Embed Size (px)
Citation preview
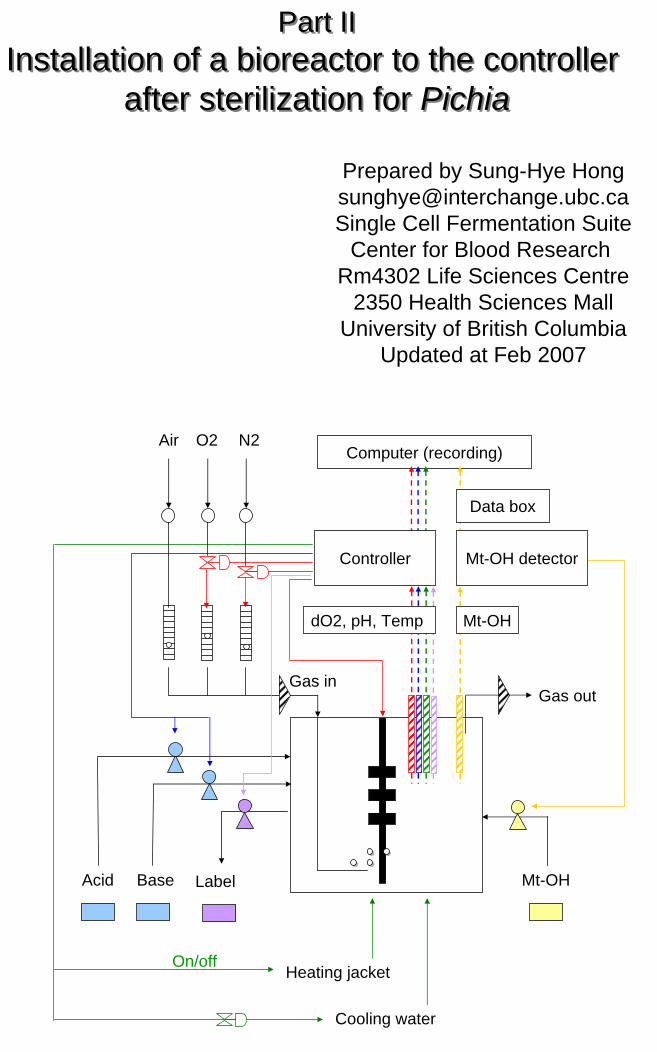
Part IIInstallation of a bioreactor to the controller
after sterilization for Pichia
Part IIInstallation of a bioreactor to the controller
after sterilization for Pichia
Prepared by Sung-Hye [email protected] Cell Fermentation Suite
Center for Blood Research Rm4302 Life Sciences Centre
2350 Health Sciences MallUniversity of British Columbia
Updated at Feb 2007
Gas outGas in
Mt-OH
Computer (recording)
Mt-OHBaseAcid
Cooling water
Heating jacket
Air O2 N2
Data box
dO2, pH, Temp
Mt-OH detectorController
On/off
Label

-1-
1) Use the sterilized funnel and flame, carefully take the rubber septum and pour 3 additives (500 ml each).
2) Put the septum back and close the port.
Step 1. Pour additives asepticallyStep 1. Pour additives aseptically
GY
P
YNB
Ring Heat exchange (fixed)
Sparger pipe(fixed)
Septum
Ring heat exchanger
TempTemp
MotorMotorpHpH
Mt-OHMt-OH
dO2dO2
TripletTriplet
Condenser Condenser
-2-
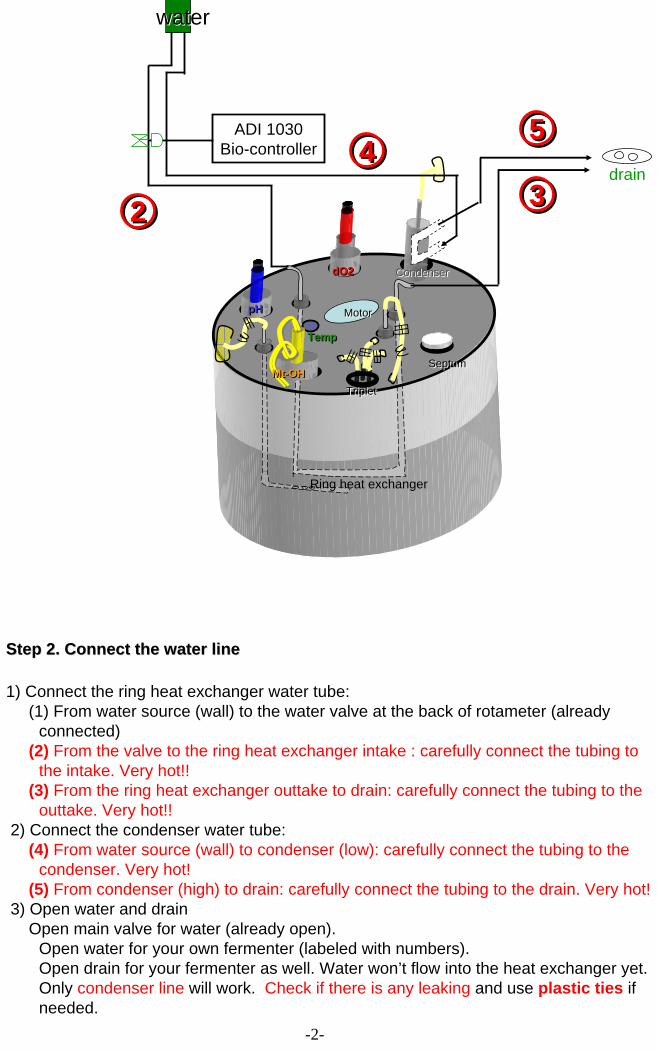
1) Connect the ring heat exchanger water tube: (1) From water source (wall) to the water valve at the back of rotameter (already
connected)(2) From the valve to the ring heat exchanger intake : carefully connect the tubing to
the intake. Very hot!!(3) From the ring heat exchanger outtake to drain: carefully connect the tubing to the
outtake. Very hot!!2) Connect the condenser water tube:
(4) From water source (wall) to condenser (low): carefully connect the tubing to the condenser. Very hot!
(5) From condenser (high) to drain: carefully connect the tubing to the drain. Very hot!3) Open water and drain
Open main valve for water (already open).Open water for your own fermenter (labeled with numbers).Open drain for your fermenter as well. Water won’t flow into the heat exchanger yet. Only condenser line will work. Check if there is any leaking and use plastic ties if needed.
Step 2. Connect the water lineStep 2. Connect the water line
22 3344
55
SeptumSeptum
Ring heat exchanger
TempTemp
MotorMotorpHpH
Mt-OHMt-OH
dO2dO2
TripletTriplet
Condenser Condenser
waterwater
ADI 1030Bio-controller
drain
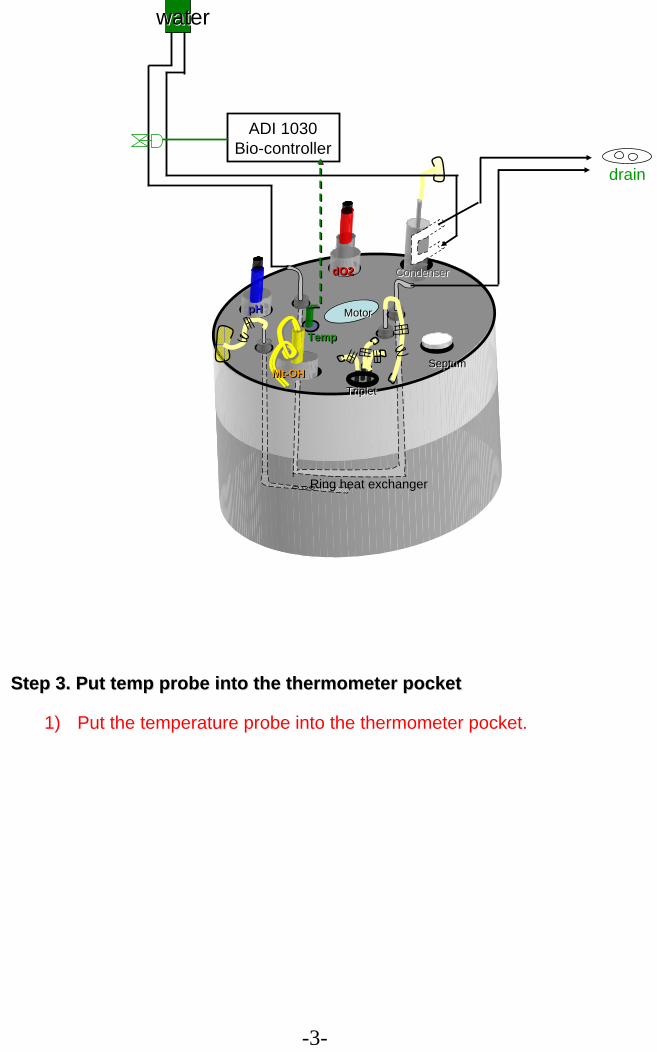
Step 3. Put temp probe into the thermometer pocketStep 3. Put temp probe into the thermometer pocket
1) Put the temperature probe into the thermometer pocket.
-3-
SeptumSeptum
Ring heat exchanger
TempTemp
MotorMotorpHpH
Mt-OHMt-OH
dO2dO2
TripletTriplet
Condenser Condenser
waterwater
drain
ADI 1030Bio-controller
-4-
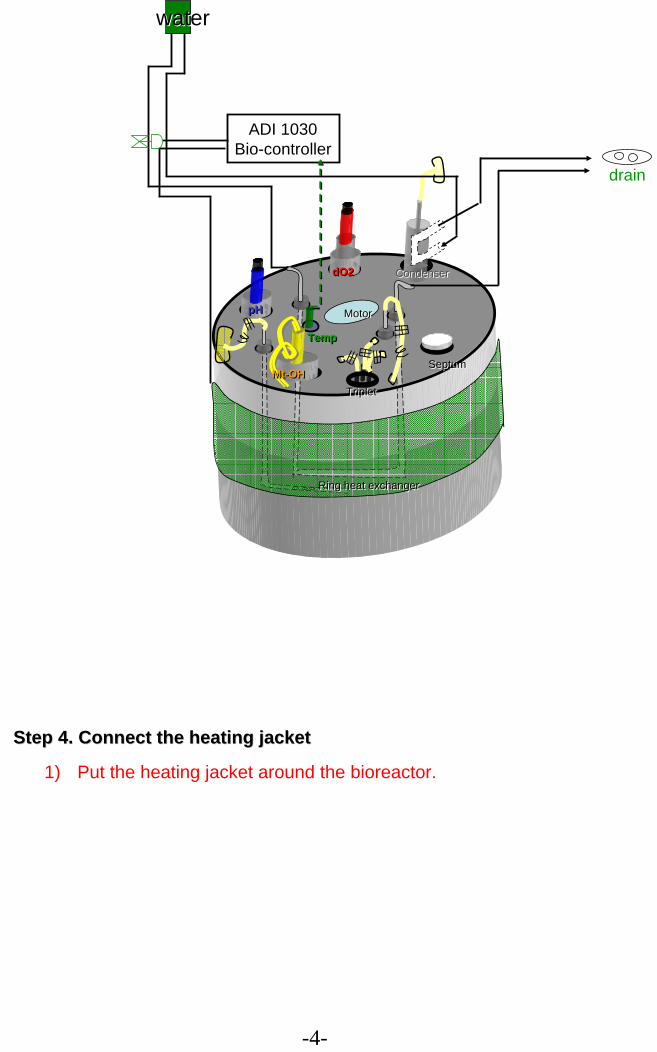
Step 4. Connect the Step 4. Connect the heating jacketheating jacket
1) Put the heating jacket around the bioreactor.
SeptumSeptum
TempTemp
MotorMotorpHpH
Mt-OHMt-OH
dO2dO2
TripletTriplet
Condenser Condenser
waterwater
drain
ADI 1030Bio-controller
Ring heat exchangerRing heat exchanger
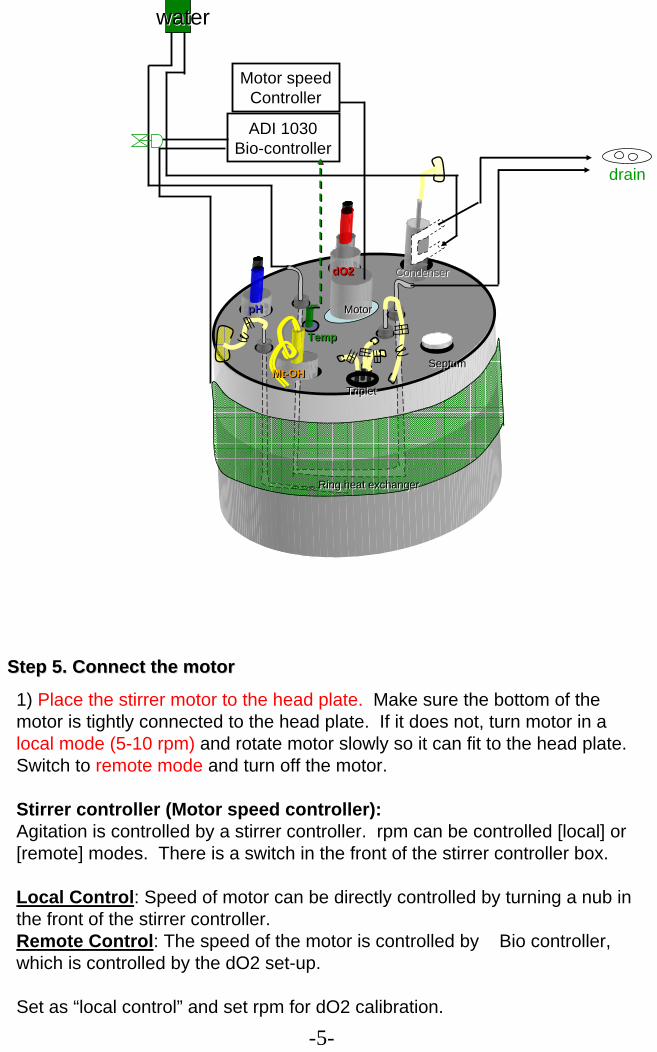
Step 5. Connect the Step 5. Connect the motormotor
1) Place the stirrer motor to the head plate. Make sure the bottom of the motor is tightly connected to the head plate. If it does not, turn motor in a local mode (5-10 rpm) and rotate motor slowly so it can fit to the head plate. Switch to remote mode and turn off the motor.
Stirrer controller (Motor speed controller):Agitation is controlled by a stirrer controller. rpm can be controlled [local] or [remote] modes. There is a switch in the front of the stirrer controller box.
Local Control: Speed of motor can be directly controlled by turning a nub in the front of the stirrer controller.Remote Control: The speed of the motor is controlled by Bio controller, which is controlled by the dO2 set-up.
Set as “local control” and set rpm for dO2 calibration.
-5-
SeptumSeptum
TempTemp
pHpH
Mt-OHMt-OHTripletTriplet
Condenser Condenser
waterwater
drain
ADI 1030Bio-controller
Ring heat exchangerRing heat exchanger
MotorMotor
Motor speedController
dO2dO2
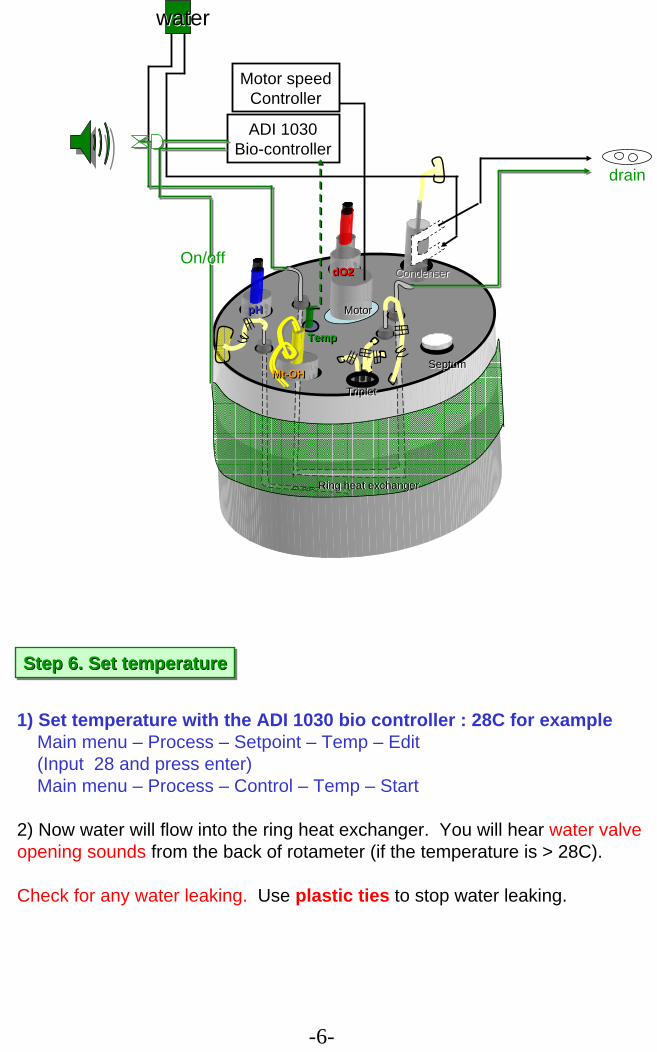
Step 6. Set temperatureStep 6. Set temperatureStep 6. Set temperature
1) Set temperature with the ADI 1030 bio controller : 28C for exampleMain menu – Process – Setpoint – Temp – Edit (Input 28 and press enter)Main menu – Process – Control – Temp – Start
2) Now water will flow into the ring heat exchanger. You will hear water valve opening sounds from the back of rotameter (if the temperature is > 28C).
Check for any water leaking. Use plastic ties to stop water leaking.
-6-
SeptumSeptum
TempTemp
pHpH
Mt-OHMt-OHTripletTriplet
Condenser Condenser
waterwater
drain
ADI 1030Bio-controller
Ring heat exchangerRing heat exchanger
MotorMotor
Motor speedController
dO2dO2On/offOn/off
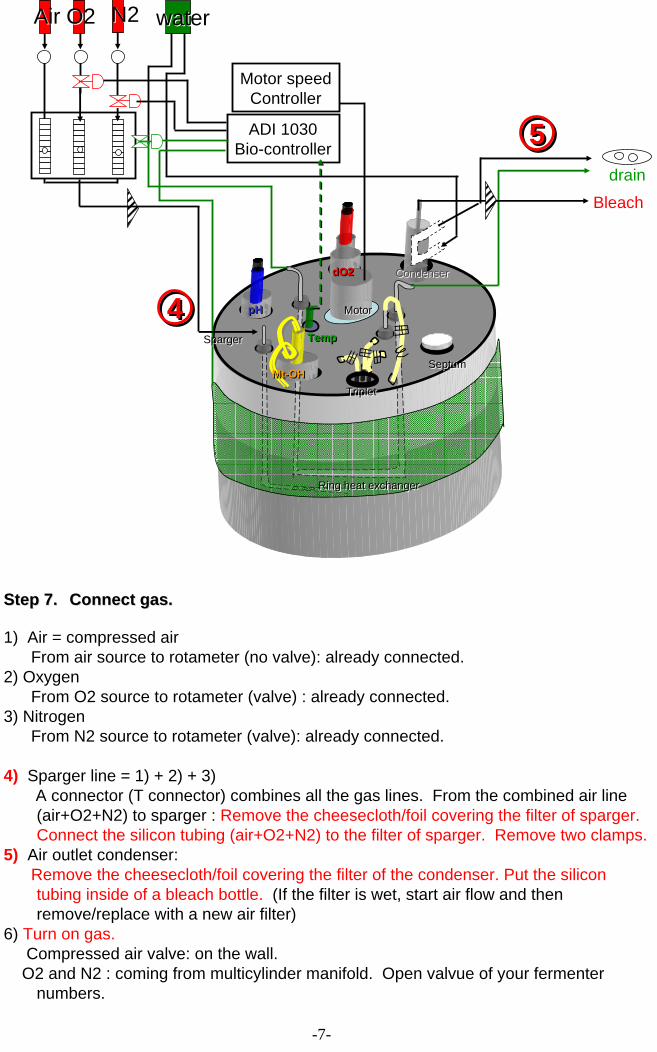
Step 7. Step 7. Connect gas. Connect gas.
1) Air = compressed airFrom air source to rotameter (no valve): already connected.
2) OxygenFrom O2 source to rotameter (valve) : already connected.
3) NitrogenFrom N2 source to rotameter (valve): already connected.
4) Sparger line = 1) + 2) + 3)A connector (T connector) combines all the gas lines. From the combined air line (air+O2+N2) to sparger : Remove the cheesecloth/foil covering the filter of sparger. Connect the silicon tubing (air+O2+N2) to the filter of sparger. Remove two clamps.
5) Air outlet condenser: Remove the cheesecloth/foil covering the filter of the condenser. Put the silicon tubing inside of a bleach bottle. (If the filter is wet, start air flow and then remove/replace with a new air filter)
6) Turn on gas.Compressed air valve: on the wall.O2 and N2 : coming from multicylinder manifold. Open valvue of your fermenter
numbers.
-7-
SeptumSeptum
TempTemp
pHpH
Mt-OHMt-OHTripletTriplet
Condenser Condenser
waterwater
drain
ADI 1030Bio-controller
Ring heat exchangerRing heat exchanger
MotorMotor
Motor speedController
dO2dO2
N2N2O2O2AirAir
SpargerSparger
Bleach
55
44
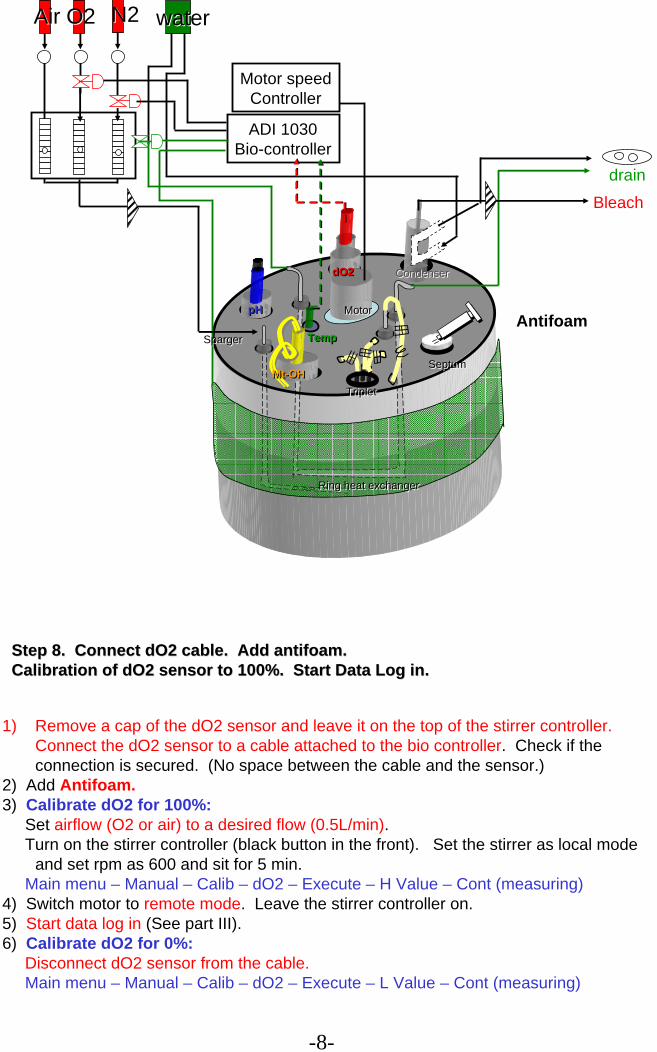
1) Remove a cap of the dO2 sensor and leave it on the top of the stirrer controller. Connect the dO2 sensor to a cable attached to the bio controller. Check if the connection is secured. (No space between the cable and the sensor.)
2) Add Antifoam. 3) Calibrate dO2 for 100%:
Set airflow (O2 or air) to a desired flow (0.5L/min). Turn on the stirrer controller (black button in the front). Set the stirrer as local mode
and set rpm as 600 and sit for 5 min.Main menu – Manual – Calib – dO2 – Execute – H Value – Cont (measuring)
4) Switch motor to remote mode. Leave the stirrer controller on.5) Start data log in (See part III).6) Calibrate dO2 for 0%:
Disconnect dO2 sensor from the cable.Main menu – Manual – Calib – dO2 – Execute – L Value – Cont (measuring)
-8-
Step 8. Connect dO2 cable. Add antifoam.Step 8. Connect dO2 cable. Add antifoam.Calibration of dO2 sensor to 100%. Start Calibration of dO2 sensor to 100%. Start Data Log inData Log in..
SeptumSeptum
TempTemp
pHpH
Mt-OHMt-OHTripletTriplet
Condenser Condenser
waterwater
drain
ADI 1030Bio-controller
Ring heat exchangerRing heat exchanger
MotorMotor
Motor speedController
dO2dO2
N2N2O2O2AirAir
SpargerSparger
Bleach
AntifoamAntifoam
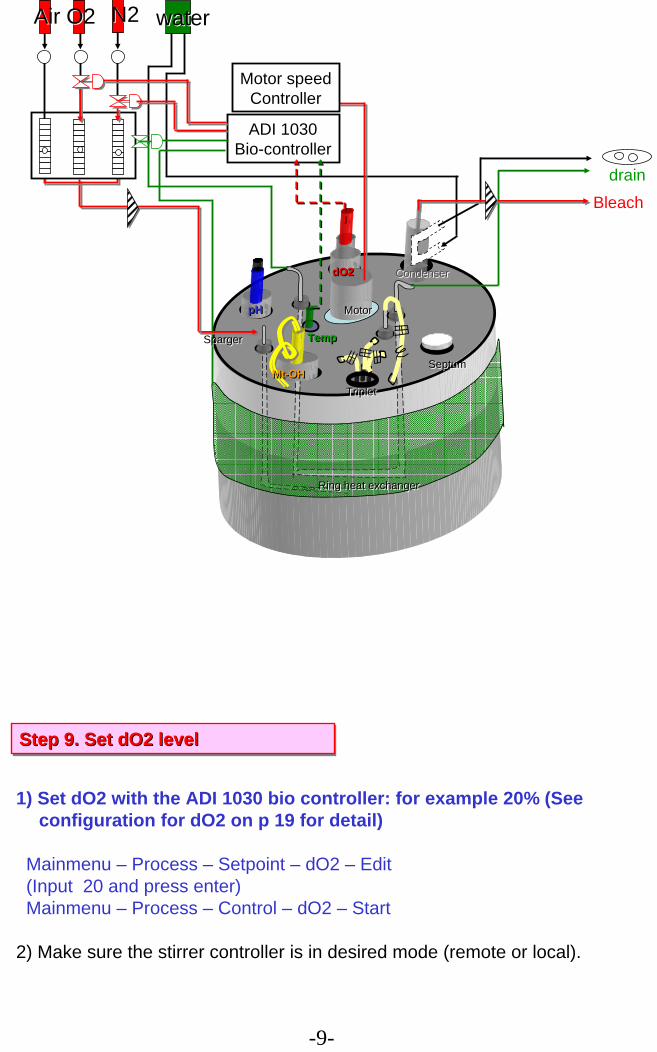
Step 9. Set dO2 levelStep 9. Set dO2 levelStep 9. Set dO2 level
1) Set dO2 with the ADI 1030 bio controller: for example 20% (See configuration for dO2 on p 19 for detail)
Mainmenu – Process – Setpoint – dO2 – Edit (Input 20 and press enter)Mainmenu – Process – Control – dO2 – Start
2) Make sure the stirrer controller is in desired mode (remote or local).
-9-
SeptumSeptum
TempTemp
pHpH
Mt-OHMt-OHTripletTriplet
Condenser Condenser
waterwater
drain
ADI 1030Bio-controller
Ring heat exchangerRing heat exchanger
MotorMotor
Motor speedController
dO2dO2
N2N2O2O2AirAir
SpargerSparger
Bleach
SeptumSeptum
TempTemp
pHpH
Mt-OHMt-OHTripletTriplet
Condenser Condenser
waterwater
drain
ADI 1030Bio-controller
Ring heat exchangerRing heat exchanger
MotorMotor
Motor speedController
dO2dO2
N2N2O2O2AirAir
SpargerSparger
Bleach
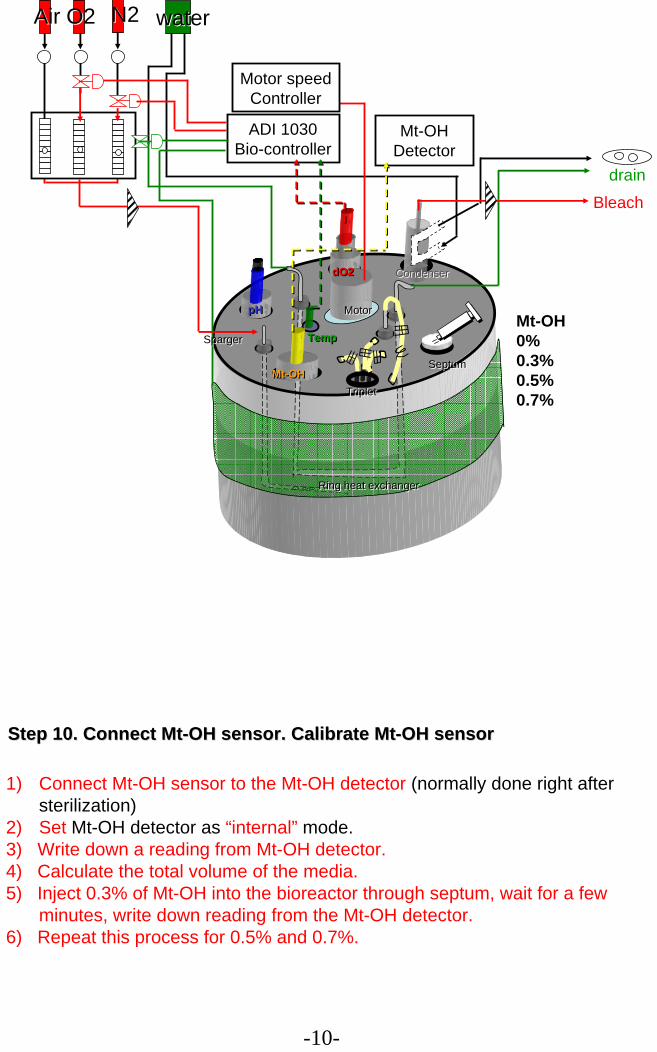
Step 10. Connect MtStep 10. Connect Mt--OH sensor. Calibrate MtOH sensor. Calibrate Mt--OH sensorOH sensor
1) Connect Mt-OH sensor to the Mt-OH detector (normally done right after sterilization)
2) Set Mt-OH detector as “internal” mode.3) Write down a reading from Mt-OH detector.4) Calculate the total volume of the media.5) Inject 0.3% of Mt-OH into the bioreactor through septum, wait for a few
minutes, write down reading from the Mt-OH detector.6) Repeat this process for 0.5% and 0.7%.
-10-
Mt-OHDetector
Mt-OH0%0.3%0.5%0.7%
Mt-OH0%0.3%0.5%0.7%
SeptumSeptum
TempTemp
pHpH
Mt-OHMt-OHTripletTriplet
Condenser Condenser
waterwater
drain
ADI 1030Bio-controller
Ring heat exchangerRing heat exchanger
MotorMotor
Motor speedController
dO2dO2
N2N2O2O2AirAir
SpargerSparger
Bleach
Mt-OHDetector
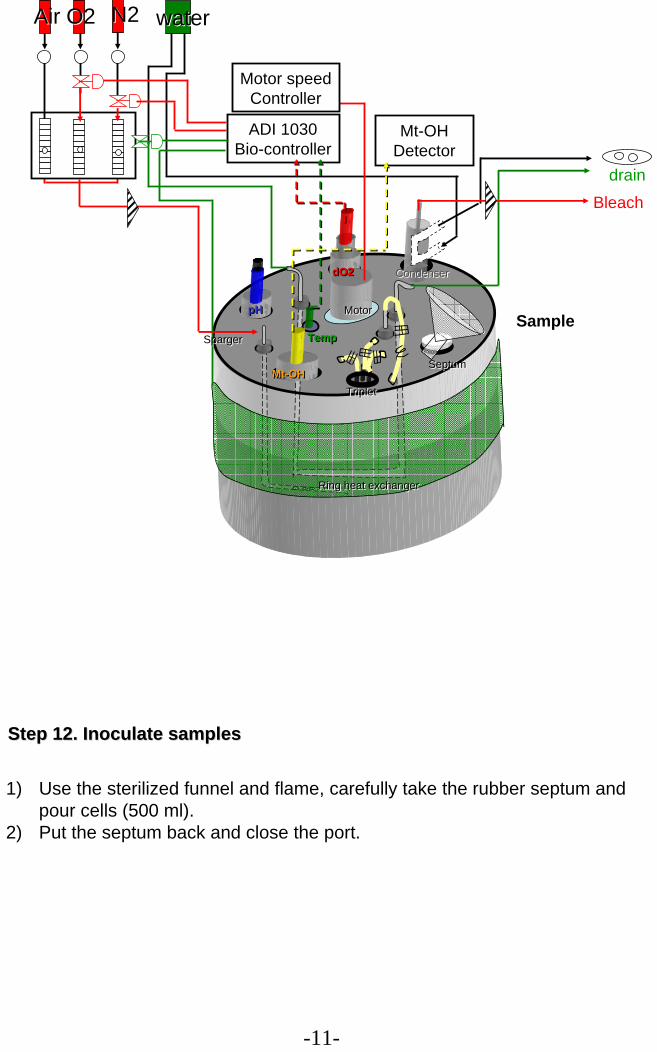
Step 12. Inoculate samplesStep 12. Inoculate samples
1) Use the sterilized funnel and flame, carefully take the rubber septum and pour cells (500 ml).
2) Put the septum back and close the port.
-11-
SampleSample
Pump
LabelLabelSeptumSeptum
TempTemp
pHpH
Mt-OHMt-OHTripletTriplet
Condenser Condenser
waterwater
drain
ADI 1030Bio-controller
Ring heat exchangerRing heat exchanger
MotorMotor
Motor speedController
N2N2O2O2AirAir
SpargerSparger
Bleach
Mt-OHDetector
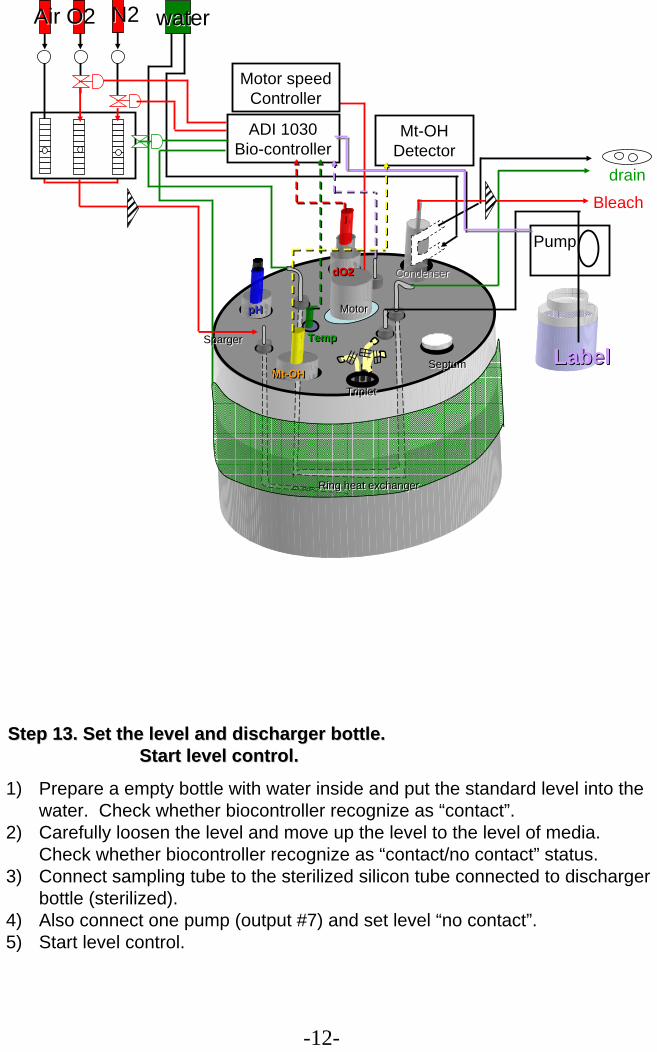
Step 13. Set the level and discharger bottle.Step 13. Set the level and discharger bottle.Start level control.Start level control.
1) Prepare a empty bottle with water inside and put the standard level into the water. Check whether biocontroller recognize as “contact”.
2) Carefully loosen the level and move up the level to the level of media. Check whether biocontroller recognize as “contact/no contact” status.
3) Connect sampling tube to the sterilized silicon tube connected to discharger bottle (sterilized).
4) Also connect one pump (output #7) and set level “no contact”.5) Start level control.
-12-
dO2dO2
MotorMotor

-13-
Step 11. Connect pH probeStep 11. Connect pH probe
1) Remove a cap from the pH probe and leave it on the top of the stirrer controller. Connect the dO2 sensor to a cable attached to the bio controller. Check if the connection is secured. (No space between the cable and the sensor.)
Pump
LabelLabelSeptumSeptum
TempTemp
pHpH
Mt-OHMt-OHTripletTriplet
Condenser Condenser
waterwater
drain
ADI 1030Bio-controller
Ring heat exchangerRing heat exchanger
Motor speedController
N2N2O2O2AirAir
SpargerSparger
Bleach
Mt-OHDetector
dO2dO2
MotorMotor
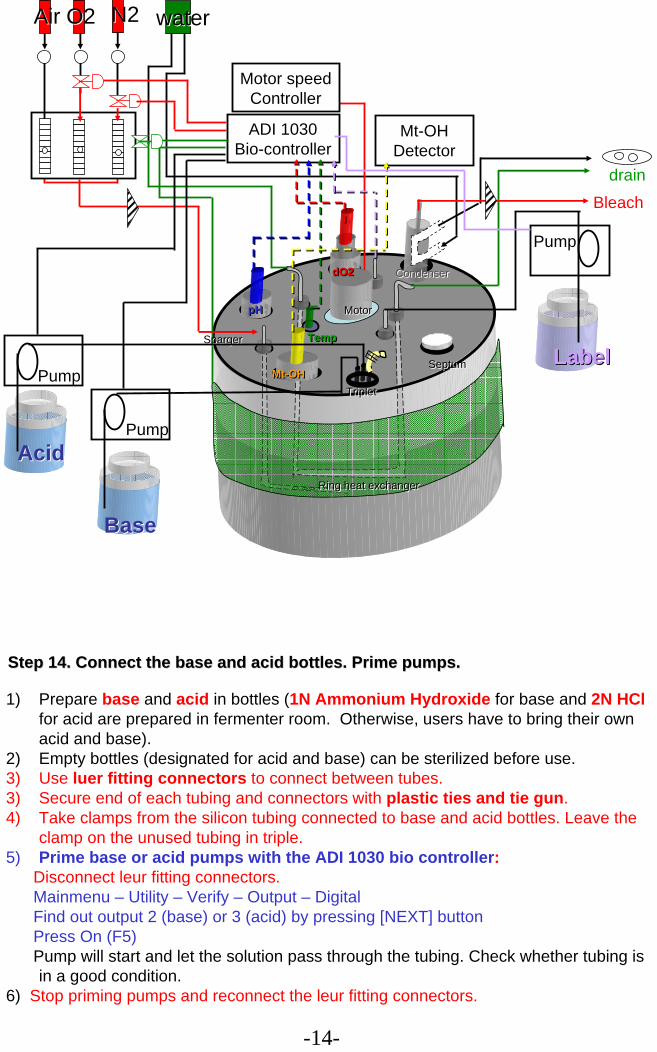
1) Prepare base and acid in bottles (1N Ammonium Hydroxide for base and 2N HClfor acid are prepared in fermenter room. Otherwise, users have to bring their own acid and base).
2) Empty bottles (designated for acid and base) can be sterilized before use.3) Use luer fitting connectors to connect between tubes. 3) Secure end of each tubing and connectors with plastic ties and tie gun. 4) Take clamps from the silicon tubing connected to base and acid bottles. Leave the
clamp on the unused tubing in triple.5) Prime base or acid pumps with the ADI 1030 bio controller:
Disconnect leur fitting connectors.Mainmenu – Utility – Verify – Output – Digital Find out output 2 (base) or 3 (acid) by pressing [NEXT] buttonPress On (F5)Pump will start and let the solution pass through the tubing. Check whether tubing is in a good condition.
6) Stop priming pumps and reconnect the leur fitting connectors.
-14-
Step 14. Connect the Step 14. Connect the base and acidbase and acid bottles. Prime pumps.bottles. Prime pumps.
Pump
LabelLabelSeptumSeptum
TempTemp
pHpH
Mt-OHMt-OHTripletTriplet
Condenser Condenser
waterwater
drain
ADI 1030Bio-controller
Ring heat exchangerRing heat exchanger
Motor speedController
N2N2O2O2AirAir
SpargerSparger
Bleach
Mt-OHDetector
dO2dO2
Pump
BaseBase
AcidAcid
Pump
MotorMotor
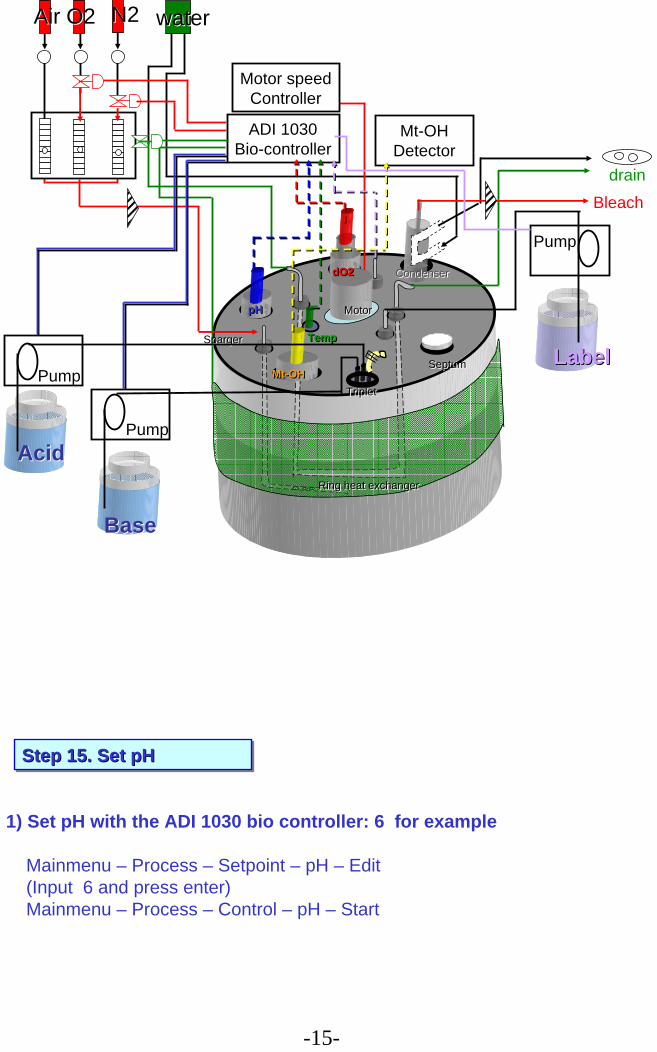
Step 15. Set pHStep 15. Set pHStep 15. Set pH
1) Set pH with the ADI 1030 bio controller: 6 for example
Mainmenu – Process – Setpoint – pH – Edit (Input 6 and press enter)Mainmenu – Process – Control – pH – Start
-15-
Pump
LabelLabelSeptumSeptum
TempTemp
pHpH
Mt-OHMt-OHTripletTriplet
Condenser Condenser
waterwater
drain
ADI 1030Bio-controller
Ring heat exchangerRing heat exchanger
Motor speedController
N2N2O2O2AirAir
SpargerSparger
Bleach
Mt-OHDetector
dO2dO2
Pump
BaseBase
AcidAcid
Pump
MotorMotor
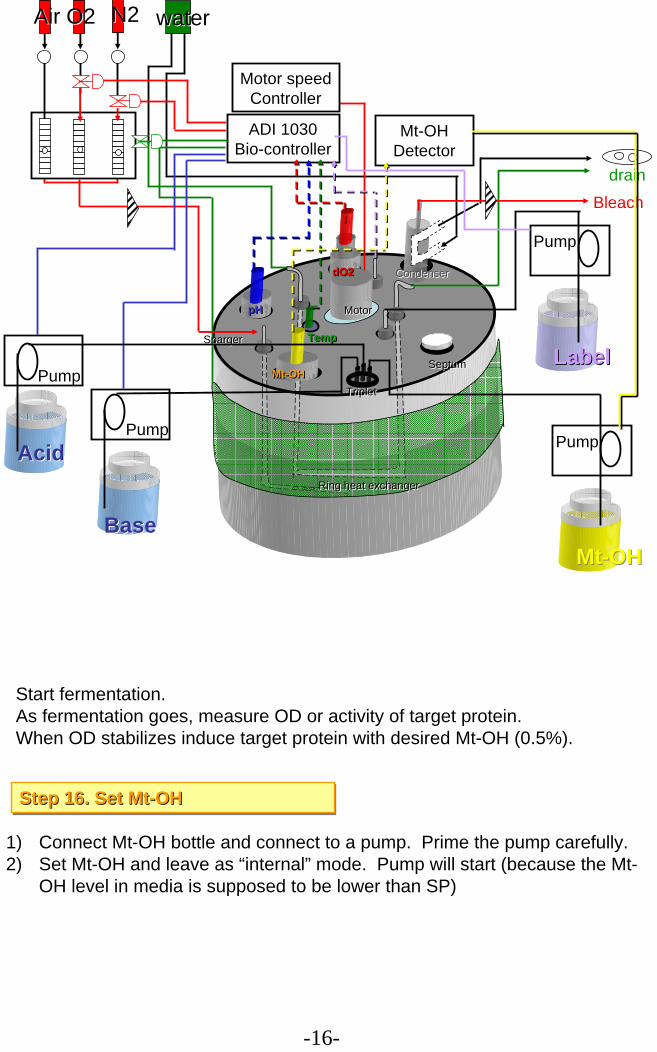
1) Connect Mt-OH bottle and connect to a pump. Prime the pump carefully.2) Set Mt-OH and leave as “internal” mode. Pump will start (because the Mt-
OH level in media is supposed to be lower than SP)
-16-
Step 16. Set Mt-OHStep 16. Set MtStep 16. Set Mt--OHOH
Pump
LabelLabelSeptumSeptum
TempTemp
pHpH
Mt-OHMt-OHTripletTriplet
Condenser Condenser
waterwater
drain
ADI 1030Bio-controller
Ring heat exchangerRing heat exchanger
Motor speedController
N2N2O2O2AirAir
SpargerSparger
Bleach
Mt-OHDetector
dO2dO2
Pump
BaseBase
AcidAcid
Pump
Pump
Mt-OHMt-OH
MotorMotor
Start fermentation.As fermentation goes, measure OD or activity of target protein.When OD stabilizes induce target protein with desired Mt-OH (0.5%).
Computer(Data recording)
Mt-OHDetector
Pump
Mt-OHMt-OH
Pump
LabelLabel
Ring heat exchangerRing heat exchanger
TripletTriplet
TempTempSpargerSparger
Condenser Condenser
SampleSample
SeptumSeptum
N2N2O2O2AirAir
Pump
BaseBase
AcidAcid
Pump
Motor speedController
ADI 1030Bio-controller
Data Box
drainBleach
waterwater
pHpH
Mt-OHMt-OH
dO2dO2
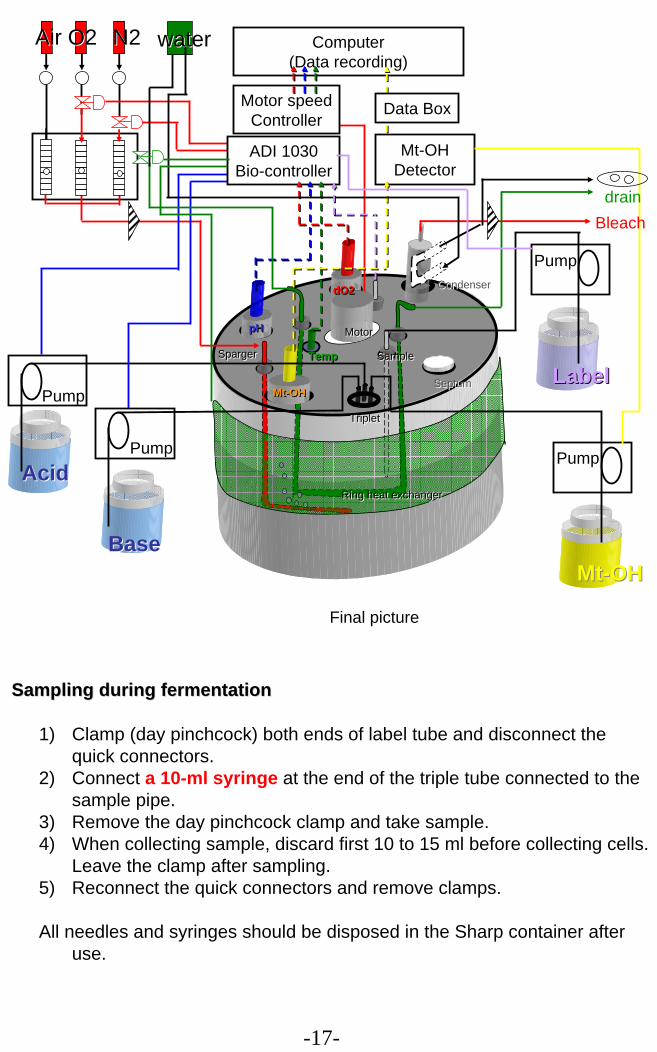
Final picture
-17-
MotorMotor
Sampling during fermentationSampling during fermentation
1) Clamp (day pinchcock) both ends of label tube and disconnect thequick connectors.
2) Connect a 10-ml syringe at the end of the triple tube connected to the sample pipe.
3) Remove the day pinchcock clamp and take sample. 4) When collecting sample, discard first 10 to 15 ml before collecting cells.
Leave the clamp after sampling.5) Reconnect the quick connectors and remove clamps.
All needles and syringes should be disposed in the Sharp container after use.
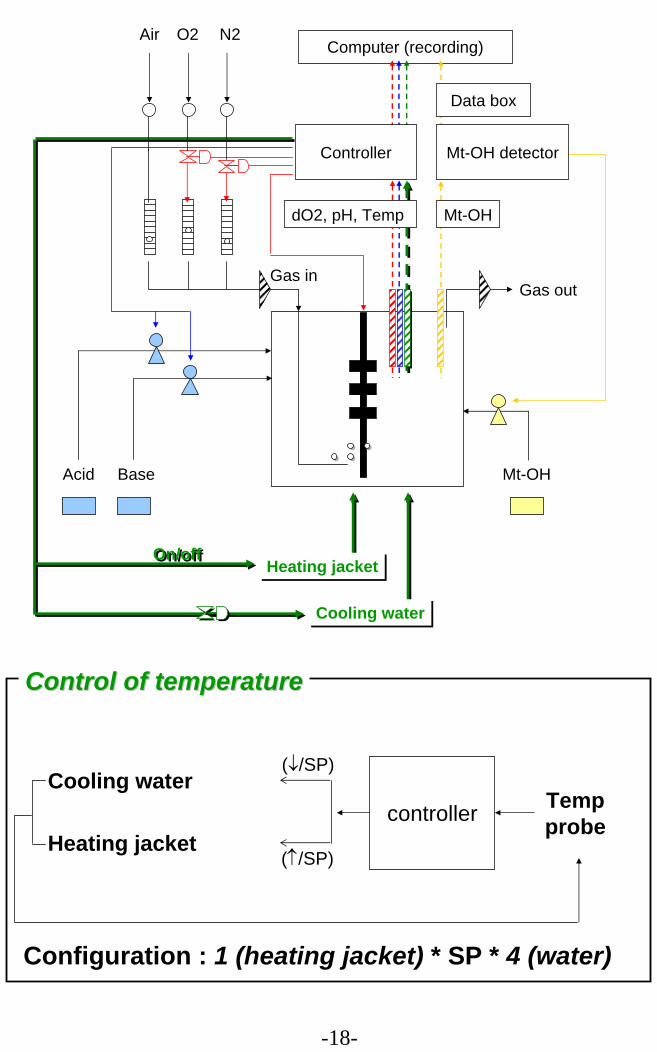
Control of temperatureControl of temperature
Tempprobe
Heating jacket
Cooling watercontroller
(↓/SP)
(↑/SP)
Configuration : 1 (heating jacket) * SP * 4 (water)
-18-
Gas outGas in
Mt-OH
Computer (recording)
Mt-OHBaseAcid
Cooling waterCooling water
Heating jacketHeating jacket
Air O2 N2
Data box
dO2, pH, Temp
Mt-OH detectorController
On/offOn/off
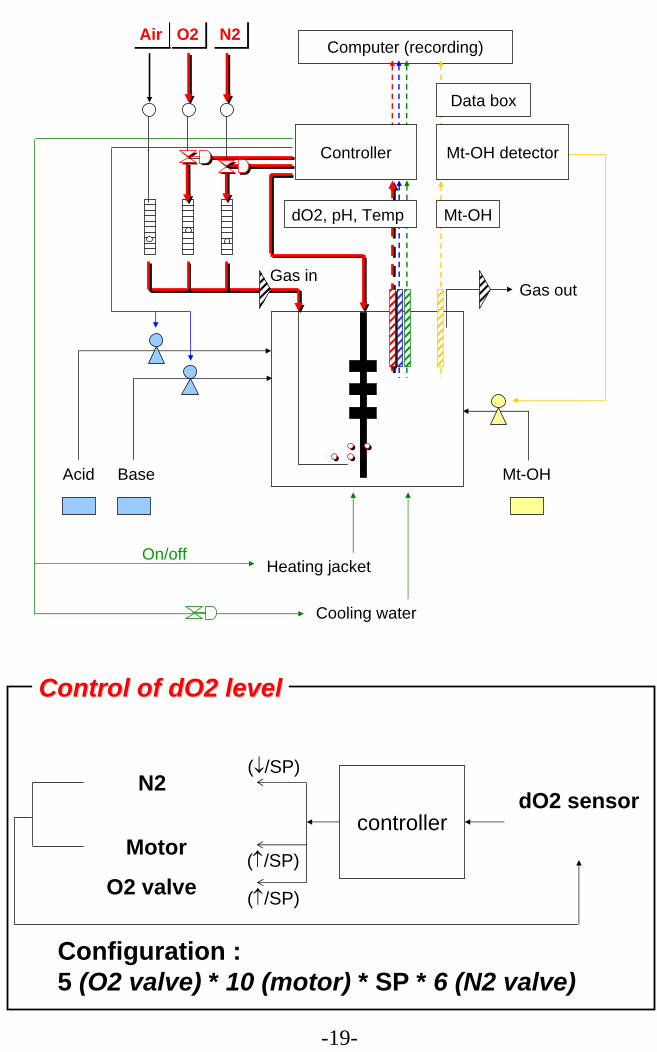
Control of dO2 levelControl of dO2 level
dO2 sensor
O2 valve
N2
controller
(↓/SP)
(↑/SP)
Configuration : 5 (O2 valve) * 10 (motor) * SP * 6 (N2 valve)
Motor
(↑/SP)
-19-
Gas outGas in
Mt-OH
Computer (recording)
Mt-OHBaseAcid
Cooling water
Heating jacket
AirAir O2O2 N2N2
Data box
dO2, pH, Temp
Mt-OH detectorController
On/off
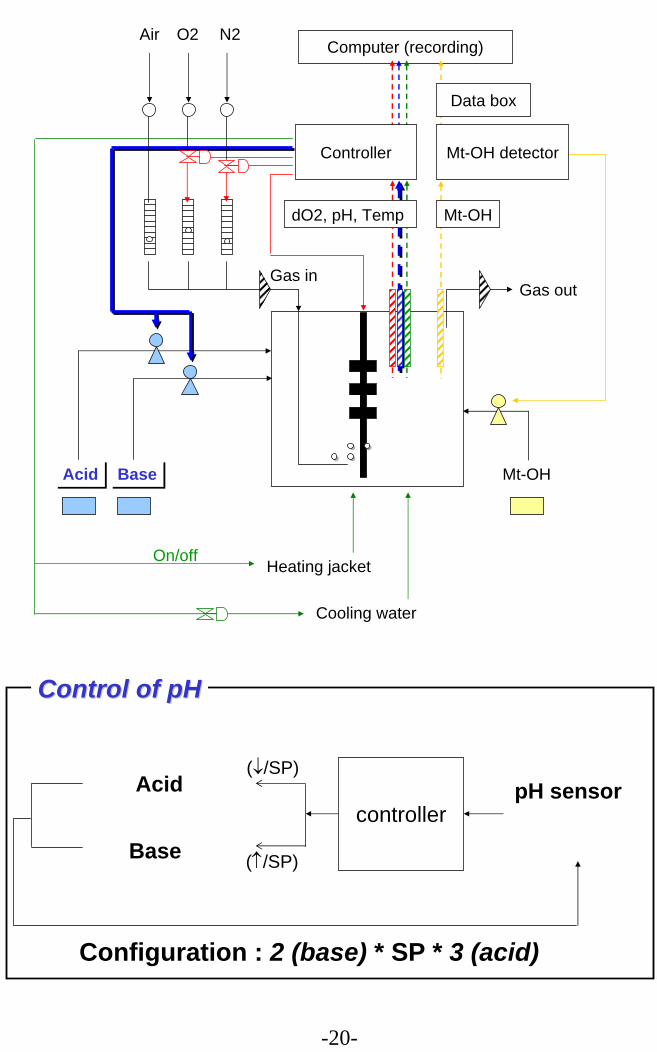
Control of pHControl of pH
pH sensorAcidcontroller
(↓/SP)
(↑/SP)
Configuration : 2 (base) * SP * 3 (acid)
Base
-20-
Gas outGas in
Mt-OH
Computer (recording)
Mt-OHBaseBaseAcidAcid
Cooling water
Heating jacket
Air O2 N2
Data box
dO2, pH, Temp
Mt-OH detectorController
On/off
-21-
Gas outGas in
Mt-OH
Computer (recording)
Mt-OHBaseAcid
Cooling water
Heating jacket
Air O2 N2
Data box
dO2, pH, Temp
Mt-OH detectorController
On/off
Label