Embed Size (px)
Citation preview
Parent Access 3.0
Teacher Documentation
Note: Most of the new features listed in this documentation will not be available until the new version of Parent Access has been turned on at your district. All of the features of the current version of Parent Access will still be available until the new version has been turned on.
2
Post Homework
Search Page………………………………………………………………………….3-4
Import Homework………………………………………………………………….. 5-6
Add Homework (Main Tab)…………………………………………………………7-9
Links Tab………………………………………………………………………… 10-11
Attachments Tab…………………………………………………………………..12-13
Students Tab………………………………………………………………………14-14
Post Homepage Main Tab…………………………………………………………………………..15-16
Links Tab………………………………………………………………………….17-18
Attachments Tab…………………………………………………………………..19-20
Setup Classes for Parent Access Setup Classes for Parent Access…………………………………………………..21-22 Text Editor Text Editor………………………………………………………………………...23-24 Excluded Assignments Excluded Assignments – Post to the Web…………………………………………25-27
3
Post Homework to the Web – Search Page
The Post Homework to the Web page has been changed to give more options to teachers for posting not only homework, but links, attachments, and messages for students as well. This page will allow the teacher to search for homework by class, dates posted, and text. The results will include assignments that are posted as homework as well as regular homework.
Homework can now be posted to Parent Access from either the Assignment Entry screen by selecting the ‘Post to the Homework Web page’ option or by using the Post Homework screen. Previous homework that has already been created by the teacher can be imported from previous reporting periods as well on this page using the Import link.
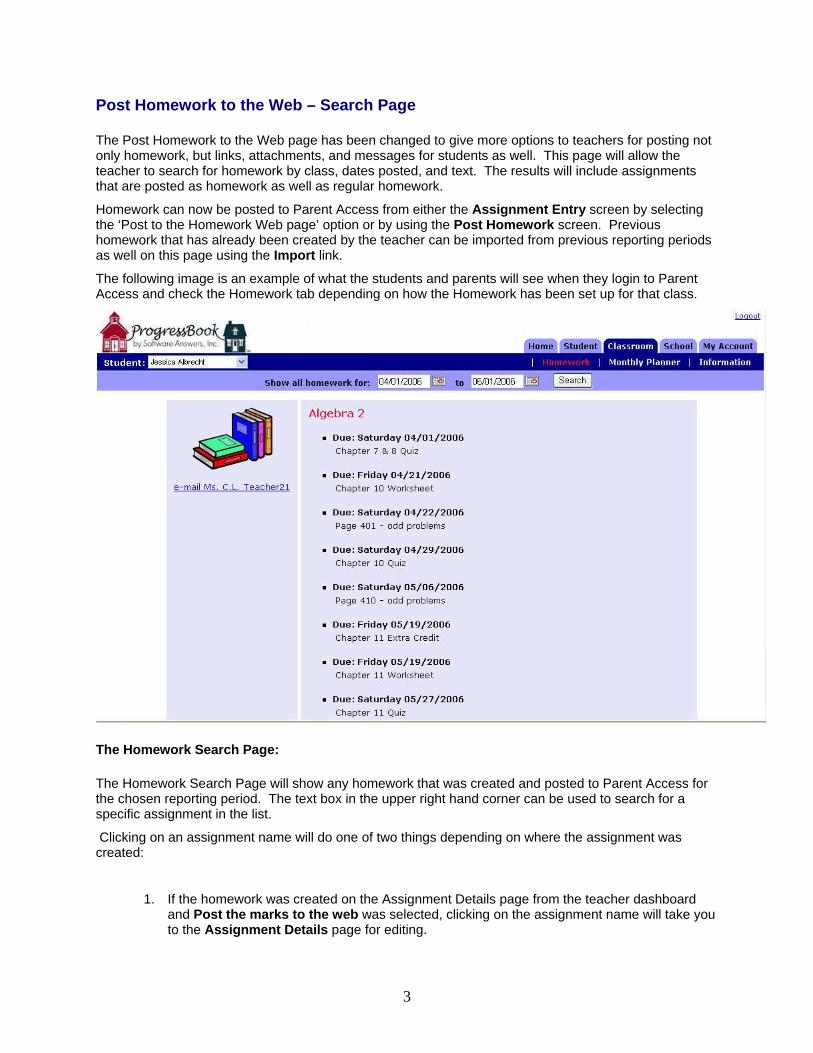
The following image is an example of what the students and parents will see when they login to Parent Access and check the Homework tab depending on how the Homework has been set up for that class.
The Homework Search Page:
The Homework Search Page will show any homework that was created and posted to Parent Access for the chosen reporting period. The text box in the upper right hand corner can be used to search for a specific assignment in the list.
Clicking on an assignment name will do one of two things depending on where the assignment was created:
1. If the homework was created on the Assignment Details page from the teacher dashboard and Post the marks to the web was selected, clicking on the assignment name will take you to the Assignment Details page for editing.
4
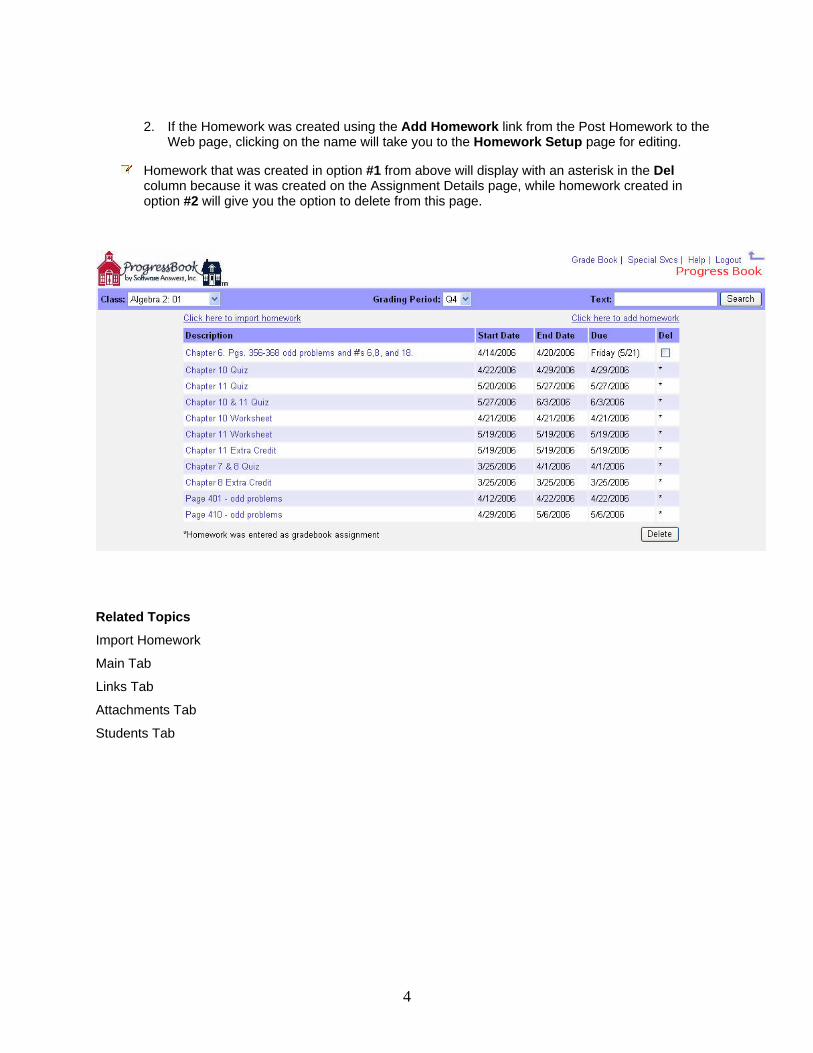
2. If the Homework was created using the Add Homework link from the Post Homework to the Web page, clicking on the name will take you to the Homework Setup page for editing.
Homework that was created in option #1 from above will display with an asterisk in the Del column because it was created on the Assignment Details page, while homework created in option #2 will give you the option to delete from this page.
Related Topics
Import Homework
Main Tab
Links Tab
Attachments Tab
Students Tab
5
Post Homework – Import Homework
The Import Homework from the Bank link on the Post Homework Search page will allow you to import homework assignments from previous years and previous reporting periods to your homework list. You will be able to import any homework assignments created using either the new Post Homework page, or homework that was created using the old Post Homework page on the dashboard.
All new homework created using the Add Homework link must have the Save this to the Homework Bank box checked in order for it to be saved to the homework bank so that it may be imported at a later date.
To Import Homework:
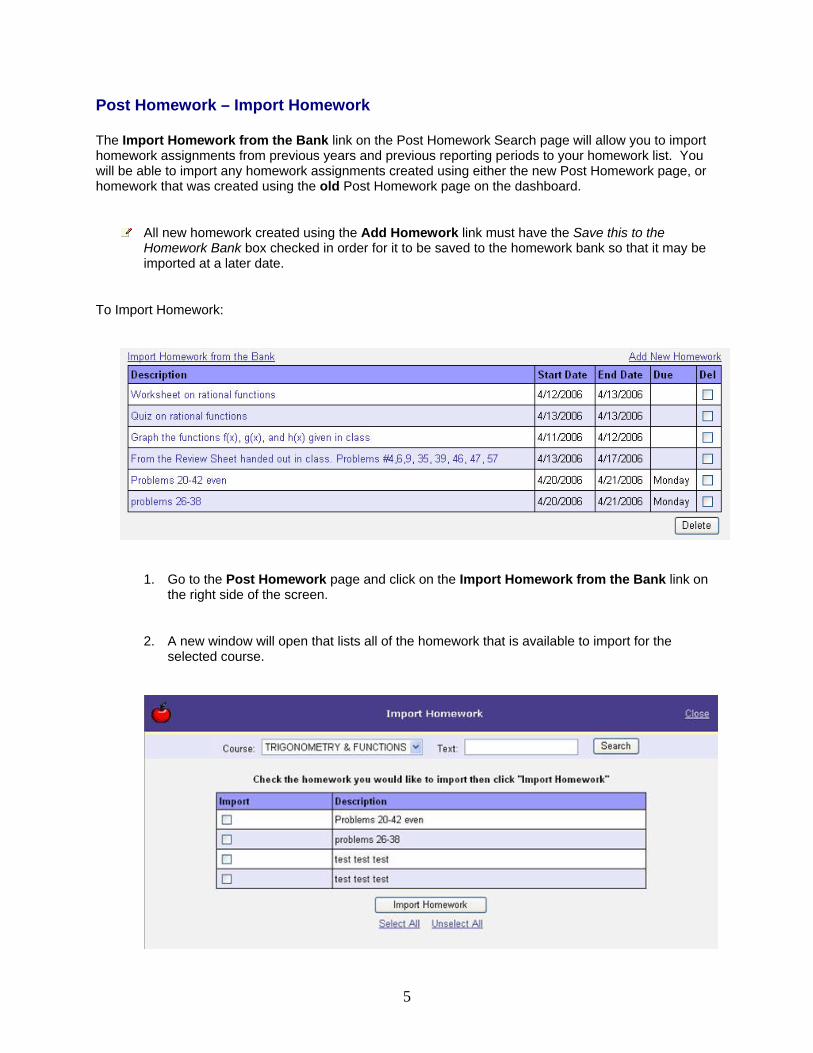
1. Go to the Post Homework page and click on the Import Homework from the Bank link on the right side of the screen.
2. A new window will open that lists all of the homework that is available to import for the selected course.
6
3. Check the Import box next to the homework that you would like to be imported and click the Import Homework button.
4. When the checkmark disappears from the box, close the open window and refresh the Homework Search page to see the newly imported homework in the list on the page.
Related Topics
Homework Search Page
Main Tab
Links Tab
Attachments Tab
Students Tab
7
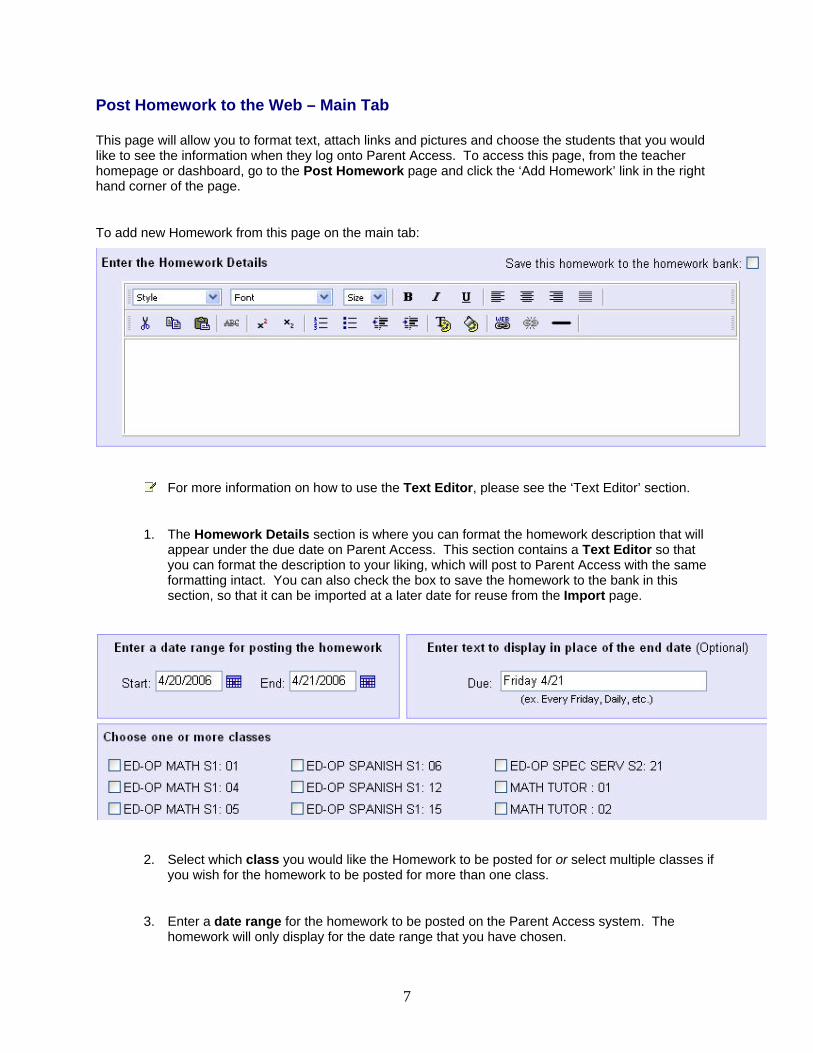
Post Homework to the Web – Main Tab
This page will allow you to format text, attach links and pictures and choose the students that you would like to see the information when they log onto Parent Access. To access this page, from the teacher homepage or dashboard, go to the Post Homework page and click the ‘Add Homework’ link in the right hand corner of the page.
To add new Homework from this page on the main tab:
For more information on how to use the Text Editor, please see the ‘Text Editor’ section.
1. The Homework Details section is where you can format the homework description that will appear under the due date on Parent Access. This section contains a Text Editor so that you can format the description to your liking, which will post to Parent Access with the same formatting intact. You can also check the box to save the homework to the bank in this section, so that it can be imported at a later date for reuse from the Import page.
2. Select which class you would like the Homework to be posted for or select multiple classes if you wish for the homework to be posted for more than one class.
3. Enter a date range for the homework to be posted on the Parent Access system. The homework will only display for the date range that you have chosen.
8
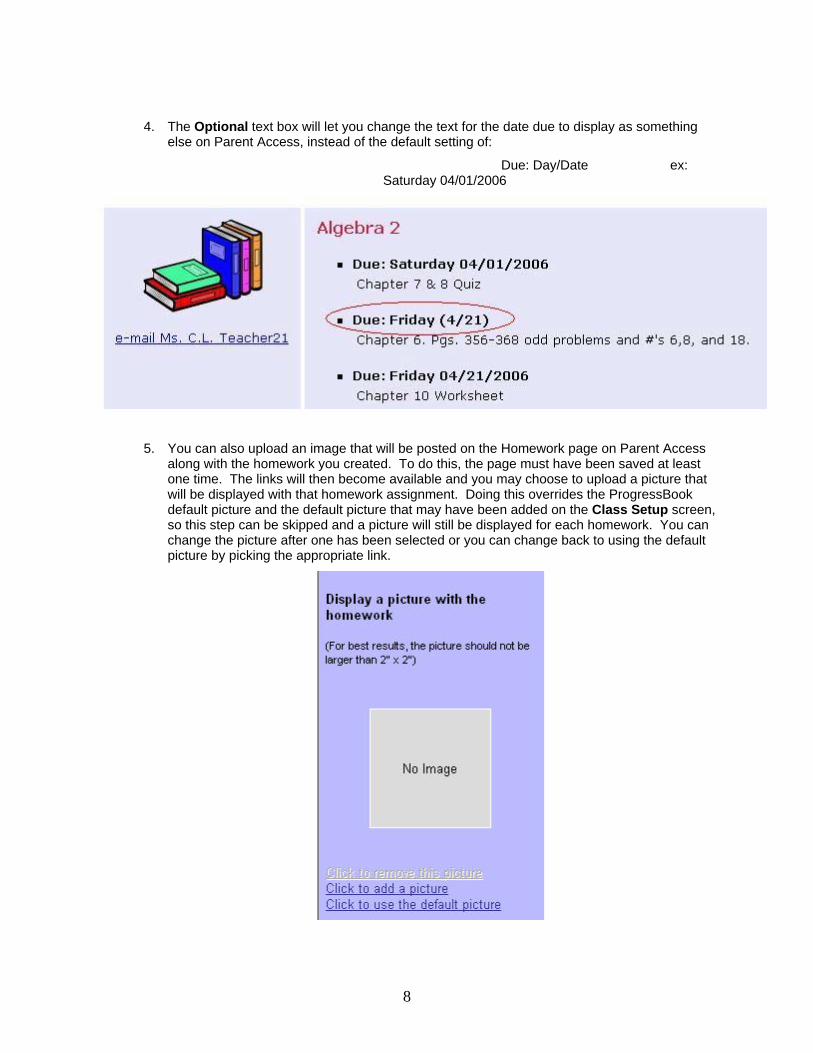
4. The Optional text box will let you change the text for the date due to display as something else on Parent Access, instead of the default setting of:
Due: Day/Date ex: Saturday 04/01/2006
5. You can also upload an image that will be posted on the Homework page on Parent Access along with the homework you created. To do this, the page must have been saved at least one time. The links will then become available and you may choose to upload a picture that will be displayed with that homework assignment. Doing this overrides the ProgressBook default picture and the default picture that may have been added on the Class Setup screen, so this step can be skipped and a picture will still be displayed for each homework. You can change the picture after one has been selected or you can change back to using the default picture by picking the appropriate link.
9
6. At the bottom of the main tab, there is also a Check Spelling button that will check the text in the homework details section for you.
7. In the Homework Details section of this page, is the check box for the Save this Homework to the Homework Bank. Checking this box will save this homework to the homework bank so that you can search for it and reuse the homework at a later date using the Import link on the search page.
8. Click the Save button at the bottom of the page to save this homework and make the Links, Attachments, and Student tabs available for the homework.
Related Topics
Homework Search Page
Import Homework
Links Tab
Attachments Tab
Students Tab
Parent Access Class Setup

10
Post Homework to the Web – Links Tab
The links tab becomes available after you have created an assignment on the Main tab and have clicked the save button for the first time. The links tab will allow you to add multiple website links to the homework that you create and add a description about what each link contains or how it pertains to the homework given. By clicking the link, a new window will be opened with that website for the student.
To add website links to the Homework page on Parent Access:
1. After the homework has been saved once on the Main tab, click the Links tab. This will give you a screen with three empty boxes.
2. The first small box with the pound sign (#) above it is the sequence number box. The sequence numbers in this box will determine what order the links display underneath the homework on Parent Access.
3. The second box is the Name box which is where you would put what you would like the link to be called, for example the name of the website. The name in this box will be the name that displays as the hyperlink that the students will click on the Parent Access site.
4. The Description box is for the description of what the link is or how it pertains to the homework. The description will appear after the hyperlink on the Parent Access system as what is shown in the screenshot above.
5. The URL box is where you will put the actual website address. The link must contain the http:// before the address. For example: http://www.ProgressBook.com. Just putting www.ProgressBook.com will cause the link not to work when the link is clicked.
11
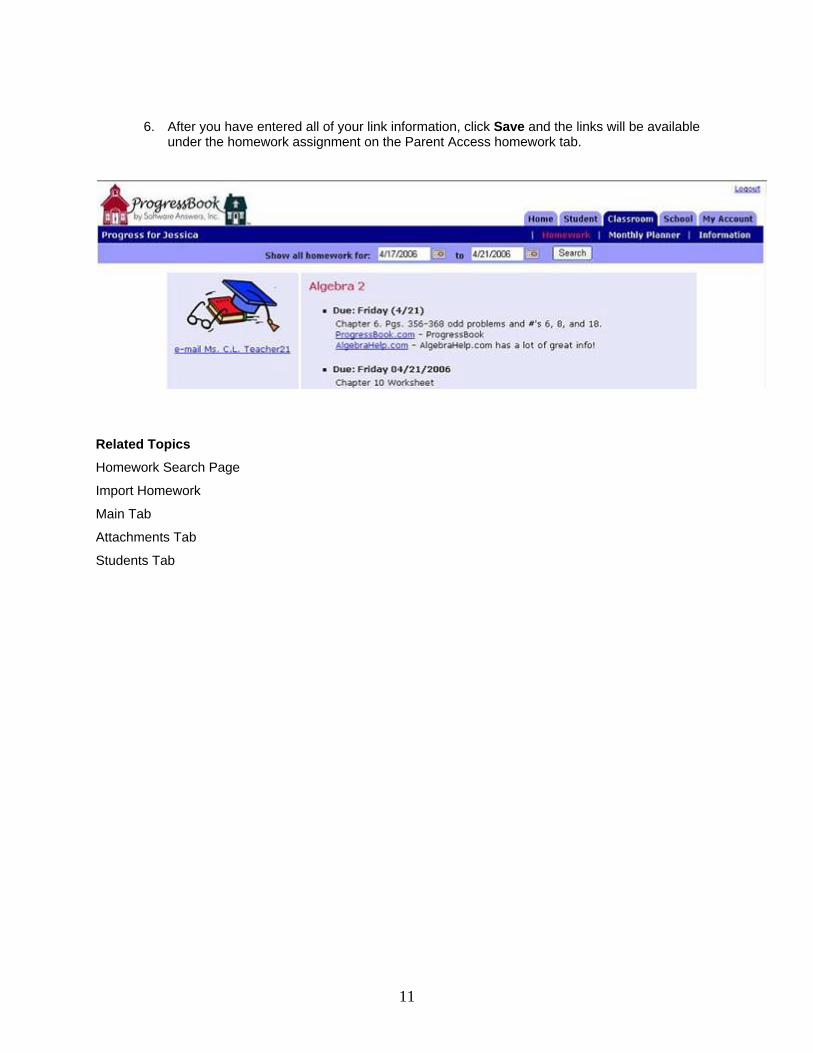
6. After you have entered all of your link information, click Save and the links will be available under the homework assignment on the Parent Access homework tab.
Related Topics
Homework Search Page
Import Homework
Main Tab
Attachments Tab
Students Tab
12
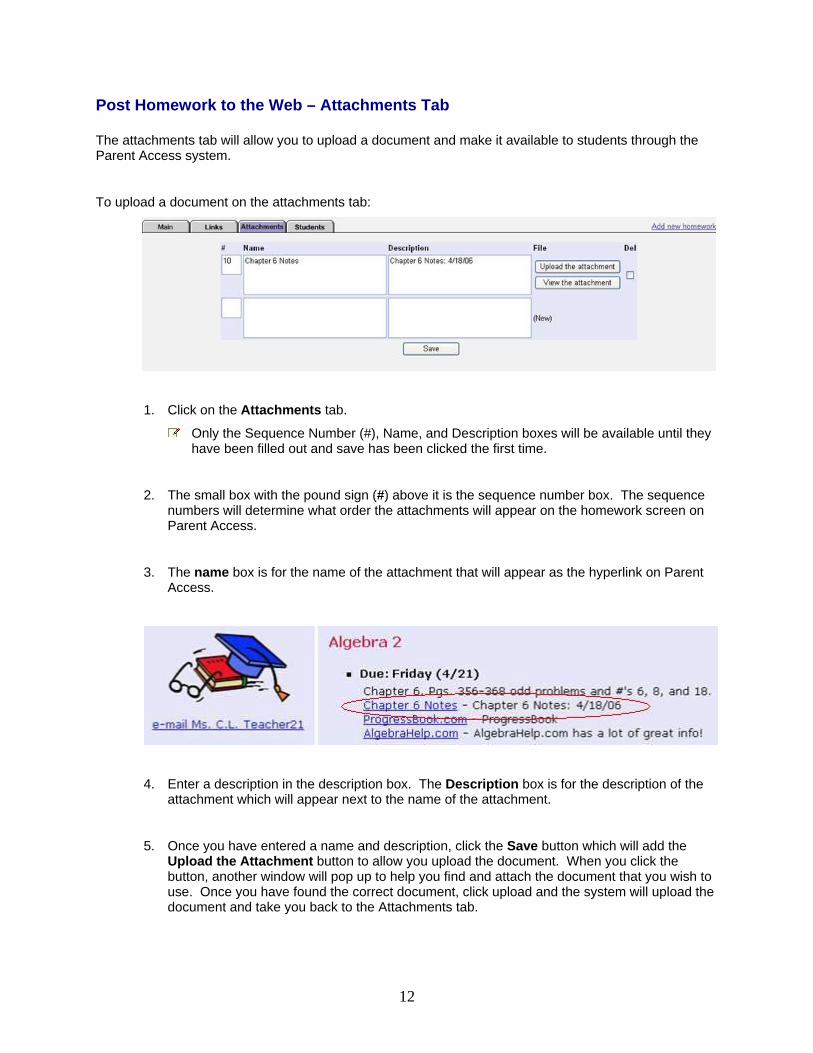
Post Homework to the Web – Attachments Tab
The attachments tab will allow you to upload a document and make it available to students through the Parent Access system.
To upload a document on the attachments tab:
1. Click on the Attachments tab.
Only the Sequence Number (#), Name, and Description boxes will be available until they have been filled out and save has been clicked the first time.
2. The small box with the pound sign (#) above it is the sequence number box. The sequence numbers will determine what order the attachments will appear on the homework screen on Parent Access.
3. The name box is for the name of the attachment that will appear as the hyperlink on Parent Access.
4. Enter a description in the description box. The Description box is for the description of the attachment which will appear next to the name of the attachment.
5. Once you have entered a name and description, click the Save button which will add the Upload the Attachment button to allow you upload the document. When you click the button, another window will pop up to help you find and attach the document that you wish to use. Once you have found the correct document, click upload and the system will upload the document and take you back to the Attachments tab.

13
6. Once back to the Attachments tab, a new button will appear that will allow you to view the document that you just uploaded. This is the same way that the document will open on Parent Access. Clicking the View Document button will open a new window which will prompt you to open the document. Once you have chosen to open the document, it will appear inside the open window.
This is the screen that appears when the view attachment button is clicked and will show the
contents of the document.
Related Topics
Homework Search Page
Import Homework
Main Tab
Links Tab
Students Tab

14
Post Homework to the Web – Students Tab
The students tab will allow you to choose the students from the class that you wish to exclude from seeing the homework or message. This would be helpful if you have a student doing make up work, or if you wanted to post a message to a student that only that student should be able to see.
To exclude a student from seeing a homework or message:
1. Click the checkmark box next to which students that you wish to exclude from seeing the homework or message posted and click the save button.
2. A quick way to exclude all but a couple of students would be to click the Check All link in the bottom left hand corner and then uncheck the student(s) that you want to see the homework/message.
Related Topics
Homework Search Page
Import Homework
Main Tab
Links Tab
Attachments Tab
15
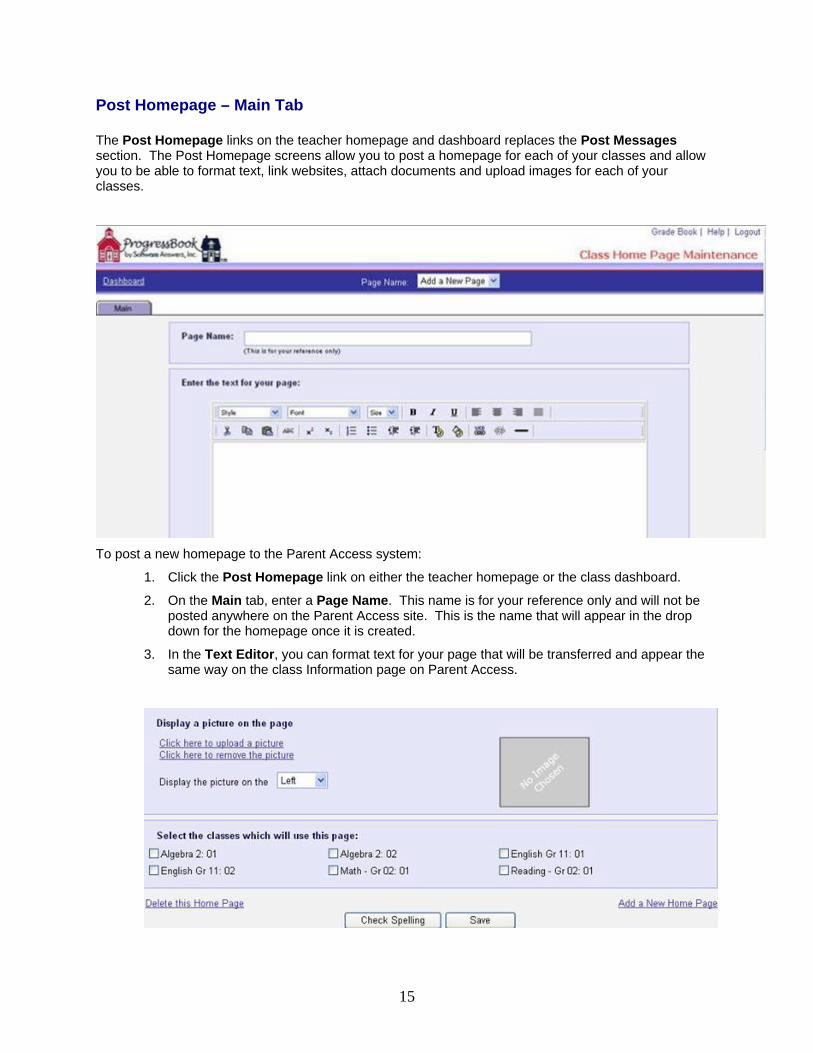
Post Homepage – Main Tab
The Post Homepage links on the teacher homepage and dashboard replaces the Post Messages section. The Post Homepage screens allow you to post a homepage for each of your classes and allow you to be able to format text, link websites, attach documents and upload images for each of your classes.
To post a new homepage to the Parent Access system:
1. Click the Post Homepage link on either the teacher homepage or the class dashboard.
2. On the Main tab, enter a Page Name. This name is for your reference only and will not be posted anywhere on the Parent Access site. This is the name that will appear in the drop down for the homepage once it is created.
3. In the Text Editor, you can format text for your page that will be transferred and appear the same way on the class Information page on Parent Access.
16
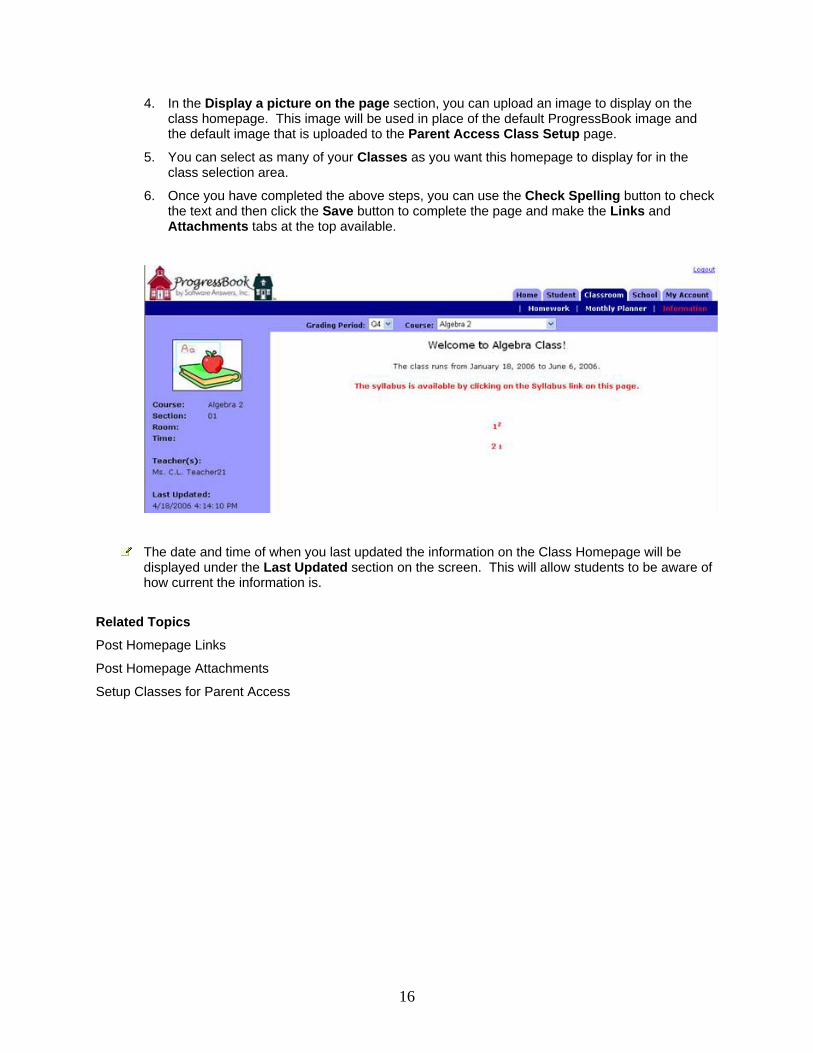
4. In the Display a picture on the page section, you can upload an image to display on the class homepage. This image will be used in place of the default ProgressBook image and the default image that is uploaded to the Parent Access Class Setup page.
5. You can select as many of your Classes as you want this homepage to display for in the class selection area.
6. Once you have completed the above steps, you can use the Check Spelling button to check the text and then click the Save button to complete the page and make the Links and Attachments tabs at the top available.
The date and time of when you last updated the information on the Class Homepage will be displayed under the Last Updated section on the screen. This will allow students to be aware of how current the information is.
Related Topics
Post Homepage Links
Post Homepage Attachments
Setup Classes for Parent Access
17
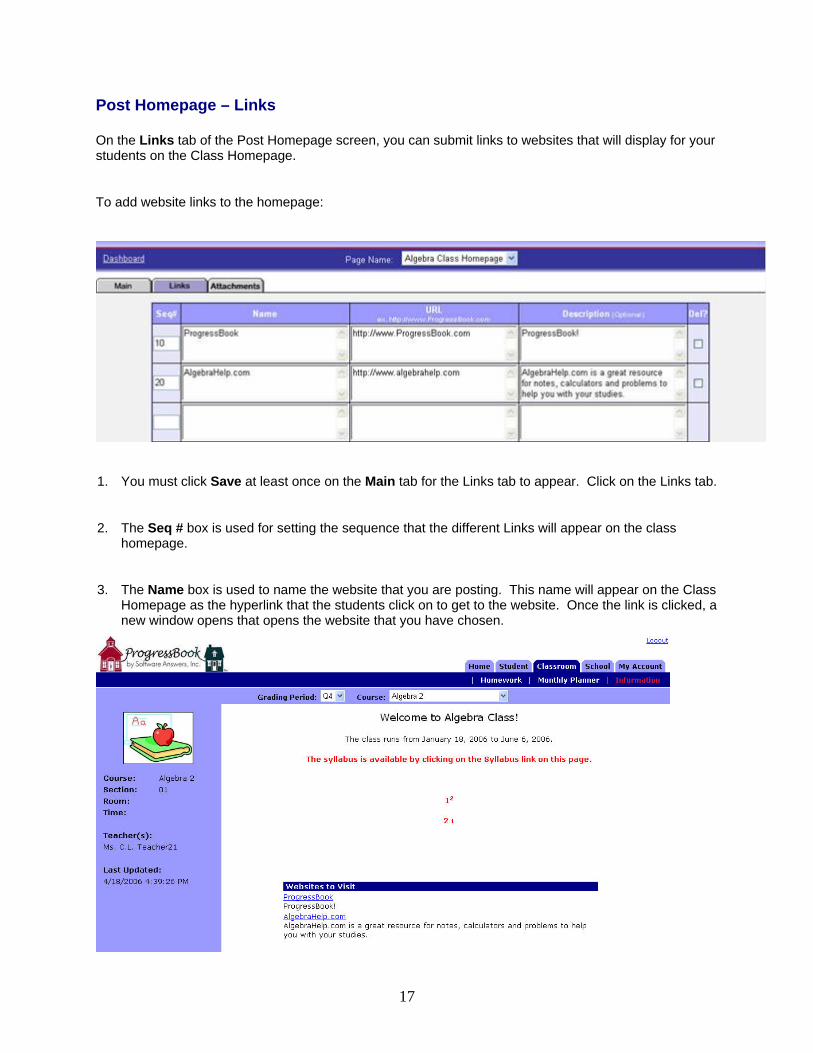
Post Homepage – Links
On the Links tab of the Post Homepage screen, you can submit links to websites that will display for your students on the Class Homepage.
To add website links to the homepage:
1. You must click Save at least once on the Main tab for the Links tab to appear. Click on the Links tab.
2. The Seq # box is used for setting the sequence that the different Links will appear on the class homepage.
3. The Name box is used to name the website that you are posting. This name will appear on the Class Homepage as the hyperlink that the students click on to get to the website. Once the link is clicked, a new window opens that opens the website that you have chosen.
18
4. The URL box is where you should type in the full address of the website. The http:// is required or the website will not open properly when the link is clicked. For example, the link should look like http://www.progressbook.com ,not www.progressbook.com .
5. The Description box is an area where you can enter a description of the website or how it pertains to a certain assignment. The description will be put underneath the name as seen above.
6. Once you have entered all of the links and information, click the Save button at the bottom and they will then appear on the Class Homepage underneath the Websites to Visit section.
Related Topics
Post Homepage - Main
Post Homepage Attachments
Setup Class for Parent Access
19
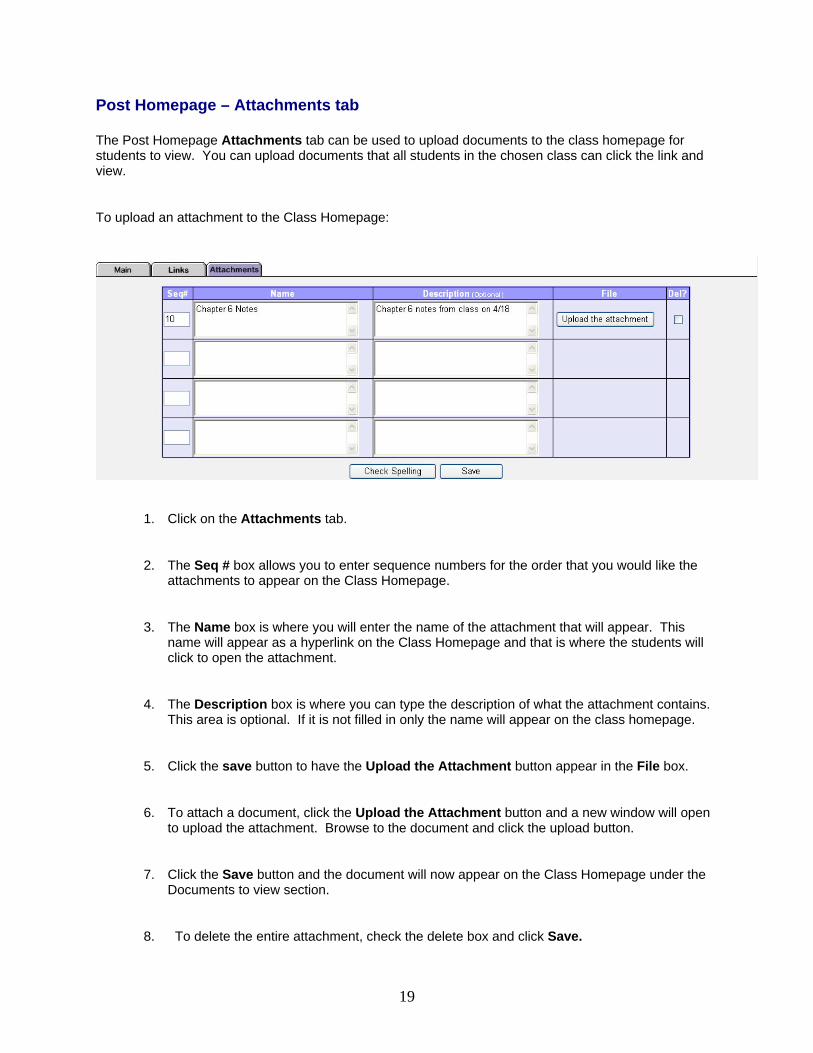
Post Homepage – Attachments tab
The Post Homepage Attachments tab can be used to upload documents to the class homepage for students to view. You can upload documents that all students in the chosen class can click the link and view.
To upload an attachment to the Class Homepage:
1. Click on the Attachments tab.
2. The Seq # box allows you to enter sequence numbers for the order that you would like the attachments to appear on the Class Homepage.
3. The Name box is where you will enter the name of the attachment that will appear. This name will appear as a hyperlink on the Class Homepage and that is where the students will click to open the attachment.
4. The Description box is where you can type the description of what the attachment contains. This area is optional. If it is not filled in only the name will appear on the class homepage.
5. Click the save button to have the Upload the Attachment button appear in the File box.
6. To attach a document, click the Upload the Attachment button and a new window will open to upload the attachment. Browse to the document and click the upload button.
7. Click the Save button and the document will now appear on the Class Homepage under the Documents to view section.
8. To delete the entire attachment, check the delete box and click Save.
20
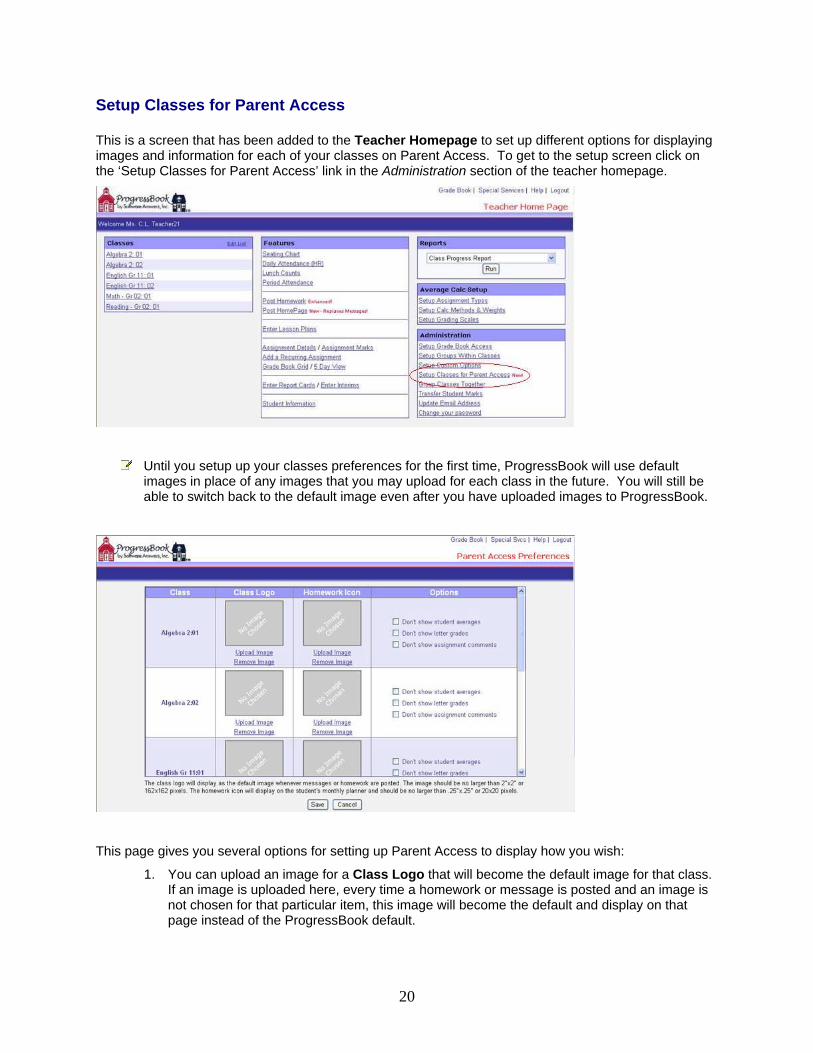
Setup Classes for Parent Access
This is a screen that has been added to the Teacher Homepage to set up different options for displaying images and information for each of your classes on Parent Access. To get to the setup screen click on the ‘Setup Classes for Parent Access’ link in the Administration section of the teacher homepage.
Until you setup up your classes preferences for the first time, ProgressBook will use default images in place of any images that you may upload for each class in the future. You will still be able to switch back to the default image even after you have uploaded images to ProgressBook.
This page gives you several options for setting up Parent Access to display how you wish:
1. You can upload an image for a Class Logo that will become the default image for that class. If an image is uploaded here, every time a homework or message is posted and an image is not chosen for that particular item, this image will become the default and display on that page instead of the ProgressBook default.
21
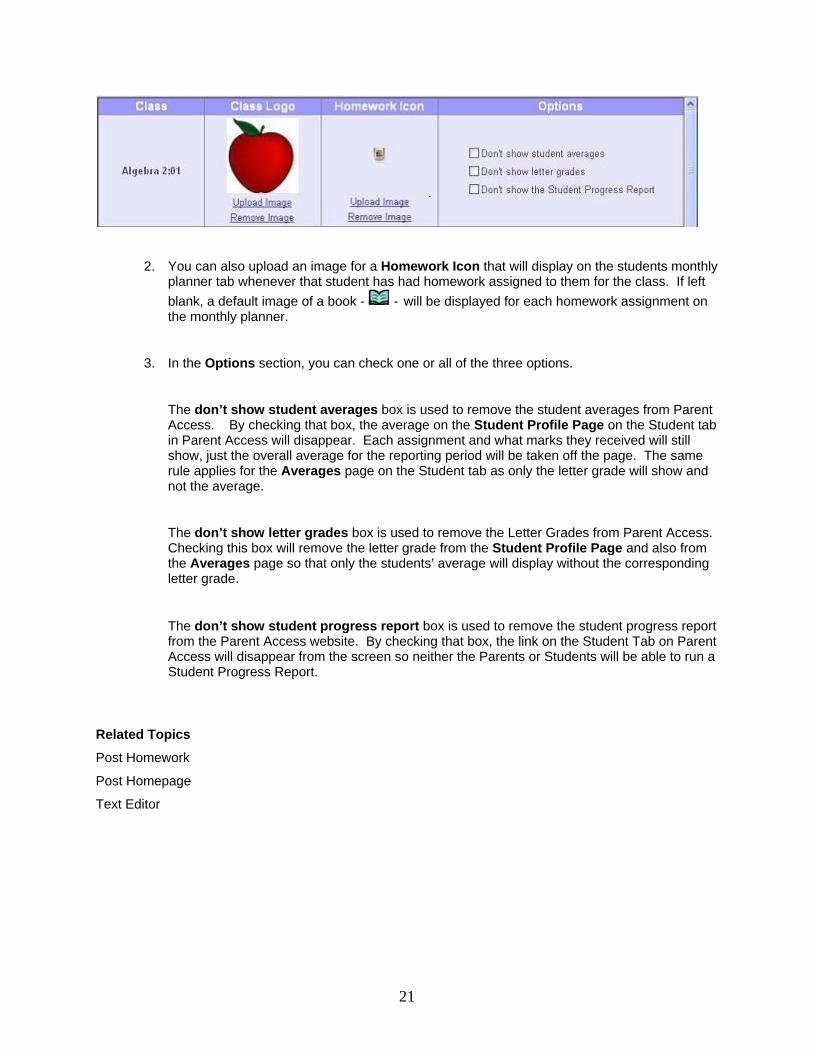
2. You can also upload an image for a Homework Icon that will display on the students monthly planner tab whenever that student has had homework assigned to them for the class. If left blank, a default image of a book - - will be displayed for each homework assignment on the monthly planner.
3. In the Options section, you can check one or all of the three options.
The don’t show student averages box is used to remove the student averages from Parent Access. By checking that box, the average on the Student Profile Page on the Student tab in Parent Access will disappear. Each assignment and what marks they received will still show, just the overall average for the reporting period will be taken off the page. The same rule applies for the Averages page on the Student tab as only the letter grade will show and not the average.
The don’t show letter grades box is used to remove the Letter Grades from Parent Access. Checking this box will remove the letter grade from the Student Profile Page and also from the Averages page so that only the students’ average will display without the corresponding letter grade.
The don’t show student progress report box is used to remove the student progress report from the Parent Access website. By checking that box, the link on the Student Tab on Parent Access will disappear from the screen so neither the Parents or Students will be able to run a Student Progress Report.
Related Topics
Post Homework
Post Homepage
Text Editor
22
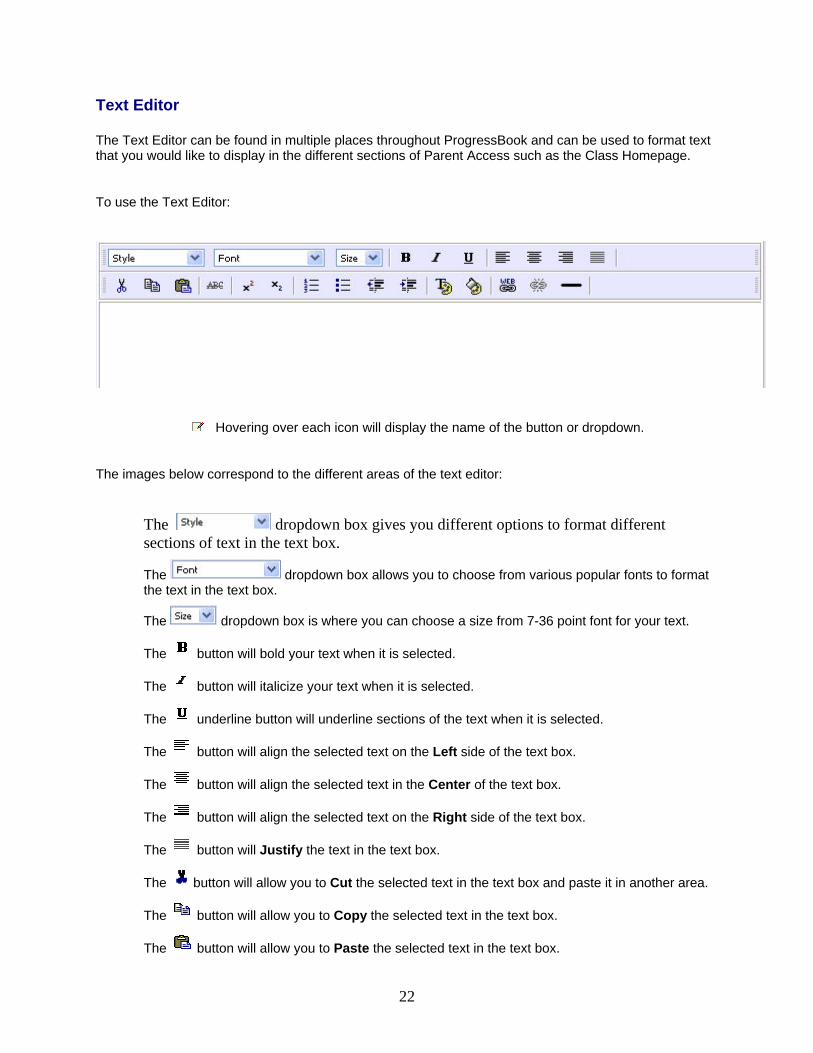
Text Editor
The Text Editor can be found in multiple places throughout ProgressBook and can be used to format text that you would like to display in the different sections of Parent Access such as the Class Homepage.
To use the Text Editor:
Hovering over each icon will display the name of the button or dropdown.
The images below correspond to the different areas of the text editor:
The dropdown box gives you different options to format different sections of text in the text box.
The dropdown box allows you to choose from various popular fonts to format the text in the text box.
The dropdown box is where you can choose a size from 7-36 point font for your text.
The button will bold your text when it is selected.
The button will italicize your text when it is selected.
The underline button will underline sections of the text when it is selected.
The button will align the selected text on the Left side of the text box.
The button will align the selected text in the Center of the text box.
The button will align the selected text on the Right side of the text box.
The button will Justify the text in the text box.
The button will allow you to Cut the selected text in the text box and paste it in another area.
The button will allow you to Copy the selected text in the text box.
The button will allow you to Paste the selected text in the text box.
23
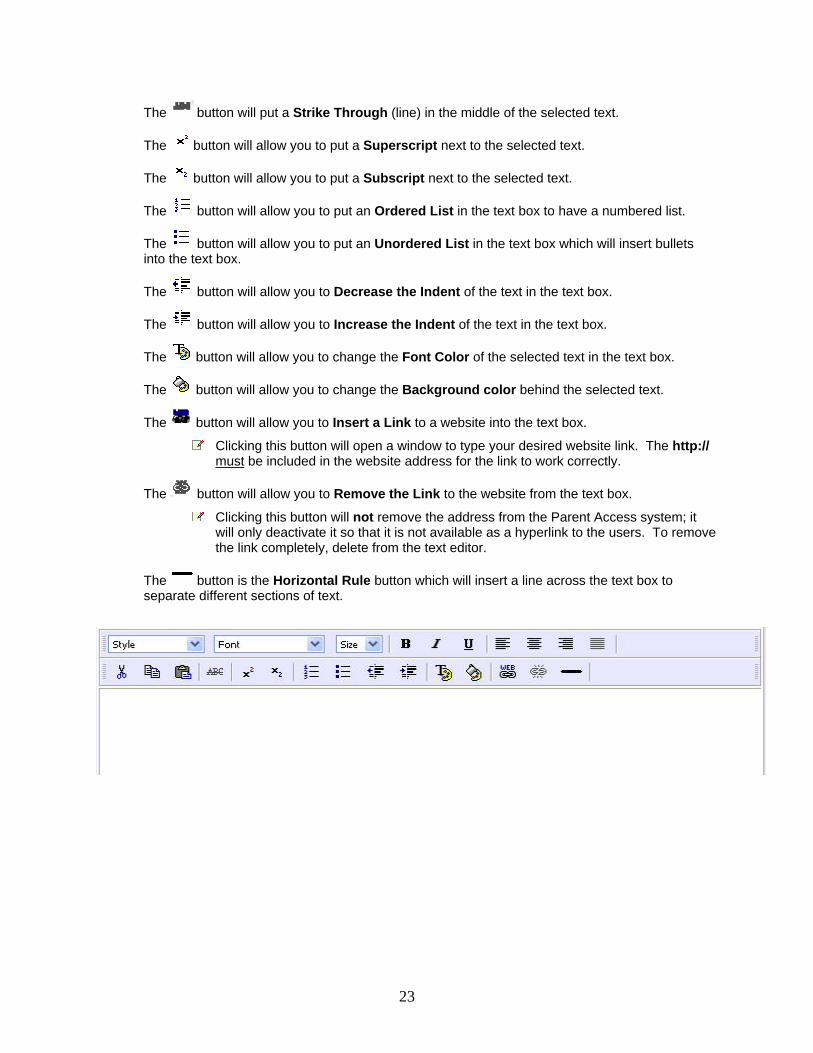
The button will put a Strike Through (line) in the middle of the selected text.
The button will allow you to put a Superscript next to the selected text.
The button will allow you to put a Subscript next to the selected text.
The button will allow you to put an Ordered List in the text box to have a numbered list.
The button will allow you to put an Unordered List in the text box which will insert bullets into the text box.
The button will allow you to Decrease the Indent of the text in the text box.
The button will allow you to Increase the Indent of the text in the text box.
The button will allow you to change the Font Color of the selected text in the text box.
The button will allow you to change the Background color behind the selected text.
The button will allow you to Insert a Link to a website into the text box.
Clicking this button will open a window to type your desired website link. The http:// must be included in the website address for the link to work correctly.
The button will allow you to Remove the Link to the website from the text box.
Clicking this button will not remove the address from the Parent Access system; it will only deactivate it so that it is not available as a hyperlink to the users. To remove the link completely, delete from the text editor.
The button is the Horizontal Rule button which will insert a line across the text box to separate different sections of text.
24
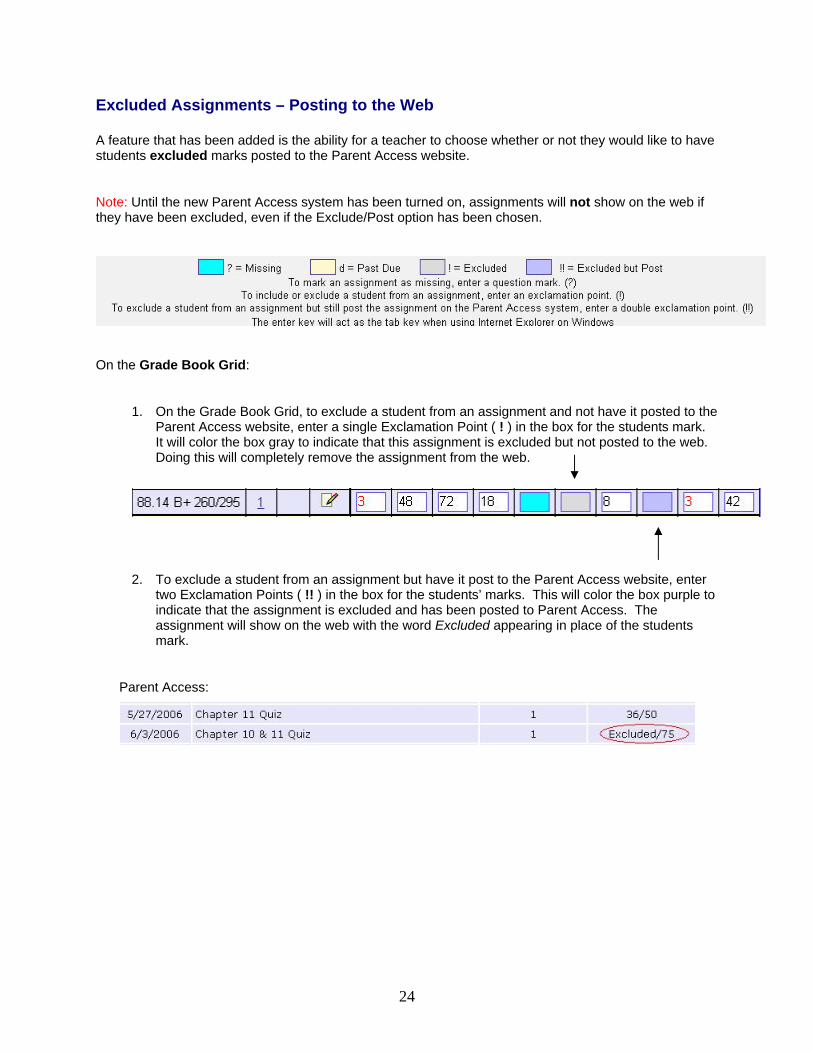
Excluded Assignments – Posting to the Web
A feature that has been added is the ability for a teacher to choose whether or not they would like to have students excluded marks posted to the Parent Access website.
Note: Until the new Parent Access system has been turned on, assignments will not show on the web if they have been excluded, even if the Exclude/Post option has been chosen.
On the Grade Book Grid:
1. On the Grade Book Grid, to exclude a student from an assignment and not have it posted to the Parent Access website, enter a single Exclamation Point ( ! ) in the box for the students mark. It will color the box gray to indicate that this assignment is excluded but not posted to the web. Doing this will completely remove the assignment from the web.
2. To exclude a student from an assignment but have it post to the Parent Access website, enter two Exclamation Points ( !! ) in the box for the students’ marks. This will color the box purple to indicate that the assignment is excluded and has been posted to Parent Access. The assignment will show on the web with the word Excluded appearing in place of the students mark.
Parent Access:
25
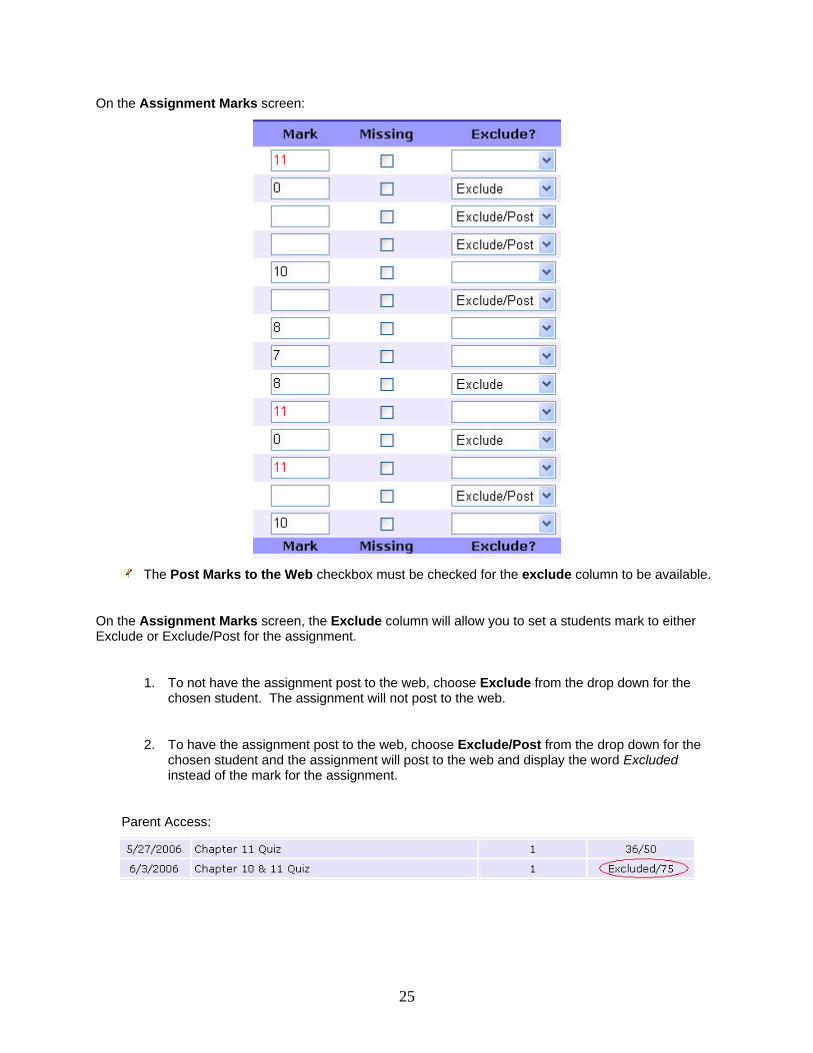
On the Assignment Marks screen:
The Post Marks to the Web checkbox must be checked for the exclude column to be available.
On the Assignment Marks screen, the Exclude column will allow you to set a students mark to either Exclude or Exclude/Post for the assignment.
1. To not have the assignment post to the web, choose Exclude from the drop down for the chosen student. The assignment will not post to the web.
2. To have the assignment post to the web, choose Exclude/Post from the drop down for the chosen student and the assignment will post to the web and display the word Excluded instead of the mark for the assignment.
Parent Access:
26
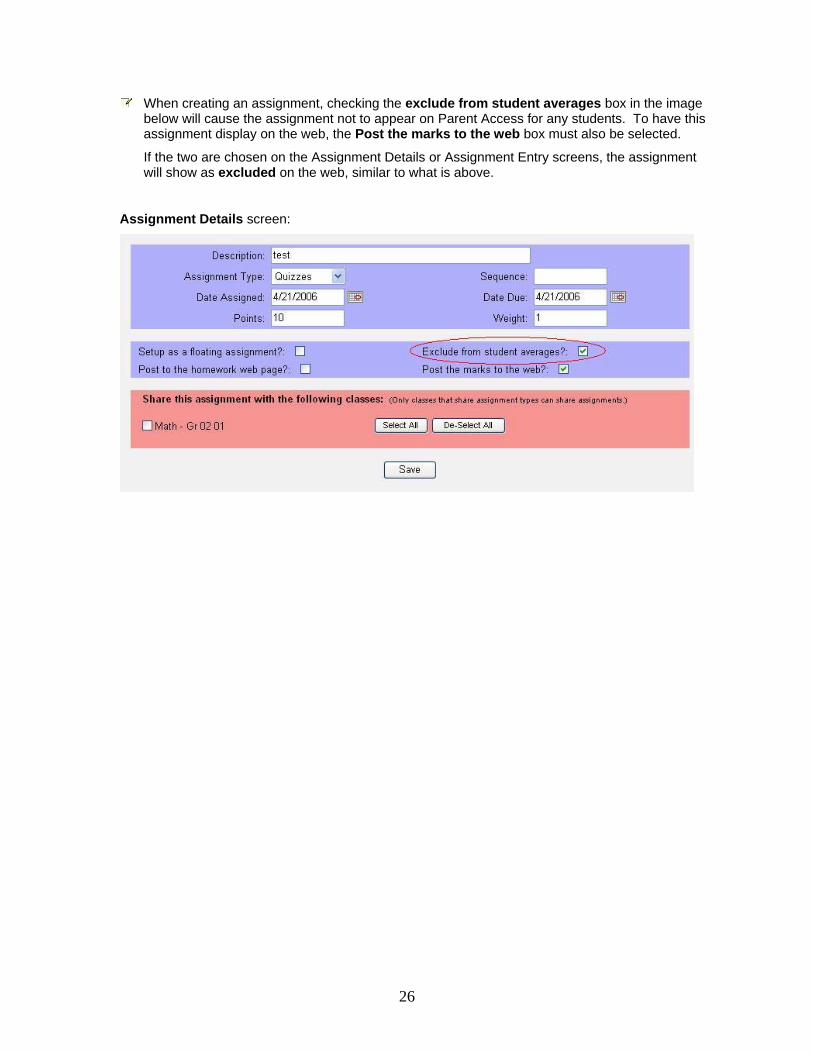
When creating an assignment, checking the exclude from student averages box in the image below will cause the assignment not to appear on Parent Access for any students. To have this assignment display on the web, the Post the marks to the web box must also be selected.
If the two are chosen on the Assignment Details or Assignment Entry screens, the assignment will show as excluded on the web, similar to what is above.
Assignment Details screen: