Embed Size (px)
Citation preview
PARAGON Technologie GmbH, Systemprogrammierung
Heinrich-von-Stephan-Str. 5c 79100 Freiburg, Germany
Tel. +49 (0) 761 59018201 Fax +49 (0) 761 59018130
Internet www.paragon-software.com Email [email protected]
Copyright© 1994-2010 Paragon Software Group. All rights reserved.
Paragon Go Virtual™
User Manual
2
Copyright© 1994-2010 Paragon Software Group. All rights reserved.
Contents Introduction .......................................................................................................................... 3
Features Overview ................................................................................................................. 4
Key Features ............................................................................................................................................... 4
Supported Technologies .............................................................................................................................. 4
Supported Virtual Machines ........................................................................................................................ 4
Getting Started ...................................................................................................................... 6
System Requirements ................................................................................................................................. 6
Windows based utilities .......................................................................................................................................................... 6
Additional requirements ......................................................................................................................................................... 6
Installation ................................................................................................................................................. 6
First Start .................................................................................................................................................... 6
Contacting Paragon Technology GmbH ........................................................................................................ 7
System Virtualization Scenarios ............................................................................................. 8
Virtualizing the current system (P2V Copy) .................................................................................................. 8
Making Windows Vista/7 backup bootable on virtual hardware (P2V Adjust OS) ........................................ 11

3
Copyright© 1994-2010 Paragon Software Group. All rights reserved.
Introduction More and more people today face the problem of smooth and cost saving system migration. It mostly has to do with constant hardware improvement. Traditional approach involving complete re-installation and re-setup of the operating system and all applications requires a lot of time and labor resources, few can afford. Moreover it doesn’t guarantee all software will flawlessly work on a new hardware platform.
Paragon Go Virtual™ is an elegant solution that can help you accomplish the following tasks:
• Migrate a live Win2K+ physical system to a virtual environment (P2V Copy);
• Make OS start up after unsuccessful migration with 3rd party tools (P2V Adjust OS).
In this manual you will find the answers to many of the technical questions, which might arise while using the program.
Our company is constantly releasing new versions and updates to its software, that's why images shown in this manual may be different from what you see on your screen.
4
Copyright© 1994-2010 Paragon Software Group. All rights reserved.
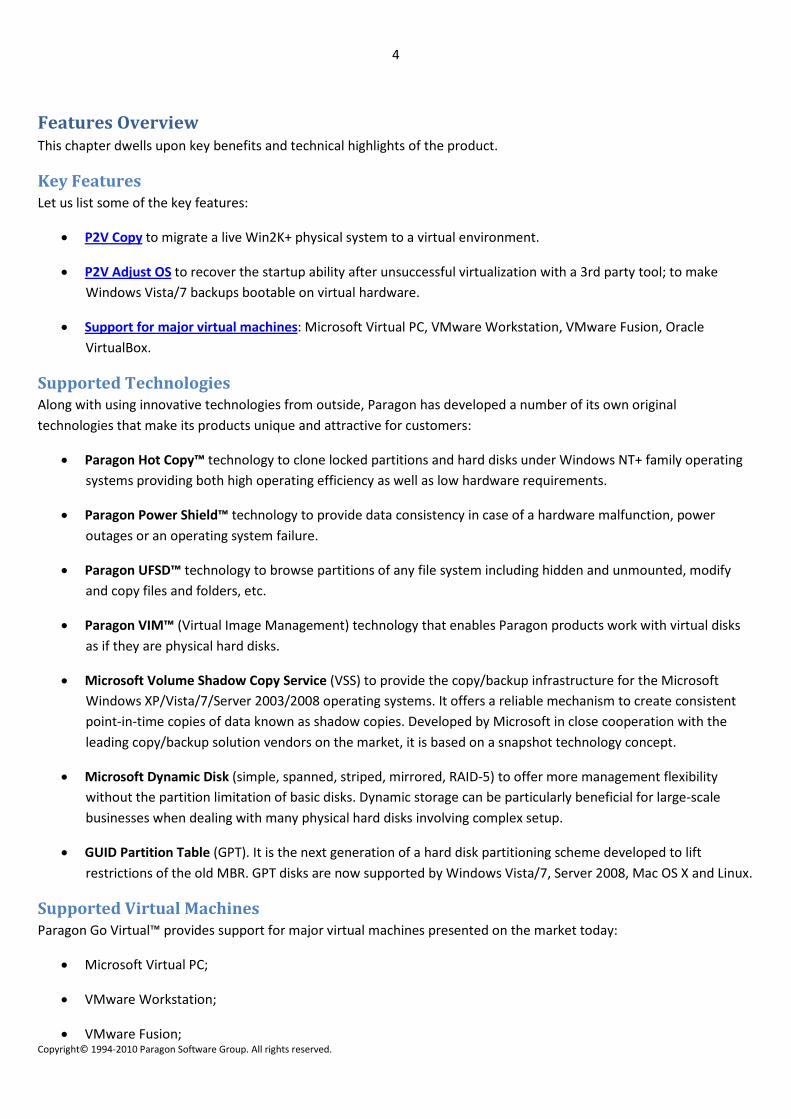
Features Overview This chapter dwells upon key benefits and technical highlights of the product.
Key Features Let us list some of the key features:
• P2V Copy to migrate a live Win2K+ physical system to a virtual environment.
• P2V Adjust OS to recover the startup ability after unsuccessful virtualization with a 3rd party tool; to make Windows Vista/7 backups bootable on virtual hardware.
• Support for major virtual machines: Microsoft Virtual PC, VMware Workstation, VMware Fusion, Oracle VirtualBox.
Supported Technologies Along with using innovative technologies from outside, Paragon has developed a number of its own original technologies that make its products unique and attractive for customers:
• Paragon Hot Copy™ technology to clone locked partitions and hard disks under Windows NT+ family operating systems providing both high operating efficiency as well as low hardware requirements.
• Paragon Power Shield™ technology to provide data consistency in case of a hardware malfunction, power outages or an operating system failure.
• Paragon UFSD™ technology to browse partitions of any file system including hidden and unmounted, modify and copy files and folders, etc.
• Paragon VIM™ (Virtual Image Management) technology that enables Paragon products work with virtual disks as if they are physical hard disks.
• Microsoft Volume Shadow Copy Service (VSS) to provide the copy/backup infrastructure for the Microsoft Windows XP/Vista/7/Server 2003/2008 operating systems. It offers a reliable mechanism to create consistent point-in-time copies of data known as shadow copies. Developed by Microsoft in close cooperation with the leading copy/backup solution vendors on the market, it is based on a snapshot technology concept.
• Microsoft Dynamic Disk (simple, spanned, striped, mirrored, RAID-5) to offer more management flexibility without the partition limitation of basic disks. Dynamic storage can be particularly beneficial for large-scale businesses when dealing with many physical hard disks involving complex setup.
• GUID Partition Table (GPT). It is the next generation of a hard disk partitioning scheme developed to lift restrictions of the old MBR. GPT disks are now supported by Windows Vista/7, Server 2008, Mac OS X and Linux.
Supported Virtual Machines Paragon Go Virtual™ provides support for major virtual machines presented on the market today:
• Microsoft Virtual PC;
• VMware Workstation;
• VMware Fusion;
5
Copyright© 1994-2010 Paragon Software Group. All rights reserved.
• Oracle VirtualBox;
Additionally for P2V Adjust OS only:
• MS Windows Vista/7 backup.
6
Copyright© 1994-2010 Paragon Software Group. All rights reserved.
Getting Started In this chapter you will find all the information necessary to get the product ready to use.
System Requirements
Windows based utilities To use the Windows utilities, you should install them first. But before that, make sure your computer meets the following minimum system requirements:
• Operating systems: Windows 2000 Professional and later versions
• Internet Explorer 5.0 or higher
• Intel Pentium CPU or its equivalent, with 300 MHz processor clock speed
• 128 MB of RAM (256+ recommended)
• Hard disk drive with 100 MB of available space
• SVGA video adapter and monitor
• Mouse
Additional requirements There may be additional requirements if you want to use advanced features:
• One of the supported virtualization software to play a virtual machine
• Network card to send/retrieve data to/from a network computer
• Recordable CD/DVD drive to burn data to compact discs
• External USB hard drive to store data.
Installation The setup utility has the standard user interface and set of installation steps. Once the installation procedure is completed you need to restart the system to activate a system driver that will enable to copy locked partitions/hard disks online.
First Start To start Paragon Go Virtual under Windows, please click the Windows Start button and then select Programs > Paragon Go Virtual™ > Paragon Go Virtual™.
The first component that will be displayed is called the Express Launcher. In general it enables to run wizards and utilities, to launch the help system, or to go to the company’s web site for the product upgrade or information.
7
Copyright© 1994-2010 Paragon Software Group. All rights reserved.
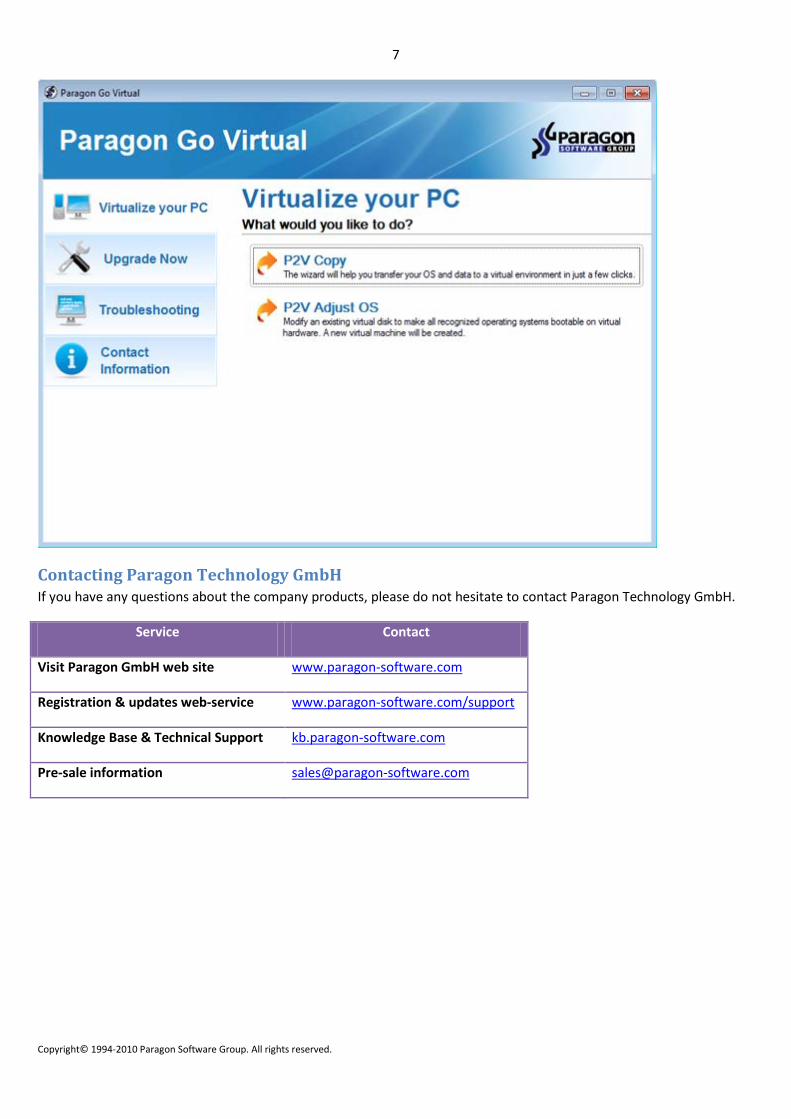
Contacting Paragon Technology GmbH If you have any questions about the company products, please do not hesitate to contact Paragon Technology GmbH.
Service Contact
Visit Paragon GmbH web site www.paragon-software.com
Registration & updates web-service www.paragon-software.com/support
Knowledge Base & Technical Support kb.paragon-software.com
Pre-sale information [email protected]

8
Copyright© 1994-2010 Paragon Software Group. All rights reserved.
System Virtualization Scenarios
Virtualizing the current system (P2V Copy) Let’s assume that you’re about to migrate to a brand-new hardware platform with the latest operating system available for it. Your current system is quite obsolete, but you still need access to some of its software. You don’t want to waste time re-installing the old software to the new system, and you do know for sure that the bulk of it won’t work anyway. The best way out is to virtualize your current system.
Before you start, please make sure the following conditions are met:
• You’ve got enough free space to store a virtual image of your system (depends on the system).
• You’ve got one of the supported virtualization software.
To migrate your current system to a virtual environment, please do the following:
1. Click the P2V Copy item of the Wizards menu (any of the ways described earlier can also be used here).
2. On the Wizard's Welcome page, click the Next button.
3. Select objects you need to virtualize. You’re allowed to select any combination of hard disks and partitions, but don’t forget to choose your system partition (Local Disk C: in our case) to use it as guest. Otherwise the resulted virtual machine won’t start up.
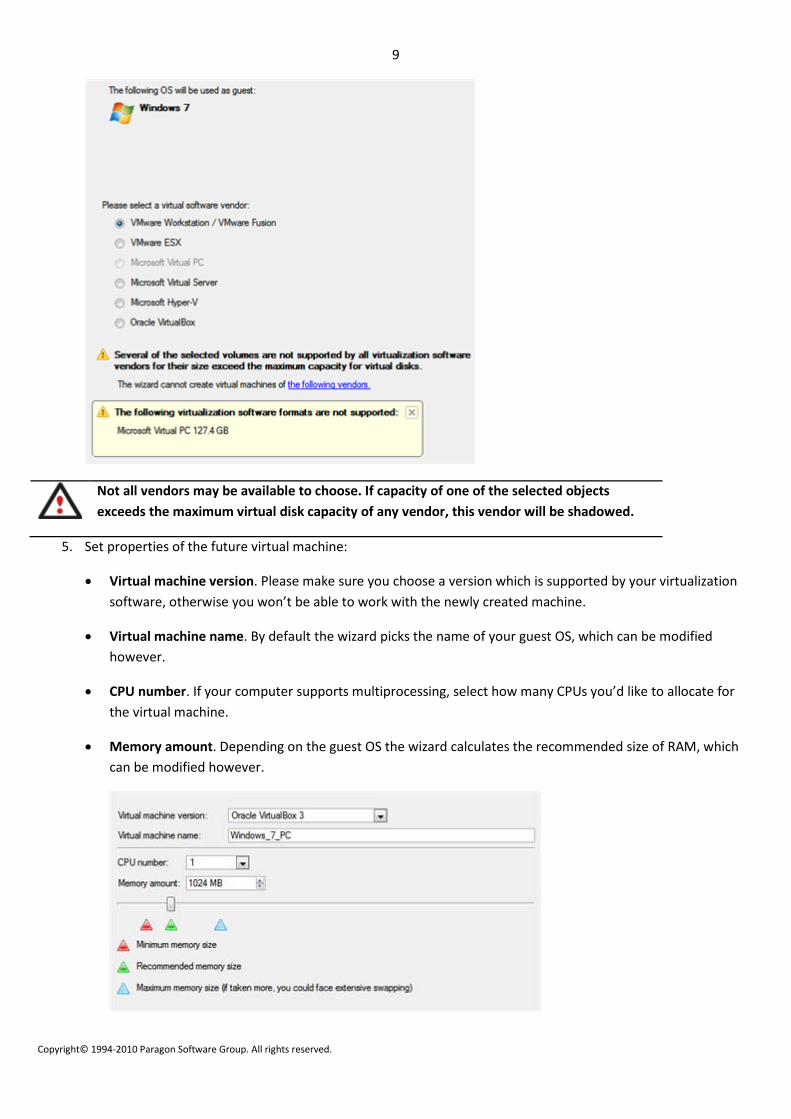
4. Specify the guest OS and a virtualization software vendor. If your system hosts several Windows OSes, our wizard will find them all and automatically patch to run in a virtual environment. However we cannot guarantee smooth startup of all found Windows systems for their configuration parameters may be incompatible with each other. This is why we additionally prompt you to specify what operating system you’d like to use as guest to configure the virtual machine for that particular system.
9
Copyright© 1994-2010 Paragon Software Group. All rights reserved.
Not all vendors may be available to choose. If capacity of one of the selected objects exceeds the maximum virtual disk capacity of any vendor, this vendor will be shadowed.
5. Set properties of the future virtual machine:
• Virtual machine version. Please make sure you choose a version which is supported by your virtualization software, otherwise you won’t be able to work with the newly created machine.
• Virtual machine name. By default the wizard picks the name of your guest OS, which can be modified however.
• CPU number. If your computer supports multiprocessing, select how many CPUs you’d like to allocate for the virtual machine.
• Memory amount. Depending on the guest OS the wizard calculates the recommended size of RAM, which can be modified however.
10
Copyright© 1994-2010 Paragon Software Group. All rights reserved.
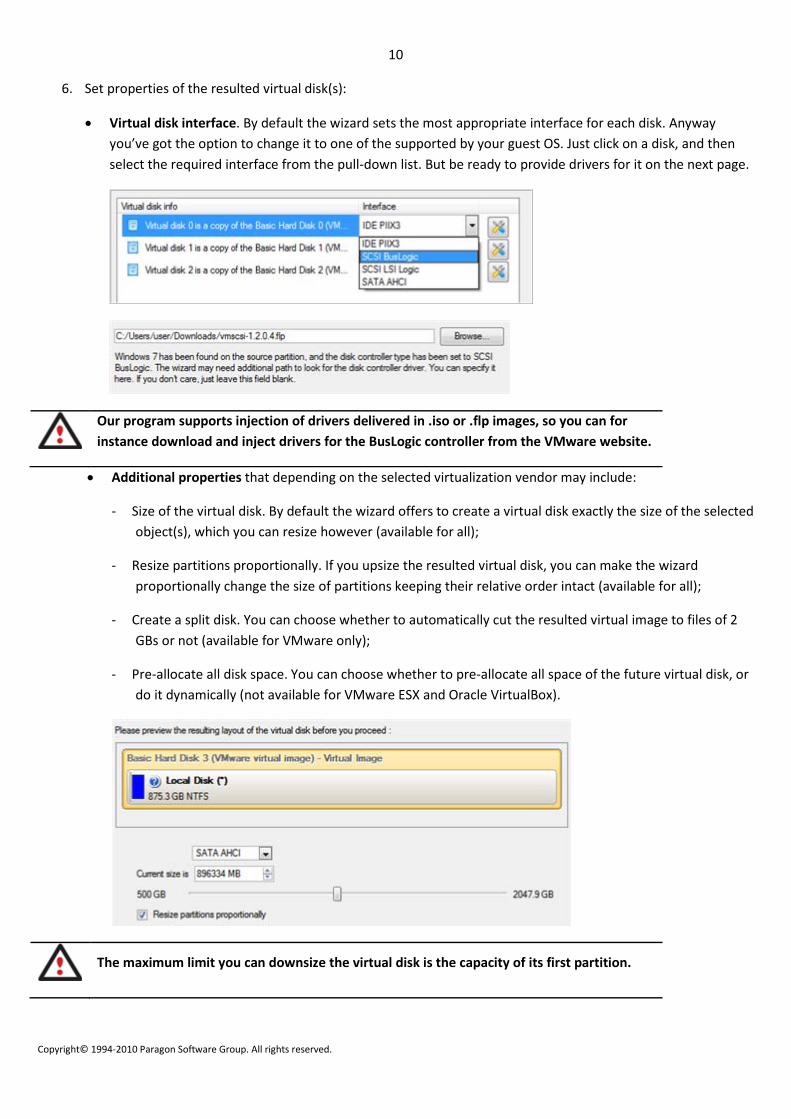
6. Set properties of the resulted virtual disk(s):
• Virtual disk interface. By default the wizard sets the most appropriate interface for each disk. Anyway you’ve got the option to change it to one of the supported by your guest OS. Just click on a disk, and then select the required interface from the pull-down list. But be ready to provide drivers for it on the next page.
Our program supports injection of drivers delivered in .iso or .flp images, so you can for instance download and inject drivers for the BusLogic controller from the VMware website.
• Additional properties that depending on the selected virtualization vendor may include:
- Size of the virtual disk. By default the wizard offers to create a virtual disk exactly the size of the selected object(s), which you can resize however (available for all);
- Resize partitions proportionally. If you upsize the resulted virtual disk, you can make the wizard proportionally change the size of partitions keeping their relative order intact (available for all);
- Create a split disk. You can choose whether to automatically cut the resulted virtual image to files of 2 GBs or not (available for VMware only);
- Pre-allocate all disk space. You can choose whether to pre-allocate all space of the future virtual disk, or do it dynamically (not available for VMware ESX and Oracle VirtualBox).
The maximum limit you can downsize the virtual disk is the capacity of its first partition.
11
Copyright© 1994-2010 Paragon Software Group. All rights reserved.
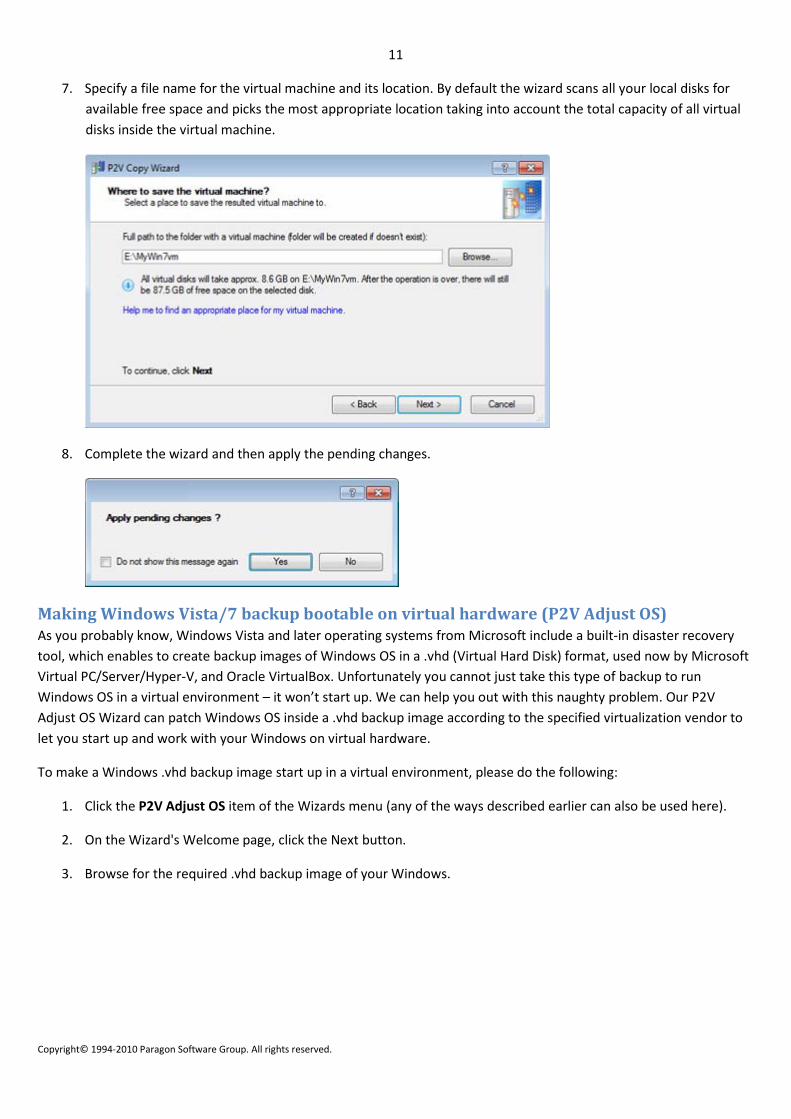
7. Specify a file name for the virtual machine and its location. By default the wizard scans all your local disks for available free space and picks the most appropriate location taking into account the total capacity of all virtual disks inside the virtual machine.
8. Complete the wizard and then apply the pending changes.
Making Windows Vista/7 backup bootable on virtual hardware (P2V Adjust OS) As you probably know, Windows Vista and later operating systems from Microsoft include a built-in disaster recovery tool, which enables to create backup images of Windows OS in a .vhd (Virtual Hard Disk) format, used now by Microsoft Virtual PC/Server/Hyper-V, and Oracle VirtualBox. Unfortunately you cannot just take this type of backup to run Windows OS in a virtual environment – it won’t start up. We can help you out with this naughty problem. Our P2V Adjust OS Wizard can patch Windows OS inside a .vhd backup image according to the specified virtualization vendor to let you start up and work with your Windows on virtual hardware.
To make a Windows .vhd backup image start up in a virtual environment, please do the following:
1. Click the P2V Adjust OS item of the Wizards menu (any of the ways described earlier can also be used here).
2. On the Wizard's Welcome page, click the Next button.
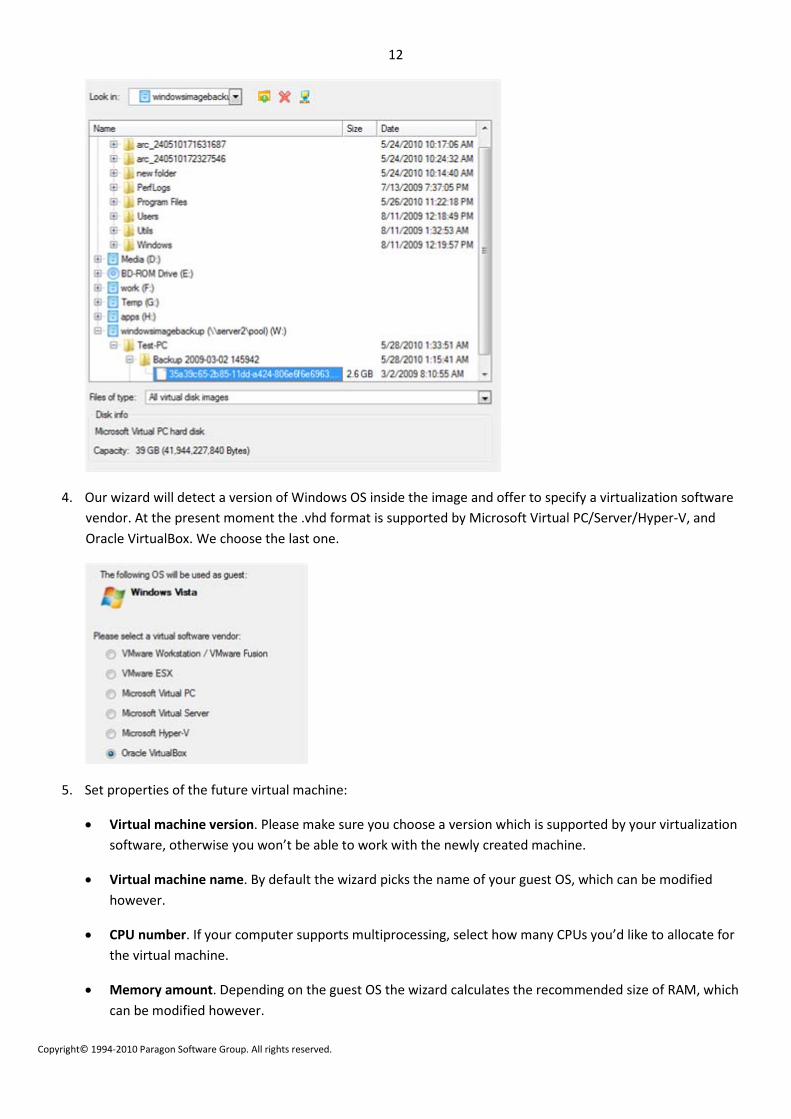
3. Browse for the required .vhd backup image of your Windows.
12
Copyright© 1994-2010 Paragon Software Group. All rights reserved.
4. Our wizard will detect a version of Windows OS inside the image and offer to specify a virtualization software vendor. At the present moment the .vhd format is supported by Microsoft Virtual PC/Server/Hyper-V, and Oracle VirtualBox. We choose the last one.
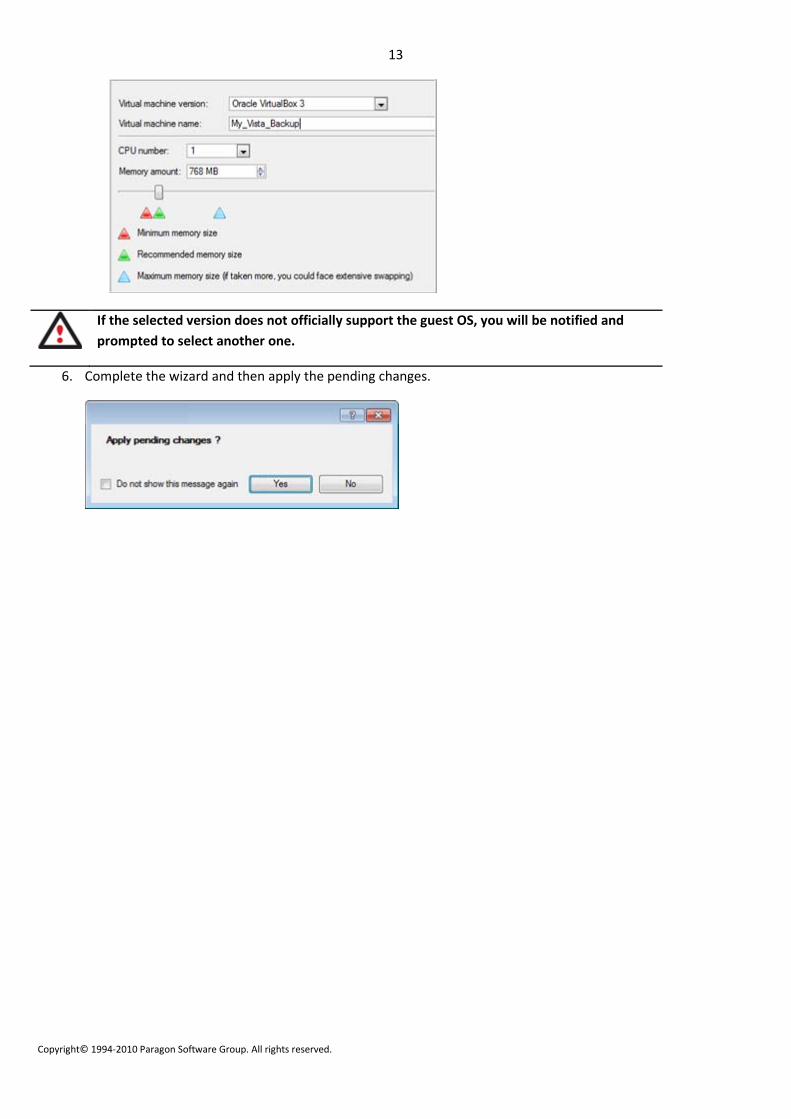
5. Set properties of the future virtual machine:
• Virtual machine version. Please make sure you choose a version which is supported by your virtualization software, otherwise you won’t be able to work with the newly created machine.
• Virtual machine name. By default the wizard picks the name of your guest OS, which can be modified however.
• CPU number. If your computer supports multiprocessing, select how many CPUs you’d like to allocate for the virtual machine.
• Memory amount. Depending on the guest OS the wizard calculates the recommended size of RAM, which can be modified however.
13
Copyright© 1994-2010 Paragon Software Group. All rights reserved.
If the selected version does not officially support the guest OS, you will be notified and prompted to select another one.
6. Complete the wizard and then apply the pending changes.