Embed Size (px)
Citation preview
PAPERS7 User Guide
AP/FACULTY APPLICANT REVIEW
Search Committee Chair
Department of Human Resources
CLASSIFIED/HOURLY
APPLICANT REVIEW
Hiring Manager
Department of Human Resources
October 2015

2
Reviewing Applicants: Hiring Manager View
1. Once successfully logged into the system and in the Applicant Tracking module as the Hiring
Manager, you will be presented with the home screen below.
2. Click the refresh icon located to the right of the User Type drop down menu. Ensure that your user
type is set to ‘Hiring Manager’ throughout the entire Applicant Review process.
3. In the banner at the top of the screen, select Postings and then the Staff link.

3
4. The following screen will provide you with all of the Postings in your area. Find the Posting for
which you wish to view applicants for and click on the blue Working Title link.
Once you click the Working Title of the Posting, the following Summary screen will appear. Select the
Applicants tab to begin reviewing individual applications.
4
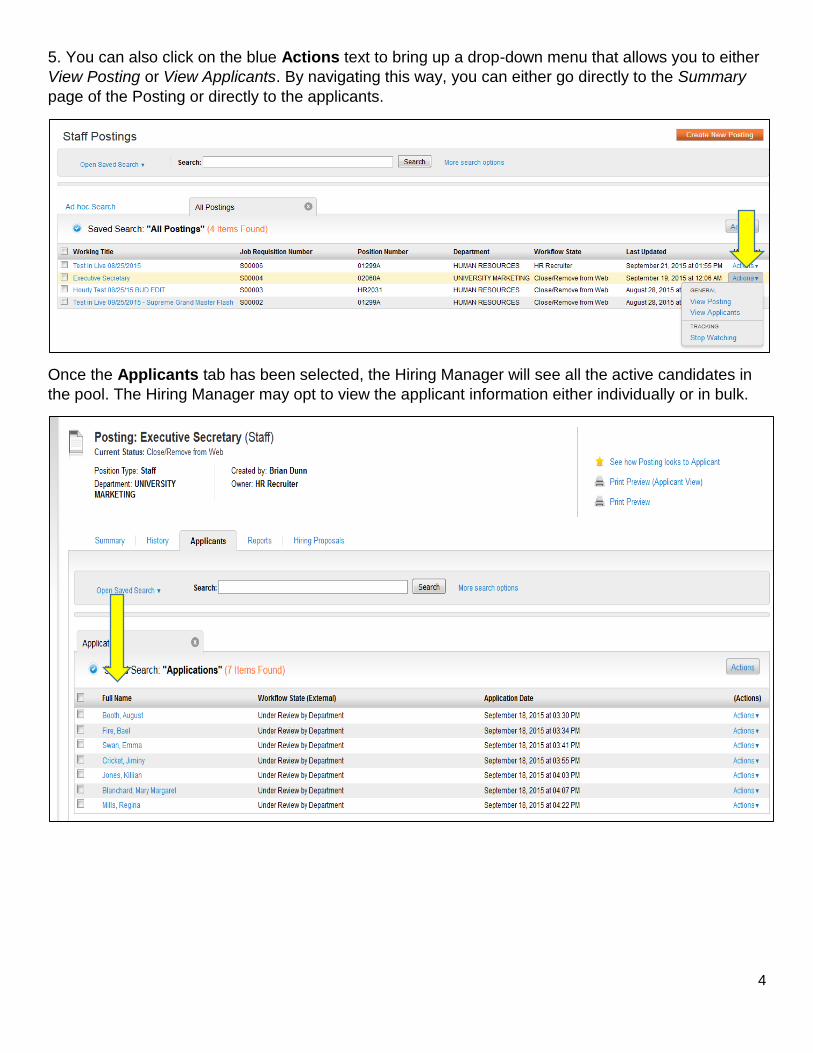
5. You can also click on the blue Actions text to bring up a drop-down menu that allows you to either
View Posting or View Applicants. By navigating this way, you can either go directly to the Summary
page of the Posting or directly to the applicants.
Once the Applicants tab has been selected, the Hiring Manager will see all the active candidates in
the pool. The Hiring Manager may opt to view the applicant information either individually or in bulk.

5
6. To view the individual applicants, scroll down the page and then click on the text under Full Name
that appears in the first column.
7. Clicking on the applicant’s Full Name will open the next page where you will see more detailed
information about the applicant.

6
8. Scrolling down the page will allow you to view the applicant’s education and employment history,
as well as their responses to the supplemental questions (if applicable).
Education History
Employment History

7
Supplemental Questions
9. At the end of the s application, you will see the Optional Documents and PDF Documents tabs.
This will contain individual application materials (such as cover letters, resumes, and other
documents) for each applicant.
The Optional Documents tab will allow you to view each applicant’s cover letters, resumes, or other
documents in PDF format. Each additional document will open in a new window.
The PDF Documents will allow you to: 1) view the application as a PDF file, or 2) generate a
combined document which includes all of the documents associated with this applicant. Click on the
View/Generate button to initiate the action.
8
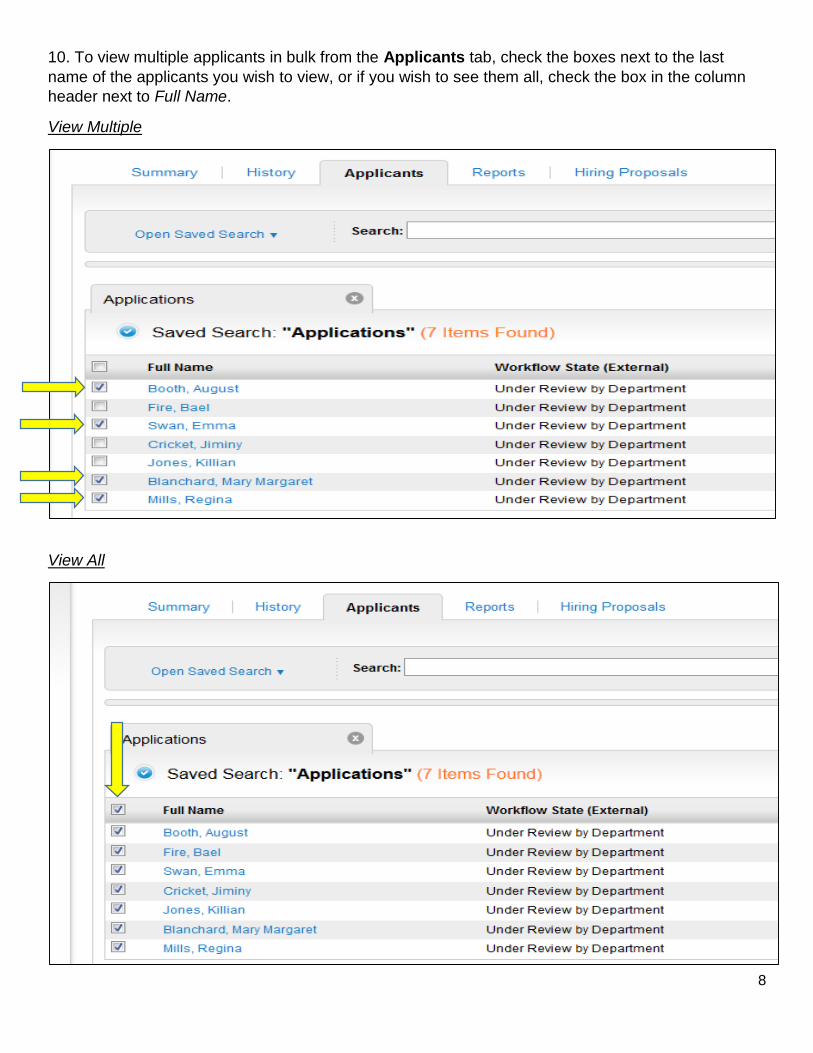
10. To view multiple applicants in bulk from the Applicants tab, check the boxes next to the last
name of the applicants you wish to view, or if you wish to see them all, check the box in the column
header next to Full Name.
View Multiple
View All
9
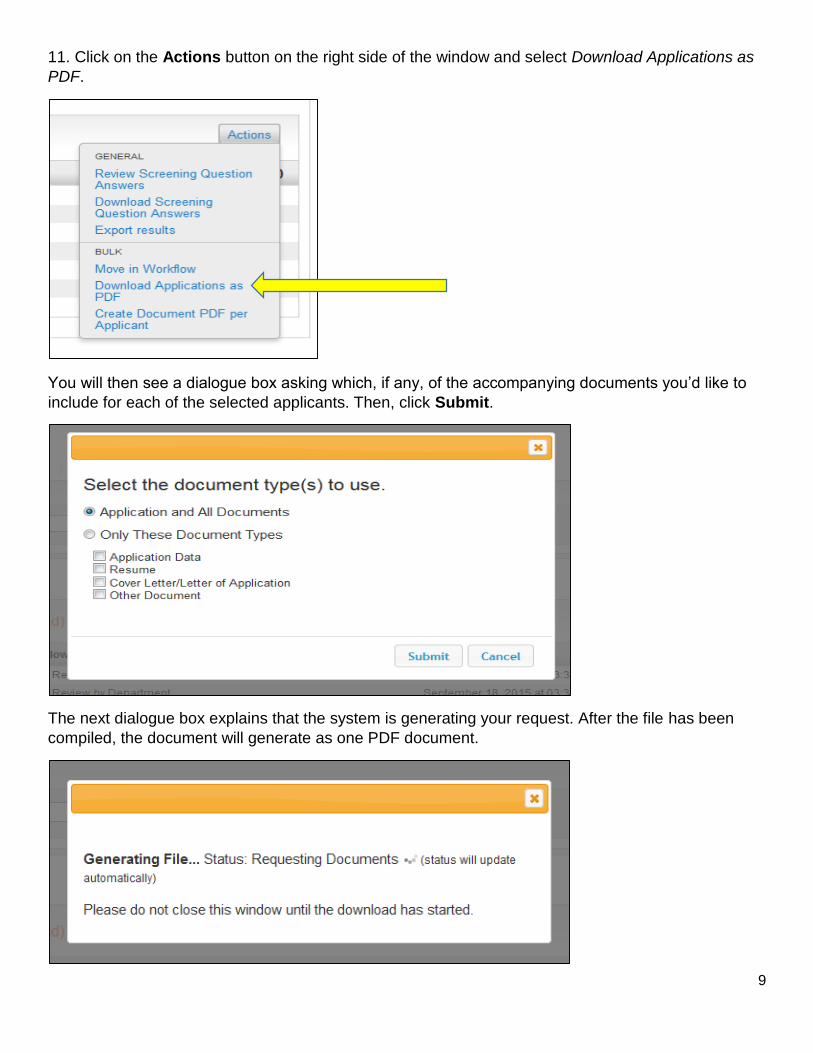
11. Click on the Actions button on the right side of the window and select Download Applications as
PDF.
You will then see a dialogue box asking which, if any, of the accompanying documents you’d like to
include for each of the selected applicants. Then, click Submit.
The next dialogue box explains that the system is generating your request. After the file has been
compiled, the document will generate as one PDF document.

10
12. You can save this document directly to your computer by clicking on the Down Arrow icon,
which is located next to the Print icon. Once this document has been generated, you can return back
to the Posting Summary page by using your browser’s back button.
Each applicant’s materials will appear in the following format:
Applicant #1 (application)
Applicant #1 (resume, if attached)
Applicant #1 (cover letter, if attached)
Applicant #1 (other document, if attached)
Applicant #2 (application)
Applicant #2 (resume, if attached)
Applicant #2 (cover letter, if attached)
Applicant #2 (other document, if attached)
This pattern will continue for each applicant in the Posting.
11
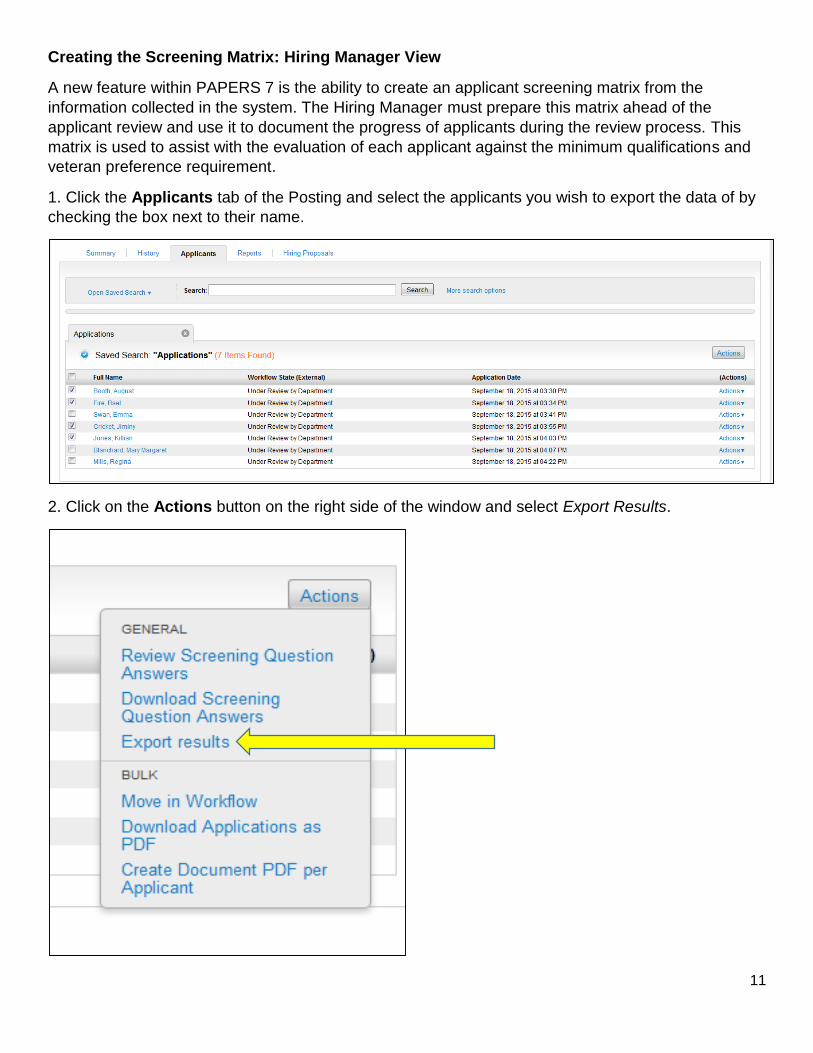
Creating the Screening Matrix: Hiring Manager View
A new feature within PAPERS 7 is the ability to create an applicant screening matrix from the
information collected in the system. The Hiring Manager must prepare this matrix ahead of the
applicant review and use it to document the progress of applicants during the review process. This
matrix is used to assist with the evaluation of each applicant against the minimum qualifications and
veteran preference requirement.
1. Click the Applicants tab of the Posting and select the applicants you wish to export the data of by
checking the box next to their name.
2. Click on the Actions button on the right side of the window and select Export Results.

12
3. Next, the system will prompt you to either: 1) open the file, or 2) save the file to a location on your
computer for future manipulation. Check the appropriate radio button and click on the OK button.
When you open the file in Excel, you will see that the data is provided in rows containing the
applicant’s full name, external workflow state, and date in which they applied.
Using Excel, you can add more columns such as the criteria you are using for screening the
applicants with and your evaluation of how well each candidate met each respective criterion.
The screening matrix is MANDATORY and must be used to document the applicants’ qualifications as you review applications. If you do not wish to use the matrix as specified above, you can simply print out a blank copy and handwrite the information. Retain the Rating Sheet in your departmental recruitment file as it will be subject to audit. Please note that three (3) points will be added to the rating total for any applicants who are: 1) veterans, 2) surviving spouse/child of a veteran killed in the line of duty, or 3) Virginia National Guard members, as these preferences are now REQUIRED by statute.

13
4. Just as the system allows the export of applicant data, it also provides a way to download the applicants’ answers to the Supplemental Questions. Follow the steps above to select the applicants, click the Actions button, and then click on the Download Screening Question Answers.
The information is also reproduced in an Excel file that can be used to assist in the screening process. This export will give you the applicants’ first and last name, along with the text of the Supplemental Questions, and the responses provided by each applicant. This information can also be copied and pasted into the other exported report to add to the matrix you’ve already created.
First Name Last Name
1. Please describe your experience with preparing
NCAA APR and GSR reports.
2. Indicate years of experience as a newspaper or
publication editor or writer.
3. Do you have landscaping
experience in a University setting?
August Booth
I have two years of experience with GSR reports, but no experience with APR reports. 1-5 years Yes
Bael Fire
What do these acronyms mean? I do not have any experience with them. 1-5 years Yes
Emma Swan
In the past year and a half, I have produced numerous APR and GSR reports. Many have been published in national magazines. 1-5 years Yes
Jiminy Cricket
I have three years of experience with APR and GSR reports. 5-10 years Yes
Killian Jones
Considerable experience preparing APR reports. Basic experience preparing GSR reports. More than 10 years Yes
Mary Margaret Blanchard
I have great experience with both reporting functions. More than 10 years Yes
Regina Mills Vast experience in both areas. More than 10 years Yes

14
Updating Applicant Statuses In The Workflow: Hiring Manager View
Once the screening matrix has been created, you are now ready to update each candidate’s status in
the workflow. It is best to begin by updating the applicants that are not being selected for interview.
1. Begin by navigating to the Applicants tab of the Posting. Then, select the applicants that are not
selected for interview. You may select multiple applicants by clicking on the check box next to the
applicants’ full name.
2. Click on the Actions button and click on the blue Move In Workflow text under the Bulk actions in
the dialogue box. You can only use the Bulk action to change statuses of the same type (i.e. Not
Selected For Interview).

15
3. The next screen will present you with the workflow state options available for each applicant.
Clicking on the downward-facing black triangle near Change for all applicants will call up the pick-list
for the statuses of each applicant. Click on the “Not Selected For Interview – Email At Filled”
option in the drop-down menu.
4. Beside each candidate, you will need to locate the Reason row and select “Describe reason for
non-selection”. It is required that a written justification is entered for each candidate that reverts back
to the position’s minimum requirements.
Acceptable non-selection justification reason examples:
Limited experience in (list minimum qualification)
Does not have adequate (list minimum qualification) experience
Unacceptable non-selection justification reason examples:
Not minimally qualified/NMQ
Does not meet minimum
Acceptable
Justification
Reason
Unacceptable
Justification
Reason
Acceptable
Justification
Reason

16
5. After saving your changes, the system will return you to the Applicants search results tab where
you will notice that the applicants not selected for interview have been removed from the list. The
remaining applicants should represent those you wish to interview.
The Workflow State (External) tab shows the status that the candidates will see when they log into
their account. However, the Workflow State (Internal) tab shows their actual state in the progress. To
view the Workflow State (Internal) tab, click on ‘More search options’ and select Workflow State
(Internal) as an option under the Add Column tab.

17
6. Once the Workflow State (Internal) tab has been selected, you are ready to update the candidates
that you wish to interview. Click on the Full Name of the candidate you wish to update. Under Take
Action On Job Application, select Request Campus Interview.
**Note: PAPERS7 has integrated phone interviews into the system. You may complete phone
interviews without obtaining HR approval, but campus interviews are required to be reviewed and
approved by HR first.**
7. You will need to enter a written justification for each candidate that reverts back to the position’s
minimum requirements.
Acceptable selection justification reason examples:
Considerable experience in (list minimum qualification)
Has good (list minimum qualification) experience
Unacceptable non-selection justification reason examples:
Meets minimum requirements
Meets expectations
Acceptable Justification Reason Unacceptable Justification Reason
18
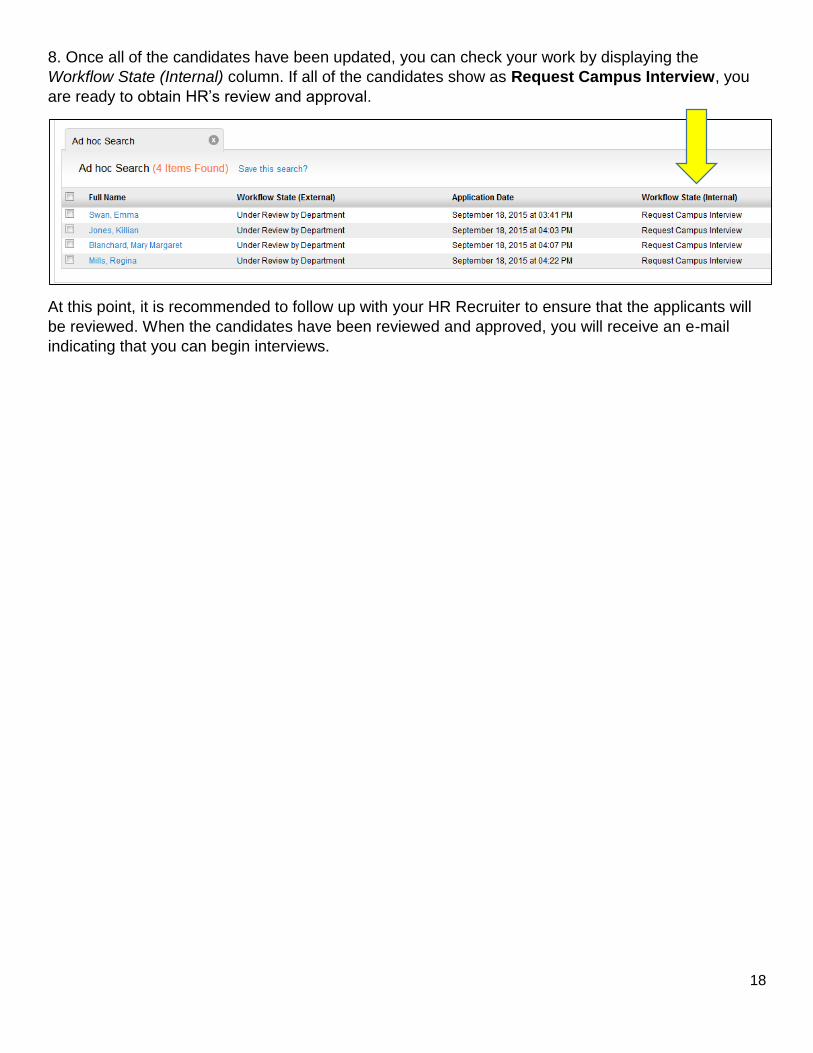
8. Once all of the candidates have been updated, you can check your work by displaying the
Workflow State (Internal) column. If all of the candidates show as Request Campus Interview, you
are ready to obtain HR’s review and approval.
At this point, it is recommended to follow up with your HR Recruiter to ensure that the applicants will
be reviewed. When the candidates have been reviewed and approved, you will receive an e-mail
indicating that you can begin interviews.

19
Updating Applicant Statuses (Post-Interview) In The Workflow: Hiring Manager View
Once campus interviews are completed, the Hiring Manager logs back into PAPERS7 to identify their
final and alternate candidates. You will be presented with three options:
Campus Interviewed – Recommended For Hire: this is the candidate that you would like to hire for
your vacant position.
Alternate: this is the candidate that you would consider hiring if your original candidate declines to
move forward. (NOTE: An alternate candidate is not required).
Campus Interviewed, Not Selected: these are the candidates that you would not like to hire for your
vacant position.
1. Using the Bulk Move In Posting option indicated on page 14 of this document, you can update all of
the interviewed candidates that you do not wish to hire all at once.
2. After selecting the Campus Interviewed, Not Selected option, you will need to locate the Reason
row and select “Describe reason for non-selection”. It is required that a written justification is entered
for each candidate that reverts back to the position’s minimum requirements.
Acceptable final non-selection justification reason examples:
Limited experience in (list minimum qualification) as displayed in interview
Did not demonstrate adequate (list minimum qualification) experience
Poor (list minimum qualification) as displayed in interview
Unacceptable non-selection justification reason examples:
Poor interview
Not selected/recommended for hire
Not minimally qualified/NMQ
Acceptable
Justification
Reason
Unacceptable
Justification
Reason
20
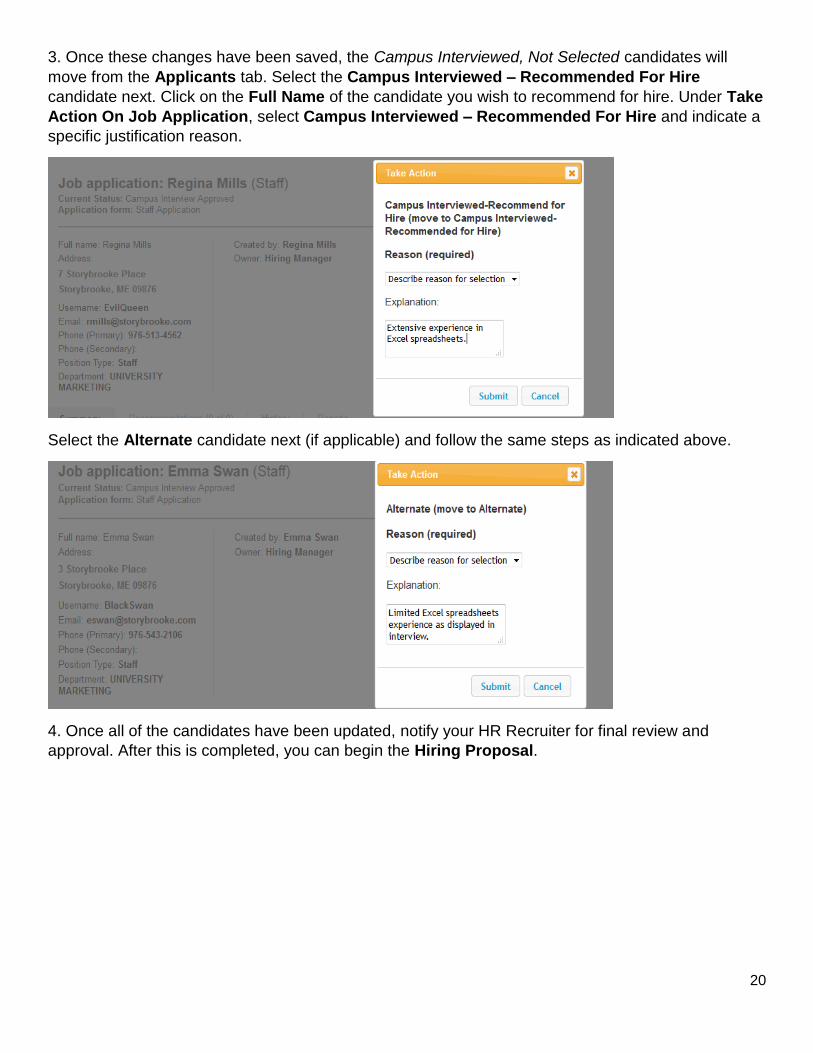
3. Once these changes have been saved, the Campus Interviewed, Not Selected candidates will
move from the Applicants tab. Select the Campus Interviewed – Recommended For Hire
candidate next. Click on the Full Name of the candidate you wish to recommend for hire. Under Take
Action On Job Application, select Campus Interviewed – Recommended For Hire and indicate a
specific justification reason.
Select the Alternate candidate next (if applicable) and follow the same steps as indicated above.
4. Once all of the candidates have been updated, notify your HR Recruiter for final review and
approval. After this is completed, you can begin the Hiring Proposal.
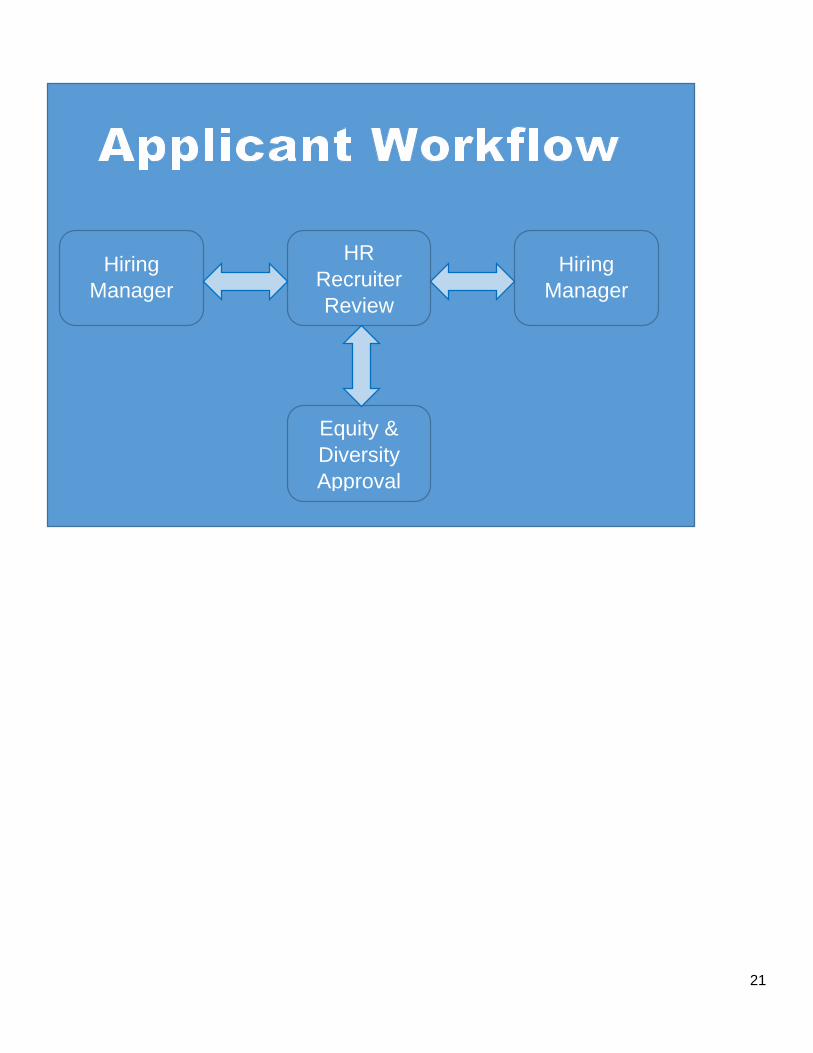
21
Hiring
Manager
HR
Recruiter
Review
Hiring
Manager
Equity &
Diversity
Approval