Embed Size (px)
Citation preview

Pandora DocumentationRelease 1.1.0
Richard Frangenberg
Jan 11, 2022


Contents:
1 Overview 11.1 Introduction . . . . . . . . . . . . . . . . . . . . . . . . . . . . . . . . . . . . 11.2 Supported Software . . . . . . . . . . . . . . . . . . . . . . . . . . . . . . . 1
2 Getting Started 32.1 Installation . . . . . . . . . . . . . . . . . . . . . . . . . . . . . . . . . . . . 32.2 Configuring Pandora . . . . . . . . . . . . . . . . . . . . . . . . . . . . . . 32.3 Submitting a job . . . . . . . . . . . . . . . . . . . . . . . . . . . . . . . . . 42.4 Tracking the progress of the job . . . . . . . . . . . . . . . . . . . . . . . . 4
3 Feature Reference 53.1 Installation . . . . . . . . . . . . . . . . . . . . . . . . . . . . . . . . . . . . 5
3.1.1 Setup Pandora integrations . . . . . . . . . . . . . . . . . . . . . . 63.1.2 Uninstall . . . . . . . . . . . . . . . . . . . . . . . . . . . . . . . . . 6
3.2 Setup the Coordinator on a server . . . . . . . . . . . . . . . . . . . . . . . 63.3 Setup Pandora with a Cloud-Service . . . . . . . . . . . . . . . . . . . . . . 73.4 Integrations . . . . . . . . . . . . . . . . . . . . . . . . . . . . . . . . . . . . 8
3.4.1 3dsMax . . . . . . . . . . . . . . . . . . . . . . . . . . . . . . . . . 83.4.2 Blender . . . . . . . . . . . . . . . . . . . . . . . . . . . . . . . . . 83.4.3 Houdini . . . . . . . . . . . . . . . . . . . . . . . . . . . . . . . . . 93.4.4 Maya . . . . . . . . . . . . . . . . . . . . . . . . . . . . . . . . . . . 93.4.5 Standalone . . . . . . . . . . . . . . . . . . . . . . . . . . . . . . . 9
3.5 Pandora Dialogs . . . . . . . . . . . . . . . . . . . . . . . . . . . . . . . . . 93.5.1 Submit Pandora renderjob . . . . . . . . . . . . . . . . . . . . . . . 93.5.2 Render Handler . . . . . . . . . . . . . . . . . . . . . . . . . . . . . 12
3.5.2.1 Menu bar . . . . . . . . . . . . . . . . . . . . . . . . . . . . 123.5.2.2 Job list . . . . . . . . . . . . . . . . . . . . . . . . . . . . . 133.5.2.3 Task list . . . . . . . . . . . . . . . . . . . . . . . . . . . . . 133.5.2.4 Settings (jobs) . . . . . . . . . . . . . . . . . . . . . . . . . 14
i

3.5.2.5 Coordinator Log . . . . . . . . . . . . . . . . . . . . . . . . 143.5.2.6 Coordinator Settings . . . . . . . . . . . . . . . . . . . . . . 143.5.2.7 Coordinator Warnings . . . . . . . . . . . . . . . . . . . . . 153.5.2.8 Slave List . . . . . . . . . . . . . . . . . . . . . . . . . . . . 153.5.2.9 Settings (slaves) . . . . . . . . . . . . . . . . . . . . . . . . 153.5.2.10 Log (slave) . . . . . . . . . . . . . . . . . . . . . . . . . . . 163.5.2.11 Warnings (slave) . . . . . . . . . . . . . . . . . . . . . . . . 16
3.5.3 Pandora Settings . . . . . . . . . . . . . . . . . . . . . . . . . . . . 173.5.3.1 Tab General . . . . . . . . . . . . . . . . . . . . . . . . . . 173.5.3.2 Tab Submission . . . . . . . . . . . . . . . . . . . . . . . . 183.5.3.3 Tab Slave . . . . . . . . . . . . . . . . . . . . . . . . . . . . 183.5.3.4 Tab Coordinator . . . . . . . . . . . . . . . . . . . . . . . . 19
4 Support and License 21
ii
CHAPTER 1
Overview
1.1 Introduction
Pandora is a Renderfarm Manager, which can manage renderjobs and simulationjobs.It automatically distibutes these jobs across all available renderslaves. You can definevarious settings to control how the jobs are assigned to the renderslaves. Pandora can beused on a single computer to queue renderjobs or on multiple computers to distribute therenderjobs between all computers. You can submit your scenefile in a DCC app (DigitalContent Creation Application) like Houdini or Maya as a renderjob. The job can be splittedinto multiple tasks. Each task can be rendered by a different renderslave. When moreslaves can render the job simultaneously, the renderings will be finished quicker of course.
Pandora is well integrated in the Prism Pipeline, which makes it easy to submit jobs fromyour Prism project, but you can use Pandora without Prism, too.
The images in this documentation were mostly taken from Prism Standalone, Houdini-or Maya- integration of Prism, but the Prism user interface in other DCC applicationsis almost identical. The features described in this documentation can be applied to theintegration of all supported programs.
1.2 Supported Software
You can open the Pandora tools as a separate software (standalone) and many tools arealso available inside your DCC apps from the Pandora menu/shelf. The job submitter
1
Pandora Documentation, Release 1.1.0
is only available in the DCC apps and the Renderslave and SlaveCoordinator are onlyaccessable from the standalone tools.
Pandora works on Windows 64bit in these DCC apps:
• Autodesk 3dsMax
• Autodesk Maya
• Blender
• SideEffects Houdini (render and simulation)
The Pandora Coordinator, who is responsible for assigning jobs to renderslaves, can alsorun on Linux.
2 Chapter 1. Overview
CHAPTER 2
Getting Started
2.1 Installation
Go to the downloads page and download the latest version of Pandora: https://prism-pipeline.com/pandora/ Follow the instructions of the Installation section to set upPandora on your PC.
You want to install Pandora on all your computers, where you want to use a part of Pan-dora. If you want to use the PC as a job submitter or as a renderslave can be definedlater.
2.2 Configuring Pandora
If you enable the checkboxes “Setup integrations”, “Start Coordinator” and “Start Render-slave” at the end of the installation dialog, Pandora will be setup with the default settingsand is immediately ready to use without any further configuration.
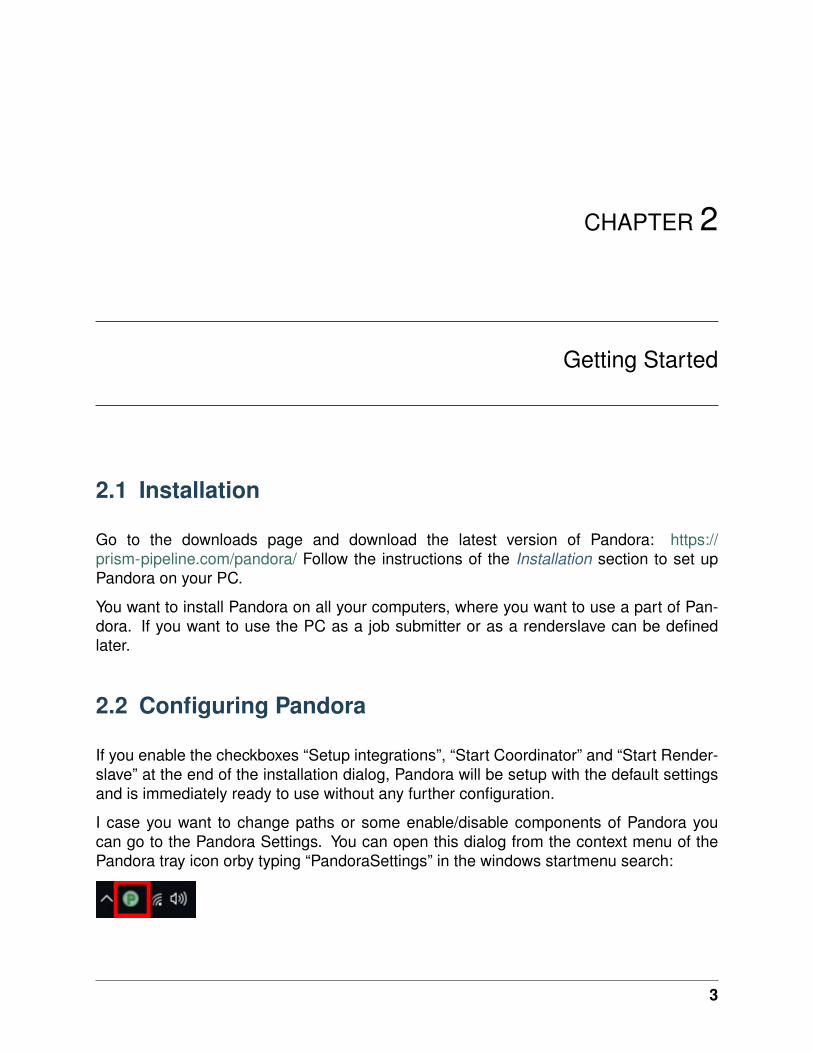
I case you want to change paths or some enable/disable components of Pandora youcan go to the Pandora Settings. You can open this dialog from the context menu of thePandora tray icon orby typing “PandoraSettings” in the windows startmenu search:
3
Pandora Documentation, Release 1.1.0
You can change the root and local repository if you like. By default this will be set to yourWindows documents folder. The root path must be accessable from all submitters andrenderslaves. If you have multiple computers, this is typically a network location.
If you enable the renderslave or the coordinator in the Pandora Settings tabs, they will bestarted as soon as you save the settings. Additionally you can start and stop them fromthe context menu of the tray icon.
The coordinator must be running to see the submitted renderjobs and their current status.At least one renderslave needs to be enabled in order to render a job.
2.3 Submitting a job
To sumit a renderjob start your DCC app and open a scenefile, which you want to render.From the Pandora shelf/menu open the Submitter tool. In this tool you have to set anoutputpath, a projectname and a jobname. Then you can press “Submit” to send the jobto Pandora.
If you use the Prism Pipeline, you don’t need to use the Pandora submitter tool. Insteadyou can open the StateManager, create an ImageRender state in there you can enablethe Pandora job submission. When you publish your scene now, Prism will send the jobto Pandora.
2.4 Tracking the progress of the job
In the RenderHandler tool you can monitor the status and the progress of all your render-jobs. You can open the RenderHandler from the Pandora shelf/menu, from the start menuor from the Pandora tray icon.
In the top left list all renderjobs are listed and in the bottom left list you can see all yourrenderslaves. In the “Task List” tab at the upper right corner you can see a list of all tasksof the currently selected renderjob. There you can see whether a task is assigned to aslave or if it is already done.
You can open the output folder from the context menu of a job to view the final renderings.If you have RV installed you can also play the renderings in RV directly from the contextmenu in the RenderHandler
4 Chapter 2. Getting Started
CHAPTER 3
Feature Reference
3.1 Installation
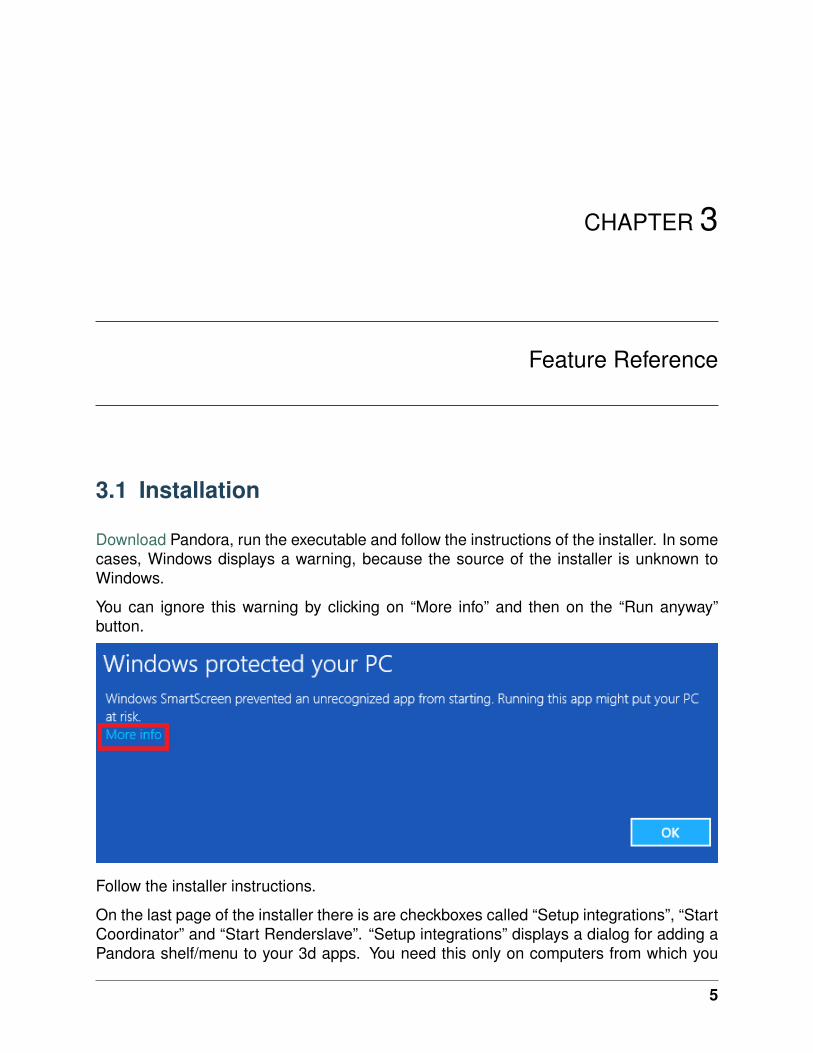
Download Pandora, run the executable and follow the instructions of the installer. In somecases, Windows displays a warning, because the source of the installer is unknown toWindows.
You can ignore this warning by clicking on “More info” and then on the “Run anyway”button.
Follow the installer instructions.
On the last page of the installer there is are checkboxes called “Setup integrations”, “StartCoordinator” and “Start Renderslave”. “Setup integrations” displays a dialog for adding aPandora shelf/menu to your 3d apps. You need this only on computers from which you
5
Pandora Documentation, Release 1.1.0
want to submit renderjobs. The “Start Coordinator” launches the Pandora Coordinatortools, which assign the renderjobs to the slaves. One Coordinator is needed in a Pan-dora renderfarm. “Start Renderslave” launches the Pandora renderslave, which can becontrolled by its tray icon. An additional Pandora tray icon launches at the end of theinstallation, which allows you to access all Pandora tools.
In the Windows start menu you can find the following tools now: “PandoraTray”, “Pan-doraCoordinator”, “PandoraSlave”, “PandoraRenderHandler” and “Pandora Settings”. Bydefault, the Pandora tray icon will start, when you start Windows. You can disable this inthe “General” tab of the Pandora Settings dialog.
3.1.1 Setup Pandora integrations
If you move the Pandora files to a different location or if you disabled the “Setupintegrations” checkbox in the installer, you can use the “Setup_Integrations.bat” and“Setup_Startmenu.bat” in the Pandora installation folder to open a dialog, which lets youselect for which programs you want to install the Pandora integration:
All supported DCC applications are listed here. The installer automatically detects whichDCCs you have installed on your PC and enables the corresponding options. In mostcases you can leave all settings to default. The “custom” options for 3ds Max and Mayacan be used to install Pandora for additional versions like 2016.5.
If you want to install Pandora for a different DCC version, you can double click a path onthe right side of the dialog. For 3ds Max and Maya this only works in the “custom” line. Anew dialog opens and lets you select a different path (for example to install Pandora foran older Houdini version).
3.1.2 Uninstall
To uninstall Pandora, you have to execute the “Uninstall.bat” in the Pandora installationfolder. This will remove all Pandora integrations and links. Then you can delete thePandora installation folder manually. In some programs (like Houdini) the Pandora shelfneeds to be deleted manually.
3.2 Setup the Coordinator on a server
You can setup the Pandora Coordinator on a server without the Pandora installer.
To do this you simply have to place the Coordinator python script in a specific folder:
First you need the PandoraCoordinator.py file. You can find it on a PC, where Pandorawas installed with the installer under this path: C:/Pandora/Scripts/PandoraCoordinator.pyYou can also download it from GitHub.
6 Chapter 3. Feature Reference
Pandora Documentation, Release 1.1.0
Then create a Pandora root folder somewhere on your server. Create “Scripts” and a“PandoraCoordinator” subfolders and place the PandoraCoordinator.py in there. The pathhas to look like this: . . . /Scripts/PandoraCoordinator/PandoraCoordinator.py
Now you can execute this script with Python 2.7. A log file called “PandoraCoordina-tor_Log.txt” will be created in the same folder and it should contain a line, which includes“starting Coordinator”.
Now go to the computer, which you want to add as a renderslave or from which you wantto submit renderjobs. On this computer set the “Root” folder as the “Pandora Root” in the“General” tab of the Pandora Settings.
To close the PandoraCoordinator safely create a “EXIT.txt” file in the same folder, wherethe PandoraCoordinator.py is (or rename the EXIT-.txt to EXIT.txt). You will see a “Coor-dinator closed” line in the Coordinator log file.
3.3 Setup Pandora with a Cloud-Service
Pandora can work in a mode, which doesn’t require the computers (Coordinator, Sub-mitters and Renderslaves) to be in the same local network. This makes it very easy toadd additional computers to a Pandora Renderfarm, because you don’t need to move thecomputers physically. However in this mode the network traffic can be a bottleneck.
To connect the different computers you can use a Cloud-Service like Dropbox orGoogleDrive (in the following I’ll use Dropbox as a representation for all cloud-services).
The setup is very similar to the usual local network setup. At first you need install Drop-box and Pandora on your computer. Setup Dropbox and create a folder on your harddrive,which will be synchronized to the cloud. Then uncheck the “Local network mode” in the“General” tab on the Pandora Settings on every computer in the renderfarm (coordina-tor, slaves and submitters). You need to restart the coordinator and the renderslaves, ifthey are already running, when you change this setting. Enable the Pandora Coordinatorand make sure you set the “Pandora Root” folder in the “Coordinator” tab of the PandoraSettings to a location inside the Dropbox folder. The “Local Repository” folder on the“General” tab doesn’t need to be in the Dropbox folder. Add new slaves and submittersin the “Coordinator” tab. The names of the slaves/submitters need to be the exact win-dows computer names. This will create folders in your Pandora root folder which you cansynchronize to the slaves/submitters later.
On the renderslave and submitter computers install Dropbox and Pandora, too. You don’tneed to synchronize the complete Pandora Root folder to the harddrive of the Render-slaves. In the Dropbox options you can select to only synchronize the slave folder (e.g.Root/PandoraFarm/Slaves/S_Richard-PC1).
In the Pandora Settings in the “Slave” tab enable the slave and set the synchronized folderas the “Slave Root” path. (the same procedure applies to the submitters)
3.3. Setup Pandora with a Cloud-Service 7
Pandora Documentation, Release 1.1.0
3.4 Integrations
3.4.1 3dsMax
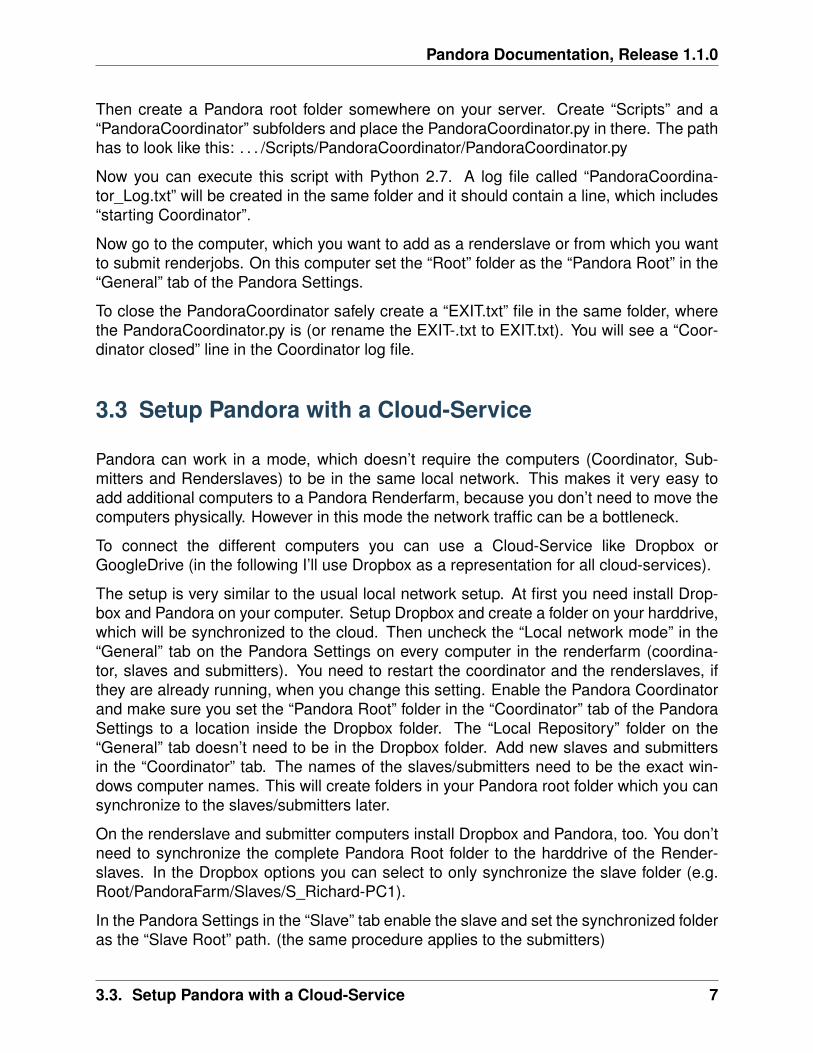
In 3ds Max Pandora can be accessed from the “Pandora” menu in the main toolbar.
You can also access the Pandora tools in the “Customize User Interface” dialog in 3dsMax. You can find them in the group “Main UI”, category “Pandora” and add them to acustom toolbar. You can also find the tools in the global 3dsMax search (pressing “x” inthe viewport), by typing the names you can find in the Pandora menu (like “Submit job. . . ”or “Render-Handler”)
3.4.2 Blender
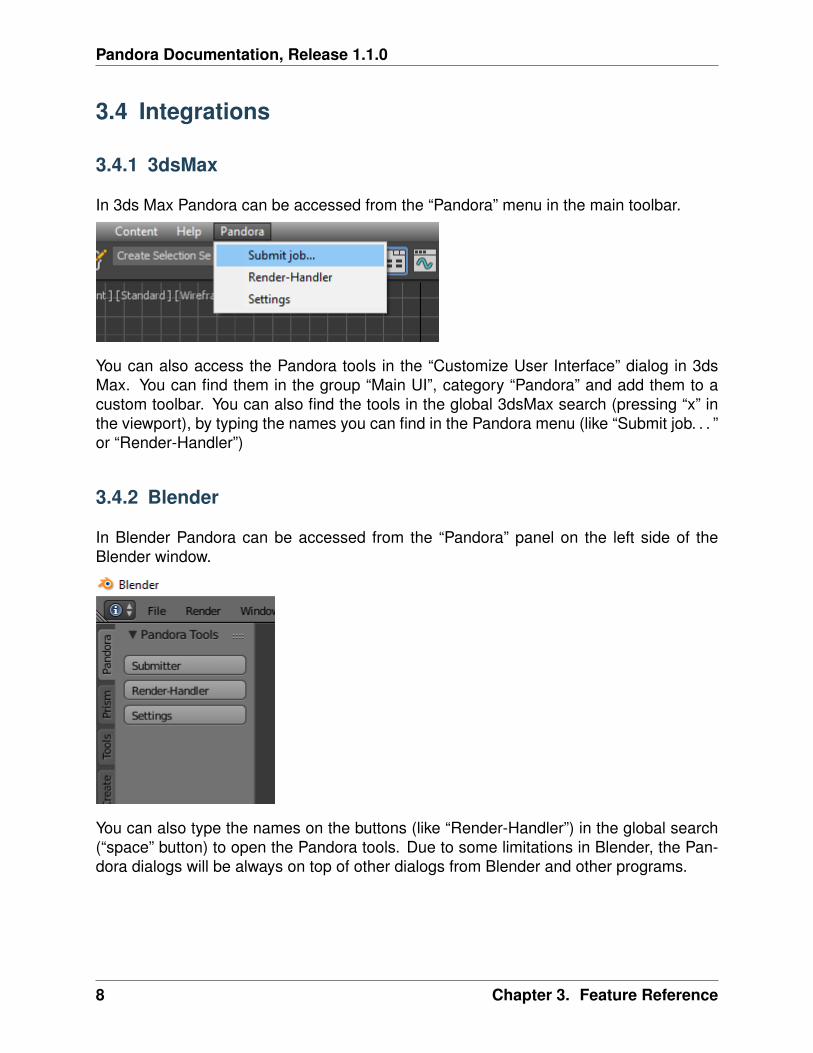
In Blender Pandora can be accessed from the “Pandora” panel on the left side of theBlender window.
You can also type the names on the buttons (like “Render-Handler”) in the global search(“space” button) to open the Pandora tools. Due to some limitations in Blender, the Pan-dora dialogs will be always on top of other dialogs from Blender and other programs.
8 Chapter 3. Feature Reference

Pandora Documentation, Release 1.1.0
3.4.3 Houdini
In Houdini you can access the Pandora tools from the Pandora shelf in the top left shelfset. If the shelf is not visible on your computer (for example because you use anotherHoudini desktop), you can add the “Pandora” shelf from the list of available shelves to anyshelf set. The Pandora shelf is being created during the Houdini startup if it doesn’t existyet. To reset it to the default state you can delete the shelf and restart Houdini.
3.4.4 Maya
In Maya you can access the Pandora tools from the Pandora shelf.
Some users experienced missing icons on the Pandora shelf. In most cases this could befixed by deleting the shelf manually and reinstalling Pandora.
3.4.5 Standalone
The standalone version of Pandora can be opened from the Pandora Tray icon or fromthe start menu. You can use it to manage your renderjobs and track the progress of them,but you cannot submit new jobs from it.
3.5 Pandora Dialogs
3.5.1 Submit Pandora renderjob
The Job submitter can be opened from the Pandora shelf/menu in any supported DCCapplication. It lets you submit the current scenefile as a renderjob to Pandora.
3.5. Pandora Dialogs 9

Pandora Documentation, Release 1.1.0
Framerange:
All frames between the “from” and “to” value will be rendered by Pandora for this renderjob.
Camera:
In this dropdown menu you can select a camera object from your scene, which will beused to render the job. The “Current View” option will render the current view, which issaved in the scenefile, but selecting a camera here is recommended.
Resolution override:
When this checkbox is checked, the renderjob will be rendered in the selected resolution(width - height). If unchecked, the resolution defined in the rendersettings of your scenewill be used.
Outputpath:
10 Chapter 3. Feature Reference

Pandora Documentation, Release 1.1.0
Here you can define where the rendered images should be saved. If you are using the“local network mode” in the Pandora Settings, this path should be accessable for all ren-derslaves. The “. . . ” button lets you select a directory in a file explorer.
Projectname:
This is the name of the project, to which this renderjob belongs to. It will be visible inRender Handler and allows to sort jobs by projectname. Many renderjobs can have thesame projectname.
Jobname:
The jobname is the most important setting to identify a job in the Render Handler. Be-cause of that the jobname should contain information about the content of this job like theshotnumber, task or version. It is possible to have multiple jobs with the same name, butto avoid confusion it is recommended to give every job a unique name.
Priority:
The priority of renderjobs defines the order in which the jobs will be rendered. The prioritycan be between 0 and 100. A higher value means the job will be rendered before a jobwith a lower priority value.
Frames per Task:
Sometimes also called chunksize. A renderjob will be splitted into multiple tasks. Eachtask can be assigned to a different renderslave, so the renderjob can be rendered bymultiple slaves a the same time. This value means how many frames each task contains.When your renderjob has the framerange 1-120 and your Frames per Task value is 10,your job will be splitted into 12 tasks, each with 10 frames. If you want to render manyframes, which are rendered very fast you can increase this value and if you want to renderonly few frames, which render very long you want to decrease this value.
Task Timeout:
This is the amount of minutes after which a task will be restartet, if a renderslave couldfinish it in this time. This avoids situations, where a renderslave freezes and blocks thecurrent task forever.
Submit suspended:
If this option is checked, all tasks of this jobs will be disabled. They can be enabledmanually in the Render Handler.
Submit dependent files:
If you have files in your scene, which are local on your computer, like textures or refer-ences, you can submit them together with your job. This is neccessarry for the render-slaves to have access to these files. If all your used textures are on network locations andaccessable for every renderslave, you can disable this option.
3.5. Pandora Dialogs 11
Pandora Documentation, Release 1.1.0
Submit: This button creates the renderjob with the settings defined above and sends itto Pandora.
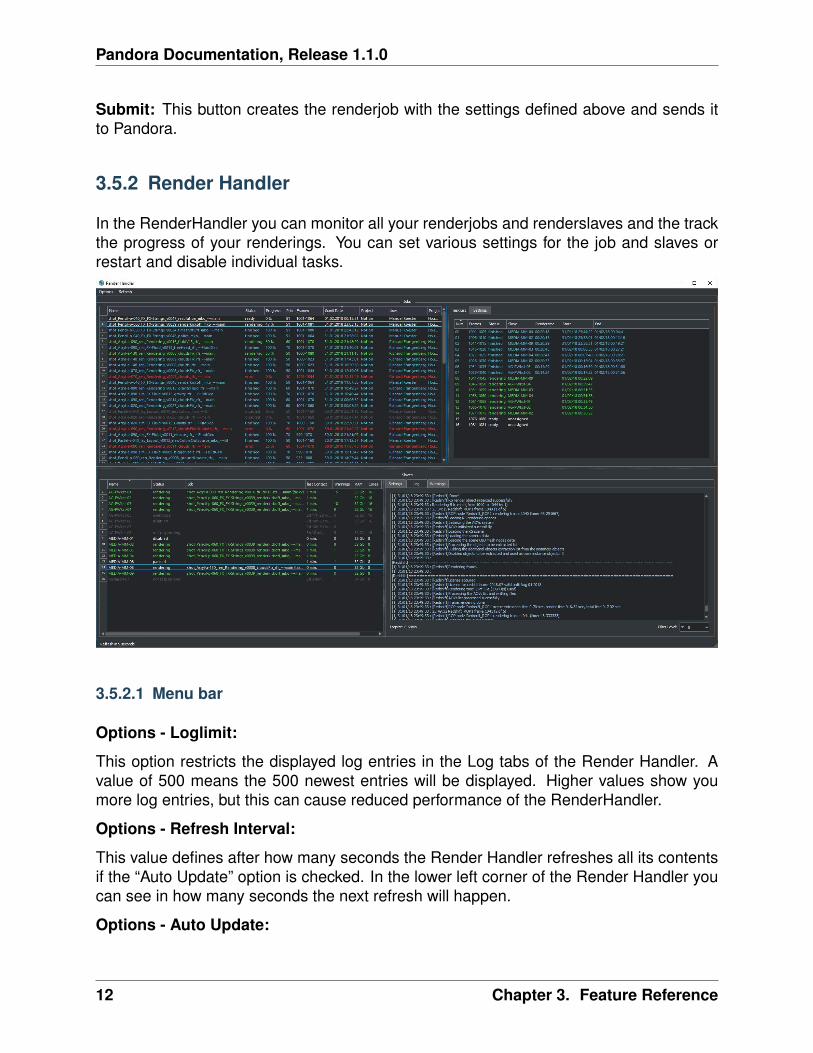
3.5.2 Render Handler
In the RenderHandler you can monitor all your renderjobs and renderslaves and the trackthe progress of your renderings. You can set various settings for the job and slaves orrestart and disable individual tasks.
3.5.2.1 Menu bar
Options - Loglimit:
This option restricts the displayed log entries in the Log tabs of the Render Handler. Avalue of 500 means the 500 newest entries will be displayed. Higher values show youmore log entries, but this can cause reduced performance of the RenderHandler.
Options - Refresh Interval:
This value defines after how many seconds the Render Handler refreshes all its contentsif the “Auto Update” option is checked. In the lower left corner of the Render Handler youcan see in how many seconds the next refresh will happen.
Options - Auto Update:
12 Chapter 3. Feature Reference
Pandora Documentation, Release 1.1.0
If this option is checked the Render Handler will refresh its contents every few seconds(defined by the “Refresh Interval” setting). If disabled you can use the “Refresh” option tomanually refresh the Render Handler.
Options - Show Coordinator:
When this option is checked, additional tabs will become visible in the top right cornerof the Render Handler. In these tabs informations and settings of the Coordinator isdisplayed. It can be used for debugging purposes.
Options - Pandora Settings:
This opens the Pandora Settings dialog.
Refresh:
This option refreshes the contents of the Render Handler.
Help:
This menu lets you open the official website, send feature requests to the developer anddisplay information about Pandora.
3.5.2.2 Job list
In the top-left area of the Render Handler there are all renderjobs listed with additionalinformation like progress, priority or submit date. By default the list ist sorted by submitdate, so the latest jobs are at the top. You can have an unlimited amount of jobs in thislist, but it is recommended to remove unnecessarry or completed jobs from time to time.
From the context menu of the jobs you have various options. You can restart, disable orenable a job. This will restart/disable/enable all tasks of the current job at once. You candelete a job, which removes the submitted scenefile, but the original scenefile and therenderoutput will remain unaffected. You can open the job settings in your default texteditor. This can be used for debugging purposes. If the outputfolder exists, the option toopen this folder in the windows explorer is enabled in the context menu. If there are filesinside the outputfolder and you have RV installed you can open the files directly from thecontext menu.
3.5.2.3 Task list
The Task list is on the right of the job list and it shows all the tasks of the currently selectedjob in the job list. You can see the framerange, rendertime and status for every task here.Every task can be assigned to one renderslave. From the context menu you can restart,disable or enable individual tasks. You can select multiple tasks at once and for examplerestart them all simultaneously.
3.5. Pandora Dialogs 13
Pandora Documentation, Release 1.1.0
3.5.2.4 Settings (jobs)
The Settings tab at the top right in the Render Handler displays all settings of the currentlyselected renderjob in the job list. At the top of this list you have some settings which youcan edit and below that there are a few job settings, which were set during the submission,which cannot be changed from the Render Handler.
The editable settings are:
Listslaves:
Here you can define, which renderslaves should be used to render the job. If you doubleclick on the “value” column of this setting, the “Slave assignment” dialog opens. Hereyou can select which slaves or slavegroups should render or should be excluded fromrendering this job.
Priority: Same as in the Job Submitter.
Task timeout: Same as in the Job Submitter.
3.5.2.5 Coordinator Log
This tab is visible only if the “Show Coordinator” option is checked in the “Options” menuin the main menu bar. Here you can see detailed information about everything the coor-dinator does like assigning jobs or sending commands to slaves. You can use the filterlevel to display only entries with a certain priority level (higher is more important). Fromthe context menu you can clear the log or open it in a text editor.
3.5.2.6 Coordinator Settings
This tab is visible only if the “Show Coordinator” option is checked in the “Options” menuin the main menu bar. Here you can change the settings of the Pandora Coordinator.
The editable settings are:
Command:
This python expression will be executed by the Coordinator. It can be used to triggerspecific functions in the coordinator script.
Coordupdatetime:
This is the interval in seconds in which the coordinator updates all job/slave status andassigns slaves to tasks.
Debugmode:
If this setting is checked, the Coordinator will print additional information in the Coordinatorlog.
14 Chapter 3. Feature Reference
Pandora Documentation, Release 1.1.0
3.5.2.7 Coordinator Warnings
This tab is visible only if the “Show Coordinator” option is checked in the “Options” menuin the main menu bar. All warnings and errors from the Coordinator are listed here. By de-fault each log entry with a priority 2 or higher creates a warning in this list. You can deleteindividual warnings or clear all warnings at once from the context menu. Doubleclick awarning to see the complete warning in a popup
3.5.2.8 Slave List
In this list you can see all renderslaves, which are connected to Pandora. You can havean unlimited amount a slaves in this list. You can see the current status of the slave, thecurrently rendering task and other slave informations in this list. From the context menuyou can open the Slave log or the Slave settings in a texteditor.
3.5.2.9 Settings (slaves)
This tab displays all the settings of the currently selected renderslave in the Slave list. Theavailable settings are:
Command:
This string will be executed by the renderslave as a python expression. It can be used totrigger specific functions. From the context menu of the value column of this setting youcan select a command from a few presets.
Cursorcheck:
If this setting is checked, the renderslave will check the mouse cursor before starting arendering. If the cursor doesn’t move, the slave assumes that nobody is using this PC atthe moment and starts rendering. If the cursor does move, the rendering won’t be startedand the assigned task will be reassigned to another renderslave.
Debugmode:
If this setting is checked the renderslave prints additional information into its log.
Enabled:
If checked the slave is active and can render jobs. If unchecked the slave won’t renderany jobs.
MaxCPU:
If the CPU usage in percent on the renderslave is higher than this value, the renderslavewon’t start rendering.
PreRenderWaitTime:
3.5. Pandora Dialogs 15
Pandora Documentation, Release 1.1.0
If this setting is higher than 0, a popup will show up on the renderslave before startinga rendering. On the popup the user can press a button to say that he wants to use thePC and that the rendering should not start. This value defines the amount of secondsafter which the popup closes and the rendering start if nobody pressed the “Don’t render”button on this popup.
Restperiod:
If this setting is enabled, the both numbers define the time range of the day, in which theslave doesn’t render any task.
ShowInterruptWindow:
If this setting is checked, a small window is visible during the rendering on the slave, whichlets a user interrupt the current rendering easily.
ShowSlaveWindow:
If checked, a message will show up when the slave starts to notify the user that the PC ispart of a renderfarm and that the PC shouldn’t be turned off when the user leaves.
SlaveGroup:
Doubleclick this setting to edit it. Here you can define groups for your slaves. You can usethe groups to assign renderjobs to groups instead of specific slaves.
Updatetime:
This defines the interval in seconds in which the Renderslave checks for commands andjob assignments.
3.5.2.10 Log (slave)
This tab displays the log of the currently selected renderslave in the Slave list. You can usethe filter level to display only entries with a certain priority level (higher is more important).From the context menu you can clear the log or open it in a text editor.
3.5.2.11 Warnings (slave)
This tab displays the warnings of the currently selected renderslave in the Slave list. Allwarnings and errors from the slave are listed here. By default each log entry with a priority2 or higher creates a warning in this list. You can delete individual warnings or clear allwarnings at once from the context menu. Doubleclick a warning to see the completewarning in a popup
16 Chapter 3. Feature Reference
Pandora Documentation, Release 1.1.0
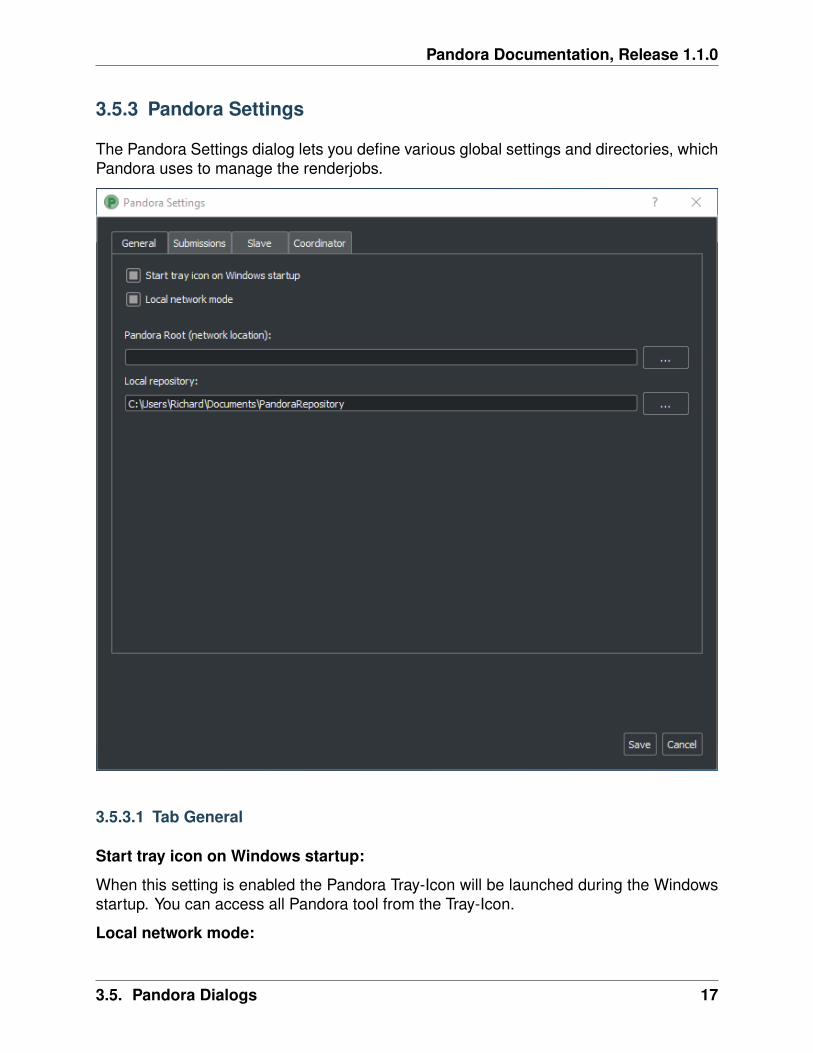
3.5.3 Pandora Settings
The Pandora Settings dialog lets you define various global settings and directories, whichPandora uses to manage the renderjobs.
3.5.3.1 Tab General
Start tray icon on Windows startup:
When this setting is enabled the Pandora Tray-Icon will be launched during the Windowsstartup. You can access all Pandora tool from the Tray-Icon.
Local network mode:
3.5. Pandora Dialogs 17

Pandora Documentation, Release 1.1.0
Enable this, when all your renderslaves are in the same network and have access to theoutputpaths of the renderjobs. If you want to use remote renderslaves, which don’t haveaccess to the final outpaths of the renderjobs you want to disable this setting. In this casesome options in the Pandora Settings dialog change.
Pandora Root (local network mode enabled):
This is the main Pandora directory. All submitter, renderslaves and the Coordinator needto have access to this folder. In most cases this is a network location.
Local repository:
Pandora saves different files in this directory based on the enabled components in thePandora Settings. If the renderslave is enabled, all the jobs beeing rendered are copiedto this folder. If the Coordinator is enabled, the global job repository will be saved in thisfolder.
Local repository:
This button lets you update the Pandora scripts directly from GitHub if you have git in-stalled or from a .zip file from the GitHub repository.
3.5.3.2 Tab Submission
This tab is visible if use have installed at least one Pandora integration for a DCC app.
Job submission path (local network mode disabled):
This directory defines in where the submitted jobs will be saved, when the local networkmode is diabled. This has to be a subdirectory of the root path in the coordinator tab.It has to look like this: <CoordinatorRoot>/PandoraFarm/Workstations/WS_<Submitter-Computername>
You can create a new submitter in the Coordinator tab, rightclick on the new submitter,use “Copy path” and paste the path from your clipboard into this setting.
Username:
The name, which will be used to identify, which person created a renderjob.
3.5.3.3 Tab Slave
Enable Pandora Renderslave:
Enable this option, if you want to use this computer as a renderslave.
Slave Root (local network mode disabled):
This directory defines in where new job assignments are saved, when the local net-work mode is diabled. This has to be a subdirectory of the root path in the coordinator
18 Chapter 3. Feature Reference
Pandora Documentation, Release 1.1.0
tab. It has to look like this: <CoordinatorRoot>/PandoraFarm/Slaves/S_<Renderslave-Computername>
You can create a new slave in the Coordinator tab, rightclick on the new slave, use “Copypath” and paste the path from your clipboard into this setting.
Start Pandora slave on Windows startup:
If this option is enabled, the renderslave will be launched during the Windows startup. Youwill see the Tray-Icon of the renderslave, when the slave is running.
Executable overrides:
Pandora tries to find the correct application to render the jobs. If you want to define aspecific version of a DCC app to render the jobs, you can select it here.
3.5.3.4 Tab Coordinator
Enable Pandora Coordinator:
Enable this option, if you want to use this computer as the Coordinator. Only one computerin your renderfarm should have this setting enabled.
Pandora Root (local network mode disabled):
In this directory all renderjobs and renderings will be exchanged between the Coordinator,submitters and renderslaves.
Start Pandora Coordinator on Windows startup:
If this option is enabled, the Coordinator will be launched during the Windows startup.
Slaves/Submiters (local network mode disabled):
Here you can add new Renderslaves and Submitters to your renderfarm. The enterednames should be the computernames of the slaves/submitters. You can copy the pathsfrom the context menu of the slaves/sumitter and paste it into the “Job submission path”or “Slave root” parameters.
3.5. Pandora Dialogs 19
Pandora Documentation, Release 1.1.0
20 Chapter 3. Feature Reference
CHAPTER 4
Support and License
If you find any bugs or if you have special feature requests and need any kind of support,please write a mail to:
Pandora is licensed under the open source GPL v3 license or later. You can find the fulllicense text in the license.txt file in your Pandora installation directory or under this Link.
If you require a different license, please contact the developer.
21