Embed Size (px)
Citation preview
ILLUMINA PROPRIETARYCatalog # PE-930-1001Part # 1005063 Rev. EFebruary 2011
Paired-End Sample Preparation GuideFOR RESEARCH USE ONLY
Introduction 3Sample Prep Workflow 4Best Practices 5DNA Input Recommendations 7Kit Contents 9Consumables and Equipment 11Fragment DNA 13Perform End Repair 18Adenylate 3' Ends 20Ligate Adapters 21Purify Ligation Products 23Enrich DNA Fragments 26Purify Final Product 29Validate Library 32Library Quantification 33DNA Template Storage 36Technical Assistance 39

This document and its contents are proprietary to Illumina, Inc. and its affiliates (ʺIlluminaʺ), and are intended solely for the contractual use of its customer in connection with the use of the product(s) described herein and for no other purpose. This document and its contents shall not be used or distributed for any other purpose and/or otherwise communicated, disclosed, or reproduced in any way whatsoever without the prior written consent of Illumina. Illumina does not convey any license under its patent, trademark, copyright, or common‐law rights nor similar rights of any third parties by this document.
The instructions in this document must be strictly and explicitly followed by qualified and properly trained personnel in order to ensure the proper and safe use of the product(s) described herein. All of the contents of this document must be fully read and understood prior to using such product(s).
FAILURE TO COMPLETELY READ AND EXPLICITLY FOLLOW ALL OF THE INSTRUCTIONS CONTAINED HEREIN MAY RESULT IN DAMAGE TO THE PRODUCT(S), INJURY TO PERSONS, INCLUDING TO USERS OR OTHERS, AND DAMAGE TO OTHER PROPERTY.
ILLUMINA DOES NOT ASSUME ANY LIABILITY ARISING OUT OF THE IMPROPER USE OF THE PRODUCT(S) DESCRIBED HEREIN (INCLUDING PARTS THEREOF OR SOFTWARE) OR ANY USE OF SUCH PRODUCT(S) OUTSIDE THE SCOPE OF THE EXPRESS WRITTEN LICENSES OR PERMISSIONS GRANTED BY ILLUMINA IN CONNECTION WITH CUSTOMERʹS ACQUISITION OF SUCH PRODUCT(S).
FOR RESEARCH USE ONLY
© 2008–2011 Illumina, Inc. All rights reserved.
Illumina, illuminaDx, Solexa, Making Sense Out of Life, Oligator, Sentrix, GoldenGate, GoldenGate Indexing, DASL, BeadArray, Array of Arrays, Infinium, BeadXpress, VeraCode, IntelliHyb, iSelect, CSPro, GenomeStudio, Genetic Energy, HiSeq, HiScan, Eco, TruSeq, and MiSeq are registered trademarks or trademarks of Illumina, Inc. All other brands and names contained herein are the property of their respective owners.
Phusion is a trademark of Finnzymes Oy. Notice to Purchaser: Limited license (proofreading DNA polymerases). The purchase price of this product includes a limited, non‐transferable license under U.S. and foreign patents (5,500,363 and 5,352,778) owned by New England Biolabs, Inc. to use this product. No other license under these patents is conveyed expressly or by implication to the purchaser by the purchase of this product. The purchase price of this product includes a limited, non‐transferable license under U.S. and foreign patents owned by BIO‐RAD Laboratories, Inc., to use this product. No other license under these patents is conveyed expressly or by implication to the purchaser by the purchase of this product.
Paired-End Sample Preparation Guide 3
Intro
du
ctio
n
Introduction
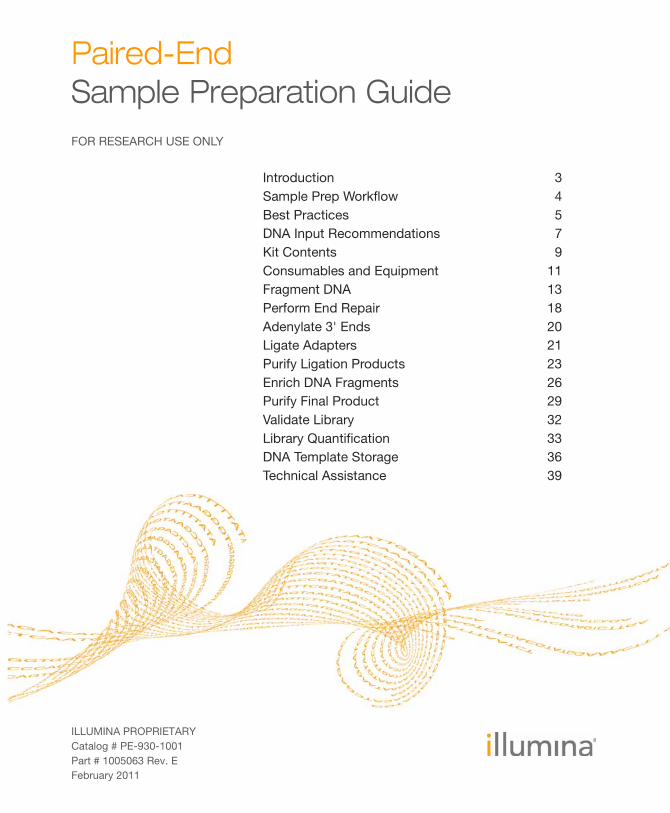
This protocol explains how to prepare libraries of genomic DNA for paired‐end sequencing on the Illumina® sequencing platform. The purpose of this protocol is to add adapter sequences onto the ends of DNA fragments to generate the following sequencing library format:
Figure 1 Sequencing Library after Paired‐End Sample Preparation
The two adapters contain sequences that are complimentary to the two surface‐bound amplification primers on the flow cells.
Depending on the number of samples being prepared, you need one or more of the Illumina kits in Table 1.
Table 1 Paired‐End DNA Sample Preparation Kits
Sample Preparation Kit Number of Samples Catalog #
Paired‐End Sample Prep Kit 10 PE‐102‐1001
Paired‐End Sample Prep Kit 40 PE‐102‐1002
DNAFragment Adaptors
SequencingLibrary

4 Part # 1005063 Rev. E
Sample Prep Workflow
The following figure illustrates the steps in the paired‐end sample preparation protocol. The total time required is approximately 6 hours.
Input genomic DNA (1–5 μg) is fragmented by hydrodynamic shearing to generate <800 bp fragments. The fragments are blunt ended and phosphorylated, and a single ʹAʹ nucleotide is added to the 3ʹ ends of the fragments in preparation for ligation to an adapter that has a single‐base ʹTʹ overhang. Adapter ligation at both ends of the genomic DNA fragment confers different sequences at the 5ʹ and 3ʹ ends of each strand in the genomic fragment. The products of this ligation reaction are purified and size‐selected by agarose gel electrophoresis. Size‐selected DNA is PCR amplified to enrich for fragments that have adapters on both ends. The resulting sample library is again purified and size‐selected by agarose gel electrophoresis. The final purified product is then quantitated prior to seeding clusters on a flow cell.
Figure 2 Paired‐End Sample Preparation Workflow
Purified Genomic DNA
Fragment Genomic DNA
Adenylate the 3’ Ends
Repair Ends
Ligate Paired-End Adapters
Remove Unligated Adapters
PCR
Fragments of < 800 bp
Blunt-ended Fragments with5'-Phosphorylated Ends
3'-dA Overhang
Adapter-modified Ends
Purified Ligation Product
Genomic DNA Library
Purified Final Product
Remove PCR Primers
Optional Stopping PointStore after cleanup
at -15° to -25°CValidated Library

Paired-End Sample Preparation Guide 5
Be
st Pra
ctic
es
Best Practices
When preparing genomic DNA libraries for sequencing, you should always adhere to good molecular biology practices.
Liquid HandlingGood liquid handling measures are essential, particularly when quantifying libraries or diluting concentrated libraries for making clusters. Small differences in volumes (±0.5 μl) can sometimes give rise to very large differences in cluster numbers (~100,000). Small volume pipetting can also be a source of potential error in protocols that require generation of standard curves, such as PicoGreen assays or qPCR, or those that require small but precise volumes, such as the Agilent BioAnalyzer. If small volumes are unavoidable, then due diligence should be taken to ensure that pipettes are correctly calibrated. Also, care should be taken, because solutions of high molecular weight dsDNA can be viscous and not evenly dispersed, resulting in aliquot measurements that are not representative of the true concentration of the solution.
To minimize pipetting errors, especially with small volume enzyme additions, prepare the reagents for multiple samples simultaneously. As a result, you pipette once from the reagent tubes with a larger volume, rather than many times with 1 μl volumes. Prepare a master mix of enzymes, water, buffer, etc. and aliquot this in a single pipetting movement to individual samples to standardize across multiple samples.

6 Part # 1005063 Rev. E
Potential DNA ContaminantsIncorrect DNA quantification may result from DNA contamination, for example, by interference from superfluous nucleic acids in a sample (e.g., RNA, small nucleic acid fragments, nucleotides, single‐stranded DNA), excess proteins, or other contaminating materials. DNA quality may also affect the quantity of usable DNA in a sample. For example, if the DNA is damaged (e.g., heavily nicked or containing extensive apurinic/apyrimidinic sites), then many of these fragments may fail during library preparation. High molecular weight dsDNA derived from host genomes can also interfere with accurate quantification. For example, bacterial artificial chromosomes (BACs) and other bacterially‐derived plasmids usually contain a few percent of the chromosomal DNA from the host cells, despite the best purification efforts. These sequences may ultimately give rise to unwanted clusters on a flow cell lane. However, this contamination can be accurately quantified by analyzing aligned reads generated during sequencing against known bacterial sequences and subtracting these out. High molecular weight contamination may also be estimated prior to library preparation using qPCR assays designed to target unique chromosomal markers.
Temperature ConsiderationsTemperature is another important consideration for making genomic DNA libraries. Elevated temperatures should be particularly avoided in the steps preceding the adapter ligation. DNA fragments that have a high AT content are more likely to denature into single strands than GC‐rich fragments, which can result in an increased probability of creating a bias in the sequencing coverage. As a general rule, libraries should be kept at temperatures below <37°C. Temperature is less of an issue after the adapters have been ligated onto the ends of the DNA, although care should be taken not to denature the library prior to the agarose gel electrophoresis process, because single‐stranded DNA has a different migration rate.
Paired-End Sample Preparation Guide 7
DN
A In
pu
t Re
co
mm
en
da
tion
s
DNA Input Recommendations
Input DNA QuantificationThe ultimate success or failure of a library preparation strongly depends on using an accurately quantified amount of input DNA, particularly when starting quantities are <1 μg. Thus, correct quantification of genomic DNA is essential. Illumina recommends 1‐5 μg.
Assessing DNA Quantity and QualityAbsorbance measurements at 260 nm are commonly used to quantify DNA. The ratio of absorbance at 260 nm to absorbance at 280 nm is used as an indication of sample purity, and values of 1.8–2.0 are considered indicative of relatively pure DNA. However, both measurements can be compromised by the presence of RNA or small nucleic acid fragments such as nucleotides. Thus, genomic DNA samples should be carefully collected to ensure that they are free of contaminants, and the most accurate spectrophotometric method available should be used to quantify the input genomic DNA.
DNA quantification methods that rely on intercalating fluorescent dyes measure only double‐stranded DNA and are less subject to excess nucleic acids. However, these methods require the preparation of calibration curves and are highly sensitive to pipetting error. Ensure that pipettes are correctly calibrated and are not used at the volume extremes of their performance specifications.
Gel electrophoresis is a powerful means for revealing the condition (even the presence or absence) of DNA in a sample. Impurities, such as detergents or proteins, can be revealed by smearing of DNA bands. RNA, which interferes with 260 nm readings, is often visible at the bottom of a gel. A ladder or smear below a band of interest may indicate nicking or other damage to DNA. Where possible, or necessary, a gel should be run to assess the condition of the DNA sample.
8 Part # 1005063 Rev. E
Consistency of ResultsGiven that fluorescent methods only measure double stranded DNA and 260 nm determinations measure both single and double stranded DNA, fluorescence analysis can be performed to assess the sample denaturation state (i.e. single or double stranded). Sample preparation can begin with a fixed amount of double‐stranded DNA prior to fragmentation and cleanup, and thereafter, can be measured by 260 nm determination. If the DNA amount is less than expected, the amount of input DNA can be adjusted before proceeding to the end‐repair steps. A further validation step can be performed by analyzing an aliquot for the presence of contaminants by electrophoresis or using an automated instrument, such as the Agilent Bioanalyzer.
Paired-End Sample Preparation Guide 9
Kit C
on
ten
ts
Kit Contents
Check that you have all of the reagents identified in this section before proceeding to sample preparation.
Box 1
Store at ‐15° to ‐25ºCThis box is shipped on dry ice. As soon as you receive it, store the components at ‐15° to ‐25°C.
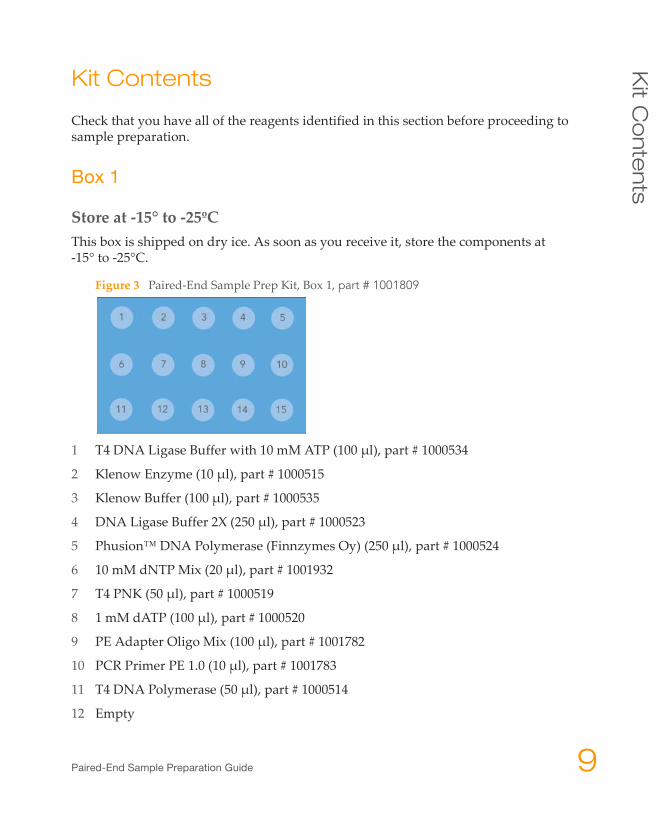
Figure 3 Paired‐End Sample Prep Kit, Box 1, part # 1001809
1 T4 DNA Ligase Buffer with 10 mM ATP (100 μl), part # 1000534
2 Klenow Enzyme (10 μl), part # 1000515
3 Klenow Buffer (100 μl), part # 1000535
4 DNA Ligase Buffer 2X (250 μl), part # 1000523
5 Phusion™ DNA Polymerase (Finnzymes Oy) (250 μl), part # 1000524
6 10 mM dNTP Mix (20 μl), part # 1001932
7 T4 PNK (50 μl), part # 1000519
8 1 mM dATP (100 μl), part # 1000520
9 PE Adapter Oligo Mix (100 μl), part # 1001782
10 PCR Primer PE 1.0 (10 μl), part # 1001783
11 T4 DNA Polymerase (50 μl), part # 1000514
12 Empty
10 Part # 1005063 Rev. E
13 Klenow Exo ‐ (30 μl), part # 1000536
14 DNA Ligase (50 μl), part # 1000522
15 PCR Primer PE 2.0 (10 μl), part # 1001784
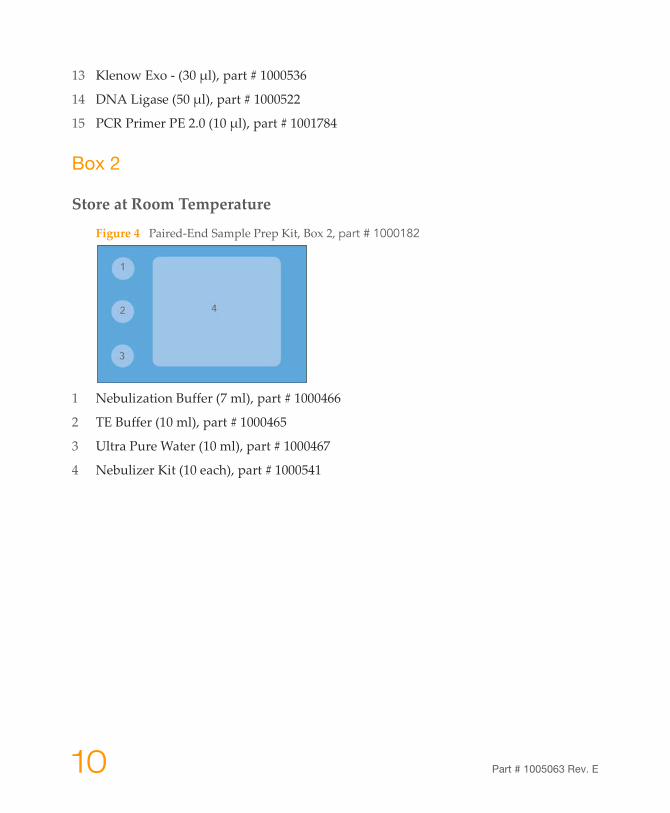
Box 2
Store at Room Temperature
Figure 4 Paired‐End Sample Prep Kit, Box 2, part # 1000182
1 Nebulization Buffer (7 ml), part # 1000466
2 TE Buffer (10 ml), part # 1000465
3 Ultra Pure Water (10 ml), part # 1000467
4 Nebulizer Kit (10 each), part # 1000541

Paired-End Sample Preparation Guide 11
Co
nsu
ma
ble
s an
d E
qu
ipm
en
t
Consumables and Equipment
Check to ensure that you have all of the necessary user‐supplied consumables and equipment before proceeding to sample preparation.
Table 2 User‐Supplied Consumables
Consumable Supplier
50X TAE Buffer BIO‐RAD, part # 161‐0743
100 bp Redi‐Load DNA ladder Invitrogen, part # 10488‐058
Certified low range ultra agarose BIO‐RAD, part # 161‐3106
Compressed air source of at least 32 psi (Do not use CO2 which could alter the pH of the nebulizer buffer)
General lab supplier
Disposable scalpels General lab supplier
Distilled water General lab supplier
Ethidium Bromide Sigma, part # E1510
Loading buffer (50 mM Tris pH 8.0, 40 mM EDTA, 40% (w/v) sucrose)
General lab supplier
MinElute PCR Purification Kit QIAGEN, part # 28004
Purified DNA (1–5 μg, 5 μg recommended)DNA should be as intact as possible, with an OD260/280 ratio of 1.8–2.0
General lab supplier
PVC tubing Intersurgical, part # 1174‐003
QIAquick Gel Extraction Kit (for 50 samples) orQIAquick Gel Extraction Kit (for 250 samples)
QIAGEN, part # 28704 (50 samples)QIAGEN, part # 28706 (250 samples)
QIAquick PCR Purification Kit QIAGEN, part # 28104
12 Part # 1005063 Rev. E
Table 3 User‐Supplied Equipment
Consumable Supplier
Benchtop microcentrifuge General lab supplier
Benchtop centrifuge with swing‐out rotor (e.g., Sorvall Legend RT)
General lab supplier
Dark Reader transilluminator or a UV transilluminator
Clare Chemical Research, part # D195M
Electrophoresis unit General lab supplier
Gel trays and tank General lab supplier
Thermal cycler General lab supplier
Paired-End Sample Preparation Guide 13
Fra
gm
en
t DN
A
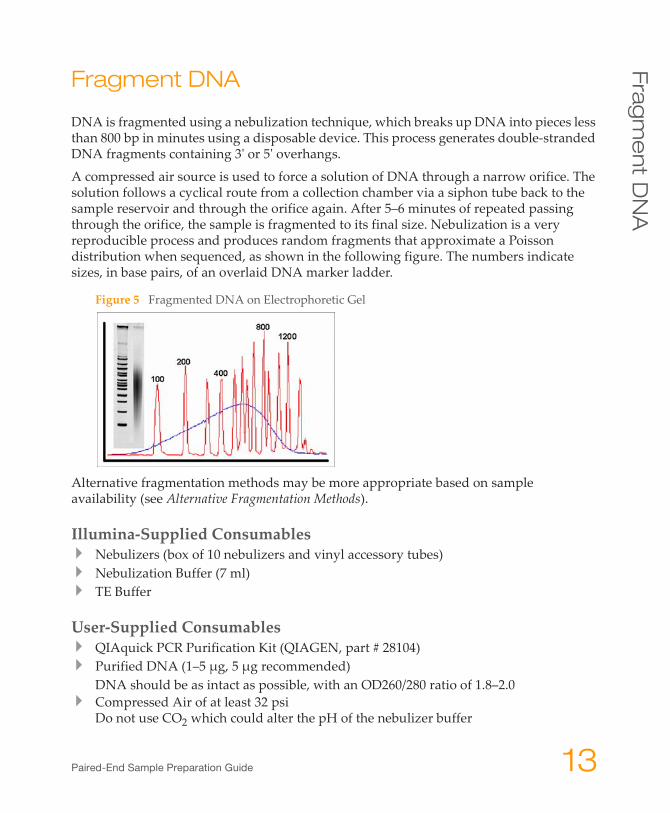
Fragment DNA
DNA is fragmented using a nebulization technique, which breaks up DNA into pieces less than 800 bp in minutes using a disposable device. This process generates double‐stranded DNA fragments containing 3ʹ or 5ʹ overhangs.
A compressed air source is used to force a solution of DNA through a narrow orifice. The solution follows a cyclical route from a collection chamber via a siphon tube back to the sample reservoir and through the orifice again. After 5–6 minutes of repeated passing through the orifice, the sample is fragmented to its final size. Nebulization is a very reproducible process and produces random fragments that approximate a Poisson distribution when sequenced, as shown in the following figure. The numbers indicate sizes, in base pairs, of an overlaid DNA marker ladder.
Figure 5 Fragmented DNA on Electrophoretic Gel
Alternative fragmentation methods may be more appropriate based on sample availability (see Alternative Fragmentation Methods).
Illumina‐Supplied ConsumablesNebulizers (box of 10 nebulizers and vinyl accessory tubes)Nebulization Buffer (7 ml)TE Buffer
User‐Supplied ConsumablesQIAquick PCR Purification Kit (QIAGEN, part # 28104)Purified DNA (1–5 μg, 5 μg recommended)DNA should be as intact as possible, with an OD260/280 ratio of 1.8–2.0Compressed Air of at least 32 psi Do not use CO2 which could alter the pH of the nebulizer buffer
14 Part # 1005063 Rev. E
PVC tubingDimensions: 1/4 inch ID, 3/8 inch OD, 1/16 inch wall, 1 meter length
ProcedureThe DNA sample to be processed should be highly pure, having an OD260/280 ratio of between 1.8 and 2.0, and should be as intact as possible.
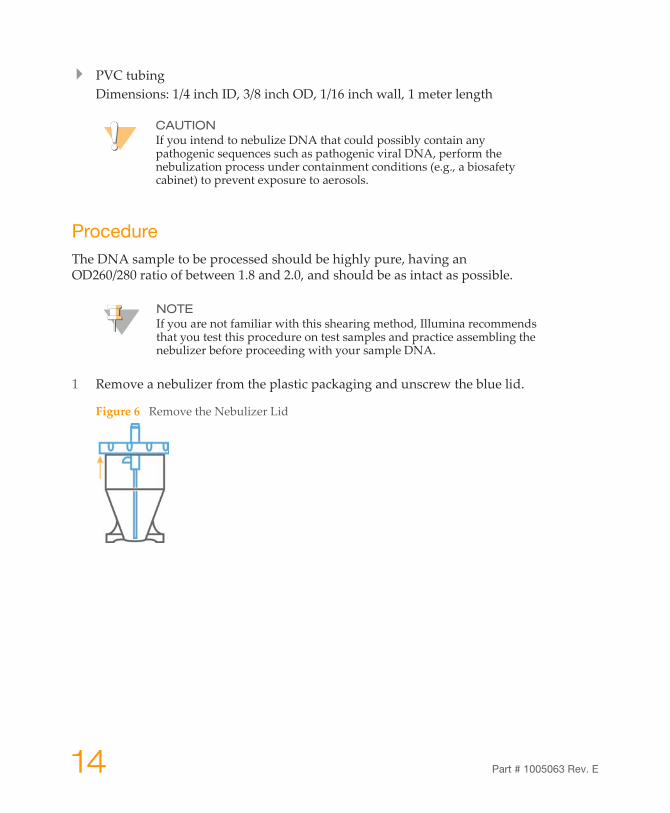
1 Remove a nebulizer from the plastic packaging and unscrew the blue lid.
Figure 6 Remove the Nebulizer Lid
CAUTIONIf you intend to nebulize DNA that could possibly contain any pathogenic sequences such as pathogenic viral DNA, perform the nebulization process under containment conditions (e.g., a biosafety cabinet) to prevent exposure to aerosols.
NOTEIf you are not familiar with this shearing method, Illumina recommends that you test this procedure on test samples and practice assembling the nebulizer before proceeding with your sample DNA.

Paired-End Sample Preparation Guide 15
Fra
gm
en
t DN
A
2 Using gloves, remove a piece of vinyl tubing from the packaging and slip it over the central atomizer tube. Push it all the way to the inner surface of the blue lid.
Figure 7 Assemble the Nebulizer
A Blue LidB AtomizerC Vinyl Tubing
3 Add 1–5 μg of Purified DNA in a total volume of 50 μl of TE Buffer to the nebulizer.
4 Add 700 μl Nebulization Buffer to the DNA and mix well.
5 Screw the lid back on (finger‐tight).
Figure 8 Replace the Nebulizer Lid
6 Chill the nebulizer containing the DNA solution on ice while performing the next step.

16 Part # 1005063 Rev. E
7 Connect the compressed air source to the inlet port on the top of the nebulizer with the PVC tubing, ensuring a tight fit.
Figure 9 Connect Compressed Air
8 Bury the nebulizer in an ice bucket and place it in a fume hood.
9 Use the regulator on the compressed air source to ensure the air is delivered at 32‐35 psi.
10 Nebulize for 6 minutes. You may notice vapor rising from the nebulizer; this is normal. Also, the Nebulization Buffer may turn white or appear frozen.
11 Centrifuge the nebulizer at 450 xg for 2 minutes to collect the droplets from the side of the nebulizer. If necessary, use an old nebulizer as a counter‐balance.
12 If a centrifuge is not available, then use 2 ml of the binding buffer (PB or PBI buffer) from the QIAquick PCR Purification Kit to rinse the sides of the nebulizer and collect the DNA solution at the base of the nebulizer.
13 Measure the recovered volume. Typically, you should recover 400–600 μl.
14 Follow the instructions in the QIAquick PCR Purification Kit to purify the sample solution and concentrate it on one QIAquick column, eluting in 30 μl of QIAGEN EB.
15 Perform a quality control step on the recovered DNA to ensure the presence of sufficient DNA (i.e., quantify the DNA by a 260 nm reading, or by a PicoGreen assay, bioanalyzer, or equivalent). Ensure that there is at least 0.5 μg of DNA. If not, then fragment more DNA.
SAFE STOPPING POINTIf you do not plan to proceed to Perform End Repair immediately, the protocol can be safely stopped here. If you are stopping, store the samples at ‐15° to ‐25°C overnight or longer. When proceeding, thaw the samples on ice.
Paired-End Sample Preparation Guide 17
Fra
gm
en
t DN
A
Alternative Fragmentation MethodsGenomic DNA sample preparation must generate dsDNA fragments of a narrow distribution around a desired median size. The fragmentation method should not introduce bias in the fragment sequence, should be able to recover ~100% of the DNA, and should be automatable, inexpensive, and simple to use. Illumina recommends nebulization for most cases because it meets many of these criteria. Alternative DNA fragmentation methods are outlined below:
Sonication
Sonication is sometimes used as an alternative to nebulization, since sonicators are relatively common in molecular biology labs. Care must be taken to avoid raising the temperature of the DNA solution above ~20°C. Heating small fragments with high AT content may result in denaturation. If this occurs, single stranded fragments will not ligate to the double stranded adapters and these will be under‐represented in the final library. During sonication, DNA fragments are typically generated in a decreasing but broad range of fragment sizes. Therefore, sonication settings must be chosen carefully to reproducibly generate a majority of fragments in the desired size range.
A probe‐based sonicator wherein the probe tip is directly immersed into the DNA sample may be used, although problems with sample heating, vaporization, and contamination may arise. Alternatively, a cup horn sonicator filled with ice and water will allow the tube containing the DNA solution to remain sealed during fragmentation.
Hydroshear
Hydroshearing fragments DNA by a similar mechanism to nebulization. A syringe pump is used to pass the DNA solution back and forth through a narrow orifice. As the liquid streams through the orifice, it becomes laminar (i.e., the center of the stream moves faster than the stream closer to the walls of the orifice) and DNA molecules are stretched and snapped at the midpoint of their length. Hydroshearing is best for generating fragments with a two‐fold size range of 1,000‐40,000 bp. However, it is not effective for generating fragments <1,000 bp in length, and so is not suitable for generating standard Illumina single read and short‐insert paired‐end sequencing libraries.
NOTEIllumina does not recommend these methods, but if you choose to use them, use them with caution.
18 Part # 1005063 Rev. E
Perform End Repair
DNA fragmentation by physical methods produces heterogeneous ends, comprising a mixture of 3’ overhangs, 5’ overhangs, and blunt ends. The overhangs will be of varying lengths and ends may or may not be phosphorylated. This step converts the overhangs resulting from fragmentation into blunt ends using T4 DNA polymerase and Klenow enzyme. The 3ʹ to 5ʹ exonuclease activity of these enzymes removes 3ʹ overhangs and the polymerase activity fills in the 5ʹ overhangs. In addition, T4 PNK in this reaction phosphorylates the 5ʹ ends of the DNA fragments.
Illumina‐Supplied ConsumablesT4 DNA Ligase Buffer with 10 mM ATP10 mM dNTP MixT4 DNA PolymeraseKlenow EnzymeT4 PNKWater
User‐Supplied ConsumablesQIAquick PCR Purification Kit (QIAGEN, part # 28104)
Paired-End Sample Preparation Guide 19
Pe
rform
En
d R
ep
air
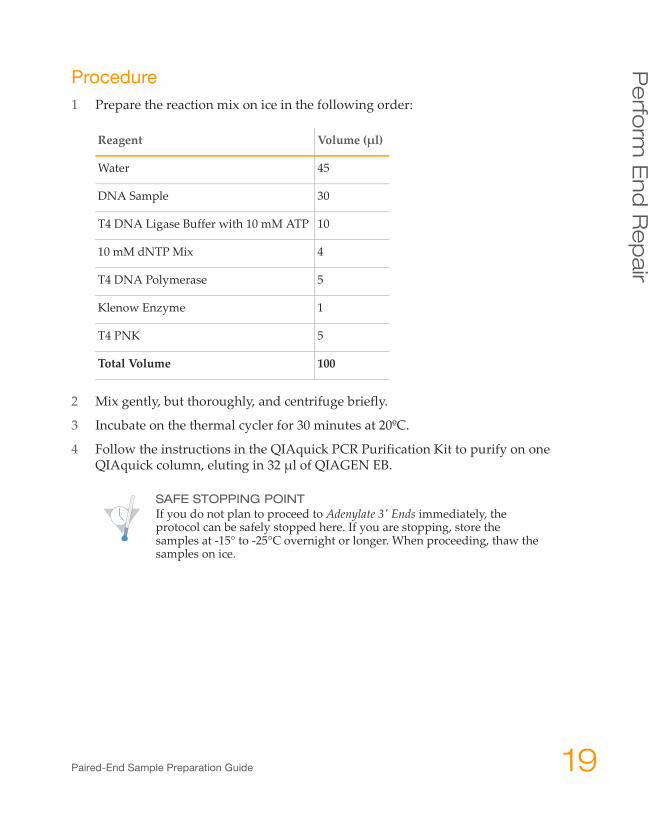
Procedure1 Prepare the reaction mix on ice in the following order:
2 Mix gently, but thoroughly, and centrifuge briefly.
3 Incubate on the thermal cycler for 30 minutes at 20ºC.
4 Follow the instructions in the QIAquick PCR Purification Kit to purify on one QIAquick column, eluting in 32 μl of QIAGEN EB.
Reagent Volume (μl)
Water 45
DNA Sample 30
T4 DNA Ligase Buffer with 10 mM ATP 10
10 mM dNTP Mix 4
T4 DNA Polymerase 5
Klenow Enzyme 1
T4 PNK 5
Total Volume 100
SAFE STOPPING POINTIf you do not plan to proceed to Adenylate 3ʹ Ends immediately, the protocol can be safely stopped here. If you are stopping, store the samples at ‐15° to ‐25°C overnight or longer. When proceeding, thaw the samples on ice.

20 Part # 1005063 Rev. E
Adenylate 3' Ends
A single ‘A’ nucleotide is added to the 3’ ends of the blunt fragments to prevent them from ligating to one another during the adapter ligation reaction. A corresponding single ‘T’ nucleotide on the 3’ end of the adapter provides a complementary overhang for ligating the adapter to the fragment. This strategy ensures a low rate of chimera (concatenated template) formation.
Illumina‐Supplied ConsumablesKlenow Buffer1 mM dATPKlenow Exo ‐
User‐Supplied ConsumablesMinElute PCR Purification Kit
Procedure1 Prepare the reaction mix on ice in the following order:
2 Incubate on the thermal cycler for 30 minutes at 37°C.
3 Follow the instructions in the MinElute PCR Purification Kit to purify on one QIAquick MinElute column, eluting in 10 μl of QIAGEN EB.
NOTEThis process requires a QIAquick MinElute column rather than a normal QIAquick column.
Reagent Volume (μl)
DNA Sample 32
Klenow Buffer 5
1 mM dATP 10
Klenow Exo ‐ 3
Total Volume 50

Paired-End Sample Preparation Guide 21
Lig
ate
Ad
ap
ters
Ligate Adapters
This process ligates adapters to the ends of the DNA fragments. The reaction adds distinct sequences to the 5’ and 3’ ends of each strand in the genomic fragment. Later in the workflow, additional sequences are added by tailed primers during PCR. These additional sequences are necessary for library amplification on the flow cell during cluster formation.
User‐Supplied ConsumablesDNA Ligase Buffer, 2XPE Adapter Oligo MixDNA Ligase
User‐Supplied ConsumablesQIAquick PCR Purification Kit (QIAGEN, part # 28104)
ProcedureA molar excess of adapter to fragments is used to increase the yield of adapter ligation to both ends of the DNA fragments. If the ratio is too great, then the yield of adapter dimers also increases, for example, if 1 μg or less of input DNA is used instead of 5 μg. The volume of adapter oligo mix added in the following procedure is recommended for an initial input DNA quantity of 5 μg (approximately 2.5 μg post‐nebulization or 4–5 μg following covaris shearing). If 1 μg of input DNA is used, then the amount of adapter added to the reaction should be decreased to 5 μl.
1 Prepare the reaction mix on ice in the following order:
2 Incubate on the thermal cycler for 15 minutes at 20°C.
Reagent Volume (μl)
DNA Sample 10
DNA Ligase Buffer 2X 25
PE Adapter Oligo Mix 10
DNA Ligase 5
Total Volume 50
22 Part # 1005063 Rev. E
3 Follow the instructions in the QIAquick PCR Purification Kit to purify on one QIAquick column, eluting in 30 μl of QIAGEN EB.
SAFE STOPPING POINTIf you do not plan to proceed to Purify Ligation Products immediately, the protocol can be safely stopped here. If you are stopping, store the samples at ‐15° to ‐25°C overnight or longer. When proceeding, thaw the samples on ice.
Paired-End Sample Preparation Guide 23
Pu
rify Lig
atio
n P
rod
uc
ts
Purify Ligation Products
This process purifies the products of the ligation reaction on a gel and removes unligated adapters, removes any adapters that may have ligated to one another, and selects a size‐range of sequencing library appropriate for cluster generation.
Size SelectionIllumina recommends gel electrophoresis and band excision after adapter ligation to remove excess adapter and adapter dimers and to tighten the range of fragment sizes. Ligation reaction products are separated on an agarose gel and a ~2 mm wide gel slice containing DNA of the desired size is excised.
Excision RangeIllumina suggests a 200 bp insert size target (+/‐ 1 standard deviation of 20 bp, i.e, a 10% variance) for read lengths of 2×75 bp or shorter. In practice, this translates to a 2 mm gel slice at ~300 bp to account for the length of the adapter sequences flanking the inserts. For read lengths of 2×100 bp or longer, Illumina recommends an insert size range of 300 bp or greater should be targeted for excision from the gel, unless you intentionally want to sequence overlapping read pairs.
NOTEIllumina recommends that you test your electrophoresis unit in advance to ensure that you can readily resolve DNA in the range below 1000 base pairs. The DNA smear should be sufficiently resolved to enable you to excise a narrow band of a chosen size with a standard deviation as low as 5% of the median (i.e., a gel slice at 400 bp, where +/‐ one standard deviation is equivalent to a size range of 380–420 bp). The conditions described are typical gel electrophoresis conditions which have been validated by Illumina.

24 Part # 1005063 Rev. E
User‐Supplied ConsumablesCertified Low Range Ultra Agarose50x TAE BufferDistilled WaterEthidium BromideLoading Buffer100 bp Redi‐Load DNA LadderQIAquick Gel Extraction Kit (QIAGEN, part # 28704 or 28706)
Procedure
1 Prepare a 150 ml, 2% agarose gel with distilled water and TAE according to the manufacturer’s instructions. The final concentration of TAE should be 1X.
2 Add Ethidium Bromide (EtBr) after the TAE‐agarose has cooled. The final concentration of EtBr should be 400 ng/ml (i.e., add 60 μg EtBr to 150 ml of 1X TAE‐agarose).
3 Cast the gel using a comb that can accommodate 56 μl in each well.Recommended well size: 1 mm (length) x 8 mm (width) x 7 mm (height).
4 Add 3 μl of Loading Buffer to 8 μl of the 100 bp Redi‐Load Ladder.
5 Add 10 μl of Loading Buffer to 30 μl of the DNA from the purified ligation reaction.
6 Load 10 μl of the ladder onto one lane of the gel.
CAUTIONIllumina does not recommend purifying multiple samples on a single gel due to the risk of cross‐contamination between libraries.
NOTEIt is important to excise as narrow a band as possible from the gel during gel purification. Paired‐end libraries should consist of templates of the same size or nearly the same size, and as narrow a size range as possible. Illumina recommends that a Dark Reader is used to visualize DNA on agarose gels.

Paired-End Sample Preparation Guide 25
Pu
rify Lig
atio
n P
rod
uc
ts
7 Load the entire sample onto another lane of the gel, leaving a gap of at least one empty lane between ladder and sample.
8 Run gel at 120 V for 60 minutes (6 V/cm).
9 View the gel on a Dark Reader transilluminator or a UV transilluminator.
10 Place a clean scalpel vertically above the sample in the gel at the desired size of the template.
11 Excise a 2 mm slice of the sample lane at approximately 400 bp using the markers as a guide.
12 Discard the scalpel to avoid sample cross‐contamination.
13 Follow the instructions in the QIAquick Gel Extraction Kit to purify on one QIAquick column, eluting in 30 μl of QIAGEN EB.
NOTEFlanking the library on both sides with ladders may make the library excision easier.
NOTECutting a band of 400 bp will result in an insert size of approximately 300 bp, accounting for the influence of the adapters on the gel mobility. Adapters add approximately 80 bp to each fragment. The sequencing read length should be considered when cutting fragment sizes. Sequencing reads that over‐reach into the adapter will cause chimeric reads, unalignable to the reference sequence.
NOTEUsing a separate scalpel, you can also slice a 600 bp fragment out of the gel as a back up library and process this separately alongside the 400 bp library well. You then get two libraries from one sample preparation.
SAFE STOPPING POINTIf you do not plan to proceed to Enrich DNA Fragments immediately, the protocol can be safely stopped here. If you are stopping, store the samples at ‐15° to ‐25°C overnight or longer. When proceeding, thaw the samples on ice.

26 Part # 1005063 Rev. E
Enrich DNA Fragments
This process uses PCR to selectively enrich those DNA fragments that have adapter molecules on both ends, and to amplify the amount of DNA in the library for accurate quantification. The PCR is performed with two primers that anneal to the ends of the adapters. The number of PCR cycles should be minimized to avoid skewing the representation of the library.
PCR AmplificationThe PCR amplification step of the protocol performs four key functions:
Add Sequences ‐ Additional sequences are added to the ends of the adapters so that the final amplified templates contain sequences to enable hybridization with primers bound to the flow cell surface for cluster generation.Enrich Fragments ‐ PCR enriches for fragments that have adapters ligated on both ends. Fragments with only one or no adapters on their ends are by‐products of inefficiencies in the ligation reaction. Neither species can be used to make clusters, as fragments without any adapters cannot hybridize to surface‐bound primers in the flow cell, and fragments with an adapter on only one end can hybridize to surface bound primers but cannot form clusters. However, the presence of these incomplete ligation products can lead to an overestimation of the final quantity of library DNA if spectrophotometric or fluorometric quantification is performed. In contrast, these ligation products are not quantified by qPCR.Enrich Templates ‐ PCR enriches for templates that include the non‐template ‘A’ nucleotide added during the A‐tailing step of the protocol and therefore eliminates adapter dimers. This is accomplished by using proprietary, modified primers that are completely resistant to the 3’–5’ exonuclease activity of the Phusion (Finnzymes Oy) polymerase used for PCR. These primers reach all the way to the non‐templated ‘A’ before the start of the genomic sequence. If the ‘A’ is not present (as in the case for an adapter dimer), then the terminal ‘T’ on the primer will mismatch and not extend. Provides Material ‐ PCR provides enough material to enable reliable quantification of the final library if spectrophotometric or fluorometric methods are used.
Illumina‐Supplied ConsumablesPhusion DNA Polymerase (Finnzymes Oy)PCR Primer PE 1.0PCR Primer PE 2.0Ultra Pure Water

Paired-End Sample Preparation Guide 27
En
rich
DN
A F
rag
me
nts
User‐Supplied ConsumablesQIAquick PCR Purification Kit (QIAGEN, part # 28104)
ProcedureThe following procedure is designed to give sufficient library after PCR to enable you to quantify your libraries by spectrophotometric methods. Quantification prior to the PCR reaction is difficult, particularly if the initial input is less than 1 μg. Therefore, the volume of adapter ligated fragments added to the PCR reaction below are based on an initial input DNA quantity of 5 μg (approximately 2.5 μg post‐nebulization or 4–5 μg following covaris shearing). If the initial input DNA is 1 μg or less, then more ligated fragments should be added to the PCR reaction. If you are using 0.5 μg, adjust the process as described in the following table.
Input of DNA to Library Prep
Volume of Purified Library into PCR Volume of Water Number of PCR
Cycles
5 μg 1 μl 22 μl 10
0.5 μg 10 μl 13 μl 12
CAUTIONTo avoid sample cross‐contamination, set up PCR reactions (all components except the template DNA) in a designated clean area, preferably a PCR hood with UV sterilization and positive air flow.
28 Part # 1005063 Rev. E
1 Prepare the reaction mix on ice in a 200 μl thin wall PCR tube in the following order:
2 Mix gently, but thoroughly, and centrifuge briefly.
3 Amplify using the following PCR process:a 30 seconds at 98°Cb 10 or 12 cycles of:
40 seconds at 98°C 30 seconds at 65°C 30 seconds at 72°C
c 5 minutes at 72°Cd Hold at 4°C
4 Follow the instructions in the QIAquick PCR Purification Kit to purify on one QIAquick column, eluting in 30 μl of QIAGEN EB.
Reagent Volume (μl)
DNA x
Ultra Pure Water to increase DNA volume to 23
PCR primer PE 2.0 1
PCR primer PE 1.0 1
Phusion DNA Polymerase (Finnzymes Oy) 25
Total Volume 50
SAFE STOPPING POINTIf you do not plan to proceed to Purify Final Product immediately, the protocol can be safely stopped here. If you are stopping, store the samples at ‐15° to ‐25°C overnight or longer. When proceeding, thaw the samples on ice.
Paired-End Sample Preparation Guide 29
Pu
rify Fin
al P
rod
uc
t
Purify Final Product
This process further purifies the products of the PCR ligation reaction on a gel to select a size‐range of templates appropriate for subsequent cluster generation.
User‐Supplied ConsumablesCertified Low Range Ultra Agarose50x TAE BufferDistilled WaterEthidium BromideLoading Buffer100 bp Redi‐Load DNA ladderQIAquick Gel Extraction Kit (QIAGEN, part # 28704 or 28706)
Procedure
1 Prepare a 150 ml, 2% agarose gel with distilled water and TAE according to the manufacturer’s instructions. The final concentration of TAE should be 1X.
2 Add EtBr after the TAE‐agarose has cooled. The final concentration of EtBr should be 400 ng/ml (i.e., add 60 μg EtBr to 150 ml of 1x TAE‐agarose).
CAUTIONIllumina does not recommend purifying multiple samples on a single gel due to the risk of cross‐contamination between libraries. However, if you excised an additional 600 bp slice during the Purify Ligation Products process (page 23) and processed it alongside the 400 bp slice, it can be purified during this process in the same gel as its matching 400 bp slice, but in separate lanes of the gel.
NOTEIt is important to excise as narrow a band as possible from the gel during gel purification. Paired‐end libraries should consist of templates of the same size or nearly the same size, and as narrow a size range as possible.Illumina recommends that a Dark Reader is used to visualize DNA on agarose gels.

30 Part # 1005063 Rev. E
3 Cast the gel using a comb that can accommodate 56 μl in each well.Recommended well size: 1 mm (length) x 8 mm (width) x 7 mm (height).
4 Add 3 μl of Loading Buffer to 8 μl of the ladder.
5 Add 10 μl of Loading Buffer to 30 μl of the DNA from the purified PCR reaction.
6 Load 10 μl of the 100 bp Redi‐Load ladder onto one lane of the gel.
7 Load the entire sample onto another lane of the gel, leaving a gap of at least one empty lane between ladder and sample.
8 Run gel at 120 V for 60 minutes (6 V/cm).
9 View the gel on a Dark Reader transilluminator or a UV transilluminator.
10 Place a clean scalpel vertically above the sample in the gel at the desired size of the template.
11 Excise a 2 mm slice of the sample lane at approximately 400 bp using the markers as a guide.
12 Discard the scalpel.
13 Follow the instructions in the QIAquick Gel Extraction Kit to purify on one QIAquick column, eluting in 30 μl of QIAGEN EB.
NOTEFlanking the library on both sides with ladders may make the library excision easier.
NOTECutting a band of 400 bp will result in an insert size of approximately 300 bp. Adapters add approximately 80 bp to each fragment. The sequencing read length should be considered when cutting fragment sizes. Sequencing reads in to the adapter will cause chimeric reads, unalignable to the reference sequence.
NOTEIf you excised an additional 600 bp slice during the Purify Ligation Products process (page 23) and processed it alongside the 400 bp slice, then excise this band from by cutting a 2 mm slice at 600 bp. This is equivalent to a 500 bp insert library.

Paired-End Sample Preparation Guide 31
Pu
rify Fin
al P
rod
uc
t
SAFE STOPPING POINTIf you do not plan to proceed to Validate Library immediately, the protocol can be safely stopped here. If you are stopping, store the samples at ‐15° to ‐25°C overnight or longer. When proceeding, thaw the samples on ice.

32 Part # 1005063 Rev. E
Validate Library
Illumina recommends performing the following quality control steps on your DNA library.
1 Check the template size distribution by running an aliquot of the library on a gel or an Agilent Bioanalyzer.
2 If validating by gel, load 10% of the volume of the library on a gel and check that the size range is as expected: a narrow smear similar in size to the DNA excised from the gel after the ligation.
3 If using Agilent Bioanalyzer, load 1 μl of the library on Agilent chip. An example of a library prepared using this protocol is shown below. The library has insert sizes ranging from 250–350 bp (i.e., a template size range of 350–450 bp).
Figure 10 Paired‐End Library Example
NOTEThe sequenced Paired‐End library reports the average insert size and distribution metrics in the Summary.htm output in the GERALD sub‐directory of the run folder.
Paired-End Sample Preparation Guide 33
Lib
rary Q
ua
ntific
atio
n
Library Quantification
In order to achieve the highest quality of data on Illumina sequencing platforms, it is important to create optimum cluster densities across every lane of every flow cell. This requires accurate quantification of DNA library templates. As described for sample input quantification, any method of measuring DNA concentration has certain advantages and potential drawbacks.
Optical Density or Intercalating DyeAbsorbance‐based quantification can erroneously measure the presence of residual PCR primers or may not be sensitive enough to make an accurate measurement in circumstances where the final library yield is low. Measurements based on intercalating dyes such as PicoGreen may also be used, but care should be taken to minimize pipetting errors and to ensure that the library is not denatured to avoid inaccuracies.
BioanalyzerAutomated analysis using an instrument like the Agilent Bioanalyzer can be used to quantify libraries and is an excellent alternative to traditional gel electrophoresis to determine the size of the library fragments. As with intercalating dye assays, single‐stranded templates will not be detected nor contribute to the library quantification even though these templates will form clusters. Therefore, care must be taken to ensure that the library is not denatured and that pipetting errors are minimized.
34 Part # 1005063 Rev. E
qPCRQuantitative real‐time PCR (qPCR) is an alternative method of quantifying DNA that measures the relationship between the initial concentration of a template and how its concentration changes during progressing cycles of thermal amplification. As in conventional PCR, a polymerase, dNTPs, and two primers are designed to match sequences within a template. In SYBR Green‐based qPCR, the amplicon quantity is measured by binding of an intercalating dye. In contrast, hydrolysis probes‐based qPCR employs a fluorescent probe that hybridizes to amplicons downstream of one of the amplification primers. During extension, the polymerase cleaves the hydrolysis probe using 5ʹ exonuclease activity, releasing the fluorophore from the probe where it can then fluoresce. For qPCR library quantification, the amplification primers and probe are designed to match sequences within the Illumina adapters. Thus, qPCR offers advantages for measuring library concentration because it will only measure templates that have adapter sequences on both ends. Moreover, qPCR sensitivity allows accurate quantification of dilute libraries with concentrations below the threshold of detection of conventional spectrophotometric methods.
qPCR quantifies DNA of unknown concentration by comparison to a control sample of known concentration. The control sample should be a library that gives a known number of clusters when titrated on a flow cell. Although any library prepared for sequencing on the Illumina platform can be used as a control for qPCR, the control library should be as similar as possible in terms of template size, GC content, and library type (e.g., genomic DNA or ChIP‐Seq) to the experimental libraries for quantification. Control libraries can be easily prepared using the Illumina Paired‐End Library Generation kit.
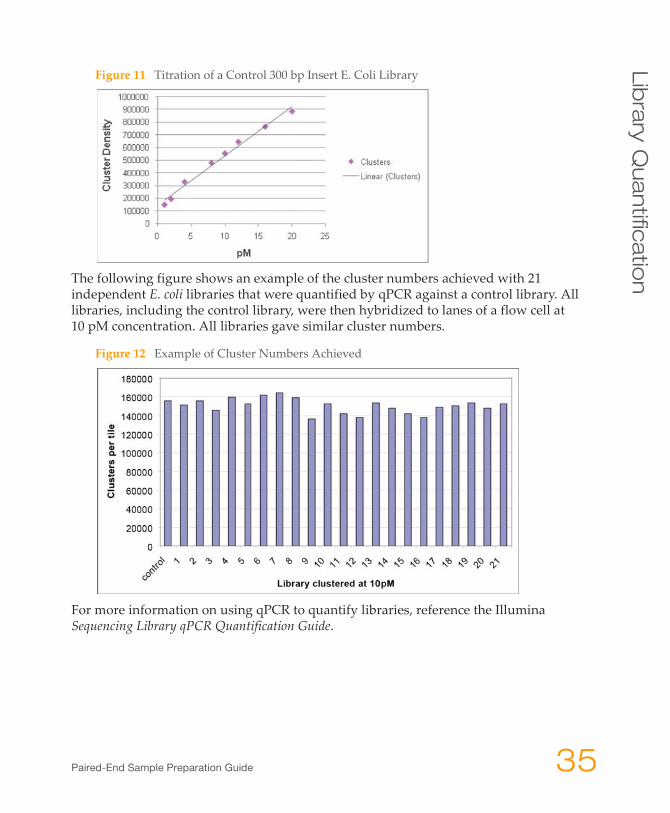
To correlate library concentration with cluster number, it is necessary to generate a titration flow cell for the control template. This can be achieved by preparing serial dilutions of ‘template hyb’ from the control library and counting the number of clusters following sequencing. A minimum of four sequencing cycles is required to achieve an accurate cluster count, because Illumina’s current Pipeline software uses the first four cycles to identify individual clusters in a full length sequencing run, as shown in the figure below. A cluster titration curve for the control template should be linear to the point at which the clusters become too dense to count accurately. Once the control library has been correlated with cluster number, this library can be used as a qPCR control.
Paired-End Sample Preparation Guide 35
Lib
rary Q
ua
ntific
atio
n
Figure 11 Titration of a Control 300 bp Insert E. Coli Library
The following figure shows an example of the cluster numbers achieved with 21 independent E. coli libraries that were quantified by qPCR against a control library. All libraries, including the control library, were then hybridized to lanes of a flow cell at 10 pM concentration. All libraries gave similar cluster numbers.
Figure 12 Example of Cluster Numbers Achieved
For more information on using qPCR to quantify libraries, reference the Illumina Sequencing Library qPCR Quantification Guide.
Insert Graphic
36 Part # 1005063 Rev. E
DNA Template Storage
Illumina recommends storing prepared DNA template at a concentration of 10 nM.
Adjust the concentration for your prepared DNA samples (or pools of samples) to 10 nM using Tris‐HCl 10 mM, pH 8.5. For long‐term storage of DNA samples at a concentration of 10 nM, add Tween 20 to the sample to a final concentration of 0.1% Tween. This helps to prevent adsorption of the template to plastic tubes upon repeated freeze‐thaw cycles, which would decrease the cluster numbers from a sample over time.

Notes

Notes
Paired-End Sample Preparation Guide 39
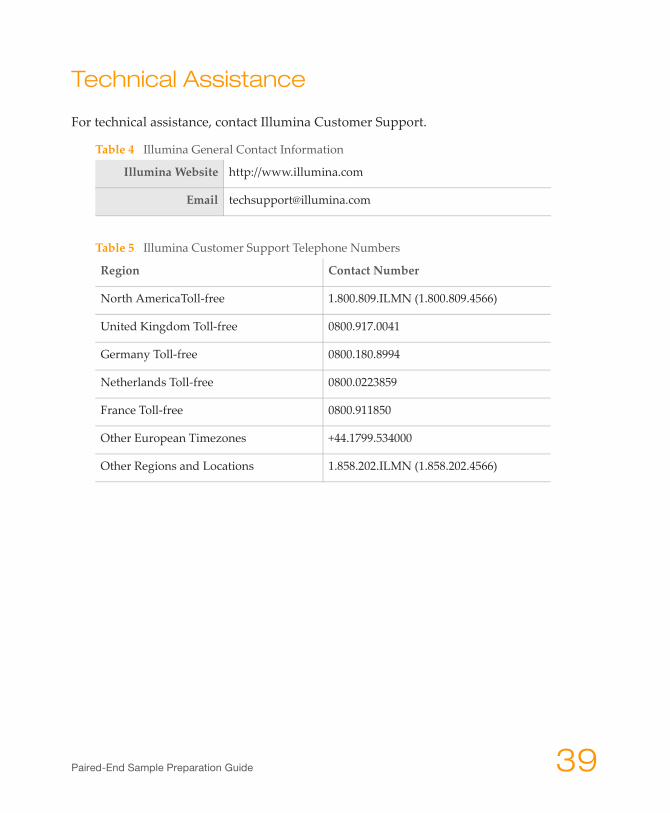
Technical Assistance
For technical assistance, contact Illumina Customer Support.
Table 4 Illumina General Contact Information
Illumina Website http://www.illumina.com
Email [email protected]
Table 5 Illumina Customer Support Telephone Numbers
Region Contact Number
North AmericaToll‐free 1.800.809.ILMN (1.800.809.4566)
United Kingdom Toll‐free 0800.917.0041
Germany Toll‐free 0800.180.8994
Netherlands Toll‐free 0800.0223859
France Toll‐free 0800.911850
Other European Timezones +44.1799.534000
Other Regions and Locations 1.858.202.ILMN (1.858.202.4566)

Illumina, Inc. 9885 Towne Centre Drive San Diego, CA 92121-1975 +1.800.809.ILMN (4566)+1.858.202.4566 (outside North America) [email protected]


![CLSM B SLiCeS Improved Immunohistochemical … Preparation and Staining The protocol for preparation of hippocampal slice cultures is described elsewhere [5]. After](https://img.pdfslide.us/doc/110x75/5ada0e837f8b9aee348c39ba/clsm-b-slices-improved-immunohistochemical-preparation-and-staining-the-protocol.jpg)


![Kyoto Protocol Durban Preparation[1]](https://img.pdfslide.us/doc/110x75/577d24821a28ab4e1e9c9bda/kyoto-protocol-durban-preparation1.jpg)
