Embed Size (px)
Citation preview

Paint a Child’s Portrait from a Photopresented by Kingslan & Gibilisco Studio
Kingslan & Gibilisco Studiowww.kingslan.com
How to Paint a Child’s Portrait from a Photo© 2012 by Kingslan & Gibilisco Decorative Arts Page 2
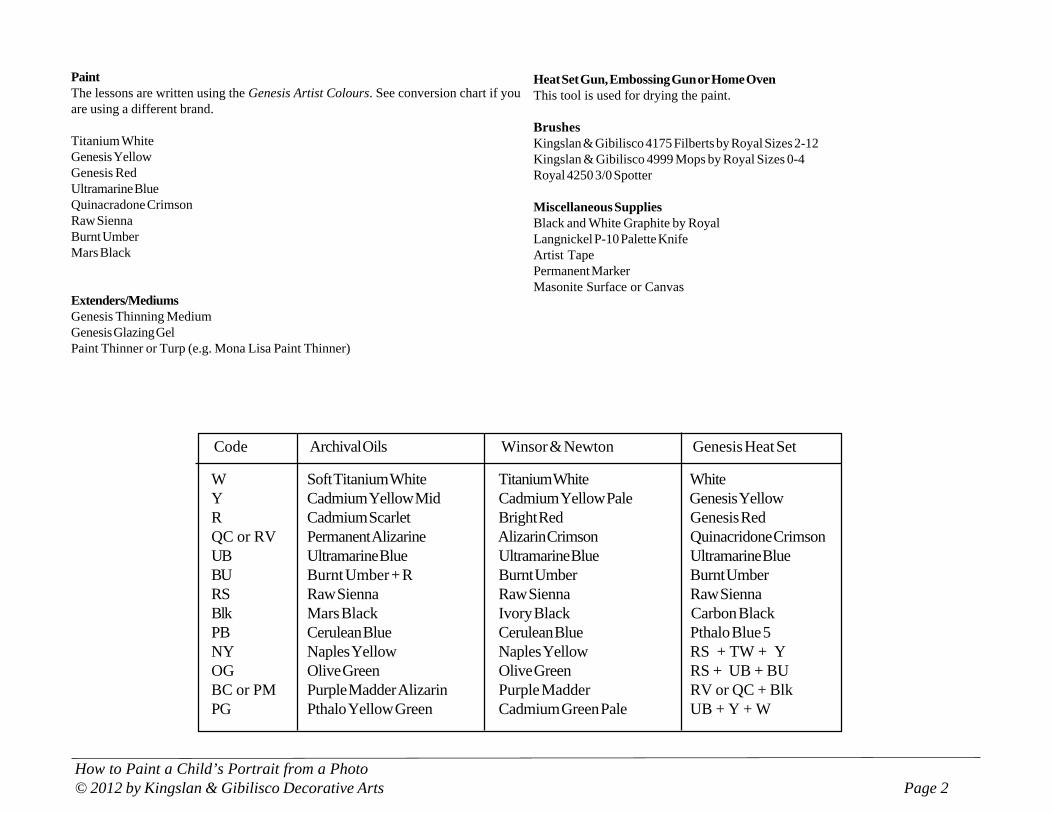
PaintThe lessons are written using the Genesis Artist Colours. See conversion chart if youare using a different brand.
Titanium WhiteGenesis YellowGenesis RedUltramarine BlueQuinacradone CrimsonRaw SiennaBurnt UmberMars Black
Extenders/MediumsGenesis Thinning MediumGenesis Glazing GelPaint Thinner or Turp (e.g. Mona Lisa Paint Thinner)
W Soft Titanium White Titanium White WhiteY Cadmium Yellow Mid Cadmium Yellow Pale Genesis YellowR Cadmium Scarlet Bright Red Genesis RedQC or RV Permanent Alizarine Alizarin Crimson Quinacridone CrimsonUB Ultramarine Blue Ultramarine Blue Ultramarine BlueBU Burnt Umber + R Burnt Umber Burnt UmberRS Raw Sienna Raw Sienna Raw SiennaBlk Mars Black Ivory Black Carbon BlackPB Cerulean Blue Cerulean Blue Pthalo Blue 5NY Naples Yellow Naples Yellow RS + TW + YOG Olive Green Olive Green RS + UB + BUBC or PM Purple Madder Alizarin Purple Madder RV or QC + BlkPG Pthalo Yellow Green Cadmium Green Pale UB + Y + W
Heat Set Gun, Embossing Gun or Home OvenThis tool is used for drying the paint.
BrushesKingslan & Gibilisco 4175 Filberts by Royal Sizes 2-12Kingslan & Gibilisco 4999 Mops by Royal Sizes 0-4Royal 4250 3/0 Spotter
Miscellaneous SuppliesBlack and White Graphite by RoyalLangnickel P-10 Palette KnifeArtist TapePermanent MarkerMasonite Surface or Canvas
Code Archival Oils Winsor & Newton Genesis Heat Set
How to Paint a Child’s Portrait from a Photo© 2012 by Kingslan & Gibilisco Decorative Arts Page 3
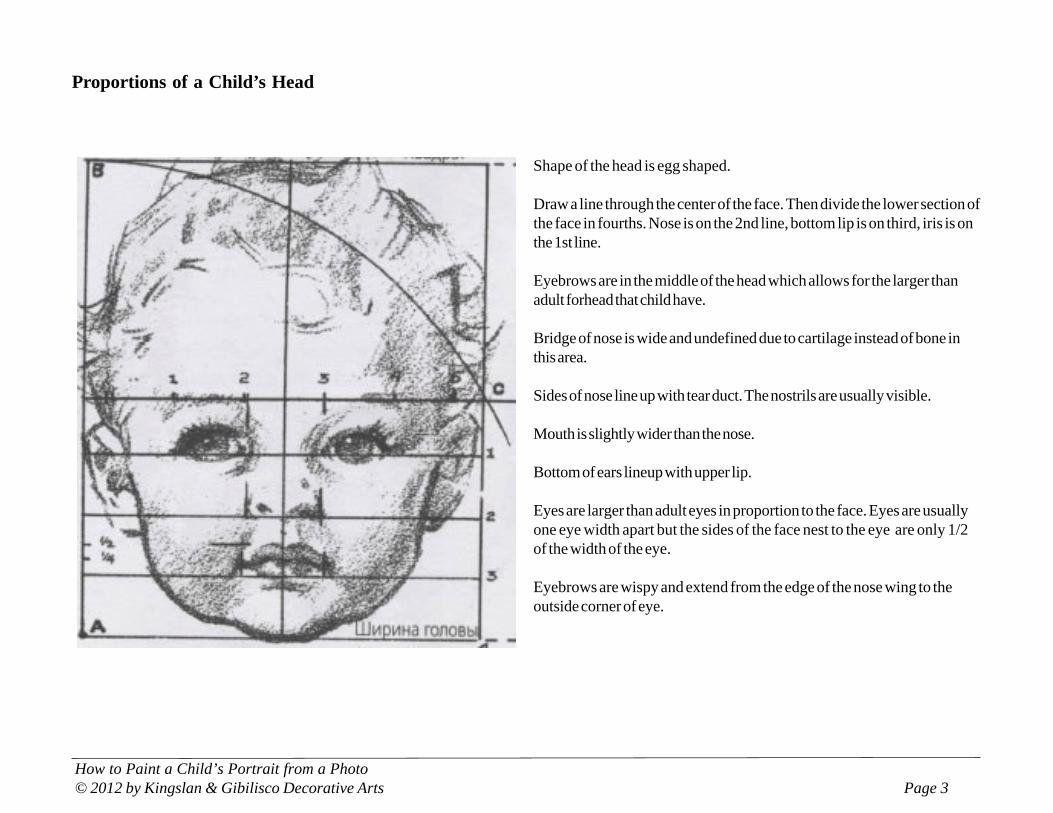
Proportions of a Child’s Head
Shape of the head is egg shaped.
Draw a line through the center of the face. Then divide the lower section ofthe face in fourths. Nose is on the 2nd line, bottom lip is on third, iris is onthe 1st line.
Eyebrows are in the middle of the head which allows for the larger thanadult forhead that child have.
Bridge of nose is wide and undefined due to cartilage instead of bone inthis area.
Sides of nose line up with tear duct. The nostrils are usually visible.
Mouth is slightly wider than the nose.
Bottom of ears lineup with upper lip.
Eyes are larger than adult eyes in proportion to the face. Eyes are usuallyone eye width apart but the sides of the face nest to the eye are only 1/2of the width of the eye.
Eyebrows are wispy and extend from the edge of the nose wing to theoutside corner of eye.

How to Paint a Child’s Portrait from a Photo© 2012 by Kingslan & Gibilisco Decorative Arts Page 4
Photograpy Tips
If you plan on taking your own photos and do not have a professionalstudio, work with natural lighting. The featured photo has employed all ofthe tips. Here are a few suggestions:
1. Choose the lighting.Concentrate on using the best light for all of your photographs. The bestlight is the light at daybreak and at dusk – the beautiful light that highlightsthe detail, yet doesn’t overwhelm you with harshness.
2. Avoid mid-day sun whenever possible.Mid-Day sunshine gives you your harshest shadows, and provides glareon both your subject and the background around you. IF this is your onlyoption, find an area that contains trees and buildings that you can use inyour background, and will block out the majority of the sun’s glare.
3. Be flexible in your posing.In outside locations, it’s easy to have a favorite place to photograph. Butdepending on the time of day, you may be facing harsh sunlight and lots ofshadows. Be flexible and have other areas that meet your needs. Moveyour subjects until you get them into the best position.
4. Always focus on the face.If you are placing your subject in a setting and the entire over image is thefocus, make sure your subject has a natural look. If you place themdirectly in the sun, they may be squinting and have a distorted face.
5. Use buildings and trees as natural light diffusers.A white building can make a great reflector, and brighten up a subjectsface, or give highlights to the overall scene. Or tuck your subject back intoa group of trees to soften the look, and provide nice highlights for theportrait.
7. Don’t avoid cloudy and rainy days.Clouds can create natural light boxes, and give you soft filtered lightanywhere you go. Though you do need to be careful not to get yourcamera wet on rainy days, the rain can enhance a portrait, and give you atotally new perspective with your subject matter. Learn to play with whatyou have, and be creative with the opportunities given.
How to Paint a Child’s Portrait from a Photo© 2012 by Kingslan & Gibilisco Decorative Arts Page 5
Lesson One
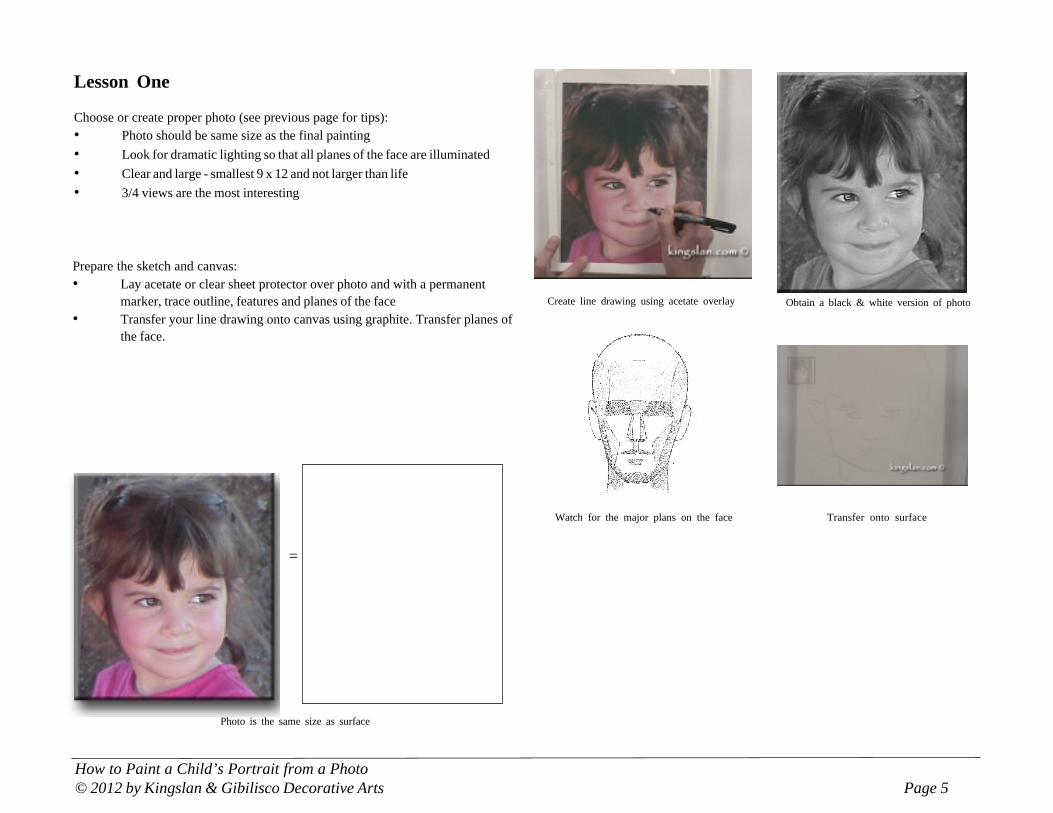
Choose or create proper photo (see previous page for tips):• Photo should be same size as the final painting
• Look for dramatic lighting so that all planes of the face are illuminated
• Clear and large - smallest 9 x 12 and not larger than life
• 3/4 views are the most interesting
Photo is the same size as surface
Create line drawing using acetate overlay Obtain a black & white version of photo
Transfer onto surface
=
Watch for the major plans on the face
Prepare the sketch and canvas:• Lay acetate or clear sheet protector over photo and with a permanent
marker, trace outline, features and planes of the face• Transfer your line drawing onto canvas using graphite. Transfer planes of
the face.
How to Paint a Child’s Portrait from a Photo© 2012 by Kingslan & Gibilisco Decorative Arts Page 6
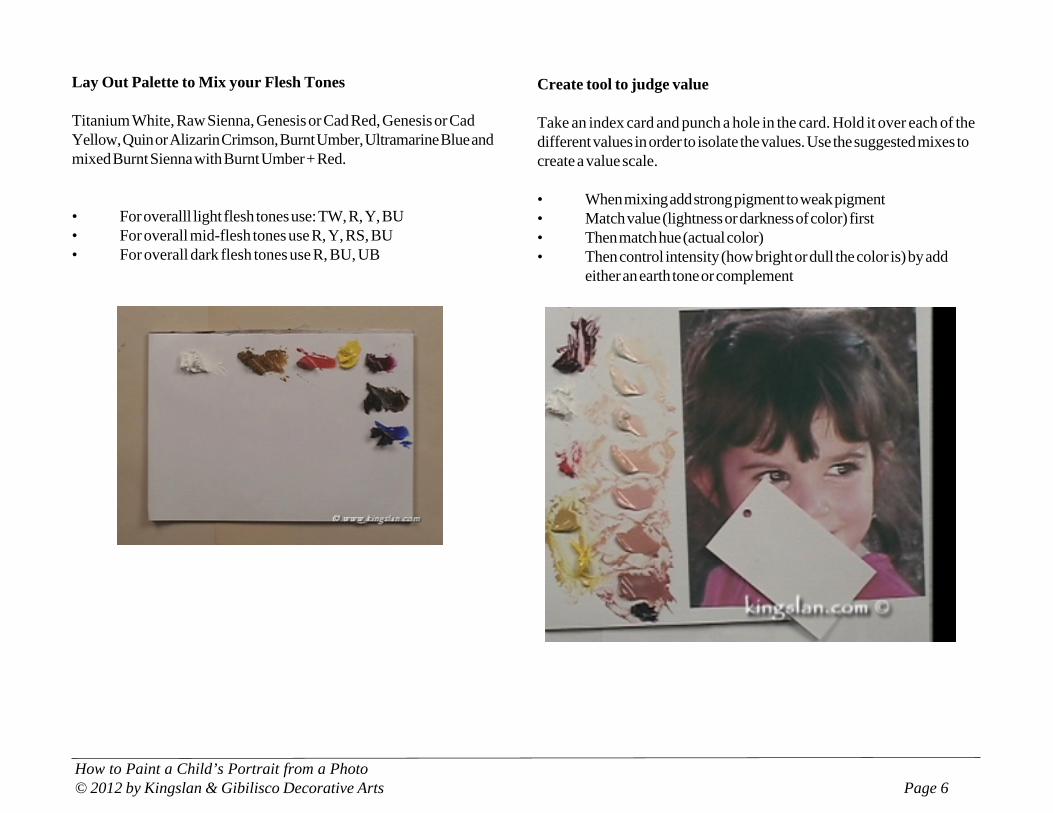
Lay Out Palette to Mix your Flesh Tones
Titanium White, Raw Sienna, Genesis or Cad Red, Genesis or CadYellow, Quin or Alizarin Crimson, Burnt Umber, Ultramarine Blue andmixed Burnt Sienna with Burnt Umber + Red.
• For overalll light flesh tones use: TW, R, Y, BU• For overall mid-flesh tones use R, Y, RS, BU• For overall dark flesh tones use R, BU, UB
Create tool to judge value
Take an index card and punch a hole in the card. Hold it over each of thedifferent values in order to isolate the values. Use the suggested mixes tocreate a value scale.
• When mixing add strong pigment to weak pigment• Match value (lightness or darkness of color) first• Then match hue (actual color)• Then control intensity (how bright or dull the color is) by add
either an earth tone or complement
How to Paint a Child’s Portrait from a Photo© 2012 by Kingslan & Gibilisco Decorative Arts Page 7
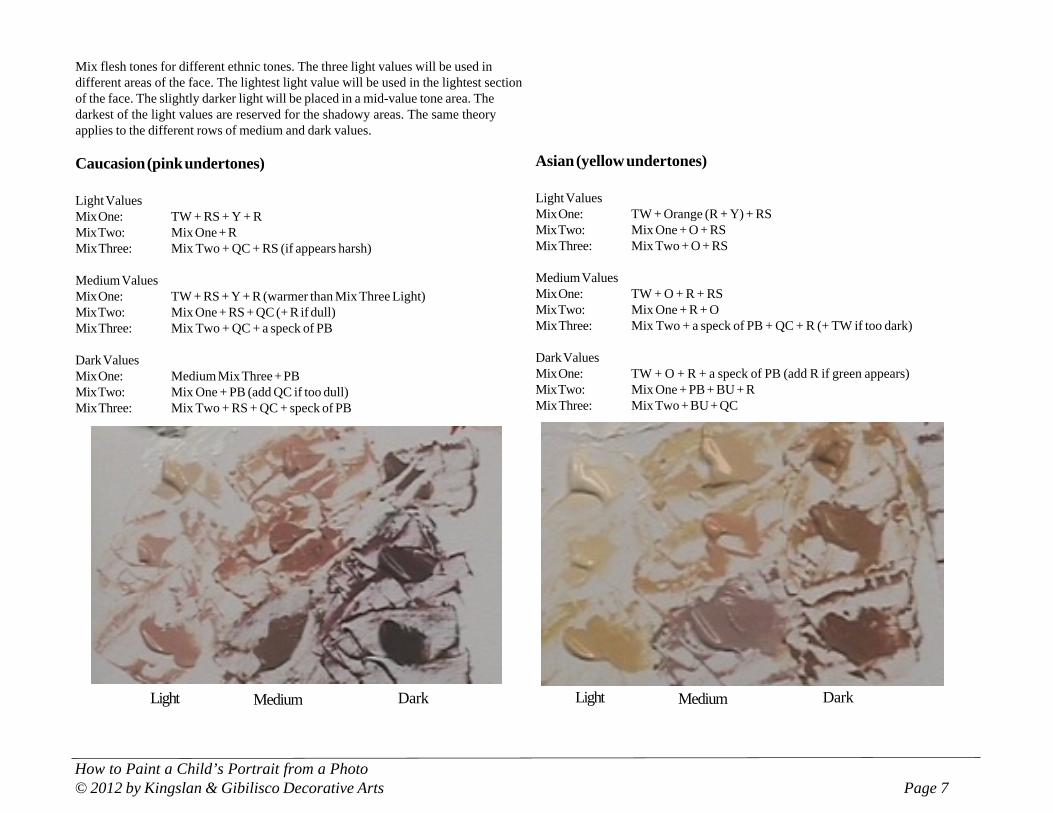
Mix flesh tones for different ethnic tones. The three light values will be used indifferent areas of the face. The lightest light value will be used in the lightest sectionof the face. The slightly darker light will be placed in a mid-value tone area. Thedarkest of the light values are reserved for the shadowy areas. The same theoryapplies to the different rows of medium and dark values.
Caucasion (pink undertones)
Light ValuesMix One: TW + RS + Y + RMix Two: Mix One + RMix Three: Mix Two + QC + RS (if appears harsh)
Medium ValuesMix One: TW + RS + Y + R (warmer than Mix Three Light)Mix Two: Mix One + RS + QC (+ R if dull)Mix Three: Mix Two + QC + a speck of PB
Dark ValuesMix One: Medium Mix Three + PBMix Two: Mix One + PB (add QC if too dull)Mix Three: Mix Two + RS + QC + speck of PB
Asian (yellow undertones)
Light ValuesMix One: TW + Orange (R + Y) + RSMix Two: Mix One + O + RSMix Three: Mix Two + O + RS
Medium ValuesMix One: TW + O + R + RSMix Two: Mix One + R + OMix Three: Mix Two + a speck of PB + QC + R (+ TW if too dark)
Dark ValuesMix One: TW + O + R + a speck of PB (add R if green appears)Mix Two: Mix One + PB + BU + RMix Three: Mix Two + BU + QC
Light Medium Dark Light Medium Dark

How to Paint a Child’s Portrait from a Photo© 2012 by Kingslan & Gibilisco Decorative Arts Page 8
Middle Eastern (brown/violet undertones)
Light ValuesMix One: TW + RS + OMix Two: Mix One + RS + BU (if too dull add O)Mix Three: Mix Two + BU + QC
Medium ValuesMix One: TW + O + RS + BU + RMix Two: Mix One + QC + RS to dull mixMix Three: Mix Two + BU + R
Dark ValuesMix One: TW + PB + BU + RMix Two: Mix One + QC + BUMix Three: Mix Two + BU + Black + QC
African American (dark brown/orange undertones)
Light ValuesMix One: TW + Orange + RS + BU (add R if green appears)Mix Two: Mix One + BU + RS + RMix Three: Mix Two + QC + RS
Medium ValuesMix One: BU + R + TW (add RS if too violet)Mix Two: Mix One + BUMix Three: Mix Two + BU + QC
Dark ValuesMix One: TW + O + BU + RMix Two: Mix One + BU + QCMix Three: Mix Two + Black + QC
Light Medium Dark Light Medium Dark
How to Paint a Child’s Portrait from a Photo© 2012 by Kingslan & Gibilisco Decorative Arts Page 9
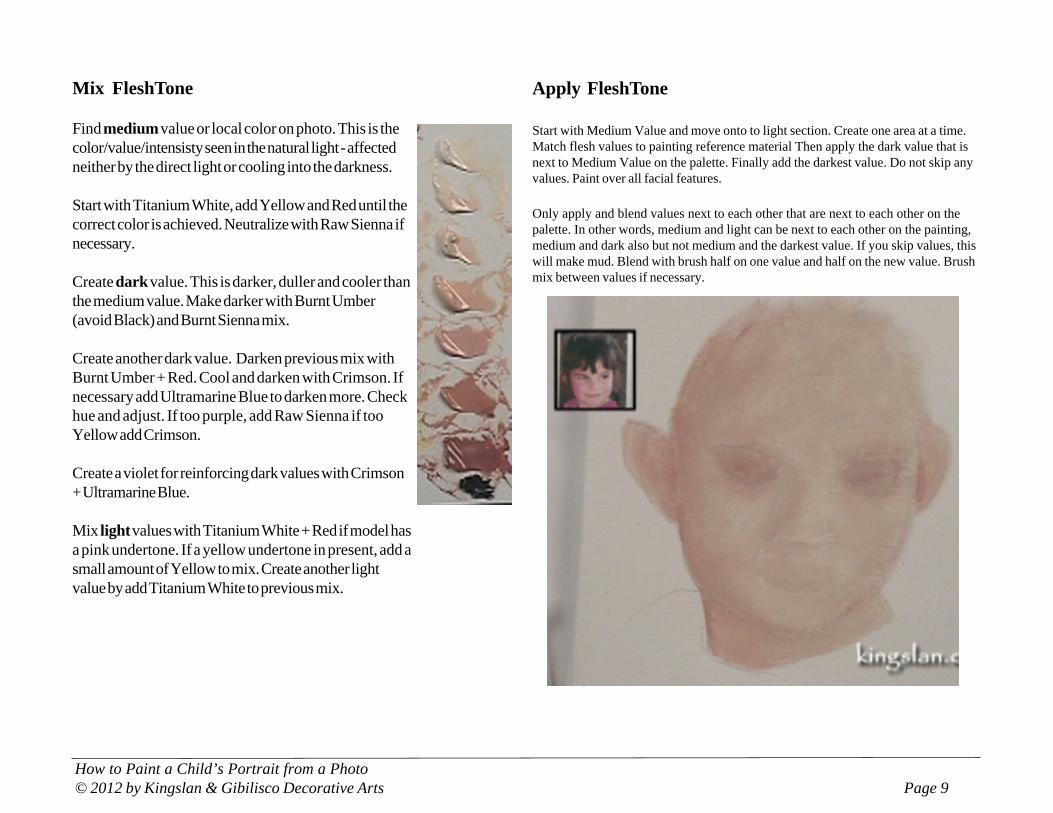
Mix FleshTone
Find medium value or local color on photo. This is thecolor/value/intensisty seen in the natural light - affectedneither by the direct light or cooling into the darkness.
Start with Titanium White, add Yellow and Red until thecorrect color is achieved. Neutralize with Raw Sienna ifnecessary.
Create dark value. This is darker, duller and cooler thanthe medium value. Make darker with Burnt Umber(avoid Black) and Burnt Sienna mix.
Create another dark value. Darken previous mix withBurnt Umber + Red. Cool and darken with Crimson. Ifnecessary add Ultramarine Blue to darken more. Checkhue and adjust. If too purple, add Raw Sienna if tooYellow add Crimson.
Create a violet for reinforcing dark values with Crimson+ Ultramarine Blue.
Mix light values with Titanium White + Red if model hasa pink undertone. If a yellow undertone in present, add asmall amount of Yellow to mix. Create another lightvalue by add Titanium White to previous mix.
Apply FleshTone
Start with Medium Value and move onto to light section. Create one area at a time.Match flesh values to painting reference material Then apply the dark value that isnext to Medium Value on the palette. Finally add the darkest value. Do not skip anyvalues. Paint over all facial features.
Only apply and blend values next to each other that are next to each other on thepalette. In other words, medium and light can be next to each other on the painting,medium and dark also but not medium and the darkest value. If you skip values, thiswill make mud. Blend with brush half on one value and half on the new value. Brushmix between values if necessary.
How to Paint a Child’s Portrait from a Photo© 2012 by Kingslan & Gibilisco Decorative Arts Page 10
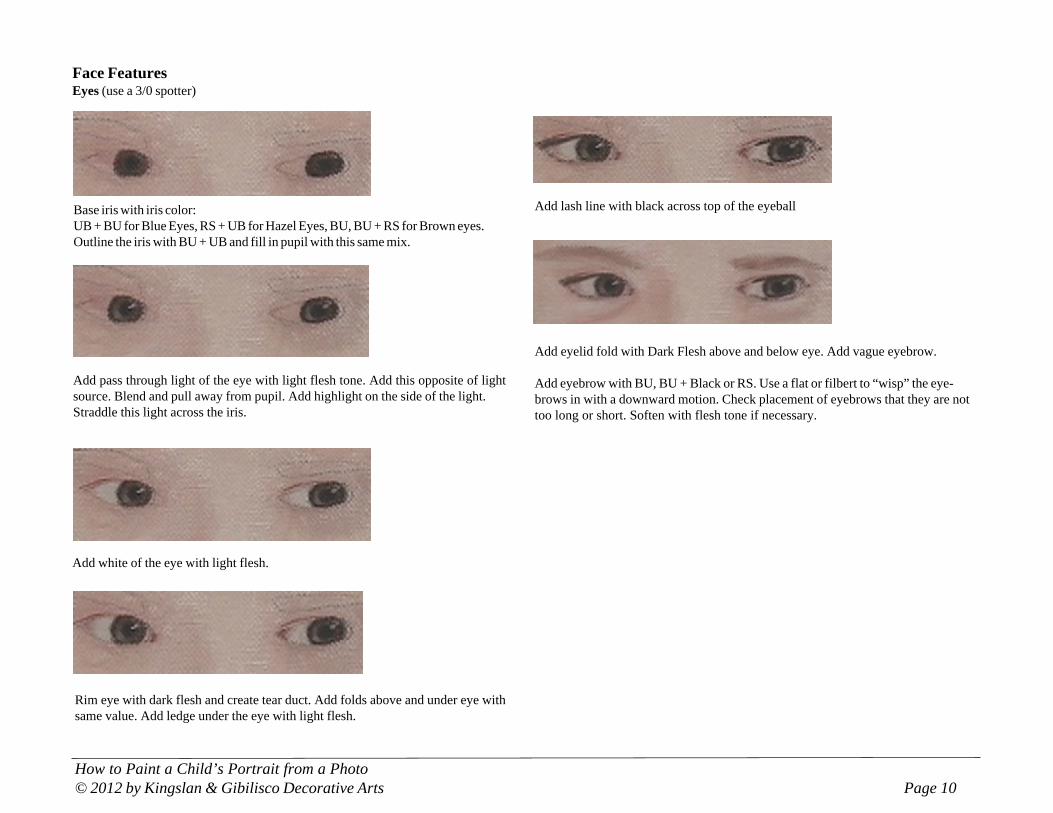
Face FeaturesEyes (use a 3/0 spotter)
Base iris with iris color:UB + BU for Blue Eyes, RS + UB for Hazel Eyes, BU, BU + RS for Brown eyes.Outline the iris with BU + UB and fill in pupil with this same mix.
Add white of the eye with light flesh.
Add pass through light of the eye with light flesh tone. Add this opposite of lightsource. Blend and pull away from pupil. Add highlight on the side of the light.Straddle this light across the iris.
Rim eye with dark flesh and create tear duct. Add folds above and under eye withsame value. Add ledge under the eye with light flesh.
Add lash line with black across top of the eyeball
Add eyelid fold with Dark Flesh above and below eye. Add vague eyebrow.
Add eyebrow with BU, BU + Black or RS. Use a flat or filbert to “wisp” the eye-brows in with a downward motion. Check placement of eyebrows that they are nottoo long or short. Soften with flesh tone if necessary.
How to Paint a Child’s Portrait from a Photo© 2012 by Kingslan & Gibilisco Decorative Arts Page 11
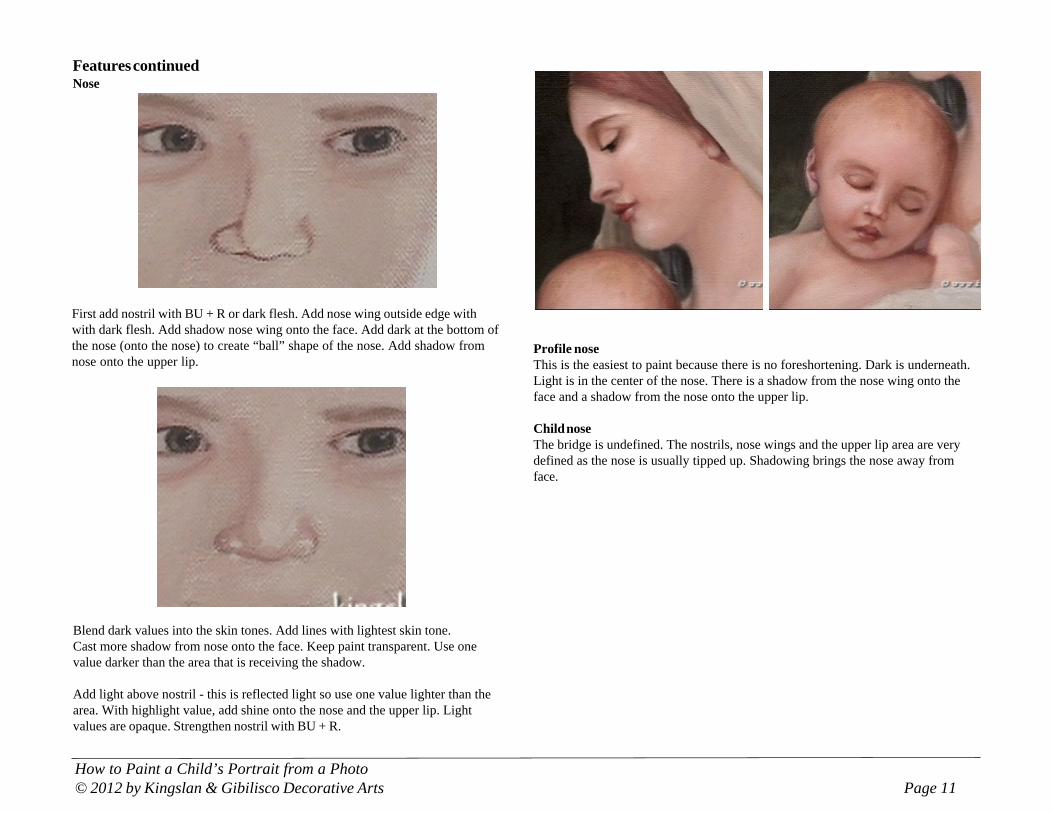
Features continuedNose
First add nostril with BU + R or dark flesh. Add nose wing outside edge withwith dark flesh. Add shadow nose wing onto the face. Add dark at the bottom ofthe nose (onto the nose) to create “ball” shape of the nose. Add shadow fromnose onto the upper lip.
Blend dark values into the skin tones. Add lines with lightest skin tone.Cast more shadow from nose onto the face. Keep paint transparent. Use onevalue darker than the area that is receiving the shadow.
Add light above nostril - this is reflected light so use one value lighter than thearea. With highlight value, add shine onto the nose and the upper lip. Lightvalues are opaque. Strengthen nostril with BU + R.
Profile noseThis is the easiest to paint because there is no foreshortening. Dark is underneath.Light is in the center of the nose. There is a shadow from the nose wing onto theface and a shadow from the nose onto the upper lip.
Child noseThe bridge is undefined. The nostrils, nose wings and the upper lip area are verydefined as the nose is usually tipped up. Shadowing brings the nose away fromface.
How to Paint a Child’s Portrait from a Photo© 2012 by Kingslan & Gibilisco Decorative Arts Page 12
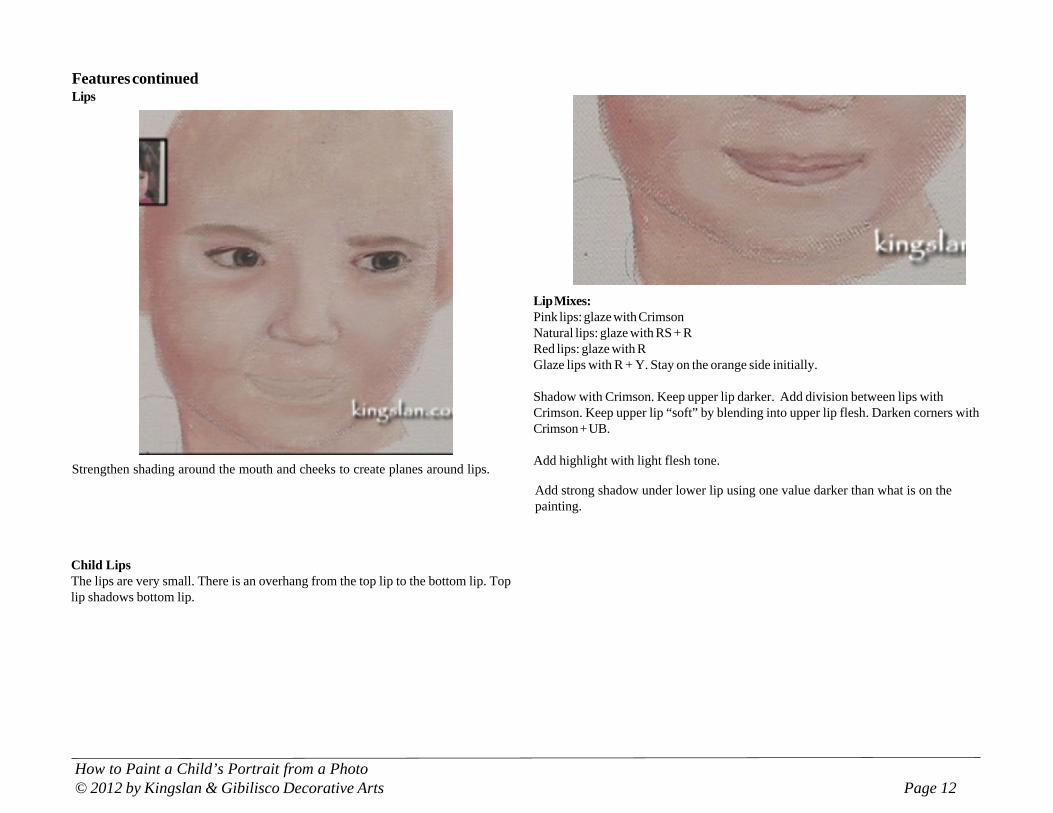
Features continuedLips
Add strong shadow under lower lip using one value darker than what is on thepainting.
Child LipsThe lips are very small. There is an overhang from the top lip to the bottom lip. Toplip shadows bottom lip.
Lip Mixes:Pink lips: glaze with CrimsonNatural lips: glaze with RS + RRed lips: glaze with RGlaze lips with R + Y. Stay on the orange side initially.
Shadow with Crimson. Keep upper lip darker. Add division between lips withCrimson. Keep upper lip “soft” by blending into upper lip flesh. Darken corners withCrimson + UB.
Add highlight with light flesh tone.Strengthen shading around the mouth and cheeks to create planes around lips.
How to Paint a Child’s Portrait from a Photo© 2012 by Kingslan & Gibilisco Decorative Arts Page 13
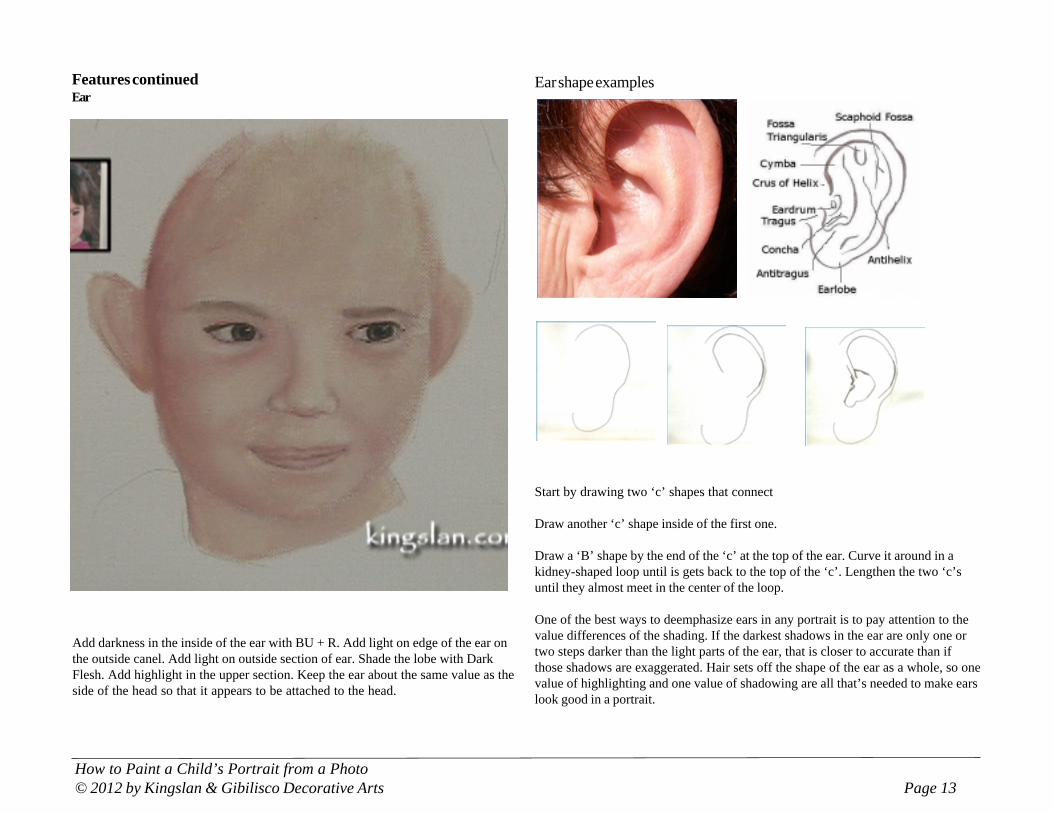
Features continuedEar
Ear shape examples
Add darkness in the inside of the ear with BU + R. Add light on edge of the ear onthe outside canel. Add light on outside section of ear. Shade the lobe with DarkFlesh. Add highlight in the upper section. Keep the ear about the same value as theside of the head so that it appears to be attached to the head.
Start by drawing two ‘c’ shapes that connect
Draw another ‘c’ shape inside of the first one.
Draw a ‘B’ shape by the end of the ‘c’ at the top of the ear. Curve it around in akidney-shaped loop until is gets back to the top of the ‘c’. Lengthen the two ‘c’suntil they almost meet in the center of the loop.
One of the best ways to deemphasize ears in any portrait is to pay attention to thevalue differences of the shading. If the darkest shadows in the ear are only one ortwo steps darker than the light parts of the ear, that is closer to accurate than ifthose shadows are exaggerated. Hair sets off the shape of the ear as a whole, so onevalue of highlighting and one value of shadowing are all that’s needed to make earslook good in a portrait.
How to Paint a Child’s Portrait from a Photo© 2012 by Kingslan & Gibilisco Decorative Arts Page 14
Features continuedHair
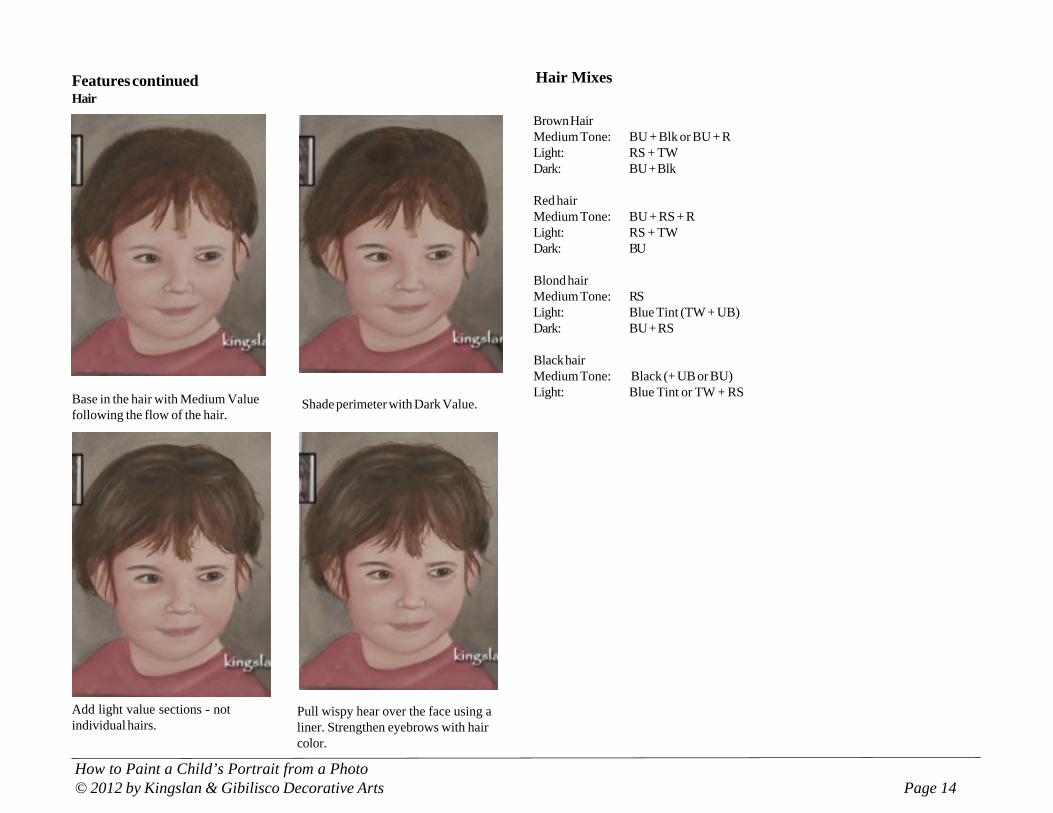
Base in the hair with Medium Valuefollowing the flow of the hair.
Shade perimeter with Dark Value.
Pull wispy hear over the face using aliner. Strengthen eyebrows with haircolor.
Add light value sections - notindividual hairs.
Hair Mixes
Brown HairMedium Tone: BU + Blk or BU + RLight: RS + TWDark: BU + Blk
Red hairMedium Tone: BU + RS + RLight: RS + TWDark: BU
Blond hairMedium Tone: RSLight: Blue Tint (TW + UB)Dark: BU + RS
Black hairMedium Tone: Black (+ UB or BU)Light: Blue Tint or TW + RS
How to Paint a Child’s Portrait from a Photo© 2012 by Kingslan & Gibilisco Decorative Arts Page 15
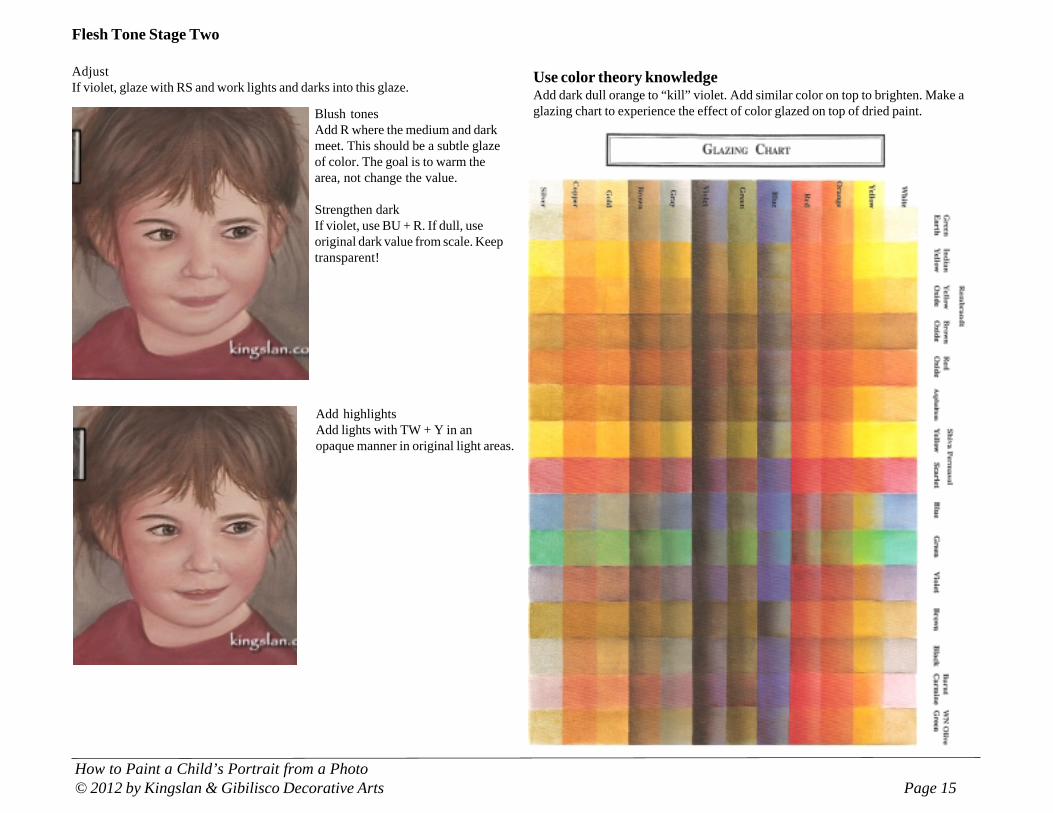
Flesh Tone Stage Two
AdjustIf violet, glaze with RS and work lights and darks into this glaze.
Blush tonesAdd R where the medium and darkmeet. This should be a subtle glazeof color. The goal is to warm thearea, not change the value.
Strengthen darkIf violet, use BU + R. If dull, useoriginal dark value from scale. Keeptransparent!
Use color theory knowledgeAdd dark dull orange to “kill” violet. Add similar color on top to brighten. Make aglazing chart to experience the effect of color glazed on top of dried paint.
Add highlightsAdd lights with TW + Y in anopaque manner in original light areas.
How to Paint a Child’s Portrait from a Photo© 2012 by Kingslan & Gibilisco Decorative Arts Page 16
Use Correct LightingIf you are working from a photo, use a photo taken in natural light asflashes fill the flace with flat light that is too harsh. It removes all of theplanes of the face. Having your sitter in in angled light lets you model theface in three dimensions.
Get the Basic Proportions RightIf you are using a photograph, try tracing some points to give you ‘sign-posts’ to work with. It isn’t cheating, its just a tool. Use negative spaceshapes to help you judge the relationships between things.
Checking Major AreasUse negtive space to check the shapes between the features. Imagine aline straight down the model’s face, through the pupil. Does the corner ofthe lip sit to the left or the right of it?
Check that:• The tilt of the eyes is correct• the nose is wide enough and long enough• the lips are the right thickness or thinness• the jawline is the correct shape• the hairline is the right height above the eyes
Portraits - How to Get a Proper Likeness
Look at the Little ThingsWhen you are drawing a portrait, tiny differences can really change theway the face looks. So check the small things. Little things, like the waythe line at the corner of the mouth tips down, the width of the lips, theshape of the wrinkles near the eyes - these things make it look like yoursitter.
ExaggerateOften a portrait artist will slightly exaggerate features to emphasise the.You can accentuate the size of the nose, the heaviness of the eyes or thefullness of the lips, ever so slightly. Step back from your model, andconsider how you would describe them Is the hairline receeding? Does hehave a drooping eyes? Does she have bushy eyebrows?
Don’t ignore the hairLastly, make sure you pay attention to the hair. Hair tells us a lot about aperson and can really change how someone looks. Be sure to pull wisps ofhair around face. Be sure there is flesh showing in the hair. Avoid “helmethead”!
Final Review
• Check features with acetate• Varnish to bring up colors• Put painting away for a few days and view with a fresh eye• Look for distractions within the piece• Strive for contrast in the eye area• Do another portrait right away!• Frame it and view