Embed Size (px)
Citation preview

1

2
Page numbers Headings
1. Title page2. Table of content3. Statement of intent4. Research and design concepts5. “ “6. “ “7. Ideas and design8. Ergonomics9. Justification of materials, components & processes10. Management11. Estimated time line12. Time line13. Finance plan14. Equipment used on job15. “ “16. Workshop safety and OH & S issues17. Work place communication18. Workshop drawings19. Cutting list20. Records of procedures21. “ “22. “ “23. Sketches24. Calculations25. Product evaluation26. Evidence of ongoing evaluation27. Appropriateness of design and modifications28. Evaluation of outdoor bench29. Production30. Quality of product31. Evidence of a range of skills32. Degree of difficulty33. Use of appropriate material34. Use of industrial technologiesEvidence of problem solving

3
My goal is to make a three seater outdoor Bench that will make the perfect outdoor garden lounge that is not to expensive. And can deal with the harsh weather of every day to day wear. I’m going to
achieve this by looking through the market and looking at all the designs. It will have to use a coating of outdoor paint to with stand the harsh conditions of outdoor climate.
I like old classical wooden designs and I really tried to bring the old touch into the design. I decided on this because there is a degree of difficulty and completing it.
It will be used for any one that has the space in the garden and use it and will last. It is going to be used for just social gatherings and BBQ’s.
It will be 1800 long and have a dark finish. The cost of it is $150 estimated no more (this includes brash bolts and all wood plus paint). It will be able to sell for $250 RRP. It can be moved easy
through doors as the width will be a bit over 500mm.
Measurement specifications 500mm by 1800mm estimate. Estimated to hold 250 KG with 3 people

4
The legs that are used here are great for weather and if you where to have the job put on
grass it would not move
The back of the bench will be a design so that the style and
elegance of an old wooden bench
The best outdoor timber is Teak coated with a outdoor gloss to last through the harsh conditions of rain. However you cant buy teak
with all the sizes that are needed in the job so for feasibility of the job radiata pine was the best choose followed by a stain and a coat
of all weather sealer.
5
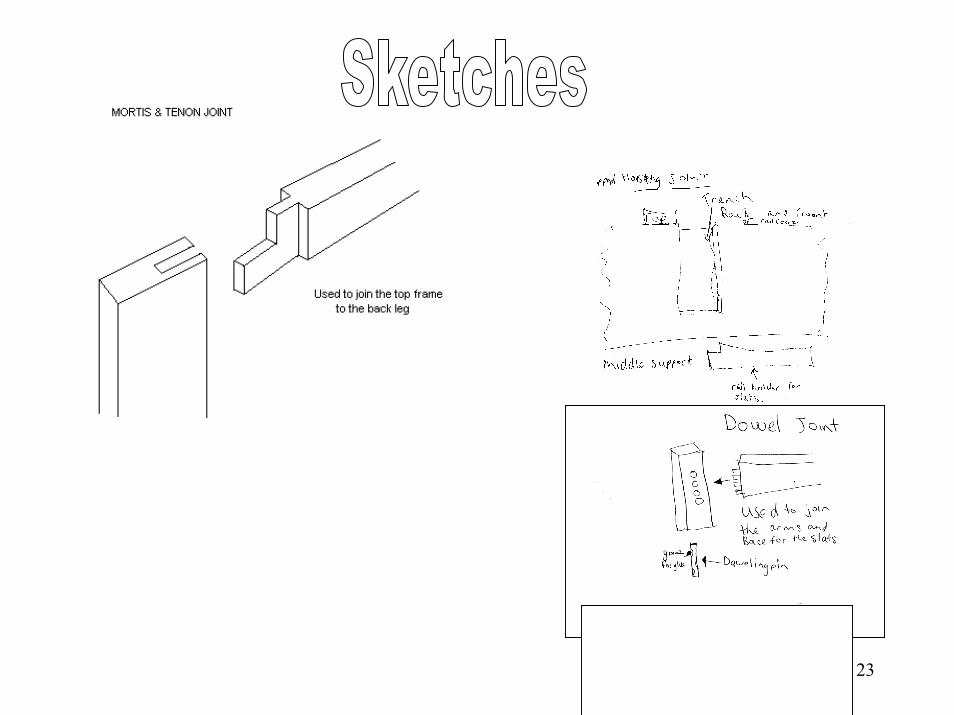
Steps involved in cutting a mortis and tenon joint.
1. Prepare timber to correct thickness and width.
2. Mark out places to cut with a mortis gauge on the tenon and the mortis. Make shore your markings fit to the design measurement of the job.
3.Cut the tenon with a tenon saw starting with even up strokes to start. then use a guide to cut the corner pieces off.
4. Now drill out the mortis. Line the drill piece up with the size of the tenon. Then drill the area marked out.
Mortis and tenon joints well be used to join the top of the frame. As it is most suitable for the job.
Aim is to allow a degree of difficult through strong joinery and have strong
joints so that it can support 3 people
9
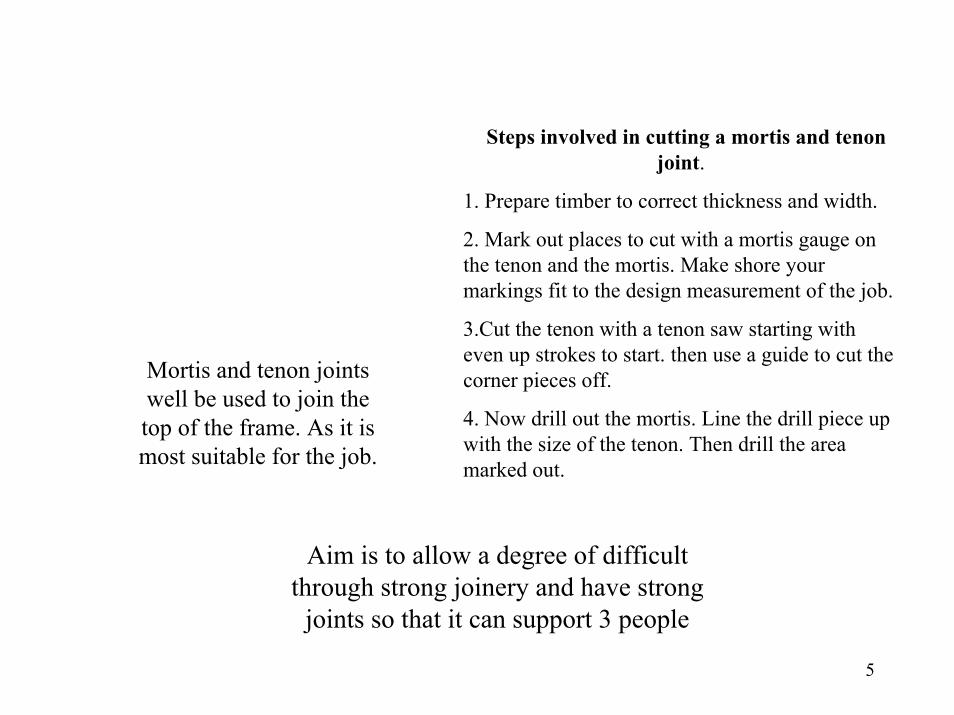
• I used all these joints for extra strong support for 3 people
• Cutting, drilling, sawing and use of all machinery
Processes• Dowel joints, mortis and tenon and stoped housing joints• Dressing timber• Marking out• gluing• painting
• Brass is strong and good for weather resistance.• Best for weather and colouring
• Brass screws
• Sikkens Stains
Components• Brass screws(rail joints)• Silver screws• Sikkens Stains
Justification of choice• It’s the only wood that comes in all different sizes needed for the job.
Choice• Pine Wood
OptionsMaterials• Pine Wood • Hard wood• Pacific Maple

10
11
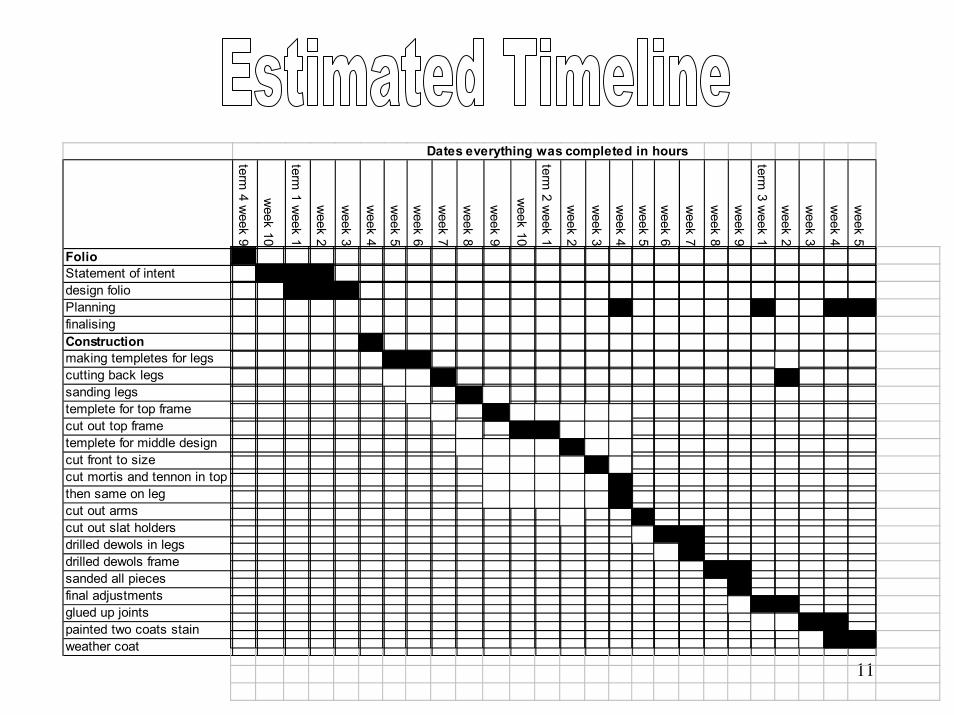
Dates everything was completed in hours
term 4 w
eek 9
week 10
term 1 w
eek 1
week 2
week 3
week 4
week 5
week 6
week 7
week 8
week 9
week 10
term 2 w
eek 1
week 2
week 3
week 4
week 5
week 6
week 7
week 8
week 9
term 3 w
eek 1
week 2
week 3
week 4
week 5
FolioStatement of intentdesign folioPlanningfinalisingConstructionmaking templetes for legscutting back legssanding legstemplete for top framecut out top frametemplete for middle designcut front to sizecut mortis and tennon in topthen same on legcut out arms cut out slat holdersdrilled dewols in legsdrilled dewols framesanded all pieces final adjustmentsglued up jointspainted two coats stainweather coat

12
Dates everything was completed in hours
term 4 w
eek 9
week 10
term 1 w
eek 1
week 2
week 3
week 4
week 5
week 6
week 7
week 8
week 9
week 10
term 2 w
eek 1
week 2
week 3
week 4
week 5
week 6
week 7
week 8
week 9
term 3 w
eek 1
week 2
week 3
week 4
week 5
FolioStatement of intentdesign folioPlanningfinalisingConstructionmaking templetes for legscutting back legssanding legstemplete for top framecut out top frametemplete for middle designcut front to sizecut mortis and tennon in topthen same on legcut out arms cut out slat holdersdrilled dewols in legsdrilled dewols framesanded all pieces final adjustmentsglued up jointspainted two coats stainweather coat

13
Items Expected cost thought to pay
Actual cost Date Purchased
Timber $150 $135.40 1/2/01
Brass screws $15 $11.95 12/5/01
Outdoor weather paint plus stain
$20 $18.50 31/7/01
Total 165.85
14
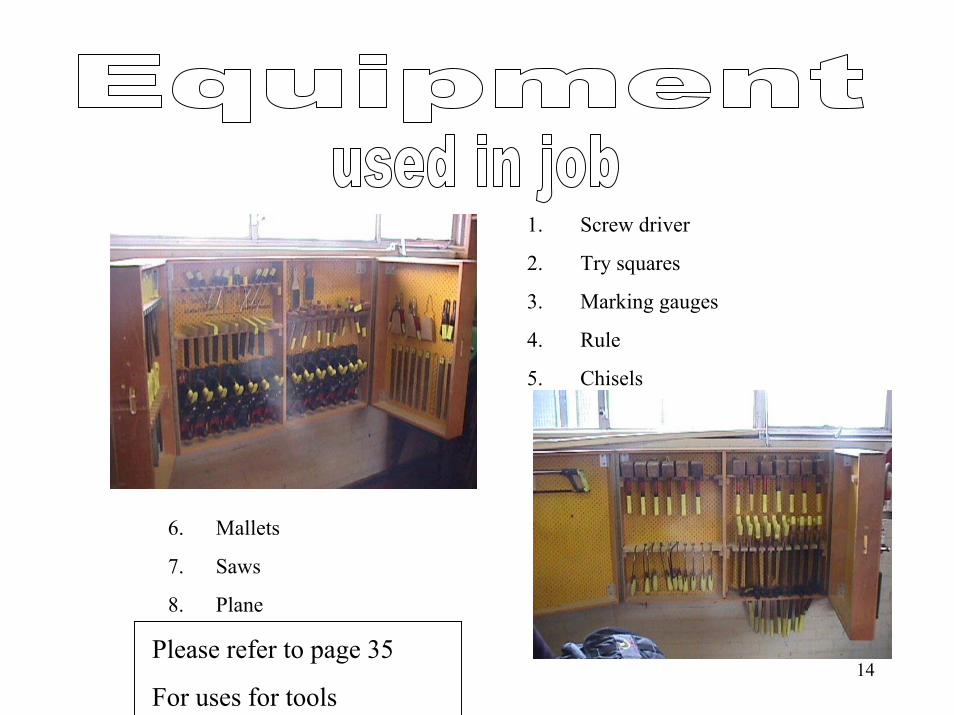
1. Screw driver
2. Try squares
3. Marking gauges
4. Rule
5. Chisels
6. Mallets
7. Saws
8. Plane
Please refer to page 35
For uses for tools

16
• The disk sander is used to power sand the wood to a perfect 90 degree angle you need specific eyewear and a steady hand.
• The circular saw is used to cut pieces of wood straight and with adjustable widths. This machine requires eye ware and a long piece of wood that can be used to feed the last bit of wood though so you hands are not in harms way.• ALL MACHINARY REQUIRES PROTECTIVE EYEWEAR AND ALL CLOTHS NEED TO BE KEEPED TIGHT, FACE AND DIST MASKS MAY BE NEEDED WHEN LOTS OF DUST APPEARS HARMFUL. All safety equipment was provided by Vaucluse high school with the proper safety equipment.
• Using the thinknesser. Protective eye ware should be worn at all times and never be removed until you have completely finished.
• Using the band saw. The band saw is used for cutting anything even bones and meat like a butcher. So when using something a dangerous as this a few things need to be addressed. When cutting a piece of wood never feed with your hands in be hind the blade many fingers have been eaten by this machine. Eyewear should be worn. Always wait till the blade has stoped spinning before removing wood. Also shirt and loose clothing should be kept tight to the body.

17

18
19
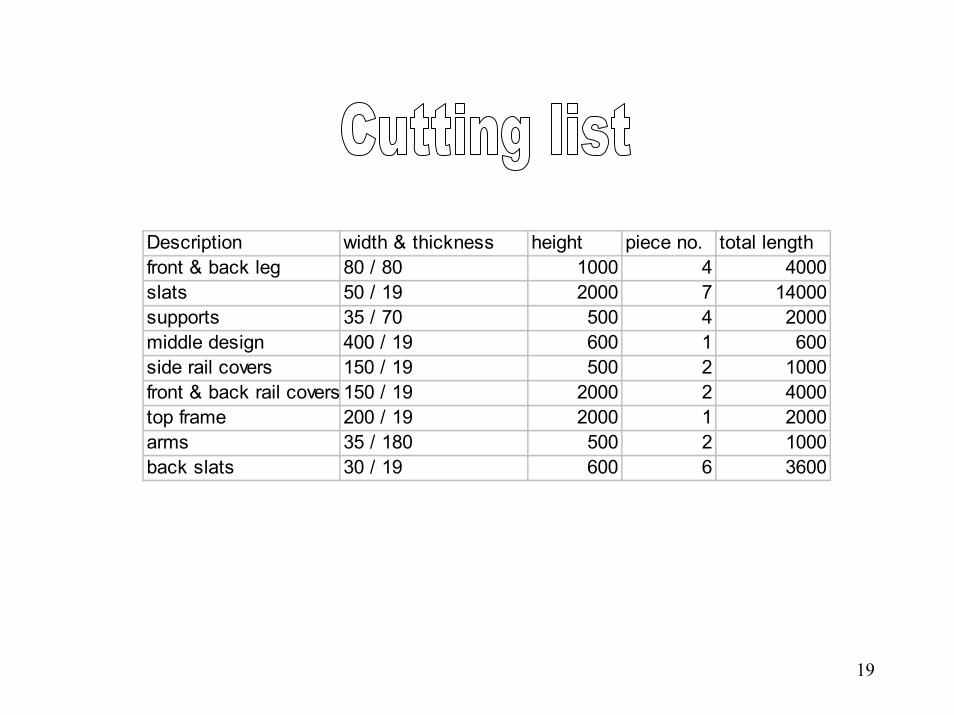
Description width & thickness height piece no. total lengthfront & back leg 80 / 80 1000 4 4000slats 50 / 19 2000 7 14000supports 35 / 70 500 4 2000middle design 400 / 19 600 1 600side rail covers 150 / 19 500 2 1000front & back rail covers 150 / 19 2000 2 4000top frame 200 / 19 2000 1 2000arms 35 / 180 500 2 1000back slats 30 / 19 600 6 3600
23
24
The calculations on the job where;
1. The front legs need to be cut lower than the back legs to 1000 down to 7000 to allow for the curve of the arms.
2. Cutting the mortis and tenon need to be a bit stronger than 1/3 across the mortis so on each piece I did from 19 mm 5/9/5. Cutting the middle piece at 9 so that it would support top frame.
3. The supports for the slats are made 550 in from each side to give extra for 3 people at once.
4. Having both sides of supports to be at right height with marking out

25
26
The mortis and tenon joint used in to join the top frame to the leg was a good an serve its prepose as supporting the back of the chair.
The middle design was made to short but was integrated in to the design of the structure. It is then made stronger with extra support.
With over 19 dowel joints, 2 mortis and tenon joints and 4 stopped housing joints this is truly a strong and difficult job that I have achieved over 8 months of hard work.
Warped timber needed to be screwed in to place to hold the support beams.With cutting pieces they needed to be cut short and shorter to get them to fit in just right with a trial and error methodThe thicknesser broke down and arteria methods need to be used. So I decided to use the circular saw to cut the big legs out.The templates I made really helped the shaping of the job.
27
Modifications need to be made to the design when I encountered that the back design didn’t fit with the required measurements as a result of the back leg angle. However this problem was over come by the using another piece so that there was more support need for the back of the chair.
The design had to be altered to the frame of the slat holders. If three people where going to sit on the chair it would require a reasonable amount of weight. So modifications need to be made instead of three slat holders it would be preferred that I use four with stoped housing joints with screws so that it provides a standard amount of weight with dowels.
28
The top frame was made first with the middle design and should have been made last to line up exactly with the slats
The hardest part of the job was joining up about 20 joints with glue and and getting everything straight.
All hardware was provided by Vaucluse high school and with all the different machinery the school has any job is attain with proper safety.The cost of the job was $165.85 with all adjustments and paint which
makes this a cheap and worthy investment for a timeless garden bench.

29

30
The product was made to 100% of my ability and with hours and hours of getting every joint to sit exactly flush with the surface of the part that it joined to. I surprised my self in that area where I thought that everything was going to be out by a bit, but nothing was even with the legs to legs including arms and side pieces all going from
one piece to another it looked pretty nice in the end.
The stain was difficult as I expected. And it really gave the job the look that I wanted a really nice old style finish.

31
The range of skills I used in the job.
• Dowel joints – after making over 19 joints with dowel pins it became easy easier and easier. And I know where my faults are that needed to be addressed in the first place. This joint was every effective and served its prepose in all aspects of the job. Drilling with a guide so the holes were straight.
• Mortis and tenon joint – the joint used was effective to the part of the job. It is strong and fits and looks good. Chiselling and drilling the holes of the job.
• Stopped housing joint – this joint was made with worped timber and need to be exactly right on both sides. The way around this was screwing the joint together.
• Use of staining
• Gluing and clamping of job
• Making various joints
32
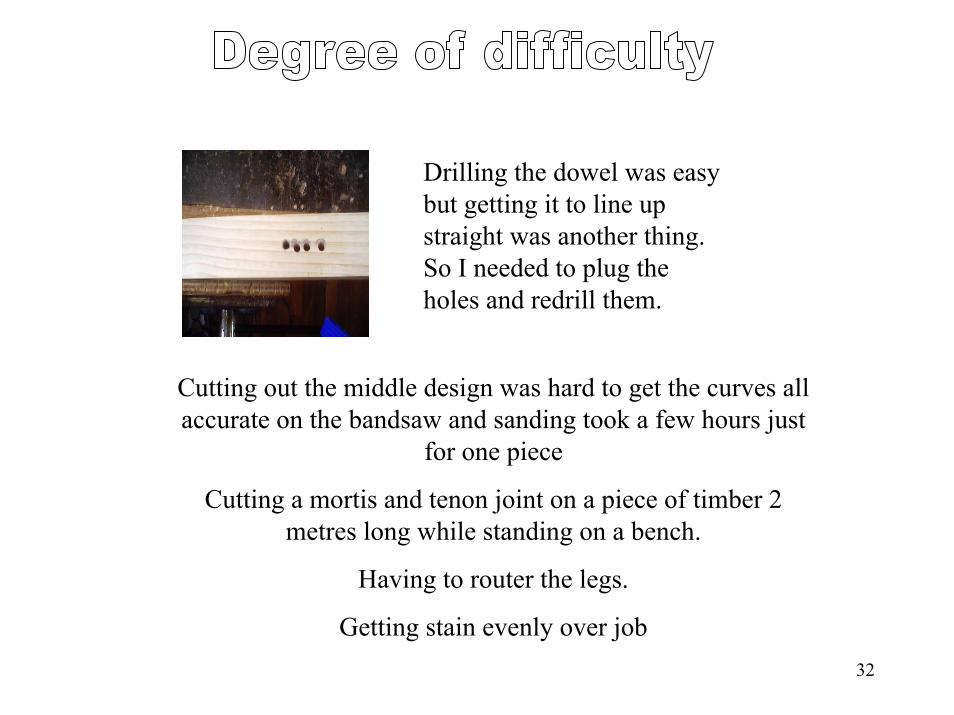
Drilling the dowel was easy but getting it to line up straight was another thing. So I needed to plug the holes and redrill them.
Cutting out the middle design was hard to get the curves all accurate on the bandsaw and sanding took a few hours just
for one piece
Cutting a mortis and tenon joint on a piece of timber 2 metres long while standing on a bench.
Having to router the legs.
Getting stain evenly over job

33
Radiata pine I think was a good decision in my job. If I used hard wood it would have be two times more expensive and with today's standards of joinery and outdoor weather paints you can change the colour of the wood to look as expensive as any hardwood.
Brass screws coated for special weather protection.

34
This folio was entirely constructed from Microsoft PowerPoint 98. All pictures where acquired by digital camera and scanner.
All machinery that was used was from Vaucluse highs wood tech prac room. Machinery and hand tools used;
• Power sander – finishes job just before
• Disc sander – painting squaring ends on all pieces
• Hand drill – used in making dowel holes and screws holds
• Circular saw – used to cut each piece of the wood to size
• Band saw – used to cut curves around timber
• Drop saw – used to shorten pieces and square ends
• Router, bench router – used to curve edges on any corner
Hand Tools
• Tenon saw – used for cutting out mortis and tenon joints
• Screw driver – used to screw in screws
• Sanding block and sand paper used to tidy up the job
• Chisel – used to make joints


![Activant Solutions, Inc. - EpicorTOC: Update Maintain TOC Account for new headings Account for change of page numbers Select TOC, right click, choose Update Field [F9] - or - Tip:](https://img.pdfslide.us/doc/110x75/5f3c468a3dfdda3af6463de0/activant-solutions-inc-epicor-toc-update-maintain-toc-account-for-new-headings.jpg)