Embed Size (px)
Citation preview

INSTRUCTIONMANUAL
FOR
BLUEDSTEEL
CALIBER9mm
© 2012 Sturm, Ruger & Co., Inc.
This manual may not be reproduced in whole or in part without the express writtenpermission of Sturm, Ruger & Co., Inc.
For Service on This Model Please Call:(928) 778-6555 (See p. 29)
THIS INSTRUCTION MANUAL SHOULD ALWAYS ACCOMPANY THIS FIREARM AND BETRANSFERRED WITH IT UPON CHANGE OF OWNERSHIP, OR WHEN THE FIREARM IS LOANED
OR PRESENTED TO ANOTHER PERSON
www.ruger.comCP 4/12 C
R3
READ THE INSTRUCTIONS ANDWARNINGS IN THIS MANUAL CAREFULLYBEFORE USING THIS FIREARM
RUGER®
LC9TM
LIGHTWEIGHT COMPACT 9MM PISTOL
S
– Rugged, Reliable Firearms –

2
State-By-State WarningsCertain states require by law that their own specified warningnotices in larger-than-normal type be conspicuously included bythe manufacturer, distributor, or retailer with firearms sold in thatstate. Sturm, Ruger sells its products in compliance withapplicable laws and regulations. Because our products may besold in these states, we include the following:
California:
Connecticut:“UNLAWFUL STORAGE OF A LOADED FIREARM MAYRESULT IN IMPRISONMENT OR FINE.”
Florida:“IT IS UNLAWFUL, AND PUNISHABLE BYIMPRISONMENT AND FINE, FOR ANY ADULT TOSTORE OR LEAVE A FIREARM IN ANY PLACE WITHINTHE REACH OR EASY ACCESS OF A MINOR UNDER 18YEARS OF AGE OR TO KNOWINGLY SELL OROTHERWISE TRANSFER OWNERSHIP OR POSSESSIONOF A FIREARM TO A MINOR OR A PERSON OFUNSOUND MIND.”
WARNING
“Children are attracted to andcan operate firearms that cancause severe injuries or death.Prevent child access by alwayskeeping guns locked away andunloaded when not in use. If youkeep a loaded firearm where achild obtains and improperly usesit, you may be fined or sent toprison.”
ADVERTENCIA“A los niños los atraen las armasde fuego y las pueden hacerfuncionar. Ellos pueden causarseslesions graves y la muerte. Eviteque los niños tengan accesso a lasarmas de fuego guardándolassiempre con llave y descargadascuando no las esté utilizando. Siusted tiene un arma de fuegocargada en un lugar en que unniño tiene acceso a ella y la usaindebidamente, le pueden dar unamulta o enviarlo a la carcel.”

Maine:“ENDANGERING THE WELFARE OF A CHILD IS ACRIME. IF YOU LEAVE A FIREARM AND AMMUNITIONWITHIN EASY ACCESS OF A CHILD, YOU MAY BESUBJECT TO FINE, IMPRISONMENT OR BOTH. KEEPFIREARMS AND AMMUNITION SEPARATE. KEEPFIREARMS AND AMMUNITION LOCKED UP. USETRIGGER LOCKS.”
Maryland:“WARNING: Children can operate firearms which may causedeath or serious injury. It is a crime to store or leave a loadedfirearm in any location where an individual knew or shouldhave known that an unsupervised minor would gain access tothe firearm. Store your firearm responsibly!”
Massachusetts:“WARNING FROM THE MASSACHUSETTS ATTORNEYGENERAL: This handgun is not equipped with a device thatfully blocks use by unauthorized users. More than 200,000firearms like this one are stolen from their owners every yearin the United States. In addition, there are more than athousand suicides each year by younger children andteenagers who get access to firearms. Hundreds more die fromaccidental discharge. It is likely that many more childrensustain serious wounds, or inflict such wounds accidentally onothers. In order to limit the chance of such misuse, it isimperative that you keep this weapon locked in a secure placeand take other steps necessary to limit the possibility of theftor accident. Failure to take reasonable preventive steps mayresult in innocent lives being lost, and in some circumstancesmay result in your liability for these deaths.”
“IT IS UNLAWFUL TO STORE OR KEEP A FIREARM,RIFLE, SHOTGUN OR MACHINE GUN IN ANY PLACEUNLESS THAT WEAPON IS EQUIPPED WITH ATAMPER-RESISTANT SAFETY DEVICE OR IS STOREDOR KEPT IN A SECURELY LOCKED CONTAINER.”
3

New Jersey:“IT IS A CRIMINAL OFFENSE TO LEAVE A LOADEDFIREARM WITHIN EASY ACCESS OF A MINOR.”
New York City:
“THE USE OF A LOCKING DEVICE OR SAFETY LOCKIS ONLY ONE ASPECT OF RESPONSIBLE FIREARMSTORAGE. FOR INCREASED SAFETY FIREARMSSHOULD BE STORED UNLOADED AND LOCKED IN ALOCATION THAT IS BOTH SEPARATE FROM THEIRAMMUNITION AND INACCESSIBLE TO CHILDRENAND OTHER UNAUTHORIZED PERSONS.”
North Carolina:“IT IS UNLAWFUL TO STORE OR LEAVE A FIREARMTHAT CAN BE DISCHARGED IN A MANNER THAT AREASONABLE PERSON SHOULD KNOW ISACCESSIBLE TO A MINOR.”
Texas:“IT IS UNLAWFUL TO STORE, TRANSPORT, ORABANDON AN UNSECURED FIREARM IN A PLACEWHERE CHILDREN ARE LIKELY TO BE AND CANOBTAIN ACCESS TO THE FIREARM.”
Wisconsin:“IF YOU LEAVE A LOADED FIREARM WITHIN THEREACH OR EASY ACCESS OF A CHILD YOU MAY BEFINED OR IMPRISONED OR BOTH IF THE CHILDIMPROPERLY DISCHARGES, POSSESSES, OREXHIBITS THE FIREARM.”
* * * * * * * * * * * * * * * * * * * * * *
Please check with your licensed retailer or state police foradditional warnings which may be required by local law orregulation. Such regulations change constantly, and localauthorities are in the best position to advise you on such legalmatters.
4

5
FIREARMS SAFETY IS YOUR RESPONSIBILITY
SAFETY MUST BE THE FIRST AND CONSTANTCONSIDERATION OF EVERY PERSON WHO HANDLES
FIREARMS AND AMMUNITION.
This Instruction Manual is designed to assist you in learning how to useand care for your RUGER® LC9TM properly. Please contact us if youhave any questions.
Only when you are certain you fully understand the Manual and canproperly carry out its instructions should you practice loading, unloading,etc. with live ammunition. If you have any doubts about your ability tohandle or use a particular type of gun safely, you should seek supervisedinstruction. Such personalized instruction often is available from localgun retailers, gun clubs or police departments. If none of these sourcescan help, visit www.nra.org/home or write to the following address:
National Rifle Association11250 Waples Mill RoadFairfax, VA 22030-7400
The person possessing a gun has a full-time job. You cannot guess; youcannot forget. You must know how to use your firearm safely. Do not useany firearm without having a complete understanding of its particularcharacteristics and safe use. Remember: There is no such thing as afoolproof gun.

TABLE OF CONTENTSState-By-State Warnings . . . . . . . . . . . . . . . . . . . . . . . . . . . . . . . . . . . . . . . . . .2Nomenclature . . . . . . . . . . . . . . . . . . . . . . . . . . . . . . . . . . . . . . . . . . . . . . . . . . .7Locking Device Installation Instructions . . . . . . . . . . . . . . . . . . . . . . . . . . . . .8General Information and Mechanical Characteristics . . . . . . . . . . . . . . . . . .10Ammunition . . . . . . . . . . . . . . . . . . . . . . . . . . . . . . . . . . . . . . . . . . . . . . . . . . .11Operation of Manual Safety . . . . . . . . . . . . . . . . . . . . . . . . . . . . . . . . . . . . . . .12Operation of Internal Lock . . . . . . . . . . . . . . . . . . . . . . . . . . . . . . . . . . . . . . .14Operation of Loaded Chamber Indicator . . . . . . . . . . . . . . . . . . . . . . . . . . . .15Operation of Magazine Disconnect . . . . . . . . . . . . . . . . . . . . . . . . . . . . . . . . .16To Load and Fire (with magazine) . . . . . . . . . . . . . . . . . . . . . . . . . . . . . . . . .16To Unload . . . . . . . . . . . . . . . . . . . . . . . . . . . . . . . . . . . . . . . . . . . . . . . . . . . . .19To Extract and Eject a Chambered Cartridge . . . . . . . . . . . . . . . . . . . . . . . . .20To Clear a Malfunction (“Jam”) . . . . . . . . . . . . . . . . . . . . . . . . . . . . . . . . . . .21To Minimize Malfunctions (“Jams”) . . . . . . . . . . . . . . . . . . . . . . . . . . . . . . . .21To Disassemble . . . . . . . . . . . . . . . . . . . . . . . . . . . . . . . . . . . . . . . . . . . . . . . . .22To Reassemble . . . . . . . . . . . . . . . . . . . . . . . . . . . . . . . . . . . . . . . . . . . . . . . . .26Magazine Inspection and Care . . . . . . . . . . . . . . . . . . . . . . . . . . . . . . . . . . . .26Care and Cleaning . . . . . . . . . . . . . . . . . . . . . . . . . . . . . . . . . . . . . . . . . . . . . .27Storage . . . . . . . . . . . . . . . . . . . . . . . . . . . . . . . . . . . . . . . . . . . . . . . . . . . . . . .28Service and Parts Policy . . . . . . . . . . . . . . . . . . . . . . . . . . . . . . . . . . . . . . . . .29Shipping Firearms for Repair . . . . . . . . . . . . . . . . . . . . . . . . . . . . . . . . . . . . .29Ordering Parts . . . . . . . . . . . . . . . . . . . . . . . . . . . . . . . . . . . . . . . . . . . . . . . . .30Parts List . . . . . . . . . . . . . . . . . . . . . . . . . . . . . . . . . . . . . . . . . . . . . . . . . . . . .31Exploded View . . . . . . . . . . . . . . . . . . . . . . . . . . . . . . . . . . . . . . . . . . . . . . . . .33The Basic Rules of Safe Firearms Handling . . . . . . . . . . . . . . . . . . . . . . . . . .34Warranty Information . . . . . . . . . . . . . . . . . . . . . . . . . . . . . . . . . . . . . . . . . . .40
“Ruger” is a registered U.S. trademark.
6
Locking Devices 8 Unloading 19Alterations 10 Slide Retraction 20Lead Exposure 12 Malfunctions 21Ammunition 12 Disassembly 22Manual Safety 13 Lubrication 28Loaded Chamber 15 Storage 28Magazine Disconnect 16 Shipping 29Firing 18 Parts Purchasers 30Handling 18
WARNINGS OF GREAT IMPORTANCE AREFOUND ON THE FOLLOWING PAGES:
OTHER CAUTIONS AND WARNINGS APPEARTHROUGHOUT THE MANUAL.

NOMENCLATUREDovetailed rearsight adjustablefor windage.
Dovetailed frontsight.
Slide’s open top design minimizespossibility of jamming, enables shooter toclear any malfunction easily by hand.Cartridges can be loaded singly if desired. Flush profile hammer
is visible in the ready-to-fire, semi-cockedposition.
7
Frame is a rigid onepiece nylon gripframe reinforced withlong glass fiber.
Single-strike, double-action onlymechanism provides that cocking andfiring can be accomplished with asingle pull of the trigger.
Magazine latch permitspositive retention and quickremoval of magazine.
Slide locks open afterlast round fired.
Extractor is designed for reliableextraction of cartridges and firedcases from chamber.
Loaded chamber viewport.
Checkered back and front strapsfor secure grip.
Internal, key-activated, lock.
Pistol grip is checkeredfor a secure grip.
Takedown pin.
Loaded chamberindicator.
Manual safety.
Slide Hold Openallows the slide to belocked to the rear topositively view thecartridge chamber.The hold open is
spring loadeddownward so it is
released by pullingthe slide slightly
rearward.

WHY ARE WE INCLUDING A FIRED CARTRIDGE CASEWITH EVERY RUGER PISTOL AND REVOLVER?
Certain states and jurisdictions require that all newly manufactured pistols andrevolvers must be accompanied by a cartridge case, which has been test firedfrom that gun at the factory. The case must be placed in a sealed containerbearing certain information concerning this test cartridge.
At the time of retail sale in those jurisdictions, firearms dealers must forwardsuch test cartridge to a designated destination such as their State PoliceLaboratory. As independent distributors of Ruger® firearms have nationwidemarkets without territorial restrictions, we have decided to include a firedcartridge case with all new Ruger pistols and revolvers, to minimize thepossibility of inadvertent non-compliance with these laws.
Retail customers located in other states, where laws or regulations do not requirethe dealer to so act, may be assured that the fired cartridge case they receive withthe firearm at the time of retail purchase is proof that your new Ruger firearmhas undergone our normal test firing procedures during manufacture.
8
LOCKING DEVICEINSTALLATION INSTRUCTIONS
WARNING – USE OF LOCKING DEVICES• Always keep your firearm pointed in a safe direction,including when you are installing or removing yourlocking device.
• Always verify that your firearm is completely unloadedbefore installing your locking device.
• Do not install locking devices in the trigger guard;always keep your fingers and locking device outside thetrigger guard during device installation and removal.
• Store firearms, ammunition and keys separately andsecurely, away from children and careless adults; do notstore your firearm with the keys in the locking device.
• Do not attempt to work the action of your firearm withthe locking device in place; this may damage yourfirearm.
• While locking devices are an important aid to securitymeasures, they are not a substitute for safe firearmhandling and proper storage. Remember that anymechanical device can be bypassed with enough time,knowledge, determination and equipment.
LOCKING DEVICES MUST BE USEDSAFELY AND RESPONSIBLY
Do not store keysin lock.
9
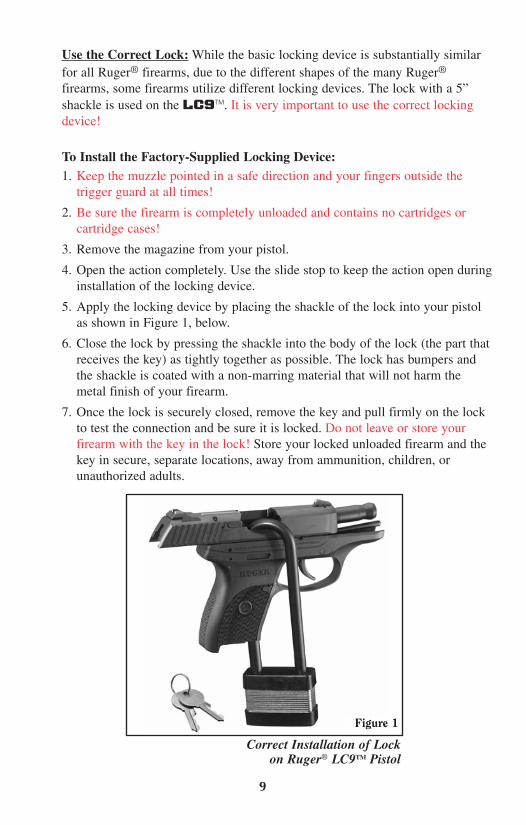
Correct Installation of Lock on Ruger® LC9TM Pistol
Use the Correct Lock:While the basic locking device is substantially similarfor all Ruger® firearms, due to the different shapes of the many Ruger®
firearms, some firearms utilize different locking devices. The lock with a 5”shackle is used on the LC9TM. It is very important to use the correct lockingdevice!
To Install the Factory-Supplied Locking Device:1. Keep the muzzle pointed in a safe direction and your fingers outside thetrigger guard at all times!
2. Be sure the firearm is completely unloaded and contains no cartridges orcartridge cases!
3. Remove the magazine from your pistol.
4. Open the action completely. Use the slide stop to keep the action open duringinstallation of the locking device.
5. Apply the locking device by placing the shackle of the lock into your pistolas shown in Figure 1, below.
6. Close the lock by pressing the shackle into the body of the lock (the part thatreceives the key) as tightly together as possible. The lock has bumpers andthe shackle is coated with a non-marring material that will not harm themetal finish of your firearm.
7. Once the lock is securely closed, remove the key and pull firmly on the lockto test the connection and be sure it is locked. Do not leave or store yourfirearm with the key in the lock! Store your locked unloaded firearm and thekey in secure, separate locations, away from ammunition, children, orunauthorized adults.
Figure 1

GENERAL INFORMATIONAND MECHANICAL CHARACTERISTICS
The RUGER® LC9TM is a compact, single-strike, double-action only,magazine-fed, recoil-operated pistol chambered for the 9mm cartridge. TheLC9TM incorporates a different “link-less” design in the barrellocking/unlocking system than earlier Ruger P-Series pistols, and features astreamlined slide, and glass reinforced nylon and aluminum subframe gripframe. The following are features with which LC9TM users should be thoroughlyfamiliar:
Action:The strong locked breech action of the RUGER® LC9TM utilizes atilting barrel design in which the barrel and slide are locked together at themoment of firing. After firing, the barrel and slide recoil to the rear a shortdistance while securely locked together. After this initial movement, the barrel iscammed downward from its locked position, permitting full recoil of the slideand the extraction and ejection of the spent cartridge case. Upon return of theslide to its forward position by the recoil spring, the barrel is cammed backupward into its locked position in the slide.
The user of this or any autoloading pistol must always remember that whenfired, it automatically reloads and recocks itself, so that simply pulling thetrigger will fire the pistol again. Therefore, an autoloading pistol user must beparticularly conscious to always keep the pistol pointed in a safe direction.
Slide Hold Open: This allows the user to manually lock the slide open. Note:when the last shot has been fired and the magazine is empty, the slide hold openautomatically holds the slide open. If a loaded magazine is inserted in the pistolwhen the slide is closed and the slide is then retracted fully, the slide hold openwill not automatically hold open the slide. The user can actuate the slide holdopen mechanism to hold the slide open at any time by retracting the slide andpushing the slide hold open up.
10
WARNING - ALTERATIONS
DO NOT ALTER ANY GUN
FIREARMS ARE DANGEROUS WEAPONS -READ THE INSTRUCTIONS AND WARNINGS
IN THIS MANUAL THOROUGHLY ANDCAREFULLY BEFORE USING.
This product was designed to functionproperly in its original condition.Alterations can make it unsafe. Do notalter any part or add or substitute parts oraccessories not made by Sturm, Ruger &Co., Inc.

11
The slide hold open can be released by drawing back slightly on the slide. Whenthe slide is released, it will move forward under pressure from the recoil spring.
The slide hold open is held in place by a spring. Therefore, when there is a loadedmagazine in place and the pistol is jarred, the slide can fly forward and chambera cartridge. For this reason and as an essential safety practice, the user shouldalways be careful to keep fingers away from the trigger, and always keep thepistol pointed in a safe direction.
Magazines: The Ruger 9mm magazine, included with your RUGER® LC9TM,has been specifically designed for the RUGER® LC9TM pistol and is notinterchangeable with other Ruger pistol magazines even though it may appearsimilar and may hold 9mm cartridges. Use of incorrect magazines in any pistolwill result in malfunctions.
DAMAGED, NON-STANDARD, OR IMPROPERLYASSEMBLED MAGAZINES SHOULD NOT BE USED.THEY CAN CAUSE THE PISTOL TO MALFUNCTION.
AMMUNITIONThe RUGER® LC9TM pistols are chambered for the 9mm cartridge. Do notattempt to load any other cartridges into the magazine or chamber of the pistol.Do not use “+P+” ammunition. (See “NOTE on +P Ammunition” below.)
The RUGER® LC9TM pistols are compatible with standard factory ammunitionloaded to U.S. Industry Standards, including hollow-point loads loaded in brassor aluminum cases. No 9mm ammunition manufactured in accordance withNATO, U.S., SAAMI, or CIP standards is known to be beyond the design limits orknown not to function in these pistols.
Note on +P Ammunition: Although the RUGER® LC9TM is capable offunctioning with 9mm +P ammunition, a steady diet of +P ammunition willshorten the endurance life of the RUGER® LC9TM. You should never shoot9mm +P+ ammunition in your RUGER® LC9TM. There are no SAAMI or CIPpressure limits on 9mm +P+ and use of this ammunition could result in seriousinjury.
Do not use “+P+” ammunition.
AMMUNITION (CARTRIDGES) NOTICEWE SPECIFICALLY DISCLAIM RESPONSIBILITY FOR ANY DAMAGE
OR INJURY WHATSOEVER OCCURRING IN CONNECTION WITH, OR ASA RESULT OF, THE USE IN RUGER FIREARMS OF FAULTY, OR NON-
STANDARD, OR “RE-MANUFACTURED”, OR HAND-LOADED(RELOADED) AMMUNITION, OR OF CARTRIDGES OTHER THAN THOSE
FOR WHICH THE FIREARM WAS ORIGINALLY CHAMBERED.

12
WARNING - AMMUNITIONDeath, serious injury, and damage can result from the use of the wrongammunition, bore obstructions, powderoverloads, or incorrect cartridgecomponents. Even the strongest gun can be“blown up” as a result of excess pressure.Always wear shooting glasses and hearingprotection.
IMPROPER AMMUNITIONDESTROYS GUNS
WARNING - LEAD EXPOSUREDischarging firearms in poorlyventilated areas, cleaning firearms, orhandling ammunition may result inexposure to lead and other substancesknown to the State of California tocause birth defects, reproductive harm,and other serious physical injury. Haveadequate ventilation at all times. Washhands thoroughly after exposure.
SHOOTING OR CLEANING GUNSMAY EXPOSE YOU TO LEAD
OPERATION OF MANUAL SAFETYThe LC9TM is equipped with a manual safety lever.
To engage the manual safety, point the pistol in a safe direction. Move the safetylever upward fully to the “safe” position. Note that the pistol must be cocked toengage the safety.
When the safety is moved fully upward to the “safe” position, the red oval on theleft side of the frame insert will be fully covered by the left safety lever and awhite oval will be visible. If any red is showing, the safety is not in the “safe”position. Do not attempt to engage the safety while pulling the trigger.

WARNING - MANUAL SAFETY
The safety mechanism provides that the trigger cannot be pulled unless thesafety is disengaged. Like the 1911 pistols, the manual safety lever locks the slideshut, ensuring that the pistol will be ready to fire when the safety is disengaged.To disengage the manual safety, point the pistol in a safe direction and push thesafety lever fully downward. The red oval signifies that the safety is disengagedand the pistol is ready to fire.
Additionally, the pistol has a separate firing pin block which will not allow the firingpin to move forward and contact the cartridge until the operator pulls the triggerwith the safety off (in its “fire” position).
The safety should be in its “safe” position at all times except when the user isdeliberately positioned to fire at a selected target. When the safety is in the “fire”position (safety lever down) the red oval is exposed just above the safety lever. SeeFigures 2 and 3, below, which illustrate the two positions of the safety.
“SAFE” POSITION “FIRE” POSITION
Red oval exposed
Figure 2 Figure 3
13
Placing the safety in an intermediate positionbetween “safe” and “fire” can result in the userthinking the pistol is in a safe or fire positionwhen it is not. Pulling the trigger with the safetyin an intermediate position may cause the pistolto fire. Therefore, always move the safety fully toits intended position and then check to be sureit is where you want it to be. Unless the red ovalis fully covered by the safety lever, the safety isnot “ON.” Unless the red oval is fully visible, thepistol is not absolutely ready to fire.
NEVER PUT SAFETY 1/2 ON

OPERATION OF INTERNAL LOCKNever rely upon any safety mechanism or mechanical device to justify unsafe orcareless handling of a firearm. When securing your pistol or to preventunauthorized access, you should completely unload the pistol and store it in agun safe or use the key-operated external locking device supplied with your pistol.(See Page 8.) However, for added security, and to comply with certain state andlocal laws, your RUGER® LC9TM pistol is also equipped with an internal lock.When actuated, this internal lock will secure the pistol’s manual safety in the "on"or "safe" position.
Before activating the internal lock on your pistol, first visually inspect thechamber and magazine to verify that they are empty and do not contain anycartridges.
To activate the internal lock, place the manual safety in the "on" or "safe" position(see Figure 2, p. 13). (Note that the pistol must be cocked to engage the safety.)Next, place the internal lock key (supplied with your pistol) into the internal lockkeyway. (See “Nomenclature,” p. 7.) Rotate the key clockwise (about 1/4 of arotation from the fully unlocked position) until it stops. (See Figure 4.) Removethe key and verify that the internal lock is engaged by attempting to move thesafety to the "off" or "fire" position. If the internal lock is engaged, the trigger willmove freely and will not function.
To deactivate the internal lock, place the internal lock key into the internal lockkeyway (see “Nomenclature,” p. 7) and rotate the key counter-clockwise (about 1/4turn from the fully locked position) until it stops. (See Figure 4.)
Be sure to store the internal lock key in a secure location, away from children andcareless adults. Do not store your firearm with the key in the internal lockkeyway. Never lock a loaded gun – always unload the gun before locking.
OPERATION OF INTERNAL LOCK
Figure 4
14
To engagethe internallock, rotatethe keyclockwise 1/4of a rotation.
To deactivate,rotate the keycounter-clockwise 1/4of a rotation.NOTE: With internal lock engaged,trigger will move freely and will notfunction.

OPERATION OFLOADED CHAMBER INDICATOR
You should always treat every gun as though it is loaded and always keep the muzzlepointed in a safe direction. Never rely upon any safety or mechanical device to justifyunsafe or careless gun handling. In order to assist you in determining the presenceof a cartridge in the chamber of your RUGER® LC9TM pistol, and to comply withstate laws, the LC9TM is equipped with a loaded chamber indicator. The indicatorappears on the top of the slide. (See “Nomenclature,” p. 7.)
When the chamber is empty, the loaded chamber indicator should be flush with thetop of the slide. (See Figure 5A, below.)
When the chamber is loaded, the forward portion of the loaded chamber indicatorshould protrude from the top of the slide. When the chamber contains a cartridge, ared bar should be visible on either side of the loaded chamber indicator. (See Figure5B, below.)
OPERATION OF LOADED CHAMBER INDICATOR
Chamber Empty
Figure 5B
Cartridge in Chamber
NEVER RELY ON YOUR MEMORY OR ANY LOADED CHAMBERINDICATOR TO KNOW IF A GUN IS LOADED. ANYMECHANICAL DEVICE CAN FAIL. ALWAYS VISUALLY CHECK THE
CHAMBER BY RETRACTING THE SLIDE AND EXAMINING THECHAMBER TO BE SURE WHETHER IT IS EMPTY OR LOADED.
IndicatorFlushWith Top
IndicatorProtrudesFromTop -Red BarVisible
“LoadedWhen Up”
Figure 5A
15

OPERATION OF MAGAZINE DISCONNECTYour RUGER® LC9TM pistol is equipped with a magazine disconnect. Thisdevice prevents firing if the magazine is removed from the pistol. You will not beable to use your LC9TM pistol as a single loader (unless you place one cartridgein the magazine and insert it into the pistol) or to fire the pistol with themagazine out of the pistol.
REMEMBER THAT A ROUND MAY STILL BE IN THE CHAMBER ANDTHAT THE PISTOL MAY STILL BE LOADED EVEN IF THE MAGAZINE ISREMOVED. AS SOON AS AN EMPTY MAGAZINE IS INSERTED, AROUND IN THE CHAMBER CAN BE FIRED BY PULLING THE TRIGGER.
BE CAREFUL! AS ALWAYS, YOU SHOULD NOT RELY UPON THE MAGAZINEDISCONNECT OR ANY OTHER MECHANICAL DEVICE OR SAFETY TO JUSTIFYCARELESS OR UNSAFE HANDLING OF ANY FIREARM.
Don’t rely on your memory or the word of others to know if a gun or magazineis loaded. Visually inspect the magazine and the chamber to be certain.
16
TO LOAD AND FIRE (WITH MAGAZINE)
Practice this important aspect of safe gun handling with an unloaded pistoluntil you can perform each of the steps described below with skill andconfidence. But before you do anything with the pistol, first read completelythrough this manual.
1. Be certain the muzzle is pointed in a safe direction. (See “The Basic Rules ofSafe Firearms Handling,” p. 34.)
2. Press the magazine latch and remove the magazine from the frame.
NOTE: The magazine is designed to fall free of the frame when the pistol isheld in the normal firing position, but you should always prevent possibledamage to the magazine by not letting it drop to the ground unless rapidreloading is absolutely necessary.
3. Place seven (7) or fewer 9mm cartridges into the magazine from the top.
4. Insert the magazine into the frame, taking care that the magazine is lockedin place by the magazine latch. Slamming the magazine into the frameforcibly is not necessary.

5. Hold the pistol firmly in the shooting hand but do not touch the trigger.Keep the pistol pointed in a safe direction. With the thumb and forefinger ofthe other hand grasp the top of the slide and pull the slide to the rear as faras it will go (see Figure 6, below). Use care to not place any part of your handin front of the muzzle (see “Slide Retraction Warning,” p. 20). Whenreleased, the slide will fly forward to strip the top cartridge from themagazine and chamber it. The hammer automatically moves to the semi-cocked position as the slide moves forward.
WARNING: The pistol is ready for instant use when the trigger is pulled oncethe slide moves fully forward. Be careful!
17
Figure 6
Retracting the slide.
Keep Hand Away From Muzzle!
6. Engage the safety by pushing the lever up until it clicks into the cut in theslide.
7. If the pistol is not to be used immediately, the magazine should be removedand the chamber unloaded.
8. The pistol is ready for instant use. When the pistol is in the “semi-cocked”mode, the first shot can be fired double-action by pulling the trigger all theway to the rear, which fully cocks and releases the hammer and then fires thepistol. Subsequent shots are fired in the same way by releasing and thenpulling the trigger until the magazine is empty, the hammer being semi-cocked by the slide as it recoils from each shot. After a shot is fired, thetrigger must be allowed to move fully forward. If the trigger is pulled beforethe trigger mechanism fully resets (two “clicks”) the hammer may or may notfire the cartridge.

18
9. Immediately following the firing of a shot, and if a subsequent shot is not tobe fired at once, remove the magazine and lock the slide back using the slidehold open. Be sure the chamber is empty. If the slide is shut, the shootershould always assume that there is a cartridge in the chamber! Don’t rely onyour memory to know if a gun or magazine is loaded. With the pistol pointedin a safe direction, visually inspect the magazine and chamber.
SLIDE OPENS FAST -HOT BRASS EJECTED
The slide automatically opens and shutsquickly while firing. Keep face and handsaway from rear. Hot brass is ejected quickly and can burn you. Always wearshooting glasses, hat with a brim, and hearingprotection.
WARNING - FIRING
WARNING - HANDLING
ANY GUN MAY FIRE IF DROPPED
Do not load the pistol until you are ready to use it, andunload it immediately when you have completedshooting. (See “Unloading Warning” on page 19. )
If dropped or struck, the pistol may fire. Keep chamberempty unless actually firing!
For maximum safety when carrying the pistol with a loaded magazine in place, the chamber should beempty, the slide should be closed and safety engaged. Ifplaced into a holster, check it to be sure that the slideis not retracted far enough to chamber a cartridge fromthe magazine.
The user should never depend on any mechanicaldevice to justify careless handling or permitting thepistol to point in an unsafe direction. The shootershould always be alert to the possibility of accidentaldischarge. The only absolutely safe pistol is one inwhich the slide is open, the chamber is empty, andthere is no magazine in the gun.
19
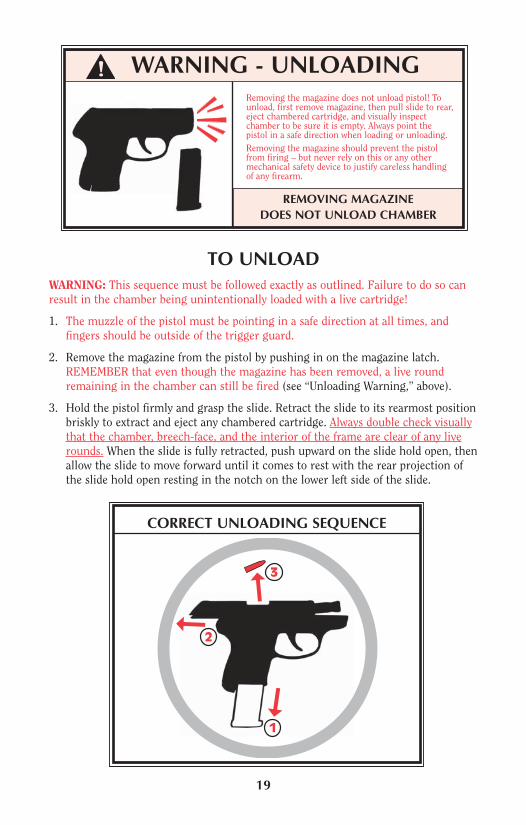
TO UNLOADWARNING: This sequence must be followed exactly as outlined. Failure to do so canresult in the chamber being unintentionally loaded with a live cartridge!
1. The muzzle of the pistol must be pointing in a safe direction at all times, andfingers should be outside of the trigger guard.
2. Remove the magazine from the pistol by pushing in on the magazine latch.REMEMBER that even though the magazine has been removed, a live roundremaining in the chamber can still be fired (see “Unloading Warning,” above).
3. Hold the pistol firmly and grasp the slide. Retract the slide to its rearmost positionbriskly to extract and eject any chambered cartridge. Always double check visuallythat the chamber, breech-face, and the interior of the frame are clear of any liverounds. When the slide is fully retracted, push upward on the slide hold open, thenallow the slide to move forward until it comes to rest with the rear projection ofthe slide hold open resting in the notch on the lower left side of the slide.
REMOVING MAGAZINEDOES NOT UNLOAD CHAMBER
WARNING - UNLOADING Removing the magazine does not unload pistol! Tounload, first remove magazine, then pull slide to rear,eject chambered cartridge, and visually inspectchamber to be sure it is empty. Always point thepistol in a safe direction when loading or unloading.Removing the magazine should prevent the pistolfrom firing – but never rely on this or any othermechanical safety device to justify careless handlingof any firearm.
1
2
3
CORRECT UNLOADING SEQUENCE

20
WARNING - SLIDE RETRACTION
The slide should always be pulledrearward (“retracted”) by pulling therear portion of the slide. Always keepfingers away from trigger!
Never put any part of your hands or body over the muzzle while retractingthe slide for loading, unloading,inspection, or clearing a malfunction.
KEEP HANDSAWAY FROM MUZZLE AND
FINGER OFF TRIGGER
4. To close the slide, again check to be sure the chamber and breech-face areempty. Pull the slide to its rearmost postion and release it. The slide will snapforward. Keep fingers out of ejection port on top of slide!
5. If the magazine contains cartridges, they can be removed by sliding eachcartridge forward and out of magazine, one at a time, until the magazine isempty.
6. Push empty (unloaded) magazine into frame until magazine latch locks it inplace.
TO EXTRACT ANDEJECT A CHAMBERED CARTRIDGE
When the pistol is fired, the same gas pressure that drives the bullet forward alsoacts through the cartridge case to push the slide to the rear. The action causesextraction and ejection of the fired cartridge case. If a cartridge fails to fire or if theshooter wishes to eject the chambered cartridge manually, follow the procedure “ToUnload,” p.19. When the slide is operated by hand, there can be a failure to extractthe cartridge from the chamber, or a failure to eject the cartridge clear of the pistol.These failures usually are the result of the slide not being pulled rearwardvigorously. The gun user must:
1. Always visually check the chamber and the breech-face after opening the slide toeject a chambered cartridge. If the slide is not vigorously retracted when beingoperated by hand, the extracted cartridge can be “ejected” into the magazine-well of the grip frame or remain held to the breech-face by the extractor.

21
2. Thoroughly clean the chamber and the extractor as often as necessary.
If an empty magazine is in the pistol when the slide is being hand retracted toextract a cartridge, the cartridge may drop on top of the magazine or remainheld to the breech-face by the extractor. Then when the slide goes forward, thecartridge will be chambered again! Remember — always remove the magazinebefore clearing the chamber, and visually ensure that no cartridges remain in thegun.
TO CLEAR A MALFUNCTION (“JAM”)1. Be certain the muzzle is continually pointed in a safe direction.
2. If possible, remove the magazine. It may be necessary to manually remove ajammed cartridge that has only been partially stripped from the magazine. Ifso, use extreme care. Lock the slide open with the slide hold open beforeattempting to clear the jam. Drawing the slide fully to the rear may bring thejammed cartridge along. Keep your face away from the ejection port duringthis operation. When attempting to clear a jam, use only wood “tools” so thatthe cartridge will not be damaged or the primer ignited. A 3/16” woodendowel with a point on one end is useful.
3. Visually check to make sure that all cartridges have been removed from thepistol. Safely dispose of any cartridges involved in a malfunction incident. Donot use damaged ammunition in any firearm.
Any autoloading pistol may occasionallymalfunction. If a cartridge hangs up, jams, orbinds when being chambered, do not attempt toforce it into the chamber by pushing or strikingthe slide. Carefully remove it.Most failures of a cartridge to feed or to chamber properly are caused by a damaged magazine,incorrect gun handling, insufficient lubrication,or improper ammunition.Whatever the cause, the user of the pistol must,above all, recognize that any cartridge jam canresult in a potentially very dangerous situation ofa cartridge discharging before it is properlychambered. If this happens, the cartridge casemay rupture and its fragments fly out of theejection port of the pistol with sufficient force tocause serious injury. Always wear shootingglasses!
WARNING - MALFUNCTIONS
HITTING PRIMERCAN BURST CARTRIDGE
TO MINIMIZE MALFUNCTIONS (“JAMS”)1. If it appears that the jam was caused by the type of ammunition being used,
try another brand, type, or lot number. Remember — use only factoryammunition of the correct caliber.

2. If changing ammunition does not at once eliminate malfunctions, then the followingsteps should be taken:
a. Thoroughly clean the pistol, paying particular attention to the removal ofaccumulated grease and dirt. Use a bristle brush and solvent to remove grease andfouling from the breech-face, extractor, chamber, and feed ramp area immediatelybehind the chamber.
b. Check to be sure that the magazine spring firmly returns the magazine follower tothe top of the magazine.
c. Check the magazine lips to be certain that they are free of nicks and burrs andthat they are not deformed or cracked.
d. Remove excess oil and solvent from all cleaned components, load the magazine,and try the pistol again. Make sure you are following the correct loading and firingsequence as described in this manual.
e. If none of the above steps is effective, try a different magazine of Rugermanufacture. If a new magazine does not function correctly, return the pistol andmagazine to the Ruger Customer Service Department. (See “Shipping FirearmsFor Repair” on page 29.)
f. Alterations to the pistol or use of non-Ruger magazines and accessories may causemalfunctions. See “Alteration Warning” on page 10.
22
Figure 7
1. Keep pistol pointed in asafe direction. Press themagazine latch andwithdraw the magazinefrom butt of pistol (seeFigure 7).
TO DISASSEMBLEBe sure pistol is unloaded!
1
2
3 Always unload a firearmbefore cleaning, lubrication,disassembly or assembly.
UNLOAD BEFORE DISASSEMBLY
WARNING – DISASSEMBLY

23
2. Pull slide to the rear andlock in the open positionby pushing upward on theslide hold open.(See Figure 8)
3. Inspect the chamber andverify that it is empty (seeFigure 9).
Figure 9
4. Retract the slide slightlyand release it (seeFigure10). This willdisengage the slide stopand allow the slide tomove fully forward.
Figure 10
12
Figure 8
Keep Hand Away From Muzzle!

24
5. Using a finger or a “soft” tool, push the takedown plate down (see Figure 11A)to expose the takedown pin (see Figure 11B).
6. The slide must be pushed back approximately 1/16” before you can insert theRuger key into the slot on the right side of the frame (see Figure 12A). Now pushthe takedown pin out the left side of the pistol (see Figure 12B).
Figure 11A Figure 11B
7. Move the slide assemblyforward and separate itfrom the grip frame (seeFigure 13).
Figure 13
Takedown pinexposed.
Figure 12A Figure 12B

8. Compress therecoilspring assemblyslightly to disengage itfrom its seat againstthe barrel lug, andremove it completely(see Figure 14).
9. Remove the barrel. It willbe necessary to move thebarrel forward slightly andthen down and back toextract it from the slide(see Figure 15).
Figure 14
Figure 15
10. The pistol is nowdisassembled for cleaning(see Figure 16).
Figure 16
25

TO REASSEMBLE1. Be certain chamber and magazine are empty.
2. With slide held upside down, replace barrel and push it rearward into itslocked position.
3. Replace the recoil spring assembly into position. The rear end of guide rodseats against barrel lug.
4. Replace slide onto frame and place in its “closed” position, as if the pistolwere fully assembled.
5. Make sure that the take down plate is fully pressed downward. Pull the slideslightly rearward to allow the pin to clear the slide. Insert the take down pininto the frame insert making sure that it is flush with the frame insert. Movethe take down plate upward until it snaps into place.
6. Replace empty magazine in frame through butt of pistol.
MAGAZINE INSPECTION AND CARECheck the magazine frequently. The magazine follower must move freely andhave adequate tension so that each cartridge is quickly raised to the feedingposition. The magazine lips should be clean and free of cracks, dents, or nicks, sothat cartridges are held in their proper feeding position.
If the magazine becomes dirty, it should be disassembledand thoroughly cleaned. The following disassemblyinstructions apply:
Snap-On Base - Unload magazine first. Use a punch (yourRuger key will work in a pinch) to press in on themagazine spring seat where it protrudes into the hole inthe magazine floorplate. Slide the magazine floorplatetoward the front of the magazine. Be careful to prevent theforcible ejection of the magazine spring seat andcompressed magazine spring. Withdraw the magazinespring seat and magazine spring from the magazine body.Turn magazine upside down to allow the follower to dropout of the magazine; remove the follower. Reassemble inreverse order, being careful to insert the spring in thecorrect orientation (see Figure 17).
26
Figure 17

When cleaning is necessary, use a solvent that will not rust the metalcomponents or adversely affect the magazine body. After the magazine has beensoaked to loosen foreign matter, be certain to shake it vigorously (with theloading opening away from you) to remove solvent or residue from within themagazine. Penetrating oils and solvents inside a magazine can “kill” or weakencartridge primers or powder which can result in failures to fire or other possiblydangerous malfunctions, such as leaving a bullet in the bore!
After cleaning, always check to be certain that the magazine follower movementand tension are correct, and that no solvent or debris remain. Improperreassembly of the magazine can cause failure to feed, which is a potentiallydangerous malfunction. If cleaning does not restore proper tension, or if youexperience a problem with the magazine, don’t use it. Get a new one.
CARE AND CLEANINGMake Sure Gun Is Unloaded!
BEFORE CLEANING, BE CERTAIN THE PISTOL AND ITS MAGAZINE CONTAINNO CARTRIDGES. (See “Unloading Warning,” p. 19)
At regular intervals, or whenever the pistol has been exposed to sand, dust,extreme humidity, condensation, immersion in water, or other adverseconditions, disassemble, clean, and oil it. Proper periodic maintenance isessential to the reliable functioning of any firearm.
To clean the pistol, proceed as follows:
1. Disassemble (fieldstrip) the pistol to the extent described on pages 22 - 25.
2. Using a cleaning rod, run a properly sized, solvent-wetted patch through thebore several times. Then attach a solvent-wetted bristle brush to a cleaningrod and run it back and forth the full length of the bore as many times asnecessary to remove grease and dirt from the bore and chamber. Clean borewith dry patches and examine. Bore fouling can contribute to reducedaccuracy, and grease accumulation in the chamber can interfere with properfeeding of cartridges from the magazine.
3. Using powder solvent on a clean patch or bristle brush, remove powderresidue from all components of the pistol. After cleaning, run a dry patchthrough the bore, then follow with a patch that is very lightly oiled. Wipe allsurfaces clean with cloth, then wipe all surfaces with a patch or cloth that hasbeen very lightly oiled.
4. NOTE: Only a light application of oil is needed to provide adequatelubrication of moving parts and to prevent rust. Excess accumulations of oiltend to attract particles of dust and dirt and may congeal in cold weather,which can interfere with the safe and reliable function of the pistol.
5. Before firing, remove all oil and grease from the bore.
27

28
STORAGEGUNS SHOULD NOT BE STORED LOADED!
Do not keep the pistol stored in a leather holster or case. Leather attractsmoisture, even though the holster or case may appear to be perfectly dry.
WARNING - LUBRICATION
IMPROPER LUBRICATIONDESTROYS GUNS
Firing a pistol with oil, grease, or any other material evenpartially obstructing the bore may result in damage to thepistol and serious injury to the shooter and those nearby.Do not spray or apply lubricants directly on ammunition. Ifthe powder of a cartridge is affected by the lubricant, it maynot be ignited, but the primer firing may push the bulletinto the bore where it may be lodged. Firing a subsequentbullet into the obstructed bore may damage the pistol andcause serious injury or death to the shooter and thosenearby. Use lubricants properly. You are responsible for theproper care and maintenance of your firearms.
USE THE LOCKING DEVICE SUPPLIED WITH THE PISTOLTO RENDER IT INOPERATIVE FOR SAFE STORAGE.
(SEE PAGE 8)
• Never place or store any firearm insuch a manner that it may bedislodged. Firearms should always bestored securely and unloaded, awayfrom children and careless adults.
• Use the locking device supplied withthe shotgun for storage. The use of alocking device or safety lock is only oneaspect of responsible firearms storage.
• For increased safety, firearms shouldbe stored unloaded in a location that isboth separate from their ammunitionand inaccessible to children and anyother unauthorized person.
STORE SECURELY & UNLOADED
WARNING–STORAGE

SHIPPING FIREARMS FOR REPAIR:
RUGER® LC9TM pistols returned to the factory for service or repair should besent to: Sturm, Ruger & Company, Inc., Customer Service Department, 200Ruger Road, Prescott, AZ 86301-6181. Telephone (928) 778-6555.
Guns should be sent prepaid. We will not accept collect shipments.
The Federal Gun Control Act, as well as the laws of most states and localities, donot prohibit an individual (who is not otherwise barred from purchasing orpossessing a firearm) from shipping a firearm directly to the manufacturer forrepair. However, before you ship your pistol to us, be certain that your state orlocality does not have a law or regulation which will prohibit you from receivingthe pistol from us after it has been repaired. If such receiving is prohibited, thenplease have a Federally Licensed Firearms Dealer ship the gun to us. If yourpistol is sent to us by a dealer, it will be returned to that dealer after beingrepaired. If a handgun (pistol or revolver) is shipped by an individual who doesnot hold a Federal Firearms License, it must be shipped for overnight deliveryvia U.P.S., Federal Express or other, similar private overnight service. NOTE:Handguns may not be shipped via U.S. Mail. Persons who do not hold a FederalFirearms License are prohibited by Federal law from shipping a handgun byMail. Handguns mailed in violation of the law are impounded by the Post Office.
Please do not include holsters, custom grip panels, or accessories with a firearmbeing shipped to the factory for service. DO NOT SEND GUN BOXES ORLITERATURE THAT YOU CONSIDER TO BE COLLECTOR’S ITEMS – THESEARE INVARIABLY DAMAGED OR DESTROYED IN SHIPMENT. Always insureyour shipment.
Enclose a letter which includes your name, address, telephone number, andserial number and model of the firearm. Describe in detail the trouble you haveexperienced with your firearm, or the work you wish to have done. Merelystating that the firearm “needs repair” is inadequate information. Please enclosecopies of any previous correspondence.
29
WARNING—BEFORE SHIPPING ANY FIREARM,BE ABSOLUTELY CERTAIN THAT IT AND ITS MAGAZINE ARE UNLOADED. DO NOT SHIPCARTRIDGES WITH A FIREARM.
SERVICE AND PARTS POLICY
If you have any questions with regard to the performance of your RUGER®
LC9TM pistol, please write or call (928-778-6555) our Customer ServiceDepartment in Prescott, Arizona, fully describing all circumstances and conditionsinvolved. If you should return your pistol to the factory for repair, or order partsfor it, please comply with the following suggestions for prompt service:

ORDERING PARTSPlease contact the Prescott, Arizona Customer Service Department for partsavailability and current prices. All parts orders for the RUGER® LC9TM pistolsshould be sent to: Sturm, Ruger & Company, Inc., Parts Department, 200 RugerRoad, Prescott AZ 86301-6181, (928) 778-6555. We cannot comply with openaccount or C.O.D. requests. Payment in full via credit card (Visa or MasterCardonly), money order or certified bank check (no personal checks, please) isrequired before any service will be performed. Please provide your credit cardnumber, your name as it appears on the credit card, and the expiration date. Allparts orders are subject to a minimum charge and charges for shipping andhandling. Order parts by Part Name and Part Number and include the entireserial number of the firearm for which the parts are being ordered. There is aminimum labor charge plus a shipping and handling charge if the parts arefactory fitted. All factory fitted parts are fit on an exchange basis only. We willnot return the replaced parts. Please contact the Customer Service Departmentfor pricing information.
Because it is a serial numbered component, the RUGER® LC9TM frame insertis defined as a “firearm” by Federal law and is not sold as a separate component.
*Parts designated by an asterisk must be factory fitted. These parts are fitted onan exchange basis only. We will not return the replaced parts. We will not returnany part that is broken, malfunctioning, badly worn or has been modified. See“Warning - Parts Purchasers,” above.
CAUTION: A gun containing modified, broken, malfunctioning, or badly worn parts should not be fired!
30
All work performed is subject to a minimum labor charge and charges forshipping and handling. Most models can be reblued, but custom gunsmithingservice or nonstandard alterations are NOT AVAILABLE from Ruger CustomerService Departments. Please contact the Customer Service Department forpricing information.
• It is the purchaser’s responsibility to beabsolutely certain that any parts ordered fromthe factory are correctly fitted and installed.
• Firearms are complicated mechanisms andIMPROPER FITTING OF PARTS MAY RESULTIN A DANGEROUS MALFUNCTION, DAMAGETO THE FIREARM, AND SERIOUS INJURY TOTHE SHOOTER AND OTHER PERSONS.
• The purchaser and installer of parts mustaccept full responsibility for the correctadjustment and functioning of the shotgunafter such installation.
PARTS MUST FIT CORRECTLY
WARNING–PARTS PURCHASERS

31
RUGER® LC9TM
PARTS LIST
Design, prices and specifications subject to change without notice.SPECIFY MODEL AND CALIBER WHEN ORDERING
(See Exploded View on Page 33)
Key No. Part Name Part No. Model† 1 Frame Insert CP00250 LC9
2 Trigger Pivot CP06710 LC93 Trigger CP03900 LC94 Slide Hold Open CP03700 LC95 Trigger Bar CP01700 LC96 Hammer CP04000 LC97 Hammer Roll Pin CP05150 LC98 Hammer Spring CP00400 LC99 Blocker Lever CP02110 LC910 Hammer Pivot Pin CP02300 LC911 Magazine Disconnect CP05000 LC9 12 Magazine Disconnect Spring CP05600 LC913 Trigger Pin CP03950 LC914 Trigger Spring CP00450 LC915 Ejector Housing CP00900 LC916 Manual Safety Detent Plunger CP02380 LC917 Hammer Pivot Detent Spring CP02360 LC918 Manual Safety Spring Guide CP01570 LC919 Manual Safety Puck CP01550 LC920 Manual Safety CP01500 LC921 Firing Pin Blocker Lifter Spring CP06420 LC922 Manual Safety Detent Spring CP01560 LC923 Slide Stop Spring CP03720 LC924 Take Down Plate CP03760 LC9
* 25 Slide CP00100 LC926 Extractor Spring SC06450 LC927 Extractor Plunger SC04600 LC928 Firing Pin CP01100 LC929 Extractor CP01400 LC930 Loaded Chamber Indicator CP11000 LC931 Front Sight CP03200 LC932 Firing Pin Blocker CP05050 LC9 33 Loaded Chamber Indicator Spring CP01150 LC934 Firing Pin Retainer CP01120 LC935 Loaded Chamber Indicator Pin CP06350 LC936 Pawl, Hammer Dog & Crane Latch KH05100V LC9
Spring Plunger
* PARTS SO MARKED MUST BE FACTORY FITTED
† The Frame Insert is a serial-numbered component and is defined as a “firearm” by Federal Law and is not sold as a separate component.

Key No. Part Name Part No. Model37 Firing Pin Blocker Spring CP05650 LC938 Rear Sight CP03300 LC939 8-32 NC -2A X .187 Hex Soc Flat Pt – CP08001 LC9
With Patch40 Firing Pin Spring CP01800 LC941 Takedown Pin CP03750 LC9
* 42 Barrel CP00600 LC943 Magazine, Complete, 7-rd. CP00500 LC944 Magazine Floor Plate, Extended CP01010 LC945 Frame Insert Pin, 2 Req’d CP06305 LC946 Hammer Catch Pin CP02350 LC947 Guide Rod CP02000 LC9 48 Recoil Spring, Outer CP02810 LC949 Recoil Spring, Inner CP02801 LC950 Hammer Catch CP02200 LC951 Hammer Catch Spring SC00450 LC952 Grip Frame CP00200 LC9 53 Hammer Anchor Pin CP02410 LC954 Hammer Spring Seat CP02400 LC955 Magazine Latch CP02600 LC956 Magazine Latch Spring CP02700 LC9
* PARTS SO MARKED MUST BE FACTORY FITTED
32

33
RUGER® LC9TM
EXPLODED VIEW

34
THE BASIC RULES OF SAFE FIREARMS HANDLINGWe believe that Americans have a right to purchase and use firearms for lawfulpurposes. The private ownership of firearms in America is traditional, but thatownership imposes the responsibility on the gun owner to use his firearms in away which will ensure his own safety and that of others. When firearms are usedin a safe and responsible manner, they are a great source of pleasure andsatisfaction, and represent a fundamental part of our personal liberty.
Firearms do not cause accidents! Firearms accidents are almost always found tohave been the result of carelessness or ignorance on the part of the shooter ofthe basic rules of safe gun handling.
The following rules must be observed by gun users at all times. Safe gunhandling is not just desirable, it is absolutely essential to your safety, the safety ofothers, and the continuation of gun ownership and sport shooting as we know ittoday.
1. LEARN THE MECHANICAL AND HANDLINGCHARACTERISTICS OF THE FIREARM YOU ARE USING.
Not all firearms are the same. Themethod of carrying and handlingfirearms varies in accordance with themechanical provisions for avoidingaccidental discharge and the variousproper procedures for loading andunloading. No person should handleany firearm without first havingthoroughly familiarized himself withthe particular type of firearms he isusing, and with safe gun handling ingeneral.
2. ALWAYS KEEP THEMUZZLE POINTED IN ASAFE DIRECTION.Be sure of the bullet stop behind yourtarget, even when dry-firing. Never letthe muzzle of a firearm point at anypart of your body or at another person.This is particularly important whenloading or unloading a firearm. In theevent of an accidental discharge, noinjury can occur as long as the muzzleis pointing in safe direction. A safedirection means a direction that willnot permit a discharged bullet tostrike a person, or to strike an objectfrom which the bullet may ricochet.

35
A safe direction must take into account the fact that a bullet may penetrate awall, ceiling, floor, window, etc., and strike a person or damage property. Makeit a habit to know exactly where the muzzle of your gun is pointing wheneveryou handle it, and be sure that you are always in control of the direction inwhich the muzzle is pointing, even if you fall or stumble. Keep your finger offthe trigger until you are ready to shoot.
3. FIREARMS SHOULD BE UNLOADED WHEN NOT IN USE.Firearms should be loaded only whenyou are in the field or on the targetrange or shooting area, ready to shoot.Firearms and ammunition should besecurely locked in safes, racks orcabinets, or by using the lockingdevice supplied with the firearm whennot in use. Ammunition should besafely stored separate from firearms.Store your firearms out of sight ofvisitors and children. It is the gunowner’s responsibility to be certainthat children and persons unfamiliarwith firearms cannot gain access tofirearms, ammunition, or components.
4. BE SURE THE BARREL IS CLEAR OF OBSTRUCTIONSBEFORE SHOOTING.
Even a bit of mud, snow or excesslubricating oil or grease in the boremay cause the barrel to bulge, oreven burst on firing, and can causeinjury to the shooter and bystanders.Be sure that you are usingammunition of the proper caliberand loading for the gun you are using. If the report or recoil on firingseems weak, or doesn’t seem quite right, CEASE FIRING IMMEDIATELY,unload your firearm, and check to be sure that no obstruction has becomelodged in the barrel. Never try to shoot an obstruction out!
1
2
3

36
5. BE SURE OF YOUR TARGET BEFORE YOUSHOOT.
Don’t shoot unless you know exactlywhere your bullet is going to strike.Be sure of the bullet stop behindyour target, even when dry-firing withan unloaded gun. If you are in the field hunting, do not fire at amovement or noise. Take the time to be absolutely certain of your targetbefore you pull the trigger.
6. WEAR SHOOTINGGLASSES AND HEARING PROTECTORS WHEN YOUSHOOT.
All shooters should wear protectiveshooting glasses and adequate hearing protection when shooting.Exposure to shooting noise candamage hearing, and adequate eye protection when shooting isessential.
7. NEVER CLIMB A TREE ORFENCE WITH A LOADED FIREARM.
Put the firearm down carefully before climbing a fence, and unload it before climbing or descending atree or jumping over a ditch or otherobstruction. Never pull or push a loaded firearm toward yourself oranother person. When in doubt, orwhenever you are about to do any-thing awkward, unload your gun!

37
8. DON,T SHOOT AT A
HARD SURFACE OR ATWATER.
Bullets can glance off many surfaceslike rocks or the surface of water andtravel in unpredictable directionswith considerable velocity.
9. NEVER TRANSPORT A LOADED FIREARM.
Firearms should always be unloadedbefore being moved or placed in avehicle. A suitable carrying case or scabbard should be used to carry anunloaded firearm to and from theshooting area.
10. AVOID ALCOHOLICBEVERAGES WHEN SHOOTING.
Don’t drink until the day’s shooting is over. Handling firearms while under the influence of alcohol in anyform, or medications that could affectyour judgement or coordination,constitutes a criminal disregard forthe safety of others.

A BRIEF ACCOUNT OF AN EXTRAORDINARYACHIEVEMENT: RUGER FIREARMS
Sturm, Ruger & Company, Inc., had its beginning in a small machineshop occupying a rented frame building in Southport, Connecticut. InJanuary, 1949, with an initial investment of only $50,000 and an idea,William B. Ruger and Alexander M. Sturm started production of a .22caliber autoloading pistol–a design which was so successful that itbecame the cornerstone upon which one of the most comprehensivelines of sporting firearms ever made in America was established. AfterAlex Sturm’s death in 1951, William B. Ruger continued to direct theCompany until his death in 2002. William B. Ruger, Jr. continued toprovide guidance, which helped make this Company a sound andsuccessful enterprise, until his retirement in 2006. The Company hascontinued to prosper, under new management and guidance from ourBoard, with new products and fresh perspectives.
Ruger, in this relatively short time, has established itself as a leadingsmall arms design organization, developing a unique and broad line offine quality sporting, military and police firearms to become one of theworld’s most famous producers of revolvers, pistols, rifles and shotguns.Since 1949, Ruger craftsmen have built many millions of firearms.
During its five decades of growth and progress under the leadership ofWilliam B. Ruger, the Company developed a business philosophy andimplemented policies which represent a constructive influence in the lifeof modern America. From the beginning, Ruger played a positive role inconservation efforts and has supported the interests of shooters throughsuch groups as the National Rifle Association, National Shooting SportsFoundation, and many regional sportsmen’s organizations.
The Company has always endeavored to market its firearms forconstructive and recreational purposes, to emphasize the traditional andresponsible aspects of shooting, to render meaningful public services,and to encourage shooters in constructive, responsible, and safeparticipation in the shooting sports. Its motto, “Arms Makers ForResponsible Citizens®,” exemplifies this Company philosophy.
Today, Ruger is particularly mindful of those elements which havecontributed to the creation of its success, and extends heartfelt thanks toits many loyal employees and customers.
The firearms catalog, and instruction manuals for all Ruger firearms,can be downloaded from our website at:
www.ruger.com.
38

NOTES
39

WHY NO WARRANTY CARD HAS BEENPACKED WITH THIS NEW RUGER FIREARM
The Magnuson-Moss Act (Public Law 93-637) does not require anyseller or manufacturer of a consumer product to give a writtenwarranty. It does provide that if a written warranty is given, it must bedesignated as “limited” or as “full” and sets minimum standards for a“full” warranty. Sturm, Ruger & Company, Inc. has elected not toprovide any written warranty, either “limited” or “full”, rather than toattempt to comply with the provisions of the Magnuson-Moss Act andthe regulations issued thereunder. There are certain impliedwarranties under state law with respect to sales of consumer goods. Asthe extent and interpretation of these implied warranties varies fromstate to state, you should refer to your state statutes. Sturm, Ruger &Company wishes to assure its customers of its continued interest inproviding service to owners of Ruger firearms.
STURM, RUGER & Company, Inc.200 Ruger Road
Prescott, Arizona 86301 U.S.A.www.ruger.com
Arms Makers For Responsible Citizens®
A COPY OF THE INSTRUCTION MANUAL FOR ANY RUGERFIREARM IS AVAILABLE FROM THE FACTORY FREE ON REQUEST, OR IT MAY BE
DOWNLOADED FROM OUR WEBSITE AT WWW.RUGER.COM.THESE INSTRUCTION MANUALS CONTAIN IMPORTANT
WARNINGS WHICH MUST BE UNDERSTOODBEFORE USING THESE FIREARMS.
The Following are Sturm, Ruger & Co., Inc. Trademarks: “10/22-FS,” “10/22 Takedown,” “22/45,” “22/45RP,” “22 Charger,” “77/357,” “Bisley,” “Gold Label,” “LC6,” “LC9,” “LCR-357,” “Mark II,” “Mark III,” “Model96,” “No. 1,” “P85,” “P90,” “P91,” “P93,” “P94,” “P95,” “P97,” “P345D,” “P345PR,” “Power Bedding,” “Ruger10/17,” “Ruger 77/50,” “Ruger Inside & Out,” “Security-Six,” “Service-Six,” “Speed-Six,” “SR1911,” “SR40c,”“SR9c,” “SR-556C,” “SR22,” “Ruger American Rifle,” “Ruger Hunting,” “Ruger Hunting” Logo, and “RugerMarksman Adjustable Trigger.”
The Following are Registered U.S. Trademarks Belonging to Sturm, Ruger & Co., Inc.: “RUGER,” THESTURM, RUGER LOGO, “AC-556,” “Arms Makers For Responsible Citizens,” “10/22,” “All-Weather,”“Bearcat,” “Blackhawk,” “BX-25,” Eagle R, Eagle SR, “GP100,” the Hard-R Logo, “Hawkeye,” “LCP,” “LCR,”“M77,” “Mini Thirty,” “Mini-14,” “Old Army,” “P345,” “Redhawk,” “Ruger Titanium,” “Ruger 77/17,” “Ruger77/22,” “Ruger 77/44,” “Ruger SP101,” “Ruger Vaquero,” “Single-Six,” “Single-Ten,” “SR9,” “SR40,” the “SR”Design, “SR-22,” “SR-556,” “SR-556E,” “Super Redhawk Alaskan” and “Target Grey.”
“DEERFIELD” is a registered trademark of Blount, Inc.

![ORGANZA - keramika.com · rev. pasta roja red body wall tiles brillo glossy D.DIAMANTE-1 Pistacho [P95] 31.6X60 cm D.DIAMANTE-2 Pistacho [P95] 31.6X60 cm L. DIAMANTE Pistacho [P72]](https://img.pdfslide.us/doc/110x75/5ffe2d6aa7cd355ff17b95ca/organza-rev-pasta-roja-red-body-wall-tiles-brillo-glossy-ddiamante-1-pistacho.jpg)