Embed Size (px)
Citation preview

P4Merge User Guide2017.3
October 2017

Copyright © 1999-2018 Perforce Software.
All rights reserved.
Perforce Software and documentation is available from www.perforce.com. You can download and use Perforce programs, but you can not sell or redistribute them. You can download, print, copy, edit, and redistribute the documentation, but you can not sell it, or sell any documentation derived from it. You can not modify or attempt to reverse engineer the programs.
This product is subject to U.S. export control laws and regulations including, but not limited to, the U.S. Export Administration Regulations, the International Traffic in Arms Regulation requirements, and all applicable end-use, end-user and destination restrictions. Licensee shall not permit, directly or indirectly, use of any Perforce technology in or by any U.S. embargoed country or otherwise in violation of any U.S. export control laws and regulations.
Perforce programs and documents are available from our Web site as is. No warranty or support is provided. Warranties and support, along with higher capacity servers, are sold by Perforce Software.
Perforce Software assumes no responsibility or liability for any errors or inaccuracies that might appear in this book. By downloading and using our programs and documents you agree to these terms.
Perforce and Inter-File Branching are trademarks of Perforce Software.
All other brands or product names are trademarks or registered trademarks of their respective companies or organizations.
Any additional software included within Perforce Software is listed in "License statements" on page 12.

Contents
How to use this guide 5Feedback 5
Other Helix Server documentation 5
Syntax conventions 5
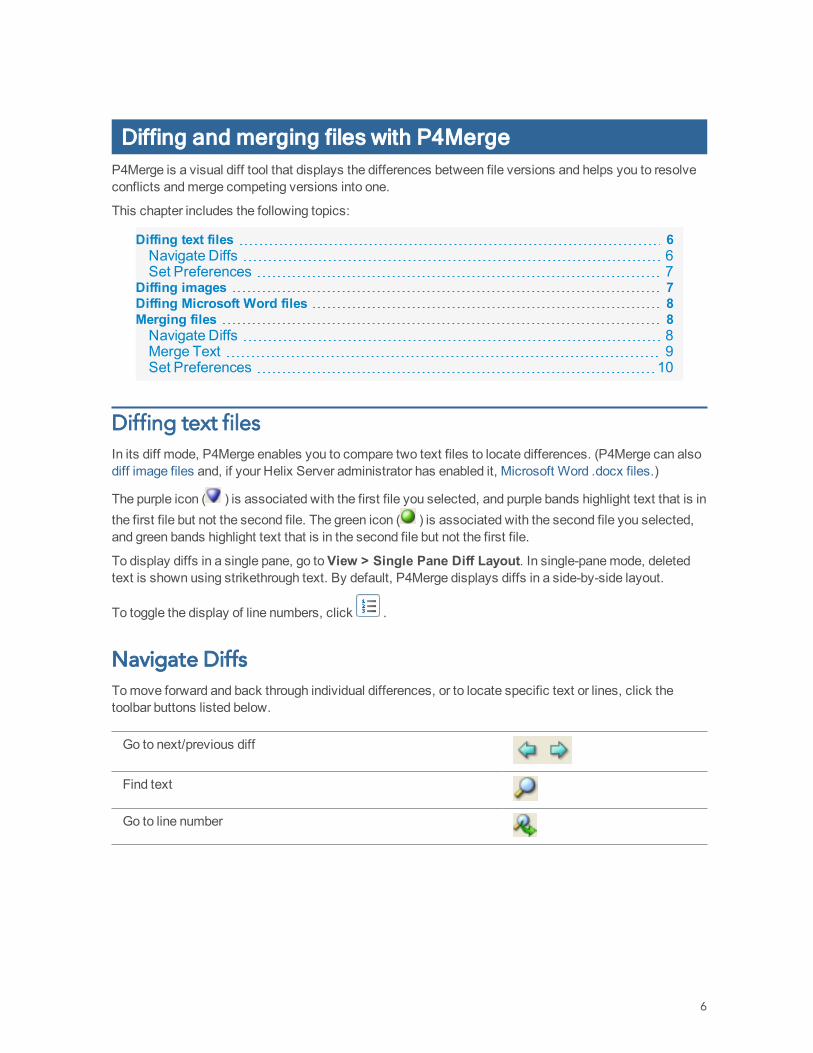
Diffing and merging files with P4Merge 6Diffing text files 6
Navigate Diffs 6Set Preferences 7
Diffing images 7
Diffing Microsoft Word files 8
Merging files 8
Navigate Diffs 8Merge Text 9Set Preferences 10
License statements 12
3


How to use this guideThis guide tells you how to use P4Merge, the Perforce visual diff tool. It is intended for anyone using P4Merge to view the differences between files across time and across codelines. P4Merge, as its name implies, also enables you to merge differing files into one.
FeedbackHow can we improve this manual? Email us at [email protected].
Other Helix Server documentationSee https://www.perforce.com/support/self-service-resources/documentation.
Syntax conventionsHelix documentation uses the following syntax conventions to describe command line syntax.
Notation Meaningliteral Must be used in the command exactly as shown.
italics A parameter for which you must supply specific information. For example, for a serverid parameter, supply the ID of the server.
[-f] The enclosed elements are optional. Omit the brackets when you compose the command.
... n Repeats as much as needed:
l alias-name[[$(arg1)...[$(argn)]]=transformation
n Recursive for all directory levels:
l clone perforce:1666 //depot/main/p4... ~/local-repos/main
l p4 repos -e //gra.../rep...
element1 | element2
Either element1 or element2 is required.
5
Diffing and merging files with P4MergeP4Merge is a visual diff tool that displays the differences between file versions and helps you to resolve conflicts and merge competing versions into one.
This chapter includes the following topics:
Diffing text files 6Navigate Diffs 6Set Preferences 7
Diffing images 7Diffing Microsoft Word files 8Merging files 8Navigate Diffs 8Merge Text 9Set Preferences 10
Diffing text filesIn its diff mode, P4Merge enables you to compare two text files to locate differences. (P4Merge can also diff image files and, if your Helix Server administrator has enabled it, Microsoft Word .docx files.)
The purple icon ( ) is associated with the first file you selected, and purple bands highlight text that is in the first file but not the second file. The green icon ( ) is associated with the second file you selected, and green bands highlight text that is in the second file but not the first file.
To display diffs in a single pane, go to View > Single Pane Diff Layout. In single-pane mode, deleted text is shown using strikethrough text. By default, P4Merge displays diffs in a side-by-side layout.
To toggle the display of line numbers, click .
Navigate DiffsTo move forward and back through individual differences, or to locate specific text or lines, click the toolbar buttons listed below.
Go to next/previous diff
Find text
Go to line number
6

Set Preferences
Set PreferencesTo configure P4Merge settings to display or suppress differences in white space and line endings, click
or choose File > Comparison Method. To configure other settings, go to Edit > Preferences (Windows) or P4Merge > Preferences (Mac).
Note If you are comparing Unicode files, selection of the correct character set is essential. If you select the wrong character set, P4Merge cannot correctly diff files.
Diffing imagesTo diff two different image files: Right-click an image file, choose Diff Against and specify the other image, or (in the Depot, Workspace, or Files pane,) drop one image file’s icon on another.
To diff two revisions of the same image file: Right-click the image file and choose File History. In the File History pane, drop one of the desired revisions on the other revision.
P4V launches P4Merge, displaying the differences between the specified images. You can display image diffs side by side or overlaid.
To enlarge or reduce the displayed images, use the zoom sliders or choose the desired display option from the View menu.
To highlight differences, check Highlight Differences and use the adjacent slider to increase or decrease sensitivity. P4Merge highlights identical areas in gray and differences in yellow.
To blend or separate overlaid images, use the vertical slider: to blend the images equally, center the slider. To increase the amount of an image used in the composite, move the slider toward that image.
You can also view image revisions sequentially in Time-lapse View. For more information, see Viewing Image File History with Time-lapse View in the P4V User Guide.
You can diff the following image file types:
n BMP
n GIF
n JPG, JPEG
n PNG
n PBM
n PGM
n PPM
n TIFF
7

Diffing Microsoft Word files
n XBM
n XPM
Diffing Microsoft Word filesIf your Helix Server administrator has enabled it, you can diff Microsoft Word .docx files in a P4Merge window using a rich comparison tool that shows differences in text, images, formats, styles, tables, headers, footers, and many other objects.
There are two .docx compare modes, Parent-Child and Sibling:
n Parent-Child mode is used to show how a file has changed from one version to another; this mode is set when you select Diff Against Have Revision in P4V.
n Sibling mode is used when there is no direct relationship between the files being compared; it is set, for example, when you drag and drop .docx files.
For more information about how to select files in P4V for diffing, see Diffing Files and Folders in the P4V User Guide .
Merging filesIf you and another user have edited the same file, Helix Server requires you to resolve those changes. One way of resolving is by merging your changes with the other changes using P4Merge. P4Merge enables you to compare two text files with a common base file to locate differences and to select the text that you want in the merged result file. The purple icon ( ) is associated with the file that another user edited ([italic] their file), and purple bands highlight text that unique to that file. The green icon ( ) is associated with file that you edited ([italic] your file), and green bands highlight text that is in the second file but not the first file. The [italic] base file is indicated by the yellow icon ( ) and yellow highlighting indicates text that is in the base file but not in the other files.
In the top half of the window, P4Merge displays the base file surrounded by the two changed versions of the revision being merged. In the bottom half of the window, P4Merge displays the merge results file, where you select or enter the text that you want to check in. Make your changes as described below, and be sure to save them before exiting P4Merge.
Navigate DiffsTo move forward and back through individual differences, or to locate specific text or lines, click the toolbar buttons listed below.
Go to next/previous diff
Find text
8

Merge Text
Go to line number
Merge TextTo merge files, you can either choose text from one of the files or enter changes directly into the merge results file.
Choose Text ChunksTo choose the entire contents of a file, click the corresponding icon in the merge diagram, as shown below.
To choose a single chunk of text from a set of diffs, click the corresponding button to the right of the chunk, as shown below.
The buttons indicate the origin of the text and the way it was changed, as follows:
Base file text
Same in theirs and base.
Same in yours and base.
Text added to their file. Not in yours or base.
Text added to your file. Not in theirs or base.
Text deleted from their file.
Text deleted from your file.
9

Set Preferences
Same in yours and theirs, different from base.
Added to both yours and theirs.
Deleted from both yours and theirs.
Note that these are toggle buttons: Click once to select the corresponding text, click again to deselect it.
If P4Merge encounters too many changes to display all the required buttons, it displays this button: . Click it to view the details.
Edit TextTo edit the text in the merge result file, click on the text in the bottom pane and enter your changes. Manually-edited text is displayed with a gray highlight, like the middle chunk in the following example:
Set PreferencesTo configure P4Merge settings to display or suppress differences in white space and line endings, click or choose File > Comparison Method. To configure other settings, choose Edit > Preferences (Windows) or P4Merge > Preferences (Mac).
To toggle the display of line numbers, click .
Note If you are comparing Unicode files, selection of the correct character set is essential. If you select the
10

Set Preferences
wrong character set, P4Merge cannot correctly compare files.
11
License statementsPerforce Software includes software developed by the University of California, Berkeley and its contributors. This product includes software developed by the OpenSSL Project for use in the OpenSSL Toolkit (http://www.openssl.org/).
Perforce Software includes software from the Apache ZooKeeper project, developed by the Apache Software Foundation and its contributors. (http://zookeeper.apache.org/)
Perforce Software includes software developed by the OpenLDAP Foundation (http://www.openldap.org/).
12


![[Paris merge world tour] Perforce Introducing Perforce Insights](https://img.pdfslide.us/doc/110x75/54843e1fb47959f10c8b4b7b/paris-merge-world-tour-perforce-introducing-perforce-insights.jpg)

![[Perforce] Component Based Development in Perforce](https://img.pdfslide.us/doc/110x75/548401935906b5ad158b46ee/perforce-component-based-development-in-perforce.jpg)


![[Perforce] Perforce the Plentiful Platform](https://img.pdfslide.us/doc/110x75/5484017e5806b5bd588b45b9/perforce-perforce-the-plentiful-platform.jpg)