Embed Size (px)
Citation preview

Growing plants in the home or office is a great way to bring the outdoors inside and enjoy plants year-round. Since houseplants have become so popular, a wide range of plants that can accommodate almost any indoor location are available at garden centers. Research has shown that having plants in the home or office can be good for your health and well-being.
Growing indoor plants is not difficult if proper environmental factors for each plant are met. The most important factors affecting plant growth and success are light, temperature, water, humidity, soil, and fertilization.
LightLight is the single most important factor in suc-
cessful indoor gardening. Plants use light as energy to make their food. The green chlorophyll in plant leaves uses light to combine carbon dioxide, water, and nu-trients to make food for growth. This process is called photosynthesis.
Even though all indoor plants require light, not all require the same amount of light. Generally, the more light a plant gets, the more food it can make. When a plant gets less light than it needs, the food reserves are used up and the plant’s health declines. Your success with indoor plants will depend largely on choosing proper plants that will grow in the amount of light you have in your home.
Light IntensityThe amount of light a plant receives is called
light intensity. The light intensities of indoor areas are generally described as being high, medium, or low. Officially, intensity is measured in foot-candles. High represents light conditions that are 1,000 or more foot-candles in intensity; medium represents 500 to 1,000 foot-candles; and low represents 50 to 500 foot-candles. Usually, an intensity of less than 50 foot-candles might be called a “disaster level” because few plants tolerate such low light levels for very long. Specific plants for high, medium, and low lights can be found on page 2.
The best thing to do is to choose plants that match the light level in your home or office.
Available LightYou can identify most of your interior areas as
high, medium, or low light. Take a tour through your home or office and observe the areas where you want to grow and place plants. Use the following guidelines to determine the light level of various areas:• Areas nearest windows and glass doors generally
offer the best light for plant growth. The size of the windows will also affect the amount of available light. Obviously, the larger the glass area, the more available light.
• Exposure (north, south, east, or west) also affects available light. In southern states, east and west exposures offer bright light and full sun for several hours each day in all seasons of the year. In gen-eral, the south of a building offers high light, while the north windows offer low light.
• The closer the plants are to the glass, the more available the light. During winter months, do not let plants touch the glass when outdoor tempera-tures are freezing. As you move more to the side or back from the glass, light levels will be lowered significantly. The intensity of the light can drop from 1,000 to 100 foot-candles in the distance of only a few feet. It is difficult to grow plants in dimly lit areas more than 8 or 10 feet from win-dows. Such areas are corners, bookcases, tables, or rooms with no windows at all. If you have plants in such low-light areas, you should occasionally move them to better light for 4 to 8 weeks. After this short period in proper light, the plants will regain their strength and you can move or rotate them back to low-light areas for decorative accents.
• Roof overhangs, porches, and awnings over win-dows and door areas will reduce the amount of light available to plants. Drapes, sheers, and blinds also drastically reduce light. Remember to note such conditions when evaluating the light of your interior area.
Care and Selectionof Indoor Plants
2
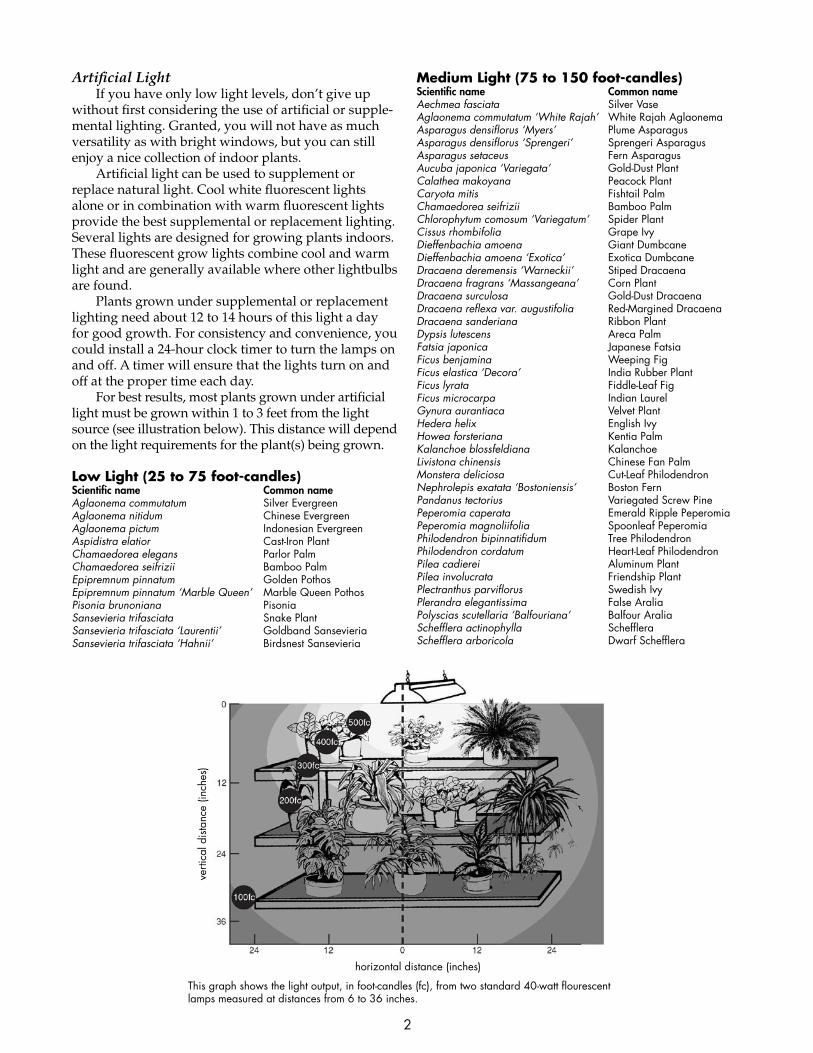
This graph shows the light output, in foot-candles (fc), from two standard 40-watt flourescent lamps measured at distances from 6 to 36 inches.
horizontal distance (inches)
verti
cal d
ista
nce
(inch
es)
Medium Light (75 to 150 foot-candles) Scientific name Common name Aechmea fasciata Silver Vase Aglaonema commutatum ‘White Rajah’ White Rajah Aglaonema Asparagus densiflorus ‘Myers’ Plume Asparagus Asparagus densiflorus ‘Sprengeri’ Sprengeri Asparagus Asparagus setaceus Fern Asparagus Aucuba japonica ‘Variegata’ Gold-Dust Plant Calathea makoyana Peacock Plant Caryota mitis Fishtail Palm Chamaedorea seifrizii Bamboo Palm Chlorophytum comosum ‘Variegatum’ Spider Plant Cissus rhombifolia Grape Ivy Dieffenbachia amoena Giant Dumbcane Dieffenbachia amoena ‘Exotica’ Exotica Dumbcane Dracaena deremensis ‘Warneckii’ Stiped Dracaena Dracaena fragrans ‘Massangeana’ Corn Plant Dracaena surculosa Gold-Dust Dracaena Dracaena reflexa var. augustifolia Red-Margined Dracaena Dracaena sanderiana Ribbon Plant Dypsis lutescens Areca PalmFatsia japonica Japanese Fatsia Ficus benjamina Weeping Fig Ficus elastica ‘Decora’ India Rubber Plant Ficus lyrata Fiddle-Leaf Fig Ficus microcarpa Indian Laurel Gynura aurantiaca Velvet Plant Hedera helix English Ivy Howea forsteriana Kentia Palm Kalanchoe blossfeldiana Kalanchoe Livistona chinensis Chinese Fan Palm Monstera deliciosa Cut-Leaf Philodendron Nephrolepis exatata ‘Bostoniensis’ Boston Fern Pandanus tectorius Variegated Screw Pine Peperomia caperata Emerald Ripple Peperomia Peperomia magnoliifolia Spoonleaf PeperomiaPhilodendron bipinnatifidum Tree Philodendron Philodendron cordatum Heart-Leaf Philodendron Pilea cadierei Aluminum Plant Pilea involucrata Friendship Plant Plectranthus parviflorus Swedish Ivy Plerandra elegantissima False AraliaPolyscias scutellaria ‘Balfouriana’ Balfour AraliaSchefflera actinophylla Schefflera Schefflera arboricola Dwarf Schefflera
Artificial LightIf you have only low light levels, don’t give up
without first considering the use of artificial or supple-mental lighting. Granted, you will not have as much versatility as with bright windows, but you can still enjoy a nice collection of indoor plants.
Artificial light can be used to supplement or replace natural light. Cool white fluorescent lights alone or in combination with warm fluorescent lights provide the best supplemental or replacement lighting. Several lights are designed for growing plants indoors. These fluorescent grow lights combine cool and warm light and are generally available where other lightbulbs are found.
Plants grown under supplemental or replacement lighting need about 12 to 14 hours of this light a day for good growth. For consistency and convenience, you could install a 24-hour clock timer to turn the lamps on and off. A timer will ensure that the lights turn on and off at the proper time each day.
For best results, most plants grown under artificial light must be grown within 1 to 3 feet from the light source (see illustration below). This distance will depend on the light requirements for the plant(s) being grown.
Low Light (25 to 75 foot-candles) Scientific name Common name Aglaonema commutatum Silver Evergreen Aglaonema nitidum Chinese Evergreen Aglaonema pictum Indonesian EvergreenAspidistra elatior Cast-Iron Plant Chamaedorea elegans Parlor Palm Chamaedorea seifrizii Bamboo Palm Epipremnum pinnatum Golden Pothos Epipremnum pinnatum ‘Marble Queen’ Marble Queen Pothos Pisonia brunoniana Pisonia Sansevieria trifasciata Snake Plant Sansevieria trifasciata ‘Laurentii’ Goldband Sansevieria Sansevieria trifasciata ‘Hahnii’ Birdsnest Sansevieria

3
low light plants medium light plants high light plants
Parlor Palm(Chamaedorea elegans)
Green Nephthytis(Syngonium
pedophyllum)
Split-Leaf Philodendron(Philodendron bipinnatifidum)
Heart-Leaf Philodendron(Philodendron
cordatum)
Weeping Fig(Ficus benjamina)
Rubber Plant(Ficus elastica)
Spider Plant(Chlorophytum comosum)
Corn Plant(Dracaena fragrans
massangeana)
Sago Cycas Palm(Cycas revoluta)
Jade Plant(Crassula ovata)
Norfolk Island Pine(Araucaria heterophylla)
Spathiphyllum x clevelandii Cleveland Peace Lily Syngonium podophyllum Syngonium, Nephthytis Tradescantia fluminensis Inch Plant Tradescantra zebrina Wandering Jew
High Light (150 to 1,000 foot-candles) Scientific name Common name Aloe vera Aloe Vera Alternanthera ficoidea Joseph’s Coat Aphelandra squarrosa Zebra Plant Araucaria columnaris Norfolk Island Pine Beaucarnea recurvata Ponytail Palm Cissus antarctica Kangaroo Vine Codiaeum variegatum Croton Cordyline fruticosa Ti Plant Crassula ovata Jade Plant
Cylindropuntia leptocaulis Christmas CactusCylindropuntia ramosissima Pencil Cactus Hatiora gaertneri Easter Cactus Hoya carnosa Wax Plant Iresine lindenii Blood LeafMonstera deliciosa Split-Leaf Philodendron Plectranthus amboinicus ColeusPodocarpus gracilior Weeping Podocarpus Saintpaulia ionantha African Violet Schlumberger truncata Thanksgiving Cactus Sedum morganianum Burro’s Tail Tradescantia spathacea Moses-in-the-Cradlex Fatshedera lizei Botanical Wonder *Some of these plants could be invasive if planted outdoors in certain areas of the state. If planted outside, be mindful of how quickly the plant spreads.

4
Temperature Temperature is another important factor that can
affect your success in growing indoor plants. Although plants will tolerate temperatures slightly lower and/or higher than ideal, the plant’s growth will be affected. The ideal temperature range for most indoor plants is a daytime temperature of 65ºF to 75ºF (18ºC to 24ºC ) and a nighttime temperature about 10 degrees cooler. The drop in night temperatures is important because it en-ables plants to build new tissues. Plants that are grown under consistently high temperatures tend to become spindly and less resistant to disease and insect attack.
WaterIf you have grown plants of any kind, you know
that providing the proper amount of water for these plants is often tricky, confusing, and difficult. We know it is a simple fact that every physiological process of plant growth requires water. The makeup of plants is often 80 to 90 percent water, but overwatering still causes the death of many houseplants. In fact, overwa-tering is the number-one cause of death of houseplants. You can develop proper watering techniques by con-sidering several common questions about watering:
1. How much water does a plant need?It is natural that some plants require more water
than others because of varying plant structures and growth habits. For example, cacti require much less water than ferns.
Plants in environmental conditions that cause rapid growth will need and use more water than plants in a limited environment. Usually, the brighter the light and warmer the temperature, the more water a plant will need. A plant in good light and proper tempera-ture will require more water than the same plant in lower light and a cooler environment.
Humidity (moisture in the air) can also affect a plant’s need for water. Through a process called transpiration, plants release water into the atmosphere through tiny openings in the leaves. High humid-ity helps slow water loss through transpiration. If your area is low in humidity, more water will be lost through transpiration, and your plant’s root system will need more water.
Humidity in most homes and offices is lower than most plants need (except cacti). The humidity in build-ings that have central heating and cooling systems is typically 10 to 30 percent—quite a drastic reduction when compared to the 70 to 90 percent humidity levels found in the native climates of most tropical plants. Also, air blowing from heating and cooling vents can be damaging. Avoid placing plants in direct drafts.
You can increase humidity by placing plants on pebbles in a shallow tray that holds a small amount of water. Excess water that drains out of the container
after you water the plants will collect in this tray and provide continuous humidity as it evaporates. Howev-er, you should never let the bottom of a plant container stand in water since this will cause a waterlogged soil and may result in root damage and eventual plant death (see page 5).
Grouping several plants together will also help increase humidity for these plants. Misting the plant foliage with water is helpful since the water evaporates rapidly. However, misting may aggravate certain foliar diseases. Do not mist if you notice abnormal foliage on your plant. Another way to increase humidity is to purchase an inexpensive humidifier and place it near plants.
In addition to these environmental factors that determine a plant’s need for water, a few cultural con-ditions can affect water practices. The potting soil you use for your plants is important. There are many dif-ferent types of soils and growing mixtures you can use for indoor plants. The water-holding capacities of these mixtures will vary as the composition varies. Some soil mixes hold more water and hold it longer than other mixes. (For more information on types of soils and their characteristics, see the Soil section on page 5).
Another factor that might affect watering practices is the type and size of container that a plant is grow-ing in. Clay pots are porous and require more water than nonporous glazed or plastic pots. Plants in large containers of any material would generally require less frequent watering than the same size plant in a smaller pot of similar material. Very simply, there is less avail-able water in the soil of a small container as compared to a large container with more soil.
In summary, the amount of water that a plant needs and uses depends on the species and structure of the plant; the environmental conditions of light, temperature, and humidity; the cultural conditions of soil; and the type of container.
2. When should plants be watered?A rigid watering schedule usually will not be suc-
cessful because of many variable factors. A rigid sched-ule will cause some plants to be overwatered while others may dry out from a lack of water. Be prepared to water your plants on an individual basis, as they need it.
So when do they need it? You can determine the time to water a plant in several ways. Although there is no foolproof method, the most accurate method is to inspect the individual plant’s foliage for signs of wilting and then feel the soil for moisture. By carefully observing soil and foliage, you can usually tell if the plant needs water.
Some plants prefer to have their soil and root sys-tems slightly dry before the next watering. You should feel the soil of these plants at several depths and water when the soil begins to feel dry. Remember, too, that large containers hold more soil and water. The soil

5
might be adequately moist near the middle or lower root zone, even if the soil near the top is dry.
Other plants require more even moisture and will not tolerate drying soil. You should water the soil and root system of these plants when the top layer of soil begins to feel dry.
How to determine if plants need water:• Touch: The most accurate way to assess if a plant
needs water is to touch the soil. Don’t just touch the top of the soil—stick your finger into the soil up to the middle joint. If your finger is dry at the tip, you need to water.
• Estimate weight: Dry soils are lighter than moist soil mixtures.
• Judge color: Dry soils are lighter than moist soil mixtures.
• Soil moisture indicator: A gauge that tells how moist/dry a soil is; read and understand the direc-tions before using.
You can predict your plant’s water needs by us-ing any of these methods. Over a period of months, you may notice that some plants need water every day, while others need it only once every 5 or 6 days. Knowing these patterns will be helpful in your water-ing practices, but you should avoid a rigid schedule. Inspect plants daily for water needs. If you are a day late with watering, you may damage or even lose a favorite plant.
3. How should plants be watered?The most convenient and efficient method of
watering is to pour water on the soil surface and allow water to move evenly through the soil structure. Usual-ly this method is better than subirrigation, a process of watering plants by placing the pot in a shallow amount of water in a tray or coaster and allowing the plants to suck the water up from the bottom.
Tap water is usually suitable for houseplants. However, you should never use cold water. Cold water will cause a sudden and extreme fluctuation in soil temperature, which may cause root injuries. For best results, use lukewarm water that is near room temper-ature. When watering from the top, be careful not to
wash the soil away from the base of the plant stems. Be sure to wet the entire depth of soil thoroughly. Excess water will drain out of the container through the drain opening, which should always be provided. The water that drains out of the container will provide additional humidity if you collect this water in a coaster or tray. Don’t let the bottom of the container remain in water. Raise the container by placing gravel in the coaster or tray.
If the soil dries too much before watering, you may find it difficult to wet the soil thoroughly. Often the drying soil will shrink away from the sides of the con-tainer, and much of the water you apply will quickly run through the cracks and out of the container; the soil never gets wet. Should this situation occur, the eas-iest way to wet the soil is to submerge the container in water. A plastic pail or garbage can will work well for this soaking. Some people even submerge their plant containers in the sink or bathtub. Allow the water level to come up to the top of the container but not over the rim and into the soil. Let it soak until all the soil air has bubbled to the top of the water—a good indication that the soil is saturated. This usually takes about 10 min-utes. When the soil is thoroughly saturated, remove the container and allow the excess water to drain.
SoilWhen you are ready to transplant a new plant or
repot an older one, you will need some potting soil. The best potting soil for growing indoor plants will usually be a recipe mixture that gives ideal conditions for moisture, drainage, and nutrient-holding capacity, porosity, and plant stability. Most potting soils used by commercial nurseries are custom blends or recipe mixes.
Generally, native soils that are dug up outside are not ideal for houseplants. The composition of these native soils varies drastically, but by making proper additions to them, you can create a much better grow-ing medium for your interior plants.
The four basic ingredients of soil mixes are organic particles, inorganic particles, air, and water dissolved with nutrients.
Put plants on pebbles in a shallow tray to increase humidity.
Never let the bottom of the container sit in water.
Group several plants together to increase humidity.
Mist plants to increase humidity.

6
Organic ParticlesOrganic particles are residues of decaying plant
and animal tissues. The amount of organic material in native soils is very low, usually less than 5 percent. In preparing a soil for indoor plants, adding organic materials provides many benefits. Organic matter is the center of activity for soil microorganisms. These organisms are necessary for many activities in the soil. Organic materials also help to loosen the soil structure and allow it to breathe better. This is a process called aeration. Also, the moisture-holding ability of a soil is generally increased when you add organic materials.
Several organic materials are usually added to soil mixtures for houseplants. These include sphagnum peat, bark, rotted sawdust, leaf mold, and manures.
Inorganic ParticlesThe inorganic particles that occur in native soils
are classified as sand, silt, or clay. This classification is based on particle size. Sands are the largest, silts in between, and clays the smallest. The large particle size of sand affords good aeration and fast drainage, but usually sands will dry more quickly. Clay particles are good nutrient holders since they attract and hold nutri-ents of the soil solution much like a magnet. However, clays tend to compact and be tight, which is bad for root growth. Fortunately, most native soils are mixtures of sands, silts, and clays—often called loams.
Several inorganic (man-made) particles are avail-able for use. The most popular is perlite. Actually, per-lite is a naturally occurring volcanic rock, but because it is crushed and then heat-treated, it is inorganic. The heat causes it to expand or puff up into tiny, porous, lightweight particles. It is an excellent ingredient for soil mixes because it loosens soils to provide better aeration and drainage. However, perlite does not hold much water or nutrients.
Another inorganic particle that is used often in growing media is vermiculite. This is a naturally occur-ring mica that is heat-treated. It is available in various sizes and can hold water and nutrients.
Air and WaterThe spaces between particles allow air to be part
of the potting soil. Water can fill these air spaces and saturate the soil. The water should gradually drain and leave some moisture in the soil structure. This remain-ing water is absorbed by the organic matter or left as a surface film on the other soil particles. A good soil will provide ample pore space and good drainage yet also hold some moisture.
Packaged Potting MixesYou can buy many kinds of packaged potting soils
at local nurseries and garden centers. These materi-als are convenient and often have been sterilized to kill harmful disease organisms and weed seed. The consistency of these materials may vary among trade
labels. For example, some packaged soils are already premixed with organic matter, perlite, or other ingredi-ents and are ready for immediate use. Other packaged growing mixtures are primarily sterile soils, which may need other additions to make a better soil mix for indoor plants.
Mixtures You Can CreateFollowing are recipes for two basic growing mix-
tures. They work quite well for most indoor gardeners. However, you may discover that you need a slight modification for your particular plant and environ-ment and cultural techniques.
Blending the mix
Mixing a potting soil is much more convenient if you use a clean, plastic garbage can for mixing. You can put the ingredients in the container and then mix by stirring, shaking, swirling, or rolling. These cans also make excellent storage containers for any mixture left over after potting. You may want to buy several cans to store the various separate ingredients. You can use one container for organic material, one for perlite, one for sand, one for soil, and another for the com-pleted mixture.
Sterilizing the mix
Potting mixes should be sterilized to kill disease organisms and weed seed. You can do this in your home by heat-treating the mix in the oven or micro-wave. Be prepared for this process to release unpleas-ant odors in your kitchen.
Oven method1. Preheat the oven to 200°F.2. Fill a disposable roasting pan with up to 3 inches
of soil.3. Moisten the soil with water, making sure not to
wet the soil excessively.4. Cover the top of the pan tightly with aluminum
foil.5. Insert an oven-safe food thermometer through the
foil into the soil.6. Adjust the thermometer so you can easily check it
periodically.7. Bake the soil until the soil temperature reaches
180°F; continue to bake for 30 minutes, adjusting the oven temperature as needed to keep it at 180°F.
8. Do not allow the soil temperature to go below 180 or above 200°F during the process.
9. Allow to cool completely before using—the steril-ization process continues as it cools.
Microwave method1. Fill a disposable, microwave-safe plastic container
with 2 pounds of moist soil. You can use a heavy plastic bag with the top left open.

7
2. Microwave the soil on full power for 1½ minutes. For microwaves of less than 1000 watts, microwave for 2½ minutes.
3. Insert a candy or meat thermometer into the center of the soil. If it doesn’t read between 180°F and 200°F, continue to heat at 1-minute intervals until the required temperature range is reached.
4. Remove from the microwave and cover the con-tainer loosely with a lid or plastic wrap. If using a bag, seal the bag and leave a small space open for ventilation.
5. Cool completely before using.6. If not using immediately, keep the container or bag
sealed to avoid contamination.7. Clean the microwave thoroughly after use to help
remove unpleasant odors and any particles.
Basic MixturesStandard Mix1 measure of packaged potting soil or 1 measure of
sterilized garden loam1 measure of coarse organic material1 measure of perlite1 measure of coarse, clean sand
Mix thoroughly and sterilize. After sterilization, add dolomitic lime at a rate of 1 ounce (28 grams) per gallon of soil mixture.
Cacti and Succulent Mix1 measure of packaged potting soil or 1 measure of
sterilized garden loam½ measure of coarse organic material½ measure of perlite1 measure of coarse, clean sand
Mix thoroughly and sterilize. After sterilization, add dolomitic lime at a rate of 1 ounce (28 grams) per gallon of soil mixture.
ContainersWhen it comes to containers for indoor plants,
you have many choices in styles and materials. Most containers are suitable for growing interior plants if there is a drainage hole in the bottom of the container. This opening will provide proper drainage for excess water, which prevents waterlogged soils that can cause root rot.
When selecting a container, first consider the size of the plant and where it will be placed in the home. Make sure you choose a container that fits the size of the plant—not too large, not too small. A general rule for choosing a proper container is that the diameter of the container should be about one-third the height of the plant from the top of the foliage.
The most widely used indoor plant containers are clay and plastic. Clay pots are porous and allow mois-
ture to evaporate through the sides of the container. This causes the soil to dry out faster, so more frequent watering is required. However, homeowners who tend to overwater will be more successful with clay pots. Plastic, glass, metal, wood, or glazed pots retain their moisture longer than clay pots. With these pots, it is important to ensure good drainage and avoid overwatering.
The most important factor when considering a con-tainer is drainage. A container with one or more drain holes lets water drain out of the container, allowing for leaching of excess salts and reentry of air into the soil. Plants in containers without drain holes are easily injured or killed by overwatering.
Many decorative containers do not have a drain-age hole in the bottom. Such containers are not ideal for plant growth; however, there are a couple of ways you can use such containers. One way is to drill a hole or several holes in the bottom of the container. Another way is to double-pot the plant. This is a technique that provides a space to catch the drainage water in the bottom of the decorative container. You can do this by first placing a few inches of gravel in the bottom of the decorative container, then setting your plant—still in its original clay or plastic pot—inside the decorative container. You can fill the space between the sides of the two containers with gravel, peat moss, or perlite. This way, you can enjoy a decorative container and still provide proper drainage for the plant.
FertilizerPlants need 16 essential elements to make their
food for growth. The most important elements are nitrogen, phosphorus, potassium (potash), calcium, magnesium, sulfur, and iron. The minor elements are carbon, hydrogen, oxygen, manganese, copper, boron, zinc, molybdenum, and chlorine.
Some of these elements are required in large quantities, while others are needed in small amounts. The amounts needed depend primarily on the plant’s growth rate. Plants that grow rapidly demand more nutrients than plants that grow slowly. Remember that most indoor areas do not provide the ideal grow-ing conditions of the greenhouse, nursery, or native habitats of plants, so the growth rates of indoor plants are reduced. As a result, indoor plants will not need as much fertilizer as plants growing rapidly under ideal greenhouse conditions. However, indoor plants with good environmental conditions will have moderate growth. Growing mixtures often lack major nutrients, so these indoor plants will not grow well unless you fertilize them.
Fertilizer MaterialsFertilizer materials for indoor plants are packaged
and sold in small, convenient sizes. There are many

8
forms and strengths of fertilizer materials at garden centers. Some are liquids, while others are granules or powders. All forms are suitable if used properly.
Manufacturers are required to indicate the fertil-izer analysis on the container label. This analysis is given in a series of numbers such as 5-1-1, 14-14-14, 18-9-9, or 6-8-8. The first number of the series indicates the amount of nitrogen; the second number, the amount of phosphorus; and the third, the amount of potassium (potash). The amounts of calcium, magnesium, iron, and other elements are also listed by name and source in the finer print on the label. Always read the label carefully and know what you are buying.
Slow-Release FertilizersSome manufacturers offer specially prepared fertil-
izer materials that are called “slow-release formulas.” Most are granules that are designed to release nutrients gradually and evenly over a long time. How long a slow-release fertilizer is active will depend on the kind it is, indoor temperature, and watering practices. The slow-release materials are available in several analyses. They are also available in several time-life formula-tions, such as 3-month, 6-month, or 9-month time-life. They offer a consistent and uniform availability of nutrients to the plant. Fewer applications are needed with slow-release fertilizers, but nutrients may not be available when the plant needs them.
Recommendations for using these materials are described in detail on the product label. Always follow directions.
Fast-Release FertilizersFast-release fertilizers are useful because their
nutrients are immediately available to plants and create an immediate response. Fast-release fertilizers are typically available as liquid, soluble crystals, or granular fertilizers. These materials disperse all of their nutrients at once. Fast-release fertilizers, however, are subject to rapid depletion from the soil because of leaching. If fast-release fertilizers are applied too heav-ily, the plant can be damaged, usually by burning.
Applying Fertilizers
A plant that is growing rapidly needs nutrients more often than a plant that is growing slowly or rest-ing. For plants in an active growing condition, apply a household fertilizer once every 2 or 3 months. During the winter months or under other conditions of low light, fertilize less frequently.
If you move indoor plants to the porch, patio, or balcony during the summer, these plants will begin to grow rapidly. Under these conditions, the plants may need fertilizers once every 2 to 3 weeks. These sugges-tions are for water-soluble fertilizers.
If you choose to use a granular slow-release fertil-izer material, the frequency of application will depend primarily on the time-life of that material.
Before fertilizing, be sure the soil is moist. Always follow label directions.
OverfertilizationToo much fertilizer will cause chemical salts in the
soil to reach an extremely high concentration. This is very dangerous because the excess salts can damage plant roots. The plants will suffer because a damaged root system is not healthy and efficient. Note these typical signs of overfertilization and excess salts:• a white or yellowish, crusty appearance of salt on
the surface of the soil• damaged roots that cause wilting leaves (even
when the soil is wet)• yellowing foliage that soon drops off the plant
If you suspect overfertilization, decrease your applications of fertilizer, and wash the salts out of the soil by thoroughly watering the plant several times. Be sure to allow the excess water to drain away as fast as possible.
RepottingAt some time in a plant’s life, the root system will
eventually fill all the available soil and space in the container and become root- or pot-bound. When this happens, the plant’s growth will be restricted unless you provide more room for root growth by repotting the plant into a larger container.
A simple examination of the root system is the best way to determine whether or not your plant is root bound and ready for repotting. You can easily remove the soil and root mass of small plants from the contain-er by following the suggestions listed on this page.
How to RepotMove plants that need repotting to a container
slightly larger than the existing container. The new container should generally be only 1 or 2 inches larger in top diameter. Containers that are too large for small plants can have too much soil and, therefore, too much water for proper root growth.
Always use a clean container for repotting. Add a layer of soil mix and firm it with your fingers. This lay-er of soil should be enough to bring the top of the root mass to within 1 inch of the container top. By allowing this 1-inch buffer near the top, you can water the plant more easily. Fill around the root mass with soil mix, and firm it with your thumbs. Then water thoroughly and allow the potting soil to drain well.
Place the newly potted plant in indirect light until it recovers from the shock of repotting, usually about 7 to 10 days. This shock is caused by a disrupted root system, which affects a plant’s ability to absorb water. Be very careful not to overwater newly repotted plants. Also, don’t fertilize the newly repotted plant until the root system has become successfully reestablished.

9
This usually takes about 2 to 4 weeks; after this time, you can resume regular fertilizer practices.
Preventing Transplant ShockWhen you repot or transplant a potted plant, it
is almost impossible to avoid injuring some of the roots. Nevertheless, be very careful during repotting to minimize injury to the root system. Some plants can stand more root damage than others before they show extreme symptoms of physiological shock typi-cal of water stress. This may result in varying degrees of wilting, leaf burn, yellowing, or splotched foliage. These are distress signals that indicate a damaged root system that is unable to function and supply adequate water to the plant.
In order to help prevent and reduce the severity of shock caused by transplanting, be sure the plant is in good health before repotting it. Inspect and examine the plant for insects and disease; then control these problems before transplanting or repotting the plant. Do not repot or transplant a starving plant. Most houseplants will be in better condition to withstand transplant shock if fertilized 10 to 14 days before repotting. Just before repotting, check the soil mois-ture content of your potted plant. The soil should be thoroughly moist. If you find that the soil is dry, water it thoroughly with lukewarm water at least an hour before repotting.
GroomingGrowing plants indoors can present some unusual
problems that can affect the success of your plants. The most common problem is dust accumulation on their leaves. A layer of dust on a plant’s foliage can interfere with the plant’s ability to photosynthesize and function properly; dust also makes plants unattractive.
It is best to clean plants every 2 to 3 months with a soft cloth moistened with warm water. Be sure to wipe clean both the top and bottom surfaces of the leaves. Another way to clean plants is to place them in the shower, sink, or outdoors and rinse them with warm water. A mild soap wash will help clean plants and can also help prevent insect and disease damage.
Turning plants to expose all sides of the plant to available light is also important. Turning the plant promotes a plant with a uniform shape. Remove dead, diseased, or discolored foliage. Use scissors to trim dried brown leaf tips and margins. For best results, fol-low the shape of the leaf when trimming to maintain a natural appearance.
DiseasesDiseases of houseplants are relatively rare. Many
problems attributed to diseases are actually caused by unfavorable growing conditions.
Prevention is the best way to control indoor plant diseases. Inspect the plant carefully before you buy. Look for an indication of diseases, wilting, or leaf spots. Examine the soil. Does it look as if it has been wet for a long time? Does it have a slight green cast on the surface or algae growing on it?
Removing the soil and root mass:
1. Thoroughly moisten the soil and allow it to drain.
2. Place your hand on top of the container, allowing the plant stem to be between your index and second fingers. With your other hand, grab the bottom of the pot and turn it upside down. Tap the pot rim sharply against the edge of a table or potting bench.
3. As you feel the soil and root mass loosen, remove the pot and examine the root system. A crowded mass or network of constricting roots indicates a need for repotting.
4. Place the soil and root mass back into the pot to stay until you begin repotting. This will help protect the delicate root from air drying.
1
2
3
4

10
If possible, inspect the color and size of the root system. Look for white (healthy) roots that are well distributed in the soil. If the roots are gray or brown, or worse, if they smell of decay, select another plant. In order to inspect the roots, you may need to place your index and middle finger around the main stem(s) of the plant, turn the pot upside down, and gently bump the pot edge on a solid surface. Be careful not to spill the potting mix.
A clean, sterile potting soil or medium will help prevent problems caused by various disease-causing organisms. It is very important to make sure that the pot is well drained and that the drainage holes are not plugged.
If you suspect one of your plants is diseased, isolate it immediately! To prevent spread of diseases, isolate all diseased plants from healthy plants. They can be diagnosed and treated in isolation.
If a leaf or plant part looks diseased, remove and destroy it immediately. Do not let it stay in the pot or around other plants where the disease can spread to healthy plant parts.
Fungi and bacteria cause most houseplant diseas-es. Bacteria usually produce angular lesions frequently surrounded by yellow halos or water-soaked areas. Fungi produce a wide variety of symptoms including root rots, stem lesions, leaf spots, mildews, and rusts.
Root RotThe most common disease of houseplants is root
rot. This happens all too easily when the upper potting mix appears dry, but the lower mix, where about two-thirds of the roots are, is still moist. Wilting leaves are the main symptom of root rots. Because this is also a symptom of too little water, people naturally think the plant doesn’t have enough water, so they water it. In fact, there is too much water smothering the roots.
Water only as needed, and check the bottom of the pot before watering. To determine if the plant needs watering, you can use your finger, as previously described, or stick an unpainted wood dowel into the pot. If the bottom of the dowel has soil adhering to it, don’t water. Overwatering kills more plants than does underwatering.
A number of soil-borne disease organisms cause this rot. When rot occurs, cut away and destroy all dis-eased plant parts. Keep the plant moderately dry. If the potting mix is very wet, it may help to repot the plant. To help eliminate soil-borne organisms in potting soil mixes, sterilize the mixture.
MildewMildew is a fungus disease that is common on
many houseplants. The first signs are whitish spots or patches on the leaves. These spots may later become darker. Provide good ventilation and avoid wetting the leaves when watering.
Leaf SpotsA number of fungi will cause leaves to scorch or
spot. These spots are usually small, circular, and tan. Do not sprinkle the foliage when watering, and in-crease air circulation. Also remove any diseased leaves as they appear.
InsectsPrevention of insects is a much better approach
than having to treat your houseplants at some future date. Always inspect new plants carefully before purchasing. If you see any sign of insect damage or in-festation, choose another plant. If you buy a new plant that is infested with insects, your other plants may become infested, as well.
Quarantine plants received as gifts and watch them carefully for at least 1 week before placing them among other plants in your collection. A routine exami-nation and proper sanitation practices (keeping foliage clean, removing dead stems and leaves) will help prevent insect infestations.
Finally, if you put any plants outside for any pe-riod of time, be sure to examine them carefully before bringing them back inside. Don’t overlook the soil. Ants, millipedes, sowbugs, and various other creatures may have taken up residence in potting soil.
Identification is another important part of pest con-trol. Being able to recognize a few common pests and their method of feeding will keep damage to a mini-mum. Among the most common are aphids, scales, mealy bugs, and spider mites. The illustrations and de-scriptions should help with proper pest identification.
Aphids are globular-shaped sucking insects that are usually found in clusters at the stem tip and on the underside of foliage. They are only one-eighth of an inch long and are light green, pink, or black. They may cause the plant’s foliage to be curled, twisted, or deformed.
Scales are sucking insects that have little or no resemblance to insects except in their early life. Eggs hatch into tiny crawlers that move about for a short time before settling down into one spot. They attach themselves to stems and to the underside of leaves and, at first, appear to be small bumps or blisters. They are small (one-sixteenth to one-eighth inch) and some-what protected by their outer shell, which is greenish-brown or black. Scale insects suck sap and cause leaves to turn yellowish and the ends of stems to die back several inches.
Mealy bugs are soft bodied, sucking insects that are about one-fifth to one-third inch long. Their bodies are covered with a whitish or yellowish, powdery wax and waxy filaments. The masses of wax from their bod-ies and cottony egg sacks make the plant unsightly. The insect can move about and is typically found in crevices such as stems and leaf joints and near the base of leaves. Mealy bugs injure plants by sucking the sap with their needle-like mouthparts.

11
Aphids, some scales, and mealybugs will excrete a sugary material called “honeydew.” This material will coat leaves as well as the floor or table on which the plant is resting. It is sticky to the touch and may attract ants. Honeydew is also a good medium for sooty mold. This sooty mold causes the stem and leaves to look blackish.
Spider mites are nearly invisible mites. They are pale green, red, or brown. All stages of this eight-legged pest can be found on the foliage of infested plants. The spider mite uses its needle-like mouthparts to puncture the plant tissues. This feeding causes a finely stippled, spotted, or mottled effect on the plant foliage. When infestations are severe, the leaves may become covered with silvery white webbing, spun by the mites.
See Extension Publication 2652 Insect Pests of House-plants for more detailed information on the identification and biology of insect and mite pests of indoor plants and recommendations on managing and controlling these pests. This publication includes information on cultural and organic controls, as well as conventional insecticides labeled for use on indoor plants.
scale (.125”) spider mite (.01”)
mealy bug (.2”) aphid (.2”)
Table 2. Diagnosing symptoms of common indoor plant problems.Symptoms
Possible causesFoliage Growth Flowers
brow
n tip
s or
mar
gins
bend
dow
n an
d cu
rl
yello
wis
h gr
een
olde
st dr
op
all d
rop
spot
s
wilt
wea
k, th
in, a
nd s
oft
new
leav
es s
mal
l
none
dev
elop
plan
t die
d
fail
to d
evel
op–b
ud d
rop
colo
r les
s in
tens
e
decl
ine
too
fast
beco
me
smal
ler
no b
loom
• • • Excess Light: Exposure to direct sun can be too intense for many plants.
• • • • • • • • Insufficient Light: Impairs photosynthesis and flowering.
• • • • Day Length: If too short, reduces growth, flowering, and life expectancy.
• • • • • • • • • High Temperature: Especially at night, reduces growth and vigor; also detrimental for flowering.
• • • • • Low Temperature: Continued exposure hurts plant growth.
• • • • • • • • • • Lack of Water: Limiting factor for growth and survival.
• • • • • • • • • • • Overwatering or Poor Drainage: Reduces soil aeration, roots die, water and nutrients are not absorbed.
• • • • • • • • • Too Much Fertilizer: Accumulation of soluble salts injures plant roots and reduces water uptake.
• • • • • • • • Lack of Fertilizer: Causes a deficiency of nutrients required for plant growth.
• • • • • • • • Compacted Soil: Reduces root functions and activity.
• • • • • • Growing Container: Too small or too large in relation to plant size.
• • • • • • • • • • • • Low Humidity: Air too dry to maintain healthy growth and flowering.

AcclimationEven after carefully analyzing and selecting a
suitable plant, you may have a plant that appears to decline and do poorly when first brought indoors from the garden center. Often this is caused by the natural response of acclimation—the process of a plant’s ad-justing to its new environment. The drastic and sudden change of light intensity, humidity, and other factors will usually result in yellowing foliage, which eventu-ally drops off the plant. Most plants will gradually adjust and improve in appearance. To help reduce the shock, try to furnish ideal growing conditions.
Some retailers and growers acclimate their plants before they are brought to the sales area. When shop-ping for new plants, ask the nursery worker or shop owner if the plants have been acclimated. Plants that have already been acclimated to typical interior condi-tions usually do better when you place them in your home or office.
Some people like to put their houseplants outdoors during the spring and summer months. Before moving plants outdoors, an acclimation period is important. Help your plants adjust to brighter and often warmer conditions by exposing them to outdoor conditions slowly. Put plants outside for a few hours each day for several weeks before totally moving them outdoors. Increase the number of hours outdoors each day.
Copyright 2016 by Mississippi State University. All rights reserved. This publication may be copied and distributed without alteration for nonprofit educational purposes provided that credit is given to the Mississippi State University Extension Service.
Produced by Agricultural Communications.
We are an equal opportunity employer, and all qualified applicants will receive consideration for employment without regard to race, color, religion, sex, national origin, disability status, protected veteran status, or any other characteristic protected by law.
Extension Service of Mississippi State University, cooperating with U.S. Department of Agriculture. Published in furtherance of Acts of Congress, May 8 and June 30, 1914. GARY B. JACKSON, Director
The information given here is for educational purposes only. References to commercial products, trade names, or suppliers are made with the under-standing that no endorsement is implied and that no discrimination against other products or suppliers is intended.
Publication 1012 (POD-01-16)
Revised by Lelia Kelly, PhD, Extension Professor; Victor Maddox, PhD, Senior Research Associate; Blake Layton, PhD, Extension Professor; and Alan Henn, PhD, Extension Professor; from a previous revision by Sonja Skelly, PhD, former Extension Horticulture Specialist, and David Nagel, PhD, Exten-sion Professor of Horticulture. Publication originally authored by James H. Perry, former Extension Horticulturist.