Embed Size (px)
Citation preview

Rev: 04.02.2014 Page 1 Power Tongue Jack Owners Manual FULL
P���� T����� J���
OWNER'S MANUAL

Rev: 04.02.2014 Page 2 Power Tongue Jack Owners Manual FULL
TABLE OF CONTENTSSystem 3Safety Information 3
Operation 4Troubleshooting 5Manual Operation 5Power Tongue Jack Clutch 6
POWER TONGUE JACK ASSEMBLY 7POWER TONGUE JACK COMPONENTS 8

Rev: 04.02.2014 Page 3 Power Tongue Jack Owners Manual FULL
SystemSafety Information
The “WARNING” symbol above is a sign that a service or maintenance procedure has a safety risk involved and may cause death or serious injury if not performed safely and within the parameters set forth in this manual.
Always wear eye protection when performing service or maintenance to the vehicle. Other safety equipment to consider would be hearing protection, gloves and possibly a full face shield, depending on the nature of the service.
This manual provides general service and maintenance procedures. Many variables can change the circumstances of the service procedure, i.e., the degree of difficulty involved in the service operation and the ability level of the individual performing the operation. This manual cannot begin to plot out procedures for every possibility, but will provide the general instructions for effectively servicing the vehicle. In the event the skill level required or the procedure too difficult, a certified technician should be consulted before performing the necessary service. Failure to correctly service the vehicle may result in death, serious injury or property damage.
The owner’s manual for the unit may have more procedures for service and maintenance.
• NEVER allow anyone unfamiliar with this product to install, operate or service this product.
• NEVER lift or level this the trailer without a properly installed footpad.
• NEVER crank jack or couple trailer without preventing the trailer from rolling.
• NEVER exert excessive side forces to the jack unit.
• NEVER allow anyone, including operator to put any body parts under the jack or the supported load during jack operation.
• NEVER drop the trailer off the hitch ball.
• NEVER exceed load capacity.
• NEVER use jack to lift trailer for service or tire change.
• NEVER move trailer before jack is fully retracted.
• NEVER use jack unless footpad retaining pin is fully inserted through both sides of the jack’s inner tube.

Rev: 04.02.2014 Page 4 Power Tongue Jack Owners Manual FULL
OperationTo Extend:
1. Chock trailer tires.
2. Be sure footpad is pinned securely in place with clevis & hair pins (Fig. 2A).
3. Push ON to turn the Power Tongue Jack on (Fig. 1A).
4. Make sure ground surface under jack is firm and level.
5. Push EXT side of switch to EXTEND jack until coupler clears hitch ball (Fig. 1D).
6. Move tow vehicle away from trailer.
7. Push OFF to turn the Power Tongue Jack off to conserve battery power (Fig. 1B).
NOTE: If left on for extended periods of time, the courtesy light will drain the battery.
To Retract:
1. Chock trailer tires.
2. Push ON to turn the Power Tongue Jack on (Fig.1A).
3. Push RET side of switch to RETRACT jack until coupler properly mounts hitch ball (Fig. 1C).
4. Push OFF to turn the Power Tongue Jack off to conserve battery power (Fig. 1B).
NOTE: If left on for extended periods of time, the courtesy light will drain the battery.
NOTE: Be sure inner tube of jack is fully retracted prior to moving vehicle (Fig. 2B).
A
B
C
D
Fig. 1 Fig. 2
A
B

Rev: 04.02.2014 Page 5 Power Tongue Jack Owners Manual FULL
TroubleshootingManual Operation
If 12VDC power is unavailable to operate the Power Tongue Jack, use the following directions to manually operate the jack.
To Extend:
1. Chock trailer tires.
2. Be sure footpad is pinned securely in place with clevis & hair pins (Fig. 4A).
3. Make sure ground surface under jack is firm and level.
4. Open rubber plug on top of jack’s gearbox to expose manual drive shaft (Fig. 5A).
5. Insert manual crank handle (Fig. 6).
6. Turn handle clockwise until trailer is supported and coupler clears hitch ball.
7. Move tow vehicle away from trailer.
8. Lower trailer until it is level by turning crank handle counterclockwise.
9. Remove crank handle (Fig. 6).
10. Replace rubber plug (Fig. 5A).
To Retract:
1. Chock trailer tires.
2. Be sure footpad is pinned securely in place with clevis and hair pins (Fig. 4A)
3. Open rubber plug on top of jack’s gearbox to expose manual drive shaft (Fig. 5A).
4. Insert manual crank handle (Fig. 6).
5. Turn crank handle counterclockwise until coupler properly mounts hitch ball.
6. Remove crank handle (Fig. 6).
7. Replace rubber plug (Fig. 5A).
NOTE: Be sure inner tube of jack is fully retracted prior to moving vehicle (Fig. 4B).
A
B
C
D
A
B
Fig. 3
Fig. 4
Fig. 5
Fig. 6AB

Rev: 04.02.2014 Page 6 Power Tongue Jack Owners Manual FULL
Power Tongue Jack ClutchThe Power Tongue Jack is provided with a motor, clutch and a 30A fuse. Fuse is located underneath the lid (Fig. 5B) of the jack and will need to be replaced if it blows. It must be replaced with a 30A ATO-type fuse. Battery must be fully charged, free of defects, and full of water prior to operating the jack. Low voltage from the battery will cause the fuse to blow prematurely.
The clutch will slip under two conditions:
1. The jack may have reached it’s extend or retract limit.
2. That the tongue weight of the trailer has exceeded the capacity limits of the jack. Items stored in the trailer can vastly influence the weight distribution of the jack. Reorganize stored items if Power Tongue Jack motor clutch continues to slip.
NOTE: Release switch immediately when clutch noise occurs. The clutch is the overload protection for the motor. The clutch should not slip during normal operation. This will cause excessive wear on the clutch and the motor.
NOTE: If left on for extended periods of time, the courtesy light will drain the battery.
NOTE: The Power Tongue jack is designed for jacking the trailer in a vertical disposition only.
Rev: 04.02.2014 Page 7 Power Tongue Jack webpages BOOKED
Contact us: Lippert Components Inc. - www.lci1.com/customerservice - Phone: (574) 537-8900 - Email: [email protected]
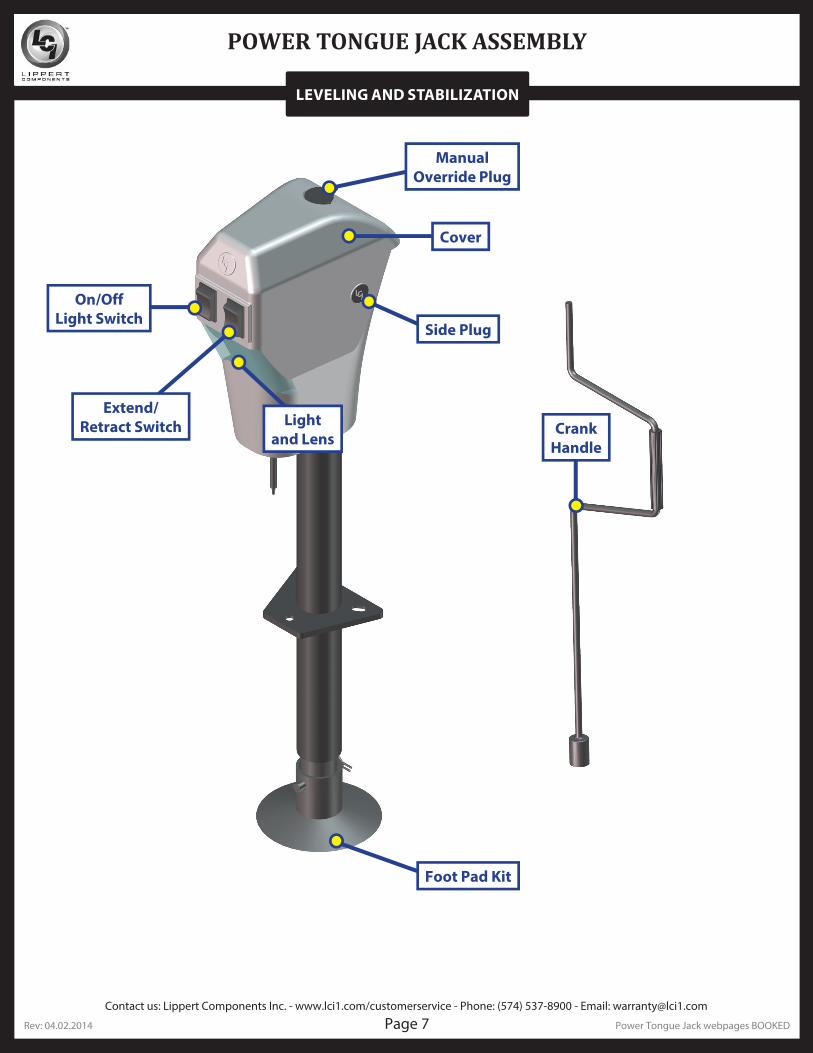
POWER TONGUE JACK ASSEMBLY
LEVELING AND STABILIZATION
Crank Handle
Manual Override Plug
Cover
Foot Pad Kit
Extend/Retract Switch
On/Off Light Switch
Side Plug
Light and Lens

Rev: 04.02.2014 Page 8 Power Tongue Jack webpages BOOKED
Contact us: Lippert Components Inc. - www.lci1.com/customerservice - Phone: (574) 537-8900 - Email: [email protected]
POWER TONGUE JACK COMPONENTS
LEVELING AND STABILIZATION
A B
C
EF
D
Callout Part # Description
A225868 Cover (White)285160 Cover (Black)
B 165253 Footpad KitC 225875 Side PlugD 225876 Original Manual Override PlugE 321807 Current Manual Override PlugF 225885 Lens

Rev: 04.02.2014 Page 9 Power Tongue Jack webpages BOOKED
Contact us: Lippert Components Inc. - www.lci1.com/customerservice - Phone: (574) 537-8900 - Email: [email protected]
POWER TONGUE JACK COMPONENTS
LEVELING AND STABILIZATION
G H
I
J
Callout Part # DescriptionG 226018 On/Off LightH 226023 Extend/Retract SwitchI 226027 LightJ 116112 Crank Handle

Rev: 04.02.2014 Page 10 End of Book
All information contained within may be distributed as a full document only, unless otherwise permitted by explicit consent of Lippert Components Inc. to distribute individual parts.
All information contained within is subject to change without notice. New editions will be posted on www.lci1.com and can be downloaded for free. Information contained within is considered factual until made
obsolete by a *NEW* revision.
Please recycle all obsolete materials.
For all concerns or questions, please contact
Lippert Components, Inc.
Ph: (574) 537-8900 Web: www.lci1.com Email: [email protected]


![Evolutionary Background Entities at the Cellular and ... · 04.02.2014 · levels in bodies of nonhuman vertebrate animals have been summarized recently.[4] In this paper, the author](https://img.pdfslide.us/doc/110x75/602eb5400a2f03213363d210/evolutionary-background-entities-at-the-cellular-and-04022014-levels-in.jpg)