Embed Size (px)
Citation preview

P. O. Box 6727
Chandler, AZ 85246
Phone: (888) 963-4817 Fax: (480) 963-4502
E-Mail: [email protected]
By Barbara EllsworthMesa Community College
Mesa, ArizonaCopyright ©2005Ellsworth Publishing Company
Presentation version 5.0
Press ‘ESC’ key to Exit
Click on the screen to continue.
Press F5 key to Begin

To Become An Excellent Typist There Are Six Absolutely Essential Techniques
1. Sit up straight and wrists straight.
Keep wrists straight!
Do not rest your wrists on the table or a wrist pad. Keep your wrists and arms straight to prevent the strain that is associated with Carpal Tunnel Syndrome.
Wrists off table!
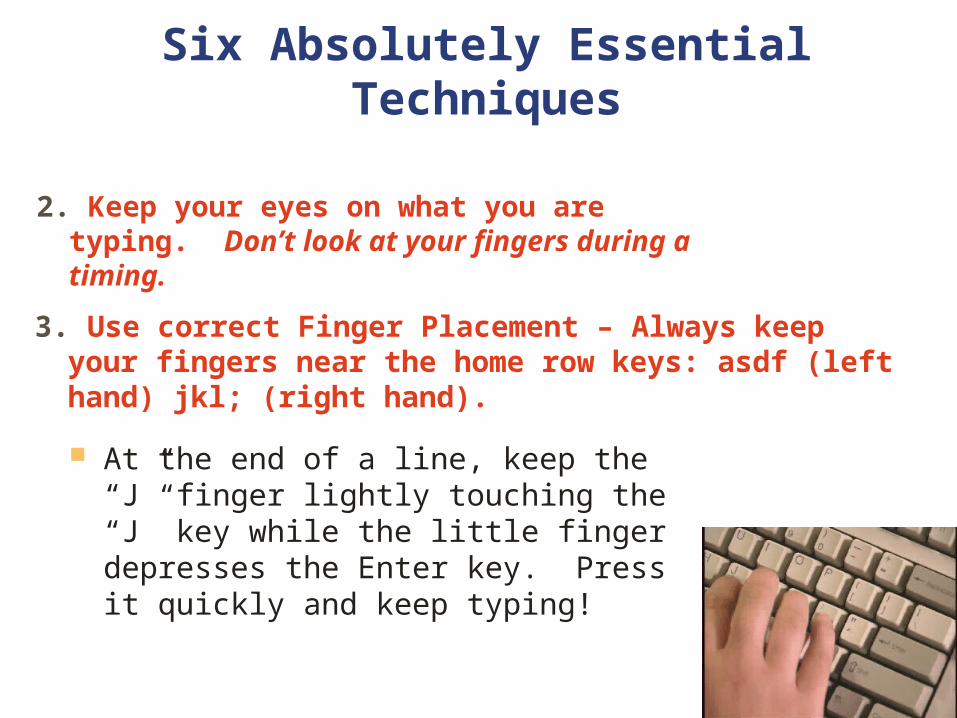
Six Absolutely Essential Techniques
2. Keep your eyes on what you are typing. Don’t look at your fingers during a timing.
3. Use correct Finger Placement – Always keep your fingers near the home row keys: asdf (left hand) jkl; (right hand).
At the end of a line, keep the “J” finger lightly touching the “J” key while the little finger depresses the Enter key. Press it quickly and keep typing!

4. Try to keep a reasonable rhythm
Six Absolutely Essential Techniques
Keep an even, steady rhythm. As you eliminate pauses, your speed will increase.
5. Erase errors properly Keep your “J” finger on the “J” key while you swing your
wrist up and touch the Backspace key with your little finger; then immediately come back to the home row.
With a little practice you can erase errors without skipping a beat.

6. Curve Your Fingers and Tap The Keys Quickly (as if the keys were hot); Don’t Mash the Keys (mashing is pressing hard on the keys with a lot of arm movement).
Six Absolutely Essential Techniques
All movement should be in the fingers.
Curve fingers and tap keys quickly

Can You Pass The M & M Test?
Place an M & M on each hand in the middle between your wrist and first knuckles.
Can you type and not have the M & Ms fall off?
If you can, you have excellent techniques !!!
Check your technique!

Technique Review—Do you remember the secret to learning to type well?
S – Sit up straight, wrists straight
E – Eyes on what you’re typing, not fingers
C – Correct finger placement
R – Reasonable rhythm
E – Erase errors properly, or not at all
T – Tap keys, No mashing

Keyboard Short Course Getting Started
Go to: www.keyboardingonline.com
The Login & Password is trojan51 & trojan51. Enter it and click Sign In.
Click: Login
Click on the 1st selection: Keyboard Short Course Screen Based program.

Keyboard Short Course —Selecting Student Data File
Click Open
Select class Select student name
Click Open
Next click OPEN then your class and your name
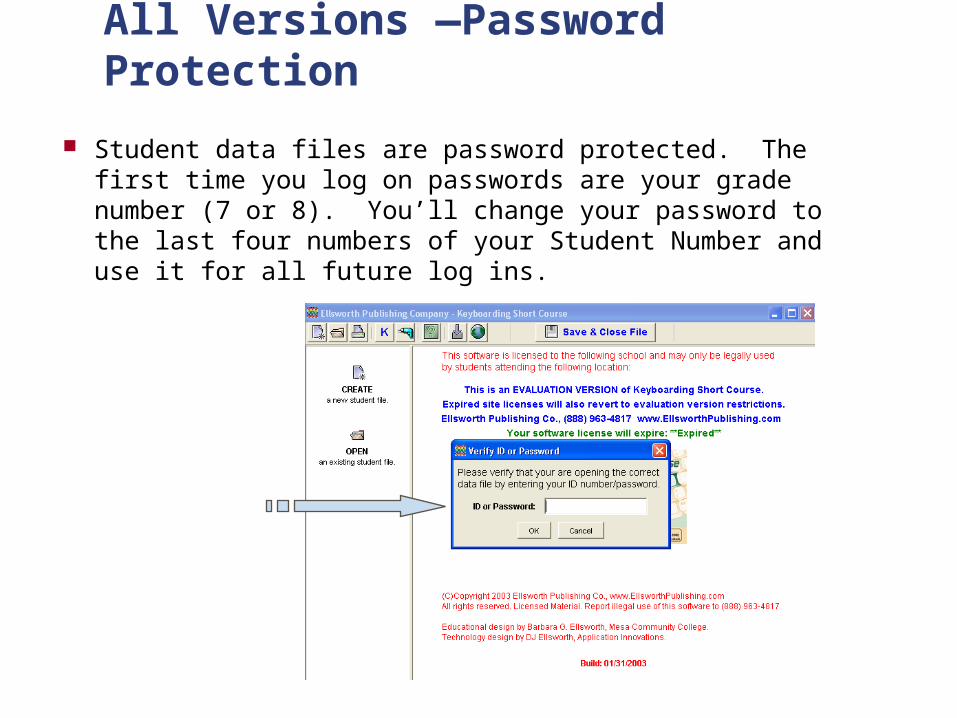
All Versions —Password Protection
Student data files are password protected. The first time you log on passwords are your grade number (7 or 8). You’ll change your password to the last four numbers of your Student Number and use it for all future log ins.

11
1st Click User Info. Enter current e-mail address. You must also change your Password here to the last 4 of your Student Number.
2nd Click Setup. Read all the information under each of the six tabs. 3rd Click Introduction. READ and follow all the information under
each of the 11 steps.

The Introduction — Step 3
The official name of your Keyboard is QWERTY!These letters are the first 6 letters in the top letter row.
Shows students the correct home row placement for their fingers.
Always press the Spacebar with the right thumb (unless you are left-handed)

The Introduction — Step 4
Practice using the Spacebar to make spaces between letters

The Introduction — Step 5
Practice keeping the “J” finger on the “J” key when depressing the Enter key with the little finger.

The Introduction — Step 6
An untimed practice on the home row keys. You may practice as many times as you need to until you feel comfortable with them.

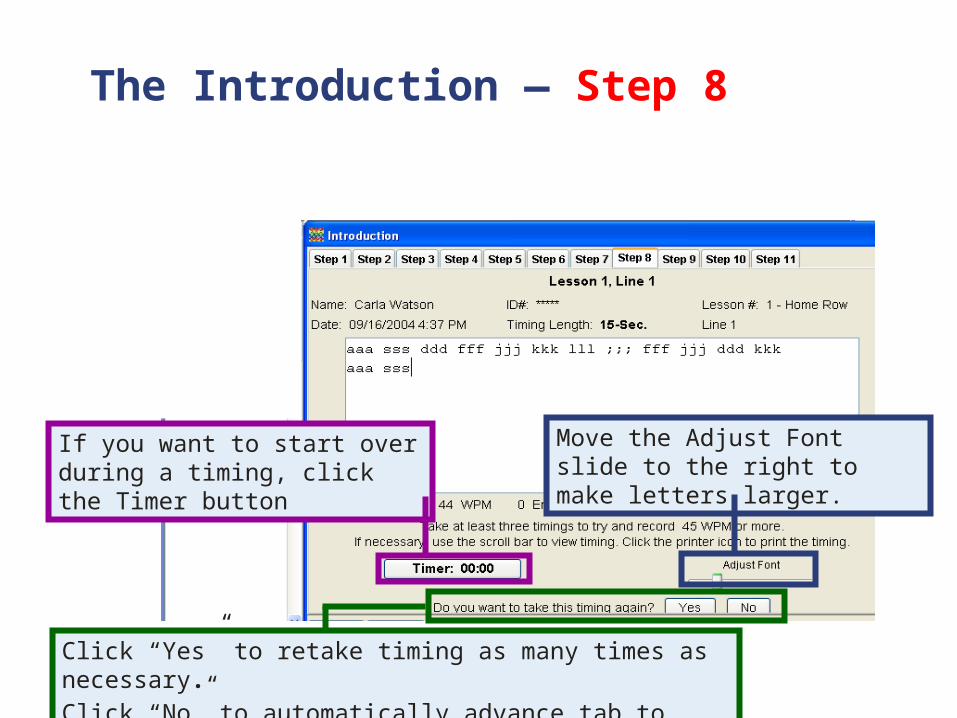
The Introduction — Step 8
Practicing a 15-second timing prepares you for taking timings.
Words per minute (WPM) and errors show immediately after each timing.
Timings that meet the errors allowed in the Setup are automatically recorded.
The Introduction — Step 8
If you want to start over during a timing, click the Timer button
Click “Yes” to retake timing as many times as necessary.Click “No” to automatically advance tab to next timing.
Move the Adjust Font slide to the right to make letters larger.

The Introduction—Step 9
The best scores from timings that meet the accuracy rate in the Setup are automatically saved to a Progress Report.
The best score from the timing in the Introduction, Lesson 1, Line 1.

19
Click Lessons Menu to expose the lessons and begin Lesson 1, Line 1.

20
The Course Entry timing establishes a current speed/accuracy rate. The boxes indicate required lessons; checks inside the boxes are
completed lessons.
Click Lesson 1—Home Row
The ten lesson exercises appear. Take the 15-second timing on Line 1. If you finish the line before the timer stops you, press Enter and keep typing on the same line. That is how you get more words per minute.
Keep practicing until you make your goal. Then go to Line 2.

The Lessons Menu
Your instructor will blackout the timing screen; keep your eyes on the screen or you will lose your place. DO NOT watch the keys! The data will appear after the timing is completed.
The Timer begins when the first key is depressed.

22
There are two Progress Reports: Simple and Comprehensive. Any timings can be practiced again—higher scores that meet the
accuracy rate will replace lower scores.
Click “Simple Report” to see your best scores. Asterisks indicate that the Backspace or Delete key was used. A higher
score without using the Backspace key will replace this score and the asterisk will be gone.

23
There are two Grade Reports: Current and Final.
Current Grade Report gives you your current Words Per Minute (WPM) average after you complete the first 10 Lines of Lesson 1.
The grading scale is: 30+ WPM is an A; 20-29 is a B; 15-19 is a C.
The Final Grade Report does not show up until all 18 Lessons are complete.

24
Before closing out of Keyboarding Online always Click the Save & Close File button. It closes your data file and saves your work.

25
Keyboarding Penalties (8th Grade Only)
Less than 5 Lessons completed:
Minus 10 points
Less than 10 Lessons completed:
Minus 5 points
Less than 18 Lessons completed:
Minus 3 points
100% for all 18 Lessons completed!!

Let’s get going now andin no time you’ll be typing as fast as your
teacher!