Embed Size (px)
Citation preview

Toyota Supports ASE Certification Page 1 of 24
PD
016-03
Title:
2004 MY PRIUS PRE-DELIVERYSERVICE (PDS)Models:
’04 Prius
Technical ServiceBULLETIN
October 17, 2003
This Service Bulletin has been prepared exclusively for Pre–Delivery Service (PDS) onthe Prius hybrid vehicle. While many of the PDS operations are similar to other Toyotavehicles, some operations are specific for the Prius. Please use the Prius PDS CheckSheet form for Pre–Delivery Service.
For additional PDS detail, please see related PDS TSBs and the “Pre–Delivery ServiceManual for Hybrid Vehicles” located on the Technical Information System (TIS).
PDS is a critical step in satisfying your dealership’s new car customers. Customerfeedback indicates the following areas deserve special attention when performing PDS:
� Careful inspection for Paint Chips/Scratches and Body Dents/Dings.� Proper Operation of Electrical Accessories (including interior light, clock, and
radio reset).� Interior Cleanliness.� Proper Function of Mechanical Systems.
For improved customer satisfaction, please pay particular attention to the FuseInstallation and Battery Maintenance areas indicated in bold red type.
The Prius has unique operating modes, so always follow the precautions below whenperforming the PDS operation:
� The Prius contains high voltage (200∼500 volts) AC and DC Systems. All highvoltage wiring and connections are orange in color. Do not carelessly touch theseorange colored wiring harnesses and connectors.
� The gasoline engine may start up and shut down suddenly whenever the “READY”light is illuminated. Be sure to press the “P” position switch, apply the parkingbrake, and press the “POWER” switch in order to stop the hybrid system (the“READY” light is OFF), and remove the ignition key before working in theengine compartment.
� The hybrid transaxle, engine radiator, and inverter radiator may reach hightemperatures during inspection. Carefully observe all caution labels and instructionson these components.
� Be sure to place the shift selector into “P” (press the “P” switch) at all times unlessotherwise instructed. When the shift selector is in the “N” position, the hybrid vehiclebattery will not charge even if the gasoline engine is operating.
� When leaving the vehicle, press the “P” position switch, apply the parking brake, andpress the “POWER” switch in order to stop the hybrid system (the “READY” light isOFF). Remove the ignition key.
� Air vents are provided on the package tray behind the rear seatback to cool thehybrid vehicle battery. Do not block these air vents.
� Do not splash water on the electric components in the engine compartment.
PR
E–D
ELIV
ER
Y S
ER
VIC
EIntroduction
Precautions
2004 MY Prius Pre–Delivery Service – PD016-03 October 17, 2003
Page 2 of 24
Prius PDS forms will be mailed to each dealership. Additional forms (M/N 00406–PDS04–PRIUS) should be ordered from the Material Distribution Center.
OP CODE DESCRIPTION TIME OFP T1 T2
001013 Pre–Delivery Service (PDS) 1.6 N/A – –
If the need for additional repairs or adjustment is noted during PDS, the required serviceshould be performed under warranty. Reimbursement will be managed under thewarranty policy.
The Warranty Policy and Procedures Manual requires that you maintain thecompleted Prius PDS Check Sheet in the customer’s file. If you cannot produce acompleted form for each retailed vehicle upon TMS and/or Region/Distributor audit, thePDS payment amount will be subject to debit.
An additional Repair Order completed in conjunction with normal PDS must have timepunch/flags for service. If multiple repairs are performed, separate time flags must bepunched for each repair.
PDS FormOrdering
Information
ReimbursementInformation
WarrantyPolicy
2004 MY Prius Pre–Delivery Service – PD016-03 October 17, 2003
Page 3 of 24
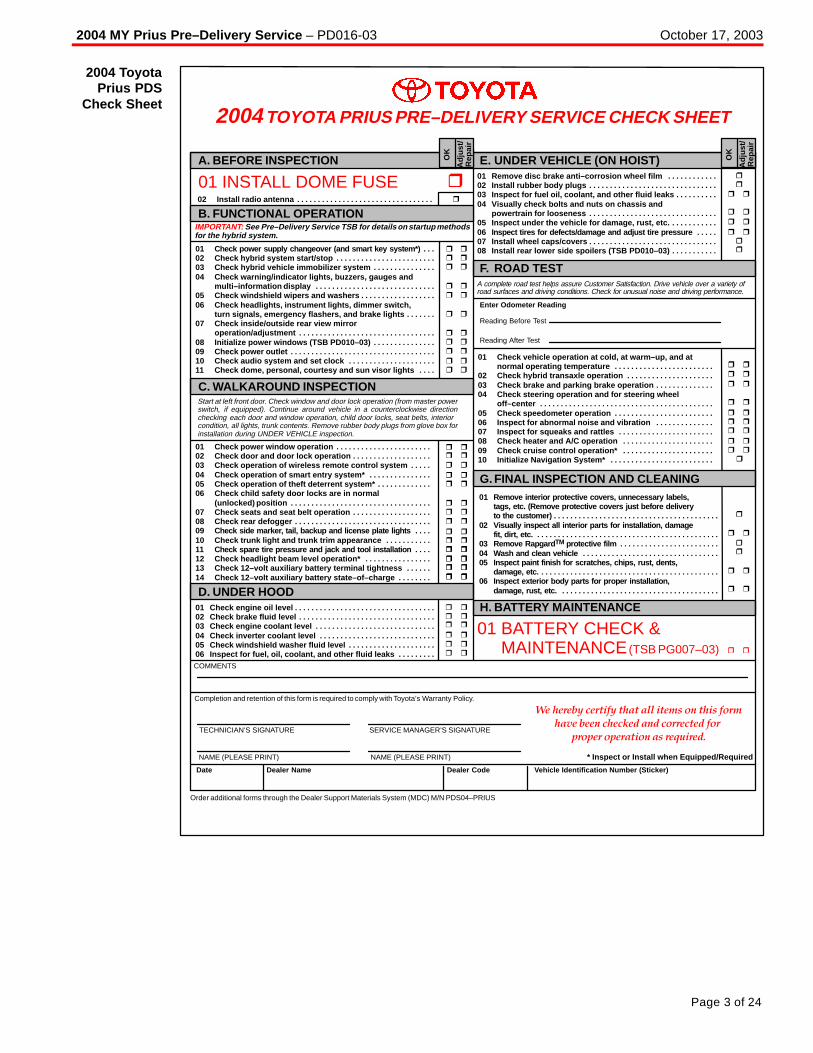
01 Check engine oil level . . . . . . . . . . . . . . . . . . . . . . . . . . . . . . . . . . 02 Check brake fluid level . . . . . . . . . . . . . . . . . . . . . . . . . . . . . . . . . 03 Check engine coolant level . . . . . . . . . . . . . . . . . . . . . . . . . . . . . 04 Check inverter coolant level . . . . . . . . . . . . . . . . . . . . . . . . . . . . 05 Check windshield washer fluid level . . . . . . . . . . . . . . . . . . . . . 06 Inspect for fuel, oil, coolant, and other fluid leaks . . . . . . . . .
2004 TOYOTA PRIUS PRE–DELIVERY SERVICE CHECK SHEET
01 Remove disc brake anti–corrosion wheel film . . . . . . . . . . . . 02 Install rubber body plugs . . . . . . . . . . . . . . . . . . . . . . . . . . . . . . . 03 Inspect for fuel oil, coolant, and other fluid leaks . . . . . . . . . . 04 Visually check bolts and nuts on chassis and
powertrain for looseness . . . . . . . . . . . . . . . . . . . . . . . . . . . . . . . 05 Inspect under the vehicle for damage, rust, etc. . . . . . . . . . . . 06 Inspect tires for defects/damage and adjust tire pressure . . . . . 07 Install wheel caps/covers . . . . . . . . . . . . . . . . . . . . . . . . . . . . . . . 08 Install rear lower side spoilers (TSB PD010–03) . . . . . . . . . . .
01 Remove interior protective covers, unnecessary labels, tags, etc. (Remove protective covers just before deliveryto the customer) . . . . . . . . . . . . . . . . . . . . . . . . . . . . . . . . . . . . . . . .
02 Visually inspect all interior parts for installation, damagefit, dirt, etc. . . . . . . . . . . . . . . . . . . . . . . . . . . . . . . . . . . . . . . . . . . . .
03 Remove Rapgard TM protective film . . . . . . . . . . . . . . . . . . . . . . . . 04 Wash and clean vehicle . . . . . . . . . . . . . . . . . . . . . . . . . . . . . . . . . 05 Inspect paint finish for scratches, chips, rust, dents,
damage, etc. . . . . . . . . . . . . . . . . . . . . . . . . . . . . . . . . . . . . . . . . . . . 06 Inspect exterior body parts for proper installation,
damage, rust, etc. . . . . . . . . . . . . . . . . . . . . . . . . . . . . . . . . . . . . . .
C. WALKAROUND INSPECTION
D. UNDER HOOD
E. UNDER VEHICLE (ON HOIST)
F. ROAD TEST
G. FINAL INSPECTION AND CLEANING
H. BATTERY MAINTENANCE
01 INSTALL DOME FUSE
01 BATTERY CHECK &MAINTENANCE (TSB PG007–03)
* Inspect or Install when Equipped/Required
Start at left front door. Check window and door lock operation (from master powerswitch, if equipped). Continue around vehicle in a counterclockwise directionchecking each door and window operation, child door locks, seat belts, interior condition, all lights, trunk contents. Remove rubber body plugs from glove box forinstallation during UNDER VEHICLE inspection.
A complete road test helps assure Customer Satisfaction. Drive vehicle over a variety of road surfaces and driving conditions. Check for unusual noise and driving performance.
Enter Odometer Reading
Reading Before Test
Reading After Test
COMMENTS
TECHNICIAN’S SIGNATURE SERVICE MANAGER’S SIGNATURE
NAME (PLEASE PRINT)NAME (PLEASE PRINT)
Date Dealer Name Dealer Code Vehicle Identification Number (Sticker)
Completion and retention of this form is required to comply with Toyota’s Warranty Policy.
Order additional forms through the Dealer Support Materials System (MDC) M/N PDS04–PRIUS
A. BEFORE INSPECTION
We hereby certify that all items on this form
have been checked and corrected for
proper operation as required.
B. FUNCTIONAL OPERATION
OK
Adj
ust/
Rep
air
OK
Adj
ust/
Rep
air
01 Check power supply changeover (and smart key system*) . . . 02 Check hybrid system start/stop . . . . . . . . . . . . . . . . . . . . . . . . 03 Check hybrid vehicle immobilizer system . . . . . . . . . . . . . . . 04 Check warning/indicator lights, buzzers, gauges and
multi–information display . . . . . . . . . . . . . . . . . . . . . . . . . . . . . 05 Check windshield wipers and washers . . . . . . . . . . . . . . . . . . 06 Check headlights, instrument lights, dimmer switch,
turn signals, emergency flashers, and brake lights . . . . . . . 07 Check inside/outside rear view mirror
operation/adjustment . . . . . . . . . . . . . . . . . . . . . . . . . . . . . . . . . 08 Initialize power windows (TSB PD010–03) . . . . . . . . . . . . . . . 09 Check power outlet . . . . . . . . . . . . . . . . . . . . . . . . . . . . . . . . . . . 10 Check audio system and set clock . . . . . . . . . . . . . . . . . . . . . 11 Check dome, personal, courtesy and sun visor lights . . . .
02 Install radio antenna . . . . . . . . . . . . . . . . . . . . . . . . . . . . . . . . .
IMPORTANT: See Pre–Delivery Service TSB for details on startup methodsfor the hybrid system.
01 Check power window operation . . . . . . . . . . . . . . . . . . . . . . . 02 Check door and door lock operation . . . . . . . . . . . . . . . . . . . 03 Check operation of wireless remote control system . . . . . 04 Check operation of smart entry system* . . . . . . . . . . . . . . . 05 Check operation of theft deterrent system* . . . . . . . . . . . . . 06 Check child safety door locks are in normal
(unlocked) position . . . . . . . . . . . . . . . . . . . . . . . . . . . . . . . . . . 07 Check seats and seat belt operation . . . . . . . . . . . . . . . . . . . 08 Check rear defogger . . . . . . . . . . . . . . . . . . . . . . . . . . . . . . . . . 09 Check side marker, tail, backup and license plate lights . . . . 10 Check trunk light and trunk trim appearance . . . . . . . . . . . 11 Check spare tire pressure and jack and tool installation . . . . 12 Check headlight beam level operation* . . . . . . . . . . . . . . . . 13 Check 12–volt auxiliary battery terminal tightness . . . . . . 14 Check 12–volt auxiliary battery state–of–charge . . . . . . . .
01 Check vehicle operation at cold, at warm–up, and atnormal operating temperature . . . . . . . . . . . . . . . . . . . . . . . .
02 Check hybrid transaxle operation . . . . . . . . . . . . . . . . . . . . . 03 Check brake and parking brake operation . . . . . . . . . . . . . . 04 Check steering operation and for steering wheel
off–center . . . . . . . . . . . . . . . . . . . . . . . . . . . . . . . . . . . . . . . . . . 05 Check speedometer operation . . . . . . . . . . . . . . . . . . . . . . . . 06 Inspect for abnormal noise and vibration . . . . . . . . . . . . . . 07 Inspect for squeaks and rattles . . . . . . . . . . . . . . . . . . . . . . . 08 Check heater and A/C operation . . . . . . . . . . . . . . . . . . . . . . 09 Check cruise control operation* . . . . . . . . . . . . . . . . . . . . . . 10 Initialize Navigation System* . . . . . . . . . . . . . . . . . . . . . . . . .
2004 ToyotaPrius PDS
Check Sheet

2004 MY Prius Pre–Delivery Service – PD016-03 October 17, 2003
Page 4 of 24
A01. Install Dome fuse.The Dome fuse (15A) is removed atthe factory prior to shipping in orderto prevent auxiliary batterydischarge. The removed Domefuse is stored in the spare locationof the engine compartment relayblock. Install the Dome fuse in therelay block as shown.
A02. Install radio antenna.The radio antenna is fixed on the roof.
B01. Check power supply changeoverand smart key system. *
HINT:For details on the startup methods for hybrid systems, refer to theOwner’s Manual.
1. Apply the parking brake.
2. Make sure the key is fullyinserted into the key slot.
NOTE:If the key is inserted into the key slot upside down, it may cause a breakdown.
3. Without depressing the brakepedal, press the “POWER”switch and change the powersupply.
� Pressed once: the hybridsystem is in the “ACC”position.
� Pressed twice: the hybridsystem is in the “IG–ON”position.
� Pressed three times: thehybrid system is “OFF.”
BeforeInspection
Relay Block
Remove ThisFuse (Dome)
Reinstall Fuse(Dome 15A) Here
FunctionalOperation
Key
Key Slot
Vehicles Equipped With Push Button Start
1 2
“POWER”Switch
POWER SUPPLY CHANGEOVER:
3
OFF ACC ONLight Off Light On (Green) Light On (Amber)
Press Once Press Twice
Press 3 Times
* Inspect or install when equipped or required
2004 MY Prius Pre–Delivery Service – PD016-03 October 17, 2003
Page 5 of 24
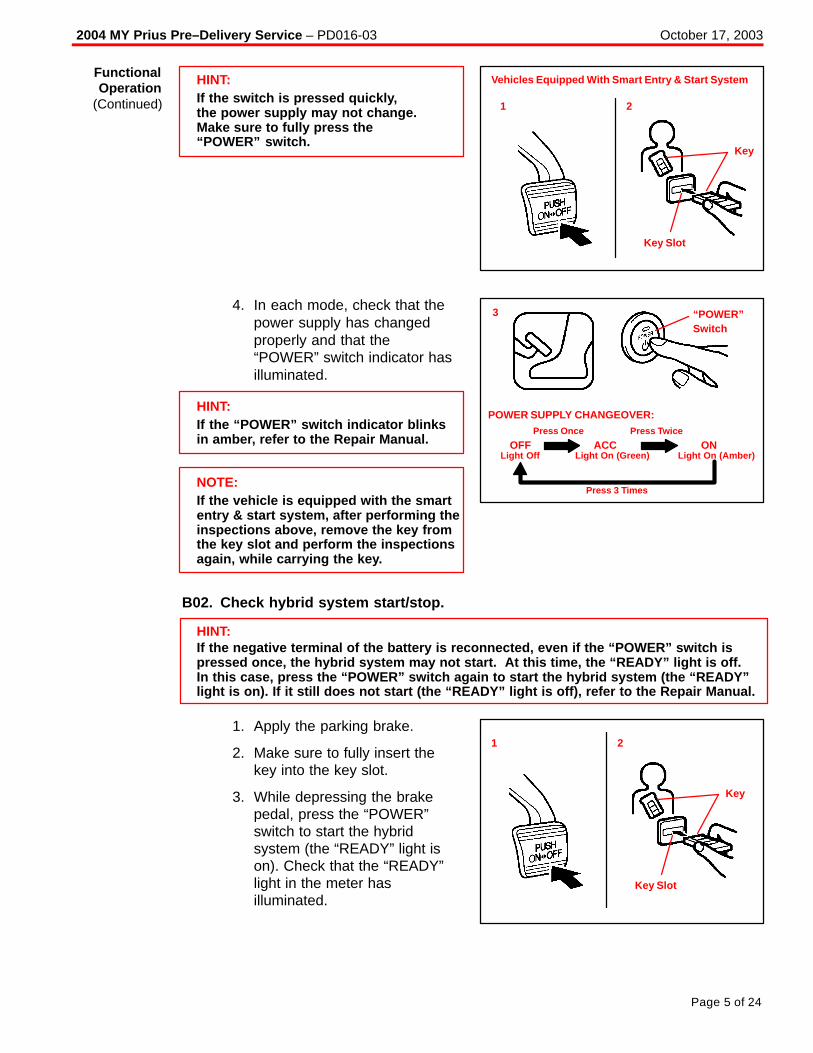
HINT:If the switch is pressed quickly, the power supply may not change. Make sure to fully press the “POWER” switch.
4. In each mode, check that thepower supply has changedproperly and that the“POWER” switch indicator hasilluminated.
HINT:If the “POWER” switch indicator blinksin amber, refer to the Repair Manual.
NOTE:If the vehicle is equipped with the smartentry & start system, after performing theinspections above, remove the key fromthe key slot and perform the inspectionsagain, while carrying the key.
B02. Check hybrid system start/stop.
HINT:If the negative terminal of the battery is reconnected, even if the “POWER” switch ispressed once, the hybrid system may not start. At this time, the “READY” light is off. In this case, press the “POWER” switch again to start the hybrid system (the “READY”light is on). If it still does not start (the “READY” light is off), refer to the Repair Manual.
1. Apply the parking brake.
2. Make sure to fully insert thekey into the key slot.
3. While depressing the brakepedal, press the “POWER”switch to start the hybridsystem (the “READY” light ison). Check that the “READY”light in the meter hasilluminated.
FunctionalOperation
(Continued)
Key
Key Slot
1 2
Vehicles Equipped With Smart Entry & Start System
“POWER”Switch
3
POWER SUPPLY CHANGEOVER:
OFF ACC ONLight Off Light On (Green) Light On (Amber)
Press Once Press Twice
Press 3 Times
Key
Key Slot
1 2
2004 MY Prius Pre–Delivery Service – PD016-03 October 17, 2003
Page 6 of 24
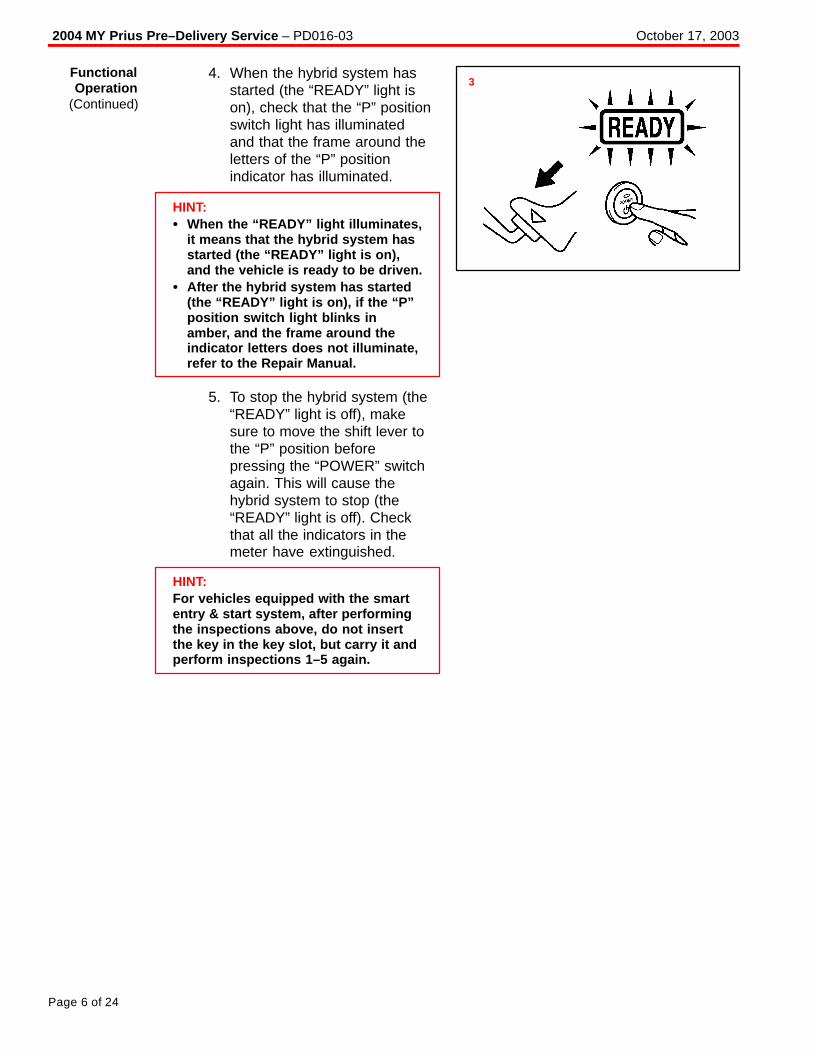
4. When the hybrid system hasstarted (the “READY” light ison), check that the “P” positionswitch light has illuminatedand that the frame around theletters of the “P” positionindicator has illuminated.
HINT:� When the “READY” light illuminates,
it means that the hybrid system hasstarted (the “READY” light is on),and the vehicle is ready to be driven.
� After the hybrid system has started(the “READY” light is on), if the “P”position switch light blinks inamber, and the frame around theindicator letters does not illuminate,refer to the Repair Manual.
5. To stop the hybrid system (the“READY” light is off), makesure to move the shift lever tothe “P” position beforepressing the “POWER” switchagain. This will cause thehybrid system to stop (the“READY” light is off). Checkthat all the indicators in themeter have extinguished.
HINT:For vehicles equipped with the smartentry & start system, after performingthe inspections above, do not insertthe key in the key slot, but carry it andperform inspections 1–5 again.
FunctionalOperation
(Continued)
3

2004 MY Prius Pre–Delivery Service – PD016-03 October 17, 2003
Page 7 of 24
B03. Check hybrid vehicle immobilizer system.
HINT:For vehicles equipped with the smartentry & start system, after performingthe inspections below, do not insertthe key in the key slot, but carry it andperform the inspections again.
1. Check that the hybrid vehicleimmobilizer indicator lightflashes when the key isremoved from the key slot.
2. Insert the key half way into thekey slot and check that thehybrid vehicle immobilizerindicator light is blinking.
3. Check that the hybrid vehicleimmobilizer indicator lightgoes off with the key fullyinserted into the key slot.
4. With the hybrid system off (the“READY” light is off) and thekey fully inserted into the keyslot, check that the buzzersounds when the driver’s dooris opened with.
5. Check that the hybrid systemcan be started (the “READY”light is on) using all the keys.
For vehicles equipped with the smart entry & start system:
6. With the key placed outsidethe vehicle, check that thehybrid system will not start(the “READY” light is off).Also check that the smartentry system warning light willilluminate for 5 seconds.
FunctionalOperation
(Continued)
Hybrid Vehicle Immobilizer Indicator Light

2004 MY Prius Pre–Delivery Service – PD016-03 October 17, 2003
Page 8 of 24
B04. Check warning/indicator lights, buzzers, gauges, and multi–information display.
HINT:For further details, refer to the Owner’s Manual.
1. Check warning and indicator lights in the meter.
a. SRS Warning Light.
After turning the hybrid system to the “IG–ON” position, check that theSRS warning light illuminates for 6 seconds before it turns off.
b. Low Temperature Indicator.
After turning the hybrid system to the “IG–ON” position, check that the lowtemperature indicator illuminates for 3 seconds before it turns off. Afterstarting the hybrid system (the “READY” light is on), check that the lowtemperature indicator turns off when the outside temperature is +3 �C(37.4 �F) or more. Check that the low temperature indicator illuminates,when the outside temperature is below +3 �C (37.4 �F).
c. Brake System Warning Light (Red).
After starting the hybrid system (the “READY” light is on) with the parkingbrake applied, check that the brake warning light (red) illuminates. Checkthat the brake warning light turns off when the parking brake is released.
HINT:When the hybrid system is started (the “READY” light is on) with the parking brakereleased, the brake warning light may remain illuminated for 60 seconds. This isnormal if the light will turn off afterwards.
d. ABS, VSC, Electronic Control Brake Warning Light (Yellow), EngineWarning Light, Slip Indicator Light.
After turning the hybrid system to the “IG–ON” position, check that thewarning lights and indicator light above will illuminate. After starting thehybrid system (the “READY” light is on), check that the warning lights andindicator light above will turn off.
HINT:When the hybrid system is started (the “READY” light is on), the ABS, VSC, and brakewarning lights may remain illuminated for 60 seconds. This is normal if the lights willturn off afterwards.
e. Open Door Warning Light.
Open one of the doors and check that the open door warning lightilluminates.Close the door and check that the open door warning light turns off.
FunctionalOperation
(Continued)

2004 MY Prius Pre–Delivery Service – PD016-03 October 17, 2003
Page 9 of 24
f. Driver’s and Passenger’s Seat Belt Reminder Lights.
After turning the hybrid system to the “IG–ON” position, check that thedriver’s seat belt reminder light blinks and that it turns off when the seatbelt is fastened. While sitting in the passenger seat, turn the hybrid systemto the “IG–ON” position, and check that the passenger seat belt reminderlight blinks and that it turns off when the seat belt is fastened.
HINT:Perform the check on the passenger side when inspecting the passenger seat.
g. Low Fuel Level Warning Light.
Low fuel level warning light blinks when the fuel tank becomes nearly empty.
h. Master Warning Light.
Comes on only when there is some malfunction in the system.
WARNING LIGHTS & BUZZERS FUNCTION
a SRS Warning Light This light will remain on as an SRS malfunctionwarning.
b Low TemperatureIndicator
This light illuminates when the outsidetemperature is +3 �C (37.4 �F) or below.
cBrake System
Warning Light (Red)and Buzzer
This light warns that there is a malfunctionsomewhere in the brake system. If the brakesystem fails seriously, the warning buzzer alsomay sound.
ABS Warning LightThis light illuminates when there is amalfunction in the ABS & brake assist systemor the VSC system.
d VSC VSC Warning Light
� This light illuminates when there is amalfunction in the VSC system and theMotive Force Suppression Control (MotorTraction Control).
� This light illuminates when there is amalfunction in the HV system.
Electronic ControlBrake Warning Light
(Yellow)
� This light illuminates when there is amalfunction in the electronic control brakesystem.
� The brake system warning light (red) alsoilluminates when a malfunction affectingbraking performance occurs.
FunctionalOperation
(Continued)
2004 MY Prius Pre–Delivery Service – PD016-03 October 17, 2003
Page 10 of 24
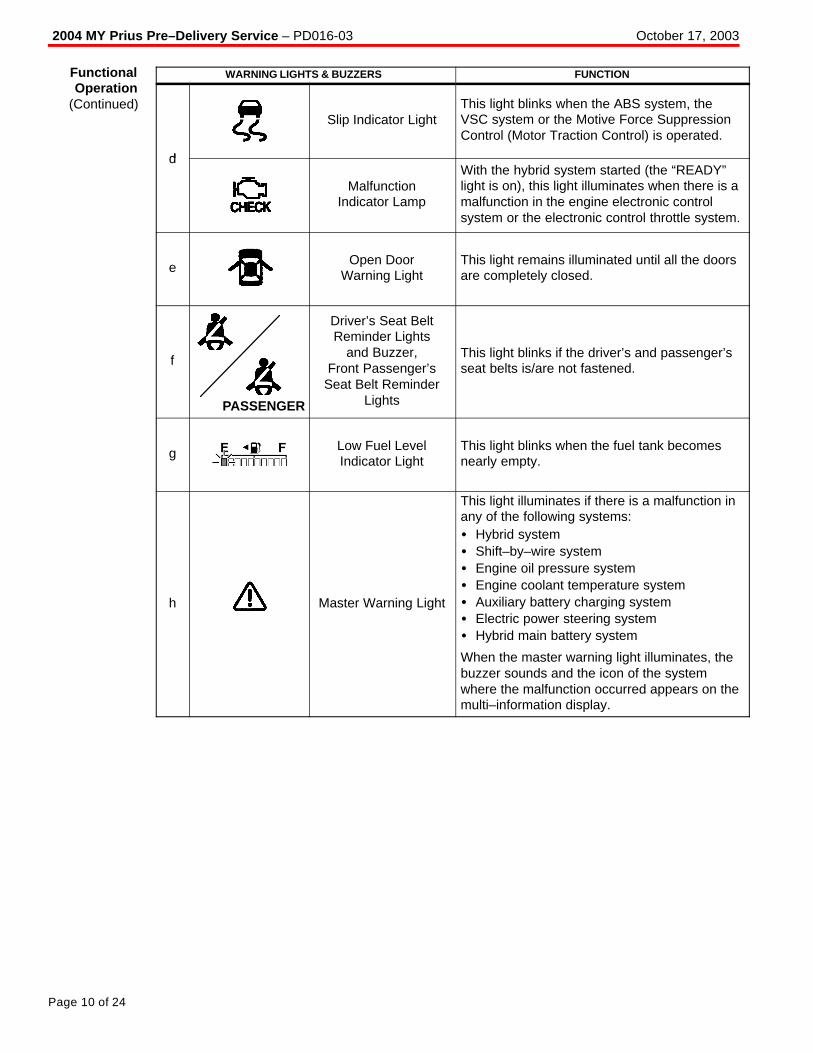
WARNING LIGHTS & BUZZERS FUNCTION
d
Slip Indicator LightThis light blinks when the ABS system, theVSC system or the Motive Force SuppressionControl (Motor Traction Control) is operated.
d
MalfunctionIndicator Lamp
With the hybrid system started (the “READY”light is on), this light illuminates when there is amalfunction in the engine electronic controlsystem or the electronic control throttle system.
e Open DoorWarning Light
This light remains illuminated until all the doorsare completely closed.
f
PASSENGER
Driver’s Seat BeltReminder Lights
and Buzzer,Front Passenger’s
Seat Belt ReminderLights
This light blinks if the driver’s and passenger’sseat belts is/are not fastened.
g Low Fuel LevelIndicator Light
This light blinks when the fuel tank becomesnearly empty.
h Master Warning Light
This light illuminates if there is a malfunction inany of the following systems:� Hybrid system� Shift–by–wire system� Engine oil pressure system� Engine coolant temperature system� Auxiliary battery charging system� Electric power steering system� Hybrid main battery system
When the master warning light illuminates, thebuzzer sounds and the icon of the systemwhere the malfunction occurred appears on themulti–information display.
FunctionalOperation
(Continued)

2004 MY Prius Pre–Delivery Service – PD016-03 October 17, 2003
Page 11 of 24
2. Check the warning lights in the multi–information display.When the hybrid system is turned to the “ACC” or “IG–ON” position, or whenthe hybrid system is started (the “READY” light is on), check that the followingwarning lights do not appear on the multi–information display.
NOTE:� The following warning lights appear on the multi–information display only when
there is a malfunction in the respective system.� If the following warning lights appear, refer to the Repair Manual.
WARNING LIGHTS(In Multi–Information Display)
FUNCTION
Discharge WarningLight
This light illuminates if there is a malfunction inthe charging system (DC/DC converter,auxiliary battery, etc.).
Low Engine OilPressure Warning
Light
This light illuminates if the engine oil pressure isabnormal.
Coolant TemperatureIndicator Light
This light illuminates if the hybrid system isalmost over–heating.
P/SElectric Power
Steering SystemWarning Light
This light illuminates when the electric powersteering control system fails.
Hybrid SystemWarning Light
This light illuminates if there is a malfunction inthe electric motor, inverter unit, hybrid vehiclebattery, etc.
Hybrid VehicleBattery Warning Light
� This light illuminates when the hybrid vehiclebattery voltage drops with the running modeselector lever left in the “N” position.
� The system works properly if you put therunning mode selector lever in the “P”position and the light turns off.
� This light illuminates if the fuel tank iscompletely empty.
� This light illuminates if the hybrid vehiclebattery is discharged.
Automatic HeadlightLeveling System
Warning Light
This light illuminates if there is a malfunction inthe automatic headlight leveling system.
FunctionalOperation
(Continued)
2004 MY Prius Pre–Delivery Service – PD016-03 October 17, 2003
Page 12 of 24
3. Check buzzers.
a. Check the key reminder buzzer.
With the key inserted into the key slot and the hybrid system turned to the“OFF” or “ACC” position, open the driver’s door and check that the keyreminder buzzer sounds.
b. Check the light reminder buzzer.
With the headlight switch in the “ON” position and the key removed fromthe key slot, open the driver’s door and check that the light reminderbuzzer sounds.
c. Check the shift position reminder buzzer.
While the hybrid system is operating (the “READY” light is on), with theshift lever in a position other than “P” or “R,” open the driver’s door andcheck that the shift position reminder buzzer sounds and the masterwarning light illuminates. At the same time, check the warning messageson the multi–information display.
d. Check the reverse warning buzzer.
While the hybrid system is operating (the “READY” light is on), move the shift lever to the “R” position and check that the reverse warningbuzzer sounds.
B05. Check windshield wipers and washers.
B06. Check headlights, instrument lights, dimmer switch, turn signals, emergency flashers, and brake lights.
B07. Check inside/outside rear view mirror operation/adjustment.
B08. Initialize power windows.
Refer to TSB No. PD010–03, “Pre–Delivery Service (PDS) Information for Prius.”
B09. Check power outlet.
NOTE:The power outlet only works with the ignition in “ACC” or “ON.” Check the outletusing an electrical accessory designed for this use.
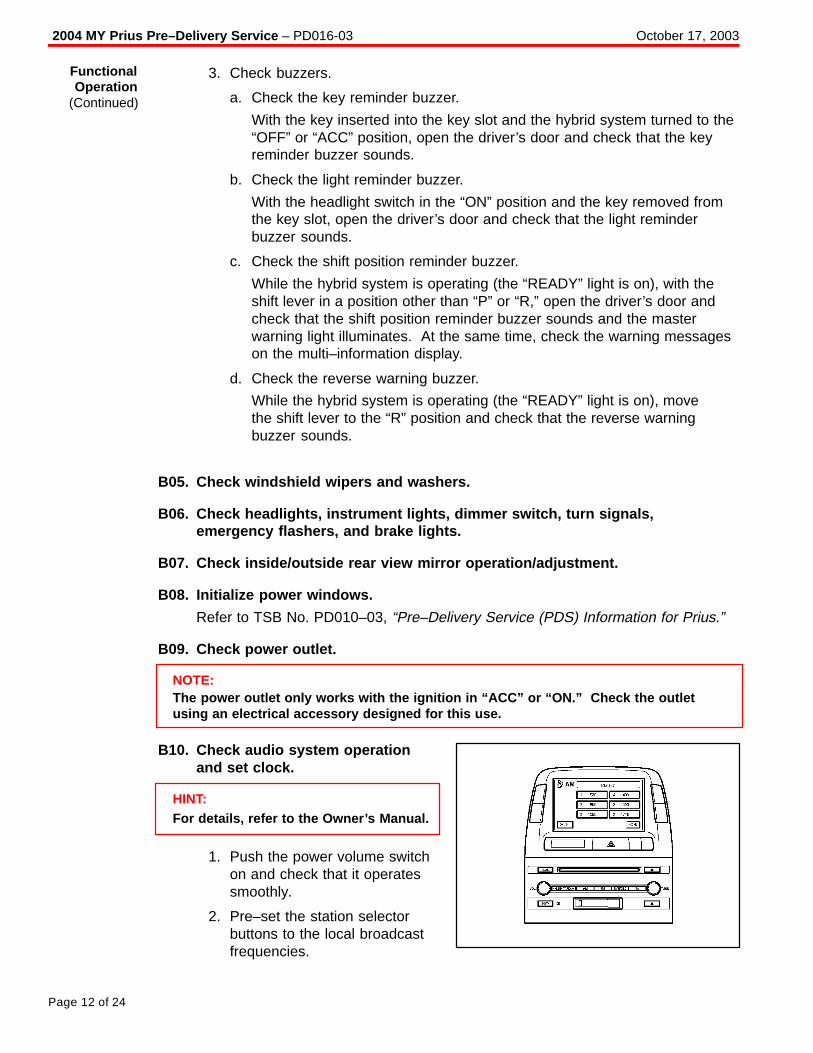
B10. Check audio system operationand set clock.
HINT:For details, refer to the Owner’s Manual.
1. Push the power volume switchon and check that it operatessmoothly.
2. Pre–set the station selectorbuttons to the local broadcastfrequencies.
FunctionalOperation
(Continued)

2004 MY Prius Pre–Delivery Service – PD016-03 October 17, 2003
Page 13 of 24
3. Check the cassette andcompact disc player operation.
4. Operate the steering padswitches and check that theaudio system can becontrolled.
B11. Check dome, personal, courtesyand sun visor lights.
Start at left front door. Check window and door lock operation (from master power switch, if equipped). Continue around vehicle in a counterclockwise direction checkingeach door and window operation, child door locks, seat belts, interior condition, all lights,trunk contents. Remove rubber body plugs from glove box for installation during UNDER VEHICLE inspection.
C01. Check power window operation.
HINT:For the power window initializingprocedure, refer to TSB No. PD010–03,“Pre–Delivery Service (PDS) Informationfor Prius.”
1. Check that the door windowsopen and close smoothlyusing the power windowswitches on each door.
Automatic operation:
2. Check for proper operation ofthe “one–touch open andclose” function by fullypushing the switch down onceand fully pulling the switch uponce.
3. Check that the windows (otherthan the driver’s window)cannot be operated after thewindow lock switch is open.
FunctionalOperation
(Continued)
WalkaroundInspection
Power Window Switch
Lock
Unlock
Push

2004 MY Prius Pre–Delivery Service – PD016-03 October 17, 2003
Page 14 of 24
4. All windows should operatewithout any abnormal noise.
C02. Check door and door lockoperation.
C03. Check operation of wireless doorlock remote control system.
1. Press the LOCK switch on thekey and check that all thedoors lock. Check that thehazard lights and the LED onthe key blink once, when theswitch is pressed.
2. Press the UNLOCK switch onthe key* and check that all thedoors unlock. Check that thehazard lights and the LED onthe key blink twice, when theswitch is pressed.
* North American specification only:
Press the switch once tounlock the driver’s door. Pressit twice to unlock all the doors.
3. After checking the UNLOCKfunction, wait forapproximately 30 secondswithout opening the doors,and check that the doors lockautomatically.
4. Push the LOCK switch on thekey while one of the doors isopen, and check that thebuzzer sounds.
WalkaroundInspection(Continued)
LED
Lock Switch
Unlock Switch
2004 MY Prius Pre–Delivery Service – PD016-03 October 17, 2003
Page 15 of 24
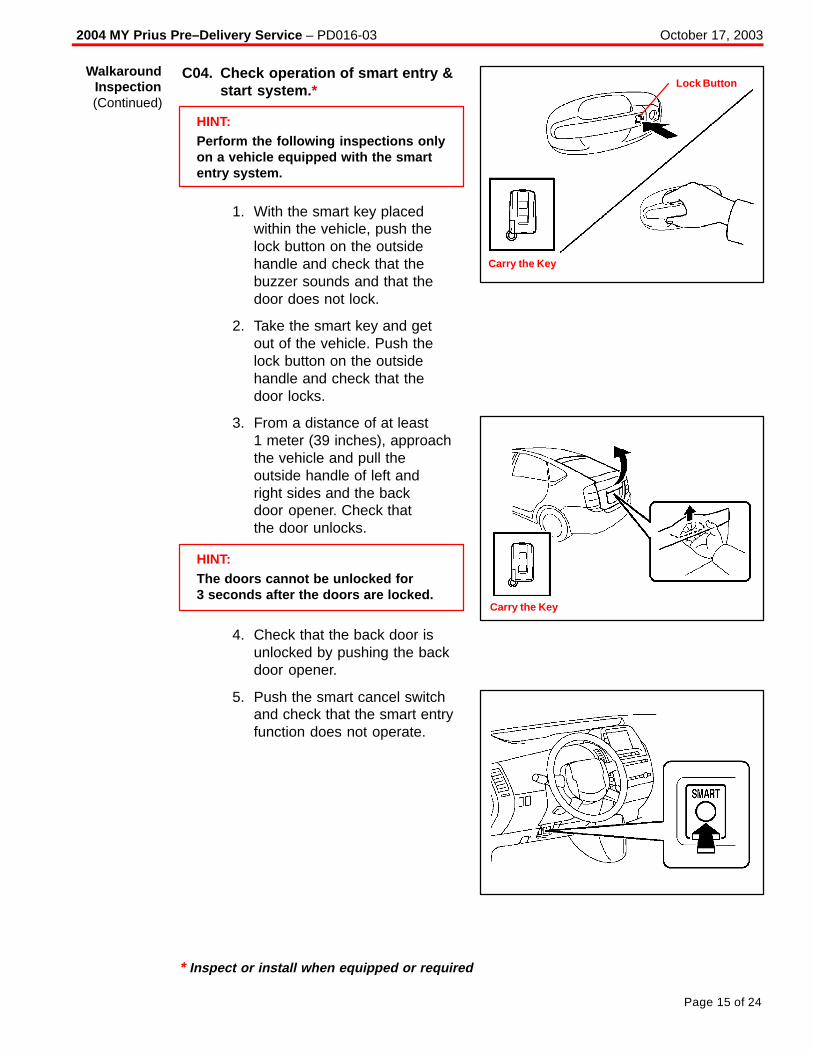
C04. Check operation of smart entry &start system. *
HINT:Perform the following inspections onlyon a vehicle equipped with the smartentry system.
1. With the smart key placedwithin the vehicle, push thelock button on the outsidehandle and check that thebuzzer sounds and that thedoor does not lock.
2. Take the smart key and getout of the vehicle. Push thelock button on the outsidehandle and check that thedoor locks.
3. From a distance of at least1 meter (39 inches), approachthe vehicle and pull theoutside handle of left and right sides and the back door opener. Check that the door unlocks.
HINT:The doors cannot be unlocked for 3 seconds after the doors are locked.
4. Check that the back door isunlocked by pushing the backdoor opener.
5. Push the smart cancel switchand check that the smart entryfunction does not operate.
* Inspect or install when equipped or required
WalkaroundInspection(Continued)
Lock Button
Carry the Key
Carry the Key

2004 MY Prius Pre–Delivery Service – PD016-03 October 17, 2003
Page 16 of 24
C05. Check operation of theftdeterrent system. *
1. With all the doors and thehood closed, use the wirelesskey to lock all of the doors.
2. Check that the theft deterrentsystem indicator light in themeter illuminates for 30seconds after the doors arelocked, and blinks afterwards.
3. Turn the door lock button in the vehicle to the unlockposition, and check that theheadlights blink and the horn sounds.
4. Cancel the security system by unlocking it with thewireless key.
5. Check that the horn soundswhen the panic button ispushed. (North Americanspecification only.)
C06. Check child safety door locks arein normal (unlocked) position.
With the child–protector in the lockposition, check that the rear doorcannot be opened by the insidehandle and can be opened by theoutside handle.
* Inspect or install when equipped or required
WalkaroundInspection(Continued)
When the System Has BeenActivated – Lights Up
When the System Is Set – Flashes
Theft Deterrent Horn
Panic Button
Lock

2004 MY Prius Pre–Delivery Service – PD016-03 October 17, 2003
Page 17 of 24
C07. Check seats and seat belt operation.
C08. Check rear defogger.
C09. Check side marker, tail, backup, and license plate lights.
C10. Check trunk light and trunk trim appearance.
C11. Check spare tire pressure and jack and tool installation.
NOTE:Check and adjust spare tire inflation pressure (compact spare – 60 psi [420kPa]).
C12. Check headlight beam levelcontrol system operation. *
With the headlights illuminated, turnthe rear fog light switch on andcheck that the rear fog lights andthe indicator will illuminate.
C13. Check 12–volt auxiliary batteryterminal tightness.
1. Turn off all lights andaccessories.
2. Stop the hybrid system (the “READY” light is off).
3. Remove the auxiliary battery cover.
4. Remove the positive terminal cover.
5. Check that the terminals aretightly connected and theclamps properly installed.
C14. Check 12–volt auxiliary batteryelectrolyte and charge level.
Refer to TSB No. PG007–03,“Maintenance for HV and Auxiliary Batteries.”
* Inspect or install when equipped or required
WalkaroundInspection(Continued)
Auxiliary Battery Cover
Positive Terminal Cover
Negative TerminalCover
PositiveTerminal
2004 MY Prius Pre–Delivery Service – PD016-03 October 17, 2003
Page 18 of 24
D01. Check engine oil level.
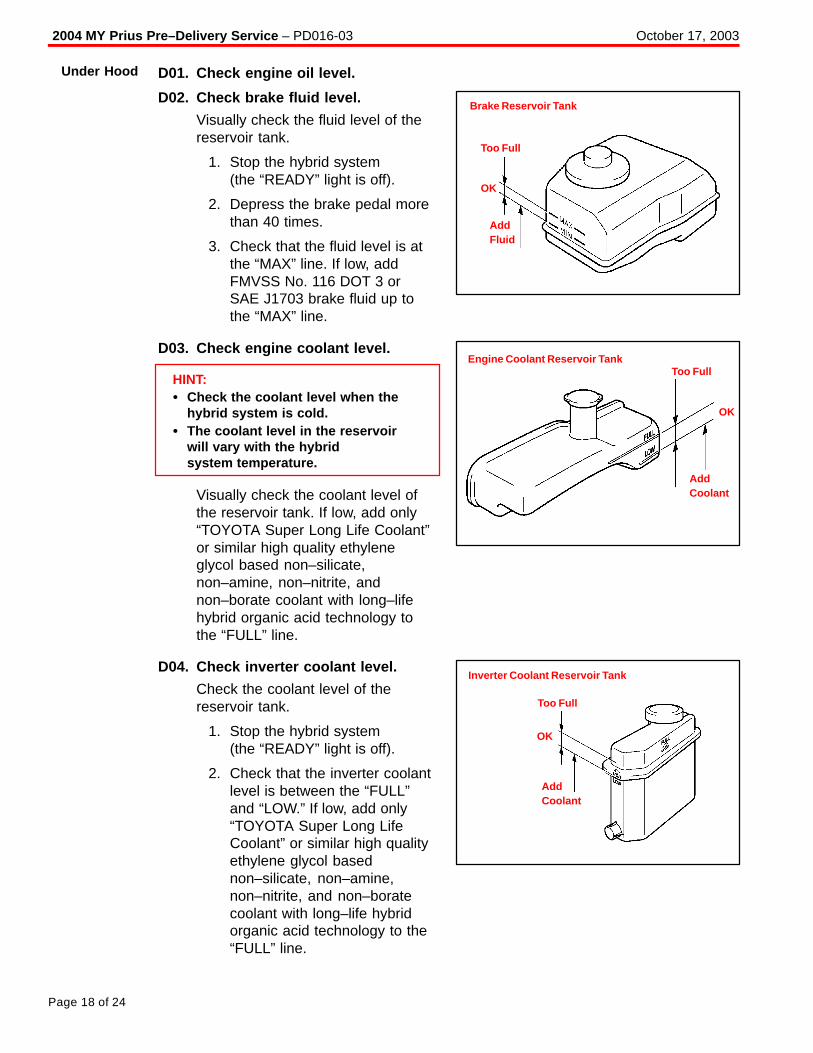
D02. Check brake fluid level.
Visually check the fluid level of thereservoir tank.
1. Stop the hybrid system (the “READY” light is off).
2. Depress the brake pedal morethan 40 times.
3. Check that the fluid level is atthe “MAX” line. If low, addFMVSS No. 116 DOT 3 orSAE J1703 brake fluid up tothe “MAX” line.
D03. Check engine coolant level.
HINT:� Check the coolant level when the
hybrid system is cold.� The coolant level in the reservoir
will vary with the hybrid system temperature.
Visually check the coolant level ofthe reservoir tank. If low, add only“TOYOTA Super Long Life Coolant”or similar high quality ethyleneglycol based non–silicate,non–amine, non–nitrite, andnon–borate coolant with long–lifehybrid organic acid technology tothe “FULL” line.
D04. Check inverter coolant level.
Check the coolant level of thereservoir tank.
1. Stop the hybrid system (the “READY” light is off).
2. Check that the inverter coolantlevel is between the “FULL”and “LOW.” If low, add only“TOYOTA Super Long LifeCoolant” or similar high qualityethylene glycol basednon–silicate, non–amine,non–nitrite, and non–boratecoolant with long–life hybridorganic acid technology to the“FULL” line.
Under Hood
Too Full
Brake Reservoir Tank
AddFluid
OK
Too FullEngine Coolant Reservoir Tank
AddCoolant
OK
Too Full
Inverter Coolant Reservoir Tank
AddCoolant
OK
2004 MY Prius Pre–Delivery Service – PD016-03 October 17, 2003
Page 19 of 24
D05. Check windshield washer fluid level.
D06. Inspect for fuel, oil, coolant, and other fluid leaks.
E01. Remove disc brake anti-corrosion wheel film.Visually inspect rotors for rust.
NOTE:For best rotor rust prevention, retain wheel film on vehicle until just prior to customer delivery.
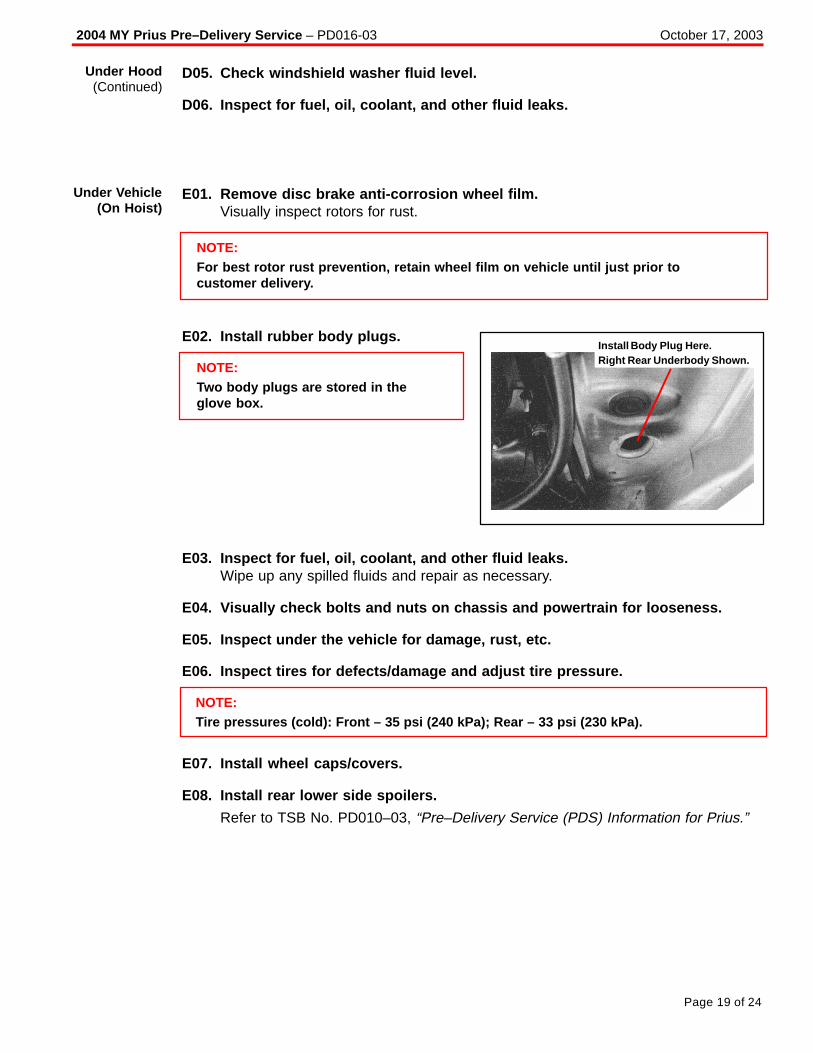
E02. Install rubber body plugs.
NOTE:Two body plugs are stored in the glove box.
E03. Inspect for fuel, oil, coolant, and other fluid leaks.Wipe up any spilled fluids and repair as necessary.
E04. Visually check bolts and nuts on chassis and powertrain for looseness.
E05. Inspect under the vehicle for damage, rust, etc.
E06. Inspect tires for defects/damage and adjust tire pressure.
NOTE:Tire pressures (cold): Front – 35 psi (240 kPa); Rear – 33 psi (230 kPa).
E07. Install wheel caps/covers.
E08. Install rear lower side spoilers.
Refer to TSB No. PD010–03, “Pre–Delivery Service (PDS) Information for Prius.”
Under Hood(Continued)
Under Vehicle(On Hoist)
Install Body Plug Here.Right Rear Underbody Shown.

2004 MY Prius Pre–Delivery Service – PD016-03 October 17, 2003
Page 20 of 24
A Complete Road Test helps assure customer satisfaction. Drive the vehicle over a variety of road surfaces and driving conditions. Check for unusual noises and vehicle performance.
F01. Check vehicle operation at cold, at warm–up, and at normal operating temperature.
F02. Check hybrid transaxleoperation.
HINT:For details on operational methods,refer to the Owner’s Manual.
1. Check that the shift lever canbe moved smoothly to eachposition, and that it returns tothe home position when it islet go.
2. When the shift lever is in eachposition, check that theappropriate indicator boxilluminates. When the shiftlever is in the “P” position,check that the “P” positionswitch light illuminates.
3. Check the transaxle operationat each shift position.
P: Parking, hybrid systemstarting (the “READY” lightis on) and key removalpositionR: Reverse positionN: Neutral positionD: Normal driving positionB: Engine braking position
F03. Check brake and parking brake operation.
F04. Check steering operation and for steering wheel off–center.
Road Test
Home Position
2004 MY Prius Pre–Delivery Service – PD016-03 October 17, 2003
Page 21 of 24
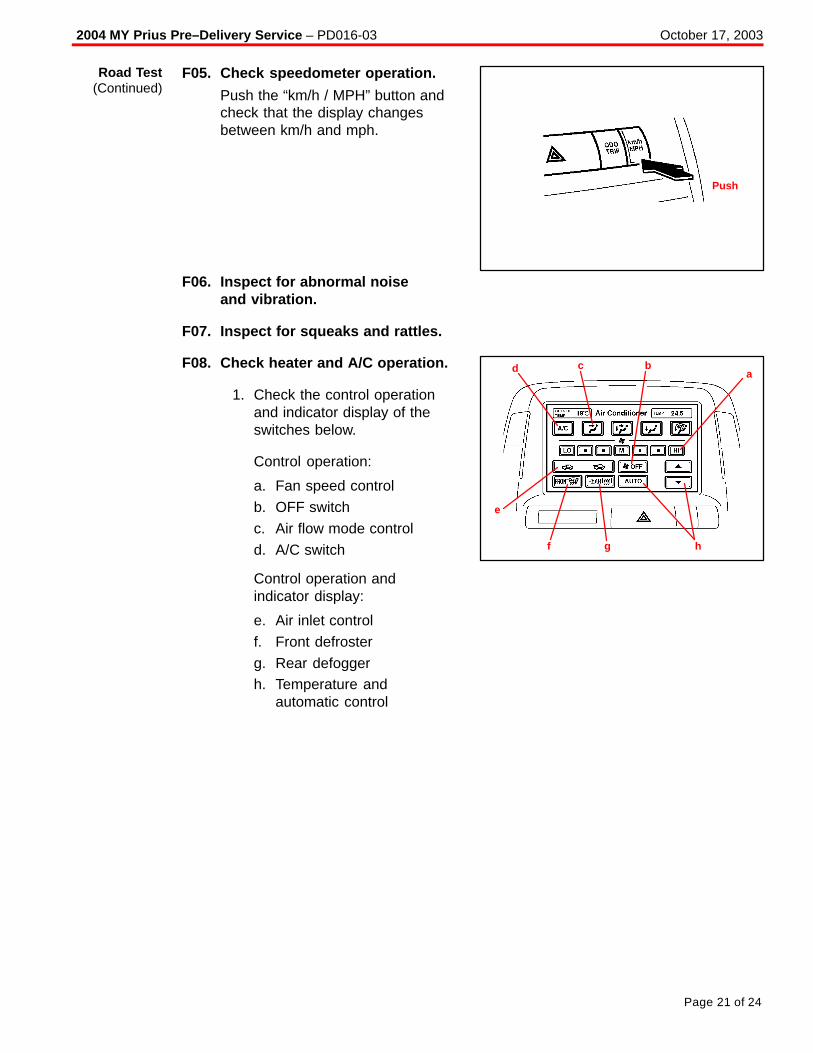
F05. Check speedometer operation.
Push the “km/h / MPH” button andcheck that the display changesbetween km/h and mph.
F06. Inspect for abnormal noise and vibration.
F07. Inspect for squeaks and rattles.
F08. Check heater and A/C operation.
1. Check the control operationand indicator display of theswitches below.
Control operation:
a. Fan speed control
b. OFF switch
c. Air flow mode control
d. A/C switch
Control operation and indicator display:
e. Air inlet control
f. Front defroster
g. Rear defoggerh. Temperature and
automatic control
Road Test(Continued)
Push
abcd
e
hf g

2004 MY Prius Pre–Delivery Service – PD016-03 October 17, 2003
Page 22 of 24
2. Check that the air flowchanges in accordance withthe air flow mode control levelor switch.
3. Operate the steering padswitches and check that thefollowing controls operateproperly and that therespective indicatorilluminates:
a. Temperature controlb. Automatic control
c. Front defroster
d. Rear defogger
e. Air inlet control
F09. Check cruise control operation. *
Check cruise control including “ON–OFF” switch, “SET/COAST,”“RESUME/ACCEL,” and “CANCEL” functions.
* Inspect or install when equipped or required
Road Test(Continued)
a
b
c
d
e
2004 MY Prius Pre–Delivery Service – PD016-03 October 17, 2003
Page 23 of 24
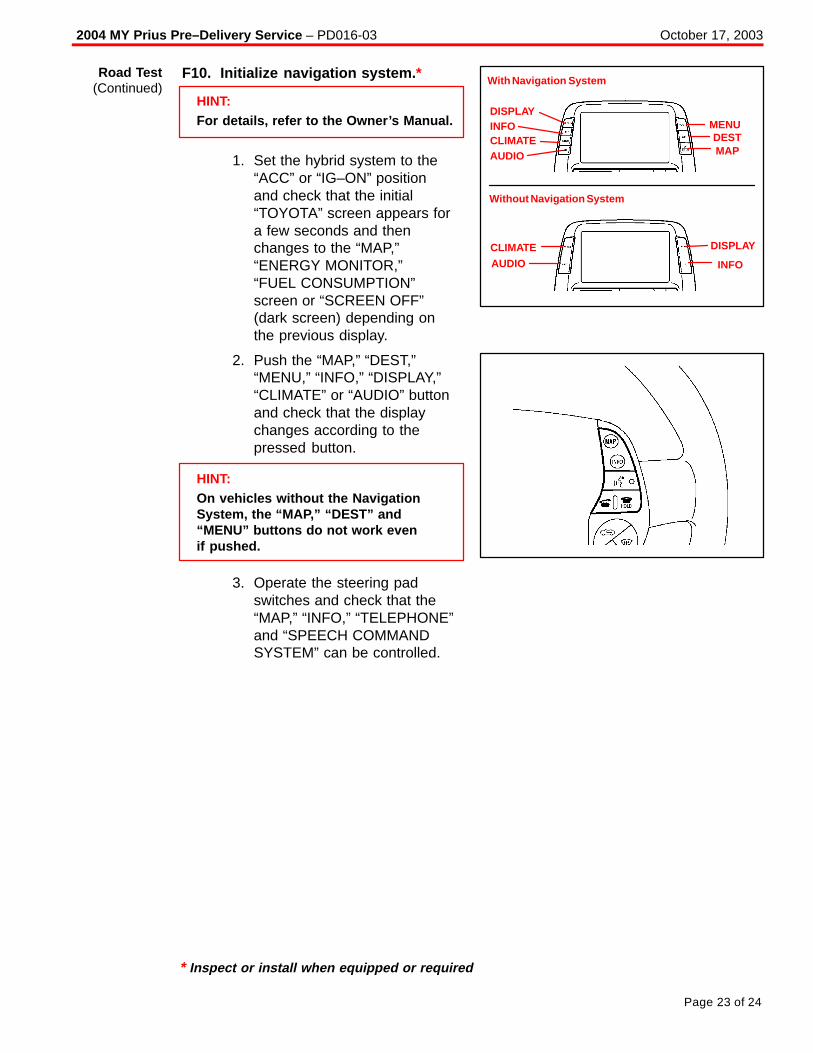
F10. Initialize navigation system. *
HINT:For details, refer to the Owner’s Manual.
1. Set the hybrid system to the“ACC” or “IG–ON” positionand check that the initial“TOYOTA” screen appears fora few seconds and thenchanges to the “MAP,”“ENERGY MONITOR,” “FUEL CONSUMPTION”screen or “SCREEN OFF”(dark screen) depending onthe previous display.
2. Push the “MAP,” “DEST,”“MENU,” “INFO,” “DISPLAY,”“CLIMATE” or “AUDIO” buttonand check that the displaychanges according to thepressed button.
HINT:On vehicles without the NavigationSystem, the “MAP,” “DEST” and“MENU” buttons do not work evenif pushed.
3. Operate the steering padswitches and check that the“MAP,” “INFO,” “TELEPHONE”and “SPEECH COMMANDSYSTEM” can be controlled.
* Inspect or install when equipped or required
DISPLAYINFOCLIMATEAUDIO
With Navigation System
Without Navigation System
MENUDESTMAP
DISPLAY
INFO
CLIMATE
AUDIO
Road Test(Continued)

2004 MY Prius Pre–Delivery Service – PD016-03 October 17, 2003
Page 24 of 24
G01. Remove interior protective covers, unnecessary labels, tags, etc.(Remove protective covers just before delivery to customer).
� Remove plastic covers from:– Door panels– Seats– Head restraints– Sun visors– Front pillar– Instrument panel– Center console– Shift lever– Cruise control switch– Inner scuff plate– Driver side floor (protective paper)
� Remove labels, tags, and stickers (except those containing owner information).
NOTE:Customer information labels such as the fuel caution, air bag warnings, and bumperlabels must be left on the vehicle until delivery to a retail customer.
G02. Visually inspect all interior parts for installation, damage, fit, dirt, etc.
G03. Remove Rapgard TM protective film.
G04. Wash and clean vehicle.
G05. Inspect paint finish for scratches, chips, rust, dents, damage, etc.
G06. Inspect exterior body parts for proper installation, damage, rust, etc.
H01. Battery check and maintenance.Maintain batteries according to procedures in TSB No. PG007–03, “Maintenance forHV and Auxiliary Batteries.”
FinalInspection& Cleaning
BatteryMaintenance