Embed Size (px)
Citation preview
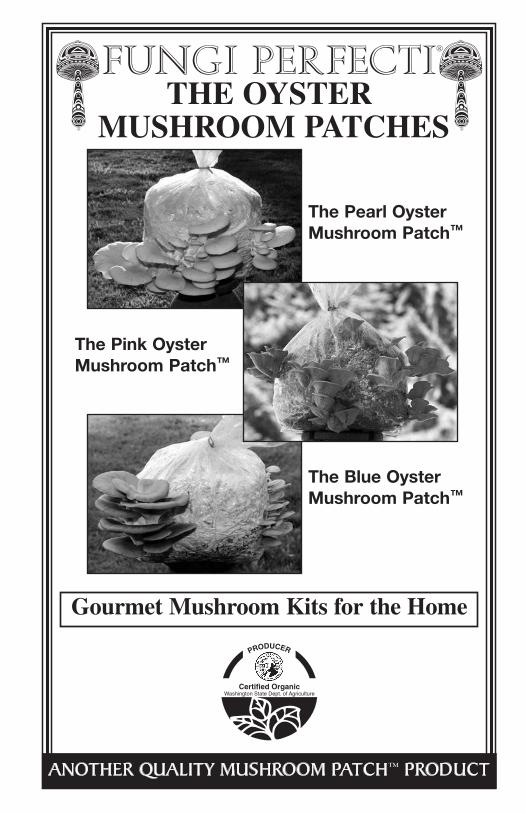
Gourmet Mushroom Kits for the Home
THE OYSTER MUSHROOM PATCHES
FUNGI PERFECTI®
The Pearl Oyster Mushroom Patch™
The Blue Oyster Mushroom Patch™
The Pink Oyster Mushroom Patch™
ANOTHER QUALITY MUSHROOM PATCH™ PRODUCT
©Paul Stamets, all rights reserved.Photos by Paul Stamets
Another Quality Mushroom Patch™ Product
Should you have any questions, call our Mushroom Hotline at (800) 780-9126. Our hours are 8:30am–4:30pm Pacific Time, Mondays through Fridays. We will be happy to help you! We also offer technical support for our products via the Internet at [email protected].
Any Questions? Need More Information?
fungi perfecti, LLCP.O. BOx 7634 • OlymPia, Wa 98507, USaORDER LINE: (800) 780-9126 • PHONE: (360) 426-9292
FAX: (360) 426-9377 • EMAIL: [email protected]://www.fungi.com
By Paul Stamets. This book is a manual for the mycological rescue of the planet. Mycelium Running marks the dawn of a new era: the use of mycelial membranes for ecological health. Linking mushroom cultivation, permaculture, ecoforestry, bioremediation and gardening, mycologist Paul Stamets makes the case that mushroom farms can be reinvented as healing arts centers, steering ecological evolution for the benefit of humans living in harmony with its inhabitants. Moreover, Mycelium
Running has chapters on nutrition, medicinal properties, log and stump cultivation, natural culture, and much more. Softcover, 356 pages, with over 360 color photographs. $35.00 + Shipping & Handling.
We supply and instruct mushroom growers worldwide, amateurs and professionals alike. Contact us via phone, fax or email for a free color brochure. Or you can browse our complete product line and order securely with your Visa, MasterCard or American Express Card at our Web site, www.fungi.com.
If you purchased this Fungi Perfecti® product from another retailer or catalog company, please offer them the courtesy of your continued business. Thank you!
1
Fungi Perfecti's
OYSTER MUSHROOM PATCHES™
Thank you for purchasing one of Fungi Perfecti’s Certified Organic Oyster Mushroom Patches. Please take a moment to review the following instructions before beginning your Mushroom Patch. Included in the box are a humidity tent and a bag full of 100% Certified Organic shredded wheat straw that has been inoculated with Oyster mushroom mycelium. We offer three species of Oyster mushrooms. To grow them, follow the same, simple instructions. They differ only in their preferences for temperature. An “X” indicates which Mushroom Patch you have received.
❑ The Pearl Oyster Mushroom Patch™ (Pleurotus ostreatus) White-Beige form. Grows between 55–75 °F. Available year 'round.
❑ The Blue Oyster Mushroom Patch™ (Pleurotus ostreatus var. columbinus) Blue-Beige form. Grows between 45–65 °F. Available October through April.
❑ The Pink Oyster Mushroom Patch™ (Pleurotus djamor) Grows between 70–85 °F. Available May through September.
Additional Supplies Needed:• A plant mister or spray bottle; make sure the bottle is clean and free of
chemical residues.• A dinner plate or other shallow dish to set your Mushroom Patch on. It is
important to use something shallow as your Mushroom Patch needs fresh air to form healthy mushrooms.
• Non-chlorinated, non-distilled water
Key Terms• Oyster Mushroom Patch: The bag containing sterilized organic straw,
also known as the substrate, that is fully colonized with Oyster mushroom mycelium. Do not remove the straw from the bag.
• Humidity Tent: A large bag with ½ inch diameter holes punched in it that was folded around these instructions.
• Mycelium: The network of thread-like cells that forms mushrooms. You can also think of this as the “roots” of the mushroom fruit body.
u If you have a Pearl or Blue Oyster Mushroom Patch, the mycelium will appear white to yellow in color.
u If you have a Pink Oyster Mushroom Patch the mycelium will appear white to pink in color.
• Primordia: The earliest stage of mushroom formation, usually appearing as small bumps or clusters of miniature mushrooms.
• Flush: A crop or harvest of mushrooms. • Spores: Microscopic “seeds” of mushrooms which appear as a white dust
around and beneath mature mushrooms.
Each patch should receive some indirect or ambient light. Direct sunlight should be avoided. If the location receives enough light to read these instructions, it will be adequate for the patch. Mushrooms like a humid environment. Locate the patch in
6
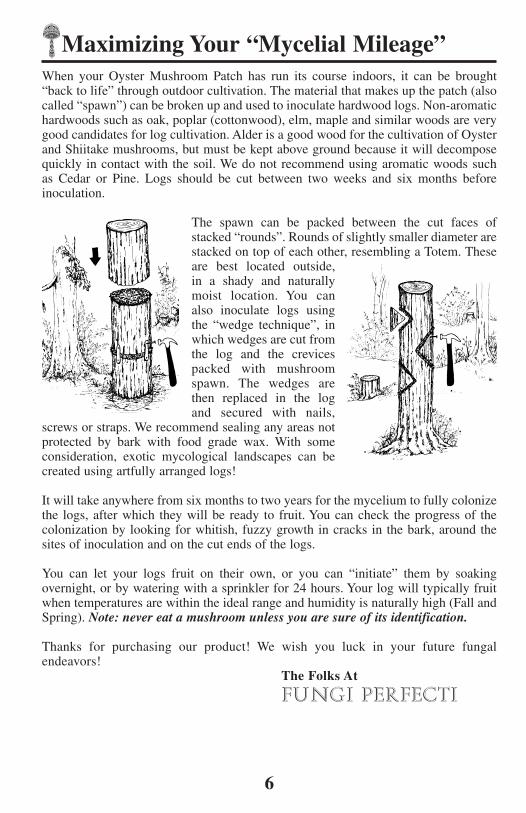
Maximizing Your “Mycelial Mileage”When your Oyster Mushroom Patch has run its course indoors, it can be brought “back to life” through outdoor cultivation. The material that makes up the patch (also called “spawn”) can be broken up and used to inoculate hardwood logs. Non-aromatic hardwoods such as oak, poplar (cottonwood), elm, maple and similar woods are very good candidates for log cultivation. Alder is a good wood for the cultivation of Oyster and Shiitake mushrooms, but must be kept above ground because it will decompose quickly in contact with the soil. We do not recommend using aromatic woods such as Cedar or Pine. Logs should be cut between two weeks and six months before inoculation.
The spawn can be packed between the cut faces of stacked “rounds”. Rounds of slightly smaller diameter are stacked on top of each other, resembling a Totem. These are best located outside, in a shady and naturally moist location. You can also inoculate logs using the “wedge technique”, in which wedges are cut from the log and the crevices packed with mushroom spawn. The wedges are then replaced in the log and secured with nails,
screws or straps. We recommend sealing any areas not protected by bark with food grade wax. With some consideration, exotic mycological landscapes can be created using artfully arranged logs!
It will take anywhere from six months to two years for the mycelium to fully colonize the logs, after which they will be ready to fruit. You can check the progress of the colonization by looking for whitish, fuzzy growth in cracks in the bark, around the sites of inoculation and on the cut ends of the logs.
You can let your logs fruit on their own, or you can “initiate” them by soaking overnight, or by watering with a sprinkler for 24 hours. Your log will typically fruit when temperatures are within the ideal range and humidity is naturally high (Fall and Spring). Note: never eat a mushroom unless you are sure of its identification.
Thanks for purchasing our product! We wish you luck in your future fungal endeavors! The Folks At
FUNGI PERFECTI
an area away from heat or air conditioning sources as they tend to dry the patch out.
Step-by-Step InstructionsNow to begin your mushroom cultivation experience:
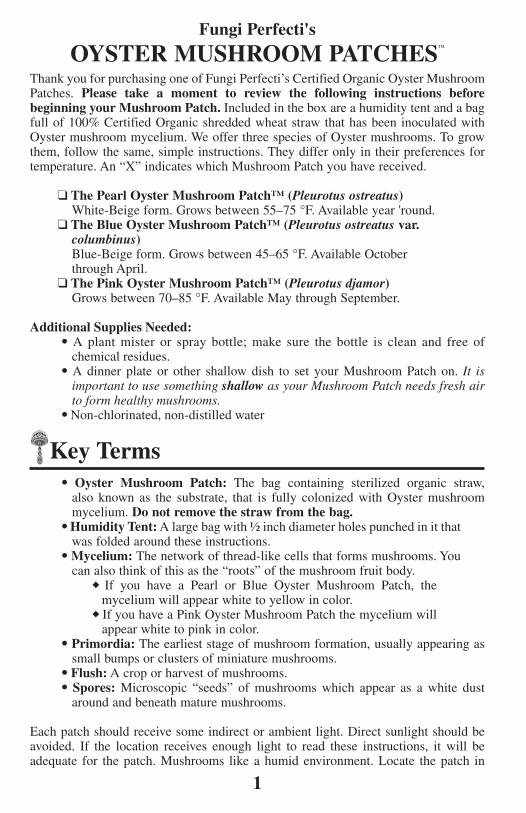
Step 1: Place your Mushroom Patch on a tray, platter or shallow dish. Place this dish in the location that you decided would be best for the particular Mushroom Patch you received.
Step 2: Place the humidity tent over your Mushroom Patch to create a dome. You can roll up the bottom (like you would a pant leg) 2 or 3 times to create a sturdy
base for the tent. It’s preferable to have 2 to 3 inches of space between the humidity tent and the top of your Mushroom Patch.
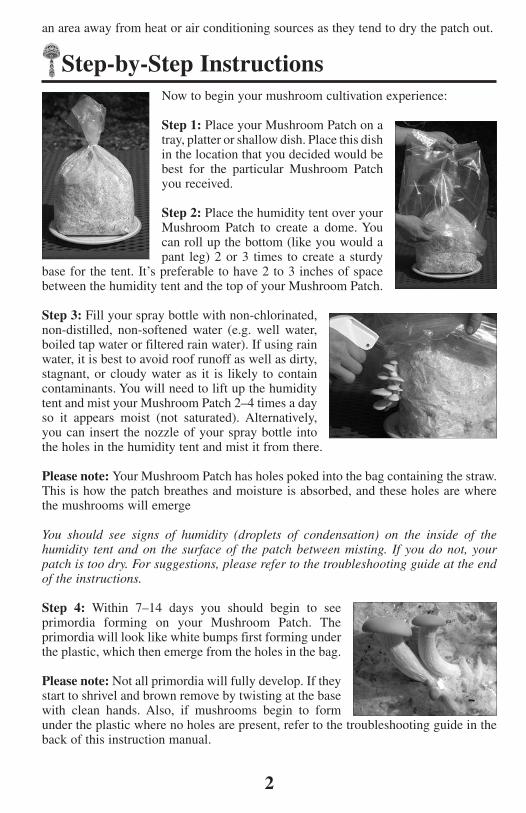
Step 3: Fill your spray bottle with non-chlorinated, non-distilled, non-softened water (e.g. well water, boiled tap water or filtered rain water). If using rain water, it is best to avoid roof runoff as well as dirty, stagnant, or cloudy water as it is likely to contain contaminants. You will need to lift up the humidity tent and mist your Mushroom Patch 2–4 times a day so it appears moist (not saturated). Alternatively, you can insert the nozzle of your spray bottle into the holes in the humidity tent and mist it from there.
Please note: Your Mushroom Patch has holes poked into the bag containing the straw. This is how the patch breathes and moisture is absorbed, and these holes are where the mushrooms will emerge
You should see signs of humidity (droplets of condensation) on the inside of the humidity tent and on the surface of the patch between misting. If you do not, your patch is too dry. For suggestions, please refer to the troubleshooting guide at the end of the instructions.
Step 4: Within 7–14 days you should begin to see primordia forming on your Mushroom Patch. The primordia will look like white bumps first forming under the plastic, which then emerge from the holes in the bag.
Please note: Not all primordia will fully develop. If they start to shrivel and brown remove by twisting at the base with clean hands. Also, if mushrooms begin to form under the plastic where no holes are present, refer to the troubleshooting guide in the back of this instruction manual.
5 2
u Pearl Oyster: 55–75 °Fu Blue Oyster: 45–65 °Fu Pink Oyster: 70–85 °F
• Reduce light: If your Mushroom Patch remains humid and is within the ideal temperature range, the problem could be excessive light exposure. Try moving it to a location where it receives less light, and make sure the patch doesn’t receive any direct sunlight.
Problem: Mushrooms are forming where there are no holes in the bag.
Solution:• Carefully cut a 1 inch “X” with a clean knife or scissors, in the plastic where
the “trapped” mushroom is forming. Try not to slice the mushrooms in the process. This will allow the mushroom to form outside the bag. Please note: the plastic bag containing your inoculated straw is very important to mushroom growth. Small openings for forming mushrooms are fine, but the majority of the bag should remain intact.
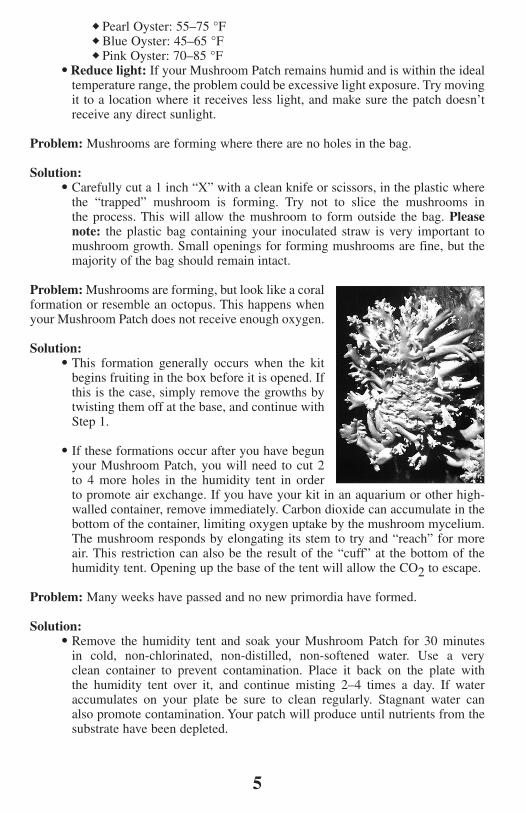
Problem: Mushrooms are forming, but look like a coral formation or resemble an octopus. This happens when your Mushroom Patch does not receive enough oxygen.
Solution:• This formation generally occurs when the kit
begins fruiting in the box before it is opened. If this is the case, simply remove the growths by twisting them off at the base, and continue with Step 1.
• If these formations occur after you have begun your Mushroom Patch, you will need to cut 2 to 4 more holes in the humidity tent in order to promote air exchange. If you have your kit in an aquarium or other high-walled container, remove immediately. Carbon dioxide can accumulate in the bottom of the container, limiting oxygen uptake by the mushroom mycelium. The mushroom responds by elongating its stem to try and “reach” for more air. This restriction can also be the result of the “cuff” at the bottom of the humidity tent. Opening up the base of the tent will allow the CO2 to escape.
Problem: Many weeks have passed and no new primordia have formed.
Solution:• Remove the humidity tent and soak your Mushroom Patch for 30 minutes
in cold, non-chlorinated, non-distilled, non-softened water. Use a very clean container to prevent contamination. Place it back on the plate with the humidity tent over it, and continue misting 2–4 times a day. If water accumulates on your plate be sure to clean regularly. Stagnant water can also promote contamination. Your patch will produce until nutrients from the substrate have been depleted.
3 4
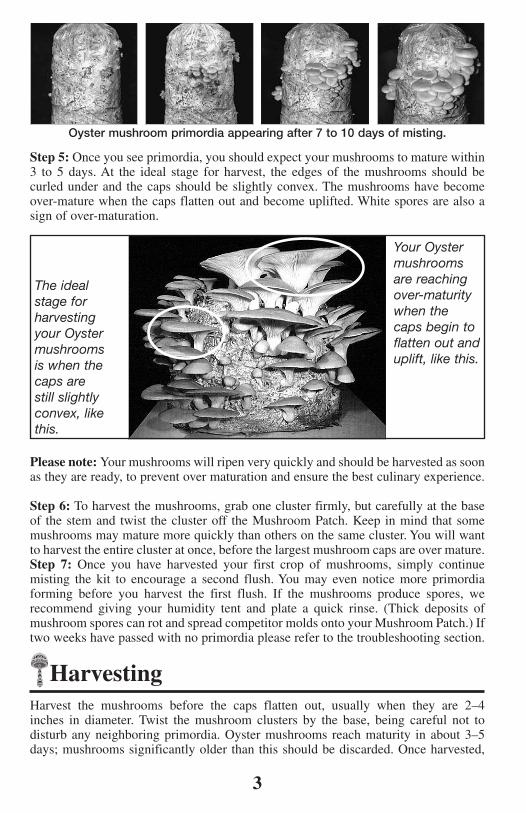
Step 5: Once you see primordia, you should expect your mushrooms to mature within 3 to 5 days. At the ideal stage for harvest, the edges of the mushrooms should be curled under and the caps should be slightly convex. The mushrooms have become over-mature when the caps flatten out and become uplifted. White spores are also a sign of over-maturation.
Please note: Your mushrooms will ripen very quickly and should be harvested as soon as they are ready, to prevent over maturation and ensure the best culinary experience.
Step 6: To harvest the mushrooms, grab one cluster firmly, but carefully at the base of the stem and twist the cluster off the Mushroom Patch. Keep in mind that some mushrooms may mature more quickly than others on the same cluster. You will want to harvest the entire cluster at once, before the largest mushroom caps are over mature.Step 7: Once you have harvested your first crop of mushrooms, simply continue misting the kit to encourage a second flush. You may even notice more primordia forming before you harvest the first flush. If the mushrooms produce spores, we recommend giving your humidity tent and plate a quick rinse. (Thick deposits of mushroom spores can rot and spread competitor molds onto your Mushroom Patch.) If two weeks have passed with no primordia please refer to the troubleshooting section.
HarvestingHarvest the mushrooms before the caps flatten out, usually when they are 2–4 inches in diameter. Twist the mushroom clusters by the base, being careful not to disturb any neighboring primordia. Oyster mushrooms reach maturity in about 3–5 days; mushrooms significantly older than this should be discarded. Once harvested,
your Mushroom Patch should produce another crop of mushrooms within 2 weeks, provided you continue frequent and abundant misting.
Cooking Oyster MushroomsNote: all mushrooms should be cooked before eating. Oyster mushrooms, when cooked and in dry form, are nearly 20% protein, are good sources of several vitamins (.1% Niacin), and provide an assortment of amino acid complexes. The best way to eat these mushrooms is by thoroughly cooking them until they are light brown in color. We recommend sautéing over medium to high temperature in olive oil until most of the water has been cooked off. (About 10-15 minutes.) Add a small amount of butter, soy sauce or tamari, chopped scallions and finally a touch of white wine. After most of the liquid has evaporated, the mushrooms—now light brownish in color—can be, added to white sauces, served upon rice, steaks, chicken or best (in this author’s opinion) in a stir fry. The only limitation is your imagination!
TroubleshootingIf you are experiencing problems with your Mushroom Patch, please read through the following troubleshooting guide and see if any of the suggestions might offer a solution. If you need further assistance please contact us by phone, fax, or email. We are here to help! Please do not mail your Mushroom Patch back to us. It is likely that we can get your patch producing. We fully guarantee all of our indoor Mushroom Patches to produce when properly cared for. If you work with us and your patch still does not produce any mushrooms, we will replace it free of charge.
Problem: There is green or black mold appearing on my Mushroom Patch:
Solutions:• Make a 1:10 dilution of 3% hydrogen peroxide and water and mist the moldy
locations with the solution. (You can generally find 3% hydrogen peroxide in any grocery store or pharmacy.)
• Using a clean knife, you can also cut a small slit in the plastic over the moldy location (if it is smaller than a penny) and carefully remove the moldy substrate with clean hands.
Problem: Mushrooms are forming, but quickly drying out. This can be caused by either lack of humidity, excessive heat or direct sunlight.
Solutions:• Increase humidity: Try to cover 2 to 4 holes of the humidity tent with clear
tape. You should see signs of humidity (condensation) on the inside of the humidity tent between misting. You can also mist through the holes in the tent rather than removing. Please note: mushrooms need 90 to 100% humidity in order to produce healthy, happy fruit bodies.
• Reduce heat: If you see condensation inside the tent but the mushrooms still dry out and die before maturing, the location may be too warm. In this case you should move it to a cooler location. The ideal temperature will depend on the type of Oyster Mushroom Patch you have.
The ideal stage for harvesting your Oyster mushrooms is when the caps are still slightly convex, like this.
Your Oyster mushrooms are reaching over-maturity when the caps begin to flatten out and uplift, like this.
Oyster mushroom primordia appearing after 7 to 10 days of misting.
3 4
Step 5: Once you see primordia, you should expect your mushrooms to mature within 3 to 5 days. At the ideal stage for harvest, the edges of the mushrooms should be curled under and the caps should be slightly convex. The mushrooms have become over-mature when the caps flatten out and become uplifted. White spores are also a sign of over-maturation.
Please note: Your mushrooms will ripen very quickly and should be harvested as soon as they are ready, to prevent over maturation and ensure the best culinary experience.
Step 6: To harvest the mushrooms, grab one cluster firmly, but carefully at the base of the stem and twist the cluster off the Mushroom Patch. Keep in mind that some mushrooms may mature more quickly than others on the same cluster. You will want to harvest the entire cluster at once, before the largest mushroom caps are over mature.Step 7: Once you have harvested your first crop of mushrooms, simply continue misting the kit to encourage a second flush. You may even notice more primordia forming before you harvest the first flush. If the mushrooms produce spores, we recommend giving your humidity tent and plate a quick rinse. (Thick deposits of mushroom spores can rot and spread competitor molds onto your Mushroom Patch.) If two weeks have passed with no primordia please refer to the troubleshooting section.
HarvestingHarvest the mushrooms before the caps flatten out, usually when they are 2–4 inches in diameter. Twist the mushroom clusters by the base, being careful not to disturb any neighboring primordia. Oyster mushrooms reach maturity in about 3–5 days; mushrooms significantly older than this should be discarded. Once harvested,
your Mushroom Patch should produce another crop of mushrooms within 2 weeks, provided you continue frequent and abundant misting.
Cooking Oyster MushroomsNote: all mushrooms should be cooked before eating. Oyster mushrooms, when cooked and in dry form, are nearly 20% protein, are good sources of several vitamins (.1% Niacin), and provide an assortment of amino acid complexes. The best way to eat these mushrooms is by thoroughly cooking them until they are light brown in color. We recommend sautéing over medium to high temperature in olive oil until most of the water has been cooked off. (About 10-15 minutes.) Add a small amount of butter, soy sauce or tamari, chopped scallions and finally a touch of white wine. After most of the liquid has evaporated, the mushrooms—now light brownish in color—can be, added to white sauces, served upon rice, steaks, chicken or best (in this author’s opinion) in a stir fry. The only limitation is your imagination!
TroubleshootingIf you are experiencing problems with your Mushroom Patch, please read through the following troubleshooting guide and see if any of the suggestions might offer a solution. If you need further assistance please contact us by phone, fax, or email. We are here to help! Please do not mail your Mushroom Patch back to us. It is likely that we can get your patch producing. We fully guarantee all of our indoor Mushroom Patches to produce when properly cared for. If you work with us and your patch still does not produce any mushrooms, we will replace it free of charge.
Problem: There is green or black mold appearing on my Mushroom Patch:
Solutions:• Make a 1:10 dilution of 3% hydrogen peroxide and water and mist the moldy
locations with the solution. (You can generally find 3% hydrogen peroxide in any grocery store or pharmacy.)
• Using a clean knife, you can also cut a small slit in the plastic over the moldy location (if it is smaller than a penny) and carefully remove the moldy substrate with clean hands.
Problem: Mushrooms are forming, but quickly drying out. This can be caused by either lack of humidity, excessive heat or direct sunlight.
Solutions:• Increase humidity: Try to cover 2 to 4 holes of the humidity tent with clear
tape. You should see signs of humidity (condensation) on the inside of the humidity tent between misting. You can also mist through the holes in the tent rather than removing. Please note: mushrooms need 90 to 100% humidity in order to produce healthy, happy fruit bodies.
• Reduce heat: If you see condensation inside the tent but the mushrooms still dry out and die before maturing, the location may be too warm. In this case you should move it to a cooler location. The ideal temperature will depend on the type of Oyster Mushroom Patch you have.
The ideal stage for harvesting your Oyster mushrooms is when the caps are still slightly convex, like this.
Your Oyster mushrooms are reaching over-maturity when the caps begin to flatten out and uplift, like this.
Oyster mushroom primordia appearing after 7 to 10 days of misting.
an area away from heat or air conditioning sources as they tend to dry the patch out.
Step-by-Step InstructionsNow to begin your mushroom cultivation experience:
Step 1: Place your Mushroom Patch on a tray, platter or shallow dish. Place this dish in the location that you decided would be best for the particular Mushroom Patch you received.
Step 2: Place the humidity tent over your Mushroom Patch to create a dome. You can roll up the bottom (like you would a pant leg) 2 or 3 times to create a sturdy
base for the tent. It’s preferable to have 2 to 3 inches of space between the humidity tent and the top of your Mushroom Patch.
Step 3: Fill your spray bottle with non-chlorinated, non-distilled, non-softened water (e.g. well water, boiled tap water or filtered rain water). If using rain water, it is best to avoid roof runoff as well as dirty, stagnant, or cloudy water as it is likely to contain contaminants. You will need to lift up the humidity tent and mist your Mushroom Patch 2–4 times a day so it appears moist (not saturated). Alternatively, you can insert the nozzle of your spray bottle into the holes in the humidity tent and mist it from there.
Please note: Your Mushroom Patch has holes poked into the bag containing the straw. This is how the patch breathes and moisture is absorbed, and these holes are where the mushrooms will emerge
You should see signs of humidity (droplets of condensation) on the inside of the humidity tent and on the surface of the patch between misting. If you do not, your patch is too dry. For suggestions, please refer to the troubleshooting guide at the end of the instructions.
Step 4: Within 7–14 days you should begin to see primordia forming on your Mushroom Patch. The primordia will look like white bumps first forming under the plastic, which then emerge from the holes in the bag.
Please note: Not all primordia will fully develop. If they start to shrivel and brown remove by twisting at the base with clean hands. Also, if mushrooms begin to form under the plastic where no holes are present, refer to the troubleshooting guide in the back of this instruction manual.
5 2
u Pearl Oyster: 55–75 °Fu Blue Oyster: 45–65 °Fu Pink Oyster: 70–85 °F
• Reduce light: If your Mushroom Patch remains humid and is within the ideal temperature range, the problem could be excessive light exposure. Try moving it to a location where it receives less light, and make sure the patch doesn’t receive any direct sunlight.
Problem: Mushrooms are forming where there are no holes in the bag.
Solution:• Carefully cut a 1 inch “X” with a clean knife or scissors, in the plastic where
the “trapped” mushroom is forming. Try not to slice the mushrooms in the process. This will allow the mushroom to form outside the bag. Please note: the plastic bag containing your inoculated straw is very important to mushroom growth. Small openings for forming mushrooms are fine, but the majority of the bag should remain intact.
Problem: Mushrooms are forming, but look like a coral formation or resemble an octopus. This happens when your Mushroom Patch does not receive enough oxygen.
Solution:• This formation generally occurs when the kit
begins fruiting in the box before it is opened. If this is the case, simply remove the growths by twisting them off at the base, and continue with Step 1.
• If these formations occur after you have begun your Mushroom Patch, you will need to cut 2 to 4 more holes in the humidity tent in order to promote air exchange. If you have your kit in an aquarium or other high-walled container, remove immediately. Carbon dioxide can accumulate in the bottom of the container, limiting oxygen uptake by the mushroom mycelium. The mushroom responds by elongating its stem to try and “reach” for more air. This restriction can also be the result of the “cuff” at the bottom of the humidity tent. Opening up the base of the tent will allow the CO2 to escape.
Problem: Many weeks have passed and no new primordia have formed.
Solution:• Remove the humidity tent and soak your Mushroom Patch for 30 minutes
in cold, non-chlorinated, non-distilled, non-softened water. Use a very clean container to prevent contamination. Place it back on the plate with the humidity tent over it, and continue misting 2–4 times a day. If water accumulates on your plate be sure to clean regularly. Stagnant water can also promote contamination. Your patch will produce until nutrients from the substrate have been depleted.
1
Fungi Perfecti's
OYSTER MUSHROOM PATCHES™
Thank you for purchasing one of Fungi Perfecti’s Certified Organic Oyster Mushroom Patches. Please take a moment to review the following instructions before beginning your Mushroom Patch. Included in the box are a humidity tent and a bag full of 100% Certified Organic shredded wheat straw that has been inoculated with Oyster mushroom mycelium. We offer three species of Oyster mushrooms. To grow them, follow the same, simple instructions. They differ only in their preferences for temperature. An “X” indicates which Mushroom Patch you have received.
❑ The Pearl Oyster Mushroom Patch™ (Pleurotus ostreatus) White-Beige form. Grows between 55–75 °F. Available year 'round.
❑ The Blue Oyster Mushroom Patch™ (Pleurotus ostreatus var. columbinus) Blue-Beige form. Grows between 45–65 °F. Available October through April.
❑ The Pink Oyster Mushroom Patch™ (Pleurotus djamor) Grows between 70–85 °F. Available May through September.
Additional Supplies Needed:• A plant mister or spray bottle; make sure the bottle is clean and free of
chemical residues.• A dinner plate or other shallow dish to set your Mushroom Patch on. It is
important to use something shallow as your Mushroom Patch needs fresh air to form healthy mushrooms.
• Non-chlorinated, non-distilled water
Key Terms• Oyster Mushroom Patch: The bag containing sterilized organic straw,
also known as the substrate, that is fully colonized with Oyster mushroom mycelium. Do not remove the straw from the bag.
• Humidity Tent: A large bag with ½ inch diameter holes punched in it that was folded around these instructions.
• Mycelium: The network of thread-like cells that forms mushrooms. You can also think of this as the “roots” of the mushroom fruit body.
u If you have a Pearl or Blue Oyster Mushroom Patch, the mycelium will appear white to yellow in color.
u If you have a Pink Oyster Mushroom Patch the mycelium will appear white to pink in color.
• Primordia: The earliest stage of mushroom formation, usually appearing as small bumps or clusters of miniature mushrooms.
• Flush: A crop or harvest of mushrooms. • Spores: Microscopic “seeds” of mushrooms which appear as a white dust
around and beneath mature mushrooms.
Each patch should receive some indirect or ambient light. Direct sunlight should be avoided. If the location receives enough light to read these instructions, it will be adequate for the patch. Mushrooms like a humid environment. Locate the patch in
6
Maximizing Your “Mycelial Mileage”When your Oyster Mushroom Patch has run its course indoors, it can be brought “back to life” through outdoor cultivation. The material that makes up the patch (also called “spawn”) can be broken up and used to inoculate hardwood logs. Non-aromatic hardwoods such as oak, poplar (cottonwood), elm, maple and similar woods are very good candidates for log cultivation. Alder is a good wood for the cultivation of Oyster and Shiitake mushrooms, but must be kept above ground because it will decompose quickly in contact with the soil. We do not recommend using aromatic woods such as Cedar or Pine. Logs should be cut between two weeks and six months before inoculation.
The spawn can be packed between the cut faces of stacked “rounds”. Rounds of slightly smaller diameter are stacked on top of each other, resembling a Totem. These are best located outside, in a shady and naturally moist location. You can also inoculate logs using the “wedge technique”, in which wedges are cut from the log and the crevices packed with mushroom spawn. The wedges are then replaced in the log and secured with nails,
screws or straps. We recommend sealing any areas not protected by bark with food grade wax. With some consideration, exotic mycological landscapes can be created using artfully arranged logs!
It will take anywhere from six months to two years for the mycelium to fully colonize the logs, after which they will be ready to fruit. You can check the progress of the colonization by looking for whitish, fuzzy growth in cracks in the bark, around the sites of inoculation and on the cut ends of the logs.
You can let your logs fruit on their own, or you can “initiate” them by soaking overnight, or by watering with a sprinkler for 24 hours. Your log will typically fruit when temperatures are within the ideal range and humidity is naturally high (Fall and Spring). Note: never eat a mushroom unless you are sure of its identification.
Thanks for purchasing our product! We wish you luck in your future fungal endeavors! The Folks At
FUNGI PERFECTI

Gourmet Mushroom Kits for the Home
THE OYSTER MUSHROOM PATCHES
FUNGI PERFECTI®
The Pearl Oyster Mushroom Patch™
The Blue Oyster Mushroom Patch™
The Pink Oyster Mushroom Patch™
ANOTHER QUALITY MUSHROOM PATCH™ PRODUCT
©Paul Stamets, all rights reserved.Photos by Paul Stamets
Another Quality Mushroom Patch™ Product
Should you have any questions, call our Mushroom Hotline at (800) 780-9126. Our hours are 8:30am–4:30pm Pacific Time, Mondays through Fridays. We will be happy to help you! We also offer technical support for our products via the Internet at [email protected].
Any Questions? Need More Information?
fungi perfecti, LLCP.O. BOx 7634 • OlymPia, Wa 98507, USaORDER LINE: (800) 780-9126 • PHONE: (360) 426-9292
FAX: (360) 426-9377 • EMAIL: [email protected]://www.fungi.com
By Paul Stamets. This book is a manual for the mycological rescue of the planet. Mycelium Running marks the dawn of a new era: the use of mycelial membranes for ecological health. Linking mushroom cultivation, permaculture, ecoforestry, bioremediation and gardening, mycologist Paul Stamets makes the case that mushroom farms can be reinvented as healing arts centers, steering ecological evolution for the benefit of humans living in harmony with its inhabitants. Moreover, Mycelium
Running has chapters on nutrition, medicinal properties, log and stump cultivation, natural culture, and much more. Softcover, 356 pages, with over 360 color photographs. $35.00 + Shipping & Handling.
We supply and instruct mushroom growers worldwide, amateurs and professionals alike. Contact us via phone, fax or email for a free color brochure. Or you can browse our complete product line and order securely with your Visa, MasterCard or American Express Card at our Web site, www.fungi.com.
If you purchased this Fungi Perfecti® product from another retailer or catalog company, please offer them the courtesy of your continued business. Thank you!