Embed Size (px)
Citation preview
FR-1x GB.book Page 1 Tuesday, November 8, 2011 11:44 AM
r
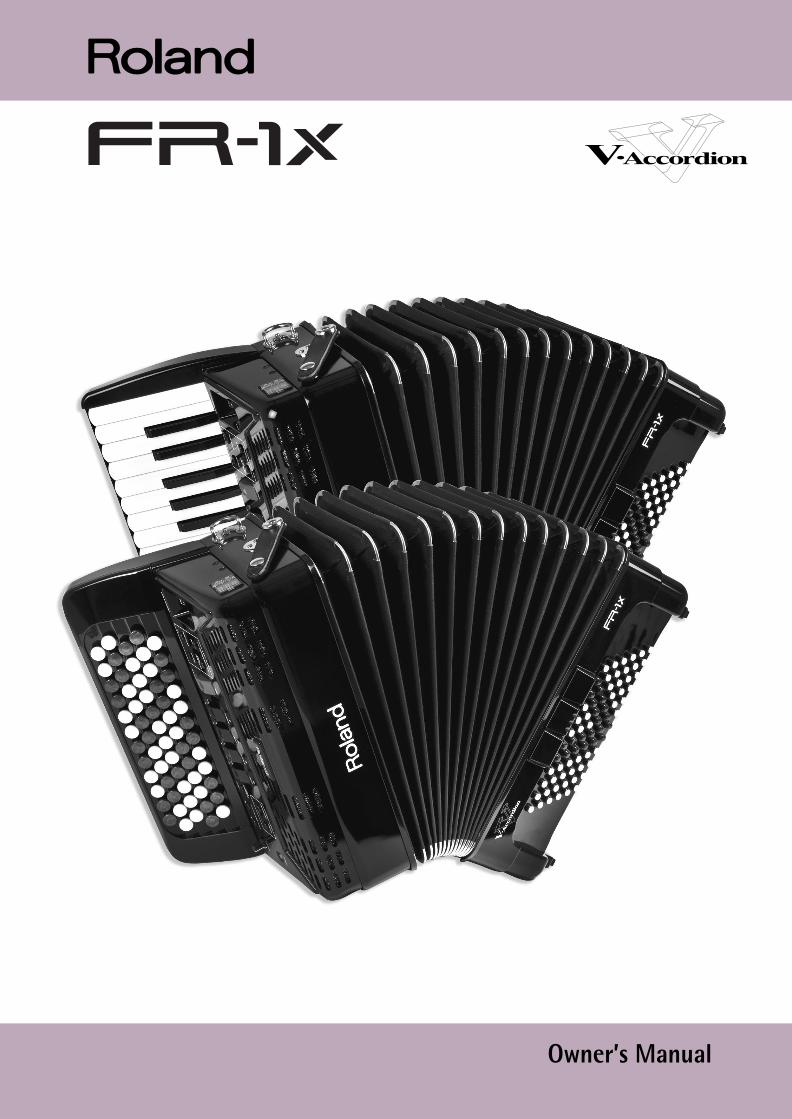
Owner’s Manual
WARNING
– To reduce the risk of fire or electric shock, do not expose this device to rain or moisture.
The technology used in the FR-1x is covered by U.S. Patent No. 6.946.594.
IMPORTANT: THE WIRES IN THIS MAINS LEAD ARE COLOURED IN ACCORDANCE WITH THE FOLLOWING CODE.
BLUE: BROWN:
As the colours of the wires in the mains lead of this apparatus may not correspond with the coloured markings identifying the terminals in your plug, proceed as follows:The wire which is coloured BLUE must be connected to the terminal which is marked with the letter N or coloured BLACK.The wire which is coloured BROWN must be connected to the terminal which is marked with the letter L or coloured RED.Under no circumstances must either of the above wires be connected to the earth terminal of a three pin plug.
NEUTRALLIVE
For the U.K.For the UK
For Canada
This Class B digital apparatus meets all requirements of the Canadian Interference-Causing Equipment Regulations.
NOTICE
AVIS
For the USA
FEDERAL COMMUNICATIONS COMMISSIONRADIO FREQUENCY INTERFERENCE STATEMENT
This product complies with the requirements of European Directive EMC 2004/108/EC.
For EU Countries
For EU countries
For the USA
For Canada
DECLARATION OF CONFORMITYCompliance Information Statement
V-Accordion FR-1xDigital AccordionRoland Corporation U.S.5100 S. Eastern Avenue, Los Angeles, CA 90040-2938(323) 890-3700
For the USA
For the USA
FR-1x GB.book Page 2 Tuesday, November 8, 2011 11:44 AM
r
Owner’s Manual
HSIL
GNE
HSIL
GNE
HSIL
GNE
HSIL
GNE
Introduction
Thank you and congratulations on your choice of the Roland FR-1x V-Accordion. To ensure that you obtain the maximum enjoyment and take full advantage of the FR-1x’s functionality, please read this owner’s manual carefully.
About this manual
You should first read the chapter “Before you start playing” (p. 15) of the owner’s manual. It explains how to connect the AC adaptor or install batteries and turn on the power. This Owner’s Manual explains everything, from the FR-1x’s basic operations to more advanced functions.
Conventions in this manual
In order to explain the operations as clearly as possible, this manual uses the following conventions:• Text enclosed in square brackets [ ] indicates the name of a button or knob. Example: the [USER PROGRAM] button.• Lines that begin with “ ” are cautionary statements that you must read.• The numbers of pages that you can turn to for additional, related information are given like this: (p. **).
The explanations in this manual include illustrations that depict what should typically be shown by the display. Note, however, that your unit may incorporate a newer, enhanced version of the system (e.g., include newer sounds), so what you actually see in the display may not always match what appears in the manual.
Before using this instrument, carefully read “Using the unit safely” (p. 7) and “Important notes” (p. 9). Those sections provide information concerning the proper operation of the FR-1x. Additionally, in order to feel assured that you have gained a good grasp of every feature provided by your new unit, the manual should be read in its entirety. The manual should be saved and kept on hand as a convenient reference.
NOTE
Copyright © 2011 ROLAND. All rights reserved. No part of this publication may be reproduced in any form without the written permission of Roland Corporation.Roland is either a registered trademark or a trademark of Roland Corporation in the United States and/or other countries.
FR-1x GB.book Page 3 Tuesday, November 8, 2011 11:44 AM
4
FR-1x
V-Accordion
FR-1x GB.book Page 4 Tuesday, November 8, 2011 11:44 AM
r
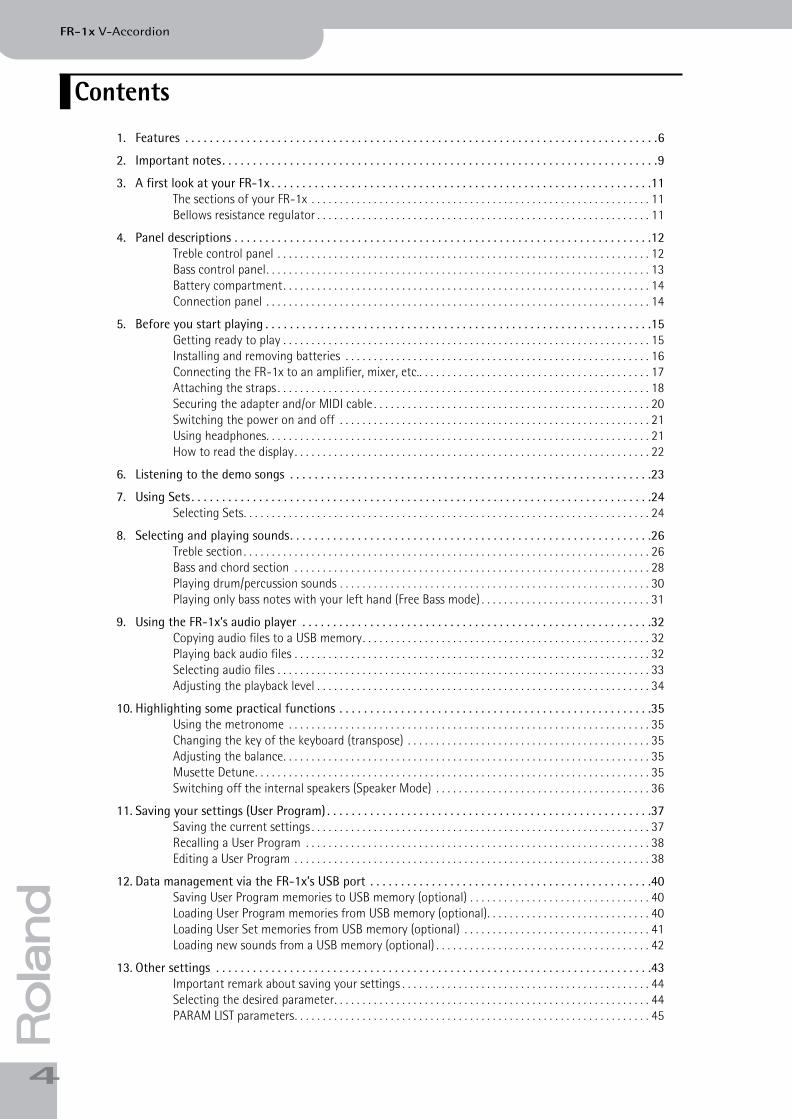
1. Features . . . . . . . . . . . . . . . . . . . . . . . . . . . . . . . . . . . . . . . . . . . . . . . . . . . . . . . . . . . . . . . . . . . . . . . . . . . . .6
2. Important notes . . . . . . . . . . . . . . . . . . . . . . . . . . . . . . . . . . . . . . . . . . . . . . . . . . . . . . . . . . . . . . . . . . . . . . .9
3. A first look at your FR-1x . . . . . . . . . . . . . . . . . . . . . . . . . . . . . . . . . . . . . . . . . . . . . . . . . . . . . . . . . . . . . .11The sections of your FR-1x . . . . . . . . . . . . . . . . . . . . . . . . . . . . . . . . . . . . . . . . . . . . . . . . . . . . . . . . . . . . 11Bellows resistance regulator . . . . . . . . . . . . . . . . . . . . . . . . . . . . . . . . . . . . . . . . . . . . . . . . . . . . . . . . . . . 11
4. Panel descriptions . . . . . . . . . . . . . . . . . . . . . . . . . . . . . . . . . . . . . . . . . . . . . . . . . . . . . . . . . . . . . . . . . . . .12Treble control panel . . . . . . . . . . . . . . . . . . . . . . . . . . . . . . . . . . . . . . . . . . . . . . . . . . . . . . . . . . . . . . . . . . 12Bass control panel. . . . . . . . . . . . . . . . . . . . . . . . . . . . . . . . . . . . . . . . . . . . . . . . . . . . . . . . . . . . . . . . . . . . 13Battery compartment. . . . . . . . . . . . . . . . . . . . . . . . . . . . . . . . . . . . . . . . . . . . . . . . . . . . . . . . . . . . . . . . . 14Connection panel . . . . . . . . . . . . . . . . . . . . . . . . . . . . . . . . . . . . . . . . . . . . . . . . . . . . . . . . . . . . . . . . . . . . 14
5. Before you start playing . . . . . . . . . . . . . . . . . . . . . . . . . . . . . . . . . . . . . . . . . . . . . . . . . . . . . . . . . . . . . . .15Getting ready to play . . . . . . . . . . . . . . . . . . . . . . . . . . . . . . . . . . . . . . . . . . . . . . . . . . . . . . . . . . . . . . . . . 15Installing and removing batteries . . . . . . . . . . . . . . . . . . . . . . . . . . . . . . . . . . . . . . . . . . . . . . . . . . . . . . 16Connecting the FR-1x to an amplifier, mixer, etc.. . . . . . . . . . . . . . . . . . . . . . . . . . . . . . . . . . . . . . . . . 17Attaching the straps . . . . . . . . . . . . . . . . . . . . . . . . . . . . . . . . . . . . . . . . . . . . . . . . . . . . . . . . . . . . . . . . . . 18Securing the adapter and/or MIDI cable . . . . . . . . . . . . . . . . . . . . . . . . . . . . . . . . . . . . . . . . . . . . . . . . . 20Switching the power on and off . . . . . . . . . . . . . . . . . . . . . . . . . . . . . . . . . . . . . . . . . . . . . . . . . . . . . . . 21Using headphones. . . . . . . . . . . . . . . . . . . . . . . . . . . . . . . . . . . . . . . . . . . . . . . . . . . . . . . . . . . . . . . . . . . . 21How to read the display. . . . . . . . . . . . . . . . . . . . . . . . . . . . . . . . . . . . . . . . . . . . . . . . . . . . . . . . . . . . . . . 22
6. Listening to the demo songs . . . . . . . . . . . . . . . . . . . . . . . . . . . . . . . . . . . . . . . . . . . . . . . . . . . . . . . . . . .23
7. Using Sets . . . . . . . . . . . . . . . . . . . . . . . . . . . . . . . . . . . . . . . . . . . . . . . . . . . . . . . . . . . . . . . . . . . . . . . . . . .24Selecting Sets. . . . . . . . . . . . . . . . . . . . . . . . . . . . . . . . . . . . . . . . . . . . . . . . . . . . . . . . . . . . . . . . . . . . . . . . 24
8. Selecting and playing sounds. . . . . . . . . . . . . . . . . . . . . . . . . . . . . . . . . . . . . . . . . . . . . . . . . . . . . . . . . . .26Treble section . . . . . . . . . . . . . . . . . . . . . . . . . . . . . . . . . . . . . . . . . . . . . . . . . . . . . . . . . . . . . . . . . . . . . . . . 26Bass and chord section . . . . . . . . . . . . . . . . . . . . . . . . . . . . . . . . . . . . . . . . . . . . . . . . . . . . . . . . . . . . . . . 28Playing drum/percussion sounds . . . . . . . . . . . . . . . . . . . . . . . . . . . . . . . . . . . . . . . . . . . . . . . . . . . . . . . 30Playing only bass notes with your left hand (Free Bass mode) . . . . . . . . . . . . . . . . . . . . . . . . . . . . . . 31
9. Using the FR-1x’s audio player . . . . . . . . . . . . . . . . . . . . . . . . . . . . . . . . . . . . . . . . . . . . . . . . . . . . . . . . .32Copying audio files to a USB memory. . . . . . . . . . . . . . . . . . . . . . . . . . . . . . . . . . . . . . . . . . . . . . . . . . . 32Playing back audio files . . . . . . . . . . . . . . . . . . . . . . . . . . . . . . . . . . . . . . . . . . . . . . . . . . . . . . . . . . . . . . . 32Selecting audio files . . . . . . . . . . . . . . . . . . . . . . . . . . . . . . . . . . . . . . . . . . . . . . . . . . . . . . . . . . . . . . . . . . 33Adjusting the playback level . . . . . . . . . . . . . . . . . . . . . . . . . . . . . . . . . . . . . . . . . . . . . . . . . . . . . . . . . . . 34
10. Highlighting some practical functions . . . . . . . . . . . . . . . . . . . . . . . . . . . . . . . . . . . . . . . . . . . . . . . . . . .35Using the metronome . . . . . . . . . . . . . . . . . . . . . . . . . . . . . . . . . . . . . . . . . . . . . . . . . . . . . . . . . . . . . . . . 35Changing the key of the keyboard (transpose) . . . . . . . . . . . . . . . . . . . . . . . . . . . . . . . . . . . . . . . . . . . 35Adjusting the balance. . . . . . . . . . . . . . . . . . . . . . . . . . . . . . . . . . . . . . . . . . . . . . . . . . . . . . . . . . . . . . . . . 35Musette Detune. . . . . . . . . . . . . . . . . . . . . . . . . . . . . . . . . . . . . . . . . . . . . . . . . . . . . . . . . . . . . . . . . . . . . . 35Switching off the internal speakers (Speaker Mode) . . . . . . . . . . . . . . . . . . . . . . . . . . . . . . . . . . . . . . 36
11. Saving your settings (User Program) . . . . . . . . . . . . . . . . . . . . . . . . . . . . . . . . . . . . . . . . . . . . . . . . . . . . .37Saving the current settings . . . . . . . . . . . . . . . . . . . . . . . . . . . . . . . . . . . . . . . . . . . . . . . . . . . . . . . . . . . . 37Recalling a User Program . . . . . . . . . . . . . . . . . . . . . . . . . . . . . . . . . . . . . . . . . . . . . . . . . . . . . . . . . . . . . 38Editing a User Program . . . . . . . . . . . . . . . . . . . . . . . . . . . . . . . . . . . . . . . . . . . . . . . . . . . . . . . . . . . . . . . 38
12. Data management via the FR-1x’s USB port . . . . . . . . . . . . . . . . . . . . . . . . . . . . . . . . . . . . . . . . . . . . . .40Saving User Program memories to USB memory (optional) . . . . . . . . . . . . . . . . . . . . . . . . . . . . . . . . 40Loading User Program memories from USB memory (optional). . . . . . . . . . . . . . . . . . . . . . . . . . . . . 40Loading User Set memories from USB memory (optional) . . . . . . . . . . . . . . . . . . . . . . . . . . . . . . . . . 41Loading new sounds from a USB memory (optional) . . . . . . . . . . . . . . . . . . . . . . . . . . . . . . . . . . . . . . 42
13. Other settings . . . . . . . . . . . . . . . . . . . . . . . . . . . . . . . . . . . . . . . . . . . . . . . . . . . . . . . . . . . . . . . . . . . . . . .43Important remark about saving your settings . . . . . . . . . . . . . . . . . . . . . . . . . . . . . . . . . . . . . . . . . . . . 44Selecting the desired parameter. . . . . . . . . . . . . . . . . . . . . . . . . . . . . . . . . . . . . . . . . . . . . . . . . . . . . . . . 44PARAM LIST parameters. . . . . . . . . . . . . . . . . . . . . . . . . . . . . . . . . . . . . . . . . . . . . . . . . . . . . . . . . . . . . . . 45
Contents
V-Accordion
r
FR-1x GB.book Page 5 Tuesday, November 8, 2011 11:44 AM
14. Connecting to MIDI devices . . . . . . . . . . . . . . . . . . . . . . . . . . . . . . . . . . . . . . . . . . . . . . . . . . . . . . . . . . . . 56Connecting an external MIDI device to the FR-1x . . . . . . . . . . . . . . . . . . . . . . . . . . . . . . . . . . . . . . . . 56Communication via the USB COMPUTER port . . . . . . . . . . . . . . . . . . . . . . . . . . . . . . . . . . . . . . . . . . . . 57MIDI parameter list . . . . . . . . . . . . . . . . . . . . . . . . . . . . . . . . . . . . . . . . . . . . . . . . . . . . . . . . . . . . . . . . . . . 58Selecting the desired MIDI parameter . . . . . . . . . . . . . . . . . . . . . . . . . . . . . . . . . . . . . . . . . . . . . . . . . . . 59MIDI parameters . . . . . . . . . . . . . . . . . . . . . . . . . . . . . . . . . . . . . . . . . . . . . . . . . . . . . . . . . . . . . . . . . . . . . 59
15. Restoring the factory defaults. . . . . . . . . . . . . . . . . . . . . . . . . . . . . . . . . . . . . . . . . . . . . . . . . . . . . . . . . . 64Loading all factory settings . . . . . . . . . . . . . . . . . . . . . . . . . . . . . . . . . . . . . . . . . . . . . . . . . . . . . . . . . . . . 64Restoring the User Sets to their factory defaults . . . . . . . . . . . . . . . . . . . . . . . . . . . . . . . . . . . . . . . . . 64
16. Troubleshooting . . . . . . . . . . . . . . . . . . . . . . . . . . . . . . . . . . . . . . . . . . . . . . . . . . . . . . . . . . . . . . . . . . . . . 66
17. Error messages. . . . . . . . . . . . . . . . . . . . . . . . . . . . . . . . . . . . . . . . . . . . . . . . . . . . . . . . . . . . . . . . . . . . . . . 68
18. Specifications . . . . . . . . . . . . . . . . . . . . . . . . . . . . . . . . . . . . . . . . . . . . . . . . . . . . . . . . . . . . . . . . . . . . . . . 69
19. Appendix . . . . . . . . . . . . . . . . . . . . . . . . . . . . . . . . . . . . . . . . . . . . . . . . . . . . . . . . . . . . . . . . . . . . . . . . . . . 71Ways in which the FR-1x displays alphabetic characters of file names . . . . . . . . . . . . . . . . . . . . . . 71MIDI implementation . . . . . . . . . . . . . . . . . . . . . . . . . . . . . . . . . . . . . . . . . . . . . . . . . . . . . . . . . . . . . . . . . 72MIDI Implementation Chart . . . . . . . . . . . . . . . . . . . . . . . . . . . . . . . . . . . . . . . . . . . . . . . . . . . . . . . . . . . 74
20. Information . . . . . . . . . . . . . . . . . . . . . . . . . . . . . . . . . . . . . . . . . . . . . . . . . . . . . . . . . . . . . . . . . . . . . . . . . 75
21. Index. . . . . . . . . . . . . . . . . . . . . . . . . . . . . . . . . . . . . . . . . . . . . . . . . . . . . . . . . . . . . . . . . . . . . . . . . . . . . . . 76
5
Features
6
FR-1x V-Accordion
FR-1x GB.book Page 6 Tuesday, November 8, 2011 11:44 AM
r1. Features
Stand-alone electronic instrumentThough the FR-1x is a fully electronic instrument, you do not need to connect it to an amplifier in order to produce sounds. Its onboard amplification system is powerful enough for small venues, restaurants, etc.The FR-1x can also be powered using 8 commercially available rechargeable Ni-MH batteries, so that you don’t need to connect it to a wall outlet.
PBM (Physical Behavior Modeling)The FR-1x V-Accordion is based on Roland’s sound gen-eration technology called “PBM” (Physical Behavior Modeling) whose sonic result is very close to the sound of traditional accordions.
Super realistic accordion simulationsAll sounds the FR-1x produces were obtained by sam-pling popular traditional acoustic accordions.This V-Accordion allows you to switch from an Italian jazz accordion to German folk, French musette or a his-toric bandoneon sound – without changing your tech-nique.Different tuning systems are also available.
Orchestral soundsOrchestral sounds can be used in combination with tra-ditional accordion sounds – complete with full bellows articulation, and two keyboard modes (Solo and Dual).
Tonewheel organ soundsThe FR-1x allows you to play amazing organ sounds with a slow/fast rotary effect in almost the same way as an organ player using the treble section.
Drum soundsYou can also use the FR-1x to play simple drum parts with your left hand (bass and chord sections).
Sound expansionThe FR-1x provides two internal memories that allow you to add new sounds.
Sophisticated bellows responseFaster response and higher sensitivity and precision plus detection of bellows opening/closing with new bellows pressure sensing circuitry.A bellows resistance regulator knob allows you to adjust the bellows’ inertia to your preference.
USB-based audio playerThe FR-1x contains an audio player function that allows you to play back mp3 and WAV files directly from a connected USB memory.
Save your settings to a USB memoryYou can save your settings by connecting an optional USB memory to the FR-1x’s USB port.
The digital advantageThe V-Accordion includes all functions and sounds of a traditional accordion, thus conveying a truly natural feel and sound. Yet it also provides the advantages only an electronic musical instrument can give you:• reduced overall weight;• possibility to choose among a wide variety of sounds;• various selectable Free Bass modes (Minor 3rd, Bayan,
North Europe, Finnish);• tuning stability over time and wear resistance of all
mechanical parts;• you can sound in a different key than the one you are
playing in (transpose function);• you can play with headphones, i.e. without disturbing
your neighbors or family.
MIDI connectionThe FR-1x allows you to control external MIDI-compat-ible instruments. The Treble keyboard and chord/bass buttons are velocity-sensitive, while the bellows con-troller provides more articulation possibilities than any other MIDI keyboard, MIDI wind instrument, etc., you may know.
Using the unit safely
V-Accordion
r
FR-1x GB.book Page 7 Tuesday, November 8, 2011 11:44 AM
Using the unit safely
• Do not open (or modify in any way) the unit or its AC adaptor.
...................................................................................................................................• Do not attempt to repair the unit, or replace parts within
it (except when this manual provides specific instructions directing you to do so). Refer all servicing to your retailer, the nearest Roland Service Center, or an authorized Roland dis-tributor, as listed on the “Information” page.
...................................................................................................................................• Never install the unit in any of the following locations.
• Subject to temperature extremes (e.g., direct sunlight in an enclosed vehicle, near a heating duct, on top of heat-generating equipment); or are
• Damp (e.g., baths, washrooms, on wet floors); or are
• Exposed to steam or smoke; or are
• Subject to salt exposure; or are
• Humid; or are
• Exposed to rain; or are
• Dusty or sandy; or are
• Subject to high levels of vibration and shakiness....................................................................................................................................
• Make sure you always have the FR-1x placed so it is level and sure to remain stable. Never place it on stands that could wobble, or on inclined surfaces.
...................................................................................................................................• Be sure to use only the AC adaptor supplied with the
unit. Also, make sure the line voltage at the installation matches the input voltage specified on the AC adaptor's body. Other AC adaptors may use a different polarity, or be designed for a different voltage, so their use could result in dam-age, malfunction, or electric shock.
...................................................................................................................................• Use only the attached power-supply cord.
Also, the supplied power cord must not be used with any other device.
...................................................................................................................................• Do not excessively twist or bend the power cord, or place
heavy objects on it. Doing so can damage the cord, pro-ducing severed elements and short circuits. Damaged cords are fire and shock hazards!
...................................................................................................................................
• The FR-1x, either alone or in combination with an ampli-fier and headphones or speakers, may be capable of pro-ducing sound levels that could cause permanent hearing loss. Do not operate for a long period of time at a high volume level, or at a level that is uncomfortable. If you experience any hearing loss or ringing in the ears, you should immediately stop using the unit, and consult an audiologist.
....................................................................................................................................• Do not place containers containing liquid (e.g., flower
vases) on this product. Never allow foreign objects (e.g., flammable objects, coins, wires) or liquids (e.g., water or juice) to enter this product. Doing so may cause short cir-cuits, faulty operation, or other malfunctions.
....................................................................................................................................• Immediately turn the power off, remove the AC adaptor
from the outlet, and request servicing by your retailer, the nearest Roland Service Center, or an authorized Roland distributor, as listed on the “Information” page when:
• The AC adaptor, the power-supply cord, or the plug has been damaged; or
• If smoke or unusual odor occurs
• Objects have fallen into, or liquid has been spilled onto the unit; or
• The unit has been exposed to rain (or otherwise has become wet); or
• The unit does not appear to operate normally or exhibits a marked change in performance.
....................................................................................................................................• In households with small children, an adult should pro-
vide supervision until the child is capable of following all the rules essential for the safe operation of the FR-1x.
....................................................................................................................................• Protect the FR-1x from strong impact.
(Do not drop it!)
....................................................................................................................................
Used for instructions intended to alert the user to the risk of injury or material damage should the unit be used improperly.
* Material damage refers to damage or other adverse effects caused with respect to the home and all its furnishings, as well to domestic animals or pets.
Used for instructions intended to alert the user to the risk of death or severe injury should the unit be used improperly.
The ● symbol alerts the user to things that must be carried out. The specific thing that must be done is indicated by the design contained within the circle. In the case of the symbol at left, it means that the power-cord plug must be unplugged from the outlet.
The symbol alerts the user to important instructions orwarnings.The specific meaning of the symbol is determined by the design contained within the triangle. In the case of the symbol at left, it is used for general cautions, warnings, or alerts to danger.
The symbol alerts the user to items that must never be carried out (are forbidden). The specific thing that must not be done is indicated by the design contained within the circle. In the case of the symbol at left, it means that the unit must never be disassembled.
7
Features
8
FR-1x V-Accordion
FR-1x_1_GB.fm Page 8 Tuesday, November 8, 2011 2:56 PM
r
• Do not force the FR-1x’s power-supply cord to share an outlet with an unreasonable number of other devices. Be especially careful when using extension cords—the total power used by all devices you have connected to the extension cord's outlet must never exceed the power rating (watts/amperes) for the extension cord. Excessive loads can cause the insulation on the cord to heat up and eventually melt through.
...................................................................................................................................• Before using the FR-1x in a foreign country, consult with
your retailer, the nearest Roland Service Center, or an authorized Roland distributor, as listed on the “Informa-tion” page.
...................................................................................................................................• Batteries must never be recharged, heated, taken apart,
or thrown into fire or water.
...................................................................................................................................• Never expose batteries to excessive heat such as sun-
shine, fire or the like.
...................................................................................................................................• Incorrect handling of batteries, rechargeable batteries, or
a battery charger can cause leakage, overheating, fire, or explosion. Before use, you must read and strictly observe all of the precautions that accompany the batteries, rechargeable batteries, or battery charger. When using rechargeable batteries and a charger, use only the combination of rechargeable batteries and charger specified by the battery manufacturer.
• The unit and the AC adaptor should be located so its location or position does not interfere with their proper ventilation.
...................................................................................................................................• Always grasp only the plug on the AC adaptor cord when
plugging into, or unplugging from, an outlet or this unit.
...................................................................................................................................• At regular intervals, you should unplug the AC adaptor
and clean it by using a dry cloth to wipe all dust and other accumulations away from its prongs. Also, discon-nect the power plug from the power outlet whenever the unit is to remain unused for an extended period of time. Any accumulation of dust between the power plug and the power outlet can result in poor insulation and lead to fire.
...................................................................................................................................• Try to prevent cords and cables from becoming entan-
gled. Also, all cords and cables should be placed so they are out of the reach of children.
...................................................................................................................................• Never climb on top of, or place heavy objects on the unit.
...................................................................................................................................• Never handle the AC adaptor or its plugs with wet hands
when plugging into, or unplugging from, an outlet or this unit.
...................................................................................................................................• Before moving the unit, disconnect the AC adaptor and
all cords coming from external devices.
...................................................................................................................................
• Before cleaning the unit, turn off the power and unplug the AC adaptor from the outlet (see p. 15).
....................................................................................................................................• Whenever you suspect the possibility of lightning in your
area, disconnect the AC adaptor from the outlet.
....................................................................................................................................• If used improperly, batteries may explode or leak and
cause damage or injury. In the interest of safety, please read and observe the following precautions.
• Carefully follow the installation instructions for bat-teries, and make sure you observe the correct polarity.
• Avoid using new batteries together with used ones. In addition, avoid mixing different types of batteries.
• Remove the batteries whenever the unit is to remain unused for an extended period of time.
• If a battery has leaked, use a soft piece of cloth or paper towel to wipe all remnants of the discharge from the battery com-partment. Then install new batteries. To avoid inflammation of the skin, make sure that none of the battery discharge gets onto your hands or skin. Exercise the utmost caution so that none of the discharge gets near your eyes. Immediately rinse the affected area with running water if any of the discharge has entered the eyes.
• Never keep batteries together with metallic objects such as ball-point pens, necklaces, hairpins, etc.
....................................................................................................................................• Used batteries must be disposed of in compliance with
whatever regulations for their safe disposal that may be observed in the region in which you live.
....................................................................................................................................• Keep the included button caps in a safe place out of chil-
dren's reach, so there is no chance of them being swal-lowed accidentally.
....................................................................................................................................• Batteries may reach a high temperature: please be care-
ful to avoid burning yourself.
....................................................................................................................................
Important notes
V-Accordion
r
FR-1x GB.book Page 9 Tuesday, November 8, 2011 11:44 AM
2. Important notes
In addition to the items listed under “Using the unit safely” on p. 7, please read and observe the following:
Power supply• Do not connect this unit to same electrical outlet that is being
used by an electrical appliance that is controlled by an inverter (such as a refrigerator, washing machine, microwave oven, or air conditioner), or that contains a motor. Depending on the way in which the electrical appliance is used, power supply noise may cause this unit to malfunction or may produce audible noise. If it is not practical to use a separate electrical outlet, connect a power supply noise filter between this unit and the electrical outlet.
• The AC adaptor will begin to generate heat after long hours of consecutive use. This is normal, and is not a cause for concern.
• Before connecting this unit to other devices, turn off the power to all units. This will help prevent malfunctions and/or damage to speakers or other devices.
• When installing or replacing batteries, always turn off the power on this unit and disconnect any other devices you may have con-nected. This way, you can prevent malfunctions and/or damage to speakers or other devices.
Placement• Using the unit near power amplifiers (or other equipment contain-
ing large power transformers) may induce hum. To alleviate the problem, change the orientation of this unit; or move it farther away from the source of interference.
• This device may interfere with radio and television reception. Do not use this device in the vicinity of such receivers.
• Noise may be produced if wireless communications devices, such as cell phones, are operated in the vicinity of this unit. Such noise could occur when receiving or initiating a call, or while conversing. Should you experience such problems, you should relocate such wireless devices so they are at a greater distance from this unit, or switch them off.
• Do not expose the unit to direct sunlight, place it near devices that radiate heat, leave it inside an enclosed vehicle, or otherwise sub-ject it to temperature extremes. Excessive heat can deform or dis-color the unit.
• When moved from one location to another where the temperature and/or humidity is very different, water droplets (condensation) may form inside the unit. Damage or malfunction may result if you attempt to use the unit in this condition. Therefore, before using the unit, you must allow it to stand for several hours, until the condensation has completely evaporated.
• Do not allow objects to remain on top of the keyboard. This can be the cause of malfunction, such as keys ceasing to produce sound.
• Depending on the material and temperature of the surface on which you place the unit, its rubber feet may discolor or mar the surface.You can place a piece of felt or cloth under the rubber feet to pre-vent this from happening. If you do so, please make sure that the unit will not slip or move accidentally.
• Do not put anything that contains water (e.g., flower vases) on this unit. Also, avoid the use of insecticides, perfumes, alcohol, nail pol-ish, spray cans, etc., near the unit. Swiftly wipe away any liquid that spills on the unit using a dry, soft cloth.
Maintenance• For everyday cleaning wipe the FR-1x with a soft, dry cloth or one
that has been slightly dampened with water. To remove stubborn dirt, use a mild, non-abrasive detergent. Afterwards, be sure to wipe the instrument thoroughly with a soft, dry cloth.
• Never use benzine, thinner, alcohol or solvents of any kind, to avoid the possibility of discoloration and/or deformation.
Repairs and data• Please be aware that all data contained in the unit’s memory may
be lost when the unit is sent for repairs. Important data should always be backed up to a USB memory, or written down on paper (when possible). During repairs, due care is taken to avoid the loss of data. However, in certain cases (such as when circuitry related to memory itself is out of order), we regret that it may not be pos-sible to restore the data, and Roland Corporation assumes no lia-bility concerning such loss of data.
Precautions for batteries (not supplied)• The temperature range for use of the batteries depends on the
battery type being used. Please see the documentation that came with the batteries.
• Do not use or store batteries at high temperature, such as in strong direct sunlight, in cars during hot weather or directly in front of heaters. This may cause battery fluid leakage, impaired performance and shorten the batteries’ service life.
• Do not splash fresh or saltwater on a battery or allow the termi-nals to become damp. This may cause heat generation and forma-tion of rust on the battery and its terminals.
• Keep the batteries out of reach of babies or small children.
• Do no strike or drop the batteries. Strong impact can cause leak-age of battery fluid, heat generation, bursting or fire.
• Do not alter or remove protective mechanisms or other parts. Never disassemble the batteries.
Additional precautions• Please be aware that the contents of memory can be irretrievably
lost as a result of a malfunction, or the improper operation of the unit. To protect yourself against the risk of loosing important data, we recommend that you periodically save a backup copy of impor-tant data you have stored inside the unit to a USB memory.
• Unfortunately, it may be impossible to restore the contents of data that was stored on a USB memory once it has been lost. Roland Corporation assumes no liability concerning such loss of data.
• Use a reasonable amount of care when using the unit's buttons, sliders, or other controls; and when using its jacks and connectors. Rough handling can lead to malfunctions.
• Never strike or apply strong pressure to the display.
• When connecting/disconnecting all cables, grasp the connector itself—never pull on the cable. This way you will avoid causing shorts, or damage to the cable's internal elements.
• To avoid disturbing your neighbors, try to keep the unit's volume at reasonable levels. You may prefer to use headphones, so you do not need to be concerned about those around you (especially when it is late at night).
• When you need to transport the unit, package it in the box (including padding) that it came in, if possible. Otherwise, you will need to use equivalent packaging materials.
• Some connection cables contain resistors. Do not use cables that incorporate resistors for connecting to this unit. The use of such cables can cause the sound level to be extremely low, or impossible to hear. For information on cable specifications, contact the man-ufacturer of the cable.
• To prevent the inadvertent disruption of power to your unit (should the plug be pulled out accidentally), and to avoid applying undue stress to the jack, secure the power cord using the supplied attachment strip. See p. 20 for details.
9
Important notes
1
FR-1x V-Accordion
FR-1x GB.book Page 10 Tuesday, November 8, 2011 11:44 AM
rStorage devices that can be connected to the FR-1x’s USB port• The FR-1x allows you to connect commercially available USB
memories. You can purchase such devices at a computer store, a digital camera dealer, etc.
• Use USB memory sold by Roland (M-UF series). We cannot guaran-tee operation if any other USB memory is used.
Before using external USB memories• When connecting a USB memory, carefully insert it all the way
into the FR-1x’s USB port.
• Do not touch the pins of the FR-1x’s USB port or allow them to become dirty.
• Never insert or remove a USB memory while this unit’s power is on. Doing so may corrupt the unit’s data or the data on the USB memory.
• USB memories are constructed using precision components; han-dle the storage devices carefully, paying particular note to the fol-lowing.
• To prevent damage from static electrical charges, discharge any static electricity that might be present in your body before han-dling a USB memory.
• Do not touch the terminals with your fingers or any metal object.
• Do not bend or drop a USB memory, or subject it to strong impact.
• Do not leave a USB memory in direct sunlight or in locations such as a closed-up automobile.
• Do not allow a USB memory to become wet.
• Do not disassemble or modify your external USB memory.
• When connecting a USB memory, position it horizontally with the FR-1x’s USB port and insert it without using excessive force. The USB port may be damaged if you use excessive force when insert-ing a USB memory.
• Do not insert anything other than a USB memory (e.g., wire, coins, other types of device) into the USB port. Doing so will damage the FR-1x’s USB port.
• Never connect your USB memory to the FR-1x via a USB hub.
Notice• MPEG Layer-3 audio compression technology is licensed from
Fraunhofer IIS Corporation and THOMSON Multimedia Corpora-tion.
• Roland and V-Accordion are either registered trademarks or trade-marks of Roland Corporation in the United States and/or other countries.
• MMP (Moore Microprocessor Portfolio) refers to a patent portfolio concerned with microprocessor architecture, which was developed by Technology Properties Limited (TPL).Roland has licensed this technology from the TPL Group.
• Company and product names appearing in this document are trademarks or registered trademarks of their respective owners.
0
A first look at your FR-1xV-Accordion r
FR-1x GB.book Page 11 Tuesday, November 8, 2011 11:44 AM
3. A first look at your FR-1x
Let us first take a look at how the FR-1x is organized and how it is operated.
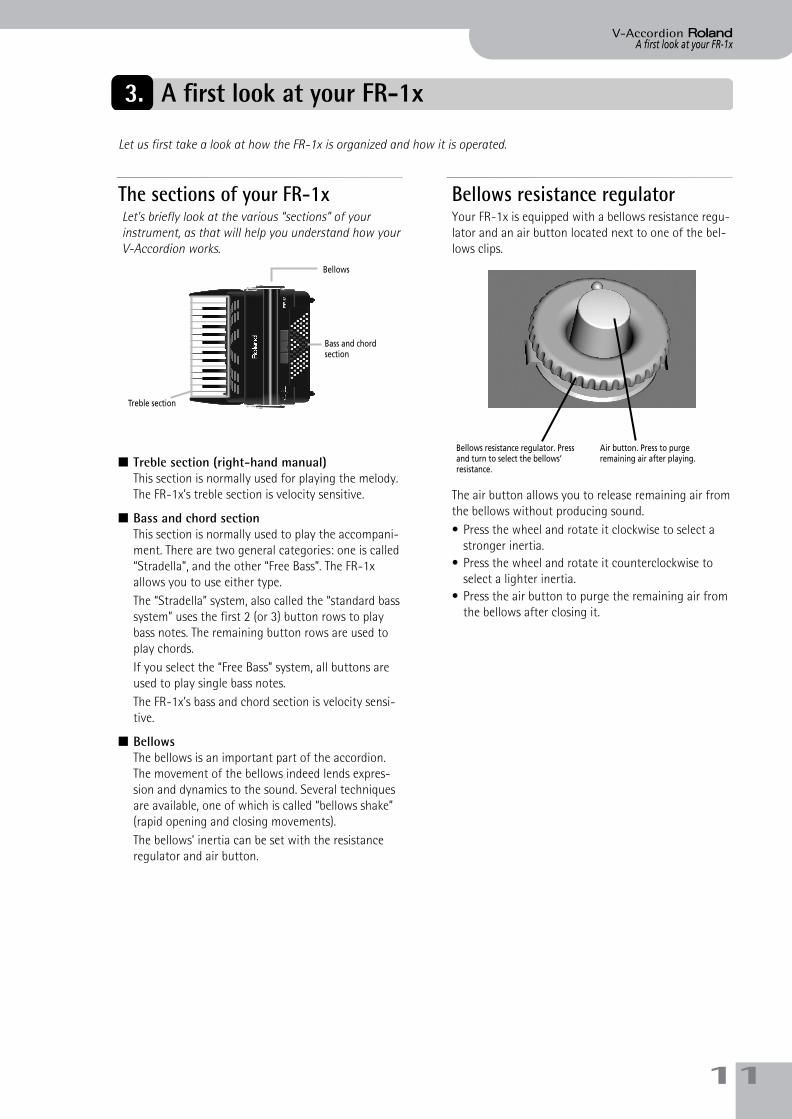
The sections of your FR-1xLet’s briefly look at the various “sections” of your instrument, as that will help you understand how your V-Accordion works.
■ Treble section (right-hand manual)This section is normally used for playing the melody. The FR-1x’s treble section is velocity sensitive.
■ Bass and chord sectionThis section is normally used to play the accompani-ment. There are two general categories: one is called “Stradella”, and the other “Free Bass”. The FR-1x allows you to use either type.The “Stradella” system, also called the “standard bass system” uses the first 2 (or 3) button rows to play bass notes. The remaining button rows are used to play chords.If you select the “Free Bass” system, all buttons are used to play single bass notes.The FR-1x’s bass and chord section is velocity sensi-tive.
■ BellowsThe bellows is an important part of the accordion. The movement of the bellows indeed lends expres-sion and dynamics to the sound. Several techniques are available, one of which is called “bellows shake” (rapid opening and closing movements).The bellows’ inertia can be set with the resistance regulator and air button.
Bellows resistance regulatorYour FR-1x is equipped with a bellows resistance regu-lator and an air button located next to one of the bel-lows clips.
The air button allows you to release remaining air from the bellows without producing sound. • Press the wheel and rotate it clockwise to select a
stronger inertia.• Press the wheel and rotate it counterclockwise to
select a lighter inertia.• Press the air button to purge the remaining air from
the bellows after closing it.
Treble section
Bass and chord section
Bellows
Bellows resistance regulator. Press and turn to select the bellows’ resistance.
Air button. Press to purge remaining air after playing.
11
Panel descriptions
1
FR-1x V-Accordion
A
J
K
L
M
FR-1x GB.book Page 12 Tuesday, November 8, 2011 11:44 AM
r4. Panel descriptions
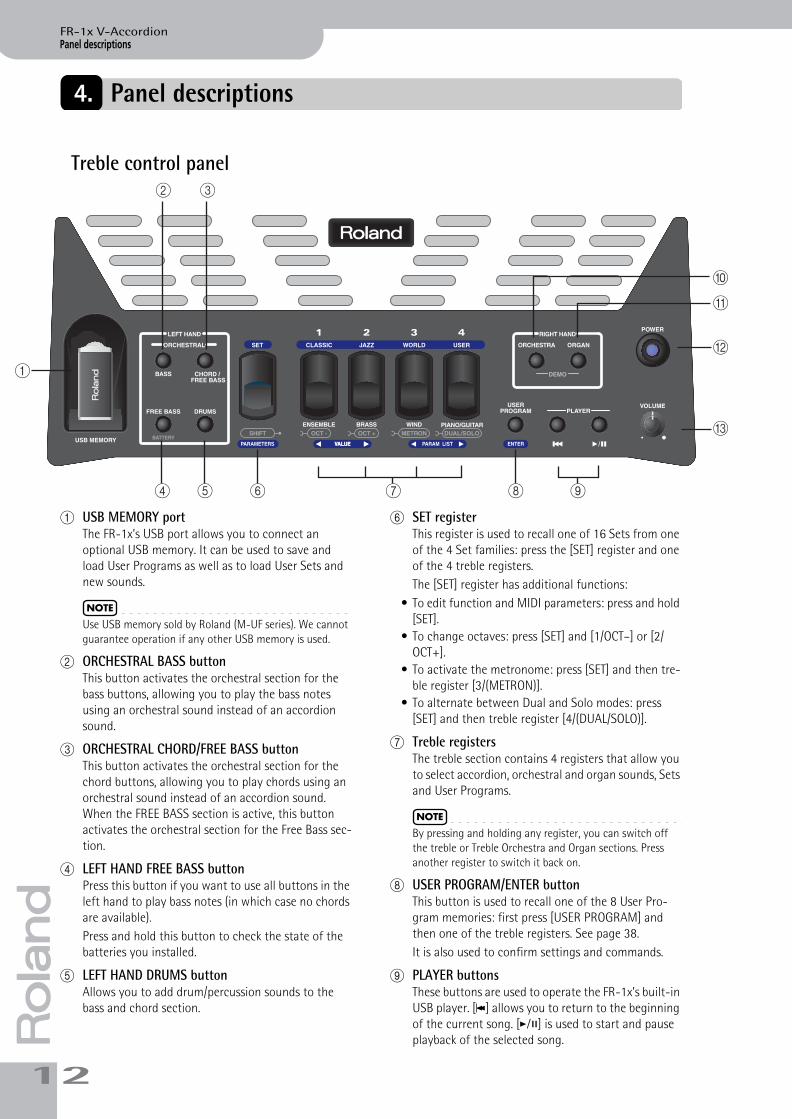
Treble control panel
A USB MEMORY portThe FR-1x’s USB port allows you to connect an optional USB memory. It can be used to save and load User Programs as well as to load User Sets and new sounds.
NOTE
Use USB memory sold by Roland (M-UF series). We cannot guarantee operation if any other USB memory is used.
B ORCHESTRAL BASS buttonThis button activates the orchestral section for the bass buttons, allowing you to play the bass notes using an orchestral sound instead of an accordion sound.
C ORCHESTRAL CHORD/FREE BASS buttonThis button activates the orchestral section for the chord buttons, allowing you to play chords using an orchestral sound instead of an accordion sound. When the FREE BASS section is active, this button activates the orchestral section for the Free Bass sec-tion.
D LEFT HAND FREE BASS buttonPress this button if you want to use all buttons in the left hand to play bass notes (in which case no chords are available).Press and hold this button to check the state of the batteries you installed.
E LEFT HAND DRUMS buttonAllows you to add drum/percussion sounds to the bass and chord section.
F SET registerThis register is used to recall one of 16 Sets from one of the 4 Set families: press the [SET] register and one of the 4 treble registers.The [SET] register has additional functions:
• To edit function and MIDI parameters: press and hold [SET].
• To change octaves: press [SET] and [1/OCT–] or [2/OCT+].
• To activate the metronome: press [SET] and then tre-ble register [3/(METRON)].
• To alternate between Dual and Solo modes: press [SET] and then treble register [4/(DUAL/SOLO)].
G Treble registersThe treble section contains 4 registers that allow you to select accordion, orchestral and organ sounds, Sets and User Programs.
NOTE
By pressing and holding any register, you can switch off the treble or Treble Orchestra and Organ sections. Press another register to switch it back on.
H USER PROGRAM/ENTER buttonThis button is used to recall one of the 8 User Pro-gram memories: first press [USER PROGRAM] and then one of the treble registers. See page 38.It is also used to confirm settings and commands.
I PLAYER buttonsThese buttons are used to operate the FR-1x’s built-in USB player. [œ] allows you to return to the beginning of the current song. [®÷π] is used to start and pause playback of the selected song.
D E F H IG
B C
2
Bass control panelV-Accordion r
FR-1x GB.book Page 13 Tuesday, November 8, 2011 11:44 AM
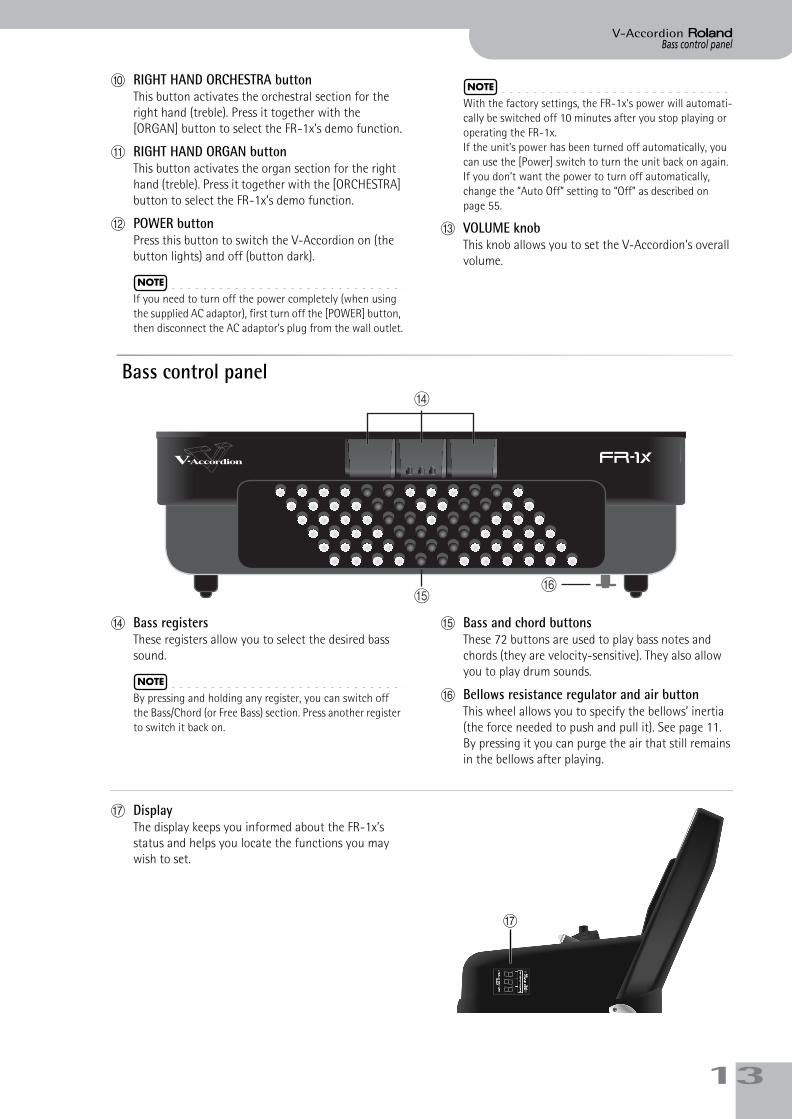
J RIGHT HAND ORCHESTRA buttonThis button activates the orchestral section for the right hand (treble). Press it together with the [ORGAN] button to select the FR-1x’s demo function.
K RIGHT HAND ORGAN buttonThis button activates the organ section for the right hand (treble). Press it together with the [ORCHESTRA] button to select the FR-1x’s demo function.
L POWER buttonPress this button to switch the V-Accordion on (the button lights) and off (button dark).
NOTE
If you need to turn off the power completely (when using the supplied AC adaptor), first turn off the [POWER] button, then disconnect the AC adaptor’s plug from the wall outlet.
NOTE
With the factory settings, the FR-1x’s power will automati-cally be switched off 10 minutes after you stop playing or operating the FR-1x.If the unit’s power has been turned off automatically, you can use the [Power] switch to turn the unit back on again. If you don’t want the power to turn off automatically, change the “Auto Off” setting to “Off” as described on page 55.
M VOLUME knobThis knob allows you to set the V-Accordion’s overall volume.
Bass control panel
N Bass registersThese registers allow you to select the desired bass sound.
NOTE
By pressing and holding any register, you can switch off the Bass/Chord (or Free Bass) section. Press another register to switch it back on.
O Bass and chord buttonsThese 72 buttons are used to play bass notes and chords (they are velocity-sensitive). They also allow you to play drum sounds.
P Bellows resistance regulator and air buttonThis wheel allows you to specify the bellows’ inertia (the force needed to push and pull it). See page 11. By pressing it you can purge the air that still remains in the bellows after playing.
Q DisplayThe display keeps you informed about the FR-1x’s status and helps you locate the functions you may wish to set.
N
OP
Q
13
Panel descriptions
1
FR-1x V-Accordion
FR-1x GB.book Page 14 Tuesday, November 8, 2011 11:44 AM
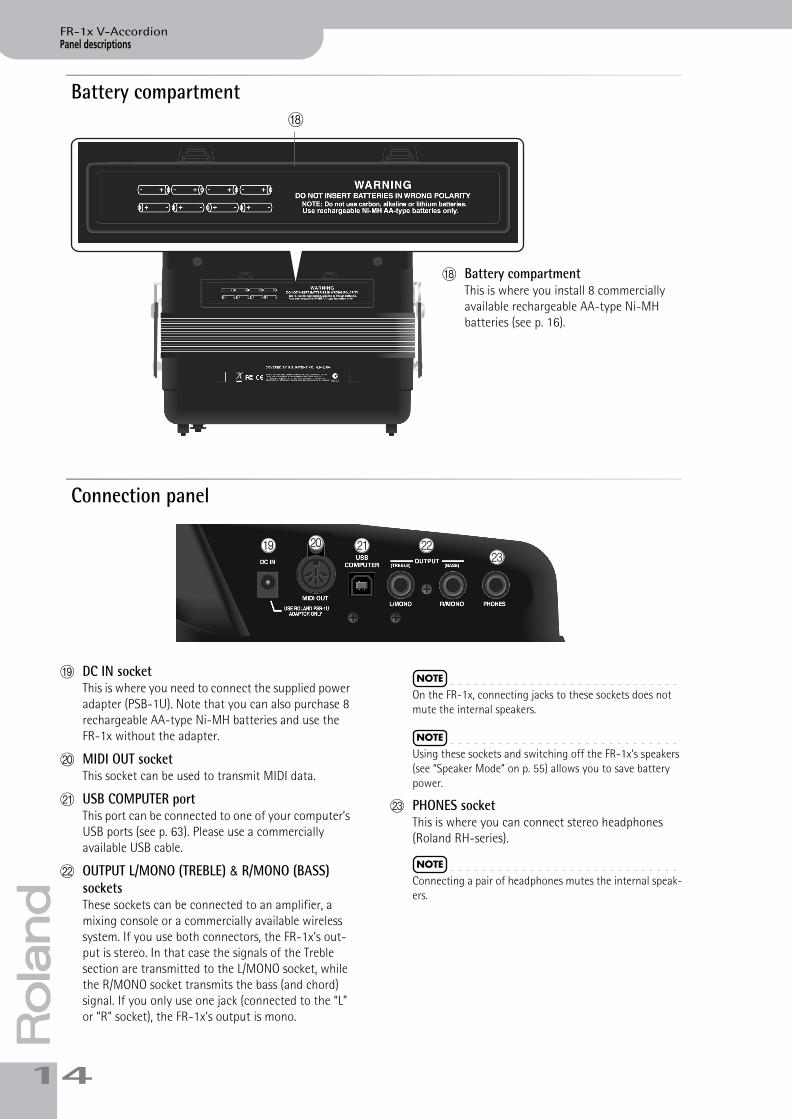
rBattery compartment
Connection panel
S DC IN socketThis is where you need to connect the supplied power adapter (PSB-1U). Note that you can also purchase 8 rechargeable AA-type Ni-MH batteries and use the FR-1x without the adapter.
T MIDI OUT socketThis socket can be used to transmit MIDI data.
U USB COMPUTER portThis port can be connected to one of your computer’s USB ports (see p. 63). Please use a commercially available USB cable.
V OUTPUT L/MONO (TREBLE) & R/MONO (BASS) socketsThese sockets can be connected to an amplifier, a mixing console or a commercially available wireless system. If you use both connectors, the FR-1x’s out-put is stereo. In that case the signals of the Treble section are transmitted to the L/MONO socket, while the R/MONO socket transmits the bass (and chord) signal. If you only use one jack (connected to the “L” or “R” socket), the FR-1x’s output is mono.
NOTE
On the FR-1x, connecting jacks to these sockets does not mute the internal speakers.
NOTE
Using these sockets and switching off the FR-1x’s speakers (see “Speaker Mode” on p. 55) allows you to save battery power.
W PHONES socketThis is where you can connect stereo headphones (Roland RH-series).
NOTE
Connecting a pair of headphones mutes the internal speak-ers.
R
R Battery compartmentThis is where you install 8 commercially available rechargeable AA-type Ni-MH batteries (see p. 16).
TS U VW
4
Before you start playingV-Accordion r
FR-1x GB.book Page 15 Tuesday, November 8, 2011 11:44 AM
5. Before you start playing
Getting ready to playThe FR-1x is an electronic instrument that requires some form of electrical power. This chapter explains how to power your FR-1x using the supplied adaptor or 8 commercially available rechargeable batteries (AA-type Ni-MH). In addition, you will learn how to connect your FR-1x to an external amplification system.
Connecting the AC adaptorNOTE
To prevent malfunction and/or damage to speakers or other devices, always turn down the volume, and turn off the power on all devices before making any connections.
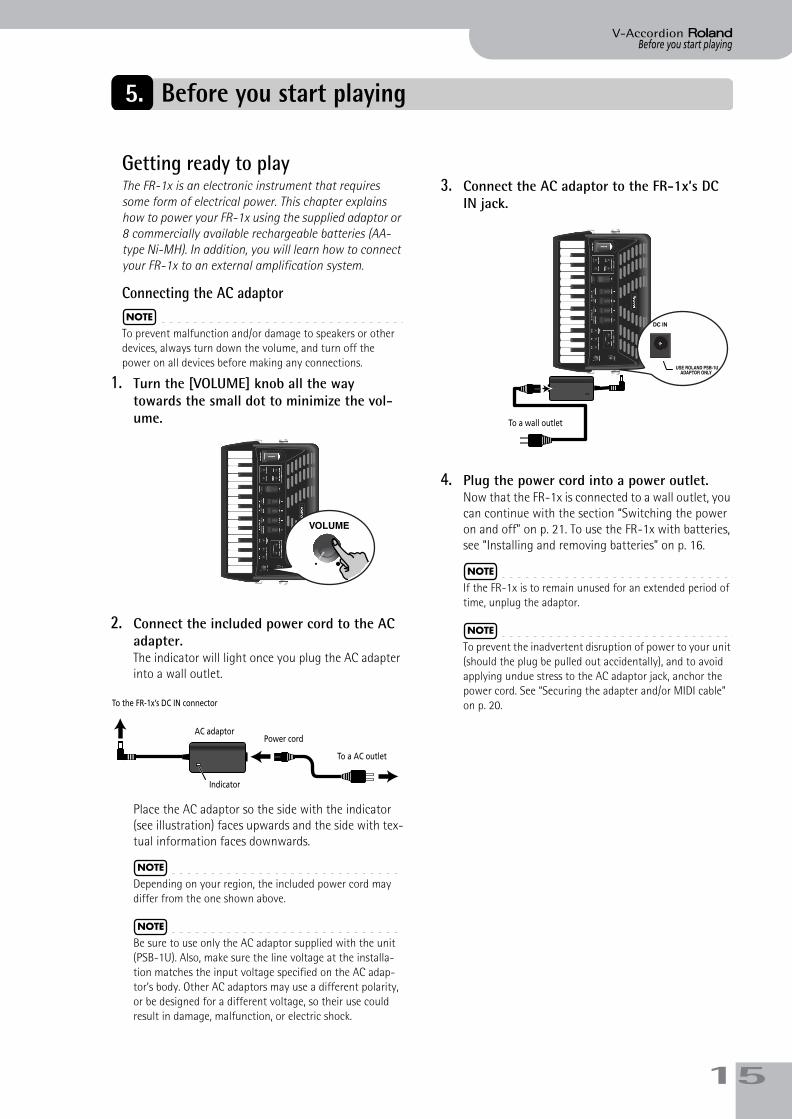
1. Turn the [VOLUME] knob all the way towards the small dot to minimize the vol-ume.
2. Connect the included power cord to the AC adapter.The indicator will light once you plug the AC adapter into a wall outlet.
Place the AC adaptor so the side with the indicator (see illustration) faces upwards and the side with tex-tual information faces downwards.
NOTE
Depending on your region, the included power cord may differ from the one shown above.
NOTE
Be sure to use only the AC adaptor supplied with the unit (PSB-1U). Also, make sure the line voltage at the installa-tion matches the input voltage specified on the AC adap-tor’s body. Other AC adaptors may use a different polarity, or be designed for a different voltage, so their use could result in damage, malfunction, or electric shock.
3. Connect the AC adaptor to the FR-1x’s DC IN jack.
4. Plug the power cord into a power outlet.Now that the FR-1x is connected to a wall outlet, you can continue with the section “Switching the power on and off” on p. 21. To use the FR-1x with batteries, see “Installing and removing batteries” on p. 16.
NOTE
If the FR-1x is to remain unused for an extended period of time, unplug the adaptor.
NOTE
To prevent the inadvertent disruption of power to your unit (should the plug be pulled out accidentally), and to avoid applying undue stress to the AC adaptor jack, anchor the power cord. See “Securing the adapter and/or MIDI cable” on p. 20.To the FR-1x’s DC IN connector
AC adaptorPower cord
To a AC outlet
Indicator
To a wall outlet
15
Before you start playing
1
FR-1x V-Accordion
FR-1x GB.book Page 16 Tuesday, November 8, 2011 11:44 AM
rInstalling and removing batteriesThe FR-1x has a compartment into which you can install 8 commercially available AA-type Ni-MH batter-ies (which are rechargeable). You can therefore play your instrument without connecting the supplied adaptor.
1. Switch off the FR-1x.
2. Remove the cover from the FR-1x’s battery compartment by pressing the two tabs and lifting the cover.
3. Insert 8 rechargeable AA-type Ni-MH bat-teries into the compartment (4 on either side), taking care to orient them in accor-dance with the “+” and “–” indications.
4. Close the FR-1x’s battery compartment.
NOTE
Though it is perfectly possible to use rechargeable batter-ies, be aware that they cannot be recharged simply by leav-ing them in the FR-1x’s compartment and connecting the adapter. You will need an external charging unit.
NOTE
When replacing batteries, be sure to insert them correctly (ensure correct polarity).
NOTE
Remove the batteries whenever the FR-1x is to remain unused for an extended period of time.
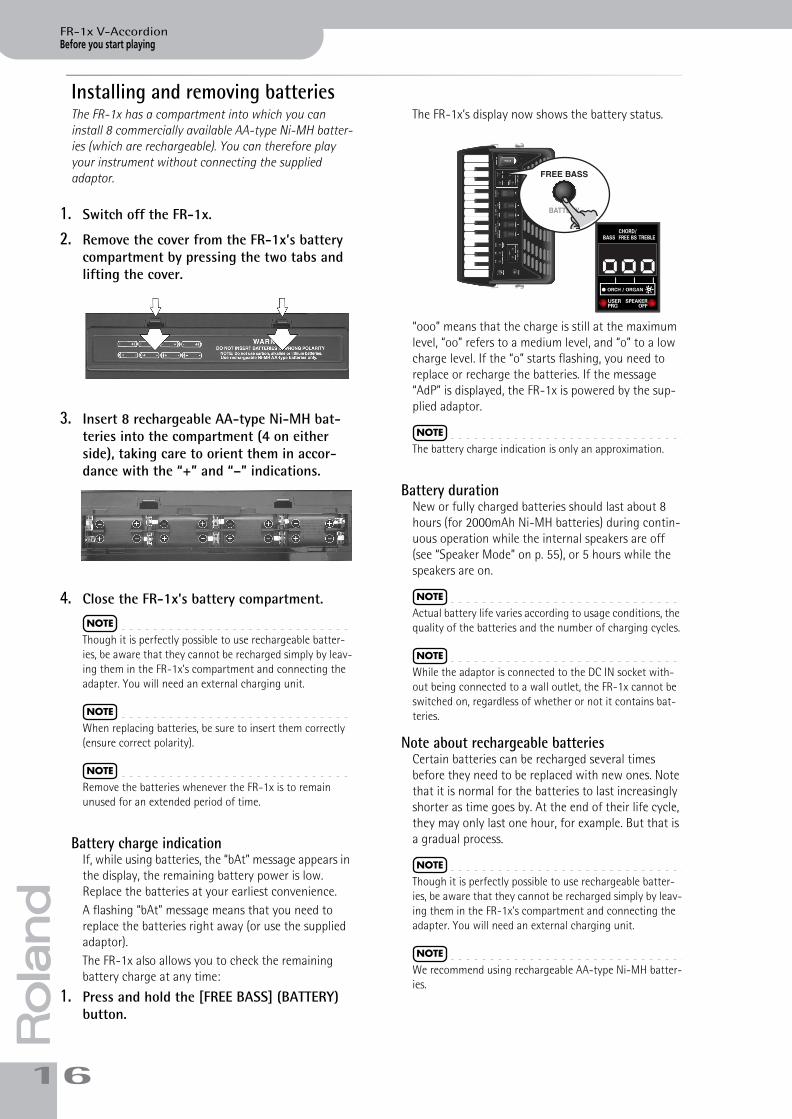
Battery charge indicationIf, while using batteries, the “bAt” message appears in the display, the remaining battery power is low. Replace the batteries at your earliest convenience. A flashing “bAt” message means that you need to replace the batteries right away (or use the supplied adaptor).The FR-1x also allows you to check the remaining battery charge at any time:
1. Press and hold the [FREE BASS] (BATTERY) button.
The FR-1x’s display now shows the battery status.
“ooo” means that the charge is still at the maximum level, “oo” refers to a medium level, and “o” to a low charge level. If the “o” starts flashing, you need to replace or recharge the batteries. If the message “AdP” is displayed, the FR-1x is powered by the sup-plied adaptor.
NOTE
The battery charge indication is only an approximation.
Battery durationNew or fully charged batteries should last about 8 hours (for 2000mAh Ni-MH batteries) during contin-uous operation while the internal speakers are off (see “Speaker Mode” on p. 55), or 5 hours while the speakers are on.
NOTE
Actual battery life varies according to usage conditions, the quality of the batteries and the number of charging cycles.
NOTE
While the adaptor is connected to the DC IN socket with-out being connected to a wall outlet, the FR-1x cannot be switched on, regardless of whether or not it contains bat-teries.
Note about rechargeable batteriesCertain batteries can be recharged several times before they need to be replaced with new ones. Note that it is normal for the batteries to last increasingly shorter as time goes by. At the end of their life cycle, they may only last one hour, for example. But that is a gradual process.
NOTE
Though it is perfectly possible to use rechargeable batter-ies, be aware that they cannot be recharged simply by leav-ing them in the FR-1x’s compartment and connecting the adapter. You will need an external charging unit.
NOTE
We recommend using rechargeable AA-type Ni-MH batter-ies.
ooo
6

Energy saving functionV-Accordion r
FR-1x GB.book Page 17 Tuesday, November 8, 2011 11:44 AM
Energy saving functionConnecting the FR-1x to an amplifier, mixer, etc.The FR-1x is equipped with an internal speaker system and thus does not need to be connected to an amplifier at all. There may be times, however when using an external amplification system is more convenient.
NOTE
If you are using optional batteries and need to connect the FR-1x to a PA system or mixer, we recommend using a com-mercially available wireless system to avoid having to use excessively long signal cables.
NOTE
To prevent malfunction and/or damage to speakers or other devices, always turn down the volume, and turn off the power on all devices before making any connections.
1. Turn the [VOLUME] knob all the way towards the small dot to minimize the vol-ume.
2. Switch off all devices.
3. Connect the FR-1x’s OUTPUT jacks to the inputs of your external device.
Please choose unbalanced (mono) cables with 1/4” jacks at one end (for the FR-1x). The connectors at the other end need to match the input sockets of the device to which you are connecting the FR-1x.
NOTE
If you use a commercially available wireless transmitter, the FR-1x’s output signals may distort. In that case, change the FR-1x’s output level (see “Output Level Attenuation” on p. 55).
NOTE
If your amplifier is monaural, you only need to connect the L/MONO (or R/MONO) socket.
NOTE
This unit has an Auto Off function, which auto-matically switches off the power after a certain amount of time has passed without any buttons being operated. One minute before the FR-1x shuts down automati-cally, the display starts counting down the seconds. If you want to keep using the FR-1x at this stage, press any button or register.You can also disable the “Auto Off” function. For more about the Auto Off function, refer to “Auto Off” on p. 55.
OUTPUT L/MONO (Treble) + R/MONO (Bass)
INPUT L + R
Use either a long signal cable (10m or more) or an optional wireless system (recommended).
17
Before you start playing
1
FR-1x V-Accordion
FR-1x GB.book Page 18 Tuesday, November 8, 2011 11:44 AM
r
After connecting any cable to the FR-1x, be sure to never place it on the side when not using it.
• Always stand the V-Accordion on its rubber feet (and in the corresponding direction) to avoid damaging the plugs.
• Always handle and move the FR-1x with care and pay special attention to the cable slack to avoid damaging or bending the cables.
• If you place the FR-1x on your lap, ensure that the audio and adapter cables run between your legs (not sideways) to avoid damaging or bending the cables.
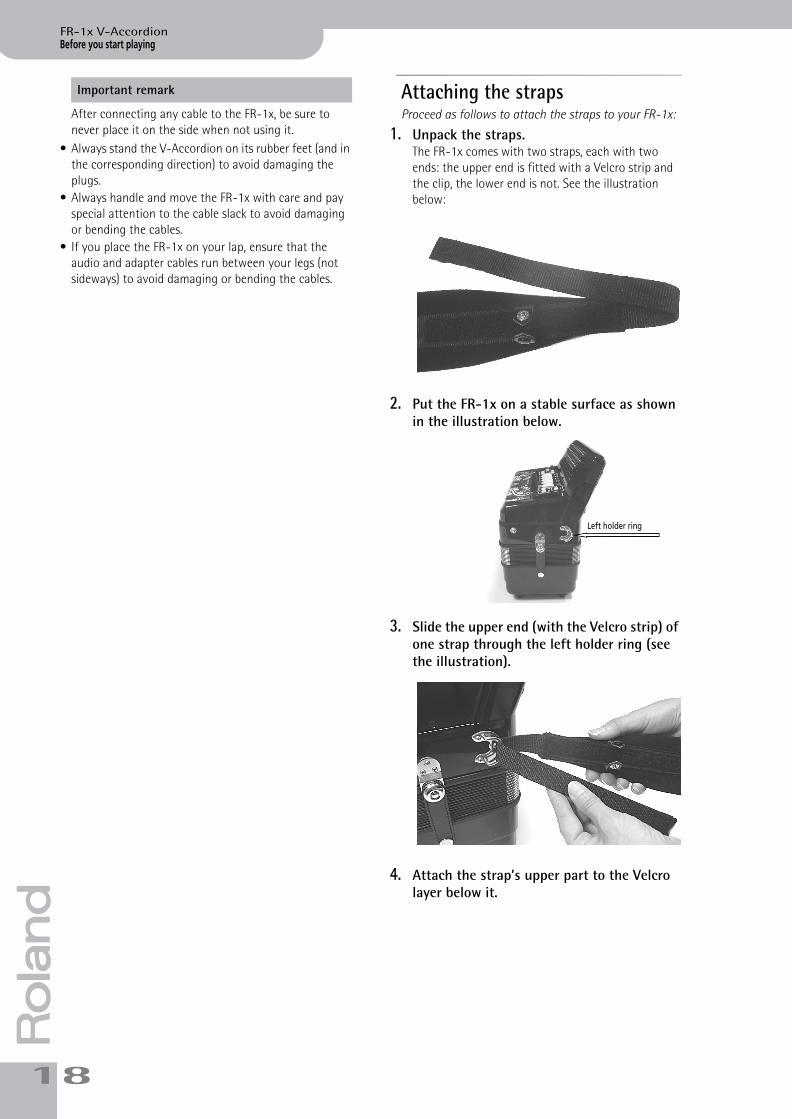
Attaching the strapsProceed as follows to attach the straps to your FR-1x:
1. Unpack the straps.The FR-1x comes with two straps, each with two ends: the upper end is fitted with a Velcro strip and the clip, the lower end is not. See the illustration below:
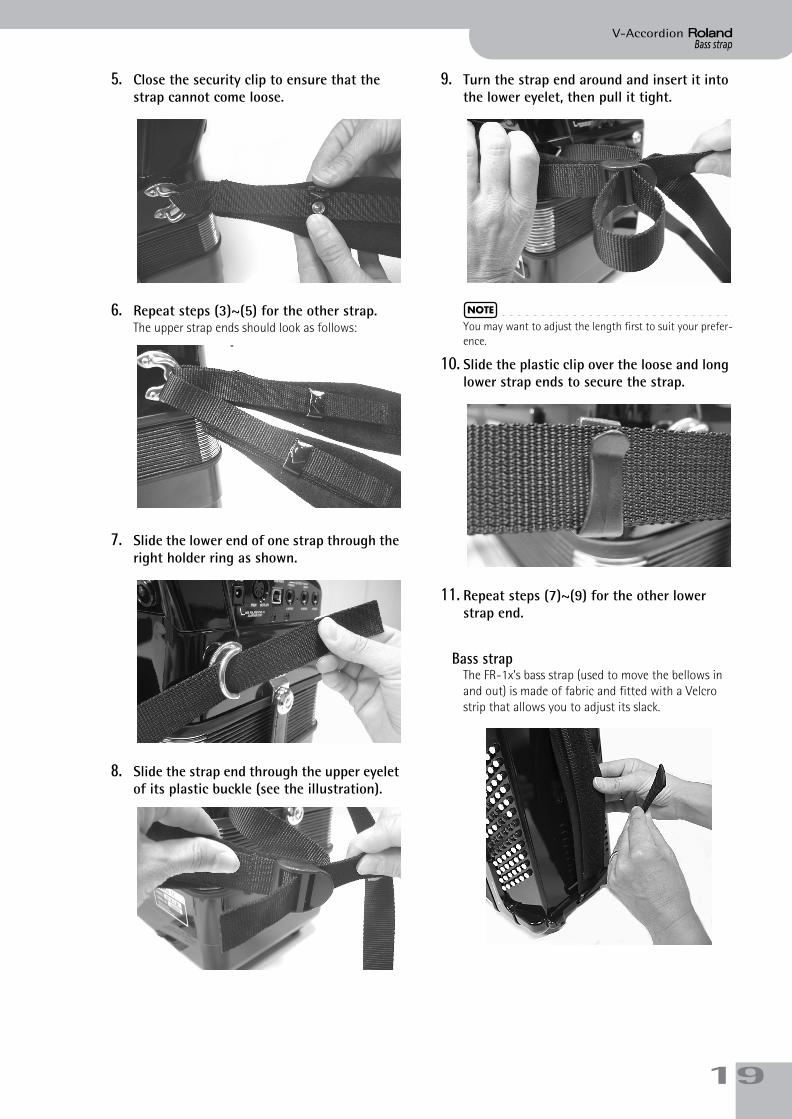
2. Put the FR-1x on a stable surface as shown in the illustration below.
3. Slide the upper end (with the Velcro strip) of one strap through the left holder ring (see the illustration).
4. Attach the strap’s upper part to the Velcro layer below it.
Important remark
Left holder ring
8
Bass strapV-Accordion r
FR-1x GB.book Page 19 Tuesday, November 8, 2011 11:44 AM
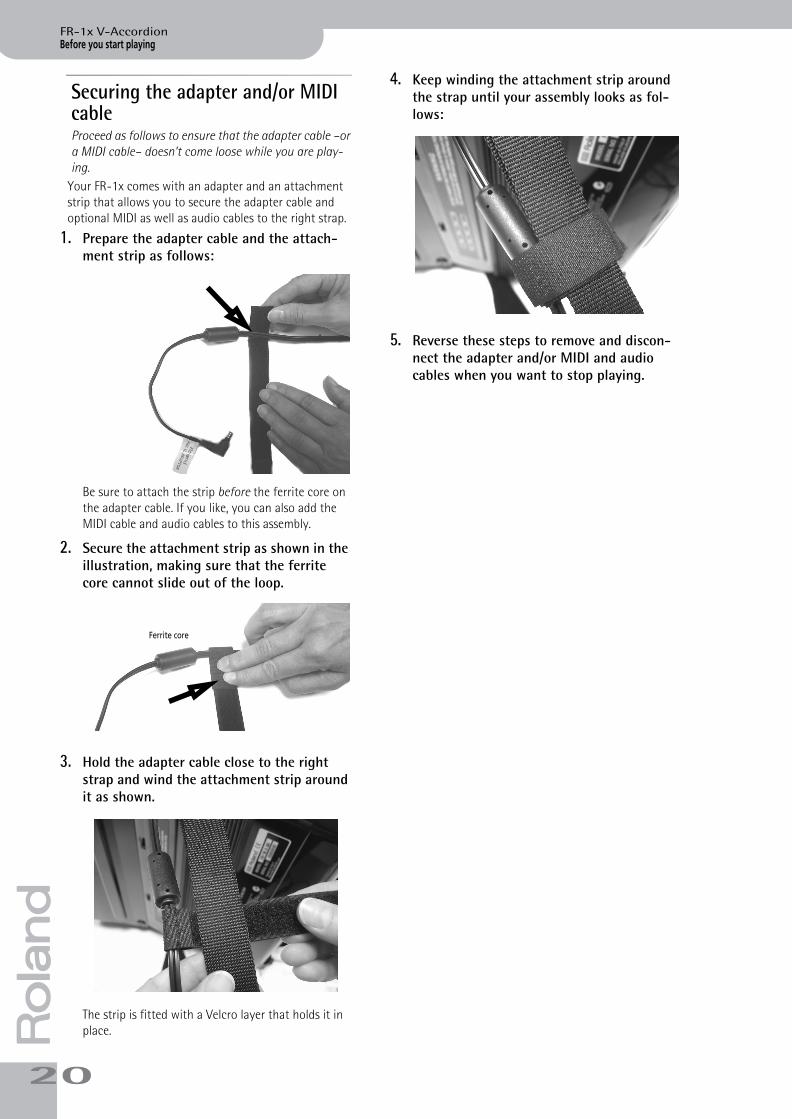
5. Close the security clip to ensure that the strap cannot come loose.
6. Repeat steps (3)~(5) for the other strap.The upper strap ends should look as follows:
7. Slide the lower end of one strap through the right holder ring as shown.
8. Slide the strap end through the upper eyelet of its plastic buckle (see the illustration).
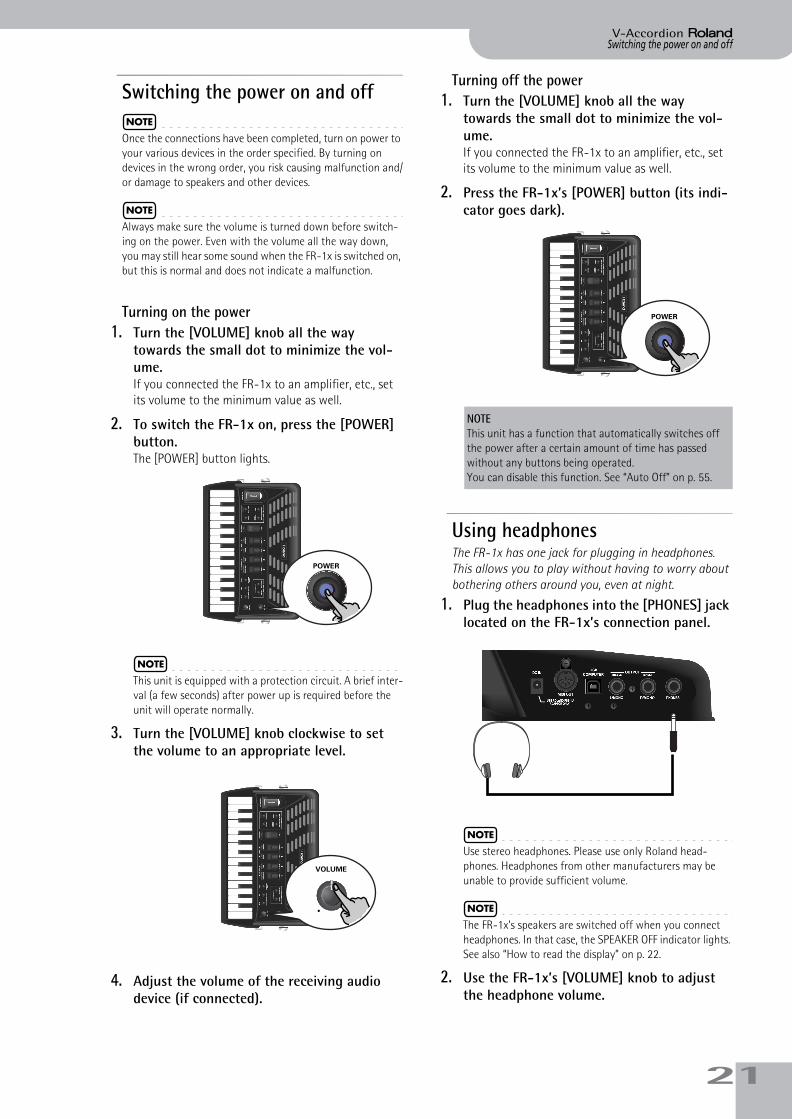
9. Turn the strap end around and insert it into the lower eyelet, then pull it tight.
NOTE
You may want to adjust the length first to suit your prefer-ence.
10. Slide the plastic clip over the loose and long lower strap ends to secure the strap.
11. Repeat steps (7)~(9) for the other lower strap end.
Bass strapThe FR-1x’s bass strap (used to move the bellows in and out) is made of fabric and fitted with a Velcro strip that allows you to adjust its slack.
19
Before you start playing
2
FR-1x V-Accordion
FR-1x GB.book Page 20 Tuesday, November 8, 2011 11:44 AM
rSecuring the adapter and/or MIDI cableProceed as follows to ensure that the adapter cable –or a MIDI cable– doesn’t come loose while you are play-ing.
Your FR-1x comes with an adapter and an attachment strip that allows you to secure the adapter cable and optional MIDI as well as audio cables to the right strap.
1. Prepare the adapter cable and the attach-ment strip as follows:
Be sure to attach the strip before the ferrite core on the adapter cable. If you like, you can also add the MIDI cable and audio cables to this assembly.
2. Secure the attachment strip as shown in the illustration, making sure that the ferrite core cannot slide out of the loop.
3. Hold the adapter cable close to the right strap and wind the attachment strip around it as shown.
The strip is fitted with a Velcro layer that holds it in place.
4. Keep winding the attachment strip around the strap until your assembly looks as fol-lows:
5. Reverse these steps to remove and discon-nect the adapter and/or MIDI and audio cables when you want to stop playing.
Ferrite core
0
Switching the power on and offV-Accordion r
FR-1x GB.book Page 21 Tuesday, November 8, 2011 11:44 AM
Switching the power on and offNOTE
Once the connections have been completed, turn on power to your various devices in the order specified. By turning on devices in the wrong order, you risk causing malfunction and/or damage to speakers and other devices.
NOTE
Always make sure the volume is turned down before switch-ing on the power. Even with the volume all the way down, you may still hear some sound when the FR-1x is switched on, but this is normal and does not indicate a malfunction.
Turning on the power1. Turn the [VOLUME] knob all the way
towards the small dot to minimize the vol-ume.If you connected the FR-1x to an amplifier, etc., set its volume to the minimum value as well.
2. To switch the FR-1x on, press the [POWER] button.The [POWER] button lights.
NOTE
This unit is equipped with a protection circuit. A brief inter-val (a few seconds) after power up is required before the unit will operate normally.
3. Turn the [VOLUME] knob clockwise to set the volume to an appropriate level.
4. Adjust the volume of the receiving audio device (if connected).
Turning off the power1. Turn the [VOLUME] knob all the way
towards the small dot to minimize the vol-ume.If you connected the FR-1x to an amplifier, etc., set its volume to the minimum value as well.
2. Press the FR-1x’s [POWER] button (its indi-cator goes dark).
Using headphonesThe FR-1x has one jack for plugging in headphones. This allows you to play without having to worry about bothering others around you, even at night.
1. Plug the headphones into the [PHONES] jack located on the FR-1x’s connection panel.
NOTE
Use stereo headphones. Please use only Roland head-phones. Headphones from other manufacturers may be unable to provide sufficient volume.
NOTE
The FR-1x’s speakers are switched off when you connect headphones. In that case, the SPEAKER OFF indicator lights. See also “How to read the display” on p. 22.
2. Use the FR-1x’s [VOLUME] knob to adjust the headphone volume.
NOTEThis unit has a function that automatically switches off the power after a certain amount of time has passed without any buttons being operated. You can disable this function. See “Auto Off” on p. 55.
21
Before you start playing
2
FR-1x V-Accordion
FR-1x GB.book Page 22 Tuesday, November 8, 2011 11:44 AM
r■ Cautions when using headphones• To prevent damage to the cord’s internal conductors,
avoid rough handling. When using headphones, mainly try to handle either the plug or the headset.
• Your headphones may be damaged if the volume of a device is already turned up when you plug them in. Minimize the volume before you plug in the head-phones.
• Excessive input will not only damage your hearing, but may also strain the headphones. Please enjoy music at an appropriate volume.
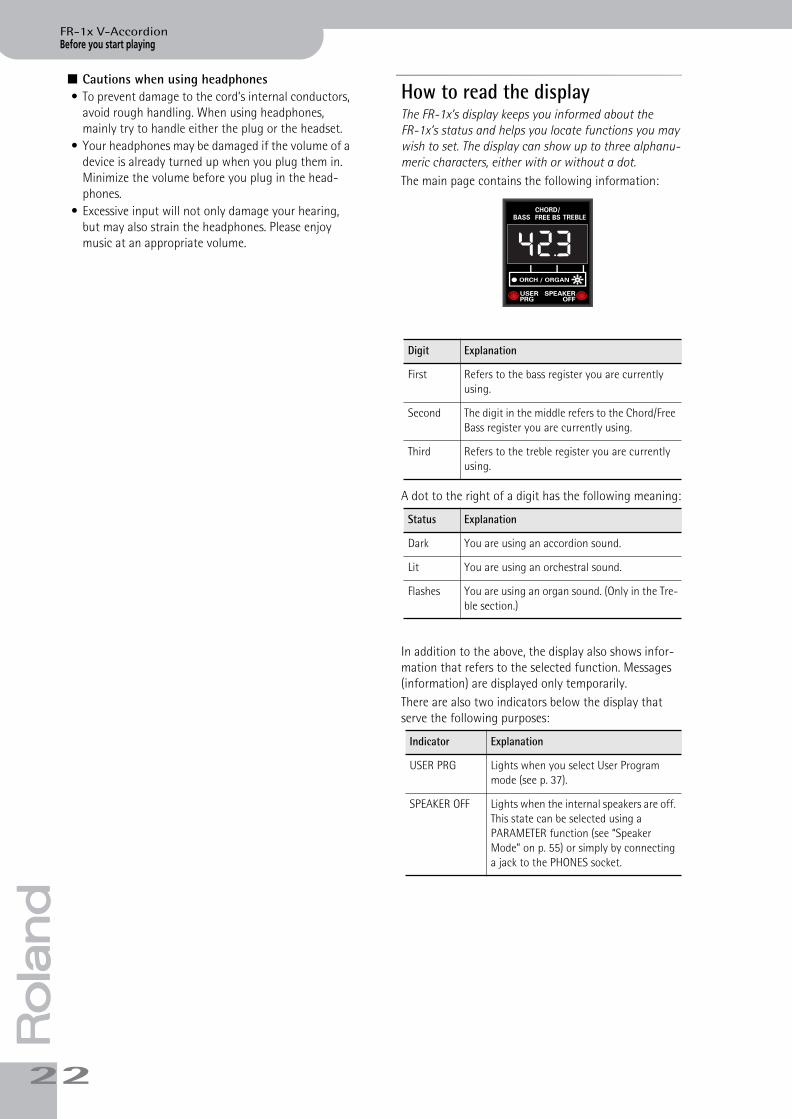
How to read the displayThe FR-1x’s display keeps you informed about the FR-1x’s status and helps you locate functions you may wish to set. The display can show up to three alphanu-meric characters, either with or without a dot.The main page contains the following information:
A dot to the right of a digit has the following meaning:
In addition to the above, the display also shows infor-mation that refers to the selected function. Messages (information) are displayed only temporarily. There are also two indicators below the display that serve the following purposes:
Digit Explanation
First Refers to the bass register you are currently using.
Second The digit in the middle refers to the Chord/Free Bass register you are currently using.
Third Refers to the treble register you are currently using.
Status Explanation
Dark You are using an accordion sound.
Lit You are using an orchestral sound.
Flashes You are using an organ sound. (Only in the Tre-ble section.)
Indicator Explanation
USER PRG Lights when you select User Program mode (see p. 37).
SPEAKER OFF Lights when the internal speakers are off. This state can be selected using a PARAMETER function (see “Speaker Mode” on p. 55) or simply by connecting a jack to the PHONES socket.
423.
2
Listening to the demo songsV-Accordion r
FR-1x GB.book Page 23 Tuesday, November 8, 2011 11:44 AM
6. Listening to the demo songs
The FR-1x contains several demo songs. Here is how to play back those demo songs and fully appreciate the sounds con-tained in the FR-1x.
1. Switch on the FR-1x.See “Switching the power on and off” on p. 21.
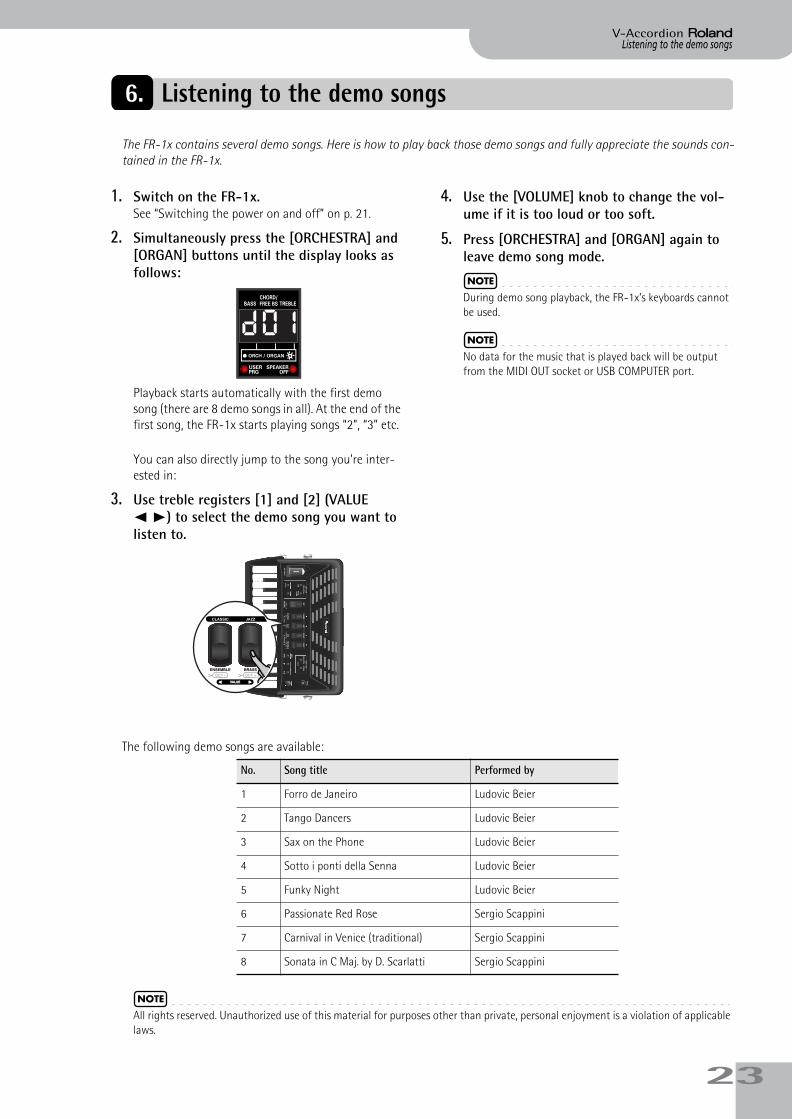
2. Simultaneously press the [ORCHESTRA] and [ORGAN] buttons until the display looks as follows:
Playback starts automatically with the first demo song (there are 8 demo songs in all). At the end of the first song, the FR-1x starts playing songs “2”, “3” etc.
You can also directly jump to the song you’re inter-ested in:
3. Use treble registers [1] and [2] (VALUE √ ®) to select the demo song you want to listen to.
4. Use the [VOLUME] knob to change the vol-ume if it is too loud or too soft.
5. Press [ORCHESTRA] and [ORGAN] again to leave demo song mode.
NOTE
During demo song playback, the FR-1x’s keyboards cannot be used.
NOTE
No data for the music that is played back will be output from the MIDI OUT socket or USB COMPUTER port.
The following demo songs are available:
NOTE
All rights reserved. Unauthorized use of this material for purposes other than private, personal enjoyment is a violation of applicable laws.
d01
No. Song title Performed by
1 Forro de Janeiro Ludovic Beier
2 Tango Dancers Ludovic Beier
3 Sax on the Phone Ludovic Beier
4 Sotto i ponti della Senna Ludovic Beier
5 Funky Night Ludovic Beier
6 Passionate Red Rose Sergio Scappini
7 Carnival in Venice (traditional) Sergio Scappini
8 Sonata in C Maj. by D. Scarlatti Sergio Scappini
23
Using Sets
2
FR-1x V-Accordion
FR-1x GB.book Page 24 Tuesday, November 8, 2011 11:44 AM
r7. Using Sets
The FR-1x is a “virtual” accordion. It recreates the sounds of various accordion instruments and can even generate orchestral sounds (like trumpet, flute, etc.), organ and drum sounds.
Recalling a Set is similar to switching to a different accordion.
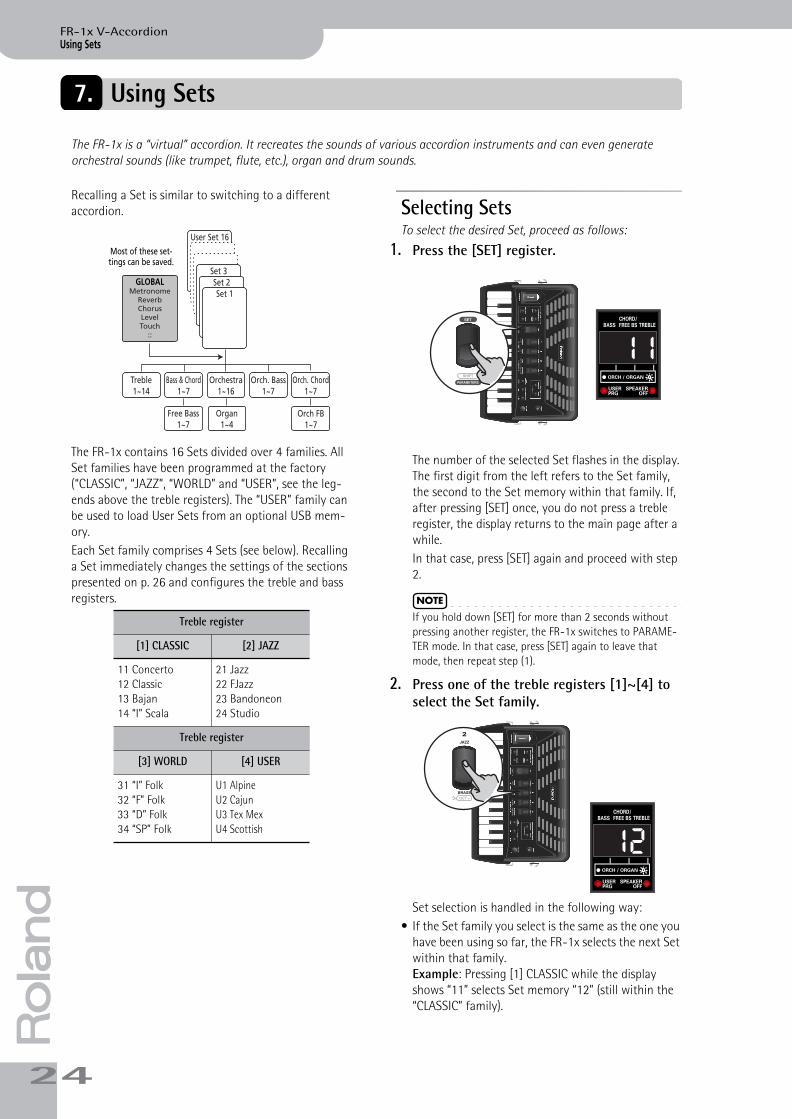
The FR-1x contains 16 Sets divided over 4 families. All Set families have been programmed at the factory (“CLASSIC”, “JAZZ”, “WORLD” and “USER”, see the leg-ends above the treble registers). The “USER” family can be used to load User Sets from an optional USB mem-ory. Each Set family comprises 4 Sets (see below). Recalling a Set immediately changes the settings of the sections presented on p. 26 and configures the treble and bass registers.
Selecting SetsTo select the desired Set, proceed as follows:
1. Press the [SET] register.
The number of the selected Set flashes in the display. The first digit from the left refers to the Set family, the second to the Set memory within that family. If, after pressing [SET] once, you do not press a treble register, the display returns to the main page after a while.In that case, press [SET] again and proceed with step 2.
NOTE
If you hold down [SET] for more than 2 seconds without pressing another register, the FR-1x switches to PARAME-TER mode. In that case, press [SET] again to leave that mode, then repeat step (1).
2. Press one of the treble registers [1]~[4] to select the Set family.
Set selection is handled in the following way:• If the Set family you select is the same as the one you
have been using so far, the FR-1x selects the next Set within that family.Example: Pressing [1] CLASSIC while the display shows “11” selects Set memory “12” (still within the “CLASSIC” family).
Treble register
[1] CLASSIC [2] JAZZ
11 Concerto12 Classic13 Bajan14 “I” Scala
21 Jazz22 FJazz23 Bandoneon24 Studio
Treble register
[3] WORLD [4] USER
31 “I” Folk32 “F” Folk33 “D” Folk34 “SP” Folk
U1 AlpineU2 CajunU3 Tex MexU4 Scottish
Treble1~14
Bass & Chord1~7
Orchestra1~16
Orch. Bass1~7
Orch. Chord1~7
Orch FB1~7
Free Bass1~7
User Set 16
Set 3Set 2Set 1
GLOBALMetronome
ReverbChorusLevelTouch
::
Organ1~4
Most of these set-tings can be saved.
11
12
4

Selecting SetsV-Accordion r
FR-1x GB.book Page 25 Tuesday, November 8, 2011 11:44 AM
To go from Set “11” to Set “14”, you therefore need to press register [1] three times after pressing [SET].
• If you select a different Set family, the FR-1x switches to the newly selected Set family and recalls the last memory you selected within that family.
NOTE
For the User Set memories, the display shows a “U”. There are four User Sets.
NOTE
While the USER PRG indicator below the display lights, it is impossible to select Sets. In order to select a Set, you will have to press the [USER PROGRAM] button to leave User Program mode.
25
Selecting and playing sounds
2
FR-1x V-Accordion
FR-1x GB.book Page 26 Tuesday, November 8, 2011 11:44 AM
r8. Selecting and playing sounds
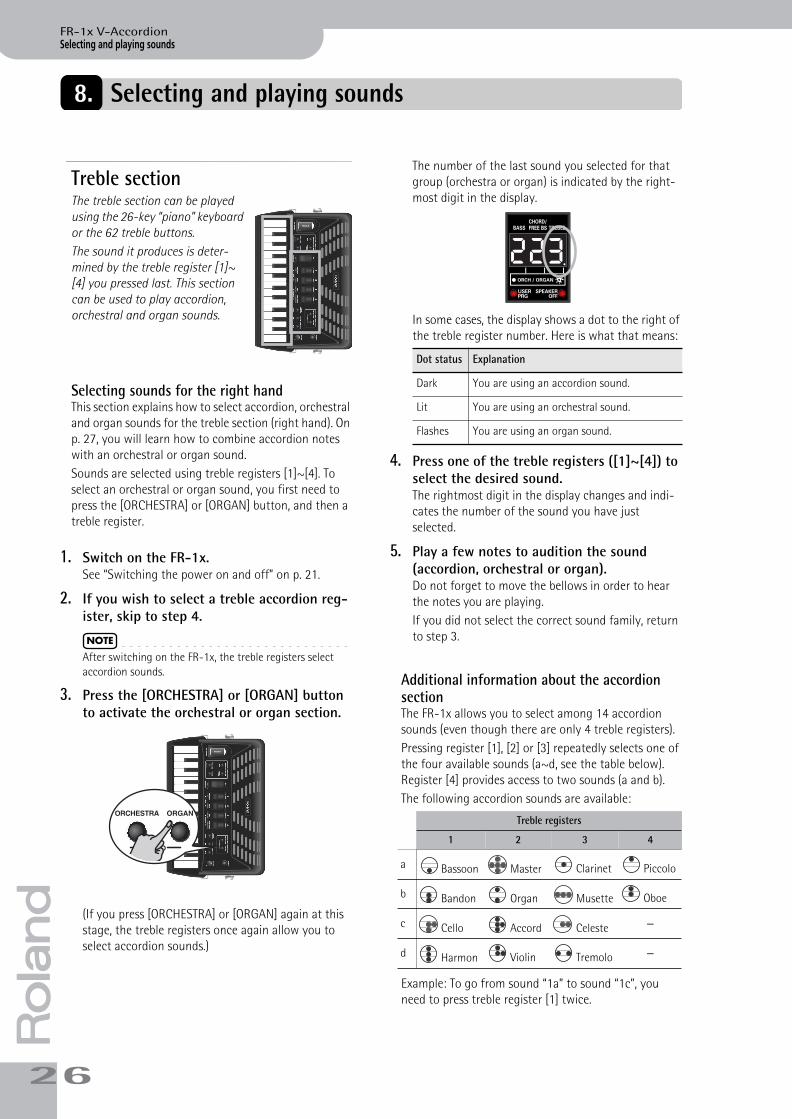
Treble sectionThe treble section can be played using the 26-key “piano” keyboard or the 62 treble buttons.The sound it produces is deter-mined by the treble register [1]~[4] you pressed last. This section can be used to play accordion, orchestral and organ sounds.
Selecting sounds for the right handThis section explains how to select accordion, orchestral and organ sounds for the treble section (right hand). On p. 27, you will learn how to combine accordion notes with an orchestral or organ sound.Sounds are selected using treble registers [1]~[4]. To select an orchestral or organ sound, you first need to press the [ORCHESTRA] or [ORGAN] button, and then a treble register.
1. Switch on the FR-1x.See “Switching the power on and off” on p. 21.
2. If you wish to select a treble accordion reg-ister, skip to step 4.
NOTE
After switching on the FR-1x, the treble registers select accordion sounds.
3. Press the [ORCHESTRA] or [ORGAN] button to activate the orchestral or organ section.
(If you press [ORCHESTRA] or [ORGAN] again at this stage, the treble registers once again allow you to select accordion sounds.)
The number of the last sound you selected for that group (orchestra or organ) is indicated by the right-most digit in the display.
In some cases, the display shows a dot to the right of the treble register number. Here is what that means:
4. Press one of the treble registers ([1]~[4]) to select the desired sound.The rightmost digit in the display changes and indi-cates the number of the sound you have just selected.
5. Play a few notes to audition the sound (accordion, orchestral or organ).Do not forget to move the bellows in order to hear the notes you are playing.If you did not select the correct sound family, return to step 3.
Additional information about the accordion sectionThe FR-1x allows you to select among 14 accordion sounds (even though there are only 4 treble registers).Pressing register [1], [2] or [3] repeatedly selects one of the four available sounds (a~d, see the table below). Register [4] provides access to two sounds (a and b).The following accordion sounds are available:
Example: To go from sound “1a” to sound “1c”, you need to press treble register [1] twice.
Dot status Explanation
Dark You are using an accordion sound.
Lit You are using an orchestral sound.
Flashes You are using an organ sound.
Treble registers
1 2 3 4
a Bassoon Master Clarinet Piccolo
b Bandon Organ Musette Oboe
c Cello Accord Celeste —
d Harmon Violin Tremolo —
223.
6

Additional information about the orchestral sectionV-Accordion r
FR-1x GB.book Page 27 Tuesday, November 8, 2011 11:44 AM
When you select Set 32, “F Folk”, the footages change as follows:
Additional information about the orchestral sectionThe [ORCHESTRA] button allows you to use treble regis-ters [1]~[4] to select from among 16 different orches-tral sounds:
Each time you press a treble register [1]~[4], you select the next sound (always starting from “a” the first time the register is pressed).Example: To go from sound “2a” to sound “2d”, you need to press treble register [2] three times.
NOTE
The dynamics of sounds marked with an asterisk (*) can only be controlled by bellows movements. Those sounds are not velocity sensitive. The dynamics of sounds marked with a double asterisk (**) can be controlled by bellows move-ments and playing velocity. For the other sounds, see also “Orchestra Bass/Chord Touch” on p. 48.
Additional information about the organ sounds and the Rotary effect (organ section)The FR-1x allows you to recall 4 organ sounds with tre-ble registers [1]~[4].Pressing the register of the selected organ sound again allows you to switch between the slow (“SLo”) and fast (“FSt”) speeds of the Rotary effect. The display briefly shows which one is selected.
The FR-1x contains the following organ sounds:
NOTE
The organ sounds can only be controlled with bellows movements.
Switching off the treble section1. To switch off the treble section, press and
hold any single register ([1]~[4]) for a while.The section in question must be assigned to the reg-isters. See above for how to decide which section can be muted.
2. To switch the treble section back on, briefly press any of its registers.
NOTE
This only switches off the section that is currently selected. Remember that the treble section can control both an accordion and an orchestral or organ sound. While in Orchestra mode, you thus only switch off (or activate) the orchestral/organ section. And while in accordion mode, you only switch off the treble accordion section.
NOTE
Even if you switch off the treble section, it still transmits MIDI messages.
SOLO and DUALThe orchestral or organ sound assigned to the treble section can be played in isolation or together with the treble accordion sound.
1. Select an orchestral or organ sound.See “Selecting sounds for the right hand” on p. 26.
2. Hold down the [SET] register and press tre-ble register [4] (DUAL/SOLO) to alternate between DUAL and SOLO modes.
NOTE
If you hold down [SET] for more than 2 seconds without pressing another register, the FR-1x switches to PARAME-TER mode. In that case, press [SET] again to leave that mode, then repeat step (1) above.
Treble registers (“F Folk” set)
1 ENSEMBLE 2 BRASS
a Basson Tsigane
b JazzA Concerto
c ArnoldX 4 Voix
d JazzX! Violon
3 WIND 4 PIANO/GUITAR
a SW Valse Piccolo
b Star 10 Mr Gus
c Pro 8M —
d SOS Musette —
Treble registers (ORCHESTRA)
1 ENSEMBLE 2 BRASS 3 WIND4 PIANO/GUITAR
a Strings* Twin Trump* Flute 1* Ac Piano
b Jazz Scat 1** Trombone* Tenor Sax 2* Ac Guitar
c Jazz Doos* French Horn* Clarinet 1* Mandolin
d Str &Choir* Brass* Oboe* HarpsStr
Treble registers (ORGAN)
1 2 3 4
Jazz Latin HousPerc Theatre
PIANO/GUITAR
27
Selecting and playing sounds
28
r
FR-1x V-Accordion
FR-1x_1_GB.fm Page 28 Tuesday, November 8, 2011 12:04 PM
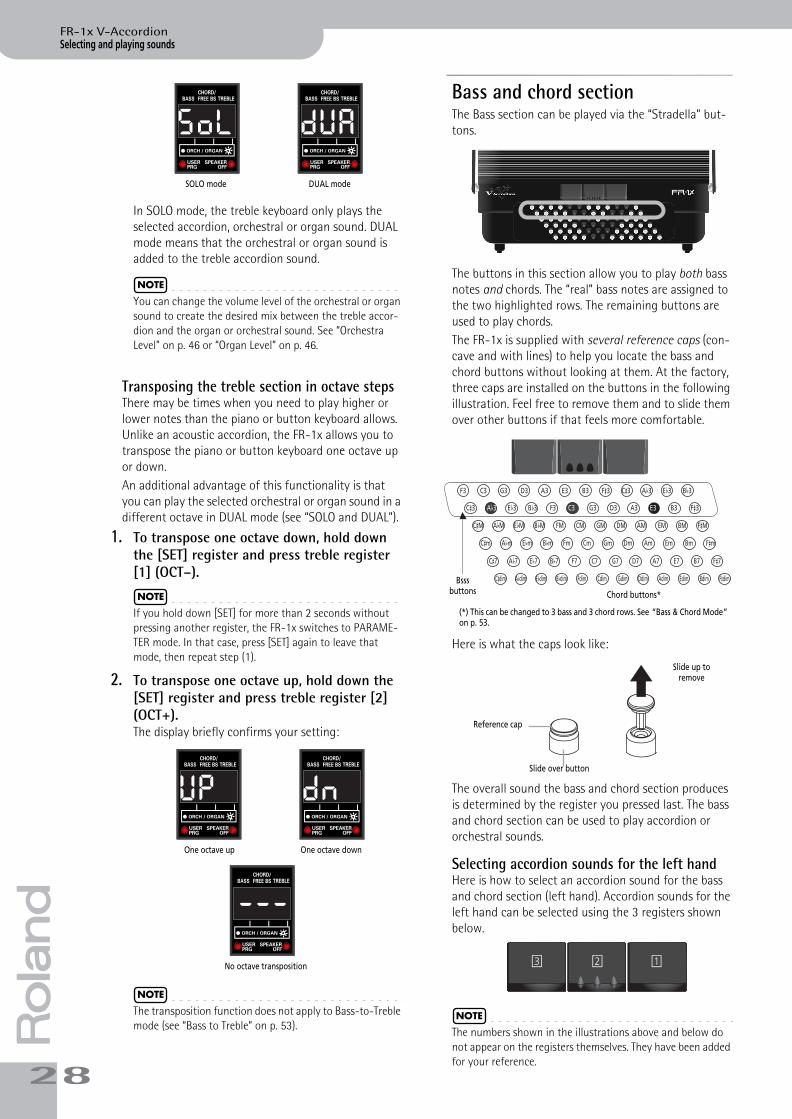
In SOLO mode, the treble keyboard only plays the selected accordion, orchestral or organ sound. DUAL mode means that the orchestral or organ sound is added to the treble accordion sound.
NOTE
You can change the volume level of the orchestral or organ sound to create the desired mix between the treble accor-dion and the organ or orchestral sound. See “Orchestra Level” on p. 46 or “Organ Level” on p. 46.
Transposing the treble section in octave stepsThere may be times when you need to play higher or lower notes than the piano or button keyboard allows. Unlike an acoustic accordion, the FR-1x allows you to transpose the piano or button keyboard one octave up or down.An additional advantage of this functionality is that you can play the selected orchestral or organ sound in a different octave in DUAL mode (see “SOLO and DUAL”).
1. To transpose one octave down, hold down the [SET] register and press treble register [1] (OCT–).
NOTE
If you hold down [SET] for more than 2 seconds without pressing another register, the FR-1x switches to PARAME-TER mode. In that case, press [SET] again to leave that mode, then repeat step (1).
2. To transpose one octave up, hold down the [SET] register and press treble register [2] (OCT+).The display briefly confirms your setting:
NOTE
The transposition function does not apply to Bass-to-Treble mode (see “Bass to Treble” on p. 53).
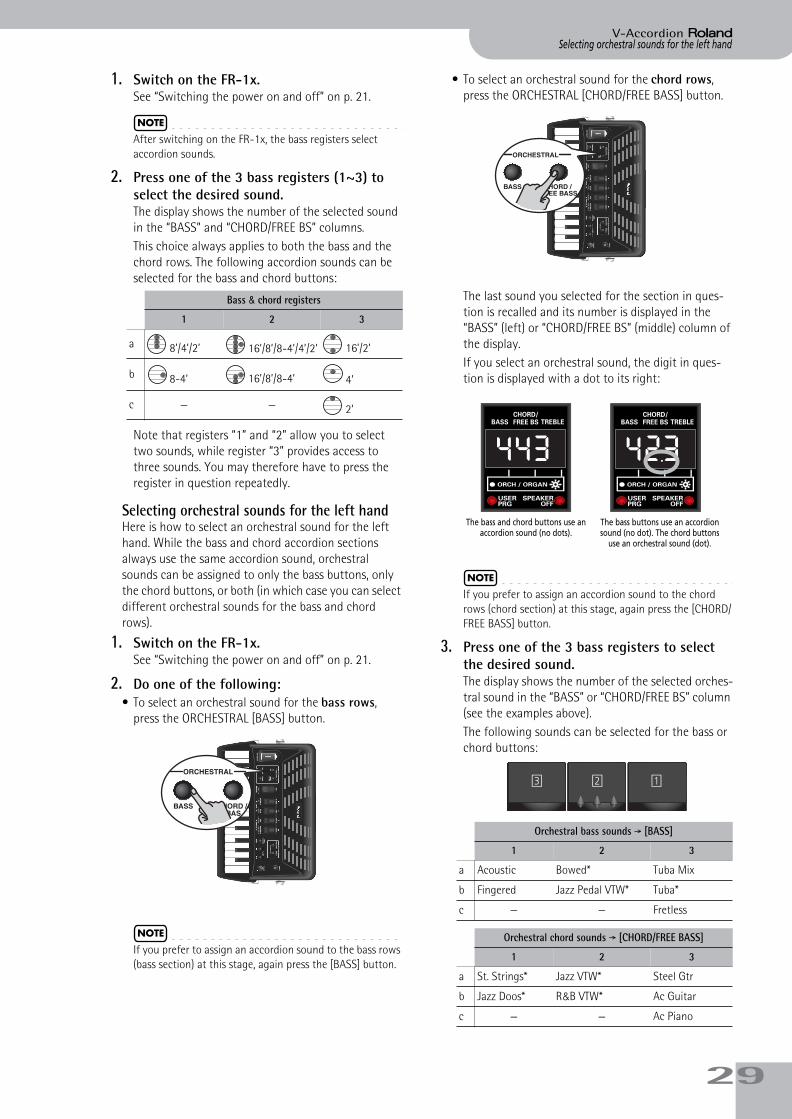
Bass and chord sectionThe Bass section can be played via the “Stradella” but-tons.
The buttons in this section allow you to play both bass notes and chords. The “real” bass notes are assigned to the two highlighted rows. The remaining buttons are used to play chords.The FR-1x is supplied with several reference caps (con-cave and with lines) to help you locate the bass and chord buttons without looking at them. At the factory, three caps are installed on the buttons in the following illustration. Feel free to remove them and to slide them over other buttons if that feels more comfortable.
Here is what the caps look like:
The overall sound the bass and chord section produces is determined by the register you pressed last. The bass and chord section can be used to play accordion or orchestral sounds.
Selecting accordion sounds for the left handHere is how to select an accordion sound for the bass and chord section (left hand). Accordion sounds for the left hand can be selected using the 3 registers shown below.
NOTE
The numbers shown in the illustrations above and below do not appear on the registers themselves. They have been added for your reference.
Sol dVA
SOLO mode DUAL mode
UP Dn
One octave up One octave down
---
No octave transposition
Chord buttons*
(*) This can be changed to 3 bass and 3 chord rows. See “Bass & Chord Mode” on p. 53.
F3
C#3
C#M
C#m
C#7
C#dim Abdim Ebdim Bbdim Fdim Cdim Gdim Ddim Adim Edim Bdim F#dim
Ab7 Eb7 Bb7 F7 C7 G7 D7 A7 E7 B7 F#7
Abm Ebm Bbm Fm Cm Gm Dm Am Em Bm F#m
AbM EbM BbM FM CM GM DM AM EM BM F#M
Ab3 Eb3 Bb3 F3 C3 G3 D3 A3 E3 B3 F#3
C3 G3 D3 A3 E3 B3 F#3 C#3 Ab3 Eb3 Bb3
Bsss buttons
Slide up to remove
Slide over button
Reference cap
[3] [2] [1]
Selecting orchestral sounds for the left hand
V-Accordion
r
FR-1x_1_GB.fm Page 29 Tuesday, November 8, 2011 12:02 PM
1. Switch on the FR-1x.See “Switching the power on and off” on p. 21.
NOTE
After switching on the FR-1x, the bass registers select accordion sounds.
2. Press one of the 3 bass registers (1~3) to select the desired sound.The display shows the number of the selected sound in the “BASS” and “CHORD/FREE BS” columns.This choice always applies to both the bass and the chord rows. The following accordion sounds can be selected for the bass and chord buttons:
Note that registers “1” and “2” allow you to select two sounds, while register “3” provides access to three sounds. You may therefore have to press the register in question repeatedly.
Selecting orchestral sounds for the left handHere is how to select an orchestral sound for the left hand. While the bass and chord accordion sections always use the same accordion sound, orchestral sounds can be assigned to only the bass buttons, only the chord buttons, or both (in which case you can select different orchestral sounds for the bass and chord rows).
1. Switch on the FR-1x.See “Switching the power on and off” on p. 21.
2. Do one of the following:• To select an orchestral sound for the bass rows,
press the ORCHESTRAL [BASS] button.
NOTE
If you prefer to assign an accordion sound to the bass rows (bass section) at this stage, again press the [BASS] button.
• To select an orchestral sound for the chord rows, press the ORCHESTRAL [CHORD/FREE BASS] button.
The last sound you selected for the section in ques-tion is recalled and its number is displayed in the “BASS” (left) or “CHORD/FREE BS” (middle) column of the display.If you select an orchestral sound, the digit in ques-tion is displayed with a dot to its right:
NOTE
If you prefer to assign an accordion sound to the chord rows (chord section) at this stage, again press the [CHORD/FREE BASS] button.
3. Press one of the 3 bass registers to select the desired sound.The display shows the number of the selected orches-tral sound in the “BASS” or “CHORD/FREE BS” column (see the examples above).The following sounds can be selected for the bass or chord buttons:
Bass & chord registers
1 2 3
a 8’/4’/2’ 16’/8’/8-4’/4’/2’ 16’/2’
b 8-4’ 16’/8’/8-4’ 4’
c — — 2’
Orchestral bass sounds ‰ [BASS]
1 2 3
a Acoustic Bowed* Tuba Mix
b Fingered Jazz Pedal VTW* Tuba*
c — — Fretless
Orchestral chord sounds ‰ [CHORD/FREE BASS]
1 2 3
a St. Strings* Jazz VTW* Steel Gtr
b Jazz Doos* R&B VTW* Ac Guitar
c — — Ac Piano
443 423.
The bass and chord buttons use an accordion sound (no dots).
The bass buttons use an accordion sound (no dot). The chord buttons
use an orchestral sound (dot).
[3] [2] [1]
29

Selecting and playing sounds
3
FR-1x V-Accordion
FR-1x GB.book Page 30 Tuesday, November 8, 2011 11:44 AM
rNote that registers “1” and “2” allow you to select two sounds, while register “3” provides access to three sounds. You may therefore have to press the register in question repeatedly.
NOTE
The dynamics of sounds marked with an asterisk (*) can only be controlled by bellows movements. Those sounds are not velocity sensitive. For the other sounds, see also “Orchestra Bass/Chord Touch” on p. 48.
NOTE
You can change the volume level of the orchestral bass or chord sound if it is too loud or too soft with respect to the other available sections. See “Orchestra Bass Level, Orches-tra Chord Level, Orchestra Free Bass Level” on p. 46.
Switching off the bass and/or chord section1. To switch off a left-hand section you do not
want to hear, press and hold any of the three bass registers for a while.The section in question must be assigned to the asso-ciated registers. See the previous pages for how to decide which section can be muted.
NOTE
Even if you switch off the bass or chord section, it still transmits MIDI messages.
2. To switch a muted section back on, briefly press any of the associated registers.
Playing drum/percussion soundsThe FR-1x allows you to play drum and percussion sounds with bass and chord buttons and to trigger the bass and chord sections simultaneously.
NOTE
This function is not available in Free Bass or Orchestra Free Bass mode.
1. To add drum/percussion sounds to the bass and chord section (or to remove them again), press the [DRUMS] button.
The display shows the number of the last Drum Set you selected (“d-x”, where “x” represents a number) or “doF” if you switched off the drum/percussion function.
2. Start playing in the left-hand section to hear the drum and percussion sounds.Those sounds are added to the accordion or orches-tral notes you play.
NOTE
See page 46 for how to select another Drum Set.
NOTE
The drum/percussion sounds also remain active while an orchestral sound is selected in Bass-to-Treble mode.
d-1
dof
0
Playing only bass notes with your left hand (Free Bass mode)
V-Accordion
r
FR-1x_1_GB.fm Page 31 Tuesday, November 8, 2011 2:56 PM
Playing only bass notes with your left hand (Free Bass mode)In Free Bass mode, all buttons of the left-hand key-board—including the chord buttons—play bass notes.
1. To select (or leave) Free Bass mode, press the [FREE BASS] button.
The digit in the middle starts flashing to indicate that Free Bass mode has been activated:
If it does not flash, you are not/no longer in Free Bass mode.
NOTE
See page 52 for the assignment of the bass buttons to the available Free Bass notes.
2. Use the three bass registers to select another registration (if necessary).
Note that registers “1” and “2” allow you to select two sounds, while register “3” provides access to three sounds. You may therefore have to press the register in question repeatedly.
3. Press the [FREE BASS] button again to return to normal bass mode.
Selecting orchestral sounds in Free Bass mode1. To select (or leave) Free Bass mode, press
the [FREE BASS] button.
2. Press the ORCHESTRAL [CHORD/FREE BASS] button.
The flashing digit in the middle now shows the num-ber of the last orchestral Free Bass sound you selected, along with a dot.
The dot means that you are in orchestral Free Bass mode. The number itself flashes to signal that the Free Bass section is active.
3. Press one of the three bass registers to select the desired sound.In this mode, the following sounds are available:
NOTE
The dynamics of sounds marked with an asterisk (*) can only be controlled by bellows movements. Those sounds are not velocity sensitive. For the other sounds, see also “Orchestra Bass/Chord Touch” on p. 48.
Note that registers “1” and “2” allow you to select two sounds, while register “3” provides access to three sounds. You may therefore have to press the register in question repeatedly.
4. To return to the accordion section, press the [CHORD/FREE BASS] button again.
NOTE
You can change the volume level of the orchestral Free Bass sound if it is too loud or too soft with respect to the other available sections. See “Orchestra Bass Level, Orches-tra Chord Level, Orchestra Free Bass Level” on p. 46.
Free Bass sounds
1 2 3
a Low Low + High High
b Low + High Low
Low Low + High
High Low + High
c — — Low High
662 Flashes
Orchestral Free Bass sounds ‰ [CHORD/FREE BASS]
1 2 3
a Strings* Jazz VTW* Ac Guitar
b Jazz Doos* Clarinet* Ac Piano
c — — Oboe*
662 Flashes and a dot appears
31
Using the FR-1x’s audio player
3
FR-1x V-Accordion
FR-1x GB.book Page 32 Tuesday, November 8, 2011 11:44 AM
r9. Using the FR-1x’s audio player
The FR-1x can play back audio files in the mp3 and WAV formats directly from a USB memory you connect to its USB MEMORY port. See below for a description of the supported file types.
Copying audio files to a USB memoryBefore being able to play back audio (mp3 or WAV) on the FR-1x, you must first copy them from your com-puter’s hard disk to a USB memory that can be con-nected to the FR-1x.
Be aware that the FR-1x can only play back files located in the USB memory’s root directory (i.e. on the same level as any folders the USB memory may contain). Never copy audio files to a folder if you wish to be able to play them back on the FR-1x.
About audio files• Audio files in the following formats can be played back:
• WAV format
• 16-bit linear
• Sampling frequency: 44.1kHz
• Stereo/mono
• mp3 files:
• MPEG-1 Audio Layer 3
• Sampling frequency: 44.1kHz
• Bit rate: 32/40/48/56/64/80/96/112/128/160/192/224/256/ 320kbps, VBR (variable bit rate)
Tip for naming audio filesThe FR-1x only displays the first three characters of the audio file names. If the USB memory contains several files whose first three characters are the same, we rec-ommend renaming those files on your computer by adding a number to their names.Here is an example: if the USB memory contains a file named “Amazing Grace.wav” and another one called “Amazing.mp3”, consider renaming them as follows to be able to distinguish between them: 1Amazing Grace.wav 2Amazing.mp3
Playing back audio files1. Insert an optional USB memory into the
FR-1x’s USB MEMORY port.
The USB memory can only be connected in one direc-tion. Insert the USB memory without applying exces-sive force.
NOTE
Carefully insert the USB memory all the way in—until it is firmly in place.
NOTE
Use a USB memory sold by Roland (M-UF-series). We can-not guarantee operation if any other USB memory is used.
The FR-1x automatically loads the first audio file in alphabetical order that it detects in the USB mem-ory’s root folder.
2. Press the PLAYER [®÷π] button to start play-back.
XX
Copy your audio files to the root level.
2
Selecting audio filesV-Accordion r
FR-1x GB.book Page 33 Tuesday, November 8, 2011 11:44 AM
Playback of the first audio file in alphabetical order in the root folder starts. The display briefly shows the first three characters of the audio file’s name as well as three dots that flash from left to right:
(In the example above, the display shows the first three characters of a file called “Amazing Grace.wav”.)The FR-1x only displays the first three characters of the audio file names. See “Tip for naming audio files” on p. 32 for how to ensure that you can tell the files apart.See page 71 for how the FR-1x displays the charac-ters of the selected file name.
3. If you are using the audio file as your accompaniment, start playing on the FR-1x as you normally would.
4. To pause playback of the audio file, press the [®÷π] button again.Playback of the selected audio file stops and the three dots flash simultaneously for a moment (after which the display returns to the main page):
5. To return to the beginning of the current song, press the PLAYER [œ] button.
NOTE
Press the PLAYER buttons [œ] and [®÷π] simultaneously to view the name of the currently selected audio file.
Selecting audio filesAs stated above, the FR-1x automatically selects the first audio file it detects on the USB memory you insert. To select a different file, proceed as follows:
1. Press and hold the [SET] register to enter PARAMETER mode.The display shows the name of the last parameter you selected.
2. If Parameter mode is not yet selected, press treble register [3] or [4] (PARAM LIST) until the display looks as follows:
NOTE
Instead of performing steps (1) and (2) above, you can also press and hold the [®÷π] button to jump to the first param-eter of Parameter mode (“AUd”).
ama
The “scrolling” dots (alternate flashing from left to right) mean that playback is running.
. . .
ama
If playback is stopped, the three dots flash simultaneously.
. . .
PIANO/GUITARWIND AUd
33
Using the FR-1x’s audio player
3
FR-1x V-Accordion
FR-1x GB.book Page 34 Tuesday, November 8, 2011 11:44 AM
r3. Use register [1] (√ VALUE) or [2]
(VALUE ®) to select the desired audio file.
(In the example above, the display shows the first three characters of a file called “Scarborough.mp3”.)The display shows the first three characters of the file name you selected. If you select another audio file while playback of the previously selected file is still running, the audio player stops. See page 71 for how the FR-1x displays the characters of the selected file name.To check whether you have selected the correct audio file, start playback ([®÷π]).
NOTE
The audio files are displayed based on the following sorting order: numbers, capital letters, small letters.
NOTE
You can only select audio files in the USB memory’s root directory. Audio files inside folders are not detected.
4. Press the [SET] register to leave the FR-1x’s PARAMETER mode.
Adjusting the playback level1. Press and hold the [SET] register to enter
PARAMETER mode.The display shows the name of the last parameter you selected.
2. Use treble register [3] or [4] (PARAM LIST) to select the following parameter:
NOTE
Pressing registers [3] and [4] (PARAM LIST) simultaneously alternates between “AUd” (first parameter of the PARAME-TER group) and “ESq” (first parameter of the MIDI group). This may come in handy to “close in” on the parameter you need.
3. Use register [1] (√ VALUE) or [2] (VALUE ®) to set the playback level.
The setting range is: Off, 1~10. If you select “Off”, the audio file will be inaudible.
4. Press the [SET] register to leave the FR-1x’s PARAMETER mode.
sCa
PIANO/GUITARWIND AUL
8
4
Highlighting some practical functions
V-Accordion
r
FR-1x_1_GB.fm Page 35 Tuesday, November 8, 2011 2:57 PM
10. Highlighting some practical functions
This chapter discusses functions like the metronome, the transposition function, Musette detuning and the speaker switch function.
Using the metronomeYour FR-1x contains a metronome that may come in handy when you are practising new pieces, or during your accordion classes.
1. To start or stop the metronome, hold down the [SET] register and press register [3] (METRONOME).The display now briefly shows “Str” (start) or “StP” (stop) to indicate the status of the metronome.
NOTE
See “Metronome Time Sign” on p. 47 and “Metronome Tempo” on p. 47 as well as “Metronome Level” on p. 47 for how to set the metronome’s time signature, tempo and level.
NOTE
If you hold down [SET] for more than 2 seconds without pressing another register, the FR-1x switches to PARAME-TER mode. In that case, press [SET] again to leave PARAME-TER mode, then continue with step 1.
NOTE
If the metronome does not start counting, check the “Met-ronome Function” setting on p. 47. It must be set to “1”.
Changing the key of the keyboard (transpose)The Transpose function lets you play a song in a differ-ent key. If you’re accompanying a singer, you can use the Transpose function to shift the pitch to a key that’s comfortable for the singer while you continue playing in the same familiar key (fingering).The transposition interval can be set in semitones. See “Transpose” on p. 45 for how to set the transposition interval and page 44 for how to select the parameter.
Adjusting the balanceThe FR-1x provides a parameter that allows you to set the balance between the treble and bass & chord sec-tions.See “Treble/Bass&Chord Balance” on p. 45 for details and page 44 for how to select the parameter.
Musette DetuneAn accordion’s 8’ treble register may consist of 2 or even 3 reeds that are usually tuned apart to provide a richer sound (accordionists call it the “musette effect”). One reed is tuned slightly above, the other slightly below the correct pitch (and the third, if available, is tuned “properly”).The FR-1x allows you to choose from among 15 differ-ent detune settings. These are called “1” (Dry), “2” (Classic), “3” (F-Folk), “4” (American L), “5” (American_H), “6” (North Eur), “7” (German L), “8” (D-Folk L), “9” (Italian L), “10” (German H), “11” (Alpine), “12” (Italian H), “13” (D-Folk H), “14” (French), “15” (Scottish).See “Musette Detune” on p. 45 for how to select the desired Musette detuning and page 44 for how to select the parameter.
NOTE
“Musette Detune” only affects registers that use the 8’ reed.
PIANO/GUITAR
Str
35

Highlighting some practical functions
3
FR-1x V-Accordion
FR-1x_1_GB.fm Page 36 Tuesday, November 8, 2011 2:57 PM
rSwitching off the internal speakers (Speaker Mode)When the FR-1x is connected to an external amplifica-tion system, it may be convenient to switch off its internal speakers. Doing so has the additional benefit that your batteries will last longer.See “Speaker Mode” on p. 55 for how to switch off the speakers and page 44 for how to select the parameter.The SPEAKER OFF indicator below the display lights when the speakers are off. It also lights when you con-nect headphones to the PHONES jack, because doing so switches off the speakers.
oFF
6
Saving your settings (User Program)V-Accordion r
FR-1x GB.book Page 37 Tuesday, November 8, 2011 11:44 AM
11. Saving your settings (User Program)
Your FR-1x contains 8 User Program memories where you can store the settings listed below. Working with those mem-ories has the advantage that you can recall frequently used settings at the press of a button. The User Program settings also include the “address” of the last Set you selected.
The following settings are saved to the User Programs:
Saving the current settingsHere is how to save the current settings.
1. Press and hold the [USER PROGRAM] button to select write mode.
The display now shows a flashing “U––” message.
The USER PRG indicator below the display lights to indicate that the FR-1x is now in User Program mode.
NOTE
If you made a mistake and do not want to save your set-tings, press the [USER PROGRAM] button to leave this function.
Set Number of the current Set
Treble section
Register
Octave setting
Bass-to-Treble mode
Treble valve noise
Orchestra
Register
Octave setting
Level
Organ
Register
Octave setting
Level
Bass & Chord section
Register
Bass button noise
Bass reed growl
Orchestral Bass
On/Off
Register
Level
Orchestral Chord
On/Off
Register
Level
Orchestral Free Bass
On/Off
Register
Level
Drum mode
On/Off
Drum Set number
Level
Free Bass
On/Off
Register
Free Bass button noise
Free Bass reed growl
Other parameters
Reverb Type
Chorus Type
Reverb Level
Chorus Level
Balance
MIDI parameters
Treble Octave Tx
Bass/Free Bass Octave TX
Chord Octave TX
Orchestra/Organ Octave TX
Orchestra Bass Octave TX
Orchestra Chord Octave TX
Orchestra Free Bass Octave TX
U--
Lights
37
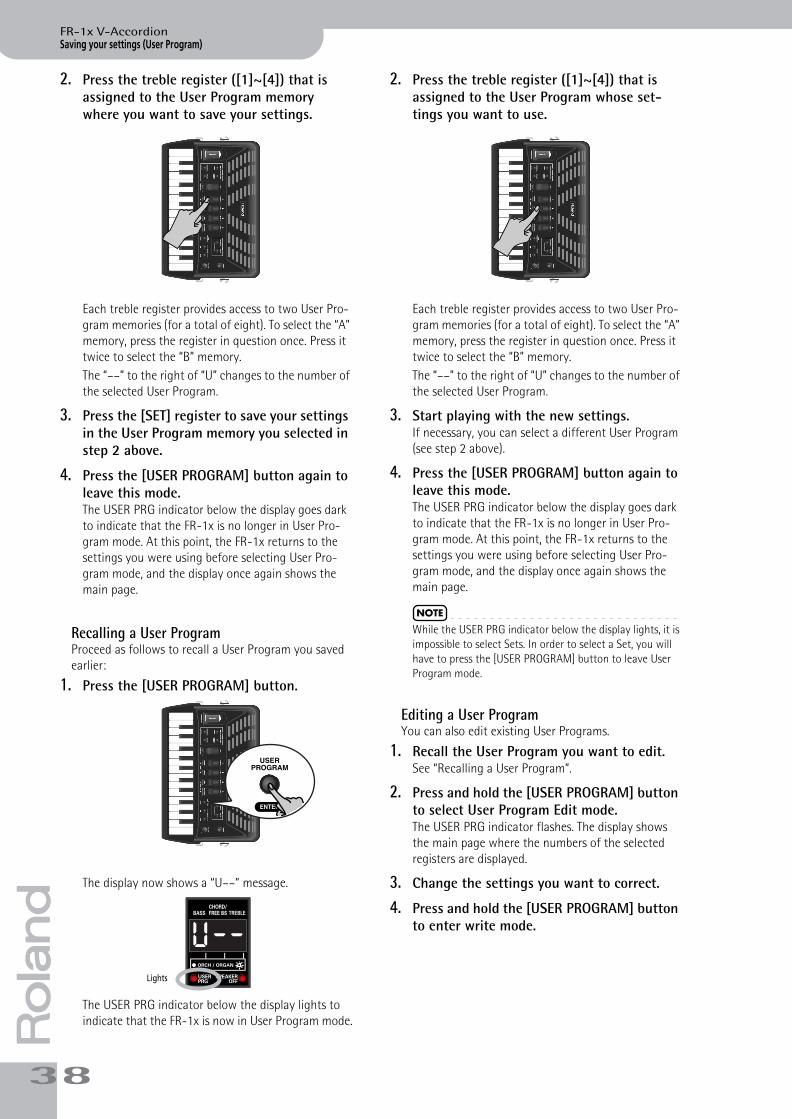
Saving your settings (User Program)
3
FR-1x V-Accordion
FR-1x GB.book Page 38 Tuesday, November 8, 2011 11:44 AM
r2. Press the treble register ([1]~[4]) that is
assigned to the User Program memory where you want to save your settings.
Each treble register provides access to two User Pro-gram memories (for a total of eight). To select the “A” memory, press the register in question once. Press it twice to select the “B” memory.The “––” to the right of “U” changes to the number of the selected User Program.
3. Press the [SET] register to save your settings in the User Program memory you selected in step 2 above.
4. Press the [USER PROGRAM] button again to leave this mode.The USER PRG indicator below the display goes dark to indicate that the FR-1x is no longer in User Pro-gram mode. At this point, the FR-1x returns to the settings you were using before selecting User Pro-gram mode, and the display once again shows the main page.
Recalling a User ProgramProceed as follows to recall a User Program you saved earlier:
1. Press the [USER PROGRAM] button.
The display now shows a “U––” message.
The USER PRG indicator below the display lights to indicate that the FR-1x is now in User Program mode.
2. Press the treble register ([1]~[4]) that is assigned to the User Program whose set-tings you want to use.
Each treble register provides access to two User Pro-gram memories (for a total of eight). To select the “A” memory, press the register in question once. Press it twice to select the “B” memory.The “––” to the right of “U” changes to the number of the selected User Program.
3. Start playing with the new settings.If necessary, you can select a different User Program (see step 2 above).
4. Press the [USER PROGRAM] button again to leave this mode.The USER PRG indicator below the display goes dark to indicate that the FR-1x is no longer in User Pro-gram mode. At this point, the FR-1x returns to the settings you were using before selecting User Pro-gram mode, and the display once again shows the main page.
NOTE
While the USER PRG indicator below the display lights, it is impossible to select Sets. In order to select a Set, you will have to press the [USER PROGRAM] button to leave User Program mode.
Editing a User ProgramYou can also edit existing User Programs.
1. Recall the User Program you want to edit.See “Recalling a User Program”.
2. Press and hold the [USER PROGRAM] button to select User Program Edit mode.The USER PRG indicator flashes. The display shows the main page where the numbers of the selected registers are displayed.
3. Change the settings you want to correct.
4. Press and hold the [USER PROGRAM] button to enter write mode.
U--
Lights
8
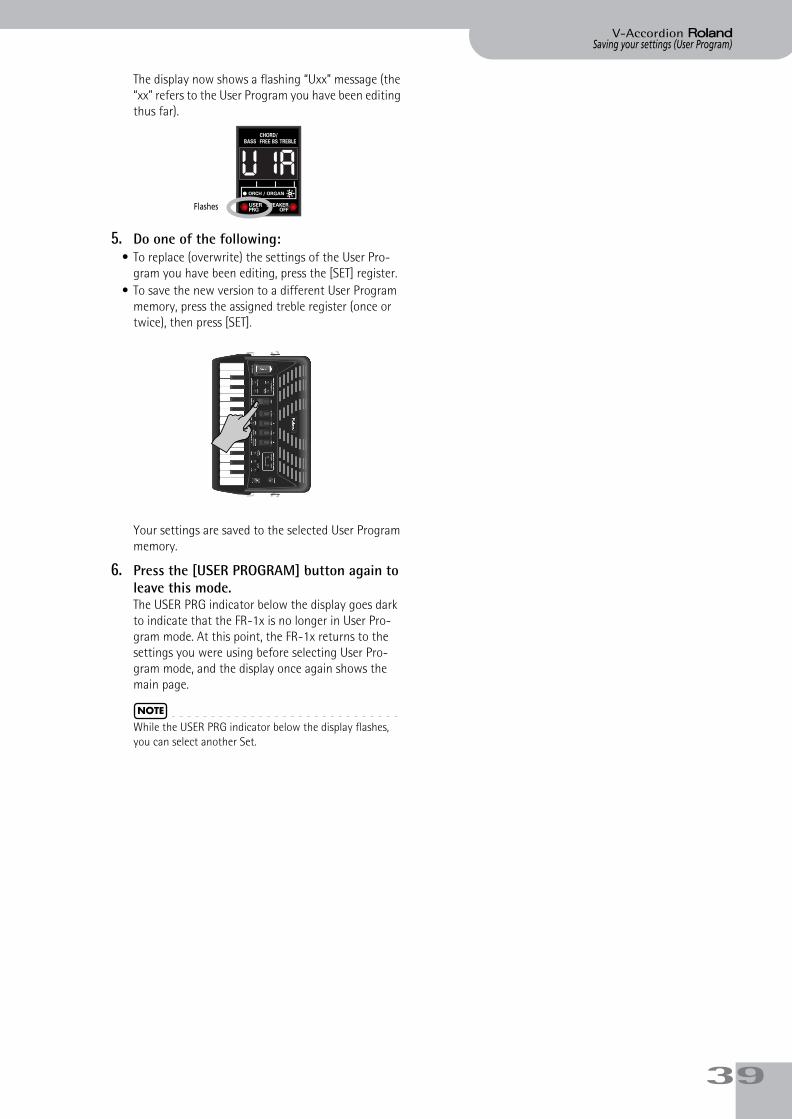
Saving your settings (User Program)V-Accordion r
FR-1x GB.book Page 39 Tuesday, November 8, 2011 11:44 AM
The display now shows a flashing “Uxx” message (the “xx” refers to the User Program you have been editing thus far).
5. Do one of the following:• To replace (overwrite) the settings of the User Pro-
gram you have been editing, press the [SET] register.• To save the new version to a different User Program
memory, press the assigned treble register (once or twice), then press [SET].
Your settings are saved to the selected User Program memory.
6. Press the [USER PROGRAM] button again to leave this mode.The USER PRG indicator below the display goes dark to indicate that the FR-1x is no longer in User Pro-gram mode. At this point, the FR-1x returns to the settings you were using before selecting User Pro-gram mode, and the display once again shows the main page.
NOTE
While the USER PRG indicator below the display flashes, you can select another Set.
U1A
Flashes
39
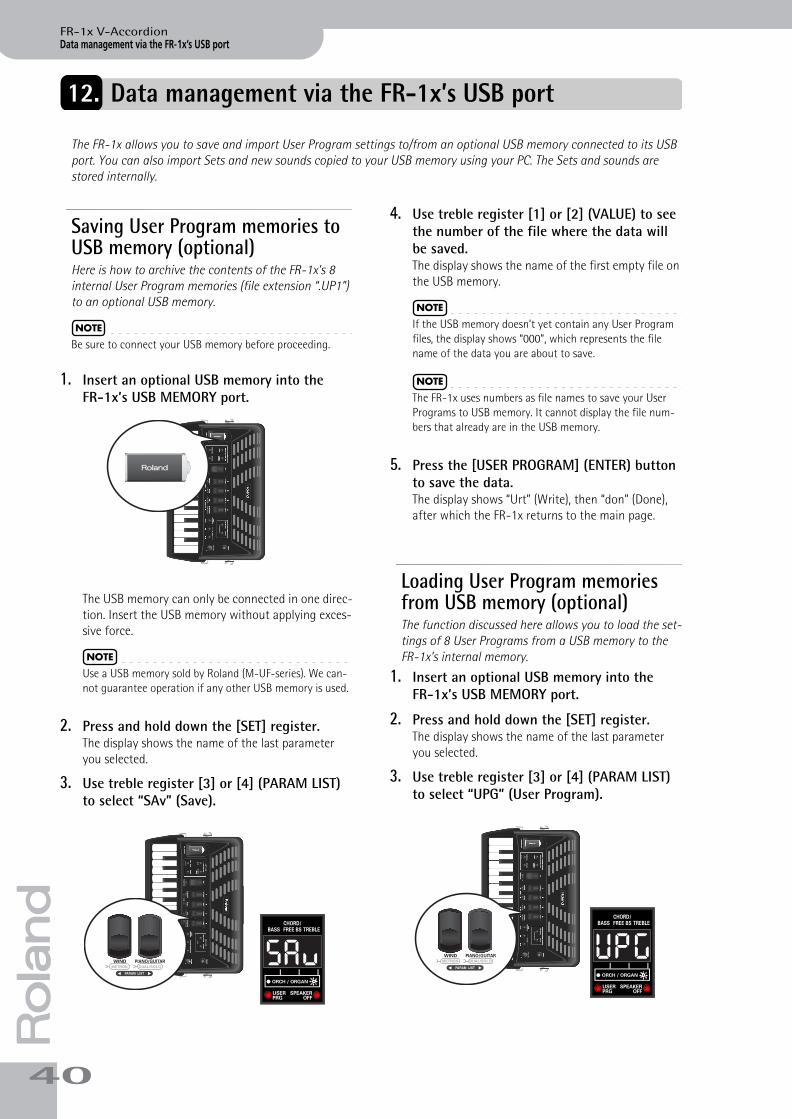
Data management via the FR-1x’s USB port
4
FR-1x V-Accordion
FR-1x GB.book Page 40 Tuesday, November 8, 2011 11:44 AM
r12. Data management via the FR-1x’s USB port
The FR-1x allows you to save and import User Program settings to/from an optional USB memory connected to its USB port. You can also import Sets and new sounds copied to your USB memory using your PC. The Sets and sounds are stored internally.
Saving User Program memories to USB memory (optional)Here is how to archive the contents of the FR-1x’s 8 internal User Program memories (file extension “.UP1”) to an optional USB memory.
NOTE
Be sure to connect your USB memory before proceeding.
1. Insert an optional USB memory into the FR-1x’s USB MEMORY port.
The USB memory can only be connected in one direc-tion. Insert the USB memory without applying exces-sive force.
NOTE
Use a USB memory sold by Roland (M-UF-series). We can-not guarantee operation if any other USB memory is used.
2. Press and hold down the [SET] register.The display shows the name of the last parameter you selected.
3. Use treble register [3] or [4] (PARAM LIST) to select “SAv” (Save).
4. Use treble register [1] or [2] (VALUE) to see the number of the file where the data will be saved.The display shows the name of the first empty file on the USB memory.
NOTE
If the USB memory doesn’t yet contain any User Program files, the display shows “000”, which represents the file name of the data you are about to save.
NOTE
The FR-1x uses numbers as file names to save your User Programs to USB memory. It cannot display the file num-bers that already are in the USB memory.
5. Press the [USER PROGRAM] (ENTER) button to save the data.The display shows “Urt” (Write), then “don” (Done), after which the FR-1x returns to the main page.
Loading User Program memories from USB memory (optional)The function discussed here allows you to load the set-tings of 8 User Programs from a USB memory to the FR-1x’s internal memory.
1. Insert an optional USB memory into the FR-1x’s USB MEMORY port.
2. Press and hold down the [SET] register.The display shows the name of the last parameter you selected.
3. Use treble register [3] or [4] (PARAM LIST) to select “UPG” (User Program).
PIANO/GUITARWIND SAv PIANO/GUITARWIND UPG
0
Loading User Set memories from USB memory (optional)V-Accordion r
FR-1x GB.book Page 41 Tuesday, November 8, 2011 11:44 AM
4. Use treble registers [1] and [2] (VALUE) to select the file number of the User Programs you want to load.If the USB memory doesn’t contain any User Program files, the display shows “---” instead of a number.
5. Press the [USER PROGRAM] (ENTER) button to load the selected User Programs.The display shows “Lod” (Load), then “don” (Done), after which the FR-1x returns to the main page.
Loading User Set memories from USB memory (optional)The FR-1x allows you to copy individual Sets from a USB memory to the four internal “USER” Set locations. The Set files (with the extension “.ST3”) must first be copied to a USB memory’s root directory before loading them into the FR-1x’s “USER” area.
1. Insert an optional USB memory into the FR-1x’s USB MEMORY port.
2. Press and hold down the [SET] register.The display shows the name of the last parameter you selected.
3. Use treble register [3] or [4] (PARAM LIST) to select “USt” (User Set).
4. Use treble registers [1] and [2] (VALUE) to select the file number of the Set you want to load.If the USB memory doesn’t contain any Set files, the display will show “---” instead of a number.
5. Press the [USER PROGRAM] (ENTER) button to confirm your selection.The FR-1x suggests “USER” memory “1” as target for the Set file.
6. Use treble registers [1] and [2] (VALUE) to select the desired target memory (1~4).
7. Press the [USER PROGRAM] (ENTER) button to load the selected Set.
The display shows “Lod” (Load), then “don” (Done) to indicate that the file was loaded successfully. Next, the FR-1x returns to the main page. See “Selecting Sets” on p. 24 for how to recall the settings of the desired User Set.
NOTE
See “Restoring the User Sets to their factory defaults” on p. 64 if you want to recover the FR-1x’s original User Sets at a later stage.
PIANO/GUITARWIND Ust
41
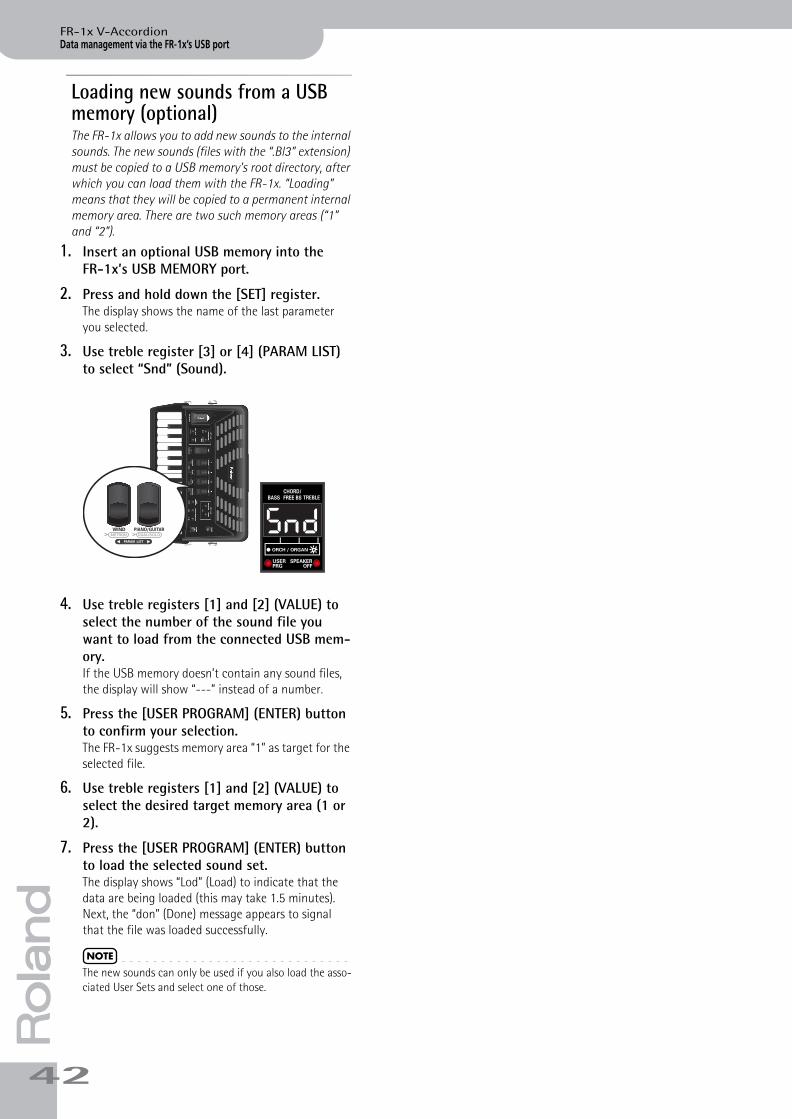
Data management via the FR-1x’s USB port
4
FR-1x V-Accordion
FR-1x GB.book Page 42 Tuesday, November 8, 2011 11:44 AM
rLoading new sounds from a USB memory (optional)The FR-1x allows you to add new sounds to the internal sounds. The new sounds (files with the “.Bl3” extension) must be copied to a USB memory’s root directory, after which you can load them with the FR-1x. “Loading” means that they will be copied to a permanent internal memory area. There are two such memory areas (“1” and “2”).
1. Insert an optional USB memory into the FR-1x’s USB MEMORY port.
2. Press and hold down the [SET] register.The display shows the name of the last parameter you selected.
3. Use treble register [3] or [4] (PARAM LIST) to select “Snd” (Sound).
4. Use treble registers [1] and [2] (VALUE) to select the number of the sound file you want to load from the connected USB mem-ory.If the USB memory doesn’t contain any sound files, the display will show “---” instead of a number.
5. Press the [USER PROGRAM] (ENTER) button to confirm your selection.The FR-1x suggests memory area “1” as target for the selected file.
6. Use treble registers [1] and [2] (VALUE) to select the desired target memory area (1 or 2).
7. Press the [USER PROGRAM] (ENTER) button to load the selected sound set.The display shows “Lod” (Load) to indicate that the data are being loaded (this may take 1.5 minutes). Next, the “don” (Done) message appears to signal that the file was loaded successfully.
NOTE
The new sounds can only be used if you also load the asso-ciated User Sets and select one of those.
PIANO/GUITARWIND Snd
2
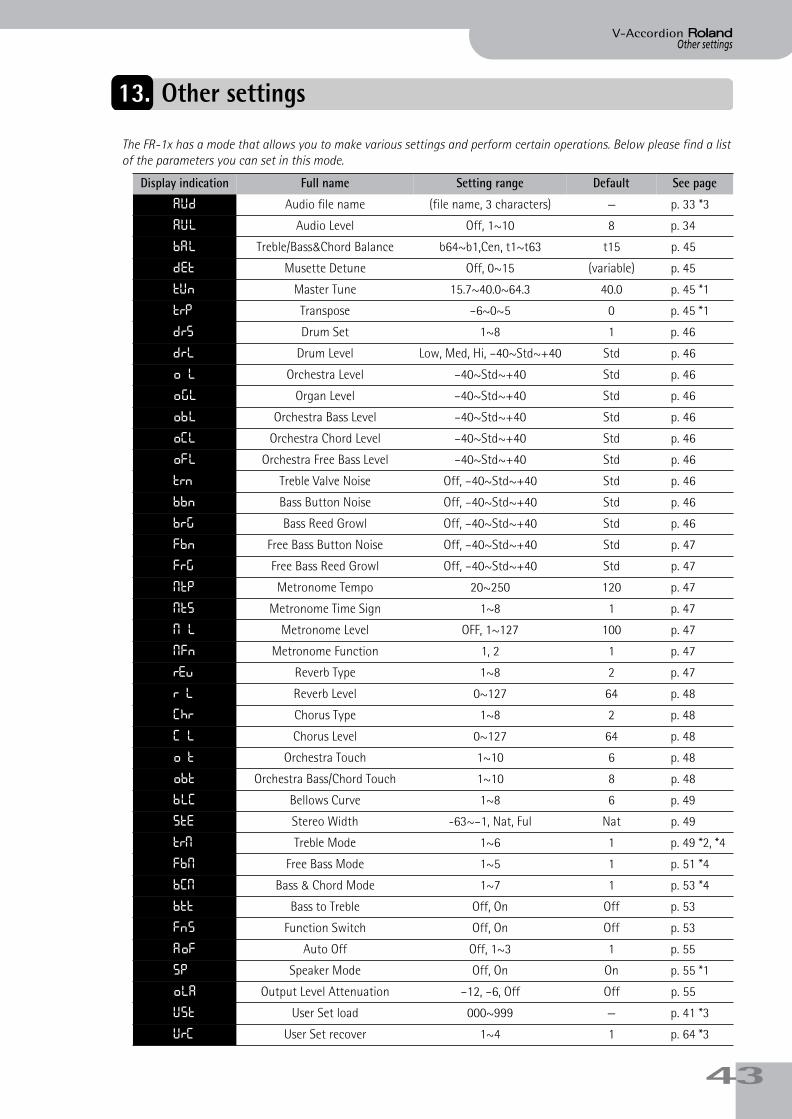
Other settingsV-Accordion r
FR-1x GB.book Page 43 Tuesday, November 8, 2011 11:44 AM
13. Other settings
The FR-1x has a mode that allows you to make various settings and perform certain operations. Below please find a list of the parameters you can set in this mode.
Display indication Full name Setting range Default See page
AUd Audio file name (file name, 3 characters) — p. 33 *3
AUL Audio Level Off, 1~10 8 p. 34
bal Treble/Bass&Chord Balance b64~b1,Cen, t1~t63 t15 p. 45
dEt Musette Detune Off, 0~15 (variable) p. 45
tUn Master Tune 15.7~40.0~64.3 40.0 p. 45 *1
trp Transpose –6~0~5 0 p. 45 *1
drs Drum Set 1~8 1 p. 46
drl Drum Level Low, Med, Hi, –40~Std~+40 Std p. 46
o l Orchestra Level –40~Std~+40 Std p. 46
ogl Organ Level –40~Std~+40 Std p. 46
obl Orchestra Bass Level –40~Std~+40 Std p. 46
oCL Orchestra Chord Level –40~Std~+40 Std p. 46
ofL Orchestra Free Bass Level –40~Std~+40 Std p. 46
trn Treble Valve Noise Off, –40~Std~+40 Std p. 46
bbn Bass Button Noise Off, –40~Std~+40 Std p. 46
brg Bass Reed Growl Off, –40~Std~+40 Std p. 46
fbn Free Bass Button Noise Off, –40~Std~+40 Std p. 47
Frg Free Bass Reed Growl Off, –40~Std~+40 Std p. 47
MtP Metronome Tempo 20~250 120 p. 47
mts Metronome Time Sign 1~8 1 p. 47
m l Metronome Level OFF, 1~127 100 p. 47
mfn Metronome Function 1, 2 1 p. 47
rEv Reverb Type 1~8 2 p. 47
r l Reverb Level 0~127 64 p. 48
Chr Chorus Type 1~8 2 p. 48
C l Chorus Level 0~127 64 p. 48
o t Orchestra Touch 1~10 6 p. 48
obt Orchestra Bass/Chord Touch 1~10 8 p. 48
blC Bellows Curve 1~8 6 p. 49
StE Stereo Width -63~–1, Nat, Ful Nat p. 49
trm Treble Mode 1~6 1 p. 49 *2, *4
fbm Free Bass Mode 1~5 1 p. 51 *4
bCm Bass & Chord Mode 1~7 1 p. 53 *4
btt Bass to Treble Off, On Off p. 53
fns Function Switch Off, On Off p. 53
Aof Auto Off Off, 1~3 1 p. 55
sp Speaker Mode Off, On On p. 55 *1
oLA Output Level Attenuation –12, –6, Off Off p. 55
USt User Set load 000~999 — p. 41 *3
UrC User Set recover 1~4 1 p. 64 *3
43
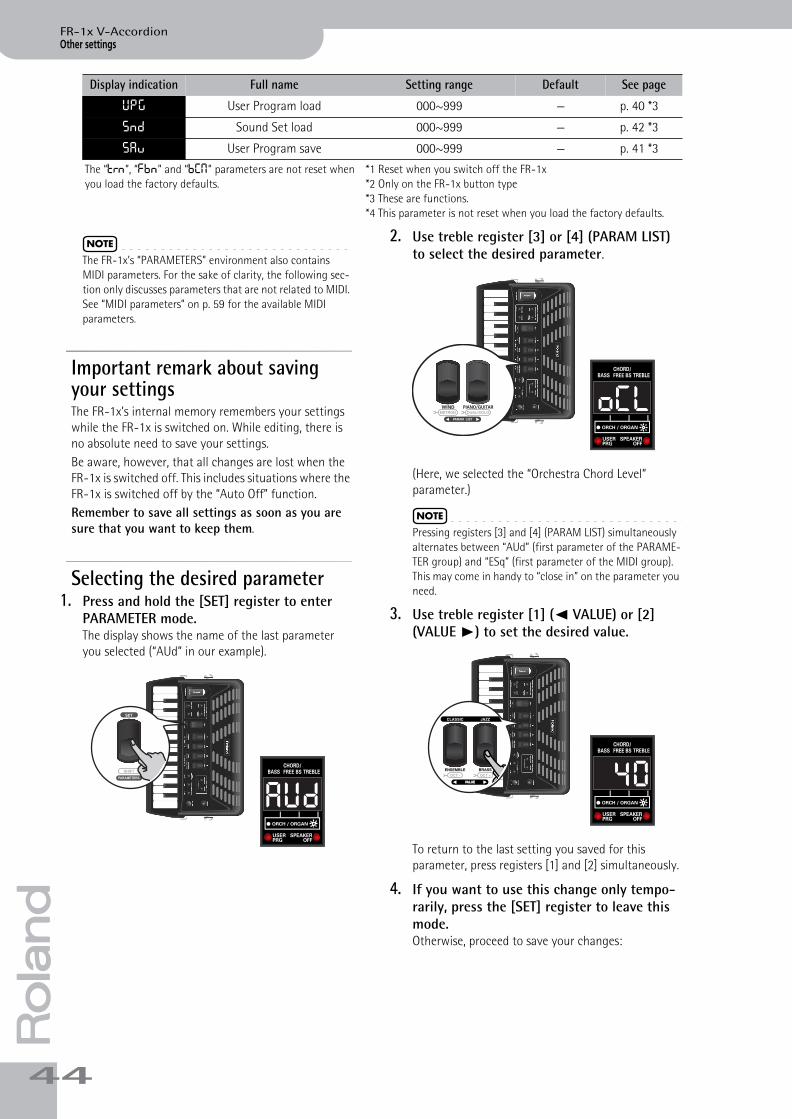
Other settings
4
FR-1x V-Accordion
FR-1x GB.book Page 44 Tuesday, November 8, 2011 11:44 AM
r
NOTE
The FR-1x’s “PARAMETERS” environment also contains MIDI parameters. For the sake of clarity, the following sec-tion only discusses parameters that are not related to MIDI. See “MIDI parameters” on p. 59 for the available MIDI parameters.
Important remark about saving your settingsThe FR-1x’s internal memory remembers your settings while the FR-1x is switched on. While editing, there is no absolute need to save your settings.Be aware, however, that all changes are lost when the FR-1x is switched off. This includes situations where the FR-1x is switched off by the “Auto Off” function.Remember to save all settings as soon as you are sure that you want to keep them.
Selecting the desired parameter1. Press and hold the [SET] register to enter
PARAMETER mode.The display shows the name of the last parameter you selected (“AUd” in our example).
2. Use treble register [3] or [4] (PARAM LIST) to select the desired parameter.
(Here, we selected the “Orchestra Chord Level” parameter.)
NOTE
Pressing registers [3] and [4] (PARAM LIST) simultaneously alternates between “AUd” (first parameter of the PARAME-TER group) and “ESq” (first parameter of the MIDI group). This may come in handy to “close in” on the parameter you need.
3. Use treble register [1] (√ VALUE) or [2] (VALUE ®) to set the desired value.
To return to the last setting you saved for this parameter, press registers [1] and [2] simultaneously.
4. If you want to use this change only tempo-rarily, press the [SET] register to leave this mode.Otherwise, proceed to save your changes:
UPG User Program load 000~999 — p. 40 *3
Snd Sound Set load 000~999 — p. 42 *3
SAv User Program save 000~999 — p. 41 *3
The “trn”, “fbn” and “bCm” parameters are not reset when you load the factory defaults.
*1 Reset when you switch off the FR-1x*2 Only on the FR-1x button type*3 These are functions.*4 This parameter is not reset when you load the factory defaults.
Display indication Full name Setting range Default See page
AUd
PIANO/GUITARWIND oCL
40
4
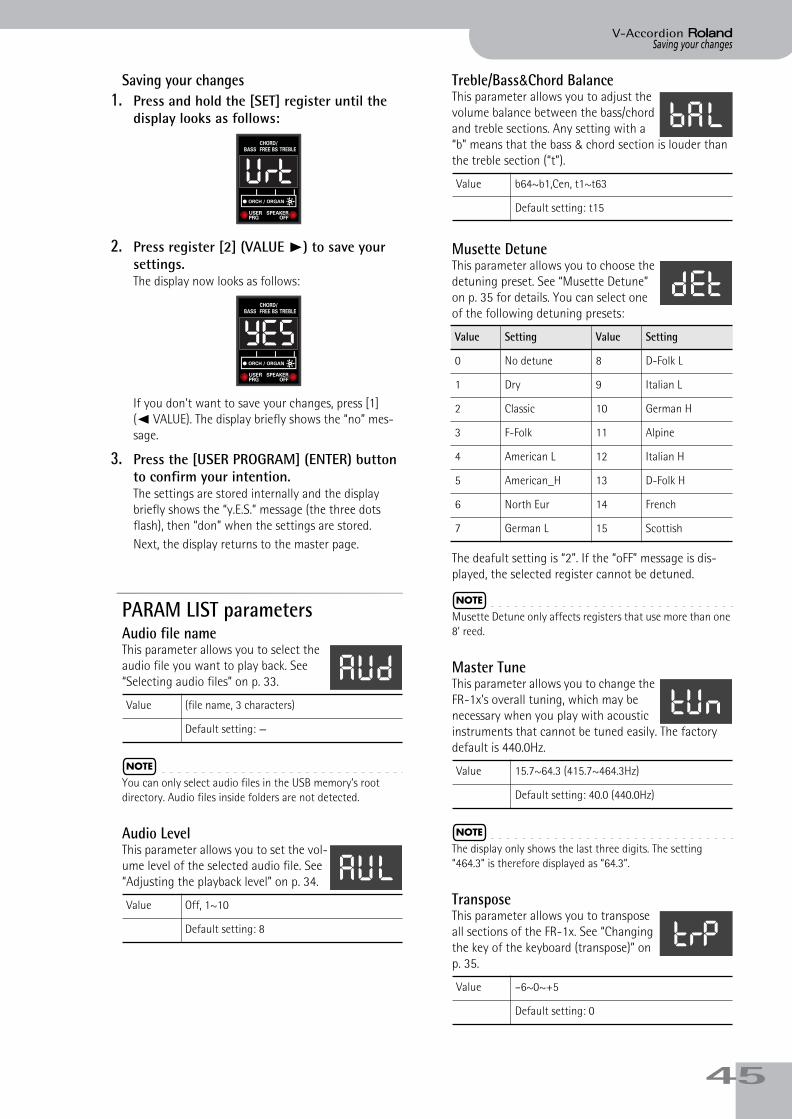
Saving your changesV-Accordion r
FR-1x GB.book Page 45 Tuesday, November 8, 2011 11:44 AM
Saving your changes1. Press and hold the [SET] register until the
display looks as follows:
2. Press register [2] (VALUE ®) to save your settings.The display now looks as follows:
If you don’t want to save your changes, press [1] (√ VALUE). The display briefly shows the “no” mes-sage.
3. Press the [USER PROGRAM] (ENTER) button to confirm your intention.The settings are stored internally and the display briefly shows the “y.E.S.” message (the three dots flash), then “don” when the settings are stored.Next, the display returns to the master page.
PARAM LIST parametersAudio file nameThis parameter allows you to select the audio file you want to play back. See “Selecting audio files” on p. 33.
NOTE
You can only select audio files in the USB memory’s root directory. Audio files inside folders are not detected.
Audio LevelThis parameter allows you to set the vol-ume level of the selected audio file. See “Adjusting the playback level” on p. 34.
Treble/Bass&Chord BalanceThis parameter allows you to adjust the volume balance between the bass/chord and treble sections. Any setting with a “b” means that the bass & chord section is louder than the treble section (“t”).
Musette DetuneThis parameter allows you to choose the detuning preset. See “Musette Detune” on p. 35 for details. You can select one of the following detuning presets:
The deafult setting is “2”. If the “oFF” message is dis-played, the selected register cannot be detuned.
NOTE
Musette Detune only affects registers that use more than one 8’ reed.
Master TuneThis parameter allows you to change the FR-1x’s overall tuning, which may be necessary when you play with acoustic instruments that cannot be tuned easily. The factory default is 440.0Hz.
NOTE
The display only shows the last three digits. The setting “464.3” is therefore displayed as “64.3”.
TransposeThis parameter allows you to transpose all sections of the FR-1x. See “Changing the key of the keyboard (transpose)” on p. 35.
Value (file name, 3 characters)
Default setting: —
Value Off, 1~10
Default setting: 8
Urt
YES
AUd
AUl
Value b64~b1,Cen, t1~t63
Default setting: t15
Value Setting Value Setting
0 No detune 8 D-Folk L
1 Dry 9 Italian L
2 Classic 10 German H
3 F-Folk 11 Alpine
4 American L 12 Italian H
5 American_H 13 D-Folk H
6 North Eur 14 French
7 German L 15 Scottish
Value 15.7~64.3 (415.7~464.3Hz)
Default setting: 40.0 (440.0Hz)
Value –6~0~+5
Default setting: 0
bal
det
tUn
trP
45
Other settings
4
FR-1x V-Accordion
FR-1x GB.book Page 46 Tuesday, November 8, 2011 11:44 AM
rDrum SetThis parameter allows you to select the type of drum/percussion instruments you wish to play simultaneously with the bass and chord section. See also “Playing drum/per-cussion sounds” on p. 30.
Drum LevelThis parameter allows you to set the audio level of the drum sounds.
Select “Lo” (low), “Med” (medium) or “Hi” (high) to use a preset level value. If you select a value, it is added to, or subtracted from, the standard value (“Std”).
Orchestra LevelThis parameter allows you to set the level of the orchestral sounds. It can be useful to create the desired “mix” (vol-ume balance) with the treble accordion sounds.
This is a relative parameter, which means that its value is added to, or subtracted from, the standard value (“Std”).
Organ LevelThis parameter allows you to set the level of the organ sounds. It can be use-ful to create the desired “mix” (volume balance) with the treble accordion sounds.
This is a relative parameter, which means that its value is added to, or subtracted from, the standard value (“Std”).
Orchestra Bass Level, Orchestra Chord Level, Orchestra Free Bass LevelThese parameters allow you to set the audio level of the Orchestra Bass, Orchestra Chord and Orchestra Free Bass sections.
Treble Valve NoiseYou will probably agree that electronic sounds must not only reproduce the basic timbre of an existing sound, but also the original instrument’s behavior and typical “noises” in order to be perceived as authentic. In the case of a guitar that would be the sliding noise of the fingers. An accordion, on the other hand, produces mechanical valve noises that cannot be suppressed on an acoustic instrument.Use this parameter to specify how prominent the noise produced by the simulated treble valves should be.
Bass Button NoiseThe bass section of almost all accordion instruments can be played via buttons. Such buttons produce a typical noise when pressed.Use this parameter to specify how prominent that but-ton noise should be.
Bass Reed GrowlThis parameter allows you to simulate the typical noise a bass reed makes just before it stops vibrating altogether (a kind of “musical flatulence” if you will). Each instru-ment of the accordion family produces its own typical growl. Use this parameter to specify how prominent that growl should be.
Value 1~8
Default setting: 1
Set Type Set Type
1 Folk1 5 Latin1
2 Folk2 6 Latin2
3 Jazz 7 V-Dance
4 March Band 8 Ethnic
Value Lo, Med, Hi, –40~Std~+40
Default setting: Std
Value –40~Std~+40
Default setting: Std
Value –40~Std~+40
Default setting: Std
drs
drl
o L
oGL
Value –40~Std~+40
Default setting: Std
Value Off, –40~Std~+40
Default setting: Std
Value Off, –40~Std~+40
Default setting: Std
Value Off, –40~Std~+40
Default setting: Std
obL
oCL
oFL
trn
bbn
brg
6
Orchestra LevelV-Accordion r
FR-1x GB.book Page 47 Tuesday, November 8, 2011 11:44 AM
Free Bass Button NoiseThe bass section of almost all accordion instruments can be played via buttons. Such buttons produce a typical noise when pressed.Use this parameter to specify how prominent that but-ton noise should be in Free Bass mode.
Free Bass Reed GrowlThis parameter allows you to simulate the typical noise a bass reed makes just before it stops vibrating altogether (a kind of “musical flatulence” if you will). Each instru-ment of the accordion family produces its own typical growl. Use this parameter to specify how prominent that growl should be in Free Bass mode.
Metronome TempoThis parameter allows you to set the metronome tempo. See page 35 for how to activate the metronome.
Metronome Time SignThis parameter allows you to set the metronome’s time signature. See page 35 for how to activate the metro-nome.
Here is what the displayed values correspond to:
Metronome LevelThis parameter allows you to change the metronome’s level when it is too loud or too soft. See page 35 for how to activate the metronome.
Metronome FunctionThis parameter allows you to choose the function to combine when you hold down the [SET] register and press treble register [3] (METRONOME). See “Using the metronome” on p. 35.
The available options are:
■ MetronomeSelect this setting to take advantage of the internal metronome.
■ MIDI Start/StopThis option means that the register combination acts as a MIDI remote control that starts and stops play-back of an external sequencer or arranger module.
Reverb TypeThis effect creates the impression that you are playing in a concert hall, a church or a room. It adds “depth” to the sound. This is where you can specify what kind of effect the Reverb processor should generate.
This parameter is a “Macro” function that recalls suit-able preset values for all reverb parameters (which have been preset at the factory). The available options are:
Value Off, –40~Std~+40
Default setting: Std
Value Off, –40~Std~+40
Default setting: Std
Value 20~250
Default setting: 120
Value 1~8
Default setting: 1
Value Time signature Value Time signature
1 1/4 5 5/4
2 2/4 6 6/4
3 3/4 7 6/8
4 4/4 8 9/8
Value Off, 1~127
Default setting: 100
Fbn
Frg
mtp
mts
m l
Value 1, 2
Default setting: 1
Value Setting
1 Metronome
2 MIDI Start/Stop
Value 1~8
Default setting: 2
Value Type Meaning
123
Room1Room2Room3
These reverbs simulate the rever-beration of a room. They provide a well-defined spacious reverbera-tion.
45
Hall1Hall2
These reverbs simulate the rever-beration of a concert hall with a deeper reverberation than the Room Reverbs.
6 Plate This effect type simulates a plate reverb (a studio device using a metal plate to simulate natural Reverb).
7 Delay This is a conventional delay that produces echo effects.
8 PanningDly This is a special delay in which the delayed sounds move left and right. It is effective when you are listen-ing in stereo.
mfn
rEv
47
Other settings
4
FR-1x V-Accordion
FR-1x GB.book Page 48 Tuesday, November 8, 2011 11:44 AM
rReverb LevelThis parameter allows you to set the level of the reverb effect with respect to the unprocessed signal. Set it to “0” if you don’t want to use the reverb effect.
Chorus TypeChorus broadens the spatial image of the sound, adding richness. You can choose from 8 types of chorus.This parameter is a “Macro” function that recalls suitable preset values for all Chorus parameters (which have been preset at the factory).
The available options are:
Chorus LevelThis parameter allows you to set the level of the chorus effect with respect to the unprocessed signal. Set it to “0” if you don’t want to use the chorus effect.
Orchestra TouchThis parameter allows you to specify the velocity sensitivity of the treble keys/buttons when they are used to play orchestral percussive sounds.
The available options are:
■ Fixed Low, Fixed Medium, Fixed HighThese three fixed curves use the same velocity value, no matter how hard or lightly you press the keys. “Low” means that a low value is used, “Med” repre-sents a medium value and “High” a high value.
■ Low, Medium, HighThe “Low” curve means that even relatively light presses already allow you to play loud notes. The “High” curve represents the most responsive velocity curve. It requires a considerable amount of strength for fortissimo notes, but it also provides more expres-sive options. The “Med” curve is in the middle.
■ Fixed L+Bellows, Fixed M+Bellows Fixed H+BellowsThese curves mean that the orchestral sound uses fixed velocity values but can also be controlled by bellows movements.
■ Bellows“Bellows” means that the Orchestra section’s expres-sion is controlled by the bellows movements – not the velocity values generated by the keys.
NOTE
By selecting a “Fixed” option for “Bellows Curve” on p. 49, you effectively switch off the bellows sensor. This also means that any setting that includes “Bellows” no longer works, because the FR-1x no longer “listens” to the bellows’ movements.
Orchestra Bass/Chord TouchThis parameter allows you to specify the velocity sensitivity (curve) of the bass and chord buttons, which are used to play orchestral percussive sounds.
The available options are: Fixed Low, Fixed Medium, Fixed High, Low, Medium, High, Fixed L + Bellows, Fixed M + Bellows, Fixed H+ Bellows, Bellows. See “Orchestra Touch” on p. 48 for details about these set-tings.
NOTE
By selecting a “Fixed” option for “Bellows Curve” on p. 49, you effectively switch off the bellows sensor. This also means that any setting that includes “Bellows” no longer works, because the FR-1x no longer “listens” to the bellows’ movements.
Value 0~127
Default setting: 64
Value 1~8
Default setting: 7
Value Type Meaning
1234
Chorus 1Chorus 2Chorus 3Chorus 4
These are conventional Chorus effects that add spaciousness and depth to the sound.
5 FBack Chr This is a Chorus with a Flanger-like effect and a soft sound.
6 Flanger This is an effect that sounds some-what like a jet airplane taking off or landing.
7 Short Delay This is a delay with a short Delay time.
8 ShortDly FB This is a short delay with many repeats.
Value 0~127
Default setting: 64
Value 1~10
Default setting: 6
r L
Chr
C L
o t
Value Setting Value Setting
1 Fixed Low 6 High
2 Fixed Medium 7 Fixed L + Bellows
3 Fixed High 8 Fixed M + Bellows
4 Low 9 Fixed H + Bellows
5 Medium 10 Bellows
Value 1~10
Default setting: 8
obt
8

Orchestra LevelV-Accordion r
FR-1x GB.book Page 49 Tuesday, November 8, 2011 11:44 AM
Bellows CurveThis parameter allows you to specify how the FR-1x should respond to the bellows’ movements. Use it to adapt the FR-1x’s expressive potential to your playing style.
The available options are:
■ Fixed Low, Fixed Medium, Fixed HighThese three fixed curves always use the same expres-sion value, no matter how hard or lightly you push/pull the bellows (no dynamic control). “Low” means that a low value is used, “Med” represents a medium value and “High” a high value.
■ X Light, Light“Light” means that you do not need to push/pull hard to achieve a meaningful effect. The “X-Light” requires even less strength (the “X” stands for “extra”).
■ StandardThe “Standard” curve refers to a normal response.
■ Heavy and X Heavy“Heavy” provides a greater variety of nuances. “X-Heavy” is even more detailed.
Stereo WidthMuch care has been taken to provide a natural stereo image for the accordion sounds. If you think the stereo image is too wide for comfort (or if you prefer to set the Pan controls on your mixing console differently), you can use this parameter to reduce the stereo image.
“Ful” (full) represents the widest stereo image.“Nat” (natural) means that the original stereo image is used.“–63” corresponds to an extremely narrow stereo image. All other values represent slight (or increasingly drastic) reductions of the stereo width.
Treble Mode (only on the button type)Like for the accordion instrument itself, there are different varieties of chromatic instruments, with different treble button layouts.
The available options are:
Since your FR-1x is an electronic musical instrument, changing the note assignments to the buttons is a mat-ter of selecting the preset that best suits your playing style. You’ll probably only change this setting once. But it’s nice to know that it exists in case you let a fellow accordion player from another country play your FR-1x. Please look at the illustrations on pages 50 and 51 to identify the setting you need. Pay attention to the note names (all Cs appear on a grey background) and look at how they are arranged, then make your selection. The numbers next to the letters refer to the octave. The numbers below the note names represent the corre-sponding MIDI note numbers. You may have noticed that the treble buttons are col-ored white (for notes without alteration) and black (notes with alteration, i.e. #/b). This coloring doesn’t change when you select another system.The FR-1x is supplied with additional white and black buttons. You can use these additional buttons to adapt the black and white treble buttons to reflect the selected treble mode.To do this, first remove the button you wish to replace by turning it counterclockwise, then install the new button and screw it clockwise.
NOTE
This parameter is not reset when you load the factory defaults (page 64).
Value 1~8
Default setting: 6
Value Setting Value Setting
1 Fixed Low 5 Light
2 Fixed Medium 6 Standard
3 Fixed High 7 Heavy
4 X Light 8 X Heavy
Value –63~–1, Nat, Ful
Default setting: Nat
blC
StE
Value 1~6
Default setting: 1
Value Setting Value Setting
1 C-Griff Europe 4 B-Griff Fin
2 C-Griff 2 5 D-Griff 1
3 B-Griff Bajan 6 D-Griff 2
trM
49

Other settings
5
FR-1x V-Accordion
FR-1x GB.book Page 50 Tuesday, November 8, 2011 11:44 AM
r
C-Griff Europe C-Griff 2 B-Griff Bajan
F#5
Eb6
G#5
Bb5
C#6
F#6
G5A5
A5 B5
B5D6
E6 F6F6
Eb6D6
C6C6
G#5
F#6G#6
G6A6
G#6
C#4 D4
Eb4 E4D4
Bb3 B3
C4 C#4B3
G3 G#3
A3 Bb3G#3
E4 F4
F#4 G4F4
C#5 D5
Eb5 E5D5
Bb4 B4
C5 C#5B4
G4 G#4
A4 Bb4G#4
E5 F5
F#5 G5F5
C#6 D6
Eb6 E6D6
Bb5 B5
C6 C#6B5
G5 G#5
A5 Bb5G#5
E6 F6
F#6 G6F6G6 G#6
A3
G3 F#3
G#3 G3Bb3 A3
C4 B3 Bb3C#4 C4
Eb4 D4 C#4
E4 Eb4
F#4 F4 E4G4 F#4
A4 G#4 G4
Bb4 A4
C5 B4 Bb4
C5Eb5 D5 C#5
E5 Eb5
F#5 F5 E5
A5 G5
Bb5 A5
C#5
G5 F#5
G#5
C6 B5 Bb5C6
Eb6 D6 C#6E6 Eb6
F#6 F6 E6
C#6
G6 F#6
Eb4
G#3
Bb3
C#4
F#4
A3A3 B3
B3D4
E4 F4F4
Eb4D4
C4C4
F#4
Eb5
G#4
Bb4
C#5
F#5
G4A4
A4 B4
B4D5
E5 F5F5
Eb5D5
C5C5
G#4
Treble Mode (1/2)
0
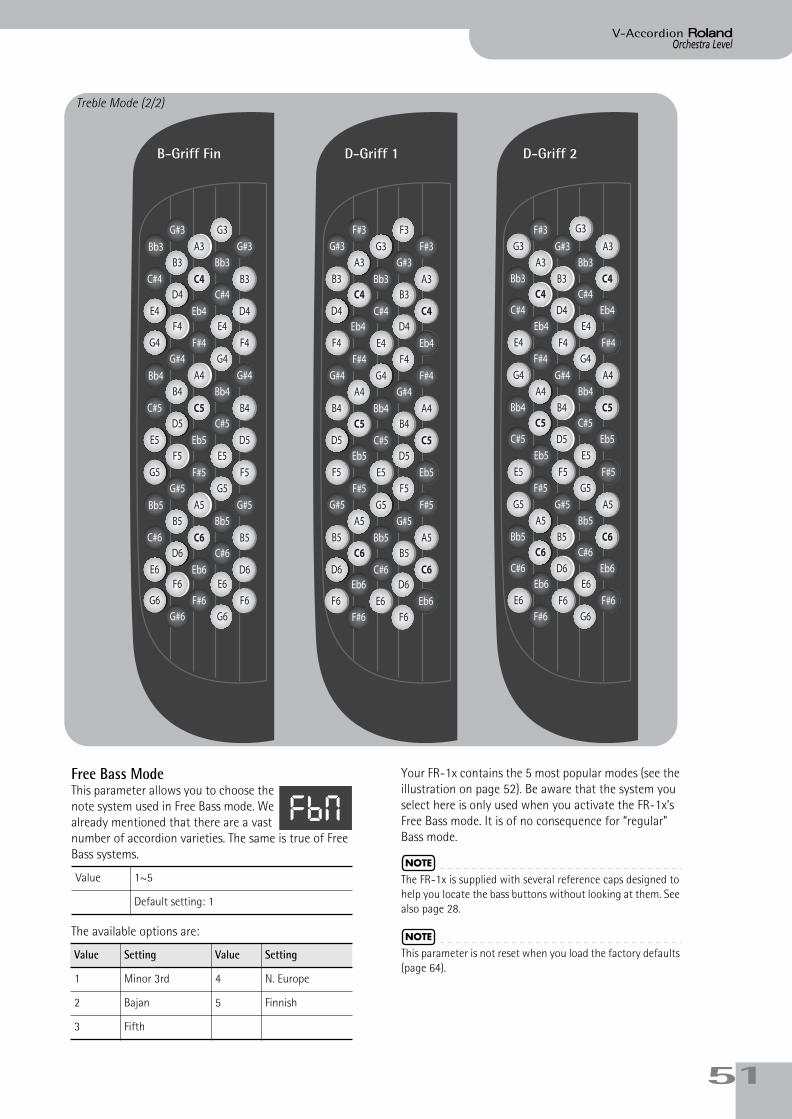
Orchestra LevelV-Accordion r
FR-1x GB.book Page 51 Tuesday, November 8, 2011 11:44 AM
Free Bass ModeThis parameter allows you to choose the note system used in Free Bass mode. We already mentioned that there are a vast number of accordion varieties. The same is true of Free Bass systems.
The available options are:
Your FR-1x contains the 5 most popular modes (see the illustration on page 52). Be aware that the system you select here is only used when you activate the FR-1x’s Free Bass mode. It is of no consequence for “regular” Bass mode.
NOTE
The FR-1x is supplied with several reference caps designed to help you locate the bass buttons without looking at them. See also page 28.
NOTE
This parameter is not reset when you load the factory defaults (page 64).
Treble Mode (2/2)
B-Griff Fin D-Griff 1 D-Griff 2
D4 C#4
Eb4 D4E4
B3 Bb3
C4 B3C#4
G#3 G3
A3 G#3Bb3
C4 B3
C#4 C4D4Eb4 D4
A3 G#3 A3 Bb3
Bb3 A3B3
F#3 F3
G3 F#3G#3
F#3
G#3 A3G3
G3
Eb5 D5
E5 Eb5F5
C6 B5
C#6 C6D6
A5 G#5
Bb5 A5B5
F#5 F5
G5 F#5G#5
Eb6 D6
E6 Eb6F6F#6 F6
E4 Eb4F4
C5 B4
C#5 C5D5
A4 G#4
C4 C#4
Bb4 A4B4
F#4 F4
G4 F#4G#4
D4 Eb4C#4
B3 C4Bb3
Eb4 E4
F4 F#4E4
A4 Bb4
F#4 G4
G#4 A4G4
C5 C#5D5 Eb5C#5
B4 C5Bb4
Eb5 E5
F5 F#5E5
A5 Bb5
F#5 G5
G#5 A5G5
C6 C#6D6 Eb6C#6
B5 C6Bb5
Eb6 E6
F6 F#6E6F#6 G6
F4 E4
F#4 F4G4
D5 C#5
Eb5 D5E5
B4 Bb4
C5 B4C#5
G#4 G4
A4 G#4Bb4
F5 E5
F#5 F5G5
D6 C#6
Eb6 D6E6
B5 Bb5
C6 B5C#6
G#5 G5
A5 G#5Bb5
F6 E6
F#6 F6G6G#6 G6
Value 1~5
Default setting: 1
Value Setting Value Setting
1 Minor 3rd 4 N. Europe
2 Bajan 5 Finnish
3 Fifth
fbm
51
Other settings
5
FR-1x V-Accordion
FR-1x GB.book Page 52 Tuesday, November 8, 2011 11:44 AM
r
N. Europe
Finnish
F2 C3 G2 D3 A2 E2 B2 F#2 C#3 Ab2 Eb2 Bb2
C#3 Ab2 Eb2 Bb2 F2 C3 G2 D3 A2 E2 B2 F#2
F2 C3 G2 D3 A2 E2 B2 F#2 C#3 Ab2 Eb2 Bb2
C#3 Ab2 Eb2 Bb2 F2 C3 G2 D3 A2 E2 B2 F#2
F2 C3 G2 D3 A2 E2 B2 F#2 C#3 Ab2 Eb2 Bb2
C#3 Ab2 Eb2 Bb2 F2 C3 G2 D3 A2 E2 B2 F#2
F6 D6 B5 Ab5 F5 D5 B4 Ab4 F4 D4 B3 Ab3
E6 C#6 Bb5 G5 E5 C#5 Bb4 G4 E4 C#4 Bb3 G3
Eb6 C6 A5 F#5 Eb5 C5 A4 F#4 Eb4 C4 A3 F#3
D6 B5 Ab5 F5 D5 B4 Ab4 F4 D4 B3 Ab3 F3
F2
B4
C3 G2 D3 A2 E2 B2 F#2 C#3 Ab2 Eb2 Bb2
C#3 Ab2 Eb2 Bb2 F2 C3 G2 D3 A2 E2 B2 F#2
Free Bass Mode
(C3= note number 48)
NOTE
The note names on the bass buttons correspond to the MIDI note numbers. The note range of the Bass part is 1 octave.
NOTE
The actual sound range depends on the type of reed and footage.
2
Orchestra LevelV-Accordion r
FR-1x GB.book Page 53 Tuesday, November 8, 2011 11:44 AM
Bass & Chord ModeThis parameter allows you to specify the number of button rows available for playing bass notes. The default is 2 bass rows and 4 chord rows.
The available options are:
■ 2 Bass RowsUsing this selection, you have 2 bass rows and 4 chord rows available (default).
■ 3 Bass Rows A-7th, 3 Bass Rows A-5dim3 Bass Rows B-7th, 3 Bass Rows B-5dimWith this selection you gain 12 bass buttons (an entire row), but you lose the dim chords.The “A-7th” and “B-7th” options mean that the 6th chord row plays seventh chords (“7”) that don’t con-tain the fifth. In the case of a C7 chord, you therefore hear C-E-Bb (but not the G). “A-7th” and “B-7th” differ in the arrangement of the bass notes (see the illustration on page 54).The “A-5dim” and “B-5dim” options mean that sev-enth chords don’t contain the root note. A C7 chord is therefore sounded with the notes E-G-Bb (but not the C). “A-5dim” and “B-5dim” differ in the arrange-ment of the bass notes (see the illustration on page 54).
■ 3 Bass Rows Bx-7thThis option reverses the “B-7th” settings (from right to left), so that the C3 note shifts from 6th to 9th position.
■ 3 Bass Rows BelgiumThis option simulates a “straight” Belgian bass & chord keyboard. See the illustration on p. 54 for the note assignments.
NOTE
The FR-1x is supplied with several reference caps designed to help you locate the bass and chord buttons without looking at them. See also page 28.
NOTE
This parameter is not reset when you load the factory defaults (page 64).
Bass to TrebleWhen this function is switched on, the FR-1x can be used like a bassoon accor-dion. In this mode, the bass part is played with the right hand. The bass and chord buttons are inactive (a real bassoon accordion doesn’t have bass/chord buttons and can only be played with one hand).
Function SwitchThis parameter allows you to use the bass buttons closest to the FR-1x logo to select or control the desired functions. When this parameter is set to “On”, the buttons in question can no longer be used to play notes or chords.
The buttons have the following factory default settings.
Value 1~7
Default setting: 1
Value Setting Value Setting
1 2 Bass Rows 5 3 Bass Rows B-5dim
2 3 Bass Row A-7th 6 3 Bass Rows Bx-7th
3 3 Bass Rows A-5dim 7 3 Bass Rows Belgium
4 3 Bass Rows B-7th
bCM
Value Off, On
Default setting: Off
Value Off, On
Default setting: Off
Bass button Function Bass button Function
1 Pitch Down 4 Brake Off
2 Pitch Up 5 Brake On
3 Modulation 6 Rotary Slow/Fast
btt
fns
[1] [6]
53
Other settings
5
FR-1x V-Accordion
FR-1x GB.book Page 54 Tuesday, November 8, 2011 11:44 AM
r
A3D3G3
D3G3
[1] 2 Bass Rows
[2] & [3] 3 Bass Rows A
[4] & [5] 3 Bass Rows B
[6] 3 Bass Rows Bx 7th
[7] 3 Bass Rows Belgium
B3 E3 A3 D3 G3 C3 F3 Bb3 Eb3 Ab3 C#3 F#3
C3 F3 Bb3 Eb3 Ab3 C#3 F#3 B3 E3 A3 D3 G3
Ab3 C#3 F#3 B3 E3 A3 D3 G3 C3 F3 Bb3 Eb3
AbM C#M F#M BM EM AM DM GM CM FM BbM EbM
Abm C#m F#m Bm Em Am Dm Gm Cm Fm Bbm Ebm
Ab7 C#7 F#7 B7 E7 A7 D7 G7 C7 F7 Bb7 Eb7
E3 A3 D3 G3 C3 F3 Bb3 Eb3 Ab3 C#3 F#3 B3
F3Bb3 Eb3 Ab3 C#3 F#3 B3 E3 A3 D3 G3 C3
C#3F#3 B3 E3 A3 D3 G3 C3 F3 Bb3 Eb3 Ab3
C#MF#M BM EM AM DM GM CM FM BbM EbM AbM
C#mF#m Bm Em Am Dm Gm Cm Fm Bbm Ebm Abm
C#7B7 E7 A7 D7 G7 C7 F7 Bb7 Eb7 Ab7 F#7
Bass & Chord Mode
“7th”= 1-3-7; “5dim”= 3-5-7
“7th”= 1-3-7; “5dim”= 3-5-7
“7th”= 1-3-7
“7th”= 1-3-7
4
Orchestra LevelV-Accordion r
FR-1x GB.book Page 55 Tuesday, November 8, 2011 11:44 AM
Auto OffThis parameter allows you to specify how long the FR-1x should wait before switching itself off while you are not using it.
The available options are:
WARNING: Be aware that any unsaved changes are lost when the FR-1x is switched off by this function. Be sure to save all important settings as soon as you can (page 45).
Speaker ModeWhen you use the FR-1x for live perfor-mances and therefore connect it to an external amplification system, it may be convenient to switch off the FR-1x’s internal speakers, because doing so preserves battery power. See also “Switching off the internal speakers (Speaker Mode)” on p. 36.
The “Off” setting means that the internal speakers are off. The “On” setting means that the internal speakers are active.
Output Level AttenuationThe FR-1x has a level attenuation func-tion that allows you to adapt its output level to the audio device you wish to connect it to. The attenuation value is expressed in dB.
NOTE
This parameter has no effect on the FR-1x’s internal speakers.
Other functionsThe following functions are covered in the chapter “Data management via the FR-1x’s USB port” on p. 40.
■ User Set loadThis function allows you to load Sets from a USB memory to one of the four internal User memories. See “Loading User Set memories from USB memory (optional)” on p. 41.
■ User Set recoverThis function allows you to recover the factory settings of the desired User Set memory. This function only loads one set at a time. See also page 64.
■ User Program loadThis function allows you to load 10 User Program settings from a USB memory (provided you have already saved User Programs to that USB memory). See also “Loading User Program memories from USB memory (optional)” on p. 40.
■ Sound Set loadThis function allows you to add new sounds to the FR-1x original sounds. See “Loading new sounds from a USB memory (optional)” on p. 42 for details.
■ User Program saveThis function allows you to save the contents of the User Program memo-ries to a USB memory (optional) con-nected to the USB port. See “Saving User Program memories to USB memory (optional)” on p. 40.
Value Off, 1~3
Default setting: 1
Setting Meaning Setting Meaning
Off Disabled 2 15 minutes
1 10 minutes 3 20 minutes
Value Off, On
Default setting: On
Value –12, –6, Off
Default setting: Off
AoF
SP
oLA
Ust
UrC
Upg
Snd
SAv
55
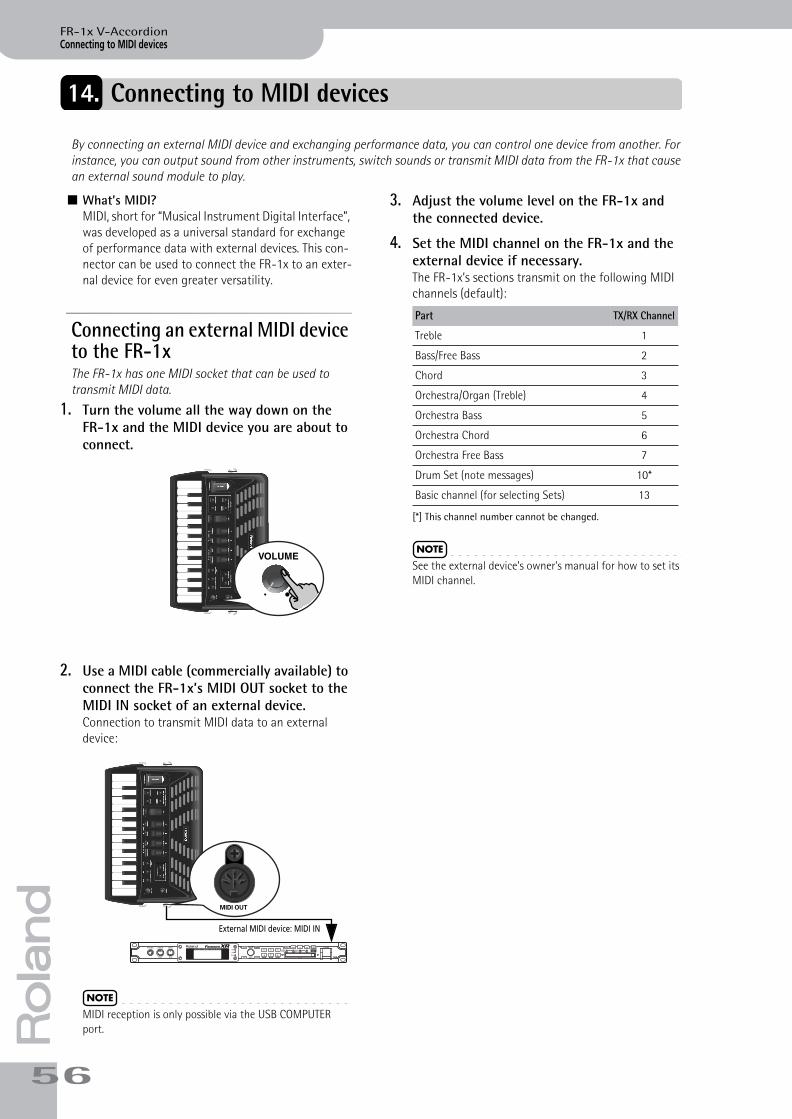
Connecting to MIDI devices
5
FR-1x V-Accordion
FR-1x GB.book Page 56 Tuesday, November 8, 2011 11:44 AM
r14. Connecting to MIDI devices
By connecting an external MIDI device and exchanging performance data, you can control one device from another. For instance, you can output sound from other instruments, switch sounds or transmit MIDI data from the FR-1x that cause an external sound module to play.
■ What’s MIDI?MIDI, short for “Musical Instrument Digital Interface”, was developed as a universal standard for exchange of performance data with external devices. This con-nector can be used to connect the FR-1x to an exter-nal device for even greater versatility.
Connecting an external MIDI device to the FR-1xThe FR-1x has one MIDI socket that can be used to transmit MIDI data.
1. Turn the volume all the way down on the FR-1x and the MIDI device you are about to connect.
2. Use a MIDI cable (commercially available) to connect the FR-1x’s MIDI OUT socket to the MIDI IN socket of an external device.Connection to transmit MIDI data to an external device:
NOTE
MIDI reception is only possible via the USB COMPUTER port.
3. Adjust the volume level on the FR-1x and the connected device.
4. Set the MIDI channel on the FR-1x and the external device if necessary.The FR-1x’s sections transmit on the following MIDI channels (default):
NOTE
See the external device’s owner’s manual for how to set its MIDI channel.
External MIDI device: MIDI IN
Part TX/RX Channel
Treble 1
Bass/Free Bass 2
Chord 3
Orchestra/Organ (Treble) 4
Orchestra Bass 5
Orchestra Chord 6
Orchestra Free Bass 7
Drum Set (note messages) 10*
[*] This channel number cannot be changed.
Basic channel (for selecting Sets) 13
6
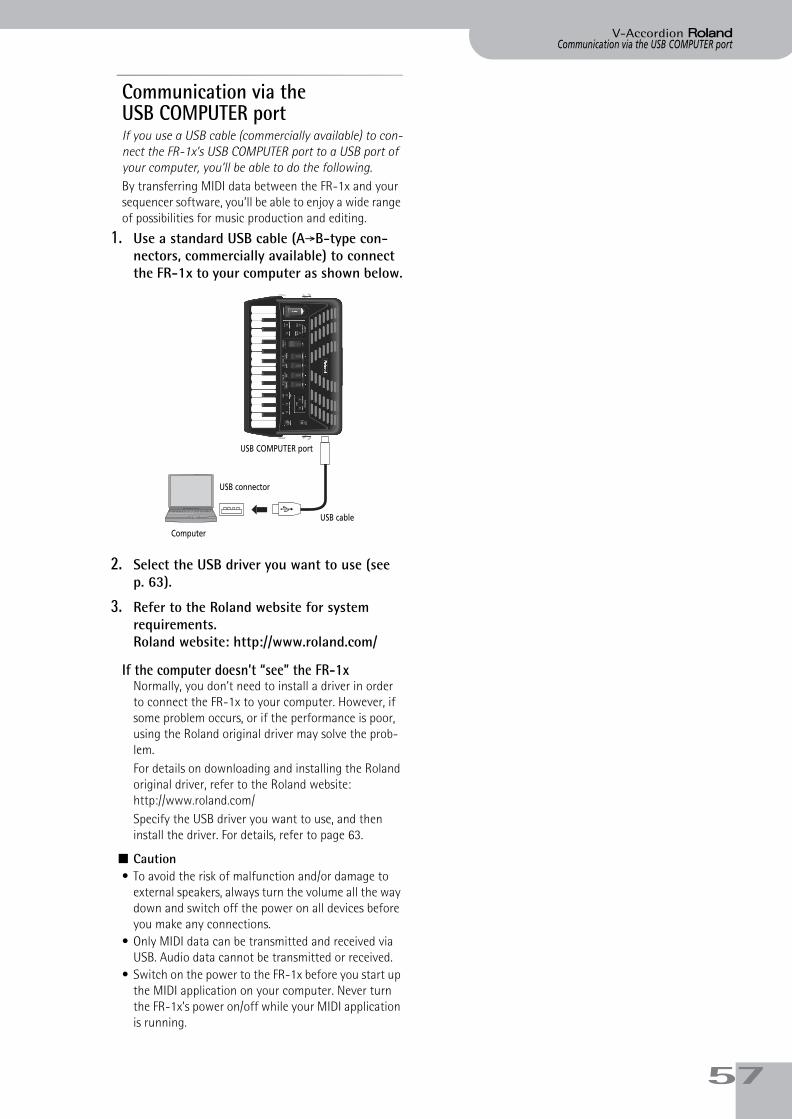
Communication via the USB COMPUTER portV-Accordion r
FR-1x GB.book Page 57 Tuesday, November 8, 2011 11:44 AM
Communication via the USB COMPUTER portIf you use a USB cable (commercially available) to con-nect the FR-1x’s USB COMPUTER port to a USB port of your computer, you’ll be able to do the following.By transferring MIDI data between the FR-1x and your sequencer software, you’ll be able to enjoy a wide range of possibilities for music production and editing.
1. Use a standard USB cable (A‰B-type con-nectors, commercially available) to connect the FR-1x to your computer as shown below.
2. Select the USB driver you want to use (see p. 63).
3. Refer to the Roland website for system requirements. Roland website: http://www.roland.com/
If the computer doesn’t “see” the FR-1xNormally, you don’t need to install a driver in order to connect the FR-1x to your computer. However, if some problem occurs, or if the performance is poor, using the Roland original driver may solve the prob-lem.For details on downloading and installing the Roland original driver, refer to the Roland website:http://www.roland.com/Specify the USB driver you want to use, and then install the driver. For details, refer to page 63.
■ Caution• To avoid the risk of malfunction and/or damage to
external speakers, always turn the volume all the way down and switch off the power on all devices before you make any connections.
• Only MIDI data can be transmitted and received via USB. Audio data cannot be transmitted or received.
• Switch on the power to the FR-1x before you start up the MIDI application on your computer. Never turn the FR-1x’s power on/off while your MIDI application is running.
USB cable
USB connector
Computer
USB COMPUTER port
57
Connecting to MIDI devices
5
FR-1x V-Accordion
FR-1x GB.book Page 58 Tuesday, November 8, 2011 11:44 AM
rMIDI parameter listThe parameters shown below are in fact the continuation of the parameters listed on page 45
Display indication Full name Setting range Default See page
ESq External Sequencer No, Yes No p. 59*
trb Treble TX/RX channel 1~16, Off 1 p. 60
tro Treble Octave Tx –3~0~3 0 p. 60
bfr Bass/Free Bass TX/RX Channel 1~16, Off 2 p. 60
bfo Bass/Free Bass Octave TX –3~0~3 0 p. 60
Chd Chord TX/RX Channel 1~16, Off 3 p. 60
Cho Chord Octave TX –3~0~3 0 p. 61
orC Orchestra/Organ TX/RX Channel 1~16, Off 4 p. 61
oro Orchestra/Organ Octave TX –3~0~3 0 p. 61
obs Orchestra Bass TX/RX Channel 1~16, Off 5 p. 61
obo Orchestra Bass Octave TX –3~0~3 0 p. 61
oCh Orchestra Chord TX/RX Channel 1~16, Off 6 p. 61
oCo Orchestra Chord Octave TX –3~0~3 0 p. 61
ofb Orchestra Free Bass TX/RX Channel 1~16, Off 7 p. 61
ofo Orchestra Free Bass Octave TX –3~0~3 0 p. 61
bCh Basic Channel TX/RX 1~16, Off 13 p. 61
PCh Program Change TX Off, On On p. 62
bEA Bellows Expression TX ALL Off, On Off p. 62
be1 Bellows Expression TX TREBLE Off, On Off p. 62
bE2 Bellows Expression TX BASS/CHORD/FREE BASS
Off, On Offp. 62
bE3 Bellows Expression TX ORCHESTRA/ORGAN
Off, On Offp. 62
bE4 Bellows Expression TX ORCHESTRA BASS Off, On Off p. 62
bE5 Bellows Expression TX ORCHESTRA CHORD
Off, On Offp. 62
bE6 Bellows Expression TX ORCHESTRA FREE BASS
Off, On Offp. 62
vel Velocity TX On, 1~127 On p. 62
bre Bellows TX Resolution 1~4 2 p. 63
Ufd USB function driver Gen, Ven Gen p. 63
*: Reset when you switch off the FR-1x.
8
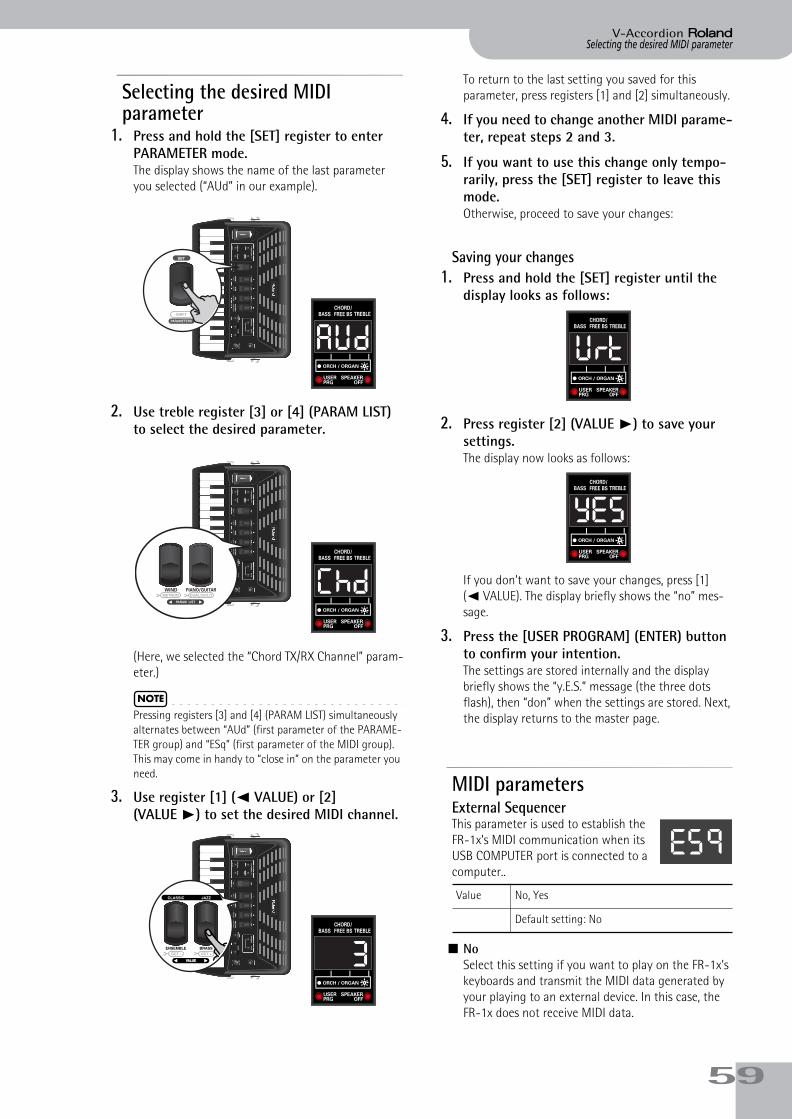
Selecting the desired MIDI parameterV-Accordion r
FR-1x GB.book Page 59 Tuesday, November 8, 2011 11:44 AM
Selecting the desired MIDI parameter
1. Press and hold the [SET] register to enter PARAMETER mode.The display shows the name of the last parameter you selected (“AUd” in our example).
2. Use treble register [3] or [4] (PARAM LIST) to select the desired parameter.
(Here, we selected the “Chord TX/RX Channel” param-eter.)
NOTE
Pressing registers [3] and [4] (PARAM LIST) simultaneously alternates between “AUd” (first parameter of the PARAME-TER group) and “ESq” (first parameter of the MIDI group). This may come in handy to “close in” on the parameter you need.
3. Use register [1] (√ VALUE) or [2] (VALUE ®) to set the desired MIDI channel.
To return to the last setting you saved for this parameter, press registers [1] and [2] simultaneously.
4. If you need to change another MIDI parame-ter, repeat steps 2 and 3.
5. If you want to use this change only tempo-rarily, press the [SET] register to leave this mode.Otherwise, proceed to save your changes:
Saving your changes1. Press and hold the [SET] register until the
display looks as follows:
2. Press register [2] (VALUE ®) to save your settings.The display now looks as follows:
If you don’t want to save your changes, press [1] (√ VALUE). The display briefly shows the “no” mes-sage.
3. Press the [USER PROGRAM] (ENTER) button to confirm your intention.The settings are stored internally and the display briefly shows the “y.E.S.” message (the three dots flash), then “don” when the settings are stored. Next, the display returns to the master page.
MIDI parametersExternal SequencerThis parameter is used to establish the FR-1x’s MIDI communication when its USB COMPUTER port is connected to a computer..
■ NoSelect this setting if you want to play on the FR-1x’s keyboards and transmit the MIDI data generated by your playing to an external device. In this case, the FR-1x does not receive MIDI data.
AUd
PIANO/GUITARWIND Chd
3
Value No, Yes
Default setting: No
Urt
yes
ESq
59
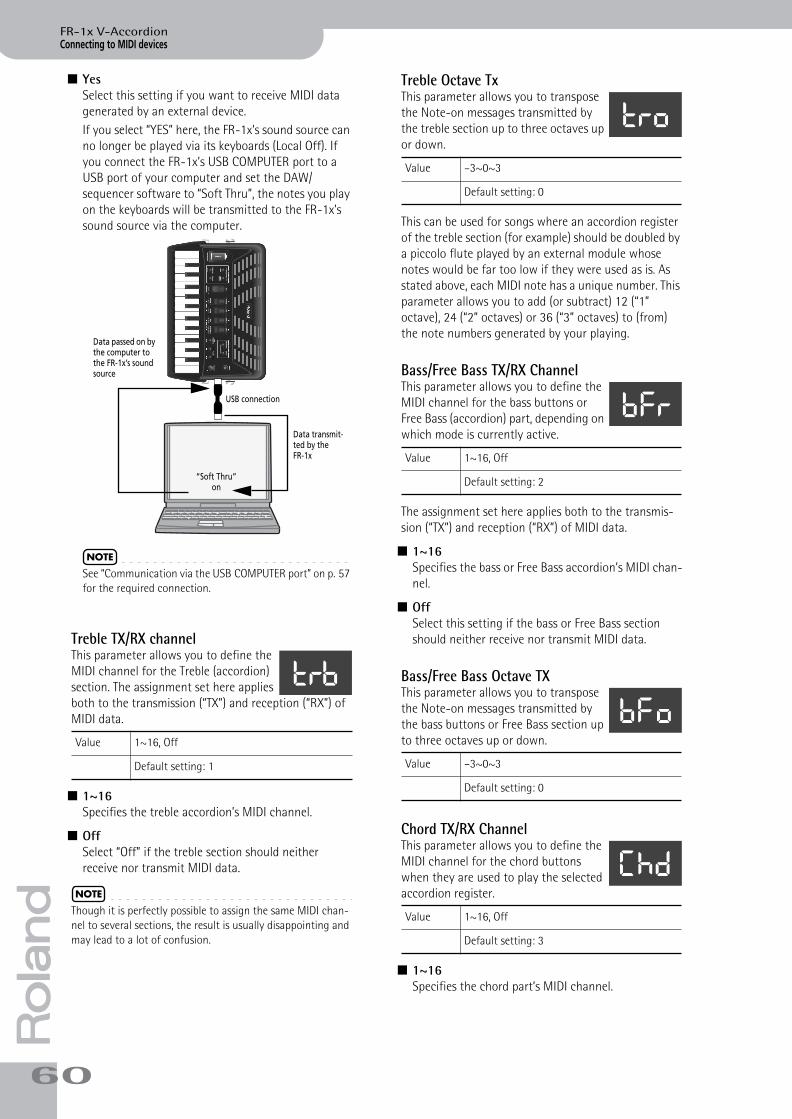
Connecting to MIDI devices
6
FR-1x V-Accordion
FR-1x_2_GB.fm Page 60 Wednesday, January 4, 2012 12:00 PM
r■ Yes
Select this setting if you want to receive MIDI data generated by an external device.If you select “YES” here, the FR-1x’s sound source can no longer be played via its keyboards (Local Off). If you connect the FR-1x’s USB COMPUTER port to a USB port of your computer and set the DAW/sequencer software to “Soft Thru”, the notes you play on the keyboards will be transmitted to the FR-1x’s sound source via the computer.
NOTE
See “Communication via the USB COMPUTER port” on p. 57 for the required connection.
Treble TX/RX channelThis parameter allows you to define the MIDI channel for the Treble (accordion) section. The assignment set here applies both to the transmission (“TX”) and reception (“RX”) of MIDI data.
■ 1~16Specifies the treble accordion’s MIDI channel.
■ OffSelect “Off” if the treble section should neither receive nor transmit MIDI data.
NOTE
Though it is perfectly possible to assign the same MIDI chan-nel to several sections, the result is usually disappointing and may lead to a lot of confusion.
Treble Octave TxThis parameter allows you to transpose the Note-on messages transmitted by the treble section up to three octaves up or down.
This can be used for songs where an accordion register of the treble section (for example) should be doubled by a piccolo flute played by an external module whose notes would be far too low if they were used as is. As stated above, each MIDI note has a unique number. This parameter allows you to add (or subtract) 12 (“1” octave), 24 (“2” octaves) or 36 (“3” octaves) to (from) the note numbers generated by your playing.
Bass/Free Bass TX/RX ChannelThis parameter allows you to define the MIDI channel for the bass buttons or Free Bass (accordion) part, depending on which mode is currently active.
The assignment set here applies both to the transmis-sion (“TX”) and reception (“RX”) of MIDI data.
■ 1~16Specifies the bass or Free Bass accordion’s MIDI chan-nel.
■ OffSelect this setting if the bass or Free Bass section should neither receive nor transmit MIDI data.
Bass/Free Bass Octave TXThis parameter allows you to transpose the Note-on messages transmitted by the bass buttons or Free Bass section up to three octaves up or down.
Chord TX/RX ChannelThis parameter allows you to define the MIDI channel for the chord buttons when they are used to play the selected accordion register.
■ 1~16Specifies the chord part’s MIDI channel.
Value 1~16, Off
Default setting: 1
USB connection
Data transmit-ted by the FR-1x
“Soft Thru” on
Data passed on by the computer to the FR-1x’s sound source
trb
Value –3~0~3
Default setting: 0
Value 1~16, Off
Default setting: 2
Value –3~0~3
Default setting: 0
Value 1~16, Off
Default setting: 3
tro
bFr
bFo
Chd
0
MIDI parameters
V-Accordion
r
FR-1x_2_GB.fm Page 61 Wednesday, January 4, 2012 12:00 PM
■ OffSelect this setting if the chord part should neither receive nor transmit MIDI data.
Chord Octave TXThis parameter allows you to transpose the Note-on messages transmitted by the chord buttons up to three octaves up or down.
Orchestra/Organ TX/RX ChannelThis parameter allows you to set the MIDI channel for the orchestral/organ part.
■ 1~16Specifies the orchestral/organ part’s MIDI channel.
■ OffSelect this setting if the treble orchestral/organ part should neither receive nor transmit MIDI data.
Orchestra/Organ Octave TXThis parameter allows you to transpose the Note-on messages transmitted by the Orchestra section.
Orchestra Bass TX/RX ChannelThis parameter allows you to define the MIDI channel for the ORCH BASS part.
■ 1~16Specifies the orchestral bass part’s MIDI channel.
■ OffSelect this setting if the orchestral bass part should neither receive nor transmit MIDI data.
Orchestra Bass Octave TXThis parameter allows you to transpose the Note-on messages transmitted by the orchestral bass part.
Orchestra Chord TX/RX ChannelThis parameter allows you to define the MIDI channel for the orchestral chord part.
■ 1~16Specifies the orchestral chord part’s MIDI channel.
■ OffSelect this setting if the orchestral chord part should neither receive nor transmit MIDI data.
Orchestra Chord Octave TXThis parameter allows you to transpose the Note-on messages transmitted by the orchestral chord part.
Orchestra Free Bass TX/RX ChannelThis parameter allows you to define the MIDI channel for the orchestral Free Bass part.
■ 1~16Specifies the orchestral Free Bass part’s MIDI channel.
■ OffSelect this setting if the orchestral Free Bass part should neither receive nor transmit MIDI data.
Orchestra Free Bass Octave TXThis parameter allows you to transpose the Note-on messages transmitted by the orchestral Free Bass part.
Basic Channel TX/RXThis parameter allows you to set the basic MIDI channel.The “Basic Channel” can be used for selecting Sets from an external MIDI device (using pro-gram change numbers). Please see “MIDI implementa-tion” on p. 72 for the program change numbers of the Sets.
The assignment set here applies both to the transmis-sion (“TX”) and reception (“RX”) of MIDI data.
Value –3~0~3
Default setting: 0
Value 1~16, Off
Default setting: 4
Value –3~0~3
Default setting: 0
Value 1~16, Off
Default setting: 5
Value –3~0~3
Default setting: 0
Cho
orC
oro
obs
obo
Value 1~16, Off
Default setting: 6
Value –3~0~3
Default setting: 0
Value 1~16, Off
Default setting: 7
Value –3~0~3
Default setting: 0
Value 1~16, Off
Default setting: 13
oCh
oCo
ofb
ofo
bCh
61

Connecting to MIDI devices
6
FR-1x V-Accordion
FR-1x_2_GB.fm Page 62 Wednesday, January 4, 2012 12:00 PM
r■ 1~16
Specifies the Basic Channel number.
■ OffSelect this setting if no MIDI data should be trans-mitted/received on the Basic Channel.
Program Change TXThe FR-1x transmits program changes when you select Sets and registers (on the MIDI channel assigned to the section for which you are selecting a different register).This is the first of a series of MIDI filters, i.e. parameters that allow you to specify whether or not the given MIDI type should be transmitted.
■ OffSelect this setting if you don’t want the FR-1x to transmit program change messages.
■ OnSelect this setting if the FR-1x should transmit pro-gram change messages.
Bellows Expression TX FiltersYou probably noticed that the strength/speed with which the bellows is pressed or pulled influences the sound – which corresponds to an acoustic accordion’s response. This effect can be translated into a MIDI mes-sage most external instruments understand.The MIDI standard provides a message (“control change”) for remotely controlling the volume of an external instrument: CC11. It is chiefly used for expres-sion purposes (similar to the way in which a guitarist or organ player uses a volume pedal).The FR-1x can filter expression messages for the follow-ing sections:
■ Bellows Expression TX ALLThis function allows you to set all fil-ters (bE1~bE6) to “Off” or “On”. It acts like a master switch.
■ Bellows Expression TX TREBLEFilters (suppresses) expression mes-sages for the treble accordion chan-nel.
■ Bellows Expression TX BASS/CHORD/FREE BASSFilters (suppresses) expression mes-sages for the bass/chord/free bass accordion channel.
■ Bellows Expression TX ORCHESTRA/ORGANFilters (suppresses) expression mes-sages for the treble orchestra/organ channel.
■ Bellows Expression TX ORCHESTRA BASSFilters (suppresses) expression mes-sages for the orchestral bass channel.
■ Bellows Expression TX ORCHESTRA CHORDFilters (suppresses) expression mes-sages for the orchestral chord channel.
■ Bellows Expression TX ORCHESTRA FREE BASSFilters (suppresses) expression mes-sages for the orchestral free bass channel.
■ OffSelect this setting if you don’t want the selected sec-tion to transmit expression messages.
■ OnSelect this setting if the selected section should transmit expression messages.
Velocity TXYour FR-1x is velocity sensitive. That is a very learned term for the fact that the volume and brightness of the notes you play on the treble or bass keyboard depend on how hard (or fast) you press the buttons. Velocity informa-tion is transmitted via MIDI.This parameter allows you to specify whether you want to transmit fixed or dynamic velocity values (i.e. the values translating how hard/fast you press a key or but-ton).
■ OnSelect this setting if you want to transmit MIDI velocity values proportional to the key pressure.
■ 1~127Specifies the fixed velocity value to be transmitted for all notes.
NOTE
Fixed velocity values can be useful for playing organ sounds on an external module.
Value Off, On
Default setting: On
PCh
bEA
bE1
bE2
bE3
Value Off, On
Default setting: Off
Value On, 1~127
Default setting: On
bE4
bE5
bE6
vEL
2
MIDI parametersV-Accordion r
FR-1x GB.book Page 63 Tuesday, November 8, 2011 11:44 AM
Bellows TX ResolutionThis parameter allows you to specify how many data the FR-1x’s bellows may transmit for expression purposes.
■ 1: Represents the highest bellows resolution (double-byte resolution).
■ 2: Represents a high bellows resolution.
■ 3: Represents the normal bellows resolution.
■ 4: Represents the lowest (coarsest) bellows resolu-tion.
NOTE
If the external sequencer you work with displays a “MIDI buffer overflow” message, select a lower resolution. If your sequencer accepts the complete data amount, use the “4” setting, because it will lead to even more nuances being captured.
USB Function driverThe FR-1x’s USB COMPUTER port can be connected to a USB port on your com-puter. Doing so allows you to transmit MIDI data to the computer (which can be recorded using sequencer software) and to receive MIDI data from the computer.Normally, you don’t need to install a driver in order to connect the FR-1x to your computer. However, if some problem occurs, or if the performance is poor, using the Roland original driver may solve the problem.To do so, first specify the USB driver you want to use (see below), and then install the driver on your com-puter. .
NOTE
For details on downloading and installing the Roland original driver, refer to the Roland website:http://www.roland.com/
■ Gen (generic)Choose this if you want to use the standard USB driver that was included with your computer. Nor-mally, you should use this mode.
■ Ven (vendor)Choose this if you want to use a USB driver down-loaded from the Roland website (www.roland.com).
■ Caution• To avoid the risk of malfunction and/or damage to
external speakers, always turn the volume all the way down and switch off the power on all devices before you make any connections.
• Only MIDI data can be transmitted and received via USB. Audio data cannot be transmitted or received.
• Switch on the power to the FR-1x before you start up the MIDI application on your computer. Never turn the FR-1x’s power on/off while your MIDI application is running.
Value 1~4
Default setting: 2
Value Gen, Ven
Default setting: Gen
brE
Ufd
63
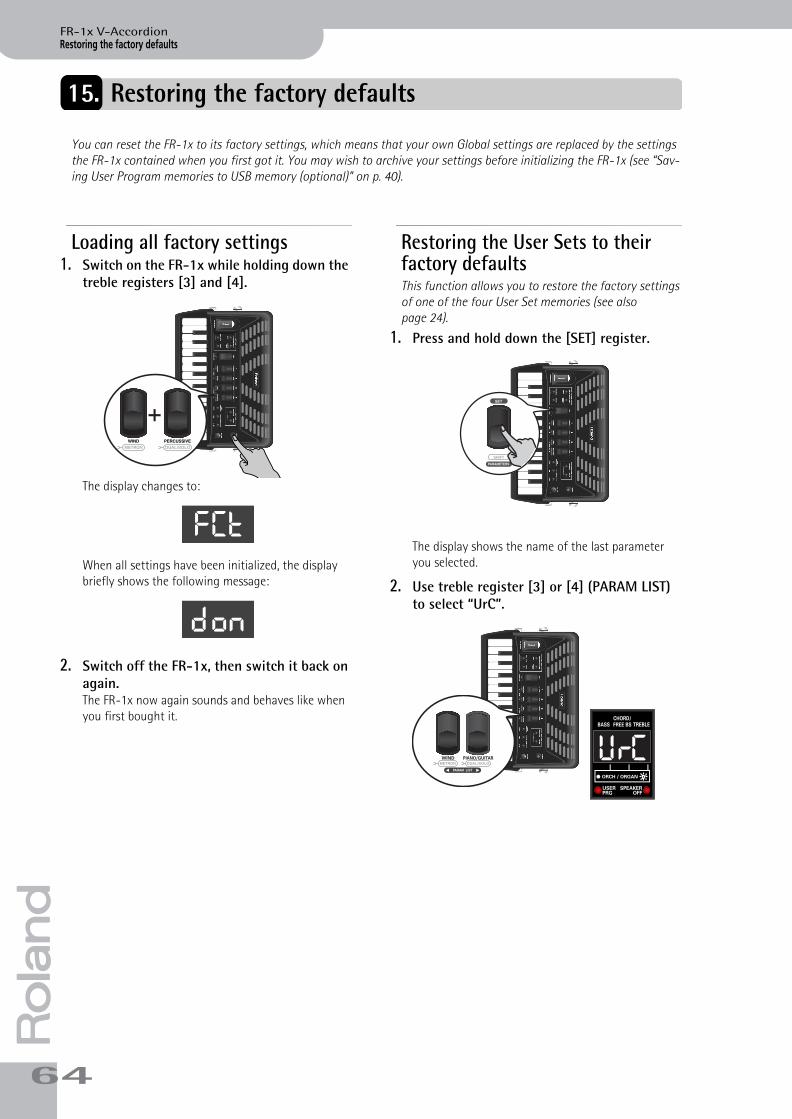
Restoring the factory defaults
6
FR-1x V-Accordion
FR-1x GB.book Page 64 Tuesday, November 8, 2011 11:44 AM
r15. Restoring the factory defaults
You can reset the FR-1x to its factory settings, which means that your own Global settings are replaced by the settings the FR-1x contained when you first got it. You may wish to archive your settings before initializing the FR-1x (see “Sav-ing User Program memories to USB memory (optional)” on p. 40).
Loading all factory settings1. Switch on the FR-1x while holding down the
treble registers [3] and [4].
The display changes to:
When all settings have been initialized, the display briefly shows the following message:
2. Switch off the FR-1x, then switch it back on again.The FR-1x now again sounds and behaves like when you first bought it.
Restoring the User Sets to their factory defaultsThis function allows you to restore the factory settings of one of the four User Set memories (see also page 24).
1. Press and hold down the [SET] register.
The display shows the name of the last parameter you selected.
2. Use treble register [3] or [4] (PARAM LIST) to select “UrC”.
FCt
don
PIANO/GUITARWIND UrC
4
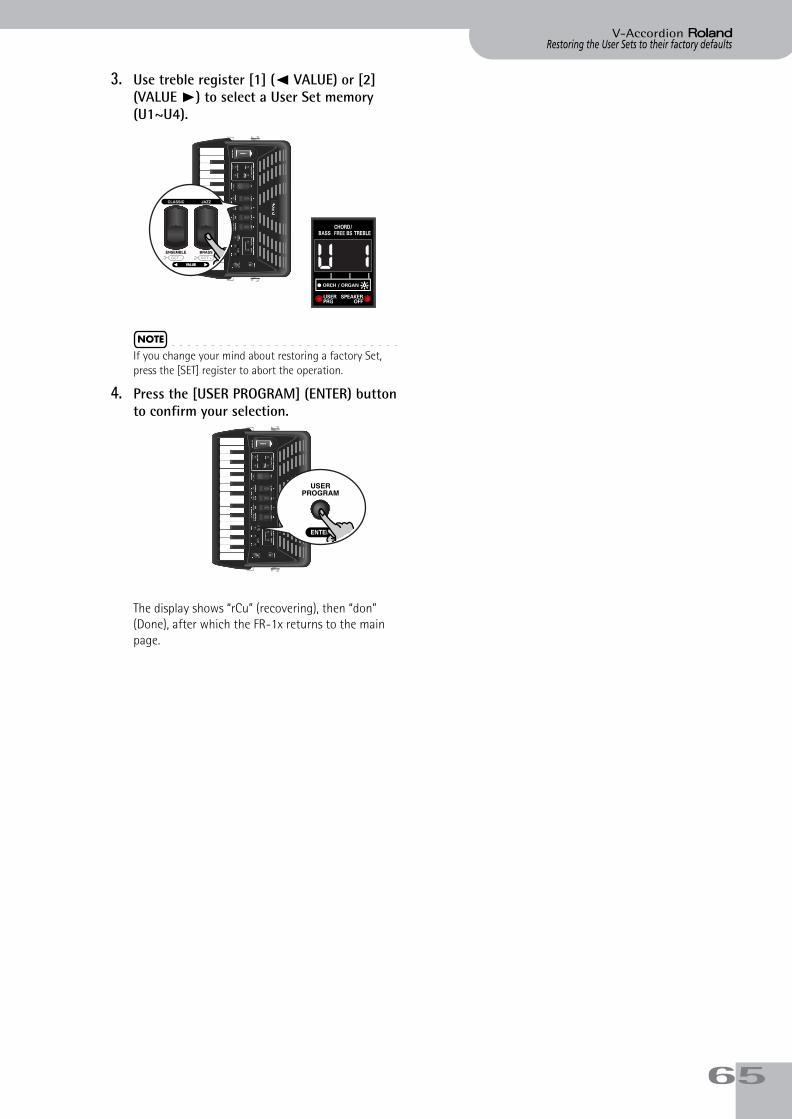
Restoring the User Sets to their factory defaultsV-Accordion r
FR-1x GB.book Page 65 Tuesday, November 8, 2011 11:44 AM
3. Use treble register [1] (√ VALUE) or [2] (VALUE ®) to select a User Set memory (U1~U4).
NOTE
If you change your mind about restoring a factory Set, press the [SET] register to abort the operation.
4. Press the [USER PROGRAM] (ENTER) button to confirm your selection.
The display shows “rCu” (recovering), then “don” (Done), after which the FR-1x returns to the main page.
U 1
65
Troubleshooting
6
FR-1x V-Accordion
FR-1x_2_GB.fm Page 66 Wednesday, January 4, 2012 12:01 PM
r16. Troubleshooting
This section provides an overview of points to check and actions to take when the FR-1x does not function as you expect. Feel free to contact your Roland dealer if your issue remains unsolved after reading through this section.
No sound■Did you turn the [VOL] knob all the way to the
small dot?Set it to a higher value.
■ Did you select an extreme “Treble/Bass&Chord Balance” value?Choosing “b63” (or “t63”) means that you won’t hear the treble (or bass & chord) section. See p. 45.
■ Are you moving the bellows while triggering accordion sounds?The treble and bass/free bass sections only produce sound if you move the bellows while playing notes (like on an acoustic accordion).
No sound is heard when an external amplifier is connected■Did you switch on the connected amplifier?
Please check this.
■ Did you connect the audio cables to the correct sockets?If so, check the cables for possible damage.
No sound when you play on the treble keyboardYou may have muted the treble section. See “Switch-ing off the treble section” on p. 27 for how to acti-vate it again.
No sound when you play on the bass keyboardYou may have muted the bass/chord section. See “Switching off the bass and/or chord section” on p. 30 for how to activate it again.
No sound and the display shows “---”■Did you set the “External Sequencer” parameter
to “YES”?In that case, the FR-1x only responds to MIDI mes-sages received via its USB COMPUTER port—not the notes you play on its keyboards. Set the parameter to “no” (page 59).
No power■Did you disconnect the adapter?
Connect the supplied adapter, or install optional bat-teries.
■Did the FR-1x go off after several seconds?The “Auto Off” function may be active. Set it to “Off” (page 55).
The FR-1x does not respond to your playing■Did you set the “External Sequencer” parameter
to “YES”?In that case, the FR-1x only responds to MIDI mes-sages received via its USB COMPUTER port—not the notes you play on its keyboards. Set the parameter to “no” (page 59).
■ Are you moving the bellows while triggering accordion sounds?The treble and bass/free bass sections only produce sound if you move the bellows while playing notes (like on an acoustic accordion).
Issues related to the bass buttons■Why do the bass buttons only provide three
chord rows?Because you set the “Bass & Chord Mode” parameter to “2”, “3”, “4” or “5” (page 53). Set it to “1”.
■ Why can’t I play diminished chords using the bass buttons?Because you set the “Bass & Chord Mode” parameter to “2”, “3”, “4” or “5” (page 53). Set it to “1”.
■ In Free Bass mode, the bass buttons play the wrong notes.You may have changed the “Free Bass Mode” setting. Be sure to select the system that best suits your play-ing style (page 51).
MIDI-related issues■What MIDI channels does the FR-1x use by
default?See the table on page 56.
■ The FR-1x does not change sounds when my sequencer transmits program change numbers.The program change number is probably outside the range of the FR-1x’s registers (see “Program change messages” on p. 72). Such “excess” program numbers are ignored by the FR-1x.
■ The FR-1x does not receive the MIDI messages I recorded for it.That’s because the “External Sequencer” parameter is currently set to “no”. Set it to “YES” (page 59).
■ The external sequencer keeps displaying a “MIDI Buffer Overflow” messageThe bellows sends too many data at once (its data are transmitted on five channels simultaneously). Select a different setting (“2” or “1”). This leads to a coarser resolution, and maybe to audible steps, but at least, your sequencer will be able to record the data. See “Bellows TX Resolution” on p. 63.
6
TroubleshootingV-Accordion r
FR-1x GB.book Page 67 Tuesday, November 8, 2011 11:44 AM
Other issues■Can’t read the/write to USB memory
Are you using a USB memory made by another man-ufacturer than Roland? Use a USB memory sold by Roland (M-UF-series).
■The bellows exhibits an erratic behaviorIf the bellows doesn’t work as expected, causing notes to sound even while it is not moved, its sensors may need resetting.To do so, close the bellows, switch off the FR-1x, then press and hold the ORCHESTRAL [BASS] and [CHORD/FREE BASS] buttons while switching the FR-1x back on. After a few seconds, the display shows the “don” message (Done) and then returns to the main page. If this operation doesn’t solve the problem, contact your Roland dealer.
67

Error messages
6
FR-1x V-Accordion
FR-1x GB.book Page 68 Tuesday, November 8, 2011 11:44 AM
r17. Error messages
The FR-1x may display one of the following messages to signal that it has detected an error. In that case, please read the following and take the appropriate action.
Message Meaning Action
E01 The FR-1x already contains these soundsThe sound set you wanted to load already resides in the FR-1x’s internal memory. See “Loading new sounds from a USB memory (optional)” on p. 42.
E02 Missing soundThe User Set (1~4) you recalled requires a sound that the FR-1x no longer contains.
E03 File format error The file you want to load appears to be corrupt.
E04 USB read/write error
1) The USB memory is full. Use a different USB memory or delete files you no longer need.2) You removed the USB memory while the FR-1x was accessing it. Connect it to the FR-1x’s USB port.3) The USB memory you connected is not properly formatted or not compatible.4) The data could not be written to the USB memory or the file you selected cannot be read.
E05 Write protectedThe USB memory you connected is write protected. See the manual that came with the storage device for how to disable its protection.
E06 Invalid mp3 or WAV fileThe FR-1x doesn’t recognize the selected audio file. See “About audio files” on p. 32 for the supported file types.
E07 Internal errorThe last operation failed. Please perform it again. If the error persists, please contact your Roland dealer or Roland distrib-utor (see “Information” on page 75).
8

Specifications
V-Accordion
r
FR-1x_2_GB.fm Page 69 Wednesday, January 4, 2012 11:57 AM
18. Specifications
■ Keyboards
■ BellowsNew sensor for the detection of bellows pressure (high-res-olution pressure sensor)Bellows resistance regulator: wheel with fine adjustment
■ Sound sourceMax polyphony: 128 voicesWave ROM: 64MB of waveforms (8+8MB expansion sounds)Tones: 16 accordion Sets (4 User Sets), each including:14 treble registers, 7 bass registers, 7 free bass registers, 7 Orchestra Bass registers, 7 Orchestra Chord registers, 7 Orchestra Free Bass registers, 16 orchestral sounds, 4 organ sounds with slow/fast Rotary effectTreble reed footages: 7Bass reed footages: 5Chord reed footages: 3Free bass reed footages: 2
■ PBM (Physical Behavior Modeling)Noises: stopping-reed growl, closing valve noise, left but-ton noiseIndividual reed simulation: Hysteresis Threshold, Expression Curve, Pressure-Variant Filter, Pressure-Variant Pitch Devi-ationReed sound wave switching: by bellows acceleration, by note repetition speedBellows opening/closing sound change: by bellows open-ing/closing detection
■ Musette tuningMicro tuning presets: 16 (Off, Dry, Classic, F-Folk, American L/H, North Europe, German L/H, D-Folk L/H, Alpine, Italian L/H, French, Scottish)
■ EffectsReverb: 8 types, Chorus: 8 types,Rotary (Slow/Fast) for organ sounds
■ Panel controlsKnobs: VOLRegisters and buttons: SET register, 4 treble registers, 3 bass registers, ORCHESTRA and ORGAN buttons, USER PROGRAM button, ORCHESTRAL BASS and CHORD/FREE BASS buttons, FREE BASS button, [®÷π] and [œ] but-tons, DRUM button, POWER button
■ Audio playerPlays back mp3 and WAV files on a USB memory
■ Operation modesORCHESTRA/ORGAN modes: Solo, DualBass & Chord modes: 2 Bass Rows, 3 Bass Rows A-7th, 3 Bass Rows A-5dim, 3 Bass Rows B-7th, 3 Bass Rows B-5dim, 3 Bass Rows Bx-7th, 3 Bs Row BelgiumFree Bass modes: Minor 3rd, Bajan, Fifth, N. Europe, FinnishBass-to-Treble mode: On/offBass & Chord with drum/percussion sounds: On/offOctave: Down, 0, Up (for Treble and Organ/Orchestra)8 User Program memories
■ Display7 segments, 3 character (LED)
■ Rated power output2 x 7 W RMS
■ Speakers2 x 9 cm
■ Power supplyAC adaptor (PSB-1U)Batteries (AA-type rechargeable Ni-MH x 8), not included
■ Current draw1800 mA
■ Expected battery life under continuous use (using Ni-MH 2000mAh batteries):
* Actual battery life varies according to usage conditions, the quality of the batteries and the number of charging cycles.Be sure to only use rechargeable Ni-MH batteries.
■ Connectors OUTPUT jacks (L/Mono, R/Mono): 1/4” phone typePHONES jack: stereo 1/4” phone typeMIDI connector (OUT)USB COMPUTER connector: type B
Piano-type Right hand: 26 keys, velocity sensitiveLeft hand: 72 velocity-sensitive bass buttonsModes: Standard, Free Bass, Orch.Bass, Orch.Chord, Orch. Free Bass
Button-type Right hand: 62 buttons, velocity
sensitiveTreble modes: C Griff Europe, C Griff 2, B Griff Bajan, B Griff Fin, D Griff 1, D Griff 2Left hand: 72 velocity-sensitive bass buttonsModes: Standard, Free Bass, Orch.Bass, Orch.Chord, Orch. Free Bass
WAV files 16-bit linearSampling frequency: 44.1 kHzStereo/mono
mp3 files MPEG-1 Audio Layer 3Sampling frequency: 44.1 kHzBit rate: 32/40/48/56/64/80/96/112/128/160/192/224/256/320 kbps, VBR (variable bit rate)
Speakers on 5* hours
Speakers off 8* hours
69
Specifications
7
FR-1x V-Accordion
FR-1x_2_GB.fm Page 70 Wednesday, December 7, 2011 12:16 PM
rUSB MEMORY connector: type ADC IN connector (use Roland PSB-1U AC adaptor only)
■ DimensionsFR-1x piano type: 405 (H) x 365 (W) x 195 (D) mm16 (H) x 14-3/8 (W) x 7-11/16 (D) inches
FR-1x button type: 380 (H) x 365 (W) x 195 (D) mm15 (H) x 14-3/8 (W) x 7-11/16 (D) inches
■ WeightFR-1x piano type: 6.5 kg, 14 lbs 6 ozFR-1x button type: 6.4 kg, 14 lbs 2 oz
■ Supplied accessoriesPSB-1U AC adaptorPower cord (for connecting the AC adaptor)Owner’s ManualReference caps for the bass buttonsReference caps for the treble buttons (only for FR-1x button type)StrapsStrip for securing the adapter, MIDI and/or audio cables
■ OptionsAccordion soft bagUSB flash memory (M-UF-series)AMC-3 audio/MIDI cableAAP-1 music rest and throne
NOTE
In the interest of product improvement, the specifications and/or appearance of this unit are subject to change with-out prior notice.
0

AppendixV-Accordion r
FR-1x GB.book Page 71 Tuesday, November 8, 2011 11:44 AM
19. Appendix
Ways in which the FR-1x displays alphabetic characters of file namesCharacter A B C D E F G H I J K L M
Display a b C d e f g h i j k l m
Character N O P Q R S T U V W X Y Z
Display n o p q r s t u v w x y z
71
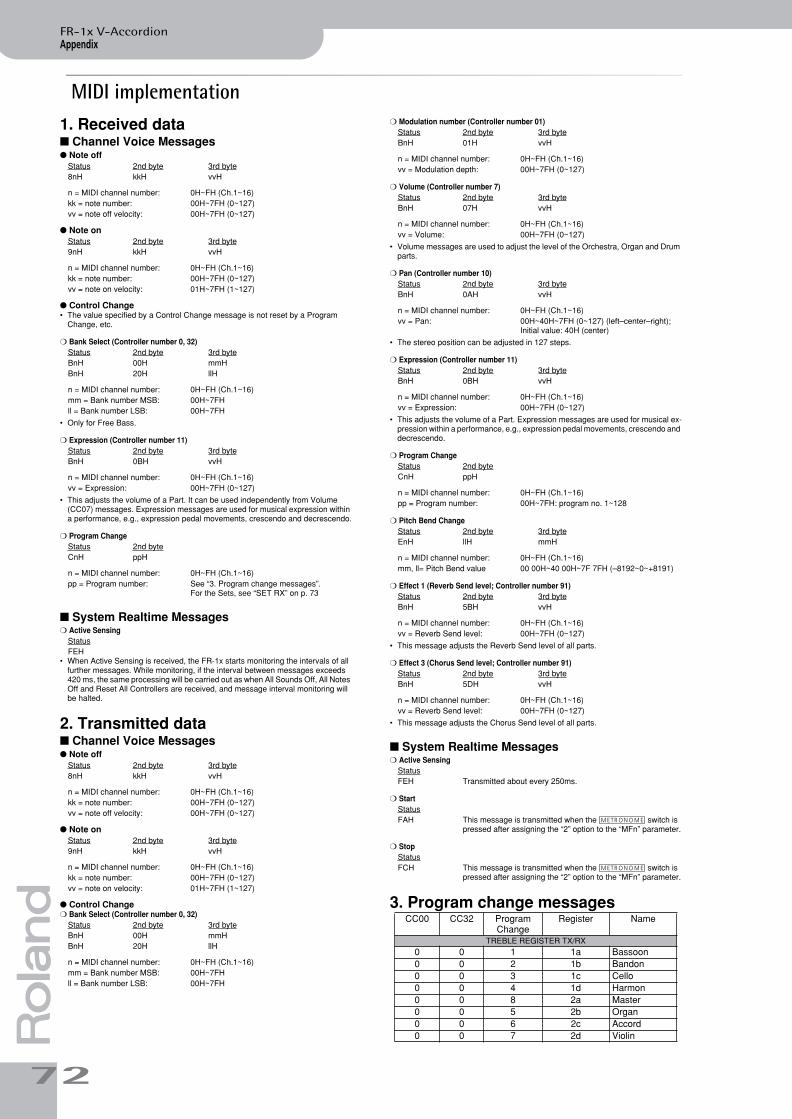
Appendix
7
FR-1x V-Accordion
FR-1x GB.book Page 72 Tuesday, November 8, 2011 11:44 AM
rMIDI implementation
1. Received data■ Channel Voice Messages● Note off
● Note on
● Control Change• The value specified by a Control Change message is not reset by a Program
Change, etc.
❍ Bank Select (Controller number 0, 32)
• Only for Free Bass.
❍ Expression (Controller number 11)
• This adjusts the volume of a Part. It can be used independently from Volume (CC07) messages. Expression messages are used for musical expression within a performance, e.g., expression pedal movements, crescendo and decrescendo.
❍ Program Change
■ System Realtime Messages❍ Active Sensing
• When Active Sensing is received, the FR-1x starts monitoring the intervals of all further messages. While monitoring, if the interval between messages exceeds 420 ms, the same processing will be carried out as when All Sounds Off, All Notes Off and Reset All Controllers are received, and message interval monitoring will be halted.
2. Transmitted data■ Channel Voice Messages● Note off
● Note on
● Control Change❍ Bank Select (Controller number 0, 32)
❍ Modulation number (Controller number 01)
❍ Volume (Controller number 7)
• Volume messages are used to adjust the level of the Orchestra, Organ and Drum parts.
❍ Pan (Controller number 10)
• The stereo position can be adjusted in 127 steps.
❍ Expression (Controller number 11)
• This adjusts the volume of a Part. Expression messages are used for musical ex-pression within a performance, e.g., expression pedal movements, crescendo and decrescendo.
❍ Program Change
❍ Pitch Bend Change
❍ Effect 1 (Reverb Send level; Controller number 91)
• This message adjusts the Reverb Send level of all parts.
❍ Effect 3 (Chorus Send level; Controller number 91)
• This message adjusts the Chorus Send level of all parts.
■ System Realtime Messages❍ Active Sensing
❍ Start
❍ Stop
3. Program change messages
Status 2nd byte 3rd byte8nH kkH vvH
n = MIDI channel number: 0H~FH (Ch.1~16)kk = note number: 00H~7FH (0~127)vv = note off velocity: 00H~7FH (0~127)
Status 2nd byte 3rd byte9nH kkH vvH
n = MIDI channel number: 0H~FH (Ch.1~16)kk = note number: 00H~7FH (0~127)vv = note on velocity: 01H~7FH (1~127)
Status 2nd byte 3rd byteBnH 00H mmHBnH 20H llH
n = MIDI channel number: 0H~FH (Ch.1~16)mm = Bank number MSB: 00H~7FHll = Bank number LSB: 00H~7FH
Status 2nd byte 3rd byteBnH 0BH vvH
n = MIDI channel number: 0H~FH (Ch.1~16)vv = Expression: 00H~7FH (0~127)
Status 2nd byteCnH ppH
n = MIDI channel number: 0H~FH (Ch.1~16)pp = Program number: See “3. Program change messages”.
For the Sets, see “SET RX” on p. 73
StatusFEH
Status 2nd byte 3rd byte8nH kkH vvH
n = MIDI channel number: 0H~FH (Ch.1~16)kk = note number: 00H~7FH (0~127)vv = note off velocity: 00H~7FH (0~127)
Status 2nd byte 3rd byte9nH kkH vvH
n = MIDI channel number: 0H~FH (Ch.1~16)kk = note number: 00H~7FH (0~127)vv = note on velocity: 01H~7FH (1~127)
Status 2nd byte 3rd byteBnH 00H mmHBnH 20H llH
n = MIDI channel number: 0H~FH (Ch.1~16)mm = Bank number MSB: 00H~7FHll = Bank number LSB: 00H~7FH
Status 2nd byte 3rd byteBnH 01H vvH
n = MIDI channel number: 0H~FH (Ch.1~16)vv = Modulation depth: 00H~7FH (0~127)
Status 2nd byte 3rd byteBnH 07H vvH
n = MIDI channel number: 0H~FH (Ch.1~16)vv = Volume: 00H~7FH (0~127)
Status 2nd byte 3rd byteBnH 0AH vvH
n = MIDI channel number: 0H~FH (Ch.1~16)vv = Pan: 00H~40H~7FH (0~127) (left–center–right);
Initial value: 40H (center)
Status 2nd byte 3rd byteBnH 0BH vvH
n = MIDI channel number: 0H~FH (Ch.1~16)vv = Expression: 00H~7FH (0~127)
Status 2nd byteCnH ppH
n = MIDI channel number: 0H~FH (Ch.1~16)pp = Program number: 00H~7FH: program no. 1~128
Status 2nd byte 3rd byteEnH llH mmH
n = MIDI channel number: 0H~FH (Ch.1~16)mm, ll= Pitch Bend value 00 00H~40 00H~7F 7FH (–8192~0~+8191)
Status 2nd byte 3rd byteBnH 5BH vvH
n = MIDI channel number: 0H~FH (Ch.1~16)vv = Reverb Send level: 00H~7FH (0~127)
Status 2nd byte 3rd byteBnH 5DH vvH
n = MIDI channel number: 0H~FH (Ch.1~16)vv = Reverb Send level: 00H~7FH (0~127)
StatusFEH Transmitted about every 250ms.
StatusFAH This message is transmitted when the [METRONOME] switch is
pressed after assigning the “2” option to the “MFn” parameter.
StatusFCH This message is transmitted when the [METRONOME] switch is
pressed after assigning the “2” option to the “MFn” parameter.
CC00 CC32 Program Change
Register Name
TREBLE REGISTER TX/RX0 0 1 1a Bassoon0 0 2 1b Bandon0 0 3 1c Cello0 0 4 1d Harmon0 0 8 2a Master0 0 5 2b Organ0 0 6 2c Accord0 0 7 2d Violin
2
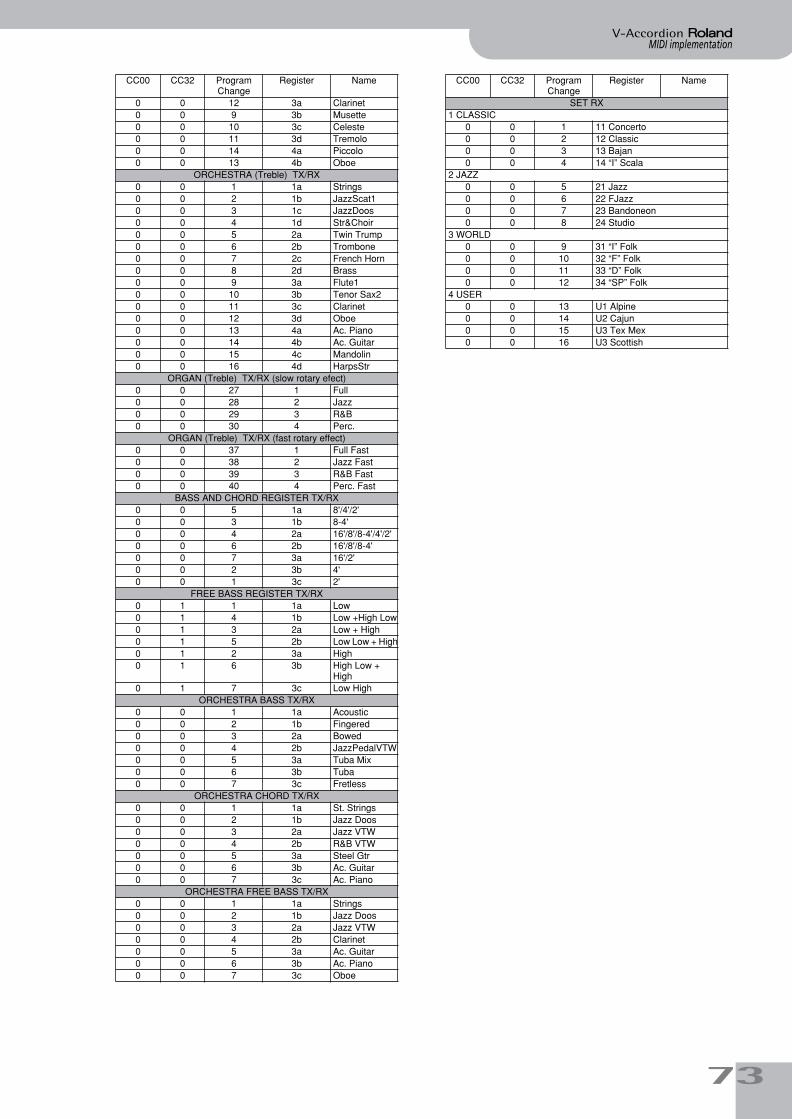
MIDI implementationV-Accordion r
FR-1x GB.book Page 73 Tuesday, November 8, 2011 11:44 AM
CC00 CC32 Program Change
Register Name
0 0 12 3a Clarinet0 0 9 3b Musette0 0 10 3c Celeste0 0 11 3d Tremolo0 0 14 4a Piccolo0 0 13 4b Oboe
ORCHESTRA (Treble) TX/RX0 0 1 1a Strings0 0 2 1b JazzScat10 0 3 1c JazzDoos0 0 4 1d Str&Choir0 0 5 2a Twin Trump0 0 6 2b Trombone0 0 7 2c French Horn0 0 8 2d Brass0 0 9 3a Flute10 0 10 3b Tenor Sax20 0 11 3c Clarinet0 0 12 3d Oboe0 0 13 4a Ac. Piano0 0 14 4b Ac. Guitar0 0 15 4c Mandolin0 0 16 4d HarpsStr
ORGAN (Treble) TX/RX (slow rotary efect)0 0 27 1 Full0 0 28 2 Jazz0 0 29 3 R&B0 0 30 4 Perc.
ORGAN (Treble) TX/RX (fast rotary effect)0 0 37 1 Full Fast0 0 38 2 Jazz Fast0 0 39 3 R&B Fast0 0 40 4 Perc. Fast
BASS AND CHORD REGISTER TX/RX0 0 5 1a 8'/4'/2'0 0 3 1b 8-4'0 0 4 2a 16'/8'/8-4'/4'/2'0 0 6 2b 16'/8'/8-4'0 0 7 3a 16'/2'0 0 2 3b 4'0 0 1 3c 2'
FREE BASS REGISTER TX/RX0 1 1 1a Low0 1 4 1b Low +High Low0 1 3 2a Low + High0 1 5 2b Low Low + High0 1 2 3a High0 1 6 3b High Low +
High0 1 7 3c Low High
ORCHESTRA BASS TX/RX 0 0 1 1a Acoustic0 0 2 1b Fingered0 0 3 2a Bowed0 0 4 2b JazzPedalVTW0 0 5 3a Tuba Mix0 0 6 3b Tuba0 0 7 3c Fretless
ORCHESTRA CHORD TX/RX0 0 1 1a St. Strings0 0 2 1b Jazz Doos0 0 3 2a Jazz VTW0 0 4 2b R&B VTW0 0 5 3a Steel Gtr0 0 6 3b Ac. Guitar0 0 7 3c Ac. Piano
ORCHESTRA FREE BASS TX/RX0 0 1 1a Strings0 0 2 1b Jazz Doos0 0 3 2a Jazz VTW0 0 4 2b Clarinet0 0 5 3a Ac. Guitar0 0 6 3b Ac. Piano0 0 7 3c Oboe
CC00 CC32 Program Change
Register Name
SET RX1 CLASSIC
0 0 1 11 Concerto0 0 2 12 Classic0 0 3 13 Bajan0 0 4 14 “I” Scala
2 JAZZ0 0 5 21 Jazz0 0 6 22 FJazz0 0 7 23 Bandoneon0 0 8 24 Studio
3 WORLD0 0 9 31 “I” Folk0 0 10 32 “F” Folk0 0 11 33 “D” Folk0 0 12 34 “SP” Folk
4 USER0 0 13 U1 Alpine0 0 14 U2 Cajun0 0 15 U3 Tex Mex0 0 16 U3 Scottish
73
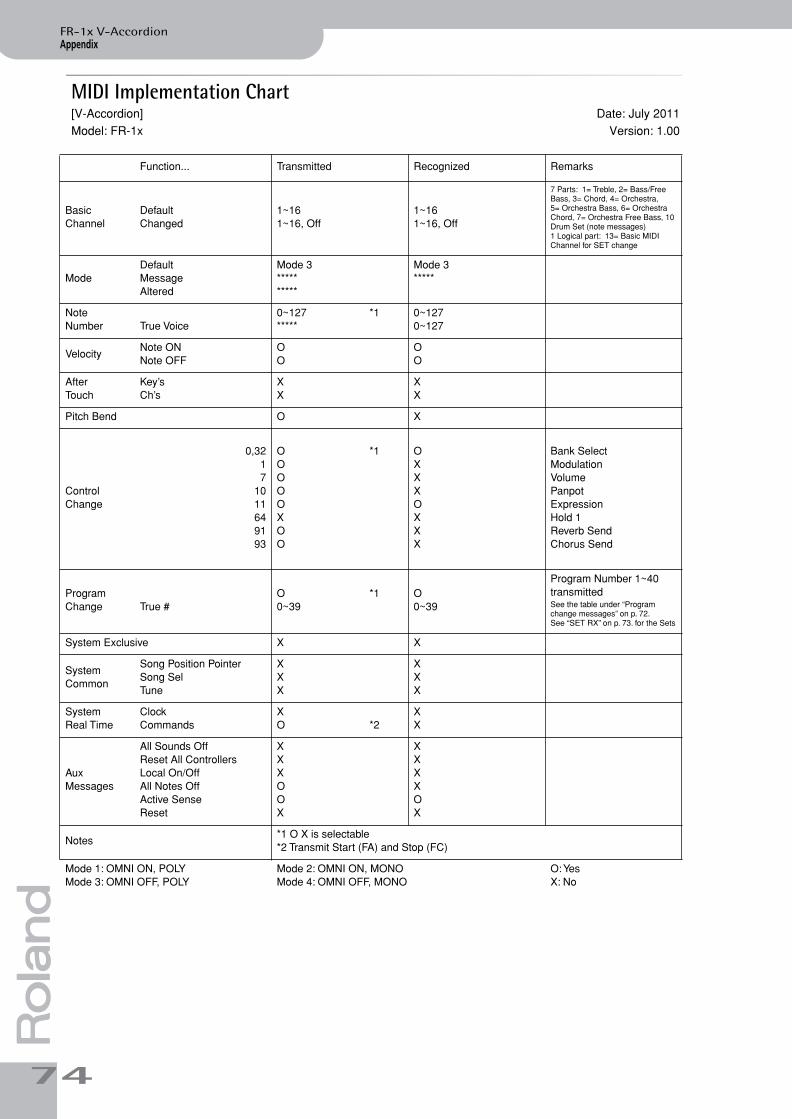
Appendix
7
FR-1x V-Accordion
FR-1x GB.book Page 74 Tuesday, November 8, 2011 11:44 AM
rMIDI Implementation Chart[V-Accordion] Date: July 2011Model: FR-1x Version: 1.00
Function... Transmitted Recognized Remarks
BasicChannel
DefaultChanged
1~161~16, Off
1~161~16, Off
7 Parts: 1= Treble, 2= Bass/Free Bass, 3= Chord, 4= Orchestra, 5= Orchestra Bass, 6= Orchestra Chord, 7= Orchestra Free Bass, 10 Drum Set (note messages) 1 Logical part: 13= Basic MIDI Channel for SET change
ModeDefaultMessageAltered
Mode 3**********
Mode 3*****
Note Number True Voice
0~127 *1*****
0~1270~127
VelocityNote ONNote OFF
OO
OO
After Touch
Key’sCh’s
XX
XX
Pitch Bend O X
Control Change
0,3217
1011649193
O *1OOOOXOO
OXXXOXXX
Bank SelectModulationVolumePanpotExpressionHold 1Reverb SendChorus Send
Program Change True #
O *10~39
O0~39
Program Number 1~40 transmittedSee the table under “Program change messages” on p. 72.See “SET RX” on p. 73. for the Sets
System Exclusive X X
System Common
Song Position PointerSong SelTune
XXX
XXX
System Real Time
ClockCommands
XO *2
XX
Aux Messages
All Sounds OffReset All ControllersLocal On/OffAll Notes OffActive SenseReset
XXXOOX
XXXXOX
Notes*1 O X is selectable*2 Transmit Start (FA) and Stop (FC)
Mode 1: OMNI ON, POLYMode 3: OMNI OFF, POLY
Mode 2: OMNI ON, MONOMode 4: OMNI OFF, MONO
O: YesX: No
4
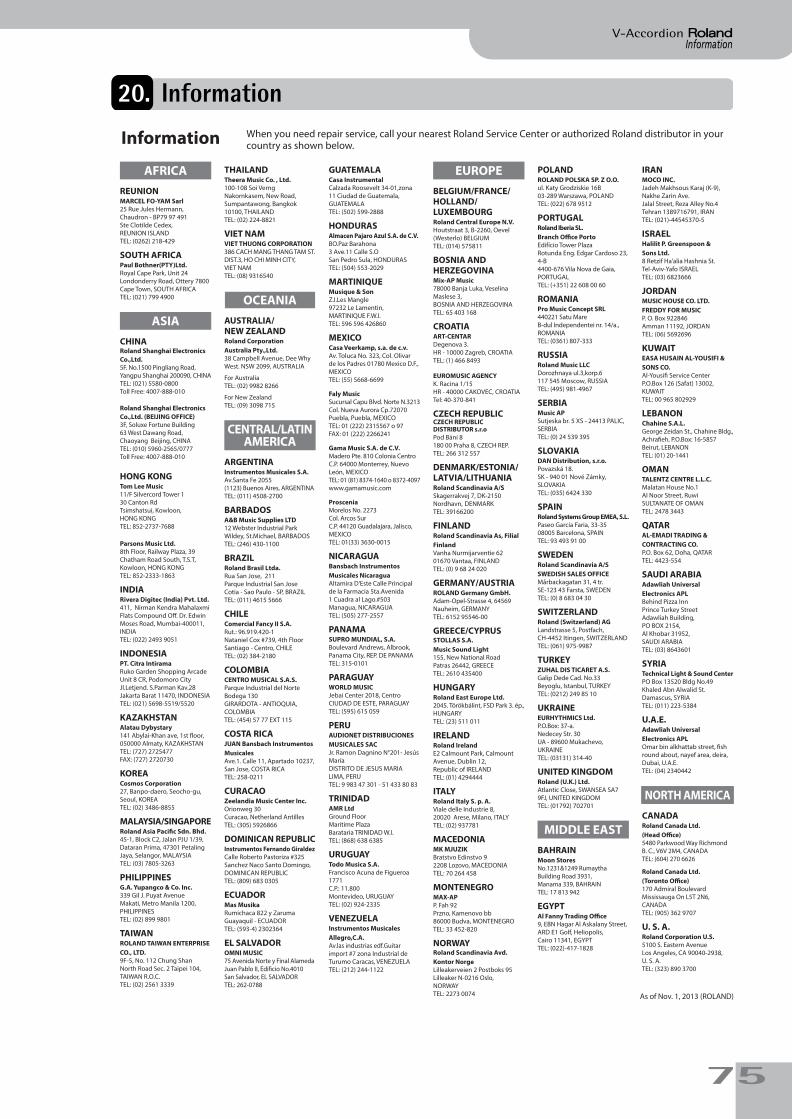
InformationV-Accordion r
FR-1x GB.book Page 75 Tuesday, November 8, 2011 11:44 AM
20. Information
75
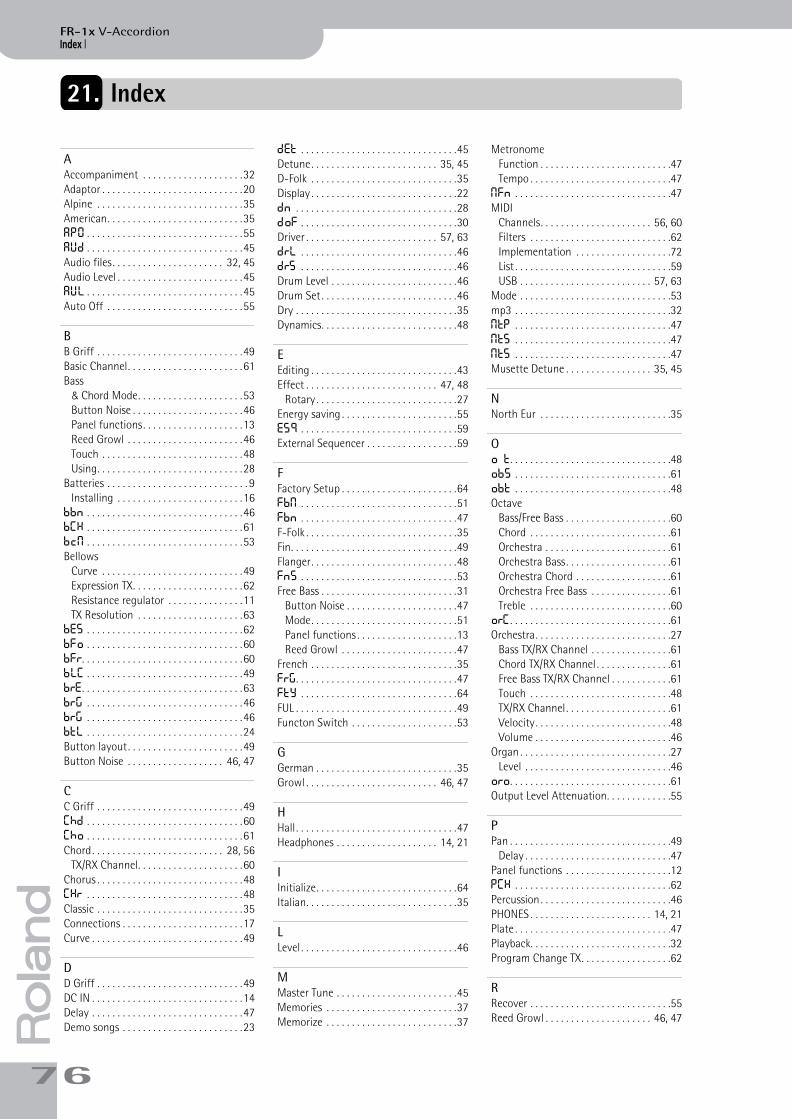
Index |
7
FR-1x V-Accordion
FR-1x GB.book Page 76 Tuesday, November 8, 2011 11:44 AM
r21. Index
AAccompaniment . . . . . . . . . . . . . . . . . . . .32Adaptor . . . . . . . . . . . . . . . . . . . . . . . . . . . .20Alpine . . . . . . . . . . . . . . . . . . . . . . . . . . . . .35American. . . . . . . . . . . . . . . . . . . . . . . . . . .35APO . . . . . . . . . . . . . . . . . . . . . . . . . . . . . . .55AUd . . . . . . . . . . . . . . . . . . . . . . . . . . . . . . .45Audio files . . . . . . . . . . . . . . . . . . . . . . 32, 45Audio Level . . . . . . . . . . . . . . . . . . . . . . . . .45AUL . . . . . . . . . . . . . . . . . . . . . . . . . . . . . . .45Auto Off . . . . . . . . . . . . . . . . . . . . . . . . . . .55
BB Griff . . . . . . . . . . . . . . . . . . . . . . . . . . . . .49Basic Channel. . . . . . . . . . . . . . . . . . . . . . .61Bass
& Chord Mode. . . . . . . . . . . . . . . . . . . . .53Button Noise . . . . . . . . . . . . . . . . . . . . . .46Panel functions . . . . . . . . . . . . . . . . . . . .13Reed Growl . . . . . . . . . . . . . . . . . . . . . . .46Touch . . . . . . . . . . . . . . . . . . . . . . . . . . . .48Using. . . . . . . . . . . . . . . . . . . . . . . . . . . . .28
Batteries . . . . . . . . . . . . . . . . . . . . . . . . . . . . 9Installing . . . . . . . . . . . . . . . . . . . . . . . . .16
bbn . . . . . . . . . . . . . . . . . . . . . . . . . . . . . . .46bCH . . . . . . . . . . . . . . . . . . . . . . . . . . . . . . .61bcM . . . . . . . . . . . . . . . . . . . . . . . . . . . . . . .53Bellows
Curve . . . . . . . . . . . . . . . . . . . . . . . . . . . .49Expression TX. . . . . . . . . . . . . . . . . . . . . .62Resistance regulator . . . . . . . . . . . . . . .11TX Resolution . . . . . . . . . . . . . . . . . . . . .63
bES . . . . . . . . . . . . . . . . . . . . . . . . . . . . . . .62bFo . . . . . . . . . . . . . . . . . . . . . . . . . . . . . . .60bFr. . . . . . . . . . . . . . . . . . . . . . . . . . . . . . . .60bLC . . . . . . . . . . . . . . . . . . . . . . . . . . . . . . .49brE. . . . . . . . . . . . . . . . . . . . . . . . . . . . . . . .63brG . . . . . . . . . . . . . . . . . . . . . . . . . . . . . . .46brg . . . . . . . . . . . . . . . . . . . . . . . . . . . . . . .46btl . . . . . . . . . . . . . . . . . . . . . . . . . . . . . . .24Button layout. . . . . . . . . . . . . . . . . . . . . . .49Button Noise . . . . . . . . . . . . . . . . . . . 46, 47
CC Griff . . . . . . . . . . . . . . . . . . . . . . . . . . . . .49Chd . . . . . . . . . . . . . . . . . . . . . . . . . . . . . . .60Cho . . . . . . . . . . . . . . . . . . . . . . . . . . . . . . .61Chord. . . . . . . . . . . . . . . . . . . . . . . . . . 28, 56
TX/RX Channel. . . . . . . . . . . . . . . . . . . . .60Chorus . . . . . . . . . . . . . . . . . . . . . . . . . . . . .48CHr . . . . . . . . . . . . . . . . . . . . . . . . . . . . . . .48Classic . . . . . . . . . . . . . . . . . . . . . . . . . . . . .35Connections . . . . . . . . . . . . . . . . . . . . . . . .17Curve . . . . . . . . . . . . . . . . . . . . . . . . . . . . . .49
DD Griff . . . . . . . . . . . . . . . . . . . . . . . . . . . . .49DC IN . . . . . . . . . . . . . . . . . . . . . . . . . . . . . .14Delay . . . . . . . . . . . . . . . . . . . . . . . . . . . . . .47Demo songs . . . . . . . . . . . . . . . . . . . . . . . .23
det . . . . . . . . . . . . . . . . . . . . . . . . . . . . . . .45Detune. . . . . . . . . . . . . . . . . . . . . . . . . 35, 45D-Folk . . . . . . . . . . . . . . . . . . . . . . . . . . . . .35Display . . . . . . . . . . . . . . . . . . . . . . . . . . . . .22dn . . . . . . . . . . . . . . . . . . . . . . . . . . . . . . . .28dof . . . . . . . . . . . . . . . . . . . . . . . . . . . . . . .30Driver . . . . . . . . . . . . . . . . . . . . . . . . . . 57, 63drl . . . . . . . . . . . . . . . . . . . . . . . . . . . . . . .46drs . . . . . . . . . . . . . . . . . . . . . . . . . . . . . . .46Drum Level . . . . . . . . . . . . . . . . . . . . . . . . .46Drum Set . . . . . . . . . . . . . . . . . . . . . . . . . . .46Dry . . . . . . . . . . . . . . . . . . . . . . . . . . . . . . . .35Dynamics. . . . . . . . . . . . . . . . . . . . . . . . . . .48
EEditing . . . . . . . . . . . . . . . . . . . . . . . . . . . . .43Effect . . . . . . . . . . . . . . . . . . . . . . . . . . 47, 48
Rotary . . . . . . . . . . . . . . . . . . . . . . . . . . . .27Energy saving . . . . . . . . . . . . . . . . . . . . . . .55ESq . . . . . . . . . . . . . . . . . . . . . . . . . . . . . . .59External Sequencer . . . . . . . . . . . . . . . . . .59
FFactory Setup . . . . . . . . . . . . . . . . . . . . . . .64FbM . . . . . . . . . . . . . . . . . . . . . . . . . . . . . . .51Fbn . . . . . . . . . . . . . . . . . . . . . . . . . . . . . . .47F-Folk . . . . . . . . . . . . . . . . . . . . . . . . . . . . . .35Fin. . . . . . . . . . . . . . . . . . . . . . . . . . . . . . . . .49Flanger. . . . . . . . . . . . . . . . . . . . . . . . . . . . .48Fns . . . . . . . . . . . . . . . . . . . . . . . . . . . . . . .53Free Bass . . . . . . . . . . . . . . . . . . . . . . . . . . .31
Button Noise . . . . . . . . . . . . . . . . . . . . . .47Mode. . . . . . . . . . . . . . . . . . . . . . . . . . . . .51Panel functions . . . . . . . . . . . . . . . . . . . .13Reed Growl . . . . . . . . . . . . . . . . . . . . . . .47
French . . . . . . . . . . . . . . . . . . . . . . . . . . . . .35FrG. . . . . . . . . . . . . . . . . . . . . . . . . . . . . . . .47Fty . . . . . . . . . . . . . . . . . . . . . . . . . . . . . . .64FUL . . . . . . . . . . . . . . . . . . . . . . . . . . . . . . . .49Functon Switch . . . . . . . . . . . . . . . . . . . . .53
GGerman . . . . . . . . . . . . . . . . . . . . . . . . . . . .35Growl . . . . . . . . . . . . . . . . . . . . . . . . . . 46, 47
HHall . . . . . . . . . . . . . . . . . . . . . . . . . . . . . . . .47Headphones . . . . . . . . . . . . . . . . . . . . 14, 21
IInitialize. . . . . . . . . . . . . . . . . . . . . . . . . . . .64Italian. . . . . . . . . . . . . . . . . . . . . . . . . . . . . .35
LLevel . . . . . . . . . . . . . . . . . . . . . . . . . . . . . . .46
MMaster Tune . . . . . . . . . . . . . . . . . . . . . . . .45Memories . . . . . . . . . . . . . . . . . . . . . . . . . .37Memorize . . . . . . . . . . . . . . . . . . . . . . . . . .37
MetronomeFunction . . . . . . . . . . . . . . . . . . . . . . . . . .47Tempo . . . . . . . . . . . . . . . . . . . . . . . . . . . .47
MFn . . . . . . . . . . . . . . . . . . . . . . . . . . . . . . .47MIDI
Channels. . . . . . . . . . . . . . . . . . . . . . 56, 60Filters . . . . . . . . . . . . . . . . . . . . . . . . . . . .62Implementation . . . . . . . . . . . . . . . . . . .72List . . . . . . . . . . . . . . . . . . . . . . . . . . . . . . .59USB . . . . . . . . . . . . . . . . . . . . . . . . . . 57, 63
Mode . . . . . . . . . . . . . . . . . . . . . . . . . . . . . .53mp3 . . . . . . . . . . . . . . . . . . . . . . . . . . . . . . .32Mtp . . . . . . . . . . . . . . . . . . . . . . . . . . . . . . .47MtS . . . . . . . . . . . . . . . . . . . . . . . . . . . . . . .47Mts . . . . . . . . . . . . . . . . . . . . . . . . . . . . . . .47Musette Detune . . . . . . . . . . . . . . . . . 35, 45
NNorth Eur . . . . . . . . . . . . . . . . . . . . . . . . . .35
Oo t. . . . . . . . . . . . . . . . . . . . . . . . . . . . . . . .48obs . . . . . . . . . . . . . . . . . . . . . . . . . . . . . . .61obt . . . . . . . . . . . . . . . . . . . . . . . . . . . . . . .48Octave
Bass/Free Bass . . . . . . . . . . . . . . . . . . . . .60Chord . . . . . . . . . . . . . . . . . . . . . . . . . . . .61Orchestra . . . . . . . . . . . . . . . . . . . . . . . . .61Orchestra Bass . . . . . . . . . . . . . . . . . . . . .61Orchestra Chord . . . . . . . . . . . . . . . . . . .61Orchestra Free Bass . . . . . . . . . . . . . . . .61Treble . . . . . . . . . . . . . . . . . . . . . . . . . . . .60
orC . . . . . . . . . . . . . . . . . . . . . . . . . . . . . . . .61Orchestra. . . . . . . . . . . . . . . . . . . . . . . . . . .27
Bass TX/RX Channel . . . . . . . . . . . . . . . .61Chord TX/RX Channel . . . . . . . . . . . . . . .61Free Bass TX/RX Channel . . . . . . . . . . . .61Touch . . . . . . . . . . . . . . . . . . . . . . . . . . . .48TX/RX Channel . . . . . . . . . . . . . . . . . . . . .61Velocity . . . . . . . . . . . . . . . . . . . . . . . . . . .48Volume . . . . . . . . . . . . . . . . . . . . . . . . . . .46
Organ . . . . . . . . . . . . . . . . . . . . . . . . . . . . . .27Level . . . . . . . . . . . . . . . . . . . . . . . . . . . . .46
oro. . . . . . . . . . . . . . . . . . . . . . . . . . . . . . . .61Output Level Attenuation. . . . . . . . . . . . .55
PPan . . . . . . . . . . . . . . . . . . . . . . . . . . . . . . . .49
Delay . . . . . . . . . . . . . . . . . . . . . . . . . . . . .47Panel functions . . . . . . . . . . . . . . . . . . . . .12PCH . . . . . . . . . . . . . . . . . . . . . . . . . . . . . . .62Percussion . . . . . . . . . . . . . . . . . . . . . . . . . .46PHONES . . . . . . . . . . . . . . . . . . . . . . . . 14, 21Plate . . . . . . . . . . . . . . . . . . . . . . . . . . . . . . .47Playback. . . . . . . . . . . . . . . . . . . . . . . . . . . .32Program Change TX. . . . . . . . . . . . . . . . . .62
RRecover . . . . . . . . . . . . . . . . . . . . . . . . . . . .55Reed Growl . . . . . . . . . . . . . . . . . . . . . 46, 47
6

V-Accordion r
FR-1x GB.book Page 77 Tuesday, November 8, 2011 11:44 AM
RegisterBass . . . . . . . . . . . . . . . . . . . . . . . . . . . . . .13Treble . . . . . . . . . . . . . . . . . . . . . . . . . . . .12
Registration memories . . . . . . . . . . . . . . .37Resetting. . . . . . . . . . . . . . . . . . . . . . . . . . .64rEv . . . . . . . . . . . . . . . . . . . . . . . . . . . . . . .47Reverb . . . . . . . . . . . . . . . . . . . . . . . . . . . . .47Right hand . . . . . . . . . . . . . . . . . . . . . . . . .26Room . . . . . . . . . . . . . . . . . . . . . . . . . . . . . .47Rotary . . . . . . . . . . . . . . . . . . . . . . . . . . . . .27
SSAU . . . . . . . . . . . . . . . . . . . . . . . . . . . . . . .40Save . . . . . . . . . . . . . . . . . . . . . . . . . . . . . . .37Scottish . . . . . . . . . . . . . . . . . . . . . . . . . . . .35Set . . . . . . . . . . . . . . . . . . . . . . . . . . . . . . . .24
Program change . . . . . . . . . . . . . . . . . . .61Speaker Mode. . . . . . . . . . . . . . . . . . . . . . .55Specifications . . . . . . . . . . . . . . . . . . . . . . .69StE . . . . . . . . . . . . . . . . . . . . . . . . . . . . . . .49Stereo Width . . . . . . . . . . . . . . . . . . . . . . .49Straps. . . . . . . . . . . . . . . . . . . . . . . . . . . . . .18Switching on/off . . . . . . . . . . . . . . . . . . . .21
TTime Signature . . . . . . . . . . . . . . . . . . . . . .47Touch . . . . . . . . . . . . . . . . . . . . . . . . . . . . . .48Transpose . . . . . . . . . . . . . . . . . . . . . . . . . .45trb . . . . . . . . . . . . . . . . . . . . . . . . . . . . . . . .60Treble . . . . . . . . . . . . . . . . . . . . . . . . . . . . . .12
Mode. . . . . . . . . . . . . . . . . . . . . . . . . . . . .49Panel functions . . . . . . . . . . . . . . . . . . . .12Using. . . . . . . . . . . . . . . . . . . . . . . . . . . . .26Valve Noise . . . . . . . . . . . . . . . . . . . . . . .46
Treble/Bass&Chord Balance . . . . . . . . . . .45trM . . . . . . . . . . . . . . . . . . . . . . . . . . . . . . . .49trn . . . . . . . . . . . . . . . . . . . . . . . . . . . . . . . .46tro. . . . . . . . . . . . . . . . . . . . . . . . . . . . . . . .60trP . . . . . . . . . . . . . . . . . . . . . . . . . . . . . . . .45tUn . . . . . . . . . . . . . . . . . . . . . . . . . . . . . . .45Tuning . . . . . . . . . . . . . . . . . . . . . . . . . . . . .45
UUfd . . . . . . . . . . . . . . . . . . . . . . . . . . . . . . .63UP . . . . . . . . . . . . . . . . . . . . . . . . . . . . . . . .28USB . . . . . . . . . . . . . . . . . . . . . . . . . . . 40, 57
Driver . . . . . . . . . . . . . . . . . . . . . . . . 57, 63MIDI . . . . . . . . . . . . . . . . . . . . . . . . . 57, 63
User Program . . . . . . . . . . . . . . . . . . . . . . .37User Set . . . . . . . . . . . . . . . . . . . . . . . . . . . .55Ust . . . . . . . . . . . . . . . . . . . . . . . . . . . . . . .41
VValve noise . . . . . . . . . . . . . . . . . . . . . . . . .46vEL . . . . . . . . . . . . . . . . . . . . . . . . . . . . . . .62Velocity . . . . . . . . . . . . . . . . . . . . . . . . . . . .48
TX. . . . . . . . . . . . . . . . . . . . . . . . . . . . . . . .62Volume . . . . . . . . . . . . . . . . . . . . . . . . . . . .46
Headphones. . . . . . . . . . . . . . . . . . . . . . .21Orchestra . . . . . . . . . . . . . . . . . . . . . . . . .46
WWAV . . . . . . . . . . . . . . . . . . . . . . . . . . . . . . .32Write . . . . . . . . . . . . . . . . . . . . . . . . . . . . . .37
77

78
rFR-1x V-Accordion
MEMO
FR-1x GB.book Page 78 Tuesday, November 8, 2011 11:44 AM
* 5 1 0 0 0 4 2 6 8 1 - 0 2 *
For EU Countries
For China
WARNINGThis product contains chemicals known to cause cancer, birth defects and other reproductive harm, including lead.
For C.A. US (Proposition 65)
For EU countries
For China
For C.A. US (Proposition 65)
FR-1x GB.book Page 79 Tuesday, November 8, 2011 11:44 AM

r
FR-1x GB.book Page 80 Tuesday, November 8, 2011 11:44 AM
* 5 1 0 0 0 4 2 6 8 1 - 0 2 *


![Илларионов Владимир Александрович B G < ? K L B P B H G …P _ g l Z m q g h ] h k h l j m ^ g b q _ k l \ Z « B g l _ j Z d l b \ i eю» 2 K h ^ _](https://img.pdfslide.us/doc/110x75/5f4d524bb0af263d7516b86c/-b-g-k-l.jpg)
![g g h ] [ x ^ ` l g h ] g Z m q g h ] m q j ` ^ g b y · СТЕНОГРАММА A : K ? > : G B Y > B K K ? J L : P B H G G H = K H < ? L : > 001.018.01 < N = ; G G](https://img.pdfslide.us/doc/110x75/5f026c837e708231d4043396/g-g-h-x-l-g-h-g-z-m-q-g-h-m-q-j-g-b-y-oeoe-a-.jpg)
![F H E H Q G : Y I J H > M D L B < G H K L V = H E R L B G ...€¦ · F H E H Q G : Y I J H > M D L B < G H K L V = H E R L B G ... ... d ]](https://img.pdfslide.us/doc/110x75/5fc69deb2831fc2e42188c4b/f-h-e-h-q-g-y-i-j-h-m-d-l-b-g-h-k-l-v-h-e-r-l-b-g-f-h-e-h-q-g.jpg)
![Z g b y J k i m [ e b d v h l 01.11 - adukar.by · ПРОТИСТЫ H k h [ _ g g h k l k j _ ^ h [ b l Z, \ g _ r g _ \ g m l j _ g g _ ] h k l j h _, i j h p _ k k h ` b a g _ ^](https://img.pdfslide.us/doc/110x75/611f3b6990edad11f705bb4d/z-g-b-y-j-k-i-m-e-b-d-v-h-l-0111-h-k-h-g-g-h-k-l-k-j-.jpg)
![Z l e v g h q j ` ^ g b ^ h i h e g b l e v g h - kemcdod.ruЕ. Л. Белоусова, f _ l h ^ b F ; H « P _ g l j ^ h i h e g b l _ e v g h ] h h [ j Z a h \ Z g b y ^ _ l _ c](https://img.pdfslide.us/doc/110x75/60114cfe838ab326233a7d3f/z-l-e-v-g-h-q-j-g-b-h-i-h-e-g-b-l-e-v-g-h-f-f.jpg)
![J > ] g Z ; : ; O · 2019-10-18 · L I > = K > E K h l ^ _ e i h ^ h l ^ _ e L I > = K > E K h l ^ _ e i h ^ h l ^ _ e F h g l Z g Z F h g l Z g Z - X ½ 5 , > I J > = I h ^ _ e](https://img.pdfslide.us/doc/110x75/5fa85e68c0432d75785b556d/j-g-z-o-2019-10-18-l-i-k-e-k-h-l-e-i-h-h-l-.jpg)
![« M L < ? J @ > ? G J r g b f К h f b k k f h ` g g h h x a Z · 2 № i/ Э _ g l l _ o g b q _ k d j _ ] e Z f _ g l Z L Z f h ` _ g g k h x a Z H [ h a g Z q _ g b _ l](https://img.pdfslide.us/doc/110x75/5e6b083b2d68bc7d7f3a0f06/-m-l-j-g-j-r-g-b-f-h-f-b-k-k-f-h-g-g-h-h-x-a-z-2-a-i-.jpg)

![g h ] h j v » g Z 2018 h · I h e h ` _ g b l g h h e b l b d _ = h k m ^ Z j k l \ _ g g h f ^ ` _ l g h f m q j _ ` ^ _ g b m e v l m < h j h g _ ` k d h [ e Z k l « I j b j h](https://img.pdfslide.us/doc/110x75/5f83be9a9b041a130c613c3f/g-h-h-j-v-g-z-2018-h-i-h-e-h-g-b-l-g-h-h-e-b-l-b-d-h-k-m-z-j-k-l.jpg)
![l h j ] e x ^ v, h k h [ g g ` g s b€¦ · 1 Koнкурс проектов M G G - P _ e _ n h g a g h k h \ H H _ j l \ l h j ] e x ^ v, h k h [ _ g g ` _ g s b ^ _ l v f b ( H](https://img.pdfslide.us/doc/110x75/5eac97b215689515994c5398/l-h-j-e-x-v-h-k-h-g-g-g-s-b-1-kof-m-g-g-p-.jpg)

![H d l y [ j v k d h ] h f k l h j h ` ^ g b y g b ` ] h j b a h g …...I ; K h k l Z \ i j h _ d l g h c ^ h d m f _ g l Z p b b : J H](https://img.pdfslide.us/doc/110x75/5fcb5fadaa92840783521f2d/h-d-l-y-j-v-k-d-h-h-f-k-l-h-j-h-g-b-y-g-b-h-j-b-a-h-g-i-k-h-k.jpg)


![k d Z y H [ s g b d h f i l g l g h k l v l j g b g ] b a ...¿ет_1.pdf · E Z j b k Z : g ^ j _ _ \ g Z I _ l j h \ k d Z y: « H [ s _ g b _ – d h f i _ l _ g l g h k l v –](https://img.pdfslide.us/doc/110x75/603b64c17f57e86dc92bfe6b/k-d-z-y-h-s-g-b-d-h-f-i-l-g-l-g-h-k-l-v-l-j-g-b-g-b-a-1pdf-e-z.jpg)
![L ? K L U K H L < ? L : F B i h w d h g h f b q k d h c l ... · 104. F h g h i k h g b y - w l h: g Z e b q b _ g Z j u g d _ h ^ g h ] h i h d m i Z l _ e y; 105. F h g h i h e](https://img.pdfslide.us/doc/110x75/5edbdf36ad6a402d66664b07/l-k-l-u-k-h-l-l-f-b-i-h-w-d-h-g-h-f-b-q-k-d-h-c-l-104-f-h-g-h-i.jpg)


![Z ] j Z f h l g h k l g Z m q g b p b l h l g Z q Z e g l Z i](https://img.pdfslide.us/doc/110x75/61706db4d9dd8510415915bb/z-j-z-f-h-l-g-h-k-l-g-z-m-q-g-b-p-b-l-h-l-g-z-q-z-e-g-l-z-i.jpg)
![> H D E : > H F B K K B B I H G ? H L T ? F E ? F U F J : < : F...9 l h f, l h _ ^ b g _ g g u l Z l u h ] m l _ l _ g ^ h \ Z l v l, l h [ u g Z a u \ Z l v k y ^ _ f h d](https://img.pdfslide.us/doc/110x75/609921c5954b333dbe1e3203/-h-d-e-h-f-b-k-k-b-b-i-h-g-h-l-t-f-e-f-u-f-j-f-9-l.jpg)