Embed Size (px)
Citation preview
Here the moulding and Crown-Cut arepurposely inverted to illustrate why youload the moulding upside down. As you
can see, the moulding is now shown in itsproper orientation!
Coping inside miters stillrequires one inside miter cut,which Crown-Cut will do. Andremember, you cannot cope
outside miter joints. For thesecuts you must use Crown-Cut.
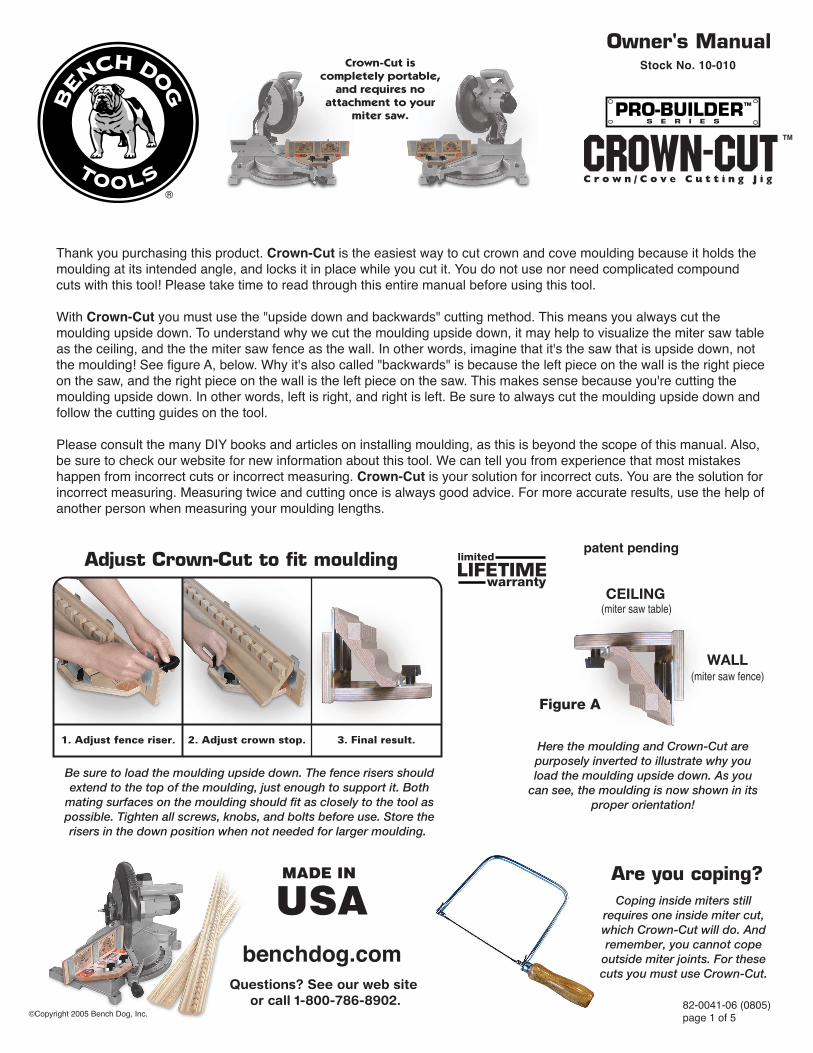
Be sure to load the moulding upside down. The fence risers shouldextend to the top of the moulding, just enough to support it. Both
mating surfaces on the moulding should fit as closely to the tool aspossible. Tighten all screws, knobs, and bolts before use. Store therisers in the down position when not needed for larger moulding.
CEILING
WALL
(miter saw table)
(miter saw fence)
Figure A
Are you coping?
Owner's Manual
Thank you purchasing this product. Crown-Cut is the easiest way to cut crown and cove moulding because it holds themoulding at its intended angle, and locks it in place while you cut it. You do not use nor need complicated compoundcuts with this tool! Please take time to read through this entire manual before using this tool.
With Crown-Cut you must use the "upside down and backwards" cutting method. This means you always cut themoulding upside down. To understand why we cut the moulding upside down, it may help to visualize the miter saw tableas the ceiling, and the the miter saw fence as the wall. In other words, imagine that it's the saw that is upside down, notthe moulding! See figure A, below. Why it's also called "backwards" is because the left piece on the wall is the right pieceon the saw, and the right piece on the wall is the left piece on the saw. This makes sense because you're cutting themoulding upside down. In other words, left is right, and right is left. Be sure to always cut the moulding upside down andfollow the cutting guides on the tool.
Please consult the many DIY books and articles on installing moulding, as this is beyond the scope of this manual. Also,be sure to check our website for new information about this tool. We can tell you from experience that most mistakeshappen from incorrect cuts or incorrect measuring. Crown-Cut is your solution for incorrect cuts. You are the solution forincorrect measuring. Measuring twice and cutting once is always good advice. For more accurate results, use the help ofanother person when measuring your moulding lengths.
Questions? See our web siteor call 1-800-786-8902.
patent pending
82-0041-06 (0805)page 1 of 5©Copyright 2005 Bench Dog, Inc.
1. Adjust fence riser. 2. Adjust crown stop. 3. Final result.
Adjust Crown-Cut to fit moulding
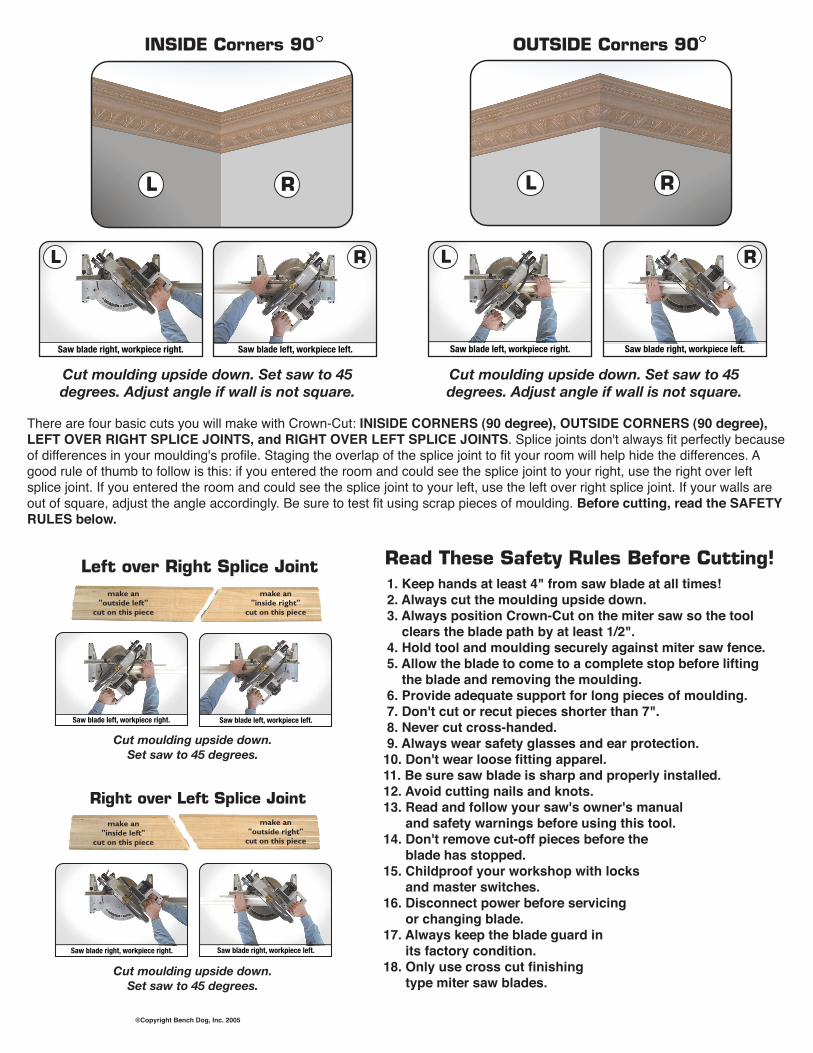
Right over Left Splice Joint
Read These Safety Rules Before Cutting!Left over Right Splice Jointmake an
"outside left"cut on this piece
make an"inside left"
cut on this piece
make an"inside right"
cut on this piece
make an"outside right"
cut on this piece
1. Keep hands at least 4" from saw blade at all times!
2. Always cut the moulding upside down.
3. Always position Crown-Cut on the miter saw so the tool
clears the blade path by at least 1/2".
4. Hold tool and moulding securely against miter saw fence.
5. Allow the blade to come to a complete stop before lifting
the blade and removing the moulding.
6. Provide adequate support for long pieces of moulding.
7. Don't cut or recut pieces shorter than 7".
8. Never cut cross-handed.
9. Always wear safety glasses and ear protection.
10. Don't wear loose fitting apparel.
11. Be sure saw blade is sharp and properly installed.
12. Avoid cutting nails and knots.
13. Read and follow your saw's owner's manual
and safety warnings before using this tool.
14. Don't remove cut-off pieces before the
blade has stopped.
15. Childproof your workshop with locks
and master switches.
16. Disconnect power before servicing
or changing blade.
17. Always keep the blade guard in
its factory condition.
18. Only use cross cut finishing
type miter saw blades.
There are four basic cuts you will make with Crown-Cut: INISIDE CORNERS (90 degree), OUTSIDE CORNERS (90 degree),
LEFT OVER RIGHT SPLICE JOINTS, and RIGHT OVER LEFT SPLICE JOINTS. Splice joints don't always fit perfectly because
of differences in your moulding's profile. Staging the overlap of the splice joint to fit your room will help hide the differences. A
good rule of thumb to follow is this: if you entered the room and could see the splice joint to your right, use the right over left
splice joint. If you entered the room and could see the splice joint to your left, use the left over right splice joint. If your walls are
out of square, adjust the angle accordingly. Be sure to test fit using scrap pieces of moulding. Before cutting, read the SAFETY
RULES below.
INSIDE Corners 90 OUTSIDE Corners 90
Cut moulding upside down. Set saw to 45degrees. Adjust angle if wall is not square.
Cut moulding upside down.Set saw to 45 degrees.
Cut moulding upside down.Set saw to 45 degrees.
Cut moulding upside down. Set saw to 45degrees. Adjust angle if wall is not square.
©Copyright Bench Dog, Inc. 2005
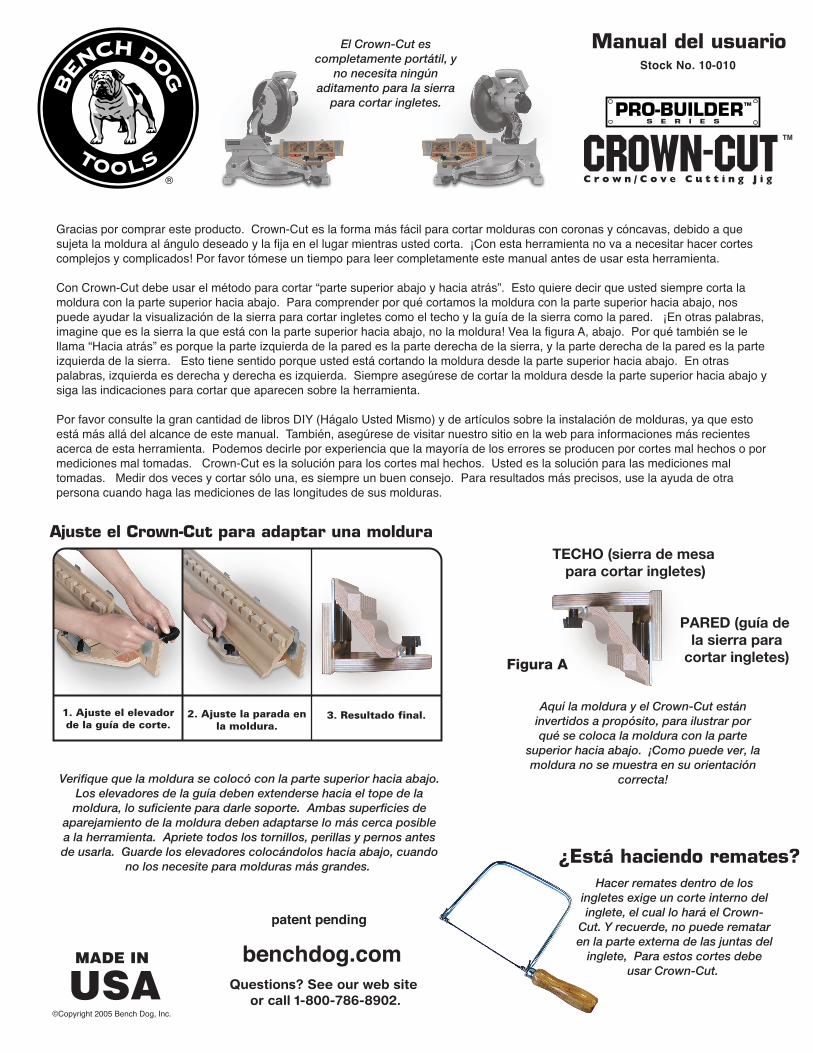
Aquí la moldura y el Crown-Cut estáninvertidos a propósito, para ilustrar porqué se coloca la moldura con la parte
superior hacia abajo. ¡Como puede ver, lamoldura no se muestra en su orientación
correcta!
El Crown-Cut escompletamente portátil, y
no necesita ningúnaditamento para la sierra
para cortar ingletes.
Verifique que la moldura se colocó con la parte superior hacia abajo.Los elevadores de la guía deben extenderse hacia el tope de lamoldura, lo suficiente para darle soporte. Ambas superficies de
aparejamiento de la moldura deben adaptarse lo más cerca posiblea la herramienta. Apriete todos los tornillos, perillas y pernos antesde usarla. Guarde los elevadores colocándolos hacia abajo, cuando
no los necesite para molduras más grandes.
TECHO (sierra de mesapara cortar ingletes)
PARED (guía dela sierra para
cortar ingletes)Figura A
¿Está haciendo remates?
Manual del usuario
Gracias por comprar este producto. Crown-Cut es la forma más fácil para cortar molduras con coronas y cóncavas, debido a que
sujeta la moldura al ángulo deseado y la fija en el lugar mientras usted corta. ¡Con esta herramienta no va a necesitar hacer cortes
complejos y complicados! Por favor tómese un tiempo para leer completamente este manual antes de usar esta herramienta.
Con Crown-Cut debe usar el método para cortar “parte superior abajo y hacia atrás”. Esto quiere decir que usted siempre corta la
moldura con la parte superior hacia abajo. Para comprender por qué cortamos la moldura con la parte superior hacia abajo, nos
puede ayudar la visualización de la sierra para cortar ingletes como el techo y la guía de la sierra como la pared. ¡En otras palabras,
imagine que es la sierra la que está con la parte superior hacia abajo, no la moldura! Vea la figura A, abajo. Por qué también se le
llama “Hacia atrás” es porque la parte izquierda de la pared es la parte derecha de la sierra, y la parte derecha de la pared es la parte
izquierda de la sierra. Esto tiene sentido porque usted está cortando la moldura desde la parte superior hacia abajo. En otras
palabras, izquierda es derecha y derecha es izquierda. Siempre asegúrese de cortar la moldura desde la parte superior hacia abajo y
siga las indicaciones para cortar que aparecen sobre la herramienta.
Por favor consulte la gran cantidad de libros DIY (Hágalo Usted Mismo) y de artículos sobre la instalación de molduras, ya que esto
está más allá del alcance de este manual. También, asegúrese de visitar nuestro sitio en la web para informaciones más recientes
acerca de esta herramienta. Podemos decirle por experiencia que la mayoría de los errores se producen por cortes mal hechos o por
mediciones mal tomadas. Crown-Cut es la solución para los cortes mal hechos. Usted es la solución para las mediciones mal
tomadas. Medir dos veces y cortar sólo una, es siempre un buen consejo. Para resultados más precisos, use la ayuda de otra
persona cuando haga las mediciones de las longitudes de sus molduras.
Questions? See our web siteor call 1-800-786-8902.
patent pending
©Copyright 2005 Bench Dog, Inc.
Hacer remates dentro de losingletes exige un corte interno delinglete, el cual lo hará el Crown-
Cut. Y recuerde, no puede remataren la parte externa de las juntas del
inglete, Para estos cortes debeusar Crown-Cut.
1. Ajuste el elevadorde la guía de corte.
2. Ajuste la parada enla moldura.
3. Resultado final.
Ajuste el Crown-Cut para adaptar una moldura
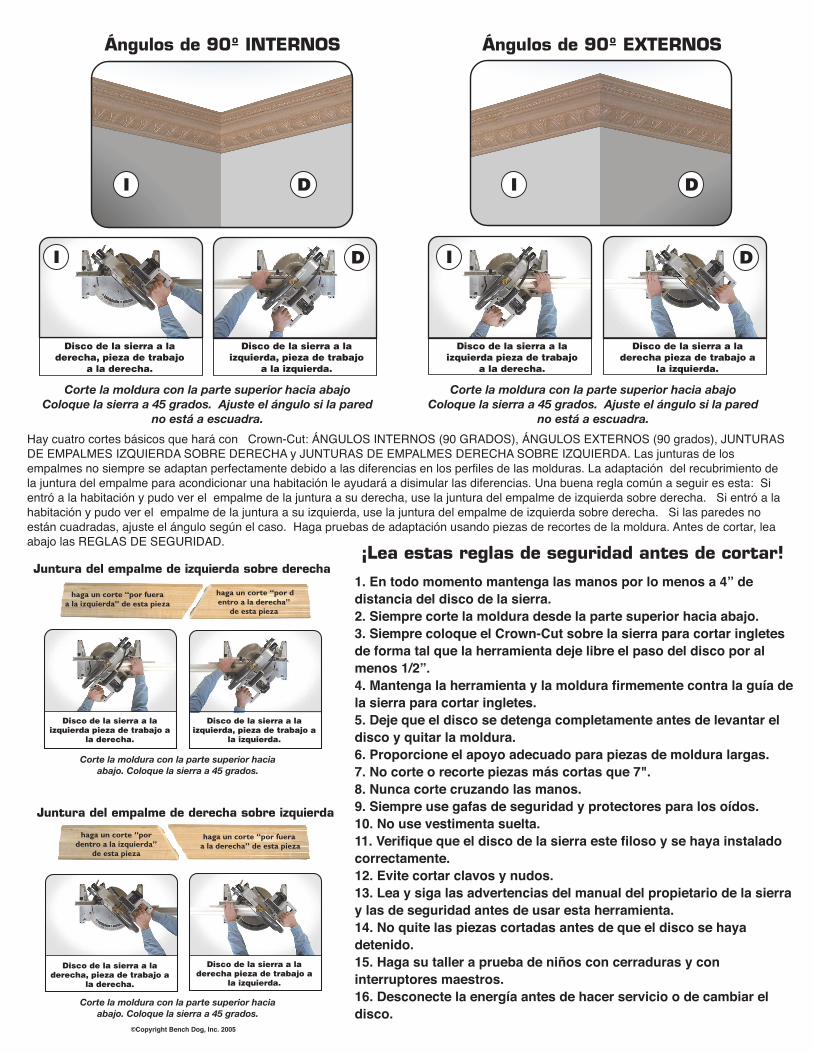
Juntura del empalme de derecha sobre izquierda
¡Lea estas reglas de seguridad antes de cortar!Juntura del empalme de izquierda sobre derecha
haga un corte “por fueraa la izquierda” de esta pieza
haga un corte “por fueraa la derecha” de esta pieza
haga un corte “por dentro a la derecha”
de esta pieza
haga un corte “pordentro a la izquierda”
de esta pieza
1. En todo momento mantenga las manos por lo menos a 4” de
distancia del disco de la sierra.
2. Siempre corte la moldura desde la parte superior hacia abajo.
3. Siempre coloque el Crown-Cut sobre la sierra para cortar ingletes
de forma tal que la herramienta deje libre el paso del disco por al
menos 1/2”.
4. Mantenga la herramienta y la moldura firmemente contra la guía de
la sierra para cortar ingletes.
5. Deje que el disco se detenga completamente antes de levantar el
disco y quitar la moldura.
6. Proporcione el apoyo adecuado para piezas de moldura largas.
7. No corte o recorte piezas más cortas que 7".
8. Nunca corte cruzando las manos.
9. Siempre use gafas de seguridad y protectores para los oídos.
10. No use vestimenta suelta.
11. Verifique que el disco de la sierra este filoso y se haya instalado
correctamente.
12. Evite cortar clavos y nudos.
13. Lea y siga las advertencias del manual del propietario de la sierra
y las de seguridad antes de usar esta herramienta.
14. No quite las piezas cortadas antes de que el disco se haya
detenido.
15. Haga su taller a prueba de niños con cerraduras y con
interruptores maestros.
16. Desconecte la energía antes de hacer servicio o de cambiar el
disco.
Hay cuatro cortes básicos que hará con Crown-Cut: ÁNGULOS INTERNOS (90 GRADOS), ÁNGULOS EXTERNOS (90 grados), JUNTURASDE EMPALMES IZQUIERDA SOBRE DERECHA y JUNTURAS DE EMPALMES DERECHA SOBRE IZQUIERDA. Las junturas de losempalmes no siempre se adaptan perfectamente debido a las diferencias en los perfiles de las molduras. La adaptación del recubrimiento dela juntura del empalme para acondicionar una habitación le ayudará a disimular las diferencias. Una buena regla común a seguir es esta: Sientró a la habitación y pudo ver el empalme de la juntura a su derecha, use la juntura del empalme de izquierda sobre derecha. Si entró a lahabitación y pudo ver el empalme de la juntura a su izquierda, use la juntura del empalme de izquierda sobre derecha. Si las paredes noestán cuadradas, ajuste el ángulo según el caso. Haga pruebas de adaptación usando piezas de recortes de la moldura. Antes de cortar, leaabajo las REGLAS DE SEGURIDAD.
Ángulos de 90º INTERNOS Ángulos de 90º EXTERNOS
Corte la moldura con la parte superior hacia abajoColoque la sierra a 45 grados. Ajuste el ángulo si la pared
no está a escuadra.
Corte la moldura con la parte superior hacia abajoColoque la sierra a 45 grados. Ajuste el ángulo si la pared
no está a escuadra.
Corte la moldura con la parte superior haciaabajo. Coloque la sierra a 45 grados.
Corte la moldura con la parte superior haciaabajo. Coloque la sierra a 45 grados.
©Copyright Bench Dog, Inc. 2005
I D
D D
I
I I
D
Disco de la sierra a laderecha, pieza de trabajo
a la derecha.
Disco de la sierra a laizquierda, pieza de trabajo
a la izquierda.
Disco de la sierra a laizquierda pieza de trabajo
a la derecha.
Disco de la sierra a laizquierda pieza de trabajo a
la derecha.
Disco de la sierra a laderecha, pieza de trabajo a
la derecha.
Disco de la sierra a laizquierda, pieza de trabajo a
la izquierda.
Disco de la sierra a laderecha pieza de trabajo a
la izquierda.
Disco de la sierra a laderecha pieza de trabajo a
la izquierda.
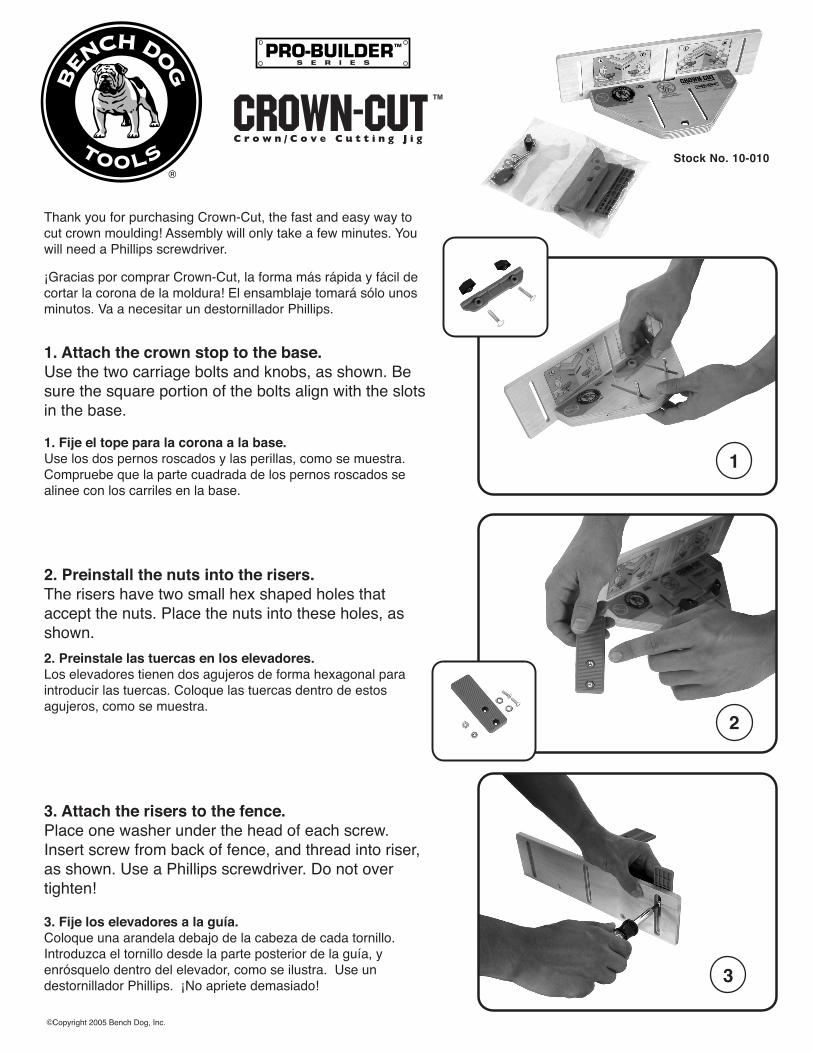
1. Attach the crown stop to the base.
Use the two carriage bolts and knobs, as shown. Be
sure the square portion of the bolts align with the slots
in the base.
1. Fije el tope para la corona a la base.
Use los dos pernos roscados y las perillas, como se muestra.
Compruebe que la parte cuadrada de los pernos roscados se
alinee con los carriles en la base.
2. Preinstale las tuercas en los elevadores.
Los elevadores tienen dos agujeros de forma hexagonal para
introducir las tuercas. Coloque las tuercas dentro de estos
agujeros, como se muestra.
3. Fije los elevadores a la guía.
Coloque una arandela debajo de la cabeza de cada tornillo.
Introduzca el tornillo desde la parte posterior de la guía, y
enrósquelo dentro del elevador, como se ilustra. Use un
destornillador Phillips. ¡No apriete demasiado!
Thank you for purchasing Crown-Cut, the fast and easy way to
cut crown moulding! Assembly will only take a few minutes. You
will need a Phillips screwdriver.
¡Gracias por comprar Crown-Cut, la forma más rápida y fácil de
cortar la corona de la moldura! El ensamblaje tomará sólo unos
minutos. Va a necesitar un destornillador Phillips.
2. Preinstall the nuts into the risers.
The risers have two small hex shaped holes that
accept the nuts. Place the nuts into these holes, as
shown.
3. Attach the risers to the fence.
Place one washer under the head of each screw.
Insert screw from back of fence, and thread into riser,
as shown. Use a Phillips screwdriver. Do not over
tighten!
1
2
3
©Copyright 2005 Bench Dog, Inc.