Embed Size (px)
Citation preview
Great Lakes Hot Tubs™
Owner’s Manual
2004
2
TABLE OF CONTENTS Important Safety Instructions .........................................................................................................3 Location and Installation ...............................................................................................................4 Hot Tub Set Up ...............................................................................................................................5 Hot Tub Operation ..........................................................................................................................6 Hot Tub Care and Maintenance ...................................................................................................7 Winterizing, Ozone .........................................................................................................................9 Water Care ......................................................................................................................................10 Consumer Notice, Fiber Optics ....................................................................................................11 GFCI Load Center Wiring .............................................................................................................12 Troubleshooting ...............................................................................................................................13 Hot Tub and Dealer Information....................................................................................................14 Warranty ...........................................................................................................................................15
3
IMPORTANT SAFETY INSTRUCTIONS
When installing and using this electrical equipment, basic safety precautions should always be followed, including the following:
1. READ AND FOLLOW ALL INSTRUCTIONS.
2. WARNING-To reduce the risk of injury, do not permit children to use this product unless they are closely supervised at all times.
3. A wire connector is provided on this unit to connect a minimum No. 8 AWG (8.4mm2) solid copper conductor between this unit
and any metal equipment, metal enclosures of electrical equipment, metal water pipe, or conduit within 5 feet (1.5m) of the unit.
4. (For cord-connected/convertible units)
DANGER-Risk of injury.
a) Replace damaged cord immediately.
b) Do not bury cord.
c) Connect to a grounded, grounding type receptacle only.
5. WARNING-If this product is provided with a ground-fault circuit-interrupter on the end of the power cord, the GFCI must be
tested before each use. With the product operating, open the service door. If the product stops operating, this merely indicates
that the door is equipped with an electrical interlock. Next, push the test button on the GFCI and close the service door. The
product should not operate. Now open the service door, push the reset button on the GFCI and close the service door. The
product should now operate normally. If the product fails to operate in this manner, there is a ground current flowing indicating
the possibility of an electric shock. Disconnect the power until the fault has been identified and corrected.
6. DANGER-Risk of Accidental Drowning. Extreme caution must be exercised to prevent unauthorized access by children. To
avoid accidents, ensure that children cannot use this hot tub unless they are supervised at all times.
7. DANGER-Risk of Injury. The suction fittings in this hot tub are sized to match the specific water flow created by the pump.
Should the need arise to replace the suction fittings or the pump, be sure that the flow rates are compatible. Never operate the
hot tub if the suction fittings are broken or missing. Never replace a suction fitting with one rated less than the flow rate marked
on the original fitting.
8. DANGER- Risk of Electric Shock. Install at least 5 feet (1.5 m) from all metal surfaces. As an alternative, a hot tub may be in-
stalled within 5 feet of metal surfaces if each metal surface is permanently connected by a minimum No. 8 AWG (8.4 mm2) solid
copper conductor to the wire connector on the terminal box that is provided for this purpose.
9. DANGER-Risk of Electric Shock. Do not permit any electric appliance, such as a light, telephone, radio, or television, within 5
feet (1.5 m) of a hot tub.
10. WARNING-To reduce the risk of injury:
a) The water in a hot tub should never exceed 40°C (104°F). Water temperatures between 38°C (100°F) and 40° C
(104°) are considered safe for a healthy adult. Lower water temperatures are recommended for young children and
when hot tub use exceeds 10 minutes.
b) Since excessive water temperatures have a high potential for causing fetal damage during the early months of
pregnancy, pregnant or possibly pregnant women should limit hot tub water temperatures to 38° C (100° F).
c) Before entering a hot tub, the user should measure the water temperature with an accurate thermometer since the tol-
erance of water temperature-regulating devices varies.
d) The use of alcohol, drugs, or medication before or during hot tub use may lead to unconsciousness with the possibility
of drowning.
e) Obese persons and persons with a history of heart disease, low or high blood pressure, circulatory system problems, or
diabetes should consult a physician before using a hot tub.
f) Persons using medication should consult a physician before using a hot tub since some medication may induce drowsi-
ness while other medication may affect heart rate, blood pressure, and circulation.
11. SAVE THESE INSTRUCTIONS.
4
LOCATION AND INSTALLATION Your Great Lakes Hot Tub™ has been conveniently designed to be used in either an indoor or outdoor setting. While your Great Lakes
Hot Tub™ was built to be used either indoors or outdoors, there are important things to remember in selecting your location.
Indoor Use Only
• Humidity will not likely be a problem. However, just like in your bathroom, an exhaust fan would be a good idea.
• No matter how careful you are, you will splash water, especially when exiting the hot tub. We suggest a tile or vinyl floor.
• A self-draining floor is a great way to ease any worries about spilled water.
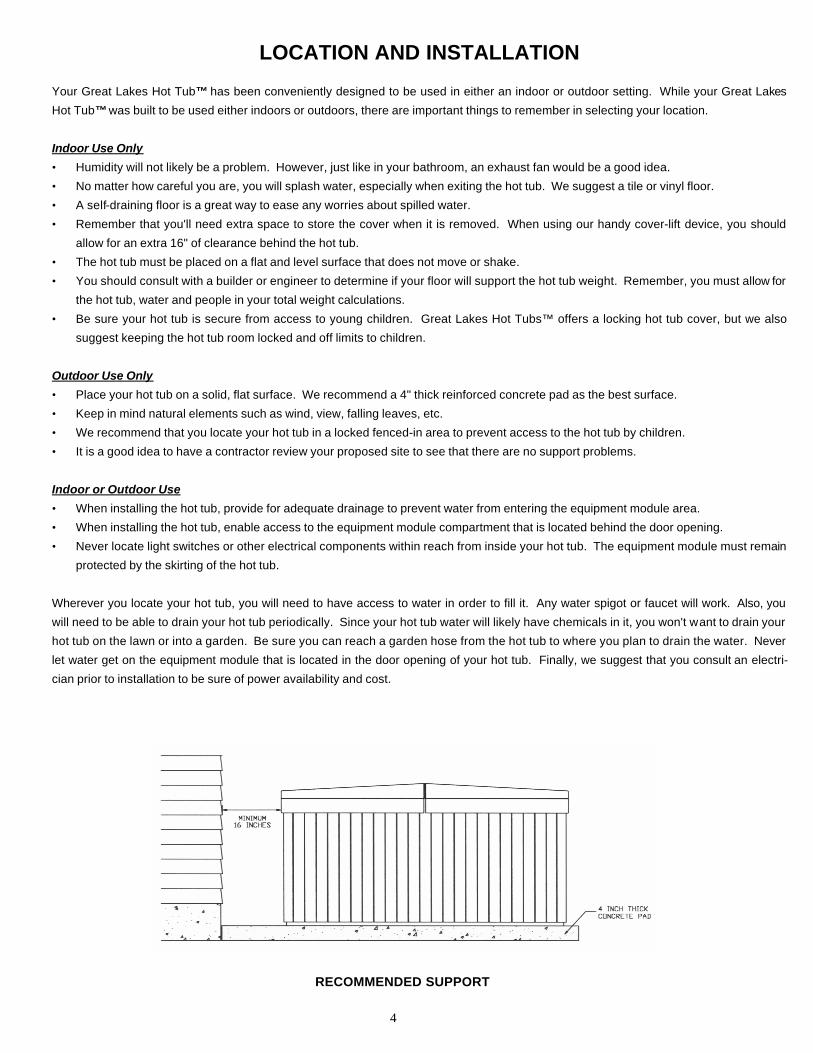
• Remember that you'll need extra space to store the cover when it is removed. When using our handy cover-lift device, you should
allow for an extra 16" of clearance behind the hot tub.
• The hot tub must be placed on a flat and level surface that does not move or shake.
• You should consult with a builder or engineer to determine if your floor will support the hot tub weight. Remember, you must allow for
the hot tub, water and people in your total weight calculations.
• Be sure your hot tub is secure from access to young children. Great Lakes Hot Tubs™ offers a locking hot tub cover, but we also
suggest keeping the hot tub room locked and off limits to children.
Outdoor Use Only
• Place your hot tub on a solid, flat surface. We recommend a 4" thick reinforced concrete pad as the best surface.
• Keep in mind natural elements such as wind, view, falling leaves, etc.
• We recommend that you locate your hot tub in a locked fenced-in area to prevent access to the hot tub by children.
• It is a good idea to have a contractor review your proposed site to see that there are no support problems.
Indoor or Outdoor Use
• When installing the hot tub, provide for adequate drainage to prevent water from entering the equipment module area.
• When installing the hot tub, enable access to the equipment module compartment that is located behind the door opening.
• Never locate light switches or other electrical components within reach from inside your hot tub. The equipment module must remain
protected by the skirting of the hot tub.
Wherever you locate your hot tub, you will need to have access to water in order to fill it. Any water spigot or faucet will work. Also, you
will need to be able to drain your hot tub periodically. Since your hot tub water will likely have chemicals in it, you won't want to drain your
hot tub on the lawn or into a garden. Be sure you can reach a garden hose from the hot tub to where you plan to drain the water. Never
let water get on the equipment module that is located in the door opening of your hot tub. Finally, we suggest that you consult an electri-
cian prior to installation to be sure of power availability and cost.
RECOMMENDED SUPPORT
5
HOT TUB SET UP SPA SETUP
Unpacking
1. Completely unwrap your hot tub and dispose of the packaging materials.
2. Remove any tape that holds down various components within the hot tub.
3. Clean any dirt or dust from the interior of your hot tub with a damp cloth. Remove any stubborn stains with an acrylic hot tub
cleaner or isopropyl alcohol. Never use an abrasive cleaner or scraper to clean the surface of your hot tub.
4. Position the cover on the hot tub and install the locking tabs to the hot tub cabinet (instructions included with cover).
5. Remove the hot tub cabinet panel that is fitted with the Tub Cubby™ to access the hot tub pump and control box. This panel is
held in place with 4-8 square drive screws. A square drive screwdriver bit has been furnished in this packet for your convenience.
Electrical
Be sure your electrician reads this section and any others relating to the electrical hookup of your hot tub.
A multi-terminal bonding connector, located on the side of the equipment module, is provided to permit connection of a bonding wire
between this point and any accessible metal surface within 5 feet of the hot tub, as may be needed to comply with local requirem ents.
The bonding wire connecting this bonding connector to the accessible metal surfaces must be a solid, No. 8 AWG copper conductor.
This bonding connector may also be used to bond any field wired components.
All electrical connections to the equipment module must be accomplished by a qualified electrician in accordance with the National
Electrical Code and in accordance with any local electrical codes in effect at the time of installation. All electrical connections must be
made in accordance with the wiring information contained in this manual, or on the back of the field wiring access panel of the equip-
ment module. National Electrical Code requires a Ground Fault Circuit Interrupter (GFCI) at the power source. All 230-volt models
with an air blower require an over-current protection device, GFCI, and minimum supply conductors rated at 50 amperes. All 230-volt
models without an air blower require an over-current protection device, GFCI, and minimum supply conductors rated at 40 amperes.
Use copper conductors only. WARNING: Improper electrical connections or conductor sizing may cause the equipment module to
operate improperly, create the potential for an electrical hazard, and may void the warranty. CAUTION: Use only approved pressure-
type wire splicing lugs or connectors suitable for the size and type of wiring used.
WARNING: Do not turn ON the power to the hot tub unless it is filled with water and all valves are open. Be sure water level is at the
recommended point. If the power is ON, the system may start even though the controls were not activated. If the equipment module
is started without sufficient water in the hot tub, the system could be permanently damaged. Also, operating hot tub without sufficient
water could cause a fire.
Note: Great Lakes Hot Tubs™ sells GFCI load centers through your local dealer. You can contact your dealer for availability and pricing.
Filling Your Hot Tub
Once the electric power has been connected, check the following while the power is OFF:
1. Be sure all fittings to the support system are tight. Hand tighten only!
2. Be sure the drain valve is closed.
3. Your hot tub is equipped with 2 or 4 push/pull valves. There is one located before the suction side of the pump and one located
after the discharge side of your heater. If you have a secondary pump, there will be two valves for this pump as well. Pull the
push/pull valves OUT so they are open.
4. Using a garden hose, fill with water to 2-4" above the skim filter. Always fill your hot tub with hard (not softened) water. Do not
overfill. After the hot tub is filled, remove the garden hose.
5. Check the equipment module area for water leaks. If there is water dripping, it is probably a loose connection at the equipment
module. You should re-check the tightness of the fittings and placement of the "O"-rings. If you cannot locate the source of the
water leak, contact your dealer.
6. Check that the filter is positioned in the skim/filter system. To remove, refer to the "Cleaning your filter" section.
7. Activate the power to your hot tub. Push the pump button on your controller until you hear the pump activate to HIGH speed. If
you have a secondary pump, push the second pump button until you hear the second pump activate. It only has a single speed.
Allow the pump(s) to run on HIGH speed for 2 minutes to purge the system of air, then push the pump button(s) until you hear the
primary pump switch to LOW speed, and then turn off the secondary pump.
6
HOT TUB OPERATION
Refer to the Control Manual operating instructions for the hot tub-side control unit. The operating functions of your hot tub controller
will vary depending on the model of Great Lakes Hot Tub™ you have purchased.
Your Great Lakes Hot Tub™ comes equipped with a variety of jets and water/air controls. Some of the jets allow you to control the
amount of water flow by rotating the face of the jet. Turning the face clockwise will reduce the water flow from the jet and turning it
counterclockwise will increase the water flow. In addition, some of the jets perform special tasks.
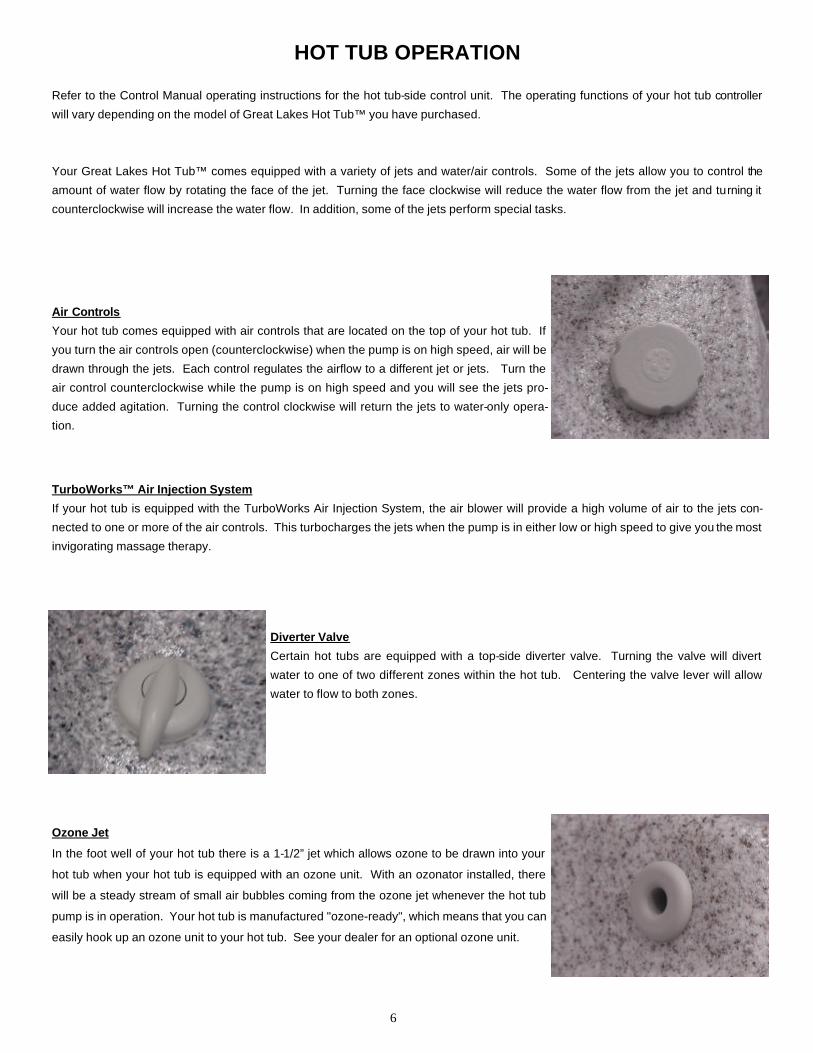
Air Controls
Your hot tub comes equipped with air controls that are located on the top of your hot tub. If
you turn the air controls open (counterclockwise) when the pump is on high speed, air will be
drawn through the jets. Each control regulates the airflow to a different jet or jets. Turn the
air control counterclockwise while the pump is on high speed and you will see the jets pro-
duce added agitation. Turning the control clockwise will return the jets to water-only opera-
tion. TurboWorks™ Air Injection System
If your hot tub is equipped with the TurboWorks Air Injection System, the air blower will provide a high volume of air to the jets con-
nected to one or more of the air controls. This turbocharges the jets when the pump is in either low or high speed to give you the most
invigorating massage therapy.
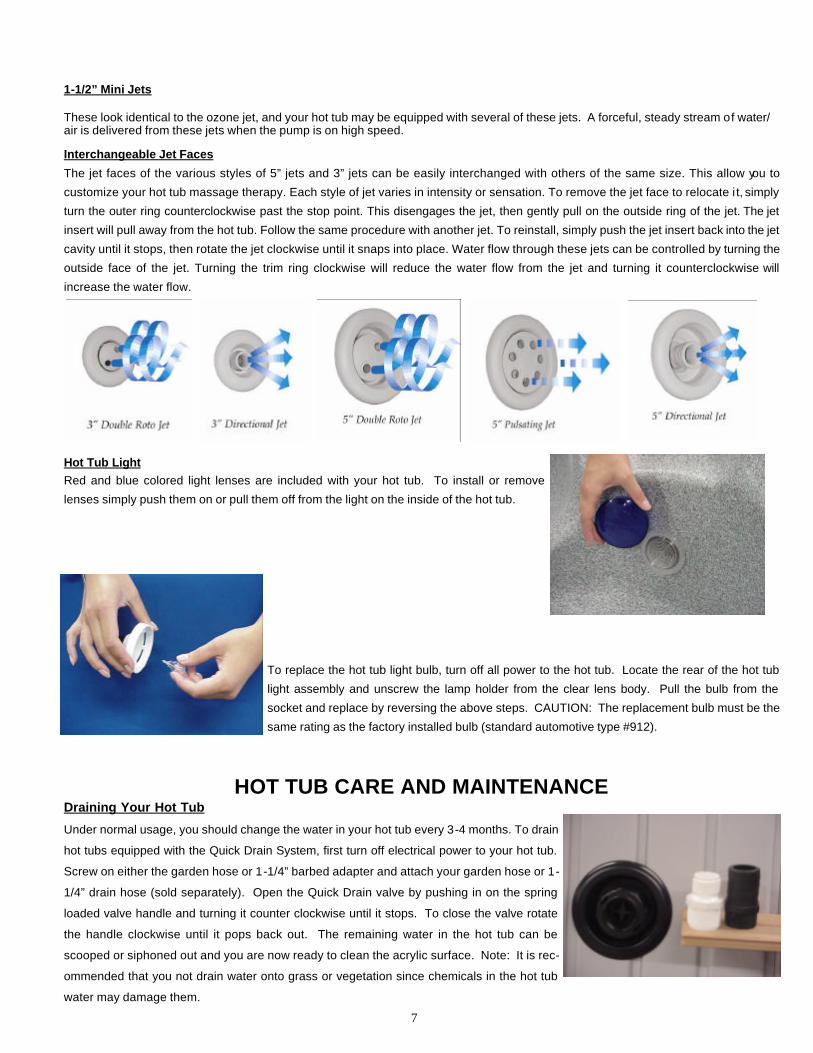
Diverter Valve
Certain hot tubs are equipped with a top-side diverter valve. Turning the valve will divert
water to one of two different zones within the hot tub. Centering the valve lever will allow
water to flow to both zones.
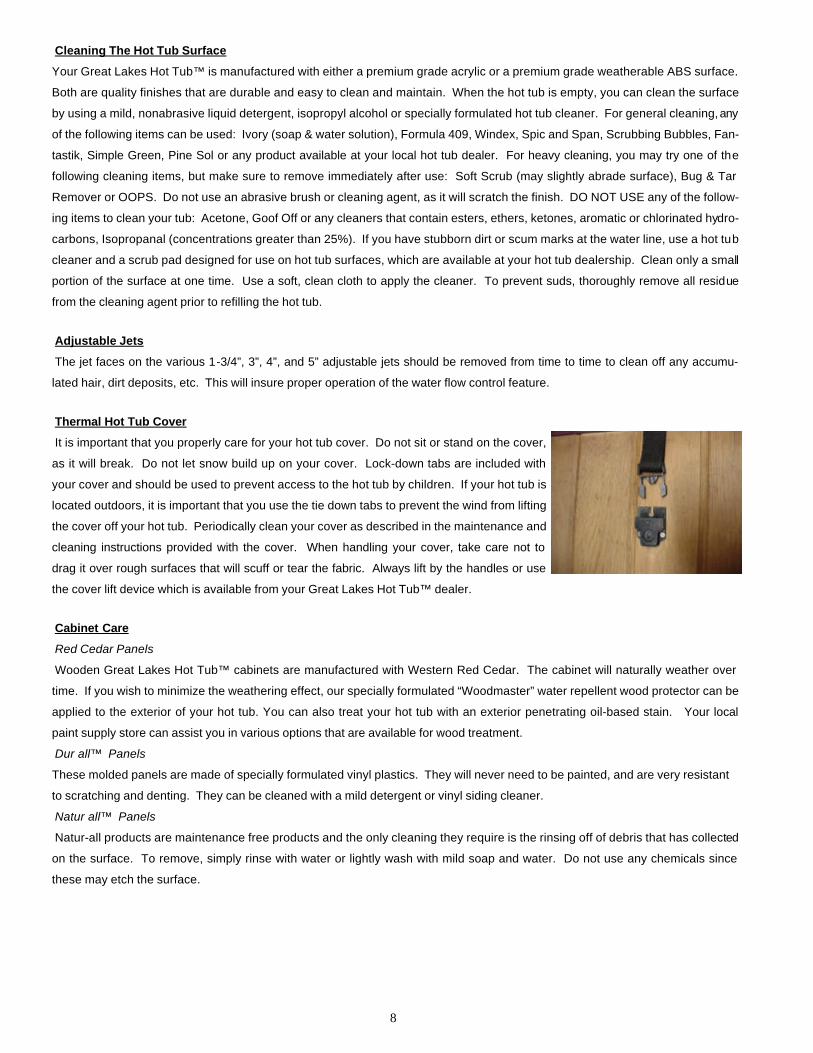
Ozone Jet
In the foot well of your hot tub there is a 1-1/2” jet which allows ozone to be drawn into your
hot tub when your hot tub is equipped with an ozone unit. With an ozonator installed, there
will be a steady stream of small air bubbles coming from the ozone jet whenever the hot tub
pump is in operation. Your hot tub is manufactured "ozone-ready", which means that you can
easily hook up an ozone unit to your hot tub. See your dealer for an optional ozone unit.
7
1-1/2” Mini Jets
These look identical to the ozone jet, and your hot tub may be equipped with several of these jets. A forceful, steady stream of water/air is delivered from these jets when the pump is on high speed.
Interchangeable Jet Faces
The jet faces of the various styles of 5” jets and 3” jets can be easily interchanged with others of the same size. This allow you to
customize your hot tub massage therapy. Each style of jet varies in intensity or sensation. To remove the jet face to relocate i t, simply
turn the outer ring counterclockwise past the stop point. This disengages the jet, then gently pull on the outside ring of the jet. The jet
insert will pull away from the hot tub. Follow the same procedure with another jet. To reinstall, simply push the jet insert back into the jet
cavity until it stops, then rotate the jet clockwise until it snaps into place. Water flow through these jets can be controlled by turning the
outside face of the jet. Turning the trim ring clockwise will reduce the water flow from the jet and turning it counterclockwise will
increase the water flow.
Hot Tub Light Red and blue colored light lenses are included with your hot tub. To install or remove
lenses simply push them on or pull them off from the light on the inside of the hot tub.
To replace the hot tub light bulb, turn off all power to the hot tub. Locate the rear of the hot tub
light assembly and unscrew the lamp holder from the clear lens body. Pull the bulb from the
socket and replace by reversing the above steps. CAUTION: The replacement bulb must be the
same rating as the factory installed bulb (standard automotive type #912).
HOT TUB CARE AND MAINTENANCE
Draining Your Hot Tub
Under normal usage, you should change the water in your hot tub every 3-4 months. To drain
hot tubs equipped with the Quick Drain System, first turn off electrical power to your hot tub.
Screw on either the garden hose or 1-1/4” barbed adapter and attach your garden hose or 1-
1/4” drain hose (sold separately). Open the Quick Drain valve by pushing in on the spring
loaded valve handle and turning it counter clockwise until it stops. To close the valve rotate
the handle clockwise until it pops back out. The remaining water in the hot tub can be
scooped or siphoned out and you are now ready to clean the acrylic surface. Note: It is rec-
ommended that you not drain water onto grass or vegetation since chemicals in the hot tub
water may damage them.
8
Cleaning The Hot Tub Surface
Your Great Lakes Hot Tub™ is manufactured with either a premium grade acrylic or a premium grade weatherable ABS surface.
Both are quality finishes that are durable and easy to clean and maintain. When the hot tub is empty, you can clean the surface
by using a mild, nonabrasive liquid detergent, isopropyl alcohol or specially formulated hot tub cleaner. For general cleaning, any
of the following items can be used: Ivory (soap & water solution), Formula 409, Windex, Spic and Span, Scrubbing Bubbles, Fan-
tastik, Simple Green, Pine Sol or any product available at your local hot tub dealer. For heavy cleaning, you may try one of the
following cleaning items, but make sure to remove immediately after use: Soft Scrub (may slightly abrade surface), Bug & Tar
Remover or OOPS. Do not use an abrasive brush or cleaning agent, as it will scratch the finish. DO NOT USE any of the follow-
ing items to clean your tub: Acetone, Goof Off or any cleaners that contain esters, ethers, ketones, aromatic or chlorinated hydro-
carbons, Isopropanal (concentrations greater than 25%). If you have stubborn dirt or scum marks at the water line, use a hot tub
cleaner and a scrub pad designed for use on hot tub surfaces, which are available at your hot tub dealership. Clean only a small
portion of the surface at one time. Use a soft, clean cloth to apply the cleaner. To prevent suds, thoroughly remove all residue
from the cleaning agent prior to refilling the hot tub.
Adjustable Jets
The jet faces on the various 1-3/4”, 3”, 4”, and 5” adjustable jets should be removed from time to time to clean off any accumu-
lated hair, dirt deposits, etc. This will insure proper operation of the water flow control feature.
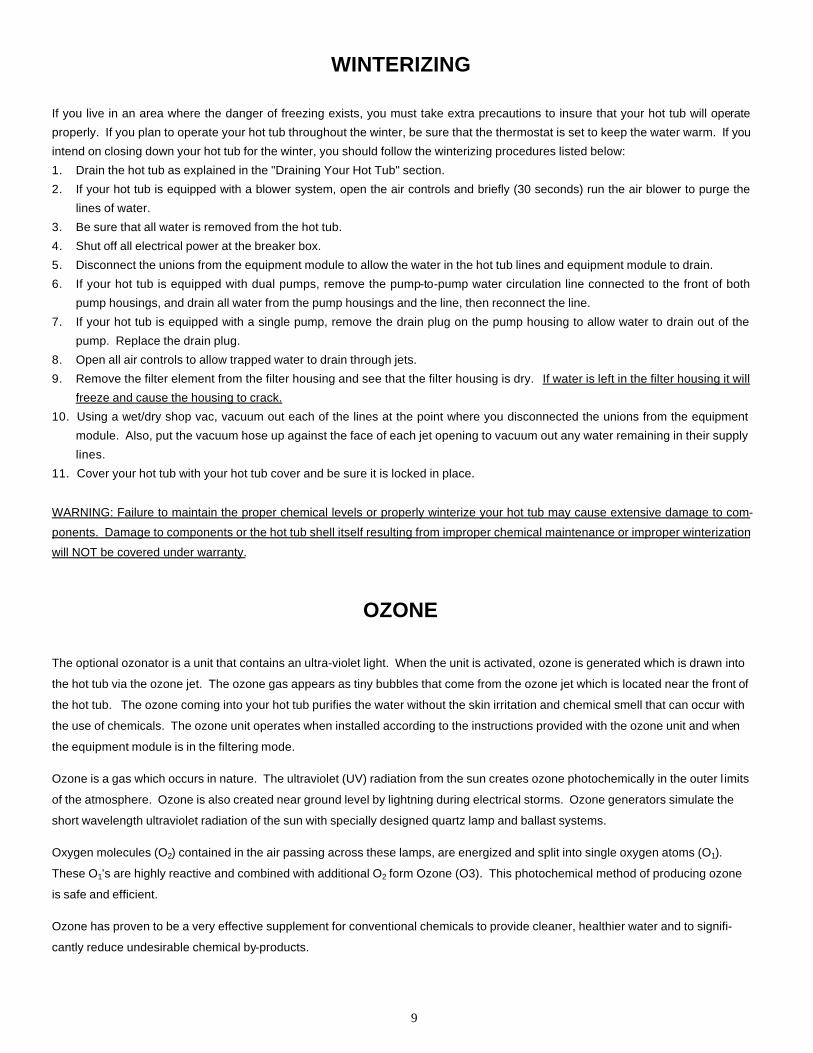
Thermal Hot Tub Cover
It is important that you properly care for your hot tub cover. Do not sit or stand on the cover,
as it will break. Do not let snow build up on your cover. Lock-down tabs are included with
your cover and should be used to prevent access to the hot tub by children. If your hot tub is
located outdoors, it is important that you use the tie down tabs to prevent the wind from lifting
the cover off your hot tub. Periodically clean your cover as described in the maintenance and
cleaning instructions provided with the cover. When handling your cover, take care not to
drag it over rough surfaces that will scuff or tear the fabric. Always lift by the handles or use
the cover lift device which is available from your Great Lakes Hot Tub™ dealer.
Cabinet Care
Red Cedar Panels
Wooden Great Lakes Hot Tub™ cabinets are manufactured with Western Red Cedar. The cabinet will naturally weather over
time. If you wish to minimize the weathering effect, our specially formulated “Woodmaster” water repellent wood protector can be
applied to the exterior of your hot tub. You can also treat your hot tub with an exterior penetrating oil-based stain. Your local
paint supply store can assist you in various options that are available for wood treatment.
Dur·all™ Panels
These molded panels are made of specially formulated vinyl plastics. They will never need to be painted, and are very resistant
to scratching and denting. They can be cleaned with a mild detergent or vinyl siding cleaner.
Natur·all™ Panels
Natur-all products are maintenance free products and the only cleaning they require is the rinsing off of debris that has collected
on the surface. To remove, simply rinse with water or lightly wash with mild soap and water. Do not use any chemicals since
these may etch the surface.
9
WINTERIZING
If you live in an area where the danger of freezing exists, you must take extra precautions to insure that your hot tub will operate
properly. If you plan to operate your hot tub throughout the winter, be sure that the thermostat is set to keep the water warm. If you
intend on closing down your hot tub for the winter, you should follow the winterizing procedures listed below:
1. Drain the hot tub as explained in the "Draining Your Hot Tub" section.
2. If your hot tub is equipped with a blower system, open the air controls and briefly (30 seconds) run the air blower to purge the
lines of water.
3. Be sure that all water is removed from the hot tub.
4. Shut off all electrical power at the breaker box.
5. Disconnect the unions from the equipment module to allow the water in the hot tub lines and equipment module to drain.
6. If your hot tub is equipped with dual pumps, remove the pump-to-pump water circulation line connected to the front of both
pump housings, and drain all water from the pump housings and the line, then reconnect the line.
7. If your hot tub is equipped with a single pump, remove the drain plug on the pump housing to allow water to drain out of the
pump. Replace the drain plug.
8. Open all air controls to allow trapped water to drain through jets.
9. Remove the filter element from the filter housing and see that the filter housing is dry. If water is left in the filter housing it will
freeze and cause the housing to crack.
10. Using a wet/dry shop vac, vacuum out each of the lines at the point where you disconnected the unions from the equipment
module. Also, put the vacuum hose up against the face of each jet opening to vacuum out any water remaining in their supply
lines.
11. Cover your hot tub with your hot tub cover and be sure it is locked in place.
WARNING: Failure to maintain the proper chemical levels or properly winterize your hot tub may cause extensive damage to com-
ponents. Damage to components or the hot tub shell itself resulting from improper chemical maintenance or improper winterization
will NOT be covered under warranty.
OZONE
The optional ozonator is a unit that contains an ultra-violet light. When the unit is activated, ozone is generated which is drawn into
the hot tub via the ozone jet. The ozone gas appears as tiny bubbles that come from the ozone jet which is located near the front of
the hot tub. The ozone coming into your hot tub purifies the water without the skin irritation and chemical smell that can occur with
the use of chemicals. The ozone unit operates when installed according to the instructions provided with the ozone unit and when
the equipment module is in the filtering mode.
Ozone is a gas which occurs in nature. The ultraviolet (UV) radiation from the sun creates ozone photochemically in the outer l imits
of the atmosphere. Ozone is also created near ground level by lightning during electrical storms. Ozone generators simulate the
short wavelength ultraviolet radiation of the sun with specially designed quartz lamp and ballast systems.
Oxygen molecules (O2) contained in the air passing across these lamps, are energized and split into single oxygen atoms (O1).
These O1’s are highly reactive and combined with additional O2 form Ozone (O3). This photochemical method of producing ozone
is safe and efficient.
Ozone has proven to be a very effective supplement for conventional chemicals to provide cleaner, healthier water and to signifi-
cantly reduce undesirable chemical by-products.

10
WATER CARE
Your Great Lakes Hot Tub™ is equipped with what we believe is the finest filtering device available. We call it the Skim/Filter system, and
it is one of the few skimmers available which actually skims the water surface. When your hot tub is operating, watch how the Skim/Filter
bobs up and down with the water level. You'll notice a distinct whirlpool being drawn into the system, and floating debris of all sizes will
literally "fall" into the unit and be trapped by the filter. It is important that you keep your filter clean, and it is suggested that you check the
filter at least once per month and replace it when it becomes loaded with dirt or debris.
Filter Basket and Cartridge Removal and Replacement Procedure
1. Turn off electrical power to the hot tub.
2. Remove the floating weir and attached basket by rotating it counterclockwise to align the flat tabs
on the filter housing flange with the flat areas on the floating weir and basket assembly, then lift
out the assembly.
3. Lift the filter cartridge straight up and out of the filter housing, quickly moving it away from the tub
to prevent collected debris from falling back into the water.
4. Separate the floating weir from the basket by rotating it counterclockwise to align the notches on
the floating weir flange with the tabs on the top of the basket, then simply pull them apart.
5. Clean any accumulated debris from the basket. Avoid hitting the basket against objects to knock
debris loose, as this will break the basket.
6. Re-attach the basket to the floating weir.
7. Install a new filter cartridge in the filter housing.
8. Reinstall the floating weir and attached basket assembly.
9. Turn electrical power to your hot tub back on.
Chemicals
Due to the warm temperatures in your hot tub, you must properly test and maintain your hot tub water for health and appearance reasons.
Chemical imbalance can cause skin irritations, and dirty water is both unsightly and undesirable to soak in. With little effort you can have
clean water for your constant enjoyment. This is attained through the use of hot tub chemicals, a superb filter system and the optional
ozonator. Consult your dealer to set up a proper water treatment program that will work best with the equipment in your hot tub.
CAUTION: Always follow the water treatment chemical manufacturer’s instructions when treating your water. Higher than normal concen-
trations of certain chemicals can degrade or cause permanent damage to your hot tub. When introducing chemicals into the water, never
pour them directly into the filter.
Be aware that the mineral content of hot tub water increases from water evaporation and with the addition of algaecidal and sanitizing
chemicals. If the mineral concentration of the water becomes too high, the minerals will precipitate and deposit on the hot tub, in the filter,
and on the heater. The water must be changed when the amount of dissolved solids becomes excessive. Algaecidal and sanitizing
chemicals are either alkaline or acidic. Sodium and calcium hypochlorite are alkaline. Chlorine gas and practically all other dry chlorine
products are acidic. Whichever type of chlorine is used, it is very important that the ph level be checked frequently and maintained be-
tween 7.2 and 7.8.
CAUTION: Do NOT store hot tub or pool chemicals near the equipment module because their corrosive fumes may cause damage.
Change the hot tub water frequently, typically every 3 to 4 months or when the water clarity and cleanliness can no longer be maintained
by chemical treatment. It is recommended that the total alkalinity of the hot tub water be kept from 80 to 100 parts per million (ppm) when
sodium or calcium hypochlorites are used, and 100 to 120 ppm when other dry chlorine products are used.
11
CONSUMER NOTICE Contact a knowledgeable hot tub dealer who can provide proper advice and appropriate water treatment chemicals before
operating your hot tub. Improper water chemistry will cause damage to the hot tub equipment and can cause rash or skin
irritation in some cases. It is important that the water chemistry in you hot tub be properly balanced before use.
FIBER OPTICS If your hot tub is equipped with a Soft Glo Fiber Optic lighting package, please read the following:
INSTRUCTIONS PERTAINING TO A RISK OF FIRE, ELECTRIC SHOCK, EXPOSURE TO EXCESSIVE UV RADIATION,
OR INJURY TO PERSONS.
IMPORTANT SAFETY INSTRUCTIONS
SAVE THESE INSTRUCTIONS
LIGHTED LAMP IS HOT!
WARNING - TO REDUCE THAT RISK OF FIRE, ELECTRIC SHOCK, EXPOSURE TO EXCESSIVE RADIATION, OR IN-
JURY TO PERSONS.
1. Turn off/unplug and allow to cool before replacing bulb.
2. Bulb gets hot quickly.
3. Do not look directly at lighted bulb.
4. Use with a 55W or smaller bulb.
5. Handle lamp by reflector only. Do not touch bulb at any time. Use a soft cloth.
6. Do not operate the unit with missing or damaged guard, lamp containment barrier or UV filter.
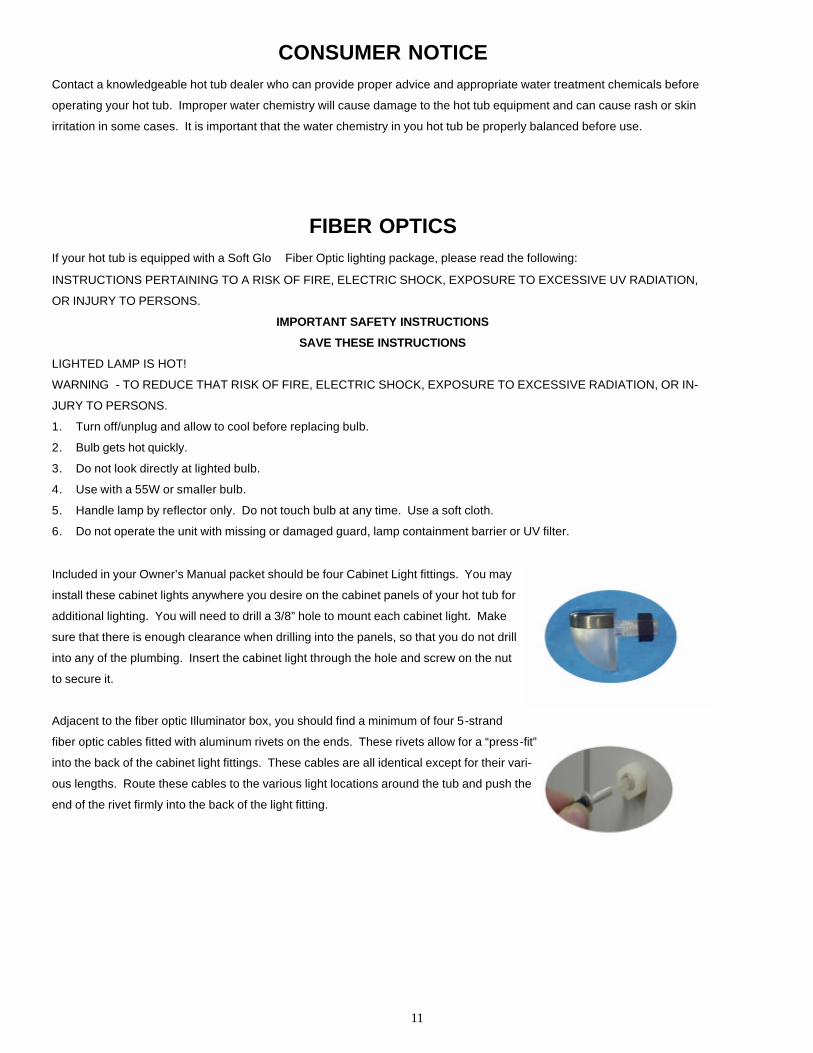
Included in your Owner’s Manual packet should be four Cabinet Light fittings. You may
install these cabinet lights anywhere you desire on the cabinet panels of your hot tub for
additional lighting. You will need to drill a 3/8” hole to mount each cabinet light. Make
sure that there is enough clearance when drilling into the panels, so that you do not drill
into any of the plumbing. Insert the cabinet light through the hole and screw on the nut
to secure it.
Adjacent to the fiber optic Illuminator box, you should find a minimum of four 5-strand
fiber optic cables fitted with aluminum rivets on the ends. These rivets allow for a “press-fit”
into the back of the cabinet light fittings. These cables are all identical except for their vari-
ous lengths. Route these cables to the various light locations around the tub and push the
end of the rivet firmly into the back of the light fitting.
12
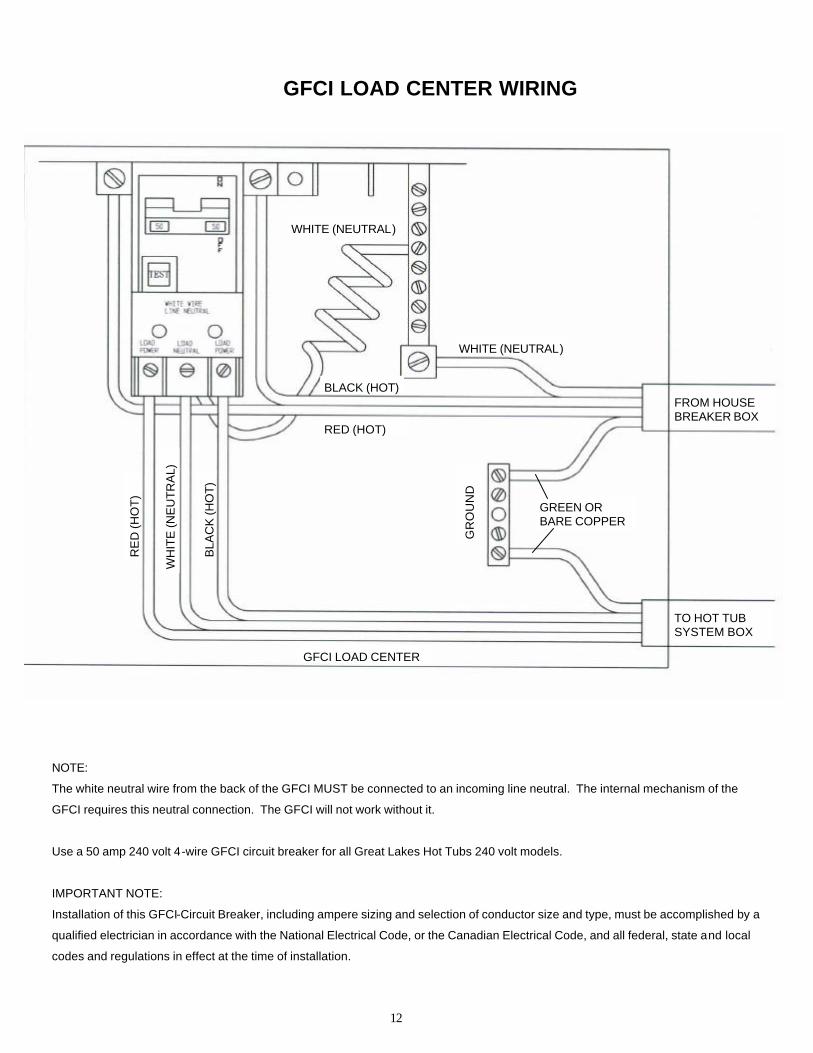
NOTE:
The white neutral wire from the back of the GFCI MUST be connected to an incoming line neutral. The internal mechanism of the
GFCI requires this neutral connection. The GFCI will not work without it.
Use a 50 amp 240 volt 4-wire GFCI circuit breaker for all Great Lakes Hot Tubs 240 volt models.
IMPORTANT NOTE:
Installation of this GFCI-Circuit Breaker, including ampere sizing and selection of conductor size and type, must be accomplished by a
qualified electrician in accordance with the National Electrical Code, or the Canadian Electrical Code, and all federal, state and local
codes and regulations in effect at the time of installation.
TO HOT TUB SYSTEM BOX
FROM HOUSE BREAKER BOX
GR
OU
ND
RE
D (H
OT
)
WH
ITE
(NE
UT
RA
L)
BLA
CK
(HO
T)
WHITE (NEUTRAL)
WHITE (NEUTRAL)
RED (HOT)
GFCI LOAD CENTER
GREEN OR BARE COPPER
GFCI LOAD CENTER WIRING
BLACK (HOT)
13
TROUBLESHOOTING • Equipment Module Will Not Operate
• Make sure the hot tub control is plugged into the circuit board of the equipment module.
• Check the main circuit breaker panel. If the GFCI or circuit breaker has tripped, reset the breaker. If the circuit breaker trips repeatedly, contact your dealer.
• Turn the circuit breaker, or switch, supplying power to the equipment module OFF then ON.
• If breaker continues to trip, check with your electrician to be sure the proper amperage breaker was installed.
• Pump Will Run But There Is No Water Flow
• Make sure all valves are in the open position.
• Make sure the filter is clean.
• Make sure the suction intake covers are free of debris.
• Make sure the water level of the hot tub is at least 2" above the skim filter.
• Check to make sure all adjustable flow-type jets are turned open.
• Pump Runs And There Is Water Flow But No Heat
• Press the temperature set button to increase temperature. Do NOT expect to feel hot water coming from the jets.
• Make sure all valves are open to allow full water flow through the system. Limited water flow will NOT build enough pres-sure to allow the heater to come on.
• Clean the filter to assure maximum water flow.
• The system is equipped with a heater delay switch that will prevent heater operation from occurring for approximately 20 seconds after the pump starts. Make sure the pump has been operating for at least 20 seconds.
• Pulsating Or Minimal Water Flow In High Speed Mode
• Make sure water level of the hot tub is at least 2" above the skim filter.
• Be sure jets are turned open (see "Operation" section).
• Make sure all valves are open.
• Make sure the filter element is clean.
• Make sure the suction intake covers are free of debris.
• Blower Will Not Blow Air Into The Hot Tub
• Check air blower connections for leaks.
• Make sure the air blower is plugged into the air blower receptacle located on the side of the equipment module.
• Make sure air controls are turned to the open position.
• Ozone Bubbles Are Not Coming Out Of Ozone Jet
• Make sure the lever of the Diverter Valve (if equipped) is not in the center position.
• Pump Vibrates Excessively
• Check for loose screws on equipment module face and bolts attaching equipment module to frame.
• Make sure hot tub is not touching or rubbing against anything such as a deck rail, house, etc.
• Air may be trapped in pump housing. Turn pump off. Slightly loosen the pump unions. With a towel covering the area
(water will splash) turn the pump on for 3-5 seconds to bleed air out of pump housing. Turn pump off and tighten the un-
ions. Repeat if necessary.
• Make sure that the hot tub has been installed on a properly supported surface.
14
Thank You!
The employees of Great Lakes Home & Resort would like to extend their sin-cere thanks to you for purchasing a Great Lakes Hot Tub™.
We hope that you, your family, and friends will experience many enjoyable
years of fun and relaxation in your Great Lakes Hot Tub™.
Please fill in the following information, it will be very important should you ever have questions or concerns regarding your hot tub.
Your Great Lakes Hot Tub™ Dealer Dealership ___________________________________________________ Address ___________________________________________________ City __________________________ State _______ ZIP _________ Phone ___________________ Fax ____________________________ E-mail ___________________________________________________ Contact Person _______________________________________________ Your Hot Tub Model Purchased ________________________________ Date Purchased _________________________________ Serial Number _________________________________ Colors Hot Tub Shell______________________________ Cabinet _________________________________ Cover _________________________________
Notes: ____________________________________________________________ ____________________________________________________________ ____________________________________________________________ ____________________________________________________________ ____________________________________________________________ ____________________________________________________________ ____________________________________________________________ ____________________________________________________________ ____________________________________________________________ ____________________________________________________________
15
GREAT LAKES HOT TUBS™
LIMITED WARRANTY
Great Lakes Home & Resort extends this Limited Warranty solely to the original consumer purchaser of any Great Lakes Hot Tub manufac-tured and installed in the U.S.A. after January 1, 2003.
TEN YEAR STRUCTURAL WARRANTY Great Lakes Home & Resort warrants the hot tub shell against water loss due to defects in the hot tub shell for a period not to exceed the lesser of ten (10) years from the date of purchase or ten (10) years six (6) months from the date of manufacture.
FIVE YEAR SURFACE WARRANTY Great Lakes Home & Resort warrants the hot tub surface against cracks or blisters caused by defective materials or workmanship for a pe-riod not to exceed the lesser of five (5) years from the date of purchase or five (5) years six (6) months from the date of manufacture. Ex-cluded from this warranty are the cosmetic damages or conditions arising from abuse, misuse, normal wear or acts of God.
TWO YEAR COMPONENT WARRANTY Great Lakes Home & Resort warrants the mechanical equipment, plumbing, fittings, and controls against defects in workmanship for a period not to exceed the lesser of two (2) years from the date of purchase or two (2) years six (6) months from the date of manufacture. Damage caused by improper electrical hook-up or wiring voids the warranty. Travel, trip, or mileage costs are not covered under this warranty and service travel charges will be assessed to the purchaser by the dealer.
EXTENT OF WARRANTY This warranty extends only to the original "consumer" purchaser of the Great Lakes Hot Tub as that term is defined in the Magnus on-Moss Warranty Act, 15 USC Section 101, as amended. This warranty terminates upon: (1) transfer of ownership of the hot tub; (2) rental of the hot tub; rental of the premises where the hot tub is located; or (4) commercial or public use of the hot tub. Warranty coverage shall not extend for any reason beyond the stated periods.
WARRANTY PERFORMANCE In the event of any malfunction or defect covered by this warranty, contact the authorized Great Lakes Home & Resort Dealer from whom you purchased your hot tub. All service work must be performed by an authorized Great Lakes Home & Resort Dealer or an authorized agent of Great Lakes Home & Resort. In the event there is not an authorized Great Lakes Home & Resort Dealer or repair firm in your area, the hot tub can be returned pre-paid freight (you pay) to Great Lakes Home & Resort for evaluation and, if necessary, repair of the defect. Great Lakes Home & Resort will then ship the hot tub back to you pre-paid (Great Lakes Home & Resort pays) upon completion of the repair. In the event the hot tub needs to be returned to Great Lakes Home & Resort for repair, contact Great Lakes Home & Resort in advance at: 935 East 40th Street, Holland, Michigan 49423, phone number: (616)392-5947, for packaging and shipping instructions. In addition, Great Lakes Home & Resort reserves the right to inspect or designate a person to inspect any part that is claimed to be defective and covered by this warranty. For any warranty service of components, Great Lakes Home & Resort reserves the right to choose at its option repair of the problem or a replacement of the defective component. The purchaser is responsible to provide adequate access to the hot tub, equipment and plumbing. Great Lakes Home & Resort, its dealers or agents will not perform service on hot tubs where conditions are unclean, unsafe or potentially unhealthy due to abuse, neglect or improper maintenance. With regard to hot tub surface warranty repairs, cracks or blisters will be repaired so as to prevent damage to or leakage from the hot tub shell. No warranty is made that the color or texture of the repair will match the original surface. Great Lakes Home & Resort reserves the right to substitute a part or component of equivalent value, either new or reconditioned, and any such repair or replacement shall assume as its warranty only the remaining portion of the warranty on the original product.
ACTS INVALIDATING WARRANTY This warranty is void if the Great Lakes Home & Resort hot tub has been subject to alteration, misuse or abuse, or if any repairs on the hot tub are attempted by anyone other than an authorized representative of Great Lakes Home & Resort. Alteration shall include but is not lim-ited to any component or plumbing change, electrical conversion, or the addition of any non-approved sanitation or water purification device or heating system which contributes to a component or unit failure or unsafe operation system. Use of the hot tub in an application for which it is not designed will void this warranty. This includes but is not limited to damage caused by operation of the hot tub at water temperatures outside the range of 50 degrees F. and 104 degrees F., damage caused by dirty, clogged or calcified filter cartridges, damage caused by a defective Support System or other defective components, damage to the hot tub surface caused by harsh chemicals which are not recom-mended by the acrylic manufacturer, damage caused by allowing un-dissolved hot tub sanitizing chemicals to lie on the hot tub surface, damage to components or hot tub surface caused by improper water chemistry maintenance, damage caused to the hot tub by leaving it uncovered in direct sunlight, damage caused by leaving the hot tub in freezing conditions, and damage to the hot tub surface caused by movement of the product, and damage to the hot tub caused by acts of God. This product is not designed or intended for commercial use.
DISCLAIMERS. Any implied warranties arising out of an original purchaser's purchase of a Great Lakes Home & Resort hot tub, including but not limited to the implied warranties of merchantability and fitness for a particular purpose, are limited in duration equal to the dura-tion of the applicable warranty stated above. Great Lakes Home & Resort shall not be liable for loss of use of the Great Lakes Home & Resort hot tub or other incidental or consequential costs, expenses or damage, which may include but are not limited to, the removal of or reinstallation of a wall, deck or other fixture, water leakage, costs of shipping or packaging, applicable taxes, or the payment of any costs or expenses of disassembly, removal, or reinstallation of the product or any part. Under no circum-stances shall Great Lakes Home & Resort or its representatives be held liable for injury to any person or damage to any property, however arising, even if caused by Great Lakes Home & Resort or its representatives' negligence. Some states do not allow limita-tion on how long an implied warranty lasts, and some states do not allow the exclusion or limitation of incidental or consequential damages, so these limitations or exclusions may not apply to you. These warranties give you specific legal rights, and you may also have other rights which vary from state to state. No distributor, salesperson, dealer, retailer, or other representative of Great Lakes Home & Resort has the authority to alter or change these warranties either orally or in writing.
htm-gls01-010204

16