Embed Size (px)
Citation preview

1
Owner’s Manual
Concept Series Kitchen Machinesfor models:
MUM 7000 UC • MUM 7100 UCMUM 7010 UC • MUM 7150 UC
MUM 7220 UC
READ THIS MANUALthoroughly for important safety and operating
instructions before using this appliance.

2
IMPORTANT SAFEGUARDS
WARNING: A risk of fire and electrical shock exists in all electrical appliances and maycause personal injury or death.
When using electrical appliances, basic safety precautions should always be followed,including the following:
1. Read all instructions before using the kitchen machine.2. To protect against risk of electric shock, do not put the drive unit in or under water or
other liquid.3. This appliance is not for use by children.4. Close supervision is necessary when any appliance is used near children.5. Do not leave appliances unattended during operation.6. Unplug from outlet when not in use, before putting on or taking off parts, and
before cleaning.7. To disconnect: Switch appliance off then remove plug from power supply.8. Avoid contacting moving parts. Keep hands, hair, clothing, as well as spatulas
and other utensils away from whisks, beaters, blades, disc, dough hook and/or othermoving parts during operation to reduce the risk of injury to persons, and/ordamage to the appliance or its attachments.
9. Do not operate any appliance with a damaged cord or plug, or after the appliancemalfunctions or is dropped or damaged in any manner. Return appliance to thenearest authorized service facility for examination, repair or electrical or mechanicaladjustment.
10. The use of attachments not recommended or sold by the appliance manufacturermay cause fire, electric shock or injury and is therefore prohibited.
11. Do not use outdoors or when standing in a damp area.12. Do not let cord hang over edge of table or counter, or touch hot surfaces.13. Always operate appliance with covers in place.14. Blades are sharp. Handle carefully due to risk of injury.15. Remove beaters from mixing bowl before washing.
NOTE: ALSO BE SURE TO READ THE WARNINGS AND CAUTIONS THAT AREPROVIDED BEFORE EACH ATTACHMENT’S OPERATING INSTRUCTION.
SAVE THESE INSTRUCTIONS
3
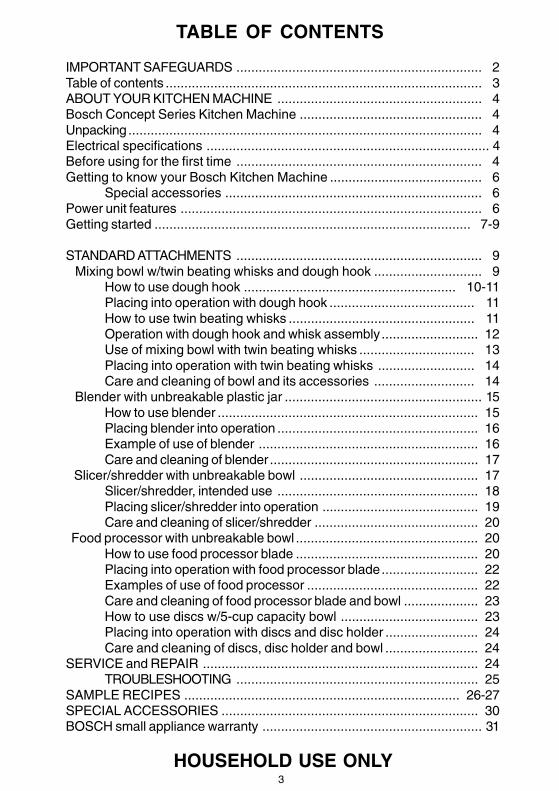
TABLE OF CONTENTS
IMPORTANT SAFEGUARDS .................................................................. 2Table of contents ..................................................................................... 3ABOUT YOUR KITCHEN MACHINE ....................................................... 4Bosch Concept Series Kitchen Machine ................................................. 4Unpacking ............................................................................................... 4Electrical specifications ............................................................................ 4Before using for the first time .................................................................. 4Getting to know your Bosch Kitchen Machine ......................................... 6
Special accessories ..................................................................... 6Power unit features ................................................................................. 6Getting started ..................................................................................... 7-9
STANDARD ATTACHMENTS .................................................................. 9 Mixing bowl w/twin beating whisks and dough hook ............................. 9
How to use dough hook ......................................................... 10-11Placing into operation with dough hook ....................................... 11How to use twin beating whisks .................................................. 11Operation with dough hook and whisk assembly.......................... 12Use of mixing bowl with twin beating whisks ............................... 13Placing into operation with twin beating whisks .......................... 14Care and cleaning of bowl and its accessories ........................... 14
Blender with unbreakable plastic jar ..................................................... 15How to use blender ...................................................................... 15Placing blender into operation ...................................................... 16Example of use of blender ........................................................... 16Care and cleaning of blender........................................................ 17
Slicer/shredder with unbreakable bowl ................................................ 17Slicer/shredder, intended use ...................................................... 18Placing slicer/shredder into operation .......................................... 19Care and cleaning of slicer/shredder ............................................ 20
Food processor with unbreakable bowl ................................................. 20How to use food processor blade ................................................. 20Placing into operation with food processor blade.......................... 22Examples of use of food processor .............................................. 22Care and cleaning of food processor blade and bowl .................... 23How to use discs w/5-cup capacity bowl ..................................... 23Placing into operation with discs and disc holder ......................... 24Care and cleaning of discs, disc holder and bowl ......................... 24
SERVICE and REPAIR .......................................................................... 24TROUBLESHOOTING ................................................................. 25
SAMPLE RECIPES .......................................................................... 26-27SPECIAL ACCESSORIES ..................................................................... 30BOSCH small appliance warranty ........................................................... 31
HOUSEHOLD USE ONLY
4
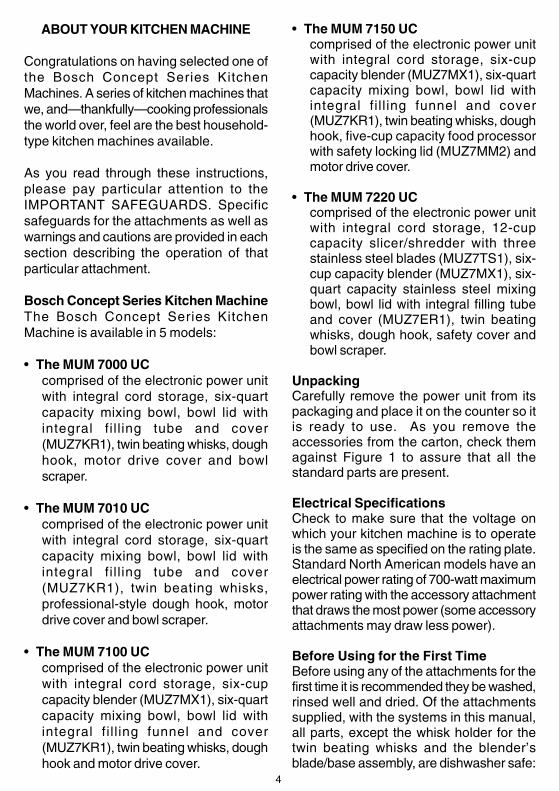
ABOUT YOUR KITCHEN MACHINE
Congratulations on having selected one ofthe Bosch Concept Series KitchenMachines. A series of kitchen machines thatwe, and—thankfully—cooking professionalsthe world over, feel are the best household-type kitchen machines available.
As you read through these instructions,please pay particular attention to theIMPORTANT SAFEGUARDS. Specificsafeguards for the attachments as well aswarnings and cautions are provided in eachsection describing the operation of thatparticular attachment.
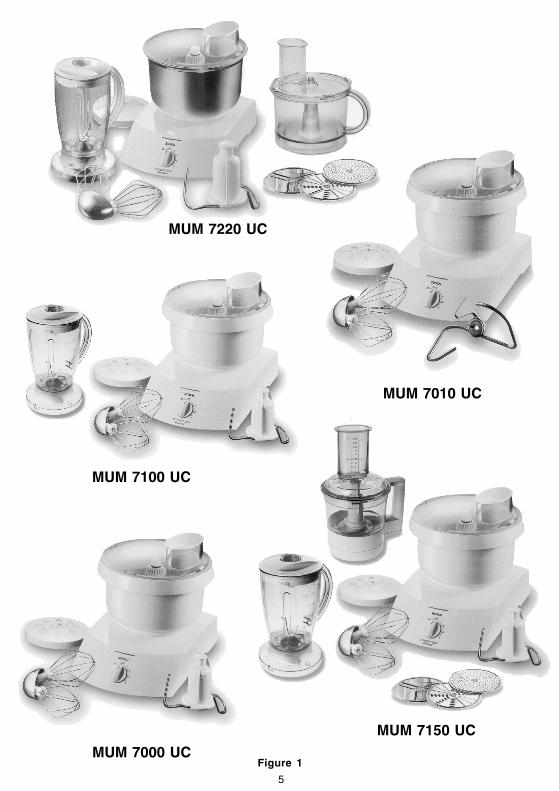
Bosch Concept Series Kitchen MachineThe Bosch Concept Series KitchenMachine is available in 5 models:
• The MUM 7000 UCcomprised of the electronic power unitwith integral cord storage, six-quartcapacity mixing bowl, bowl lid withintegral fi l l ing tube and cover(MUZ7KR1), twin beating whisks, doughhook, motor drive cover and bowlscraper.
• The MUM 7010 UCcomprised of the electronic power unitwith integral cord storage, six-quartcapacity mixing bowl, bowl lid withintegral fi l l ing tube and cover(MUZ7KR1), twin beating whisks,professional-style dough hook, motordrive cover and bowl scraper.
• The MUM 7100 UCcomprised of the electronic power unitwith integral cord storage, six-cupcapacity blender (MUZ7MX1), six-quartcapacity mixing bowl, bowl lid withintegral fi l l ing funnel and cover(MUZ7KR1), twin beating whisks, doughhook and motor drive cover.
• The MUM 7150 UCcomprised of the electronic power unitwith integral cord storage, six-cupcapacity blender (MUZ7MX1), six-quartcapacity mixing bowl, bowl lid withintegral fi l l ing funnel and cover(MUZ7KR1), twin beating whisks, doughhook, five-cup capacity food processorwith safety locking lid (MUZ7MM2) andmotor drive cover.
• The MUM 7220 UCcomprised of the electronic power unitwith integral cord storage, 12-cupcapacity slicer/shredder with threestainless steel blades (MUZ7TS1), six-cup capacity blender (MUZ7MX1), six-quart capacity stainless steel mixingbowl, bowl lid with integral filling tubeand cover (MUZ7ER1), twin beatingwhisks, dough hook, safety cover andbowl scraper.
UnpackingCarefully remove the power unit from itspackaging and place it on the counter so itis ready to use. As you remove theaccessories from the carton, check themagainst Figure 1 to assure that all thestandard parts are present.
Electrical SpecificationsCheck to make sure that the voltage onwhich your kitchen machine is to operateis the same as specified on the rating plate.Standard North American models have anelectrical power rating of 700-watt maximumpower rating with the accessory attachmentthat draws the most power (some accessoryattachments may draw less power).
Before Using for the First TimeBefore using any of the attachments for thefirst time it is recommended they be washed,rinsed well and dried. Of the attachmentssupplied, with the systems in this manual,all parts, except the whisk holder for thetwin beating whisks and the blender’sblade/base assembly, are dishwasher safe:
5
Figure 1
MUM 7220 UC
MUM 7000 UC
MUM 7100 UC
MUM 7010 UC
MUM 7150 UC

6
> The whisk holder should be handwashed in warm soapy water, rinsedand dried.
> The blender’s blade/base assemblyshould be washed under running waterand dried.
Note: It is recommended that the blender’sblade/base assembly never be left tostand in water or soap solution to preventthe bearing lubricant from being washed out.
Getting to Know Your Bosch KitchenMachineThe Bosch Concept Series KitchenMachines are comprised of variousattachments, depending on the systempurchased (see above). In addition to theattachments listed on the previous pagesthat are available with the standard systems,Bosch offers many special accessories.
Special AccessoriesTo allow you to get the most service fromyour Bosch Concept Series KitchenMachine, Bosch engineers have designeda line of special accessories to expand theusefulness of your machine. In addition tothe attachments that come with the variousConcept Series Kitchen Machines, thereare optional accessories that can be orderedseparately. These accessories include afood and meat grinder, grain mills, citrusjuicer and ice cream maker, plus additionalattachments that can be used with the meatgrinder: fancy cookie attachment, fruitpulper, pasta-making disks and graterattachment. See SPECIALACCESSORIES, at the back of thisbooklet, page 30. Or, to view all currentlyavailable accessories, visit our Web site at
www.boschsmallappliances.com
Work on expanding the usefulness of theBosch Kitchen Machine is a continuingprocess. If there is some type of accessoryin which you are interested in that is notincluded at the back of the book, pleaseeither write us at:
• Bosch Small AppliancesCustomer SupportBSH Home Appliances5551 McFadden AvenueHuntington Beach, CA 92649
Power Unit FeaturesAll MUM 7000 power units have the followingfeatures, refer to figure 2:
700-watt motorThe most powerful motor offered with anyhousehold kitchen machine.
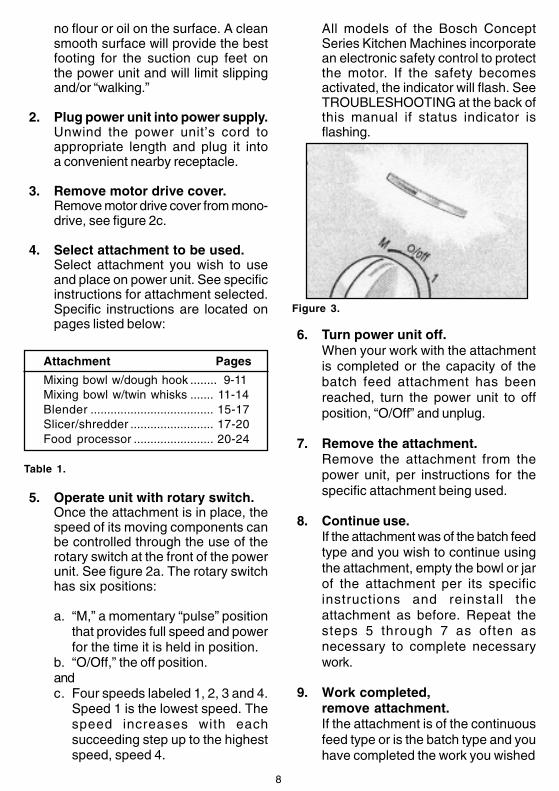
Electronic speed controlSix-position rotary switch is located at frontof power unit: 4 speeds plus a momentarypulse function and a stop position “O/Off,”see figure 2a.
Control status indicatorIndicates when power unit is functioningnormally, or if there is a problem that hascaused the electronic safety control to beactivated, see figure 2b:• The indicator will glow steadily when
the power unit is functioning normally.or,• The indicator will flash if the electronic
safety control of the power unit hasbeen activated.
Mono driveFour electronically controlled shaft speedsare all available from a single location; eachattachment automatically connects to theappropriate drive speed.
Motor drive coverUsed to cover mono drive when not in use,see figure 2c.

7
Gentle start
a special feature that brings the motor upto speed over a two-second period; limitingsplashing.
Convenient cord storage
Convenient cord storage is located on theback of the power unit, see 2d.
Integrated hand grips
Side recesses provide for easy lifting andcarrying of power unit when not in use, see2e.
Four rubber feet
Four rubber feet with formed suction cupsprovide the ultimate in stability, while alsoserving to isolate the power unit from thehard surface to minimize noise andvibration. Need clean smooth surface, seefigure 2f.
Figure 2.
Getting StartedThe operation of your Bosch Concept SeriesKitchen Machine is summarized below.
Specific instructions for using each of theattachments, provided with the kitchenmachine systems covered by this manual,follow the summarized instructions. Pleaseread the specific instructions thoroughlybefore using that attachment, payingparticular attention to the IMPORTANTSAFEGUARDS and WARNINGS provided.
1. Place power unit on suitable worksurface.Before using the machine with any ofthe attachments the power unit shouldbe placed on suitable work surface.The surface should be sturdy, smoothand clean; make sure that there is
8
no flour or oil on the surface. A cleansmooth surface will provide the bestfooting for the suction cup feet onthe power unit and will limit slippingand/or “walking.”
2. Plug power unit into power supply.Unwind the power unit’s cord toappropriate length and plug it intoa convenient nearby receptacle.
3. Remove motor drive cover.Remove motor drive cover from mono-drive, see figure 2c.
4. Select attachment to be used.Select attachment you wish to useand place on power unit. See specificinstructions for attachment selected.Specific instructions are located onpages listed below:
Attachment Pages
Mixing bowl w/dough hook ........ 9-11Mixing bowl w/twin whisks ....... 11-14Blender ..................................... 15-17Slicer/shredder ......................... 17-20Food processor ........................ 20-24
Table 1.
5. Operate unit with rotary switch.Once the attachment is in place, thespeed of its moving components canbe controlled through the use of therotary switch at the front of the powerunit. See figure 2a. The rotary switchhas six positions:
a. “M,” a momentary “pulse” positionthat provides full speed and powerfor the time it is held in position.
b. “O/Off,” the off position.andc. Four speeds labeled 1, 2, 3 and 4.
Speed 1 is the lowest speed. Thespeed increases with eachsucceeding step up to the highestspeed, speed 4.
All models of the Bosch ConceptSeries Kitchen Machines incorporatean electronic safety control to protectthe motor. If the safety becomesactivated, the indicator will flash. SeeTROUBLESHOOTING at the back ofthis manual if status indicator isflashing.
Figure 3.
6. Turn power unit off.When your work with the attachmentis completed or the capacity of thebatch feed attachment has beenreached, turn the power unit to offposition, “O/Off” and unplug.
7. Remove the attachment.Remove the attachment from thepower unit, per instructions for thespecific attachment being used.
8. Continue use.If the attachment was of the batch feedtype and you wish to continue usingthe attachment, empty the bowl or jarof the attachment per its specificinstructions and reinstall theattachment as before. Repeat thesteps 5 through 7 as often asnecessary to complete necessarywork.
9. Work completed,remove attachment.If the attachment is of the continuousfeed type or is the batch type and youhave completed the work you wished
9
to perform with the attachment,remove the attachment from the powerunit per the instructions for the specificattachment being used.
10. Place contents (batch feed type)If the attachment is the batch feedtype, disassemble per the specificattachment’s instructions and placethe contents in a suitable container.
11. Care and CleaningOnce you have completed workingwith the Bosch Kitchen Machine, thenext step is to disassemble and cleanthe attachments. If you wish to useanother attachment please return tostep 4, above.
Power unitWith the power unit turned off andunplugged, it should be cleaned only witha clean, damp cloth. Never use coarse orcaustic cleaning products to clean thepower unit. Never immerse the power unitin water. Then wipe off the motor drive coverand reinstall on the power unit.
The power unit may be left on the counteror stored for future use. In either case,always be sure to replace the motor drivecover on the mono drive. This will preventdust and/or flour build-up in the drive.
The Bosch Concept Series KitchenMachines have been specially designed toenable them to be stored in a drawer. Windthe cord around the cord holder and, usingthe carry grips, lift the power unit and placein your chosen storage area.
AttachmentsThe attachment(s) that have been usedshould be disassembled and washed, pertheir specific instructions, dried and storedfor future use.
STANDARD ATTACHMENTSFollowing are the specific instructions forthe standard attachments provided with theBosch Concept Series Kitchen Machinescovered by this manual.
Mixing Bowl with Twin Beating Whisksand Dough Hook(MUZ 7 KR1 or MUZ 7 ER1)
WARNING1. There is a risk of injury from rotating
tools when using the mixing bowl withthe dough hook or the twin beatingwhisks.
2. Avoid contact with moving parts. Keephands, hair, clothing, as well asspatulas, bowl scrapers and otherutensils away from dough hook andwhisks during operation to preventinjury, and/or damage to the power unitor accessories.
3. Always work with the bowl lid fitted inplace.
4. Do not change tools until the power unithas come to a complete stop; whenswitched off, the power unit will continueto turn for a brief period.
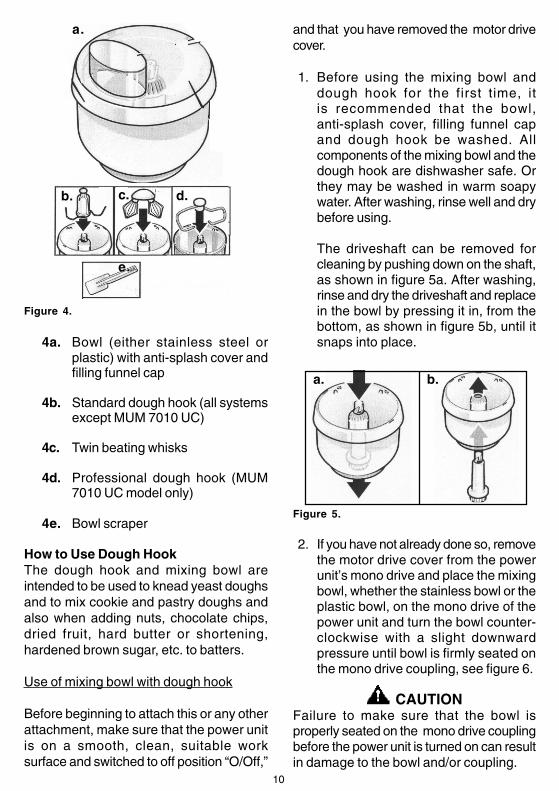
All models of the Bosch Concept SeriesKitchen Machines are provided with a six-quart mixing bowl with twin beating whisksand dough hook. You may have either thestainless steel bowl or the plastic mixingbowl with the twin beating whisks and doughhook, see figure 1. Or you may have thestandard dough hook or the professionaldough hook. Additional mixing bowls areavailable as accessory items under the partnumbers: MUZ 7 ER1 and/or MUZ 7 KR1,refer to SPECIAL ACCESSORIES sectionat the back of this manual. The mixing bowlwith dough hook and twin beating whisksconsists of the following components,dependent upon the system you have, seefigure 4:
10
and that you have removed the motor drivecover.
1. Before using the mixing bowl anddough hook for the first time, itis recommended that the bowl,anti-splash cover, filling funnel capand dough hook be washed. Allcomponents of the mixing bowl and thedough hook are dishwasher safe. Orthey may be washed in warm soapywater. After washing, rinse well and drybefore using.
The driveshaft can be removed forcleaning by pushing down on the shaft,as shown in figure 5a. After washing,rinse and dry the driveshaft and replacein the bowl by pressing it in, from thebottom, as shown in figure 5b, until itsnaps into place.
Figure 5.
2. If you have not already done so, removethe motor drive cover from the powerunit’s mono drive and place the mixingbowl, whether the stainless bowl or theplastic bowl, on the mono drive of thepower unit and turn the bowl counter-clockwise with a slight downwardpressure until bowl is firmly seated onthe mono drive coupling, see figure 6.
CAUTIONFailure to make sure that the bowl isproperly seated on the mono drive couplingbefore the power unit is turned on can resultin damage to the bowl and/or coupling.
a.
e.
d.c.b.
Figure 4.
4a. Bowl (either stainless steel orplastic) with anti-splash cover andfilling funnel cap
4b. Standard dough hook (all systemsexcept MUM 7010 UC)
4c. Twin beating whisks
4d. Professional dough hook (MUM7010 UC model only)
4e. Bowl scraper
How to Use Dough HookThe dough hook and mixing bowl areintended to be used to knead yeast doughsand to mix cookie and pastry doughs andalso when adding nuts, chocolate chips,dried fruit, hard butter or shortening,hardened brown sugar, etc. to batters.
Use of mixing bowl with dough hook
Before beginning to attach this or any otherattachment, make sure that the power unitis on a smooth, clean, suitable worksurface and switched to off position “O/Off,”
a. b.
11
Figure 6.
3. There are two styles of dough hookused with the Bosch Machine, thestandard and the professional, but nomatter which one you have they aremounted in the mixing bowl in the sameway: engage the dough hook on thedriveshaft of the mixing bowl by placingit over the center column, as shown infigure 7. Once in place, check to makesure dough hook has engaged thedriveshaft by turning the dough hookclockwise while pushing down until itstops.
Figure 7.
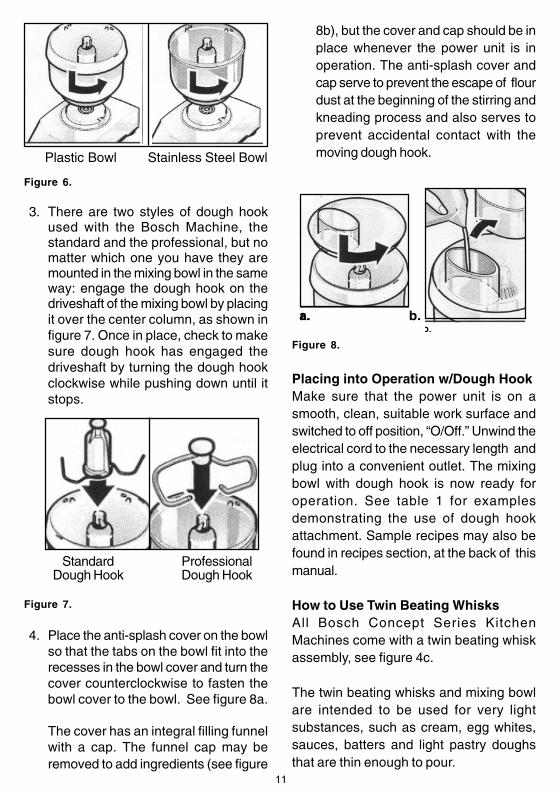
4. Place the anti-splash cover on the bowlso that the tabs on the bowl fit into therecesses in the bowl cover and turn thecover counterclockwise to fasten thebowl cover to the bowl. See figure 8a.
The cover has an integral filling funnelwith a cap. The funnel cap may beremoved to add ingredients (see figure
8b), but the cover and cap should be inplace whenever the power unit is inoperation. The anti-splash cover andcap serve to prevent the escape of flourdust at the beginning of the stirring andkneading process and also serves toprevent accidental contact with themoving dough hook.
Figure 8.
Placing into Operation w/Dough HookMake sure that the power unit is on asmooth, clean, suitable work surface andswitched to off position, “O/Off.” Unwind theelectrical cord to the necessary length andplug into a convenient outlet. The mixingbowl with dough hook is now ready foroperation. See table 1 for examplesdemonstrating the use of dough hookattachment. Sample recipes may also befound in recipes section, at the back of thismanual.
How to Use Twin Beating WhisksAll Bosch Concept Series KitchenMachines come with a twin beating whiskassembly, see figure 4c.
The twin beating whisks and mixing bowlare intended to be used for very lightsubstances, such as cream, egg whites,sauces, batters and light pastry doughsthat are thin enough to pour.
Plastic Bowl Stainless Steel Bowl
Standard ProfessionalDough Hook Dough Hook
a. b.
12
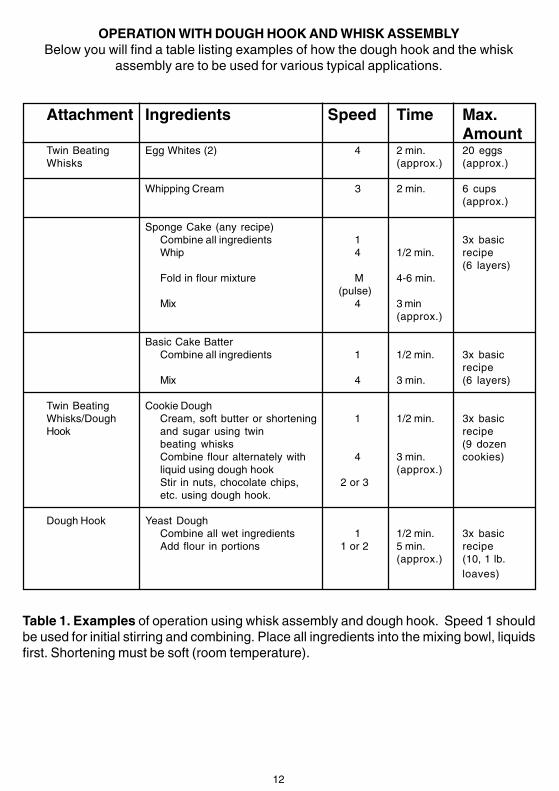
OPERATION WITH DOUGH HOOK AND WHISK ASSEMBLYBelow you will find a table listing examples of how the dough hook and the whisk
assembly are to be used for various typical applications.
Attachment Ingredients Speed Time Max.Amount
Twin Beating Egg Whites (2) 4 2 min. 20 eggsWhisks (approx.) (approx.)
Whipping Cream 3 2 min. 6 cups(approx.)
Sponge Cake (any recipe)Combine all ingredients 1 3x basicWhip 4 1/2 min. recipe
(6 layers)Fold in flour mixture M 4-6 min.
(pulse)Mix 4 3 min
(approx.)
Basic Cake BatterCombine all ingredients 1 1/2 min. 3x basic
recipeMix 4 3 min. (6 layers)
Twin Beating Cookie DoughWhisks/Dough Cream, soft butter or shortening 1 1/2 min. 3x basicHook and sugar using twin recipe
beating whisks (9 dozenCombine flour alternately with 4 3 min. cookies)liquid using dough hook (approx.)Stir in nuts, chocolate chips, 2 or 3etc. using dough hook.
Dough Hook Yeast DoughCombine all wet ingredients 1 1/2 min. 3x basicAdd flour in portions 1 or 2 5 min. recipe
(approx.) (10, 1 lb.loaves)
Table 1. Examples of operation using whisk assembly and dough hook. Speed 1 shouldbe used for initial stirring and combining. Place all ingredients into the mixing bowl, liquidsfirst. Shortening must be soft (room temperature).
13
The dough hook should be used for allheavier substances such as cookie doughs,yeast doughs, pastry doughs and otherheavy doughs.The dough hook shouldalways be used when adding nuts,chocolate chips, dried fruits, hard butter orother fats, hardened brown sugar, etc. to amixture.
Use of mixing bowl with twin beating whisks
Before beginning to attach this or any otherattachment, make sure that the power unitis on a smooth, clean, suitable surface andswitched to off position, “O/Off,” and thatyou have removed the motor drive cover.
1. Before using the mixing bowl and twinbeating whisk assembly for the firsttime, it is recommended that the bowl,anti-splash cover, filling funnel cap andtwin beating whisk assembly bewashed. All components of the mixingbowl and the twin beating whiskassembly are dishwasher safe, exceptthe whisk holder.
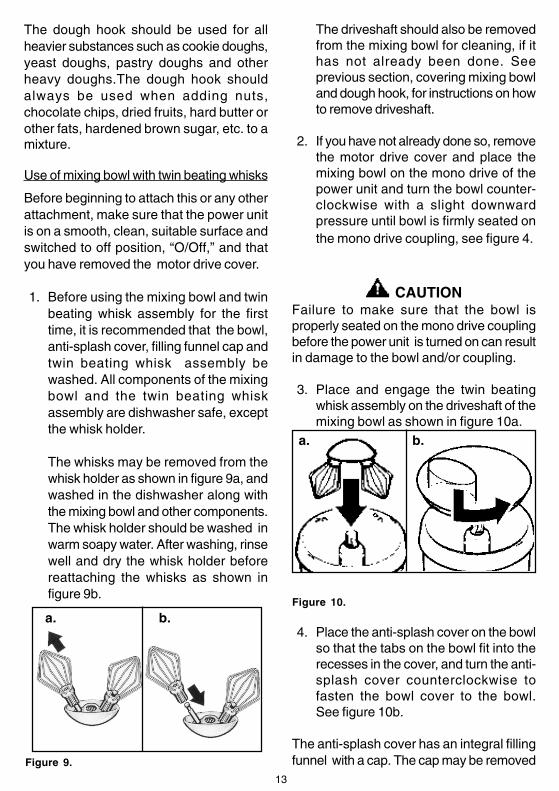
The whisks may be removed from thewhisk holder as shown in figure 9a, andwashed in the dishwasher along withthe mixing bowl and other components.The whisk holder should be washed inwarm soapy water. After washing, rinsewell and dry the whisk holder beforereattaching the whisks as shown infigure 9b.
The driveshaft should also be removedfrom the mixing bowl for cleaning, if ithas not already been done. Seeprevious section, covering mixing bowland dough hook, for instructions on howto remove driveshaft.
2. If you have not already done so, removethe motor drive cover and place themixing bowl on the mono drive of thepower unit and turn the bowl counter-clockwise with a slight downwardpressure until bowl is firmly seated onthe mono drive coupling, see figure 4.
CAUTIONFailure to make sure that the bowl isproperly seated on the mono drive couplingbefore the power unit is turned on can resultin damage to the bowl and/or coupling.
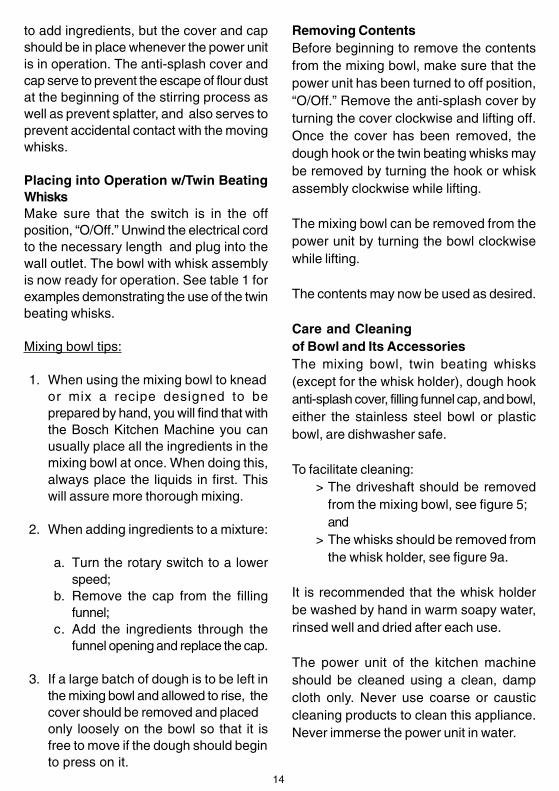
3. Place and engage the twin beatingwhisk assembly on the driveshaft of themixing bowl as shown in figure 10a.
Figure 10.
4. Place the anti-splash cover on the bowlso that the tabs on the bowl fit into therecesses in the cover, and turn the anti-splash cover counterclockwise tofasten the bowl cover to the bowl.See figure 10b.
The anti-splash cover has an integral fillingfunnel with a cap. The cap may be removed
a. b.
Figure 9.
a. b.
14
to add ingredients, but the cover and capshould be in place whenever the power unitis in operation. The anti-splash cover andcap serve to prevent the escape of flour dustat the beginning of the stirring process aswell as prevent splatter, and also serves toprevent accidental contact with the movingwhisks.
Placing into Operation w/Twin BeatingWhisksMake sure that the switch is in the offposition, “O/Off.” Unwind the electrical cordto the necessary length and plug into thewall outlet. The bowl with whisk assemblyis now ready for operation. See table 1 forexamples demonstrating the use of the twinbeating whisks.
Mixing bowl tips:
1. When using the mixing bowl to kneador mix a recipe designed to beprepared by hand, you will find that withthe Bosch Kitchen Machine you canusually place all the ingredients in themixing bowl at once. When doing this,always place the liquids in first. Thiswill assure more thorough mixing.
2. When adding ingredients to a mixture:
a. Turn the rotary switch to a lowerspeed;
b. Remove the cap from the fillingfunnel;
c. Add the ingredients through thefunnel opening and replace the cap.
3. If a large batch of dough is to be left inthe mixing bowl and allowed to rise, thecover should be removed and placedonly loosely on the bowl so that it isfree to move if the dough should beginto press on it.
Removing ContentsBefore beginning to remove the contentsfrom the mixing bowl, make sure that thepower unit has been turned to off position,“O/Off.” Remove the anti-splash cover byturning the cover clockwise and lifting off.Once the cover has been removed, thedough hook or the twin beating whisks maybe removed by turning the hook or whiskassembly clockwise while lifting.
The mixing bowl can be removed from thepower unit by turning the bowl clockwisewhile lifting.
The contents may now be used as desired.
Care and Cleaningof Bowl and Its AccessoriesThe mixing bowl, twin beating whisks(except for the whisk holder), dough hookanti-splash cover, filling funnel cap, and bowl,either the stainless steel bowl or plasticbowl, are dishwasher safe.
To facilitate cleaning:> The driveshaft should be removed
from the mixing bowl, see figure 5;and
> The whisks should be removed fromthe whisk holder, see figure 9a.
It is recommended that the whisk holderbe washed by hand in warm soapy water,rinsed well and dried after each use.
The power unit of the kitchen machineshould be cleaned using a clean, dampcloth only. Never use coarse or causticcleaning products to clean this appliance.Never immerse the power unit in water.
15
How to Use BlenderEither this plastic blender or the stainlesssteel blender are available as accessoryitems under the part numbers:
• MUZ 7 MX1for blender with polycarbonate jar;
or• MUZ 7 MX3
for blender with stainless steel jar.
The blender has been designed for crushingice; mixing liquids; pureeing vegetables;preparing special diet and infant foods;pulverizing fruit, vegetables, nuts and driedbread (for bread crumbs); and preparingmayonnaise and sauces.
Before beginning to use this or any otherattachment, make sure that the power unitis on a clean, smooth, suitable worksurface and switched to off position, “O/Off,”and that you have removed the motor drivecover.
1. Before using the blender for the firsttime, it is recommended that theblender jar cover, closure/funnel andblade/base assembly be washed. Allcomponents, except the blade/baseassembly, are dishwasher safe.Remove the blade/base assembly fromthe blender, see figure 12.
CAUTIONBlade/base assembly is very sharp.
Handle with care.
The blade/base assembly may beeasily removed, as shown in figure 12a,by inverting the blender and pressingdown on the quick release handle andturning it counterclockwise until itstops and then lifting up.
Blender with Unbreakable Plastic Jar(MUZ 7 MX1)
WARNING1. There is a risk of injury from sharp
blades when using the blenderattachment.
2. Keep hands and utensils out of theblender jar while it is attached to thepower unit.
3. Blades are sharp. Handle carefully.4. To avoid injury, never place blade
assembly on power unit withoutblender jar properly attached.
5. Always operate the blender with thecover in place.
6. The use of attachments, includingcanning jars, not recommended bythe manufacturer, may cause a riskof personal injury.
7. When blending hot and/or frothingliquids, process a maximum of 18 fluidounces (0.5 litres) at a time.
The MUM 7100 UC, MUM 7150 UC and theMUM 7220 UC Bosch Concept SeriesKitchen Machines include the MUZ 7 MX1blender accessory. The blender accessoryconsists of, figure 11:
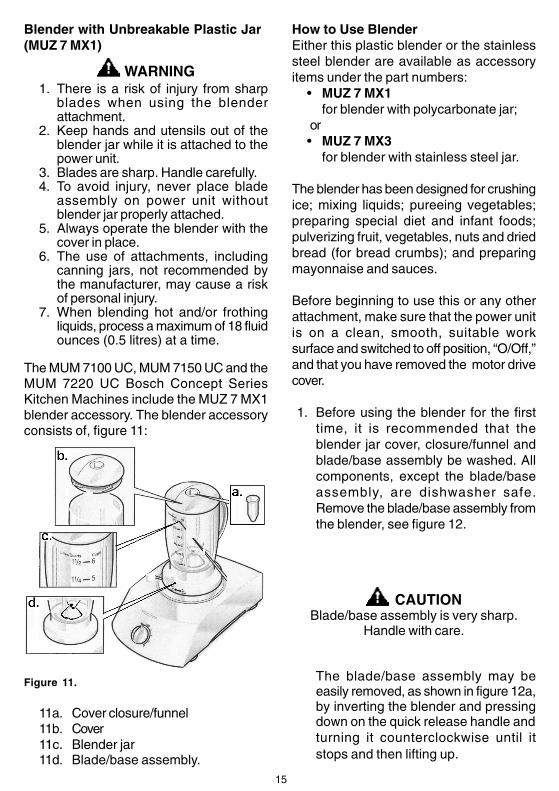
Figure 11.
11a. Cover closure/funnel11b. Cover11c. Blender jar11d. Blade/base assembly.

16
Figure 12.
Wash the blade/base assembly underrunning water. Do not place the blade/base assembly in the dishwasher orallow it to stand in water. This will tendto wash out the lubricant. Aftercleaning, rinse thoroughly and drybefore using.
2. To assemble or reassemble blade/baseassembly into the blender, insert theblade/base assembly into the blenderjar as shown in figure 12b, pressdown on the quick release handle ofthe blade/base assembly and turnclockwise to the stop. The blade/baseassembly is then back in place.
3. If you have not already done so, removethe motor drive cover and place theblender on the mono drive and turncounterclockwise to lock the blenderin place.
Figure 13.
Placing Blender into OperationMake sure that the switch is in the offposition, “O/Off.” Unwind the electrical cordto the necessary length and plug into walloutlet. The blender is now ready foroperation.
Normally when blending, the blender jarshould be filled with the entire amount ofmaterial to be blended, if possible, beforeswitching the appliance on. The cover andcover closure should always be in place afterfilling the blender jar and before switchingthe power unit to On. Any subsequentadditions to the blended material should bemade through the cover opening, see figure14. For solids and/or granular material,remove the cover closure/funnel to add thematerial, as shown in figure 14a. For liquids,the closure/funnel may be left in place andthe liquids added by pouring it into theclosure/funnel, see figure 14b.
Figure 14.
Example of Use of BlenderTo familiarize you with the operation of theblender, a sample recipe for mayonnaise isprovided below:
Mayonnaise Recipe1 whole egg
1/3 cup of vegetable oil2 tablespoons lemon juice or light
vinegar1 teaspoon sugar
1/2 teaspoon dry mustard1/2 teaspoon of salt2/3 cup of vegetable oil
Mix all ingredients, except final 2/3’s cupof oil, for a few seconds at speed 1, thenquickly pour the oil in through the openingin the cover in a uniformly thick stream, asshown in figure 14b. Operate the blender atspeeds 1 or 4 until mixture is thick andsmooth (approximately 10-20 seconds).Makes 1 1/4 cups.
a. b.
a. b.

17
Tips:
The blender should be operated with carefulconsideration as to what is required and/ordesired. The speed at which the blender isoperated and the length of operation for agiven job will depend upon the degree offineness desired or the amount beingblended.
When the blender is being used on drymaterials, such as nuts or dry bread, thebest results will be obtained when theblender jar is filled with approximately 1/2cup of material to be blended.
If the blender does not start (even after tryingthe highest speed) after having switched itOn and the control status indicator isflashing, the blade has become blocked bythe contents. The power unit should be:
1. Switched to off, “0/Off,” and unplugged.2. The mixture should be removed and the
contents at the bottom of the jarloosened.
Removing ContentsBefore beginning to remove the contentsfrom the blender, make sure that the powerunit has been turned to off position “O/Off”.Remove the blender from the power unit byturning the blender to the clockwise whilelifting. With the blender removed from thepower unit, the contents of the blender maynow be poured into a suitable container orbowl, as desired.
Care and Cleaning of BlenderAll components of the blender, except theblade/base assembly, are dishwasher safe.It is recommended that the blade/baseassembly be cleaned only under flowingwater rather than in the dishwasher. Soapand detergent will tend to wash out thebearing lubricant of the blade/baseassembly. Do not use scouring cleaners onany of the blender parts.
The power unit of the kitchen machineshould be cleaned with a clean, damp clothonly. Never use coarse or caustic cleaningproducts to clean this appliance. Neverimmerse the power unit in water.
Slicer/Shredder, w/Unbreakable Bowl(MUZ 7 TS1)
WARNING1. Blades on discs are sharp. Handle
carefully. Do not grip the discs by theblades.
2. When operating slicer/shredder keephands clear of filling tube. Only workwith pusher.
3. Always operate the slicer/shredder withthe cover in place.
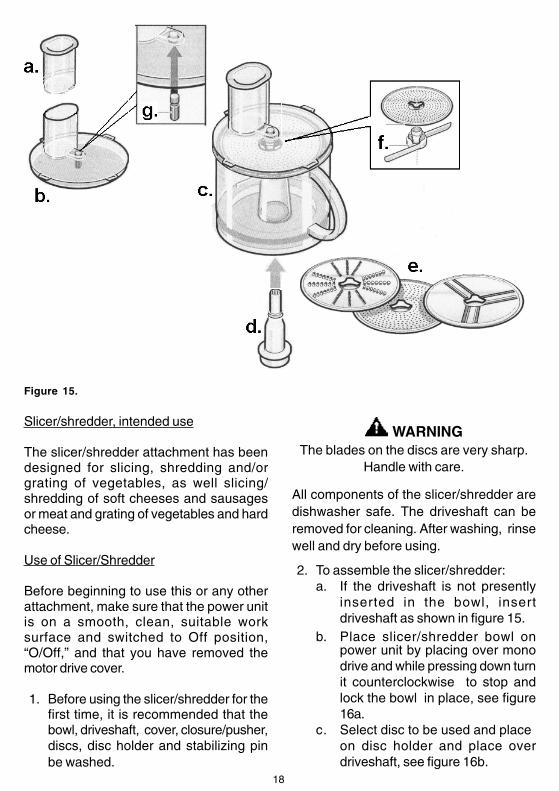
The MUM 7220 UC Bosch Concept SeriesKitchen Machine includes the MUZ 7 TS1slicer/shredder attachment. The slicer/shredder attachment consists of, figure 15:
a. Cover closure/pusherb. Coverc. Unbreakable 12-cup capacity bowld. Driveshafte. 3 slicer/shredder discs:
• reversible slicing disc• reversible shredding disc• grating disc
f. disc holderg. stabilizing pin
18
WARNINGThe blades on the discs are very sharp.
Handle with care.
All components of the slicer/shredder aredishwasher safe. The driveshaft can beremoved for cleaning. After washing, rinsewell and dry before using.
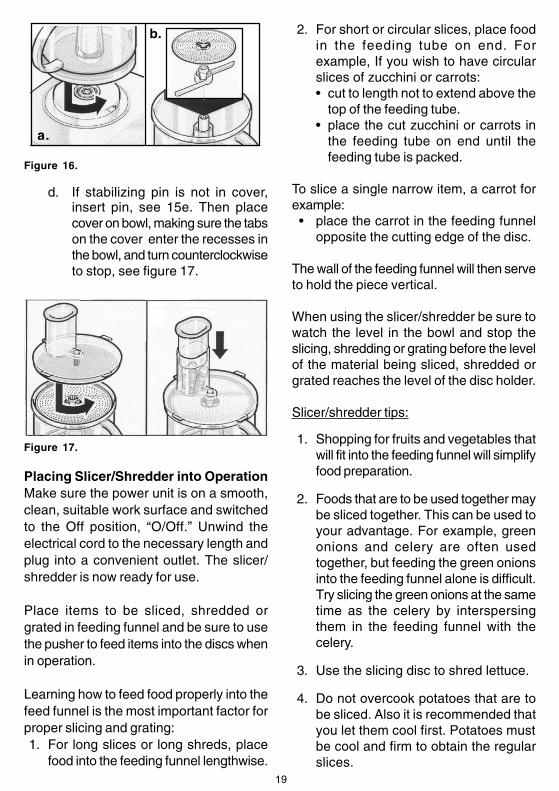
2. To assemble the slicer/shredder:a. If the driveshaft is not presently
inserted in the bowl, insertdriveshaft as shown in figure 15.
b. Place slicer/shredder bowl onpower unit by placing over monodrive and while pressing down turnit counterclockwise to stop andlock the bowl in place, see figure16a.
c. Select disc to be used and placeon disc holder and place overdriveshaft, see figure 16b.
Figure 15.
Slicer/shredder, intended use
The slicer/shredder attachment has beendesigned for slicing, shredding and/orgrating of vegetables, as well slicing/shredding of soft cheeses and sausagesor meat and grating of vegetables and hardcheese.
Use of Slicer/Shredder
Before beginning to use this or any otherattachment, make sure that the power unitis on a smooth, clean, suitable worksurface and switched to Off position,“O/Off,” and that you have removed themotor drive cover.
1. Before using the slicer/shredder for thefirst time, it is recommended that thebowl, driveshaft, cover, closure/pusher,discs, disc holder and stabilizing pinbe washed.
19
Figure 16.
d. If stabilizing pin is not in cover,insert pin, see 15e. Then placecover on bowl, making sure the tabson the cover enter the recesses inthe bowl, and turn counterclockwiseto stop, see figure 17.
Figure 17.
Placing Slicer/Shredder into OperationMake sure the power unit is on a smooth,clean, suitable work surface and switchedto the Off position, “O/Off.” Unwind theelectrical cord to the necessary length andplug into a convenient outlet. The slicer/shredder is now ready for use.
Place items to be sliced, shredded orgrated in feeding funnel and be sure to usethe pusher to feed items into the discs whenin operation.
Learning how to feed food properly into thefeed funnel is the most important factor forproper slicing and grating:1. For long slices or long shreds, place
food into the feeding funnel lengthwise.
2. For short or circular slices, place foodin the feeding tube on end. Forexample, If you wish to have circularslices of zucchini or carrots:• cut to length not to extend above the
top of the feeding tube.• place the cut zucchini or carrots in
the feeding tube on end until thefeeding tube is packed.
To slice a single narrow item, a carrot forexample:• place the carrot in the feeding funnel
opposite the cutting edge of the disc.
The wall of the feeding funnel will then serveto hold the piece vertical.
When using the slicer/shredder be sure towatch the level in the bowl and stop theslicing, shredding or grating before the levelof the material being sliced, shredded orgrated reaches the level of the disc holder.
Slicer/shredder tips:
1. Shopping for fruits and vegetables thatwill fit into the feeding funnel will simplifyfood preparation.
2. Foods that are to be used together maybe sliced together. This can be used toyour advantage. For example, greenonions and celery are often usedtogether, but feeding the green onionsinto the feeding funnel alone is difficult.Try slicing the green onions at the sametime as the celery by interspersingthem in the feeding funnel with thecelery.
3. Use the slicing disc to shred lettuce.
4. Do not overcook potatoes that are tobe sliced. Also it is recommended thatyou let them cool first. Potatoes mustbe cool and firm to obtain the regularslices.
a.
b.
20
If the slicer/shredder does not start (evenafter trying the highest speed) and theindicator above the rotary dial is flashing:the disc has become blocked by thecontents. The power unit should be:
1. Switched to Off position, “O/Off,” andunplugged.
2. The top cover should be removed andthe items causing the blockageremoved.
Removing ContentsBefore beginning to remove the contentsfrom the slicer/shredder, make sure that thepower unit has been turned to the Offposition, “O/Off.” Remove the slicer/shredder from the power unit by turning theslicer/shredder bowl clockwise while lifting.With the slicer/shredder removed from thepower unit, remove the top cover, by turningit clockwise while lifting. Next lift the discholder and disc out of the bowl by graspingthe knob of the disc holder that is protrudingthrough the center of the disc. The contentsof the slicer/shredder may now be pouredinto a suitable container or bowl, as desired.
Care and Cleaningof Slicer/ShredderAll components of the slicer/shredder aredishwasher safe. It is recommended thatthe driveshaft be removed prior to placingthe bowl in the dishwasher. Do not usescouring cleaners on any of the slicer/shredder parts.
The power unit of the kitchen machineshould be cleaned with a clean, damp clothonly. Never use coarse or caustic cleaningproducts to clean this appliance. Neverimmerse the power unit in water.
Food Processor with Unbreakable Bowl(MUZ 7 MM2)
WARNING1. There is a risk of injury from sharp
blades when using the food processoraccessory.
2. Blades are sharp. Handle carefully.3. Always operate the food processor
accessory properly assembled withthe cover in place.
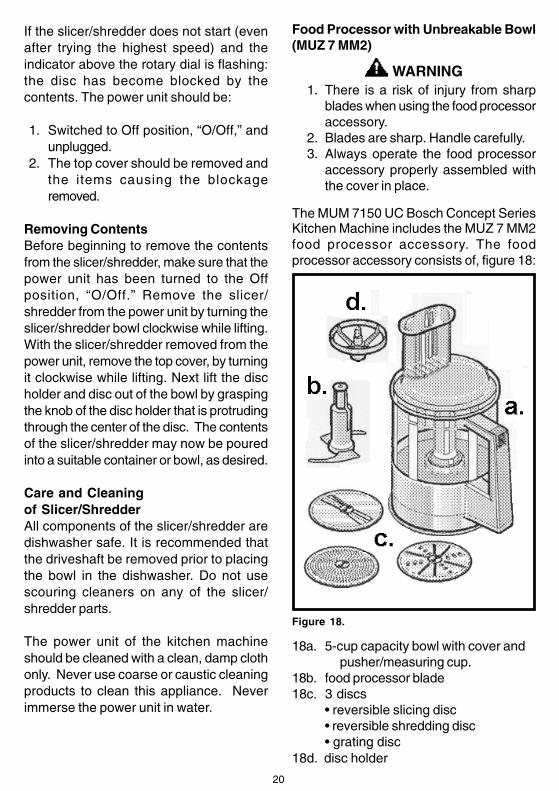
The MUM 7150 UC Bosch Concept SeriesKitchen Machine includes the MUZ 7 MM2food processor accessory. The foodprocessor accessory consists of, figure 18:
Figure 18.
18a. 5-cup capacity bowl with cover andpusher/measuring cup.
18b. food processor blade18c. 3 discs
• reversible slicing disc• reversible shredding disc• grating disc
18d. disc holder
21
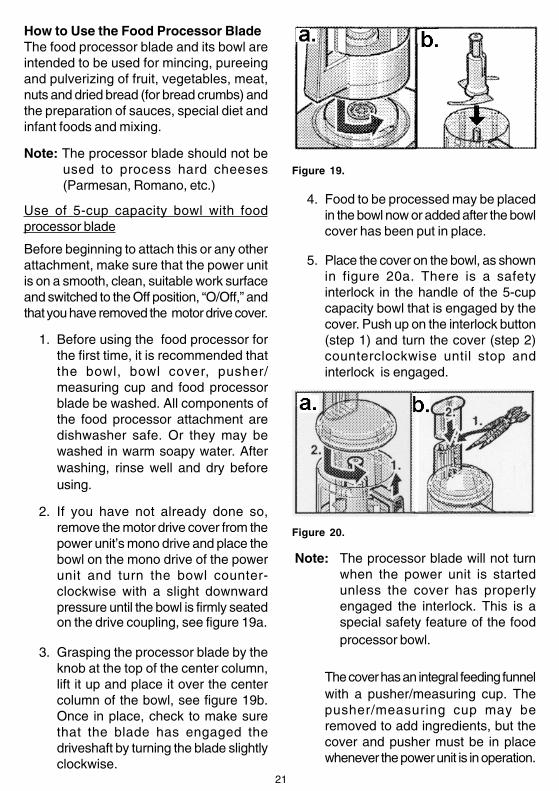
How to Use the Food Processor BladeThe food processor blade and its bowl areintended to be used for mincing, pureeingand pulverizing of fruit, vegetables, meat,nuts and dried bread (for bread crumbs) andthe preparation of sauces, special diet andinfant foods and mixing.
Note: The processor blade should not beused to process hard cheeses(Parmesan, Romano, etc.)
Use of 5-cup capacity bowl with foodprocessor blade
Before beginning to attach this or any otherattachment, make sure that the power unitis on a smooth, clean, suitable work surfaceand switched to the Off position, “O/Off,” andthat you have removed the motor drive cover.
1. Before using the food processor forthe first time, it is recommended thatthe bowl, bowl cover, pusher/measuring cup and food processorblade be washed. All components ofthe food processor attachment aredishwasher safe. Or they may bewashed in warm soapy water. Afterwashing, rinse well and dry beforeusing.
2. If you have not already done so,remove the motor drive cover from thepower unit’s mono drive and place thebowl on the mono drive of the powerunit and turn the bowl counter-clockwise with a slight downwardpressure until the bowl is firmly seatedon the drive coupling, see figure 19a.
3. Grasping the processor blade by theknob at the top of the center column,lift it up and place it over the centercolumn of the bowl, see figure 19b.Once in place, check to make surethat the blade has engaged thedriveshaft by turning the blade slightlyclockwise.
Figure 19.
4. Food to be processed may be placedin the bowl now or added after the bowlcover has been put in place.
5. Place the cover on the bowl, as shownin figure 20a. There is a safetyinterlock in the handle of the 5-cupcapacity bowl that is engaged by thecover. Push up on the interlock button(step 1) and turn the cover (step 2)counterclockwise until stop andinterlock is engaged.
Figure 20.
Note: The processor blade will not turnwhen the power unit is startedunless the cover has properlyengaged the interlock. This is aspecial safety feature of the foodprocessor bowl.
The cover has an integral feeding funnelwith a pusher/measuring cup. Thepusher/measuring cup may beremoved to add ingredients, but thecover and pusher must be in placewhenever the power unit is in operation.
22
Placing into Operationwith Food Processor BladeMake sure that the power unit is on asmooth, clean, suitable work surface andswitched to the Off, “O/Off,” position. Unwindthe electrical cord to the necessary lengthand plug into a convenient outlet. The 5-cupcapacity bowl with food processor blade isnow ready for operation.
The processor blade sits low in the bowl,near the bottom. Food to be processed mustbe fed through the feeding funnel using thepusher. The food is then minced or pureednear the bottom of the bowl by the spinningblade. Food should be prepared as usual(wash, dry, peel, etc.) and cut into piecesto readily fit through the feeding funnel.
The degree of mincing desired, to a greatextent, depends upon the intended purposeand the individual taste of the preparer, sothe times listed below in the examplesshould be taken as a general guide only.Also, the processing times depend uponthe quantity of food being processed; thatis, for small quantities and/or coarser result,use a shorter operating time, for largerquantities and/or finer result, use a longeroperating time.
Examples of Use of Food ProcessorTo familiarize you with the operation of thefood processor, below you will find sometypical uses:
• Herbs (except chives)Place herbs, up to an amount ofapproximately 1 tablespoon (10 g.) intothe bowl dry. Use speed 4, or “M,” themomentary “pulse” position, for 20-30seconds.
• Onions or GarlicCut onions into quarters. Processingapproximately 1/4 pound at a time(100 g.) use “M,” briefly (5-7 seconds)until desired consistency is obtained.
• Almonds, nutsPlace nuts approximately 1/4 pound at atime (100 g.) into the bowl dry. Use speed4 for approximately 1 - 1 1/2 minutes.
• MeatDo not process more than 3/4 of a poundat a time (375 g.). Remove the bones,gristle and tendons and cut meat intopieces suitable to fit through the feedingtube.
Note: Before processing, spices or breadmaybe added as called for in your recipe.
Use speed 4, or “M,” until desired resultis obtained (approximately 30 - 60seconds).
• PureeingFruits, vegetables and cheeses withingredients and spices may also beprocessed. Do not process more than3/4 of a pound at a time (375 g.). Usespeed 4 or “M” until desired result isobtained (approx. 1 minute).
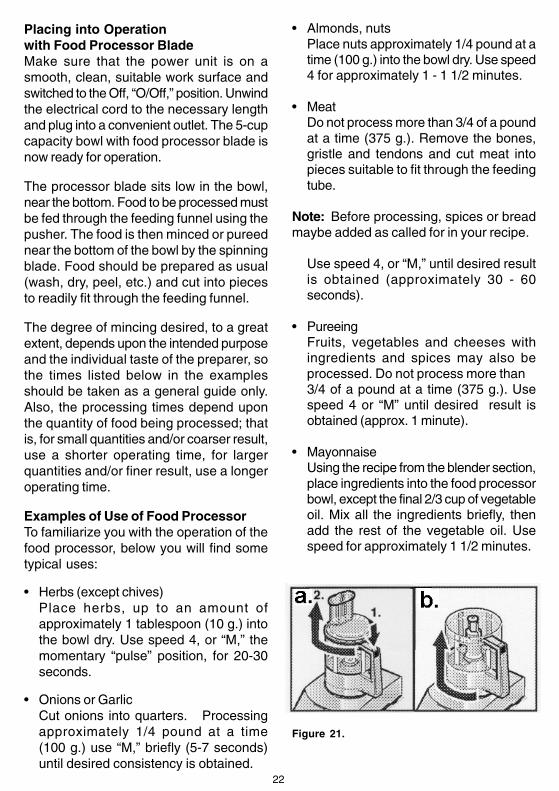
• MayonnaiseUsing the recipe from the blender section,place ingredients into the food processorbowl, except the final 2/3 cup of vegetableoil. Mix all the ingredients briefly, thenadd the rest of the vegetable oil. Usespeed for approximately 1 1/2 minutes.
Figure 21.
23
Removing ContentsBefore beginning to remove the contentsfrom the food processor, make sure that thepower unit has been turned to the Offposition, “O/Off.” Remove the top cover fromthe bowl by depressing the interlock buttonon the handle, step 1, and turning the coverclockwise, step 2, while lifting, see figure21a. With the cover removed the bowl canbe removed from the power unit by turningit clockwise while lifting, see figure 21b.The contents of the bowl may now bepoured into a suitable container or bowl, asdesired. Be sure to hold the processor bladein the bowl by placing a finger on the top ofthe processor blade’s center column whilepouring.
Next lift the processor blade out of the bowlby grasping the knob of the center columnof the processor blade and lifting.
CAUTIONProcessor blade is very sharp.
Handle with care.
Care and Cleaningof Food Processor Blade and BowlAll components of the food processor aredishwasher safe. Do not use scouringcleaners on any of the food processor parts.
The power unit of the kitchen machineshould be cleaned with a clean, damp clothonly. Never use coarse or caustic cleaningproducts to clean this appliance. Neverimmerse the power unit in water.
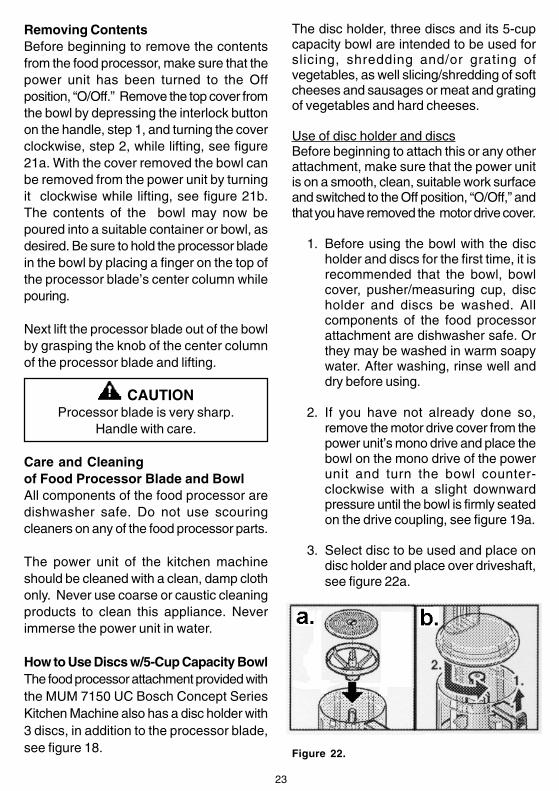
How to Use Discs w/5-Cup Capacity BowlThe food processor attachment provided withthe MUM 7150 UC Bosch Concept SeriesKitchen Machine also has a disc holder with3 discs, in addition to the processor blade,see figure 18.
The disc holder, three discs and its 5-cupcapacity bowl are intended to be used forslicing, shredding and/or grating ofvegetables, as well slicing/shredding of softcheeses and sausages or meat and gratingof vegetables and hard cheeses.
Use of disc holder and discsBefore beginning to attach this or any otherattachment, make sure that the power unitis on a smooth, clean, suitable work surfaceand switched to the Off position, “O/Off,” andthat you have removed the motor drive cover.
1. Before using the bowl with the discholder and discs for the first time, it isrecommended that the bowl, bowlcover, pusher/measuring cup, discholder and discs be washed. Allcomponents of the food processorattachment are dishwasher safe. Orthey may be washed in warm soapywater. After washing, rinse well anddry before using.
2. If you have not already done so,remove the motor drive cover from thepower unit’s mono drive and place thebowl on the mono drive of the powerunit and turn the bowl counter-clockwise with a slight downwardpressure until the bowl is firmly seatedon the drive coupling, see figure 19a.
3. Select disc to be used and place ondisc holder and place over driveshaft,see figure 22a.
Figure 22.
24
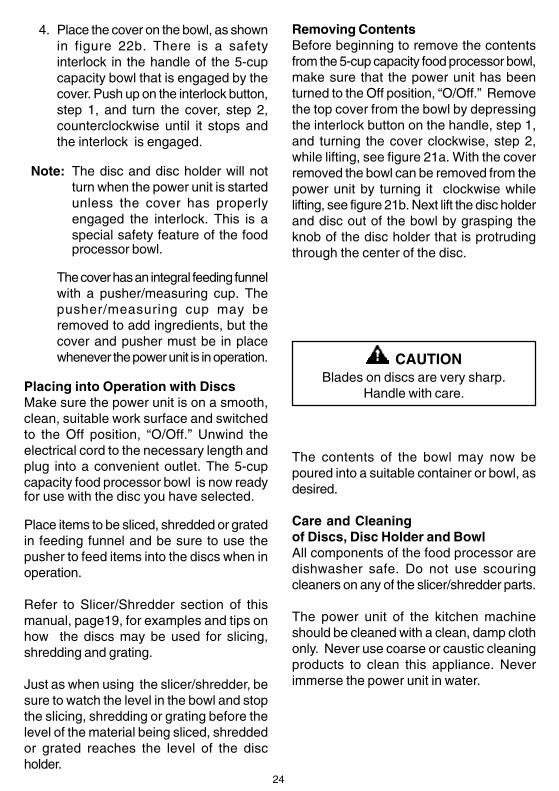
4. Place the cover on the bowl, as shownin figure 22b. There is a safetyinterlock in the handle of the 5-cupcapacity bowl that is engaged by thecover. Push up on the interlock button,step 1, and turn the cover, step 2,counterclockwise until it stops andthe interlock is engaged.
Note: The disc and disc holder will notturn when the power unit is startedunless the cover has properlyengaged the interlock. This is aspecial safety feature of the foodprocessor bowl.
The cover has an integral feeding funnelwith a pusher/measuring cup. Thepusher/measuring cup may beremoved to add ingredients, but thecover and pusher must be in placewhenever the power unit is in operation.
Placing into Operation with DiscsMake sure the power unit is on a smooth,clean, suitable work surface and switchedto the Off position, “O/Off.” Unwind theelectrical cord to the necessary length andplug into a convenient outlet. The 5-cupcapacity food processor bowl is now readyfor use with the disc you have selected.
Place items to be sliced, shredded or gratedin feeding funnel and be sure to use thepusher to feed items into the discs when inoperation.
Refer to Slicer/Shredder section of thismanual, page19, for examples and tips onhow the discs may be used for slicing,shredding and grating.
Just as when using the slicer/shredder, besure to watch the level in the bowl and stopthe slicing, shredding or grating before thelevel of the material being sliced, shreddedor grated reaches the level of the discholder.
Removing ContentsBefore beginning to remove the contentsfrom the 5-cup capacity food processor bowl,make sure that the power unit has beenturned to the Off position, “O/Off.” Removethe top cover from the bowl by depressingthe interlock button on the handle, step 1,and turning the cover clockwise, step 2,while lifting, see figure 21a. With the coverremoved the bowl can be removed from thepower unit by turning it clockwise whilelifting, see figure 21b. Next lift the disc holderand disc out of the bowl by grasping theknob of the disc holder that is protrudingthrough the center of the disc.
CAUTIONBlades on discs are very sharp.
Handle with care.
The contents of the bowl may now bepoured into a suitable container or bowl, asdesired.
Care and Cleaningof Discs, Disc Holder and BowlAll components of the food processor aredishwasher safe. Do not use scouringcleaners on any of the slicer/shredder parts.
The power unit of the kitchen machineshould be cleaned with a clean, damp clothonly. Never use coarse or caustic cleaningproducts to clean this appliance. Neverimmerse the power unit in water.
25
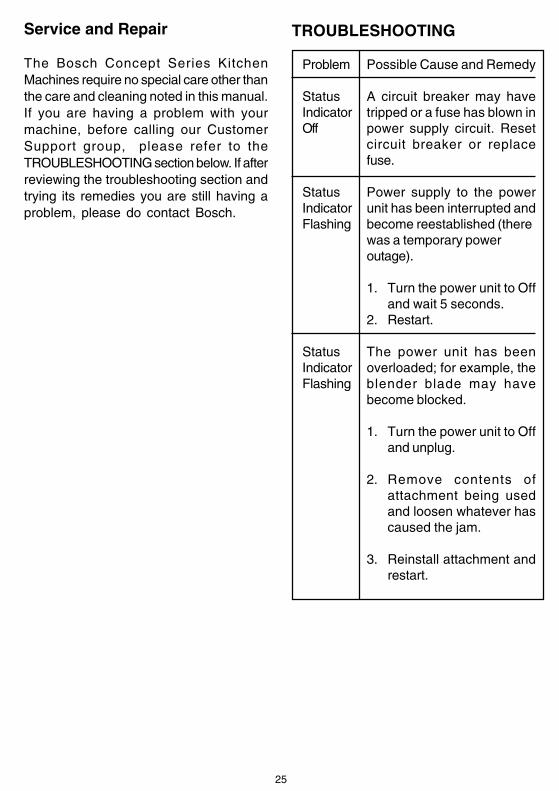
Service and Repair
The Bosch Concept Series KitchenMachines require no special care other thanthe care and cleaning noted in this manual.If you are having a problem with yourmachine, before calling our CustomerSupport group, please refer to theTROUBLESHOOTING section below. If afterreviewing the troubleshooting section andtrying its remedies you are still having aproblem, please do contact Bosch.
TROUBLESHOOTING
Problem Possible Cause and Remedy
Status A circuit breaker may haveIndicator tripped or a fuse has blown inOff power supply circuit. Reset
circuit breaker or replacefuse.
Status Power supply to the powerIndicator unit has been interrupted andFlashing become reestablished (there
was a temporary poweroutage).
1. Turn the power unit to Offand wait 5 seconds.
2. Restart.
Status The power unit has beenIndicator overloaded; for example, theFlashing blender blade may have
become blocked.
1. Turn the power unit to Offand unplug.
2. Remove contents ofattachment being usedand loosen whatever hascaused the jam.
3. Reinstall attachment andrestart.
26
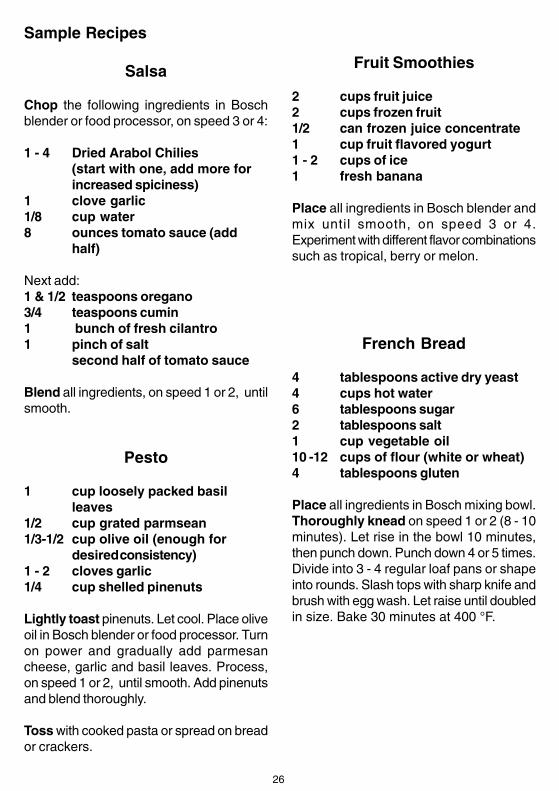
Sample Recipes
Salsa
Chop the following ingredients in Boschblender or food processor, on speed 3 or 4:
1 - 4 Dried Arabol Chilies(start with one, add more forincreased spiciness)
1 clove garlic1/8 cup water8 ounces tomato sauce (add
half)
Next add:1 & 1/2 teaspoons oregano3/4 teaspoons cumin1 bunch of fresh cilantro1 pinch of salt
second half of tomato sauce
Blend all ingredients, on speed 1 or 2, untilsmooth.
Pesto
1 cup loosely packed basilleaves
1/2 cup grated parmsean1/3-1/2 cup olive oil (enough for
desiredconsistency)1 - 2 cloves garlic1/4 cup shelled pinenuts
Lightly toast pinenuts. Let cool. Place oliveoil in Bosch blender or food processor. Turnon power and gradually add parmesancheese, garlic and basil leaves. Process,on speed 1 or 2, until smooth. Add pinenutsand blend thoroughly.
Toss with cooked pasta or spread on breador crackers.
Fruit Smoothies
2 cups fruit juice2 cups frozen fruit1/2 can frozen juice concentrate1 cup fruit flavored yogurt1 - 2 cups of ice1 fresh banana
Place all ingredients in Bosch blender andmix until smooth, on speed 3 or 4.Experiment with different flavor combinationssuch as tropical, berry or melon.
French Bread
4 tablespoons active dry yeast4 cups hot water6 tablespoons sugar2 tablespoons salt1 cup vegetable oil10 -12 cups of flour (white or wheat)4 tablespoons gluten
Place all ingredients in Bosch mixing bowl.Thoroughly knead on speed 1 or 2 (8 - 10minutes). Let rise in the bowl 10 minutes,then punch down. Punch down 4 or 5 times.Divide into 3 - 4 regular loaf pans or shapeinto rounds. Slash tops with sharp knife andbrush with egg wash. Let raise until doubledin size. Bake 30 minutes at 400 °F.
27
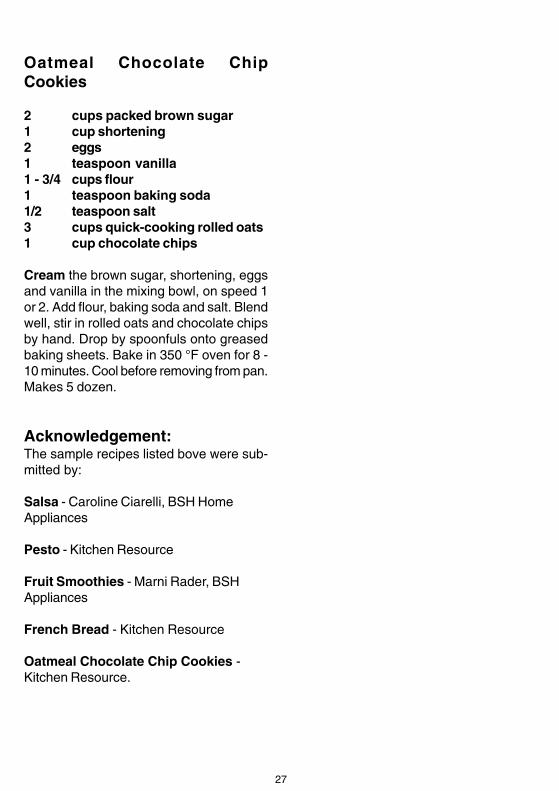
Oatmeal Chocolate ChipCookies
2 cups packed brown sugar1 cup shortening2 eggs1 teaspoon vanilla1 - 3/4 cups flour1 teaspoon baking soda1/2 teaspoon salt3 cups quick-cooking rolled oats1 cup chocolate chips
Cream the brown sugar, shortening, eggsand vanilla in the mixing bowl, on speed 1or 2. Add flour, baking soda and salt. Blendwell, stir in rolled oats and chocolate chipsby hand. Drop by spoonfuls onto greasedbaking sheets. Bake in 350 °F oven for 8 -10 minutes. Cool before removing from pan.Makes 5 dozen.
Acknowledgement:The sample recipes listed bove were sub-mitted by:
Salsa - Caroline Ciarelli, BSH HomeAppliances
Pesto - Kitchen Resource
Fruit Smoothies - Marni Rader, BSHAppliances
French Bread - Kitchen Resource
Oatmeal Chocolate Chip Cookies -Kitchen Resource.

28
Important Notes

29
Important Notes

30
SPECIAL ACCESSORIES

31
BOSCH Small Appliance Warranty
BSH Home Appliances (“BOSCH”) warrants all new small appliances to be free from originaldefects in design, materials and workmanship for one (1) year after the sale to the originalowner.
Within the stated warranty period, BOSCH will repair or replace, at its sole option, anysmall appliance or parts thereof which prove defective under the conditions of normal useand service at no charge to you. It is the owner’s responsibility to return the appliance forrepair. Repaired and replacement small appliances and parts shall be the same or asclose in appearance as possible to the original for the purposes of this warranty.
Should you require service of your BOSCH small appliance, please contact customerservice at 1-866-44-BOSCH. Repair of BOSCH appliances should only be performed byqualified technicians.
This warranty is limited to the original consumer purchase and is not transferable. Specificallyexcluded from this warranty are failures caused by accident, misuse, neglect, abuse,including tampering, use of frequency or voltage other than marked on the product, anduse for commercial purposes.
To the extent allowed by law, this warranty sets out your exclusive remedies, whether fornegligence or otherwise. BOSCH will not be liable for any consequential or incidentaldamages, losses or expenses. THIS WARRANTY IS IN LIEU OF ALL OTHER EXPRESSEDWARRANTIES. ANY WARRANTY IMPLIED BY LAW, WHETHER FORMERCHANTABILITY OR FITNESS FOR A PARTICULAR PURPOSE OR OTHERWISE,SHALL BE EFFECTIVE ONLY FOR THE PERIOD THAT THIS EXPRESSED WARRANTYIS EFFECTIVE. BOSCH DOES NOT ASSUME ANY RESPONSIBILITY FOR INCIDENTALOR CONSEQUENTIAL DAMAGES.
No attempt to alter, modify or amend this warranty shall be effective unless authorized inwriting by an officer of BOSCH. Some states do not allow limitations on how long impliedwarranties last or the exclusion or limitation of incidental or consequential damages, sothe foregoing limitations and exclusions may not apply to you. This warranty gives youspecific legal rights and you may also have other rights which vary from state to state.

32
Looking for more information about BOSCH products?
Call Toll Free 1-866-852-4268 For Specials or Visit our Web site
www.www.everythingkitchens.com