Embed Size (px)
Citation preview

Blackstar Amplification Ltd, Beckett House, 14 Billing Road, Northampton, NN1 5AW, UKFor the latest information go to: www.blackstaramps.com
Whilst the information contained herein is correct at the time of publication, due to our policy of constant improvement and development, Blackstar Amplification Ltd reserves the right to alter specifications without prior notice.
Designed and Engineered byBlackstar Amplification UK
HB
K-1060 01/15
Owner’s Manual
B L U E T O O T H A M P L I F I E R

3
US
A / C
anada
IMPORTANT SAFETY INSTRUCTIONS1. Read these instructions.
2. Keep these instructions.
3. Heed all warnings.
4. Follow all instructions.
5. Do not use this apparatus near water.
6. Clean only with a dry cloth.
7. Do not block any ventilation openings.
8. Install in accordance with the manufacturer’s instructions.
9. Do not install near any heat sources such as radiators, heat registers, stoves, or other apparatus (including amplifiers) that produce heat.
10. Do not defeat the safety purpose of the polarized or grounding-type plug. A polarized plug has two blades with one wider than the other. A grounding type plug has two blades and a third grounding prong. The wide blade or the third prong are provided for your safety. If the provided plug does not fit into your outlet, consult an electrician for replacement of the obsolete outlet.
11. Protect the power cord from being walked on or pinched particularly at plugs, convenience receptacles, and the point where they exit from the apparatus.
12. Only use attachments/accessories specified by the manufacturer.
13. Unplug this apparatus during lightning storms or when unused for long periods of time.
14. Refer all servicing to qualified service personnel. Servicing is required when the apparatus has been damaged in any way, such as power-supply cord or plug is damaged, liquid has been spilled or objects have fallen into the apparatus, the apparatus has been exposed to rain or moisture, does not operate normally, or has been dropped.
“TO COMPLETELY DISCONNECT THIS APPARATUS FROM THE AC MAINS, DISCONNECT THE POWER-SUPPLY CORD PLUG FROM THE AC RECEPTACLE”.
“WARNING: TO REDUCE THE RISK OF FIRE OR ELECTRIC SHOCK, DO NOT EXPOSE THIS APPARATUS TO RAIN OR MOISTURE. THE APPARATUS SHALL NOT BE EXPOSED TO DRIPPING OR SPLASHING AND THAT OBJECTS FILLED WITH LIQUIDS, SUCH AS VASES, SHALL NOT BE PLACED ON APPARATUS".
This symbol is intended to alert the user to the presence of uninsulated “dangerous voltage” within the product’s enclosure that may be of sufficient magnitude to constitute a risk of electric shock to persons.
This symbol is intended to alert the user to the presence of important operation and maintenance (servicing) instructions in the literature accompanying the appliance.

English
5
Eng
lish
4
Never disconnect the protective mains earth connection.
High loudspeaker levels can cause permanent hearing damage. You should therefore avoid the direct vicinity of loudspeakers operating at high levels. Wear hearing protection if continuously exposed to high levels.
If the product does not operate normally when the operating instructions are followed, then refer the product to a qualified service engineer.
The U.S. Government's Occupational Safety and Health Administration (OSHA) has specified the following permissible noise level exposures:
Duration Per Day In Hours Sound Level dBA, Slow Response8 906 924 953 972 1001½ 1021 105½ 110¼ or less 115
According to OSHA, any exposure in excess of the above permissible limits could result in some hearing loss.
Ear plug protectors in the ear canals or over the ears must be worn when operating this amplification system in order to prevent a permanent hearing loss if exposure is in excess of the limits as set forth above. To ensure against potentially dangerous exposure to high sound pressure levels, it is recommended that all persons exposed to equipment capable of producing high sound pressure levels such as this amplification system be protected by hearing protectors while this unit is in operation.
Warning!Important safety information!
READ THE FOLLOWING INFORMATION CAREFULLY.SAVE ALL INSTRUCTIONS FOR FUTURE REFERENCE!
Follow all warnings and instructions marked on the product!
Do not open the equipment case. There are no user serviceable parts in this equipment. Refer all servicing to qualified service personnel.
Clean only with a dry cloth.
Condensation can form on the inside of an amplifier if it is moved from a cold environment to a warmer location. Before switching the unit on, it is recommended that the unit be allowed to reach room temperature.
Unauthorised modification of this equipment is expressly forbidden by Blackstar Amplification Ltd.
Do not expose this apparatus to rain, liquids or moisture of any type.
Do not place this product on an unstable trolley, stand or table. The product may fall, causing serious damage to the product or to persons!
This unit must only be used in a well ventilated area and never switched on when it is within a poorly ventilated space, such as a bookcase.
This product should not be placed near a source of heat such as a stove, radiator, or another heat producing amplifier.
Use only the supplied power cord which is compatible with the mains voltage supply in your area.
Power supply cords should always be handled carefully and should be replaced if damaged in any way.
Never break off the earth (ground) pin on the power supply cord.
The power supply cord should be unplugged when the unit is to be unused for long periods of time.
An apparatus with Class I construction should be connected to a mains socket outlet with a protective earthing connection.
The mains plug of the power supply cord should remain readily accessible.
Always replace damaged fuses with the correct rating and type.
All electrical and electronic products should be disposed of separately from the municipal waste stream via designated collection facilities appointed by the government or the local authorities.

FeaturesSince its launch in 2007, Blackstar has led the way in the innovation of guitar amplification. ID:Core BEAM represents the latest step forward in technical Research and Development. Designed for the home environment it brings incredible tone into your home and is the central hub for instruments and stunning audio playback.
Listening to your Bluetooth audio is a truly awesome experience with Blackstar’s unique Super Wide Stereo technology. When it’s time to play you get the same immersive room-filling sound for your electric, bass and acoustic guitar, with built-in vintage style effects for each.
ID:Core BEAM’s advanced audio performance is due to its sealed and ported cabinet. Acoustically tuned left and right speaker chambers deliver clear, natural audio with excellent stereo separation and incredible bass response even at low volume.
Deep editing and storing of patches is simple using Blackstar’s free INSIDER software.
Patches can be shared, uploaded and downloaded via the online community. The USB connectivity gives pro audio recording from your amp directly to your computer using low latency ASIO drivers.
Compact and powerful, it’s everything you need to inspire your music – playing or listening.
7
IntroductionThank you for purchasing this Blackstar ID:Core BEAM amplifier. Like all our products, this amp is the result of countless hours of painstaking Research and Development by our world-class design team. Based in Northampton (UK), the Blackstar team are all experienced musicians themselves and the sole aim of the development process is to provide guitarists with products which are the ultimate tools for self-expression.
All Blackstar products are subjected to extensive laboratory and road testing to ensure that they are truly uncompromising in terms of reliability, quality and above all TONE.
Please read through this handbook carefully to ensure you get the maximum benefit from your new Blackstar product.
If you like what you hear and want to find out more about the Blackstar range of products please visit our website at www.blackstaramps.com.
Thanks!
The Blackstar Team
Eng
lish
6
English
9
Factory ResetThe default factory patches and settings can be restored to your amplifier at any time. Simply hold down the MOD, DLY and REV switches simultaneously, whilst switching on the amplifier.
The voice LED will count down to indicate that a factory reset is imminent. If any of the MOD, DLY and REV switches are released before the Voice LEDs have switched off, then the operation is cancelled and the amplifier will remain unaffected.
IMPORTANT NOTE: This process will overwrite any user saved patches and settings.
Eng
lish
8
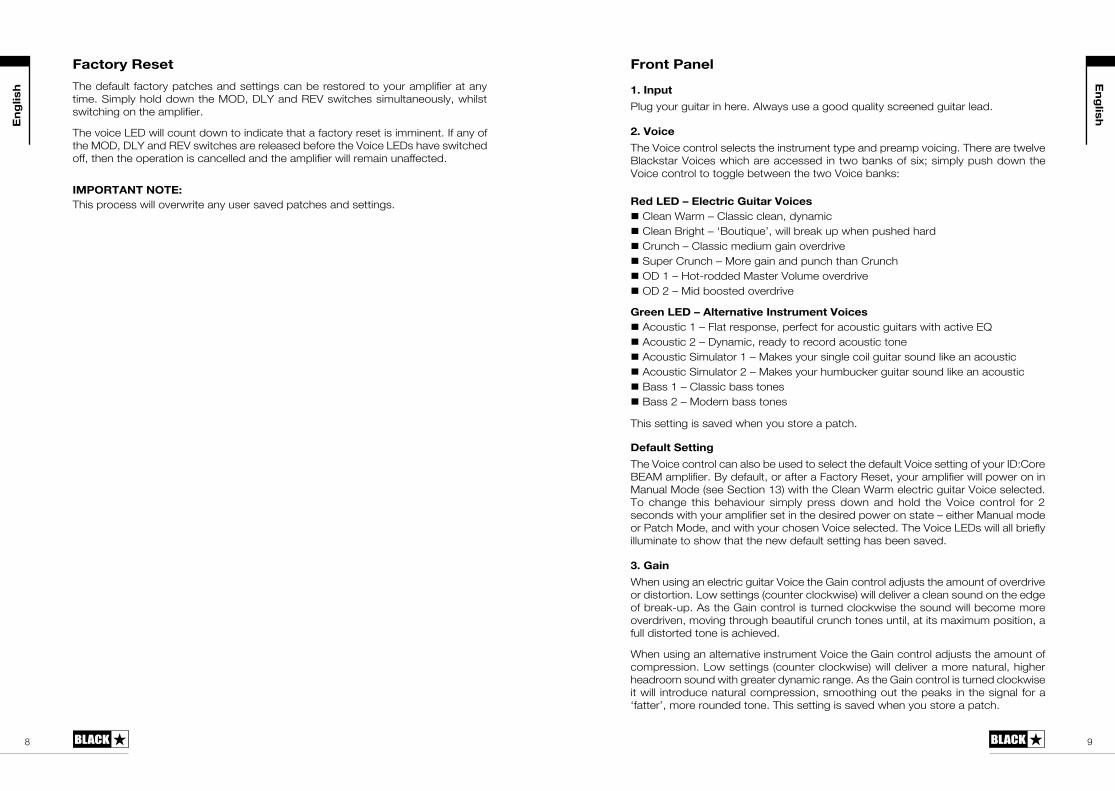
Front Panel
1. InputPlug your guitar in here. Always use a good quality screened guitar lead.
2. Voice The Voice control selects the instrument type and preamp voicing. There are twelve Blackstar Voices which are accessed in two banks of six; simply push down the Voice control to toggle between the two Voice banks:
Red LED – Electric Guitar Voices Clean Warm – Classic clean, dynamic Clean Bright – ‘Boutique’, will break up when pushed hard Crunch – Classic medium gain overdrive Super Crunch – More gain and punch than Crunch OD 1 – Hot-rodded Master Volume overdrive OD 2 – Mid boosted overdrive
Green LED – Alternative Instrument Voices Acoustic 1 – Flat response, perfect for acoustic guitars with active EQ Acoustic 2 – Dynamic, ready to record acoustic tone Acoustic Simulator 1 – Makes your single coil guitar sound like an acoustic Acoustic Simulator 2 – Makes your humbucker guitar sound like an acoustic Bass 1 – Classic bass tones Bass 2 – Modern bass tones
This setting is saved when you store a patch.
Default SettingThe Voice control can also be used to select the default Voice setting of your ID:Core BEAM amplifier. By default, or after a Factory Reset, your amplifier will power on in Manual Mode (see Section 13) with the Clean Warm electric guitar Voice selected. To change this behaviour simply press down and hold the Voice control for 2 seconds with your amplifier set in the desired power on state – either Manual mode or Patch Mode, and with your chosen Voice selected. The Voice LEDs will all briefly illuminate to show that the new default setting has been saved.
3. Gain When using an electric guitar Voice the Gain control adjusts the amount of overdrive or distortion. Low settings (counter clockwise) will deliver a clean sound on the edge of break-up. As the Gain control is turned clockwise the sound will become more overdriven, moving through beautiful crunch tones until, at its maximum position, a full distorted tone is achieved.
When using an alternative instrument Voice the Gain control adjusts the amount of compression. Low settings (counter clockwise) will deliver a more natural, higher headroom sound with greater dynamic range. As the Gain control is turned clockwise it will introduce natural compression, smoothing out the peaks in the signal for a ‘fatter’, more rounded tone. This setting is saved when you store a patch.
English
4. VolumeThis controls the instrument volume. High levels of volume will introduce the effect of valve power amp distortion and compression. This is a global setting and not saved when storing a patch.
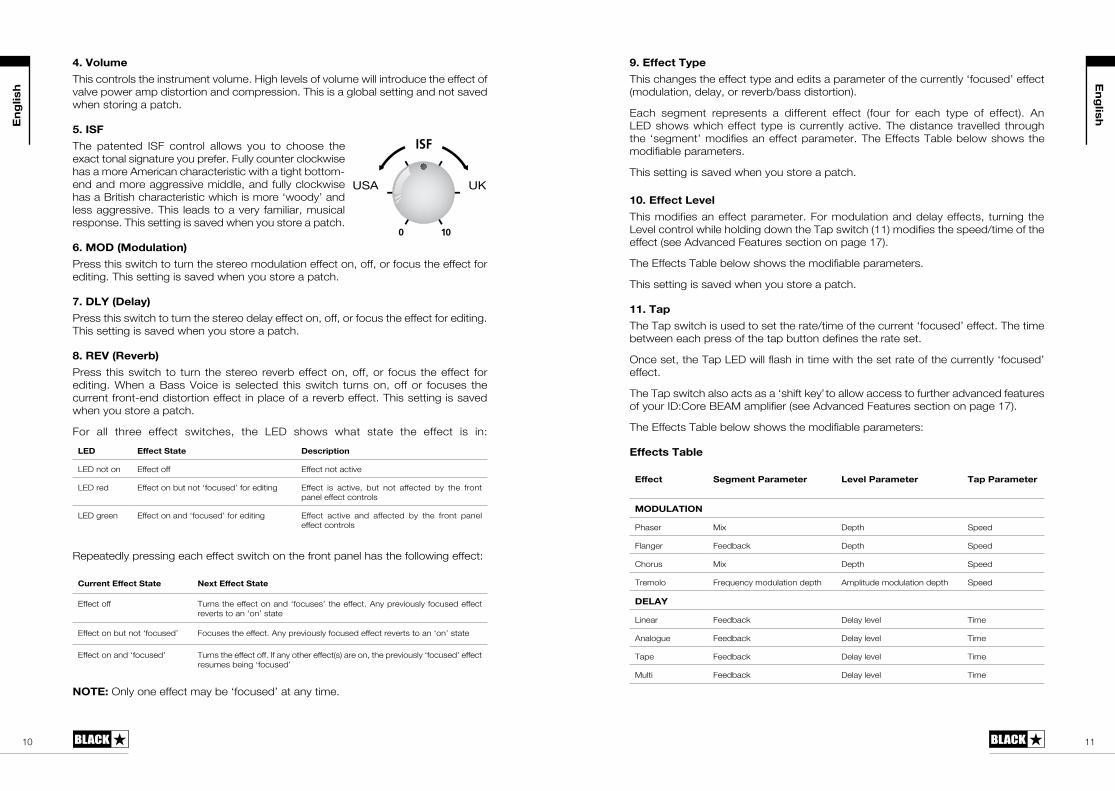
5. ISF The patented ISF control allows you to choose the exact tonal signature you prefer. Fully counter clockwise has a more American characteristic with a tight bottom-end and more aggressive middle, and fully clockwise has a British characteristic which is more ‘woody’ and less aggressive. This leads to a very familiar, musical response. This setting is saved when you store a patch.
6. MOD (Modulation) Press this switch to turn the stereo modulation effect on, off, or focus the effect for editing. This setting is saved when you store a patch.
7. DLY (Delay)Press this switch to turn the stereo delay effect on, off, or focus the effect for editing. This setting is saved when you store a patch.
8. REV (Reverb)Press this switch to turn the stereo reverb effect on, off, or focus the effect for editing. When a Bass Voice is selected this switch turns on, off or focuses the current front-end distortion effect in place of a reverb effect. This setting is saved when you store a patch.
For all three effect switches, the LED shows what state the effect is in:LED Effect State Description
LED not on Effect off Effect not active
LED red Effect on but not ‘focused’ for editing Effect is active, but not affected by the front panel effect controls
LED green Effect on and ‘focused’ for editing Effect active and affected by the front panel effect controls
Repeatedly pressing each effect switch on the front panel has the following effect:
Current Effect State Next Effect State
Effect off Turns the effect on and ‘focuses’ the effect. Any previously focused effect reverts to an ‘on’ state
Effect on but not ‘focused’ Focuses the effect. Any previously focused effect reverts to an ‘on’ state
Effect on and ‘focused’ Turns the effect off. If any other effect(s) are on, the previously ‘focused’ effect resumes being ‘focused’
NOTE: Only one effect may be ‘focused’ at any time.
11
Eng
lish
10
9. Effect TypeThis changes the effect type and edits a parameter of the currently ‘focused’ effect (modulation, delay, or reverb/bass distortion).
Each segment represents a different effect (four for each type of effect). An LED shows which effect type is currently active. The distance travelled through the ‘segment’ modifies an effect parameter. The Effects Table below shows the modifiable parameters.
This setting is saved when you store a patch.
10. Effect Level This modifies an effect parameter. For modulation and delay effects, turning the Level control while holding down the Tap switch (11) modifies the speed/time of the effect (see Advanced Features section on page 17).
The Effects Table below shows the modifiable parameters.
This setting is saved when you store a patch.
11. TapThe Tap switch is used to set the rate/time of the current ‘focused’ effect. The time between each press of the tap button defines the rate set.
Once set, the Tap LED will flash in time with the set rate of the currently ‘focused’ effect.
The Tap switch also acts as a ‘shift key ̓ to allow access to further advanced features of your ID:Core BEAM amplifier (see Advanced Features section on page 17).
The Effects Table below shows the modifiable parameters:
Effects Table
Effect Segment Parameter Level Parameter Tap Parameter
MODULATION
Phaser Mix Depth Speed
Flanger Feedback Depth Speed
Chorus Mix Depth Speed
Tremolo Frequency modulation depth Amplitude modulation depth Speed
DELAY
Linear Feedback Delay level Time
Analogue Feedback Delay level Time
Tape Feedback Delay level Time
Multi Feedback Delay level Time
USA UK
English

Effect Segment Parameter Level Parameter Tap Parameter
REVERB
Room Size Reverb level -
Hall Size Reverb level -
Spring Size Reverb level -
Plate Size Reverb level -
Overdrive Blend (clean-distorted mix) Gain -
Distortion Blend (clean-distorted mix) Gain -
Modern Blend (clean-distorted mix) Gain -
Fuzz Blend (clean-distorted mix) Gain -
12. USB Plug a USB cable in here to connect the amplifier to a Windows PC or Mac.
Blackstar’s INSIDER software offers a host of features and can be downloaded from: www.blackstarinsider.co.uk
See the USB Audio section on page 16 for more information.
NOTE: The amplifier will appear on a personal computer as an audio capture device within recording software.
13. ManualPress this switch to toggle between Patch Mode and Manual Mode. When the amplifier is in Manual Mode, the sound will reflect the current physical position of the knobs. This is applicable to the Voice, Gain, Volume and ISF knobs. Any effects that are active when switching to Manual Mode will be turned off.
While in Manual Mode any of the controls can still be modified by the Blackstar INSIDER software but this means that the sound will not represent the positions of the knobs on the front panel.
Patch ModePatch mode is indicated by the Manual LED being unlit. See the Programmability section on page 16 for more information.
Tuner ModeHolding the Tap (11) and Manual (13) switches together for one second will engage the tuner. The Recall Indicator LED (17) will flash continuously to indicate the amplifier is in Tuner Mode. The amplifier output will be muted whilst in Tuner Mode.
The Voice LEDs will indicate the closest note to the note being played.
13
Eng
lish
12
Clean Warm String 1 and 6 (E, low/high)
Clean Bright String 2 (A)
Crunch String 3 (D)
Super Crunch String 4 (G)
OD 1 String 5 (B)
The MOD, DLY and REV LEDs act as indicators to show how close the played note is to the tuned note.
MOD LED red Note is sharp (above pitch)
DLY LED green Note is in tune
REV LED red Note is flat (below pitch)
All other LEDs on the front panel will be off in Tuner Mode.
Pressing any button will exit Tuner Mode.
14. MP3/Line InConnect the output of your external audio source here, for example your MP3 player, computer or television/AV equipment. Adjust the audio source volume to match that of your guitar to enable you to play along.
The playback volume of the Line In audio signal can be controlled independently of your instrument volume by holding down the Tap switch (11) whilst turning the Volume control (4) on the front panel (see Advanced Features section on page 17).
15. Speaker Emulated/Headphone Out This output emulates the tonal characteristics of a speaker cabinet and provides a natural tone for connection to headphones, a recording device, PA system or mixing desk.
To make full use of the Super Wide Stereo effects, use a ‘stereo 3.5mm jack to two mono jacks’ splitter lead to feed two channels of the recording device or mixer.
Always use a good quality screened lead.
Turning the Volume knob (4) will control the Emulated Output level of your instrument.
NOTE: The amplifier speakers will mute when a cable is connected to the Emulated Output.
16. BluetoothYour ID:Core BEAM amplifier is equipped with Bluetooth connectivity for wirelessly streaming your favourite music in Super Wide Stereo. The custom designed speakers and acoustically tuned cabinet reproduce your music with incredible hi-fi sound quality, from crisp, clear highs to deep, punchy lows. Press this switch to pair a Bluetooth device to your ID:Core BEAM amplifier and toggle between the modes of operation (see below). When the Bluetooth LED is unlit the Bluetooth connectivity is not active.
BASS DISTORTION (Bass Voices only)
English
15
Discoverable Mode (slow LED flash)To connect a Bluetooth device to your ID:Core BEAM for the first time you must make a ‘pairing’ between the two devices. To pair, simply press the Bluetooth switch on your ID:Core BEAM amplifier until the Bluetooth LED displays a slow flash. In this state other Bluetooth devices are able to ‘see’ your ID:Core BEAM amplifier (hence the term ‘Discoverable’) and can make a request to pair.
Whilst the Bluetooth LED is flashing slowly, go to the Bluetooth Settings page of your Bluetooth device and look for your ID:Core BEAM amplifier in the list of available devices. Your amplifier will be identified as ‘ID Beam XX:XX’, where XX:XX is the last four characters of your amplifier’s unique ID. When ‘ID Beam XX:XX’ appears, simply select this device and wait a few moments for the pairing to be made. You will hear an audible tone from the amplifier to indicate that a device has been successfully connected.
If a pairing has not been made within the Discoverable Mode timeout window, the Bluetooth connectivity will switch off and will wait for user input in order to attempt a new pairing. Simply press the Bluetooth switch again to enter Discoverable Mode again and restart the pairing process.
Pressing the Bluetooth switch while in Discoverable Mode will set your ID:Core BEAM amplifier to Scanning Mode.
Scanning Mode (fast LED flash)Scanning Mode is used to reconnect any previously paired Bluetooth devices to your ID:Core BEAM if they have travelled out of range or have been disconnected. Ensure your previously paired Bluetooth device has Bluetooth connectivity switched on and enter Scanning Mode; your amplifier will ‘scan’ for previously paired devices within range and attempt to reconnect, starting with the device that was most recently connected. You will hear an audible tone from the amplifier to indicate that a device has been successfully reconnected.
If you have previously paired any Bluetooth Devices to your ID:Core BEAM amplifier it will power on in Scanning Mode. If your Bluetooth device is within range and has Bluetooth connectivity switched on, your amplifier will automatically reconnect to your device, allowing you to start streaming your music straight away.
Pressing the Bluetooth switch from Scanning Mode will set your amplifier to Discoverable Mode in order to begin pairing a new device.
At any time, you may disconnect your Bluetooth device from your amplifier by either pressing and holding the Bluetooth switch on the amplifier front panel or switching off the Bluetooth functionality of your device. You will hear an audible tone from the amplifier to indicate that a device has been disconnected.
Performing a Factory Reset will clear the amplifier’s memory of previously paired Bluetooth devices. You will need to repeat the pairing process with any devices you wish to reconnect.
Eng
lish
14
17. Recall IndicatorThe Recall Indicator shows if there is a mismatch between the current value of a parameter within the amplifier and the corresponding physical front panel control. For example, when you change to a different patch the controls on the front panel may not always reflect the setting you are hearing.
To prevent unexpected level jumps in the control you are adjusting, the front panel knobs will have no effect on the sound until the knob reaches the current parameter value. Once reached the Recall Indicator flashes twice and the knob ‘takes control’ of the value and can increase or decrease the value.
The recall indicator will flash each time the physical knob ‘passes through’ the currently active value that you are hearing.
Recall is active for Gain, Volume and ISF.
When the Tuner is active the Recall Indicator will flash continuously.
Rear Panel
1. Power Switch
This switch is used to turn the amplifier on and off; the white dot marks the ON position.
2. DC Input
The supplied detachable DC power supply is connected here. Always ensure the Power Switch is in the OFF position before connecting the power supply. The lead should only be connected to a power outlet that is compatible with the voltage, power and frequency requirements stated on the power supply. If in doubt seek advice from a qualified technician.
3. Footcontroller Connect a Blackstar FS-11 footcontroller (not supplied) to control your ID:Core in one of the following modes:
FS-11 Switch 1 Switch 2
Default Mode Toggles between 2 patches, selectable via INSIDER
Toggles all saved patch effects on/off
Alternative Mode Patch down Patch up
In Alternative Mode (selected via INSIDER) patches will cycle on a ʻloopʼ. e.g. switching up from Bass 2 will move to Clean Warm.
When in Manual Mode, the effect of any footcontroller switch will depend on its last state. Pressing Switch 1 will return the amplifier to Patch Mode. Pressing Switch 2 will toggle the effects off and on without returning to Patch Mode.
English

17
ProgrammabilityStoring Patches
Your ID:Core BEAM amplifier stores 12 patches (1 patch per Voice setting).
To store the current sound as a patch press and hold the Manual switch for two seconds. The currently selected Voice LED will flash to indicate the patch has been stored.
Storing a patch will overwrite any previous patch in that location.
Patches can also be stored via Blackstar’s INSIDER software.
NOTE: Each patch on your ID:Core BEAM must use the Voice setting assigned to that patch i.e. the Clean Warm patch uses the Clean Warm Voice.
Recalling Patches
When in Patch Mode turn the Voice control to choose the desired Voice patch.
Patches can also be recalled via the Blackstar INSIDER software or a connected footcontroller.
NOTE: To recall a patch, the Manual LED must be off to indicate Patch Mode is active. Turning the Voice control while the Manual LED is on (in Manual Mode) will only select the indicated voice.
USB Audio
Standard audio drivers are used to connect the amplifier to a Windows PC or Mac. No specific drivers are required. For a guide on low-latency USB recording visit: www.blackstaramps.com/usbrecording and visit the Blackstar YouTube channel for tips on how to record directly to an Apple iOS device using the Apple Camera Connection Kit.
NOTE: Always connect the amplifier via a main USB port, often found on the rear of the computer.
The amplifier will appear as an audio capture device within recording software. The USB audio signal output level from your ID:Core BEAM amplifier can be controlled independently of your amplifier’s speaker volume by holding down the Tap switch (11) whilst turning the Gain control (3) on the front panel (see the Advanced Features section on page 17). This will allow you to achieve a strong recording signal level whilst monitoring the output at a lower, more comfortable level, or even silently if you prefer; simply turn the amplifier speaker volume to zero using the Volume control on the front panel.
The output of the audio over USB can be changed via the Blackstar INSIDER software, and can be one of the following:
Speaker emulated stereo effected audio channels2 x mono audio channels - Left – effected amplifier signal - Right – unprocessed guitar signal
Reamping Mode
Eng
lish
16
ReampingThe amplifier can be switched into Reamping Mode via the Blackstar INSIDER software. This is a non-storable setting and will be switched off either when the USB cable is removed, or when the amplifier power is switched off. When activated, Reamping Mode allows the amplifier to accept a pre-recorded, dry guitar signal via USB and return a fully processed audio signal. This return signal can then be captured using recording software on the connected Windows PC or Mac.
Advanced FeaturesYour ID:Core BEAM amplifier has further advanced features, which are aimed at more in-depth users who enjoy getting the most from their amplifier. These features do not have independent controls on the front panel of the amplifier, but instead are accessed by using the Tap switch (11) as a ‘shift key’ and using other controls to access these features.
Music Playback Super Wide Stereo Width – Tap + Voice
Your ID:Core BEAM is an incredibly high quality personal music player and features Blackstar’s Super Wide Stereo. These two features combine to deliver an immersive audio experience by making you feel like your music is being played from all around you. Your ID:Core BEAM allows you to control and set the amount of Super Wide Stereo effect you hear on your music playback, ranging from ‘standard’ stereo to extreme Super Wide Stereo.
You can control the amount of Super Wide Stereo effect you hear on your music playback simply by holding down the Tap switch (11) whilst turning the Voice control (2) on the front panel. The Voice LEDs will display how much of the effect is active.Once set, and the Tap switch is released, this setting will be saved and remembered each time you power on your ID:Core BEAM. The music playback will briefly mute to confirm that the setting has been saved.
Independent Music Playback Volume – Tap + Volume
Under most circumstances, the volume of your music playback via either Bluetooth or the MP3/Line Input is effectively controlled directly from your playback device. For quieter environments and general convenience you can also further reduce the music playback volume of your ID:Core BEAM amplifier by simply holding down the Tap switch (11) whilst turning the Volume control (4) on the front panel.
USB Recording Level – Tap + Gain
As stated in the USB Audio section (see page 16), the output level of the USB audio signal from your ID:Core BEAM amplifier can be controlled independently of your amplifier’s speaker volume by holding down the Tap switch (11) whilst turning the Gain control (3) on the front panel.
Effect Speed/Time – Tap + Effects Level
As stated in the Effect Level section (see page 11), the speed/time of the modulation and delay effects can be controlled by holding down the Tap switch (11) whilst turning the Effect Level control (10) on the front panel. This can be very useful for setting a specific accurate effect tempo instead of using the Tap switch.
STANDARDSTEREO
English

18 19
Cet appareil doit être utilisé dans un environnement bien ventilé et ne doit jamais être mis sous tension si l'endroit est confiné.
Français
Firmware UpdateFirmware updates are initiated via the Blackstar INSIDER software. A new version of the Blackstar INSIDER software will be released whenever an update is available.
When the amplifier is connected (via USB) to a version of the Blackstar INSIDER software containing newer firmware, a message will be displayed prompting you to install the latest files. Whilst updating, the amplifier controls will be unresponsive. Front panel voice LEDs will cycle to indicate data activity during the update process.
The amplifier power should not be switched off during a firmware update. If the amplifier is switched off during an update, the controls may be unresponsive after the power is reapplied and the amplifier will produce no sound. The voice LEDs will cycle to indicate that the amplifier contains no valid firmware and is awaiting a firmware update.
If you are experiencing problems with the firmware update process the amplifier can be forced to power up in Update Mode. Hold down the Manual (13) and MOD (6) switches simultaneously, whilst switching on the amplifer to enter this mode with the voice LEDs cycling to indicate Update Mode. Connect the amplifier to the Blackstar INSIDER software to begin a firmware update.
The amplifier must be connected to the Blackstar INSIDER software to reinstall valid firmware. The update process will start automatically if the Blackstar INSIDER software detects that the amplifier is in this state.
Eng
lish
18

2120
La loi américaine sur la santé et la sécurité du travail indique la durée d'exposition autorisée à différents niveaux sonores:
8 906 924 953 972 1001½ 1021 105½ 110¼ or less 115
Tous les produits électriques et électroniques doivent être jetés séparément, dans le flux de déchets municipaux, dans les lieux de collecte désignés par le gouvernement ou les autorités locales.
IntroductionMerci d’avoir acheté cet amplificateur Blackstar ID:Core BEAM. Comme tous nos produits, cet amplificateur est le résultat d’innombrables heures de recherche et développement minutieux par notre équipe de conception de classe mondiale. Basée à Northampton (Royaume-Uni), l’équipe Blackstar est composée de musiciens chevronnés et l’unique objectif du processus de développement est de fournir aux guitaristes les outils ultimes pour s’exprimer.
Tous les produits Blackstar sont soumis à des tests intensifs en laboratoire et en conditions réelles pour s’affranchir véritablement de tout compromis en termes de fiabilité, de qualité et avant tout de SON.
L’ID:Series est véritablement révolutionnaire, combinant des innovations uniques, un jeu de commandes intuitives et traditionnelles, et la souplesse de programmation.
Veuillez lire attentivement la totalité de ce mode d’emploi pour tirer le bénéfice maximal de votre nouveau produit Blackstar.
Si vous aimez ce que vous entendez et voulez en découvrir plus sur la gamme de produits Blackstar, veuillez visiter notre site web à l’adresse www.blackstaramps.com.
Merci !
L’équipe Blackstar
Fran
çais
Français

2322
CaractéristiquesDepuis sa création en 2007, Blackstar a ouvert la voie de l'innovation dans le monde de l’amplification guitare. L’ID: CORE BEAM représente l’étape ultime dans la recherche technique et le développement. Conçu pour l'utilisation à la maison, il procure un son incroyable chez vous et fait office de station pour les instruments et la diffusion audio. L’écoute audio de votre musique via Bluetooth est une expérience vraiment impressionnante avec la technologie ‘Super Wide Stereo’ unique de Blackstar. Quand il est temps de jouer de votre instrument, vous obtenez le même son énorme qui remplit la pièce pour votre guitare électrique, basse et guitare acoustique, avec des effets vintage pour chaque.
Les performances audio avancées de l’ID:Core BEAM sont dues en grande partie à son baffle scellé pourvu d’un évent. Les logements des haut-parleurs gauche et droit sont acoustiquement accordés pour offrir une réponse audio claire, naturelle
avec une excellente séparation stéréo et un rendu des basses incroyable, même à faible volume.
L’édition approfondie et le stockage des patchs est simple en utilisant le logiciel INSIDER gratuit de Blackstar.
Les patchs peuvent être partagés et téléchargés via la communauté en ligne. La connectique USB permet l’enregistrement audio pro directement à partir de votre ampli sur votre ordinateur grâce aux pilotes ASIO de faible latence.
Compact et puissant, l’ID:Core BEAM est tout ce qu'il faut pour inspirer votre musique - jouer ou écouter.
Réinitialisation d’usineLes patches et réglages d’origine par défaut peuvent être à tout moment restaurés dans votre amplificateur. Maintenez simplement pressés simultanément les boutons MOD, DLY et REV, pendant que vous allumez l’amplificateur. Les LED de la commande 'Voice' servant à choisir la tonalité de l’ampli s’allumeront successivement en rouge pour indiquer l’imminence de la réinitialisation d’usine. Ce processus prend un total de 2 secondes. Si n’importe lequel des boutons MOD, DLY ou REV est relâché avant que la LED Bank n’ait passé en revue toutes ces couleurs, alors l’opération est annulée et l’amplificateur ne subit aucune modification.
NOTE IMPORTANTE: Ce processus écrasera tout contenu créé par l’utilisateur.
Fran
çais
Français

2524
Face Avant
1. InputBranchez ici votre guitare.
Utilisez toujours un cordon blindé de bonne qualité pour guitare.
2. Voice La commande ‘Voice’ sélectionne le type d'appareil et préampli. Il y a 12 ‘Voice’ Blackstar accessibles via 2 banques de 6 ; il suffit d'appuyer sur la commande ‘Voice’ pour basculer entre les 2 types de sons :
LED rouge - Les sons de guitare électrique Clean Warm - Son clair propre, dynamique Clean Bright - "Boutique", sature légèrement quand on le pousse Crunch - Overdrive de gain classique Super Crunch - Plus de gain et de punch que le Crunch OD 1 – Overdrive Master Volume OD 2 – Overdrive boostée dans les médiums
LED verte - Instruments issus des ‘Voices’ alternatives Acoustic 1 - réponse plate, parfaite pour les guitares acoustiques avec EQ actif Acoustic 2 - dynamique, prêt à enregistrer sa guitare acoustique Acoustic Simulator 1 - Votre guitare avec micro simple bobinage sonne comme une guitare acoustique Acoustic Simulator 2 - Votre guitare avec micro humbucker sonne comme une guitare acoustique Bass 1 - Sons de basse classique Bass 2 - Sons de basse moderne
Ce paramètre est enregistré lorsque vous stockez un patch.
Réglage par défaut La commande ‘Voice’ peut également être utilisée pour sélectionner le réglage de ‘Voice’ par défaut de votre ID: CORE BEAM. Par défaut, ou après une réinitialisation d’usine, votre amplificateur s’allumera en mode manuel (voir la section 13) avec la guitare électrique en son ‘Clean War’ sélectionné.Pour modifier ce comportement, appuyez simplement et maintenez la commande ‘Voice’ pendant 2 secondes avec votre amplificateur réglé en mode d’allumage désirée - soit en mode manuel ou en mode Patch, et avec votre ‘Voice’ choisi sélectionné. Les LED ‘Voice’ s’allument toutes brièvement pour indiquer que le nouveau réglage par défaut a été bien enregistré.
3. Gain Lorsque vous utilisez une ‘Voice’ guitare électrique, le contrôle de gain ajuste la quantité d'overdrive ou de distorsion. Des réglages faibles (dans le sens inverse des aiguilles d’une montre) délivreront un son clair à peine en saturation. Plus le contrôle de gain est tourné en fin de course du potentiomètre, plus le son deviendra saturé, oscillant par de belles teintes crunch jusqu'à ce qu’à sa position maximale, un son plein de distorsion est atteint.Lorsque vous utilisez une ‘Voice’ alternative, le contrôle de gain ajuste la quantité de compression. Des réglages faibles (dans le sens inverse des aiguilles d’une montre) délivreront un son plus naturel avec plus de dynamique. Lorsque le contrôle de gain est tourné en fin de course du potentiomètre, il introduira une compression naturelle qui lisse les pics dans le signal pour un son «plus gros», plus arrondi. Ce paramètre est enregistré lorsque vous stockez un patch.
4. VolumeIl contrôle le volume de l'instrument. Un volume élevé accentuera le l’effet de distorsion d’amplication et de compression des lampes. Ceci est un paramètre global et est non sauvegardé lorsque vous enregistrez un patch.
5. ISF La commande ISF brevetée vous permet de choisir la signature tonale que vous préférez. À fond dans le sens anti-horaire, elle donne un caractère plus américain avec des graves nerveux et des médiums plus agressifs, et à fond dans le sens horaire, un caractère britannique plus 'woody' et moins agressif. Contrairement aux commandes 'contour' conventionnelles et aux systèmes égaliseurs paramétriques, les commandes Bass, Middle et Treble restent interactives comme dans un réseau de correction traditionnel d’amplificateur de guitare. Cela donne une réponse musicale, très familière. Ce réglage est sauvegardé quand vous mémorisez un patch.
6. MOD (Modulation) Pressez ce commutateur afin de mettre l’effet de modulation en/hors service ou de le choisir pour l'éditer. Ce réglage est sauvegardé quand vous mémorisez un patch.
7. DLY (Delay)Pressez ce commutateur afin de mettre l’effet delay (retard) en/hors service ou de le choisir pour l'éditer. Ce réglage est sauvegardé quand vous mémorisez un patch.
8. REV (Reverb)Pressez ce commutateur afin de mettre l’effet reverb en/hors service ou de le choisir pour l'éditer. Ce réglage est sauvegardé quand vous mémorisez un patch.
Fran
çais
Français
USA UK

2726
Pour les trois commutateurs d’effet, la LED indique leur statut :
LED Effect State Description
LED éteinte Effet désactivé L’effet n’est pas en service
LED rouge Effet activé mais pas choisi pour l’édition L’effet est en service mais il n’est pas affecté par les commandes d’effet de la face avant
LED verte Effet activé et choisi pour l’édition L’effet est en service et est affecté par les commandes d’effet de la face avant
Presser répétitivement chaque commutateur d’effet de la face avant donne le résultat suivant :
État actuel de l'effet Suivant État de l'effet
Effet désactivé Active l’effet et le choisit pour l’édition. Tout effet préalablement choisi pour l’édition retrouve son simple statut activé
Effet activé mais pas choisi pour l’édition
Choisit l’effet pour l’édition. Tout effet préalablement choisi pour l’édition retrouve son simple statut activé
Effet activé et choisi pour l’édition
Désactive l’effet. Si un ou d’autres effets sont activés, l’effet préalablement choisi pour l’édition le redevient
NOTE: un seul effet peut être choisi à la fois pour l’édition.
9. Type d’effetChange le type d’effet et modifie un paramètre de l’effet actuellement choisi pour l’édition (modulation, delay ou reverb).
Chaque segment représente un effet différent (quatre pour chaque type d’effet). Une LED indique le type d’effet actuellement activé. La distance parcourue dans le 'segment' modifie un paramètre de l’effet. Le effet tableau ci-dessous montre les paramètres modifiables.
Ce réglage est sauvegardé quand vous mémorisez un patch.
10. Niveau d’effet (Level)Modifie un paramètre d’effet. Pour les effets de modulation et de retard (delay), tourner la commande Level en maintenant enfoncé le commutateur Tap (11) modifie la cadence/durée de l’effet.
Le effet tableau ci-dessous montre les paramètres modifiables.
Ce réglage est sauvegardé quand vous mémorisez un patch.
11. TapL'interrupteur ‘Tap’ agit également comme une touche ‘shift ̓ pour permettre l'accès à de nouvelles fonctionnalités avancées
de votre ID: CORE BEAM (voir la section ‘Caractéristiques avancées’ à la page 17).
Le tableau des effets ci-dessous montre les paramètres modifiables :
Effets Tableau
Effet Paramètre du segment Paramètre réglé par Level
Paramètre réglé par Tap
MODULATION
Phaser Mixage Profondeur Vitesse
Flanger Feedback Profondeur Vitesse
Chorus Mix Profondeur Vitesse
Tremolo Frequency modulation depth Amplitude modulation depth Vitesse
DELAY
Linear Réinjection Niveau de retard Temps
Analogue Réinjection Niveau de retard Temps
Tape Réinjection Niveau de retard Temps
Multi Réinjection Niveau de retard Temps
REVERB
Room Taille Niveau de reverb -
Hall Taille Niveau de reverb -
Spring Taille Niveau de reverb -
Plate Taille Niveau de reverb -
Ce réglage est sauvegardé quand vous mémorisez un patch.
12. USB Branchez ici un câble USB pour relier l’amplificateur à un PC sous Windows ou à un Mac. Le logiciel Insider de Blackstar peut être téléchargé depuis cette adresse: www.blackstarinsider.co.uk et offre une foule de fonctions.
Voir la section Audio USB en page 15 pour plus d’informations.
NOTE: l’amplificateur apparaîtra dans le logiciel d’enregistrement d’un ordinateur personnel comme un périphérique de capture audio.
14. MP3/Line InLe volume de lecture du signal audio ‘Line In’ peut-être contrôlé indépendamment de votre volume d'instrument en appuyant sur l'interrupteur ‘Tap’ (11) tout en tournant le contrôle de volume (4) sur le panneau avant (voir la section ‘Caractéristiques avancées’ à la page 17).
Mode PatchLe mode patch est indiqué par la LED Manual éteinte. Voir la section Programmabilité à la page 14 pour plus d’informations.
Fran
çais
Français
2928
Mode accordeurMaintenir les commutateurs Tap (11) et Manual (14) durant une seconde active l’accordeur. La LED témoin Recall (18) clignotera continuellement pour signaler que l’amplificateur est en mode accordeur. La sortie de l’amplificateur sera coupée en mode accordeur.
Les LED Voice indiqueront la note la plus proche de celle jouée.
Clean Warm Corde 1 (E)
Clean Bright Corde 2 (A)
Crunch Corde 3 (D)
Super Crunch Corde 4 (G)
OD 1 Corde 5 (B)
Les LEDs MOD, DLY et REV servent d’indication pour connaitre l’écart entre la note joué et la note de l’accordeur.
LED Mode rouge La note est trop aiguë (au-dessus de la hauteur juste)
LED DLY verte La note est accordée
LED REV rouge La note est trop basse (au-dessous de la hauteur juste)
Les autres LED de la face avant seront éteintes en mode accordeur.
Presser n’importe quel commutateur de la face avant vous fera quitter le mode accordeur.
15. Sortie émuléeCette sortie émule les caractéristiques tonales d’un baffle de guitare et fournit un son naturel pour le branchement à un casque audio, un enregistreur, un système de sonorisation ou à une table de mixage. Pour tirer pleinement parti des effets stéréo, utilisez un câble en Y avec un jack stéréo de 3,5mm vers deux jacks mono comme source vers deux canaux de l’enregistreur ou de la table de mixage. Utilisez toujours un cordon blindé de bonne qualité. Tourner la commande Volume contrôlera le niveau de la sortie émulée.
NOTE: Les hauts-parleurs de l’ampli seront coupés si un câble est connecté à la sortie émulée.
16. BluetoothVotre ID: CORE BEAM est équipé de la fonctionnalité Bluetooth pour la diffusion sans fil de votre musique préférée.En mode ‘Super Wide Stereo’. Les haut-parleurs conçus sur mesure et le baffle acoustiquement ajusté pour reproduire votre musique avec une incroyable qualité sonore, avec un détail, des aigus clairs et des basses profondes pleines de punch. Appuyez sur ce commutateur pour coupler un périphérique Bluetooth à votre ID: CORE BEAM et basculer entre les différents modes de fonctionnement (voir ci-dessous). Lorsque le voyant Bluetooth est éteint, la connectivité Bluetooth n’est pas active.
Mode de détection (Clignotement lent de la LED)Pour connecter un périphérique Bluetooth à votre ID: CORE BEAM pour la première fois, vous devez faire un «jumelage» entre les deux dispositifs. Pour jumeler, appuyez simplement sur le commutateur Bluetooth de votre amplificateur ID: CORE BEAM jusqu'à ce que le voyant Bluetooth affiche un clignotement lent. Dans ce mode, d'autres périphériques Bluetooth sont capables de «voir» votre ID: CORE BEAM (d'où le terme «Détectable») et peut faire une demande de jumelage. Alors que le voyant Bluetooth clignote lentement, allez à la page ‘Paramètres Bluetooth’ de votre appareil Bluetooth et cherchez votre ID: CORE BEAM dans la liste des appareils disponibles. Votre amplificateur sera identifié comme «ID BEAM XX: XX ', où XX: XX est la dernière série de quatre caractères de l’ID unique de votre amplificateur. Lorsque 'ID BEAM XX: XX' apparaît, tout simplement sélectionnez cet appareil et attendez quelques instants que le jumelage soit effectif. Vous entendrez un signal sonore venant de l'amplificateur qui indique qu'un dispositif a été associé avec succès. Si un jumelage n’a pas été effectué durant la période impartie du de mode de détection, la connectivité Bluetooth s’éteint et attend l'entrée utilisateur afin de tenter un nouveau jumelage. Il suffit d'appuyer à nouveau l'interrupteur Bluetooth pour passer en mode Détectable’ et redémarrez le processus de jumelage. Presser le bouton Bluetooth en mode de détection enclenchera votre ID: CORE BEAM en mode balayage.
Mode ‘Scan’ (Clignotement rapide de la LED)Le mode ‘Scan’ est utilisé pour reconnecter les périphériques Bluetooth précédemment couplés à votre ID: CORE BEAM qui se sont retrouvés hors de portée ou ont été débranchés. Assurez-vous que votre appareil Bluetooth précédemment lié a la connectivité Bluetooth activée et entrez en mode ‘Scan’ ; votre amplificateur passera en revue les appareils précédemment jumelés à portée et tentera de se reconnecter, à commencer par l'appareil qui a été le plus récemment connecté. Vous entendrez un signal sonore de l'amplificateur qui indiquer que le dispositif a été rebranché avec succès. Si vous avez déjà jumelé des périphériques Bluetooth à votre ID: CORE BEAM, il s’allumera en mode ‘Scan’. Si votre appareil Bluetooth est à portée avec la connectivité Bluetooth activée, votre amplificateur se reconnectera automatiquement à votre appareil, vous permettant ainsi de lire votre musique en streaming immédiatement.
Presser le bouton Bluetooth depuis le mode ‘Scan’ mettra votre amplificateur en mode de détection à nouveau afin de commencer un jumelage avec un nouveau dispositif. À tout moment, vous pouvez déconnecter votre périphérique Bluetooth de votre amplificateur soit en appuyant et maintenant le commutateur Bluetooth sur le panneau avant de l'amplificateur ou en désactivant la fonctionnalité Bluetooth de votre appareil.
Vous entendrez un signal sonore depuis l’amplificateur qui indique qu'un terminal a été déconnecté.
Procéder à une réinitialisation d’usine effacera de la mémoire de l'amplificateur les périphériques Bluetooth déjà jumelés précédemment. Vous devrez répéter le processus de jumelage avec les périphériques que vous souhaitez reconnecter.
Fran
çais
Français

3130
18. Indicateur RecallL’indicateur Recall signale une disparité entre la valeur actuelle d’un paramètre dans l’amplificateur et la commande physique correspondante en façade. Par exemple, quand vous changez de patch, les commandes de la face avant peuvent ne plus refléter les réglages que vous entendez.Pour éviter des sauts brutaux de niveau quand vous réglez une commande, les commandes de la face avant n’ont pas d’effet sur le son tant que vous ne leur avez pas fait rejoindre la valeur actuelle du paramètre. Une fois celle-ci atteinte, l’indicateur Recall clignote deux fois et la commande 'prend le contrôle' de la valeur, ce qui lui permet de l’augmenter ou de la diminuer.L’indicateur Recall clignotera chaque fois que la commande physique 'passera par' la valeur actuelle active que vous entendez.Recall ne concerne que les commandes Gain et ISF. Quand l’accordeur est activé, l’indicateur Recall clignote continuellement.
Panneau arrière
1. Commutateur de mise sous tensionCe commutateur est utilisé pour allumer ou éteindre l'amplificateur; le point blanc marque la position ON, allumé.
2. Entrée d’alimentation secteur
Le cordon d’alimentation secteur détachable fourni se branche ici. Vérifiez systématiquement que l’Interrupteur (12) est sur la position OFF avant de brancher l’alimentation. Le cordon ne doit être branché qu’à une prise secteur compatible avec les besoins électriques de tension, puissance et fréquence indiqués en face arrière. En cas de doute, demandez conseil à un technicien qualifié.
3. PédalierConnectez un pédalier Blackstar FS-11 (non fourni) afin de contrôler votre ID: CORE BEAM dans l'un des modes suivants : FS-11 commutateur 1 commutateur 2.
FS-11 Commutateur 1 Commutateur 2
Mode par défaut Bascule entre deux patches, sélectionnables via Ile logicie lNSIDER
Bascule tous les effets de patch enregistrés on/off
Mode alternatif Patch haut Patch bas
En mode alternatif (sélectionné par INSIDER) les changement de patches se déplacent ‘boucle’. par exemple, le commutation depuis ‘Bass 2’ passera à ‘Clean Warm’. En mode manuel, la ‘commutation’ du pédalier dépendra de son dernier état. Appuyer sur le commutateur 1 remettra l'amplificateur en mode Patch. Appuyer sur le commutateur 2 permet de basculer les effets ON et OFF sans revenir au mode Patch.
Programmabilité
Mémorisation des patches
Votre ID:Core peut mémoriser 6 patches (1 par patch par réglage Voice) Pour mémoriser le son actuel comme patch, pressez pendant 2 secondes le bouton Manual. La LED Voice sélectionnée clignotera pour indiquer que le patch a bien été
mémorisé. Enregistrer un patch effacera le patch précédent à cet emplacement. Les patches peuvent aussi être enregistrés via le logiciel Blackstar INSIDER.
NOTE: Chaque patch de votre ID:Core doit utiliser le réglage Voice qui lui correspond. Par exemple le patch 'Clean Warm' utilisera le réglage Voice 'Clean Warm'.
Rappel des patches
Quand le mode Patch est activé tournez le bouton Voice pour choisir le patch Voice désiré Sinon, les patches peuvent être rappelés au moyen du logiciel Insider de Blackstar ou d’un pédalier connecté.
NOTE: Pour rappeler un patch, la LED Manual doit être éteinte pour indiquer le mode patch. Tourner le bouton Voice pendant que la LED Manual est allumée (en mode Manual) ne fera que sélectionner la 'voice' indiquée.
Audio USB
Des pilotes audio standard sont utilisés pour connecter l’amplificateur à un PC ou à
un Mac, aucun pilote spécifique n’est nécessaire. Pour un guide sur la faible latence USB visitez: www.blackstaramps.com/usbrecording
L'amplificateur apparaîtra comme un périphérique de capture audio dans le logiciel d'enregistrement. Le signal de sortie audio USB de votre ID: CORE BEAM peut être contrôlé indépendamment du volume du haut-parleur de votre amplificateur en maintenant enfoncée la touche ‘Tap’ (11) tout en tournant le réglage de gain (3) sur le panneau avant (voir les ‘Fonctions avancées’ à la page 17). Cela vous permettra d'atteindre un niveau de signal d'enregistrement optimal tout en ‘monitorant’ la sortie à un niveau inférieur, plus confortable, voir même en silence si vous le préférez; il suffit de tourner le volume du haut-parleur à zéro en utilisant le contrôle du volume sur le panneau avant.
Ré-amplificationL’amplificateur peut être commuté en mode de ré-amplification via INSIDER. C’est un réglage non programmable qui sera désactivé soit lorsque le câble USB sera retiré soit lorsque l’amplificateur sera éteint.
Quand il est activé, le mode de ré-amplification permet à l’amplificateur d’accepter un signal de guitare sec préenregistré via USB et de renvoyer un signal audio entièrement traité. Ce signal de retour peut alors être capturé par le logiciel d’enregistrement sur le PC ou Mac connecté.
Fran
çais
Français
32 33
Fonctions avancéesVotre ID: CORE BEAM dispose de fonctionnalités plus avancées, qui visent les utilisateurs désireux de tirer le meilleur de leur amplificateur. Ces fonctionnalités n’ont pas de contrôles indépendants sur le panneau avant de l'amplificateur, mais sont accessibles en utilisant l'interrupteur ‘Tap’ (11) comme une ‘touche shift' et en utilisant d'autres commandes pour accéder à ces fonctions.
Largeur de la fonction ‘Super Wide Stereo’ - Tap + Voice
Votre ID: CORE BEAM dispose d’une incroyable qualité en lecture de votre musique et offre la fonction ‘Super Wide Stereo’ de Blackstar. Ces 2 caractéristiques se combinent pour offrir une expérience d’immersion audio sans précédent en vous faisant ressentir votre musique comme si elle était diffusée tout autour de vous. Votre ID: CORE BEAM vous permet de contrôler et de définir la quantité de ‘Super Wide Stereo’. L'effet stéréo que vous entendez à la lecture de musique, peut aller de stéréo «standard» à «extrême». Vous pouvez contrôler la quantité de ‘Super Wide Stereo’ que vous entendez sur votre musique tout simplement en appuyant sur l'interrupteur ‘Tap’ (11) tout en tournant la commande ‘Voice’ (2) sur le panneau avant. Les LED ‘Voice’ afficheront de quelle manière l'effet est actif.
Une fois réglé, et que le commutateur ‘Tap’ (11) est désenclenché, ce paramètre sera enregistré et se rappelle de la sorte chaque fois que vous allumez votre ID: CORE BEAM. La lecture de la musique deviendra brièvement muette pour confirmer que le réglage a bien été enregistré.
Volume de lecture de Musique Indépendant - Tap + Volume
Dans la plupart des cas, le volume de votre lecture de musique soit via Bluetooth ou par l’entrée MP3 / Line est effectivement contrôlé directement depuis votre appareil de lecture. Pour les environnements plus calmes et un confort général, vous pouvez également réduire davantage le volume de lecture de la musique de votre amplificateur simplement en maintenant enfoncé l’interrupteur ‘Tap’ (11) tout en tournant le bouton du volume (4) sur le panneau avant.
Niveau d’enregistrement USB - Tap + Gain
Comme indiqué dans la section Audio USB (voir page 16), le niveau de sortie du signal audio USB de votre ID: CORE BEAM peut être contrôlée indépendamment de votre volume de haut-parleur en maintenant l'interrupteur du ‘Tap’ (11) tout en tournant le contrôle de Gain (3) sur le panneau avant.
Vitesse/Temps des effets - Tap + Effects Level
Comme indiqué dans la section Effect Level (voir page 11), la vitesse / temps de la modulation et les effets de retard peuvent être contrôlés en maintenant l'interrupteur du ‘Tap’ (11), tandis que vous tournez la commande Effect Level (10) sur le panneau avant. Cela peut être très utile pour définir un temps d’effet spécifique au lieu d'utiliser l'interrupteur ‘Tap’.
Mise à jour du firmwareLes mises à jour du firmware sont initiées au moyen du logiciel Insider de Blackstar. Une nouvelle version du logiciel Insider de Blackstar sortira lorsqu’une mise à jour sera disponible.
Quand l’amplificateur est connecté (par USB) à une version contenant un firmware plus récent, un message s’affiche, vous demandant d’installer les derniers fichiers. Durant la mise à jour, les commandes de l’amplificateur ne sont pas opérationnelles. Les LED Voice clignotent pour indiquer l’activité d’échange de données durant le processus de mise à jour.
L’alimentation de l’amplificateur ne doit pas être coupée durant une mise à jour de firmware. Si l’amplificateur est coupé durant une mise à jour, les commandes ne répondront pas lorsqu’il sera rallumé et l’amplificateur ne produira aucun son. Les LED clignoteront pour indiquer que l’amplificateur ne contient pas de firmware exploitable.
Si vous rencontrez des problèmes avec la mise à jour de la nouvelle version, l’ampli peut être forcé à s’allumer en mode Mise à Jour. Restez appuyés simultanément sur les boutons Manual (14) et MOD (6) tout en allumant l’ampli pour entrer dans le mode avec les LED Voice s’allumant successivement pour indiquer le mode de Mise à Jour. L’amplificateur doit être connecté au logiciel Insider de Blackstar pour réinstaller un firmware valable. Le processus de mise à jour démarrera automatiquement si le logiciel Insider de Blackstar détecte que l’amplificateur est dans ces conditions.
Spécifications Techniques ID:CORE BEAM
Puissance: 2 x 10 Watts (Stereo 20 Watts)
Poids (kg): 3.7
Dimensions (mm): 290(W) x 202 (H) x 165(D)
Footcontroller (not supplied): FS-11 footcontroller
STANDARDSTEREO
Fran
çais
Français

3534
WICHTIGE SICHERHEITSHINWEISE1. Lesen Sie diese Anleitung.2. Bewahren Sie diese Anleitung auf.3. Beachten Sie alle Warnungen.4. Leisten Sie allen Anweisungen Folge.5. Betreiben Sie dieses Gerät nicht in der Nähe von Wasser.6. Verwenden Sie zum Reinigen des Geräts ausschließlich ein trockenes Tuch.7. Die Lüftungsschlitze dürfen nicht abgedeckt werden!8. Beachten Sie bei der Installation die Hinweise des Herstellers.9. Betreiben Sie das Gerät nicht neben Heizkörpern, Öfen oder anderen
Wärmequellen.10. Kleben Sie in keinem Fall den Schutzkontakt des Steckers ab. Ein verpol-
ungssicherer Stecker besitzt zwei Kontakte, von denen ein Kontakt breiter ist als der andere. Ein Schukostecker besitzt zwei Kontakte und einen dritten Erdungskontakt. Der breitere Kontakt des verpolungssicheren Steckers bzw. der Erdungskontakt des Schukosteckers dient Ihrer Sicherheit. Sollte der Stecker des mitgelieferten Netzkabels nicht in Ihre Steckdose passen, besorgen Sie sich im Fachhandel ein passendes Kabel.
11. Treten Sie nicht auf das Netzkabel, knicken Sie es nicht und behandeln Sie Stecker und Buchsen besonders vorsichtig.
12. Verwenden Sie ausschließlich Zubehör, das vom Hersteller vorgesehen ist.13. Ziehen Sie den Netzstecker des Geräts bei Gewitter oder wenn Sie das Gerät
längere Zeit nicht verwenden.14. Lassen Sie alle Wartungsarbeiten von qualifiziertem Fachpersonal ausführen.
Der Service-Fall tritt ein, wenn z. B. Netzkabel oder -stecker beschädigt sind, wenn Flüssigkeit oder Fremdkörper in das Gehäuse gelangt sind, das Gerät Regen oder Feuchtigkeit ausgesetzt war, das Gerät nicht ordnungsgemäß funk-tioniert, fallen gelassen oder anderweitig beschädigt wurde.
„UM DAS GERÄT STROMLOS ZU MACHEN, ZIEHEN SIE DAS NETZTEILKABEL.“
„WARNUNG: UM BRÄNDE ODER STROMSCHLÄGE ZU VERMEIDEN, SETZEN SIE DAS GERÄT NIEMALS REGEN ODER FEUCHTIGKEIT AUS. SORGEN SIE DAFÜR, DASS KEINE FLÜSSIGKEIT AUF DAS GERÄT TROPFT BZW. GESPRITZT WIRD UND STELLEN SIE NIEMALS FLÜSSIGKEITSBEHÄLTER (Z. B. VASEN) DARAUF.“
Dieses Symbol soll den Anwender auf nicht isolierte Leitungen und Kontakte im Geräteinneren hinweisen, an denen hohe Spannungen anliegen, die im Fall einer Berührung zu lebensgefährlichen Stromschlägen führen können.
Dieses Symbol soll den Anwender auf wichtige Bedien- sowie Service-Hinweise in den zugehörigen Handbüchern aufmerksam machen.
Warnung!Wichtige Sicherheitshinweise!
LESEN SIE DIE FOLGENDEN INFORMATIONEN SORGFÄLTIG DURCH. HEBEN SIE DIE ALLE ANLEITUNGEN FÜR REFERENZWECKE AUF!
Beachten Sie alle Warnungen und folgen sie den auf dem Produkt ange-brachten Anweisungen!
Öffnen Sie niemals das Gehäuse. Es befinden sich keine vom Anwender aus-tauschbaren Teile im Gerät. Lassen Sie alle Wartungsarbeiten von qualifiziertem Fachpersonal ausführen.
Verwenden Sie zum Reinigen des Geräts ausschließlich ein trockenes Tuch.
Im Inneren von Verstärkern kann sich Kondensfeuchtigkeit bilden, wenn der Verstärker aus einer kalten in eine wärmere Umgebung gebracht wird. Warten Sie vor dem Einschalten, bis das Gerät Raumtemperatur erreicht hat.
Unautorisierte Modifikationen am Gerät sind von Blackstar Amplification Ltd. aus-drücklich untersagt.
Setzen Sie das Gerät niemals Regen oder Feuchtigkeit aus.
Platzieren Sie das Gerät nicht auf instabilen Rollwagen, Ständern oder Tischen. Andernfalls könnte das Gerät herunterfallen und schwere Schäden am Produkt oder Verletzungen verursachen.
Dieses Gerät darf nur an gut belüfteten Standorten betrieben werden und darf nicht an Orten ohne ausreichende Luftzirkulation wie in einem Regal betrieben werden.
Dieses Produkt darf nicht in der Nähe von Wärmequellen wie Öfen, Heizkörpern oder einem anderen Wärme produzierenden Verstärker betrieben werden.
Verwenden Sie ausschließlich das mitgelieferte, mit dem Stromnetz in Ihrer Region kompatible Netzkabel.
Netzkabel müssen sehr sorgfältig behandelt werden und müssen bei jeglichem Defekt umgehend ausgetauscht werden.
Entfernen Sie niemals den Erdungskontakt des Netzkabels.
Wenn Sie das Gerät längere Zeit nicht verwenden, ziehen Sie das Netzkabel.
Geräte der Schutzklasse 1 dürfen nur an eine geerdete Steckdose angeschlossen werden.
Der Stecker des Netzkabels muss jederzeit gut erreichbar sein.
Vor dem Einschalten müssen die Lautsprecher wie im Handbuch beschrieben mit den vom Hersteller empfohlenen Kabeln angeschlossen werden.
Ersetzen Sie beschädigte Sicherungen immer durch Sicherungen gleichen Typs.
DeutschD
euts
ch

3736
Manipulieren Sie niemals den Schutzleiter des Netzsteckers.
Hohe Lautsprecherpegel können zu dauerhaften Hörschäden führen. Halten Sie sich nicht in direkter Nähe von mit hoher Lautstärke betriebenen Lautsprechern auf. Falls Sie längere Zeit hohen Lautstärken ausgesetzt sind, verwenden Sie einen Gehörschutz.
Falls das Gerät trotz bestimmungsgemäßer Verwendung nicht normal funktioniert, wenden Sie sich an einen qualifizierten Service-Techniker.
Das amerikanische Amt für Sicherheit und Gesundheitsschutz am Arbeitsplatz (OSHA) hat folgende Grenzwerte für Lärmbelastung festgelegt:Dauer pro Tag in Stunden Lärmpegel in dBA, langsame Ansprechzeit8 906 924 953 972 1001½ 1021 105½ 110¼ oder weniger 115
Laut OSHA kann jede Belastung oberhalb der angegebenen Grenzwerte zu einem partiellen Hörverlust führen.
Wird dieses Verstärkersystem bei Pegeln oberhalb der angegebenen Grenzwerte betrieben, muss ein Gehörschutz (Ohrstöpsel oder Gehörschutzkopfhörer) getragen werden, um einem dauerhaften Gehörschaden vorzubeugen. Um sich gegen die potenziellen Gefahren hoher Schalldruckpegel zu schützen, sollten alle Personen, die Geräten mit hohen Schalldruckpegeln (wie z. B. diesem Verstärker) ausgesetzt sind, für die Dauer des Betriebs einen Gehörschutz tragen.
Elektrische und elektronische Geräte dürfen nicht im Hausmüll, sondern nur den staatlichen bzw. kommunalen Vorgaben entspre-chend entsorgt werden.
EinleitungVielen Dank, dass Sie sich für den Blackstar ID:Core BEAM Verstärker entschieden haben. Dieser Amp ist wie alle unsere Verstärker das Ergebnis unzähliger Stunden akribischer Arbeit durch unser erstklassiges Entwickler-Team. Blackstar hat seinen Sitz in Northampton (UK) und setzt sich aus einem Team erfahrener Musiker zusam-men, die nur ein Ziel verfolgen: Gitarristen mit den Werkzeugen zu versorgen, die ihnen dabei helfen, sich selbst zu verwirklichen.
Alle Blackstar-Produkte wurden sowohl in unseren Labors als auch im Live-Betrieb auf Herz und Nieren getestet, um sicherzustellen, dass sie in puncto Zuverlässigkeit, Qualität und KLANG absolut kompromisslose Ergebnisse liefern.
Die ID:Core Serie ist eine wirklich bahnbrechende Neuvorstellung, die einzigar-tige Innovationen mit intuitiv-traditionellen Bedienelementen und einer vielseitigen Programmierbarkeit kombiniert.
Bitte lesen Sie dieses Handbuch aufmerksam durch, um Ihr neues Blackstar-Produkt optimal nutzen zu können.
Wenn Sie mehr über die Blackstar-Produktreihe erfahren möchten, besuchen Sie unsere Webseite unter www.blackstaramps.com.
Vielen Dank!
Das Blackstar-Team
DeutschD
euts
ch

3938
MerkmaleSeit 2007 hat sich Blackstar hat sich zu einem führenden Hersteller innovativer Gitarrenverstärker etabliert. ID:Core BEAM ist nun das neueste Beispiel für unsere Fortschritte bei der technischen Entwicklung. Der für den privaten Bereich konzipi-erte Verstärker sorgt zuhause für einen unglaublichen Sound und empfiehlt sich als Zentrale für Ihre Instrumente und eine überzeugende Audiowiedergabe.
Die Bluetooth-Wiedergabe Ihres Audiomaterials wird dank der einzigartigen Super Wide Stereo Technologie von Blackstar zu einem echten Erlebnis. Und wenn Sie Ihre Gitarre, Ihren Bass oder eine akustische Gitarre anschließen, profitieren Sie von demselben, raumfüllenden Sound und diesen zudem mit klassischen Effekten verfeinern.
Die überzeugende Audiowiedergabe hat ID:Core BEAM dem geschlossenen Bassreflex-Lautsprecher zu verdanken. Akustisch optimierte Kammern für den linken und rechten Lautsprecher sorgen für eine natürliche Audiowiedergabe mit einer perfekten Stereotrennung und einem selbst bei niedrigen Lautstärken beein-druckenden Bassfundament.
Mit Hilfe der kostenfreien INSIDER-Software von Blackstar gestaltet sich die detail-lierte Editierung ebenso wie das Speichern von Patches extrem einfach.
Patches können über die Online Community hochgeladen, heruntergeladen und ausgetauscht werden. Über den USB-Anschluss und den ASIO-Treiber mit geringer Latenz können Sie Ihre Aufnahmen in professioneller Klangqualität direkt auf Ihren Computer übertragen.
Kompakt und leistungsstark – mehr Inspiration benötigen Sie nicht für Ihre Musik, egal ob Sie sie einspielen oder abhören.
Factory ResetDie Werks-Patches und -Einstellungen können im Verstärker zu jeder Zeit wieder-hergestellt werden. Halten Sie die Tasten MOD, DLY und REV gleichzeitig gedrückt, während Sie den Verstärker einschalten.
Über die Voice-LEDs wird nun angezeigt, dass die Werkseinstellungen wiederherg-estellt werden. Wenn Sie eine der Tasten MOD, DLY und REV loslassen, bevor die Voice-LEDs alle Farben durchlaufen haben und erloschen sind, wird der Vorgang abgebrochen und der Verstärker wird nicht zurückgesetzt.
WICHTIGER HINWEIS: Durch diesen Vorgang werden alle vom Anwender gespeicherten Patches und Einstellungen überschrieben.
DeutschD
euts
ch

4140
Vorderseite
1. InputHier schließen Sie Ihre Gitarre an. Verwenden Sie in jedem Fall hochwertige geschirmte Gitarrenkabel.
2. Voice Mit dem Voice-Regler wählen Sie den Instrumententyp und das Preamp-Voicing aus. Insgesamt stehen 12 Blackstar-Voices zur Auswahl, auf die Sie über zwei Bänke mit je sechs Voices zugreifen: Drücken Sie dazu einfach den Voice-Regler, um zwischen den Bänken umzuschalten:
Rote LED – Voices für elektrische Gitarre
Clean Warm – Klassischer, dynamischer Clean-Sound Clean Bright – ‘Boutique’, zerrt bei hartem Anschlag Crunch – Klassischer Overdrive bei mittlerem Gain Super Crunch – Mehr Gain und Druck als Crunch OD 1 – „Aufgebohrter“ Overdrive-Sound mit Master Volume OD 2 – Heftiger Overdrive-Sound mit Mitten-Boost
Grüne LED – Voices für alternative Instrumente
Acoustic 1 – Lineare Ansprache, perfekt für Akustikgitarren mit aktivem EQ Acoustic 2 – Dynamischer Akustik-Sound für die Aufnahme Acoustic Simulator 1 – Verwandelt den Sound Ihrer Single-Coil-Gitarre in eine Akustische Acoustic Simulator 2 – Verwandelt den Sound Ihrer Humbucker-Gitarre in eine Akustische Bass 1 – Klassischer Bass-Sound Bass 2 – Moderner Bass-Sound
Diese Einstellung wird beim Sichern eines Patches gespeichert.
3. Gain Wenn Sie eine Voice für eine elektrische Gitarre auswählen, steuert der Gain-Regler den Grad der Verzerrung (Overdrive oder Distortion). Niedrige Einstellungen (gegen den Uhrzeigersinn) liefern cleane bis angezerrte Sounds. Wenn der Gain-Regler im Uhrzeigersinn aufgedreht wird, nimmt der Verzerrungsgrad mehr und mehr zu und wechselt von crunchigen Sounds bis hin zu stark verzerrten Sounds in der Extremposition.
Wenn Sie eine Voice für ein alternatives Instrument auswählen, steuert der Gain-Regler den Grad der Kompression. Niedrige Einstellungen (gegen den Uhrzeigersinn) liefern einen natürlicheren Klang mit mehr Headroom und einer höheren Dynamik. Wenn der Gain-Regler im Uhrzeigersinn aufgedreht wird, nimmt die Kompression mehr und mehr zu und Pegelspitzen werden zurückgenommen, während der Gesamtklang „fetter und runder“ wird. Diese Einstellung wird beim Sichern eines Patches gespeichert.
4. VolumeDieser Regler steuert die Lautstärke des Instruments. Bei hoher Lautstärke kommt es zunehmend zu Verzerrungen und einer Kompression der Endstufenröhren. Hierbei handelt es sich um eine globale Einstellung, die nicht in den Patches ges-peichert wird.
Der Tap-Taster dient zudem als Shift-Taste, mit der Sie Zugriff auf weitere Funktionen Ihres ID:Core BEAM Verstärkers haben (siehe Abschnitt „Erweiterte Merkmale“ auf Seite 17).
5. ISF Mit dem ISF-Regler finden Sie immer die ge-suchte Klangfärbung. Bei Einstellungen gegen den Uhrzeigersinn besitzt der Amp einen „amerikanischen“ Sound-Charakter mit einem knackigen Bassfundament und aggressiveren Mitten. Bei Einstellungen im Uhrzeigersinn erzeugt der Amp einen „britischen“ Sound, der deutlich erdiger und weniger aggressiv klingt. Das führt letztlich zu einem vertrauten, musika-lischen Verhalten.Diese Einstellung wird beim Sichern eines Patches gespeichert.
6. MOD (Modulation) Mit diesem Schalter (de-)aktivieren Sie den Modulationseffekt oder wählen ihn zur Editierung aus. Diese Einstellung wird beim Sichern eines Patches gespeichert.
7. DLY (Delay)Mit diesem Schalter (de-)aktivieren Sie den Delay-Effekt oder wählen ihn zur Editierung aus. Diese Einstellung wird beim Sichern eines Patches gespeichert.
8. REV (Reverb)Mit diesem Schalter (de-)aktivieren Sie den Reverb-Effekt oder wählen ihn zur Editierung aus. Diese Einstellung wird beim Sichern eines Patches gespeichert.
Die Tasten-LEDs der drei Effekt-Schalter geben den Status des jeweiligen Effekts an:
LED Effekt-Status Beschreibung
LED inaktiv Effekt aus Effekt inaktiv
LED rot Effekt an, aber nicht für die Editierung aus-gewählt
Effekt ist aktiv, wird aber nicht über die Effekt-Regler auf der Front gesteuert
LED grün Effekt an und für die Editierung ausgewählt Effekt ist aktiv und wird über die Effekt-Regler gesteuert
DeutschD
euts
ch
USA UK

4342
Ein wiederholtes Drücken der Effekt-Schalter auf der Vorderseite hat den folgenden Effekt:
Aktuelle Effect Staat Weiter Effect Staat
Effekt aus Aktiviert den Effekt und setzt ihn in den „Fokus“. Der bisherige „Fokus“-Effekt wird in den Status „On“ geschaltet
Effekt aktiv, aber nicht im „Fokus“
Setzt den Effekt in den Fokus. Der bisherige „Fokus“-Effekt wird in den Status „On“ geschaltet
Effekt aktiv und im „Fokus“ Schaltet den Effekt aus. Wenn ein (oder mehrere) andere(r) Effekt aktiv ist, bleibt der bisherige „Fokus“-Effekt weiterhin im „Fokus“
ANMERKUNG: Es kann immer nur ein Effekt im „Fokus“ sein.
9. Effekt-TypHier wählen Sie den Effekt-Typ und editieren einen Parameter des aktuellen „Fokus“-Effekts (Modulation, Delay oder Reverb).
Jedes Segment steht für einen anderen Effekt (vier für jeden Effekt-Typ). Eine LED zeigt, welcher Effekt-Typ momentan aktiv ist. Der Regelweg innerhalb des „Segments“ verändert den jeweiligen Effekt-Parameter. In der Effekt-Tabelle weiter unten sind alle einstellbaren Parameter aufgelistet:
Diese Einstellung wird beim Sichern eines Patches gespeichert.
10. Effekt-Level Dieser Regler verändert einen Effekt-Parameter. Bei Modulations- und Delay-Effekten können Sie mit dem Level-Regler bei gehaltenem Tap-Taster (11) die Rate/Time des Effekts verändern.
In der Effekt-Tabelle weiter unten sind alle einstellbaren Parameter aufgelistet: Diese Einstellung wird beim Sichern eines Patches gespeichert.
11. Tap-TasterDer Tap-Taster dient zur Eingabe der Rate/Time des Effekts, der sich aktuell im „Fokus“ befindet. Die Dauer zwischen jedem Drücken des Tap-Tasters bestimmt die Rate-Einstellung.
Nach der Einstellung blinkt die Tap-LED in der Geschwindigkeit, die für den Effekt im „Fokus“ eingegeben wurde.
In der folgenden Effekt-Tabelle sind alle einstellbaren Parameter aufgelistet:
Effekt-Tabelle
Effekt Segment-Parameter Level-Parameter Tap-Parameter
MODULATION
Phaser Mix Depth Speed
Flanger Feedback Depth Speed
Chorus Mix Depth Speed
Tremolo Tiefe der Frequenz-Modulation
Tiefe der Amplituden-Modulation
Speed
DELAY
Linear Feedback Delay-Pegel Time
Analogue Feedback Delay-Pegel Time
Tape Feedback Delay-Pegel Time
Multi Feedback Delay-Pegel Time
REVERB
Room Size Reverb-Pegel -
Hall Size Reverb-Pegel -
Spring Size Reverb-Pegel -
Plate Size Reverb-Pegel -
Diese Einstellung wird beim Sichern eines Patches gespeichert.
12. USB Hier schließen Sie ein USB-Kabel an, um den Verstärker mit einem Windows PC oder einem Mac zu verbinden. Die INSIDER-Software von Blackstar bietet zahlreiche Funktionen und kann unter dem Link www.blackstarinsider.co.uk herunterge-laden werden.
Lesen Sie dazu den Abschnitt USB Audio auf Seite 15.
ANMERKUNG: Der Verstärker wird innerhalb der Aufnahme-Software auf dem Computer als Audio-Interface angezeigt.
14. MP3/Line InAn dieser Buchse schließen Sie den Ausgang Ihres MP3- oder CD-Spielers an. Zum Üben passen Sie die Lautstärke der externen Quelle an den Pegel Ihrer Gitarre an
13. ManualDrücken Sie diese Taste, um zwischen den Modi Patch und Manual umzuschalten. Im Manual-Modus entspricht der Sound den aktuellen physikalischen Positionen der Regler. Dies gilt für die Regler Voice, Gain, Volume und ISF. Alle Effekte, die beim Umschalten in den Manual-Modus aktiv sind, werden abgeschaltet.
Im Manual-Modus können alle Regler auch weiterhin über die Blackstar INSIDER Software gesteuert werden. Das hat aber zur Folge, dass der Sound nicht den physikalischen Positionen der Regler auf der Front entspricht.
DeutschD
euts
ch

4544
Patch-Modus
Der Patch-Modus ist dann aktiv, wenn die Manual-LED (14) nicht leuchtet. Weitere Informationen dazu finden Sie im Abschnitt „Programmierung“ auf Seite 14.
Tuner-ModusDurch gleichzeitiges Drücken der Tasten Tap (11) und Manual (14) für eine Sekunde aktivieren Sie den Tuner. Die LED der Recall-Anzeige (18) blinkt dauerhaft und zeigt so, dass der Tuner-Modus aktiv ist. Der Verstärkerausgang wird stummgeschaltet, wenn der Tuner-Modus aktiv ist.
Über die Voice-LEDs wird die Note angezeigt, die der gespielten Note am nächsten kommt.
Clean Warm Saite 1 (E)
Clean Bright Saite 2 (A)
Crunch Saite 3 (D)
Super Crunch Saite 4 (G)
OD 1 Saite 5 (B)
Overdrive (Mischung Clean-Verzerrt) Gain -
Distortion (Mischung Clean-Verzerrt) Gain -
Modern (Mischung Clean-Verzerrt) Gain -
Fuzz (Mischung Clean-Verzerrt) Gain -
Über die LEDs MOD, DLY und REV wird dargestellt, inwieweit die gespielte Note von der Referenzstimmung abweicht.
MOD-LED rot Note (Stimmung) ist zu hoch
DLY-LED grün Note ist korrekt gestimmt
REV-LED rot Note (Stimmung) ist zu tief
Alle anderen LEDs auf der Vorderseite sind im Tuner-Modus inaktiv.
Durch Drücken einer beliebigen Taste verlassen Sie den Tuner-Modus.
15. Emulated Output/Kopfhörer-AusgangDieser Ausgang emuliert den Klangcharakter einer Gitarren-Lautsprecherbox und sorgt in Kombination mit einem Kopfhörer, Aufnahmegerät, einem PA-System oder Mischpult für einen natürlichen Klang.
Um die Stereo-Effekte nutzen zu können, verwenden Sie ein Y-Kabel, das einen Stereoklinkenstecker auf zwei Monoklinkenstecker splittet: So können Sie zwei Kanäle des Aufnahmegeräts oder Mixers ansteuern (siehe Abbildung unten). Verwenden Sie in jedem Fall hochwertige geschirmte Kabel.
Mit dem Volume-Regler steuern Sie den Pegel des Emulated Outputs.
ANMERKUNG: Die internen Lautsprecher des Verstärkers werden stummge-schaltet, wenn ein Kabel am Line Out angeschlossen wird.
16. BluetoothIhr ID:Core BEAM Verstärker ist Bluetooth-fähig und kann daher Ihre drahtlos gestreamte Lieblingsmusik mit dem Super-Wide-Stereo-Effekt wiedergeben. Die speziell en-twickelten Lautsprecher und die akustisch optimierten Box übertragen Ihre Musik mit extrem hoher Klangqualität, die von transparenten, zarten Höhen bis zu tiefen, druckvollen Bässen reicht. Drücken Sie diesen Schalter, um ein externes Bluetooth-Gerät mit Ihrem ID:Core BEAM Verstärker zu kop-peln und um zwischen den Betriebsmodi umzuschalten (siehe unten). Wenn die Bluetooth-LED nicht leuchtet, ist die Bluetooth-Anbindung inaktiv.
Discoverable-Modus (langsames Blinken der LED)Um ein Bluetooth-Gerät zum ersten Mal mit Ihrem ID:Core BEAM zu verbinden, müssen Sie diese beiden Geräte miteinander verkoppeln. Dazu drücken Sie ein-fach die Bluetooth-Taste an Ihrem ID:Core BEAM Verstärker, bis die Bluetooth-LED langsam blinkt. In diesem Zustand kann ein externes Bluetooth-Gerät Ihren ID:Core BEAM Verstärker „sehen“ (oder erkennen) und eine Verbindung anfragen.
Während die Bluetooth-LED langsam blinkt, wechseln Sie auf die Seite mit den Bluetooth-Einstellungen für das externe Gerät und überprüfen, ob Ihr ID:Core BEAM Verstärker in der Liste der verfügbaren Geräte aufgeführt ist. Ihre Verstärker wird dort als „ID Beam XX:XX“ bezeichnet, wobei das XX:XX für die letzten vier Ziffern der einzigartigen ID Ihres Verstärkers steht. Wenn „ID Beam XX:XX“ eingeblendet wird, wählen Sie das Gerät einfach aus und warten ein paar Momente, bis die Verbindung eingerichtet wird. Sie hören dann einen Klang vom Verstärker, der so anzeigt, dass ein anderes Gerät erfolgreich verbunden wurde.
Wenn die Verbindung nicht innerhalb der Zeitvorgabe im Discoverable-Modus eingerichtet werden konnte, wird die Bluetooth-Verbindung abgeschaltet und der Anwender muss manuell einen neuen Versuch zur Kopplung unternehmen. Drücken Sie dazu einfach die Bluetooth-Taste erneut, um den Discoverable-Modus zu ak-tivieren, und wiederholen Sie den Kopplungsvorgang.
Wenn Sie die Bluetooth-Taste im Discoverable-Modus drücken, versetzen Sie Ihren ID:Core BEAM Verstärker in den Scan-Modus.
Scan-Modus (schnelles Blinken der LED)Im Scan-Modus können Sie Bluetooth-Geräte, die bereits einmal mit Ihrem ID:Core BEAM verkoppelt waren, erneut verbinden, wenn die Sendereichweite überschritten wurde oder die Verkopplung anderweitig unterbrochen wurde.
Stellen Sie sicher, dass die Bluetooth-Kommunikation in dem früher bereits verkop-pelten Bluetooth-Gerät aktiv ist, und öffnen Sie den Scan-Modus: Nun „sucht“ Ihr Verstärker nach Geräten, mit denen er bereits einmal verbunden war, und versucht, die Verbindung wieder aufzunehmen. Dabei beginnt er mit dem Gerät, mit dem er zuletzt verbunden war. Sie hören dann einen Klang vom Verstärker, der so anzeigt,
DeutschD
euts
ch
BASS DISTORTION (nur für Bass-Voices)

4746
dass ein anderes Gerät erneut erfolgreich verbunden wurde.
Wenn Sie bereits früher ein Bluetooth-Gerät mit Ihrem ID:Core BEAM verkoppelt hatten, ist der Scan-Modus nach dem Einschalten aktiv. Wenn sich Ihr Bluetooth-Gerät innerhalb der Reichweite befindet und die Bluetooth-Kommunikation aktiv ist, verbindet sich der Verstärker automatisch mit Ihrem Gerät, sodass Sie sofort mit dem Streamen der Musik beginnen können.
Durch das Drücken der Bluetooth-Taste im Scan-Modus schalten Sie Ihren Verstärker in den Discoverable-Modus und können mit der Verkopplung mit einem neuen Gerät beginnen.
Sie können Ihr Bluetooth-Gerät zu jeder Zeit von Ihrem Verstärker abmelden, indem Sie wahlweise die Bluetooth-Taste auf der Vorderseite des Verstärkers drücken und halten oder die Bluetooth-Kommunikation Ihres Geräts deaktivieren. Sie hören dann einen Klang vom Verstärker, der so anzeigt, dass ein Gerät abgemeldet wurde.
Durch einen Factory Reset werden alle bisher verbundenen Bluetooth-Geräte aus dem Speicher des Verstärkers gelöscht. In diesem Fall müssen Sie jedes Gerät, das Sie wieder verkoppeln möchten, neu anmelden.
17. Recall-AnzeigeDie Recall-Anzeige zeigt, ob der aktuelle Parameterwert im Verstärker mit der physi-kalischen Position des zugehörigen Reglers auf der Vorderseite übereinstimmt oder nicht. Wenn Sie beispielsweise zu einem anderen Patch wechseln, entsprechen die Regler-Einstellungen auf der Frontseite mit Sicherheit nicht den Einstellungen, die Sie hören.
Um unerwünschte Pegelsprünge beim Einstellen der Parameter zu verhindern, haben die Regler auf der Front keine Funktion, bis die physikalische Position den aktuellen Parameterwert erreicht hat. In diesem Moment blinkt die Recall-Anzeige zweimal und der Regler „übernimmt“ die Parametersteuerung, sodass Sie den Wert anheben oder absenken können.
Die Recall-Anzeige blinkt jedes Mal, wenn ein physikalischer Regler die aktuell aktive und damit hörbare Einstellung überstreicht.
Recall ist für die Regler Gain und ISF aktiv.
Wenn der Tuner aktiv ist, blinkt die Recall-Anzeige dauerhaft.
Rückseite
1. Power-Schalter
Mit diesem Schalter wird der Verstärker ein- bzw. ausgeschaltet: Der weiße Punkt markiert die Position ON.
2. NetzteilbuchseHier schließen Sie das mitgelieferte DC-Netzteil an. Stellen Sie sicher, dass sich der Power-Schalter (12) immer in der Stellung OFF befindet, bevor Sie das Netzteil anschließen. Das Netzkabel muss an einer Steckdose angeschlossen werden, die in puncto Spannung, Leistung und Netzfrequenz den auf dem Netzteil vermerkten Spezifikationen entspricht. Im Zweifelsfall wenden Sie sich an einen qualifizierten Techniker/Elektriker.
3. FußschalterSchließen Sie einen (optional erhältlichen) Blackstar FS-11 Fußschalter an, um Ihren ID:Core in einem der folgenden Modi zu steuern:
FS-11 Schalter 1 Schalter 2
Voreinstellung Schaltet zwischen zwei Patches um, die Sie über INSIDER auswählen
Schaltet alle gespeicherten Patch-Effekte an oder aus
Alternativer Modus Nächstes Patch Vorheriges Patch
Im (über INSIDER ausgewählten) Alternative-Modus werden die Patches in der Schleife umgeschaltet. So wird nach der Voice „Bass 2“ wieder die Voice „Clean Warm“ geladen.
Im Manual-Modus hängt die Funktion der Fußschalter von ihrem letzten Status ab. Durch Drücken von Taster 1 versetzen Sie den Verstärker wieder in den Patch-Modus. Durch Drücken von Taster 2 schalten Sie die Effekte ein bzw. aus, ohne in den Patch-Modus zu wechseln.
ProgrammierungSpeichern von Patches
Ihr ID:Core BEAM Verstärker speichert 12 Patches (1 Patch pro Voice-Einstellung).
Um den aktuellen Sound als Patch abzuspeichern, drücken und halten Sie die Manual-Taste für zwei Sekunden. Die LED der gewählten Voice blinkt und zeigt so, dass das Patch gespeichert wurde.
Das Speichern eines Patches überschreibt ein auf dem Speicherplatz eventuell vorhandenes Patch.
Patches können auch über die Blackstar INSIDER Software gespeichert werden.
DeutschD
euts
ch

4948
DeutschD
euts
ch
ANMERKUNG: Jedem Patch in Ihrem ID:Core muss eine spezifische Voice-Einstellung zugewiesen sein – ein Clean-Warm-Patch muss also auch die Clean-Warm-Voice verwenden.
Patches laden Im Patch-Modus wählen Sie das gewünschte Voice-Patch einfach über den Voice-Regler aus.
Zudem können die Patches über die Blackstar INSIDER Software oder einen an-geschlossenen Fußschalter (nur ID:CORE STEREO 20 & ID:CORE STEREO 40) aufgerufen werden.
Anmerkung: Um ein Patch zu laden, muss der Patch-Modus aktiv sein – in diesem Fall leuchtet die Manual-LED nicht. Wenn Sie den Voice-Regler bedienen, während die Manual-LED leuchtet (Manual-Modus ist aktiv), wird nur die entsprechende Voice aufgerufen.
USB Audio
Die Kommunikation des Verstärkers mit einem PC oder Mac erfolgt über herkömmli-che Audio-Treiber. Es werden keine spezifischen Treiber benötigt. Eine kurze Anleitung zur USB-Aufnahme mit minimaler Latenz finden Sie unter: www.blackstaramps.com/usbrecording
ANMERKUNG: Schließen Sie den Verstärker immer über einen Haupt-USB-Port des Computers an (meist auf der Rückseite zu finden).
Der Verstärker erscheint innerhalb der Aufnahme-Software auf dem Computer als Audio-Interface.
Folgende Audioformate für die USB-Ausgabe können über die Blackstar INSIDER Software gewählt werden:Stereo-Audiokanäle mit Speaker-Emulation und Effekten2 x Mono-Audiokanäle - Links – Verstärkersignal mit Effekt - Rechts – unbearbeitetes Gitarrensignal
Reamping-Modus
ReampingÜber die INSIDER-Software von Blackstar kann der Verstärker in den Reamping-Modus versetzt werden. Hierbei handelt es sich um eine nicht-programmierbare Einstellung, die deaktiviert wird, wenn wahlweise das USB-Kabel entfernt oder der Verstärker ausgeschaltet wird.
Wenn der Reamping-Modus aktiv ist, kann ein bereits aufgenommenes, unbear-beitetes Gitarrensignal über USB in den Verstärker gespeist und als bearbeitetes Audiosignal wieder abgegriffen werden. Dieses Return-Signal kann nun über die Recording-Software im angeschlossenen PC oder Mac aufgenommen werden.
Erweiterte MerkmaleIhr ID:Core BEAM Verstärker bietet erweiterte Merkmale, die sich speziell an Anwender richten, die etwas in die Tiefe gehen und das Maximum aus Ihrem Verstärker herausholen möchten. Zu diesen Merkmalen gehören Funktionen, die keine separaten Bedienelemente auf der Vorderseite des Verstärkers zur Verfügung stehen, sondern auf die Sie durch Halten des Tap-Tasters (11) als „Shift-Taste“ und über andere Bedienelemente zugreifen.
Super-Wide-Stereobreite bei der Musikwiedergabe – Tap + Voice
Ihr ID:Core BEAM kann auch extrem hochwertiger Musik-Player mit dem Super-Wide-Stereo-Effekt von Blackstar betrieben werden. In der Kombination sorgen diese beiden Merkmale für ein unglaubliches Hörvergnügen – Sie sind förmlich von Sound umgeben. Bei Ihrem ID:Core BEAM können Sie die Breite des Super-Wide-Stereo-Effekts steuern und im Bereich von „Standard-Stereo“ bis hin zu maximalem „Super-Wide-Stereo“ einstellen. Um die Breite des Super-Wide-Stereo-Effekts und damit der Musikwiedergabe einzustellen, drücken und halten Sie die Tap-Taste (11) gedrückt, während Sie den Voice-Regler (2) auf der Vorderseite bedienen. Die Voice-LEDs zeigen die Stärke des Effekts an. Wenn Sie den Tap-Taster nach der Eingabe wieder loslassen, wird die Einstellung gespeichert und jedes Mal geladen, wenn Sie Ihren ID:Core BEAM einschalten. Die Musikwiedergabe wird kurz unterbrochen, um zu bestätigen, dass die Einstellung gespeichert wurde.
Unabhängige Lautstärke für die Musikwiedergabe – Tap + Volume
In der Regel wird die Lautstärke der Musikwiedergabe, die wahlweise über Bluetooth oder am MP3/Line-Eingang anliegt, direkt über das Wiedergabegerät gesteuert. Bei einer ruhigen Umgebung oder aus praktischen Gründen können Sie die Wiedergabelautstärke jedoch an Ihrem ID:Core BEAM Verstärker noch weiter reduzieren, indem Sie den Tap-Taster (11) gedrückt halten, während Sie den Volume-Regler (4) auf der Vorderseite bedienen.
USB-Aufnahmepegel – Tap + Gain
Wie im Abschnitt zu USB Audio (siehe Seite 16) erwähnt können Sie die Wiedergabe-Lautstärke des USB-Audiosignals von Ihrem ID:Core BEAM Verstärkers unabhängig vom Lautsprecher Ihres Verstärkers aussteuern, indem Sie den Tap-Taster (11) gedrückt halten und den Gain-Regler (3) auf der Vorderseite bedienen.
USB-Aufnahmepegel – Tap + Effects Level
Wie im Abschnitt zum Effektpegel (siehe Seite 11) erwähnt können Sie die Geschwindigkeit/Dauer der Modulations- und Delay-Effekte steuern, indem Sie den Tap-Taster (11) gedrückt halten und den Regler Effect Level (10) auf der Vorderseite bedienen. So können Sie eine Einstellung für ein spezifisches Effekt-Tempo treffen und müssen es nicht über den Tap-Taster eingeben.
STANDARDSTEREO

5150
Firmware UpdateFirmware-Aktualisierungen werden über die Blackstar INSIDER Software ausgeführt. Eine aktuelle Version der Blackstar INSIDER Software wird zu jedem Update veröffentlicht.
Wenn der (über USB) mit der INSIDER-Software verbundene Verstärker eine neuere Firmware erkennt, wird eine Meldung eingeblendet, die eine Installation dieser aktuel-len Daten empfiehlt. Während der Aktualisierung können die Regler am Verstärker nicht bedient werden. Die Voice-LEDs auf der Vorderseite leuchten für die Dauer des Aktualisierungsvorgangs.
Der Verstärker darf während der Firmware-Aktualisierung nicht ausgeschaltet werden. Wenn der Amp während der Aktualisierung ausgeschaltet wird, können die Regler am Verstärker auch nach dem Einschalten eventuell nicht mehr bedient werden und der Verstärker gibt keinen Sound aus. Die Voice-LEDs blinken zyklisch und zeigen damit an, dass keine gültige Firmware im Verstärker installiert ist.
Wenn bei der Aktualisierung der Firmware Probleme auftreten, können Sie den Verstärker auch gezielt im Update-Modus einschalten. Halten Sie die Tasten Manual (14) & MOD (6) gleichzeitig gedrückt, während Sie den Verstärker einschalten: Der Verstärker wird im Update-Modus gestartet, was durch die zyklisch blinkenden Voice-LEDs angezeigt wird. Verbinden Sie den Verstärker mit der Blackstar INSIDER Software, um mit der Firmware-Aktualisierung zu beginnen.
Der Verstärker muss mit der Blackstar INSIDER Software verbunden sein, um eine gültige Firmware zu installieren. Die Aktualisierung wird automatisch ausgeführt, wenn die Blackstar INSIDER Software erkennt, dass sich der Verstärker im Update-Modus befindet.
Technische SpezifikationenID:Core BEAM
Leistung: 2 x 10 Watt (20 Watt stereo)
Gewicht (kg): 3.7
Abmessungen (mm): 290((B) x 202(H) x 165(T)
Footcontroller (not supplied): FS-11 footcontroller
Deu
tsch

5352
Japa
nese
Japanese

5554
初めに
このたびはBlackstar ID:Core BEAMをお買い上げいただきまして、誠にありがとうございます。
ID:Core BEAMは、世界的にもトップレベルであると自負するBlackstarの設計チームにより、長期間にわたる徹底した研究、調査を元に設計してあります。
英国ノーザンプトンを拠点とするBlackstar社のスタッフは、全員ミュージシャンとしての経験を持っています。我々は、ギタリストのベストパフォーマンスを実現するための「究極のギターツール」を提供することを唯一の目的としています。
全てのBlackstar製品は、品質、とりわけサウンドクオリティにおいて妥協せず、多くの検査機関での試験、およびロードテストを行っています。
このID:Core BEAMはユニークで革新的で、さらに直観的に操作できる伝統的なコントロール、万能なプログラム機能を統合させたこれまでにない製品です。
ID:Core BEAMの能力を最大限に引き出すために、このハンドブックを一通りお読みになり、末永くご愛用いただきますようお願いします。
Blackstar製品の最新情報は、ホームページでチェックしてください。
URL: www.blackstaramps.com
ブラックスター・チームより
主な特徴
2007年の創立から現在に至るまで、Blackstarは画期的な商品をリリースすることによって、ギターアンプ市場を牽引してきました。ID:Core BEAMは、今迄の長期的な研究・調査によって生み出されたBlackstarの新たな一歩となる商品です。自宅練習用としてデザインされたアンプにもかかわらず、素晴らしいトーンを実現し、セントラルハブとして、またオーディオ再生機器としても素晴らしい機能を有しています。
Bluetooth機能を用いてID:Core BEAMから音楽の再生をしてみてください。ID:Core BEAMの特徴的な技術である“スーパーワイド・ステレオ”によって素晴らしいサウンドを体験することができます。ID:Core BEAMはエレクトリックギターとベース、そしてエレクトリック・アコースティックギターに対応しています。もちろんアンプとしてのサウンドも申し分ありません。ヴィンテージスタイルのエフェクトを搭載し、室内を満たすかのような奥行きのあるサウンドで演奏することができます。
これらのID:Core BEAMの素晴らしいサウンドは、ポートを装備した密封キャビネット構造のおかげなのです。音響的にチューンされた左右のスピーカー・チェンバーは、クリアでナチュラルな素晴らしいステレオサウンドを実現し、ロー・ヴォリュームの状態でも驚くほどのベース・レスポンスを発揮します。
より細やかなサウンド編集とパッチの保存をしたいときには、専用のソフトウェアINSIDERが便利です
INSIDERを利用することで、パッチをコミュニティにアップロードすることや、アップロードされているパッチをダウンロードして使用することができます。また、USBコネクターでコンピューターとID:Core BEAMを接続し、ローレイテンシーのASIOドライバーを使用することによって、プロ並みのレコーディングをアンプから直接行うことができます。
ID:Core BEAMのコンパクトなボディには、お好みの音楽をサポートするすべてが詰まっています。
※インサイダー・ソフトウェアを使用するにはインターネット環境が必要となります。下記のURLから無償ダウンロードできます。(英文サイト)
http://www.blackstarinsider.co.uk/
※インストールするPCの使用環境などはサイトに記載してあります。
Japa
nese
Japanese

5756
ID:Core BEAMを工場出荷時の状態にリセットする場合は、MOD, DLY, REVボタンを同時に長押ししながら、 パワースイッチを押して電源を入れてください。
VOICE LEDが6つ全て点灯しリセットが始まります。順番にLEDが消灯すれば完了です。
もしVOICE LEDが消灯する前にMOD、DLY、REVの長押しを解除すると、この操作はキャンセルされてアンプはリセットされる前の状態に戻ります。
重要:ファクトリー・リセットを行うと内部にセーブしたデータは失われてしまいますのでご注意ください
フロントパネル
1. Input (インプット)
モノラル・シールド・ケーブルでギターを接続します。
2. Voice (ボイス)
ID:Core BEAMのボイシングは2つのバンクに分かれています。使用する楽器に合わせてプリアンプのボイシングを切り替えることが可能です。片方がエレキギター用で、もう片方はアコースティックギター・アコースティックシミュレーター・ベースギター用がそれぞれ2つずつ登録されています。2つのバンクは、ボイス・コントロールを押すことで切り替えることが可能です。
Red LED-エレキギター用ボイシング-
Clean Warm : ダイナミックで上質なクリーン
Clean Bright : ハードに弾くと軽く歪むブティック・トーン
Crunch : 中程度のゲインを持たせたクラッシックなオーバードライブ
Super Crunch : さらにゲインとパンチを効かせたサウンド
OD1 : 中程度のパワーアンプ・ダンピングを伴ったホット・ロッドなオバ ードライブ
OD2 : さらにミッドレンジを強化させたホット・ロッドなオーバードライブ
Green LED-オルタナティブ・インストゥルメント用ボイシング-
Acoustic 1 フラットなレスポンス、イコライザーをアクティブにしたアコ ースティックギターに最適
Acoustic 2 ダイナミックなレコーディング向きのアコースティック・トーン
Acoustic Simulator 1 シングルコイルPU搭載ギターのサウンドをアコース ティックギターのサウンドへ
Acoustic Simulator 2 ハムバッカーPU搭載ギターのサウンドをアコーステ ィックギターのサウンドへ
Bass 1 クラシックなベーストーン
Bass 2 モダンなベーストーン
パッチをストアするとセッティングが保存されます。
Japa
nese
Japanese

5958
Default Setting (デフォルト・セッティング)
ID:Core BEAMのボイス・コントロールは、デフォルトのセッティングを選択するように設定されています。デフォルト、またはファクトリー・プリセットの状態でマニュアル・モードに切り替えるとエレキギター用のボイスチャンネルの“Clean Warm”が選択されています。この設定を変更する場合は、本体の電源をオンにし、新たにデフォルトとして設定したいボイスチャンネルを選んだ状態で、ボイス・コントロールのノブを約2秒間押し続けてください。ボイシングのチャンネルのすべてのLEDが短く点滅したら、変更が完了になります。
3. Gain (ゲイン)
赤いLEDのエレキギター用ボイシングが設定されているときにゲイン・コントロールを回すと、オーバードライブとディストーションの量を調整することができます。左に回すに従いエッジの効いたクリーンサウンドに近づいていき、右に回すに従いドライブさが増したクランチなトーンに近づいていきます。そして、右に回しきったポジションでフルにディストーションの効いたトーンになります。
また、緑のLEDのオルタナティブ・インストゥルメント用ボイシングが設定されているときにゲイン・コントロールを回すと、コンプレッションの量を調整することができます。左に回すに従いダイナミックでナチュラルな高いヘッドルームのサウンドに近づいていき、右に回すに従いナチュラルなコンプレッションが掛かった、丸みのあるファットなトーンになります。パッチをストアするとセッティングが保存されます。
4. Volume (ボリューム)
ボリュームの調節ができます。右に回すに従い音量が大きくなります。右に回すに従い音量が大きくなり真空管をシミュレートしたパワー、ディストーション、コンプレッションが現れます。このセッティングはパッチをストアしても保存されません。
5. ISF
ISFはベース、ミドル、トレブルと連動して働き、自分独自の音色を選ぶことが出来ます。左に回しきった位置でタイトなボトムエンドとアグレッシブなミドルのモダンなアメリカンサウンド、右に回しきるとより箱鳴り感のあるブリティッシュサウンドになります。従来のコンツアーやパラメトリックEQと異なり、ベース、ミドル、トレブルコントロールはトラディショナルなアンプのように効果的に働きます。そのため音楽的に使える効果があります。パッチをストアするとセッティングが保存されます。
6. MOD (モジュレーション)
ボタンを押してオン/オフ、またはエフェクトの編集を行います。
パッチをストアするとセッティングが保存されます。
7. DLY (ディレイ
ボタンを押してオン/オフ、またはエフェクトの編集を行います。
パッチをストアするとセッティングが保存されます。
8. REV (リバーブ)
ボタンを押してオン/オフ、またはエフェクトの編集を行います。
ベースギター用のボイスチャンネルを選択している場合は、リバーブがディストーションに切り替わります。
パッチをストアするとセッティングが保存されます。
3つのEffect スイッチにあるLEDの点灯する色によってEffect の状態を示します。
LED 状態 内容
消灯 エフェクト・オフ エフェクトは作動していません。
赤 エフェクト・オン
編集は不可。
エフェクトは作動しますが、フロントパネルのエフェクト・コントロールの影響を受けません。
緑 エフェクト・オン
編集可能(9,10,11参照)
エフェクトは作動し、フロントパネルエフェクト・コントロール位置の影響を受けます。
Japa
nese
Japanese
USA UK

6160
繰り返しそれぞれ3つEffectスイッチを押すと以下の順番で状態が順番に変わります。
現在の状態 押した後の状態
エフェクト・オフ エフェクトがオンになります。
引き続きエフェクトがオンでエフェクトの編集ができます(9, 10, 11参照)。
エフェクト・オンで編集が不可 引き続きエフェクトがオンでエフェクトの編集ができます(9, 10, 11参照)。
エフェクト・オンで編集が可能 押したスイッチのエフェクトがオフになります。
注意:編集できるのは1つのエフェクトだけで、2つ以上のエフェクトを同時に編集することはできません。
9. Effect Type (エフェクト・タイプ)
エフェクトの種類を変更し選択しているエフェクト(MOD、DLY、REV)のパラメーターを編集します。
それぞれのセグメント内に異なったエフェクトを持たせています(それぞれのエフェクトごとに4つ)。作動中のエフェクトにはLEDが点灯します。セグメント内でエフェクトのパラメーターを変更することが出来ます。変更出来るパラメーターについては次のエフェクト表を参照してください。
パッチをストアするとセッティングが保存されます。
10. Effect Level (エフェクト・レベル)
エフェクトのパラメーターを変更します。
MODとDLYに限ってはTAP スイッチ(11)を押し続けてLevelコントロールを回すことによってレート/タイムを変更することもできます。(詳細は、後述の”Advance Feature”を参照してください。)
変更出来るパラメーターについては下記表を参照してください。
パッチをストアするとセッティングが保存されます。
11. TAP (タップ)
選択しているエフェクトのレート/タイムを変更します。スイッチをタップして長さをセットします。
セットするとLEDがセットした長さに応じて点滅します。
このスイッチは、ID:Core BEAMに搭載されている先進的な特徴にアクセスできるようになる「シフトキー」のような役割を果たします。(詳細は、後述の”Advance Feature”を参照してください。)
変更出来るパラメーターについては下記表を参照ください。
Effect Effect Type Effect Level TapMODULATION
フェイザー ミックス デプス スピード
フランジャー フィードバック デプス スピード
コーラス ミックス デプス スピード
トレモロ ビブラート・デプス トレモロ・デプス スピード
DELAY
リニア フィードバック ディレイ・レベル タイム
アナログ フィードバック ディレイ・レベル タイム
テープ フィードバック ディレイ・レベル タイム
マルチ フィードバック ディレイ・レベル タイム
REVERB
ルーム サイズ リバーブ・レベル
ホール サイズ リバーブ・レベル
スプリング サイズ リバーブ・レベル
プレート サイズ リバーブ・レベル
BASS DISTORTION
オーバードライブ ブレンド ゲイン
ディストーション ブレンド ゲイン
モダン ブレンド ゲイン
ファズ ブレンド ゲイン
Japa
nese
Japanese

6362
パッチをストアするとセッティングが保存されます。
12. USB
USBケーブルでID:Core BEAMとWidows PCやMacを接続する際に使用します。
専用ソフトウェアINSIDERをウェブサイトからダウンロードでき、多くの機能を楽しむことが出来ます。(INSIDERのダウンロードは、下記のURL先で行えます。)
http://www.blackstarinsider.co.uk
詳しくは、後述のUSB Audioの項目もご覧ください。
注意:このアンプはレコーディング・ソフト内のオーディオ・キャプチャー・デバイスとしてパーソナル・パーソナル・コンピューターの画面に現れます。
13. Manual (マニュアル)
このスイッチを押してパッチ・モード(消灯時)とマニュアル・モード(点灯時)の切り替えを行います。 マニュアル・モードでのサウンドは、現在のノブの位置が反映されます。これはVoice, Gain, Volume, ISFに適用されます。あらゆるエフェクトはマニュアル・モードに切り替えるとオフになります。
マニュアル・モードでの全てのコントロールは、専用ソフトウェアINSIDERでも変更できますが、この場合は、サウンドがアンプ本体のパネルのノブ位置に左右されないようになっています。
Tuner Mode (チューナー・モード)
Tap(11)スイッチとManual(13) ボタンを長押しするとチューナーが作動します。リコール・インジケーターLED(17)が点滅しアンプがチューナー・モードに入ったことを知らせます。チューナー・モードでは出力はミュートされます。
VOICEのLEDが最も近い音程を弾くと点灯して知らせます。
Clean Warm E
Clean Bright A
Crunch D
Super Crunch G
OD 1 B
MOD, DLY, REVのLEDが弾いた音程がどれぐらい近いかを点灯して知らせます。
MOD LED 赤 チューニングがシャープ(音程が高い)
DLY LED 緑 チューニングが合っている状態
REV LED 赤 チューニングがフラット(音程が低い)
チューナー・モードではフロントパネルの他のLEDはオフになります。
いずれかのボタンを押すとチューナー・モードから抜け出せます。
14. MP3/Line In (ライン・イン)
MP3ライン・インを用いれば、オーディオ機器(MP3プレーヤー、コンピューター、テレビ、AV機器)を接続して、ID:Core BEAMからお気に入りの曲を出力することが可能です。オーディオ機器側のボリュームを調整すれば、簡単にジャム・セッションをお楽しみいただけます。
TAPスイッチを押しながらボリューム・コントロールのノブを回すとオーディオ機器からのボリュームを調整することもできます。
15. Speaker Emulated / Headphone Out
(スピーカーエミュレイテッド / ヘッドフォン・アウト)
この端子からは、ギターアンプのスピーカーやキャビネットサウンドをシミュレーションした回路を通ったサウンドが出力されます。録音機器やミキサーに直接接続する場合に使用します。
スーパーワイド・ステレオ効果をフルに利用するには、ミキサーや録音機器の2つのチャンネルに接続するためにステレオY字ケーブルをご利用ください。
常に良質のケーブルをご使用することをお勧めします。
VOLUME (4)でこの端子からの出力を調整します。
注意: ここにケーブルを接続するとアンプのスピーカーはミュートされます。
16. Bluetooth (ブルートゥース)
ID:Core BEAMには、スーパーワイド・ステレオでお気に入りの音楽をワイヤレスでストリーミングできるようにBluetooth機能が搭載されています。カスタムデザインが施されたスピーカーと音響的にチューンされたキャビネットは、あなたのお気に入りの音楽をクリアなハイトーンからパンチが効いたロートーンまで驚くほどリアルな音質で出力することができます。フロントパネル上のBluetoothボタンを押すことによって、ID:Core BEAM本体とお手持ちのデバイスをペアリングすることができ、Bluetoothボタンを押すことでモードの切り替えも可能です。Bluetoothボタンのランプが点灯し
ていないときは、ペアリングを実行することができません。
Japa
nese
Japanese

6564
※ブルートゥース機能を使用するには、ブルートゥース対応の機器(音楽プレイヤー、スマートフォン、タブレットPC等)が必要です
Discoverable Mode (ディスカバラブル・モード-LEDがゆっくり点滅-)
ID:Core BEAMのBluetooth機能を使用する場合、まずペアリングをする必要があります。最初は、ID:Core BEAM本体のBluetoothボタンを押して、ランプの点滅速度が遅いディスカバラブル・モードに設定してください。このモードに設定しているときは、BluetoothデバイスのBluetooth設定画面のペアリング候補が表示されるリストの上にID:Core BEAMが表示されるので、そこからID:Core BEAMに対してペアリングのリクエストを送ることができます。
お使いのデバイスのペアリング候補リストからID:Core BEAMを探してみてください。リストには、「ID Beam XX:XX」といったように表示されているはずです。(XX:XXには、ID:Core BEAM本体の個別ナンバーが入ります。)リスト上から”ID Beam XX:XX”を見つけられたら、それを選択してしばらく待っていてください。ペアリングが無事に完了すると、ID:Core BEAM本体から電子音が発音されます。
一定の時間内にペアリングが完了しなかった場合、Bluetoothの接続が解除されてしまった場合は、Bluetoothボタンを押して再びディスカバラブル・モードに切り替えてから、ペアリングの手順の最初からやり直してください。
ディスカバラブル・モードのときに、Bluetoothボタンを押すと、スキャニング・モー
ドに切り替わります。
Scanning Mode (スキャニング・モード-LEDが素早く点滅-)
スキャニング・モードは、ペアリングが完了している状態でデバイスをBluetooth範囲内の外へ出してしまう、もしくは単純に接続が切れてしまった時に、以前ペアリングしたデバイスと再接続するときに有用なモードです。以前にID:Core BEAMとペアリングしたデバイスのBluetooth機能がオンの状態で、ID:Core BEAMがスキャニング・モードで待機している場合、ID:Core BEAMは周りのBluetoothデバイスをスキャンし、以前ペアリングをしたことがあるデバイスの中で最も新しいデバイスとペアリングを実行します。無事に再接続が完了すると、ID:Core BEAM本体から電子音が発音されます。
もし、お使いのID:Core BEAMがBluetoothデバイスとペアリングをしたことがある場合、電源を入れるとスキャニング・モードの状態で起動します。この時、Bluetoothの範囲内にペアリングをしたことがあるデバイスが存在する場合、自動的にペアリングが実行されます。
ID:Core BEAMとペアリングをしたことがないデバイスを使用する場合は、ディスカバラブル・モードに変更してからペアリングを実行してください。
ペアリングが完了している状態からペアリングを解除したい場合は、ID:Core BEAMのBluetoothボタンを長押しするか、デバイスのBluetooth機能をオフにしてください。ペアリングが解除されると、ID:Core BEAM本体から電子音が発音されます。
工場出荷時の状態へリセットを行った場合、ID:Core BEAMに保存されているペアリングしたデバイスについてのデータもリセットされます。再度ペアリングをする際は、初めから設定し直してください。。
17. Recall Indicator (リコール・インジケーター)
リコール・インジケーターは、現在のパラメーターとフロントパネルのノブ位置との間に差異があるかどうかを知らせます。例えば、異なったパッチへ変更すると、フロントパネルのコントロールノブは必ずしも実際に聞こえているセッティングを反映しません。
調整する際に予想外の位置までレベルを動かしてしまうことを避けるために、フロントパネルのノブは現在のパラメーターの位置になるまで効果がかからないようになっています。その位置にまで到達するとリコール・インジケーターは2回点滅して、ノブのコントロールが有効になり効果を増減させることが出来るようになります。
現在のパッチに保存している値の位置をノブが通過するたびにリコール・インジケーターが2回点滅して知らせます。したがって簡単に記憶されている値を確認することができます。
リコールはGAIN, VOLUME, ISFに働きます。
チューナー・モードの時もリコール・インジケーターは継続して点滅します。
Rear Panel (リア・パネル)
1.Power Switch (パワー・スイッチ)
このスイッチの白い丸が付いている方を押し込むと電源がオンになります。
2.DC input (DCインプット)
付属品のDCパワーサプライをここに接続します。
パワーサプライ本体に記載されている所定の電圧、周波数を満たしたコンセントに入れるようにしてください。不明な場合は、資格のある技術者からアドバイスを得てください。
3. Footcontroller (フットコントローラー)
別売フットコントローラー(FS-11)を使用すると下記2つのモードでいずれかのコントールの切り替えが出来ます。
Japa
nese
Japanese

6766
FS-11 スイッチ1 スイッチ2
初期モード INSIDER経由で選択した2つのパッチの切り替え
保存してあるパッチでのエフェクトのオン/オフ
オルタナティブ・モード パッチのダウン パッチのアップ
オルタナティブ・モードではBASS 2からClean Warmの間でPatchのアップダウンができます。
マニュアル・モードではフットコントローラーでの切り替えは最後の状況に左右されます。
パッチを切り替えるスイッチ(スイッチ1)を踏むとアンプはパッチ・モードに変わります。
(マニュアル・モードに戻るにはアンプ本体のMANUALスイッチを押してください)
エフェクト切替えのスイッチ(スイッチ2)を踏むとパッチ・モードへ戻らずにエフェクトのオン・オフが出来ます。
初期モードからオルタナティブ・モードへの切り替えはINSIDERで行えます。
Programmability (プログラムに関して)
Storing Patches(パッチの保存)
ID:Core BEAMは12種類のパッチを記憶させることが出来ます(各VOICEチャンネルに1つのパッチを記憶させることができます。)
現在のサウンドをパッチとして記憶させるにはMANUALボタンを2秒間押してください。
現在使用しているVOICE LEDが点滅すればパッチの保存が完了します。
パッチを記憶させると、同じ場所に入っていた情報を上書きすることになります。
パッチは、専用ソフトウェア INSIDERでも保存することが出来ます。
Recall Patches (パッチの呼び出し)
パッチ・モードにしてVOICEコントロールを好みのVOICEに合わせると、そのVOICEに保存したパッチが呼び出されます。
パッチは、INSIDERまたはフットコントローラーを使用して呼び出すことも可能です。
注意:パッチを呼び戻すには、MANUALスイッチのLEDが消灯していることを確認してください。MANUALスイッチのLEDが点灯している時(マニュアル・モードがオンの状態)でVOICEコントロールを回すと、選択したVOICEのみが作動し、パッチの呼び出しはできません 。
Japa
nese
USB Audio
標準的なオーディオ・ドライバーがPCやMacと接続するために使用されます。
特定のドライバーは要求されません。ローレイテンシーUSBレコーディングのガイドについては下記サイトを参照してください。
(www.blackstaramps.com/usbrecording)(英語サイト)
注意:常にPC本体のUSBポートと直接接続してください。
アンプは、レコーディング・ソフト内のひとつのオーディオ・キャプチャーとして現れます。
オーディオ・フォーマットはINSIDERを通じて変更でき、3つのモードから選べます。
■スピーカー・エミュレイテッド・ステレオエフェクト・オーディオ・チャンネル
■ 2 X モノラル・オーディオ・チャンネル
左チャンネル – エフェクトされたアンプからの信号
右チャンネル – ギターからの未加工信号
■ リアンプ・モード
Reamping (リアンプ)
アンプは、専用ソフトウェアINSIDERを経由してリアンプ・モードの選択ができます。これはプログラムできないセッティングで、USBケーブルを抜くかアンプ本体のスイッチをオフにした時に、リアンプがオフになります。リアンプ・モードにするとアンプはUSBを経由してパソコンに録音されたギターのドライ・モノラル信号を受け入れることができます。さらにアンプで加工した信号を送り返すことができます。この戻されたデータは接続されたPCやMacで使用しているレコーディング・ソフトでキャプチャーすることが出来ます。
Advanced Features (先進的な機能)
ID:Core BEAMには、より深く音楽を楽しむための先進的な機能が備わっています。これらの機能は、フロントパネル上に独立してコントロールが付いているわけではありませんが、TAPスイッチをPCのShiftキーのように使うことによって、これらの機能を使用することができます。
注 意 : 以 下の A d v a n c e d Feature(先進的な機能)を利用する場合は、
後述するFirmware Update (ファームウェアのアップデート) が必要な場合があります。
Japanese
STANDARDSTEREO

6968
Music Playback Super Wide Stereo Width – Tap + Voice (音楽再生する際のスーパーワイド・ステレオ効果の設定)
ID:Core BEAMは、Blackstar独自のスーパーワイド・ステレオと高い品質によって、音楽プレーヤーとしても驚くべき性能を持っています。スーパーワイド・ステレオの効果により、全方向から音楽が再生されて、音楽に体を包み込まれているかのような音楽体験をすることができます。このスーパーワイド・ステレオの効果は、好みに合わせて調整することも可能です。
スーパーワイド・ステレオ効果を変更したい場合は、コントロールパネル上のTAPスイッチを押しながら、ボイス・コントロールのノブを回してください。ボイス・コントロールのLEDランプがすべて緑の時は、通常のステレオ出力の設定になっています。ボイス・コントロールのノブを回すことによってLEDランプの色が真ん中から赤に変わっていき、スーパーワイド・ステレオの効果が徐々に多くなっていきます。TAPスイッチを押すのをやめると、その時のスーパーワイド・ステレオの設定が記憶されて、電源を落とすまで保存されます。スーパーワイド・ステレオの設定が記憶される瞬間は、再生されている音楽がミュートされます。
Independent Music Playback Volume – Tap + Volume (音楽再生のボリューム設定)
音楽を再生する際のボリュームの調整は、BluetoothまたはMP3ライン・インを通して接続した音楽デバイスのボリューム・コントロールで調整可能です。また、コントロールパネル上のTAPスイッチを押しながら、ボリューム・コントロールのノブを回すことによって、再生されている音楽のボリュームを下げることもできます。
USB Recording Level – Tap + Gain (USBレコーディング・レベルの設定)
ID:Core BEAMから出力されるボリュームと独立して、ID:Core BEAMからUSB端子を経由して出力されるアウトプットのレベルをコントロールすることが可能です。その際は、コントロールパネル上のTAPスイッチを押しながらゲイン・コントロールのノブを回してください。
Effect Speed/Time – Tap + Effects Level (エフェクト・レベルの設定)
ID:Core BEAMに搭載されているデジタルエフェクトのモジュレーションとディレイのスピードおよびタイムは、コントロールパネル上のTAPスイッチを押しながらレベル・コントロールのノブを回すこととによって調整することも可能です。通常のTAPスイッチの用途で調整するよりも、より細やかな調整ができます。
Japa
nese
Firmware Update (ファームウェアのアップデート)
ファームウェアのアップデートはBlackstar専用のソフトウェアINSIDERを通じて行われます。新バージョンがリリースされると、いつでもアップデートが可能になります。
アンプをUSB経由でINSIDERに接続し、アンプが旧バージョンのファームウェアと認識されると、最新ファイルをインストールするようメッセージが表示されます。アップデート中はアンプのコントロールはできません。アップデートの作業中はVOICE LEDが周回的に点灯します。
アップデートの最中はアンプ本体のパワー・スイッチをオフにしないでください。
アップデートの間にアンプの電源がオフになると、再び電源をオンにしてもコントロールは効かずアンプから音は出ません。VOICE LEDが周回的に点灯した場合はアンプに有効なファームウェアが搭載されていないことを示します。
もしファームウェア・アップデートの過程で問題が起こると、アンプはアップデート・モードにするために電源を入れなければなりません。ファームウェア・アップデートを開始するためにアンプをINSIDERに接続して、MANUAL(14)とMOD(6)ボタンを長押ししながらアンプ本体パワー・スイッチをオンにしてください。VOICE LEDが周回的に点灯すればアンプがアップデート・モードに入ったことを示します。
有効なファームウェアを入手するにはアンプをINSIDERソフトウェアに接続しなければなりません。INSIDERソフトウェアがアンプの状態を感知すれば自動的にアップデートを開始します。
Technical Specification (技術仕様)
ID: CORE BEAM
出力 : 2 x 10 Watts (Stereo 20 Watts)
重量 (kg) : 3.9 kg
サイズ (mm) : 291 (W) x 169 (H) x 166 (D)
フットスイッチ・コントローラー (別売) : FS-11 Footcontroller
Japanese

Deutsch
FrançaisJapanese
ID:CORE BEAM Front Panel
VOICE GAIN VOLUME EFFECTSEQ
ISFLEVEL LEVELTYPELEVEL
REVDIST
HOLD:STORE
B • E • A • M
Eng
lish
Fran
çais
Japa
nese
Deu
tsch
ID:CORE BEAM Rear Panel
English
6370

Blackstar Amplification Ltd, Beckett House, 14 Billing Road, Northampton, NN1 5AW, UKFor the latest information go to: www.blackstaramps.com
Whilst the information contained herein is correct at the time of publication, due to our policy of constant improvement and development, Blackstar Amplification Ltd reserves the right to alter specifications without prior notice.
Designed and Engineered byBlackstar Amplification UK
HB
K-1060 01/15
Owner’s Manual
B L U E T O O T H A M P L I F I E R