Embed Size (px)
Citation preview
www.sharkclean.com
Owner’s guideGuía del usuario
NV351
NV352
NV351_26_NV352_26_IM_ENG_SPA_101207.indd 1 10-12-08 9:32 AM
2 TOLL FREE: 1-800-798-7398
WHEN USING AN ELECTRICAL APPLIANCE, BASIC SAFETY PRECAUTIONS SHOULD ALWAYS BE OBSERVED, INCLUDING THE FOLLOWING:
READ ALL INSTRUCTIONS BEFORE USING YOUR SHARK® NAVIGATOR LIFT-AWAY
POLARIZED PLUG: To reduce the risk of electric shock, this appliance has a polarized plug (one blade is wider than the other). As a safety feature, this plug will fit into a polarized outlet only one way. If the plug does not fit fully into the outlet, reverse the plug. If it still does not fit, contact a qualified electrician. DO NOT force into outlet or try to modify to fit.
WARNING: To reduce the risk of electric shock or injury, do not use outdoors or on wet surfaces.
WARNING:TO REDUCE THE RISK OF FIRE, ELECTRIC SHOCK OR INJURY:
GENERAL ELECTRICAL SAFETY:
1. Unplug from electrical outlet when not in use and before servicing.
2. DO NOT use vacuum with a damaged cord or plug. If appliance is not working as it should, has been dropped, damaged, left outdoors, or dropped into water, return it to EURO-PRO Operating LLC for examination, repair, or adjustment.
3. DO NOT pull or carry vacuum by the cord.
4. DO NOT unplug by pulling on cord; to unplug, grasp the plug, not the cord.
5. DO NOT handle plug or appliance with wet hands.
6. DO NOT run the vacuum over the power cord.
7. DO NOT use the cord as a handle.
8. DO NOT close a door on the cord.
9. DO NOT pull cord around sharp corners. The use of an extension cord is not recommended.
10. DO NOT leave appliance when plugged in.
11. Keep cord away from heated surfaces.
12. Turn off all controls before plugging or unplugging vacuum cleaner.
13. Always turn off this appliance before connecting or disconnecting motorized nozzle.
14. Store your appliance with the power cord secured around the two cord holders-as shown in the storage instructions.
IMPORTANT SAFETY INSTRUCTIONSFor Household Use Only
NV351_26_NV352_26_IM_ENG_SPA_101207.indd 2 10-12-08 9:32 AM
TOLL FREE: 1-800-798-7398 3www.sharkclean.com
HOSE ATTACHMENTS:
1. DO NOT use if air flow is restricted; if the air paths, the hose, or the accessories become blocked, turn the vacuum cleaner off. Remove all obstructions before you turn on the unit again.
2. Keep the end of the hose and accessory openings away from face and body.
3. Keep cleaning tools and hose suction openings away from hair, face, fingers, uncovered feet, or loose clothing.
4. Only use manufacturer’s recommended attachments.
GENERAL USE:
1. Use only as described in this manual.
2. DO NOT put any objects into openings. DO NOT use with any opening blocked; keep free of dust, lint, hair, and anything that may reduce air flow.
3. Keep your work area well lit.
4. Keep the vacuum moving over the carpet surface at all times to avoid damaging the carpet fibers.
5. DO NOT place vacuum on unstable surfaces such as chairs or tables.
6. DO NOT allow young children to operate the vacuum or use as a toy. Close attention is necessary when used by or near children.
7. DO NOT use vacuum cleaner if it has been dropped, damaged, left outdoors, or submerged in water. Return to EURO-PRO Operating LLC for examination, repair, or adjustment.
8. DO NOT use without dust cup and/or filters in place.
DUST CUP/FILTERS/ACCESSORIES:
Before turning on the vacuum:
1. Make sure that all filters are thoroughly dry after routine cleaning.
2. Make sure that dust cup and all filters are in place after routine maintenance.
3. Make sure accessories are free of blockages.
4. Only use filters and accessories provided by EURO-PRO Operating LLC. [Failure to do so will void the warranty.]
GENERAL CLEANING:
1. DO NOT pick up large-sized objects.
2. DO NOT pick up hard or sharp objects such as glass, nails, screws or coins that could damage the vacuum cleaner.
3. DO NOT pick up smoking or burning objects such as hot coals, cigarette butts, or matches.
4. DO NOT pick up flammable or combustible materials such as lighter fluid, gasoline, or kerosene or use vacuum in areas where they may be present.
5. DO NOT pick up toxic solutions such as chlorine bleach, ammonia, or drain cleaner.
6. DO NOT use in an enclosed space where vapors are present from paint, paint thinner, moth-proofing substances, flammable dust or other explosive or toxic materials.
7. DO NOT vacuum up any liquids.
8. DO NOT immerse vacuum cleaner in water or other liquids.
9. DO NOT use outdoors or on wet surfaces; use only on dry surfaces.
10. Use extra care when cleaning on stairs.
SAVE THESE INSTRUCTIONS
English
NV351_26_NV352_26_IM_ENG_SPA_101207.indd 3 10-12-08 9:32 AM

4 TOLL FREE: 1-800-798-7398
This manual covers model number:
NV351 26
NV352 26
TECHNICAL SPECIFICATIONS
Voltage: 120V., 60Hz
Watts: 1200W
Amps: 10A
NV351_26_NV352_26_IM_ENG_SPA_101207.indd 4 10-12-08 9:32 AM
TOLL FREE: 1-800-798-7398 5www.sharkclean.com
Contents
Thank you for purchasing the Shark® Navigator Lift-Away.
English
Getting Started 6
Mode 1: Upright Vac 8
Mode 2: Detachable Canister 10
Above-Floor Cleaning 11
With Floor Nozzle 11
Storing 12
Maintenance 12
Emptying the Dust Cup 13
Cleaning the Pre-Motor Filters 13
Cleaning the Post-Motor HEPA Filter 14
Cleaning the Turbo Brush 14
Cleaning the Motorized Floor Brush 15
Checking for Blockages 15
Ordering Parts 16
Troubleshooting Guide 17
Warranty 18
NV351_26_NV352_26_IM_ENG_SPA_101207.indd 5 10-12-08 9:32 AM
6 TOLL FREE: 1-800-798-7398
Getting Started
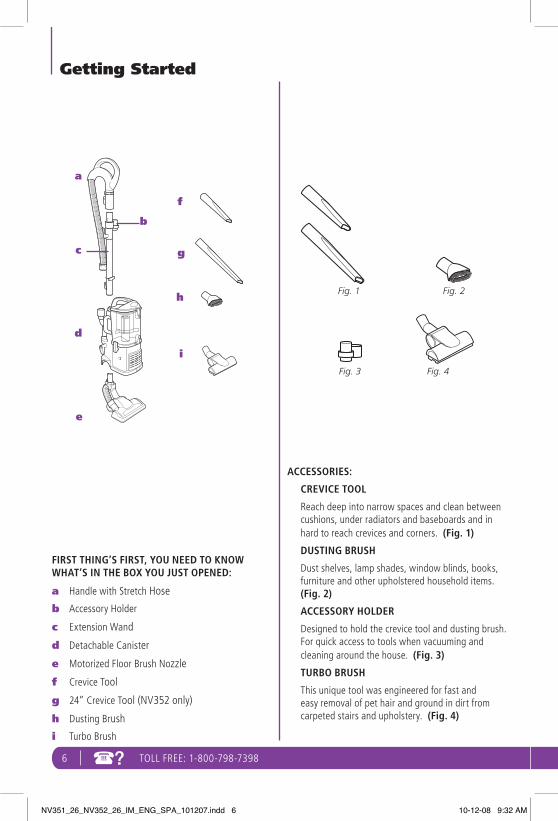
FIRST THING’S FIRST, YOU NEED TO KNOW WHAT’S IN THE BOX YOU JUST OPENED:
a Handle with Stretch Hose
b Accessory Holder
c Extension Wand
d Detachable Canister
e Motorized Floor Brush Nozzle
f Crevice Tool
g 24” Crevice Tool (NV352 only)
h Dusting Brush
i Turbo Brush
i
f
h
ACCESSORIES:
CREVICE TOOL
Reach deep into narrow spaces and clean between cushions, under radiators and baseboards and in hard to reach crevices and corners. (Fig. 1)
DUSTING BRUSH
Dust shelves, lamp shades, window blinds, books, furniture and other upholstered household items. (Fig. 2)
ACCESSORY HOLDER
Designed to hold the crevice tool and dusting brush. For quick access to tools when vacuuming and cleaning around the house. (Fig. 3)
TURBO BRUSH
This unique tool was engineered for fast and easy removal of pet hair and ground in dirt from carpeted stairs and upholstery. (Fig. 4)
Fig. 1
Fig. 4
Fig. 2
Fig. 3
a
e
c
d
b
g
NV351_26_NV352_26_IM_ENG_SPA_101207.indd 6 10-12-08 9:32 AM
TOLL FREE: 1-800-798-7398 7www.sharkclean.com
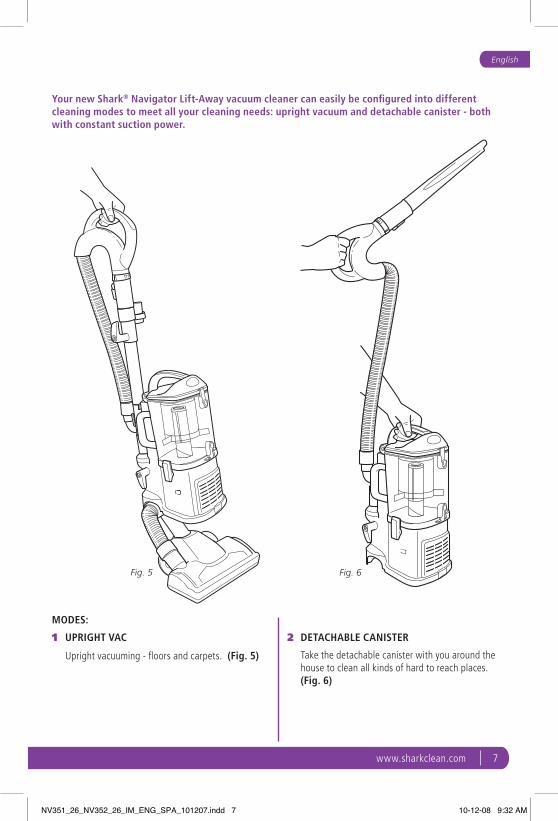
Your new Shark® Navigator Lift-Away vacuum cleaner can easily be configured into different cleaning modes to meet all your cleaning needs: upright vacuum and detachable canister - both with constant suction power.
MODES:
1 UPRIGHT VAC
Upright vacuuming - floors and carpets. (Fig. 5)
Fig. 5 Fig. 6
2 DETACHABLE CANISTER
Take the detachable canister with you around the house to clean all kinds of hard to reach places. (Fig. 6)
English
NV351_26_NV352_26_IM_ENG_SPA_101207.indd 7 10-12-08 9:32 AM
8 TOLL FREE: 1-800-798-7398
Mode 1: Upright Vac
To reduce the risk of electric shock, unplug the unit before assembling, adding or removing attachments or converting modes.
WARNING: The On/Off switch is on the top of the detachable canister. Always ensure the power is OFF (“O” position) before plugging and unplugging.
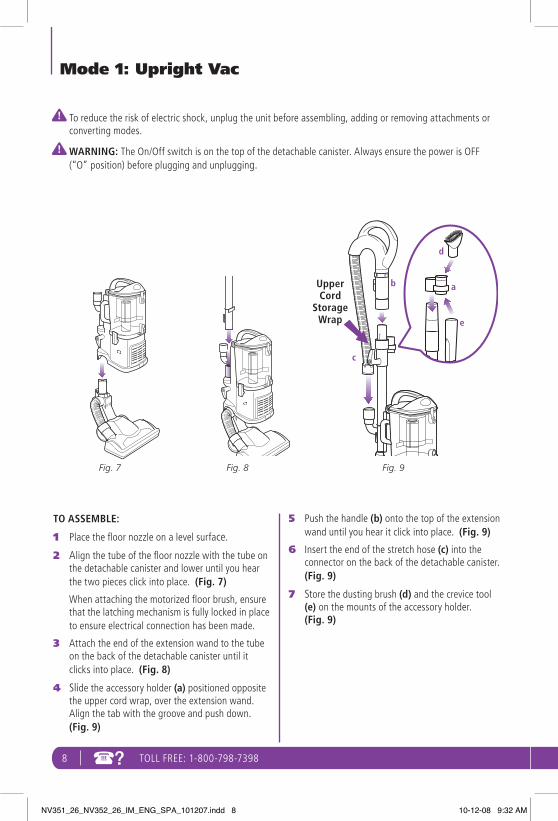
TO ASSEMBLE:
1 Place the floor nozzle on a level surface.
2 Align the tube of the floor nozzle with the tube on the detachable canister and lower until you hear the two pieces click into place. (Fig. 7)
When attaching the motorized floor brush, ensure that the latching mechanism is fully locked in place to ensure electrical connection has been made.
3 Attach the end of the extension wand to the tube on the back of the detachable canister until it clicks into place. (Fig. 8)
4 Slide the accessory holder (a) positioned opposite the upper cord wrap, over the extension wand. Align the tab with the groove and push down. (Fig. 9)
5 Push the handle (b) onto the top of the extension wand until you hear it click into place. (Fig. 9)
6 Insert the end of the stretch hose (c) into the connector on the back of the detachable canister. (Fig. 9)
7 Store the dusting brush (d) and the crevice tool (e) on the mounts of the accessory holder. (Fig. 9)
Fig. 7 Fig. 8 Fig. 9
ab
c
Upper Cord
Storage Wrap
d
e
NV351_26_NV352_26_IM_ENG_SPA_101207.indd 8 10-12-08 9:32 AM

TOLL FREE: 1-800-798-7398 9www.sharkclean.com
TO USE:
1 Rotate the cord release to quickly release the power cord.
2 Secure the power cord in the cord hook (a). (Fig. 10)
= Brush Roll ON
= Bare Floor
= OFF
3 Press the On/Off switch (b) to the “I” position to vacuum bare floors (straight suction only) or to the “II” position to engage the motorized floor brush (for vacuuming carpets and rugs). (Fig. 10)
IMPORTANT: The motorized brush indicator light (c) will illuminate green when motorized floor brush is on, or red if there is a blockage or jam. (Fig. 10) This feature is designed to protect your Lifetime Belt that powers your motorized floor brush. See Checking for Blockages on page 15.
4 Gently press the floor nozzle down with your foot while you grasp the handle and tilt it back towards you. (Fig. 11)
NOTE: The rotating brush on the motorized floor brush will not spin unless the nozzle is flat against the floor and the handle is tilted back.
5 Due to the huge suction power of this vacuum, it may become necessary at times to adjust the suction release (d) on the handle. (Fig. 10) If the vacuum seems difficult to push or pull or if it is lifting up area rugs, adjust the suction release by rotating the collar 90° counterclockwise to open the valve. Rotate the collar clockwise to close the valve when you need high suction and for vacuuming floors.
6 Empty dust cup after vacuuming and periodically during use when it appears full. (See “Maintenance” section for instructions.)
7 When you are finished vacuuming, turn the vacuum off.
Fig. 11
English
Fig. 10
c
Cord Hook Suction
Release Collar
da
b
Release suction for easier push & pull on high pile carpets and area rugs.
NV351_26_NV352_26_IM_ENG_SPA_101207.indd 9 10-12-08 9:32 AM
10 TOLL FREE: 1-800-798-7398
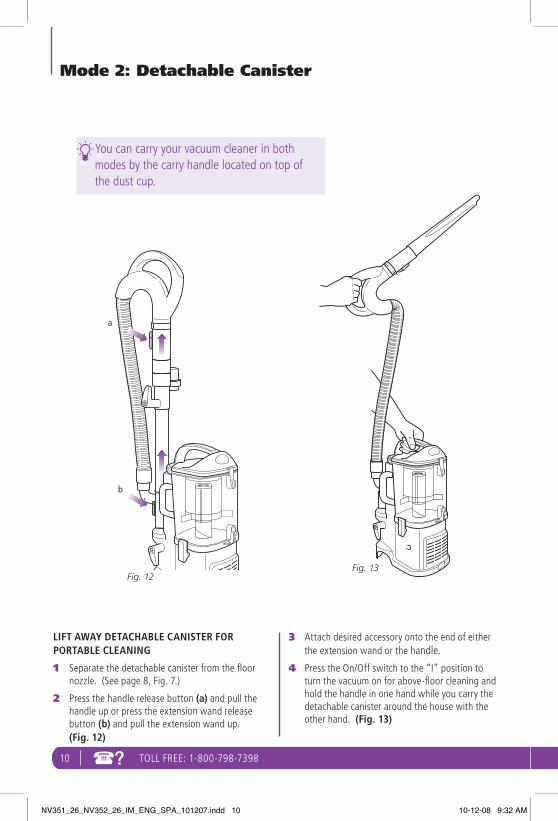
LIFT AWAY DETACHABLE CANISTER FOR PORTABLE CLEANING
1 Separate the detachable canister from the floor nozzle. (See page 8, Fig. 7.)
2 Press the handle release button (a) and pull the handle up or press the extension wand release button (b) and pull the extension wand up. (Fig. 12)
3 Attach desired accessory onto the end of either the extension wand or the handle.
4 Press the On/Off switch to the “I” position to turn the vacuum on for above-floor cleaning and hold the handle in one hand while you carry the detachable canister around the house with the other hand. (Fig. 13)
b
Mode 2: Detachable Canister
You can carry your vacuum cleaner in both modes by the carry handle located on top of the dust cup.
Fig. 13
a
Fig. 12
NV351_26_NV352_26_IM_ENG_SPA_101207.indd 10 10-12-08 9:32 AM
TOLL FREE: 1-800-798-7398 11www.sharkclean.com
Above-Floor Cleaning
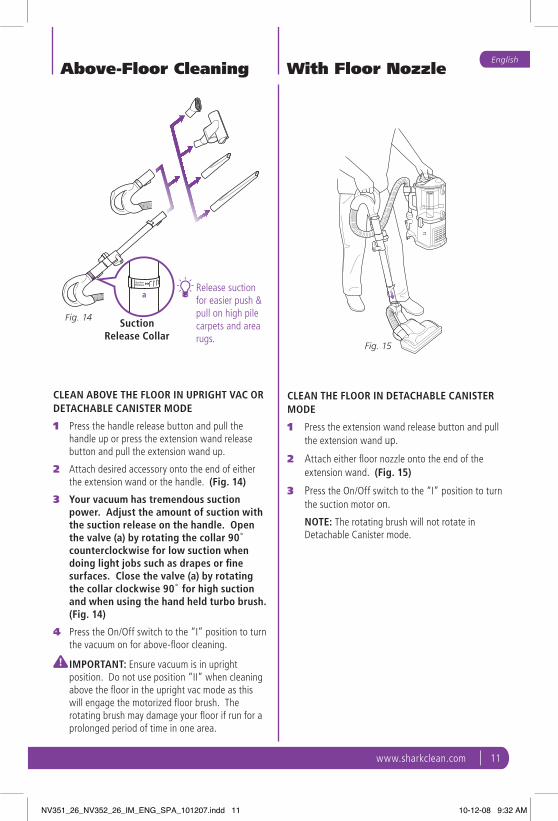
CLEAN THE FLOOR IN DETACHABLE CANISTER MODE
1 Press the extension wand release button and pull the extension wand up.
2 Attach either floor nozzle onto the end of the extension wand. (Fig. 15)
3 Press the On/Off switch to the “I” position to turn the suction motor on.
NOTE: The rotating brush will not rotate in Detachable Canister mode.
With Floor Nozzle
Fig. 15
English
CLEAN ABOVE THE FLOOR IN UPRIGHT VAC OR DETACHABLE CANISTER MODE
1 Press the handle release button and pull the handle up or press the extension wand release button and pull the extension wand up.
2 Attach desired accessory onto the end of either the extension wand or the handle. (Fig. 14)
3 Your vacuum has tremendous suction power. Adjust the amount of suction with the suction release on the handle. Open the valve (a) by rotating the collar 90˚ counterclockwise for low suction when doing light jobs such as drapes or fine surfaces. Close the valve (a) by rotating the collar clockwise 90˚ for high suction and when using the hand held turbo brush. (Fig. 14)
4 Press the On/Off switch to the “I” position to turn the vacuum on for above-floor cleaning.
IMPORTANT: Ensure vacuum is in upright position. Do not use position “II” when cleaning above the floor in the upright vac mode as this will engage the motorized floor brush. The rotating brush may damage your floor if run for a prolonged period of time in one area.
Release suction for easier push & pull on high pile carpets and area rugs.
Fig. 14 SuctionRelease Collar
a
NV351_26_NV352_26_IM_ENG_SPA_101207.indd 11 10-12-08 9:32 AM
12 TOLL FREE: 1-800-798-7398
To reduce the risk of electric shock, unplug the unit before performing any cleaning, maintenance, or troubleshooting checks.
Reassemble all parts securely before operating vacuum.
DO NOT operate the vacuum without the pre-motor filters and dust cup in place.
DO NOT operate the vacuum with WET filters.
IMPORTANT: Make sure all filters are completely dry before inserting back into vacuum.
WARNING: Never insert sharp objects into any opening to clear an obstruction.
IMPORTANT: Damages caused while clearing or attempting to clear blockages are not covered under your product’s limited warranty.
Fig. 17 Fig. 18
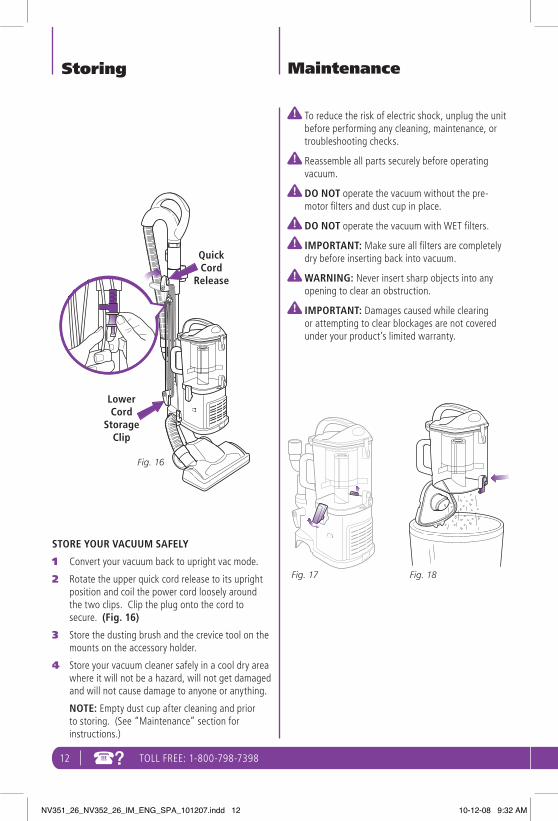
Storing
Quick Cord
Release
Fig. 16
Maintenance
STORE YOUR VACUUM SAFELY
1 Convert your vacuum back to upright vac mode.
2 Rotate the upper quick cord release to its upright position and coil the power cord loosely around the two clips. Clip the plug onto the cord to secure. (Fig. 16)
3 Store the dusting brush and the crevice tool on the mounts on the accessory holder.
4 Store your vacuum cleaner safely in a cool dry area where it will not be a hazard, will not get damaged and will not cause damage to anyone or anything.
NOTE: Empty dust cup after cleaning and prior to storing. (See “Maintenance” section for instructions.)
Lower Cord
Storage Clip
NV351_26_NV352_26_IM_ENG_SPA_101207.indd 12 10-12-08 9:32 AM
TOLL FREE: 1-800-798-7398 13www.sharkclean.com
English
COMPONENT MAINTENANCE SCHEDULE
Rinse and air dry every 3 months under normal use.
Empty each time you vacuum.
Pre-Motor Foam Filter
Dust Cup
Rinse and air dry every 3 months under normal use.Pre-Motor Felt Filter
Clean once every 2 years or as needed.Post-Motor HEPA Filter
1
2
3
4
CLEANING THE PRE-MOTOR FILTERS
1 Remove the dust cup.
2 Pull the 2 filters out from the top of the motor base. (Fig. 20)
3 Rinse the filters thoroughly in lukewarm water until the water runs clear.
DO NOT put the filter in the washing machine or dishwasher.
NOTE: The material in the filter will discolor over time. This is NORMAL and will not affect the performance of the filter.
4 Squeeze out excess water and let air-dry for at least 24 hours before replacing. Do not use a hair dryer or other heating methods to dry.
5 Place the felt filter in first, then the foam filter.
6 Replace the dust cup.
EMPTYING THE DUST CUP
The dust cup needs to be emptied each time you vacuum and periodically during cleaning, when the dust cup appears full.
1 Undo the latches on the sides of the dust cup by lifting them up and outwards to remove the dust cup from the motor base. (Fig. 17)
2 Hold the dust cup over a trash receptacle and press the bottom door release button. (Fig. 18) Tap gently to empty contents. Press the door shut again until it clicks.
3 If needed, turn the dust cup upside down over the trash receptacle and press the top door release button. (Fig. 19) Tap gently to remove contents.
Use a dry cloth or paper towel to remove debris stuck to the screen filter inside the dust cup. Press the door shut again until it clicks.
4 Replace the dust cup on top of the motor base. Hook the two latches onto the tabs on the sides of the dust cup and push down to lock.
ScreenFilter
Fig. 19 Fig. 20
Pre-Motor Foam Filter Felt Filter
Post MotorHEPA Filter
NV351_26_NV352_26_IM_ENG_SPA_101207.indd 13 10-12-08 9:32 AM
14 TOLL FREE: 1-800-798-7398
Maintenance - cont’d
Fig. 22
Fig. 21
Fig. 23
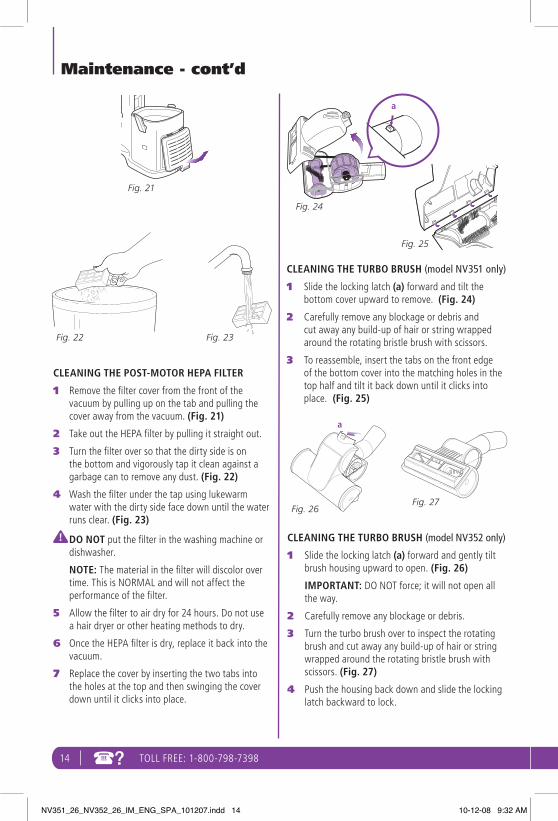
CLEANING THE POST-MOTOR HEPA FILTER
1 Remove the filter cover from the front of the vacuum by pulling up on the tab and pulling the cover away from the vacuum. (Fig. 21)
2 Take out the HEPA filter by pulling it straight out.
3 Turn the filter over so that the dirty side is on the bottom and vigorously tap it clean against a garbage can to remove any dust. (Fig. 22)
4 Wash the filter under the tap using lukewarm water with the dirty side face down until the water runs clear. (Fig. 23)
DO NOT put the filter in the washing machine or dishwasher.
NOTE: The material in the filter will discolor over time. This is NORMAL and will not affect the performance of the filter.
5 Allow the filter to air dry for 24 hours. Do not use a hair dryer or other heating methods to dry.
6 Once the HEPA filter is dry, replace it back into the vacuum.
7 Replace the cover by inserting the two tabs into the holes at the top and then swinging the cover down until it clicks into place.
Fig. 27Fig. 26
a
CLEANING THE TURBO BRUSH (model NV352 only)
1 Slide the locking latch (a) forward and gently tilt brush housing upward to open. (Fig. 26)
IMPORTANT: DO NOT force; it will not open all the way.
2 Carefully remove any blockage or debris.
3 Turn the turbo brush over to inspect the rotating brush and cut away any build-up of hair or string wrapped around the rotating bristle brush with scissors. (Fig. 27)
4 Push the housing back down and slide the locking latch backward to lock.
CLEANING THE TURBO BRUSH (model NV351 only)
1 Slide the locking latch (a) forward and tilt the bottom cover upward to remove. (Fig. 24)
2 Carefully remove any blockage or debris and cut away any build-up of hair or string wrapped around the rotating bristle brush with scissors.
3 To reassemble, insert the tabs on the front edge of the bottom cover into the matching holes in the top half and tilt it back down until it clicks into place. (Fig. 25)
Fig. 25
Fig. 24
a
NV351_26_NV352_26_IM_ENG_SPA_101207.indd 14 10-12-08 9:32 AM
TOLL FREE: 1-800-798-7398 15www.sharkclean.com
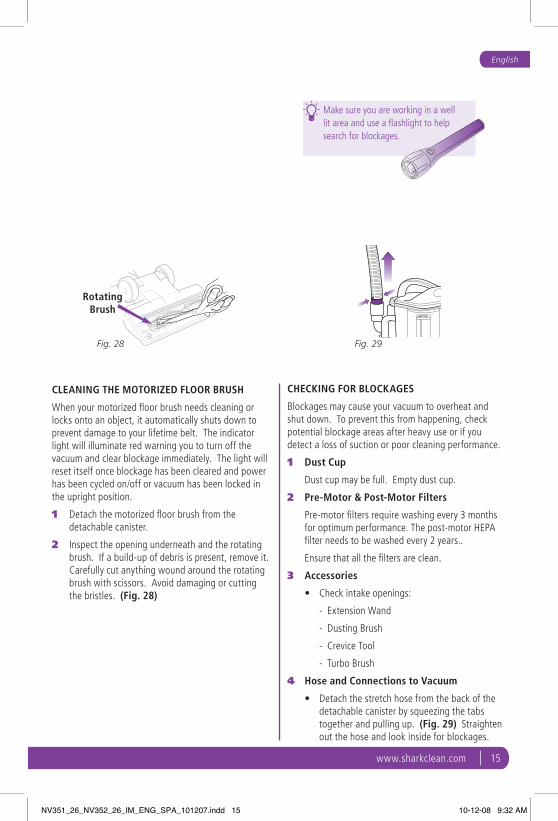
Make sure you are working in a well lit area and use a flashlight to help search for blockages.
CLEANING THE MOTORIZED FLOOR BRUSH
When your motorized floor brush needs cleaning or locks onto an object, it automatically shuts down to prevent damage to your lifetime belt. The indicator light will illuminate red warning you to turn off the vacuum and clear blockage immediately. The light will reset itself once blockage has been cleared and power has been cycled on/off or vacuum has been locked in the upright position.
1 Detach the motorized floor brush from the detachable canister.
2 Inspect the opening underneath and the rotating brush. If a build-up of debris is present, remove it. Carefully cut anything wound around the rotating brush with scissors. Avoid damaging or cutting the bristles. (Fig. 28)
CHECKING FOR BLOCKAGES
Blockages may cause your vacuum to overheat and shut down. To prevent this from happening, check potential blockage areas after heavy use or if you detect a loss of suction or poor cleaning performance.
1 Dust Cup
Dust cup may be full. Empty dust cup.
2 Pre-Motor & Post-Motor Filters
Pre-motor filters require washing every 3 months for optimum performance. The post-motor HEPA filter needs to be washed every 2 years..
Ensure that all the filters are clean.
3 Accessories
• Check intake openings:
- Extension Wand
- Dusting Brush
- Crevice Tool
- Turbo Brush
4 Hose and Connections to Vacuum
• Detach the stretch hose from the back of the detachable canister by squeezing the tabs together and pulling up. (Fig. 29) Straighten out the hose and look inside for blockages.
RotatingBrush
Fig. 28 Fig. 29
English
NV351_26_NV352_26_IM_ENG_SPA_101207.indd 15 10-12-08 9:32 AM
16 TOLL FREE: 1-800-798-7398
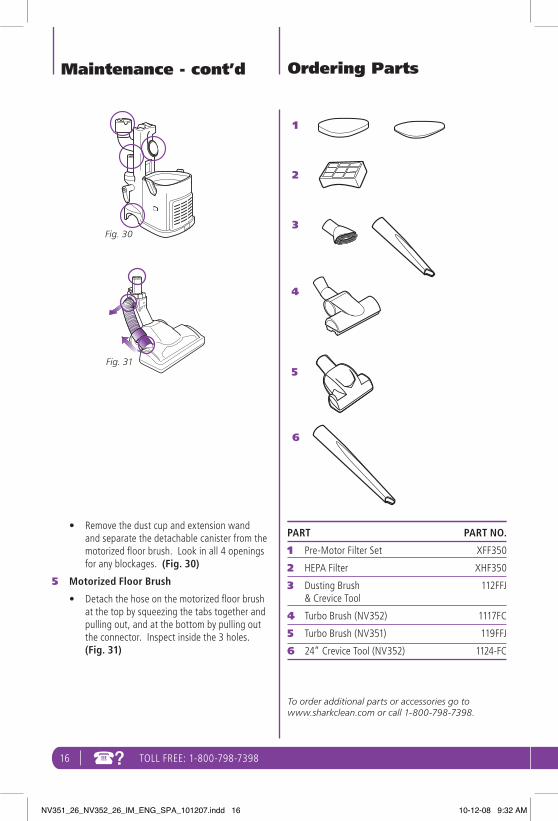
4
3
• Remove the dust cup and extension wand and separate the detachable canister from the motorized floor brush. Look in all 4 openings for any blockages. (Fig. 30)
5 Motorized Floor Brush
• Detach the hose on the motorized floor brush at the top by squeezing the tabs together and pulling out, and at the bottom by pulling out the connector. Inspect inside the 3 holes. (Fig. 31)
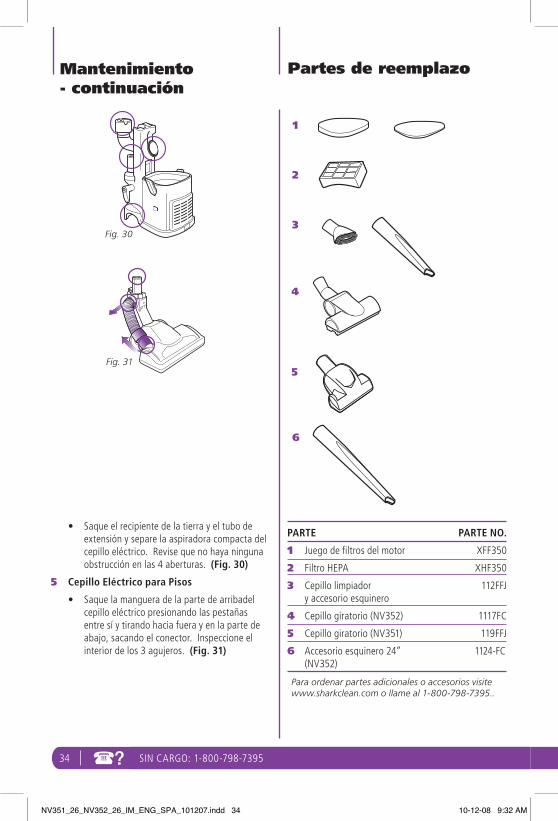
Fig. 31
Maintenance - cont’d Ordering Parts
Fig. 30
1
2
PART PART NO.
1 Pre-Motor Filter Set XFF350
2 HEPA Filter XHF350
3 Dusting Brush 112FFJ & Crevice Tool
4 Turbo Brush (NV352) 1117FC
5 Turbo Brush (NV351) 119FFJ
6 24” Crevice Tool (NV352) 1124-FC
To order additional parts or accessories go to www.sharkclean.com or call 1-800-798-7398.
5
6
NV351_26_NV352_26_IM_ENG_SPA_101207.indd 16 10-12-08 9:32 AM
TOLL FREE: 1-800-798-7398 17www.sharkclean.com
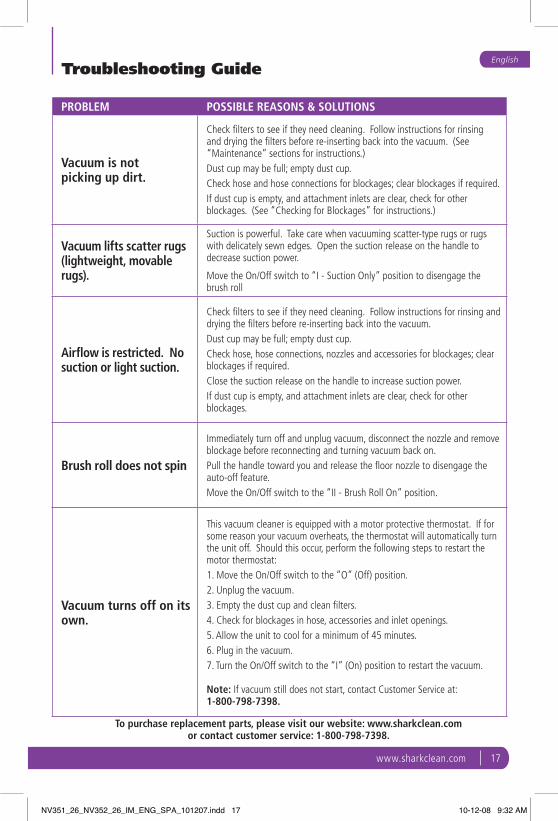
Troubleshooting Guide
To purchase replacement parts, please visit our website: www.sharkclean.com or contact customer service: 1-800-798-7398.
English
PROBLEM POSSIBLE REASONS & SOLUTIONS
Vacuum is not picking up dirt.
Check filters to see if they need cleaning. Follow instructions for rinsing and drying the filters before re-inserting back into the vacuum. (See “Maintenance” sections for instructions.)Dust cup may be full; empty dust cup.Check hose and hose connections for blockages; clear blockages if required.If dust cup is empty, and attachment inlets are clear, check for other blockages. (See “Checking for Blockages” for instructions.)
Vacuum lifts scatter rugs (lightweight, movable rugs).
Suction is powerful. Take care when vacuuming scatter-type rugs or rugs with delicately sewn edges. Open the suction release on the handle to decrease suction power.
Move the On/Off switch to “I - Suction Only” position to disengage the brush roll
Airflow is restricted. No suction or light suction.
Check filters to see if they need cleaning. Follow instructions for rinsing and drying the filters before re-inserting back into the vacuum. Dust cup may be full; empty dust cup.Check hose, hose connections, nozzles and accessories for blockages; clear blockages if required.Close the suction release on the handle to increase suction power.If dust cup is empty, and attachment inlets are clear, check for other blockages.
Brush roll does not spin
Immediately turn off and unplug vacuum, disconnect the nozzle and remove blockage before reconnecting and turning vacuum back on. Pull the handle toward you and release the floor nozzle to disengage the auto-off feature.Move the On/Off switch to the “II - Brush Roll On” position.
Vacuum turns off on its own.
This vacuum cleaner is equipped with a motor protective thermostat. If for some reason your vacuum overheats, the thermostat will automatically turn the unit off. Should this occur, perform the following steps to restart the motor thermostat:1. Move the On/Off switch to the “O” (Off) position.2. Unplug the vacuum.3. Empty the dust cup and clean filters. 4. Check for blockages in hose, accessories and inlet openings. 5. Allow the unit to cool for a minimum of 45 minutes. 6. Plug in the vacuum. 7. Turn the On/Off switch to the “I” (On) position to restart the vacuum.
Note: If vacuum still does not start, contact Customer Service at: 1-800-798-7398.
NV351_26_NV352_26_IM_ENG_SPA_101207.indd 17 10-12-08 9:32 AM
18 TOLL FREE: 1-800-798-7398
EURO-PRO FIVE-YEAR (5) LIMITED WARRANTY
EURO-PRO Operating LLC warrants this product to be free from material defects and workmanship for a period of five (5) years from the date of purchase when utilized for normal household use, subject to the following conditions, exclusions and exceptions.
The liability of EURO-PRO Operating LLC is limited solely to the cost of the repair or replacement of the unit at our option. This Limited Warranty does not cover normal wear of parts and does not apply to any unit that has been tampered with or used for commercial purposes. This Limited Warranty does not cover damage caused by misuse, abuse, negligent handling or damage due to faulty packaging or mishandling in transit. This Limited Warranty does not cover damage or defects caused by or resulting from damages from shipping or repairs, service or alteration to the product or any of its parts, which have been performed by a repair person not authorized by EURO-PRO Operating LLC.
If your appliance fails to operate properly while in use under normal household conditions within the warranty period, you may return the complete appliance and accessories with proof of purchase and date, freight prepaid. For customer service support, call 1-800-798-7398 or visit our website at www.sharkclean.com.
If the appliance is found by EURO-PRO Operating LLC to be defective, in EURO-PRO Operating LLC’s sole discretion, we will repair or replace it free of charge. Proof of purchase date and a check made payable to EURO-PRO Operating LLC in the amount of $19.95 to cover the cost of return shipping and handling must be included.*
Non-durable parts including, without limitation, filters, brushes and electrical parts which normally require replacement are specifically excluded from warranty.
This Limited Warranty is extended to the original purchaser of the unit and excludes all other legal, implied and/or conventional warranties. The responsibility of EURO-PRO Operating LLC if any, is limited to the specific obligations expressly assumed by it under the terms of this Limited Warranty. In no event is EURO-PRO Operating LLC liable for incidental or consequential damages to anyone of any nature whatsoever. Some states do not permit the exclusion or limitation of incidental or consequential damages, so the above may not apply to you.
This Limited Warranty gives you specific legal rights, and you may also have other rights which vary from state to state or province to province.
*IMPORTANT: Carefully pack item to avoid damage in shipping. Be sure to include proof of purchase date and to attach a tag to item before packing including your name, complete address and phone number with a note giving purchase information, model number and what you believe is the problem with the item. We recommend you insure the package (as damage in shipping is not covered by your warranty). Mark the outside of your package “ATTENTION CUSTOMER SERVICE”. We are constantly striving to improve our products, therefore the specifications contained herein are subject to change without notice.
Product Registration
Please visit www.sharkclean.com or call 1-800-798-7398 to register your new Shark® product within ten (10) days of purchase. You will be asked to provide the store name, date of purchase and model number along with your name and address.
The registration will enable us to contact you in the unlikely event of a product safety notification. By registering you acknowledge to have read and understood the instructions for use, and warnings set forth in the accompanying instructions.
NV351_26_NV352_26_IM_ENG_SPA_101207.indd 18 10-12-08 9:32 AM
TOLL FREE: 1-800-798-7398 19www.sharkclean.com
Notes
NV351_26_NV352_26_IM_ENG_SPA_101207.indd 19 10-12-08 9:32 AM
20 TOLL FREE: 1-800-798-7398
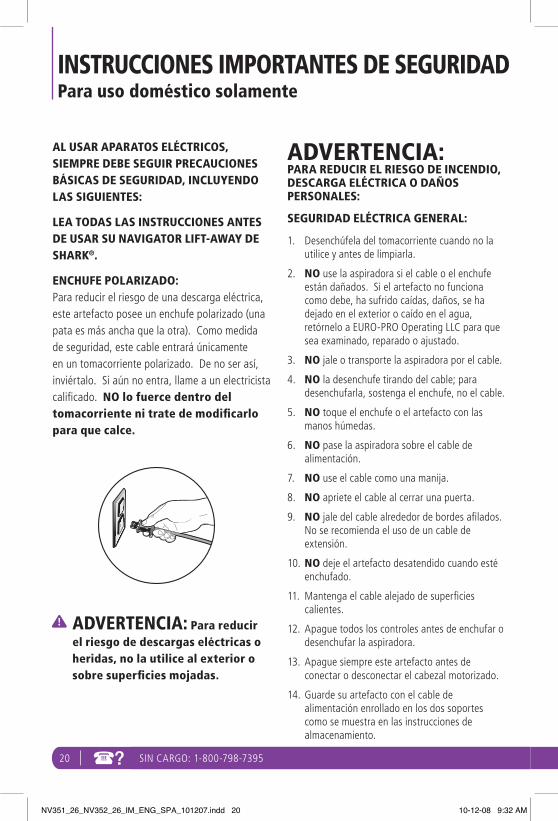
AL USAR APARATOS ELÉCTRICOS, SIEMPRE DEBE SEGUIR PRECAUCIONES BÁSICAS DE SEGURIDAD, INCLUYENDO LAS SIGUIENTES:
LEA TODAS LAS INSTRUCCIONES ANTES DE USAR SU NAVIGATOR LIFT-AWAY DE SHARK®.
ENCHUFE POLARIZADO: Para reducir el riesgo de una descarga eléctrica, este artefacto posee un enchufe polarizado (una pata es más ancha que la otra). Como medida de seguridad, este cable entrará únicamente en un tomacorriente polarizado. De no ser así, inviértalo. Si aún no entra, llame a un electricista calificado. NO lo fuerce dentro del tomacorriente ni trate de modificarlo para que calce.
ADVERTENCIA: Para reducir el riesgo de descargas eléctricas o heridas, no la utilice al exterior o sobre superficies mojadas.
ADVERTENCIA: PARA REDUCIR EL RIESGO DE INCENDIO, DESCARGA ELÉCTRICA O DAÑOS PERSONALES:
SEGURIDAD ELÉCTRICA GENERAL:
1. Desenchúfela del tomacorriente cuando no la utilice y antes de limpiarla.
2. NO use la aspiradora si el cable o el enchufe están dañados. Si el artefacto no funciona como debe, ha sufrido caídas, daños, se ha dejado en el exterior o caído en el agua, retórnelo a EURO-PRO Operating LLC para que sea examinado, reparado o ajustado.
3. NO jale o transporte la aspiradora por el cable.
4. NO la desenchufe tirando del cable; para desenchufarla, sostenga el enchufe, no el cable.
5. NO toque el enchufe o el artefacto con las manos húmedas.
6. NO pase la aspiradora sobre el cable de alimentación.
7. NO use el cable como una manija.
8. NO apriete el cable al cerrar una puerta.
9. NO jale del cable alrededor de bordes afilados. No se recomienda el uso de un cable de extensión.
10. NO deje el artefacto desatendido cuando esté enchufado.
11. Mantenga el cable alejado de superficies calientes.
12. Apague todos los controles antes de enchufar o desenchufar la aspiradora.
13. Apague siempre este artefacto antes de conectar o desconectar el cabezal motorizado.
14. Guarde su artefacto con el cable de alimentación enrollado en los dos soportes como se muestra en las instrucciones de almacenamiento.
INSTRUCCIONES IMPORTANTES DE SEGURIDADPara uso doméstico solamente
SIN CARGO: 1-800-798-7395
NV351_26_NV352_26_IM_ENG_SPA_101207.indd 20 10-12-08 9:32 AM
TOLL FREE: 1-800-798-7398 21www.sharkclean.com
ACCESORIOS PARA LA MANGUERA:
1. NO los use si el flujo de aire está restringido; si las aberturas de circulación de aire, la manguera o los accesorios se tapan, apague la aspiradora. Saque todas las obstrucciones antes de volver a encender la unidad.
2. Mantenga el extremo de la manguera y las aberturas de los accesorios alejados de la cara y del cuerpo.
3. Mantenga las herramientas de limpieza y las aberturas de succión de la manguera alejados del cabello, la cara, los dedos, los pies o ropa suelta.
4. Use únicamente los accesorios recomendados por el fabricante.
USO GENERAL:
1. Utilícela solamente como se indica en este manual.
2. NO introduzca ningún objeto en las ranuras. NO la use con ninguna abertura tapada; manténgalas libres de polvo, pelusa, pelos y cualquier otra cosa que pudiera reducir el flujo de aire.
3. Mantenga el área de trabajo bien iluminada.
4. Mantenga la aspiradora en movimiento sobre la superficie de la alfombra todo el tiempo para evitar dañar las fibras de la alfombra.
5. NO coloque la aspiradora sobre superficies inestables como sillas o mesas.
6. NO permita que los niños pequeños usen la aspiradora o que se utilice como un juguete. Debe tener mucho cuidado al ser utilizada por o cerca de niños.
7. NO utilice la aspiradora si se ha caído, dañado, dejado en el exterior o sumergido en agua. Retórnela a EURO-PRO Operating LLC para que sea examinada, reparada o ajustada.
8. NO la utilice sin el recipiente de la tierra y/o los filtros instalados en su lugar.
RECIPIENTE PARA LA TIERRA/FILTROS/ACCESORIOS:
Antes de encender la aspiradora:
1. Verifique que todos los filtros estén completamente secos luego de limpiarlos.
2. Verifique que el recipiente para la tierra y todos los filtros estén en su lugar luego de realizar el mantenimiento de rutina.
3. Verifique que los accesorios no estén tapados.
4. Use únicamente filtros y accesorios proporcionados por EURO-PRO Operating LLC. [El no hacerlo invalidará la garantía.]
LIMPIEZA GENERAL:
1. NO aspire objetos muy grandes.
2. NO aspire objetos duros o filosos como vidrios, clavos, tornillos, monedas, los que podrían dañar la aspiradora.
3. NO aspire objetos con fuego o humeantes tales como carbón caliente, colillas de cigarrillos o fósforos.
4. NO aspire materiales inflamables o combustibles como líquido para encendedor o kerosene, ni use la aspiradora en áreas en las cuales puedan estar presentes.
5. NO la use para aspirar soluciones tóxicas tales como lavandina, amoníaco o destapa cañerías.
6. NO la use en lugares cerrados y con vapores de pintura, diluyente de pintura, substancias antipolilla, polvo inflamable u otros materiales explosivos o tóxicos.
7. NO aspire ningún líquido.
8. NO sumerja la aspiradora en agua o ningún otro líquido.
9. NO la use en el exterior o en superficies mojadas; úsela únicamente en superficies secas.
10. Tenga especial cuidado al limpiar escaleras.
CONSERVE ESTAS INSTRUCCIONES
INSTRUCCIONES IMPORTANTES DE SEGURIDADPara uso doméstico solamente
Español
NV351_26_NV352_26_IM_ENG_SPA_101207.indd 21 10-12-08 9:32 AM

22 TOLL FREE: 1-800-798-7398SIN CARGO: 1-800-798-7395
Este manual cubre el modelos:
NV351 26
NV352 26
ESPECIFICACIONES TÉCNICAS
Voltage: 120V., 60Hz
Vatio: 1200W
Amperio: 10A
NV351_26_NV352_26_IM_ENG_SPA_101207.indd 22 10-12-08 9:32 AM
TOLL FREE: 1-800-798-7398 23www.sharkclean.com
Table des matières Español
Gracias por haber comprado la Shark® Navigator Lift-Away.
Procedimientos iniciales 24
Modo 1: Aspiradora vertical 26
Modo 2: Aspiradora compacta 28
Limpieza por encima del piso 29
Con boquillas para el piso 29
Almacenamiento 30
Mantenimiento 30
Vaciado del recipiente de la tierra 31
Limpieza de los filtros del motor 31
Limpieza del filtro hepa de salida 32
Limpieza del cepillo giratorio 32
Limpieza del cepillo eléctrico 33
Verificación de obstrucciones 33
Ordenando partes 34
Guía de diagnóstico de problemas 35
Garantía 36
NV351_26_NV352_26_IM_ENG_SPA_101207.indd 23 10-12-08 9:32 AM
24 TOLL FREE: 1-800-798-7398
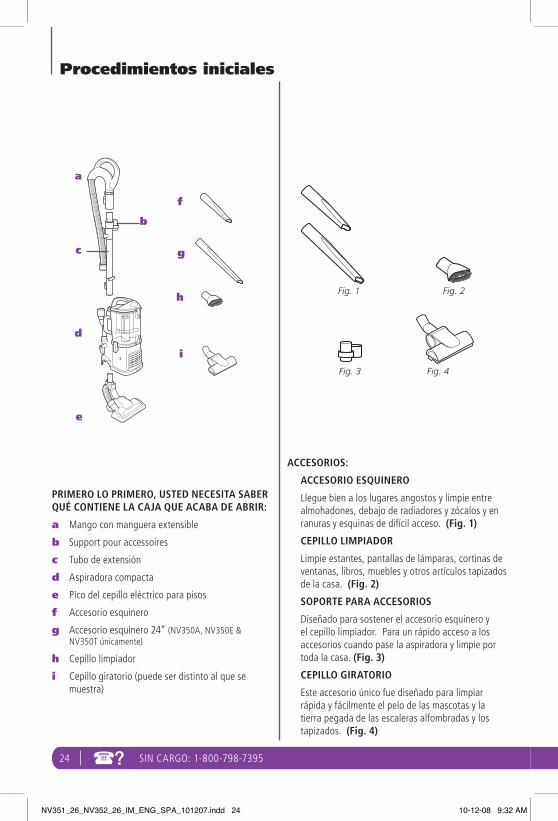
PRIMERO LO PRIMERO, USTED NECESITA SABER QUÉ CONTIENE LA CAJA QUE ACABA DE ABRIR:
a Mango con manguera extensible
b Support pour accessoires
c Tubo de extensión
d Aspiradora compacta
e Pico del cepillo eléctrico para pisos
f Accesorio esquinero
g Accesorio esquinero 24” (NV350A, NV350E & NV350T únicamente)
h Cepillo limpiador
i Cepillo giratorio (puede ser distinto al que se muestra)
SIN CARGO: 1-800-798-7395
Procedimientos iniciales
i
f
hFig. 1
Fig. 4
Fig. 2
Fig. 3
a
e
c
d
b
g
ACCESORIOS:
ACCESORIO ESQUINERO
Llegue bien a los lugares angostos y limpie entre almohadones, debajo de radiadores y zócalos y en ranuras y esquinas de difícil acceso. (Fig. 1)
CEPILLO LIMPIADOR
Limpie estantes, pantallas de lámparas, cortinas de ventanas, libros, muebles y otros artículos tapizados de la casa. (Fig. 2)
SOPORTE PARA ACCESORIOS
Diseñado para sostener el accesorio esquinero y el cepillo limpiador. Para un rápido acceso a los accesorios cuando pase la aspiradora y limpie por toda la casa. (Fig. 3)
CEPILLO GIRATORIO
Este accesorio único fue diseñado para limpiar rápida y fácilmente el pelo de las mascotas y la tierra pegada de las escaleras alfombradas y los tapizados. (Fig. 4)
NV351_26_NV352_26_IM_ENG_SPA_101207.indd 24 10-12-08 9:32 AM
TOLL FREE: 1-800-798-7398 25www.sharkclean.com
Fig. 5 Fig. 6
Español
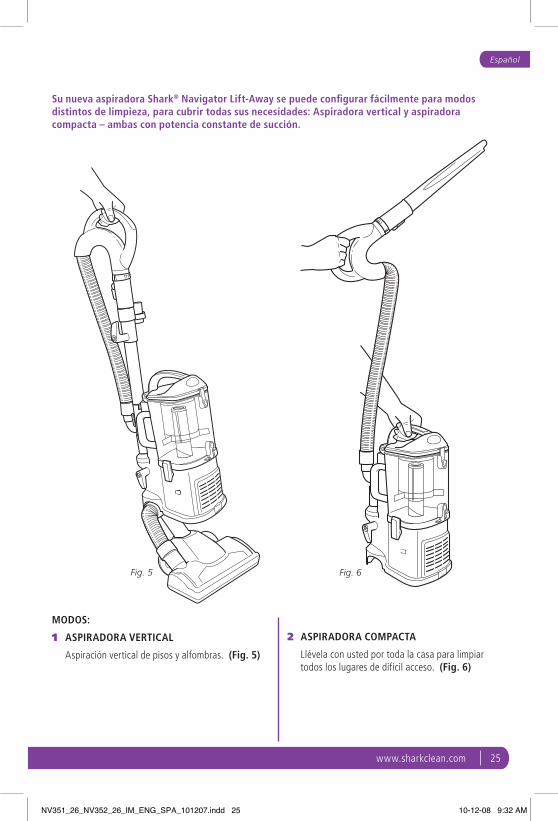
MODOS:
1 ASPIRADORA VERTICAL
Aspiración vertical de pisos y alfombras. (Fig. 5)
2 ASPIRADORA COMPACTA
Llévela con usted por toda la casa para limpiar todos los lugares de difícil acceso. (Fig. 6)
Su nueva aspiradora Shark® Navigator Lift-Away se puede configurar fácilmente para modos distintos de limpieza, para cubrir todas sus necesidades: Aspiradora vertical y aspiradora compacta – ambas con potencia constante de succión.
NV351_26_NV352_26_IM_ENG_SPA_101207.indd 25 10-12-08 9:32 AM
26 TOLL FREE: 1-800-798-7398
ab
c
d
e
Fig. 7 Fig. 8 Fig. 9
SIN CARGO: 1-800-798-7395
Modo 1: Aspiradora vertical
Para reducir el riesgo de una descarga eléctrica, desenchufe la unidad antes de ensamblarla, agregar o sacar accesorios o cambiarla de modo.
ADVERTENCIA: La llave de encendido está en la parte de arriba de la aspiradora compacta. Siempre verifique que la llave esté en la posición de apagado (posición “O”) antes de enchufarla y desenchufarla.
Gancho superior
del cable
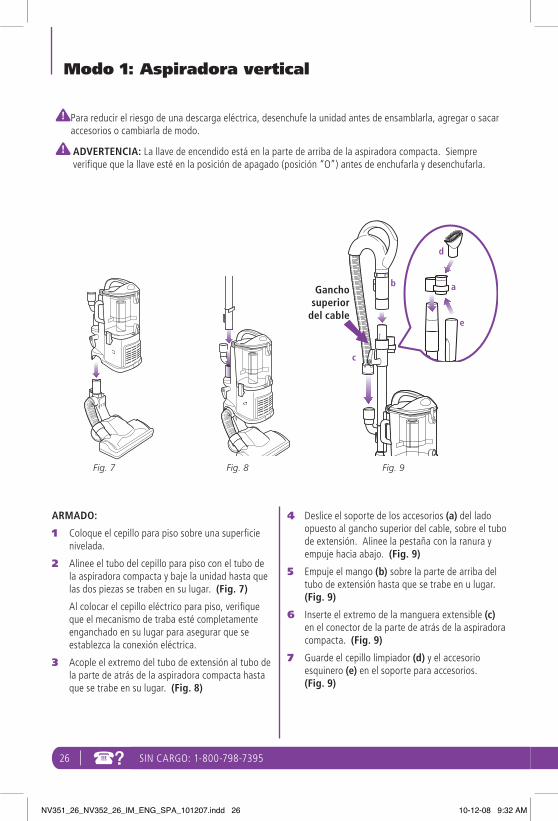
ARMADO:
1 Coloque el cepillo para piso sobre una superficie nivelada.
2 Alinee el tubo del cepillo para piso con el tubo de la aspiradora compacta y baje la unidad hasta que las dos piezas se traben en su lugar. (Fig. 7)
Al colocar el cepillo eléctrico para piso, verifique que el mecanismo de traba esté completamente enganchado en su lugar para asegurar que se establezca la conexión eléctrica.
3 Acople el extremo del tubo de extensión al tubo de la parte de atrás de la aspiradora compacta hasta que se trabe en su lugar. (Fig. 8)
4 Deslice el soporte de los accesorios (a) del lado opuesto al gancho superior del cable, sobre el tubo de extensión. Alinee la pestaña con la ranura y empuje hacia abajo. (Fig. 9)
5 Empuje el mango (b) sobre la parte de arriba del tubo de extensión hasta que se trabe en u lugar. (Fig. 9)
6 Inserte el extremo de la manguera extensible (c) en el conector de la parte de atrás de la aspiradora compacta. (Fig. 9)
7 Guarde el cepillo limpiador (d) y el accesorio esquinero (e) en el soporte para accesorios. (Fig. 9)
NV351_26_NV352_26_IM_ENG_SPA_101207.indd 26 10-12-08 9:32 AM
TOLL FREE: 1-800-798-7398 27www.sharkclean.com
Fig. 11
Fig. 10
c
da
b
Español
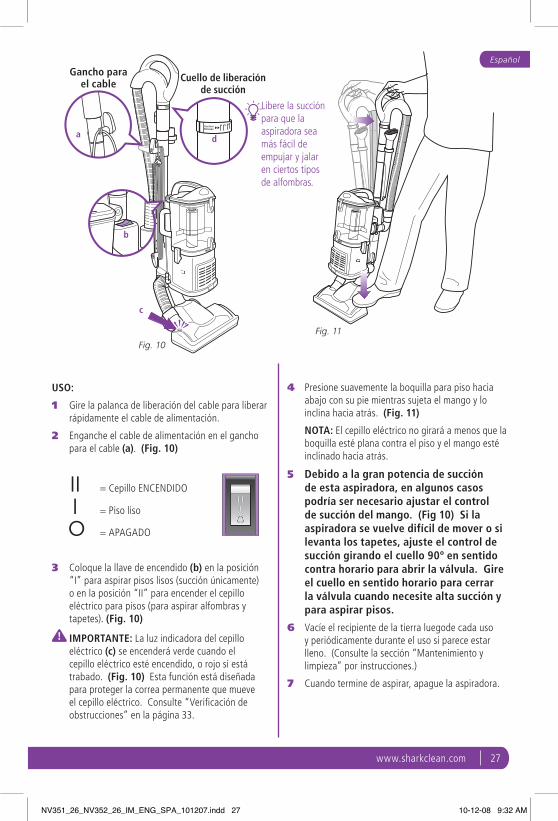
Gancho para el cable Cuello de liberación
de succión
Libere la succión para que la aspiradora sea más fácil de empujar y jalar en ciertos tipos de alfombras.
USO:
1 Gire la palanca de liberación del cable para liberar rápidamente el cable de alimentación.
2 Enganche el cable de alimentación en el gancho para el cable (a). (Fig. 10)
= Cepillo ENCENDIDO
= Piso liso
= APAGADO
3 Coloque la llave de encendido (b) en la posición “I” para aspirar pisos lisos (succión únicamente) o en la posición “II” para encender el cepillo eléctrico para pisos (para aspirar alfombras y tapetes). (Fig. 10)
IMPORTANTE: La luz indicadora del cepillo eléctrico (c) se encenderá verde cuando el cepillo eléctrico esté encendido, o rojo si está trabado. (Fig. 10) Esta función está diseñada para proteger la correa permanente que mueve el cepillo eléctrico. Consulte “Verificación de obstrucciones” en la página 33.
4 Presione suavemente la boquilla para piso hacia abajo con su pie mientras sujeta el mango y lo inclina hacia atrás. (Fig. 11)
NOTA: El cepillo eléctrico no girará a menos que la boquilla esté plana contra el piso y el mango esté inclinado hacia atrás.
5 Debido a la gran potencia de succión de esta aspiradora, en algunos casos podría ser necesario ajustar el control de succión del mango. (Fig 10) Si la aspiradora se vuelve difícil de mover o si levanta los tapetes, ajuste el control de succión girando el cuello 90º en sentido contra horario para abrir la válvula. Gire el cuello en sentido horario para cerrar la válvula cuando necesite alta succión y para aspirar pisos.
6 Vacíe el recipiente de la tierra luegode cada uso y periódicamente durante el uso si parece estar lleno. (Consulte la sección “Mantenimiento y limpieza” por instrucciones.)
7 Cuando termine de aspirar, apague la aspiradora.
NV351_26_NV352_26_IM_ENG_SPA_101207.indd 27 10-12-08 9:32 AM
28 TOLL FREE: 1-800-798-7398
b
Fig. 12Fig. 13
a
SIN CARGO: 1-800-798-7395
Modo 2: Aspiradora compacta
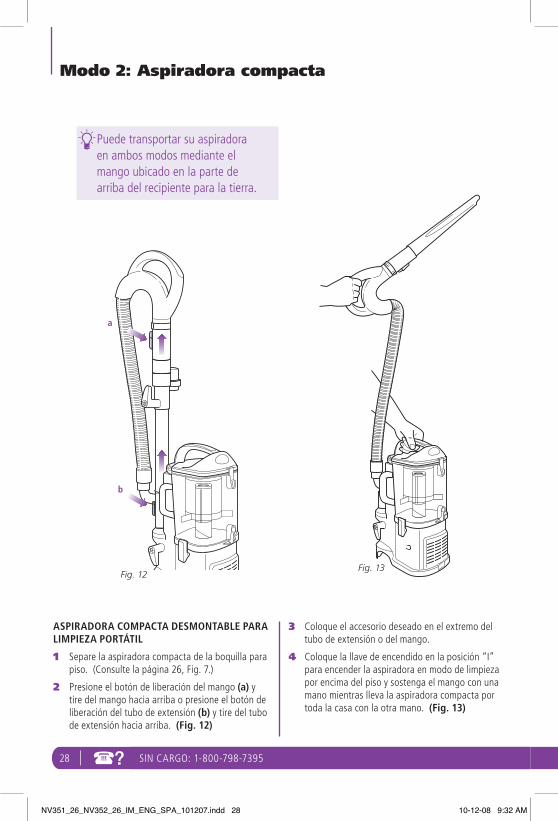
Puede transportar su aspiradora en ambos modos mediante el mango ubicado en la parte de arriba del recipiente para la tierra.
ASPIRADORA COMPACTA DESMONTABLE PARA LIMPIEZA PORTÁTIL
1 Separe la aspiradora compacta de la boquilla para piso. (Consulte la página 26, Fig. 7.)
2 Presione el botón de liberación del mango (a) y tire del mango hacia arriba o presione el botón de liberación del tubo de extensión (b) y tire del tubo de extensión hacia arriba. (Fig. 12)
3 Coloque el accesorio deseado en el extremo del tubo de extensión o del mango.
4 Coloque la llave de encendido en la posición “I” para encender la aspiradora en modo de limpieza por encima del piso y sostenga el mango con una mano mientras lleva la aspiradora compacta por toda la casa con la otra mano. (Fig. 13)
NV351_26_NV352_26_IM_ENG_SPA_101207.indd 28 10-12-08 9:32 AM
TOLL FREE: 1-800-798-7398 29www.sharkclean.com
Fig. 15
Fig. 14
EspañolLimpieza por encima del piso
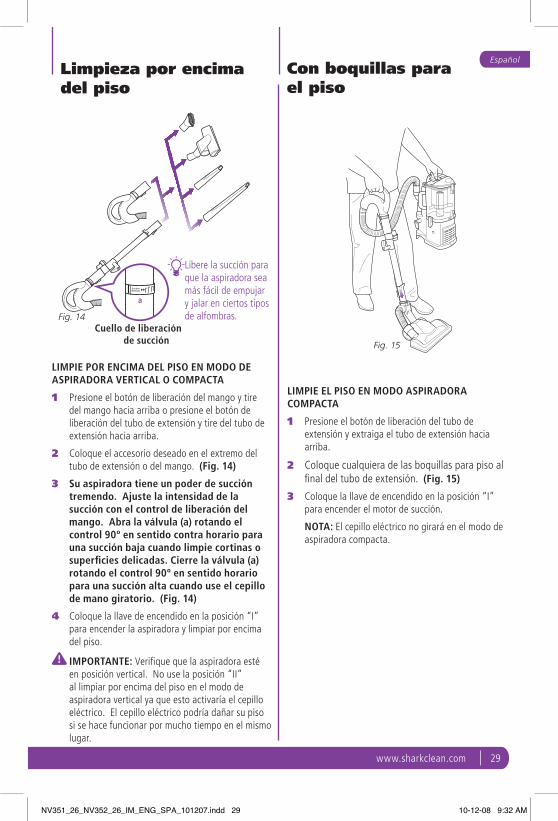
Con boquillas para el piso
Libere la succión para que la aspiradora sea más fácil de empujar y jalar en ciertos tipos de alfombras.
a
Cuello de liberación de succión
LIMPIE EL PISO EN MODO ASPIRADORA COMPACTA
1 Presione el botón de liberación del tubo de extensión y extraiga el tubo de extensión hacia arriba.
2 Coloque cualquiera de las boquillas para piso al final del tubo de extensión. (Fig. 15)
3 Coloque la llave de encendido en la posición “I” para encender el motor de succión.
NOTA: El cepillo eléctrico no girará en el modo de aspiradora compacta.
LIMPIE POR ENCIMA DEL PISO EN MODO DE ASPIRADORA VERTICAL O COMPACTA
1 Presione el botón de liberación del mango y tire del mango hacia arriba o presione el botón de liberación del tubo de extensión y tire del tubo de extensión hacia arriba.
2 Coloque el accesorio deseado en el extremo del tubo de extensión o del mango. (Fig. 14)
3 Su aspiradora tiene un poder de succión tremendo. Ajuste la intensidad de la succión con el control de liberación del mango. Abra la válvula (a) rotando el control 90º en sentido contra horario para una succión baja cuando limpie cortinas o superficies delicadas. Cierre la válvula (a) rotando el control 90º en sentido horario para una succión alta cuando use el cepillo de mano giratorio. (Fig. 14)
4 Coloque la llave de encendido en la posición “I” para encender la aspiradora y limpiar por encima del piso.
IMPORTANTE: Verifique que la aspiradora esté en posición vertical. No use la posición “II” al limpiar por encima del piso en el modo de aspiradora vertical ya que esto activaría el cepillo eléctrico. El cepillo eléctrico podría dañar su piso si se hace funcionar por mucho tiempo en el mismo lugar.
NV351_26_NV352_26_IM_ENG_SPA_101207.indd 29 10-12-08 9:32 AM
30 TOLL FREE: 1-800-798-7398
Fig. 17 Fig. 18
Fig. 16
SIN CARGO: 1-800-798-7395
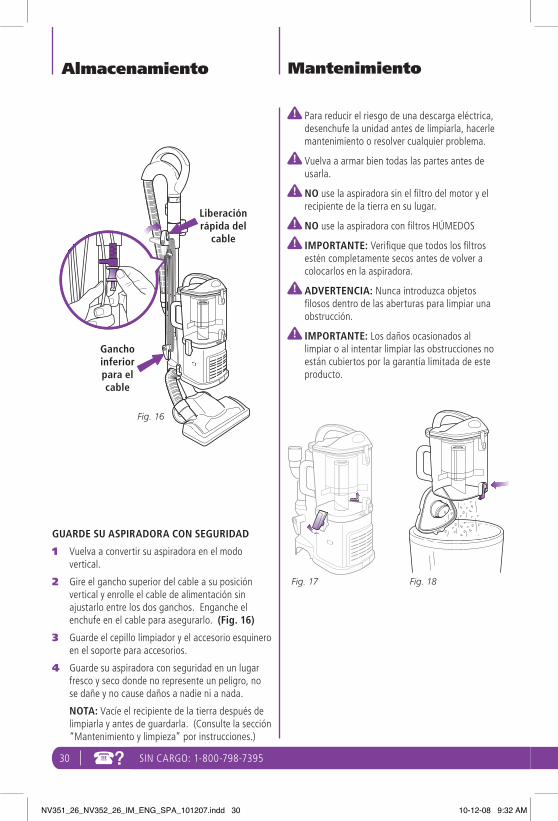
Almacenamiento
Liberación rápida del
cable
Mantenimiento
Gancho inferior para el cable
Para reducir el riesgo de una descarga eléctrica, desenchufe la unidad antes de limpiarla, hacerle mantenimiento o resolver cualquier problema.
Vuelva a armar bien todas las partes antes de usarla.
NO use la aspiradora sin el filtro del motor y el recipiente de la tierra en su lugar.
NO use la aspiradora con filtros HÚMEDOS
IMPORTANTE: Verifique que todos los filtros estén completamente secos antes de volver a colocarlos en la aspiradora.
ADVERTENCIA: Nunca introduzca objetos filosos dentro de las aberturas para limpiar una obstrucción.
IMPORTANTE: Los daños ocasionados al limpiar o al intentar limpiar las obstrucciones no están cubiertos por la garantía limitada de este producto.
GUARDE SU ASPIRADORA CON SEGURIDAD
1 Vuelva a convertir su aspiradora en el modo vertical.
2 Gire el gancho superior del cable a su posición vertical y enrolle el cable de alimentación sin ajustarlo entre los dos ganchos. Enganche el enchufe en el cable para asegurarlo. (Fig. 16)
3 Guarde el cepillo limpiador y el accesorio esquinero en el soporte para accesorios.
4 Guarde su aspiradora con seguridad en un lugar fresco y seco donde no represente un peligro, no se dañe y no cause daños a nadie ni a nada.
NOTA: Vacíe el recipiente de la tierra después de limpiarla y antes de guardarla. (Consulte la sección “Mantenimiento y limpieza” por instrucciones.)
NV351_26_NV352_26_IM_ENG_SPA_101207.indd 30 10-12-08 9:32 AM
TOLL FREE: 1-800-798-7398 31www.sharkclean.com
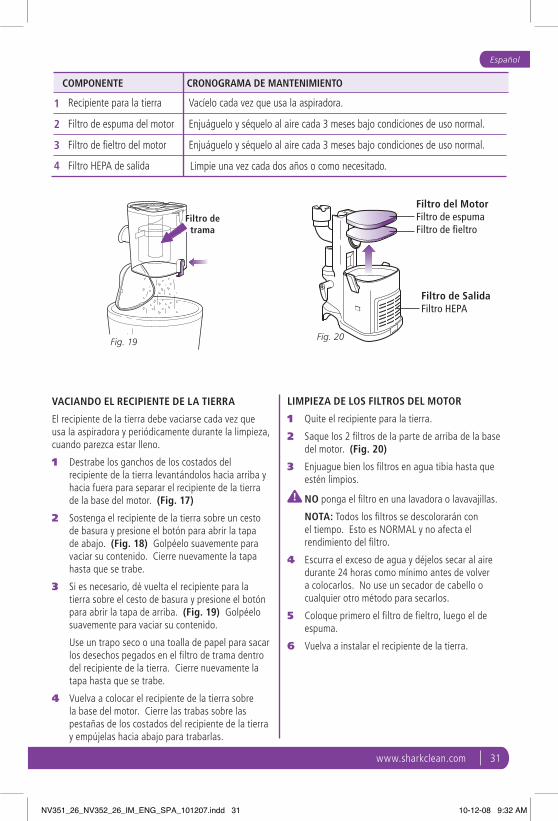
COMPONENTE CRONOGRAMA DE MANTENIMIENTO
Fig. 19 Fig. 20
1
2
3
4
Filtro de SalidaFiltro HEPA
Español
Filtro de espuma del motor
Recipiente para la tierra
Filtro de fieltro del motor
Filtro HEPA de salida
Enjuáguelo y séquelo al aire cada 3 meses bajo condiciones de uso normal.
Vacíelo cada vez que usa la aspiradora.
Enjuáguelo y séquelo al aire cada 3 meses bajo condiciones de uso normal.
Limpie una vez cada dos años o como necesitado.
Filtro de trama
Filtro del Motor Filtro de espuma Filtro de fieltro
LIMPIEZA DE LOS FILTROS DEL MOTOR
1 Quite el recipiente para la tierra.
2 Saque los 2 filtros de la parte de arriba de la base del motor. (Fig. 20)
3 Enjuague bien los filtros en agua tibia hasta que estén limpios.
NO ponga el filtro en una lavadora o lavavajillas.
NOTA: Todos los filtros se descolorarán con el tiempo. Esto es NORMAL y no afecta el rendimiento del filtro.
4 Escurra el exceso de agua y déjelos secar al aire durante 24 horas como mínimo antes de volver a colocarlos. No use un secador de cabello o cualquier otro método para secarlos.
5 Coloque primero el filtro de fieltro, luego el de espuma.
6 Vuelva a instalar el recipiente de la tierra.
VACIANDO EL RECIPIENTE DE LA TIERRA
El recipiente de la tierra debe vaciarse cada vez que usa la aspiradora y periódicamente durante la limpieza, cuando parezca estar lleno.
1 Destrabe los ganchos de los costados del recipiente de la tierra levantándolos hacia arriba y hacia fuera para separar el recipiente de la tierra de la base del motor. (Fig. 17)
2 Sostenga el recipiente de la tierra sobre un cesto de basura y presione el botón para abrir la tapa de abajo. (Fig. 18) Golpéelo suavemente para vaciar su contenido. Cierre nuevamente la tapa hasta que se trabe.
3 Si es necesario, dé vuelta el recipiente para la tierra sobre el cesto de basura y presione el botón para abrir la tapa de arriba. (Fig. 19) Golpéelo suavemente para vaciar su contenido.
Use un trapo seco o una toalla de papel para sacar los desechos pegados en el filtro de trama dentro del recipiente de la tierra. Cierre nuevamente la tapa hasta que se trabe.
4 Vuelva a colocar el recipiente de la tierra sobre la base del motor. Cierre las trabas sobre las pestañas de los costados del recipiente de la tierra y empújelas hacia abajo para trabarlas.
NV351_26_NV352_26_IM_ENG_SPA_101207.indd 31 10-12-08 9:32 AM
32 TOLL FREE: 1-800-798-7398
Fig. 21
Fig. 22 Fig. 23
SIN CARGO: 1-800-798-7395
Mantenimiento - continuación NO ponga el filtro en una lavadora o lavavajillas.
NOTA: Todos los filtros se descolorarán con el tiempo. Esto es NORMAL y no afecta el rendimiento del filtro.
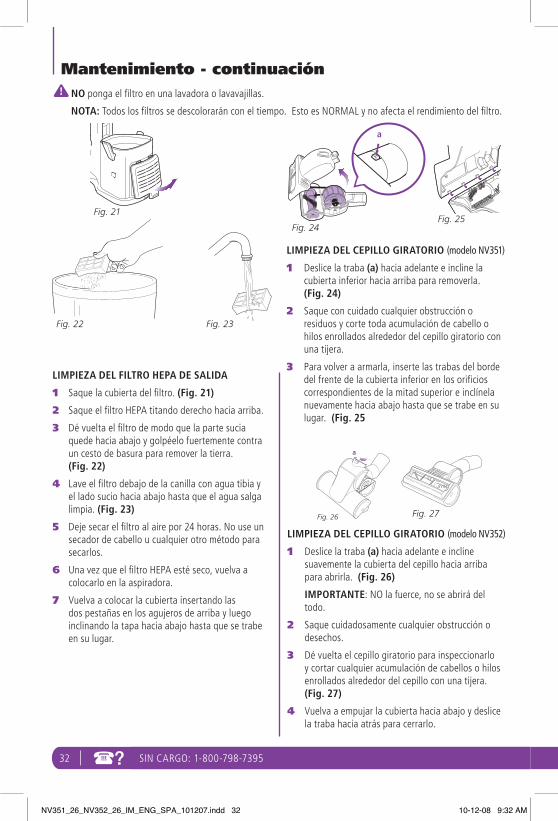
LIMPIEZA DEL FILTRO HEPA DE SALIDA
1 Saque la cubierta del filtro. (Fig. 21)
2 Saque el filtro HEPA titando derecho hacia arriba.
3 Dé vuelta el filtro de modo que la parte sucia quede hacia abajo y golpéelo fuertemente contra un cesto de basura para remover la tierra. (Fig. 22)
4 Lave el filtro debajo de la canilla con agua tibia y el lado sucio hacia abajo hasta que el agua salga limpia. (Fig. 23)
5 Deje secar el filtro al aire por 24 horas. No use un secador de cabello u cualquier otro método para secarlos.
6 Una vez que el filtro HEPA esté seco, vuelva a colocarlo en la aspiradora.
7 Vuelva a colocar la cubierta insertando las dos pestañas en los agujeros de arriba y luego inclinando la tapa hacia abajo hasta que se trabe en su lugar.
Fig. 27Fig. 26
a
LIMPIEZA DEL CEPILLO GIRATORIO (modelo NV352)
1 Deslice la traba (a) hacia adelante e incline suavemente la cubierta del cepillo hacia arriba para abrirla. (Fig. 26)
IMPORTANTE: NO la fuerce, no se abrirá del todo.
2 Saque cuidadosamente cualquier obstrucción o desechos.
3 Dé vuelta el cepillo giratorio para inspeccionarlo y cortar cualquier acumulación de cabellos o hilos enrollados alrededor del cepillo con una tijera. (Fig. 27)
4 Vuelva a empujar la cubierta hacia abajo y deslice la traba hacia atrás para cerrarlo.
LIMPIEZA DEL CEPILLO GIRATORIO (modelo NV351)
1 Deslice la traba (a) hacia adelante e incline la cubierta inferior hacia arriba para removerla. (Fig. 24)
2 Saque con cuidado cualquier obstrucción o residuos y corte toda acumulación de cabello o hilos enrollados alrededor del cepillo giratorio con una tijera.
3 Para volver a armarla, inserte las trabas del borde del frente de la cubierta inferior en los orificios correspondientes de la mitad superior e inclínela nuevamente hacia abajo hasta que se trabe en su lugar. (Fig. 25
Fig. 25Fig. 24
a
NV351_26_NV352_26_IM_ENG_SPA_101207.indd 32 10-12-08 9:32 AM
TOLL FREE: 1-800-798-7398 33www.sharkclean.com
Fig. 28 Fig. 29
Español
Asegúrese de trabajar en un área bien iluminada y use una linterna para ayudarle a ver cualquier obstrucción.
Cepillogiratorio
LIMPIEZA DEL CEPILLO ELÉCTRICO PARA PISOS
Cuando el cepillo eléctrico necesita limpieza o se traba en algún objeto, se apaga automáticamente para evitar daños a su correa permanente. La luz indicadora se encenderá rojo para avisarle que apague la aspiradora y limpie la obstrucción inmediatamente. La luz se apagará automáticamente una vez que se haya solucionado el bloqueo y que se haya apagado y prendido la aspiradora, o se la haya trabado en posición vertical.
1 Saque el cepillo eléctrico para pisos de la aspiradora compacta.
2 Inspeccione la abertura de abajo y el cepillo giratorio. Si hay acumulación de desechos, remuévalos. Corte con cuidado todo lo que esté enrollado alrededor del cepillo giratorio con una tijera. No dañe o corte las cerdas del cepillo. (Fig. 28)
VERIFICACIÓN DE OBSTRUCCIONES
Las obstrucciones pueden hacer que su aspiradora se sobrecaliente y se apague. Para evitar que pase esto, revise las áreas de obstrucciones potenciales luego de usarla mucho o si detecta una pérdida de succión o que limpia mal.
1 Recipiente para la tierra
El recipiente de la tierra puede estar lleno. Vacíe el recipiente de la tierra.
2 Filtros del motor y de salida
Hay que lavar los filtros del motor cada 3 meses para un óptimo rendimiento. Hay que lavar los filtros de salida cada 12 meses.
Verifique que todos los filtros estén limpios.
3 Accesorios
• Revise las entradas de aire:
- Tubo de extensión
- Cepillo limpiador
- Accesorio esquinero
- Cepillo giratorio
4 Manguera y conexiones a la aspiradora
• Desconecte la manguera extensible de la parte de atrás de la aspiradora compacta presionando las pestañas entre sí y tirando hacia arriba. (Fig. 29) Extienda la manguera y mire su interior para ver si está tapada.
NV351_26_NV352_26_IM_ENG_SPA_101207.indd 33 10-12-08 9:32 AM
34 TOLL FREE: 1-800-798-7398
PARTE PARTE NO.
1 Juego de filtros del motor XFF350
2 Filtro HEPA XHF350
3 Cepillo limpiador 112FFJ y accesorio esquinero
4 Cepillo giratorio (NV352) 1117FC
5 Cepillo giratorio (NV351) 119FFJ
6 Accesorio esquinero 24” 1124-FC(NV352)
Fig. 31
Fig. 30
Para ordenar partes adicionales o accesorios visite www.sharkclean.com o llame al 1-800-798-7395..
SIN CARGO: 1-800-798-7395
• Saque el recipiente de la tierra y el tubo de extensión y separe la aspiradora compacta del cepillo eléctrico. Revise que no haya ninguna obstrucción en las 4 aberturas. (Fig. 30)
5 Cepillo Eléctrico para Pisos
• Saque la manguera de la parte de arribadel cepillo eléctrico presionando las pestañas entre sí y tirando hacia fuera y en la parte de abajo, sacando el conector. Inspeccione el interior de los 3 agujeros. (Fig. 31)
Mantenimiento - continuación
4
3
1
2
5
6
Partes de reemplazo
NV351_26_NV352_26_IM_ENG_SPA_101207.indd 34 10-12-08 9:32 AM
TOLL FREE: 1-800-798-7398 35www.sharkclean.com
EspañolGuía de diagnóstico de problemas
PROBLEMA POSIBLE CAUSA Y SOLUCIÓN
La aspiradora no levanta la tierra.
Revise si hay que limpiar los filtros. Siga las instrucciones para enjuagar y secar los filtros antes de volver a instalarlos en la aspiradora. (Consulte la sección “Mantenimiento” por instrucciones.)El recipiente de la tierra puede estar lleno; vacíelo.Revise que no haya ninguna obstrucción en la manguera y sus conexiones; limpie las obstrucciones si es necesario.Si el recipiente para la tierra está vacío y las entradas de los accesorios están bien, busque otras obstrucciones. (Consulte las instrucciones “Verificación de obstrucciones”.)
La aspiradora levanta los tapetes (tapetes livianos, móviles).
Demasiada succión. Tenga cuidado al aspirar tapetes sueltos o alfombras con bordes bordados delicados. Abra el control de liberación de succión del mango para disminuir la potencia de succión.Ajustar el interruptor a la posición “I -suction only” (succión solamente) para desprender el cepillo giratorio.
Flujo de aire restringido. No hay succión o es muy baja.
Revise si hay que limpiar los filtros. Siga las instrucciones para enjuagar y secar los filtros antes de volver a instalarlos en la aspiradora. El recipiente de la tierra puede estar lleno; vacíelo. Revise que no haya ninguna obstrucción en la manguera, sus conexiones, las boquillas y los accesorios; limpie las obstrucciones si es necesario.Cierre el control de liberación de succión del mango para aumentar la potencia de succión.Si el recipiente para la tierra está vacío y las entradas de los accesorios están bien, busque otras obstrucciones.
El cepillo eléctrico se trabó o se apagó.
Apague y desenchufe inmediatamente la aspiradora, desconecte la boquilla y remueva la obstrucción antes de volver a conectarla y de volver a encender la aspiradora. Estirar el mango hacia usted y soltar la boquilla motorizada para pisos con el elemento de auto apagado. Seleccionar la posición “II - Brush Roll on” (encender cepillo giratorio) en el interruptor.
La aspiradora se apaga sola.
Esta unidad está equipada con un termostato de protección del motor. Si la aspiradora se sobrecalienta por cualquier motivo, el termostato la apagará automáticamente. Si pasa eso, siga los siguientes pasos para reiniciar el termostato del motor:
1. Coloque el botón de encendido en la posición “O” (apagado).2. Desenchufe la aspiradora.3. Vacíe el recipiente para la tierra y limpie los filtros. 4. Revise que la manguera, los accesorios y las entradas de aire no estén tapados. 5. Permita que la unidad se enfríe durante 45 minutos como mínimo.6. Enchufe la aspiradora. 7. Coloque la llave de encendido en la posición “I” (encendido) para volver a encender
la aspiradora.
Nota: Si la aspiradora todavía no se enciende, llame a nuestro servicio al cliente al: 1-800-798-7395.
Para comprar partes de reemplazo, visite nuestro sitio Web: www.sharkclean.com o llame a servicio al cliente al: 1-800-798-7395.
NV351_26_NV352_26_IM_ENG_SPA_101207.indd 35 10-12-08 9:32 AM
36 TOLL FREE: 1-800-798-7398SIN CARGO: 1-800-798-7395
GARANTÍA LIMITADA DE CINCO (5) AÑOS DE EURO-PRO
EURO-PRO Operating LLC garantiza este producto contra defectos de materiales y mano de obra por un término de cinco (5) año a partir de la fecha de compra original, siempre que sea utilizado para uso doméstico normal, sujeto a las siguientes condiciones, exclusiones y excepciones.
La responsabilidad de EURO-PRO Operating LLC se limita únicamente al costo de reparación o reemplazo de la unidad, a nuestro criterio. Esta garantía limitada no cubre el desgaste normal de las partes y no cubre ninguna unidad que haya sido alterada o utilizada con fines comerciales. Esta garantía limitada no cubre daños ocasionados por uso inadecuado, abuso, negligencia o daños causados por embalaje inapropiado o maltrato durante el transporte. Esta garantía limitada no cubre daños o defectos causados o resultantes durante el transporte para su reparación o alteraciones del producto o cualquiera de sus partes, realizadas por una persona no autorizada por EURO-PRO Operating LLC.
Si su artefacto no funciona correctamente al utilizarlo bajo condiciones domésticas normales dentro del período de garantía limitada, puede devolver el artefacto completo y los accesorios, junto con un comprobante de la fecha de compra, pagando los gastos de envío. Por servicio al cliente, llame al 1-800-798-7395 o visite nuestro sitio Web www.sharkclean.com.
Si EURO-PRO Operating LLC determina que el artefacto presenta un defecto, lo reparará o remplazará sin cargo, a su criterio. Debe incluir un comprobante de la fecha de compra y un cheque a favor de EURO-PRO Operating LLC por la suma de $19,95 para cubrir los gastos de envío y procesamiento.*
Los insumos tales como, sin limitación, filtros, cepillos y partes eléctricas que normalmente necesitan ser reemplazados son explícitamente excluidos de la garantía.
Esta garantía limitada es válida para el comprador original del producto y excluye cualquier otra garantía legal, implícita y/o convencional. La responsabilidad de EURO-PRO Operating LLC, de existir, se limita a las obligaciones específicas asumidas expresamente bajo los términos de esta garantía limitada. Bajo ninguna circunstancia EURO-PRO Operating LLC será responsable por daños incidentales o indirectos a cualquiera, de ninguna clase. Algunos estados no permiten la exclusión o limitación de daños consiguientes o incidentales, por lo tanto lo anterior puede no ser válido para usted.
Esta garantía limitada le otorga derechos legales específicos, y usted puede también tener otros derechos los que varían de estado a estado o de provincia a provincia.
*IMPORTANTE: Embale el producto cuidadosamente para evitar daños durante el transporte. Asegúrese de incluir un comprobante de la fecha de compra y de colocarle una etiqueta al producto con su nombre, dirección completa y número de teléfono, una nota proporcionando información de la compra, número de modelo y una descripción del problema que tenga la unidad. Le recomendamos asegurar el paquete (puesto que la garantía limitada no cubre daños de envío). Escriba en el exterior del paquete “ATTENTION CUSTOMER SERVICE”. Nosotros nos esforzamos constantemente en mejorar nuestros productos, por lo tanto las especificaciones aquí indicadas pueden cambiar sin previo aviso.
Inscripción del comprador
Por favor visite www.sharkclean.com o llame al 1-800-798-7395 para registrar su nuevo producto Shark®, dentro los diez (10) días después de su compra. Le van a preguntar el nombre de la tienda, la fecha de su compra, numero de modelo, su nombre y dirección.
Su registración nos permitirá de llamarle en caso de algun defecto de fabrica. Con su registracion usted demuestra que a leido y entendido la instrucciones del uso y las advertencias establecidas en las instrucciones acompañantes.
NV351_26_NV352_26_IM_ENG_SPA_101207.indd 36 10-12-08 9:32 AM
TOLL FREE: 1-800-798-7398 37www.sharkclean.com
Notes / Remarques
NV351_26_NV352_26_IM_ENG_SPA_101207.indd 37 10-12-08 9:32 AM

38 TOLL FREE: 1-800-798-7398
Notes / Remarques
SIN CARGO: 1-800-798-7395
NV351_26_NV352_26_IM_ENG_SPA_101207.indd 38 10-12-08 9:32 AM
TOLL FREE: 1-800-798-7398 39www.sharkclean.com
Notes / Remarques
NV351_26_NV352_26_IM_ENG_SPA_101207.indd 39 10-12-08 9:32 AM

EURO-PRO Operating LLC
U.S.: Newton, MA 02459
Canada: Ville St. Laurent, Québec H4S 1A7
English: 1-800-798-7398
Español: 1-800-798-7395
www.sharkclean.com
Copyright © Euro-Pro Operating LLC 2010
Derechos reservados © Euro-Pro Operating LLC 2010
Printed in China / Impreso en China
Illustrations may differ from actual product.
El dibujo puede ne ser igual al producto real.
NV351.NV352.ES.101207
NV351_26_NV352_26_IM_ENG_SPA_101207.indd 40 10-12-08 9:32 AM