Embed Size (px)
Citation preview

1-800-305-61161-800-305-61161-800-305-61161-800-305-61161-800-305-6116
Owner’s Manualand Training Guide
www.extremedogfence.com - [email protected]
Pet Fencing System Powered by Perimeter Technologies

Register Your New
eXtreme Dog Fence® Containment System within 30 Days of Purchase
to
Activate your 10 Year Warranty
You will need the following information ready to register:
1. Order # 2. Date of Purchase 3. Phone Number 4. E-Mail Address
www.extremedogfence.com 800-305-6116
To register, go to:
www.extremedogfence.com/register And follow the online directions.
Thank you for your purchase, and welcome to the family.
CONGRATULATIONS
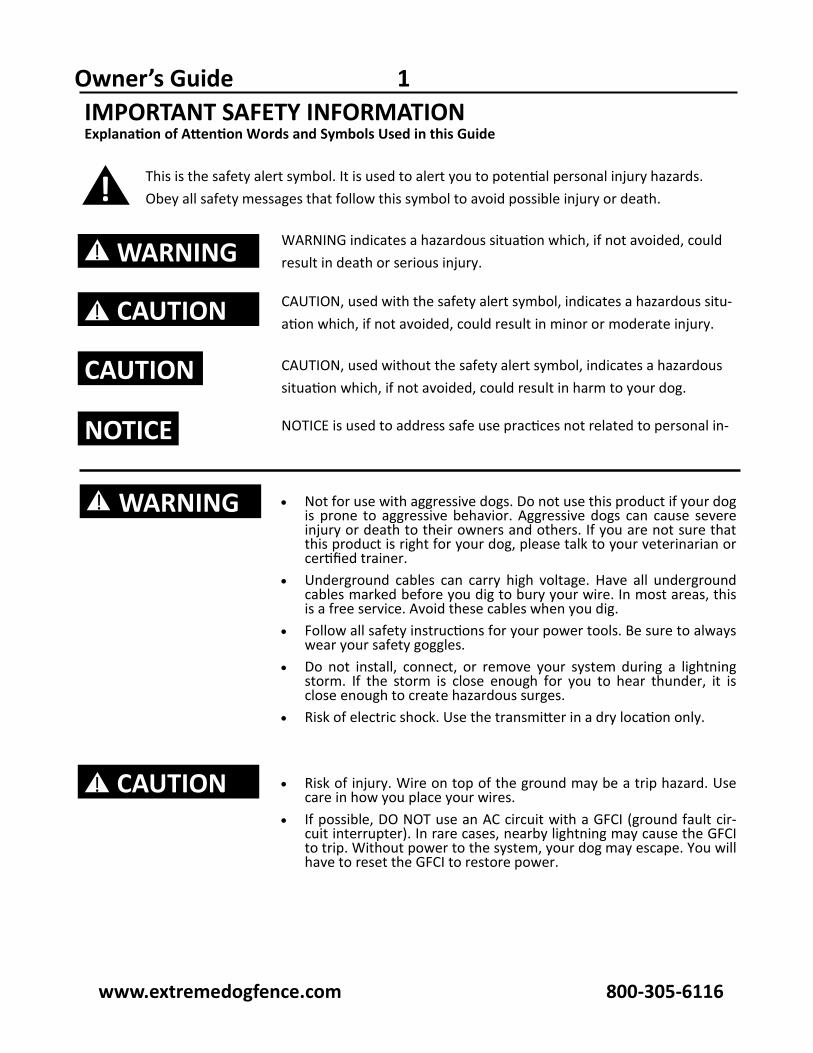
Owner’s Guide 1 IMPORTANT SAFETY INFORMATION Explanation of Attention Words and Symbols Used in this Guide
! This is the safety alert symbol. It is used to alert you to potential personal injury hazards. Obey all safety messages that follow this symbol to avoid possible injury or death.
WARNING indicates a hazardous situation which, if not avoided, could result in death or serious injury. WARNING !
CAUTION ! CAUTION, used with the safety alert symbol, indicates a hazardous situ-ation which, if not avoided, could result in minor or moderate injury.
CAUTION CAUTION, used without the safety alert symbol, indicates a hazardous situation which, if not avoided, could result in harm to your dog.
NOTICE NOTICE is used to address safe use practices not related to personal in-
WARNING ! Not for use with aggressive dogs. Do not use this product if your dog is prone to aggressive behavior. Aggressive dogs can cause severe injury or death to their owners and others. If you are not sure that this product is right for your dog, please talk to your veterinarian or certified trainer.
Underground cables can carry high voltage. Have all underground cables marked before you dig to bury your wire. In most areas, this is a free service. Avoid these cables when you dig.
Follow all safety instructions for your power tools. Be sure to always wear your safety goggles.
Do not install, connect, or remove your system during a lightning storm. If the storm is close enough for you to hear thunder, it is close enough to create hazardous surges.
Risk of electric shock. Use the transmitter in a dry location only. Risk of injury. Wire on top of the ground may be a trip hazard. Use
care in how you place your wires. If possible, DO NOT use an AC circuit with a GFCI (ground fault cir-
cuit interrupter). In rare cases, nearby lightning may cause the GFCI to trip. Without power to the system, your dog may escape. You will have to reset the GFCI to restore power.
CAUTION !
www.extremedogfence.com 800-305-6116
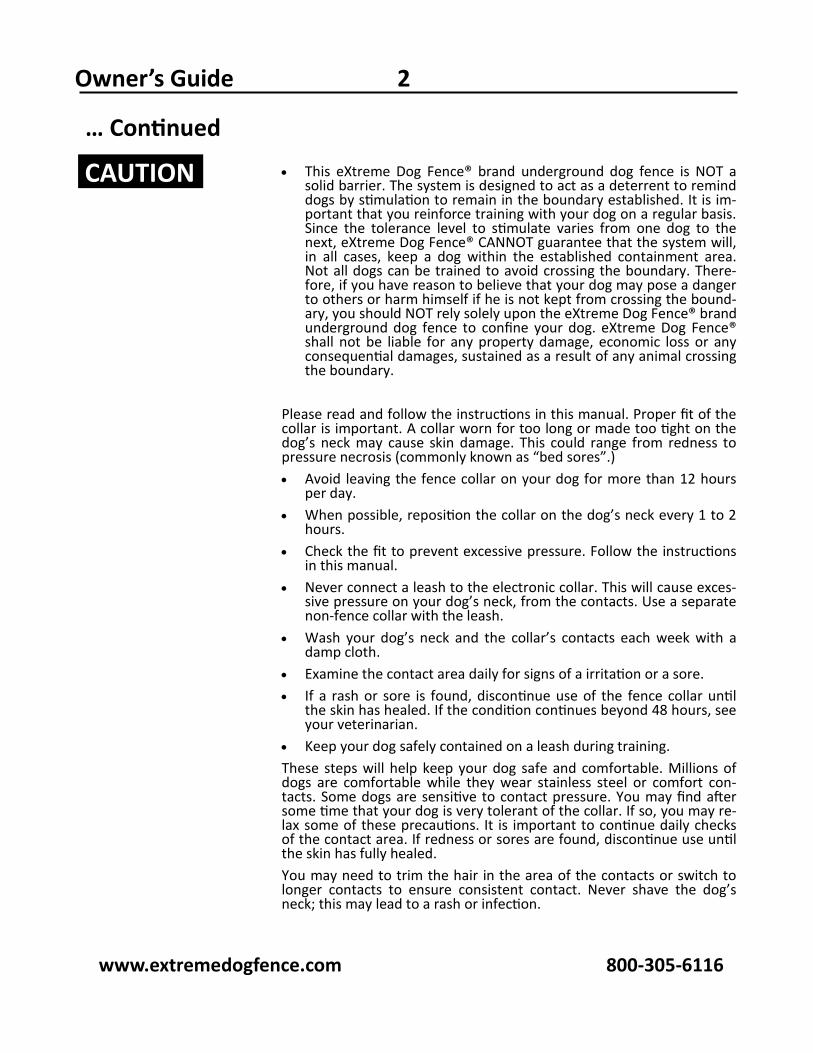
Owner’s Guide 2
… Continued This eXtreme Dog Fence® brand underground dog fence is NOT a
solid barrier. The system is designed to act as a deterrent to remind dogs by stimulation to remain in the boundary established. It is im-portant that you reinforce training with your dog on a regular basis. Since the tolerance level to stimulate varies from one dog to the next, eXtreme Dog Fence® CANNOT guarantee that the system will, in all cases, keep a dog within the established containment area. Not all dogs can be trained to avoid crossing the boundary. There-fore, if you have reason to believe that your dog may pose a danger to others or harm himself if he is not kept from crossing the bound-ary, you should NOT rely solely upon the eXtreme Dog Fence® brand underground dog fence to confine your dog. eXtreme Dog Fence® shall not be liable for any property damage, economic loss or any consequential damages, sustained as a result of any animal crossing the boundary.
Please read and follow the instructions in this manual. Proper fit of the collar is important. A collar worn for too long or made too tight on the dog’s neck may cause skin damage. This could range from redness to pressure necrosis (commonly known as “bed sores”.) Avoid leaving the fence collar on your dog for more than 12 hours
per day. When possible, reposition the collar on the dog’s neck every 1 to 2
hours. Check the fit to prevent excessive pressure. Follow the instructions
in this manual. Never connect a leash to the electronic collar. This will cause exces-
sive pressure on your dog’s neck, from the contacts. Use a separate non-fence collar with the leash.
Wash your dog’s neck and the collar’s contacts each week with a damp cloth.
Examine the contact area daily for signs of a irritation or a sore. If a rash or sore is found, discontinue use of the fence collar until
the skin has healed. If the condition continues beyond 48 hours, see your veterinarian.
Keep your dog safely contained on a leash during training. These steps will help keep your dog safe and comfortable. Millions of dogs are comfortable while they wear stainless steel or comfort con-tacts. Some dogs are sensitive to contact pressure. You may find after some time that your dog is very tolerant of the collar. If so, you may re-lax some of these precautions. It is important to continue daily checks of the contact area. If redness or sores are found, discontinue use until the skin has fully healed. You may need to trim the hair in the area of the contacts or switch to longer contacts to ensure consistent contact. Never shave the dog’s neck; this may lead to a rash or infection.
CAUTION
www.extremedogfence.com 800-305-6116
Owner’s Guide 3
… Continued To prevent an unintended correction: The collar receiver should not be on your dog when the system is
tested. Remove the collar receiver before making any changes to your sys-
tem. Before placing the collar receiver on your dog, test the signal field
after any change. For added protection, when unused for long periods of time or prior
to thunderstorms, unplug from the wall outlet and disconnect the boundary wires. This will prevent damage to the transmitter due to surges.
Avoid damage to the jacket of the loop wire during the install; Dam-age may cause areas of weak signal and lead to early failure of the loop (wire breaks).
CAUTION
NOTICE
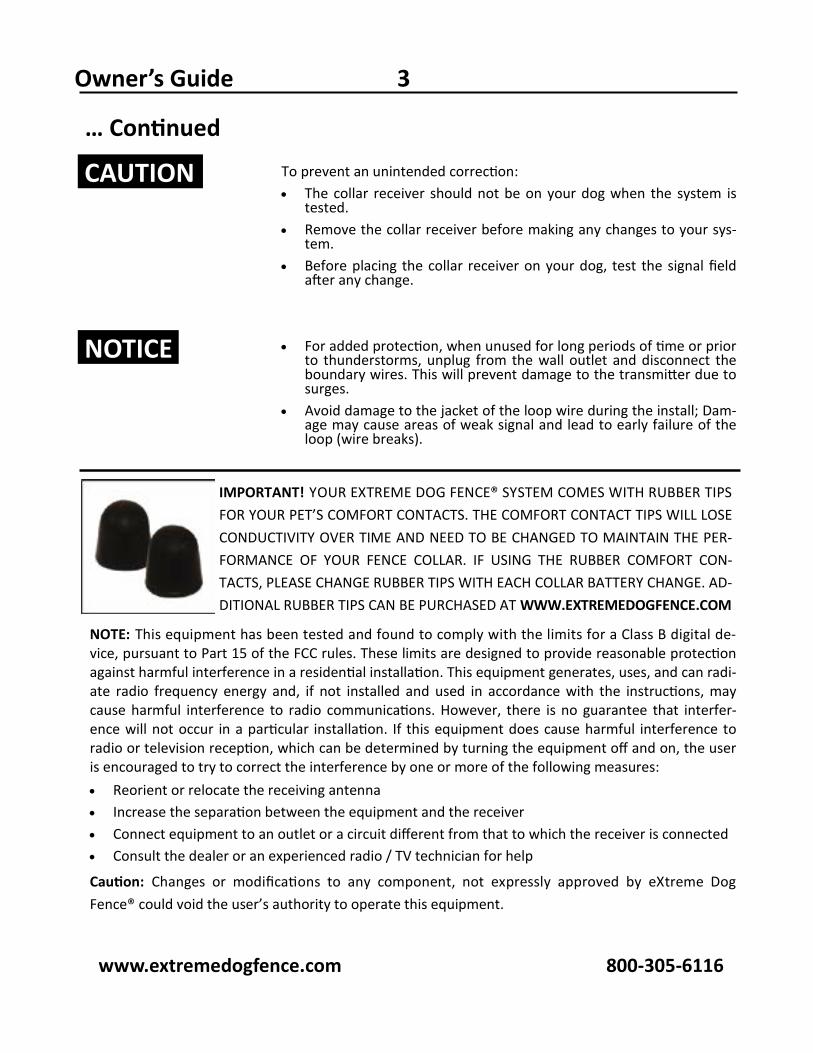
IMPORTANT! YOUR EXTREME DOG FENCE® SYSTEM COMES WITH RUBBER TIPS FOR YOUR PET’S COMFORT CONTACTS. THE COMFORT CONTACT TIPS WILL LOSE CONDUCTIVITY OVER TIME AND NEED TO BE CHANGED TO MAINTAIN THE PER-FORMANCE OF YOUR FENCE COLLAR. IF USING THE RUBBER COMFORT CON-TACTS, PLEASE CHANGE RUBBER TIPS WITH EACH COLLAR BATTERY CHANGE. AD-DITIONAL RUBBER TIPS CAN BE PURCHASED AT WWW.EXTREMEDOGFENCE.COM
NOTE: This equipment has been tested and found to comply with the limits for a Class B digital de-vice, pursuant to Part 15 of the FCC rules. These limits are designed to provide reasonable protection against harmful interference in a residential installation. This equipment generates, uses, and can radi-ate radio frequency energy and, if not installed and used in accordance with the instructions, may cause harmful interference to radio communications. However, there is no guarantee that interfer-ence will not occur in a particular installation. If this equipment does cause harmful interference to radio or television reception, which can be determined by turning the equipment off and on, the user is encouraged to try to correct the interference by one or more of the following measures: Reorient or relocate the receiving antenna Increase the separation between the equipment and the receiver Connect equipment to an outlet or a circuit different from that to which the receiver is connected Consult the dealer or an experienced radio / TV technician for help
Caution: Changes or modifications to any component, not expressly approved by eXtreme Dog Fence® could void the user’s authority to operate this equipment.
www.extremedogfence.com 800-305-6116
Owner’s Guide 4
Congratulations! You have purchased the most comfortable and reliable pet fencing sys-tem for your cherished family pet. eXtreme Dog Fence® Comfort Contact system was designed by the industry’s most experienced team to provide years of worry-free freedom for both you and your pet. Simply follow the steps outlined in this user’s guide and your fence will be operational in no time.
Should you have any difficulty along the way, help is available both by calling the Customer Care Center at 1-800-305-6116, or by sending an E-mail message to [email protected].
How the System Works The eXtreme Dog Fence® containment system has been tested and proven safe, comfortable, and effec-tive for dogs over 8 pounds. The system works by producing a radio signal from the fence transmitter box through up to 5000 feet of 14 gauge boundary wire (2500 feet of 20 gauge). The boundary wire is laid out to encompass your dog’s play area, completing a closed loop from and back to the transmitter. You temporarily define the boundary with training flags, as a visual aid while training your dog. Your dog wears a collar receiver with contact points that touch your pet’s neck and, once trained, is allowed to roam freely inside the containment area you define. When your dog reaches the signal field emitted from the boundary wire, the collar receiver gives a warning beep. If you dog continues a short distance further into the signal field (approximately 6 inches), a safe stimulation will be delivered through the contact points, signaling your dog to return to his containment area.
Key Terms TRANSMITTER: The power source that transmits the radio signal through the wire loop.
SIGNAL FIELD: The amount of warning/correction zone that is emitted from the wire in all directions.
BOUNDARY WIRE: The wire that surrounds the area you encompass to keep your dog within.
TWISTED WIRE: Two lengths of coupled wire that do not trigger the collar’s correction.
GROUND WIRE: A length of wire you cut to be used as basic protection against lightning surges.
WARNING BEEP: A warning tone the collar emits when it is within 6” or less of the correction zone.
SURGE PROTECTOR: The lightning protection unit that sits between your transmitter and wire.
COLLAR RECEIVER: The strap and oval unit that receives the radio signal from the boundary wire.
CONTACTS: The retractable probes and rubber tip covered metal probes that connect to the receiver.
FREQUENCY: The AM radio signal bands that the fence can be set to run on (7kHz and 4kHz).
www.extremedogfence.com 800-305-6116

INCLUDED COMPONENTS
Standard Grade Kit Boundary Wire (20 Gauge) Digital Transmitter (with Power Supply) Collar Receiver(s) 1x Battery Per Collar 1x Set of Medium Comfort Contacts Per Collar 1x Set of Long Steel Contacts Per Collar Training Flags (1 Per Each Foot of Boundary Wire) Waterproof Splice Kits Transmitter Mounting Hardware
Pro Grade Kit Boundary Wire (14 Gauge) Twisted Wire (16 Gauge) Digital Transmitter (with Power Supply) Dog Fence Surge Protector Collar Receiver(s) 1x Battery Per Collar 1x Set of Medium Comfort Contacts Per Collar 1x Set of Long Steel Contacts Per Collar Training Flags (1 Per Each Foot of Boundary Wire) Waterproof Splice Kits 10x Yard Staples Transmitter Mounting Hardware
Owner’s Guide 5
www.extremedogfence.com 800-305-6116
Table of Contents
Important Safety Information 1
How the System Works and Key Terms 4
Included Components 5
At a Glance (Overview) 7
Step 1 - Planning Your Fence Layout 9
Step 2 - Selecting a Transmitter Location 10
Step 3 - Layout Your Wire and Make Connections 11
Step 4 - Testing Your Fence Operation 14
Step 5 - Securing Your Fence Wire 15
Step 6 - System Adjustments and Programming 17
Step 7 - Training Your Dog(s) 21
Troubleshooting 26
Frequently Asked Questions 29
Short Loop Test 32
Terms of Use 33
Owner’s Guide 6
www.extremedogfence.com 800-305-6116
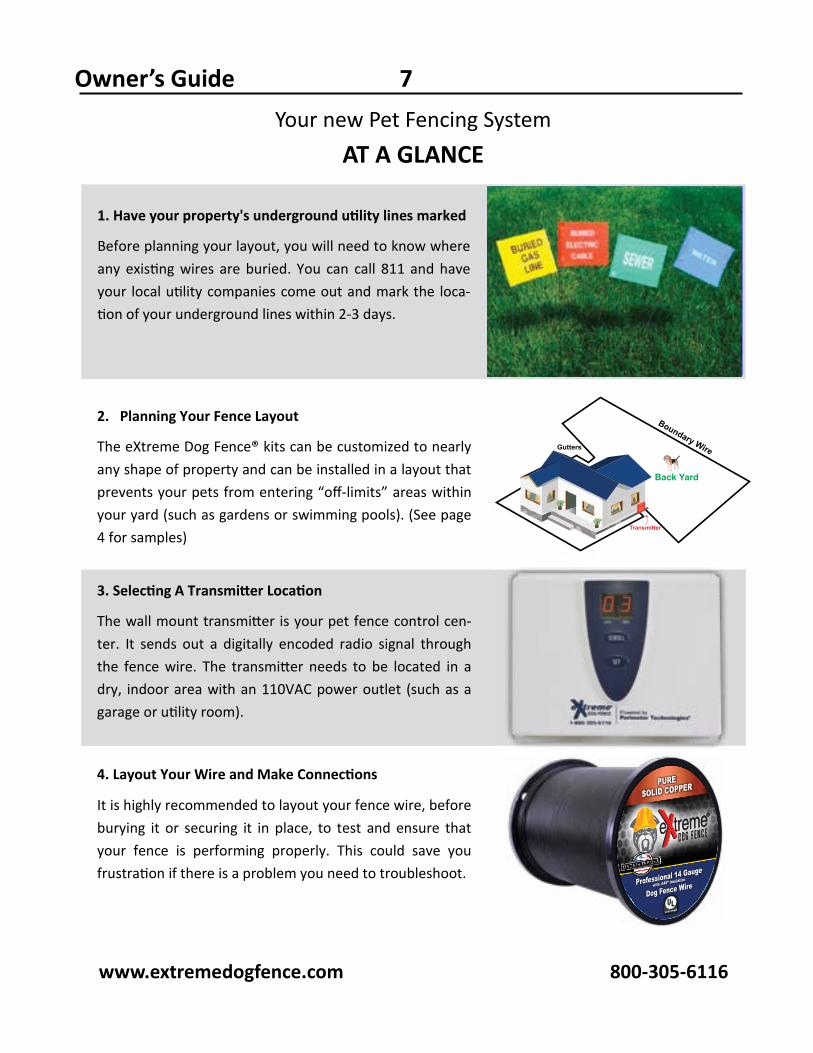
Owner’s Guide 7 Your new Pet Fencing System
AT A GLANCE
1. Have your property's underground utility lines marked
Before planning your layout, you will need to know where any existing wires are buried. You can call 811 and have your local utility companies come out and mark the loca-tion of your underground lines within 2-3 days.
2. Planning Your Fence Layout
The eXtreme Dog Fence® kits can be customized to nearly any shape of property and can be installed in a layout that prevents your pets from entering “off-limits” areas within your yard (such as gardens or swimming pools). (See page 4 for samples)
3. Selecting A Transmitter Location
The wall mount transmitter is your pet fence control cen-ter. It sends out a digitally encoded radio signal through the fence wire. The transmitter needs to be located in a dry, indoor area with an 110VAC power outlet (such as a garage or utility room).
4. Layout Your Wire and Make Connections
It is highly recommended to layout your fence wire, before burying it or securing it in place, to test and ensure that your fence is performing properly. This could save you frustration if there is a problem you need to troubleshoot.
www.extremedogfence.com 800-305-6116
®
Professional 14 Gauge
Dog Fence Wirewith .045” Insulation
Transmitter
Gutters
Back Yard
Boundary Wire

Owner’s Guide 8 Your new Pet Fencing System
AT A GLANCE
5. Testing Your Fence Operation
Set the desired width of the signal field emitted from the wire and set your collar to the training (beep only) level. If there is a neighboring fence system that is running on the same frequency, you can change your frequency to help avoid any interference.
6. Securing Your Fence Wire
If your eXtreme Dog Fence® is a Pro Grade package, you can either bury your wire as deep as 18”, secure it above ground using 6” landscape staples, or attach it to an ex-isting physical fence (depending on the material of the fence).
If your eXtreme Dog Fence® is a Standard Grade package, you should bury your wire from 1” to 3” deep.
7. Training Your Dog(s)
Training your pet will typically take 1-3 weeks, and consist of 1-2 training sessions per day. Each training session should be limited to 10-15 minutes each. Otherwise, your pet may become bored or lose interest. (See the training regimen on page 15)
www.extremedogfence.com 800-305-6116
Owner’s Guide 9
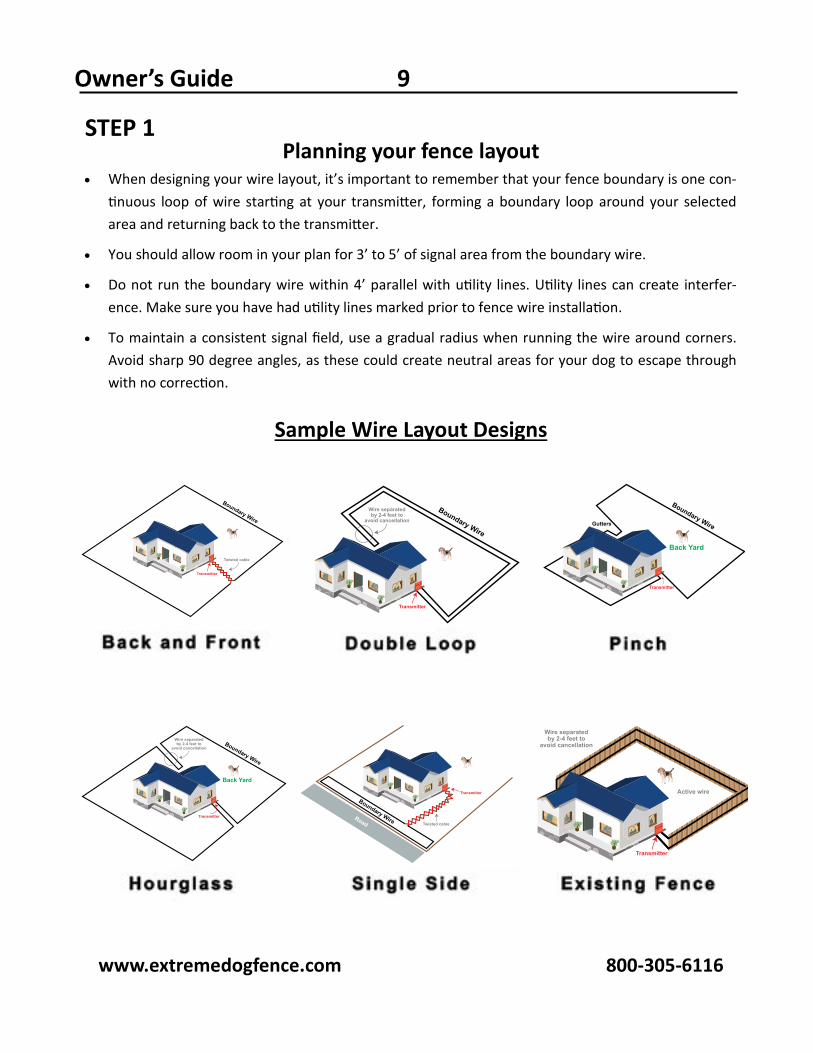
STEP 1 Planning your fence layout
When designing your wire layout, it’s important to remember that your fence boundary is one con-tinuous loop of wire starting at your transmitter, forming a boundary loop around your selected area and returning back to the transmitter.
You should allow room in your plan for 3’ to 5’ of signal area from the boundary wire.
Do not run the boundary wire within 4’ parallel with utility lines. Utility lines can create interfer-ence. Make sure you have had utility lines marked prior to fence wire installation.
To maintain a consistent signal field, use a gradual radius when running the wire around corners. Avoid sharp 90 degree angles, as these could create neutral areas for your dog to escape through with no correction.
Sample Wire Layout Designs
www.extremedogfence.com 800-305-6116
Transmitter
Wire separatedby 2-4 feet to
avoid cancellation
Back Yard
Boundary Wire
Transmitter
Twisted cable
Boundary Wire
Transmitter
Boundary Wire
Wire separatedby 2-4 feet to
avoid cancellation
Transmitter
Wire separatedby 2-4 feet to
avoid cancellation
Active wireTransmitter
Twisted cable
Boundary WireRoad
Transmitter
Gutters
Back Yard
Boundary Wire
Owner’s Guide 10
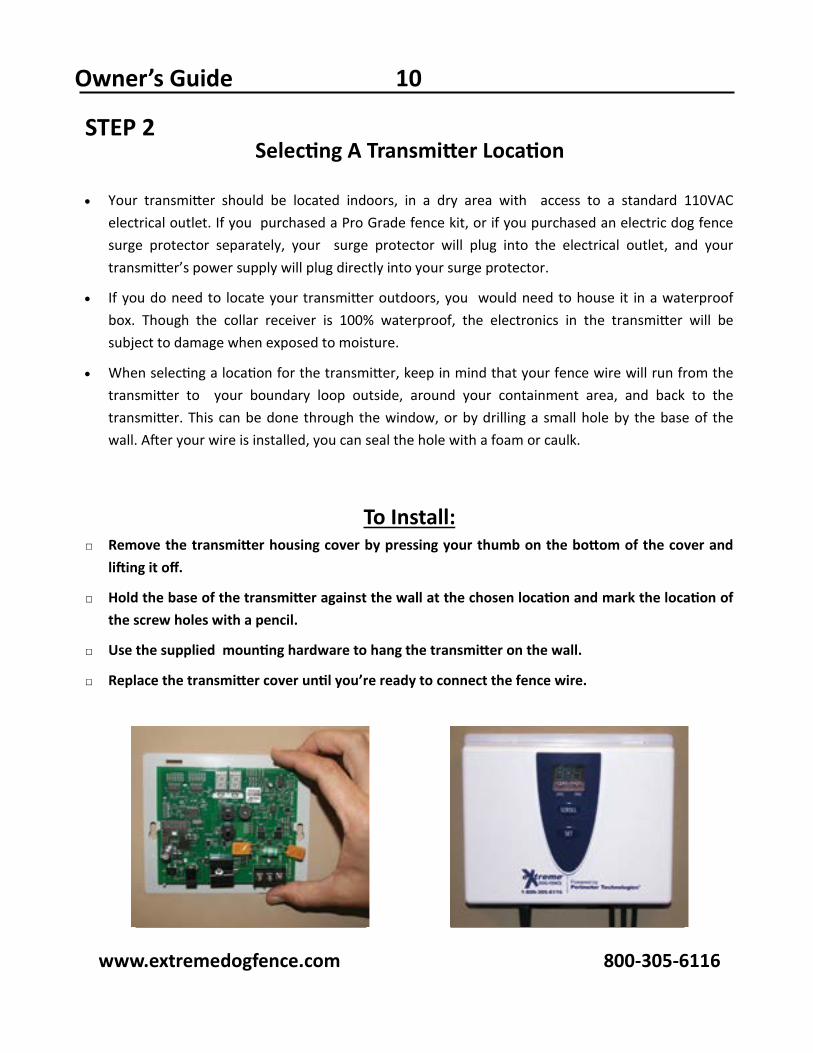
STEP 2 Selecting A Transmitter Location
Your transmitter should be located indoors, in a dry area with access to a standard 110VAC
electrical outlet. If you purchased a Pro Grade fence kit, or if you purchased an electric dog fence surge protector separately, your surge protector will plug into the electrical outlet, and your transmitter’s power supply will plug directly into your surge protector.
If you do need to locate your transmitter outdoors, you would need to house it in a waterproof box. Though the collar receiver is 100% waterproof, the electronics in the transmitter will be subject to damage when exposed to moisture.
When selecting a location for the transmitter, keep in mind that your fence wire will run from the transmitter to your boundary loop outside, around your containment area, and back to the transmitter. This can be done through the window, or by drilling a small hole by the base of the wall. After your wire is installed, you can seal the hole with a foam or caulk.
To Install: □ Remove the transmitter housing cover by pressing your thumb on the bottom of the cover and
lifting it off.
□ Hold the base of the transmitter against the wall at the chosen location and mark the location of the screw holes with a pencil.
□ Use the supplied mounting hardware to hang the transmitter on the wall.
□ Replace the transmitter cover until you’re ready to connect the fence wire.
www.extremedogfence.com 800-305-6116

STEP 3 Layout Your Fence Wire and Make Connections
Owner’s Guide 11
ACRES FEET OF WIRE NEEDED
1/3 500
1/2 700
1 1000
2 1400
3 1700
4 2000
5 2200
6 2400
7 2600
8 2800
9 3000
10 3200
12 3500
14 3700
16 4000
18 4200
20 4500
25 5000
Whether you select the Standard Grade kit or the Pro Grade kit, the base package includes 500 feet of boundary wire. You can add additional boundary wire in increments of 500 feet. Pro Grade kits also include 50 feet of twisted wire.
The Pro Grade (14 gauge) boundary wire is avail-able in continuous spools up to 5000 feet. How-ever, if you prefer to have it delivered in separate spools of smaller increments, we will accommo-date your request.
The Standard Grade (20 gauge) wire is available in continuous spools up to 2000 feet.
The Pro Grade twisted (16 gauge) wire is availa-ble in continuous spools up to 200 feet, in incre-ments of 50 feet.
NOTE: Wire (Including boundary wire and twist-ed wire) must form a closed loop with the trans-mitter. All splicing must be done on a one-to-one relationship. This prevents the incorporation of twisted into an arbitrary location along your boundary wire run, unless you are running a “double loop” layout (see Sample Layouts on page 9)
The table above indicates an approximate length of boundary wire needed for a rectangular, single loop layout. Length will vary due to the amount of twisted wire and layout used.
How Much Wire Do I Need?
www.extremedogfence.com 800-305-6116
Owner’s Guide 12
… Continued
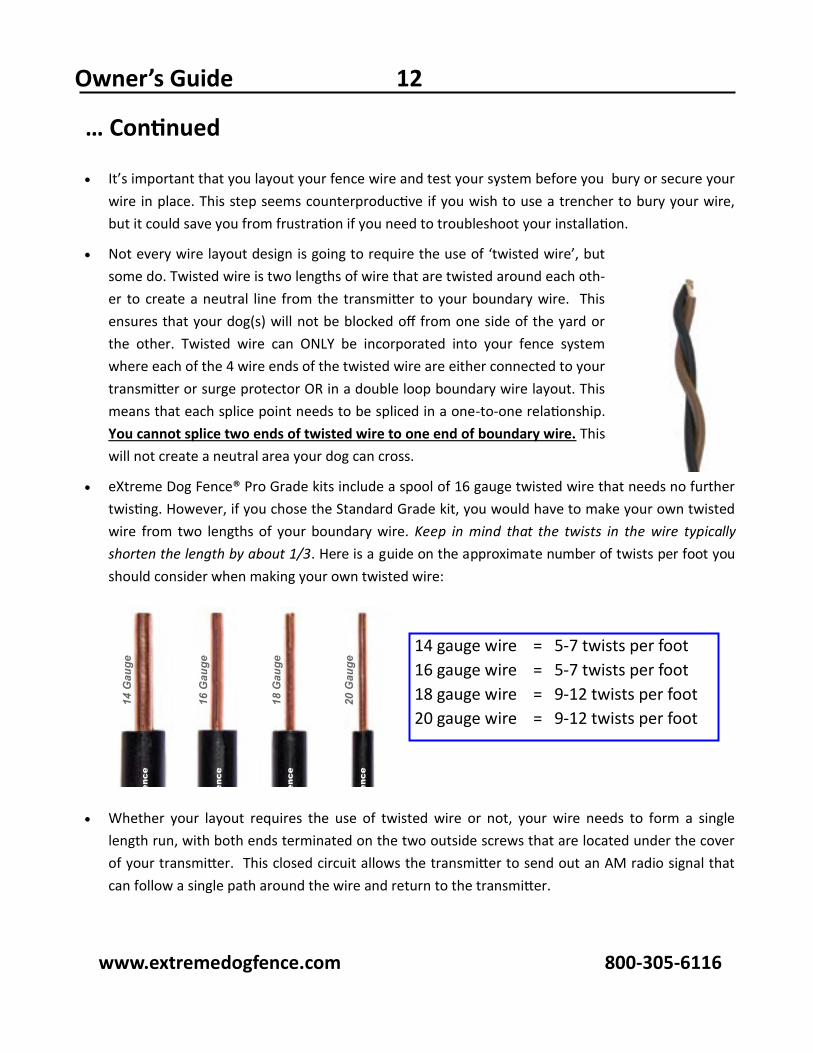
It’s important that you layout your fence wire and test your system before you bury or secure your wire in place. This step seems counterproductive if you wish to use a trencher to bury your wire, but it could save you from frustration if you need to troubleshoot your installation.
Not every wire layout design is going to require the use of ‘twisted wire’, but some do. Twisted wire is two lengths of wire that are twisted around each oth-er to create a neutral line from the transmitter to your boundary wire. This ensures that your dog(s) will not be blocked off from one side of the yard or the other. Twisted wire can ONLY be incorporated into your fence system where each of the 4 wire ends of the twisted wire are either connected to your transmitter or surge protector OR in a double loop boundary wire layout. This means that each splice point needs to be spliced in a one-to-one relationship. You cannot splice two ends of twisted wire to one end of boundary wire. This will not create a neutral area your dog can cross.
eXtreme Dog Fence® Pro Grade kits include a spool of 16 gauge twisted wire that needs no further twisting. However, if you chose the Standard Grade kit, you would have to make your own twisted wire from two lengths of your boundary wire. Keep in mind that the twists in the wire typically shorten the length by about 1/3. Here is a guide on the approximate number of twists per foot you should consider when making your own twisted wire:
Whether your layout requires the use of twisted wire or not, your wire needs to form a single length run, with both ends terminated on the two outside screws that are located under the cover of your transmitter. This closed circuit allows the transmitter to send out an AM radio signal that can follow a single path around the wire and return to the transmitter.
14 gauge wire = 5-7 twists per foot 16 gauge wire = 5-7 twists per foot 18 gauge wire = 9-12 twists per foot 20 gauge wire = 9-12 twists per foot
www.extremedogfence.com 800-305-6116
eXtr
eme
Dog
Fen
ce
eXtr
eme
Dog
Fen
ce
14 G
auge
16 G
auge
20 G
auge
18 G
auge
eXtr
eme
Dog
Fen
ce
eXtr
eme
Dog
Fen
ce
Owner’s Guide 13
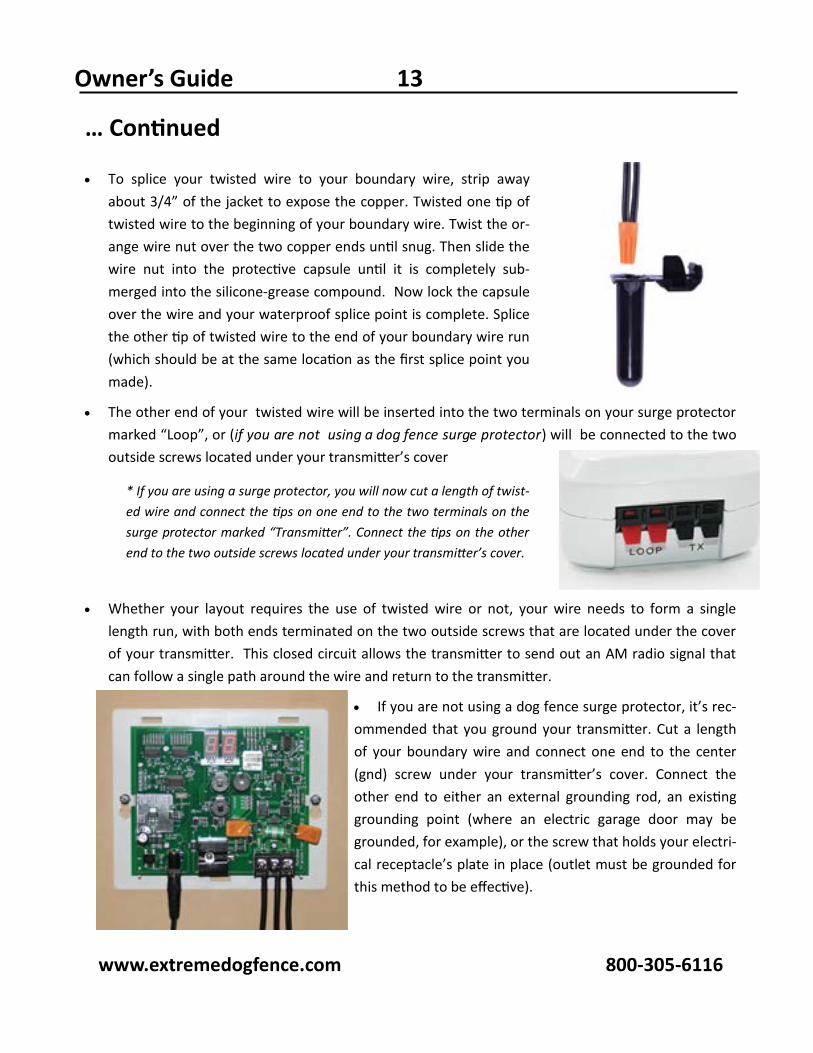
… Continued To splice your twisted wire to your boundary wire, strip away
about 3/4” of the jacket to expose the copper. Twisted one tip of twisted wire to the beginning of your boundary wire. Twist the or-ange wire nut over the two copper ends until snug. Then slide the wire nut into the protective capsule until it is completely sub-merged into the silicone-grease compound. Now lock the capsule over the wire and your waterproof splice point is complete. Splice the other tip of twisted wire to the end of your boundary wire run (which should be at the same location as the first splice point you made).
The other end of your twisted wire will be inserted into the two terminals on your surge protector marked “Loop”, or (if you are not using a dog fence surge protector) will be connected to the two outside screws located under your transmitter’s cover
Whether your layout requires the use of twisted wire or not, your wire needs to form a single length run, with both ends terminated on the two outside screws that are located under the cover of your transmitter. This closed circuit allows the transmitter to send out an AM radio signal that can follow a single path around the wire and return to the transmitter.
If you are not using a dog fence surge protector, it’s rec-ommended that you ground your transmitter. Cut a length of your boundary wire and connect one end to the center (gnd) screw under your transmitter’s cover. Connect the other end to either an external grounding rod, an existing grounding point (where an electric garage door may be grounded, for example), or the screw that holds your electri-cal receptacle’s plate in place (outlet must be grounded for this method to be effective).
* If you are using a surge protector, you will now cut a length of twist-ed wire and connect the tips on one end to the two terminals on the surge protector marked “Transmitter”. Connect the tips on the other end to the two outside screws located under your transmitter’s cover.
www.extremedogfence.com 800-305-6116
Owner’s Guide 14
STEP 4 Testing Your Fence Operation
It’s important to test that your system is functioning properly before securing your wire into its
permanent location. You want to ensure that your collar is activated consistently at the same distance from your wire, in various locations in your containment zone. As well, you want to be certain that your fence collar(s) do not activate in unwanted or random areas within your yard. (Random corrections would be caused by some source of interference. See troubleshooting section on page 22.)
To Test the Fence: □ Install battery in the collar: unscrew the battery cap on the collar. Insert the battery with the
positive side positioned closest to the outside. Replace the battery cap. (Note that the collar light will not come on unless the battery is running low, or you are programming it at the transmitter)
□ Power up your transmitter: Connect the power supply to the transmitter and plug it into your surge protector, or (if you do not have a surge protector) directly into your 110VAC electrical outlet.
□ Test the collar in your signal field: While holding your collar by the nylon strap, approach your fence wire, at different locations, and be sure that your collar emits a warning beep at the same distance from the wire each time. Next, stand inside the correction field and be sure that your collar beeps for approximately 15 seconds and then stops. (This is a safety feature built into the system to ensure that your pet does not get corrected indefinitely).
□ Test the collar over the twisted wire: While holding your collar by the nylon strap, walk over any twisted wire runs that you have connected to your boundary wire and ensure that your fence collar is not activated.
□ Test the collar in safe areas: While holding your collar by the nylon strap, walk around inside your containment area and be sure that your collar is not being activated where it should not be.
If everything tests successfully, you’re all set to finalize your fence installation and secure your wire into its permanent location.
* If any of the test steps fail, please see our troubleshooting section on page 20
www.extremedogfence.com 800-305-6116

Owner’s Guide 15
STEP 5 Securing Your Fence Wire
After ensuring that your eXtreme Dog Fence® is operating as expected, it’s time to bury or secure
your wire in its permanent location. Your options will vary depending on the gauge of wire you are using. Here are the most recommended suggestions:
To Bury Wire Method 1: You can use a garden hoe or spade shovel to cut an angled groove into your yard. Tuck your wire into the cut and press the earth back down over the wire.
To Bury Wire Method 2: Use a lawn edger to cut a groove into your lawn. Tuck your fence wire into groove, and cover with dirt.
To Bury Wire Method 3: (If you chose to forgo testing your wire, before securing it) You can use a trencher, which will cut the groove, lay your wire into it, and cover with dirt as you go. This type of machine can be rented from many building supply stores. Just be sure the one you rent will ac-commodate the spool(s) of wire that your kit was ordered with.
Above Ground Installation: (If using 14 or 16 gauge wire) You can opt to secure your wire to the ground using eXtreme Dog Fence® 6” landscape staples. You would set one at every 5’ interval of wire. This keeps your wire taut to the ground during the first few weeks, while the wire is settling, so lawn mowers will not grab it and nobody will trip over it.
Existing Fence Installation: Some customers will invest in an eXtreme Dog Fence® solution to sup-plement an existing physical fence. This is typically to deter pets from digging under or jumping over the existing fence. The Pro Grade solution is best for this supplemental application, because the 14 gauge wire can be attached directly to the existing fence (as long as it is not non-galvanized steel, aluminum, or other conductive metal that could cause interference). The wire can be secured in place with either zip ties, round headed staples, or simply weaved through chain links.
* With 16 or 14 gauge wire, you can bury part and have part above ground, as needed.
20 or 18 Gauge Wire Bury 1” - 3” Deep 16 Gauge Wire Bury 1” - 10” Deep or
Secure to Ground with Staples at Every 5’
14 Gauge Wire Bury 1” to 18” Deep or Secure to Ground with Staples at Every 5’ or Attach to Existing Wood or Galvanized Physical Fence
www.extremedogfence.com 800-305-6116
Owner’s Guide 16
… Continued Securing Your Fence Wire
When it comes to crossing driveways, there are a handful of options to consider, depending on
your driveway material.
1. Expansion Seam: If you have a cement driveway, you will typically find expansion seams in one or more locations. You can remove any necessary material, lay your wire into the seam, and then cover with an external grade caulk.
2. Circular Saw: If you have a cement or asphalt driveway, without a usable expansion seam, you can cut a path for your wire. Using a circular saw with a masonry blade, cut a clean groove across your driveway. Place your wire into the cut and cover with an exterior grade caulk.
3. Conduit: If you have a gravel driveway, you can bury a protective conduit (such as PVC or garden hose), and run your fence wire through this tube. This will protect your wire’s jacket from damage, and will not impede your fence signal. (Do not run any other conductive wire through this conduit with your fence wire, as it may cause interference)
4. Driveway Traverse Strip: If you have a cement, asphalt or compacted gravel driveway, and prefer a non-destructive method to traverse it, you can purchase a Driveway Traverse Strip. This is a 16’ long external cable manager that you can run your wire through. You can drive over this strip with full assurance that your wire is completely protected. The adhesive back will keep this strip in place.
It’s important to test that your system is functioning properly before securing your wire into its per-manent location. You want to ensure that your collar is activated consistently at the same distance from your wire, in various locations in your containment zone. As well, you want to be certain that your fence collar(s) do not activate in unwanted or random areas within your yard. (Random cor-rections would be caused by some source of interference. See troubleshooting section on page 22.)
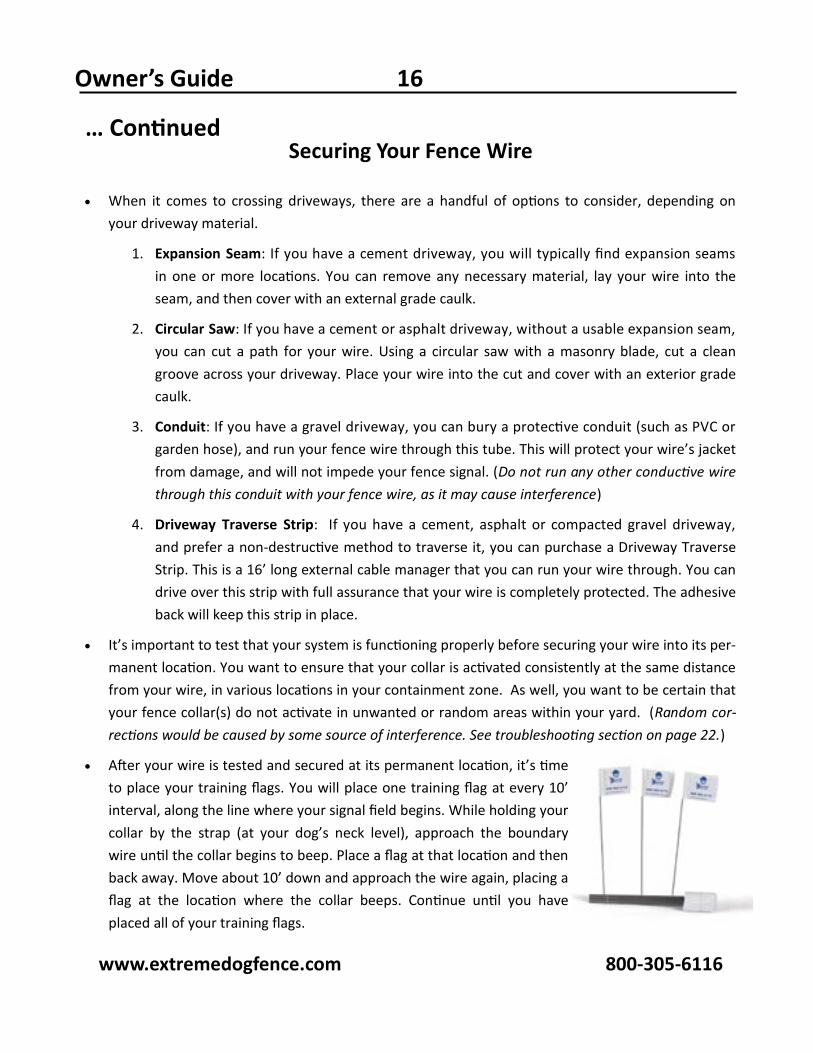
After your wire is tested and secured at its permanent location, it’s time to place your training flags. You will place one training flag at every 10’ interval, along the line where your signal field begins. While holding your collar by the strap (at your dog’s neck level), approach the boundary wire until the collar begins to beep. Place a flag at that location and then back away. Move about 10’ down and approach the wire again, placing a flag at the location where the collar beeps. Continue until you have placed all of your training flags.
www.extremedogfence.com 800-305-6116

Owner’s Guide 17
STEP 6 System Adjustments and Programming
1. THE SIGNAL FIELD
Under normal operation, the number you see on your transmitter’s LCD screen represents the signal field. This is the distance from the wire that your pet’s collar will activate.
This field is emitted from the wire in all directions. If your collar is activated at a distance of 5’ from the boundary wire inside the yard, it will also be activated at a distance of 5’ from the wire outside of the yard. This gives you a total horizontal signal field of 10’. It also means that the collar will activate 5’ above the wire and 5’ below.
To increase your signal field, press the ‘Scroll’ button on the transmitter. The number on the screen will increase by 1 each time you press it.
To decrease your signal field, press the ‘Set’ button on the transmitter. The number on the screen will decrease by 1 each time you press it.
The number does not necessarily correspond to a measurement of your signal field in feet. There are a number of factors that play a role in the potential maximum width of field you can achieve, such as:
Amount of Wire: The more wire you have on your fence, the more resistance your fence signal will have to contend with. For instance, with 500’ of boundary wire, your signal field setting of “10” may provide 4-5’ of signal field in all directions. However, with 2000’ of boundary wire, your signal field setting of 10 may only provide 2-3’ of signal in all directions.
Wire Gauge: Another consideration is the gauge/quality of your wire. For instance, the heavy duty 14 gauge wire is going to have much less resistance on it than its thin 20 gauge counterpart. This means that a Pro Grade fence with 2000’ of wire is going to allow for a wider signal field than would a Standard Grade fence with 2000’ of wire.
Interference: If you have underground utilities that are run parallel and too close to your dog fence wire, it is possible that they could draw your fence signal down like a magnet. This could deplete the signal emitted from your fence wire. This is why it is very important to have your underground utilities marked before you begin your dog fence installation.
Frequency: If you have accidentally changed your frequency setting, and your collar(s) and transmitter are not in sync, you may have to be right on top of the wire to trigger it. Correct-ly recalibrating the frequency between the transmitter and collar(s) will rectify this.
www.extremedogfence.com 800-305-6116

Owner’s Guide 18
… Continued System Adjustments and Programming
2. THE COLLAR CORRECTION LEVEL
The eXtreme Dog Fence® collar receivers have several correction levels to choose from, as well as a tone/beep only level. This allows our containment systems to accommodate a wide array of different personalities and temperaments. Though the system can accommodate an unlim-ited number of collars, each collar will be set independently. This ensures that no dog will be overcorrected. The 3 eXtreme Dog Fence® systems each have their own correction level op-tions, as follows:
Timid System:
Active System:
Hyper System:
Designed for the skittish dogs. Not recommended for most dogs. The lightest correction levels ac-commodate the most timid of pets. Only about 5% of dogs can benefit from the Timid system.
Level 0 Beep Only Level 1 Low Level 2 Medium Level 3 High Level 4 Progressive (1, 2, 3)
Level 0 Beep Only Level 1 Extra-Low Level 2 Low Level 3 Medium Level 4 Medium-High Level 5 High Level 6 Low-Progressive (1, 2, 3) Level 7 High-Progressive (3, 4, 5)
Level 0 Beep Only Level 1 Low Level 2 Low-Medium Level 3 Medium Level 4 High Level 5 Extra-High Level 6 Low-Progressive (1, 2, 3) Level 7 Med-Progressive (2, 3, 4) Level 8 High-Progressive (3, 4, 5)
The best system for 88% of dogs. The 7 correction levels accommodate dogs from 8 lbs right up to 120 lbs, and even larger. The majority of large dog owners will not need anything more powerful than the correction levels on this system.
For the ultra-stubborn dogs, we have the Hyper system. About 7% of dogs ever need this fence system. Most hard-headed dogs do just fine with the higher levels on the Active system. However, there are some exceptions, and the Hyper system will put out that extra kick you may need.
www.extremedogfence.com 800-305-6116

Owner’s Guide 19
… Continued System Adjustments and Programming
Setting Your Collar Correction Level
Training should always be started with the dog’s collar on level 0 (beep only). This will help keep your dog from being overwhelmed during the first few days of his/her introduction to your new fence system.
To set/change the correction level on your dog’s collar, you will need to have the collar in hand and be at the transmitter. Follow these steps:
1. Simultaneously press the ‘Scroll’ and ‘Set’ buttons on the transmitter, and hold them in until your screen changes to “00” (about 3-4 sec-onds). Release the buttons. Your screen will immediately change from “00” to the level that your collar is presently set to.
2. While the collar level is flashing, press the ‘Scroll’ button to increase the level by 1.
3. Hold your collar right next to the transmitter and press the ‘Set’ button. You should see your collar’s LED flash the number of times corresponding to the correction level you set (ie: When setting the collar to level 4, you will see the collar’s LED flash 4 times to signal a suc-cessful programming).
4. After you have set your collar’s correction level, the transmitter will return to normal opera-tion, displaying your signal field setting.
If you hold these buttons in for too long, your screen will pass “00” and go to either “01” or “02”. This is the frequency programming mode.
Either let this time out and return to the default screen, or unplug the transmitter’s power supply for 5 seconds, and plug it back in. Then you can start again.
In order to set the collar to a lower level than it is presently set to, you will need to cycle up through all the levels on the transmitter using the ‘Scroll’ button. After level 8, you will reach 0 again. You cannot hit the ‘Set’ button to go down a level.
Keep in mind that when increasing your collar correction level, you should only do so one level at a time.
Ensure that the collar is snug enough, on your dog’s neck, so that you can fit a single finger between the dog’s neck and one of the contact probes. If the collar is too loose, the probes may not make good enough contact for your dog to feel the correction.
www.extremedogfence.com 800-305-6116

Owner’s Guide 20
… Continued System Adjustments and Programming
Setting Your Collar Correction Level
Changing Your Fence Frequency Setting
One unique feature of the eXtreme Dog Fence® line of containment fences is the multiple fre-quencies on which the system can run. The two frequency options are:
To set/change the frequency that your fence is communicating on, you will need to have the collar in hand and be at the transmitter. Follow these steps:
1. Simultaneously press the ‘Scroll’ and ‘Set’ buttons on the transmitter, and hold them in until your screen bypasses “00”, and displays either “01” or “02” (about 7-8 seconds). Release the buttons.
2. While the frequency setting is flashing, press the ‘Scroll’ button to cycle between “01” and “02”. Select the frequency you wish to set.
3. Hold your collar right next to the transmitter and press the ‘Set’ button. You should see your collar’s LED flash the number of times corresponding to the setting you set (ie: When setting the frequency to “01” [7kHz], you will see the collar’s LED flash 1 time to signal a suc-cessful programming).
4. After you have set your fence’s frequency, the transmitter will return to normal operation, displaying your signal field setting.
When selecting a correction level for your dog, you want to look for a physical response when he/she enters the correction signal field. The dog’s neck may cock back, or ears perk up, or the dog may scratch at the collar. This is a good indicator that you have a good level set for this dog.
Each dog’s collar will be set independently, according to each dog’s individual personality and temperament.
You may call our professional support staff at 800-305-6116 for assistance with programming your collar correction level.
You should not have to change your frequency setting unless there is a neighboring fence system that is causing interference.
Setting Frequency 01 7kHz 02 4kHz
Repeat this process for each fence collar, or if your attempt was unsuccessful.
You may call our professional support staff at 800-305-6116 for assistance .
www.extremedogfence.com 800-305-6116
Owner’s Guide 21
STEP 7 Training Your Dog(s)
Please take your time training your dog and complete each step of the process to enjoy optimal perfor-mance from your eXtreme Dog Fence® system. If you have questions along the way, expert advice is only a call away at 800-305-6116.
The goal of fence training is to:
Help you teach your dog to identify and respect his/her new fence
To make the training fair—so your dog will understand the consequences of leaving
To make the training fun—so your dog will enjoy staying and playing on your property.
Completely trusting your dog with his eXtreme Dog Fence® will take place over the course of about 1-3 weeks. The training is a small part of this process. The rest of the time is just close supervision.
Training your dog is a very important process and imperative to ensuring that your dog will be safely contained within the boundary you set. Without training, your dog would receive corrections, when entering the correction field, and not understand why.
Time should be set aside to work with your dog(s) for 10-15 minutes, one or two times per day (per dog).
Both you and your dog will appreciate the short, fun lessons and this will make the training more effec-tive.
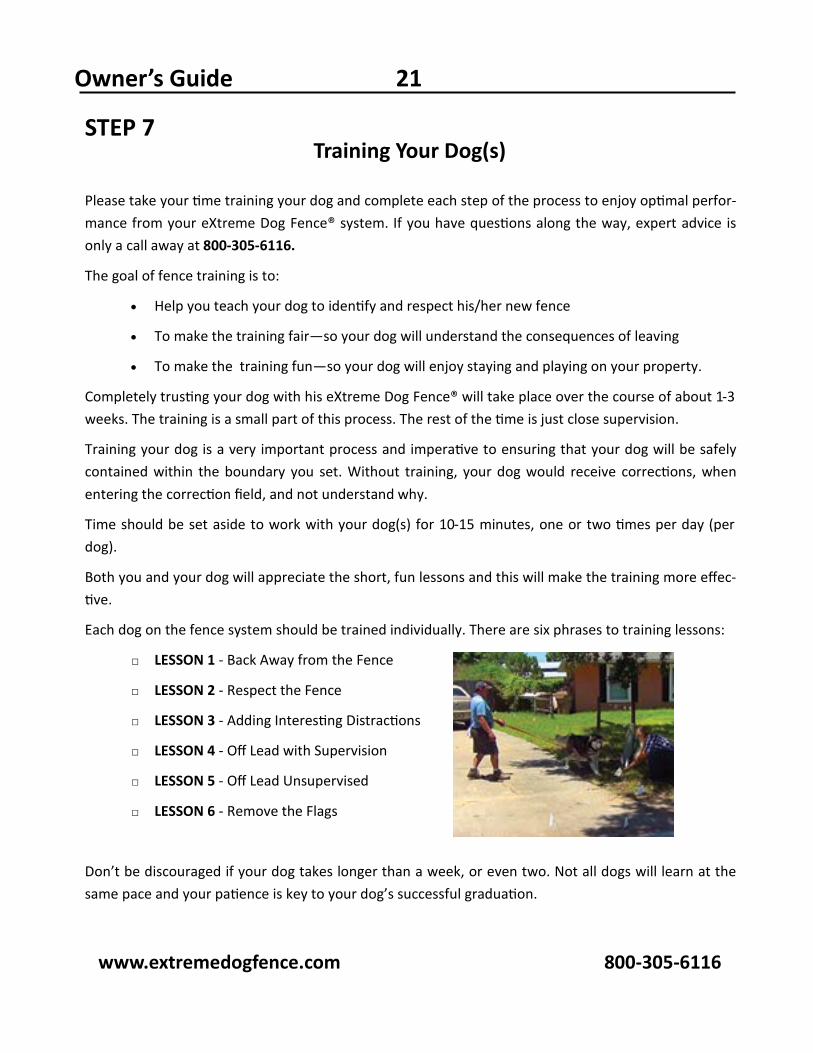
Each dog on the fence system should be trained individually. There are six phrases to training lessons:
□ LESSON 1 - Back Away from the Fence
□ LESSON 2 - Respect the Fence
□ LESSON 3 - Adding Interesting Distractions
□ LESSON 4 - Off Lead with Supervision
□ LESSON 5 - Off Lead Unsupervised
□ LESSON 6 - Remove the Flags
Don’t be discouraged if your dog takes longer than a week, or even two. Not all dogs will learn at the same pace and your patience is key to your dog’s successful graduation.
www.extremedogfence.com 800-305-6116
Owner’s Guide 22
… Continued Training Your Dog(s)
Helpful Hints:
Use a calendar so you can keep track of the training process. Your dog’s behavior will tell you when it is time to proceed to the next lesson.
A training session includes putting the eXtreme Dog Fence® collar on your dog, making sure that the collar has the proper fit (high on the dog’s neck) and is making contact with the dog’s skin.
Start every session playing with a favorite toy and plenty of praise. Make sure your dog is comforta-ble and having fun.
Do boundary work at locations around the entire boundary of your yard.
Always end sessions with your dog successfully avoiding the fence and with more play and praise.
If you are training more than one dog, train each dog in separate training sessions.
LESSON 1 - Back Away from the Fence
Start the first phase of training with the collar set to level “00” (beep only). This is to ensure that your dog can hear the warning tone at the boundary, but there is no chance of correction. You can introduce a correction level (“1”) in lesson 2 of the training.
Put the electronic training collar on your dog and make sure the wall mount transmitter is turned on.
The first lesson is to introduce your dog to the boundary and to help him/her understand to back away from the fence when the warning tone is heard.
With your dog on a lead, casually walk to the boundary. When the dog reaches the signal field and hears the warning beep, immediately spin around and briskly jog back into the yard. The dog will feel the tug and run after you. Praise enthusiastically.
On days two and three repeat the same lesson in a different part of the yard. As the training sessions of the next day or two progress, you’ll see that your dog will start to anticipate the sig-nal and retreat without your prompting.
Training is successful if your dog retreats without your prompting and refuses to approach the boundary as your approach. For each successful attempt, be sure to praise, praise and praise again.
www.extremedogfence.com 800-305-6116
Owner’s Guide 23
… Continued Training Your Dog(s)
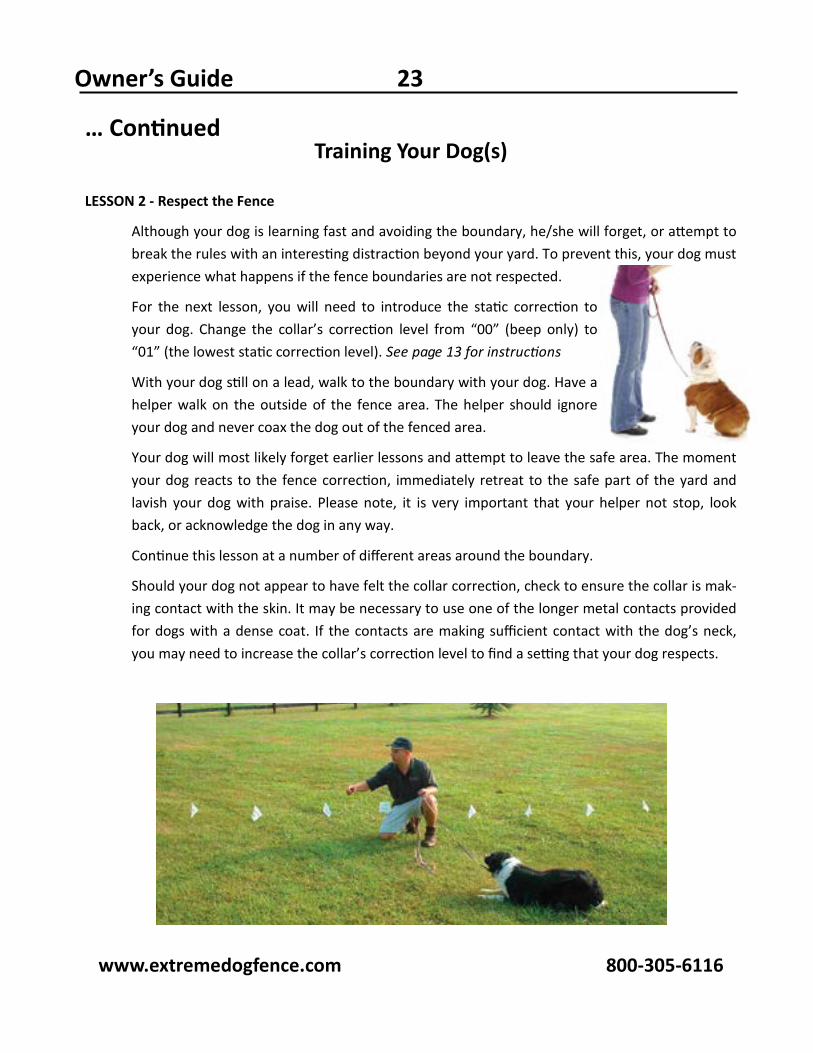
LESSON 2 - Respect the Fence
Although your dog is learning fast and avoiding the boundary, he/she will forget, or attempt to break the rules with an interesting distraction beyond your yard. To prevent this, your dog must experience what happens if the fence boundaries are not respected.
For the next lesson, you will need to introduce the static correction to your dog. Change the collar’s correction level from “00” (beep only) to “01” (the lowest static correction level). See page 13 for instructions
With your dog still on a lead, walk to the boundary with your dog. Have a helper walk on the outside of the fence area. The helper should ignore your dog and never coax the dog out of the fenced area.
Your dog will most likely forget earlier lessons and attempt to leave the safe area. The moment your dog reacts to the fence correction, immediately retreat to the safe part of the yard and lavish your dog with praise. Please note, it is very important that your helper not stop, look back, or acknowledge the dog in any way.
Continue this lesson at a number of different areas around the boundary.
Should your dog not appear to have felt the collar correction, check to ensure the collar is mak-ing contact with the skin. It may be necessary to use one of the longer metal contacts provided for dogs with a dense coat. If the contacts are making sufficient contact with the dog’s neck, you may need to increase the collar’s correction level to find a setting that your dog respects.
www.extremedogfence.com 800-305-6116

Owner’s Guide 24
… Continued Training Your Dog(s)
LESSON 3 - Adding Interesting Distractions
If your dog is avoiding the boundary at multiple locations around your boundary, you are ready to add more tempting distractions. Remember, never pull or coax your dog into the boundary area.
This lesson teaches your dog that he must resist all temptations to leave the yard.
You can’t assume that if your dog won’t chase a ball out of the yard, he won’t chase a bicycle or your favorite neighbor.
Interesting distractions you can employ can be anything that your dog could get excited about. Some examples may include:
Another pet
A family member
A favorite toy
A neighbor
A child on a bicycle
A laser pointer
Your training has been successful at this point if your dog has resisted the urge to cross the boundary, on lead, with any distractions you can dream up.
LESSON 4 - Off Lead with Supervision
After several sessions of distractions, your dog should be ready for off lead play. You must stay in the yard for off lead training. This is a good time for testing the success in the previous train-ing lessons.
The more your dog stays on the property, for the first month, the less chance of your dog ever attempting to leave the area.
Continue to supervise and play with your dog outside for a period of 3-7 days. Watch to see how your dog reacts to distractions.
Should your dog run out of the containment area, for any reason, revisit your distractions train-ing step (with your dog on a leash).
www.extremedogfence.com 800-305-6116

Owner’s Guide 25
… Continued Training Your Dog(s)
LESSON 5 - Off Lead Unsupervised
When your dog resists all manner of distractions, both on and off the lead, he can be left un-attended in the yard.
Keep a close eye on your dog for two weeks, from inside the house. Ensure that your pet is not conscious of your watchful eye. It’s during the time when he/she believes they are unattended that their temptation will truly be tested.
This freedom should be brief at first and the amount of time increased gradually.
Before and after each unsupervised session, you must continue the play and praise routine to reinforce that the yard is a happy, fun and safe place to be.
Remember, not all dogs learn the same. Do not be afraid to step back and revisit any of the pre-vious steps if needed.
LESSON 6 - Removing the Flags
After two weeks of successful containment, you can begin removing the flags. Start by remov-ing every other flag, every other day, until all of the flags are gone.
The leads, trainers, flags and electronic fence collar are all clues for your dog to learn the boundaries. They are all removed gradually, except the electronic fence collar.
It’s essential that you observe whether your off-lead, unsupervised dog still avoids and retreats from the unmarked boundary. If your dog’s response is anything but immediate, retrace your steps through the training process.
Remember, once your dog is properly trained and respecting his/her new boundaries, your dog will be safe from:
Walking Into Traffic
Wandering Off / Getting Lost
Bothering Neighbors
Chasing Cars or Bicycles
www.extremedogfence.com 800-305-6116
Owner’s Guide 26
SYMPTOM SOLUTIONS
You plug in your transmitter and it does nothing
Check the following items:
1. Problem with AC outlet: Plug your transmitter into an AC out-let that you are certain is functioning properly. If it powers up, the problem lies with the original AC outlet.
2. Problem with Transmitter: Double check to ensure that your AC adapter is snugly connected to the transmitter’s AC port.
If these items were checked and your transmitter still does not power up:
Contact Support: 800-305-6116
Collar must be right over the wire to activate the beep/correction
Check the following items:
1. Signal field setting: Look at the screen on your transmitter. If it’s set to 4 or lower, try to increase the field using the ‘Scroll’ button and check again.
2. Frequency setting: Go into frequency setting mode (see page 20) and ensure that your frequency is correctly set between collar and transmitter. Set them to “01”, unless you specifically need your fence frequency changed to avoid interference with neighboring fence system. Then you can set it to “02”.
3. Interference: Did you have your underground utilities marked before installing your fence system? If not, there could be a buried line that is too close and parallel to your dog fence wire. This could be drawing your signal away from your bound-ary wire.
Still having issues?
Contact Support: 800-396-5517
TROUBLESHOOTING
www.extremedogfence.com 800-305-6116
Owner’s Guide 27
TROUBLESHOOTING
SYMPTOM SOLUTIONS
You plug in your transmitter and it’s flashing and alarming
You can determine where the problem lies by:
1. Checking your wire connections: Ensure that you have con-nected your wire ends to the two outer screws under the cov-er of your transmitter. The center screw is only for grounding fence systems that do not have a surge protector. (See page 13) If your fence system has a surge protector, make sure that your wires coming from outside are connected to the surge protector’s terminals marked “Loop”, and that you have a length of twisted wire connecting the terminals on the surge protector marked “Transmitter” and the two outer screws lo-cated underneath the cover of your transmitter.
2. Short Loop Test: (see page 32 for more detail) Disconnect your fence wire from the transmitter, and replace it with a 3’ mini-mum length of your remaining wire. If the flashing/alarming ceases when you power up the transmitter, then your problem is not the transmitter. (If you have a dog fence surge protector, move your short loop wire to the two terminals on the surge protector marked “Loop”, and reconnect the wires between the transmitter and the two terminals on the surge protector marked “Transmitter”. If you power on the transmitter and the flashing/alarming begins again, then the problem lies in your surge protector. Contact support for assistance. If the flashing/alarm does not begin again, then your issue lies in your wire run or splice connections.)
Still having issues?
Contact Support: 800-305-6116
… Continued
www.extremedogfence.com 800-305-6116
Owner’s Guide 28
TROUBLESHOOTING
SYMPTOM SOLUTIONS
You have correctly set the col-lar correction level, and it’s being triggered in the signal field, but your dog shows no response
Check the following items:
1. Collar fit: Make sure your dog’s collar is snug enough so that you can only get one finger between the dog’s neck and one of the contact probes.
2. Contact probes: If your collar has the shorter probes attached, but your dog has longer neck hair –The probes may not be making good contact with the neck. Replace the probes with longer ones, that will traverse your dog’s neck hair, and test again.
3. Correction level: Double check your collar to make sure it’s not set to level 0 (beep only). (see page 19). If it’s set to a cor-rection level between 1-4, increase the level by 1 and test it again. Be sure to follow the correction level settings that corre-spond to your eXtreme Dog Fence® model (see page 18)
Still having issues?
Contact Support: 800-305-6116
Your dog is getting random corrections inside of the con-tainment area
Check the following items:
1. Utility lines: Make sure that your signal field is set low enough so that it does not reach any underground utility line that is parallel to your dog fence wire.
2. Home’s wiring: Make sure that your dog fence wire is not run parallel and close enough to the electrical, phone, and cable wires in your home’s walls that your dog fence signal field can reach them. The fence signal can easily jump to your home’s internal wiring and create a web of fence signal inside the home.
Still having issues?
Contact Support: 800-305-6116
… Continued
www.extremedogfence.com 800-305-6116
Owner’s Guide 29
FREQUENTLY ASKED QUESTIONS Which eXtreme Dog Fence® is right for me?
Most dogs are going to be a good fit for the “Active” system. The 7 different correction levels to choose from, and collar re-ceiver’s small profile make this system the ‘go to’ pet fence for most pet owners.
On rare occasion, there may be a dog that has decided he/she will muscle through all of the correction levels the Active sys-tem has to offer. In this case, your dog may need the “Hyper” collar. Due to the low strength of the lowest correction level on the Active system, the “Timid” system is only needed in the rarest of circumstances. Its physical profile is the same as the Active collar, but the correction levels are about 30% lighter.
All three systems come in either a Standard Grade kit or a Pro Grade kit (see page 5 for differences). They also all utilize the same transmitter, which makes all three systems compatible with one another.
Does the wire have to make a loop or can I leave it open ended?
No matter what your configuration needs are, you do need to form a closed loop with your transmitter. The closed loop needs to be a single virtual wire, meaning that you cannot in-troduce a length of twisted wire, along your perimeter, in a single loop wire layout.
Can I use twisted wire to create a neutral area for my dog to cross over the bounda-ry wire?
The only times you can splice twisted wire into your boundary wire are:
1. When creating a line from the points where your boundary wire begin and end to the transmitter (or surge protector if one is used.)
2. When you setup your boundary wire in a double loop lay-out (see page 12 for detail).
Can my children get hurt? No. The corrections are emitted from the contacts located on the collar receiver. The wire only carries an AM radio signal, and is completely safe to touch.
www.extremedogfence.com 800-305-6116
Owner’s Guide 30
FREQUENTLY ASKED QUESTIONS Is this difficult to setup? The eXtreme Dog Fence® systems are feature rich, but not
difficult to install. If you follow the steps outlined in this manu-al, you will have no trouble. However, if you feel overwhelmed at any time, you can contact our professional support staff 7 days per week at 800-305-6116. They are very happy to pro-vide you step by step assistance at your most comfortable
Can I use an eXtreme Dog Fence® with my existing fence?
Yes. Many customers will supplement their traditional fence with an eXtreme Dog Fence® system in order to deter digging under or jumping over the traditional fence.
Can I use an eXtreme Dog Fence® on more than one dog?
Yes. The eXtreme Dog Fence® systems can accommodate any number of dogs, with the purchase of one of the three com-patible collar options.
How old does my dog need to be before I can start training him/her on the fence?
Though 6 months is the rule of thumb, the more real world answer would be; “When your dog is able to understand and respond to basic obedience commands like ‘sit’ and ‘stay’.”
Are the collar receiver batteries recharge-able?
No. There are presently no rechargeable batteries for any of the three eXtreme Dog Fence® collars.
How long do the collar receiver batteries last?
The initial battery will deplete quicker than normal during your training period. However, after your training is complete, and your dog is not challenging the fence line often, each battery will provide an average of 4-5 months of life.
Why is my transmitter beeping and flash-ing?
This is an alarm. It signals you that your fence system is inop-erable. In other words, the fence signal is not leaving one end of the wire and returning to the transmitter through the other end. (see troubleshooting on page 27.)
www.extremedogfence.com 800-305-6116
FREQUENTLY ASKED QUESTIONS Is the collar receiver waterproof? Yes. The collar receiver is not only waterproof, but it is also
submersible to 10 feet deep. Your dog can safely go for a swim and the collar will not be compromised or emit a stronger or weaker correction in the signal fields.
Can I set the transmitter up outside? Because the transmitter is subject to damage by moisture, it is highly recommended that it be setup in the home, a garage, or shed next to a 110VAC electrical outlet.
However, if you do wish to have it outdoors, we recommend the use of a waterproof box to house it in.
Can I use a different gauge of wire to re-pair or extend my fence’s coverage?
If you need to splice in a different gauge of wire from what is already used in your fence system, you should only go up or down 1 gauge. Anything more and your fence may not operate correctly, reliably, or consistently.
How do I ground my fence system? If you do not have a dog fence surge protector, then ground-ing your transmitter is certainly recommended.
To do so, you can cut a length of your boundary wire and con-nect one end to the center screw located under the cover of your transmitter. Connect the other end of wire to either a grounding rod, the center screw that hold the plate on your electrical outlet, or any other existing grounding point nearby.
Is there a remote I can use with this fence to do obedience training with the same collar?
eXtreme Dog Fence® does have a companion handheld re-mote training kit, but it is not designed to use the same collar.
We have found it to be more effective when a dog can associ-ate containment with one collar and behavior training with another. It’s far less confusing for the dog and provides quick-er results.
Owner’s Guide 31
www.extremedogfence.com 800-305-6116
Owner’s Guide 32
SHORT LOOP TEST The Short Loop Test is a simple test that will help determine which fence component (transmitter, surge protector, collar receiver, wire) is the source of a malfunctioning system. This test is performed at the transmitter, and will require the following parts:
A Length of Left Over Boundary Wire (3’ or More Recommended) Wire Strippers
TEST 1 STEPS: 1. Disconnect the power cord from your transmitter. 2. Disconnect the wire ends from the screw terminals under the cover on your transmitter. 3. Strip the jacket from the ends of your length of test wire and connect each end to the two
outer screw terminals under the cover on your transmitter. 4. Reconnect the power cord to your transmitter.
If your transmitter continues to alarm and flash, the problem lies in your transmitter. Please contact sup-port at 800-305-6116.
If your transmitter does not alarm and flash, and you do not use a dog fence surge protector, the prob-lem lies in your wire. Check all your splice points. If they are installed correctly and intact, the problem lies in your wire. You will need to find any area of your wire that is damaged and repair it.
If your transmitter does not alarm and flash, and your system uses a dog fence surge protector, proceed to TEST 2 STEPS.
TEST 2 STEPS (for Systems with a Dog Fence Surge Protector):
1. Disconnect the power cord from your transmitter.
2. Disconnect the test wire from your transmitter, and reconnect the wires that were in place before you started your Short Loop Test.
3. Disconnect the wire ends from the terminals on your surge protector that are marked “Loop”.
4. Connect each end of your test wire to the Loop terminals on the surge protector.
5. Reconnect the power cord to your transmitter.
If your transmitter alarms and flashes, the problem lies in your surge protector. Please contact support at 800-305-6116.
If your transmitter does not alarm and flash, the problem lies in your wire. Check all your splice points. If they are installed correctly and intact, the problem lies in your wire. You will need to find any area of your wire that is damaged and repair it.
www.extremedogfence.com 800-305-6116
Owner’s Guide 33
TERMS OF USE AND LIMITATION OF LIABILITY 1. TERMS OF USE
This product is offered to you conditioned upon your acceptance without modification of the terms, conditions and notices contained herein. Usage of this product implies acceptance of all such terms, conditions, and notices.
2. PROPER USE
This product is designed for use with dogs where training is desired. The specific temperament of your dog may not work with this product. We recommend that you not use this product if your dog is less than 6 pounds, or if your dog is aggressive. If you are unsure whether this is appropri-ate for your dog, please consult your veterinarian, certified trainer, or contact our professional support team 7 days per week at 800-305-6116.
Proper use includes reviewing the entire Owner’s Manual and Training Guide provided with your product and any specific CAUTION statements.
3. NO UNLAWFUL OR PROHIBITED USE
This product is designed for use with dogs only. This dog training device is not intended to harm, injure, or provoke. Using this product in a way that is not intended could result in violation of fed-eral, state, or local laws.
4. LIMITATION OF LIABILITY
In no event shall eXtreme Dog Fence® be liable for any direct, indirect, punitive, incidental, spe-cial, or consequential damages, or any damages whatsoever arising out of or connected with the use or misuse of this product. Buyer assumes all risks and liability from the use of this product.
5. MODIFICATION OF TERMS AND CONDITIONS
eXtreme Dog Fence® reserves the right to change the terms, conditions , and notices under which this product is offered.
CUSTOMER CARE CONTACT Toll Free Tel: 800-305-6116 Mon-Fri 8:30 AM to 5:00 PM EST, Sat-Sun 9:00 AM to 5:00 PM EST
E-mail: [email protected]
www.extremedogfence.com 800-305-6116

Owner’s Guide 34
TRAINING AND INSTALLATION NOTES: _________________________________________________________________________
_________________________________________________________________________
_________________________________________________________________________
_________________________________________________________________________
_________________________________________________________________________
_________________________________________________________________________
_________________________________________________________________________
_________________________________________________________________________
_________________________________________________________________________
_________________________________________________________________________
_________________________________________________________________________
www.extremedogfence.com 800-305-6116
LAYOUT PLANNING
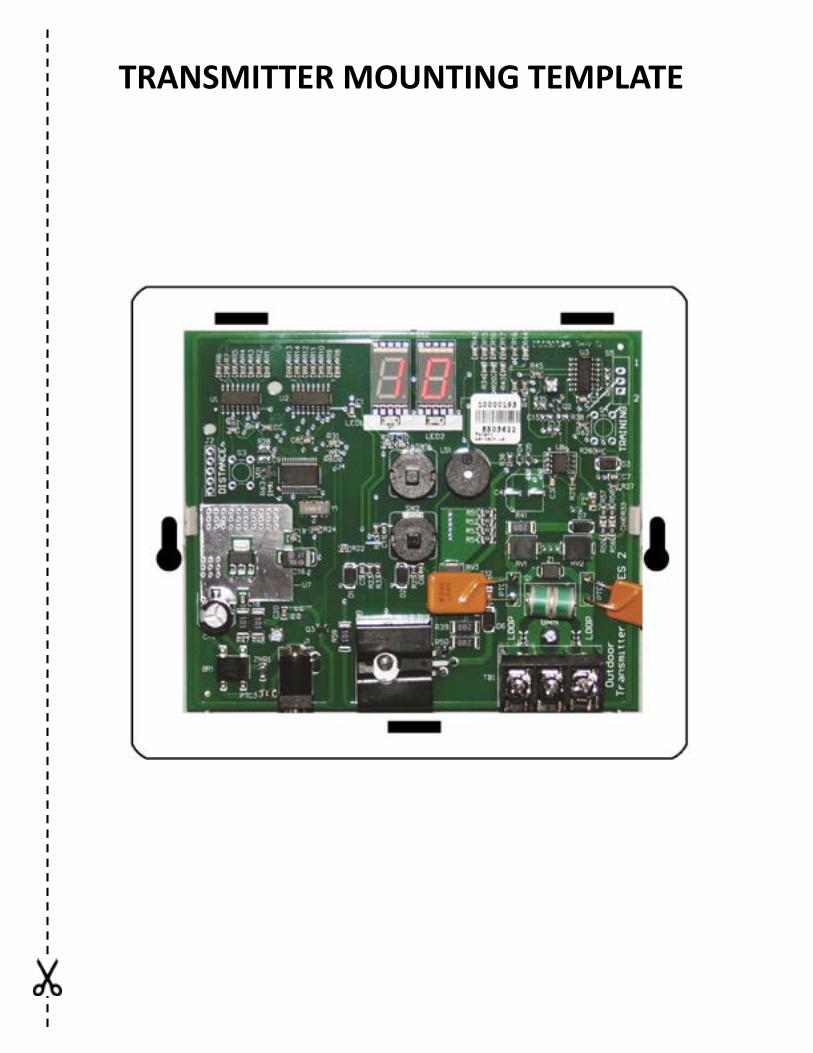
TRANSMITTER MOUNTING TEMPLATE


1-800-305-6116 www.extremedogfence.com [email protected] [email protected]