Embed Size (px)
Citation preview
Owner’s Manual

This household sewing machine is designed to comply with IEC/EN 60335-2-28 and UL1594.
IMPORTANT SAFETY INSTRUCTIONSWhen using an electrical appliance, basic safety precautions should always be followed, includingthe following:Read all instructions before using this household sewing machine. Keep the instructions at asuitable place close to the machine. Make sure to hand them over if the machine is given to a thirdparty.
DANGER –TO REDUCE THE RISK OF ELECTRIC SHOCK:• A sewing machine should never be left unattended when plugged in. Always unplug this sewing
machine from the electric outlet immediately after using and before cleaning, removing covers,lubricating or when making any other user servicing adjustments mentioned in the instructionmanual.
WARNING –TO REDUCE THE RISK OF BURNS, FIRE, ELECTRICSHOCK, OR INJURY TO PERSON:• Do not allow to be used as a toy. Close attention is necessary when this sewing machine is used
by or near children.• Use this sewing machine only for its intended use as described in this manual. Use only
attachments recommended by the manufacturer as contained in this manual.• Never operate this sewing machine if it has a damaged cord or plug, if it is not working properly,
if it has been dropped or damaged, or dropped into water. Return the sewing machine to thenearest authorized dealer or service center for examination, repair, electrical or mechanicaladjustment.
• Never operate the sewing machine with any air openings blocked. Keep ventilation openings ofthe sewing machine and foot control free from the accumulation of lint, dust, and loose cloth.
• Keep fingers away from all moving parts. Special care is required around the sewing machineneedle.
• Always use the proper needle plate. The wrong plate can cause the needle to break.• Do not use bent needles.• Do not pull or push fabric while stitching. It may deflect the needle causing it to break.• Wear safety glasses.• Switch the sewing machine off (“0”) when making any adjustment in the needle area, such as
threading needle, changing needle, threading bobbin, or changing presser foot, etc.• Never drop or insert any object into any opening.• Do not use outdoors.• Do not operate where aerosol (spray) products are being used or where oxygen is being
administrated.• To disconnect, turn all controls to the off (“0”) position, then remove plug from outlet.• Do not unplug by pulling on cord. To unplug, grasp the plug, not the cord.• The foot control is used to operate the machine. Avoid placing other objects on the foot control.• Do not use the machine if it is wet.

• If the LED lamp is damaged or broken, it must be replaced by the manufacturer or its serviceagent or a similarly qualified person, in order to avoid a hazard.
• If the cord connected with the foot control is damaged, it must be replaced by the manufactureror its service agent or a similarly qualified person, in order to avoid a hazard.
• This sewing machine is provided with double insulation. Use only identical replacement parts.See instructions for Servicing of Double-Insulated Appliances.
SAVE THESE INSTRUCTIONSFOR EUROPE ONLY:This appliance can be used by children aged from 8 years and above and persons with reducedphysical, sensory or mental capabilities or lack of experience and knowledge if they have been givensupervision or instruction concerning use of the appliance in a safe way and understand thehazards involved. Children shall not play with the appliance. Cleaning and user maintenance shallnot be made by children without supervision.The noise level under normal operating conditions is less than 70 dB.The machine must only be used with foot control of type C-9000 manufactured by CHIEN HUNGTAIWAN Ltd.
FOR OUTSIDE EUROPE:This sewing machine is not intended for use by persons (including children) with reduced physical,sensory or mental capabilities, or lack of experience and knowledge, unless they have been givensupervision or instruction concerning use of the sewing machine by a person responsible for theirsafety. Children should be supervised to ensure that they do not play with the sewing machine.The noise level under normal operating conditions is less than 70 dB.The machine must only be used with foot control of type C-9000 manufactured by CHIEN HUNGTAIWAN Ltd.
SERVICING OF DOUBLE INSULATED PRODUCTSIn a double-insulated product, two systems of insulation are provided instead of grounding. Noground means is provided on a double-insulated product, nor should a means for grounding beadded to the product. Servicing of a double-insulated product requires extreme care and knowledgeof the system and should be done only by qualified service personnel. Replacement parts for adouble-insulated product must be identical to those parts in the product. A double-insulatedproduct is marked with the words ‘DOUBLE INSULATION’ or ‘DOUBLE INSULATED’.
TABLE OF CONTENTS1 Introduction ...............................................6
Machine Overview..........................................6Front.............................................................6Top Parts ......................................................7Rear Side ......................................................7Accessory Tray ..............................................7Parts of the Embroidery Unit .........................8
Accessories ......................................................8Included Accessories .....................................8Included Hoop ..............................................9Included Accessories not in Picture.................9
Presser Feet .....................................................9Stitch Overview ............................................11
Utility Stitches ............................................. 11Quilt Stitches............................................... 13Needle Art Stitches ...................................... 13Satin Stitches ............................................... 13Decorative Stitches ...................................... 13Optional Feet Stitches .................................. 14
Alphabets ......................................................14Block .......................................................... 14Cyrillic........................................................ 14
2 Preparations ........................................... 15Unpacking.....................................................15Connect the Power Cord and FootControl ..........................................................15Pack Away After Sewing ..............................16LED Lights ....................................................16Free Arm .......................................................16Mounting Machine in Sewing Cabinet .........16Thread Cutter................................................16Spool Pins......................................................17
Horizontal Position...................................... 17Vertical Position .......................................... 17Auxiliary Spool Pin...................................... 17
Threading the Machine.................................18Needle Threader.......................................... 18Threading for Twin Needle .......................... 19
Bobbin Winding............................................20Winding From Horizontal Position ............... 20Winding Through the Needle ....................... 20
Inserting the Bobbin......................................21IDT™ System (Integrated Dual Feed) ..........21
Engaging the IDT™ System.......................... 21Disengaging the IDT™ System ..................... 22
Needles .........................................................22Universal Needle......................................... 22Stretch Needle ............................................. 22Embroidery Needle ..................................... 22Denim Needle ............................................. 22Wing Needle ............................................... 23
Changing the Needle ....................................23Lowering Feed Dogs.....................................23Presser Foot Pressure ....................................24
Presser Foot Lift ............................................24Changing the Presser Foot............................24
Remove Presser Foot.................................... 24Attach Presser Foot...................................... 25
USB Port ........................................................25USB Embroidery Stick.................................. 25Connect to and Remove From USB Port ........ 25
Complimentary Embroidery IntroSoftware (PC) ................................................25How to Update Your Machine .....................26
Updating Instructions .................................. 26Buttons and Indicators..................................27
Needle Stop Up/Down Button withIndicator ..................................................... 27Tie-off Button .............................................. 27Thread Snips Button with Indicator .............. 27Start/Stop Button ........................................ 27Reverse Button with Indicator ...................... 28Sewing Mode/Embroidery Stitch-outMode Button ............................................... 28Sequencing/Embroidery Edit ModeButton......................................................... 28Alphabet Mode, Sequencing Button .............. 28Settings Menu Button................................... 28Graphic Display .......................................... 28Stitch Width/Stitch Positioning Buttons ........ 28Cursor Buttons ............................................ 28Stitch Length/Stitch Density Buttons ............ 28Direct Selection Buttons ............................... 28Load Button ................................................ 28Save Personal Stitch or Sequence button........ 28Delete Button .............................................. 28Mirror End to End Button ............................ 28Mirror Side to Side Button............................ 28Alt Button ................................................... 28Info Button.................................................. 28Wheel Buttons ............................................. 29OK Button................................................... 29Speed Control Lever .................................... 29
Settings Menu ...............................................30Thread Tension ........................................... 30Twin Needle ............................................... 30Stitch Width Safety ...................................... 30Automatic Stop for Cut ................................ 31Language .................................................... 31Audible Alarm ............................................ 31Contrast ...................................................... 31Software Version ......................................... 31Hoop Positions ............................................ 31
3 Sewing Mode .......................................... 33Select a Stitch.................................................33
Sewing Recommendations ........................... 33Stitch Adjustments........................................34
Stitch Width/Stitch Positioning .................... 34Stitch Length/Stitch Density ........................ 34Elongation .................................................. 34
Thread Tension ........................................... 35Mirroring .................................................... 35
Personal Stitch...............................................35Save Personal Stitch ..................................... 35Overwrite Personal Stitch............................. 35Load Personal Stitch .................................... 35
Sewing Techniques .......................................36Three-Step Zigzag Stitch .............................. 36Buttonholes ................................................. 36Sew On a Button.......................................... 38Darning ...................................................... 38Sewing Hems in Heavy Fabric ...................... 38Handlook Quilting ...................................... 39Free-Motion ................................................ 39Free-Motion Stippling .................................. 39Blindhem Stitch ........................................... 40Sewing in Zippers........................................ 41
Common Sewing Pop-Ups ...........................41Check Needle Thread................................... 41Machine Needs to Rest................................. 41
4 Sequencing ............................................. 42Create a Sequence .........................................42Using the Alphabet .......................................42Create a Text Sequence .................................42
Select Character Set and Font........................ 43Adjust Text and Stitches............................... 43Delete a Stitch or Letter in a Sequence ........... 43
Manage Your Sequences ...............................43Save Sequence ............................................. 43Load Sequence ............................................ 44
Sewing a sequence ........................................44
5 Embroidery Preparations................... 45Embroidery Unit Overview..........................45Embroidery Hoop Overview........................45Designs..........................................................45Embroidery Collection..................................45Download Backup Designs...........................46Connect the Embroidery Unit.......................46Remove the Embroidery Unit.......................46Attach Embroidery/Free-Motion Foot 6 ......47To Hoop the Fabric .......................................47
Attach/Remove the Hoop ............................ 48
6 Embroidering.......................................... 49Design Information.......................................49Embroidery Stitch-Out..................................50
Load a Design ............................................. 50Load an Embroidery Font ............................ 50Embroidery Text Editor ............................... 51Hoop Sizes .................................................. 51Hoop Positions ............................................ 52Stitches Left in Color Block........................... 52Current Color.............................................. 52Orbit to Check Position ................................ 53
Basting........................................................ 53Monochrome............................................... 53Speed Control ............................................. 53Thread Tension ........................................... 53
Getting Started Embroidering ......................54Embroidery Edit............................................55
Rotate ......................................................... 55Design Height ............................................. 55Design Width .............................................. 55Move .......................................................... 55Mirroring .................................................... 56
Common Embroidery Pop-Ups....................56
7 Maintenance ........................................... 58Cleaning the Machine ...................................58
Cleaning the Bobbin Area............................. 58Cleaning Under the Bobbin Area .................. 59
Replacing the Needle Plate ...........................59Troubleshooting............................................60Technical specification..................................62
Index .......................................................... 63
Introduction
1 Introduction
Machine Overview
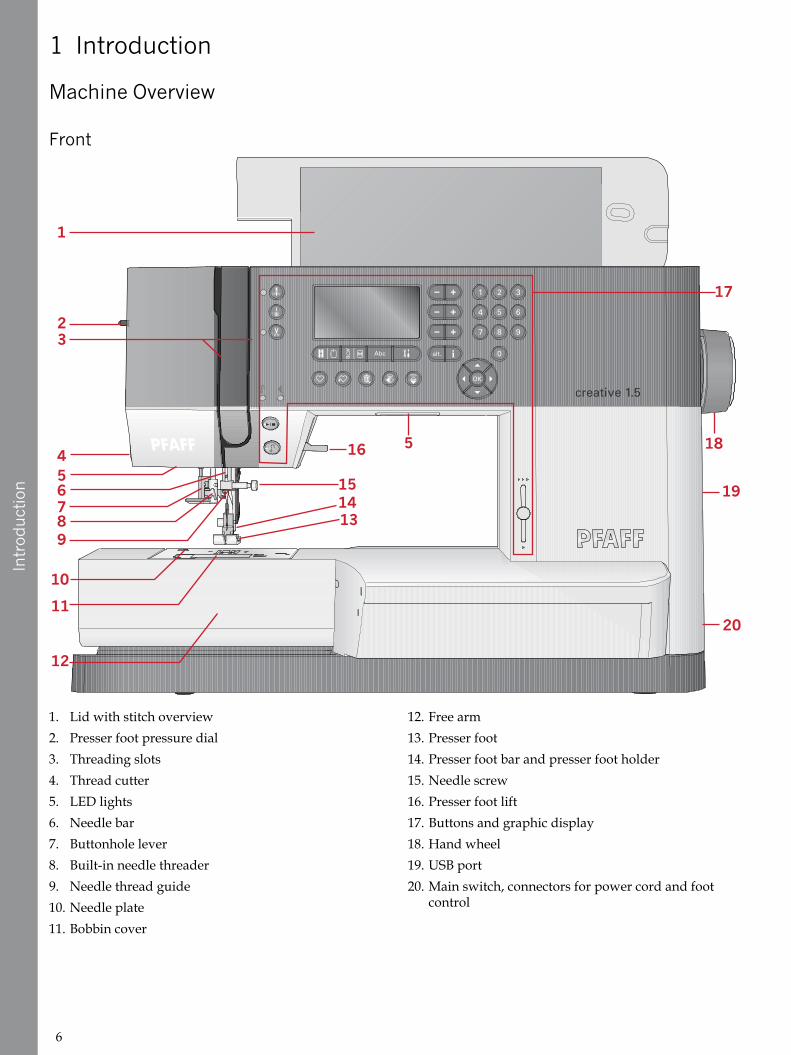
Front
1. Lid with stitch overview2. Presser foot pressure dial3. Threading slots4. Thread cutter5. LED lights6. Needle bar7. Buttonhole lever8. Built-in needle threader9. Needle thread guide10. Needle plate11. Bobbin cover
12. Free arm13. Presser foot14. Presser foot bar and presser foot holder15. Needle screw16. Presser foot lift17. Buttons and graphic display18. Hand wheel19. USB port20. Main switch, connectors for power cord and foot
control
6
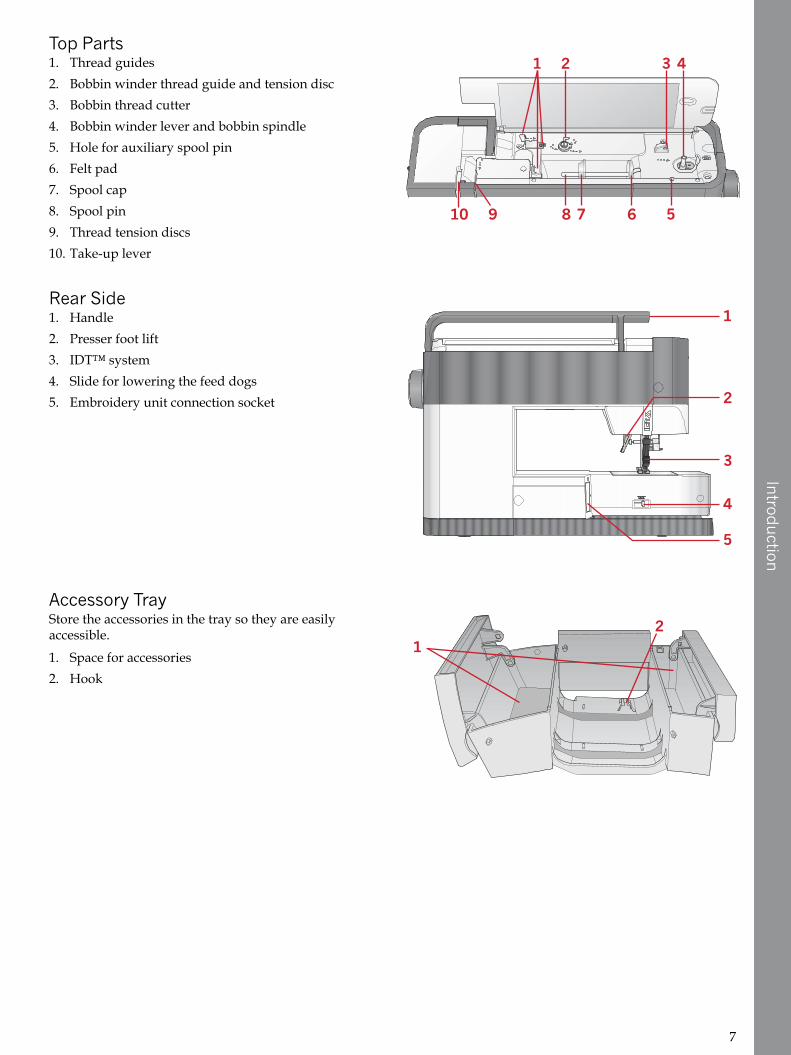
IntroductionTop Parts1. Thread guides2. Bobbin winder thread guide and tension disc3. Bobbin thread cutter4. Bobbin winder lever and bobbin spindle5. Hole for auxiliary spool pin6. Felt pad7. Spool cap8. Spool pin9. Thread tension discs10. Take-up lever
Rear Side1. Handle2. Presser foot lift3. IDT™ system4. Slide for lowering the feed dogs5. Embroidery unit connection socket
Accessory TrayStore the accessories in the tray so they are easilyaccessible.
1. Space for accessories2. Hook
7
Introduction
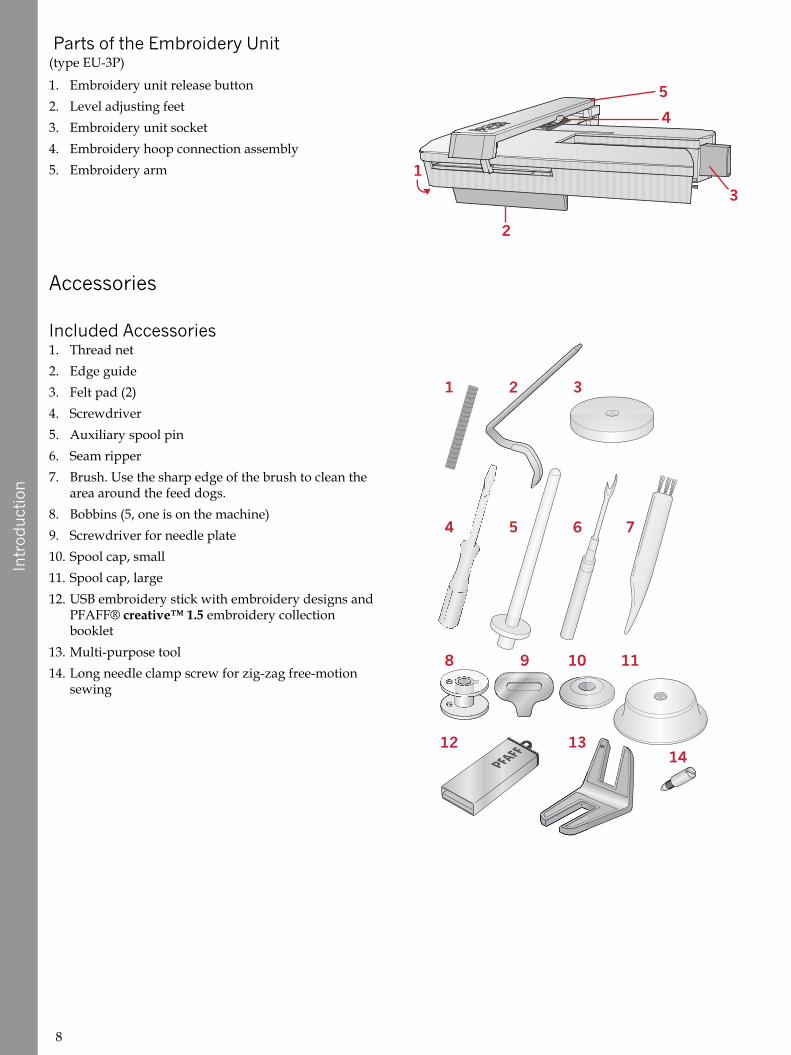
Parts of the Embroidery Unit(type EU-3P)
1. Embroidery unit release button2. Level adjusting feet3. Embroidery unit socket4. Embroidery hoop connection assembly5. Embroidery arm
Accessories
Included Accessories1. Thread net2. Edge guide3. Felt pad (2)4. Screwdriver5. Auxiliary spool pin6. Seam ripper7. Brush. Use the sharp edge of the brush to clean the
area around the feed dogs.8. Bobbins (5, one is on the machine)9. Screwdriver for needle plate10. Spool cap, small11. Spool cap, large12. USB embroidery stick with embroidery designs and
PFAFF® creative™ 1.5 embroidery collectionbooklet
13. Multi-purpose tool14. Long needle clamp screw for zig-zag free-motion
sewing
8

IntroductionIncluded Hoop1. creative™MASTER HOOP (240x150 mm)
Included Accessories not in Picture• Foot control• Power cord• Needles• Hard cover
Presser FeetOA -Standard Presser Foot for IDT™ System(attached on the machine upon delivery)
This foot is used mainly for straight stitching and zigzag stitching with a stitch length longerthan 1.0 mm.1A - Fancy Stitch Foot for IDT™ SystemThis foot is used for decorative stitches. The groove on the underside of the foot is designedto flow smoothly over the stitches.
2A - Fancy Stitch FootWhen sewing decorative stitches or short zigzag stitches and other utility stitches with lessthan 1.0mm stitch length, use this foot. The groove on the underside of the foot is designedto flow smoothly over the stitches.
3 – Blindhem Foot for IDT™ SystemThis foot is used for blindhem stitches. The toe on the foot guides the fabric. The red guideon the foot is designed to ride along the fold of the hem edge.
4 – Zipper Foot for IDT™ SystemThis foot can be snapped on either the right or the left of the needle, making it easy to sewclose to both sides of the zipper teeth. Move the needle position to the right or left to sewcloser to zipper teeth.
5 – One Step Buttonhole FootThis foot has a space in the back for a button used to set the size of the buttonhole. Themachine will sew a buttonhole to fit that button size. Used to sew buttonholes up to 25mm.
9

Introduction
5M - Manual Buttonhole FootThis foot is used for sewing manual buttonholes longer than 25 mm. Use the markings onthe foot to position the garment edge. The finger on the back of the foot holds cording forcorded buttonhole.
6 – Embroidery/Free-Motion FootThis foot is used for embroidery and free-motion sewing. This foot can also be used fordarning.
Note: When free-motion sewing using zigzag, replace the short needle clamp screw with the longneedle clamp screw found in the included accessories.
10
Introduction
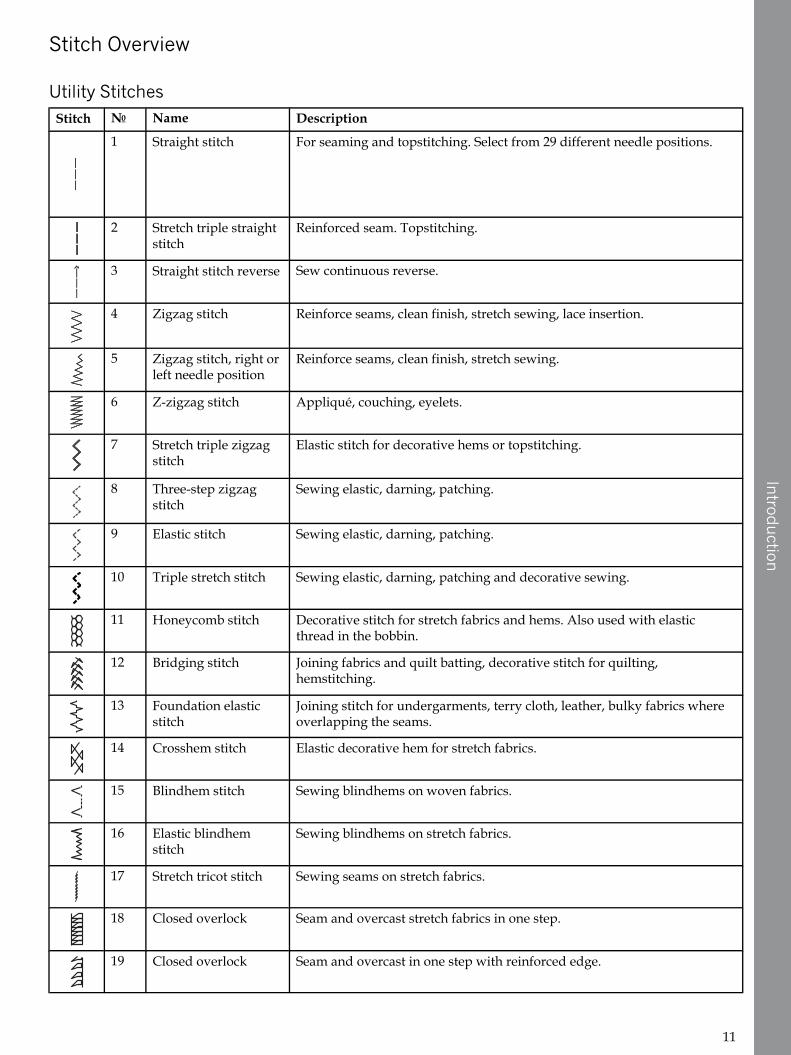
Stitch Overview
Utility StitchesStitch № Name Description
1 Straight stitch For seaming and topstitching. Select from 29 different needle positions.
2 Stretch triple straightstitch
Reinforced seam. Topstitching.
3 Straight stitch reverse Sew continuous reverse.
4 Zigzag stitch Reinforce seams, clean finish, stretch sewing, lace insertion.
5 Zigzag stitch, right orleft needle position
Reinforce seams, clean finish, stretch sewing.
6 Z-zigzag stitch Appliqué, couching, eyelets.
7 Stretch triple zigzagstitch
Elastic stitch for decorative hems or topstitching.
8 Three-step zigzagstitch
Sewing elastic, darning, patching.
9 Elastic stitch Sewing elastic, darning, patching.
10 Triple stretch stitch Sewing elastic, darning, patching and decorative sewing.
11 Honeycomb stitch Decorative stitch for stretch fabrics and hems. Also used with elasticthread in the bobbin.
12 Bridging stitch Joining fabrics and quilt batting, decorative stitch for quilting,hemstitching.
13 Foundation elasticstitch
Joining stitch for undergarments, terry cloth, leather, bulky fabrics whereoverlapping the seams.
14 Crosshem stitch Elastic decorative hem for stretch fabrics.
15 Blindhem stitch Sewing blindhems on woven fabrics.
16 Elastic blindhemstitch
Sewing blindhems on stretch fabrics.
17 Stretch tricot stitch Sewing seams on stretch fabrics.
18 Closed overlock Seam and overcast stretch fabrics in one step.
19 Closed overlock Seam and overcast in one step with reinforced edge.
11

Introduction
Stitch № Name Description
20 Elastic overcast Seam and overcast stretch fabrics in one step.
21 Overlock Seam and overcast in one step, patch, hem.
22 Closed overlock Seam and overcast in one step, patch, hem.
23 Stretch knit overlock Seam and overcast stretch fabrics in one step.
24 Closed overlock blindhem
Create decorative overlock blindhem for stretch fabrics.
25 Linen buttonhole Buttonhole for blouses, shirts and linen.
26 Standard buttonhole Basic buttonhole for blouses, shirts and jackets. Also for pillow cases.
27 Rounded buttonholewith lengthwise tack
Buttonhole for garments.
28 Eyelet buttonholewith pointed
Tailors buttonhole or decorative buttonhole.
29 Eyelet buttonholewith lengthwise tack
Tailors buttonhole for jackets and trousers.
30 Rounded buttonhole Buttonhole for light garments or jackets.
31 Stretch buttonhole Buttonhole for stretch fabrics.
32 Button sewing Sew on buttons or tacking.
33 Eyelet Heirloom sewing decorative trim.
34 Programmabledarning stitch
Darning holes or damaged fabric.
35 Programmablereinforced darningstitch
Reinforced darning holes or damaged fabric.
36 Bartack Automatically reinforce seams and pockets.
37 Denim bartack Automatically reinforce seams and pockets decoratively.
12

IntroductionQuilt Stitches
38 39 40 41 42 43 44 45 46 47 48 49 50 51 52
53 54 55 56 57 58 59 60 61 62 63 64 65 66 67
Needle Art Stitches
68 69 70 71 72 73 74 75 76 77 78 79 80 81 82
83 84 85
Satin Stitches
86 87 88 89 90 91 92 93 94 95 96 97 98 99 100
101 102 103 104 105
Decorative Stitches
106 107 108 109 110 111 112 113 114 115 116 117 118 119 120
121 122 123 124 125 126 127 128 129 130 131 132 133 134 135
136 137 138 139 140 141 142 143 144 145
13
Introduction
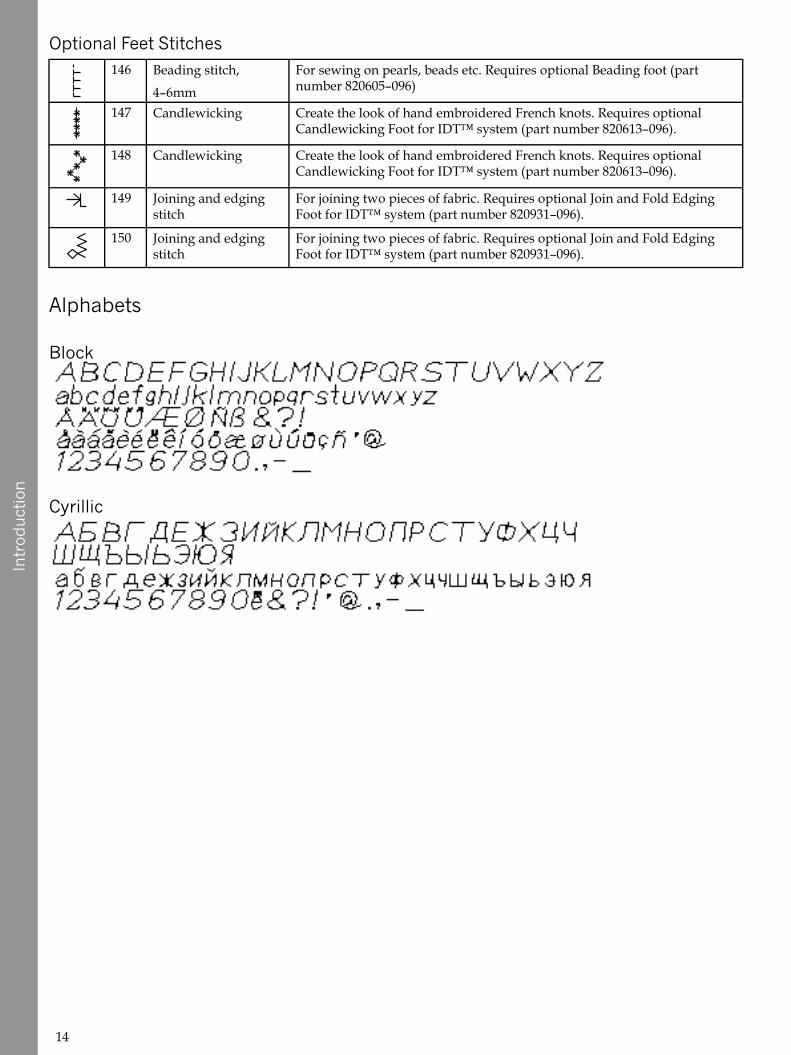
Optional Feet Stitches146 Beading stitch,
4–6mm
For sewing on pearls, beads etc. Requires optional Beading foot (partnumber 820605–096)
147 Candlewicking Create the look of hand embroidered French knots. Requires optionalCandlewicking Foot for IDT™ system (part number 820613–096).
148 Candlewicking Create the look of hand embroidered French knots. Requires optionalCandlewicking Foot for IDT™ system (part number 820613–096).
149 Joining and edgingstitch
For joining two pieces of fabric. Requires optional Join and Fold EdgingFoot for IDT™ system (part number 820931–096).
150 Joining and edgingstitch
For joining two pieces of fabric. Requires optional Join and Fold EdgingFoot for IDT™ system (part number 820931–096).
Alphabets
Block
Cyrillic
14

Preparations
2 Preparations
Unpacking1. Place the box on a steady, flat surface. Lift the
machine out of the box, remove the outer packagingand lift off the machine hard cover.
2. Remove all outer packing material and the plasticbag.
Note: Your PFAFF® creative™ 1.5 machine is adjusted toprovide the best stitch result at normal room temperature.Extreme hot and cold temperatures can affect the sewn result.
Note: Some fabrics have a lot of excess dye which can causediscoloration on other fabric but also on your sewing machine.This discoloring may be very difficult or impossible to remove.Fleece and denim fabric, especially red and blue, often containa lot of excess dye. If you suspect that your fabric/ready-to-wear garment contains a lot of excess dye, always pre-wash itbefore sewing to avoid the discoloring.
Connect the Power Cord and FootControlAmong the accessories you will find the power cord andthe foot control.
Note: Consult a qualified electrician if in doubt as how toconnect the machine to the power source. Unplug the powercord when the machine is not in use.
For this sewing machine, foot control model C-9000manufactured by CHIEN HUNG TAIWAN Ltd must beused.
1. Connect the foot control cord to the front socket onthe bottom right side of the machine (A).
2. Connect the power cord to the rear socket on thebottom right side of the machine (B). Plug the cordinto the wall socket.
3. Press the ON/OFF switch to ON to turn on powerand light (C).
For the USA and Canada
This sewing machine has a polarized plug (one bladewider than the other). To reduce the risk of electricshock, this plug is intended to fit in a polarized outletonly one way. If the plug does not fit fully in theoutlet, reverse the plug. If it still does not fit, contact aqualified electrician to install the proper outlet. Donot modify the plug in any way.
15

Preparations
Pack Away After Sewing1. Switch the main switch off.2. Unplug the cord from the wall socket and then from
the machine.3. Unplug the foot control cord from the machine.
Wind the cord around the foot control for easystorage.
4. Place all accessories in the accessory tray. Slide thetray on to the machine around the free arm.
5. Place the foot control in the space above the freearm.
6. Put on the hard cover.
LED LightsYour machine has LED lights which distribute the lightevenly over the sewing area and eliminates shadows.
Free ArmTo use the free arm, slide off the accessory tray. Whenattached, a hook keeps the accessory tray securelyattached to the machine. Remove the tray by sliding it tothe left.
Mounting Machine in SewingCabinetThere are two holes on the underside of the machinedesigned for mounting the machine into a sewingcabinet. Attach the machine with M6 screws.
Thread CutterTo use the thread cutter, pull the thread from back tofront as shown (A).
16
Preparations
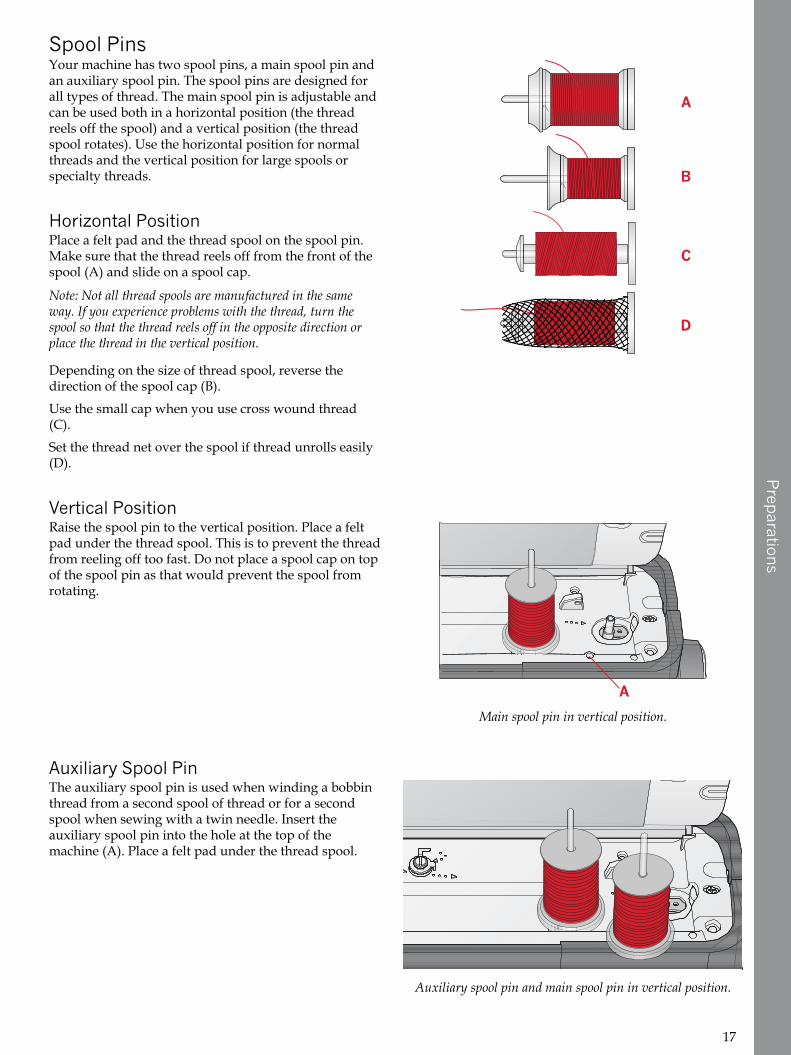
Spool PinsYour machine has two spool pins, a main spool pin andan auxiliary spool pin. The spool pins are designed forall types of thread. The main spool pin is adjustable andcan be used both in a horizontal position (the threadreels off the spool) and a vertical position (the threadspool rotates). Use the horizontal position for normalthreads and the vertical position for large spools orspecialty threads.
Horizontal PositionPlace a felt pad and the thread spool on the spool pin.Make sure that the thread reels off from the front of thespool (A) and slide on a spool cap.
Note: Not all thread spools are manufactured in the sameway. If you experience problems with the thread, turn thespool so that the thread reels off in the opposite direction orplace the thread in the vertical position.
Depending on the size of thread spool, reverse thedirection of the spool cap (B).
Use the small cap when you use cross wound thread(C).
Set the thread net over the spool if thread unrolls easily(D).
Vertical Position
Main spool pin in vertical position.
Raise the spool pin to the vertical position. Place a feltpad under the thread spool. This is to prevent the threadfrom reeling off too fast. Do not place a spool cap on topof the spool pin as that would prevent the spool fromrotating.
Auxiliary Spool Pin
Auxiliary spool pin and main spool pin in vertical position.
The auxiliary spool pin is used when winding a bobbinthread from a second spool of thread or for a secondspool when sewing with a twin needle. Insert theauxiliary spool pin into the hole at the top of themachine (A). Place a felt pad under the thread spool.
17

Preparations
Threading the MachineMake sure that the presser foot is raised and the needleis in its highest position.
1. Place a felt pad and the thread spool on the spoolpin and fit a spool cap of the right size and direction.
Note: Hold thread with both hands to prevent it fromslacking while threading. This ensures that the thread willbe positioned properly in the threading path.
2. Pull the thread under the thread guide (A) from theright to the left.
3. Pull the thread from the right to left along the slot.4. Pull the thread between the tension discs (B).5. Thread down through the right-hand threading slot
and then upwards through the left-hand threadingslot.
6. Bring the thread from the right into the take-up lever(C) and down in the left-hand threading slot into theneedle thread guide (D).
7. Thread the needle.
Needle ThreaderThe needle threader allows you to thread the needleautomatically. The needle must be in its highest positionto use the built-in needle threader. Press the needle up/down button to make sure the needle is fully raised.
We also recommend lowering the presser foot.
1. Use the handle (A) to pull the needle threader all theway down. Metal flanges encase the needle and asmall hook will pass through the needle eye.
2. Place the thread from the back over the thread guide(B) and under the small hook (C).
3. Let the needle threader gently swing back. The hookpulls the thread through the needle eye and forms aloop behind the needle. Pull the thread loop outbehind the needle.
4. Raise the presser foot and place the thread under it.
Note: The needle threader is designed to be used for size 70-120 needles. You cannot use the needle threader for size 60needles or smaller, wing needles or twin needles.
There are also some optional accessories that require manualthreading of the needle.
When threading the needle manually, make sure that theneedle is threaded from front to back.
18
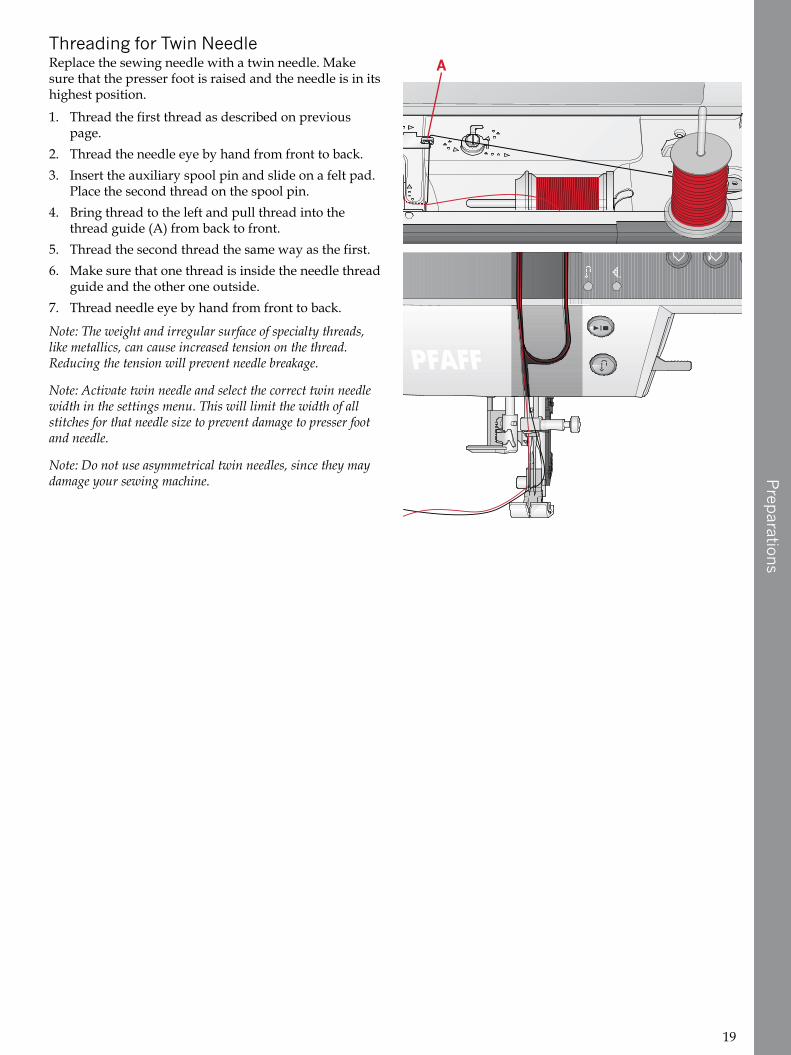
PreparationsThreading for Twin NeedleReplace the sewing needle with a twin needle. Makesure that the presser foot is raised and the needle is in itshighest position.
1. Thread the first thread as described on previouspage.
2. Thread the needle eye by hand from front to back.3. Insert the auxiliary spool pin and slide on a felt pad.
Place the second thread on the spool pin.4. Bring thread to the left and pull thread into the
thread guide (A) from back to front.5. Thread the second thread the same way as the first.6. Make sure that one thread is inside the needle thread
guide and the other one outside.7. Thread needle eye by hand from front to back.
Note: The weight and irregular surface of specialty threads,like metallics, can cause increased tension on the thread.Reducing the tension will prevent needle breakage.
Note: Activate twin needle and select the correct twin needlewidth in the settings menu. This will limit the width of allstitches for that needle size to prevent damage to presser footand needle.
Note: Do not use asymmetrical twin needles, since they maydamage your sewing machine.
19

Preparations
Bobbin Winding
Winding From Horizontal Position1. Place the felt pad and thread spool on the spool pin
in horizontal position. Slide on a spool cap of theright type and direction.
2. Place the thread under the thread guide (A) fromright to left. Pull the thread to the rear and aroundthe thread guide (B) from left to right.
3. Pull thread to the right and then through the threadguide (C) from back to front. Pass thread undertension disc (D) in counter clockwise direction.
Note: Make sure the thread is pulled securely inside thetension disc for correct thread tension.
4. Thread through the hole in the empty bobbin (E)from the inside to the outside.
5. Place the bobbin on the bobbin winder spindle.6. Push the bobbin lever to the right to wind. A pop-up
appears on the screen to inform you that bobbinwinding is active. Press the foot control or the start/stop button to start winding the bobbin. Hold theend of the thread firmly when starting to wind.
When the bobbin is full, release the foot control orpress the start/stop button again to stop. Push thebobbin lever to the left. The pop-up closes. Removethe bobbin and cut the thread using the bobbinthread cutter (F).
Winding Through the NeedleMake sure that the presser foot is raised and the needleis in its highest position. Bring the thread up from theneedle, under the presser foot, upward through the left-hand threading slot and through the bobbin threadguide (A). Then follow step 3 to 6.
Note: Use a metal presser foot when bobbin winding from theneedle.
20

Preparations
Inserting the BobbinMake sure that the needle is fully raised and themachine is turned off before inserting or removing thebobbin.
1. Open the bobbin cover by pushing the release buttonto the right (A). Remove the cover (B).
2. Insert the bobbin in the bobbin case with the threadrunning in a counterclockwise direction.
3. With a finger held gently on top of the bobbin, pullthe thread into notch (C). Then pull the thread atarrow markings into the needle plate thread guidefrom (C) to (D). Pull the thread at the arrowmarkings into the needle plate thread guide from (D)to (E). To cut off excess thread, pull thread to theright over the blade (E).
4. Replace the bobbin cover.
IDT™ System (Integrated Dual Feed)For sewing any fabric precisely, the PFAFF® creative™1.5machine provides the ideal solution: the integrateddual feed, IDT™ system. As on industrial machines, theIDT™ system feeds the fabric from the top and bottomat the same time. The material is fed precisely,eliminating puckering on seams in light weight fabricssuch as silk and rayon. The dual feed action of theIDT™ system prevents layers from shifting whilesewing, keeping quilt layers aligned and ensuring amore perfect match when sewing plaid or stripedfabrics.
Engaging the IDT™ SystemImportant: For all work with the IDT™ system, usepresser feet with the center back cut-out (A).
Raise the presser foot. Press the IDT™ system downuntil it engages.
21
Preparations
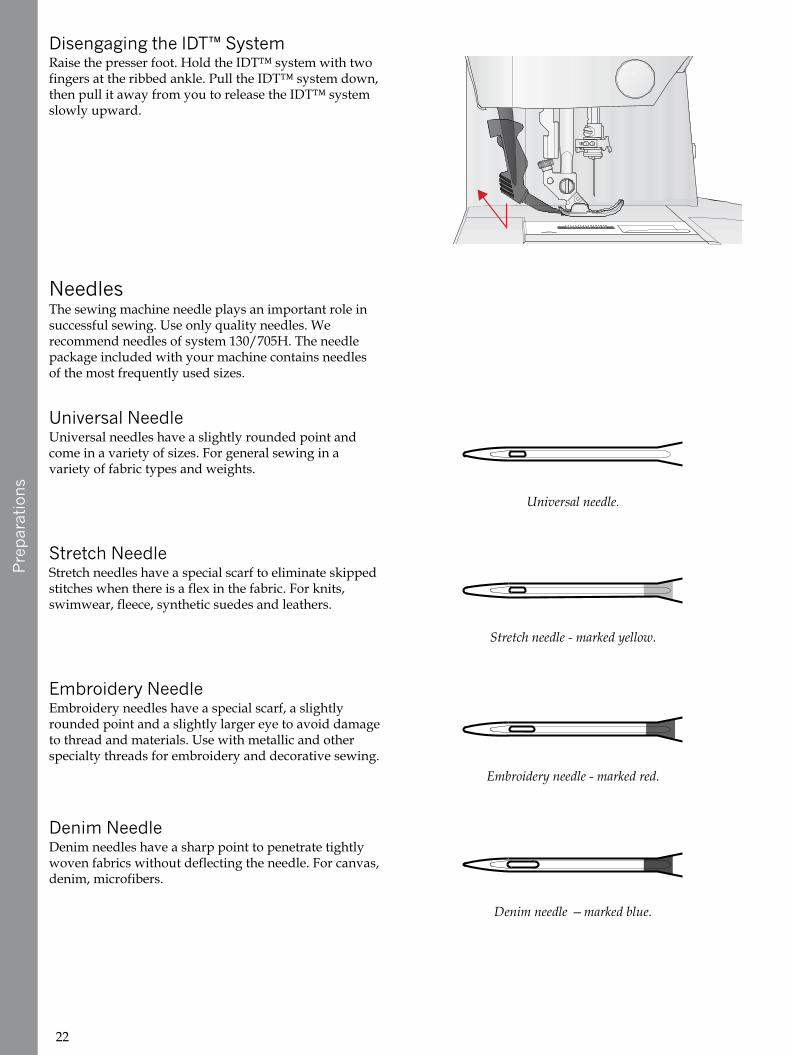
Disengaging the IDT™ SystemRaise the presser foot. Hold the IDT™ system with twofingers at the ribbed ankle. Pull the IDT™ system down,then pull it away from you to release the IDT™ systemslowly upward.
NeedlesThe sewing machine needle plays an important role insuccessful sewing. Use only quality needles. Werecommend needles of system 130/705H. The needlepackage included with your machine contains needlesof the most frequently used sizes.
Universal Needle
Universal needle.
Universal needles have a slightly rounded point andcome in a variety of sizes. For general sewing in avariety of fabric types and weights.
Stretch Needle
Stretch needle - marked yellow.
Stretch needles have a special scarf to eliminate skippedstitches when there is a flex in the fabric. For knits,swimwear, fleece, synthetic suedes and leathers.
Embroidery Needle
Embroidery needle - marked red.
Embroidery needles have a special scarf, a slightlyrounded point and a slightly larger eye to avoid damageto thread and materials. Use with metallic and otherspecialty threads for embroidery and decorative sewing.
Denim Needle
Denim needle —marked blue.
Denim needles have a sharp point to penetrate tightlywoven fabrics without deflecting the needle. For canvas,denim, microfibers.
22
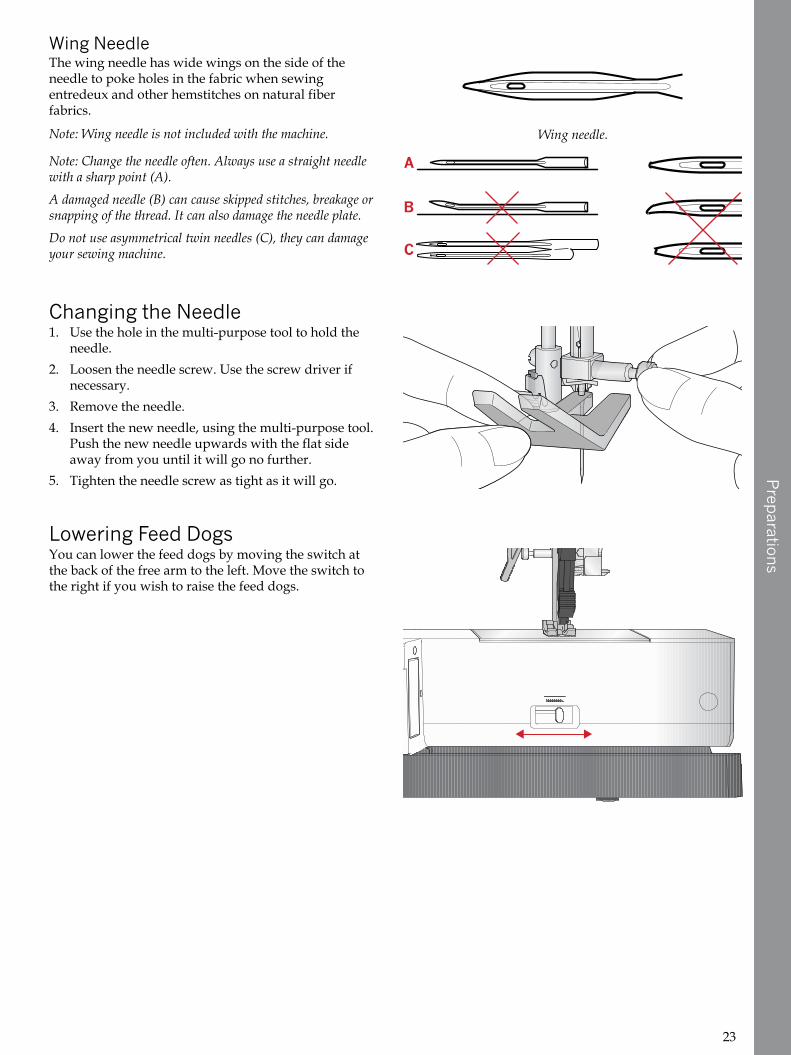
PreparationsWing Needle
Wing needle.
The wing needle has wide wings on the side of theneedle to poke holes in the fabric when sewingentredeux and other hemstitches on natural fiberfabrics.
Note: Wing needle is not included with the machine.
Note: Change the needle often. Always use a straight needlewith a sharp point (A).
A damaged needle (B) can cause skipped stitches, breakage orsnapping of the thread. It can also damage the needle plate.
Do not use asymmetrical twin needles (C), they can damageyour sewing machine.
Changing the Needle1. Use the hole in the multi-purpose tool to hold the
needle.2. Loosen the needle screw. Use the screw driver if
necessary.3. Remove the needle.4. Insert the new needle, using the multi-purpose tool.
Push the new needle upwards with the flat sideaway from you until it will go no further.
5. Tighten the needle screw as tight as it will go.
Lowering Feed DogsYou can lower the feed dogs by moving the switch atthe back of the free arm to the left. Move the switch tothe right if you wish to raise the feed dogs.
23

Preparations
Presser Foot PressureThe presser foot pressure has been pre-set to thestandard value ”N”. In most cases, you do not need toadjust the presser foot pressure. For specialtytechniques, or when sewing on very light or heavyfabric, adjusting the pressure can improve the result. Forvery light fabrics, turn the dial to a lower number. Forheavy fabric, turn the dial to a higher number.
Presser Foot LiftThe presser foot is lowered or raised with the presserfoot lift (A). If you are sewing on heavy fabric or severallayers of fabric, the presser foot can be raised higher (B)to make it easier to place the fabric underneath thepresser foot.
Note: The machine will not start when the presser foot israised (except for bobbin winding).
Changing the Presser Foot
Remove Presser FootPress the presser foot downwards until it disengagesfrom the presser foot holder.
24
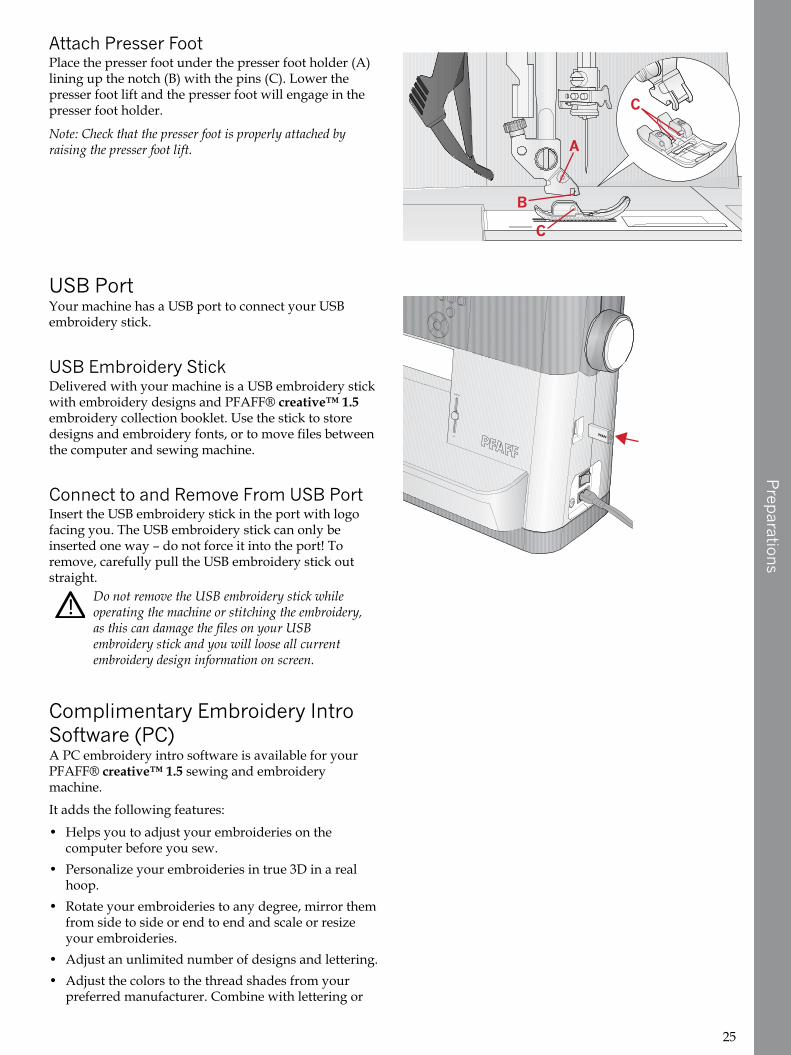
PreparationsAttach Presser FootPlace the presser foot under the presser foot holder (A)lining up the notch (B) with the pins (C). Lower thepresser foot lift and the presser foot will engage in thepresser foot holder.
Note: Check that the presser foot is properly attached byraising the presser foot lift.
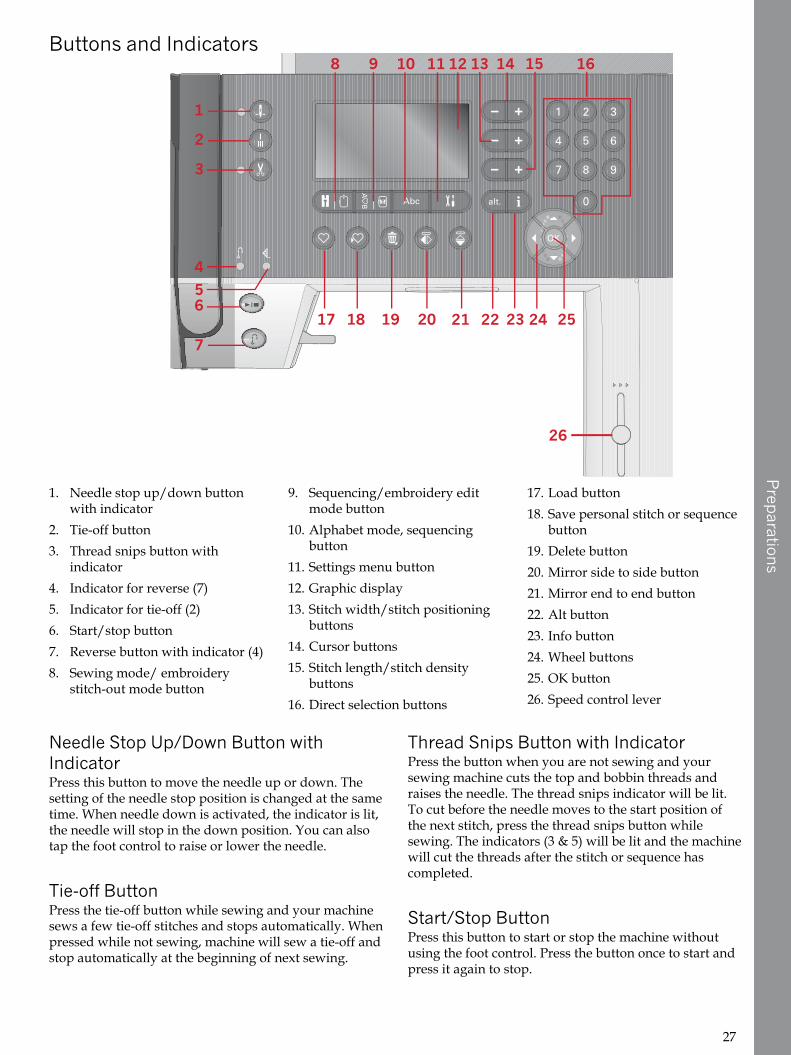
USB PortYour machine has a USB port to connect your USBembroidery stick.
USB Embroidery StickDelivered with your machine is a USB embroidery stickwith embroidery designs and PFAFF® creative™ 1.5embroidery collection booklet. Use the stick to storedesigns and embroidery fonts, or to move files betweenthe computer and sewing machine.
Connect to and Remove From USB PortInsert the USB embroidery stick in the port with logofacing you. The USB embroidery stick can only beinserted one way – do not force it into the port! Toremove, carefully pull the USB embroidery stick outstraight.
Do not remove the USB embroidery stick whileoperating the machine or stitching the embroidery,as this can damage the files on your USBembroidery stick and you will loose all currentembroidery design information on screen.
Complimentary Embroidery IntroSoftware (PC)A PC embroidery intro software is available for yourPFAFF® creative™ 1.5 sewing and embroiderymachine.
It adds the following features:
• Helps you to adjust your embroideries on thecomputer before you sew.
• Personalize your embroideries in true 3D in a realhoop.
• Rotate your embroideries to any degree, mirror themfrom side to side or end to end and scale or resizeyour embroideries.
• Adjust an unlimited number of designs and lettering.• Adjust the colors to the thread shades from your
preferred manufacturer. Combine with lettering or
25

Preparations
shapes. ColorSort to intelligently re-sort the colororder of a design and reduce the number of threadchanges. Select multiple designs and move them as agroup.
• Add multi-line lettering with your choice of 4 linetypes and flexibility to resize and space lettersindividually. Use the QuickFont wizard to create newfonts for the embroidery intro software from mostTrueType® or OpenType® fonts on your computer.Add SuperDesigns to your project. Surroundlettering or designs with a frame.
Go to PFAFF® website at www.pfaff.com and look forsupport and download the software.
More information and detailed installation instructionsare available on a separate PDF file on the USBembroidery stick. A printed product code sheet withyour unique product activation code is packed withyour machine. Please store the printed product codesheet in a safe place. Together with your sales receipt foryour embroidery machine, it forms your proof ofownership for your software. The unique productactivation code is needed to activate and use yourembroidery intro software.
How to Update Your MachineBe sure to consult the web site at www.pfaff.com and/or your local authorized PFAFF® dealer for updates andupgrades for your machine and owner’s manual.
Updating Instructions• Go to the PFAFF® web site at www.pfaff.com to find
information about available updates.• Follow the update wizard to prepare your USB
embroidery stick for the update.• Insert the prepared USB embroidery stick into the
machine before turning it on.• To start your machine in update mode, press and
hold the reverse button and the needle up/downbutton, while turning on your machine. Keep thereverse button and needle up/down button presseduntil update mode is visible on the graphic display.Follow the instructions to update.
26
Preparations
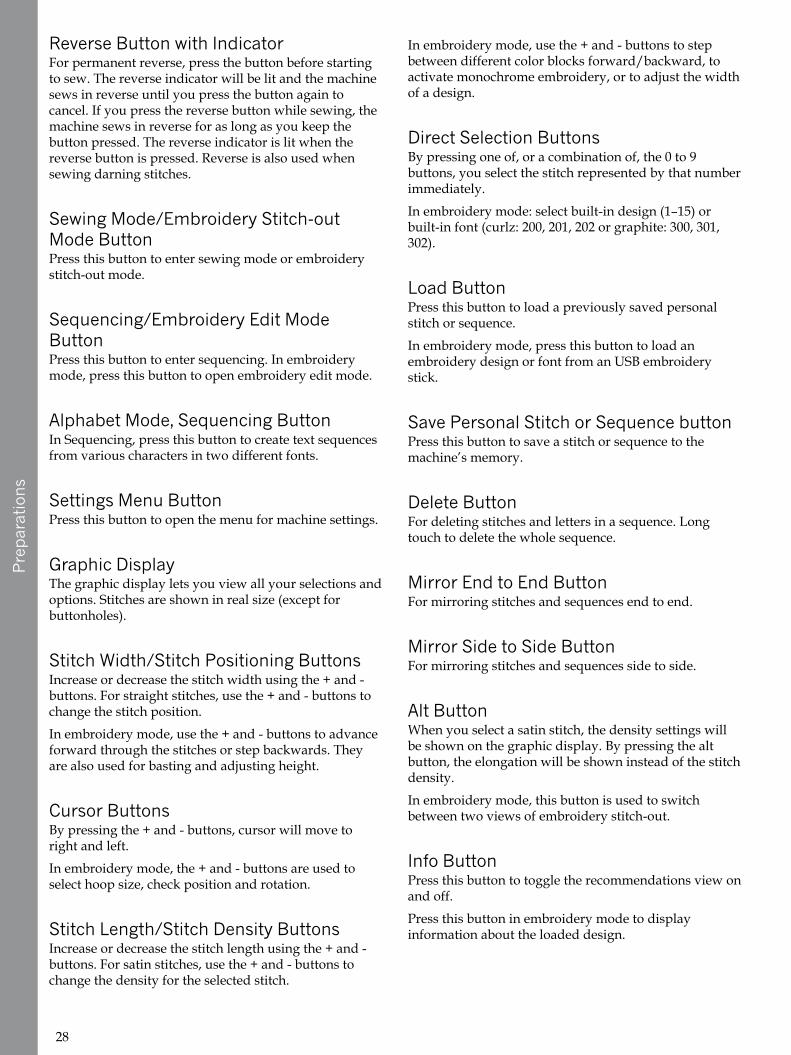
Buttons and Indicators
1. Needle stop up/down buttonwith indicator
2. Tie-off button3. Thread snips button with
indicator4. Indicator for reverse (7)5. Indicator for tie-off (2)6. Start/stop button7. Reverse button with indicator (4)8. Sewing mode/ embroidery
stitch-out mode button
9. Sequencing/embroidery editmode button
10. Alphabet mode, sequencingbutton
11. Settings menu button12. Graphic display13. Stitch width/stitch positioning
buttons14. Cursor buttons15. Stitch length/stitch density
buttons16. Direct selection buttons
17. Load button18. Save personal stitch or sequence
button19. Delete button20. Mirror side to side button21. Mirror end to end button22. Alt button23. Info button24. Wheel buttons25. OK button26. Speed control lever
Needle Stop Up/Down Button withIndicatorPress this button to move the needle up or down. Thesetting of the needle stop position is changed at the sametime. When needle down is activated, the indicator is lit,the needle will stop in the down position. You can alsotap the foot control to raise or lower the needle.
Tie-off ButtonPress the tie-off button while sewing and your machinesews a few tie-off stitches and stops automatically. Whenpressed while not sewing, machine will sew a tie-off andstop automatically at the beginning of next sewing.
Thread Snips Button with IndicatorPress the button when you are not sewing and yoursewing machine cuts the top and bobbin threads andraises the needle. The thread snips indicator will be lit.To cut before the needle moves to the start position ofthe next stitch, press the thread snips button whilesewing. The indicators (3 & 5) will be lit and the machinewill cut the threads after the stitch or sequence hascompleted.
Start/Stop ButtonPress this button to start or stop the machine withoutusing the foot control. Press the button once to start andpress it again to stop.
27
Preparations
Reverse Button with IndicatorFor permanent reverse, press the button before startingto sew. The reverse indicator will be lit and the machinesews in reverse until you press the button again tocancel. If you press the reverse button while sewing, themachine sews in reverse for as long as you keep thebutton pressed. The reverse indicator is lit when thereverse button is pressed. Reverse is also used whensewing darning stitches.
Sewing Mode/Embroidery Stitch-outMode ButtonPress this button to enter sewing mode or embroiderystitch-out mode.
Sequencing/Embroidery Edit ModeButtonPress this button to enter sequencing. In embroiderymode, press this button to open embroidery edit mode.
Alphabet Mode, Sequencing ButtonIn Sequencing, press this button to create text sequencesfrom various characters in two different fonts.
Settings Menu ButtonPress this button to open the menu for machine settings.
Graphic DisplayThe graphic display lets you view all your selections andoptions. Stitches are shown in real size (except forbuttonholes).
Stitch Width/Stitch Positioning ButtonsIncrease or decrease the stitch width using the + and -buttons. For straight stitches, use the + and - buttons tochange the stitch position.
In embroidery mode, use the + and - buttons to advanceforward through the stitches or step backwards. Theyare also used for basting and adjusting height.
Cursor ButtonsBy pressing the + and - buttons, cursor will move toright and left.
In embroidery mode, the + and - buttons are used toselect hoop size, check position and rotation.
Stitch Length/Stitch Density ButtonsIncrease or decrease the stitch length using the + and -buttons. For satin stitches, use the + and - buttons tochange the density for the selected stitch.
In embroidery mode, use the + and - buttons to stepbetween different color blocks forward/backward, toactivate monochrome embroidery, or to adjust the widthof a design.
Direct Selection ButtonsBy pressing one of, or a combination of, the 0 to 9buttons, you select the stitch represented by that numberimmediately.
In embroidery mode: select built-in design (1–15) orbuilt-in font (curlz: 200, 201, 202 or graphite: 300, 301,302).
Load ButtonPress this button to load a previously saved personalstitch or sequence.
In embroidery mode, press this button to load anembroidery design or font from an USB embroiderystick.
Save Personal Stitch or Sequence buttonPress this button to save a stitch or sequence to themachine’s memory.
Delete ButtonFor deleting stitches and letters in a sequence. Longtouch to delete the whole sequence.
Mirror End to End ButtonFor mirroring stitches and sequences end to end.
Mirror Side to Side ButtonFor mirroring stitches and sequences side to side.
Alt ButtonWhen you select a satin stitch, the density settings willbe shown on the graphic display. By pressing the altbutton, the elongation will be shown instead of the stitchdensity.
In embroidery mode, this button is used to switchbetween two views of embroidery stitch-out.
Info ButtonPress this button to toggle the recommendations view onand off.
Press this button in embroidery mode to displayinformation about the loaded design.
28
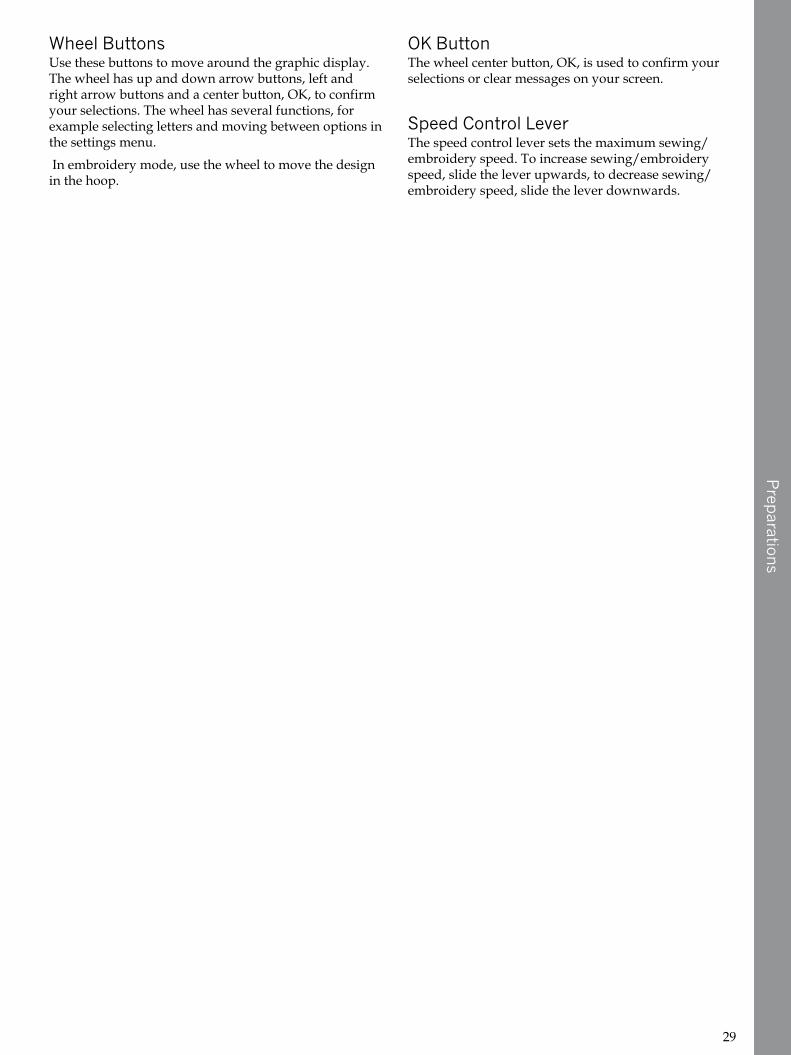
PreparationsWheel ButtonsUse these buttons to move around the graphic display.The wheel has up and down arrow buttons, left andright arrow buttons and a center button, OK, to confirmyour selections. The wheel has several functions, forexample selecting letters and moving between options inthe settings menu.
In embroidery mode, use the wheel to move the designin the hoop.
OK ButtonThe wheel center button, OK, is used to confirm yourselections or clear messages on your screen.
Speed Control LeverThe speed control lever sets the maximum sewing/embroidery speed. To increase sewing/embroideryspeed, slide the lever upwards, to decrease sewing/embroidery speed, slide the lever downwards.
29

Preparations
Settings MenuIn the settings menu, you can adjust the machinesettings, sound settings and screen settings. Open bypressing the settings menu button and select the settingyou wish to adjust by pressing the up and down arrowbuttons on the wheel. Use the left and right arrowbuttons to adjust the values. Activate settings or open alist of choices by pressing OK. A solid box means afunction is activated, an empty box means it is notactivated.
Note: If a setting cannot be combined with a previouslyselected setting, the outlines of that box will be dashed.Different settings are available depending on whether you arein sewing or embroidery mode.
Press the settings menu button again to leave thesettings menu.
Thread TensionYour sewing machine will electronically pre-set a threadtension for the selected stitch. Depending on the fabric,batting, thread etc, the tension may need to be adjusted.Use the left and right arrow buttons on the wheel toadjust the thread tension. The changes only affect theselected stitch. The setting will go back to default whenyou select another stitch.
In sewing mode, press the info button to seethe current selected thread tension.
Twin NeedleActivate the twin needle program and use the left andright arrow buttons on the wheel to set the twin needlewidth. When a twin needle size is selected, the width ofall stitches is limited for that needle size to preventneedle breakage.
In sewing mode, press the info button. Thetwin needle recommendation icon will beshown. The setting is kept until you deactivateit.
Note: Twin needle and stitch width safety cannot be used atthe same time.
Note: A warning pop-up will be shown if you select a stitchthat is too wide for the set twin needle size.
Stitch Width SafetySelect this function when using a presser foot forquilting, available as an optional accessory, to lock thecenter needle position for all stitches and preventdamage to the needle or presser foot.
In sewing mode, press the info button. Thestitch width safety icon will be shown. Thesetting is kept until you deactivate it.
30

PreparationsWhen turning on the machine with this setting activatedand for every stitch selection that is not a straight stitch,a pop-up informs you that the machine is set to straightstitch.
Note: Twin needle and stitch width safety cannot be used atthe same time.
Automatic Stop for Cut(Only in embroidery mode)
When starting to embroider the machine stops after afew stitches asking you to cut the thread end. Use theOK button to turn on or off this function in the settingsmenu.
Note: Automatic stop for cut is disabled if you use the footcontrol when embroidering.
LanguageUse the left and right arrow buttons to change thelanguage of all text in your machine.
Audible AlarmTurn all alarm sounds of the machine on or off. Defaultsetting is on.
ContrastAdjust the contrast of the graphic display by using theleft and right arrow buttons. The value can be setbetween -3 to 4 in steps of 1.
Software VersionCheck the software version for your sewing machine.
Hoop Positions(Only in embroidery mode)
Use the hoop position functions to move the hoop todifferent positions.
Current PositionWhen you want to return to the current stitch and startembroidering again where the embroidery wasinterrupted, use the wheel to select the current positionand press OK. You can also press the start/stop buttononce to return to the current stitch and start toembroider.
31
Preparations
Park PositionWhen you have finished your embroidery, remove thehoop and open the settings menu. Use the wheel toselect the park position option and press OK.
It is very important to remove the hoop beforeselecting park position, otherwise it may bedamaged.
Cut PositionCut position will move the hoop towards you, making iteasier to cut jump stitches and trim fabric whenembroidering an appliqué.
Center PositionUse the center position if you want to move the needleto the center position of the hoop.
32

Sewing
Mode
3 Sewing ModeSewing mode is the first view on the graphic displayafter you turn on the machine. Your selected stitch willbe shown in real size in the stitch field. Here you willfind all the basic information you need to start sewing.This is also the menu where you adjust the settings ofyour stitch. Straight stitch is selected by default.
Note: It’s not possible to sew with the embroidery unitattached.
Sewing Mode — Overview1. Stitch field2. Selected stitch number3. Stitch width/stitch positioning4. Stitch length/density
Note: The tabs on the bottom of the screen indicates whichmode is selected. The selected mode is indicated by the blacktab disappearing on screen.
Select a StitchBy pressing one of the direct selection buttons, youselect that stitch number immediately. Press two orthree digits in quick succession to select a stitch from 10and up. If the stitch number does not exist, you will heara beep and the last entered digit will be selected as astitch. Use the up and down arrow buttons on the wheelto step between stitches.
Sewing RecommendationsPress the info button to show sewing recommendationsfor the current stitch. Press the button again to hide theinformation.
1. Needle recommendation/setting
Universal needle
Set for twin needle
Wing needle recommended
Set for stitch width safety
2. Presser foot recommendation3. Stabilizer recommended4. Feed dog/IDT™ system recommendation5. Thread tension value
Note: All symbols and options will not be shown at the sametime.
33
SewingMode
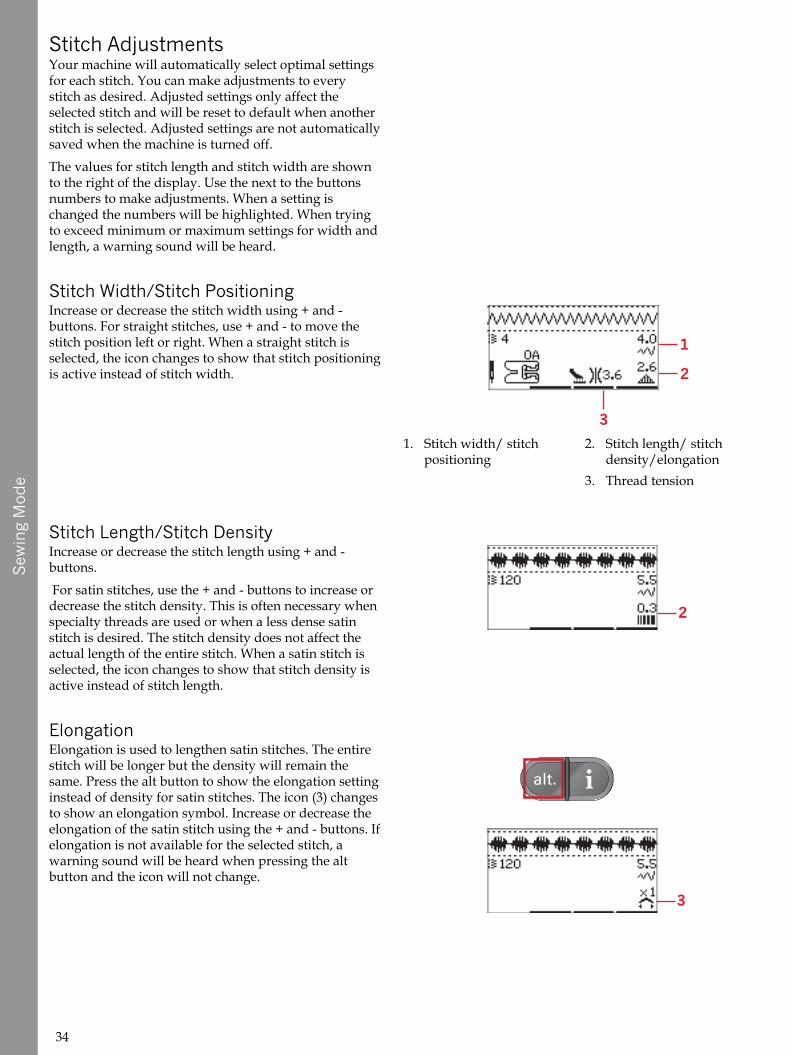
Stitch AdjustmentsYour machine will automatically select optimal settingsfor each stitch. You can make adjustments to everystitch as desired. Adjusted settings only affect theselected stitch and will be reset to default when anotherstitch is selected. Adjusted settings are not automaticallysaved when the machine is turned off.
The values for stitch length and stitch width are shownto the right of the display. Use the next to the buttonsnumbers to make adjustments. When a setting ischanged the numbers will be highlighted. When tryingto exceed minimum or maximum settings for width andlength, a warning sound will be heard.
Stitch Width/Stitch Positioning
1. Stitch width/ stitchpositioning
2. Stitch length/ stitchdensity/elongation
3. Thread tension
Increase or decrease the stitch width using + and -buttons. For straight stitches, use + and - to move thestitch position left or right. When a straight stitch isselected, the icon changes to show that stitch positioningis active instead of stitch width.
Stitch Length/Stitch DensityIncrease or decrease the stitch length using + and -buttons.
For satin stitches, use the + and - buttons to increase ordecrease the stitch density. This is often necessary whenspecialty threads are used or when a less dense satinstitch is desired. The stitch density does not affect theactual length of the entire stitch. When a satin stitch isselected, the icon changes to show that stitch density isactive instead of stitch length.
ElongationElongation is used to lengthen satin stitches. The entirestitch will be longer but the density will remain thesame. Press the alt button to show the elongation settinginstead of density for satin stitches. The icon (3) changesto show an elongation symbol. Increase or decrease theelongation of the satin stitch using the + and - buttons. Ifelongation is not available for the selected stitch, awarning sound will be heard when pressing the altbutton and the icon will not change.
34

Sewing
Mode
Thread Tension
Correct tension
For the best stitch appearance and durability, make surethe needle thread tension is correctly adjusted, i.e. forgeneral sewing, the threads evenly meet between thetwo fabric layers. Your sewing machine electronicallysets a thread tension for the selected stitch. Dependingon the fabric, batting, thread etc, the tension may needto be adjusted. See page 30 for instructions on how tochange the setting manually.
Tension too tight
If the bobbin thread is visible on the top side of thefabric, the needle thread tension is too tight. Reduce theneedle thread tension.
Tension too loose
If top thread is visible on the underside of the fabric, theneedle thread tension is too loose. Increase the needlethread tension.
For decorative stitches and buttonholes, the top threadshould be visible on the underside of the fabric.
Mirroring
Left: mirror side to side button. Right: mirror end to endbutton.
To mirror stitches or sequences side to side, press themirror side to side button. To mirror end to end, pressthe mirror end to end button.
Personal Stitch
Save Personal StitchSave your personal stitch in your machine by pressingthe save button. Adjustments in stitch length, width,density, elongation, mirroring and thread tension willbe saved.
Note: Some special stitches, such as buttonholes, cannot besaved. A pop-up will inform you of this when you try to savesuch a stitch.
Overwrite Personal StitchIf the memory is occupied, a pop-up message willappear asking if you wish to overwrite the previouslysaved stitch or sequence with the new one. Select Yes orNo with the arrow buttons and press the OK.
Load Personal StitchLoad your personal stitch by pressing the load button.
35
SewingMode
Sewing Techniques
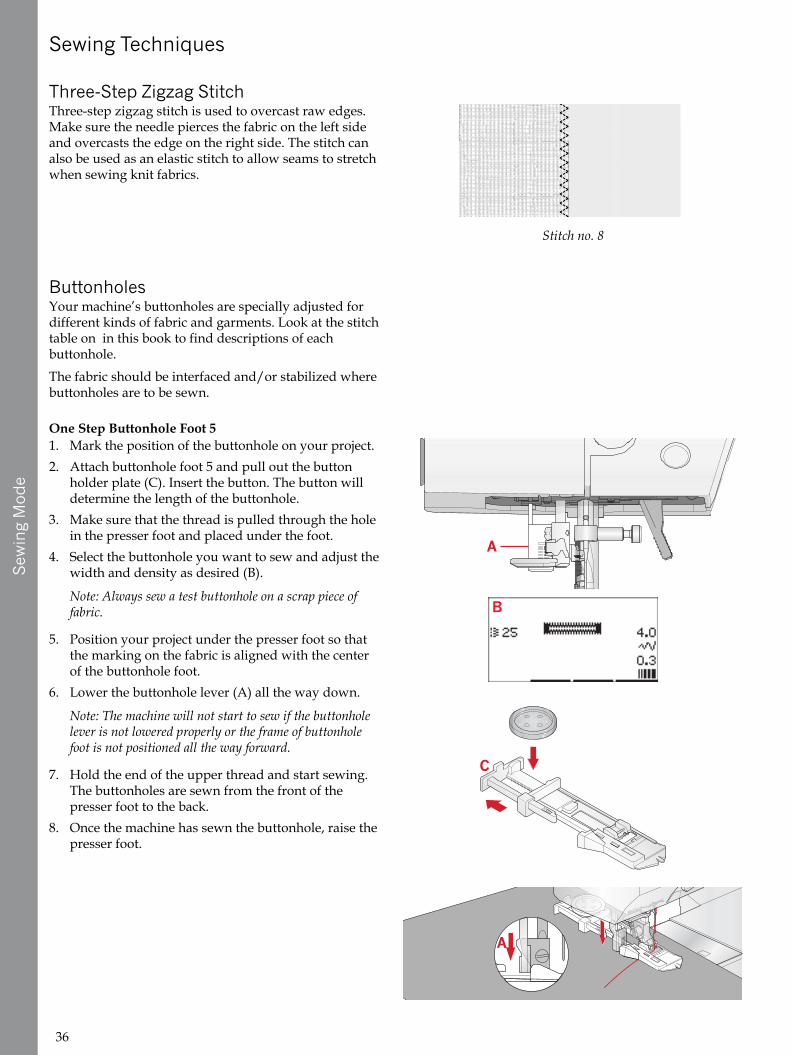
Three-Step Zigzag Stitch
Stitch no. 8
Three-step zigzag stitch is used to overcast raw edges.Make sure the needle pierces the fabric on the left sideand overcasts the edge on the right side. The stitch canalso be used as an elastic stitch to allow seams to stretchwhen sewing knit fabrics.
ButtonholesYour machine’s buttonholes are specially adjusted fordifferent kinds of fabric and garments. Look at the stitchtable on in this book to find descriptions of eachbuttonhole.
The fabric should be interfaced and/or stabilized wherebuttonholes are to be sewn.
One Step Buttonhole Foot 51. Mark the position of the buttonhole on your project.2. Attach buttonhole foot 5 and pull out the button
holder plate (C). Insert the button. The button willdetermine the length of the buttonhole.
3. Make sure that the thread is pulled through the holein the presser foot and placed under the foot.
4. Select the buttonhole you want to sew and adjust thewidth and density as desired (B).
Note: Always sew a test buttonhole on a scrap piece offabric.
5. Position your project under the presser foot so thatthe marking on the fabric is aligned with the centerof the buttonhole foot.
6. Lower the buttonhole lever (A) all the way down.
Note: The machine will not start to sew if the buttonholelever is not lowered properly or the frame of buttonholefoot is not positioned all the way forward.
7. Hold the end of the upper thread and start sewing.The buttonholes are sewn from the front of thepresser foot to the back.
8. Once the machine has sewn the buttonhole, raise thepresser foot.
36

Sewing
Mode
Manual Buttonhole
Sewing sequences for buttonhole stitches 25–31.
To sew a buttonhole longer than 25mm, use presser foot5M.
1. Lower the buttonhole lever and presser foot. Pressstart/stop button or the foot control to start sewingwhile pushing the buttonhole lever away from youuntil the machine starts sewing a straight stitchbackwards. Sew until you reach the desired lengthof the buttonhole.
2. Pull the buttonhole lever towards you until themachine starts sewing the first column forwards.
3. When the column stitching has reached your desiredlength, push the buttonhole lever away from youuntil the machine starts sewing a straight stitchbackwards.
4. Pull the buttonhole lever towards you until themachine starts sewing the bar tack and secondcolumn forwards.
5. When the columns are aligned, push the buttonholelever away from you until the machine starts sewingthe bar tack. The machine will sew a few tie-offstitches and stop automatically. The machine cutsthe top and bobbin thread and raises the needle.
Depending on style of buttonhole selected, the sewingsequence will differ, see illustration.
Corded ButtonholeCorded buttonholes that are sewn with gimp threadsare more stable, durable and have a professionalappearance. Use pearl cotton or a regular gimp thread.
1. Loop a piece of heavy thread or pearl cotton over themetal bar extending from the center back of the 5Mmanual buttonhole foot or of the plastic bar of the 5one step buttonhole foot. Pull the thread tails underthe foot, towards the front, then secure around thefinger at the front of the foot.
2. Stitch a buttonhole. The satin buttonhole columnswill stitch over the cord.
3. When the buttonhole is finished, lift the cord off thefinger and pull out the slack.
4. Cross the cord in front of the needle and thread cordends into a large needle, pull to the wrong side andknot ends before cutting excess.
5. Use the seam ripper to carefully open thebuttonhole.
37
SewingMode
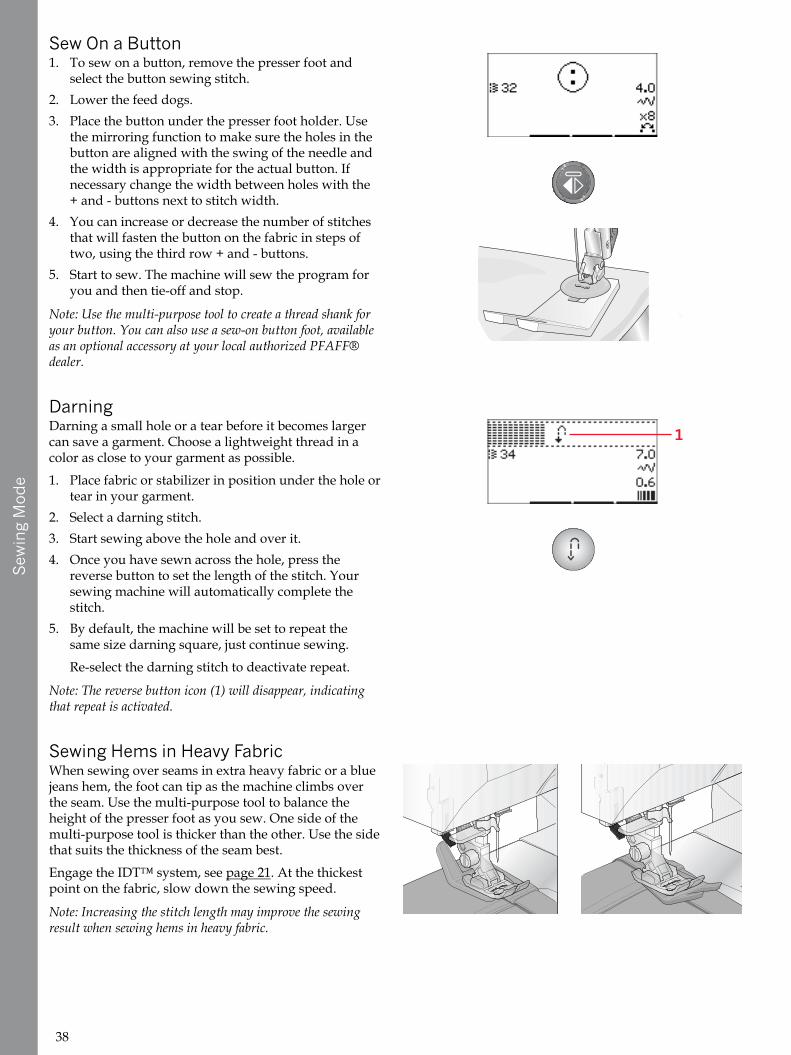
Sew On a Button1. To sew on a button, remove the presser foot and
select the button sewing stitch.2. Lower the feed dogs.3. Place the button under the presser foot holder. Use
the mirroring function to make sure the holes in thebutton are aligned with the swing of the needle andthe width is appropriate for the actual button. Ifnecessary change the width between holes with the+ and - buttons next to stitch width.
4. You can increase or decrease the number of stitchesthat will fasten the button on the fabric in steps oftwo, using the third row + and - buttons.
5. Start to sew. The machine will sew the program foryou and then tie-off and stop.
Note: Use the multi-purpose tool to create a thread shank foryour button. You can also use a sew-on button foot, availableas an optional accessory at your local authorized PFAFF®dealer.
DarningDarning a small hole or a tear before it becomes largercan save a garment. Choose a lightweight thread in acolor as close to your garment as possible.
1. Place fabric or stabilizer in position under the hole ortear in your garment.
2. Select a darning stitch.3. Start sewing above the hole and over it.4. Once you have sewn across the hole, press the
reverse button to set the length of the stitch. Yoursewing machine will automatically complete thestitch.
5. By default, the machine will be set to repeat thesame size darning square, just continue sewing.
Re-select the darning stitch to deactivate repeat.
Note: The reverse button icon (1) will disappear, indicatingthat repeat is activated.
Sewing Hems in Heavy FabricWhen sewing over seams in extra heavy fabric or a bluejeans hem, the foot can tip as the machine climbs overthe seam. Use the multi-purpose tool to balance theheight of the presser foot as you sew. One side of themulti-purpose tool is thicker than the other. Use the sidethat suits the thickness of the seam best.
Engage the IDT™ system, see page 21. At the thickestpoint on the fabric, slow down the sewing speed.
Note: Increasing the stitch length may improve the sewingresult when sewing hems in heavy fabric.
38
Sewing
Mode
Handlook QuiltingA quilt usually consists of three layers, two layers offabric with a layer of batting sandwiched between.
1. Baste the completed quilt top to the batting andbacking.
2. Thread the needle with an invisible (monofilament)thread. Use needle size 90 and lightweight, softcotton (60 wt or lighter) thread in the bobbin.
3. Select a quilt stitch and snap on the recommendedfoot shown in the sewing recommendations view.
4. Engage the IDT™ system.5. When you sew the stitch you should only see your
bobbin thread. You might need to adjust the threadtension depending on which fabric, thread andbatting that is used. Make a few tests on a scrappiece of the fabric you are going to sew and checkthe tension.
Recommended Stitches for a Handlook Quilt
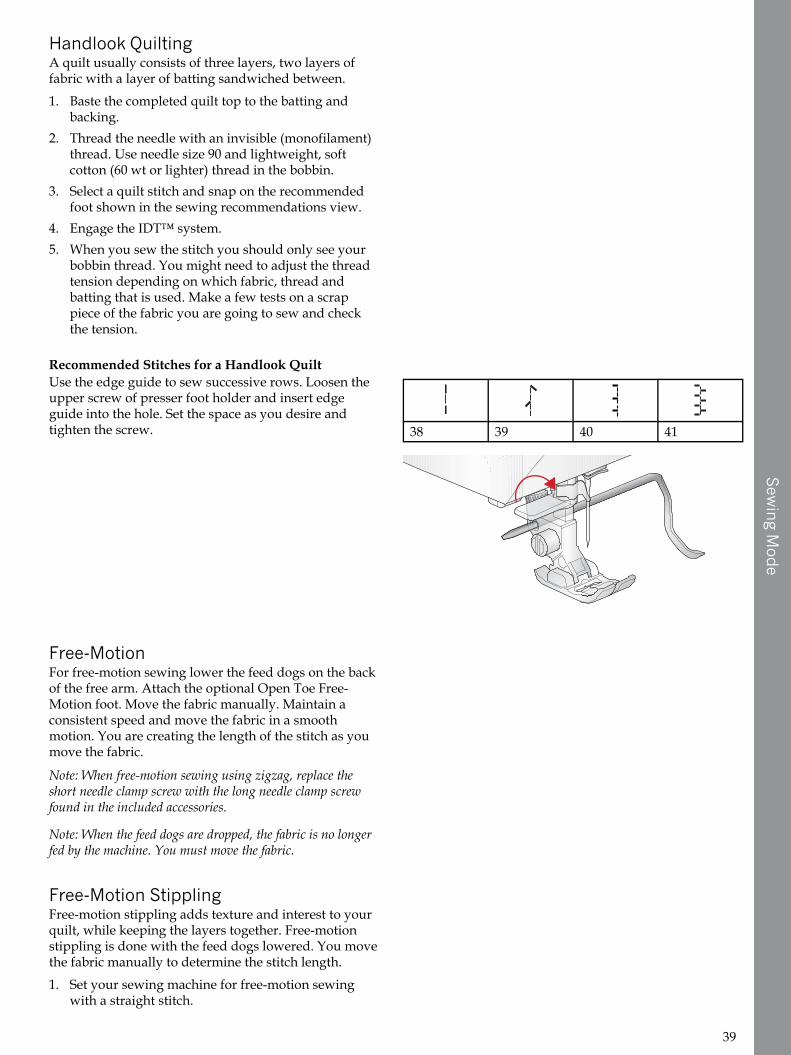
38 39 40 41
Use the edge guide to sew successive rows. Loosen theupper screw of presser foot holder and insert edgeguide into the hole. Set the space as you desire andtighten the screw.
Free-MotionFor free-motion sewing lower the feed dogs on the backof the free arm. Attach the optional Open Toe Free-Motion foot. Move the fabric manually. Maintain aconsistent speed and move the fabric in a smoothmotion. You are creating the length of the stitch as youmove the fabric.
Note: When free-motion sewing using zigzag, replace theshort needle clamp screw with the long needle clamp screwfound in the included accessories.
Note: When the feed dogs are dropped, the fabric is no longerfed by the machine. You must move the fabric.
Free-Motion StipplingFree-motion stippling adds texture and interest to yourquilt, while keeping the layers together. Free-motionstippling is done with the feed dogs lowered. You movethe fabric manually to determine the stitch length.
1. Set your sewing machine for free-motion sewingwith a straight stitch.
39
SewingMode
2. Attach the optional Open Toe Free-Motion foot.Disengage the IDT™ system and lower the feeddogs.
3. Begin by pin basting your quilt through all layerswith safety pins, starting from the center of yourquilt and working out. Place a pin every 6-8 inches(15-20 cm).
Note: Practice stippling on scraps of the fabric and battingfrom your quilt. It is important to move your hands at thesame speed as the needle to prevent stitches that are toolong or too short. Maintaining a consistent speed whilefree-motion sewing will also help keep stitches even.
4. Begin near the center of your quilt. Take one stitchand pull the bobbin thread to the top of the quilt.Take a few stitches right next to one another to lockthe threads.
5. Plan a path for your stitching, then begin stitchingyour desired stipple pattern, moving the quilt as yougo. The stitching should not cross over itself andshould travel in a meandering motion.
Blindhem StitchThe blindhem stitch is used to make invisible hems onskirts, trousers and home décor projects. Use footnumber 3 with the IDT™ system.
1. Finish the edge of the hem.2. Fold and press the hem allowance to the wrong side.3. Fold the hem back on itself so approximately 3/8" (1
cm) of the finished edge extends beyond the fold.The wrong side of your project should now be facingup.
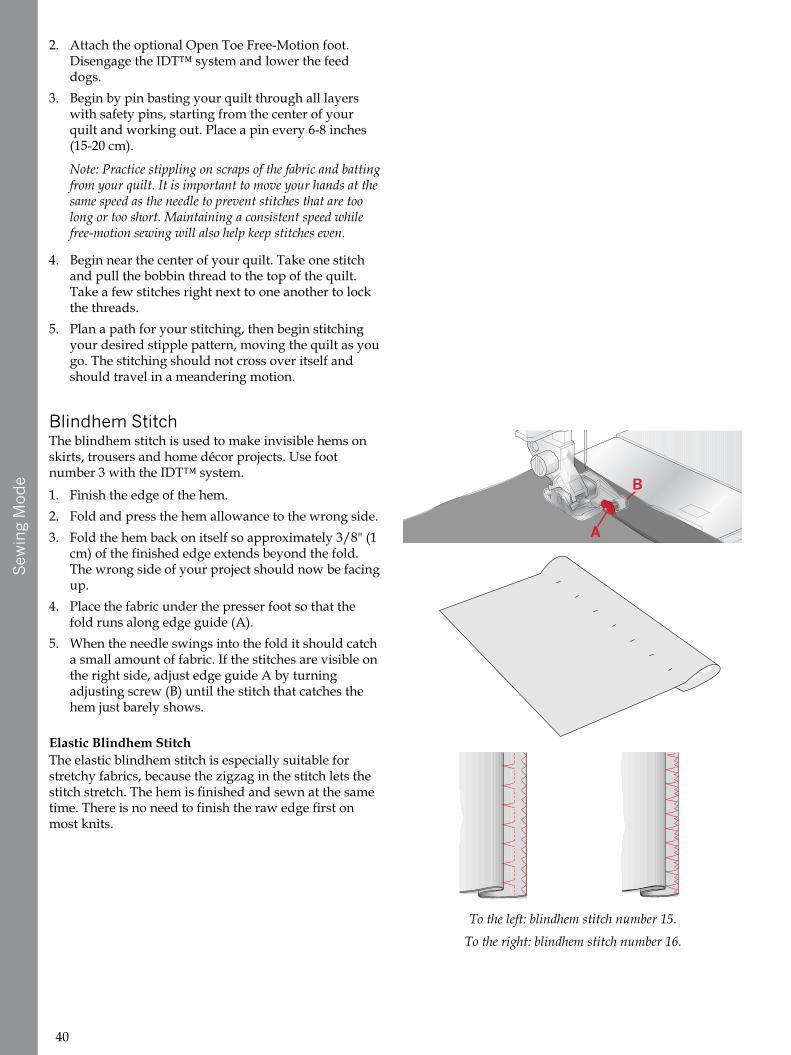
4. Place the fabric under the presser foot so that thefold runs along edge guide (A).
5. When the needle swings into the fold it should catcha small amount of fabric. If the stitches are visible onthe right side, adjust edge guide A by turningadjusting screw (B) until the stitch that catches thehem just barely shows.
Elastic Blindhem Stitch
To the left: blindhem stitch number 15.
To the right: blindhem stitch number 16.
The elastic blindhem stitch is especially suitable forstretchy fabrics, because the zigzag in the stitch lets thestitch stretch. The hem is finished and sewn at the sametime. There is no need to finish the raw edge first onmost knits.
40

Sewing
Mode
Sewing in ZippersThere are different ways to sew in zippers. Follow thedirections included with your pattern for best results.For all types of zippers it is important to sew close to theteeth of the zipper. The zipper foot 4 can be snapped tothe presser foot bar on the left or right, depending onhow you will insert your zipper. Then set the stitchposition so that it enters close to the edge of the zipperteeth by using one of the 29 needle positions availablefor the straight stitch. If the presser foot is attached onthe right side, the needle must only be moved to theright. If the foot is attached on the left, the needle mustonly be moved to the left.
Common Sewing Pop-Ups
Check Needle ThreadThe machine stops automatically if the needle threadruns out or breaks. Re-thread the machine, press OKand start sewing again.
Machine Needs to RestIf the machine stops and this pop-up appears on thescreen, the machine needs to rest. When the pop-upmessage closes you can resume sewing. The sewingresults will not be affected.
41

Sequencing
4 SequencingThe sequencing function on your machine makes itpossible to combine stitches and letters into sequences.You can add up to 60 stitches and/or letters in asequence. Save your sequence on your machine; reloadand sew any time you like. All stitches in your sewingmachine can be used for sequencing except forbuttonholes, darning stitch, button sewing and bar tackstitches.
Sequencing - Overview1. Stitch field2. Current stitch number3. Stitch width/stitch positioning4. Stitch length/density/elongation
Create a Sequence
1. Press the sequencing button to enter sequencing.2. Select the stitch you wish to use (see page 33 on how
to select a stitch). The stitch will appear in the stitchfield.
3. Select a letter from the alphabet (2) using the arrowon the wheel and press OK to insert it. The letter willbe placed at the cursor position in the stitch field.
Note: The current position in the stitch field is marked by acursor. Inserted stitches will be placed at the cursor position.Move the cursor through the sequence using the - and +arrow buttons just to the right of the stitch field.
Using the Alphabet
Alphabet Mode, Sequencing- Overview1. Stitch field2. Alphabet3. Character set (upper case/lower case, normal/
special symbols)4. Font selection
Create a Text Sequence1. Press the alphabet mode, sequencing button.2. Move the cursor through the stitch field (1) with the
- and + buttons just to the right of the stitch field towhere you want to add a letter.
3. Select a letter from the alphabet (2) using the arrowbuttons and press OK to insert it. It will be placed atthe cursor position in the stitch field.
Note: The selected letter in the alphabet will be highlighted.
42

SequencingSelect Character Set and FontPress the - or + buttons just to the right of the characterset indicator (3) to change character set between upperor lower case, normal or special letters and symbols.
Press the - or + buttons just to the right of the fontindicator (4) to change fonts.
Adjust Text and StitchesPress the sequence button to enter sequence view. Youcan mirror, adjust length and width or change thedensity, elongation and stitch position of the selectedstitch. The adjustments work just like in sewing mode.See page 34. When you have changed a value, the digitswill be highlighted on the graphic display to show thatthe value is not default.
Note: The adjustments will only affect the stitch at the cursorposition. If you return to sewing mode, all adjustments madethere will affect the entire sequence and will not be saved youreturn to sequencing.
Delete a Stitch or Letter in a SequenceIf you want to delete a stitch, move the cursor to thestitch you want to delete and press the clear button. Todelete the entire sequence from the stitch field, longpress the delete button.
Manage Your SequencesYou can save and reload your sequence. The sequencememory has a space of 60 stitches and letters.
Save SequenceSaving your sequence works just like in sewing mode.See page 35.
Note: If another sequence is already saved, a pop-up willappear asking if you wish to overwrite. Select yes or no withthe arrow buttons and press OK.
43

Sequencing
Load SequenceLoading your sequence works just like in sewing mode,see page 35. To load your sequence, press the loadbutton.
Note: When loading a sequence into sewing mode, the valuedisplayed for the sequence will be the letter M.
Sewing a sequenceTo sew the sequence, return to sewing mode by pressingsewing mode button, the start/stop button or bystepping on the foot control. Your sequence is ready tobe sewn out. The sequence will be sewn continuously. Ifyou want to stop at the end of the sequence, press thethread snips while sewing. The machine will tie-off andcut the threads at the end of the sequence.
Note: Adjustments made in sewing mode will affect the wholesequence. However, these adjustments will not be saved if youreturn to sequencing.
44

Embroidery
Preparations
5 Embroidery Preparations
Embroidery Unit Overview(type EU-3P)
A. Embroidery unit release buttonB. Level adjusting feetC. Embroidery unit socketD. Embroidery hoop connection assemblyE. Embroidery arm
Embroidery Hoop OverviewA. Embroidery hoop connectorB. Outer hoopC. Inner hoopD. Quick releaseE. Retaining screwF. Ribs for fitting optional clipsG. Center markings
Designs86 designs are stored on the USB embroidery stickdelivered with your machine. We recommend copyingthe designs to your computer as an easily accessiblebackup if you should lose the USB embroidery stick or ifyou temporarily want to remove the designs from thestick.
Embroidery CollectionPage through the PFAFF® creative™ 1.5 embroiderycollection booklet, found as a PDF-file on the USBembroidery stick, for an overview of the availabledesigns and embroidery fonts. The design number,
45

EmbroideryPreparations
stitch count (number of stitches in the design) and thedesign size are displayed next to each design. Thesuggested thread colors for each color number areshown.
Download Backup DesignsAll creative™ 1.5 designs and other files from the USBstick are also available on our website for backup. Go toPFAFF® website at www.pfaff.com, click on Supportand select creative™ 1.5 . When downloading the filesyou will be asked to enter a code. Enter number:
8200creative
Connect the Embroidery UnitThere is a covered socket behind the free-arm, seeillustration. The cover will open automatically whenconnecting the embroidery unit.
1. Make sure the machine is turned off.2. Slide the accessory tray off.3. Slide the embroidery unit onto the free arm of the
machine until it plugs firmly into the socket. Ifneeded, use the level adjusting feet so that themachine and embroidery unit are even.
4. Turn on the machine. It will automatically restartand enter embroidery mode.
5. Clear the embroidery area. A pop-up tells you toremove the hoop for positioning. Press OK. Themachine will calibrate and the embroidery arm willmove to the ready position.
Make sure not to calibrate the machine with theembroidery hoop attached as this can damage theneedle, presser foot, hoop and/or the embroideryunit. Be sure to clear all materials from around themachine before calibrating so that the embroideryarm does not bump into anything while calibrating.
Remove the Embroidery Unit1. To store the embroidery unit, move the embroidery
arm to park position by selecting park position in thehoop options menu or the settings menu.
2. Make sure the machine is turned off.3. Press and pull the button at the left, underneath the
embroidery unit (A) and slide the unit to the left toremove it.
4. The cover of the socket closes automatically.5. Store the embroidery unit in the original packing
material.
46
Embroidery
Preparations
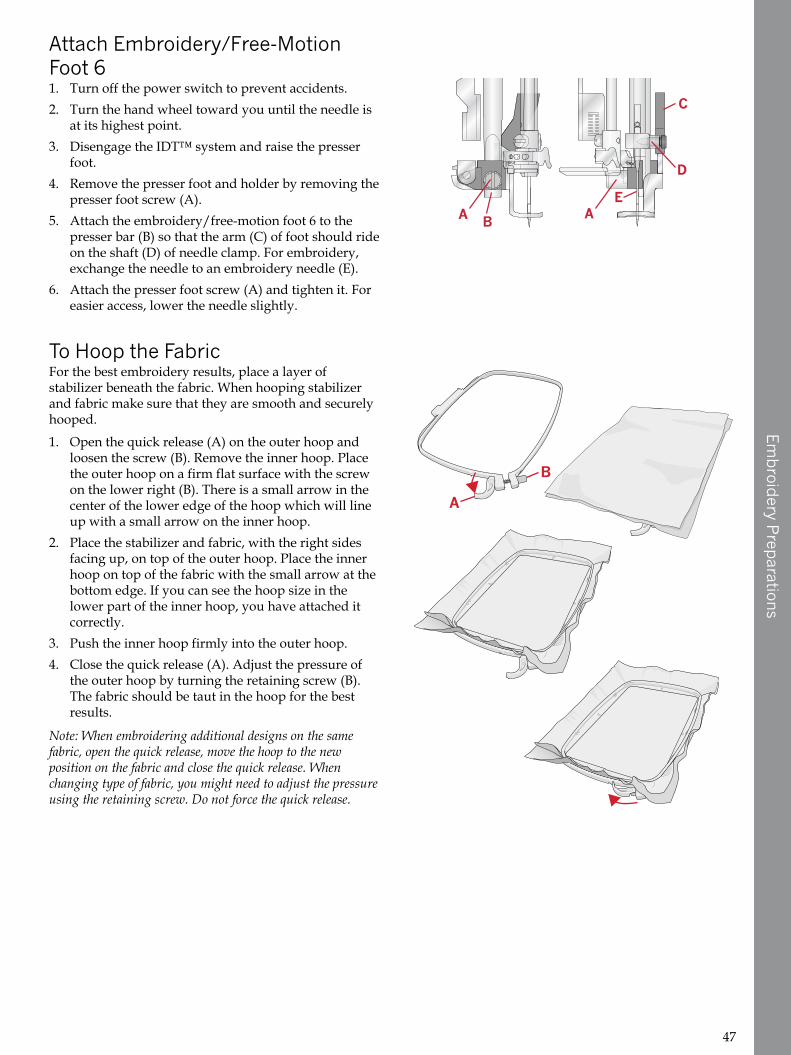
Attach Embroidery/Free-MotionFoot 61. Turn off the power switch to prevent accidents.2. Turn the hand wheel toward you until the needle is
at its highest point.3. Disengage the IDT™ system and raise the presser
foot.4. Remove the presser foot and holder by removing the
presser foot screw (A).5. Attach the embroidery/free-motion foot 6 to the
presser bar (B) so that the arm (C) of foot should rideon the shaft (D) of needle clamp. For embroidery,exchange the needle to an embroidery needle (E).
6. Attach the presser foot screw (A) and tighten it. Foreasier access, lower the needle slightly.
To Hoop the FabricFor the best embroidery results, place a layer ofstabilizer beneath the fabric. When hooping stabilizerand fabric make sure that they are smooth and securelyhooped.
1. Open the quick release (A) on the outer hoop andloosen the screw (B). Remove the inner hoop. Placethe outer hoop on a firm flat surface with the screwon the lower right (B). There is a small arrow in thecenter of the lower edge of the hoop which will lineup with a small arrow on the inner hoop.
2. Place the stabilizer and fabric, with the right sidesfacing up, on top of the outer hoop. Place the innerhoop on top of the fabric with the small arrow at thebottom edge. If you can see the hoop size in thelower part of the inner hoop, you have attached itcorrectly.
3. Push the inner hoop firmly into the outer hoop.4. Close the quick release (A). Adjust the pressure of
the outer hoop by turning the retaining screw (B).The fabric should be taut in the hoop for the bestresults.
Note: When embroidering additional designs on the samefabric, open the quick release, move the hoop to the newposition on the fabric and close the quick release. Whenchanging type of fabric, you might need to adjust the pressureusing the retaining screw. Do not force the quick release.
47
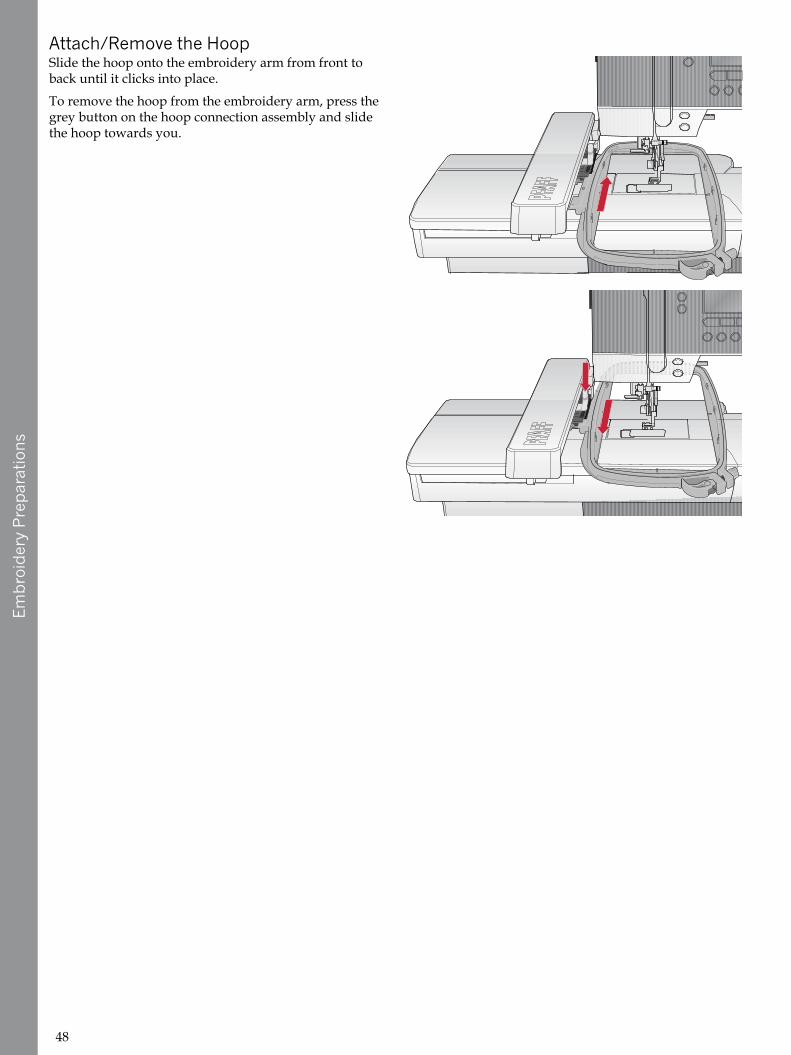
EmbroideryPreparations
Attach/Remove the HoopSlide the hoop onto the embroidery arm from front toback until it clicks into place.
To remove the hoop from the embroidery arm, press thegrey button on the hoop connection assembly and slidethe hoop towards you.
48

Embroidering
6 EmbroideringIn embroidery mode you can adjust and stitch outdesigns. You need to have the embroidery unitconnected to your machine to enter embroidery mode.After loading a design there are two views available inembroidery mode - stitch-out and edit.
Embroidery Stitch-Out View 11. Embroidery field2. Loaded design3. Hoop size4. Stitches left in color block (total number of stitches
left in design)5. Current color (total number of colors)
Embroidery Stitch-Out View 2Press the alt button to toggle to view 2.
1. Orbit to check position2. Basting3. Monochrome embroidery
Embroidery Edit ViewTo adjust a design, press the embroidery edit button.
1. Rotate design2. Design height3. Design width
Note: Values that have been changed from default will behighlighted. The stitch out view will automatically be shownwhen starting to stitch-out your design
To return to the stitch-out view, press the stitch-outbutton.
Design Information
1. Design name/number2. Design position3. Color list
Press the info button to view information about theloaded design.
Note: The machine will stop if you press the info button whilemachine is running.
Design Name/NumberShows the name and number of the current design.
Design PositionShows how many millimeters the design has beenmoved from the center position in the hoop.
49

Embroidering
Color ListAll colors in the loaded design are shown in the orderthey will be embroidered. Each listed color shows order,name and thread type. Use the up and down arrowbuttons to view all of the colors in the list.
Embroidery Stitch-Out
Load a DesignThis machine has 15 built-in embroidery designs and 86designs delivered on the USB embroidery stick. Alldesigns can be viewed in the creative™ 1.5 embroiderycollection booklet available as a PDF file on the USBembroidery stick.
Load Built-In DesignsWith the embroidery unit connected, enter the numberof desired design using the direct selection buttons. Thedesign will be loaded into the embroidery field inembroidery stitch-out.
Load Designs From the USB Embroidery Stick1. To load a design from the USB embroidery stick,
insert the stick into the USB port on the right side ofthe machine with the embroidery unit attached andpress the load button. Your machine can load .vp3embroidery files.
2. Use the arrow buttons to select a folder and thenpress OK to open it. To go back to the previousfolder, select the top line and press OK.
3. Select the design you want to load and press OK toconfirm. It will be loaded into the embroidery fieldin embroidery stitch-out.
Note: If you have already loaded a design, the next design youload will automatically replace the first one.
When saving designs to the USB embroidery stick fromyour PC, make sure not to create too many levels of subfolders as this may create a file path that is too long.Also make sure to keep the file name short.
Load an Embroidery FontThis machine has 2 built-in fonts, curlz and graphite, inthree different sizes. Select a font from creative™ 1.5embroidery collection booklet and type in the fontnumber (curlz: 200, 201, 202 or graphite: 300, 301, 302)using the keypad. The font will load into theembroidery text editor.
50
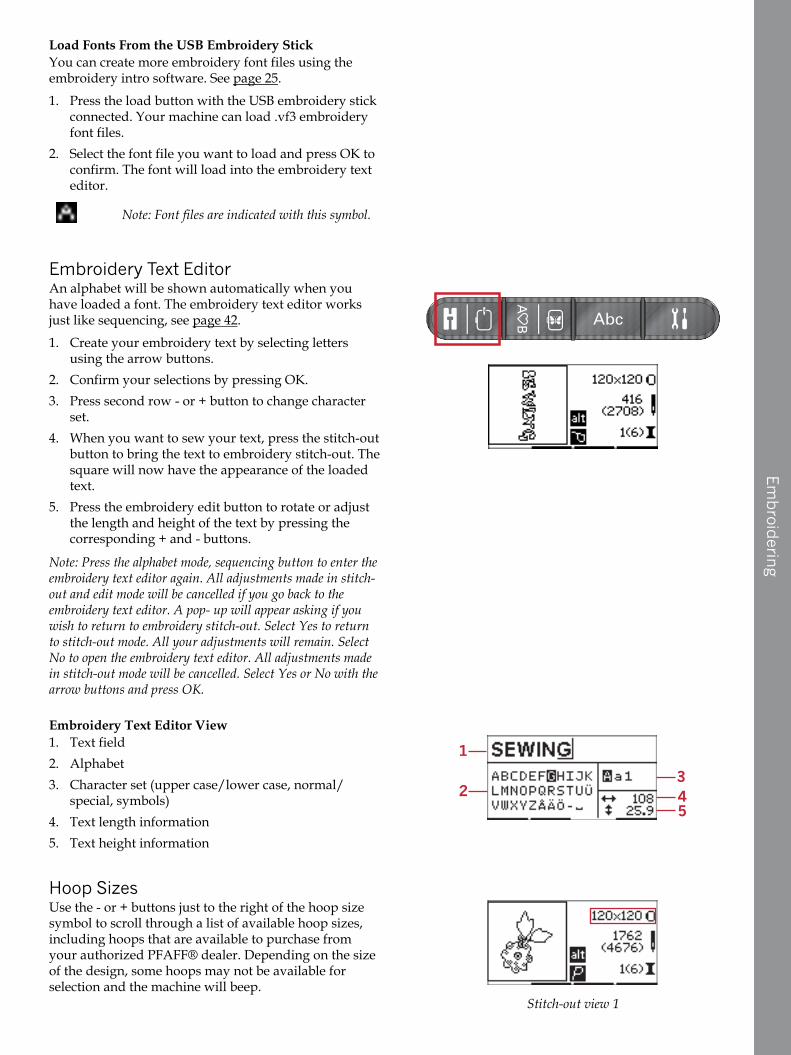
Embroidering
Load Fonts From the USB Embroidery StickYou can create more embroidery font files using theembroidery intro software. See page 25.
1. Press the load button with the USB embroidery stickconnected. Your machine can load .vf3 embroideryfont files.
2. Select the font file you want to load and press OK toconfirm. The font will load into the embroidery texteditor.
Note: Font files are indicated with this symbol.
Embroidery Text EditorAn alphabet will be shown automatically when youhave loaded a font. The embroidery text editor worksjust like sequencing, see page 42.
1. Create your embroidery text by selecting lettersusing the arrow buttons.
2. Confirm your selections by pressing OK.3. Press second row - or + button to change character
set.4. When you want to sew your text, press the stitch-out
button to bring the text to embroidery stitch-out. Thesquare will now have the appearance of the loadedtext.
5. Press the embroidery edit button to rotate or adjustthe length and height of the text by pressing thecorresponding + and - buttons.
Note: Press the alphabet mode, sequencing button to enter theembroidery text editor again. All adjustments made in stitch-out and edit mode will be cancelled if you go back to theembroidery text editor. A pop- up will appear asking if youwish to return to embroidery stitch-out. Select Yes to returnto stitch-out mode. All your adjustments will remain. SelectNo to open the embroidery text editor. All adjustments madein stitch-out mode will be cancelled. Select Yes or No with thearrow buttons and press OK.
Embroidery Text Editor View1. Text field2. Alphabet3. Character set (upper case/lower case, normal/
special, symbols)4. Text length information5. Text height information
Hoop Sizes
Stitch-out view 1
Use the - or + buttons just to the right of the hoop sizesymbol to scroll through a list of available hoop sizes,including hoops that are available to purchase fromyour authorized PFAFF® dealer. Depending on the sizeof the design, some hoops may not be available forselection and the machine will beep.

Embroidering
Note: If you try to start embroidering and the hoop you haveselected is not the same as the hoop attached to the embroideryunit, a pop-up will appear to inform you of this. Attach thecorrect hoop or select another hoop in the list.
Hoop PositionsOpen the settings menu to choose between differenthoop positions.
Current PositionWhen you want to return to the current stitch and startembroidering again where the embroidery wasinterrupted, select the current position option. You canalso press the start/stop button once to return to thecurrent stitch and start to embroider.
Park PositionWhen you have finished your embroidery, remove thehoop and select the park position option.
It is very important that the hoop is removed,otherwise it may be damaged.
Cut PositionCut position will move the hoop towards you, making iteasier to trim fabric when embroidering an appliqué.
Center PositionUse the center position if you want to move the needleto the center position of the hoop.
Stitches Left in Color Block
Stitch-out view 1
The two values shown in the center position on the rightside of the display indicate the number of stitches left inthe current color block and the number of stitches left inthe design (shown in brackets). Press the + or - buttonsto step forward or backward stitch by stitch through thedesign. Step backwards a few stitches if the needlethread breaks or runs out.
Current Color
Stitch-out view 1
The values displayed in the lower right corner denotethe current color block and the total number of colorblocks in the design (shown in brackets). Use the + and -buttons to move forward or backward through the colorblocks.
52

Embroidering
Orbit to Check Position
Stitch-out view 2
Orbiting can be used to trace the design area. Press thefirst row + button to move the hoop so the needle isplaced in the upper left corner of where the design willbe embroidered. Each time you press the + button thehoop will move to view all corners of the design. On thefifth press the hoop will move so the needle is above thecenter position of the design. On the sixth press it willmove back to its original position. If the - button ispressed the hoop will move in reverse sequence. Thehoop will first move to the center position of the designand then to each corner.
Basting
Stitch-out view 2
Press the second row - or + button and the machine willcreate a basting stitch around the design area.
Basting enables you to secure your fabric to a stabilizerplaced beneath it, especially when the fabric to beembroidered cannot be hooped. Basting providessupport for stretchy fabrics. It also shows where thedesign will be placed on the fabric.
Note: During basting the design box will be indicated with adashed line.
Monochrome
Stitch-out view 2
Press the third row - or + buttons to activatemonochrome embroidery. The machine will not stop forcolor block changes. Press the button again to deactivatemonochrome embroidery.
Note: When monochrome is activated, the design box will beindicated with a black frame.
Speed ControlAdjust the maximum embroidery speed by sliding thespeed control lever up or down. It works just like insewing mode, see page 29.
Thread TensionWhen embroidering with specialty thread or fabric youmay need to adjust the thread tension to achieve thebest result. Thread tension can be adjusted in thesettings menu, see page 30.
53

Embroidering
Getting Started Embroidering1. Clear sufficient space to accommodate movement of
the embroidery arm and the hoop.2. Make sure the machine is turned off and slide the
embroidery unit onto the free arm of the machineuntil it plugs firmly into the socket. Turn on themachine. It will automatically restart and enterembroidery mode. A pop-up tells you to remove thehoop for positioning. Press OK. The machine willcalibrate and the embroidery arm will move to theready position.
3. Make sure the IDT™ system is disengaged andattach the embroidery foot. Insert a bobbin withlightweight bobbin thread.
4. Select a design number from the machine by usingthe keypad or select one from a USB embroiderystick (make sure that the USB embroidery stick isconnected) and press OK to load to embroiderystitch-out.
5. The design is placed in the center of the hoop.6. Hoop a piece of fabric and stabilizer, and slide the
hoop onto the embroidery arm.7. Thread the machine with the first color in the color
list.8. Lower the presser foot. Hold the needle thread and
press the start/stop button or the foot control. Themachine starts embroidering and stopsautomatically after few stitches. A pop-up appearsasking you to cut thread end. Cut thread end andpress OK. Continue embroidering by pressing start/stop or the foot control.
Note: Automatic stop for cut is activated by default. Open thesettings menu to deactivate this setting. Automatic stop forcut is disabled if you use the foot control when embroidering.
9. When the first color is completed, your machinestops. A pop-up appears asking you to change color.Re-thread with the next color and press OK.Continue embroidering by pressing start/stop or thefoot control. Each color segment is tied off at the endand the needle and bobbin threads are cut.
10. When the embroidery is completed, your machinecuts both threads and stops. A pop-up informs youthat your embroidery is finished. Press OK. Raise thepresser foot to easily remove the hoop.
54
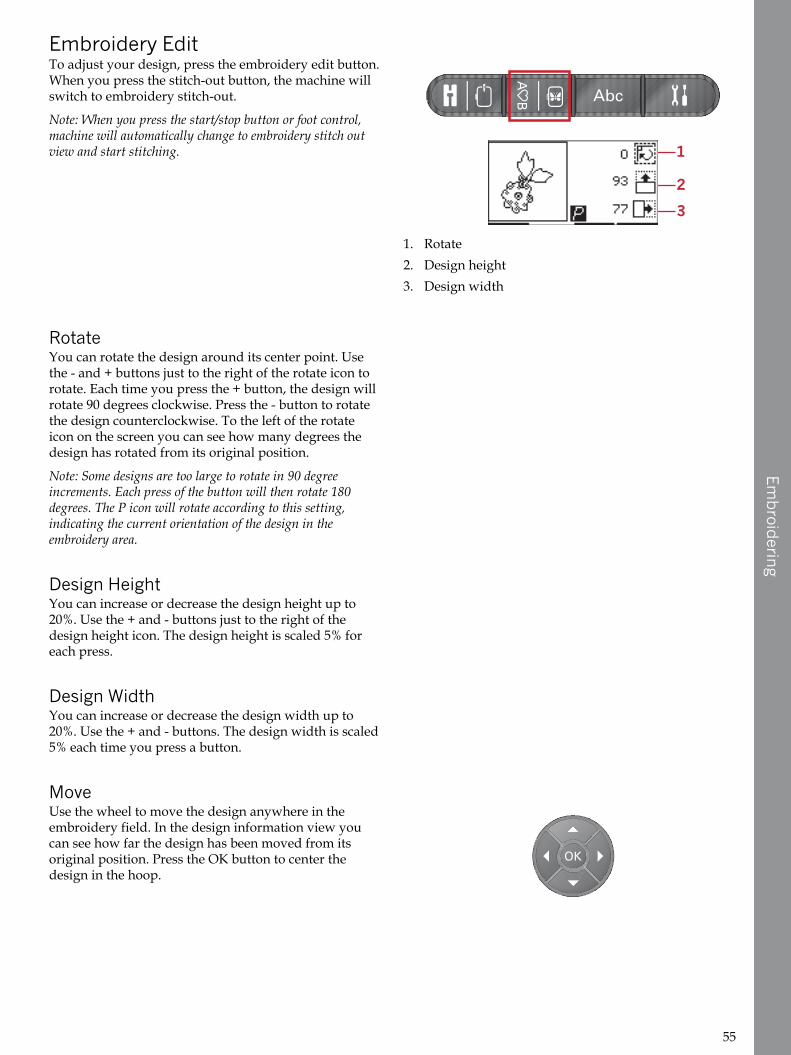
Embroidering
Embroidery Edit
1. Rotate2. Design height3. Design width
To adjust your design, press the embroidery edit button.When you press the stitch-out button, the machine willswitch to embroidery stitch-out.
Note: When you press the start/stop button or foot control,machine will automatically change to embroidery stitch outview and start stitching.
RotateYou can rotate the design around its center point. Usethe - and + buttons just to the right of the rotate icon torotate. Each time you press the + button, the design willrotate 90 degrees clockwise. Press the - button to rotatethe design counterclockwise. To the left of the rotateicon on the screen you can see how many degrees thedesign has rotated from its original position.
Note: Some designs are too large to rotate in 90 degreeincrements. Each press of the button will then rotate 180degrees. The P icon will rotate according to this setting,indicating the current orientation of the design in theembroidery area.
Design HeightYou can increase or decrease the design height up to20%. Use the + and - buttons just to the right of thedesign height icon. The design height is scaled 5% foreach press.
Design WidthYou can increase or decrease the design width up to20%. Use the + and - buttons. The design width is scaled5% each time you press a button.
MoveUse the wheel to move the design anywhere in theembroidery field. In the design information view youcan see how far the design has been moved from itsoriginal position. Press the OK button to center thedesign in the hoop.
55

Embroidering
MirroringUse the mirroring buttons to mirror the design end toend or side to side. The icons will appear when thesebuttons are pressed.
Note: The P icon will mirror according to this setting.
Common Embroidery Pop-Ups
Embroidery Unit CalibrationWhen the embroidery unit is attached, a pop-up asksyou to remove the hoop and clear the machine area forcalibrating the embroidery arm. Press OK. The machinewill calibrate and the embroidery arm will move to theready position.
Note: It is very important to remove the hoop, otherwise thehoop or the embroidery unit may be damaged whilecalibrating.
Connect an USB Embroidery StickIn embroidery mode if you press the load buttonwithout having a USB embroidery stick connected, thispop-up will appear. Connect a USB embroidery stickand press OK to load a design.
The Data On the USB Embroidery Stick Is Not ReadableThis pop-up will appear when your sewing machinecannot access the information on the USB embroiderystick. This can be caused when incorrect file formats aresaved to the USB embroidery stick. Other reasons couldbe that the USB embroidery stick is damaged or notcompatible with the sewing machine.
Design Includes Elements That Cannot Be OpenedSome designs may consist of several designs or containother elements that cannot be opened. Use yourcomplimentary embroidery intro software to re-save thedesign as a combined design.
Remove the HoopThis pop-up will appear when a function has beenchosen that forces the embroidery unit to move outsidethe limits for the attached hoop. In order for theembroidery arm to move freely, remove the hoop andthen press OK.
56

Embroidering
Stop Command in DesignThis pop-up will appear when there is a programmedstop in the design. The machine will stop. Press OK toconfirm and continue embroidering.
57

Maintenance
7 Maintenance
Cleaning the MachineTo keep your sewing machine operating well, clean itoften. No lubrication (oiling) is needed. Wipe theexterior surface of your machine with a soft cloth toremove any dust or lint built up. Wipe the graphicdisplay with a clean, soft and damp cloth.
Cleaning the Bobbin AreaLower the feed dogs and turn off the machine.
Remove the presser foot. Push the bobbin cover releasebutton (A) to the right and remove the bobbin cover (B)and the bobbin. Use the screwdriver for the needle plateto remove the two screws (C) in the needle plate. Lift upthe needle plate. Clean the feed dogs and bobbin areawith the brush included with the accessories.
58
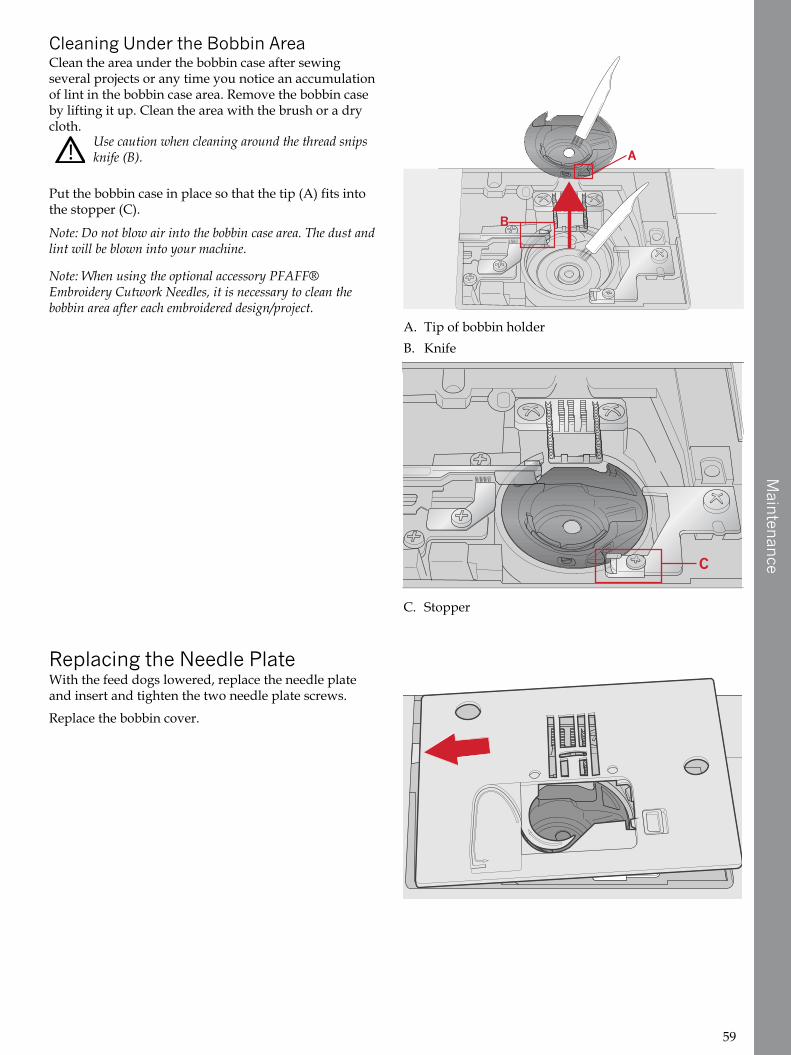
Maintenance
Cleaning Under the Bobbin Area
A. Tip of bobbin holderB. Knife
C. Stopper
Clean the area under the bobbin case after sewingseveral projects or any time you notice an accumulationof lint in the bobbin case area. Remove the bobbin caseby lifting it up. Clean the area with the brush or a drycloth.
Use caution when cleaning around the thread snipsknife (B).
Put the bobbin case in place so that the tip (A) fits intothe stopper (C).
Note: Do not blow air into the bobbin case area. The dust andlint will be blown into your machine.
Note: When using the optional accessory PFAFF®Embroidery Cutwork Needles, it is necessary to clean thebobbin area after each embroidered design/project.
Replacing the Needle PlateWith the feed dogs lowered, replace the needle plateand insert and tighten the two needle plate screws.
Replace the bobbin cover.
59

Maintenance
TroubleshootingIn this troubleshooting guide you will find solutions tothe problems you may have with your machine. Forfurther information please contact your local authorizedPFAFF® dealer who will be happy to help you.
General ProblemsBobbin alarm does not work? Clean lint from bobbin area and use only the bobbins
approved for this model.
Thread snips do not cut the thread? Remove needle plate and clean lint from bobbin area.
Fabric does not move? Make sure that the feed dogs are not lowered.
Wrong stitch, irregular or narrow stitch? Deactivate twin needle or stitch width safety in thesettings menu.
The needle breaks? Insert needle correctly as described, see page 23. Attachcorrect needle for the fabric.
The machine will not sew? Check that all plugs are securely plugged into themachine and into the wall socket. Check that the footcontrol cord is securely plugged into the front socket onthe bottom right side of the machine.
Push bobbin winder lever to sewing position.
The sewing and embroidery machine function buttonsdo not respond to touch?
The sockets and function buttons on the machine can besensitive to static electricity. If the buttons do notrespond to touch, turn the machine OFF and then ONagain. If the problem persists, contact your localauthorized PFAFF® dealer.
The Machine Skips StitchesDid you insert the needle properly? Insert needle correctly as described, see page 23.
Did you insert a wrong needle? Use needle system 130/705 H.
Is the needle bent or blunt? Insert a new needle.Did you thread the machine properly? Check how the machine is threaded.
Is the correct presser foot used? Attach correct presser foot.
Is the needle too small for the thread? Make sure the needle is correct for the thread and fabric.
Needle Thread BreaksDid you insert the needle properly? Insert needle correctly as described, see page 23.
Did you insert a wrong needle? Use needle system 130/705 H.
Is the needle bent or blunt? Insert a new needle.Did you thread the machine properly? Check how the machine is threaded.
Is the needle too small for the thread? Change the needle to the proper size for the thread.
Are you using poor thread with slubs or thread whichhas become dry?
Change to a new higher quality thread purchased froman authorized PFAFF® dealer.
Is a correct spool cap used? Attach a spool cap of the right size for the actual threadspool.
Is the best spool pin position used? Try a different spool pin position (vertical or horizontal).
Is the needle plate hole damaged? Change the needle plate.
60
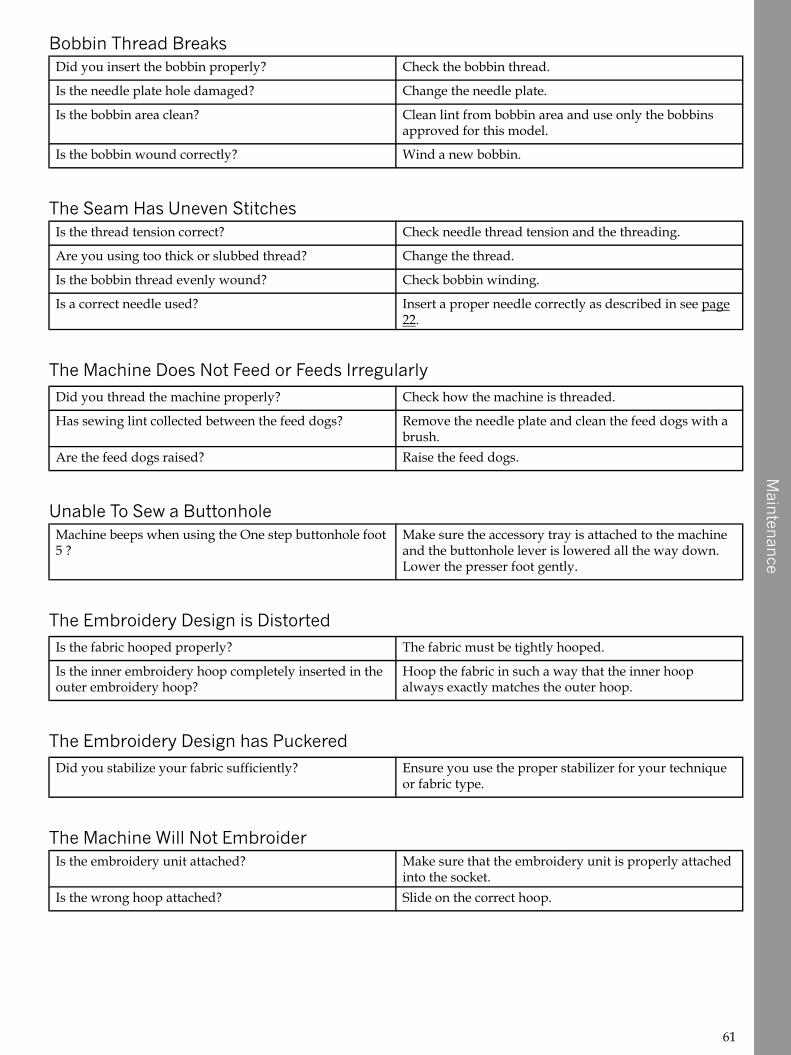
Maintenance
Bobbin Thread BreaksDid you insert the bobbin properly? Check the bobbin thread.
Is the needle plate hole damaged? Change the needle plate.
Is the bobbin area clean? Clean lint from bobbin area and use only the bobbinsapproved for this model.
Is the bobbin wound correctly? Wind a new bobbin.
The Seam Has Uneven StitchesIs the thread tension correct? Check needle thread tension and the threading.
Are you using too thick or slubbed thread? Change the thread.
Is the bobbin thread evenly wound? Check bobbin winding.
Is a correct needle used? Insert a proper needle correctly as described in see page22.
The Machine Does Not Feed or Feeds IrregularlyDid you thread the machine properly? Check how the machine is threaded.
Has sewing lint collected between the feed dogs? Remove the needle plate and clean the feed dogs with abrush.
Are the feed dogs raised? Raise the feed dogs.
Unable To Sew a ButtonholeMachine beeps when using the One step buttonhole foot5 ?
Make sure the accessory tray is attached to the machineand the buttonhole lever is lowered all the way down.Lower the presser foot gently.
The Embroidery Design is DistortedIs the fabric hooped properly? The fabric must be tightly hooped.
Is the inner embroidery hoop completely inserted in theouter embroidery hoop?
Hoop the fabric in such a way that the inner hoopalways exactly matches the outer hoop.
The Embroidery Design has PuckeredDid you stabilize your fabric sufficiently? Ensure you use the proper stabilizer for your technique
or fabric type.
The Machine Will Not EmbroiderIs the embroidery unit attached? Make sure that the embroidery unit is properly attached
into the socket.Is the wrong hoop attached? Slide on the correct hoop.
61

Maintenance
Have your sewing machine serviced regularly by your local authorized PFAFF® dealer!
If you have followed this trouble shooting information and still have problems, take your sewing machine to yourdealer. If there is a specific problem, it is a great help to test sew with your thread on a scrap of your sewing fabricand bring it to your dealer. A sewing sample will often give much better information than words.
Non-original parts and accessories
The warranty does not cover any defect or damage caused by use of non-original accessories or parts.
Technical specification
Sewing machineRated voltage 100–240V ~ 50–60Hz
Nominal consumption 55W
Light LED
Sewing speed 800 rpm maximum
Machine dimensions:
Length (mm)
Width (mm)
Height (mm)
Net weight (kg)
480
193
300
13
Foot controlModel C-9000Rated voltage DC 15V, max. 3mA
• The technical specifications and this owner’s manualcan be changed without prior notice.
62
IndexIndex
AAAccessories.................................................................8Accessory Tray ...........................................................7Adjust Text and Stitches ............................................ 43alphabet mode, sequencing........................................ 51Alphabet Mode, Sequencing ................................. 28, 42Alphabets................................................................. 14Alt Button ................................................................ 28Attach Embroidery/Free-Motion Foot 6 ..................... 47Attach Presser Foot ................................................... 25Attach/Remove the Hoop ......................................... 48Audible Alarm.......................................................... 31Automatic stop for cut.......................................... 31, 54Auxiliary Spool Pin ................................................... 17
BBbasting ................................................................ 28, 40Basting ..................................................................... 53Blindhem Stitch ........................................................ 40Block........................................................................ 14Bobbin Thread Breaks ............................................... 61Bobbin Winding........................................................ 20Buttonholes .............................................................. 36Buttons and Indicators .............................................. 27
CCCenter Position .................................................... 32, 52Changing the Needle................................................. 23Changing the Presser Foot ......................................... 24Check Needle Thread................................................ 41Cleaning the Bobbin Area .......................................... 58Cleaning the Machine................................................ 58Cleaning Under the Bobbin Area................................ 59Color List ................................................................. 50Common Embroidery Pop-Ups.................................. 56Common Sewing Pop-Ups......................................... 41Complimentary Embroidery Intro Software (PC) ........ 25Connect an USB Embroidery Stick.............................. 56Connect the Embroidery Unit .................................... 46Connect the Power Cord and Foot Control ................. 15Connect to and Remove From USB Port...................... 25Contrast ................................................................... 31Corded Buttonhole.................................................... 37Create a Sequence ..................................................... 42Create a Text Sequence.............................................. 42Current Color ........................................................... 52Current Position .................................................. 31, 52Cursor Buttons ......................................................... 28Cut Position......................................................... 32, 52Cyrillic ..................................................................... 14
DDDarning.................................................................... 38Decorative Stitches.................................................... 13Delete a Stitch or Letter in a Sequence ........................ 43Delete Button............................................................ 28Design Height........................................................... 55Design Includes Elements That Cannot Be Opened ..... 56Design Information ................................................... 49Design Name/Number ............................................. 49Design Position......................................................... 49Design Width ........................................................... 55Direct Selection Buttons............................................. 28Disengaging the IDT™ System................................... 22
EEElastic Blindhem Stitch .............................................. 40Elongation................................................................ 34Embroidery Collection .............................................. 45Embroidery Edit ....................................................... 55Embroidery Edit View............................................... 49Embroidery Hoop Overview ..................................... 45Embroidery Preparations........................................... 45Embroidery Stitch-Out .............................................. 50Embroidery Stitch-Out View 1 ................................... 49Embroidery Stitch-Out View 2 ................................... 49Embroidery Text Editor............................................. 51Embroidery Text Editor View .................................... 51Embroidery Unit Calibration ..................................... 56Embroidery Unit Overview ....................................... 45Engaging the IDT™ System ....................................... 21
FFFree Arm.................................................................. 16Front ..........................................................................6
GGGeneral Problems...................................................... 60Getting Started Embroidering .................................... 54Graphic Display........................................................ 28
HHHandlook Quilting.................................................... 39Hoop Positions .................................................... 31, 52Hoop Sizes ............................................................... 51Horizontal Position ................................................... 17How to Update Your Machine ................................... 26
63
Index
IIIDT™ system........................................ 21–22, 33, 38, 54Info Button ............................................................... 28Inserting the Bobbin .................................................. 21
LLLanguage ................................................................. 31LED Lights ............................................................... 16Load a Design........................................................... 50Load an Embroidery Font.......................................... 50Load Built-In Designs................................................ 50Load Button.............................................................. 28Load Designs From the USB Embroidery Stick............ 50Load Fonts From the USB Embroidery Stick ............... 51Load Personal Stitch.................................................. 35Load Sequence.......................................................... 44Lowering Feed Dogs ................................................. 23
MMMachine Needs to Rest .............................................. 41Machine Overview......................................................6Maintenance ............................................................. 58Manage Your Sequences............................................ 43Manual Buttonhole ................................................... 37Mirror End to End Button.......................................... 28Mirror Side to Side Button ......................................... 28Mirroring ............................................................ 35, 56Monochrome ............................................................ 53Mounting Machine in Sewing Cabinet........................ 16Move ....................................................................... 55
NNNeedle Art Stitches ................................................... 13Needle Stop Up/Down Button with Indicator............. 27Needle Thread Breaks ............................................... 60Needle Threader ....................................................... 18Needles .................................................................... 22
OOOK Button ................................................................ 29One Step Buttonhole Foot 5 ....................................... 36Optional Feet Stitches................................................ 14Orbit to Check Position ............................................. 53Overwrite Personal Stitch .......................................... 35
PPPack Away After Sewing ........................................... 16Park Position ....................................................... 32, 52
Parts of the Embroidery Unit .......................................8Personal Stitch .......................................................... 35Presser Feet ................................................................9Presser Foot Lift ........................................................ 24Presser Foot Pressure ................................................ 24
QQQuilt Stitches ............................................................ 13
RRRear Side ....................................................................7Recommended Stitches for a Handlook Quilt.............. 39Remove Presser Foot ................................................. 24Remove the Embroidery Unit .................................... 46Remove the Hoop ..................................................... 56Replacing the Needle Plate ........................................ 59Reverse Button with Indicator.................................... 28Rotate ...................................................................... 55
SSSatin Stitches ............................................................ 13Save Personal Stitch or Sequence button ..................... 28Save Sequence .......................................................... 43Select a Stitch............................................................ 33Select Character Set and Font ..................................... 43Sequencing ............................................................... 42Sequencing/Embroidery Edit Mode Button ................ 28Settings Menu...................................................... 28, 30Sew On a Button ....................................................... 38Sewing a sequence .................................................... 44Sewing Hems in Heavy Fabric ................................... 38Sewing in Zippers ..................................................... 41Sewing Mode/Embroidery Stitch-out Mode Button .... 28Sewing Recommendations......................................... 33Sewing Techniques ................................................... 36Software Version ...................................................... 31Speed Control........................................................... 53Speed Control Lever.................................................. 29Spool Pins ................................................................ 17Start/Stop Button...................................................... 27Stitch Adjustments .................................................... 34Stitch Length/Stitch Density................................. 28, 34Stitch Overview ........................................................ 11Stitch Width Safety.................................................... 30Stitch Width/Stitch Positioning ............................ 28, 34Stitches Left in Color Block ........................................ 52Stop Command in Design.......................................... 57
TTThe Data On the USB Embroidery Stick Is NotReadable................................................................. 56
64

IndexThe Embroidery Design has Puckered ........................ 61The Embroidery Design is Distorted........................... 61The Machine Does Not Feed or Feeds Irregularly ........ 61The Machine Skips Stitches........................................ 60The Machine Will Not Embroider .............................. 61The Seam Has Uneven Stitches .................................. 61Thread Cutter ........................................................... 16Thread Snips Button with Indicator............................ 27Thread Tension............................................... 30, 35, 53Threading for Twin Needle........................................ 19Threading the Machine.............................................. 18Three-Step Zigzag Stitch............................................ 36Tie-off Button ........................................................... 27To Hoop the Fabric ................................................... 47Top Parts....................................................................7Troubleshooting ....................................................... 60Twin Needle............................................................. 30
UUUnable To Sew a Buttonhole ...................................... 61Unpacking................................................................ 15Updating Instructions ............................................... 26USB embroidery stick................................................ 45USB Embroidery Stick ............................................... 25USB Port .................................................................. 25Using the Alphabet ................................................... 42Utility Stitches .......................................................... 11
VVVertical Position........................................................ 17
WWWheel Buttons .......................................................... 29Winding From Horizontal Position ............................ 20Winding Through the Needle .................................... 20
65


INTELLECTUAL PROPERTYCREATIVE, IDT, PFAFF, and PERFECTION STARTS HERE are trademarks of KSINLuxembourg II, S.ar.l.
You have purchased a modern, updatable sewing and embroidery machine. As weregularly release software updates, it is possible that there may be some differencesbetween the machine software and the software described in the User’s Guide.Consult your local Authorized PFAFF® retailer, and be sure to visit our website atwww.pfaff.com for the latest updates of the software and the User’s Guide.
We reserve the right to change the machine equipment and the assortment ofaccessories without prior notice, or make modifications to the performance or design.Such modifications, however, will always be to the benefit of the user and theproduct.
Please note that on disposal, this product must be safely recycled inaccordance with relevant National legislation relating to electrical/electronic products. Do not dispose of electrical appliances as unsortedmunicipal waste, use separate collection facilities. Contact your localgovernment for information regarding the collection systems available.When replacing old appliances with new ones, the retailer may belegally obligated to take back your old appliance for disposal free ofcharge.
If electrical appliances are disposed of in landfills or dumps, hazardoussubstances can leak into the groundwater and get into the food chain,damaging your health and well-being.
CE – Authorised Representative
VSM GROUP AB, SVP Worldwide
Drottninggatan 2, SE-56184, Huskvarna, SWEDEN

4710087-26D·Inhouse·©
2015
KSINLuxembourgII,S.ar.l.·Allrightsreserved
·PrintedinGermanyon
enviromentalfriendlypaper.
www.pfaff.com


![INDEX []agricultural chemicals, 118, 119, 122, 130, 133 Cebul, Brent: book reviewed by, 212](https://img.pdfslide.us/doc/110x75/5f037e967e708231d4095a35/index-agricultural-chemicals-118-119-122-130-133-cebul-brent-book-reviewed.jpg)


![[Key Custom Options] Menu (P.118-119) [AF Mode] · [Key Custom Options] Menu (P.118-119) [Set Fn1 Button] / [Set Fn2 Button] / [Effect Button Setting] [Conversion Lens] (p.134) is](https://img.pdfslide.us/doc/110x75/5e4aadf2688e5541ac5ab41f/key-custom-options-menu-p118-119-af-mode-key-custom-options-menu-p118-119.jpg)