Embed Size (px)
Citation preview
1
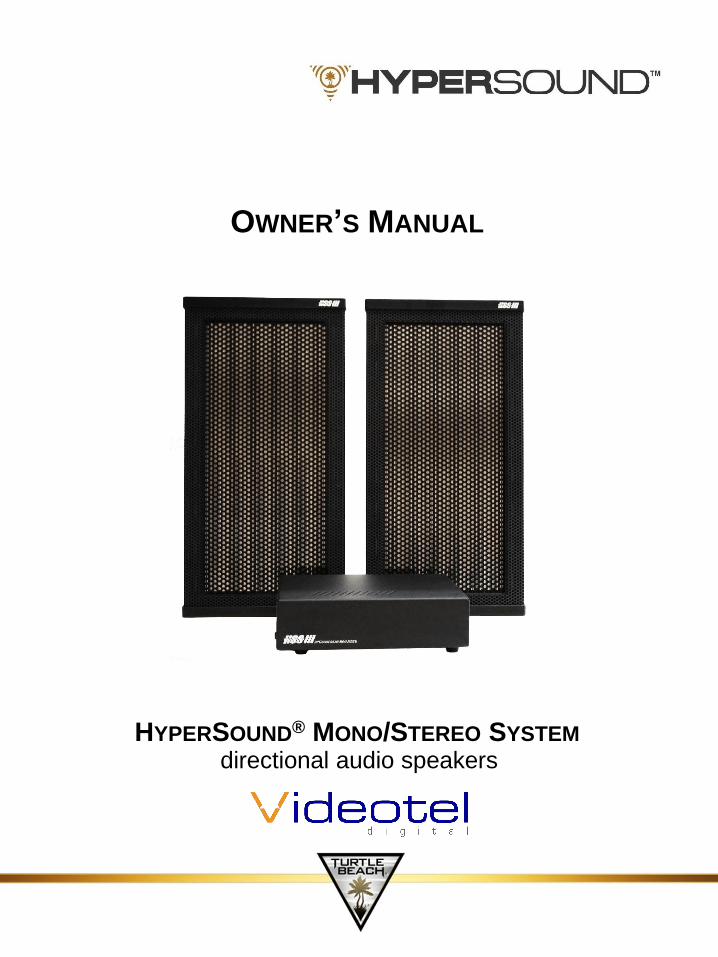
HYPERSOUND® MONO/STEREO SYSTEM
directional audio speakers
OWNER’S MANUAL
2
CONTENTS
1. Important Safety Information………………………………………………………. 3
2. General Specifications……………………………………………………………… 4
3. Product Description…………………………………………………………………. 5
4. Items Included……………………………………………………………………….. 6
5. Product Illustrations…………………………………………………………………. 7
6. Product Specifications…….………………………………………………………... 8
7. Connections: Mono System…….………………………………………………….. 9
8. Connections: Stereo System…………………………….………………………… 10
9. Connections: Woofer Combo Box..……………………………………….……….. 11
10. Connections: Behringer Pre-Amp………………………..………………………. 12
11. Making Sound……………………………………………………………………… 13
12. Commercial Installation Guidelines..…………………………………………… 14
13. Reflective Surfaces.……………………………………………………………… 15
14. Placement….……………………………………………………………………… 16
15. Mounting & Positioning…………………………………………………………… 17
16. Troubleshooting……….…………………………………………………………... 18
17. Terms of Warranty………………………………………………………….……... 19
18. Contact Information………………………………………………………………... 21
19. Appendix:
I. Regulatory Compliance Statements ……………………………............................. 22
II. Translated caution statements, warning conventions and warning messages ................... 24
©2014 Turtle Beach Corporation. All rights reserved.
3
1. IMPORTANT SAFETY INFORMATION
1. Read all documentation prior to operating
your equipment.
2. Follow all instructions carefully.
3. Keep these instructions.
4. Before making any connections to the
HyperSound system, ensure you
disconnect the unit from the mains power
supply.
5. Only use power outlets that conform to the
power requirements.
6. Use HyperSound Amplifier and supplied
power source only.
7. Unplug the system during electrical storms
or when unused for long periods of time.
8. Do not block any ventilation openings.
9. Keep system away from high heat or
moisture producing items and/or devices.
10. This product is approved for indoor use only
in normal operating temperatures.
11. Protect the power cord from being walked
on or pinched, especially at plugs or
anywhere the power cord connects to the
system.
12. To reduce the risk of electronic shock, do
not remove cover. There are no user
serviceable parts inside.
13. CAUTION - Do not operate the apparatus
with the front grill of the emitter removed.
14. Do not allow any foreign objects to pass
through the emitter grill face or touch the
emitter.
15. Do not spill water or other liquids into or on
the unit.
16. System should be installed by a trained
professional only.
17. Research indicates that levels of ultrasound
used in HyperSound devices are not
harmful.
Note: Any modifications to the system not
expressly approved by the manufacturer
and/or compliance representative could
void the user's authority to operate the
equipment.
SAFETY REGULATIONS
For commercial and professional use only
©2014 Turtle Beach Corporation. All rights reserved.
4
2. GENERAL SPECIFICATIONS
OSHA (USA) OSHA Technical Manual, Section III, Chapter 5, Section V, Table III: 5-4 “TLV’s For
Ultrasound”
FDA (USA) The Company has submitted the applicable reports to the FDA pursuant to Title 21, CFR,
sub-chapter J as it pertains to ultrasonic devices for other than medical device applications.
EMC (electromagnetic compatibility) Safety
Packaging Specifications (USA)
The packaging for HyperSound Systems is suitable for common parcel shipment.
Structures and methods utilized in this system are patented under one or more US patents. US
6,011,855, US 6,044,160, US 6,151,398, US 6,584,205, US 6,577,738, US 6,606,389, US 7,162,042,
US 7,298,853, US 7,729,498, US 8,391,514, US 8,718,297, US 8,767,979 and other additional US and
International patents pending.
©2014 Turtle Beach Corporation. All rights reserved.
5
3. PRODUCT DESCRIPTION
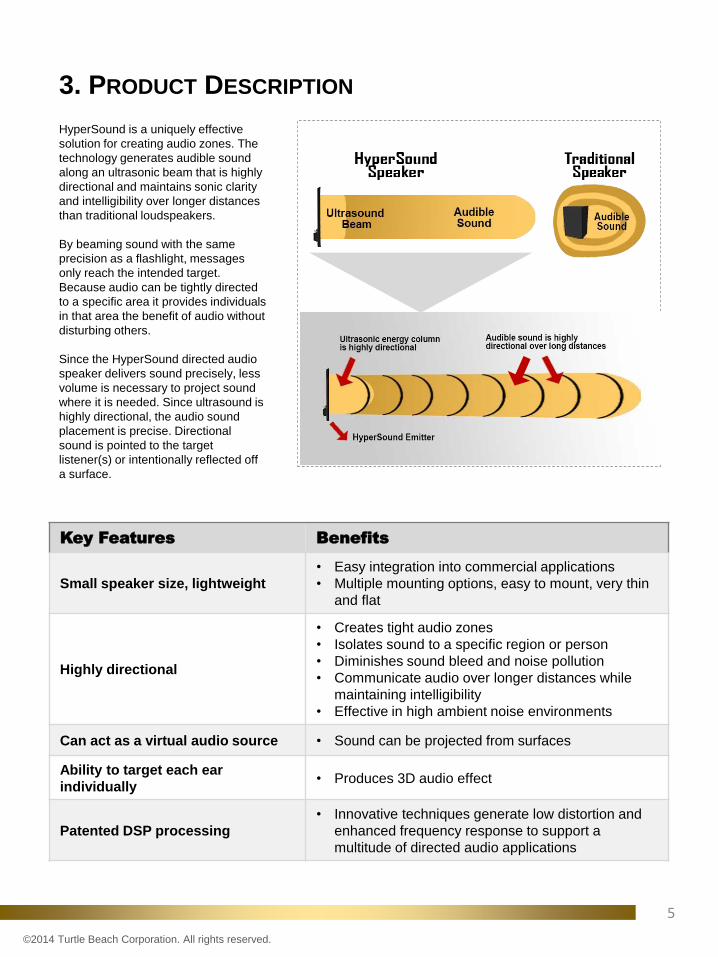
HyperSound is a uniquely effective
solution for creating audio zones. The
technology generates audible sound
along an ultrasonic beam that is highly
directional and maintains sonic clarity
and intelligibility over longer distances
than traditional loudspeakers.
By beaming sound with the same
precision as a flashlight, messages
only reach the intended target.
Because audio can be tightly directed
to a specific area it provides individuals
in that area the benefit of audio without
disturbing others.
Since the HyperSound directed audio
speaker delivers sound precisely, less
volume is necessary to project sound
where it is needed. Since ultrasound is
highly directional, the audio sound
placement is precise. Directional
sound is pointed to the target
listener(s) or intentionally reflected off
a surface.
Key Features Benefits
Small speaker size, lightweight
• Easy integration into commercial applications
• Multiple mounting options, easy to mount, very thin
and flat
Highly directional
• Creates tight audio zones
• Isolates sound to a specific region or person
• Diminishes sound bleed and noise pollution
• Communicate audio over longer distances while
maintaining intelligibility
• Effective in high ambient noise environments
Can act as a virtual audio source • Sound can be projected from surfaces
Ability to target each ear
individually• Produces 3D audio effect
Patented DSP processing
• Innovative techniques generate low distortion and
enhanced frequency response to support a
multitude of directed audio applications
©2014 Turtle Beach Corporation. All rights reserved.
6
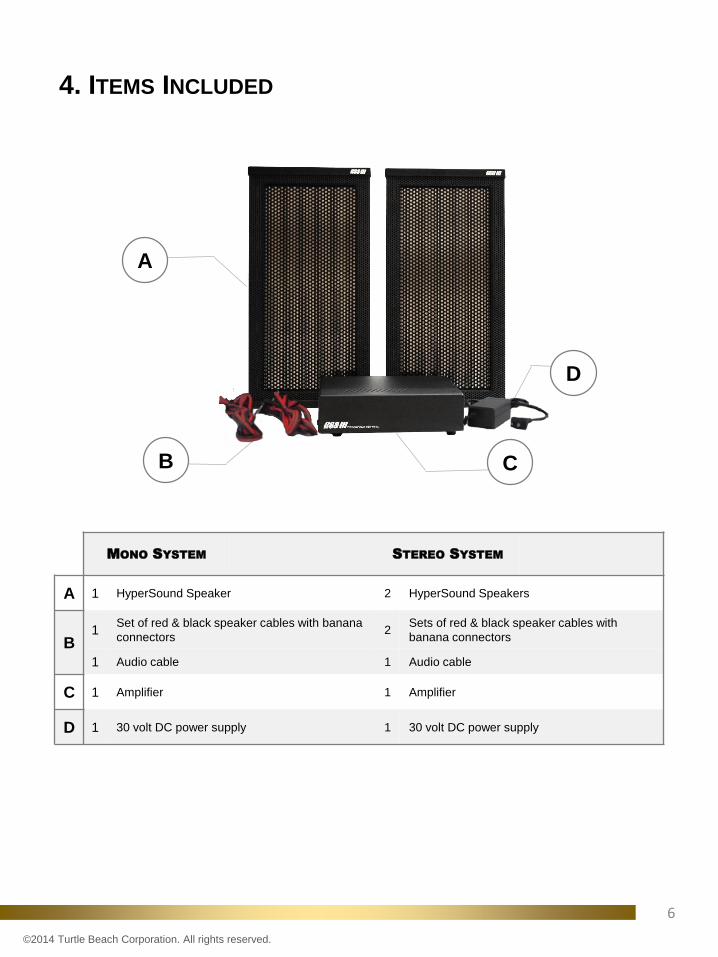
4. ITEMS INCLUDED
MONO SYSTEM STEREO SYSTEM
A 1 HyperSound Speaker 2 HyperSound Speakers
B1
Set of red & black speaker cables with banana
connectors2
Sets of red & black speaker cables with
banana connectors
1 Audio cable 1 Audio cable
C 1 Amplifier 1 Amplifier
D 1 30 volt DC power supply 1 30 volt DC power supply
A
B
D
C
©2014 Turtle Beach Corporation. All rights reserved.
7
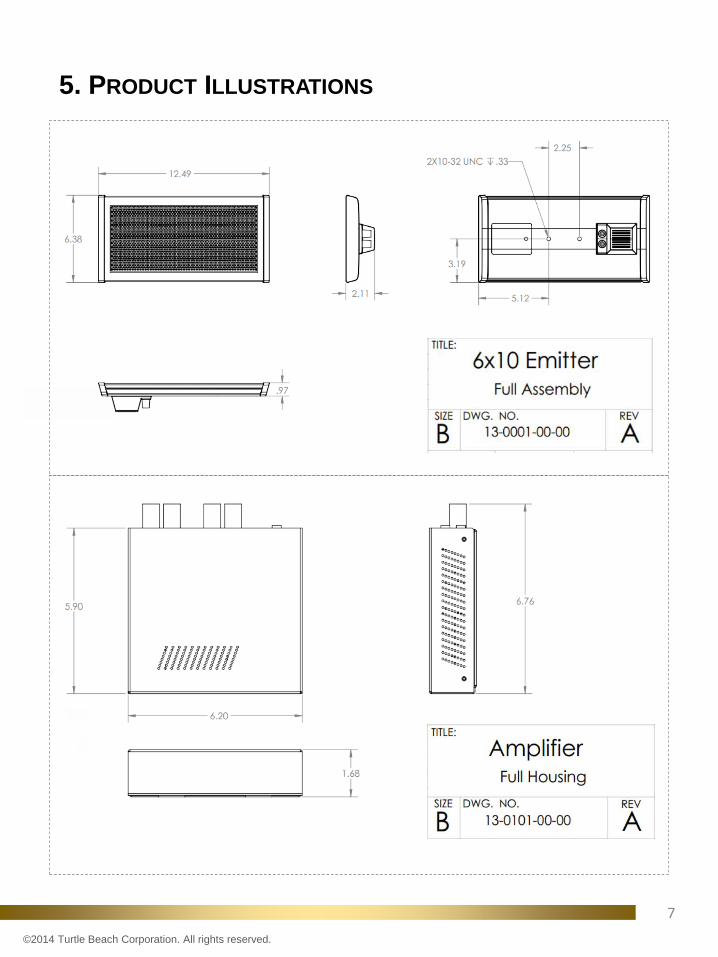
5. PRODUCT ILLUSTRATIONS
©2014 Turtle Beach Corporation. All rights reserved.
8
6. PRODUCT SPECIFICATIONS
Electrical:
AC power cord length:
1.5 meters (5 feet)
Speaker cord length
(14AWG):
2 meters (6.5 feet)
Universal power supply:
Input: 100V-240V-50/60
Hz
Output: 30V DC @ 1.5
amps
Mechanical:
Speaker dimensions:
12.5 x 6.375 x 2.125
inches
Amplifier box:
6.25 x 6.75 x 1.875 inches
Unit Weight:
7.4 pounds (3.4 kg)
(per complete system)
Colors:
Black - Standard
White - Standard
Environmental:
Operating temperature:
10°C to 40°C (50° to
104°F)
Storage temperature:
-20°C to 50°C (-4°to
122°F)
Operating humidity range:
0 to 95% (non-
condensing)
Storage humidity range:
0 to 95% (non-
condensing)
System:
Max audio SPL output:
(single speaker) 89dB
@ 1.5 kHz/2 meters
Audio:
Impedance: 10k Ohms
Input connectors: 1
RCA style connector
(per channel)
Speaker cable
connectors:
2 banana style
connectors (per
speaker)
Powered subwoofer
output:
1 RCA style
System configuration:
Stereo 2 channel or
mono
Max input for max
output: 160 mVrms per
channel
Frequency response:
300 Hz to 18kHz
Ultrasonic and DSP
Processing:
Carrier frequency:
Proprietary in range of
40 kHz
Modulation method:
Proprietary and patent
pending processing
Ultrasonic Speaker
Type:
HyperSound proprietary,
patented and patent
pending monolithic film
transducer
Power Amplification:
Amplifier type:
Customized Class D
digital Amplifier power
output: 15 watts
Specifications are subject
to change without notice.
©2014 Turtle Beach Corporation. All rights reserved.
MODEL HSS-3000

9
7. CONNECTIONS: MONO SYSTEM
NOTE: Unplug equipment while configuring all audio and
power connections.
STEP 1: SPEAKER CABLE CONNECTIONS
Connect only one set of cables with red and
black banana connections to the back of the
speaker and the corresponding ends to the
back of the amplifier as shown to the L – left
channel.
STEP 2: RCA CABLE CONNECTIONS
Take the dual female RCA cable with the
single male RCA cable at the other end, and
connect the single male RCA to only the L
(left) input channel. Connect the other end to
your audio source (iPhone, iPad, PC, MP3
Player, TV, etc.) The input impedance is
approximately 10k Ohms.
NOTE: Upon applying power to the system, the volume
will slowly ramp up taking up to 1 minute to reach full
volume. Wait for this time to be exceed before adjusting
the input level to the amplifier.
STEP 3: AMPLIFIER POWER CONNECTION
a) Plug the amplifier power cord into the 30v
DC Supply located on the back of the
amplifier
b) Plug the amplifier power supply into a
properly grounded AC outlet
NOTE: The unit does not have a power switch. It will
automatically turn ON when AC power is established.
After connecting to the AC power outlet, a small LED
light located next to the DC power receptacle will glow
green, indicating the unit is on.
©2014 Turtle Beach Corporation. All rights reserved.
LED STATUS
LIGHT
10
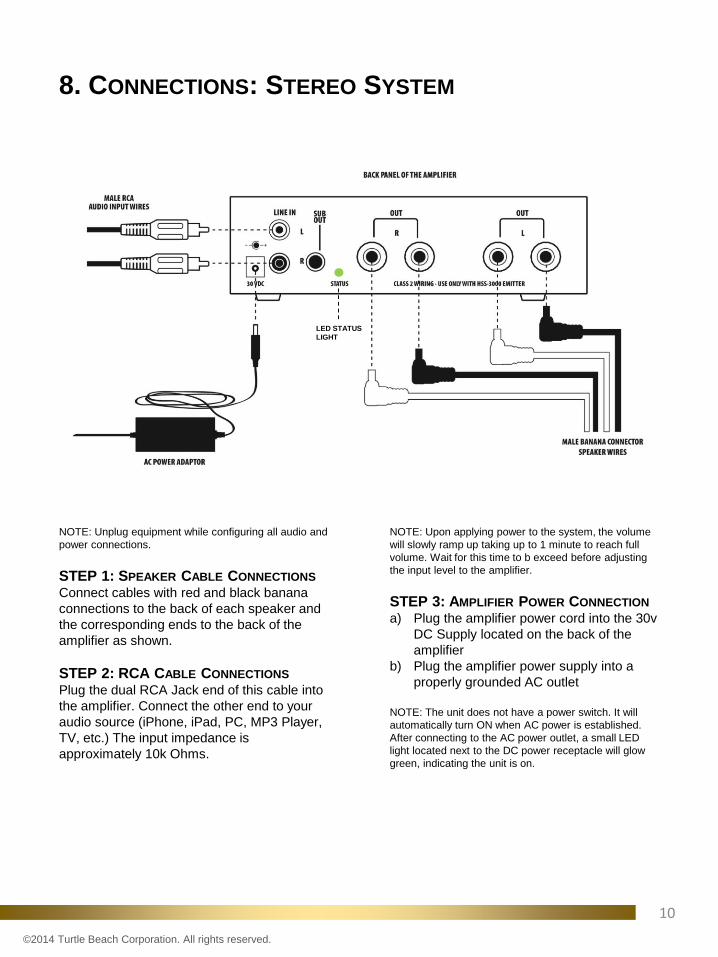
8. CONNECTIONS: STEREO SYSTEM
NOTE: Unplug equipment while configuring all audio and
power connections.
STEP 1: SPEAKER CABLE CONNECTIONS
Connect cables with red and black banana
connections to the back of each speaker and
the corresponding ends to the back of the
amplifier as shown.
STEP 2: RCA CABLE CONNECTIONS
Plug the dual RCA Jack end of this cable into
the amplifier. Connect the other end to your
audio source (iPhone, iPad, PC, MP3 Player,
TV, etc.) The input impedance is
approximately 10k Ohms.
NOTE: Upon applying power to the system, the volume
will slowly ramp up taking up to 1 minute to reach full
volume. Wait for this time to b exceed before adjusting
the input level to the amplifier.
STEP 3: AMPLIFIER POWER CONNECTION
a) Plug the amplifier power cord into the 30v
DC Supply located on the back of the
amplifier
b) Plug the amplifier power supply into a
properly grounded AC outlet
NOTE: The unit does not have a power switch. It will
automatically turn ON when AC power is established.
After connecting to the AC power outlet, a small LED
light located next to the DC power receptacle will glow
green, indicating the unit is on.
©2014 Turtle Beach Corporation. All rights reserved.
LED STATUS
LIGHT

11
9. CONNECTIONS: WOOFER COMBO BOX CONNECTIONS
(OPTIONAL SET-UP)
WOOFER CABLE WITH ONE MALE RCA AND DB9
CONNECTION
STEP 1: Connect Male RCA connection to Sub Out
connection on the back of the Amplifier.
STEP 2: Plug the DB9 Connector to the Female DB9
Connector on the back of the woofer.
©2014 Turtle Beach Corporation. All rights reserved.
12
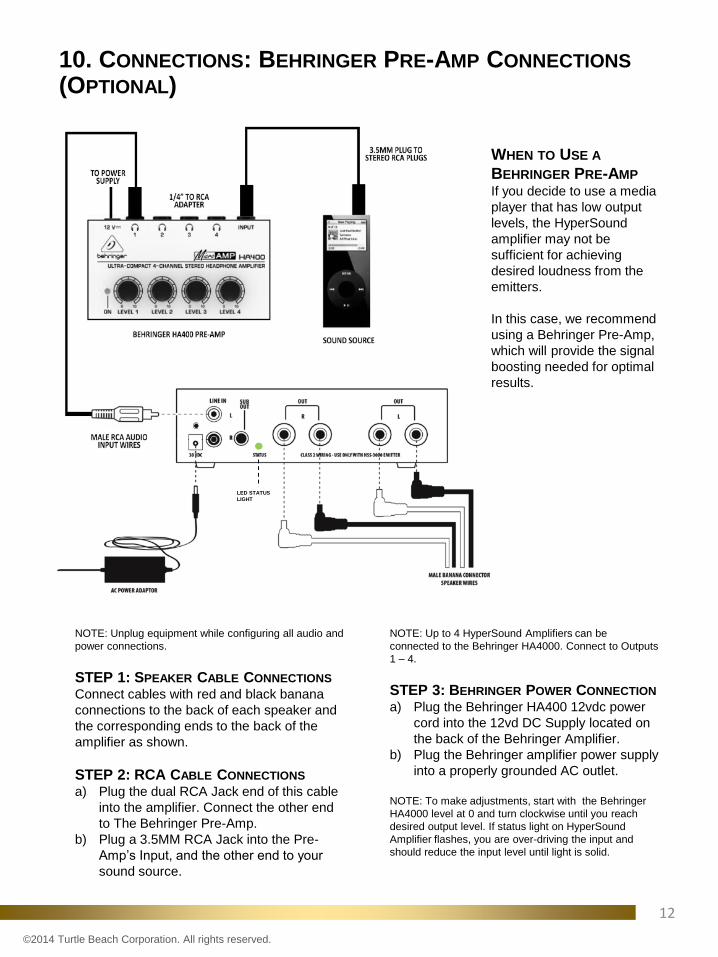
10. CONNECTIONS: BEHRINGER PRE-AMP CONNECTIONS
(OPTIONAL)
NOTE: Up to 4 HyperSound Amplifiers can be
connected to the Behringer HA4000. Connect to Outputs
1 – 4.
STEP 3: BEHRINGER POWER CONNECTION
a) Plug the Behringer HA400 12vdc power
cord into the 12vd DC Supply located on
the back of the Behringer Amplifier.
b) Plug the Behringer amplifier power supply
into a properly grounded AC outlet.
NOTE: To make adjustments, start with the Behringer
HA4000 level at 0 and turn clockwise until you reach
desired output level. If status light on HyperSound
Amplifier flashes, you are over-driving the input and
should reduce the input level until light is solid.
©2014 Turtle Beach Corporation. All rights reserved.
LED STATUS
LIGHT
NOTE: Unplug equipment while configuring all audio and
power connections.
STEP 1: SPEAKER CABLE CONNECTIONS
Connect cables with red and black banana
connections to the back of each speaker and
the corresponding ends to the back of the
amplifier as shown.
STEP 2: RCA CABLE CONNECTIONS
a) Plug the dual RCA Jack end of this cable
into the amplifier. Connect the other end
to The Behringer Pre-Amp.
b) Plug a 3.5MM RCA Jack into the Pre-
Amp’s Input, and the other end to your
sound source.
WHEN TO USE A
BEHRINGER PRE-AMP
If you decide to use a media
player that has low output
levels, the HyperSound
amplifier may not be
sufficient for achieving
desired loudness from the
emitters.
In this case, we recommend
using a Behringer Pre-Amp,
which will provide the signal
boosting needed for optimal
results.
13
11. MAKING SOUND
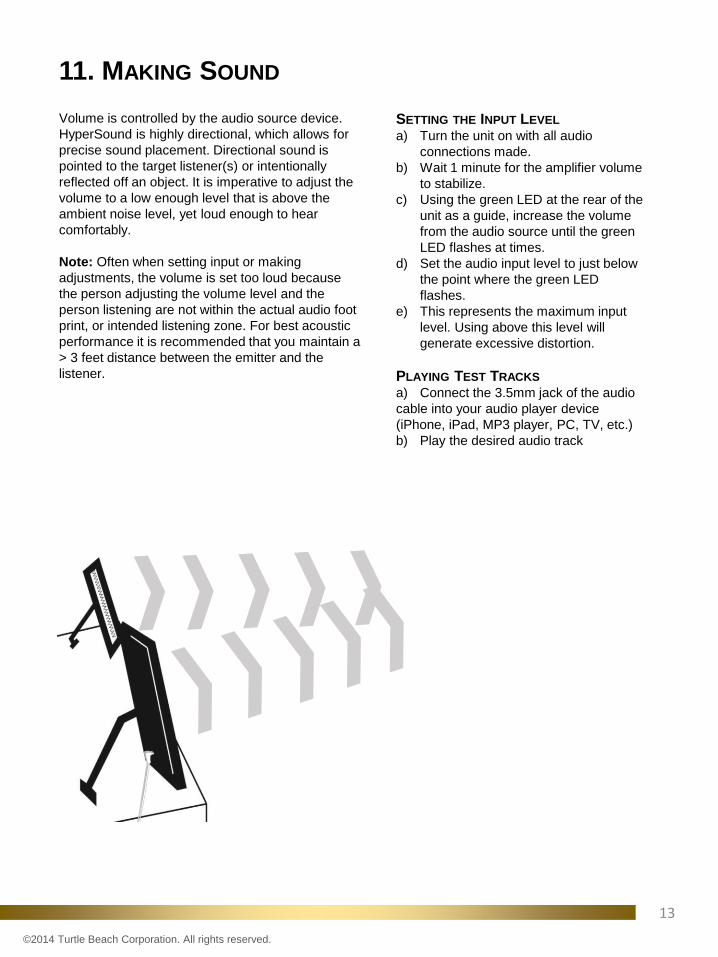
Volume is controlled by the audio source device.
HyperSound is highly directional, which allows for
precise sound placement. Directional sound is
pointed to the target listener(s) or intentionally
reflected off an object. It is imperative to adjust the
volume to a low enough level that is above the
ambient noise level, yet loud enough to hear
comfortably.
Note: Often when setting input or making
adjustments, the volume is set too loud because
the person adjusting the volume level and the
person listening are not within the actual audio foot
print, or intended listening zone. For best acoustic
performance it is recommended that you maintain a
> 3 feet distance between the emitter and the
listener.
SETTING THE INPUT LEVEL
a) Turn the unit on with all audio
connections made.
b) Wait 1 minute for the amplifier volume
to stabilize.
c) Using the green LED at the rear of the
unit as a guide, increase the volume
from the audio source until the green
LED flashes at times.
d) Set the audio input level to just below
the point where the green LED
flashes.
e) This represents the maximum input
level. Using above this level will
generate excessive distortion.
PLAYING TEST TRACKS
a) Connect the 3.5mm jack of the audio
cable into your audio player device
(iPhone, iPad, MP3 player, PC, TV, etc.)
b) Play the desired audio track
©2014 Turtle Beach Corporation. All rights reserved.

14
12. COMMERCIAL INSTALLATION GUIDELINES
DESIGN OBJECTIVES
HyperSound is a uniquely effective solution
for environments in which directionality is
important. Other circumstances include the
need for:
• Sound zone(s) or sound isolation
• Clear, intelligible audio
• Immersive listener experience(s)
When designing HyperSound into projects,
keep in mind the system’s main objective is
to improve application performance without
sound bleed and without adding to distracting
background noise.
Audio footprint (zone) size depends on height
and orientation of the system. If speakers are
not able to provide sufficient sound pressure
level, intelligibility, or cover the intended
space, additional speakers may be used.
CHOOSING THE RIGHT MEDIA
One of the most important considerations is
selecting media that can be heard clearly
over any ambient noise.
For optimal playback, it is best to select
audio files with the following attributes:
• Close, or within, human speech
frequencies (300-7000 Hz)
• Does not contain high-contrasting content
(numerous low volume sections and high
volume sections within the same track)
If there is a requirement for numerous sound
zones, each playing different media content,
then each feed requires its own audio source
and amplifier.
CREATING 3D AUDIO APPLICATIONS
You can create 3D audio experiences by
setting-up HyperSound stereo speakers so
that directed sound targets each ear
individually.
a) To ensure they are placed properly, first set
them side-by-side.
b) Direct the left speaker toward the Listener’s
left ear, and the right speaker toward the
Listener’s right ear.
c) Adjust the speakers so that they are at
equal angles.
d) The speakers must be set at the exact same
angle from the Listener to achieve the
optimal level of highly targeted sound.
e) The Listener should hear the sound equally
from each speaker.
NOTE: If the Listener feels the audio is not
balanced, adjust the speakers by turning
them in or out until the Listener reports that
the sound is centered.
©2014 Turtle Beach Corporation. All rights reserved.
15
13. REFLECTIVE SURFACES
REFLECTIVE SURFACES
Although HyperSound’s audio beam is very
narrow, it still will reflect from surfaces. Just
like a mirror reflects light from a flashlight,
HyperSound will reflect audio in a similar
manner. It's important to understand that
sound reflects from all hard surface materials,
and will act differently when it hits other types
of surfaces.
Tips:
• In order to avoid unwanted reflections,
which spread the sound to wanted areas it
is recommended that volume level should
not be set any higher than necessary.
• If you have wood or vinyl flooring, try
placing an area rug to help absorb some of
those harmful reflections.
Note: Wherever you see your speaker reflected in the mirror, that's a point of reflection that should
receive absorptive, or in some cases, diffusive acoustic treatment. Applying absorptive material to
walls and other reflective surfaces is the primary method for taming unwanted reflections.
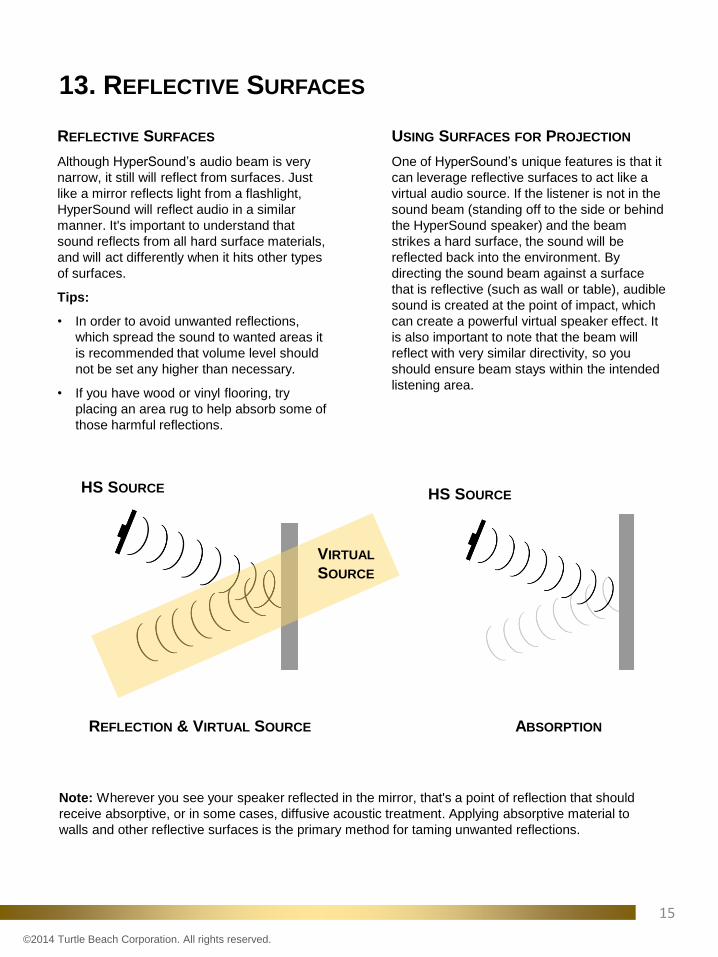
USING SURFACES FOR PROJECTION
One of HyperSound’s unique features is that it
can leverage reflective surfaces to act like a
virtual audio source. If the listener is not in the
sound beam (standing off to the side or behind
the HyperSound speaker) and the beam
strikes a hard surface, the sound will be
reflected back into the environment. By
directing the sound beam against a surface
that is reflective (such as wall or table), audible
sound is created at the point of impact, which
can create a powerful virtual speaker effect. It
is also important to note that the beam will
reflect with very similar directivity, so you
should ensure beam stays within the intended
listening area.
REFLECTION & VIRTUAL SOURCE ABSORPTION
HS SOURCE HS SOURCE
VIRTUAL
SOURCE
©2014 Turtle Beach Corporation. All rights reserved.

16
14. PLACEMENT
Important considerations when deciding on
mounting/placement of your system:
• Speakers should be directed towards intended
listeners only as to not disturb nearby employees or
patrons.
• Amplifiers and speakers can be mounted separately,
for example, into a separate room/cabinet where
other components such as content players. We
recommend the distance between the amplifier and
speaker not to exceed 25 feet.
• For the best results, we recommend (refer to the
diagram below):
a) Mounting the system directly above the
listener
b) Mounting the system on the floor facing
upwards toward the listener
c) Mounting the system on a wall facing
downward at an angle toward the listener
NOTE: The customer is responsible for
the correct selection and use of
mounting hardware that will ensure the
proper and safe wall-mounting of the
speakers. Mounting and suspension of
speakers should be done only by
qualified professionals. Unsafe
mounting can result in serious injury
and equipment damage.
A
B
C
©2014 Turtle Beach Corporation. All rights reserved.
17
15. MOUNTING & POSITIONING
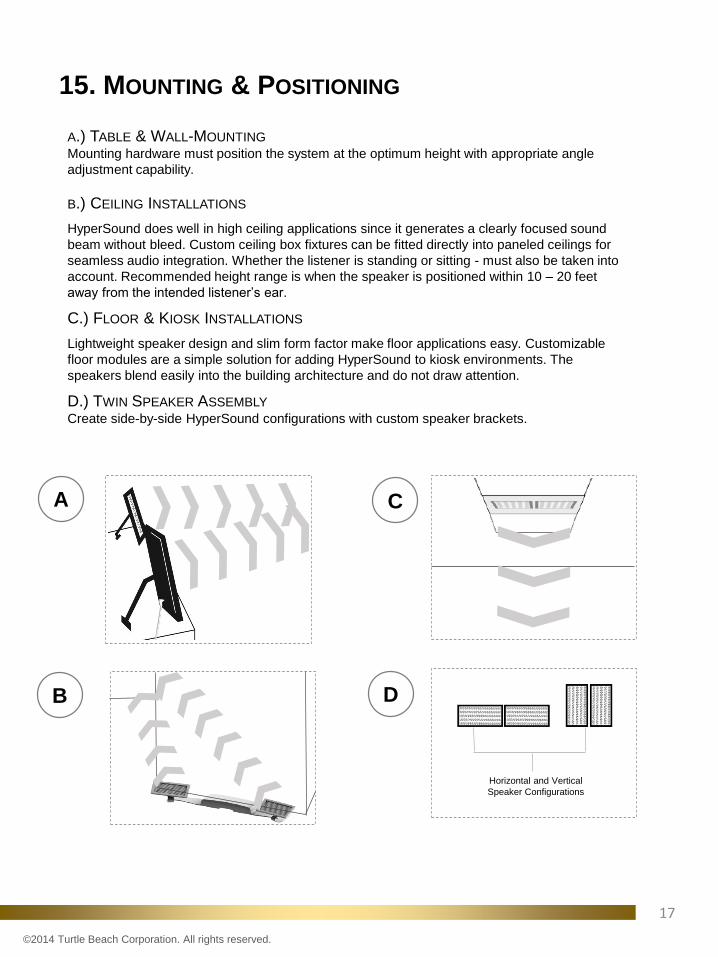
A.) TABLE & WALL-MOUNTING
Mounting hardware must position the system at the optimum height with appropriate angle
adjustment capability.
B.) CEILING INSTALLATIONS
HyperSound does well in high ceiling applications since it generates a clearly focused sound
beam without bleed. Custom ceiling box fixtures can be fitted directly into paneled ceilings for
seamless audio integration. Whether the listener is standing or sitting - must also be taken into
account. Recommended height range is when the speaker is positioned within 10 – 20 feet
away from the intended listener’s ear.
C.) FLOOR & KIOSK INSTALLATIONS
Lightweight speaker design and slim form factor make floor applications easy. Customizable
floor modules are a simple solution for adding HyperSound to kiosk environments. The
speakers blend easily into the building architecture and do not draw attention.
D.) TWIN SPEAKER ASSEMBLY
Create side-by-side HyperSound configurations with custom speaker brackets.
Horizontal and Vertical
Speaker Configurations
A
B
C
D
©2014 Turtle Beach Corporation. All rights reserved.
18
16. TROUBLESHOOTING
If there is little or no sound from your speakers, check these settings:
• Make sure a signal source is connected and producing sound.
• Make sure speakers are aimed at the target listening area.
• Make sure the power cord is plugged in and the green LED is illuminated at the rear
of the unit.
• Check to ensure the amplifier is turned on and connected to the speaker(s).
• Make sure none of the speaker wires are damaged (frayed, cut, etc.).
• Make sure no wires are touching other wires/terminals (can create short circuit).
• Experiment with different locations and/or angles for optimal audio placement.
If the above measures do not correct the problem, please contact Videotel Digital at [email protected] or call (619) 670-4412.
©2014 Turtle Beach Corporation. All rights reserved.

19
17. TERMS OF WARRANTY
WARRANTY COVERAGE
Turtle Beach Corporation’s (“TBC”) warranty obligations are limited to the terms set forth below:
TBC warrants this hardware product or products to the purchaser of record (the customer) against defects in
materials and workmanship for a period of ONE (1) YEAR from the date of the original purchase from TBC. If a
defect exists, in TBC’s judgment, at its option, TBC will (1) repair the product at no charge, using new or
refurbished replacement parts or (2) exchange the product with a product that is new or which has been
manufactured from new or serviceable used parts and is at least functionally equivalent to the original product. If
TBC cannot, or determines that it is not practical to, repair or replace the returned product, the price therefore
paid by the customer will be refunded. A replacement or repaired product shall be warranted for the remainder of
the warranty period or 90 days from the date the replacement or repaired product is shipped from TBC to the
customer, whichever provide longer coverage. When a product or part is exchanged, any replacement item
becomes the customer’s property and the replaced item becomes TBC’s property. If a defect does not exist, in
TBC’s judgment, the customer will be charged a $125 service fee.
OBTAINING WARRANTY SERVICE
For U.S. customers, please contact TBC Customer Support at 888-477-2150 or [email protected] to
obtain a Return Authorization (RA) code. No returns will be accepted without a valid RA issued by TBC. If you
have purchased your unit outside of the U.S., please contact the HSS-III licensee, dealer, distributor, or installer
where you purchased the unit. The customer shall be responsible for all loss or damage during shipment of the
product for warranty service and damage claims should be filed with the carrier.
Repaired units in the U.S. will be returned to you via the method of TBC’s choosing. Return shipping will be paid
by TBC. For customers outside the U.S., check with the HSS licensee, dealer, distributor, or installer where you
purchased the unit with regards to their particular policies for shipping and service.
You should include the following information with your unit: Name, Company Name, Address, Daytime Telephone
Number, Model & Serial Number, E-mail Address, Purchase Date, and a detailed description of the problem.
DISCLAIMER OF WARRANTIES AND EXCLUSIONS
The TBC Standard Limited Hardware Warranty applies only to hardware products manufactured by or for TBC
that can be identified by the Turtle Beach Corporation, HyperSound or HSS trademark, trade name, or logo
affixed to them.
THIS WARRANTY AND REMEDIES SET FORTH ABOVE ARE EXCLUSIVE AND IN LIEU OF ALL OTHER
WARRANTIES, REMEDIES AND CONDITIONS, WHETHER ORAL OR WRITTEN, EXPRESS OR IMPLIED.
TBC SPECIFICALLY DISCLAIMS ANY AND ALL IMPLIED WARRANTIES, INCLUDING, WITHOUT
LIMITATIONS, WARRANTIES AND MERCHANTABILITY AND FITNESS FOR A PARTICULAR PURPOSE. IF
TBC CANNOT LAWFULLY DISCLAIM IMPLIED WARRANTIES UNDER THIS LIMITED WARRANTY, ALL
SUCH WARRANTIES, INCLUDING WARRANTIES OF MERCHANTABILITY AND FITNESS FOR A
PARTICULAR PURPOSE, ARE LIMITED IN DURATION TO THE DURATION OF THIS WARRANTY. NO TBC
LICENSEE, DISTRIBUTOR, RETAILER, INSTALLER, OR EMPLOYEE IS AUTHORIZED TO MAKE ANY
MODIFICATION, EXTENSION, OR ADDITION TO THIS WARRANTY.
SOME STATES OR JURISDICATIONS DO NOT ALLOW FOR THE DISCLAIMER OF IMPLIED WARRANTIES
OR ALLOW LIMITATIONS ON HOW LONG AN IMPLIED WARRANTY LASTS, SO THE ABOVE LIMITATIONS
MAY NOT APPLY TO YOU.
©2014 Turtle Beach Corporation. All rights reserved.
20
EXCLUSIONS FROM WARRANTY
TBC SHALL NOT BE LIABLE FOR NOR SHALL THIS WARRANTY INCLUDE OR APPLY TO LOSS OR
DAMAGE CAUSED BY OR RESULTING FROM THE FOLLOWING:
1) Improper installation of the product or the failure to install in strict compliance with specifications provided by
TBC;
2) Operation of the product in a manner other than as specified in the operations and maintenance manuals or
website of TBC;
3) Use of the product beyond its rated capacity or specifications;
4) Modification, alteration or repair not performed by TBC or its authorized subcontractors or third parties
approved by TBC;
5) A force majeure condition or event, including but not limited to riots, wars, acts of enemies, terrorist act or
threat, floods, fires, earthquakes, vandalism or other similar casualty or acts of God.
6) The enforcement of any law or ordinance regulating use of the product, except for any law or ordinance in
effect as of the date of delivery;
7) Abuse, misuse, negligent handling, improper or inadequate maintenance, tampering, or accident;
8) Operation on improper voltages;
9) Accessories, alterations, attachments or other devices not furnished and installed by TBC or its authorized
agents, employees or subcontractors;
10) Any HyperSound product, which was not purchased directly from TBC or an authorized TBC licensee,
distributor, or installer;
11) If the TBC serial number has been removed or defaced; or
12) Failure of the customer to follow operating procedures or the instructions of TBC, or to provide a suitable
operating environment.
AN ACTION FOR BREACH OF WARRANTY OR OTHERWISE ARISING OUT OF THE ABOVE MUST BE
COMMENCED WITHIN ONE (1) YEAR FROM THE DATE THE RIGHT, CLAIM OR CAUSE OF ACTION SHALL
FIRST OCCUR, OR WILL BE BARRED FOREVER.
LIMITATION OF LIABILITY TBC IS NOT RESPONSIBLE FOR INDIRECT, SPECIAL, INCIDENTAL OR
CONSEQUENTIAL DAMAGES RESULTING FROM THE DELIVERY, SALE, USE, INABILITY TO USE OR
PERFORMANCE OF THE HARDWARE PRODUCT OR FROM ANY BREACH OF WARRANTY OR
CONDITION, OR UNDER ANY OTHER LEGAL THEORY, INCLUDING BUT NOT LIMITED TO LOST PROFITS,
DOWNTIME, GOODWILL, DAMAGE TO OR REPLACEMENT OF EQUIPMENT AND PROPERTY.
IN NO EVENT SHALL TBC BE LIABLE FOR ANY DAMAGES, INCLUDING DIRECT DAMAGES, WHETHER
BASED IN THEORIES OF TORT, CONTRACT OR ANY OTHER LEGAL OR EQUITABLE THEORY, IN
EXCESS OF THE AMOUNT PAID TO TBC BY THE CUSTOMER HEREUNDER. IT IS EXPRESSLY
UNDERSTOOD AND AGREED THAT EACH AND EVERY PROVISION OF THIS AGREEMENT WHICH
PROVIDES FOR A LIMITATION OF LIABILITY, DISCLAIMER OF WARRANTIES OR EXCLUSION OF
DAMAGES, IS INTENDED BY THE PARTIES TO BE SEVERABLE AND INDEPENDENT OF ANY OTHER
PROVISION AND TO BE ENFORCED AS SUCH.
©2014 Turtle Beach Corporation. All rights reserved.
21
CONTACT INFORMATION
*Trademark Information: HyperSound and HSS are registered trademarks of Turtle Beach Corporation. All other trade
names and logos used herein are either trademarks or registered trademarks of the respective holders.
V4.5 September 2014
For more information:
HyperSound Sales
(888) 477-2150
4275 Executive Square, Suite 500
La Jolla, CA 92037
To learn more about HyperSound Directed Audio Solutions, visit
hypersound.com
©2014 Turtle Beach Corporation. All rights reserved.

22
Appendix I:Regulatory Compliance Statements for the HyperSound HSS-3000 Model
Federal Communications Commission (FCC) Compliance Notices
Class B Interference Statement
This equipment has been tested and found to comply with the limits for a Class B digital device, pursuant to Part
15, Subpart B of the FCC Rules. These limits are designed to provide reasonable protection against harmful
interference in a residential installation. This equipment generates, uses, and can radiate radio frequency energy
and, if not installed and used in accordance with the instructions, may cause harmful interference to radio
communications. However, there is no guarantee that interference will not occur in a particular installation. If this
equipment does cause harmful interference to radio or television reception, which can be determined by turning
the equipment off and on, the user is encouraged to try to correct the interference by one or more of the following
measures:
• Reorient or relocate the receiving antenna.
• Increase the separation between the equipment and receiver.
• Connect the equipment into an outlet on a circuit different from that to which the receiver is
connected.
• Consult the dealer or an experienced radio/TV technician for help.
FCC Caution:
This device complies with Part 15 of the FCC Rules. Operation is subject to the following two conditions: (1) This
device may not cause harmful interference, and (2) this device must accept any interference received, including
interference that may cause undesired operation.
Canadian ICES Statements
Canadian Department of Communications Radio Interference Regulations
This digital apparatus does not exceed the Class B limits for radio-noise emissions from a digital apparatus as set
out in the Radio Interference Regulations of the Canadian Department of Communications. This Class B digital
apparatus complies with Canadian ICES-003.
Règlement sur le brouillage radioélectrique du ministère des Communications
Cet appareil numérique respecte les limites de bruits radioélectriques visant les appareils numériques de classe
B prescrites dans le Règlement sur le brouillage radioélectrique du ministère des Communications du Canada.
Cet appareil numérique de la Classe B est
conforme à la norme NMB-003 du Canada.
©2014 Turtle Beach Corporation. All rights reserved.
19. APPENDIX

23
European Union and European Fair Trade Association (EFTA)
Regulatory ComplianceDeclaration of Conformity
Marking by this symbol:
indicates compliance with the Essential Requirements of the EMC Directive of the European Union
(2004/108/EC). This equipment meets the following conformance standards:
Safety: EN 60065: 2002 + A1: 2006 + A11: 2008 + A12: 2011 (T-Mark License)
Also Licensed for Standards:
IEC 60065: 2001 + A1: 2005 + A2: 2010, (CB Scheme Report/Certificate),
UL60065 (NRTL License), CSA22.2, 60065 (SCC License)
Additional licenses issued for specific countries available on request
Emissions: EN 55022: 2010, EN 55103-1: 2009, CISPR 22: 2008, EN 61000-3-2: 2009, EN 61000-3-3:
2008
Immunity: EN 55024: 2010, EN 55103-2: 2009, EN 61000-4-2: 2009, EN 61000-4-3: 2010,
EN 61000-4-4: 2010, EN 61000-4-5: 2006, EN 61000-4-6: 2009, EN 61000-4-8:
2010, EN 61000-4-11 : 2004
The products are licensed, as required, for additional country specific standards for the International Marketplace.
Additional issued licenses available upon request.
Environmental: Low Voltage Directive 2006/95/EC, RoHS 2011/65/EU,
REACH 2006/1907/EC, WEEE 2012/19/EU, Packaging 94/62/EC
Warning!
This is a Class B product. In a domestic environment, this product may cause radio interference, in which case,
the user may be required to take appropriate measures.
Achtung!
Dieses ist ein Gerät der Funkstörgrenzwertklasse B. In Wohnbereichen können bei Betrieb dieses Gerätes
Rundfunkstörungen auftreten, in welchen Fällen der Benutzer für entsprechende Gegenmaßnahmen
verantwortlich ist.
Attention!
Ceci est un produit de Classe B. Dans un environnement domestique, ce produit risque de créer des
interférences radioélectriques, il appartiendra alors à l’utilisateur de prendre les mesures spécifiques
appropriées.
This symbol on the product or its packaging indicates that this product must not be disposed of with your other household waste. Instead, it is your responsibility to dispose of your waste equipment by handing it over to a designated collection point for the recycling of waste electrical and electronic equipment. The separate collection and recycling of your waste equipment at the time of disposal will help conserve natural resources and ensure that it is recycled in a manner that protects human health and the environment. For more information about where you can drop off your waste for recycling, please contact your local authority, or where you purchased your product.
©2014 Turtle Beach Corporation. All rights reserved.
24
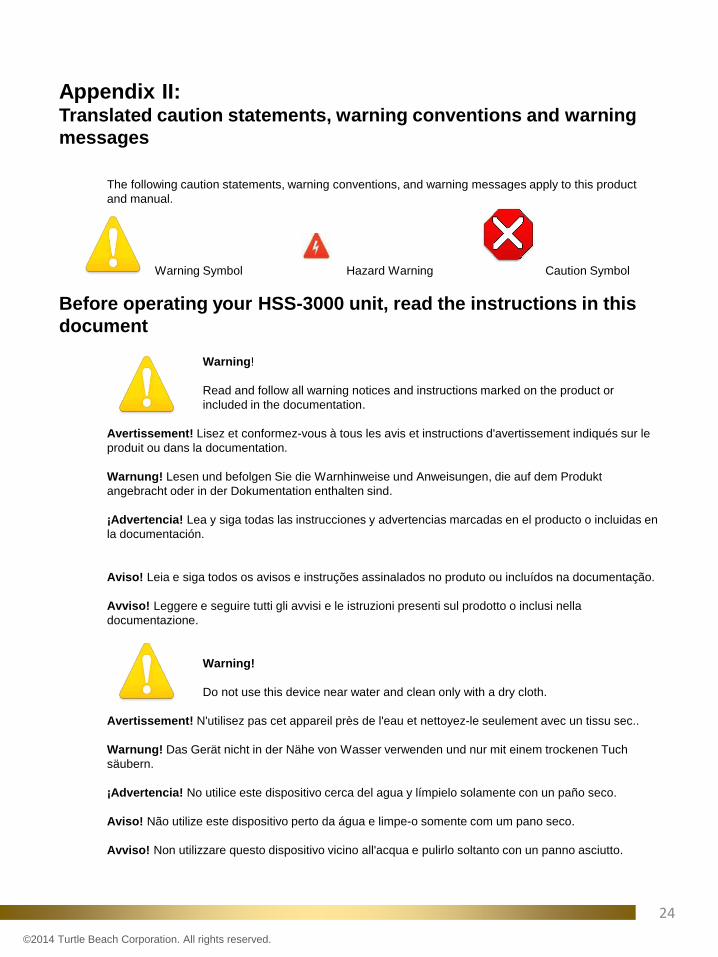
Appendix II:Translated caution statements, warning conventions and warning
messages
The following caution statements, warning conventions, and warning messages apply to this product
and manual.
Warning Symbol Hazard Warning Caution Symbol
Before operating your HSS-3000 unit, read the instructions in this
document
Warning!
Read and follow all warning notices and instructions marked on the product or
included in the documentation.
Avertissement! Lisez et conformez-vous à tous les avis et instructions d'avertissement indiqués sur le
produit ou dans la documentation.
Warnung! Lesen und befolgen Sie die Warnhinweise und Anweisungen, die auf dem Produkt
angebracht oder in der Dokumentation enthalten sind.
¡Advertencia! Lea y siga todas las instrucciones y advertencias marcadas en el producto o incluidas en
la documentación.
Aviso! Leia e siga todos os avisos e instruções assinalados no produto ou incluídos na documentação.
Avviso! Leggere e seguire tutti gli avvisi e le istruzioni presenti sul prodotto o inclusi nella
documentazione.
Warning!
Do not use this device near water and clean only with a dry cloth.
Avertissement! N'utilisez pas cet appareil près de l'eau et nettoyez-le seulement avec un tissu sec..
Warnung! Das Gerät nicht in der Nähe von Wasser verwenden und nur mit einem trockenen Tuch
säubern.
¡Advertencia! No utilice este dispositivo cerca del agua y límpielo solamente con un paño seco.
Aviso! Não utilize este dispositivo perto da água e limpe-o somente com um pano seco.
Avviso! Non utilizzare questo dispositivo vicino all'acqua e pulirlo soltanto con un panno asciutto.
©2014 Turtle Beach Corporation. All rights reserved.
25
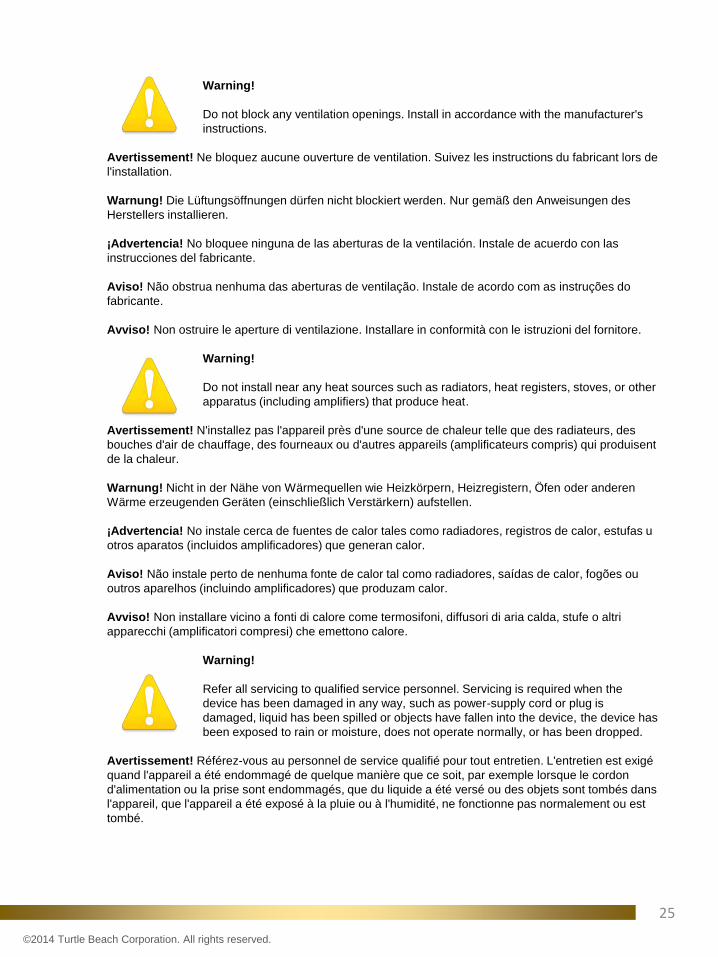
Warning!
Do not block any ventilation openings. Install in accordance with the manufacturer's
instructions.
Avertissement! Ne bloquez aucune ouverture de ventilation. Suivez les instructions du fabricant lors de
l'installation.
Warnung! Die Lüftungsöffnungen dürfen nicht blockiert werden. Nur gemäß den Anweisungen des
Herstellers installieren.
¡Advertencia! No bloquee ninguna de las aberturas de la ventilación. Instale de acuerdo con las
instrucciones del fabricante.
Aviso! Não obstrua nenhuma das aberturas de ventilação. Instale de acordo com as instruções do
fabricante.
Avviso! Non ostruire le aperture di ventilazione. Installare in conformità con le istruzioni del fornitore.
Warning!
Do not install near any heat sources such as radiators, heat registers, stoves, or other
apparatus (including amplifiers) that produce heat.
Avertissement! N'installez pas l'appareil près d'une source de chaleur telle que des radiateurs, des
bouches d'air de chauffage, des fourneaux ou d'autres appareils (amplificateurs compris) qui produisent
de la chaleur.
Warnung! Nicht in der Nähe von Wärmequellen wie Heizkörpern, Heizregistern, Öfen oder anderen
Wärme erzeugenden Geräten (einschließlich Verstärkern) aufstellen.
¡Advertencia! No instale cerca de fuentes de calor tales como radiadores, registros de calor, estufas u
otros aparatos (incluidos amplificadores) que generan calor.
Aviso! Não instale perto de nenhuma fonte de calor tal como radiadores, saídas de calor, fogões ou
outros aparelhos (incluindo amplificadores) que produzam calor.
Avviso! Non installare vicino a fonti di calore come termosifoni, diffusori di aria calda, stufe o altri
apparecchi (amplificatori compresi) che emettono calore.
Warning!
Refer all servicing to qualified service personnel. Servicing is required when the
device has been damaged in any way, such as power-supply cord or plug is
damaged, liquid has been spilled or objects have fallen into the device, the device has
been exposed to rain or moisture, does not operate normally, or has been dropped.
Avertissement! Référez-vous au personnel de service qualifié pour tout entretien. L'entretien est exigé
quand l'appareil a été endommagé de quelque manière que ce soit, par exemple lorsque le cordon
d'alimentation ou la prise sont endommagés, que du liquide a été versé ou des objets sont tombés dans
l'appareil, que l'appareil a été exposé à la pluie ou à l'humidité, ne fonctionne pas normalement ou est
tombé.
©2014 Turtle Beach Corporation. All rights reserved.
26
Warnung! Das Gerät sollte nur von qualifizierten Fachkräften gewartet werden. Eine Wartung ist fällig,
wenn das Gerät in irgendeiner Weise beschädigt wurde, wie bei beschädigtem Netzkabel oder
Netzstecker, falls Flüssigkeiten oder Objekte in das Gerät gelangen, das Gerät Regen oder Feuchtigkeit
ausgesetzt wurde, nicht ordnungsgemäß funktioniert oder fallen gelassen wurde.
¡Advertencia! Consulte al personal calificado por cuestiones de reparación. El servicio de reparación
se requiere cuando el dispositivo ha recibido cualquier tipo de daño, por ejemplo cable o espigas
dañadas, se ha derramado líquido o se han caído objetos dentro del dispositivo, el dispositivo ha sido
expuesto a la lluvia o humedad, o no funciona de modo normal, o se ha caído.
Aviso! Remeta todos os serviços de manutenção para o pessoal de assistência qualificado. A
prestação de serviços de manutenção é exigida quando o dispositivo foi danificado mediante qualquer
forma, como um cabo de alimentação ou ficha que se encontra danificado/a, quando foi derramado
líquido ou caíram objectos sobre o dispositivo, quando o dispositivo foi exposto à chuva ou à humidade,
quando não funciona normalmente ou quando foi deixado cair.
Avviso! Fare riferimento al personale qualificato per tutti gli interventi di assistenza. L'assistenza è
necessaria quando il dispositivo è stato danneggiato in qualche modo, ad esempio se il cavo di
alimentazione o la spina sono danneggiati, è stato rovesciato del liquido è stato rovesciato o qualche
oggetto è caduto nel dispositivo, il dispositivo è stato esposto a pioggia o umidità, non funziona
correttamente o è caduto.
Warning!
Disconnect the external AC power supply line cord(s) from the mains power before
moving the unit.
Avertissementþ! Retirez le ou les cordons d’alimentation en CA de la source d’alimentation principale
lorsque vous déplacez l’appareil.
Warnung! Trennen Sie die Wechselstrom-Versorgungskabel vom Netzstrom, bevor Sie das Gerät
verschieben.
¡Advertencia! Cuando mueva la unidad desenchufe de la red eléctrica el/los cable(s) de la fuente de
alimentación CA tipo brick.
Advertência! Remova os cabos CA de alimentação brick da rede elétrica ao mover a unidade.
Avvertenza! Scollegare il cavo dell’alimentatore quando si sposta l’unità.
Hazard Warning!
High Voltage. This situation or condition can cause injury due to electric shock.
Avertissement! Tension élevée. Cette situation ou condition peut causer des blessures dues à un choc
électrique.
Warnung! Hochspannung. Diese Situation oder Bedingung kann zu Verletzungen durch Stromschlag
führen.
¡Advertencia! Alto voltaje . Esta situación o condición puede causar lesiones debidas a una descarga
eléctrica.
©2014 Turtle Beach Corporation. All rights reserved.
27
Aviso! Alta Tensão . Esta situação ou condição pode causar danos devido a choques elétricos.
Avviso! Alta tensione. Questa situazione o condizione può causare lesioni a causa di scosse elettriche.
Warning!
Only use attachments and accessories specified and/or sold by the manufacturer.
Avertissement! Utilisez seulement les attaches et accessoires spécifiés et/ ou vendus par le fabricant.
Warnung! Verwenden Sie nur Zusatzgeräte und Zubehör angegeben und / oder verkauft wurde durch
den Hersteller.
¡Advertencia! Utilice solamente los accesorios y conexiones especificados y/o vendidos por el
fabricante.
Aviso! Utilize apenas equipamentos/acessórios especificados e/ou vendidos pelo fabricante.
Avviso! Utilizzare soltanto i collegamenti e gli accessori specificati e/o venduti dal produttore.
Warning!
Do not defeat the safety purpose of the polarized or grounding-type plug. A polarized
plug has two blades with one wider than the other. A grounding type plug has two
blades and a third grounding prong. The wide blade or the third prong are provided for
your safety. If the provided plug does not fit into your outlet, consult an electrician for
replacement of the obsolete outlet.
Avertissement! La sécurité de la prise polarisée ou de la prise de type mise à la terre ne doit en aucun
cas être empêchée de fonctionner. Une prise polarisée a deux broches, l'une étant plus large que
l'autre. Une prise de type mise à la terre a deux broches et une troisième broche pour la mise à la terre.
La broche large ou la troisième broche sont fournies pour votre sécurité. Si la prise fournie ne s'insère
pas dans votre prise femelle, consultez un électricien pour le remplacement de la prise femelle obsolète.
Warnung! Der Sicherheitszweck des gepolten bzw. Schukosteckers ist zu berücksichtigen. Ein gepolter
Stecker verfügt über zwei Pole, von denen einer breiter als der andere ist. Ein Schukostecker verfügt
neben den zwei Polen noch über einen dritten Pol zur Erdung. Der breite Pol bzw. der Erdungspol
dienen der Sicherheit. Wenn der zur Verfügung gestellte Stecker nicht in Ihren Anschluss passt,
konsultieren Sie einen Elektriker, um den veralteten Anschluss zu ersetzen.
¡Advertencia! No eche por tierra la finalidad del tipo de enchufe polarizado con conexión a tierra. Un
enchufe polarizado tiene dos espigas, una más ancha que la otra. Un enchufe con conexión a tierra
tiene dos espigas iguales y una tercera espiga que sirve para la conexión a tierra. La expiga ancha, o la
tercera espiga, sirven para su seguridad. Si el enchufe suministrado no encaja en el tomacorriente,
consulte con un electricista para reemplazar el tomacorriente obsoleto.
Aviso! Não anule a finalidade da segurança da ficha polarizada ou do tipo ligação terra. Uma ficha
polarizada tem duas lâminas sendo uma mais larga do que a outra. Uma ficha do tipo de ligação à terra
tem duas lâminas e um terceiro terminal de ligação à terra. A lâmina larga ou o terceiro terminal são
fornecidos para sua segurança. Se a ficha fornecida não couber na sua tomada, consulte um
electricista para a substituição da tomada obsoleta.
©2014 Turtle Beach Corporation. All rights reserved.
28
Avviso! Non compromettere la sicurezza della spina polarizzata o con messa a terra. Una spina
polarizzata ha due spinotti, di cui uno più largo. Una spina con messa a terra ha due spinotti e un terzo
polo per la messa a terra. Lo spinotto largo o il terzo polo sono forniti per motivi di sicurezza. Se la spina
fornita non si inserisce nella presa di corrente, contattare un elettricista per la sostituzione della presa
obsoleta.
Warning!
Since the Mains plug is used as the disconnection for the device, it must remain
readily accessible and operable.
Avertissement! Puisque la prise principale est utilisée pour débrancher l'appareil, elle doit rester
aisément accessible et fonctionnelle.
Warnung! Da der Netzstecker als Trennvorrichtung dient, muss er stets zugänglich und funktionsfähig
sein.
¡Advertencia! Puesto que el enchufe de la red eléctrica se utiliza como dispositivo de desconexión,
debe seguir siendo fácilmente accesible y operable.
Aviso! Dado que a ficha principal é utilizada como a desconexão para o dispositivo, esta deve manter-
se prontamente acessível e funcional.
Avviso! Poiché il cavo di alimentazione viene usato come dispositivo di sconnessione, deve rimane
prontamente accessibile e operabile.
Warning!
Protect the power cord from being walked on or pinched particularly at plugs,
convenience receptacles, and the point where they exit from the device.
Avertissement! Protégez le cordon d'alimentation pour que l'on ne marche pas dessus ou qu'on le
pince, en particulier au niveau des prises mâles, des réceptacles de convenance, et à l'endroit où il sort
de l'appareil.
Warnung! Es muss verhindert werden, auf das Netzanschlusskabel zu treten oder dieses zu knicken,
besonders an den Steckern, den Steckerbuchsen und an dem Punkt, an dem das Kabel aus dem Gerät
heraustritt.
¡Advertencia! Puesto que el enchufe de la red eléctrica se utiliza como dispositivo de desconexión,
debe seguir siendo fácilmente accesible y operable.
Aviso! Proteja o cabo de alimentação de ser pisado ou de ser comprimido particularmente nas fichas,
em tomadas de parede de conveniência e no ponto de onde sai do dispositivo.
Avviso! Proteggere il cavo di alimentazione in modo che nessuno ci cammini sopra e che non venga
schiacciato soprattutto in corrispondenza delle spine e del punto in cui esce dal dispositivo.
©2014 Turtle Beach Corporation. All rights reserved.
29
Warning!
Unplug this device during lightning storms or when unused for long periods of time.
Avertissement! Débranchez cet appareil pendant les orages avec éclairsou s'il est inutilisé pendant de
longues périodes.
Warnung! Das Gerät ist bei Gewitterstürmen oder wenn es über lange Zeiträume ungenutzt bleibt vom
Netz zu trennen.
¡Advertencia! Desenchufe este dispositivo durante tormentas eléctricas o cuando no se lo utilice por
largos periodos del tiempo.
Aviso! Desconecte este dispositivo da tomada durante trovoadas ou quando não é utilizado durante
longos períodos de tempo.
Avviso! Utilizzare soltanto i collegamenti e gli accessori specificati e/o venduti dal produttore, quali il
treppiedi e l'esoscheletro.
Warning!
Do not open the chassis. There are no user-serviceable parts inside. Opening the
chassis will void the warranty unless performed by a service center or licensed facility.
Avertissement! Ne pas ouvrir le châssis. Aucun élément à l’intérieur du châssis ne peut être réparé par
l’utilisateur. La garantie sera annulée si le châssis est ouvert par toute autre personne qu’un technicien
d’un centre de service ou d’un établissement agréé.
Warnung! Öffnen Sie das Gehäuse nicht. Keine der Geräteteile können vom Benutzer gewartet
werden. Durch das Öffnen des Gehäuses wird die Garantie hinfällig, es sei denn, solche
Wartungsarbeiten werden in einem Service-Center oder einem lizenzierten Betrieb vorgenommen.
¡Advertencia! No abra el chasis. El interior no contiene piezas reparables por el usuario.
El abrir el chasis anulará la garantía a menos que se lo haga en un centro de servicio
o en un local autorizado.
Advertência! Não abra o chassi. Não há internamente nenhuma peça que permita manutenção pelo
usuário. Abrir o chassi anula a garantia, a menos que a abertura seja realizada por uma central de
serviços da ou por um local autorizado.
Avvertenza! Non aprire lo chassis. All’interno non ci sono parti riparabili dall’utente. L’apertura dello
chassis invaliderà la garanzia se non viene effettuata da un centro ufficiale o autorizzato.
©2014 Turtle Beach Corporation. All rights reserved.