Embed Size (px)
Citation preview
Installing SRM v5.1 in a lab environment. V1.5
OverviewThis guide is for setting up a single server to host SQL Express, databases for VC, VUM, SSO and SRM. Why on earth would anyone do that? Well simple really… in a small lab there are limited resources and installing everything on a single server makes the most efficient use of those resources. Memory, disk, Microsoft Windows activations… you get the picture!
Basic Server Setup1. Install Win2k8 R22. Install Service Pack 13. Configure networking (fixed IP), DNS Servers, Gateway & disable IPv64. Activate windows (optional)5. Set the time zone6. Set the machine name including the FQDN.7. Enable Remote desktop8. Join machine to domain9. Disable Windows Firewall (including domain)10. Disable IE Enhanced Security Configuration (right click on Computer -> Manage -> Configure IE
ESC -> Off for Administrators and Off for Users
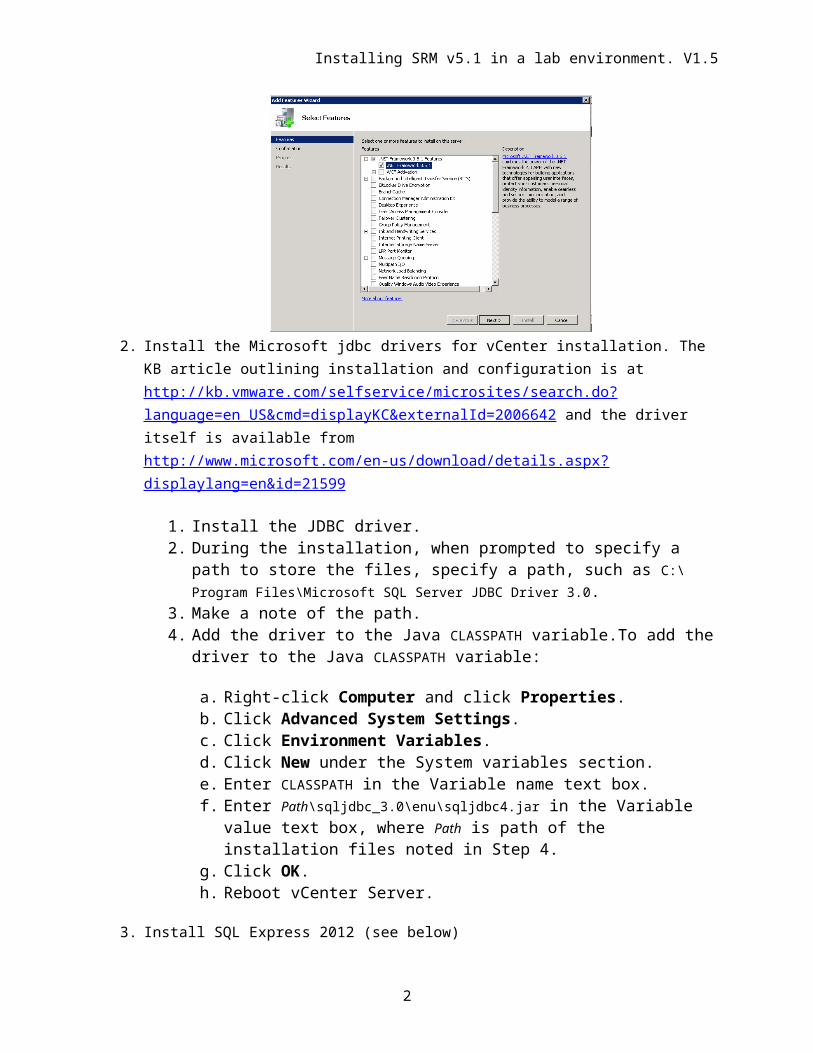
Middleware components1. Install .Net 3.5 SP1. Start-> Administrative Tools -> Server Manager -> Features -> Add features
a. Do not install WCF Activation or you’ll wind up with IIS running on port 80 which will conflict with Vmware services!
2. Install the Microsoft jdbc drivers for vCenter installation. The KB article outlining installation and configuration is at http://kb.vmware.com/selfservice/microsites/search.do?language=en_US&cmd=displayKC&externalId=2006642 and the driver itself is available from http://www.microsoft.com/en-us/download/details.aspx?displaylang=en&id=21599
1. Install the JDBC driver.
1
Installing SRM v5.1 in a lab environment. V1.5
2. During the installation, when prompted to specify a path to store the files, specify a path, such as C:\Program Files\Microsoft SQL Server JDBC Driver 3.0.
3. Make a note of the path. 4. Add the driver to the Java CLASSPATH variable.To add the driver to the Java
CLASSPATH variable:
a. Right-click Computer and click Properties. b. Click Advanced System Settings. c. Click Environment Variables. d. Click New under the System variables section. e. Enter CLASSPATH in the Variable name text box. f. Enter Path\sqljdbc_3.0\enu\sqljdbc4.jar in the Variable value text
box, where Path is path of the installation files noted in Step 4. g. Click OK. h. Reboot vCenter Server.
3. Install SQL Express 2012 (see below)4. Install the older SQL Native Client for SRM
Notes
VUM is a 32 bit SQL Native Client DSN
VCDB is a 64 bit SQL Native Client
SRM must be 64 bit SQL Native Client (old)
2
Installing SRM v5.1 in a lab environment. V1.5
SQL Server Express 2012
SQL 2012 Server Express InstallationYou’ll need a 64 bit version of SQL. If you have a production version then fantastic otherwise for a lab build you’ll have to use “Express”. This product is not suitable for production use for a number of reasons:
- 10GB per database maximum- 1 Physical CPU maximum, but multiple cores allowed (obviously this limits performance)- 1 GB RAM max. The system can have more than that but SQL Express will only use 1 GB.- No SQL Server Agent Service
The good news is that the download is FREE and comes with Management Studio for interfacing with the database server.
At present both can be downloaded in one package from:
http://www.microsoft.com/sqlserver/en/us/editions/2012-editions/express.aspx
You should wind up with a single file names SQLEXPRWT_x64_ENU.exe. Double click the executable to begin the installation.
Pick the first option to install a new stand-alone server.
3

Installing SRM v5.1 in a lab environment. V1.5
The installer will launch a “Rules Checker” to validate the installation then provide the license term dialogue
4

Installing SRM v5.1 in a lab environment. V1.5
Click “Next” to accept the terms. You’ll see a quick rule check dialogue fly by (hopefully it doesn’t produce any errors and stop!). The next screen is the feature selection dialogue. There’s no need to make changes unless you’re looking to change the software’s installation location.
5

Installing SRM v5.1 in a lab environment. V1.5
6

Installing SRM v5.1 in a lab environment. V1.5
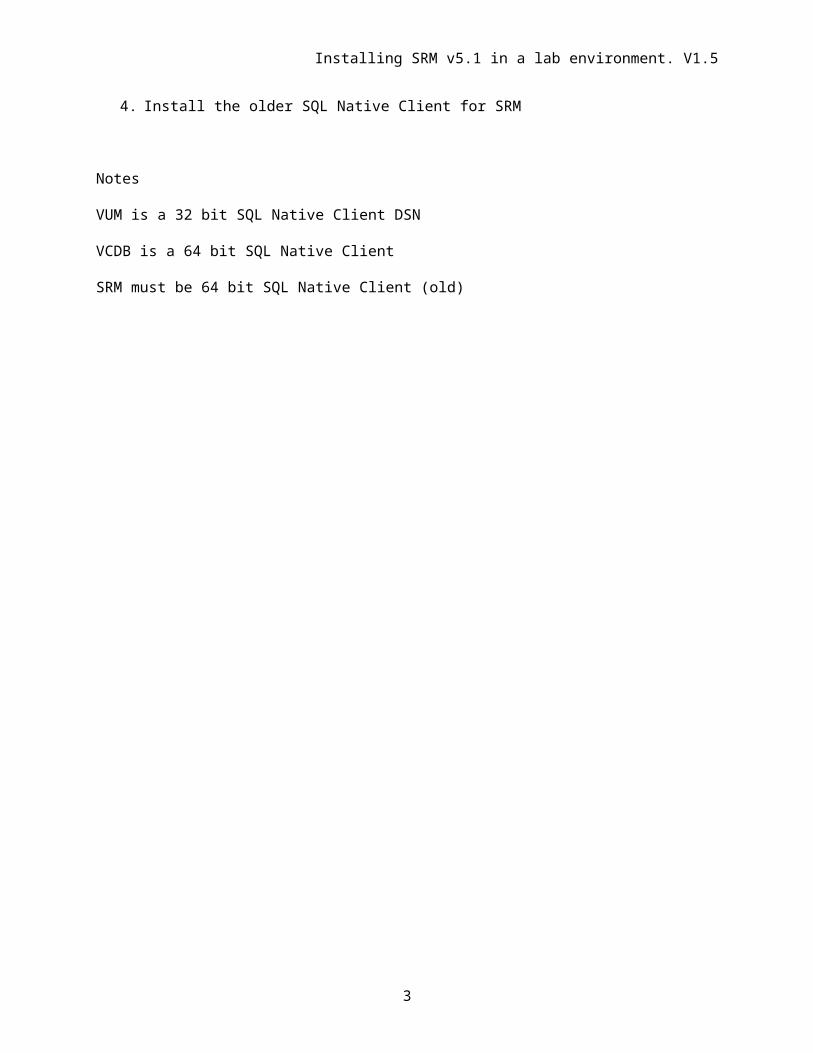
The next screen is the instance ID configuration option. I prefer to leave this at the defaults and add more instances later. I’m just never sure what other components will assume. At least if I leave the defaults in place I know nothing down the road will break.
7

Installing SRM v5.1 in a lab environment. V1.5
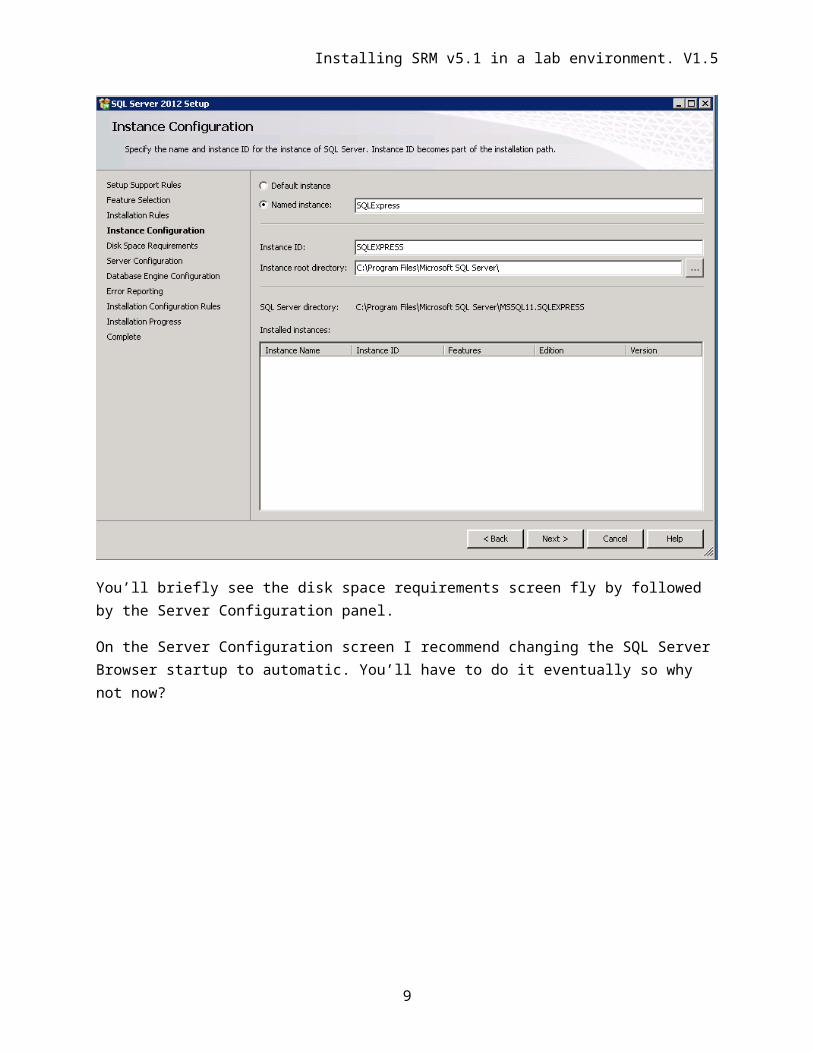
You’ll briefly see the disk space requirements screen fly by followed by the Server Configuration panel.
On the Server Configuration screen I recommend changing the SQL Server Browser startup to automatic. You’ll have to do it eventually so why not now?
8
Installing SRM v5.1 in a lab environment. V1.5
The next screen is the Database Engine Configuration panel. Definitely change the Authentication mode here to “Mixed” and don’t forget to record the “sa” password! This allows you to use windows authentication OR to create users and passwords within the database. A word of caution here… sometimes ODBC connectors or VMware software can have different rules regarding acceptable passwords meaning you can enter the correct password but because it contains something that violates the entry rules on the end application it will be rejected as though it were incorrect. The point is to avoid special characters, especially wildcards!
9

Installing SRM v5.1 in a lab environment. V1.5
Notice the Data Directories tab… If you wanted to place the actual database instance data on another disk this would be the place to do so. For production I would highly recommend doing so as IO characteristics are completely different for binaries versus data. However here in the lab it’s not so critical. For lab use I generally thin provision a 100 GB C drive and allow it to grow as required.
10

Installing SRM v5.1 in a lab environment. V1.5
Error Reporting: No change.
11

Installing SRM v5.1 in a lab environment. V1.5
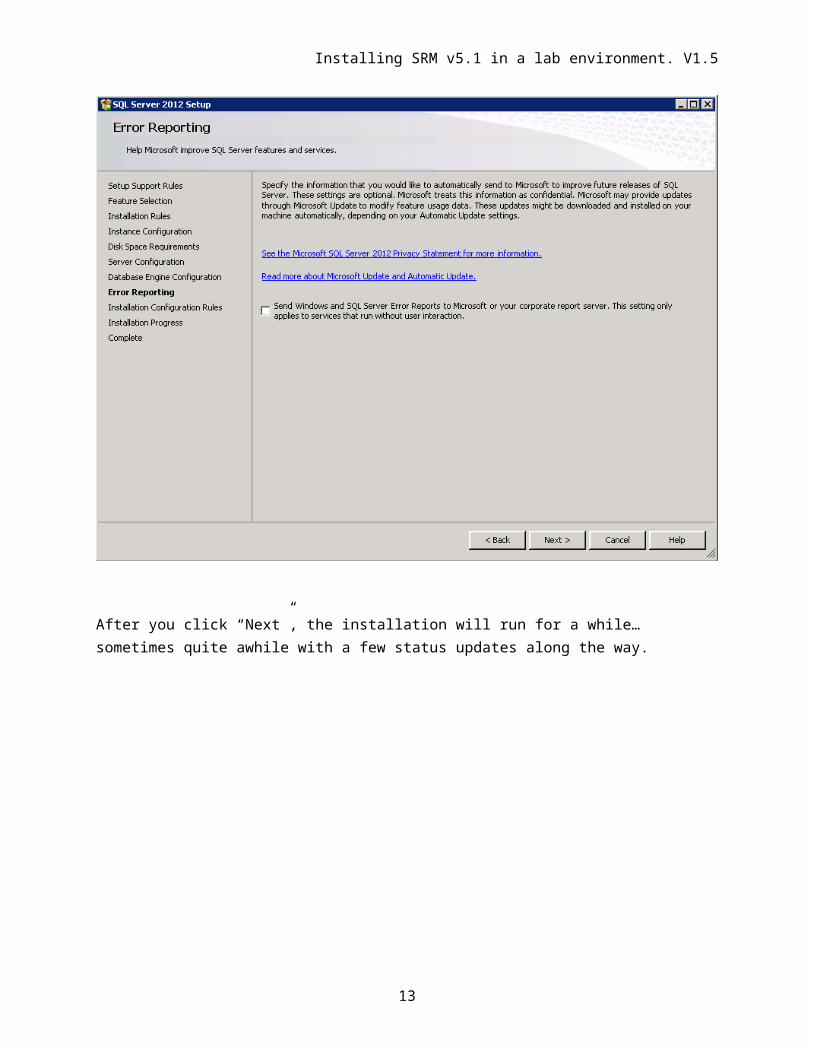
After you click “Next”, the installation will run for a while… sometimes quite awhile with a few status updates along the way.
12
Installing SRM v5.1 in a lab environment. V1.5
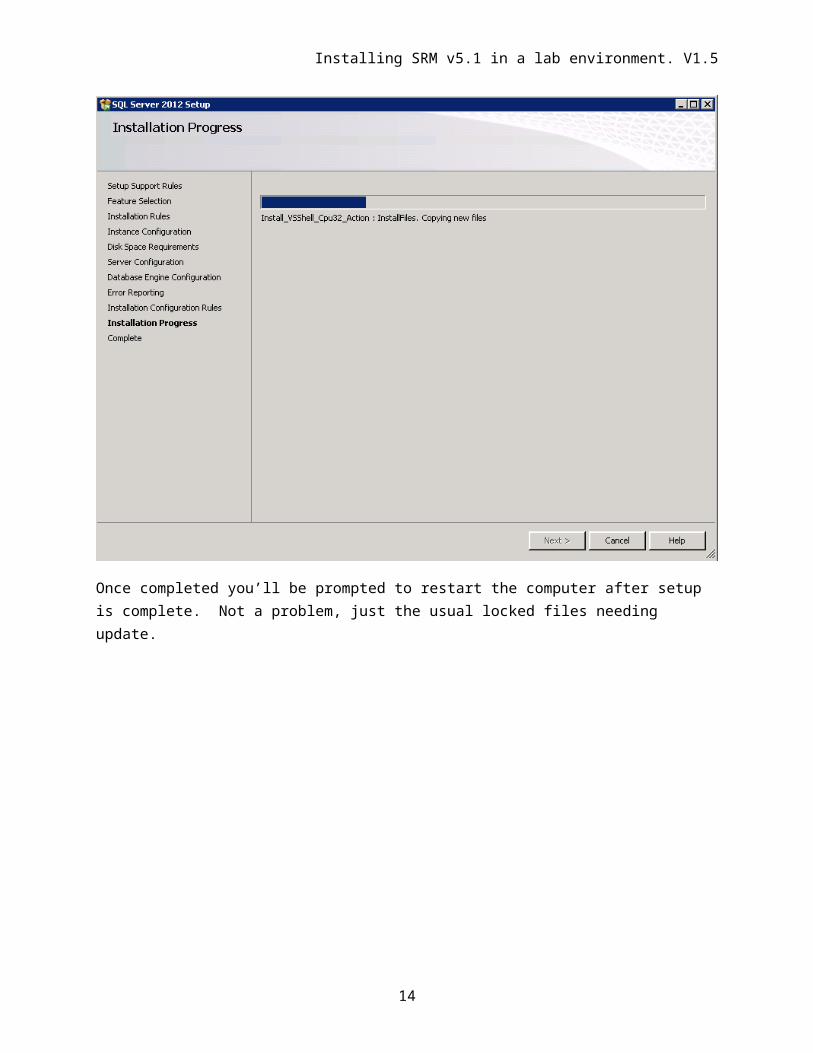
Once completed you’ll be prompted to restart the computer after setup is complete. Not a problem, just the usual locked files needing update.
13
Installing SRM v5.1 in a lab environment. V1.5
Once the warning dialogue is acknowledged you’ll be left with the underlying “Complete” panel.
14

Installing SRM v5.1 in a lab environment. V1.5
Close the SQL Server 2012 Setup. You’ll be left with the installation wizard (below). Close the wizard and restart the system. At this stage I usually do a reboot (to install the locked files), a shutdown then a snapshot. Given the length of time it takes to get to this stage it’s probably a good time to take a snap, before the db config and VMware software installs.
15

Installing SRM v5.1 in a lab environment. V1.5
16
Installing SRM v5.1 in a lab environment. V1.5
Configuration of SQL Express 2012By default, SQL Express does not permit connections from remote computers. Local configurations should work as long as you’re installing VC and/or SRM onto the same systems as SQL however you may still encounter issues with communications protocol mismatches between the client and the server. A more consistently successful approach is to enable remote tcp/ip connections and disable the alternate protocols. This simplifies troubleshooting and increases the likelihood of success right out of the box. You must enable remote connections for each instance of SQL Express that you want to connect to from a remote computer.
1. Click Start -> All Programs -> Microsoft SQL Server 2012 -> Configuration tools -> SQL Server Configuration Manager
2. Expand SQL Server Network Configuration and Click on Protocols for SQLEXPRESS3. In the right hand pane will be three transport protocols. Shared memory, Named Pipes and
TCPIP. Right click to disable the first two then right-click on TCPIP to enable it.4. You will receive a warning that changes will not take effect until the service is stopped and
restarted. We will do that at the end.
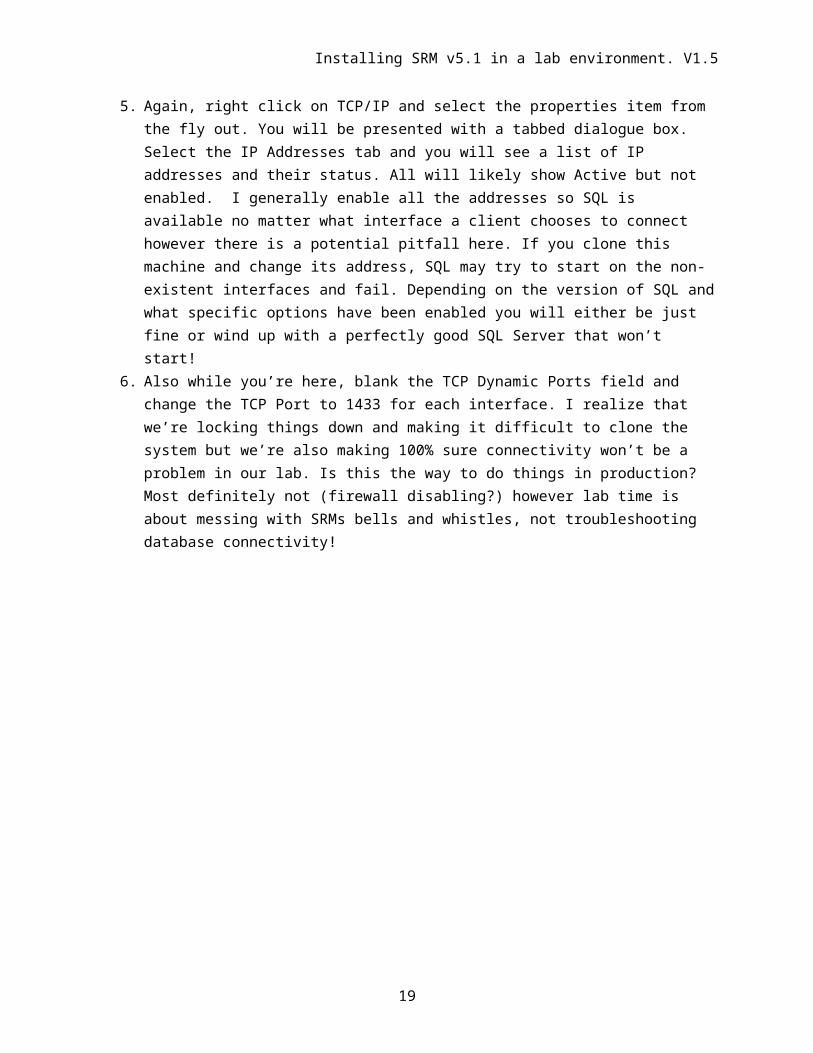
5. Again, right click on TCP/IP and select the properties item from the fly out. You will be presented with a tabbed dialogue box. Select the IP Addresses tab and you will see a list of IP addresses and their status. All will likely show Active but not enabled. I generally enable all the addresses so SQL is available no matter what interface a client chooses to connect however there is a potential pitfall here. If you clone this machine and change its address, SQL may try to start on the non-existent interfaces and fail. Depending on the version of SQL and what specific options have been enabled you will either be just fine or wind up with a perfectly good SQL Server that won’t start!
17

Installing SRM v5.1 in a lab environment. V1.5
6. Also while you’re here, blank the TCP Dynamic Ports field and change the TCP Port to 1433 for each interface. I realize that we’re locking things down and making it difficult to clone the system but we’re also making 100% sure connectivity won’t be a problem in our lab. Is this the way to do things in production? Most definitely not (firewall disabling?) however lab time is about messing with SRMs bells and whistles, not troubleshooting database connectivity!
7. Now repeat the steps for the SQL Native Client configuration. Make sure both the 32 and 64 bit clients are enabled for TCP/IP and not for Named Pipes or Shared Memory! Notice also that the clients are already set up to try port 1433 by default so no port level configuration changes are needed,
18
Installing SRM v5.1 in a lab environment. V1.5
8. Now with all the changes made, restart SQL and the SQL Browsing service. In the Left pane, select the option for SQL Server Services then, in the right pane,
a. Stop (don’t restart) the Browser service b. Restart the SQL Serverc. Start the SQL Server Browser
Order is important here! SQL Server will pick up the configuration changes on a restart but the browser needs to start AFTER SQL Server has picked up its changes or it will run with old configuration data. If it’s all too much to follow just reboot the box and come back in a couple minutes!
19

Installing SRM v5.1 in a lab environment. V1.5
20

Installing SRM v5.1 in a lab environment. V1.5
Database CreationUp till now we’ve just been installing software and playing with basic middleware configuration. Now it’s time to get our hands dirty and create some actual databases. You’ll need four databases.
vCenter Update Manager Single Sign On SRM
You may want to take a snapshot before we begin and perhaps create a shortcut for the Management Studio on the desktop. Also, pull out the sa password as you’re going to need it!
vCentervCenter wants a database for configuration data and statistics. If you’re doing heavy logging you may want to create this on a different storage profile but for a lab environment we’re going to just use basic mechanical disk. How droll!
Fire up Management Studio and log in as the sa user.
Once logged in, click the New Query button up in the ribbon bar and enter the following commands:
Log into SQL Management Studio
Start -> All Programs -> SQL Server 2012 -> SQL Server Management Studio. Choose SQL Server Authentication and log in with the sa account
Once logged in, click the New Query button up in the ribbon bar and enter the following commands:
CREATE SCHEMA vcdb ;
Click Execute
21

Installing SRM v5.1 in a lab environment. V1.5
Create the database
CREATE DATABASE vcdb ;
Click Execute
Use the database
USE vcdb ;
Click Execute
User Creation
CREATE LOGIN vpxuser WITH PASSWORD = 'Canada01';CREATE USER vpxuser FOR LOGIN vpxuser WITH DEFAULT_SCHEMA = vcdb ;
Click Execute
22

Installing SRM v5.1 in a lab environment. V1.5
Ownership & permissions
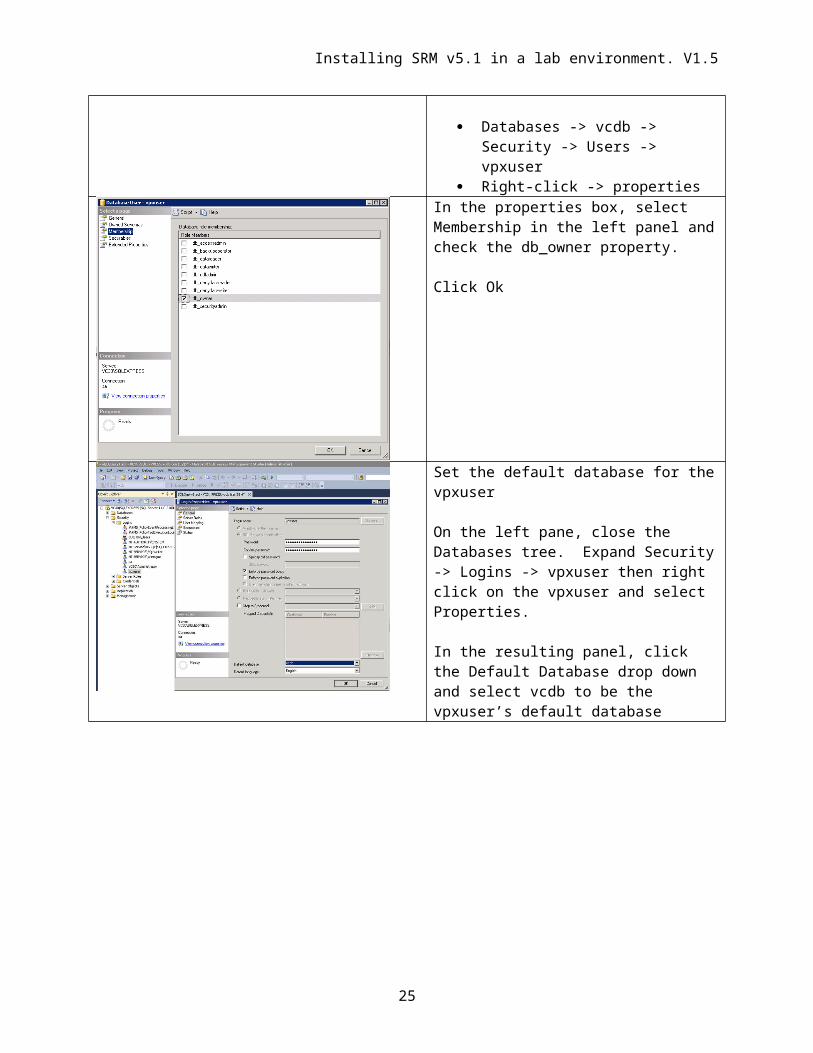
Now change the ownership and permissions for vcdb
Databases -> vcdb -> Security -> Users -> vpxuser
Right-click -> properties
23

Installing SRM v5.1 in a lab environment. V1.5
In the properties box, select Membership in the left panel and check the db_owner property.
Click Ok
Set the default database for the vpxuser
On the left pane, close the Databases tree. Expand Security -> Logins -> vpxuser then right click on the vpxuser and select Properties.
In the resulting panel, click the Default Database drop down and select vcdb to be the vpxuser’s default database
In the User Mapping tab you should be able to see the default db AND the db_owner permission has been set. If you don’t see the db_owner permission, make sure you’re looking at the vcdb database and not the master db. Hint: see in the pane to the left, I’ve selected the vcdb row to ensure I’m looking at the right thing.
24
Installing SRM v5.1 in a lab environment. V1.5
Now check the msdb box and in the bottom right pane, click the db_owner attribute as well. You can revoke this after the install but vCenter needs it during the actual installation so it can install SQL agent jobs related to rollup of statistics.
Click Ok
Verify the defaults
Once again, right click the vpxuser and select properties. In the resulting panel, click User Mappings in the left pane and confirm the vpxuser has a default schema of vcdb and a default database of vcdb AND has db_owner permissions for msdb.
If you forget this latter piece you’ll receive a misleading error message during the vCenter install suggesting there’s a problem with the permissions on the vcdb database. The issue is in fact missing db_owner perms on msdb!
Set the default schema
Now log out of Management Studio and log back in as vpxuser. Execute the command
CREATE SCHEMA vcdb AUTHORIZATION vpxuser ;
25

Installing SRM v5.1 in a lab environment. V1.5
Now testLog out and log back into Management Studio Express as the vpxd user. Try to execute the following script
USE vcdb ;goCREATE TABLE test( data varchar(10))Go
If it fails, you will see something likeMsg 262, Level 14, State 1, Line 1CREATE TABLE permission denied in database ‘vcdb’ WITH DEFAULT SCHEMA = vcdb.GO
In the bottom pane. Obviously this is a permission problem of some kind and you will need to retrace your steps until you find and correct the problem. vCenter cannot install unless it can create objects within the database so it is imperative that you do not proceed until this command can complete successfully.
26

Installing SRM v5.1 in a lab environment. V1.5
Configure the ODBC data connectionAs of 5.1, vCenter wants a 64 bit SQL Native client which means you can use the option right off the start menu. Previous versions wanted a 32 bit connection which predicated using the c:\Windows\SysWoW64\odbcad32.exe utility.
Start -> Administrative tools -> Data Sources
Select the System DSN tab and click Add
From the list of options, select SQL Native Client 11.0 and click Finish. Do not select the SQL Native Client dated 2005!
If you select SQL Server as the driver (and I’ve seen doc that suggests you do) you will not see it as an option during the install of vCenter. Only a 64 bit SQL Native client will work for VC 5.1.
Give the connection the name VCDB to differentiate it from other VMware intended databases.
Enter a brief description and select your local SQL Express instance from the drop down list.
Click Next
Change the authentication method to SQL
27

Installing SRM v5.1 in a lab environment. V1.5
Server authentication and enter the vpxuser id and credentials
Click NextChange the default database to vcdb and click Next
Technically you shouldn’t have to do this however it can’t hurt.
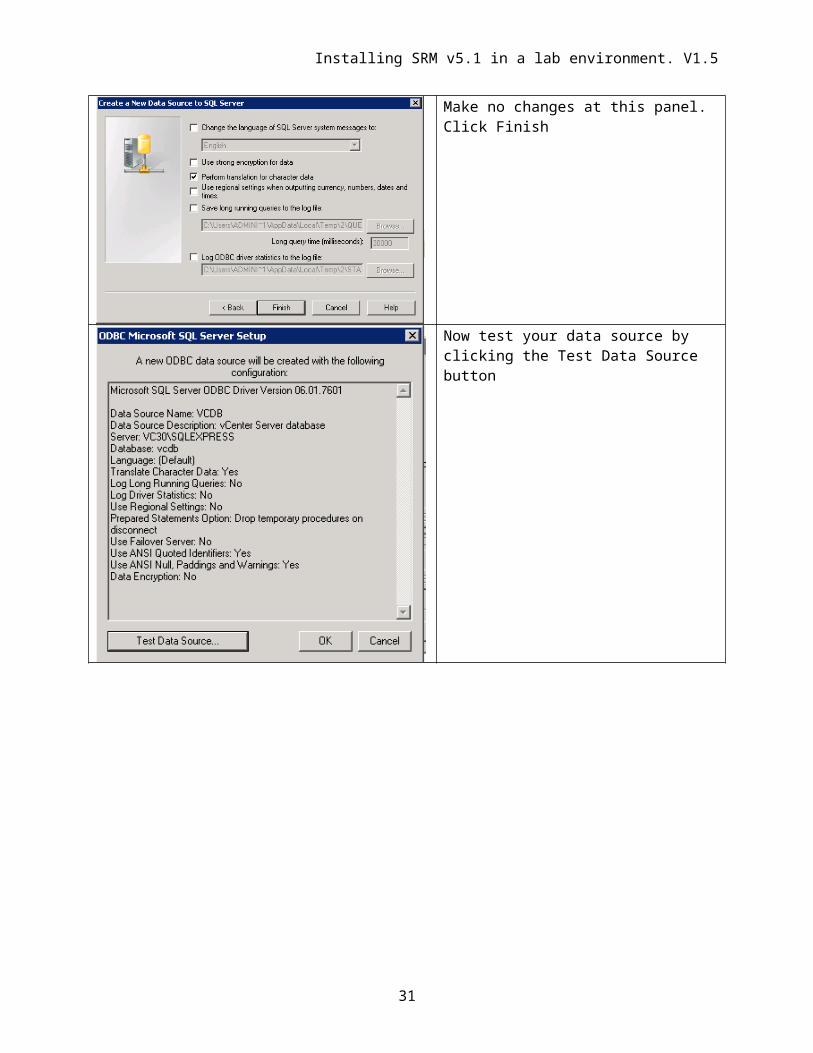
Make no changes at this panel. Click Finish
28

Installing SRM v5.1 in a lab environment. V1.5
Now test your data source by clicking the Test Data Source button
If your result looks like the panel to the left then congratulations, you have successfully configured your database.
If you see any other message then it’s time to retrace your steps. Typical connection failures include
Misconfigured/mismatched client-server protocols
Mismatched TCP/IP ports Firewall configurations Failure to properly restart the SQL
Server and Browser services
29

Installing SRM v5.1 in a lab environment. V1.5
Update ManagerLog into SQL Management Studio
Start -> All Programs -> SQL Server 2012 -> SQL Server Management Studio. Choose SQL Server Authentication and log in with the sa account
Once logged in, click the New Query button up in the ribbon bar and enter the following commands:
CREATE SCHEMA vum ;
Click Execute
Create the database
CREATE DATABASE vum ;
Click Execute
Use the database
USE vum ;
Click Execute
30
Installing SRM v5.1 in a lab environment. V1.5
User Creation
CREATE LOGIN vumuser WITH PASSWORD = 'Canada01';CREATE USER vumuser FOR LOGIN vumuser WITH DEFAULT_SCHEMA = vum ;
Click Execute
Alter msdb
VC will require access to msdb during the initial installation process but these permissions can be removed once installation is complete. First create the user vumuser within the msdb database
USE msdb ;CREATE USER vumuser for LOGIN vumuser ;
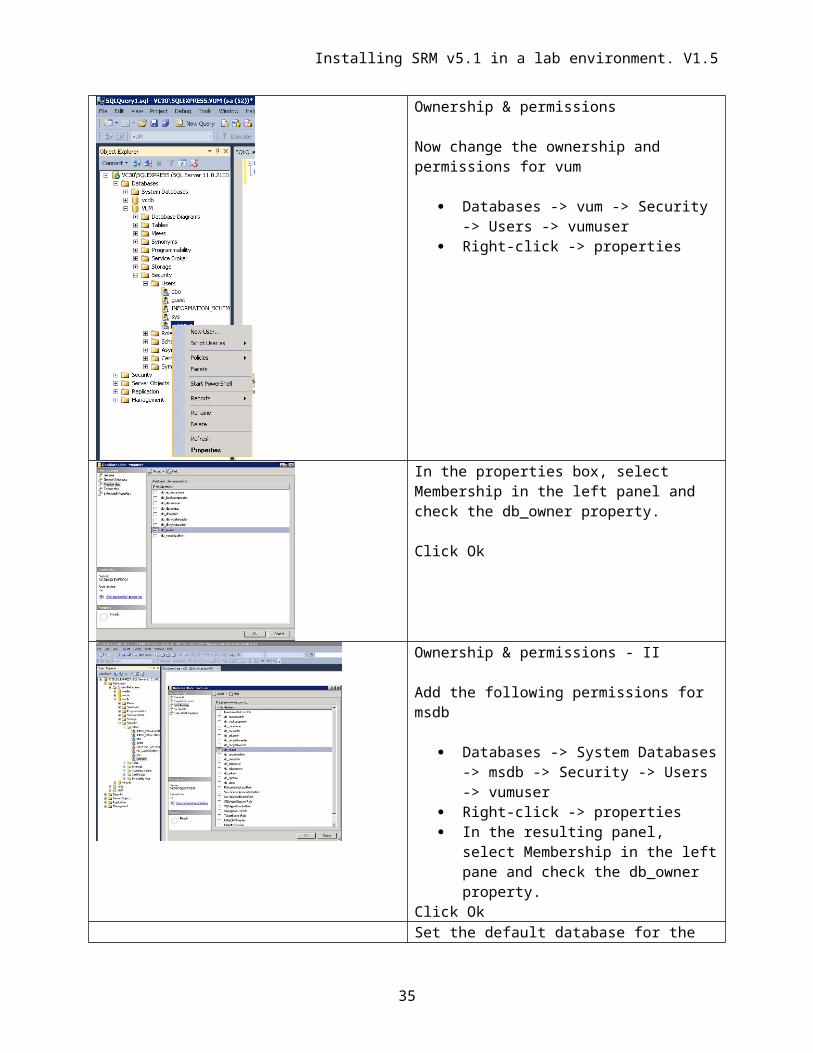
Click ExecuteOwnership & permissions
Now change the ownership and permissions for vum
Databases -> vum -> Security -> Users -> vumuser
Right-click -> properties
31

Installing SRM v5.1 in a lab environment. V1.5
In the properties box, select Membership in the left panel and check the db_owner property.
Click Ok
Ownership & permissions - II
Add the following permissions for msdb
Databases -> System Databases -> msdb -> Security -> Users -> vumuser
Right-click -> properties In the resulting panel, select Membership
in the left pane and check the db_owner property.
Click OkSet the default database for the vumuser
On the left pane, close the Databases tree. Expand Security -> Logins -> vumuser then right click on the vumuser and select Properties.
In the resulting panel, click the Default Database drop down and select vum to be the vumuser’s default database
32

Installing SRM v5.1 in a lab environment. V1.5
Verify the defaults
Once again, right click the vumuser and select properties. In the resulting panel, click User Mappings in the left pane and confirm the vumuser has a default schema of vum and a default database of vum. Also confirm the user had the db_owner attribute set for both the vum database and the msdb database (shown)
Set the default schema
Now log out of Management Studio and log back in as vumuser. Execute the command
CREATE SCHEMA vum AUTHORIZATION vumuser ;
Now testLog out and log back into Management Studio Express as vumuser. Try to execute the following script
USE vum ;goCREATE TABLE test( data varchar(10))Go
If it fails, you will see something likeMsg 262, Level 14, State 1, Line 1CREATE TABLE permission denied in database ‘vum’ WITH DEFAULT SCHEMA = vum.GO
In the bottom pane. Obviously this is a permission problem of some kind and you will need to retrace your steps until you find and correct the problem. vCenter cannot install unless it can create objects within the database so it is imperative that you do not proceed until this command can complete successfully.
33

Installing SRM v5.1 in a lab environment. V1.5
Configure the ODBC Data Connection for Update Manager
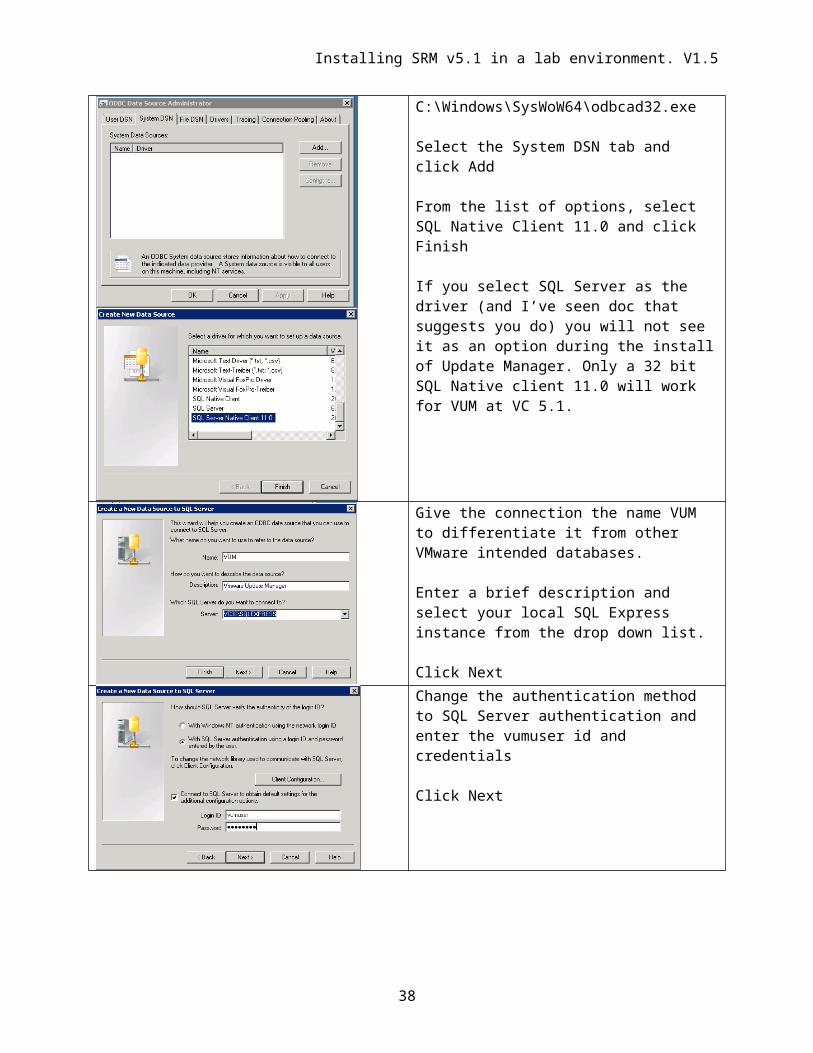
Warning: Update Manager wants a 32 bit DSN so don’t use the Start menu option (it’s 64 bit only) and because you’ve installed the earlier SQL Native Client (2005) you’re going to have more than one to choose from. Pick v11, not 2005!
C:\Windows\SysWoW64\odbcad32.exe
Select the System DSN tab and click Add
From the list of options, select SQL Native Client 11.0 and click Finish
If you select SQL Server as the driver (and I’ve seen doc that suggests you do) you will not see it as an option during the install of Update Manager. Only a 32 bit SQL Native client 11.0 will work for VUM at VC 5.1.
Give the connection the name VUM to differentiate it from other VMware intended databases.
Enter a brief description and select your local SQL Express instance from the drop down list.
Click Next
34
Installing SRM v5.1 in a lab environment. V1.5
Change the authentication method to SQL Server authentication and enter the vumuser id and credentials
Click Next
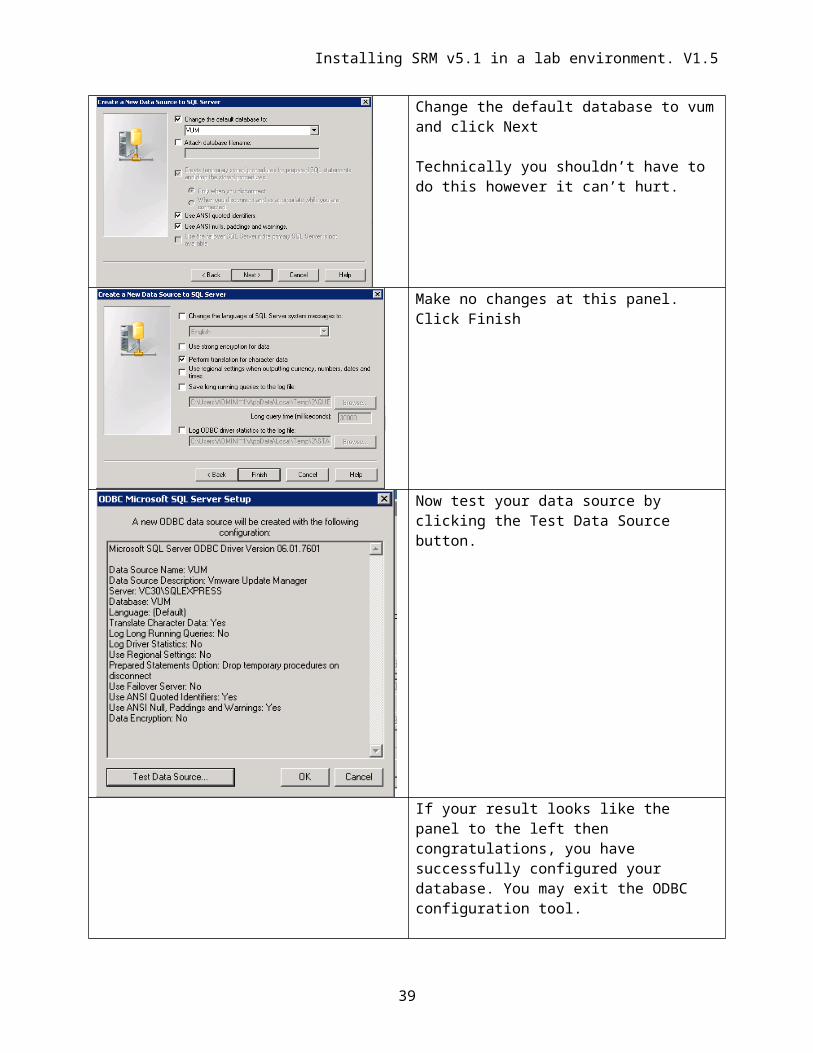
Change the default database to vum and click Next
Technically you shouldn’t have to do this however it can’t hurt.
Make no changes at this panel. Click Finish
35

Installing SRM v5.1 in a lab environment. V1.5
Now test your data source by clicking the Test Data Source button.
If your result looks like the panel to the left then congratulations, you have successfully configured your database. You may exit the ODBC configuration tool.
If you see any other message then it’s time to retrace your steps. Typical connection failures include
Misconfigured/mismatched client-server protocols
Mismatched TCP/IP ports Firewall configurations Failure to properly restart the SQL Server
and Browser services
36

Installing SRM v5.1 in a lab environment. V1.5
Vmware Single Sign-OnThe Vmware single sign-on component is a mandatory piece that includes software from (surprise) RSA! There are two SQL scripts buried in the installation package which must be executed to create both the required tables and the necessary users (with permissions). Scripts are located on the installation iso file under /Single Sign On/DBScripts/SSOServer/schema/mssql . There are alternate scripts for other databases but since this is a lab environment I’m only going to address the database we’re actually using.
The two scripts you’ll need are
1. rsaIMSLiteMSSQLSetupTablespaces.sql2. rsaIMSLiteMSSQLSetupUsers.sql
Note that these 2 scripts cannot be run ‘as is’. Both contain fields which must be customized before use.
Warning: There is a 3rd script for schema creation “rsaIMSLiteMSSQLCreateSchema.sql” which you’ll be tempted to run. Don’t!
I’ve modified the script for ease of use by placing the new RSA database files in the default data directory for SQL Express 2012 on Windows 2008 R2. It should work as a straight cut and paste but while this is perfectly OK for a light use lab it’s a huge no-no for production installations.
Log into SQL Management Studio as sa and execute the following:
USE MASTERGO
CREATE DATABASE RSA ON PRIMARY( NAME='RSA_DATA',
FILENAME='C:\Program Files\Microsoft SQL Server\MSSQL11.SQLEXPRESS\MSSQL\DATA\RSA_DATA.mdf', SIZE=10MB, MAXSIZE=UNLIMITED, FILEGROWTH=10%),FILEGROUP RSA_INDEX( NAME='RSA_INDEX',
FILENAME='C:\Program Files\Microsoft SQL Server\MSSQL11.SQLEXPRESS\MSSQL\DATA\RSA_INDEX.mdf', SIZE=10MB, MAXSIZE=UNLIMITED, FILEGROWTH=10%)LOG ON( NAME='translog',
FILENAME='C:\Program Files\Microsoft SQL Server\MSSQL11.SQLEXPRESS\MSSQL\DATA\translog.ldf', SIZE=10MB, MAXSIZE=UNLIMITED, FILEGROWTH=10% )GO
37
Installing SRM v5.1 in a lab environment. V1.5
There are a number of performance and maintenance options that leverage the sp_dboption command which is no longer supported as of SQL 2012. The replacements (according to http://beyondrelational.com/modules/2/blogs/28/Posts/15429/replacement-for-system-stored-procedure-spdboption-in-sql-server-2012-denali.aspx can be found in the modified script below.
-- Set recommended perform settings on the database-- Old Command-- EXEC SP_DBOPTION 'RSA', 'autoshrink', true-- New replacementALTER DATABASE RSA SET AUTO_SHRINK ONGO-- Old Command-- EXEC SP_DBOPTION 'RSA', 'trunc. log on chkpt.', true-- New replacementALTER DATABASE RSA SET RECOVERY SIMPLEGOCHECKPOINTGO
38
Installing SRM v5.1 in a lab environment. V1.5
Now create the RSA user ids. Once again I’ve taken the liberty of pre-editing the passwords to be Canada01 so you should be able to do a straight cut and paste but feel free to modify or revert to the original scripts.
USE MASTERGO
CREATE LOGIN RSA_DBA WITH PASSWORD = 'Canada01', DEFAULT_DATABASE = RSAGOCREATE LOGIN RSA_USER WITH PASSWORD = 'Canada01', DEFAULT_DATABASE = RSAGO
USE RSAGO
ALTER AUTHORIZATION ON DATABASE::RSA TO [RSA_DBA]GO
CREATE USER RSA_USER FOR LOGIN [RSA_USER]GO
39

Installing SRM v5.1 in a lab environment. V1.5
CHECKPOINTGO
Warning (again):
Do not be tempted to run the rsaIMSLiteMSSQLCreateSchema.sql script… If you do, the Single Sign On Installer will run it again and fail because the schema already exists. SSO will then roll back and exit the installation in a failed state.
Don’t ask me how I know this…
Warning:
During the installation process for Single Sign On, you will encounter a screen that asks for the database user name. On this panel in the installer you must check the box that says “Manually created database users”. If you check this box the panel will change to permit entry of both the RSA_DBA userid and the RSA_USER id.
If you fail to check this box, you will receive an insufficient permissions error no matter which user id you enter here.
40

Installing SRM v5.1 in a lab environment. V1.5
Sample Error message
41

Installing SRM v5.1 in a lab environment. V1.5
Setting up the SRM database
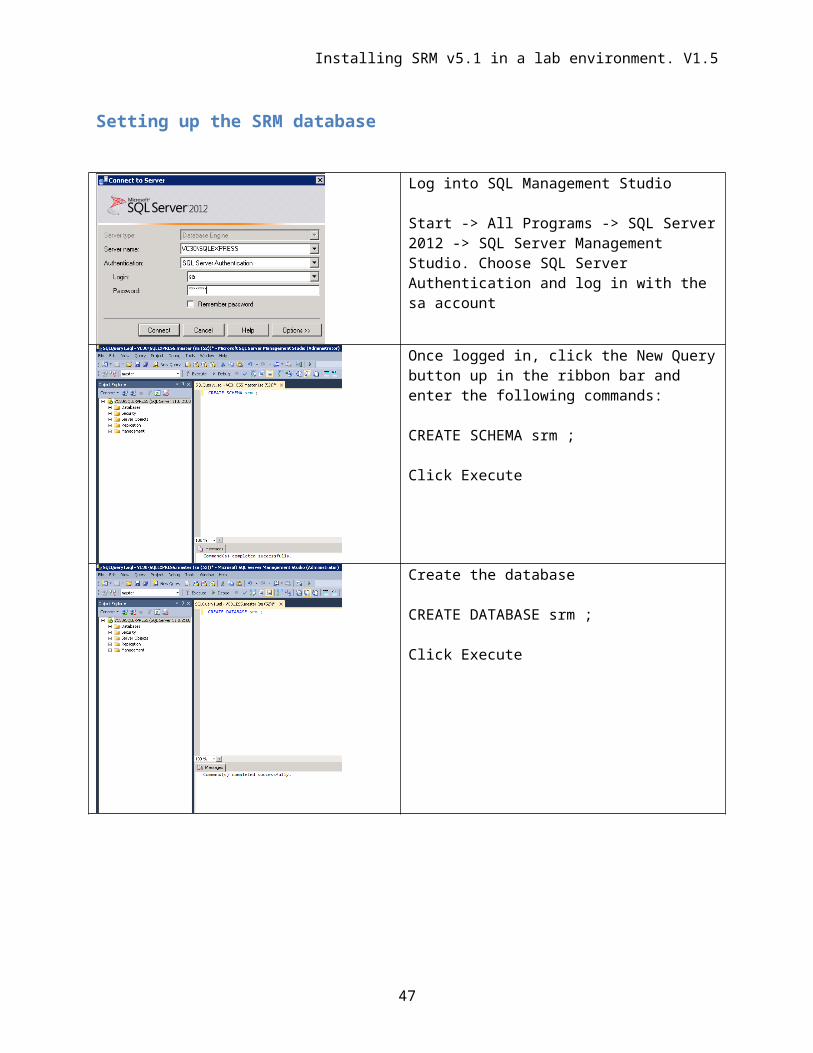
Log into SQL Management Studio
Start -> All Programs -> SQL Server 2012 -> SQL Server Management Studio. Choose SQL Server Authentication and log in with the sa account
Once logged in, click the New Query button up in the ribbon bar and enter the following commands:
CREATE SCHEMA srm ;
Click Execute
Create the database
CREATE DATABASE srm ;
Click Execute
42

Installing SRM v5.1 in a lab environment. V1.5
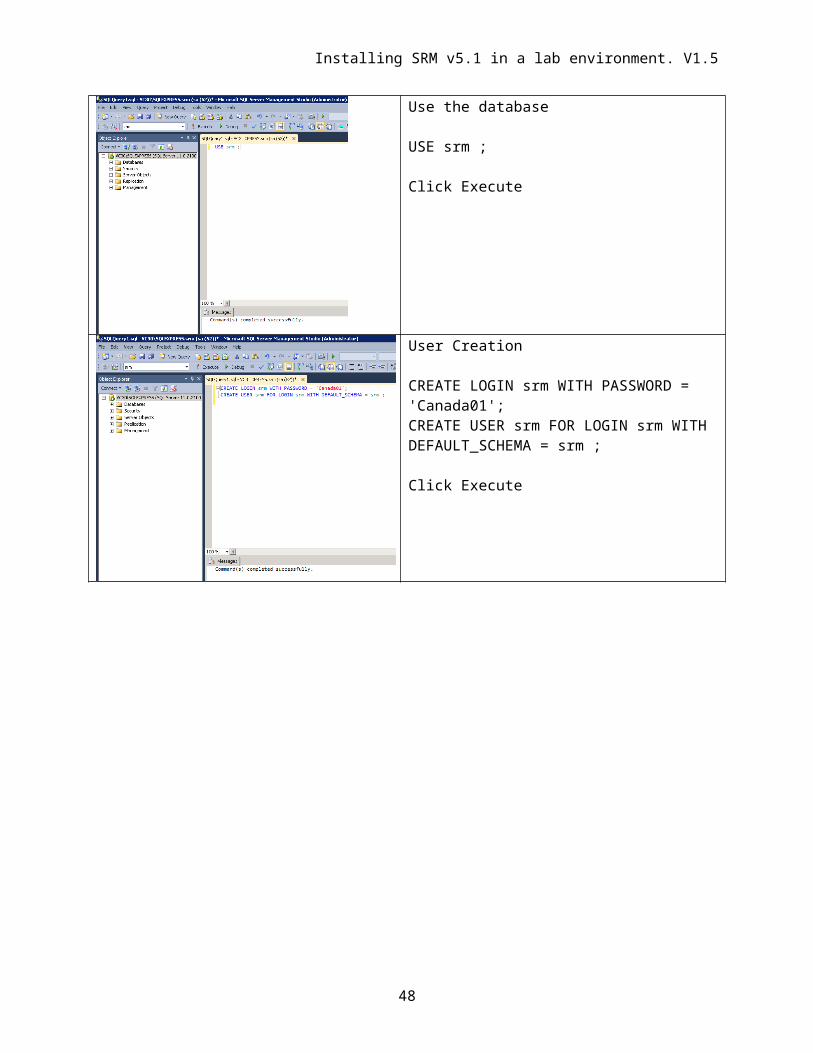
Use the database
USE srm ;
Click Execute
User Creation
CREATE LOGIN srm WITH PASSWORD = 'Canada01';CREATE USER srm FOR LOGIN srm WITH DEFAULT_SCHEMA = srm ;
Click Execute
43

Installing SRM v5.1 in a lab environment. V1.5
Ownership & permissions
Now change the ownership and permissions for srm
Databases -> srm -> Security -> Users -> srm Right-click -> properties
In the properties box, select Membership in the left panel and check the db_owner property.
Click Ok
44

Installing SRM v5.1 in a lab environment. V1.5
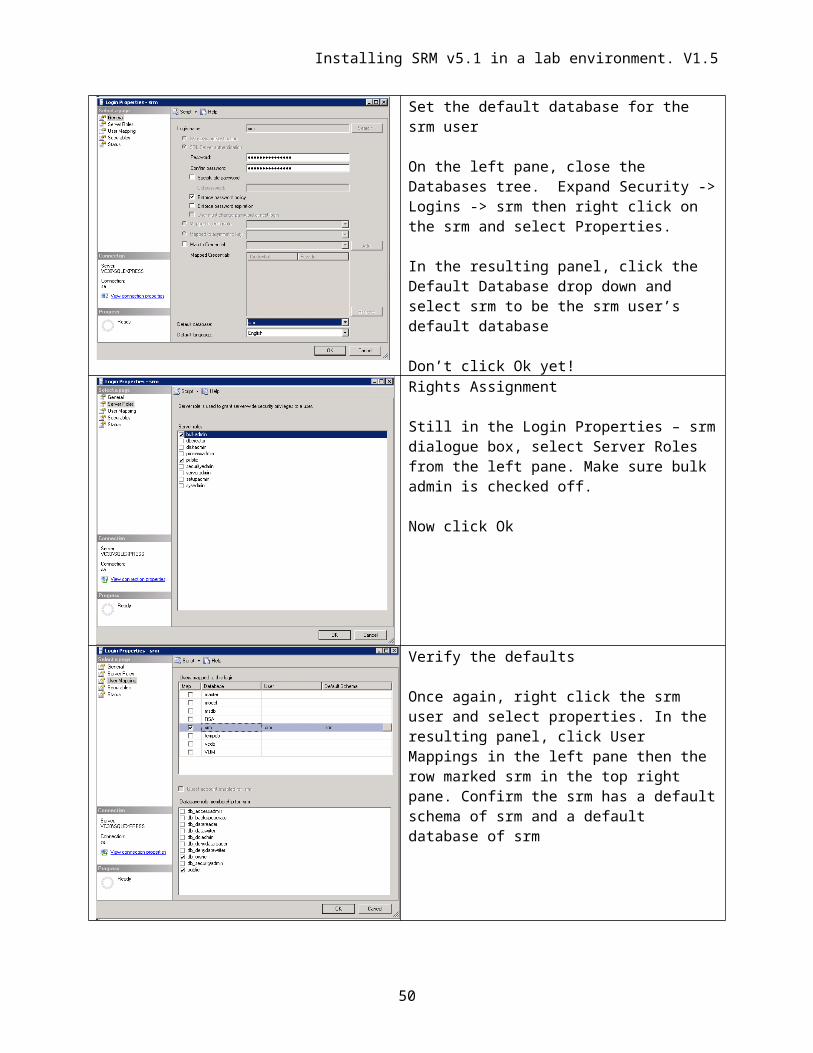
Set the default database for the srm user
On the left pane, close the Databases tree. Expand Security -> Logins -> srm then right click on the srm and select Properties.
In the resulting panel, click the Default Database drop down and select srm to be the srm user’s default database
Don’t click Ok yet!
Rights Assignment
Still in the Login Properties – srm dialogue box, select Server Roles from the left pane. Make sure bulk admin is checked off.
Now click Ok
Verify the defaults
Once again, right click the srm user and select properties. In the resulting panel, click User Mappings in the left pane then the row marked srm in the top right pane. Confirm the srm has a default schema of srm and a default database of srm
45

Installing SRM v5.1 in a lab environment. V1.5
Set the default schema
Now log out of Management Studio and log back in as the srm user. Execute the command
CREATE SCHEMA srm AUTHORIZATION srm ;
Now testLog out and log back into Management Studio Express as the srm user. Try to execute the following script
USE srm ;goCREATE TABLE test( data varchar(10))Go
If it fails, you will see something likeMsg 262, Level 14, State 1, Line 1CREATE TABLE permission denied in database ‘srm’ WITH DEFAULT SCHEMA = srm.GO
In the bottom pane. Obviously this is a permission problem of some kind and you will need to retrace your steps until you find and correct the problem. SRM cannot install unless it can create objects within the database so it is imperative that you do not proceed until this command can complete successfully.
46
Installing SRM v5.1 in a lab environment. V1.5
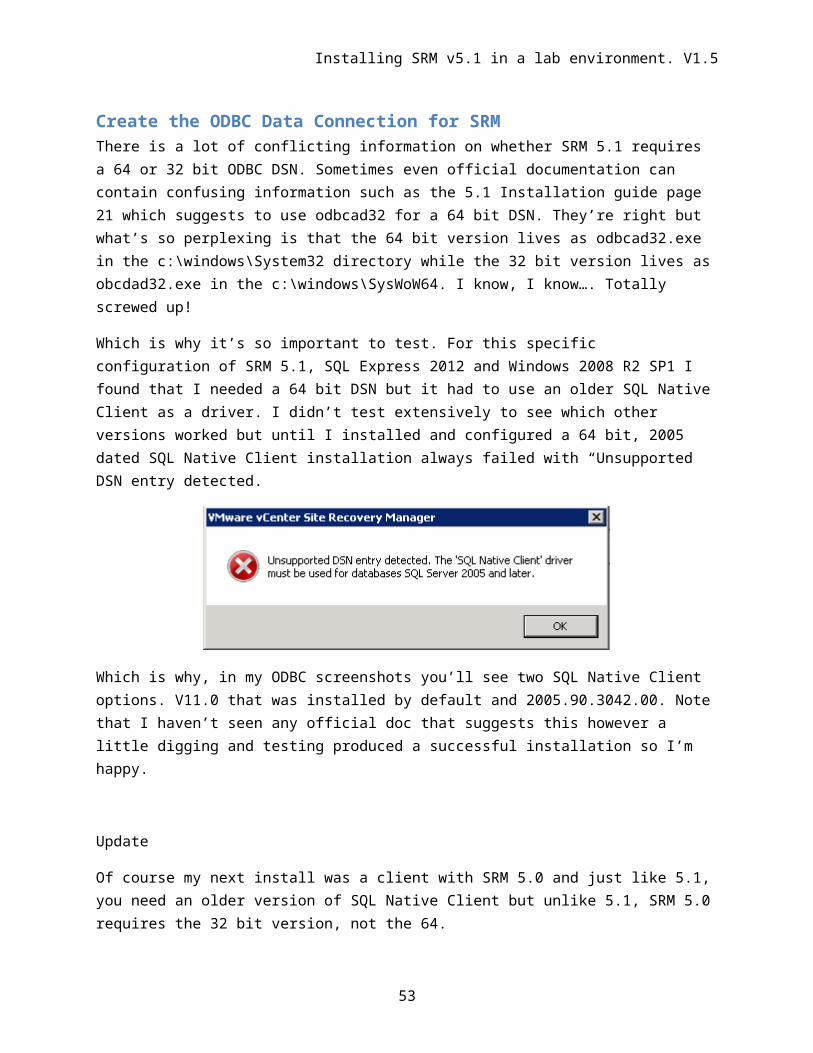
Create the ODBC Data Connection for SRMThere is a lot of conflicting information on whether SRM 5.1 requires a 64 or 32 bit ODBC DSN. Sometimes even official documentation can contain confusing information such as the 5.1 Installation guide page 21 which suggests to use odbcad32 for a 64 bit DSN. They’re right but what’s so perplexing is that the 64 bit version lives as odbcad32.exe in the c:\windows\System32 directory while the 32 bit version lives as obcdad32.exe in the c:\windows\SysWoW64. I know, I know…. Totally screwed up!
Which is why it’s so important to test. For this specific configuration of SRM 5.1, SQL Express 2012 and Windows 2008 R2 SP1 I found that I needed a 64 bit DSN but it had to use an older SQL Native Client as a driver. I didn’t test extensively to see which other versions worked but until I installed and configured a 64 bit, 2005 dated SQL Native Client installation always failed with “Unsupported DSN entry detected.
Which is why, in my ODBC screenshots you’ll see two SQL Native Client options. V11.0 that was installed by default and 2005.90.3042.00. Note that I haven’t seen any official doc that suggests this however a little digging and testing produced a successful installation so I’m happy.
Update
Of course my next install was a client with SRM 5.0 and just like 5.1, you need an older version of SQL Native Client but unlike 5.1, SRM 5.0 requires the 32 bit version, not the 64.
47
Installing SRM v5.1 in a lab environment. V1.5
Start -> Administrative tools -> Data Sources
Select the System DSN tab and click Add
From the list of options, select the top option, SQL Server Native Client 2005.90.3042.00 and click Finish
Give the connection the name SRM to differentiate it from other VMware intended databases.
Enter a brief description and select your local SQL Express instance from the drop down list.
Click Next
48

Installing SRM v5.1 in a lab environment. V1.5
Change the authentication method to SQL Server authentication and enter the sa user id and credentials.
Click Next
Note: Resist the urge to use the srm user id and password here. sa is required during installation!
Change the default database to srm and click Next
Make no changes at this panel. Click Finish
49
Installing SRM v5.1 in a lab environment. V1.5
Now test your data source by clicking the Test Data Source button.
If your result looks like the panel to the left then congratulations, you have successfully configured your database. You may exit the ODBC configuration tool.
If you see any other message then it’s time to retrace your steps. Typical connection failures include
Misconfigured/mismatched client-server protocols
Mismatched TCP/IP ports Firewall configurations Failure to properly restart the SQL Server
and Browser services
50

Installing SRM v5.1 in a lab environment. V1.5
Installation Notes
Generally I shut down the server and take a snapshot at this stage. I have all the basic OS in place, middleware installed and configured and am just about to begin the installation of the Vmware components so it’s a good time to pause, grab a coffee and take out some insurance against mistakes!
The general order of operations here is pretty straightforward
1. Single Sign On2. Inventory Service3. vCenter4. Client5. Web Client6. Update Manager
I’m not going to cover off the panel by panel installation, that would take forever and for the most part it’s all next-next-next type stuff with a little relevant data in the input fields here and there. What I DO want to cover off is the stumbling blocks and gotchas that sometimes aren’t obvious the first time through.
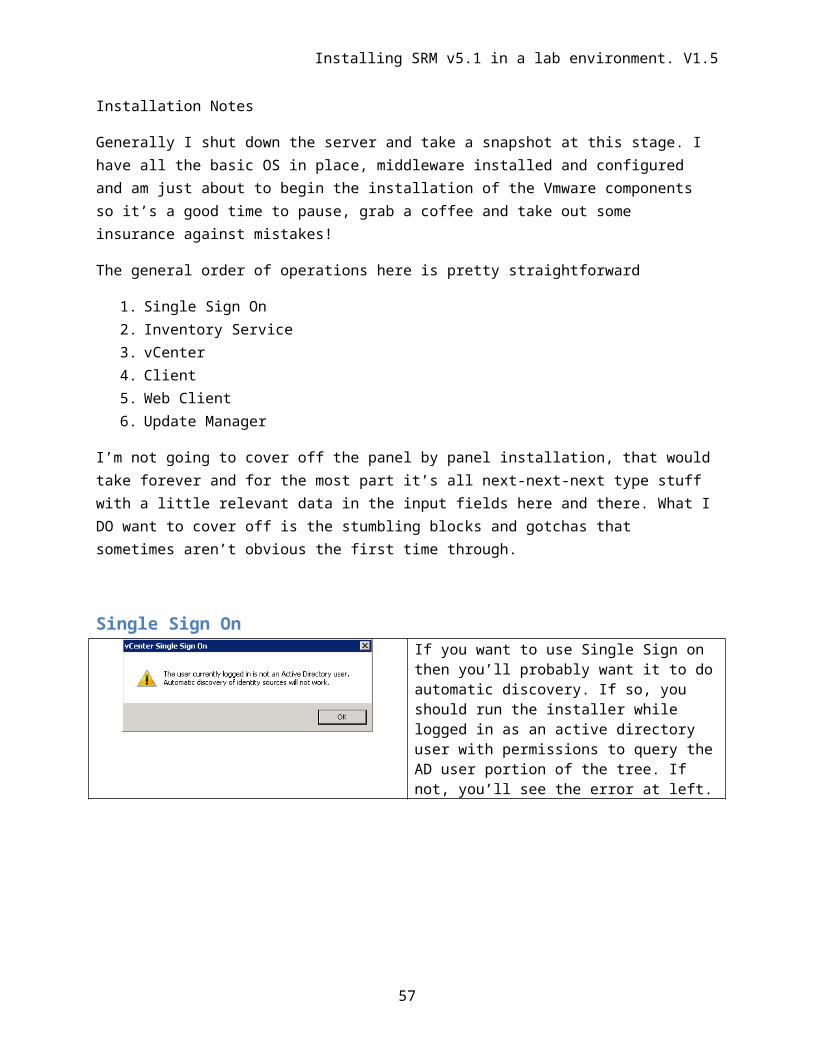
Single Sign OnIf you want to use Single Sign on then you’ll probably want it to do automatic discovery. If so, you should run the installer while logged in as an active directory user with permissions to query the AD user portion of the tree. If not, you’ll see the error at left.When asked to set the password for the administrator account be sure to write it down. You’ll need it later
51

Installing SRM v5.1 in a lab environment. V1.5
When the database panel comes up, use the bottom option to select an existing, supported database. You can ignore the prepatory script advisory, it’s already been completed.
This is the trick screen… the trick is that you have to check that little checkbox halfway down the right side “Use manually created DB users”
If you don’t check this box you can’t get past this screen without a permissions error, no matter what you enter in the User and Password field.
Ahh That’s better.
Database Name = RSA IP Address = 127.0.0.1 Db user = RSA_USER/password =
Canada01 DBA user = RSA_DBA/password
=Canada01
At this point the installation should proceed smoothly
Vmware vCenter Inventory Service
52
Installing SRM v5.1 in a lab environment. V1.5
Here’s that Single Sign On administrator id and password I suggested writing down during the Single Sign On installation.
vCenter Server
On the Database options panel select the option to use an existing supported database and from the drop down pick the DSN for your vCenter instance
You should see the vpxuser id pop up automatically. Enter the appropriate password.
Click Next
53

Installing SRM v5.1 in a lab environment. V1.5
During the install of vCenter, you may receive an error message that the JDBC URL could not be automatically generated. If you have installed the Microsoft JDBC 3.0 driver and modified the CLASSPATH variable as previously instructed then you should be able to manually specify the URL as jdbc:sqlserver://127.0.0.1
Again with the SSO Admin id!
vCenter Client
Nothing special
vCenter Web Client
Pesky SSO Admin password!
54

Installing SRM v5.1 in a lab environment. V1.5
vCenter Update Manager
By default, VUM will download updates immediately following the software installation. I usually uncheck this box (bottom left) not because I don’t want to use VUM for updating but because I’m setting up for SRM and don’t really want to wait for updates to complete.
I have issues with delayed gratification.
These are vCenter credentials the installer is asking for, not SSO credentials!
Select “Use an existing supported database” and pick the VUM DSN from the drop down list.
55

Installing SRM v5.1 in a lab environment. V1.5
VUM user id and password please!
You can elect to identify the VUM Server by IP or hostname. While hostname is prettier, I tend to prefer IP addresses as they’re not dependent on DNS services being available.
You should have 120 GB free space available. And you can store updates on another disk but if you’re in a rush as I was you’ll see this space warning.
One the VUM installer completes I tend to reboot the system, fire up a vCenter client and do a quick run through to make sure everything is working before moving onto SRM
Site Recovery Manager
56
Installing SRM v5.1 in a lab environment. V1.5
I tend to install vSphere replication even though I haven’t yet had anyone ask for it. But it’s cool and is a great option for smaller customers whose pockets are a little shallower than the big boys.
These are straight administrator credentials, not SSO
I’m still using ipv4…
Select the srm DSN from the drop down. If it’s not available then it wasn’t done with the proper 64 bit, 2005-version SQL Native Client driver.
Use the srm userid and password as previously configured.
57

Installing SRM v5.1 in a lab environment. V1.5
58