Embed Size (px)
Citation preview

MapR Administrator Training
April 2012
Version 3.1.0December 13, 2013
OverviewArchitecture
Installation

1. Start Here . . . . . . . . . . . . . . . . . . . . . . . . . . . . . . . . . . . . . . . . . . . . . . . . . . . . . . . . . . . . . . . . . . . . . . . . . . . . . . . . . . . . . . . . . . . . . . . . . . 21.1 MapR Sandbox for Hadoop . . . . . . . . . . . . . . . . . . . . . . . . . . . . . . . . . . . . . . . . . . . . . . . . . . . . . . . . . . . . . . . . . . . . . . . . . . . . . . . . 81.2 Architecture Guide . . . . . . . . . . . . . . . . . . . . . . . . . . . . . . . . . . . . . . . . . . . . . . . . . . . . . . . . . . . . . . . . . . . . . . . . . . . . . . . . . . . . . . 12
2. Quick Installation Guide . . . . . . . . . . . . . . . . . . . . . . . . . . . . . . . . . . . . . . . . . . . . . . . . . . . . . . . . . . . . . . . . . . . . . . . . . . . . . . . . . . . . . . . 272.1 About Installation . . . . . . . . . . . . . . . . . . . . . . . . . . . . . . . . . . . . . . . . . . . . . . . . . . . . . . . . . . . . . . . . . . . . . . . . . . . . . . . . . . . . . . . . 292.2 MapR Overview . . . . . . . . . . . . . . . . . . . . . . . . . . . . . . . . . . . . . . . . . . . . . . . . . . . . . . . . . . . . . . . . . . . . . . . . . . . . . . . . . . . . . . . . . 38
3. Advanced Installation Topics . . . . . . . . . . . . . . . . . . . . . . . . . . . . . . . . . . . . . . . . . . . . . . . . . . . . . . . . . . . . . . . . . . . . . . . . . . . . . . . . . . . 403.1 Planning the Cluster . . . . . . . . . . . . . . . . . . . . . . . . . . . . . . . . . . . . . . . . . . . . . . . . . . . . . . . . . . . . . . . . . . . . . . . . . . . . . . . . . . . . . 423.2 Preparing Each Node . . . . . . . . . . . . . . . . . . . . . . . . . . . . . . . . . . . . . . . . . . . . . . . . . . . . . . . . . . . . . . . . . . . . . . . . . . . . . . . . . . . . 513.3 Installing MapR Software . . . . . . . . . . . . . . . . . . . . . . . . . . . . . . . . . . . . . . . . . . . . . . . . . . . . . . . . . . . . . . . . . . . . . . . . . . . . . . . . . 60
3.3.1 MapR Repositories and Package Archives . . . . . . . . . . . . . . . . . . . . . . . . . . . . . . . . . . . . . . . . . . . . . . . . . . . . . . . . . . . . . . . 723.3.2 Configuration Changes During Installation . . . . . . . . . . . . . . . . . . . . . . . . . . . . . . . . . . . . . . . . . . . . . . . . . . . . . . . . . . . . . . . 74
3.4 Bringing Up the Cluster . . . . . . . . . . . . . . . . . . . . . . . . . . . . . . . . . . . . . . . . . . . . . . . . . . . . . . . . . . . . . . . . . . . . . . . . . . . . . . . . . . . 753.5 Installing Hadoop Components . . . . . . . . . . . . . . . . . . . . . . . . . . . . . . . . . . . . . . . . . . . . . . . . . . . . . . . . . . . . . . . . . . . . . . . . . . . . . 79
3.5.1 Cascading . . . . . . . . . . . . . . . . . . . . . . . . . . . . . . . . . . . . . . . . . . . . . . . . . . . . . . . . . . . . . . . . . . . . . . . . . . . . . . . . . . . . . . . . 803.5.2 Flume . . . . . . . . . . . . . . . . . . . . . . . . . . . . . . . . . . . . . . . . . . . . . . . . . . . . . . . . . . . . . . . . . . . . . . . . . . . . . . . . . . . . . . . . . . . 803.5.3 HBase . . . . . . . . . . . . . . . . . . . . . . . . . . . . . . . . . . . . . . . . . . . . . . . . . . . . . . . . . . . . . . . . . . . . . . . . . . . . . . . . . . . . . . . . . . . 813.5.4 Hive . . . . . . . . . . . . . . . . . . . . . . . . . . . . . . . . . . . . . . . . . . . . . . . . . . . . . . . . . . . . . . . . . . . . . . . . . . . . . . . . . . . . . . . . . . . . . 883.5.5 Mahout . . . . . . . . . . . . . . . . . . . . . . . . . . . . . . . . . . . . . . . . . . . . . . . . . . . . . . . . . . . . . . . . . . . . . . . . . . . . . . . . . . . . . . . . . . 1023.5.6 MultiTool . . . . . . . . . . . . . . . . . . . . . . . . . . . . . . . . . . . . . . . . . . . . . . . . . . . . . . . . . . . . . . . . . . . . . . . . . . . . . . . . . . . . . . . . . 1053.5.7 Oozie . . . . . . . . . . . . . . . . . . . . . . . . . . . . . . . . . . . . . . . . . . . . . . . . . . . . . . . . . . . . . . . . . . . . . . . . . . . . . . . . . . . . . . . . . . . . 1053.5.8 Pig . . . . . . . . . . . . . . . . . . . . . . . . . . . . . . . . . . . . . . . . . . . . . . . . . . . . . . . . . . . . . . . . . . . . . . . . . . . . . . . . . . . . . . . . . . . . . . 1093.5.9 Sqoop . . . . . . . . . . . . . . . . . . . . . . . . . . . . . . . . . . . . . . . . . . . . . . . . . . . . . . . . . . . . . . . . . . . . . . . . . . . . . . . . . . . . . . . . . . . 1103.5.10 Whirr . . . . . . . . . . . . . . . . . . . . . . . . . . . . . . . . . . . . . . . . . . . . . . . . . . . . . . . . . . . . . . . . . . . . . . . . . . . . . . . . . . . . . . . . . . . 1113.5.11 Installing Hue . . . . . . . . . . . . . . . . . . . . . . . . . . . . . . . . . . . . . . . . . . . . . . . . . . . . . . . . . . . . . . . . . . . . . . . . . . . . . . . . . . . . . 1123.5.12 Installing Impala on MapR . . . . . . . . . . . . . . . . . . . . . . . . . . . . . . . . . . . . . . . . . . . . . . . . . . . . . . . . . . . . . . . . . . . . . . . . . . . 114
3.5.12.1 Additional Impala Configuration Options . . . . . . . . . . . . . . . . . . . . . . . . . . . . . . . . . . . . . . . . . . . . . . . . . . . . . . . . . . . 1163.6 Next Steps After Installation . . . . . . . . . . . . . . . . . . . . . . . . . . . . . . . . . . . . . . . . . . . . . . . . . . . . . . . . . . . . . . . . . . . . . . . . . . . . . . . 1183.7 Setting Up the Client . . . . . . . . . . . . . . . . . . . . . . . . . . . . . . . . . . . . . . . . . . . . . . . . . . . . . . . . . . . . . . . . . . . . . . . . . . . . . . . . . . . . . 120
4. Upgrade Guide . . . . . . . . . . . . . . . . . . . . . . . . . . . . . . . . . . . . . . . . . . . . . . . . . . . . . . . . . . . . . . . . . . . . . . . . . . . . . . . . . . . . . . . . . . . . . . 1274.1 Planning the Upgrade Process . . . . . . . . . . . . . . . . . . . . . . . . . . . . . . . . . . . . . . . . . . . . . . . . . . . . . . . . . . . . . . . . . . . . . . . . . . . . . 1304.2 Preparing to Upgrade . . . . . . . . . . . . . . . . . . . . . . . . . . . . . . . . . . . . . . . . . . . . . . . . . . . . . . . . . . . . . . . . . . . . . . . . . . . . . . . . . . . . 1324.3 Upgrading MapR Packages . . . . . . . . . . . . . . . . . . . . . . . . . . . . . . . . . . . . . . . . . . . . . . . . . . . . . . . . . . . . . . . . . . . . . . . . . . . . . . . 139
4.3.1 Offline Upgrade . . . . . . . . . . . . . . . . . . . . . . . . . . . . . . . . . . . . . . . . . . . . . . . . . . . . . . . . . . . . . . . . . . . . . . . . . . . . . . . . . . . . 1404.3.2 Rolling Upgrade . . . . . . . . . . . . . . . . . . . . . . . . . . . . . . . . . . . . . . . . . . . . . . . . . . . . . . . . . . . . . . . . . . . . . . . . . . . . . . . . . . . . 1474.3.3 Scripted Rolling Upgrade . . . . . . . . . . . . . . . . . . . . . . . . . . . . . . . . . . . . . . . . . . . . . . . . . . . . . . . . . . . . . . . . . . . . . . . . . . . . 154
4.4 Configuring the New Version . . . . . . . . . . . . . . . . . . . . . . . . . . . . . . . . . . . . . . . . . . . . . . . . . . . . . . . . . . . . . . . . . . . . . . . . . . . . . . 1574.5 Troubleshooting Upgrade Issues . . . . . . . . . . . . . . . . . . . . . . . . . . . . . . . . . . . . . . . . . . . . . . . . . . . . . . . . . . . . . . . . . . . . . . . . . . . 161
4.5.1 NFS incompatible when upgrading to MapR v1.2.8 or later . . . . . . . . . . . . . . . . . . . . . . . . . . . . . . . . . . . . . . . . . . . . . . . . . . 1615. Setting up a MapR Cluster on Amazon Elastic MapReduce . . . . . . . . . . . . . . . . . . . . . . . . . . . . . . . . . . . . . . . . . . . . . . . . . . . . . . . . . . . 1616. Launching a MapR Cluster on the Google Compute Engine . . . . . . . . . . . . . . . . . . . . . . . . . . . . . . . . . . . . . . . . . . . . . . . . . . . . . . . . . . . 167

Start HereData Protection: Rolling Back with SnapshotsKeeping it Safe: Security FeaturesSimpler Data Flows with Direct Access NFSManagement ServicesThe MapR Control System (MCS)MapReduce PerformanceFilesystem Storage for Tables: Keep your Data off the Performance FloorThe MapR-FS Layer: Performance on DiskExpand Your Capabilities with Third-Party SolutionsGet Started
MapR is a complete enterprise-grade distribution for Apache Hadoop. The MapR distribution for Apache Hadoop has been engineered to improveHadoop’s reliability, performance, and ease of use. The MapR distribution is fully compatible with the Apache Hadoop, HDFS, and MapReduceAPIs, providing a full Hadoop stack that includes the MapR File System (MapR-FS), MapReduce, a Hadoop ecosystem with over a dozenprojects, and the MapR Control System user interface.
The following image displays a high-level view of the MapR Distribution for Apache Hadoop:
The MapR distribution provides several unique features that address common concerns with Apache Hadoop:
Issue Addressed by MapR Feature Apache Hadoop
Data Protection MapR Snapshots provide complete recoverycapabilities. MapR Snapshots are rapid point-in-time consistent snapshots for bothfiles and tables. MapR Snapshots makeefficient use of storage and CPU resources,storing only changes from the point thesnapshot is taken. You can configureschedules for MapR Snapshots with easy touse but powerful scheduling tools.
Snapshot-like capabilities are not consistent,require application changes to makeconsistent, and may lead to data loss incertain situations.
Security With Wire-level Security, data transmissionsto, from, and within the cluster are encrypted,and strong authorization mechanisms enableyou to tailor the actions a given user is ableto perform. Authentication is robust withoutburdening end-users. Permissions for usersare checked on each file access.
Permissions for users are checked on fileopen only.
Disaster Recovery MapR provides business continuity anddisaster recovery services out of the box withmirroring that’s simple to configure andmakes efficient use of your cluster’s storage,CPU, and bandwidth resources.
No standard mirroring solution. Scripts basedon distcp quickly become hard to administerand manage. No enterprise-gradeconsistency.
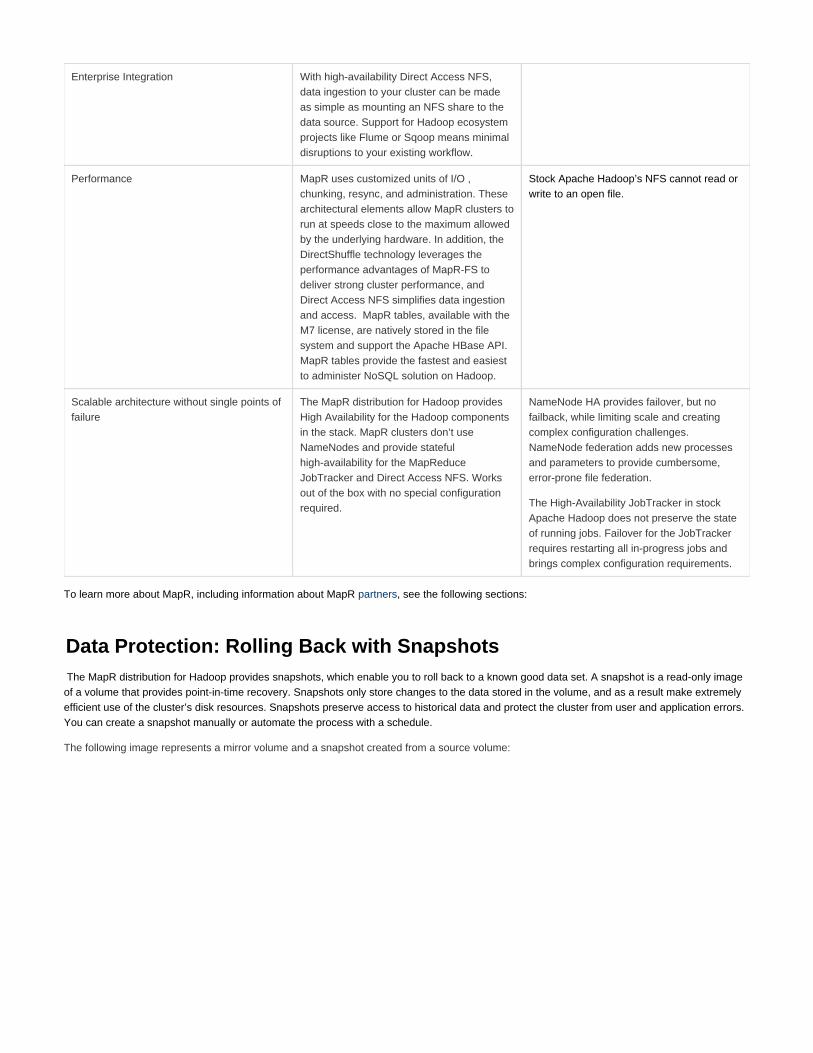
Enterprise Integration With high-availability Direct Access NFS,data ingestion to your cluster can be madeas simple as mounting an NFS share to thedata source. Support for Hadoop ecosystemprojects like Flume or Sqoop means minimaldisruptions to your existing workflow.
Performance MapR uses customized units of I/O ,chunking, resync, and administration. Thesearchitectural elements allow MapR clusters torun at speeds close to the maximum allowedby the underlying hardware. In addition, theDirectShuffle technology leverages theperformance advantages of MapR-FS todeliver strong cluster performance, andDirect Access NFS simplifies data ingestionand access. MapR tables, available with theM7 license, are natively stored in the filesystem and support the Apache HBase API.MapR tables provide the fastest and easiestto administer NoSQL solution on Hadoop.
Stock Apache Hadoop’s NFS cannot read orwrite to an open file.
Scalable architecture without single points offailure
The MapR distribution for Hadoop providesHigh Availability for the Hadoop componentsin the stack. MapR clusters don’t useNameNodes and provide statefulhigh-availability for the MapReduceJobTracker and Direct Access NFS. Worksout of the box with no special configurationrequired.
NameNode HA provides failover, but nofailback, while limiting scale and creatingcomplex configuration challenges.NameNode federation adds new processesand parameters to provide cumbersome,error-prone file federation.
The High-Availability JobTracker in stockApache Hadoop does not preserve the stateof running jobs. Failover for the JobTrackerrequires restarting all in-progress jobs andbrings complex configuration requirements.
To learn more about MapR, including information about MapR , see the following sections:partners
Data Protection: Rolling Back with Snapshots The MapR distribution for Hadoop provides , which enable you to roll back to a known good data set. A snapshot is a read-only imagesnapshotsof a volume that provides point-in-time recovery. Snapshots only store changes to the data stored in the volume, and as a result make extremelyefficient use of the cluster’s disk resources. Snapshots preserve access to historical data and protect the cluster from user and application errors.You can create a snapshot manually or automate the process with a schedule.
The following image represents a mirror volume and a snapshot created from a source volume:

Read the for details.Snapshots documentation
Keeping it Safe: Security FeaturesThe 3.1 release of the MapR distribution for Hadoop provides authentication, authorization, and encryption services to protect the data in yourcluster. MapR leverages Linux pluggable authentication modules (PAM) to support the main authentication protocols out of the box. A MapRcluster can authenticate users through Kerberos, LDAP/AD, NIS, or any other service that has a PAM module.
For authorization, MapR provides Access Control Lists (ACLs) for job queues, volumes, and the cluster as a whole. Because MapR supportsPOSIX permissions on files and directories, MapR-FS performs permission checks on each file access. Other Hadoop distributions only checkpermissions on file open.
MapR clusters also incorporate wire-level security (WLS) to encrypt data transmission for traffic within the cluster, as well as traffic between thecluster and client machines.
MapR leverages the Hadoop Fair Scheduler to ensure fair allocation of resources to different users, and includes support for SELinux.
Read the for details.Security documentation
Authorization with Volumes: Intelligent Policy Management
The MapR File System uses volumes as a unique management entity. A volume is a logical unit that you create to apply policies to a set of files,directories, tables, and sub-volumes. You can create volumes for each user, department, or project. Mirror volumes and volume snapshots,discussed later in this document, provide data recovery and data protection functionality.
Volumes can enforce disk usage limits, set replication levels, establish ownership and control permissible actions, and measure the costgenerated by different projects or departments. When you set policies on a volume, all files contained within the volume inherit the same policiesset on the volume. Other Hadoop distributions require administrators to manage policies at the file level.
You can manage volume permissions through Access Control Lists (ACLs) in the MapR Control System or from the command line. You can alsoset read, write, and execute permissions on a file or directory for users and groups with standard UNIX commands, when that volume has beenmounted through NFS, or using standard hadoop fs commands.
Read the for details.Managing Data with Volumes documentation
Disaster Recovery With Mirrors
The MapR distribution for Hadoop provides built-in mirroring to set recovery time objectives and automatically mirror data for backup. You cancreate local or remote mirror volumes to mirror data between clusters, data centers, or between on-premise and public cloud infrastructures.

Mirror volumes are read-only copies of a source volume. You can control the schedule for mirror refreshes from the MapR Control System or withthe command-line tools.
The following image shows two clusters with mutual remote mirroring and a local mirror:
Read the for details.Mirroring documentation
For more information:
Explore scenariosData Protection
Simpler Data Flows with Direct Access NFSThe MapR direct access file system enables real-time read/write data ows using the Network File System (NFS) protocol. Standard applicationsand tools can directly access the MapR-FS storage layer using NFS. Legacy systems can access data and traditional file I/O operations work asexpected in a conventional UNIX file system.
A remote client can easily mount a MapR cluster over NFS to move data to and from the cluster. Application servers can write log les and otherdata directly to the MapR cluster’s storage layer instead of caching the data on an external direct or network-attached storage.
Read the fNFS documentation or details.
Management ServicesMapR provides high availability management and data processing services for automatic continuity throughout the cluster. You can use the MapRControl System, command-line interface, or REST API to start, stop, and monitor services at the node or cluster level.
MapReduce services such as the JobTracker, management services such as the ZooKeeper, and data access services such as NFS providecontinuous service during any system failure.
Read the for details.Services documentation
The MapR Control System (MCS)The MapR Control System (MCS) provides a graphical control panel for cluster administration with all the functionality of the command-line orREST APIs. The MCS provides and helps you troubleshoot issues, such as which jobs required the most memory in ajob monitoring metricsgiven week or which events caused job and task failures.

The MCS Dashboard provides a summary of information about the cluster including a cluster heat map that displays the health of each node; analarms summary; cluster utilization that shows the CPU, memory, and disk space usage; services running across the cluster; the number ofavailable, unavailable, and under replicated volumes; MapReduce jobs. Links in each pane provide shortcuts to more detailed information.
The following image shows the MCS Dashboard:
The MCS provides various views. You can navigate through views to monitor and configure your cluster. Select any of the following links to seewhat each view in the MCS provides:
ClusterMapR-FSNFS HAAlarmsSystem Settings
HBaseJobTrackerNagiosTerminal
For more information:
Take a look at the HeatmapRead about and Analyzing Job Metrics Node Metrics
MapReduce PerformanceMapR provides performance improvements in the shuffle phase of MapReduce and adds high availability for all Hadoop services.
With MapR, you can configure Hadoop services to run on multiple nodes for failover. If one service node fails, another continues to perform thetasks related to that service without delaying the MapReduce job.
The shuffle phase of a MapReduce job combines the map output so that all the records from a given key/value pair’s key go to one reduce task.This phase involves a great deal of copying and coordination between nodes in the cluster. Shuffling in MapR-FS is much faster than otherHadoop distributions because MapR uses highly optimized, efficient remote procedure call connections to transport data while other Hadoopdistributions use HTTP connections.
Other Hadoop distributions keep map output on local disk, which creates competition for disk space between local and distributed storage. InMapR, any spilled data is stored in the distributed file system making it directly accessible.
View this video for an introduction to MapReduce...
For more information:
Read about Tuning a Cluster for MapReduce Performance

Read about Provisioning for Performance
Filesystem Storage for Tables: Keep your Data off the PerformanceFloorA MapR cluster integrates NoSQL technology that stores tables natively in the filesystem layer. MapR tables support the Hbase API. The MapRdistribution for Hadoop integrates files and tables to provide significant performance and administration benefits over other distributions. MapRclusters deliver a 2-10x throughput advantage and a 2-50x read latency decrease across different workloads compared to other distributions whilesignificantly reducing latency variability. Tables stored in the MapR-FS layer benefit from high availability, automatic datathe MapR distribution'sprotection, and disaster recovery with snapshots and mirrors.
There’s no limit to the number of tables or files you can have in a MapR cluster. Tables can be managed by individual users, freeing clusteradministrators from database administration overhead. With MapR Tables, cluster administrators do not have to manage RegionServers ordaemons, and region splits are handled automatically. Node upgrades and other administrative tasks do not cause downtime for table storage.
HBase applications and MapReduce jobs can co-exist on the same nodes without disrupting cluster performance. MapR tables supportin-memory column families to speed inserts and updates. A MapR cluster supports mixed environments that use MapR tables and Apache HBaseas well as environments that use MapR tables exclusively.
Read the for detailsM7 - Native Storage for MapR Tables documentation .
The MapR-FS Layer: Performance on Disk The MapR Filesystem, or MapR-FS, is a random read-write distributed file system that allows applications to concurrently read and write directlyto disk. The Hadoop Distributed File System (HDFS), by contrast, has append-only writes and can only read from closed files.
Because HDFS is layered over the existing Linux file system, a greater number of input/output (I/O) operations decrease the cluster’sperformance.
The following image compares an Apache Hadoop stack to the MapR stack:
The storage system architecture used by MapR-FS is written in C/C++ and prevents locking contention, eliminating performance impact from Javagarbage collection.
Expand Your Capabilities with Third-Party SolutionsMapR has with Datameer, which provides a self-service Business Intelligence platform that runs best on the MapR Distribution forpartnered
Apache Hadoop. Your download of MapR includes a 30-day trial version of Datameer Analytics Solution (DAS), which provides spreadsheet-styleanalytics, ETL and data visualization capabilities.
Other MapR partners include , , and .HParser Karmasphere Pentaho
Get StartedNow that you know a bit about how the features of MapR Distribution for Apache Hadoop work, take a quick tour to see for yourself how they canwork for you:
MapR Sandbox for Hadoop - Try out a single-node cluster that's ready to roll, right out of the box!Advanced Installation Topics - Learn how to set up a production cluster, large or smallDevelopment Guide - Read more about what you can do with a MapR clusterAdministrator Guide - Learn how to configure and tune a MapR cluster for performance
MapR Sandbox for Hadoop
Overview
The MapR Sandbox for Hadoop is a fully-functional single-node cluster that gently introduces business analysts, current and aspiring Hadoopdevelopers, and administrators (database, system, and Hadoop) to the big data promises of Hadoop and its ecosystem. Use the sandbox toexperiment with Hadoop technologies using the MapR Control System (MCS) and Hue.
MapR’s Sandbox for Hadoop includes tutorials to help you understand the power and capabilities of Hadoop through the MCS and Huetools. Hadoop administrators can launch the MCS and use the tutorials to configure, monitor, and manage a cluster. Hadoop developers oranalysts, looking to gain understanding of Hadoop and MapR, can launch the Hue interface and use the tutorials to perform tasks using the
xplore solutions to your use cases, and run jobs on your data in the MapR Sandbox for Hadoop.applications included in Hue. E
To use the MapR Sandbox for Hadoop, perform the following tasks:
Verify that the host system meets the prerequisites.Install the MapR Sandbox for Hadoop.Launch Hue or the MapR Control System.
Prerequisites
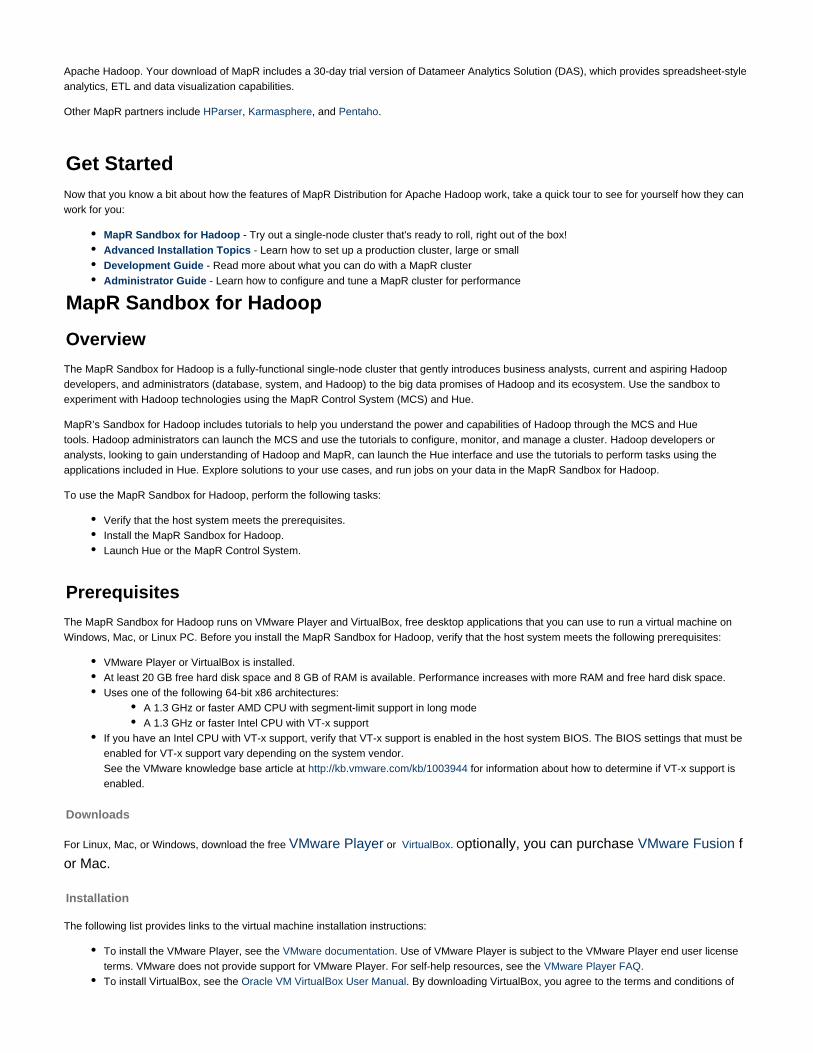
The MapR Sandbox for Hadoop runs on VMware Player and VirtualBox, free desktop applications that you can use to run a virtual machine onWindows, Mac, or Linux PC. Before you install the MapR Sandbox for Hadoop, verify that the host system meets the following prerequisites:
VMware Player or VirtualBox is installed.At least 20 GB free hard disk space and 8 GB of RAM is available. Performance increases with more RAM and free hard disk space.Uses one of the following 64-bit x86 architectures:
A 1.3 GHz or faster AMD CPU with segment-limit support in long modeA 1.3 GHz or faster Intel CPU with VT-x support
If you have an Intel CPU with VT-x support, verify that VT-x support is enabled in the host system BIOS. The BIOS settings that must beenabled for VT-x support vary depending on the system vendor. See the VMware knowledge base article at for information about how to determine if VT-x support ishttp://kb.vmware.com/kb/1003944enabled.
Downloads
For Linux, Mac, or Windows, download the free or . OVMware Player VirtualBox ptionally, you can purchase VMware Fusion for Mac.
Installation
The following list provides links to the virtual machine installation instructions:
To install the VMware Player, see the . Use of VMware Player is subject to the VMware Player end user licenseVMware documentationterms. VMware does not provide support for VMware Player. For self-help resources, see the .VMware Player FAQTo install VirtualBox, see the . Oracle VM VirtualBox User Manual By downloading VirtualBox, you agree to the terms and conditions of

1.
2.
3.
4.
5.
1.
2. 3.
4.
the respective license.
Install the MapR Sandbox for Hadoop
Download the MapR Sandbox for Hadoop file. Use your virtual machine player to open and run the MapR Sandbox for Hadoop.
For , complete the following steps to install the MapR Sandbox for Hadoop: VMware Player or VMware Fusion
Download the MapR Sandbox for Hadoop file to a directory on your machine:
http://package.mapr.com/releases/v3.1.0/vmdemo/vmware/MapR-Sandbox-For-Hadoop-3.1.0_VM.ova Open the virtual machine player, and select the option. Open a Virtual Machine
Tip for VMware Fusion
If you are running VMware Fusion, make sure to select Open or Open and Run instead of creating a new virtual machine.
Navigate to the directory where you downloaded the MapR Sandbox for Hadoop file, and select MapR-Sandbox-For-Hadoop-3.1.0_
VM.ova
Click . It may take a few minutes for the MapR services to start. After the MapR services start and installationPlay virtual machinecompletes, the following details appear:
Follow the instructions in the window to access the MapR Sandbox for Hadoop. For example, navigate to the URL provided.
For VirtualBox, complete the following steps to install the MapR Sandbox for Hadoop:
Download the MapR Sandbox for Hadoop file to a directory on your machine:
http://package.mapr.com/releases/v3.1.0/vmdemo/virtualbox/MapR-Sandbox-For-Hadoop-3.1.0_VB.ova Open the VirtualBox application.Select .File > Import Appliance
Verify that your VMWare Player's Networking settings are set to Bridge. You can access these settings under Virtual Machine >Virtual Machine Settings. Select Network Adapter in the settings dialog, then Bridged at the Network Connection pane.
If you are on Windows and do not see the file, verify that the option is selected in tAll Files(*.*) he drop-down field next to theFile name.
If the virtual machine does not install successfully, power off and restart the virtual machine or return to step 1 and start theinstallation process over.

4.
5.
6.
7.
8. 9.
10.
11. 12.
13.
Navigate to , and click . The Appliance Settings window appears.MapR-Sandbox-For-Hadoop-3.1.0_VB.ova Next
Click . The Import Appliance imports the image.Import
When the import completes, navigate back to the VirtualBox and select . The VirtualBox Settings windowVirtualBox > Preferencesappears.Select and click on the tab. If no adapters appear, click the green button to add an adapter. TheNetwork Host-only Networks +vboxnet0 adapter appears.Click to continue.OKSelect , and click on . The VM Settings window appears.VM SettingsSelect . Verify that Adapter 1 is enabled and that it is attached to the Host-only Adapter. The Host-only adapter name must beNetworkvmboxnet0.Click to continue.OkClick . It may take a few minutes for the MapR services to start. After the MapR services start and installation completes, theStartfollowing details appear:
Follow the instructions in the window to access the MapR Sandbox for Hadoop. For example, navigate to the URL provided.

1.
2.
Launch Hue or the MCS When you navigate to the URL provided, you see the following MapR Sandbox for Hadoop launch page:
Click a launch button to launch Hue or the MCS. A new page appears with a tutorial pane on the left and the application window on the right. You can use the tutorials to perform some basic tasks in the application window.
Login to Hue or the MCS with the username and the password . root mapr
If you launch the MCS, the system populates the username and password fields for you. Click to proceed.OK
If the virtual machine does not install successfully, power off and restart the virtual machine or return to step 1 and start the installationprocess over.
Username and Password
2.
You have completed the steps required to access the MapR Sandbox for Hadoop. Have fun!
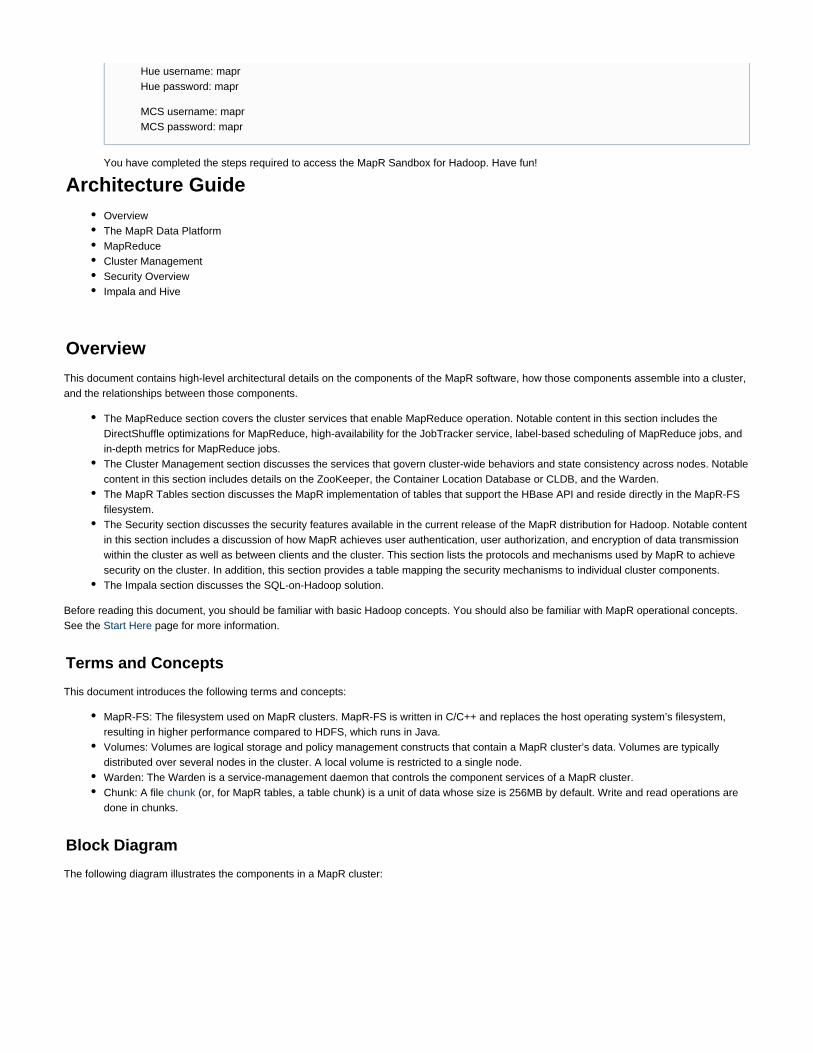
Architecture GuideOverviewThe MapR Data PlatformMapReduce Cluster ManagementSecurity OverviewImpala and Hive
Overview
This document contains high-level architectural details on the components of the MapR software, how those components assemble into a cluster,and the relationships between those components.
The MapReduce section covers the cluster services that enable MapReduce operation. Notable content in this section includes theDirectShuffle optimizations for MapReduce, high-availability for the JobTracker service, label-based scheduling of MapReduce jobs, andin-depth metrics for MapReduce jobs.The Cluster Management section discusses the services that govern cluster-wide behaviors and state consistency across nodes. Notablecontent in this section includes details on the ZooKeeper, the Container Location Database or CLDB, and the Warden.The MapR Tables section discusses the MapR implementation of tables that support the HBase API and reside directly in the MapR-FSfilesystem.The Security section discusses the security features available in the current release of the MapR distribution for Hadoop. Notable contentin this section includes a discussion of how MapR achieves user authentication, user authorization, and encryption of data transmissionwithin the cluster as well as between clients and the cluster. This section lists the protocols and mechanisms used by MapR to achievesecurity on the cluster. In addition, this section provides a table mapping the security mechanisms to individual cluster components.The Impala section discusses the SQL-on-Hadoop solution.
Before reading this document, you should be familiar with basic Hadoop concepts. You should also be familiar with MapR operational concepts.See the page for more information.Start Here
Terms and Concepts
This document introduces the following terms and concepts:
MapR-FS: The filesystem used on MapR clusters. MapR-FS is written in C/C++ and replaces the host operating system’s filesystem,resulting in higher performance compared to HDFS, which runs in Java.Volumes: Volumes are logical storage and policy management constructs that contain a MapR cluster’s data. Volumes are typicallydistributed over several nodes in the cluster. A local volume is restricted to a single node.Warden: The Warden is a service-management daemon that controls the component services of a MapR cluster.Chunk: A file (or, for MapR tables, a table chunk) is a unit of data whose size is 256MB by default. Write and read operations arechunkdone in chunks.
Block Diagram
The following diagram illustrates the components in a MapR cluster:
Hue username: maprHue password: mapr
MCS username: maprMCS password: mapr

The MapR Data Platform
The MapR Data Platform provides a unified data solution for structured data (tables) and unstructured data (files).
MapR-FS
The MapR File System (MapR-FS) is a fully read-write distributed file system that eliminates the Namenode associated with cluster failure in otherHadoop distributions. MapR re-engineered the Hadoop Distributed File System (HDFS) architecture to provide flexibility, increase performance,and enable special features for data management and high availability.
The following table provides a list of some MapR-FS features and their descriptions:
Feature Description
Storage pools A group of disks that MapR-FS writes data to.
Containers An abstract entity that stores files and directories in MapR-FS. Acontainer always belongs to exactly one volume and can holdnamespace information, file chunks, or table chunks for the volumethe container belongs to.
CLDB A service that tracks the location of every container in MapR-FS.
Volumes A management entity that stores and organizes containers inMapR-FS. Used to distribute metadata, set permissions on data inthe cluster, and for data backup. A volume consists of a single namecontainer and a number of data containers.
Snapshots Read-only image of a volume at a specific point in time used topreserve access to deleted data.
Direct Access NFS Enables applications to read data and write data directly into thecluster.
Storage PoolsMapR-FS storage architecture consists of multiple storage pools that reside on each node in a cluster. A storage pool is made up of several disksgrouped together by MapR-FS. The default number of disks in a storage pool is three. The containers that hold MapR-FS data are stored in andreplicated among the storage pools in the cluster.
The following image represents disks grouped together to create storage pools that reside on a node:

Write operations within a storage pool are striped across disks to improve write performance. Stripe width and depth are configurable with the disksetup script. Since MapR-FS performs data replication, RAID configuration is unnecessary.
Containers and the CLDB
MapR-FS stores data in abstract entities called containers that reside on storage pools. Each storage pool can store many containers.
Blocks enable full read-write access to MapR-FS and efficient snapshots. An application can write, append, or update more than once inMapR-FS, and can also read a file as it is being written. In other Hadoop distributions, an application can only write once, and the applicationcannot read a file as it is written.
An average container is 10-30 GB. The default container size is 32GB. Large containers allow for greater scaling and allocation of space inparallel without bottlenecks.
Described from the physical layer:
Files are divided into chunksThe chunks are assigned to containersThe containers are written to storage pools, which are made up of disks on the nodes in the cluster
The following table compares the MapR-FS storage architecture to the HDFS storage architecture:
Storage Architecture HDFS MapR-FS
Management layers Files, directories and blocks, managed byNamenode.
Volume, which holds files and directories,made up of containers, which manage diskblocks and replication.
Size of file shard 64MB block 256MB chunk
Unit of replication 64MB block 32GB container
Unit of file allocation 64MB block 8KB block
MapR-FS automatically replicates containers across different nodes on the cluster to preserve data. Container replication creates multiplesynchronized copies of the data across the cluster for failover. Container replication also helps localize operations and parallelizes readoperations. When a disk or node failure brings a container’s replication levels below a specified replication level, MapR-FS automaticallyre-replicates the container elsewhere in the cluster until the desired replication level is achieved. A container only occupies disk space when anapplication or program writes to it.
Volumes
Volumes are a management entity that logically organizes a cluster’s data. Since a container always belongs to exactly one volume, thatcontainer’s replicas all belong to the same volume as well. Volumes do not have a fixed size and they do not occupy disk space until MapR-FSwrites data to a container within the volume. A large volume may contain anywhere from 50-100 million containers.

The CLI and REST API provide functionality for volume management. Typical use cases include volumes for specific users, projects,development, and production environments. For example, if an administrator needs to organize data for a special project, the administrator cancreate a specific volume for the project. MapR-FS organizes all containers that store the project data within the project volume.
A volume’s topology defines which racks or nodes a volume includes. The topology describes the locations of nodes and racks in the cluster.
The following image represents a volume that spans a cluster:
Volume topology is based on node topology. You define volume topology after you define node topology. When you set up node topology, youcan group nodes by rack or switch. MapR-FS uses node topology to determine where to replicate data for continuous access to the data in theevent of a rack or node failure.
Distributed Metadata
MapR-FS creates a Name container for each volume that stores the volume’s namespace and file chunk locations, along with inodes for theobjects in the filesystem. The file system stores the metadata for files and directories in the Name container, which is updated with each writeoperation.
When a volume has more than 50 million inodes, the system raises an alert that the volume is reaching the maximum recommended size.
Local Volumes
Local volumes are confined to one node and are not replicated. Local volumes are part of the cluster’s global namespace and are accessible onthe path /var/mapr/local/<host>.
Snapshots
A snapshot is a read-only image of a volume at a specific point in time. Snapshots preserve access to deleted data and protect the cluster fromuser and application errors. Snapshots enable users to roll back to a known good data set. Snapshots can be created on-demand or at scheduledtimes.

New write operations on a volume with a snapshot are redirected to preserve the original data. Snapshots only store the incremental changes in avolume’s data from the time the snapshot was created.
The storage used by a volume's snapshots does not count against the volume's quota.
Mirror Volumes
A mirror volume is a read-only physical copy of a source volume. Local (on the same cluster) or remote (on a different cluster) mirror volumes canbe created from the MCS or from the command line to mirror data between clusters, data centers, or between on premise and public cloudinfrastructures.
When a mirror volume is created, MapR-FS creates a temporary snapshot of the source volume. The mirroring process reads content from thesnapshot into the mirror volume. The source volume remains available for read and write operations during the mirroring process.
The initial mirroring operation copies the entire source volume. Subsequent mirroring operations only update the differences between the sourcevolume and the mirror volume. The mirroring operation never consumes all of the available network bandwidth, and throttles back when otherprocesses need more network bandwidth.
Mirrors are atomically updated at the mirror destination. The mirror does not change until all bits are transferred, at which point all the new files,directories, and blocks are atomically moved into their new positions in the mirror volume.
MapR-FS replicates source and mirror volumes independently of each other.

Direct Access NFS
You can mount a MapR cluster directly through a network file system (NFS) from a Linux or Mac client. When you mount a MapR cluster,applications can read and write data directly into the cluster with standard tools, applications, and scripts. MapR enables direct file modificationand multiple concurrent reads and writes with POSIX semantics. For example, you can run a MapReduce job that outputs to a CSV file, and thenimport the CSV file directly into SQL through NFS.
MapR exports each cluster as the directory /mapr/<cluster name>. If you create a mount point with the local path /mapr, Hadoop FS paths andNFS paths to the cluster will be the same. This makes it easy to work on the same files through NFS and Hadoop. In a multi-cluster setting, theclusters share a single namespace. You can see them all by mounting the top-level /mapr directory.
MapR Tables
Starting in the 3.0 release of the MapR distribution for Hadoop, MapR-FS enables you to create and manipulate tables in many of the same waysthat you create and manipulate files in a standard UNIX file system.
A unified architecture for files and tables provides distributed data replication for structured and unstructured data. Tables enable you to manage structured data, as opposed to the unstructured data management provided by files. The structure for structured data management is defined by a data model, a set of rules that defines the relationships in the structure.
By design, the data model for tables in MapR focuses on columns, similar to the open-source standard Apache HBase system. Like ApacheHBase, MapR tables store data structured as a nested sequence of key/value pairs. For example, in the key/value pair table familyname:column
, the value column family becomes the key for the key/value pair column family:column. Apache HBase is compatible with MapR tables. With
a properly licensed MapR installation, you can use MapR tables exclusively or work in a mixed environment with Apache HBase tables.
MapR tables are implemented directly within MapR-FS, yielding a familiar, open-standards API that provides a high-performance datastore fortables. MapR-FS is written in C and optimized for performance. As a result, MapR-FS runs significantly faster than JVM-based Apache HBase.
Benefits of Integrated Tables in MapR-FS
The MapR cluster architecture provides the following benefits for table storage, providing an enterprise-grade HBase environment.
MapR clusters with HA features recover instantly from node failures.MapR provides a unified namespace for tables and files, allowing users to group tables in directories by user, project, or any other usefulgrouping.Tables are stored in volumes on the cluster alongside unstructured files. Storage policy settings for volumes apply to tables as well asfiles.Volume mirrors and snapshots provide flexible, reliable read-only access.Table storage and MapReduce jobs can co-exist on the same nodes without degrading cluster performance.The use of MapR tables imposes no administrative overhead beyond administration of the MapR cluster.Node upgrades and other administrative tasks do not cause downtime for table storage.
HBase Compatibility
MapR's implementation is API-compatible with the core HBase API. Programmers who are used to writing code for the HBase API will haveimmediate, intuitive access to MapR tables. MapR delivers faithfully on the original vision for Google's BigTable paper, using the open-standardHBase API.
MapR's implementation of the HBase API provides enterprise-grade high availability (HA), data protection, and disaster recovery features fortables on a distributed Hadoop cluster. MapR tables can be used as the underlying key-value store for Hive, or any other application requiring ahigh-performance, high-availability key-value datastore. Because MapR tables are API-compatible with HBase, many legacy HBase applicationscan continue to run without modification.
MapR has extended the HBase shell to work with MapR tables in addition to Apache HBase tables. Similar to development for Apache HBase,the simplest way to create tables and column families in MapR-FS, and put and get data from them, is to use the HBase shell. MapR tables canbe created from the MapR Control System (MCS) user interface or from the Linux command line, without the need to coordinate with a databaseadministrator. You can treat a MapR table just as you would a file, specifying a path to a location in a directory, and the table appears in the samenamespace as your regular files. You can also create and manage column families for your table from the MCS or directly from the command line.
During data migration or other specific scenarios where you need to refer to a MapR table of the same name as an Apache HBase table in thesame cluster, you can map the table namespace to enable that operation.
MapR does not support hooks to manipulate the internal behavior of the datastore, which are common in Apache HBase applications. The

Apache HBase codebase and community have internalized numerous hacks and workarounds to circumvent the intrinsic limitations of a datastoreimplemented on a Java Virtual Machine. Some HBase workflows are designed specifically to accommodate limitations in the Apache HBaseimplementation. HBase code written around those limitations will generally need to be modified in order to work with MapR tables.
To summarize:
The MapR table API is compatible with the core HBase API.MapR tables implement the HBase feature set.MapR tables can be used as the datastore for Hive applications.Unlike Apache HBase tables, MapR tables do not support manipulation of internal storage operations.Apache HBase applications crafted specifically to accommodate architectural limitations in HBase will require modification in order to runon MapR tables.
Effects of Decoupling API and Architecture
The following features of MapR tables result from decoupling the HBase API from the Apache HBase architecture:
MapR's High Availability (HA) cluster architecture eliminates the RegionServer and HBaseMaster components of traditional ApacheHBase architecture, which are common single points of failure and scalability bottlenecks. In MapR-FS, MapR tables are HA at all levels,similar to other services on a MapR cluster.MapR-FS allows an unlimited number of tables, with cells up to 16MB.MapR tables can have up to 64 column families, with no limit on number of columns.MapR-FS automates compaction operations and splitting for MapR tables.Crash recovery is significantly faster than Apache HBase.
MapReduce
MapR has made a number of improvements to the MapReduce framework, designed to improve performance and manageability of the cluster,and performance and reliability of MapReduce jobs. The following sections provide more detail.
DirectShuffle
MapR has made performance optimizations to the shuffle process, in which output from Mappers are sent to reducers. First, instead of writingintermediate data to local disks controlled by the operating system, MapR writes to a MapR-FS volume limited by its topology to the local node.This improves performance and reduces demand on local disk space while making the output available cluster-wide.
The direct shuffle leverages the underlying storage layer and takes advantage of its unique capabilities:
High sequential and random I/O performance, including the ability to create millions of files at extremely high rates (using sequential I/O)The ability to leverage multiple NICs via RPC-level bonding. By comparison, the shuffle in other distributions can only leverage a singleNIC (in theory, one could use port trunking in any distribution, but the performance gains would be minimal compared to the MapRdistribution’s RPC-level load balancing)The ability to compress data at the block level
Protection from Runaway Jobs
MapR includes several mechanisms to protect against runaway jobs. Many Hadoop users experience situations in which the tasks of a poorlydesigned job consume too much memory and, as a result, the nodes start swapping and quickly become unavailable. Since tasks have an upperbound on memory usage, tasks that exceed this limit are automatically killed with an out-of-memory exception. Quotas on disk usage can be seton a per-user, as well as a per-volume, basis.
JobTracker HA
In a MapR cluster, the JobTracker can be configured for High Availability (HA). If the node running the JobTracker fails, the ZooKeeper instructsthe Warden on another JobTracker node to start an instance of the JobTracker. The new JobTracker takes over where the first JobTracker left off.The TaskTrackers maintain information about the state of each task, so that when they connect to the new JobTracker they are able to continuewithout interruption. For a deeper discussion of JobTracker failover, see the Jobtracker Failover section of this document.
Label-based Scheduling

MapR lets you use labels to create subsets of nodes within a cluster so you can allocate jobs to those nodes depending on a given use case. Thelabels are in a simple node-labels mapping file that correlates node identifiers to lists of labels. Each identifier can be the name of a node, or aregular expression or glob that matches multiple nodes.
The JobTracker caches the mapping file, checking the file’s modification time every two minutes (by default) for updates. If the file has beenmodified, the JobTracker updates the labels for all active TaskTrackers. The change takes effect immediately, meaning that it affects running jobs;tasks that are currently in process are allowed to finish, but new tasks will not be started on nodes that no longer match the label under which thejob has been run.
Centralized Logging
Centralized logging provides a job-centric view of all the log files generated by TaskTracker nodes throughout the cluster. This enables users togain a complete picture of job execution by having all the logs available in a single directory, without having to navigate from node to node.
MapReduce programs generate three types of output that are intercepted by the task runner:
standard output stream - captured in the filestdout
standard error stream - captured in the filestderr
Log4j logs - captured in the filesyslog
Hadoop maintains another file named log.index in every task attempt’s log directory. This file is required to deal with the cases where the same
JVM is reused for multiple tasks. The number of times a JVM is reused is controlled by the mapred.job.reuse.jvm.num.tasks configuration
variable. When the JVM is reused, the physical log files , , and stdout stderr syslog only appear in the log directory of the first task attempt
run by that JVM. These files are shared by all tasks. The task tracker UI uses the log.index file to separate information relating to different
tasks from each other. The log.index file stores the following information in human-readable format:
The log directory where the log files are stored. This is the log directory for the first task attempt run by a given JVM.The beginning offset and length of output within a given log file where the information for each subsequent task attempt is located withinthat log file.
Since the logs are copied to a MapR-FS local volume, the logs are available cluster-wide, and the central directories for task attempts contain the
log.index,stdout, stderr, and syslog files for all tasks, regardless of JVM reuse. Logs formerly located in the Hadoop userlogs directory on
an OS mount point now appear on a MapR-FS local volume:
Standard log location: /opt/mapr/hadoop/hadoop- /logs/userlogs<version>
Centralized logging: /var/mapr/local/ /logs/mapred/userlogs<host>
Central Logging maintains log.index only for compatibility reasons.
Because the logs on the local volume are available to MapR-FS cluster-wide, the command can create symbolic links maprcli job linklogs
for all the logs in a single directory. You can then use tools such as grep and awk to analyze them from an NFS mount point.
Job Metrics
MapR collects and stores job-related metrics in a MySQL database as well as in a local MapR-FS volume called metrics. There are two
different types of metrics:
Node metrics and events (data about services on each node)MapReduce metrics and events (job, task, and task attempt data)
Node metrics are inserted into the database at the point where they are produced (by the hoststats service and the warden). MapReduce jobmetrics are propagated to local hoststats from the JobTracker via remote procedure calls (RPC) along with task and task attempt data. The taskattempt data is partitioned by day based on job submission time, and cleaned up if the corresponding job data is not viewed within 48 hours.
Job, task attempt, and task metrics are gathered by the Hadoop Metrics Framework every minute. TaskAttempt counters are updated on theJobTracker only every minute from the TaskTrackers. Hoststats collects metrics from each node and gets metrics from MapR-FS every tenseconds via shared memory. The JobTracker and TaskTrackers also use the Hadoop Metrics Framework to write metrics and events every tenseconds into a job history file in MapR-FS. There is a new history file that includes transactional and event data from the MapReduce job. Thesefiles created by hoststats are used to generate the charts that are viewable in the MapR Metrics user interface in the MapR Control System.
Cluster Management

This section provides information about the ZooKeeper, CLDB, and Warden services, and their role in managing a MapR cluster.
How ZooKeeper Works in the Cluster
Zookeeper is a coordination service for distributed applications. It provides a shared hierarchical namespace that is organized like a standard filesystem. The namespace consists of data registers called znodes, for Zookeeper data nodes, which are similar to files and directories. A name inthe namespace is a sequence of path elements where each element is separated by a / character, such as the path /app1/p_2 shown here:
Namespace
The znode hierarchy is kept in-memory within each ZooKeeper server in order to minimize latency and to provide high throughput of workloads.
The ZooKeeper Ensemble
The ZooKeeper service is replicated across a set of hosts called an ensemble. One of the hosts is designated as the leader, while the other hostsare followers. ZooKeeper uses a leader election process to determine which ZooKeeper server acts as the leader, or master. If the ZooKeeperleader fails, a new leader is automatically chosen to take its place.
Establishing a ZooKeeper Quorum
As long as a majority (a quorum) of the ZooKeeper servers are available, the Zookeeper service is available. For example, if the ZooKeeperservice is configured to run on five nodes, three of them form a quorum. If two nodes fail (or one is taken off-line for maintenance and another onefails), a quorum can still be maintained by the remaining three nodes. An ensemble of five ZooKeeper nodes can tolerate two failures. Anensemble of three ZooKeeper nodes can tolerate only one failure. Because a quorum requires a majority, an ensemble of four ZooKeeper nodescan only tolerate one failure, and therefore offers no advantages over an ensemble of three ZooKeeper nodes. In most cases, you should runthree or five ZooKeeper nodes on a cluster. Larger quorum sizes result in slower write operations.
Ensuring Node State Consistency
Each ZooKeeper server maintains a record of all znode write requests in a transaction log on the disk. The ZooKeeper leader issues timestampsto order the write requests, which, when executed, update elements in the shared data store. Each ZooKeeper server must sync transactions todisk and wait for a majority of ZooKeeper servers (a quorum) to acknowledge an update. Once an update is held by a quorum of nodes, asuccessful response can be returned to clients. By ordering the write requests with timestamps and waiting for a quorum to be established tovalidate updates, ZooKeeper avoids race conditions and ensures that node state is consistent.
Service Management with the Warden

The Warden is a light Java application that runs on all the nodes in a cluster and coordinates cluster services. The Warden’s job on each node isto start, stop, or restart the appropriate services, and allocate the correct amount of memory to them. The Warden makes extensive use of the znode abstraction discussed in the ZooKeeper section of this Guide to monitor the state of cluster services.
Each running service on a cluster has a corresponding znode in the ZooKeeper namespace, named in the pattern /services/ /<hostname> <s
ervicename>. The Warden’s Watcher interface listens for changes in a monitored znode, and acts when a znode is created or deleted, or when
child znodes of a monitored znode are created or deleted.
Warden configuration is contained in the file, which lists service triplets in the form warden.conf <servicename>:<number of nodes>:<de
pendencies>. The number of nodes element of this triplet controls the number of concurrent instances of the service that can run on the cluster.
Some services, such as the JobTracker, are restricted to one running instance per cluster, while others, such as the FileServer, can run on everynode. The Warden monitors changes to its configuration file in real time.
When a configuration triplet lists another service as a dependency, the Warden will only start that service after the dependency service is running.
Memory Management with the Warden
System administrators can configure how much of the cluster’s memory is allocated to running the host operating systems for the nodes. The ser
vice.command.os.heapsize.percent, service.command.os.heapsize.max, and service.command.os.heapsize.min parameter
s in the file control the memory use of the host OS. The configuration file warden.conf /opt/mapr/conf/warden.conf defines several
parameters that determine how much of the memory reserved for MapR software is allocated to the various services. You can edit memoryparameters to reserve memory for purposes other than MapR.
The service. .heapsize.percent<servicename> parameter controls the percentage of system memory allocated to the named
service.The service. .heapsize.max<servicename> parameter defines the maximum heapsize used when invoking the service.
The service. .heapsize.min<servicename> parameter defines the minimum heapsize used when invoking the service.
The actual heap size used when invoking a service is a combination of the three parameters according to the formula max(heapsize.min,
min(heapsize.max, total-memory * heapsize.percent / 100)).
The Warden and Failover
The Warden on each node watches appropriate znodes to determine whether to start or stop services during failover. The following paragraphsprovide failover examples for the JobTracker and the CLDB. Note that not all failover involves the Warden; NFS failover is accomplished usingVIPs, discussed elsewhere in this document.
JobTracker Failover
The Warden on every JobTracker node watches the JobTracker’s znode for changes. When the active JobTracker’s znode is deleted, the Wardendaemons on other JobTracker nodes attempt to launch the JobTracker. The ZooKeeper quorum ensures that only one node’s launch request isfulfilled. The node that has its launch request succeed becomes the new active JobTracker. Since the JobTracker can only run on one node in acluster, all JobTracker launch requests received while an active JobTracker exists are denied. Job and task activity persist in the JobTrackervolume, so the new JobTracker can resume activity immediately upon launching.
CLDB Failover
The ZooKeeper contains a znode corresponding to the active master CLDB. This znode is monitored by the slave CLDBs. When the znode isdeleted, indicating that the master CLDB is no longer running, the slave CLDBs recognize the change. The slave CLDBs contact Zookeeper in anattempt to become the new master CLDB. The first CLDB to get a lock on the znode in Zookeeper becomes the new master.
The Warden and Pluggable Services
Services provided by open source components can be plugged into the Warden’s monitoring infrastructure by setting up an individualconfiguration file for each supported service in the /opt/mapr/conf/conf.d directory, named in the pattern warden. .conf<servicename> .
The <servicename>:<number of nodes>:<dependencies> triplets for a pluggable service are stored in the individual warden.<service
.confname> files, not in the main warden.conf file.
The following open source components have configuration files preconfigured at installation:
HueHTTP-FS

BeeswaxThe Hive metastoreHiveServer2Oozie
As with other Warden services, the Warden daemon monitors the znodes for a configured open source component’s service and restarts theservice as specified by the configuration triplet. The configuration file also specifies resource limits for the service, any ports used by the service,and a location for log files.
The CLDB and ZooKeeper
The Container Location Database (CLDB) service tracks the following information about every container in MapR-FS:
The node where the container is located.The container’s size.The volume the container belongs to.The policies, quotas, and usage for that volume.
For more information on containers, see the of this Guide.MapR-FS section
The CLDB also tracks fileservers in the cluster and node activity. Running the CLDB service on multiple nodes distributes lookup operationsacross those nodes for load balancing, and also provides high availability.
When a cluster runs the CLDB service on multiple nodes, one node acts as the master CLDB and the others act as slaves. The master node hasread and write access to the file system, while slave nodes only have read access. The kvstore (key-value store) container has the container ID
1, and holds cluster-related information. The ZooKeeper tracks container information for the kvstore container. The CLDB assigns a container IDto each new container it creates. The CLDB service tracks the location of containers in the cluster by the container ID.
When a client application opens a file, the application queries the CLDB for for the container ID of the root volume’s name container. The CLDBreturns the container ID and the IP addresses of the nodes in the cluster where the replicas of that container are stored. The client applicationlooks up the volume associated with the file in the root volume’s name container, then queries the CLDB for the container ID and IP addresses ofthe nodes in the cluster with the name container for the target volume. The target volume’s name container has the file ID and inode for the targetfile. The client application uses this information to open the file for a read or write operation.
Each fileserver heartbeats to the CLDB periodically, at a frequency ranging anywhere from 1-3 seconds depending on the cluster size, to reportits status and container information. The CLDB may raise alarms based on the status communicated by the FileServer.
Central Configuration
Each service on a node has one or more configuration files associated with it. The default version of each configuration file is stored locally under
/opt/mapr/.
Customized versions of the configuration files are placed in the volume, which is mounted at mapr.configuration /var/mapr/configurat
ion. The following diagram illustrates where each configuration file is stored:
MapR uses the pullcentralconfig script to detect customized configuration files in /var/mapr/configuration. This script is launched
every five minutes by default. When the script finds a customized file, it overwrites the local files in /opt/mapr. First, the script looks for
node-specific custom configuration files under /var/mapr/configuration/nodes/<hostname>. If the script does not find any configuration

files at that location, the script searches for cluster-wide configuration files under /var/mapr/configuration/default. The /default direct
ory stores cluster-wide configuration files that apply to all nodes in the cluster by default.
Security Overview
Using Hadoop as an enterprise-level tool requires data protection and disaster recovery capabilities in the cluster. As the amount ofenterprise-critical data that resides in the cluster increases, the need for securing access becomes just as critical.
Since data must be shared between nodes on the cluster, data transmissions between nodes and from the cluster to the client are vulnerable tointerception. Networked computers are also vulnerable to attacks where an intruder successfully pretends to be another authorized user and thenacts improperly as that user. Additionally, networked machines share the security vulnerabilities of a single node.
A secure environment is predicated on the following capabilities:
Authentication: Restricting access to a specified set of users. Robust authentication prevents third parties from representing themselvesas legitimate users.Authorization: Restricting an authenticated user's capabilities on the system. Flexible authorization systems enable a system to grant auser a set of capabilities that enable the user to perform desired tasks, but prevents the use of any capabilities outside of that scope.Encryption: Restricting an external party's ability to read data. Data transmission between nodes in a secure MapR cluster is encrypted,preventing an attacker with access to that communication from gaining information about the transmission's contents.
Authentication
The core component of user authentication in MapR is the ticket. A ticket is an object that contains specific information about a user, an expirationtime, and a key. Tickets uniquely identify a user and are encrypted to protect their contents. Tickets are used to establish sessions between auser and the cluster.
MapR supports two methods of authenticating a user and generating a ticket: a username/password pair and Kerberos. Both of these methodsare mediated by the maprlogin utility. When you authenticate with a username/password pair, the system verifies credentials using Pluggable
Authentication Modules (PAM). You can configure the cluster to use any registry that has a PAM module.
MapR tickets contain the following information:
UID (generated from the UNIX user ID)GIDs (group IDs for each group the user belongs to)ticket creation timeticket expiration time (by default, 14 days)renewal expiration time (by default, 30 days from date of ticket creation)
A MapR ticket determines the user's identity and the system uses the ticket as the basis for authorization decisions. A MapR cluster with securityfeatures enabled does not rely on the client-side operating system identity.
Authorization
MapR supports Hadoop Access Control Lists (ACLs) for regulating a user’s privileges on the and . MapR extends the ACLjob queue clusterconcept to cover , a unique to the MapR filesystem. The M7 license level of MapR provides , whichvolumes logical storage construct MapR tablesare stored natively on the file system. Authorization for MapR tables is managed by (ACEs), a list of logicalAccess Control Expressionsstatements that intersect to define a set of users and the actions those users are authorized to perform. The MapR filesystem also supportsstandard POSIX filesystem to control filesystem actions.permission levels
Encryption
MapR uses several technologies to protect network traffic:
The Secure Sockets Layer/Transport Layer Security (SSL/TLS) protocol secures several channels of HTTP traffic.In compliance with the NIST standard, the Advanced Encryption Standard in Galois/Counter Mode (AES/GCM) secures severalcommunication channels between cluster components.Kerberos encryption secures several communication paths elsewhere in the cluster.
Security Architecture

1.
a.
b. 2.
3. 4. 5. 6.
7.
A secure MapR cluster provides the following specific security elements:
Communication between the nodes in the cluster is encrypted:HBase traffic is secured with Kerberos.NFS traffic between the server and cluster, traffic within the MapR filesystem, and CLDB traffic are encrypted with secure MapRRPCs.Traffic between JobClients, TaskTrackers, and JobTrackers are secured with MAPRSASL, an implementation of the SimpleAuthentication and Security Layer framework.
Support for Kerberos user authentication.Support for Kerberos encryption for secure communication to open source components that require it.Support for the Simple and Protected GSSAPI Negotiation Mechanism ( ) used with the web UI frontends of some clusterSPNEGOcomponents.
Authentication Architecture: The maprlogin Utility
Explicit User Authentication
When you explicitly generate a ticket, you have the option to authenticate with your username and password or authenticate with Kerberos:
The user invokes the maprlogin utility, which connects to a CLDB node in the cluster using HTTPS. The hostname for the CLDB node
is specified in the mapr-clusters.conf file.When using username/password authentication, the node authenticates using PAM modules with the Java Authentication andAuthorization Service (JAAS). The JAAS configuration is specified in the mapr.login.conf file. The system can use any registrythat has a PAM module available.When using Kerberos to authenticate, the CLDB node verifies the Kerberos principal with the keytab file.
After authenticating, the CLDB node uses the standard UNIX APIs getpwnam_r and getgrouplist, which are controlled by the /etc/
nsswitch.conf file, to determine the user's user ID and group ID.
The CLDB node generates a ticket and returns it to the client machine.The server validates that the ticket is properly encrypted, to verify that the ticket was issued by the cluster's CLDB.The server also verifies that the ticket has not expired or been blacklisted.The server checks the ticket for the presence of a privileged identity such as the user. Privileged identities have impersonationmapr
functionality enabled.The ticket's user and group information are used for authorization to the cluster, unless impersonation is in effect.
Implicit Authentication with Kerberos
On clusters that use Kerberos for authentication, a MapR ticket is implicitly obtained for a user that that runs a MapR command without first usingthe maprlogin utility. The implicit authentication flow for the maprlogin utility first checks for a valid ticket for the user, and uses that ticket if itexists. If a ticket does not exist, the maprlogin utility checks if Kerberos is enabled for the cluster, then checks for an existing valid Kerberos
identity. When the maprlogin utility finds a valid Kerberos identity, it generates a ticket for that Kerberos identity.
Authorization Architecture: ACLs and ACEs
An Access Control List (ACL) is a list of users or groups. Each user or group in the list is paired with a defined set of permissions that limit theactions that the user or group can perform on the object secured by the ACL. In MapR, the objects secured by ACLs are the job queue, volumes,and the cluster itself.
A job queue ACL controls who can submit jobs to a queue, kill jobs, or modify their priority. A volume-level ACL controls which users and groupshave access to that volume, and what actions they may perform, such as mirroring the volume, altering the volume properties, dumping orbacking up the volume, or deleting the volume.
An Access Control Expression (ACE) is a combination of user, group, and role definitions. A role is a property of a user or group that defines a setof behaviors that the user or group performs regularly. You can use roles to implement your own custom authorization rules. ACEs are used tosecure MapR tables that use native storage.
Encryption Architecture: Wire-Level Security
MapR uses a mix of approaches to secure the core work of the cluster and the Hadoop components installed on the cluster. Nodes in a MapRcluster use different protocols depending on their tasks:
The FileServer, JobTracker, and TaskTracker use MapR tickets to secure their remote procedure calls (RPCs) with the native MapRsecurity layer. Clients can use the maprlogin utility to obtain MapR tickets. Web UI elements of these components use password securityby default, but can also be configured to use SPNEGO.

HiveServer2, Flume, and Oozie use MapR tickets by default, but can be configured to use Kerberos.HBase and the Hive metaserver require Kerberos for secure communications.The MCS Web UI is secured with passwords. The MCS Web UI does not support SPNEGO for users, but supports both password andSPNEGO security for REST calls.
Servers must use matching security approaches. When an Oozie server, which supports MapR Tickets and Kerberos, connects to HBase, whichsupports only Kerberos, Oozie must use Kerberos for outbound security. When servers have both MapR and Kerberos credentials, thesecredentials must map to the same User ID to prevent ambiguity problems.
Security Protocols Used by MapR
Protocol Encryption Authentication
MapR RPC AES/GCM maprticket
Hadoop RPC and MAPRSASL MAPRSASL maprticket
Hadoop RPC and Kerberos Kerberos Kerberos ticket
Generic HTTP Handler HTTPS using SSL/TLS maprticket, username and password, orKerberos SPNEGO
Security Protocols Listed by Component
Component Protocols Used
CLDB Outbound: MapR RPC
Inbound: Custom HTTP handler for the utility, whichmaprlogin
supports authentication through username and password orKerberos.
MapR file system MapR RPC
Task and Job Trackers Hadoop RPC and MAPRSASL. Traffic to the MapR file system usesMapR RPC.
HBase Inbound: Hadoop RPC and Kerberos
Outbound: Hadoop RPC and Kerberos. Traffic to the MapR filesystem uses MapR RPC.
Oozie Inbound: Generic HTTP Handler by default, configurable for HTTPSusing SSL/TLS
Outbound: Hadoop RPC and MAPRSASL by default, configurable toreplace MAPRSASL with Kerberos. Traffic to the MapR file systemuses MapR RPC.
NFS Inbound: Unencrypted NFS protocol
Outbound: MapR RPC
Flume Inbound: None
Outbound: Hadoop RPC and MAPRSASL by default, configurable toreplace MAPRSASL with Kerberos. Traffic to the MapR file systemuses MapR RPC.

HiveServer2 Inbound: Thrift and Kerberos, or username/password over SSL.
Outbound: Hadoop RPC and MAPRSASL by default, configurable toreplace MAPRSASL with Kerberos. Traffic to the MapR file systemuses MapR RPC.
Hive Metaserver Inbound: Hadoop RPC and Kerberos.Traffic to the MapR file systemuses MapR RPC.
MCS Inbound: User traffic is secured with HTTPS using SSL/TLS andusername/password. REST traffic is secured with HTTPS usingSSL/TLS with username/password and SPNEGO.
Web UIs Generic HTTP handler. Single sign-on (SSO) is supported by sharedcookies.
Impala and Hive
SQL-on-Hadoop provides a way to run ad-hoc queries on structured and schema-free data in Hadoop. SQL-on-Hadoop uses purpose-built MPP(massively parallel processing) engines running on and using Hadoop for storage and processing. You can move processing to the data in aHadoop cluster to reap the low cost benefits of commodity hardware and horizontal scaling benefits that MapReduce and MapR-FS provide forinteractive analytics.
MapR supports and as SQL-on-Hadoop options. With SQL-on-Hadoop components, you can easily and quickly explore and analyzeHive Impaladata. With MapR, SQL-on-Hadoop components are open source and work with any file format in Hadoop without any special processing.
When you use Hive to submit queries in a MapR cluster, MapR-FS translates the query into a series of MapReduce jobs and processes the jobsin parallel across the cluster. Hive is most useful for batch queries. Impala processes SQL queries with a specialized engine that sits on thecluster. Impala uses pushdown SQL operators to MapR-FS to collocate and process the data, making Impala a solid choice for very specificqueries.
Impala uses the Hive metastore to store metadata. The Hive metastore is typically the same database that Hive uses to store metadata. Impalacan access tables you create in Hive when they contain datatypes, file formats, and compression codecs that Impala supports.
The following table contains a list of components that work together to process a query issued to Impala:
Component Description
Clients The impala-shell, JDBC client, or ODBC client that you connect toImpala from. You issue a query to Impala from the client.
Hive Metastore Stores information about the tables that Impala can access.
Impala (impalad, statestored) Impalad is a process that runs on designated nodes in the cluster. Itcoordinates and runs queries. Each node running the Impala processcan receive, plan, and coordinate queries sent from a client. Statestored tracks the state of the Impalad processes in the cluster.
MapR-FS/M7/HBase MapR-FS is the MapR file system that stores data files and tables.HBase stores table data. MapR stores M7 tables natively.
The following image represents how the different components communicate:
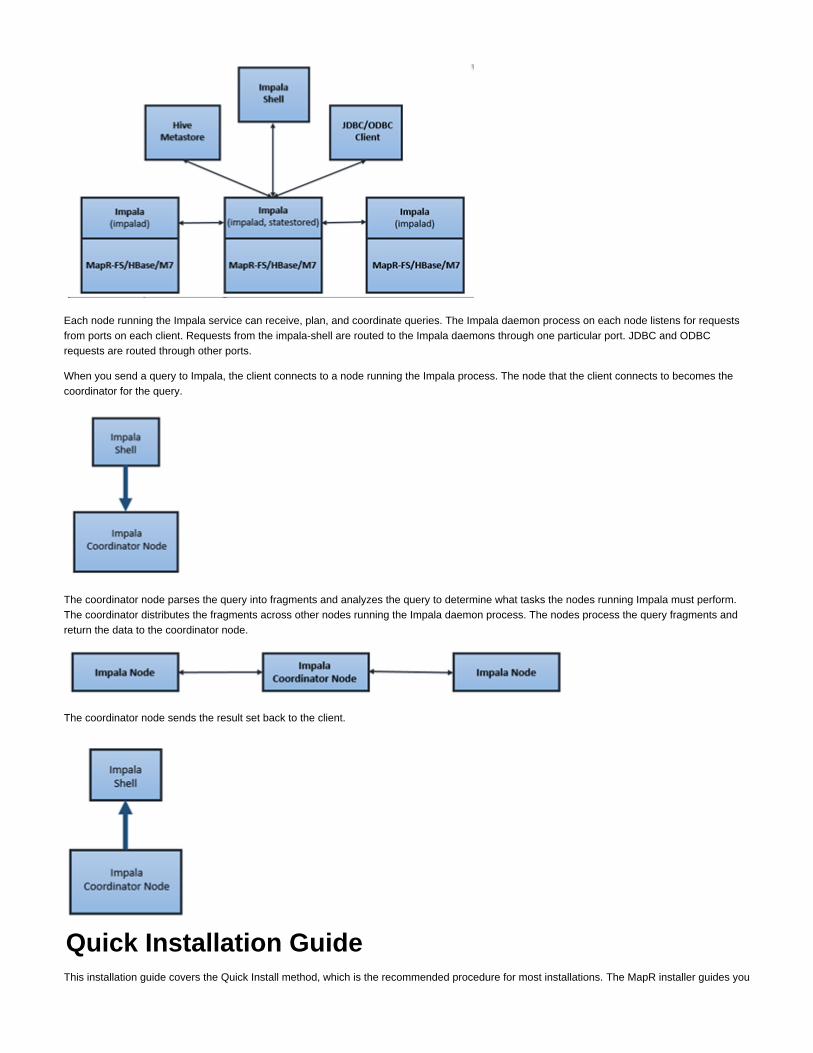
Each node running the Impala service can receive, plan, and coordinate queries. The Impala daemon process on each node listens for requestsfrom ports on each client. Requests from the impala-shell are routed to the Impala daemons through one particular port. JDBC and ODBCrequests are routed through other ports.
When you send a query to Impala, the client connects to a node running the Impala process. The node that the client connects to becomes thecoordinator for the query.
The coordinator node parses the query into fragments and analyzes the query to determine what tasks the nodes running Impala must perform.The coordinator distributes the fragments across other nodes running the Impala daemon process. The nodes process the query fragments andreturn the data to the coordinator node.
The coordinator node sends the result set back to the client.
Quick Installation Guide This installation guide covers the Quick Install method, which is the recommended procedure for most installations. The MapR installer guides you

1.
2.
3.
4.
5.
through the process of building a cluster composed of four types of nodes:
nodes manage the operation of the cluster. Control nodes store and process data using MapReduce, Hive, or MapR Tables (M7).Data control/data nodes that combine the functions of both types.Both nodes provide controlled user access to the cluster.Client
For more information about node types, see .Understanding Node Types
Before you run the MapR quick installer
Determine how many control nodes your cluster will have (typically three for a cluster running with an M5 or M7 license; must be an oddnumber).Note that you can have as many data and client nodes as you want.For each node, identify which disks you want to allocate to the MapR file system.
For more information and guidelines about the MapR installation process, see .About Installation
Supported Operating Systems
The quick installer runs on the following operating systems
RedHat Enterprise Linux (RHEL) or Community Enterprise Linux (CentOS) version 5.4 and laterUbuntu Linux version 9.04 and later
Installing the First Control Node
When you are ready to run the MapR installer, download and run the utility first.mapr-setup
Download from one of the following URLs: mapr-setup
http://package.mapr.com/releases/v3.1.0/redhat/mapr-setup
http://package.mapr.com/releases/v3.1.0/ubuntu/mapr-setup
Navigate to the directory containing hange the permissions: and cmapr-setup
chmod 755 mapr-setup
Run from the directory where you downloaded it. You must have access to and , or you can run it as themapr-setup /opt /tmp
superuser or with sudo (as shown here):sudo ./mapr-setup
This command installs the to .mapr-installer /opt/mapr-installer
Issue the following command to run the installer:sudo /opt/mapr-installer/bin/install
Answer each question from the installer or press to choose the default value. enter Here are a few tips:
Since this is the first node, make sure to indicate that this is a new installation.When you specify whether the cluster will run MapReduce, M7, or HBase, your answers determine which packages are loaded
.on each type of node (see for a complete list of packages)Node Types and Associated ServicesYou will have a chance to review your answers and make changes after the last question.
Installing Subsequent Control Nodes
For each subsequent control node, follow steps 1 through 4 as you did for the first control node. Answer each question from the installer or press enter to choose the default value. Here are a few tips:
Indicate that the node is an 'add' to an existing cluster.The installer prompts you for the hostname, mapr username, and password of the initial control node so it can transfer the clusterinstallation details from that node. This information is available within a few minutes of launching the install process on the first node. Once the transfer completes, you only need to supply the node type ( or ) and the full pathname of your disks. You do notcontrol bothneed to enter cluster-wide information unless the transfer does not succeed.
The first node you install in your cluster be a node or both a control node and a data node (a node).must control both

1.
2. 3.
4.
5.
Installing Data Nodes
Once the control nodes are installed, you can install the data nodes. Follow steps 1 through 4 as you did for the first control node. Here are someinstallation tips:
The cluster type you selected when you installed the first control node determines which packages are installed on data nodes.When the installer prompts for the type of node, answer data.If a node is listed as a control node, it cannot be installed as a data node.
Installing Client Nodes
Client nodes provide access to the cluster, but do not perform any processing or management function in the cluster. A client node can be a Linuxmachine (your laptop, for example). When you install client nodes, communication is established between the client nodes and the other nodes inthe cluster so you can submit jobs and retrieve data.
To install client nodes, follow steps 1 through 4 as you did for the first control node. When the installer prompts for the type ofnode, answer client.
Post InstallationOnce a majority of control nodes are successfully deployed, your cluster will be up and running. To complete the post installation process, followthese steps:
Access the MCS by entering the following URL in your browser, substituting the IP address of a controlnode on your cluster:https://<ip_address>:8443
Compatible browsers include Chrome, Firefox 3.0 and above, Safari (see for moreBrowser Compatibilityinformation) and Internet Explorer 10 and above. If a message about the security certificate appears, click Proceed anyway.To register and apply a license, click in the upper right corner, and follow the instructions to add a license via the web.Manage Licenses
See Managing Licenses for more information.Create separate volumes so you can specify different policies for different subsets of data. See Managin
for more information.g Data with VolumesSet up topology so the cluster is rack-aware for optimum replication. See for guidelinesNode Topologyon setting up topology.
About Installation
MapR's Quick Install method automates the installation process for you. It is designed to get a small-scale cluster up and running quickly, with a
minimum of user intervention. When you run the MapR installer, it checks prerequisites for you, asks you questionsabout the configuration of your cluster, prepares the system, and installs MapR software. In most cases, theQuick Install method is the preferred method. The following table will help you choose which method to use forinstallation:
Quick Install Expert Installation Mode

This method is best suited for:
small to medium clustersproof of concept testingusers who are new to MapR
You should only consider performing a manual (expert mode)installation if you:
have a very large or complex clusterneed granular control of each node which services run onplan to write scripts that pass arguments to direconfigure.sh
ctlyneed to install from behind a firewall, or from machines that arenot connected to the Internet
See for more information.Advanced Installation Topics
While the provides a high-level view of the installation process, this document provides more detail to help you with yourQuick Installation Guideinstallation. Topics include:
(setup requirements and cluster planning)Planning (suggestions to help your installation succeed)Installation Tips
(what the installer is doing during the process)Installation Process (how to recognize when the installation completes successfully)Successful Installation (registering the cluster and applying the license)Bringing Up the Cluster
Planning
This section explains how to prepare for the Quick Install process. Note that the installer performs a series of checks automatically (see Installatio). In addition to these checks, n Process make sure you meet the following requirements:
You install MapR software from internet-enabled nodes (not behind a firewall), so you can access and the Linuxhttp://package.mapr.comdistribution repositoriesAll the nodes in your cluster can communicate with each other over the network. The installer uses port 22 for ssh. In addition, MapR
software requires connectivity across other ports between the cluster nodes. For a list of all ports used by MapR, refer to Services and. Ports Quick Reference
Each node meets the requirements outlined in Preparing Each Node.
If you do not have internet access, or you want to install MapR software on nodes behind a firewall, see forAdvanced Installation Topicsinstructions.
Understanding Node Types
The MapR installer categorizes nodes as nodes, nodes, control and data nodes, or nodes. Clusters generally consist ofcontrol data both clientone, three, or five control nodes and an arbitrary number of data or client nodes. The function of each node type is explained briefly here:
nodes manage the cluster and have cluster management services installed.Control nodes are used for processing data, so they have the FileServer and TaskTracker servicesData
installed. If you run M7 or HBase on a data node, the HBase Client service is also installed. nodes act as both a control and a data node. It performs both functions and has both sets ofBoth
services installed. nodes provide access to the cluster so you can communicate via the command line or the MapRClient
Control System.
The following sections provide more detail about each node type.
Control Nodes
The first node you install in your cluster must be a control node. When you install your first node, the installer asks you for information about theother control nodes in your cluster. This information is stored in a manifest file and is shared when you install the remaining nodes on your cluster.Since most of the information is already supplied by the manifest file, the installation process is faster for subsequent nodes.
To simplify the installation process, all control nodes have the same services installed on them. In Expert Mode, you can configure each node so

these management services are split across nodes. See for more information.Advanced Installation Topics
Data Nodes
Data nodes are used for running MapReduce jobs and processing table data. These nodes run the FileServer service along with TaskTracker (forMapReduce nodes) or HBase client (for M7 and HBase nodes).
Both Nodes
Both nodes act as both control and data nodes. For a single-node cluster, designate the node as so it will have control node and data nodebothservices installed.
Client Nodes
Client nodes provide access to each node on the cluster so you can submit jobs and retrieve data. A client node can be an edge node of thecluster, your laptop, or any Windows machine. You can install as many client nodes as you want on your cluster. When you specify a client node,you provide the host name of the initial control node, which establishes communication with the cluster.
Node Types and Associated Services
The following table shows which services are assigned to each node type. The main services correspond to the core MapR packages, while theadditional services are determined by the type of cluster you specify (MapReduce, M7, HBase, or a combination). See the section of Installation In
under for more information on these services.stalling MapR Software Advanced Installation Topics
Node Type Main Services AdditionalMapReduceServices
Additional M7 Services
AdditionalHBaseServices
control node CLDB
ZooKeeper
FileServer
NFS
Webserver
Metrics
JobTracker HBase
HBase Master
data node FileServer
TaskTracker HBase Client HBase Client
HBase Region Server
both (controland data)
CLDB
ZooKeeper
FileServer
NFS
Webserver
Metrics
JobTracker
TaskTracker
HBase Client HBase Client
HBase Master
HBase Region Server
client node MapR Client MapR Client HBase Client
Cluster Planning Guidelines
To help you plan your cluster, here are some scenarios that illustrate how to allocate different types of nodes in a cluster. You can adjust theseguidelines for your particular situation.

For a 5-node cluster, you can configure one node as a node (or choose node type ) and the remaining four nodes as nodes. control both data To provide high availability (HA) in a 5-node cluster, you need three control nodes. In addition, all the nodesshould be able to process data. In this scenario, choose three both nodes and two data nodes.
Total # Nodesin Cluster
Number of Control Nodes
Number ofBoth Nodes
Number ofData Nodes
5 (non-HA) 1 0 4
5 (HA) 0 3 2
20 3 0 17
20 0 3 17
For a 20-node cluster, you still only need three control nodes to manage the cluster. If you need nodes to process data, the control nodes canalldouble as data nodes, which means you can choose either or for the node type. The remaining nodes can be dedicated data nodes,control bothas shown.
Installation Tips
These tips help you successfully complete the installation process.
Installing the First Node
When you install the first node on your cluster, you select to indicate that this is the first node of your cluster. The installer then asks you tonew
enter hostnames of control nodes (the current node is added automatically). Make sure these nodes are up and running ( )all ping <hostname and their hostnames are valid.
After you answer all the questions, the installer displays a summary and you have an opportunity to modify thesettings. At this point, you should change the MapR user password for security purposes.
When you are satisfied with the settings, select to install the next node.(c)ontinue
If you want to save the configuration and resume the installation later, select . The next time you run the installer, it displays the following(a)bortmessage:
Configuration file found. Do you wish to use this configuration? If no, then it willstart from new. (y/n) [n]: y
To use the saved configuration file, enter for yes.y
Installing Subsequent Control Nodes
When you install the remaining control nodes in your cluster, the installer first asks you for the hostname of the initial node so it can retrieve your. It also asks you for the MapR user name and password. The installer then searches for the hostname ofresponses to the first set of questions
the current node you want to add. Once it finds the hostname, it displays the following message:
Node found in list of control nodes. Automatically setting node as control node.
If the .information cannot be retrieved from the first node of the cluster, you will need to re-enter the cluster details on this new node
Ensure that all user information matches across nodes. Each username and password must match on every node, and must haveallthe same UID. Each groupname must match on every node, and must have the same GID.

When you supply the hostname of the initial node, the installer attempts to resolve the IP address for the current node and compare it to the IPaddress in the manifest file. If the IP addresses do not agree, the installer displays an error message.
Installing Remaining Nodes
Once you install all the control nodes, the remaining nodes will be either data nodes or client nodes. The installer searches for the clusterconfiguration information from the first cluster node to simplify the installation process.
When you install a client node, the installer does not ask for the full path of each disk because MFS is not run on client nodes.
Installation ProcessThis section explains what happens when you run the MapR installer. When you use the installer to interactively install and configure the nodeson your cluster, the installation script is launched and it performs these tasks for you:
Prepares the system :Checks for necessary resourcesChecks to see if another version of Hadoop is already installed (if so, you must uninstall this version before you run the installer).Installs and configures OS packagesInstalls Java
Installs MapR softwareConfigures the repositoriesInstalls the MapR packagesConfigures MapR software
Various information messages are displayed to your output device while the installer is running. The installer verifies systempre-requisites for you, and then checks your system configuration. Next, it launches the interactive
, the installer displaysquestion-and-answer process. When you finish the process (and select )continue the tasks it is performing (indicated by " ") and tasks it is skipping (indicated by "messages about ok => skipp
"). To determine what actions are taking place, read the "ok" messages and disregard the "skipping"ing
messages.
Installation Summary
During the installation process, the installer asks questions about your cluster configuration. When you finish answering all the questions, theinstaller displays a summary that includes the choices you selected as well as some other default settings. Here is a sample summary:

Current information (Please verify if correct) ============================================== Cluster Name: "my.cluster.com" MapR User name: "mapr" MapR User Group name: "mapr" UID for MapR User: "2000" GID for MapR User: "2000" Password for MapR User: "****" Security: "disabled" Node Role: "control" Node using MapReduce: "y" Node using MapR M7 Edition: "y" Node using Hbase: "n" Disks to use: "/dev/sdb" Control Nodes: "ubuntunode01,ubuntunode02" Packages to Install (based on Node Role, MapReduce, M7, and Hbase):"fileserver,cldb,zookeeper,jobtracker,webserver,nfs,hbase" MapR database schema information: None Core Repo URL: "http://archive.mapr.com/releases" Ecosystem Repo URL: "http://archive.mapr.com/releases/ecosystem" MapR Version to Install: "3.1.0" Java Version to Install: "OpenJDK7"
(c)ontinue with install, continue to (m)odify options, or save current configurationand (a)bort? (c/m/a) [c]:
This summary displays all the settings for the current node. Note that the installer does not ask you for values for every setting. Instead, it assignsdefault values to some settings, and then it allows you to change any setting.
At this stage, you can continue with the install, modify the settings, or save the current configuration and continue later.
Modifying Settings
You can modify any of the settings in the installation summary. If you enter to modify settings, the installer displays the following menu:m

Pick an optionn) Change Cluster Name (Current Value: "my.cluster.com")s) Change Security Settings (Current Value: "disabled")c) Change Control Nodes (Current Value: "ubuntunode01,ubuntunode02")m) Change Primary Node Role (Either control" or both control and data: "control")mr) Change Node MapReduce setting (Current Value: "n")m7) Change Node MapR M7 setting (Current Value: "y")hb) Change Node Hbase setting (Current Value: "n")d) Change Disks to use (Current Value: "/dev/sdb")un) Change MapR User Name (Current Value: "mapr")gn) Change MapR User Group Name (Current Value: "mapr")ui) Change MapR User ID (Current Value: "2000")gi) Change MapR User Group ID (Current Value: "2000")pw) Change MapR User Password (Current Value: "****")uc) Change MapR Core Repo URL (Current Value: http://archive.mapr.com/releases")ue) Change MapR Ecosystem Repo URL (Current Value:http://archive.mapr.com/releases/ecosystem")v) Change MapR Software Version to install (Current Value: "3.1.0")db) Change MapR database schema information. (Current Values: None)cont) Continue Installation:
Each setting is explained below, along with advice for modifying the setting.
Cluster Name
The installer assigns a default name, , to your cluster. If you want to assign a different name to your cluster, enter and themy.cluster.com n
new cluster name. If your environment includes multiple clusters, assign a different name to each one.
Security Settings
Basic security (authentication and authorization) measures are automatically implemented on every MapR cluster. An additional layer of security(data encryption, known as wire-level security) is available, but is disabled by default. If you want to enable wire-level security, enter and changes
the setting to .secure
Control Nodes
If you need to reassign the role of control node to different hostnames, enter followed by the hostnames of the new control nodes.c
Primary Node Role
Your first node must be either a node or a control node and a data node. The default setting is . If you decide to change thecontrol both control
role, enter and the new node type (either or ). Note that nodes cannot also function as data nodes, but nodes can.m control both control both
Node MapReduce Setting
Since most clusters run MapReduce on their data nodes, the default setting is . If you decide that you don't want to run MapReduce on theyes
current node, enter and change the setting to . This setting is done on a node-by-node basis.mr n
Node MapR M7 Setting
The default setting for M7 is , which assumes that you have an M7 license and that you are using M7 tables instead of HBase tables. Toyes
change this setting, enter followed by . This setting is done on a node-by-node basis.m7 n
The cluster name cannot contain spaces.

Node Hbase Setting
When the M7 setting is (which is the default setting), the Hbase setting is automatically set to . If you are using HBase tables instead of M7yes no
tables, enter followed by .hb y
Disks to use
You must specify which disks to use . The installer automatically runs the script to format for the MapR file system for each node disksetup
these disks. If you want to change the list of disks before you continue with the installation, enter followed by the full path of each disk. Eachd
disk entry can be separated by commas or spaces or a combination of both.
MapR User Name
The installer assigns a default 'mapr' user name, . If you want to change the user name, enter followed by the new user name. For moremapr un
information, see in Advanced Installation Topics.Common Users
MapR User Group Name
The default MapR user group name is . To change the user group name, enter followed by the new user group name.mapr gn
MapR User ID
The default MapR user ID is 2000. To change this value, enter followed by the new MapR user ID.ui
MapR User Group ID
The default MapR user group ID is 2000 (the same as the MapR user ID). To change this value, enter followed by the new MapR user groupgi
ID.
MapR User Password
The default MapR user password is . For security, change this password and share it only with other users who are authorized to access themapr
cluster. To change the password, enter followed by the new password. Notice that the password itself is not displayed. Instead, each characterpw
is replaced by an asterisk (*).
MapR Core Repo URL
By default, the MapR core repository is located at . If you want to get the core repository from anotherhttp://archive.mapr.com/releases
URL, enter followed by the new URL.ur
MapR Ecosystem Repo URL
By default, the MapR ecosystem repository is located at . If you want to get thehttp://archive.mapr.com/releases/ecosystem
ecosystem repository from another URL, enter , then enter the new URL.ue
MapR Software Version
The installer always installs the latest available version of MapR software.
MapR Database Schema Information
To specify the MySQL database parameters for the MapR metrics database, enter and you will be prompted for additional parameters throughdb
a sub-menu. See for more information.Setting up the MapR Metrics Database
Continuing Installation
When you install subsequent nodes, you will be asked for the MapR user name for the initial node. If you change the user name, besure to use the new name when the system prompts you.

When you choose the (c)ontinue option, the installer executes a script and displays messages from the Ansible MapRrun-install
meta-playbook. These messages show you what steps are being performed while the script executes. The steps are summarized in the playbookunder these headings:
Gathering setup infoExtra Repository InitializationMapR Operating System InitializationMapR Operating System Initialization for Ubuntu/Debian (for an Ubuntu node)MapR OS Security Initialization for Ubuntu and Debian (for an Ubuntu node)MapR Admin User (creates the MapR user and group)ntp playbookInstall OpenJDK packagesMapR Repository InitializationMapR Repository Initialization for DebianInstall MapR PackagesDisable MapR Services until configuration (for initial control nodes, until a quorum of ZooKeepers is reached)Configure MapR softwareIdentify and Configure Disks for MapR File SystemStart MapR ServicesFinalize MapR Cluster configuration
During the final step for the initial control node installation, the system displays the following message:
CLDB service will not come on-line until Zookeeper quorum is achieved; Please proceedwith installation on remaining control nodes.
Successful Installation
A successful node installation takes approximately 10-30 minutes, depending on the type of node, and whether a quorum of ZooKeeper serviceshas been reached. This section shows the messages that appear for each type of node when it is installed correctly.
Successful Installation of the First Node
When the first node has finished installing successfully, you see the following message:
"msg": "Successfully installed MapR on initial node <hostname>. Cluster will comeon-line once a majority of the control nodes are successfully deployed. After theother control nodes are installed, please verify cluster operation with the command'hadoop fs -ls /' ."
You can also see that a volume called is created in the cluster for the admin user. For M7 deployments, this volume ismaprfs://user/mapr
used as the default table location (instead of the / volume).
Successful Installation of Subsequent Nodes
When subsequent nodes are installed successfully, you will see a message like this:
"msg": "Successfully installed MapR version <version#> on node <hostname>. Use themaprcli command to further manage the system."
Once you install all the control nodes you identified during installation of the initial node, you can install as many nodes as you want at any time.You do not need to indicate the last node in your cluster, since you can always add more nodes.
Bringing Up the Cluster

1. 2. 3.
When you finish the installation process, the resulting cluster will have an M3 license without NFS. You can see the state of your cluster bylogging in to the MapR Control System (MCS).
To get your cluster up and running, follow these steps:
Register the cluster to obtain a full M3 license.Apply the license.Restart the NFS service.
Registering the Cluster
You can register your cluster through the MapR Control System (MCS). Select from the navigation pane and follow theManage Licensesinstructions.
When the License Management dialog box opens, select The next dialog box provides a link to whereAdd licenses via Web. www.mapr.com,you can register your cluster.
Applying the License
After you register your cluster, click in the License Management dialog box. For best results, use an M5 license (available as aApply Licensestrial license), which entitles you to run NFS on any node on which it is installed. An M3 license limits you to one node for NFS, which means youcan only have one node or one node.control both
Restarting NFS
The last step in bringing up the cluster is to restart NFS. Even though the installer loads the NFS service on all and nodes, NFScontrol bothrequires a license in order to run (which you applied in the previous step). You can restart the NFS service from the MCS, See Manage Node
for information.Services
Once NFS is running, the cluster appears at the mount point in the Linux file system for all and nodes./mapr control both
MapR OverviewMapR is a complete, industry-standard, distribution with key improvements. MapR Hadoop is API-compatible and includes or works withHadoopthe family of Hadoop ecosystem components such as HBase, Hive, Pig, Flume, and others. MapR provides a version of Hadoop and keyecosystem components that have been tested together on specific platforms.
For example, while MapR supports the Hadoop FS abstraction interface, MapR specifically improves the performance and robustness of thedistributed file system, eliminating the Namenode. The MapR distribution for Hadoop supports continuous read/write access, improving data loadand unload processes.
To reiterate, .MapR Hadoop does not use Namenodes

The diagram above illustrates the services surrounding the basic Hadoop idea of Map and Reduce operations performed across a distributedstorage system. Some services provide management and others run at the application level.
The (MCS) is a browser-based management console that provides a way to view and control the entire cluster.MapR Control System
Editions
MapR offers multiple editions of the MapR distribution for Apache Hadoop.
Edition Description
M3 Free community edition
M5 Adds high availability and data protection, including multi-node NFS
M7 Supports structured table data natively in the storage layer, providinga flexible, NoSQL database compatible with Apache HBase.Available with MapR version 3.0 and later.
The type of license you apply determines which features will be available on the cluster. The installation steps are similar for all editions, but you
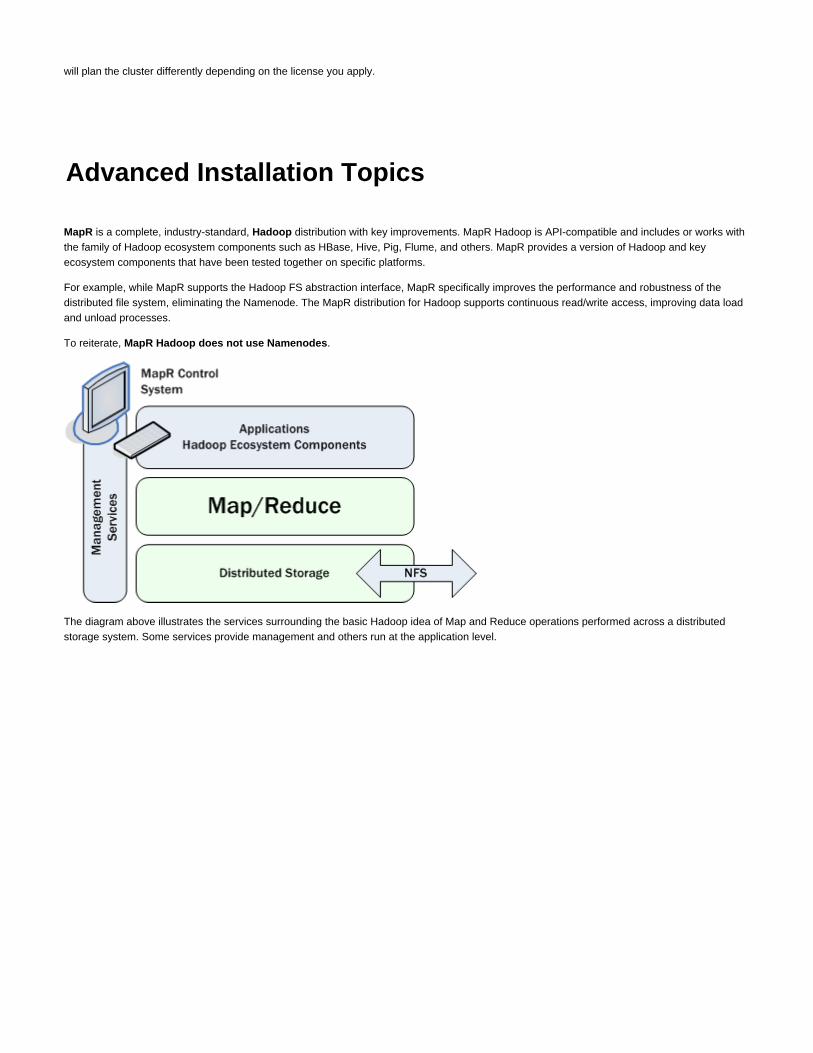
will plan the cluster differently depending on the license you apply.
Advanced Installation Topics
MapR is a complete, industry-standard, distribution with key improvements. MapR Hadoop is API-compatible and includes or works withHadoopthe family of Hadoop ecosystem components such as HBase, Hive, Pig, Flume, and others. MapR provides a version of Hadoop and keyecosystem components that have been tested together on specific platforms.
For example, while MapR supports the Hadoop FS abstraction interface, MapR specifically improves the performance and robustness of thedistributed file system, eliminating the Namenode. The MapR distribution for Hadoop supports continuous read/write access, improving data loadand unload processes.
To reiterate, .MapR Hadoop does not use Namenodes
The diagram above illustrates the services surrounding the basic Hadoop idea of Map and Reduce operations performed across a distributedstorage system. Some services provide management and others run at the application level.

The (MCS) is a browser-based management console that provides a way to view and control the entire cluster.MapR Control System
Editions
MapR offers multiple editions of the MapR distribution for Apache Hadoop.
Edition Description
M3 Free community edition
M5 Adds high availability and data protection, including multi-node NFS
M7 Supports structured table data natively in the storage layer, providinga flexible, NoSQL database compatible with Apache HBase.Available with MapR version 3.0 and later.
The type of license you apply determines which features will be available on the cluster. The installation steps are similar for all editions, but youwill plan the cluster differently depending on the license you apply.
Installation Process
This has been designed as a set of sequential steps. Complete each step before proceeding to the next.Installation Guide
1.
2.
3.
4.
5.
Installing MapR Hadoop involves these steps:
Planning the ClusterDetermine which services will be run on each node. It is important to see the big picture before installing and configuring theindividual management and compute nodes.
Preparing Each NodeCheck that each node is a suitable platform for its intended use. Nodes must meet minimum requirements for operating system,memory and disk resources and installed software, such as Java. Including unsuitable nodes in a cluster is a major sourceof installation difficulty.
Installing MapREach node in the cluster, even purely data/compute nodes, runs several services. Obtain and install MapR packages, usingeither a package manager, a local repository, or a downloaded tarball.After installing services on a node, configure it to participate in the cluster, then initialize the raw disk resources.
Bringing Up the ClusterStart the nodes and check the cluster. Verify node communication and that services are up and running.Create one or more to organize data.volumes
Installing Hadoop Ecosystem ComponentsInstall additional Hadoop components alongside MapR services.
To begin, start by .Planning the Cluster
Planning the Cluster
A MapR Hadoop installation is usually a large-scale set of individual hosts, called , collectively called a . In a typical cluster, most (ornodes clusterall) nodes are dedicated to data processing and storage, and a smaller number of nodes run other services that provide cluster coordination andmanagement. The first step in deploying MapR is planning which nodes will contribute to the cluster, and selecting the services that will run oneach node.
First, plan what computers will serve as nodes in the MapR Hadoop cluster and what specific services (daemons) will run on each node. Todetermine whether a computer is capable of contributing to the cluster, it may be necessary to check the requirements found in Step 2, Preparing
. Each node in the cluster must be carefully checked against these requirements; unsuitability of a node is one of the most commonEach Nodereasons for installation failure.
The objective of Step 1 is a Cluster Plan that details each node's set of services. The following sections help you create this plan:
Unique Features of the MapR DistributionSelect ServicesCluster Design Objectives
Licensing ChoicesData WorkloadHigh Availability
Cluster HardwareService Layout in a Cluster
Node Types

Example Cluster DesignsPlan Initial Volumes
User AccountsNext Step
Unique Features of the MapR Distribution
Administrators who are familiar with ordinary Apache Hadoop will appreciate the MapR distribution's real-time read/write storage layer. WhileAPI-compatible with HDFS, MapR Hadoop does not require Namenodes. Furthermore, MapR utilizes raw disks and partitions without RAID orLogical Volume Manager. Many Hadoop installation documents spend pages discussing HDFS and Namenodes, and MapR Hadoop's solution issimpler to install and offers higher performance.
The MapR Filesystem (MapR-FS) stores data in , conceptually in a set of containers distributed across a cluster. Each container includesvolumesits own metadata, eliminating the central "Namenode" single point of failure. A required directory of container locations, the Container LocationDatabase (CLDB), can improve network performance and provide high availability. Data stored by MapR-FS can be files or tables.
A process called the runs on all nodes to manage, monitor, and report on the other services on each node. The MapR cluster useswardenApache ZooKeeper to coordinate services. ZooKeeper prevents service conflicts by enforcing a set of rules and conditions that determine whichinstance of each service is the master. The warden will not start any services unless ZooKeeper is reachable and more than half of the configuredZooKeeper nodes (a ) are live.quorum
The MapR M7 Edition provides native table storage in MapR-FS. The is used to access table data via the open-standardMapR HBase ClientApache HBase API. M7 Edition simplifies and unifies administration for both structured table data and unstructured file data on a single cluster. Ifyou plan to use MapR tables exclusively for structured data, then you do not need to install the Apache HBase Master or RegionServer. However,Master and RegionServer services be deployed on an M7 cluster if your applications require them, for example, during the migration periodcanfrom Apache HBase to MapR tables. The MapR HBase Client provides access to both Apache HBase tables and MapR tables. As of MapRversion 3.0, table features are included in all MapR-FS fileservers. Table features are enabled by applying an appropriate M7 license.
Select Services
In a typical cluster, most nodes are dedicated to data processing and storage and a smaller number of nodes run services that provide clustercoordination and management. Some applications run on cluster nodes and others run on clients that can reach the cluster, but which are not partof it.
The services that you choose to run on each node will likely evolve over the life of the cluster. Services can be added and removed over time. Wewill plan for the cluster you're going to start with, but it's useful to think a few steps down the road: Where will services migrate to when you growthe cluster by 10x? 100x?
The following table shows some of the services that can be run on a node.
Service Description
Warden The Warden service runs on every node, coordinating the node'scontribution to the cluster.
TaskTracker The TaskTracker service starts and tracks MapReduce tasks on anode. The TaskTracker service receives task assignments from theJobTracker service and manages task execution.
FileServer FileServer is the MapR service that manages disk storage forMapR-FS on each node.
CLDB Maintains the (CLDB) service. The CLDBcontainer location databaseservice coordinates data storage services among MapR-FSFileServer nodes, MapR NFS gateways, and MapR clients.
NFS Provides read-write MapR Direct Access NFS™ access to thecluster, with full support for concurrent read and write access.

MapR HBase Client Provides access to tables in MapR-FS on an M7 Edition cluster viaHBase APIs. Required on all nodes that will access table data inMapR-FS, typically all TaskTracker nodes and edge nodes foraccessing table data.
JobTracker Hadoop JobTracker service. The JobTracker service coordinates theexecution of MapReduce jobs by assigning tasks to TaskTrackernodes and monitoring task execution.
ZooKeeper Enables high availability (HA) and fault tolerance for MapR clustersby providing coordination.
HBase Master The master service manages the region servers that make upHBaseHBase table storage.
Web Server Runs the MapR Control System and provides the MapR Heatmap™.
Metrics Provides optional real-time analytics data on cluster and jobperformance through the interface. If used, theAnalyzing Job MetricsMetrics service is required on all JobTracker and Web Server nodes.
HBase Region Server HBase region server is used with the HBase Master service andprovides storage for an individual HBase region.
Pig Pig is a high-level data-flow language and execution framework.
Hive Hive is a data warehouse that supports SQL-like ad hoc querying anddata summarization.
Flume Flume is a service for aggregating large amounts of log data
Oozie Oozie is a workflow scheduler system for managing Hadoop jobs.
HCatalog HCatalog aggregates HBase data.
Cascading Cascading is an application framework for analyzing and managingbig data.
Mahout Mahout is a set of scalable machine-learning libraries that analyzeuser behavior.
Sqoop Sqoop is a tool for transferring bulk data between Hadoop andrelational databases.
MapR is a complete Hadoop distribution, but not all services are required. Every Hadoop installation requires and serviJobTracker TaskTrackerces to manage Map/Reduce tasks. In addition, MapR requires the service to coordinate the cluster, and at least one node must runZooKeeperthe service. The service is required if the browser-based MapR Control System will be used.CLDB WebServer
MapR Hadoop includes tested versions of the services listed here. MapR provides a more robust, read-write storage system based on volumesand containers. MapR data nodes typically run and . Do not plan to use packages from other sources in place of theTaskTracker FileServerMapR distribution.
This service is only needed for Apache HBase. Your clustersupports without this service.MapR Tables
This service is only needed for Apache HBase. Your clustersupports without this service.MapR Tables

Cluster Design Objectives
Begin by understanding the work that the cluster will perform. Establish metrics for data storage capacity, throughput, and characterize the dataprocessing that will typically be performed.
Licensing Choices
The MapR Hadoop distribution is licensed in tiers.
If you need to store table data, choose the M7 license. M7 includes all features of the M5 license, and adds support for structured table datanatively in the storage layer. M7 Edition provides a flexible, NoSQL database compatible with Apache HBase.
The M5 license enables enterprise-class storage features, such as and of individual volumes, and high-availability features,snapshots mirrorssuch as the ability to run NFS servers on multiple nodes which also improves bandwidth and performance.
The free M3 community edition includes MapR improvements, such as the read/write MapR-FS and NFS access to the filesystem, but does notinclude the level of technical support offered with the M5 or M7 editions.
You can obtain an M3 license or an M5 trial license online by registering. To obtain an M7 license, you will need to contact a MapRrepresentative.
Data Workload
While MapR is relatively easy to install and administer, designing and tuning a large production MapReduce cluster is a complex task that beginswith understanding your data needs. Consider the kind of data processing that will occur and estimate the storage capacity and throughput speedrequired. Data movement, independent of MapReduce operations, is also a consideration. Plan for how data will arrive at the cluster, and how itwill be made useful elsewhere.
Network bandwidth and disk I/O speeds are related; either can become a bottleneck. CPU-intensive workloads reduce the relative importance ofdisk or network speed. If the cluster will be performing a large number of big reduces, network bandwidth is important, suggesting that thehardware plan include multiple NICs per node. In general, the more network bandwidth, the faster things will run.
Running NFS on multiple data nodes can improve data transfer performance and make direct loading and unloading of data possible, but multipleNFS instances requires an M5 license. For more information about NFS, see .Setting Up MapR NFS
Plan which nodes will provide NFS access according to your anticipated traffic. For instance, if you need 5Gb/s of write throughput and 5Gb/s ofread throughput, the following node configurations would be suitable:
12 NFS nodes with a single 1GbE connection each6 NFS nodes with dual 1GbE connections each4 NFS nodes with quadruple 1GbE connections each
When you set up NFS on all of the file server nodes, you enable a self-mounted NFS point for each node. A cluster made up of nodes withself-mounted NFS points enable you to run native applications as tasks. You can use round-robin DNS or a hardware load balancer to mount NFSon one or more dedicated gateways outside the cluster to allow controlled access.
High Availability
A properly licensed and configured MapR cluster provides automatic failover for continuity throughout the stack. Configuring a cluster for HAinvolves redundant instances of specific services, as well as a correct configuration of the MapR NFS service. HA features are not available withthe M3 Edition license.
The following describes redundant services used for HA:
Service Strategy Min. instances
CLDB Master/slave--two instances in case one fails 2
ZooKeeper A majority of ZK nodes (a ) must bequorumup
3
It is not necessary to bond or trunk the NICs together. MapR is able to take advantage of multiple NICs transparently.

JobTracker Active/standby--if the first JT fails, thebackup is started
2
HBase Master Active/standby--if the first HBase Masterfails, the backup is started. This is only aconsideration when deploying ApacheHBase on the cluster.
2
NFS The more redundant NFS services, the better 2
On a large cluster, you may choose to have extra nodes available in preparation for failover events. In this case, you keep spare, unused nodesready to replace nodes running control services--such as CLDB, JobTracker, ZooKeeper, or HBase Master--in case of a hardware failure.
Virtual IP Addresses
You can set up virtual IP addresses (VIPs) for NFS nodes in an M5-licensed MapR cluster, for load balancing or failover. VIPs provide multipleaddresses that can be leveraged for round-robin DNS, allowing client connections to be distributed among a pool of NFS nodes. VIPs also enablehigh availability (HA) NFS. In a HA NFS system, when an NFS node fails, data requests are satisfied by other NFS nodes in the pool. Use aminimum of one VIP per NFS node per NIC that clients will use to connect to the NFS server. If you have four nodes with four NICs each, witheach NIC connected to an individual IP subnet, use a minimum of 16 VIPs and direct clients to the VIPs in round-robin fashion. The VIPs shouldbe in the same IP subnet as the interfaces to which they will be assigned. See Setting Up VIPs for NFS for details on enabling VIPs for yourcluster.
If you plan to use VIPs on your M5 cluster's NFS nodes, consider the following tips:
Set up NFS on at least three nodes if possible.All NFS nodes must be accessible over the network from the machines where you want to mount them.To serve a large number of clients, set up dedicated NFS nodes and load-balance between them. If the cluster is behind a firewall, youcan provide access through the firewall via a load balancer instead of direct access to each NFS node. You can run NFS on all nodes inthe cluster, if needed.To provide maximum bandwidth to a specific client, install the NFS service directly on the client machine. The NFS gateway on the clientmanages how data is sent in or read back from the cluster, using all its network interfaces (that are on the same subnet as the clusternodes) to transfer data via MapR APIs, balancing operations among nodes as needed.Use VIPs to provide High Availability (HA) and failover.
Cluster Hardware
When planning the hardware architecture for the cluster, make sure all hardware meets the node requirements listed in .Preparing Each Node
The architecture of the cluster hardware is an important consideration when planning a deployment. Among the considerations are anticipateddata storage and network bandwidth needs, including intermediate data generated during MapReduce job execution. The type of workload isimportant: consider whether the planned cluster usage will be CPU-intensive, I/O-intensive, or memory-intensive. Think about how data will beloaded into and out of the cluster, and how much data is likely to be transmitted over the network.
Planning a cluster often involves tuning key ratios, such as: disk I/O speed to CPU processing power; storage capacity to network speed; ornumber of nodes to network speed.
Typically, the CPU is less of a bottleneck than network bandwidth and disk I/O. To the extent possible, network and disk transfer rates should bebalanced to meet the anticipated data rates using multiple NICs per node. It is not necessary to bond or trunk the NICs together; MapR is able totake advantage of multiple NICs transparently. Each node should provide raw disks and partitions to MapR, with no RAID or logical volumemanager, as MapR takes care of formatting and data protection.
The following example architecture provides specifications for a standard compute/storage node for general purposes, and two sample rackconfigurations made up of the standard nodes. MapR is able to make effective use of more drives per node than standard Hadoop, so each nodeshould present enough face plate area to allow a large number of drives. The standard node specification allows for either 2 or 4 1Gb/s ethernetnetwork interfaces. MapR recommends 10Gb/s network interfaces for high-performance clusters.
You should use an odd number of ZooKeeper instances. For a high availability cluster, use 5 ZooKeepers, so that the cluster cantolerate 2 ZooKeeper nodes failing and still maintain a quorum. Setting up more than 5 ZooKeeper instances is not recommended.

Standard 50TB Rack Configuration
10 standard compute/storage nodes(10 x 12 x 2 TB storage; 3x replication, 25% margin)24-port 1 Gb/s rack-top switch with 2 x 10Gb/s uplinkAdd second switch if each node uses 4 network interfaces
Standard 100TB Rack Configuration
20 standard nodes(20 x 12 x 2 TB storage; 3x replication, 25% margin)48-port 1 Gb/s rack-top switch with 4 x 10Gb/s uplinkAdd second switch if each node uses 4 network interfaces
To grow the cluster, just add more nodes and racks, adding additional service instances as needed. MapR rebalances the cluster automatically.
Service Layout in a Cluster
How you assign services to nodes depends on the scale of your cluster and the MapR license level. For a single-node cluster, no decisions areinvolved. All of the services you are using run on the single node. On medium clusters, the performance demands of the CLDB and ZooKeeperservices requires them to be assigned to separate nodes to optimize performance. On large clusters, good cluster performance requires thatthese services run on separate nodes.
The cluster is flexible and elastic---nodes play different roles over the lifecycle of a cluster. The basic requirements of a node are not different formanagement or for data nodes.
As the cluster size grows, it becomes advantageous to locate control services (such as ZooKeeper and CLDB) on nodes that do not run computeservices (such as TaskTracker). The MapR M3 Edition license does not include HA capabilities, which restricts how many instances of certainservices can run. The number of nodes and the services they run will evolve over the life cycle of the cluster. When setting up a cluster initially,take into consideration the following points from the page .Assigning Services to Nodes for Best Performance
The architecture of MapR software allows virtually any service to run on any node, or nodes, to provide a high-availability, high-performancecluster. Below are some guidelines to help plan your cluster's service layout.
Node Types
In a production MapR cluster, some nodes are typically dedicated to cluster coordination and management, and other nodes are tasked with datastorage and processing duties. An edge node provides user access to the cluster, concentrating open user privileges on a single host. In smallerclusters, the work is not so specialized and a single node may perform data processing as well as management.
Nodes Running ZooKeeper and CLDB
It is possible to install MapR Hadoop on a one- or two-node demo cluster. Production clusters may harness hundreds of nodes, but five-or ten-node production clusters are appropriate for some applications.

High latency on a ZooKeeper node can lead to an increased incidence of ZooKeeper quorum failures. A ZooKeeper quorum failure occurs whenthe cluster finds too few copies of the ZooKeeper service running. If the ZooKeeper node is also running other services, competition for computingresources can lead to increased latency for that node. If your cluster experiences issues relating to ZooKeeper quorum failures, consider reducingor eliminating the number of other services running on the ZooKeeper node.
The following are guidelines about which services to separate on large clusters:
JobTracker on ZooKeeper nodes: Avoid running the JobTracker service on nodes that are running the ZooKeeper service. On largeclusters, the JobTracker service can consume significant resources.MySQL on CLDB nodes: Avoid running the MySQL server that supports the MapR Metrics service on a CLDB node. Consider runningthe MySQL server on a machine external to the cluster to prevent the MySQL server’s resource needs from affecting services on thecluster.TaskTracker on CLDB or ZooKeeper nodes: When the TaskTracker service is running on a node that is also running the CLDB orZooKeeper services, consider reducing the number of task slots that this node's instance of the TaskTracker service provides. SeeTuning Your MapR Install.Webserver on CLDB nodes: Avoid running the webserver on CLDB nodes. Queries to the MapR Metrics service can impose abandwidth load that reduces CLDB performance.JobTracker on large clusters: Run the JobTracker service on a dedicated node for clusters with over 250 nodes.
Nodes for Data Storage and Processing
Most nodes in a production cluster are data nodes. Data nodes can be added or removed from the cluster as requirements change over time.
Tune TaskTracker for fewer slots on nodes that include both management and data services. See .Tuning Your MapR Install
Edge Nodes
So-called Edge nodes provide a common user access point for the MapR webserver and other client tools. Edge nodes may or may not be part ofthe cluster, as long as the edge node can reach cluster nodes. Nodes on the same network can run client services, MySQL for Metrics, and so on.
Example Cluster Designs
Small M3 Cluster
For a small cluster using the free M3 Edition license, assign the CLDB, JobTracker, NFS, and WebServer services to one node each. A hardwarefailure on any of these nodes would result in a service interruption, but the cluster can be recovered. Assign the ZooKeeper service to the CLDBnode and two other nodes. Assign the FileServer and TaskTracker services to every node in the cluster.
Example Service Configuration for a 5-Node M3 Cluster

This cluster has several single points of failure, at the nodes with CLDB, JobTracker and NFS.
Small High-Availability M5 Cluster
A small M5 cluster can ensure high availability (HA) for all services by providing at least two instances of each service, eliminating single points offailure. The example below depicts a 5-node, high-availabilty M5 cluster with HBase installed. ZooKeeper is installed on three nodes. CLDB,JobTracker, and HBase Master services are installed on two nodes each, spread out as much as possible across the nodes:
Example Service Configuration for a 5-Node M5 Cluster
These examples put CLDB and ZooKeeper services on the same nodes and generally place JobTracker services on other nodes, but this issomewhat arbitrary. The JobTracker service can coexist on the same node as ZooKeeper or CLDB services.
Large High-Availability M5 Cluster
On a large cluster designed for high availability (HA), assign services according to the example below, which depicts a 150-node HA M5 cluster.The majority of nodes are dedicated to the TaskTracker service. ZooKeeper, CLDB, and JobTracker are installed on three nodes each, and areisolated from other services. The NFS server is installed on most machines, providing high network bandwidth to the cluster.
Example Service Configuration for a 100+ Node M5 Cluster

Plan Initial Volumes
MapR manages the data in a cluster in a set of . Volumes can be mounted in the Linux filesystem in a hierarchical directory structure, butvolumesvolumes do not contain other volumes. Each volume has its own policies and other settings, so it is important to define a number of volumes inorder to segregate and classify your data.
Plan to define volumes for each user, for each project, and so on. For streaming data, you might plan to create a new volume to store new dataevery day or week or month. The more volume granularity, the easier it is to specify backup or other policies for subsets of the data. For moreinformation on volumes, see .Managing Data with Volumes
User Accounts
Part of the cluster plan is a list of authorized users of the cluster. It is preferable to give each user an account, because account-sharing makesadministration more difficult. Any user of the cluster must be established with the same Linux UID and GID on every node in the cluster. Centraldirectory services, such as LDAP, are often used to simplify user maintenance.
Next Step
It is important to begin installation with a complete Cluster Plan, but plans should not be immutable. Cluster services often change over time,particularly as clusters scale up by adding nodes. Balancing resources to maximize utilization is the goal, and it will require flexibilty.
The next step is to prepare each node. Most installation difficulties are traced back to nodes that are not qualified to contribute to the cluster, orwhich have not been properly prepared. For large clusters, it can save time and trouble to use a configuration management tool such as Puppetor Chef.
Proceed to and assess each node.Preparing Each Node

Preparing Each Node
Each node contributes to the cluster designed in the , so each must be able to run MapR and Hadoop software.previous step
Requirements
CPU 64-bit
OS Red Hat, CentOS, SUSE, or Ubuntu
Memory 4 GB minimum, more in production
Disk Raw, unformatted drives and partitions
DNS Hostname, reaches all other nodes
Users Common users across all nodes; passwordless ssh (optional)
Java Must run Java
Other NTP, Syslog, PAM
Use the following sections as a checklist to make each candidate node suitable for its assigned roles. Once each node has been prepared ordisqualified, proceed to Step 3, .Installing MapR Software
2.1 CPU and Operating System
a. Processor is 64-bit

To determine the processor type, run
$ uname -mx86_64
If the output includes "x86_64," the processor is 64-bit. If it includes "i386," "i486," "i586," or "i686," it is a 32-bit processor, which is not supportedby MapR software.
If the results are "unknown," or none of the above, try one of these alternative commands.
$ uname -aLinux mach-name 2.6.35-22-server #33-Ubuntu SMP Sun Sep 19 20:48:58 UTC 2012 x86_64GNU/Linux
In the file, the flag 'lm' (for "long-mode") indicates a 64-bit processor.cpuinfo
$ grep flags /proc/cpuinfoflags : fpu vme de pse tsc msr pae mce cx8 apic sep mtrr pge mca cmovpat pse36 clflush dts acpi mmx fxsr sse sse2 ss syscall nx rdtscp lm constant_tsc uparch_perfmon pebs bts rep_good xtopology tsc_reliable nonstop_tsc aperfmperf pnipclmulqdq ssse3 cx16 sse4_1 sse4_2 popcnt aes hypervisor lahf_lm ida arat
b. Operating System is supported
Run the following command to determine the name and version of the installed operating system. (If the lsb_release command reports "No LSBmodules are available," this is not a problem.)
$ lsb_release -aNo LSB modules are available.Distributor ID: UbuntuDescription: Ubuntu 10.10Release: 10.10Codename: maverick
The operating system must be one of the following:
Operating System Minimum version
RedHat Enterprise Linux (RHEL) or Community Enterprise Linux(CentOS)
5.4 or later
SUSE Enterprise Linux Server 11 or later
Ubuntu Linux 9.04 or later
If the command is not found, try one of the following alternatives.lsb_release
$ cat /proc/versionLinux version 2.6.35-22-server (build@allspice) (gcc version 4.4.5 (Ubuntu/Linaro4.4.4-14ubuntu4) ) #33-Ubuntu SMP Sun Sep 19 20:48:58 UTC 2012
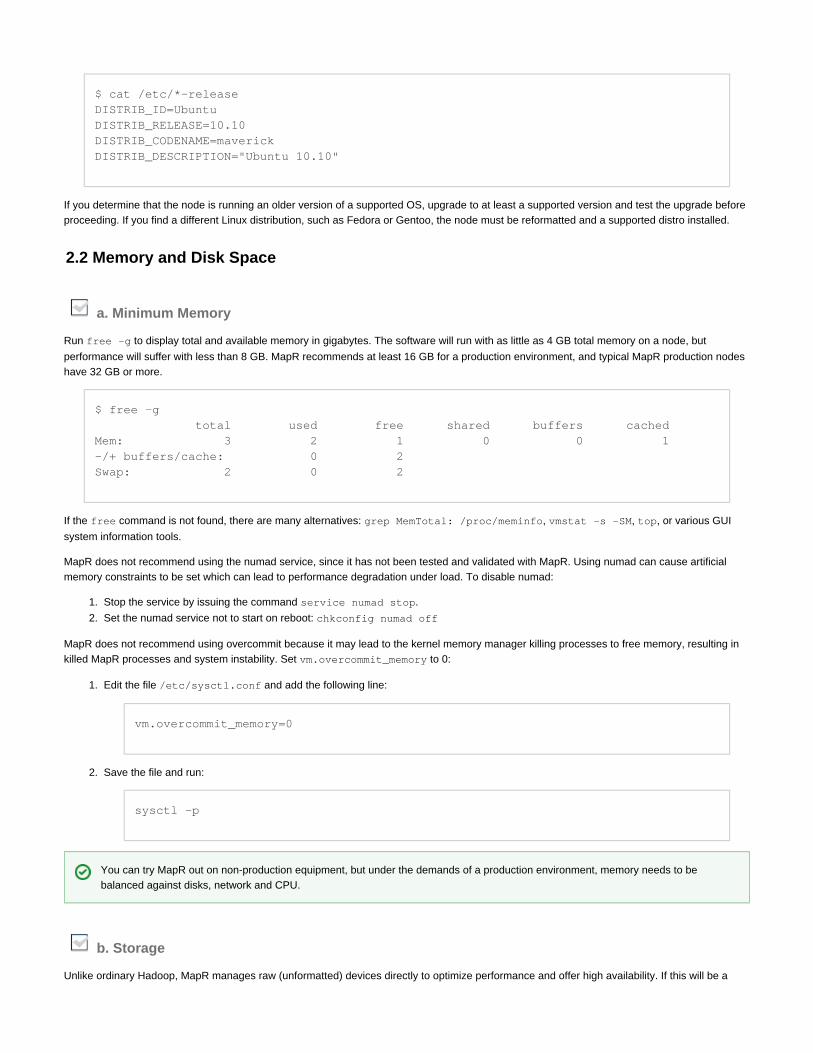
1.
2.
1.
2.
$ cat /etc/*-releaseDISTRIB_ID=UbuntuDISTRIB_RELEASE=10.10DISTRIB_CODENAME=maverickDISTRIB_DESCRIPTION="Ubuntu 10.10"
If you determine that the node is running an older version of a supported OS, upgrade to at least a supported version and test the upgrade beforeproceeding. If you find a different Linux distribution, such as Fedora or Gentoo, the node must be reformatted and a supported distro installed.
2.2 Memory and Disk Space
a. Minimum Memory
Run to display total and available memory in gigabytes. The software will run with as little as 4 GB total memory on a node, butfree -g
performance will suffer with less than 8 GB. MapR recommends at least 16 GB for a production environment, and typical MapR production nodeshave 32 GB or more.
$ free -g total used free shared buffers cachedMem: 3 2 1 0 0 1-/+ buffers/cache: 0 2Swap: 2 0 2
If the command is not found, there are many alternatives: , , , or various GUIfree grep MemTotal: /proc/meminfo vmstat -s -SM top
system information tools.
MapR does not recommend using the numad service, since it has not been tested and validated with MapR. Using numad can cause artificialmemory constraints to be set which can lead to performance degradation under load. To disable numad:
Stop the service by issuing the command .service numad stop
Set the numad service to start on reboot: not chkconfig numad off
MapR does not recommend using because it may lead to the kernel memory manager killing processes to free memory, resulting inovercommitkilled MapR processes and system instability. Set to 0:vm.overcommit_memory
Edit the file and add the following line:/etc/sysctl.conf
vm.overcommit_memory=0
Save the file and run:
sysctl -p
b. Storage
Unlike ordinary Hadoop, MapR manages raw (unformatted) devices directly to optimize performance and offer high availability. If this will be a
You can try MapR out on non-production equipment, but under the demands of a production environment, memory needs to bebalanced against disks, network and CPU.

datanode, MapR recommends at least 3 unmounted physical drives or partitions available for use by MapR storage. MapR uses disk spindles inparallel for faster read/write bandwidth and therefore groups disks into sets of three. These raw drives should not use RAID or Logical VolumeManagement. (MapR can work with these technologies, but they require advanced setup and actually degrade cluster performance.)
Minimum Disk Space
OS Partition. Provide at least 10 GB of free disk space on the operating system partition.
Disk. Provide 10 GB free disk space in the directory (for JobTracker and TaskTracker temporary files) and 128 GB free disk space in the /tmp /o
directory (for logs, cores, and support images).pt
Swap space. Provide sufficient swap space for stability, 10% more than the node's physical memory, but not less than 24 GB and not more than128 GB.
ZooKeeper. On ZooKeeper nodes, dedicate a partition, if practicable, for the directory to avoid other processes filling that/opt/mapr/zkdata
partition with writes and to reduce the possibility of errors due to a full directory. This directory is used to store snapshots/opt/mapr/zkdata
that are up to 64 MB. Since the four most recent snapshots are retained, reserve at least 500 MB for this partition. Do not share the physical diskwhere resides with any MapR File System data partitions to avoid I/O conflicts that might lead to ZooKeeper service/opt/mapr/zkdata
failures.
2.3 Connectivity
a. Hostname
Each node in the cluster must have a unique hostname, resolvable forward and backward with every other node with both normal and reverseDNS name lookup.
Run to check the node's hostname. For example:hostname -f
$ hostname -fnode125
If returns a name, run to return the node's IP address and fully-qualified domain name (FQDN).hostname -f getent hosts `hostname`
$ getent hosts `hostname`10.250.1.53 node125.corp.example.com
To troubleshoot hostname problems, edit the file as root. A simple might contain:/etc/hosts /etc/hosts
127.0.0.1 localhost10.10.5.10 mapr-hadoopn.maprtech.prv mapr-hadoopn
A common problem is an incorrect loopback entry (127.0.x.x) that prevents the IP address from being assigned to the hostname. For example, onUbuntu, the default file might contain:/etc/hosts
127.0.0.1 localhost127.0.1.1 node125.corp.example.com
MapR requires a minimum of one disk or partition for MapR data. However, file contention for a shared disk will decrease performance.In a typical production environment, multiple physical disks on each node are dedicated to the distributed file system, which results inmuch better performance.

A loopback ( ) entry with the node's hostname will confuse the installer and other programs. Edit the file and delete any127.0.x.x /etc/hosts
entries that associate the hostname with a loopback IP. Only associate the hostname with the actual IP address.
Use the command to verify that each node can reach the others using each node's hostname. For more information, see the ping hosts(5) man
.page
b. Common Users
A user that accesses the cluster must have the same credentials and user ID (uid) on each node in the cluster. Every person or department thatruns MapR jobs must have an account and must also belong to a common group ID (gid). The uid for each user, and the gid for each group, mustbe consistent across all nodes.
A 'mapr' user must exist. The 'mapr' user has full privileges to administer the cluster. If you create the 'mapr' user before you install MapR, youcan test for connectivity issues. If you do not create the 'mapr' user, installing MapR automatically creates the user for you. The 'mapr' user ID isautomatically created on each node if you do not use a directory service, such as LDAP.
To create a group, add a user to the group, or create the 'mapr' user, run the following command as root substituting a uid for and a gid for .m n(The error "cannot lock /etc/passwd" suggests that the command was not run as root.)
$ useradd mapr --gid n --uid m
c. Optional: Passwordless ssh
If you plan to use the procedure to upgrade the cluster in the future, it is very helpful for the common user to be able toscripted rolling upgradessh from each webserver node to any other node without providing a password. Otherwise, passwordless ssh between nodes is optional becauseMapR will run without it.
Setting up passwordless ssh is straightforward. On each webserver node, generate a key pair and append the key to an authorization file. Thencopy this authorization file to each node, so that every node is available from the webserver node.
su mapr (if you are not already logged in as mapr)
ssh-keygen -t rsa -P '' -f ~/filename
The command creates , containing the private key, and , containing the public key. For convenience, youssh-keygen filename filename.pub
may want to name the file for the hostname of the node. For example, on the node with hostname "node10.10.1.1,"
ssh-keygen -t rsa -P '' -f ~/node10.10.1.1
In this example, append the file to the file./home/mapr/node10.10.1.1.pub authorized_keys
Append each webserver node's public key to a single file, using a command like . (The key file iscat filename.pub >> authorized_keys
simple text, so you can append the file in several ways, including a text editor.) When every webserver node's empty passphrase public key hasbeen generated, and the public key file has been appended to the master "authorized_keys" file, copy this master keys file to each node as ~/.s
, where ~ refers to the mapr user's home directory (typically ).sh/authorized_keys /home/mapr
For more information about Ubuntu's default file, see ./etc/hosts https://bugs.launchpad.net/ubuntu/+source/cloud-init/+bug/871966
Example:
$ groupadd -g 5000 mapr
$ useradd -g 5000 -u 5000 mapr
To verify that the users or groups were created, . su mapr Verify that a home directory was created (usually /)home/mapr and that the users or groups have read-write access to it. The users or groups must have write
access to the /tmp directory, or the warden will fail to start services.
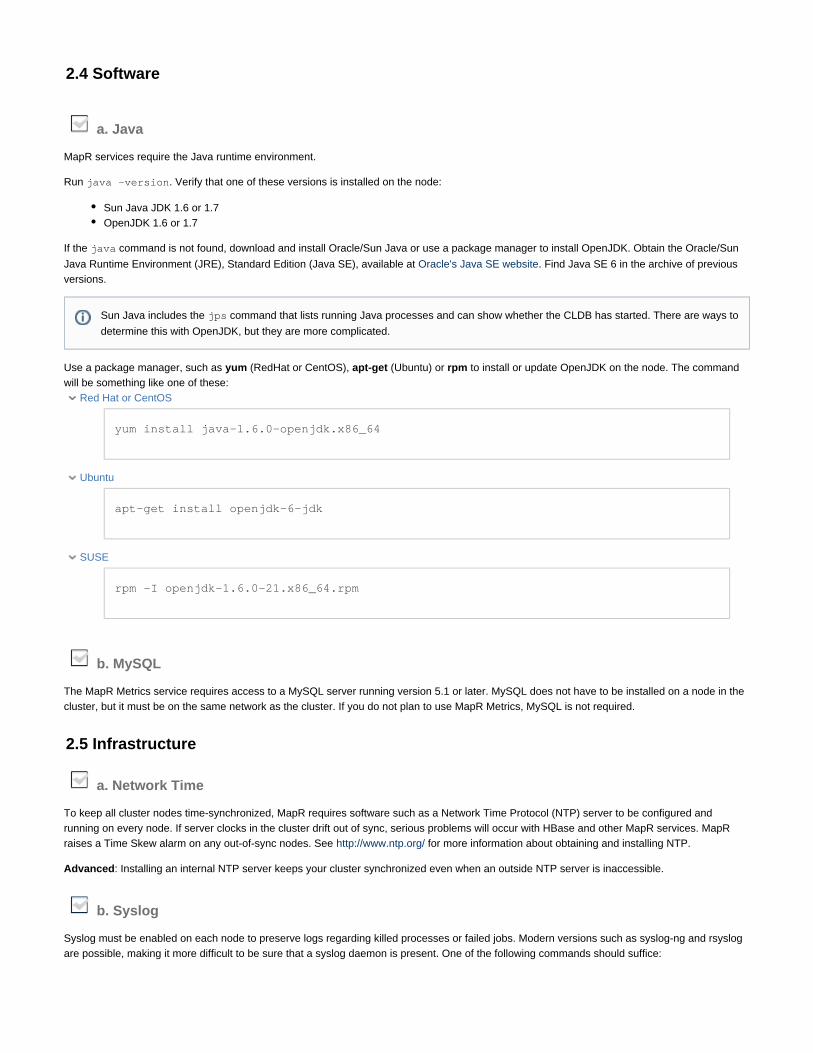
2.4 Software
a. Java
MapR services require the Java runtime environment.
Run . Verify that one of these versions is installed on the node:java -version
Sun Java JDK 1.6 or 1.7OpenJDK 1.6 or 1.7
If the command is not found, download and install Oracle/Sun Java or use a package manager to install OpenJDK. Obtain the Oracle/Sunjava
Java Runtime Environment (JRE), Standard Edition (Java SE), available at . Find Java SE 6 in the archive of previousOracle's Java SE websiteversions.
Use a package manager, such as (RedHat or CentOS), (Ubuntu) or to install or update OpenJDK on the node. The commandyum apt-get rpmwill be something like one of these:
Red Hat or CentOS
yum install java-1.6.0-openjdk.x86_64
Ubuntu
apt-get install openjdk-6-jdk
SUSE
rpm -I openjdk-1.6.0-21.x86_64.rpm
b. MySQL
The MapR Metrics service requires access to a MySQL server running version 5.1 or later. MySQL does not have to be installed on a node in thecluster, but it must be on the same network as the cluster. If you do not plan to use MapR Metrics, MySQL is not required.
2.5 Infrastructure
a. Network Time
To keep all cluster nodes time-synchronized, MapR requires software such as a Network Time Protocol (NTP) server to be configured andrunning on every node. If server clocks in the cluster drift out of sync, serious problems will occur with HBase and other MapR services. MapRraises a Time Skew alarm on any out-of-sync nodes. See for more information about obtaining and installing NTP.http://www.ntp.org/
Advanced: Installing an internal NTP server keeps your cluster synchronized even when an outside NTP server is inaccessible.
b. Syslog
Syslog must be enabled on each node to preserve logs regarding killed processes or failed jobs. Modern versions such as syslog-ng and rsyslogare possible, making it more difficult to be sure that a syslog daemon is present. One of the following commands should suffice:
Sun Java includes the command that lists running Java processes and can show whether the CLDB has started. There are ways tojps
determine this with OpenJDK, but they are more complicated.

1.
2.
3.
syslogd -vservice syslog status
rsyslogd -vservice rsyslog status
c. ulimit
ulimit is a command that sets limits on the user's access to system-wide resources. Specifically, it provides control over the resources available
to the shell and to processes started by it.
The mapr-warden script uses the command to set the maximum number of file descriptors ( ) and processes ( ) to 64000.ulimit nofile nproc
Higher values are unlikely to result in an appreciable performance gain. Lower values, such as the default value of 1024, are likely to result in taskfailures.
Depending on your environment, you might want to set limits manually rather than relying on Warden to set them automatically using .ulimit
The following examples show how to do this, using the recommended value of 64000.Setting resource limits on Centos/Redhat
Edit and add the following line:/etc/security/limits.conf
<MAPR_USER> - nofile 64000
Edit and add the following line:/etc/security/limits.d/90-nproc.conf
<MAPR_USER> - nproc 64000
Check that the /etc/pam.d/system-auth file contains the following settings:
MapR's recommended value is set automatically every time warden is started.

3.
1.
2.
1. 2.
#%PAM-1.0
auth sufficient pam_rootok.so
# Uncomment the following line to implicitly trust users in the "wheel"group.
#auth sufficient pam_wheel.so trust use_uid
# Uncomment the following line to require a user to be in the "wheel"group.
#auth required pam_wheel.so use_uid
auth include system-auth
account sufficient pam_succeed_if.so uid = 0 use_uid quiet
account include system-auth
password include system-auth
session include system-auth
session required pam_limits.so
session optional pam_xauth.so
Setting resource limits on Ubuntu
Edit and add the following lines:/etc/security/limits.conf
<MAPR_USER> - nofile 64000<MAPR_USER> - nproc 64000
Edit and uncomment the following line:/etc/pam.d/su
session required pam_limits.so
Use to verify settings:ulimit
Reboot the system.Run the following command as the MapR user (not root) at a command line:
ulimit -n
The command should report .64000
d. PAM
Nodes that will run the (the service) can take advantage of Pluggable Authentication Modules (PAM) ifMapR Control System mapr-webserver
found. Configuration files in directory are typically provided for each standard Linux command. MapR can use, but does not/etc/pam.d/

1.
2.
require, its own profile.
For more detail about configuring PAM, see .PAM Configuration
e. Security - SELinux, AppArmor
SELinux (or the equivalent on other operating systems) must be disabled during the install procedure. If the MapR services run as a non-rootuser, SELinux can be enabled after installation and while the cluster is running.
f. TCP Retries
On each node, set the number of TCP retries to 5 so that MapR can detect unreachable nodes with less latency.
Edit the file and add the following line:/etc/sysctl.conf
net.ipv4.tcp_retries2=5
Save the file and run:
sysctl -p
g. NFS
Disable the stock Linux NFS server on nodes that will run the MapR NFS server.
h. iptables
Enabling iptables on a node may close ports that are used by MapR. If you enable iptables, make sure that remain open. Checkrequired portsyour current IP table rules with the following command:
$ service iptables status
Automated Configuration
Some users find tools like Puppet or Chef useful to configure each node in a cluster. Make sure, however, that any configuration tool does notreset changes made when MapR packages are later installed. Specifically, do not let automated configuration tools overwrite changes to thefollowing files:
/etc/sudoers
/etc/security/limits.conf
/etc/udev/rules.d/99-mapr-disk.rules
Next Step
Each prospective node in the cluster must be checked against the requirements presented here. Failure to ensure that each node is suitable foruse generally leads to hard-to-resolve problems with installing Hadoop.
After each node has been shown to meet the requirements and has been prepared, you are ready to .Install MapR components
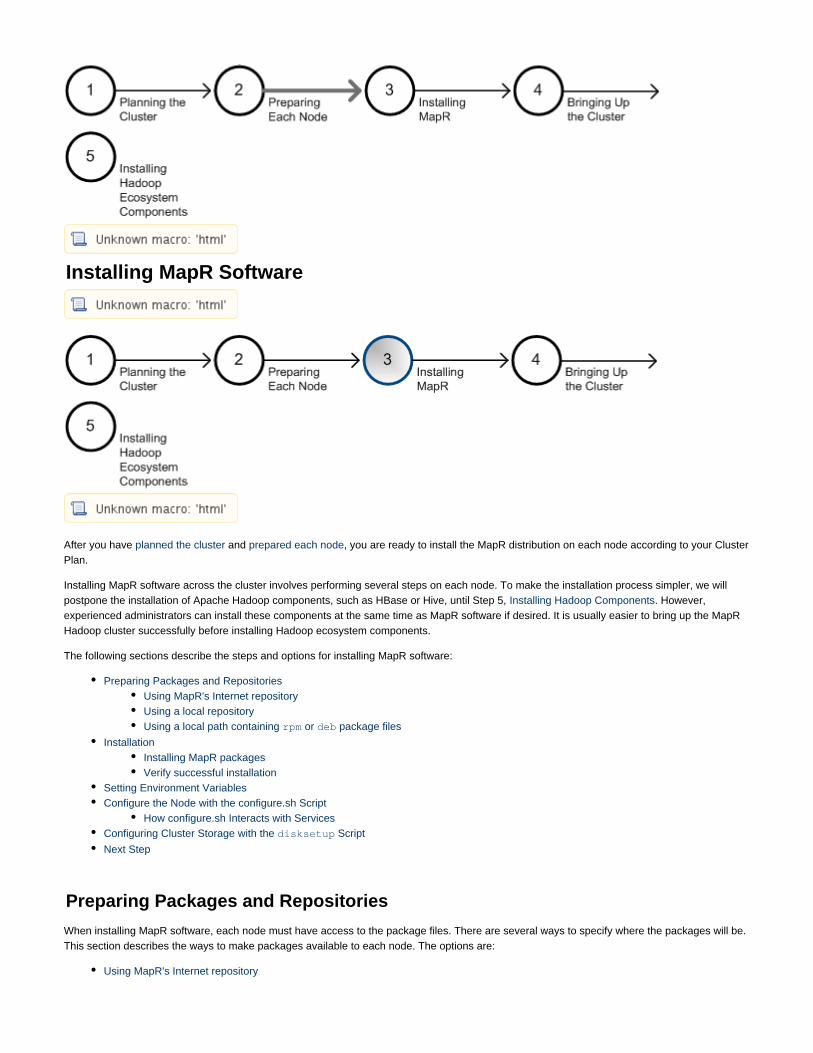
Installing MapR Software
After you have and , you are ready to install the MapR distribution on each node according to your Clusterplanned the cluster prepared each nodePlan.
Installing MapR software across the cluster involves performing several steps on each node. To make the installation process simpler, we willpostpone the installation of Apache Hadoop components, such as HBase or Hive, until Step 5, . However,Installing Hadoop Componentsexperienced administrators can install these components at the same time as MapR software if desired. It is usually easier to bring up the MapRHadoop cluster successfully before installing Hadoop ecosystem components.
The following sections describe the steps and options for installing MapR software:
Preparing Packages and RepositoriesUsing MapR's Internet repositoryUsing a local repositoryUsing a local path containing or package filesrpm deb
InstallationInstalling MapR packagesVerify successful installation
Setting Environment VariablesConfigure the Node with the configure.sh Script
How configure.sh Interacts with ServicesConfiguring Cluster Storage with the Scriptdisksetup
Next Step
Preparing Packages and Repositories
When installing MapR software, each node must have access to the package files. There are several ways to specify where the packages will be.This section describes the ways to make packages available to each node. The options are:
Using MapR's Internet repository

1.
2.
3.
Using a local repositoryUsing a local path containing or package filesrpm deb
You also must consider all packages that the MapR software depends on. You can install dependencies on each node before beginning theMapR installation process, or you can specify repositories and allow the package manager on each node to resolve dependencies. See Packages
for details.and Dependencies for MapR Software
Starting in the 2.0 release, MapR separates the distribution into two repositories:
MapR packages which provide core functionality for MapR clusters, such as the MapR filesystemHadoop ecosystem packages which are not specific to MapR, such as HBase, Hive and Pig
Using MapR's Internet repository
The MapR repository on the Internet provides all the packages you need in order to install a MapR cluster using native tools such as on Redyum
Hat or CentOS, or on Ubuntu. Installing from MapR's repository is generally the easiest method for installation, but requires the greatestapt-get
amount of bandwidth. With this method, each node must be connected to the Internet and will individually download the necessary packages.
Below are instructions on setting up repositories for each supported Linux distribution.
Adding the MapR repository on Red Hat or CentOS
Change to the user (or use for the following commands).root sudo
Create a text file called in the directory with the following contents:maprtech.repo /etc/yum.repos.d/
[maprtech]name=MapR Technologiesbaseurl=http://package.mapr.com/releases/v3.1.0/redhat/enabled=1gpgcheck=0protect=1
[maprecosystem]name=MapR Technologiesbaseurl=http://package.mapr.com/releases/ecosystem/redhatenabled=1gpgcheck=0protect=1
(See the for the correct paths for all past releases.)Release NotesIf your connection to the Internet is through a proxy server, you must set the environment variable before installation:http_proxy
http_proxy=http://<host>:<port>export http_proxy
You can also set the value for the environment variable by adding the following section to the file:http_proxy /etc/yum.conf
proxy=http://<host>:<port>proxy_username=<username>proxy_password=<password>
To enable the EPEL repository on CentOS or Red Hat 5.x:
The EPEL (Extra Packages for Enterprise Linux) repository contains dependencies for the package on Redmapr-metrics
Hat/CentOS. If your Red Hat/CentOS cluster does not use the service, you can skip EPEL configuration.mapr-metrics

1.
2.
1.
2.
1.
2.
3.
4.
5.
6.
Download the EPEL repository:
wget http://dl.fedoraproject.org/pub/epel/5/x86_64/epel-release-5-4.noarch.rpm
Install the EPEL repository:
rpm -Uvh epel-release-5*.rpm
To enable the EPEL repository on CentOS or Red Hat 6.x:
Download the EPEL repository:
wgethttp://download.fedoraproject.org/pub/epel/6/x86_64/epel-release-6-8.noarch.rpm
Install the EPEL repository:
rpm -Uvh epel-release-6*.rpm
Adding the MapR repository on SUSE
Change to the user (or use for the following commands).root sudo
Use the following command to add the repository for MapR packages:
zypper ar http://package.mapr.com/releases/v3.1.0/suse/ maprtech
Use the following command to add the repository for MapR ecosystem packages:
zypper ar http://package.mapr.com/releases/ecosystem/suse/ maprecosystem
(See the for the correct paths for all past releases.)MapR Release NotesIf your connection to the Internet is through a proxy server, you must set the environment variable before installation:http_proxy
http_proxy=http://<host>:<port>export http_proxy
Update the system package index by running the following command:
zypper refresh
MapR packages require a compatibility package in order to install and run on SUSE. Execute the following command to install theSUSE compatibility package:
zypper install mapr-compat-suse

1.
2.
3.
4.
1.
2.
3.
4.
5.
Adding the MapR repository on Ubuntu
Change to the user (or use for the following commands).root sudo
Add the following lines to :/etc/apt/sources.list
deb http://package.mapr.com/releases/v3.1.0/ubuntu/ mapr optionaldeb http://package.mapr.com/releases/ecosystem/ubuntu binary/
(See the for the correct paths for all past releases.)MapR Release NotesUpdate the package indexes.
apt-get update
If your connection to the Internet is through a proxy server, add the following lines to :/etc/apt/apt.conf
Acquire {Retries "0";HTTP {Proxy "http://<user>:<password>@<host>:<port>";};};
Using a local repository
You can set up a local repository on each node to provide access to installation packages. With this method, the package manager on each nodeinstalls from packages in the local repository. Nodes do not need to be connected to the Internet.
Below are instructions on setting up a local repository for each supported Linux distribution. These instructions create a single repository thatincludes both MapR components and the Hadoop ecosystem components.
Setting up a local repository requires running a web server that nodes access to download the packages. Setting up a web server is notdocumented here.
Creating a local repository on Red Hat or CentOS
Login as on the node.root
Create the following directory if it does not exist: /var/www/html/yum/base
On a computer that is connected to the Internet, download the following files, substituting the appropriate and <version> <datest
:amp>
http://package.mapr.com/releases/v<version>/redhat/mapr-v<version>GA.rpm.tgzhttp://package.mapr.com/releases/ecosystem/redhat/mapr-ecosystem-<datestamp>.rpm.tgz
(See for the correct paths for all past releases.)MapR Repositories and Package ArchivesCopy the files to on the node, and extract them there./var/www/html/yum/base
tar -xvzf mapr-v<version>GA.rpm.tgztar -xvzf mapr-ecosystem-<datestamp>.rpm.tgz
Create the base repository headers:

5.
1.
1.
2.
1.
2.
1.
2.
3.
createrepo /var/www/html/yum/base
When finished, verify the contents of the new directory: /var/www/html/yum/base/repodata filelists.xml.gz,
other.xml.gz, primary.xml.gz, repomd.xml
To add the repository on each node
Add the following lines to the file:/etc/yum.conf
[maprtech]name=MapR Technologies, Inc.baseurl=http://<host>/yum/baseenabled=1gpgcheck=0
To enable the EPEL repository on CentOS or Red Hat 5.x:
On a computer that is connected to the Internet, download the EPEL repository:
wget http://dl.fedoraproject.org/pub/epel/5/x86_64/epel-release-5-4.noarch.rpm
Install the EPEL repository:
rpm -Uvh epel-release-5*.rpm
To enable the EPEL repository on CentOS or Red Hat 6.x:
On a computer that is connected to the Internet, download the EPEL repository:
wgethttp://download.fedoraproject.org/pub/epel/6/x86_64/epel-release-6-8.noarch.rpm
Install the EPEL repository:
rpm -Uvh epel-release-6*.rpm
Creating a local repository on SUSE
Login as on the node.root
Create the following directory if it does not exist: /var/www/html/zypper/base
On a computer that is connected to the Internet, download the following files, substituting the appropriate and <version> <datest
:amp>
The EPEL (Extra Packages for Enterprise Linux) repository contains dependencies for the package on Redmapr-metrics
Hat/CentOS. If your Red Hat/CentOS cluster does not use the service, you can skip EPEL configuration.mapr-metrics

3.
4.
5.
1.
1.
2.
3.
4.
http://package.mapr.com/releases/v<version>/suse/mapr-v<version>GA.rpm.tgzhttp://package.mapr.com/releases/ecosystem/suse/mapr-ecosystem-<datestamp>.rpm.tgz
(See for the correct paths for all past releases.)MapR Repositories and Package ArchivesCopy the files to on the node, and extract them there./var/www/html/zypper/base
tar -xvzf mapr-v<version>GA.rpm.tgztar -xvzf mapr-ecosystem-<datestamp>.rpm.tgz
Create the base repository headers:
createrepo /var/www/html/zypper/base
When finished, verify the contents of the new directory: /var/www/html/zypper/base/repodata filelists.xml.gz,
other.xml.gz, primary.xml.gz, repomd.xml
To add the repository on each node
Use the following commands to add the repository for MapR packages and the MapR ecosystem packages, substituting theappropriate <version>:
zypper ar http://<host>/zypper/base/ maprtech
Creating a local repository on Ubuntu
To create a local repository
Login as on the machine where you will set up the repository.root
Change to the directory and create the following directories within it:/root
~/mapr. dists binary optional binary-amd64 mapr
On a computer that is connected to the Internet, download the following files, substituting the appropriate and <version> <datest
.amp>
http://package.mapr.com/releases/v<version>/ubuntu/mapr-v<version>GA.deb.tgzhttp://package.mapr.com/releases/ecosystem/ubuntu/mapr-ecosystem-<datestamp>.deb.tgz
(See for the correct paths for all past releases.)MapR Repositories and Package ArchivesCopy the files to on the node, and extract them there./root/mapr/mapr

4.
5.
6.
7.
1.
2.
1.
2.
tar -xvzf mapr-v<version>GA.rpm.tgztar -xvzf mapr-ecosystem-<datestamp>.rpm.tgz
Navigate to the directory./root/mapr/
Use to create in the directory:dpkg-scanpackages Packages.gz binary-amd64
dpkg-scanpackages . /dev/null | gzip -9c >./dists/binary/optional/binary-amd64/Packages.gz
Move the entire directory to the default directory served by the HTTP server (e. g. ) and make sure the/root/mapr /var/www
HTTP server is running.
To add the repository on each node
Add the following line to on each node, replacing with the IP address or hostname of the node/etc/apt/sources.list <host>
where you created the repository:
deb http://<host>/mapr binary optional
On each node update the package indexes (as or with ).root sudo
apt-get update
After performing the above steps, you can use as normal to install MapR software and Hadoop ecosystem components on eachapt-get
node from the local repository.
Using a local path containing or package filesrpm deb
You can download package files and store them locally, and install from there. This option is useful for clusters that are not connected to theInternet.
Using a machine connected to the Internet, download the tarball for the MapR components and the Hadoop ecosystem components,substituting appropriate , and :<platform> <version> <datestamp>
<version>/<platform>/mapr-v<version>GA.rpm.tgzhttp://package.mapr.com/releases/v (or ).deb.tgz
<platform>/mapr-ecosystem-<datestamp>.rpm.tgzhttp://package.mapr.com/releases/ecosystem/ (or .deb
).tgz
For example, .http://package.mapr.com/releases/v3.1.0/ubuntu/mapr-v3.1.0GA.deb.tgz(See for the correct paths for all past releases.)MapR Repositories and Package Archives
Extract the tarball to a local directory, either on each node or on a local network accessible by all nodes.
tar -xvzf mapr-v<version>GA.rpm.tgztar -xvzf mapr-ecosystem-<datestamp>.rpm.tgz
MapR package dependencies need to be pre-installed on each node in order for MapR installation to succeed. If you are not using a packagemanager to install dependencies from Internet repositories, you need to manually download and install other dependency packages as well.
Installation
After and preparing packages and repositories, you are ready to install the MapR software.making your Cluster Plan

1. 2.
3.
To proceed you will need the following from your Cluster Plan:
A list of the hostnames (or IP addresses) for all CLDB nodesA list of the hostnames (or IP addresses) for all ZooKeeper nodesA list of all disks and/or partitions to be used for the MapR cluster on all nodes
Perform the following steps on each node:
Install the planned MapR servicesRun the script to the nodeconfigure.sh configure
Format raw drives and partitions allocated to MapR using the scriptdisksetup
The following table shows some of the services that can be run on a node, and the name of the package used to install the service.
Service Package
CLDB mapr-cldb
JobTracker mapr-jobtracker
MapR Control System mapr-webserver
MapR-FS File Server mapr-fileserver
Metrics mapr-metrics
NFS mapr-nfs
TaskTracker mapr-tasktracker
ZooKeeper mapr-zookeeper
MapR HBase Client mapr-hbase-<version>
Refer to the section of the Installing HBase on a Client HBase for details.documentation
Hadoop Ecosystem Components Use MapR-tested versions, compatible and in some cases improvedcomponents
Cascading mapr-cascading
Flume mapr-flume
HBase mapr-hbase-master
mapr-hbase-regionserver
HCatalog mapr-hcatalog
mapr-hcatalog-server
Hive mapr-hive
Mahout mapr-mahout
Oozie mapr-oozie
Pig mapr-pig
Sqoop mapr-sqoop
Whirr mapr-whirr
Before you proceed, make sure that all nodes meet the . Failure to meet node requirements is the primaryRequirements for Installationcause of installation problems.

1.
2.
1.
2.
1.
2.
MapR HBase Client Installation on M7 Edition
MapR M7 Edition, which introduces table storage in MapR-FS, is available in MapR version 3.0 and later. Nodes that will access table data inMapR-FS must have the MapR HBase Client installed. The package name is , where matches the versionmapr-hbase-<version> <version>
of HBase API to support, such as 0.92.2 or 0.94.5. This version has no impact on the underlying storage format used by the MapR-FS file server.
If you have existing applications written for a specific version of the HBase API, install the MapR HBase Client package with the same version. Ifyou are developing new applications to use MapR tables exclusively, use the highest available version of the MapR HBase Client.
Installing MapR packages
Based on your Cluster Plan for which services to run on which nodes, use the commands in this section to install the appropriate packages foreach node.
You can use a package manager such as or , which will automatically resolve and install dependency packages, provided thatyum apt-get
necessary repositories have been set up correctly. Alternatively, you can use or commands to manually install package files that yourpm dpkg
have downloaded and extracted to a local directory.
Installing from a repositoryInstalling from a repository on Red Hat or CentOS
Change to the user (or use for the following command).root sudo
Use the command to install the services planned for the node. For example:yum
Use the following command to install TaskTracker and MapR-FS
yum install mapr-tasktracker mapr-fileserver
Use the following command to install CLDB, JobTracker, Webserver, ZooKeeper, Hive, Pig, Mahout, and the MapR HBaseclient 0.92.2:
yum install mapr-cldb mapr-jobtracker mapr-webserver mapr-zookeepermapr-hive mapr-pig mapr-mahout mapr-hbase-0.92.2.19720.GA
Installing from a repository on SUSE
Change to the user (or use for the following command).root sudo
Use the command to install the services planned for the node. For example:zypper
Use the following command to install TaskTracker and MapR-FS
zypper install mapr-tasktracker mapr-fileserver
Use the following command to install CLDB, JobTracker, Webserver, ZooKeeper, Hive, Pig, Mahout, and the MapR HBaseclient 0.92.2:
zypper install mapr-cldb mapr-jobtracker mapr-webserver mapr-zookeepermapr-hive mapr-pig mapr-mahout mapr-hbase-0.92.2.19720.GA
Installing from a repository on Ubuntu
Change to the user (or use for the following commands).root sudo
On all nodes, issue the following command to update the Ubuntu package cache:
apt-get update

3.
1.
2.
3.
1.
2.
3.
Use the command to install the services planned for the node. For example:apt-get install
Use the following command to install TaskTracker and MapR-FS
apt-get install mapr-tasktracker mapr-fileserver
Use the following command to install CLDB, JobTracker, Webserver, ZooKeeper, Hive, Pig, Mahout, and the MapR HBaseclient 0.92.2:
apt-get install mapr-cldb mapr-jobtracker mapr-webserver mapr-zookeepermapr-hive mapr-pig mapr-mahout mapr-hbase=0.92.2.19720.GA
Installing from package files
When installing from package files, you must manually pre-install any dependency packages in order for the installation to succeed. Note thatmost MapR packages depend on the package . Similarly, many Hadoop ecosystem components have internal dependencies, such asmapr-core
the package for . See for details.hbase-internal mapr-hbase-regionserver Packages and Dependencies for MapR Software
In the commands that follow, replace with the exact version string found in the package filename. For example, for version 3.1.0,<version>
substitute with .mapr-core-<version>.x86_64.rpm mapr-core-3.1.0.GA-1.x86_64.rpm
Installing from local files on Red Hat, CentOS, or SUSE
Change to the user (or use for the following command).root sudo
Change the working directory to the location where the package files are located.rpm
Use the command to install the appropriate packages for the node. For example:rpm
Use the following command to install TaskTracker and MapR-FS
rpm -ivh mapr-core-<version>.x86_64.rpmmapr-fileserver-<version>.x86_64.rpmmapr-tasktracker-<version>.x86_64.rpm
Use the following command to install CLDB, JobTracker, Webserver, ZooKeeper, Hive, Pig, and the MapR HBase client:
rpm -ivh mapr-core-<version>.x86_64.rpm mapr-cldb-<version>.x86_64.rpm \mapr-jobtracker-<version>.x86_64.rpm mapr-webserver-<version>.x86_64.rpm\mapr-zk-internal-<version>.x86_64.rpm mapr-zookeeper-<version>.x86_64.rpm\mapr-hive-<version>.noarch.rpm mapr-pig-<version>.noarch.rpm \mapr-hbase-<version>.noarch.rpm
Installing from local files on Ubuntu
Change to the user (or use for the following command).root sudo
Change the working directory to the location where the package files are located.deb
Use the command to install the appropriate packages for the node. For example:dpkg
Use the following command to install TaskTracker and MapR-FS
dpkg -i mapr-core_<version>.x86_64.debmapr-fileserver_<version>.x86_64.debmapr-tasktracker_<version>.x86_64.deb
Use the following command to install CLDB, JobTracker, Webserver, ZooKeeper, Hive, Pig, and the MapR HBase client:

3.
dpkg -i mapr-core_<version>_amd64.deb mapr-cldb_<version>_amd64.deb \mapr-jobtracker_<version>_amd64.deb mapr-webserver_<version>_amd64.deb \mapr-zk-internal_<version>_amd64.deb mapr-zookeeper_<version>_amd64.deb \mapr-pig-<version>_all.deb mapr-hive-<version>_all.deb \mapr-hbase-<version>_all.deb
Verify successful installation
To verify that the software has been installed successfully, check the directory on each node. The software is installed in/opt/mapr/roles
directory and a file is created in for every service that installs successfully. Examine this directory to verify/opt/mapr /opt/mapr/roles
installation for the node. For example:
# ls -l /opt/mapr/rolestotal 0-rwxr-xr-x 1 root root 0 Jan 29 17:59 fileserver-rwxr-xr-x 1 root root 0 Jan 29 17:58 tasktracker-rwxr-xr-x 1 root root 0 Jan 29 17:58 webserver-rwxr-xr-x 1 root root 0 Jan 29 17:58 zookeeper
Setting Environment Variables
Set in . This variable be set before you start ZooKeeper or Warden.JAVA_HOME /opt/mapr/conf/env.sh must
Set other environment variables for MapR as described in the section.Environment Variables
Configure the Node with the configure.sh Script
The script configures a node to be part of a MapR cluster, or modifies services running on an existing node in the cluster. Theconfigure.sh
script creates (or updates) configuration files related to the cluster and the services running on the node.
Before you run , make sure you have a list of the hostnames of the CLDB and ZooKeeper nodes. You can optionally specify theconfigure.sh
ports for the CLDB and ZooKeeper nodes as well. The default ports are:
Service Default Port #
CLDB 7222
ZooKeeper 5181
The script takes an optional cluster name and log file, and comma-separated lists of CLDB and ZooKeeper host names or IPconfigure.sh
addresses (and optionally ports), using the following syntax:
/opt/mapr/server/configure.sh -C <host>[:<port>][,<host>[:<port>]...] -Z
<host>[:<port>][,<host>[:<port>]...] [-L <logfile>][-N <cluster name>]
Configure the node first, then prepare raw disks and partitions with the command. On version 3.1 and later of the MapRdisksetup
distribution for Hadoop, the script can handle the disk setup tasks on its own. Refer to the main configure.sh docuconfigure.sh
for details.mentation
If you plan to license your cluster for M7, run the script with the option to apply M7 settings to the node. If the M7configure.sh -M7
license is applied to the cluster before the nodes are configured with the M7 settings, the system raises the NODE_ALARM_M7_CONFIG
alarm. To clear the alarm, restart the FileServer service on all of the nodes using the instructions on the page._MISMATCH Services

Example:
/opt/mapr/server/configure.sh -C r1n1.sj.us:7222,r3n1.sj.us:7222,r5n1.sj.us:7222 -Zr1n1.sj.us:5181,r2n1.sj.us:5181,r3n1.sj.us:5181,r4n1.sj.us:5181,r5n1.sj.us:5181 -NMyCluster
How configure.sh Interacts with Services
When you run the script on a node with the role, the script runs the command to disableconfigure.sh mapr-nfs /etc/init.d nfs stop
the standard Linux NFS daemon.
The script starts the services below if they are not already running, but does not restart them if they are already running:configure.sh
When you run the script on a node with the role, the script automatically starts the ZooKeeperconfigure.sh mapr-zookeeper
service.The script automatically starts the Warden service on any node where you run the script.configure.sh
The Warden are ZooKeeper service are added to the file as the first available IDs, enabling these services to restartinittab inittab
automatically upon failure.
When the script starts services, the message is echoed to the standard output, to enable the userconfigure.sh starting <servicename>
to see which services are starting.
Configuring Cluster Storage with the Scriptdisksetup
If is installed on this node, use the following procedure to format the disks and partitions for use by MapR.mapr-fileserver
/dev/sdb
/dev/sdc1 /dev/sdc2 /dev/sdc4
/dev/sdd
Later, when you run to format the disks, specify the file. For example:disksetup disks.txt
Each time you specify the option, you must use the for the ZooKeeper node list. If you change the-Z <host>[:<port>] same order
order for any node, the ZooKeeper leader election process will fail.
This section only applies to versions 3.1 and later of the MapR distribution for Hadoop.
The script is used to format disks for use by the MapR cluster. Create a text file listing the disks anddisksetup /tmp/disks.txt
partitions for use by MapR on the node. Each line lists either a single disk or all applicable partitions on a single disk. When listingmultiple partitions on a line, separate by spaces. For example:
Run the script (described above) running .configure.sh before disksetup
On versions 3.1 and later of the MapR distribution for Hadoop, you can have the script handle disk formatingconfigure.sh
by passing the or flags. Refer to the main for details.-D -F documentationconfigure.sh
/opt/mapr/server/disksetup -F /tmp/disks.txt
The script removes all data from the specified disks. Make sure you specify the disks correctly, and that any data you wishdisksetup
to keep has been backed up elsewhere.

If you are re-using a node that was used previously in another cluster, it is important to format the disks to remove any traces of data from the oldcluster.
This procedure assumes you have free, unmounted physical partitions or hard disks for use by MapR. If you are not sure, please read Setting Up.Disks for MapR
Next Step
After you have successfully installed MapR software on each node according to your cluster plan, you are ready to .bring up the cluster
MapR Repositories and Package Archives
This page describes the online repositories and archives for MapR software.
and Repositories for MapR Core Softwarerpm deb
and Repositories for Hadoop Ecosystem Toolsrpm deb
Package Archive for All Releases of Hadoop Ecosystem ToolsGitHub Repositories for Source CodeMaven Repositories for Application DevelopersOther Scripts and ToolsHistory of and Repository URLsrpm deb
rpm and Repositories for MapR Core Softwaredeb
MapR hosts and repositories for installing the MapR core software using Linux package management tools. For every release of therpm deb
core MapR software, a repository is created for each supported platform.
These platform-specific repositories are hosted at: <version>/<platform>http://package.mapr.com/releases/
For a list of the repositories for all MapR releases see section below.History of rpm and deb Repository URLs
rpm and Repositories for Hadoop Ecosystem Toolsdeb
MapR hosts and repositories for installing Hadoop ecosystem tools, such as Cascading, Flume, HBase, HCatalog, Hive, Mahout, Oozie,rpm deb
Pig, Sqoop, and Whirr. At any given time, MapR's recommended versions of ecosystem tools that work with the latest version of MapR coresoftware are available here.
These platform-specific repositories are hosted at: <platform>http://package.mapr.com/releases/ecosystem/
Package Archive for All Releases of Hadoop Ecosystem Tools
All of MapR's past and present releases of Hadoop ecosystem tools, such as HBase, Hive, and Oozie, are available at: http://package.mapr.com/r<platform>.eleases/ecosystem-all/
While this is not a repository, and files are archived here, and you can download and install them manually.rpm deb

GitHub Repositories for Source Code
MapR releases the source code for Hadoop ecosystem components to GitHub, including all patches MapR has applied to the components.MapR's repos under GitHub include Cascading, Flume, HBase, HCatalog, Hive, Mahout, Oozie, Pig, Sqoop, and Whirr. Source code for allreleases since March 2013 are available here. For details see or browse to .Source Code for MapR Software http://github.com/mapr
Maven Repositories for Application Developers
MapR hosts a Maven repository where application developers can download dependencies on MapR software or Hadoop ecosystemcomponents. Maven artifacts for all releases since March 2013 are available here. For details see .Maven Repository and Artifacts for MapR
Other Scripts and Tools
Other MapR scripts and tools can be found in the following locations:
http://package.mapr.com/scripts/http://package.mapr.com/tools/
History of and Repository URLsrpm deb
Here is a list of the paths to the repositories for current and past releases of the MapR distribution for Apache Hadoop.
Version 3.1.0http://archive.mapr.com/releases/v3.1.0/mac/ (Mac)http://archive.mapr.com/releases/v3.1.0/redhat/ (CentOS or Red Hat)http://archive.mapr.com/releases/v3.1.0/suse/ (SUSE)http://archive.mapr.com/releases/v3.1.0/ubuntu/ (Ubuntu)http://archive.mapr.com/releases/v3.1.0/windows/ (Windows)
Version 3.0.2http://package.mapr.com/releases/v3.0.2/mac/ (Mac)http://package.mapr.com/releases/v3.0.2/redhat/ (CentOS or Red Hat)http://package.mapr.com/releases/v3.0.2/suse/ (SUSE)http://package.mapr.com/releases/v3.0.2/ubuntu/ (Ubuntu)http://package.mapr.com/releases/v3.0.2/windows/ (Windows)
Version 3.0.1http://package.mapr.com/releases/v3.0.1/mac/ (Mac)http://package.mapr.com/releases/v3.0.1/redhat/ (CentOS or Red Hat)http://package.mapr.com/releases/v3.0.1/suse/ (SUSE)http://package.mapr.com/releases/v3.0.1/ubuntu/ (Ubuntu)http://package.mapr.com/releases/v3.0.1/windows/ (Windows)
Version 2.1.3http://package.mapr.com/releases/v2.1.3/mac/ (Mac)http://package.mapr.com/releases/v2.1.3/redhat/ (CentOS or Red Hat)http://package.mapr.com/releases/v2.1.3/suse/ (SUSE)http://package.mapr.com/releases/v2.1.3/ubuntu/ (Ubuntu)http://package.mapr.com/releases/v2.1.3/windows/ (Windows)
Version 2.1.2http://package.mapr.com/releases/v2.1.2/mac/ (Mac)http://package.mapr.com/releases/v2.1.2/redhat/ (CentOS or Red Hat)http://package.mapr.com/releases/v2.1.2/suse/ (SUSE)http://package.mapr.com/releases/v2.1.2/ubuntu/ (Ubuntu)http://package.mapr.com/releases/v2.1.2/windows/ (Windows)
Version 2.1.1http://package.mapr.com/releases/v2.1.1/mac/ (Mac)http://package.mapr.com/releases/v2.1.1/redhat/ (CentOS or Red Hat)http://package.mapr.com/releases/v2.1.1/suse/ (SUSE)http://package.mapr.com/releases/v2.1.1/ubuntu/ (Ubuntu)http://package.mapr.com/releases/v2.1.1/windows/ (Windows)
Version 2.1http://package.mapr.com/releases/v2.1.0/mac/ (Mac)

http://package.mapr.com/releases/v2.1.0/redhat/ (CentOS or Red Hat)http://package.mapr.com/releases/v2.1.0/suse/ (SUSE)http://package.mapr.com/releases/v2.1.0/ubuntu/ (Ubuntu)http://package.mapr.com/releases/v2.1.0/windows/ (Windows)
Version 2.0.1http://package.mapr.com/releases/v2.0.1/redhat/ (CentOS or Red Hat)http://package.mapr.com/releases/v2.0.1/suse/ (SUSE)http://package.mapr.com/releases/v2.0.1/ubuntu/ (Ubuntu)
Version 2.0.0http://package.mapr.com/releases/v2.0.0/mac/ (Mac)http://package.mapr.com/releases/v2.0.0/redhat/ (CentOS or Red Hat)http://package.mapr.com/releases/v2.0.0/suse/ (SUSE)http://package.mapr.com/releases/v2.0.0/ubuntu/ (Ubuntu)http://package.mapr.com/releases/v2.0.0/windows/ (Windows)
Version 1.2.10http://package.mapr.com/releases/v1.2.10/redhat/ (CentOS or Red Hat)http://package.mapr.com/releases/v1.2.10/suse/ (SUSE)http://package.mapr.com/releases/v1.2.10/ubuntu/ (Ubuntu)
Version 1.2.9http://package.mapr.com/releases/v1.2.9/mac/ (Mac)http://package.mapr.com/releases/v1.2.9/redhat/ (CentOS, Red Hat, or SUSE)http://package.mapr.com/releases/v1.2.9/ubuntu/ (Ubuntu)http://package.mapr.com/releases/v1.2.9/windows/ (Windows)
Version 1.2.7http://package.mapr.com/releases/v1.2.7/mac/ (Mac)http://package.mapr.com/releases/v1.2.7/redhat/ (CentOS, Red Hat, or SUSE)http://package.mapr.com/releases/v1.2.7/ubuntu/ (Ubuntu)http://package.mapr.com/releases/v1.2.7/windows/ (Windows)
Version 1.2.3http://package.mapr.com/releases/v1.2.3/mac/ (Mac)http://package.mapr.com/releases/v1.2.3/redhat/ (Red Hat or CentOS)http://package.mapr.com/releases/v1.2.3/ubuntu/ (Ubuntu)http://package.mapr.com/releases/v1.2.3/windows/ (Windows)
Version 1.2.2http://package.mapr.com/releases/v1.2.2/mac/ (Mac)http://package.mapr.com/releases/v1.2.2/redhat/ (Red Hat or CentOS)http://package.mapr.com/releases/v1.2.2/ubuntu/ (Ubuntu)http://package.mapr.com/releases/v1.2.2/windows/ (Windows)
Version 1.2.0http://package.mapr.com/releases/v1.2.0/mac/ (Mac)http://package.mapr.com/releases/v1.2.0/redhat/ (Red Hat or CentOS)http://package.mapr.com/releases/v1.2.0/ubuntu/ (Ubuntu)http://package.mapr.com/releases/v1.2.0/windows/ (Windows)
Version 1.1.3http://package.mapr.com/releases/v1.1.3/redhat/ (Red Hat or CentOS)http://package.mapr.com/releases/v1.1.3/ubuntu/ (Ubuntu)
Version 1.1.2 - Internal maintenance releaseVersion 1.1.1
http://package.mapr.com/releases/v1.1.1/mac/ (Mac client)http://package.mapr.com/releases/v1.1.1/redhat/ (Red Hat or CentOS)http://package.mapr.com/releases/v1.1.1/ubuntu/ (Ubuntu)
Version 1.1.0http://package.mapr.com/releases/v1.1.0-sp0/mac/ (Mac client)http://package.mapr.com/releases/v1.1.0-sp0/redhat/ (Red Hat or CentOS)http://package.mapr.com/releases/v1.1.0-sp0/ubuntu/ (Ubuntu)
Version 1.0.0http://package.mapr.com/releases/v1.0.0-sp0/redhat/ (Red Hat or CentOS)http://package.mapr.com/releases/v1.0.0-sp0/ubuntu/ (Ubuntu)
Configuration Changes During Installation

The following sections provide information about configuration changes that MapR makes to each node during installation.
TCP Windowing Parameters
Setting certain TCP windowing parameters has shown to increase performance. As of version 2.1.3, MapR changes the parameters shown in thefollowing table.
Parameter Old Value New Value
net.ipv4.tcp_rmem 4096 87380 6291456 4096 1048576 4194304
net.ipv4.tcp_wmem 4096 16384 4194304 4096 1048576 4194304
net.ipv4.tcp_mem 190761 254349 381522 8388608 8388608 8388608
SELinux
As of version 3.1, MapR changes the configuration of SELinux from Enforcing to Permissive, and disables iptables.
# chkconfig iptables --list
iptables 0:off 1:off 2:off 3:off 4:off 5:off 6:off
# getenforce
Permissive
Changes Made by the configure.sh Script
When you run the script to perform initial configuration for your cluster, the script creates a group named if that groupconfigure.sh shadow
does not already exist, then sets the file and the user's group membership to . The script then modifiesshadow mapr shadow configure.sh
the permissions for to grant read access to the shadow group. These changes are required to enable /etc/shadow Pluggable Authentication
(PAM) to validate user authentication.Modules
Bringing Up the Cluster
The installation of software across a cluster of nodes will go more smoothly if the services have be pre-planned and each node has beenvalidated. Referring to the cluster design developed in , ensure that each node has been prepared and meets the minimumPlanning the Clusterrequirements described in , and that the MapR packages have been in accordance with the plan.Preparing Each Node installed on each node
Initialization SequenceTroubleshooting InitializationInstalling the Cluster LicenseVerifying Cluster StatusAdding VolumesNext Step
Bringing up the cluster involves setting up the administrative user, and installing a MapR license. Once these initial steps are done, the cluster is

1.
2.
3.
4.
5.
6.
functional. You can use the MapR Control System Dashboard, or the MapR Command Line Interface, to examine nodes and activity on thecluster.
Initialization Sequence
First, start the ZooKeeper service. It is important that all ZooKeeper instances start up, because the rest of the system cannot start unless amajority (or ) of ZooKeeper instances are up and running. Next, start the service on each node, or at least on the nodes that hostquorum wardenthe CLDB and webserver services. The warden service manages all MapR services on the node (except ZooKeeper) and helps coordinatecommunications. Starting the warden automatically starts the CLDB.
To bring up the cluster
Start on all nodes where it is installed, by issuing the following command:ZooKeeper
Verify that the quorum has been successfully established. Issue the following command and make sure that one Zookeeper is the Leaderand the rest are Followers before starting the :warden
Start the on all nodes where CLDB is installed by issuing the following command:wardenservice mapr-warden start
Verify that a CLDB master is running by issuing the command. For example:maprcli node cldbmaster
Do not proceed until a CLDB master is active.Start the on all remaining nodes using the following command:wardenservice mapr-warden start
Issue the following command to give full permission to the chosen administrative user:/opt/mapr/bin/maprcli acl edit -type cluster -user <user>:fc
Troubleshooting Initialization
Difficulty bringing up the cluster seems daunting, but most cluster problems are easily resolved. For the latest support tips, visit http://answers.ma.pr.com
Can each node connect with the others? For a list of ports that must be open, see .Ports Used by MapRIs the warden running on each node? On the node, run the following command as root:
$ service mapr-warden status
WARDEN running as process 18732
If the warden service is not running, check the warden log file, , for clues/opt/mapr/logs/warden.log
To restart the warden service:
$ service mapr-warden start
The ZooKeeper service is not running on one or more nodesCheck the warden log file for errors related to resources, such as low memoryCheck the warden log file for errors related to user permissionsCheck for DNS and other connectivity issues between ZooKeeper nodes
On versions 3.1 and later of the MapR distribution for Hadoop, the script initializes the cluster automatically after aconfigure.sh
successful setup, and you can skip this process.
service mapr-zookeeper start
service mapr-zookeeper qstatus
Before continuing, wait 30 to 60 seconds for the warden to start the CLDB service. Calls to maprcli commands may fail if
executed before the CLDB has started successfully.
# maprcli node cldbmastercldbmaster ServerID: 4553404820491236337 HostName: node-36.boston

1.
a.
b.
c.
2.
a. b.
The MapR CLI program won't run/opt/mapr/bin/maprcli
Did you configure this node? See .Installing MapR Software
Permission errors appear in the logCheck that MapR changes to the following files have not been overwritten by automated configuration management tools:
/etc/sudoers Allows the user to invoke commands as rootmapr
/etc/security/limits.conf Allows MapR services to increase limits on resources suchas memory, file handles, threads and processes, andmaximum priority level
/etc/udev/rules.d/99-mapr-disk.rules Covers permissions and ownership of raw disk devices
Before contacting MapR Support, you can collect your cluster's logs using the script.mapr-support-collect
Installing the Cluster License
MapR Hadoop requires a valid license file, even for the free M3 Community Edition.
Using the web-based MCS to install the license
On a machine that is connected to the cluster and to the Internet,perform the following steps to open the MapR Control System andinstall the license:
In a browser, view the MapR Control System by navigating tothe node that is running the MapR Control System: https:/<
webserver>/:8443
Your computer won't have an HTTPS certificate yet, so thebrowser will warn you that the connection is not trustworthy.You can ignore the warning this time.The first time MapR starts, you must accept the Terms of Useand choose whether to enable the MapR service.Dial HomeLog in to the MapR Control System as the administrative useryou designated earlier.Until a license is applied, the MapR Control System dashboardmight show some nodes in the amber "degraded" state. Don't worry if not all nodes are green and "healthy" at this stage.
In the navigation pane of the MapR Control System, expand the Syste group and click to display them Settings Views Manage Licenses
MapR License Management dialog.Click .Add Licenses via WebIf the cluster is already registered, the license is appliedautomatically. Otherwise, click to register the cluster onOKMapR.com and follow the instructions there.
Installinga licensefrom thecommandline
Use thefollowingsteps if it isnot possibleto connect tothe cluster
Click on the thumbnail images to view them full-size.

1. 2. 3.
1. 2. 3.
1. 2.
and theInternet at the same time.
Obtain a valid license file from MapRCopy the license file to a cluster nodeRun the following command to add the license:
maprcli license add [ -cluster <name> ] -license <filename> -is_file true
Verifying Cluster Status
To view cluster status using the web interface
Log in to the MapR Control System.Under the group in the left pane, click .Cluster DashboardCheck the pane and make sure each service is running the correct number of instances, according to your cluster plan.Services
To view cluster status using the command line interface
Log in to a cluster nodeUse the following command to list MapR services:
$ maprcli service list
name state logpath displayname
fileserver 0 /opt/mapr/logs/mfs.log FileServer
webserver 0 /opt/mapr/logs/adminuiapp.log WebServer
cldb 0 /opt/mapr/logs/cldb.log CLDB
hoststats 0 /opt/mapr/logs/hoststats.log HostStats
$ maprcli license list
$ maprcli disk list -host <name or IP address>
Next, start the warden on all remaining nodes using one of the following commands:
service mapr-warden start
/etc/init.d/mapr-warden start
Adding Volumes
Referring to the volume plan created in , use the MapR Control System or the command to create and mountPlanning the Cluster maprcli
distinct volumes to allow more granularity in specifying policy for subsets of data.
If you do not set up volumes, and instead store all data in the single volume mounted at , it creates problems in administering data/
policy later as data size grows.

Next Step
Now that the MapR Hadoop cluster is up and running, the final installation step is to . If you will not installinstall Hadoop Ecosystem Componentsany Hadoop components, see for a list of post-install considerations.Next Steps After Installation
Installing Hadoop Components
The final step in installing a MapR cluster is to install and bring up Hadoop ecosystem components that are not included in the MapR distributionbecause not every installation requires them. This section provides information about integrating the following tools with a MapR cluster:
Cascading - Installing and using Cascading on a MapR clusterFlume - Installing and using Flume on a MapR cluster

1.
2. 3.
4.
1.
2. 3.
HBase - Installing and using HBase on MapRHive - Installing and using Hive on a MapR cluster, and setting up a MySQL metastoreImpala - Installing and using Impala on a MapR clusterMahout - Environment variable settings needed to run Mahout on MapRMultiTool - A wrapper for Cascading MultiToolPig - Installing and using Pig on a MapR clusterOozie - Installing and using Oozie on a MapR clusterSqoop - Installing and using Sqoop on a MapR clusterWhirr - Using Whirr to manage services on a MapR cluster
After installing all the needed components, see for a list of post-install considerations to configure your cluster.Next Steps After Installation
MapR works well with Hadoop monitoring tools, such as:
Ganglia - Setting up Ganglia monitoring on a MapR clusterNagios Integration - Generating a Nagios Object Definition file for use with a MapR cluster
MapR works with the leaders in the Hadoop ecosystem to provide the most powerful data analysis solutions. For more information about ourpartners, take a look at the following pages:
DatameerHParserKarmaspherePentaho
Cascading
Cascading™ is a Java application framework produced by that enables developersConcurrent, Inc.to quickly and easily build rich enterprise-grade Data Processing and Machine Learning applicationsthat can be deployed and managed across private or cloud-based Hadoop clusters.
Installing Cascading
The following procedures use the operating system package managers to download and install fromthe MapR Repository. To install the packages manually, refer to Preparing Packages and
.Repositories
To install Cascading on an Ubuntu cluster:
Execute the following commands as or using .root sudo
This procedure is to be performed on a MapR cluster. If you have not installed MapR, see the .Advanced Installation TopicsUpdate the list of available packages:
apt-get update
On each planned Cascading node, install :mapr-cascading
apt-get install mapr-cascading
To install Cascading on a Red Hat or CentOS cluster:
Execute the following commands as or using .root sudo
This procedure is to be performed on a MapR cluster. If you have not installed MapR, see the .Advanced Installation TopicsOn each planned Cascading node, install :mapr-cascading
yum install mapr-cascading

1.
2. 3.
4.
1.
2. 3.
Flume
Flume is a reliable, distributed service for collecting, aggregating, and moving large amounts of log data, generally delivering the data to adistributed file system such as MapR-FS. For more information about Flume, see the .Apache Flume Incubation Wiki
Installing Flume
The following procedures use the operating system package managers to download and install from the MapR Repository. If you want to installthis component manually from packages files, see .Packages and Dependencies for MapR Software
To install Flume on an Ubuntu cluster:
Execute the following commands as or using .root sudo
This procedure is to be performed on a MapR cluster. If you have not installed MapR, see the .Advanced Installation TopicsUpdate the list of available packages:
apt-get update
On each planned Flume node, install :mapr-flume
apt-get install mapr-flume
To install Flume on a Red Hat or CentOS cluster:
Execute the following commands as or using .root sudo
This procedure is to be performed on a MapR cluster. If you have not installed MapR, see the .Advanced Installation TopicsOn each planned Flume node, install :mapr-flume
yum install mapr-flume
Using Flume
For information about configuring and using Flume, see the following documents:
Flume User GuideFlume Developer Guide
HBase
HBase is the Hadoop database, which provides random, realtime read/write access to very large data.
See for information about using HBase with MapRInstalling HBaseSee for information about compressing HFile storageSetting Up Compression with HBaseSee for information about using MapReduce with HBaseRunning MapReduce Jobs with HBaseSee for HBase tips and tricksHBase Best Practices
Installing HBase
Plan which nodes should run the HBase Master service, and which nodes should run the HBase RegionServer. At least one node (generally threenodes) should run the HBase Master; for example, install HBase Master on the ZooKeeper nodes. Only a few of the remaining nodes or all of theremaining nodes can run the HBase RegionServer. When you install HBase RegionServer on nodes that also run TaskTracker, reduce thenumber of map and reduce slots to avoid oversubscribing the machine. The following procedures use the operating system package managers todownload and install from the MapR Repository. To install the packages manually, refer to .Preparing Packages and Repositories
To use Java 7 with HBase, set the value of the attribute in to the location of your Java 7 JVM.JAVA_HOME /opt/mapr/conf/env.sh

1.
2. 3.
4.
5.
6.
7.
1.
2.
3.
Currently Supported HBase Versions
The following table shows compatibility between HBase versions and releases of the MapR distribution for Hadoop.
HBase Version MapR Version
0.90.x 1.2.9
0.92.x 1.2.x, 2.x, 3.0.0
0.94.x 1.2.x, 2.x, 3.0.0, 3.0.1
0.94.12 1.2.x, 2.x, 3.x
0.94.13 3.x
To install HBase on an Ubuntu cluster:
Execute the following commands as or using .root sudo
This procedure is to be performed on a MapR cluster. If you have not installed MapR, see the .Advanced Installation TopicsUpdate the list of available packages:
apt-get update
On each planned HBase Master node, install :mapr-hbase-master
apt-get install mapr-hbase-master
On each planned HBase RegionServer node, install :mapr-hbase-regionserver
apt-get install mapr-hbase-regionserver
On all HBase nodes, run with a list of the CLDB nodes and ZooKeeper nodes in the cluster.configure.sh
The warden picks up the new configuration and automatically starts the new services. When it is convenient, restart the warden:
# service mapr-warden stop# service mapr-warden start
To install HBase on a Red Hat or CentOS cluster:
Execute the following commands as or using .root sudo
On each planned HBase Master node, install :mapr-hbase-master
yum install mapr-hbase-master
On each planned HBase RegionServer node, install :mapr-hbase-regionserver
yum install mapr-hbase-regionserver
Note that this change results in all other Hadoop and MapR Java daemons and code using the specified JVM.

4.
5.
1.
2.
3.
4.
1.
2.
3.
On all HBase nodes, run the script with a list of the CLDB nodes and ZooKeeper nodes in the cluster.configure.sh
The warden picks up the new configuration and automatically starts the new services. When it is convenient, restart the warden:
# service mapr-warden stop# service mapr-warden start
Installing HBase on a Client
To use the HBase shell from a machine outside the cluster, you can install HBase on a computer running the MapR client. For MapR client setupinstructions, see .Setting Up the Client
Prerequisites:
The MapR client must be installedYou must know the IP addresses or hostnames of the ZooKeeper nodes on the cluster
To install HBase on a client computer:
Execute the following commands as or using .root sudo
On the client computer, install :mapr-hbase-internal
CentOS or Red Hat: yum install mapr-hbase-internal
Ubuntu: apt-get install mapr-hbase-internal
On all HBase nodes, run with a list of the CLDB nodes and ZooKeeper nodes in the cluster.configure.sh
Edit , setting the property to include a comma-separated list of the IP addresses orhbase-site.xml hbase.zookeeper.quorum
hostnames of the ZooKeeper nodes on the cluster you will be working with. Example:
<property> <name>hbase.zookeeper.quorum</name> <value>10.10.25.10,10.10.25.11,10.10.25.13</value></property>
Getting Started with HBase
In this tutorial, we'll create an HBase table on the cluster, enter some data, query the table, then clean up the data and exit.
HBase tables are organized by column, rather than by row. Furthermore, the columns are organized in groups called . Whencolumn familiescreating an HBase table, you must define the column families before inserting any data. Column families should not be changed often, nor shouldthere be too many of them, so it is important to think carefully about what column families will be useful for your particular data. Each columnfamily, however, can contain a very large number of columns. Columns are named using the format .family:qualifier
Unlike columns in a relational database, which reserve empty space for columns with no values, HBase columns simply don't exist for rows wherethey have no values. This not only saves space, but means that different rows need not have the same columns; you can use whatever columnsyou need for your data on a per-row basis.
Create a table in HBase:
Start the HBase shell by typing the following command:
/opt/mapr/hbase/hbase-0.94.12/bin/hbase shell
Create a table called with one column family named :weblog stats
create 'weblog', 'stats'

3.
4.
5.
6.
7.
8.
9.
10.
11.
Verify the table creation by listing everything:
list
Add a test value to the column in the column family for row 1:daily stats
put 'weblog', 'row1', 'stats:daily', 'test-daily-value'
Add a test value to the column in the column family for row 1:weekly stats
put 'weblog', 'row1', 'stats:weekly', 'test-weekly-value'
Add a test value to the column in the column family for row 2:weekly stats
put 'weblog', 'row2', 'stats:weekly', 'test-weekly-value'
Type to display the contents of the table. Sample output:scan 'weblog'
ROW COLUMN+CELL row1 column=stats:daily, timestamp=1321296699190,value=test-daily-value row1 column=stats:weekly, timestamp=1321296715892,value=test-weekly-value row2 column=stats:weekly, timestamp=1321296787444,value=test-weekly-value2 row(s) in 0.0440 seconds
Type to display the contents of row 1. Sample output:get 'weblog', 'row1'
COLUMN CELL stats:daily timestamp=1321296699190, value=test-daily-value stats:weekly timestamp=1321296715892, value=test-weekly-value2 row(s) in 0.0330 seconds
Type to disable the table.disable 'weblog'
Type to drop the table and delete all data.drop 'weblog'
Type to exit the HBase shell.exit
Setting Up Compression with HBase
Using compression with HBase reduces the number of bytes transmitted over the network and stored on disk. These benefits often outweigh theperformance cost of compressing the data on every write and uncompressing it on every read.
GZip Compression
GZip compression is included with most Linux distributions, and works natively with HBase. To use GZip compression, specify it in the per-columnfamily compression flag while creating tables in HBase shell. Example:

1.
2.
3.
4.
5.
6.
7. 8.
create 'mytable', {NAME=>'colfam:', COMPRESSION=>'gz'}
LZO Compression
Lempel-Ziv-Oberhumer (LZO) is a lossless data compression algorithm, included in most Linux distributions, that is designed for decompressionspeed.
Setting up LZO compression for use with HBase:
Make sure HBase is installed on the nodes where you plan to run it. See and for morePlanning the Deployment Installing MapR Softwareinformation.On each HBase node, ensure the native LZO base library is installed:
On Ubuntu: apt-get install liblzo2-dev liblzo2
On Red Hat or CentOS: yum install lzo-devel lzo
Check out the native connector library from http://svn.codespot.com/a/apache-extras.org/hadoop-gpl-compression/For 0.20.2 check out branches/branch-0.1
svn checkouthttp://svn.codespot.com/a/apache-extras.org/hadoop-gpl-compression/branches/branch-0.1/
Set the compiler flags and build the native connector library:
$ export CFLAGS="-m64"$ ant compile-native$ ant jar
Create a directory for the native libraries (use TAB completion to fill in the <version> placeholder):
mkdir -p /opt/mapr/hbase/hbase-<version>/lib/native/Linux-amd64-64/
Copy the build results into the appropriate HBase directories on every HBase node. Example:
$ cp build/native/Linux-amd64-64/lib/libgplcompression.*/opt/mapr/hbase/hbase-<version>/lib/native/Linux-amd64-64/
Download the hadoop-lzo compression library from .https://github.com/twitter/hadoop-lzoCreate a symbolic link under to point to/opt/mapr/hbase/hbase-<version>/lib/native/Linux-amd64-64/
On Ubuntu:
ln -s /usr/lib/x86_64-linux-gnu/liblzo2.so.2/opt/mapr/hbase/hbase-<version>/lib/native/Linux-amd64-64/
On Red Hat or CentOS:
ln -s /usr/lib64/liblzo2.so.2/opt/mapr/hbase/hbase-<version>/lib/native/Linux-amd64-64/liblzo2.so.2

9. Restart the RegionServer:
maprcli node services -hbregionserverrestart -nodes <hostname>
Once LZO is set up, you can specify it in the per-column family compression flag while creating tables in HBase shell. Example:
create 'mytable', {NAME=>'colfam:', COMPRESSION=>'lzo'}
Snappy Compression
The Snappy compression algorithm is optimized for speed over compression. Snappy compression is included in the core MapR installation andno additional configuration is required.
Running MapReduce Jobs with HBase
To run MapReduce jobs with data stored in HBase, set the environment variable to the output of the cHADOOP_CLASSPATH hbase classpath
ommand (use TAB completion to fill in the placeholder):<version>
$ export HADOOP_CLASSPATH=`/opt/mapr/hbase/hbase-<version>/bin/hbase classpath`
Note the backticks ( ).`
Example: Exporting a table named t1 with MapReduce
Notes: On a node in a MapR cluster, the output directory /hbase/export_t1 will be located in the mapr hadoop filesystem, so to list the output filesin the example below use the following hadoop fs command from the node's command line:
# hadoop fs -ls /hbase/export_t1
To view the output:
# hadoop fs -cat /hbase/export_t1/part-m-00000

# cd /opt/mapr/hadoop/hadoop-0.20.2# export HADOOP_CLASSPATH='/opt/mapr/hbase/hbase-0.94.12/bin/hbase classpath'# ./bin/hadoop jar /opt/mapr/hbase/hbase-0.94.12/hbase-0.94.12.jar export t1/hbase/export_t111/09/28 09:35:11 INFO mapreduce.Export: verisons=1, starttime=0,endtime=922337203685477580711/09/28 09:35:11 INFO fs.JobTrackerWatcher: Current running JobTracker is:lohit-ubuntu/10.250.1.91:900111/09/28 09:35:12 INFO mapred.JobClient: Running job: job_201109280920_000311/09/28 09:35:13 INFO mapred.JobClient: map 0% reduce 0%11/09/28 09:35:19 INFO mapred.JobClient: Job complete: job_201109280920_000311/09/28 09:35:19 INFO mapred.JobClient: Counters: 1511/09/28 09:35:19 INFO mapred.JobClient: Job Counters11/09/28 09:35:19 INFO mapred.JobClient: Aggregate execution time ofmappers(ms)=325911/09/28 09:35:19 INFO mapred.JobClient: Total time spent by all reduceswaiting after reserving slots (ms)=011/09/28 09:35:19 INFO mapred.JobClient: Total time spent by all mapswaiting after reserving slots (ms)=011/09/28 09:35:19 INFO mapred.JobClient: Launched map tasks=111/09/28 09:35:19 INFO mapred.JobClient: Data-local map tasks=111/09/28 09:35:19 INFO mapred.JobClient: Aggregate execution time ofreducers(ms)=011/09/28 09:35:19 INFO mapred.JobClient: FileSystemCounters11/09/28 09:35:19 INFO mapred.JobClient: FILE_BYTES_WRITTEN=6131911/09/28 09:35:19 INFO mapred.JobClient: Map-Reduce Framework11/09/28 09:35:19 INFO mapred.JobClient: Map input records=511/09/28 09:35:19 INFO mapred.JobClient: PHYSICAL_MEMORY_BYTES=10799104011/09/28 09:35:19 INFO mapred.JobClient: Spilled Records=011/09/28 09:35:19 INFO mapred.JobClient: CPU_MILLISECONDS=78011/09/28 09:35:19 INFO mapred.JobClient: VIRTUAL_MEMORY_BYTES=75983667211/09/28 09:35:19 INFO mapred.JobClient: Map output records=511/09/28 09:35:19 INFO mapred.JobClient: SPLIT_RAW_BYTES=6311/09/28 09:35:19 INFO mapred.JobClient: GC time elapsed (ms)=35
HBase Best Practices
The HBase write-ahead log (WAL) writes many tiny records, and compressing it would cause massive CPU load. Before using HBase,turn off MapR compression for directories in the HBase volume (normally mounted at . Example:/hbase
hadoop mfs -setcompression off /hbase
You can check whether compression is turned off in a directory or mounted volume by using to list the file contents.hadoop mfs
Example:
hadoop mfs -ls /hbase
The letter in the output indicates compression is turned on; the letter indicates compression is turned off. See for moreZ U hadoop mfs
information.On any node where you plan to run both HBase and MapReduce, give more memory to the FileServer than to the RegionServer so thatthe node can handle high throughput. For example, on a node with 24 GB of physical memory, it might be desirable to limit theRegionServer to 4 GB, give 10 GB to MapR-FS, and give the remainder to TaskTracker. To change the memory allocated to each
service, edit the file. See for more information./opt/mapr/conf/warden.conf Tuning Your MapR Install
You can start and stop HBase the same as other services on MapR. For example, use the following commands to shut down HBaseacross the cluster:
maprcli node services -hbregionserver stop -nodes <list of RegionServer nodes>maprcli node services -hbmaster stop -nodes <list of HBase Master nodes>
Hive
Apache Hive is a data warehouse system for Hadoop that uses a SQL-like language called Hive Query Language (HQL) to query structured datastored in a distributed filesystem. For more information about Hive, see the .Apache Hive project page
On this page:
Installing Hive, HiveServer2, and Hive Metastore
Getting Started with HiveStarting HiveManaging Hive MetastoreManaging Hiveserver2Default Hive DirectoriesHive Scratch DirectoryHive Warehouse Directory
Setting Up Hive with a MySQL MetastorePrerequisitesConfiguring Hive for MySQL
Hive-HBase IntegrationInstall and Configure Hive and HBaseGetting Started with Hive-HBase IntegrationGetting Started with Hive-MapR Tables IntegrationZookeeper Connections
Installing Hive, HiveServer2, and Hive Metastore
The following procedures use the operating system package managers to download and install Hive from the MapR Repository. If you want toinstall this component manually from packages files, see .Packages and Dependencies for MapR Software
As of MapR version 3.0.2 and ecosystem release 1310 (mapr-hive-*-1310), Hive is distributed as three packages:
mapr-hive - contains the following components:
The core Hive package.HiveServer2 - allows multiple concurrent connections to the Hive server over a network.Hive Metastore - stores the metadata for Hive tables and partitions in a relational database.
mapr-hiveserver2 - allows HiveServer2 to be managed by the warden, allowing you to start and stop HiveServer2 using maprcli or
the MapR Control System. The package is a dependency and will be installed if you install . Atmapr-hive mapr-hiveserver2
installation time, Hiveserver2 is started automatically.mapr-hivemetastore - allows Hive Metastore to be managed by the warden, allowing you to start and stop Hive Metastore using
maprcli or the MapR Control System. The package is a dependency and will be installed if you install mapr-hive mapr-hivemetastor
. At installation time, the Hive Metastore is started automatically.e
This procedure is to be performed on a MapR cluster (see the ) or client (see ).Advanced Installation Topics Setting Up the Client
Make sure the environment variable is set correctly. Example:JAVA_HOME
# export JAVA_HOME=/usr/lib/jvm/java-6-sun

1.
2.
3.
1.
2.
Make sure the environment variable is set correctly. Example:HIVE_HOME
# export HIVE_HOME=/opt/mapr/hive/hive-<version>
After Hive is installed, the executable is located at: /opt/mapr/hive/hive-<version>/bin/hive
To install Hive on an Ubuntu cluster:
Execute the following commands as or using .root sudo
Update the list of available packages:
apt-get update
On each planned Hive node, install Hive.To install only Hive:
apt-get install mapr-hive
To install Hive and HiveServer2:
apt-get install mapr-hiveserver2
To Install Hive and Hive Metastore:
apt-get install mapr-hivemetastore
To install Hive, Hive Metastore, and HiveServer2:
apt-get install mapr-hivemetastore mapr-hiveserver2
To install Hive on a Red Hat or CentOS cluster:
Execute the following commands as or using .root sudo
On each planned Hive node, install Hive.To install only Hive:
yum install mapr-hive
To install Hive and HiveServer2:
yum install mapr-hiveserver2
To Install Hive and Hive Metastore:
This procedure installs Hive 0.11.0. To install an earlier version, specify it in the package names. Make sure to install the same versionof all packages. Example:
apt-get install mapr-hive-0.9.0-1310
You can determine the available versions with the command. See the Hive 0.10.0 foapt-cache madison mapr-hive release notes
r a list of fixes and new features added since the release of Hive 0.9.0.

2.
1.
2.
1.
yum install mapr-hivemetastore
To install Hive, Hive Metastore, and HiveServer2:
yum install mapr-hivemetastore mapr-hiveserver2
Getting Started with Hive
In this tutorial, you'll create a Hive table, load data from a tab-delimited text file, and run a couple of basic queries against the table.
First, make sure you have downloaded the sample table: On the page , select andA Tour of the MapR Virtual Machine Tools > Attachmentsright-click on , select from the pop-up menu, select a directory to save to, then click OK. If you'resample-table.txt Save Link As...
working on the MapR Virtual Machine, we'll be loading the file from the MapR Virtual Machine's local file system (not the cluster storage layer), sosave the file in the MapR Home directory (for example, )./home/mapr
Take a look at the source data
First, take a look at the contents of the file using the terminal:
Make sure you are in the Home directory where you saved (type if you are not sure).sample-table.txt cd ~
Type to display the following output.cat sample-table.txt
mapr@mapr-desktop:~$ cat sample-table.txt1320352532 1001 http://www.mapr.com/doc http://www.mapr.com 192.168.10.11320352533 1002 http://www.mapr.com http://www.example.com 192.168.10.101320352546 1001 http://www.mapr.com http://www.mapr.com/doc 192.168.10.1
Notice that the file consists of only three lines, each of which contains a row of data fields separated by the TAB character. The data in the filerepresents a web log.
Create a table in Hive and load the source data:
Set the location of the Hive scratch directory by editing the file to add/opt/mapr/hive/hive-<version>/conf/hive-site.xml
the following block, replacing with the path to a directory in the user volume:/tmp/mydir
This procedure installs Hive 0.11.0. To install an earlier version, specify it in the package names. Make sure to install the same versionof all packages. Example:
yum install 'mapr-hive-0.9.0-*'
. See the Hive 0.10.0 for a list of fixes and new features added since the release of Hive 0.9.0.release notes
If you are using HiveServer2, you will use the BeeLine CLI instead of the Hive shell, as shown below. For details on setting upHiveServer2 and starting BeeLine, see .Using HiveServer2

1.
2.
3.
4.
<property> <name>hive.exec.scratchdir</name> <value>/tmp/mydir</value> <description>Scratch space for Hive jobs</description> </property>
Alternately, use the option in the following step to specify the scratch-hiveconf hive.exec.scratchdir=scratch directory
directory's location or use the at the command line.set hive exec.scratchdir=scratch directory
Type the following command to start the Hive shell, using tab-completion to expand the :<version>
/opt/mapr/hive/hive-0.9.0/bin/hive
At the prompt, type the following command to create the table:hive>
CREATE TABLE web_log(viewTime INT, userid BIGINT, url STRING, referrer STRING, ipSTRING) ROW FORMAT DELIMITED FIELDS TERMINATED BY '\t';
Type the following command to load the data from into the table:sample-table.txt
LOAD DATA LOCAL INPATH '/home/mapr/sample-table.txt' INTO TABLE web_log;
Run basic queries against the table:
Try the simplest query, one that displays all the data in the table:
SELECT web_log.* FROM web_log;
This query would be inadvisable with a large table, but with the small sample table it returns very quickly.
Try a simple SELECT to extract only data that matches a desired string:
SELECT web_log.* FROM web_log WHERE web_log.url LIKE '%doc';
This query launches a MapReduce job to filter the data.
Starting Hive
You can start the Hive shell with the command. When the Hive shell starts, it reads an initialization file called which is located inhive .hiverc
the or directories. You can edit this file to set custom parameters or commands that initialize the Hive command-lineHIVE_HOME/bin/ $HOME/
environment, one command per line.
When you run the Hive shell, you can specify a MySQL initialization script file using the option. Example:-i
hive -i <filename>
Managing Hive Metastore
As of MapR version 3.0.2, the Hive Metastore is started automatically by the warden at installation time if the package ismapr-hivemetastore

1. 2.
1. 2.
1. 2. 3. 4.
1. 2.
installed. It is sometimes necessary to start or stop the service (for example, after changing the configuration). You can start and stopHive Metastore in two ways:
Using the command - Using this command, you can start Hive Metastore on multiple nodes at one time.maprcli node services
Using the MapR Control System
To start Hive Metastore using the maprcli:
Make a list of nodes on which Hive Metastore is configured.Issue the maprcli node services command, specifying the nodes on which Hive Metastore is configured, separated by spaces. Example:
maprcli node services -name hivemeta -action start -nodes node001 node002 node003
To stop Hive Metastore using the maprcli:
Make a list of nodes on which Hive Metastore is configured.Issue the maprcli node services command, specifying the nodes on which Hive Metastore is configured, separated by spaces. Example:
maprcli node services -name hivemeta -action stop -nodes node001 node002 node003
To start or stop Hive Metastore using the MapR Control System:
In the Navigation pane, expand the Cluster Views pane and click .DashboardIn the Services pane, click to open the Nodes screen displaying all the nodes on which Hive Metastore is configured.Hive Metastore On the Nodes screen, click the hostname of each node to display its Node Properties screen.On each Node Properties screen, use the button in the Hive Metastore row under Manage Services to start Hive Metastore.Stop/Start
Managing Hiveserver2
As of MapR version 3.0.2, Hiveserver2 is started automatically at installation time by the warden if the package is installed.mapr-hiveserver2
It is sometimes necessary to start or stop the service (for example, after changing the configuration). You can start and stop Hiveserver2 in twoways:
Using the command - Using this command, you can start Hiveserver2 on multiple nodes at one time.maprcli node services
Using the MapR Control System
To start Hiveserver2 using the maprcli:
Make a list of nodes on which Hiveserver2 is configured.Issue the maprcli node services command, specifying the nodes on which Hiveserver2 is configured, separated by spaces. Example:

2.
1. 2.
1. 2. 3. 4.
maprcli node services -name hs2 -action start -nodes node001 node002 node003
To stop Hiveserver2 using the maprcli:
Make a list of nodes on which Hiveserver2 is configured.Issue the maprcli node services command, specifying the nodes on which Hiveserver2 is configured, separated by spaces. Example:
maprcli node services -name hs2 -action stop -nodes node001 node002 node003
To start or stop Hiveserver2 using the MapR Control System:
In the Navigation pane, expand the Cluster Views pane and click .DashboardIn the Services pane, click to open the Nodes screen displaying all the nodes on which Hiveserver2 is configured.Hiveserver2 On the Nodes screen, click the hostname of each node to display its Node Properties screen.On each Node Properties screen, use the button in the Hiveserver2 row under Manage Services to start Hiveserver2.Stop/Start
Using Hive with MapR VolumesBefore you run a job, set the Hive scratch directory and Hive warehouse directory in the volume where the data for the Hive job resides.sameThis is the most efficient way to set up the directory structure. If the Hive scratch directory and the Hive warehouse directory are in volumdifferentes, Hive needs to move data across volumes, which is slower than a move within the same volume.
In earlier MapR releases (before version 2.1), setting the scratch and warehouse directories in different MapR volumes can cause errors.
The following sections provide additional detail on preparing volumes and directories for use with Hive.
Default Hive Directories
It is not necessary to create and the Hive and directories in the MapR cluster. By default, MapR createschmod /tmp /user/hive/warehouse
and configures these directories for you when you create your first Hive table.
These default directories are defined in the file:$HIVE_HOME/conf/hive-default.xml

1.
2. a.
b.
3. 4.
<configuration> ... <property> <name>hive.exec.scratchdir</name> <value>/tmp/hive-$\{user.name}</value> <description>Scratch space for Hive jobs</description> </property>
<property> <name>hive.metastore.warehouse.dir</name> <value>/user/hive/warehouse</value> <description>location of default database for the warehouse</description> </property> ...</configuration>
If you need to modify the default names for one or both of these directories, create a file for this purpose if$HIVE_HOME/conf/hive-site.xml
it doesn't already exist.
Copy the and/or the property elements from the file andhive.exec.scratchdir hive.metastore.warehouse.dir hive-default.xml
paste them into an XML configuration element in the file. Modify the value elements for these directories in the hive-site.xml hive-site.xm
file as desired, and then save and close the file and close the file.l hive-site.xml hive-default.xml
Hive Scratch Directory
When running an import job on data from a MapR volume, set to a directory in the volume where the data forhive.exec.scratchdir same
the job resides. The directory should be under the volume's mount point (as viewed in ) – for example, .Volume Properties /tmp
You can set this parameter from the Hive shell. Example:
hive> set hive.exec.scratchdir=/myvolume/tmp
How Hive Handles Scratch Directories on MapR
When a query requires requires Hive to query existing tables and create data for new tables, Hive uses the following workflow:
Create the query scratch directory under . You can configurehive_ _<timestamp> <randomnumber> /user/ /tmp/hive<username>
the location of this directory with the parameter in .hive.exec.scratchdir hive-site.xml
Create the following directories as subdirectories of the scratch directory:Final query output directory. This directory's name takes the form .-ext-<number>
An output directory for each MapReduce job. These directories' names take the form .-mr-<number>
Hive executes the tasks, including MapReduce jobs and loading data to the query output directory.Hive loads the data from output directory into a table. By default, the table's directory is in the directory. You/user/hive/warehouse
can configure this location with the parameter in , unless the table DDL specifieshive.metastore.warehouse.dir hive-site.xml
a custom location. Hive renames the output directory to the table directory in order to load the output data to the table..
MapR uses , which are logical units that enable you to apply policies to a set of files, directories, and sub-volumes. When the outputvolumesdirectory and the table directory are in different volumes, this workflow involves moving data across volumes. This move is slower than movingdata within a volume. In order to avoid moving data across a volume boundary, set the Hive scratch directory to be in the same volume as thetable data for the query.
To make this scratch directory setting automatic, set the following property in :hive-site.xml

<property> <name>hive.optimize.insert.dest.volume</name> <value>true</value> <description>For CREATE TABLE AS and INSERT queries create the scratch directoryunder the destination directory. This avoids the data move across volumes and improvesperformance.</description></property>
These scratch directories are automatically deleted after the query completes successfully.
Hive Warehouse Directory
When writing queries that move data between tables, make sure the tables are in the volume. By default, all volumes are created under thesamepath "/user/hive/warehouse" under the root volume. This value is specified by the property , which you canhive.metastore.warehouse.dir
set from the Hive shell. Example:
hive> set hive.metastore.warehouse.dir=/myvolume/mydirectory
Setting Up Hive with a MySQL Metastore
The metadata for Hive tables and partitions are stored in the Hive Metastore (for more information, see the ). ByHive project documentationdefault, the Hive Metastore stores all Hive metadata in an embedded Apache Derby database in MapR-FS. Derby only allows one connection at atime; if you want multiple concurrent Hive sessions, you can use MySQL for the Hive Metastore. You can run the Hive Metastore on any machinethat is accessible from Hive.
Prerequisites
Make sure MySQL is installed on the machine on which you want to run the Metastore, and make sure you are able to connect to theMySQL Server from the Hive machine. You can test this with the following command:
mysql -h <hostname> -u <user>
The database administrator must create a database for the Hive metastore data, and the username specified in javax.jdo.Connecti
must have permissions to access it. The database can be specified using the parameter. The tables andonUser ConnectionURL
schemas are created automatically when the metastore is first started.
Download and install the driver for the MySQL JDBC connector. Example:
$ curl -L'http://www.mysql.com/get/Downloads/Connector-J/mysql-connector-java-5.1.18.tar.gz/from/http://mysql.he.net/|http://mysql.he.net/' | tar xz$ sudo cp mysql-connector-java-5.1.18/mysql-connector-java-5.1.18-bin.jar/opt/mapr/hive/hive-<version>/lib/
Configuring Hive for MySQL
Create the file in the Hive configuration directory ( ) with the contents from thehive-site.xml /opt/mapr/hive/hive-<version>/conf
example below. Then set the parameters as follows:
You can set a specific port for Thrift URIs by adding the command into the file (if export METASTORE_PORT=<port> hive-env.sh h
does not exist, create it in the Hive configuration directory). Example:ive-env.sh

export METASTORE_PORT=9083
To connect to an existing MySQL metastore, make sure the parameter and the parameters in ConnectionURL Thrift URIs hive-si
point to the metastore's host and port.te.xml
Once you have the configuration set up, start the Hive Metastore service using the following command (use tab auto-complete to fill in the):<version>
/opt/mapr/hive/hive-<version>/bin/hive --service metastore
You can use to run metastore in the background.nohup hive --service metastore
Example hive-site.xml

<configuration>
<property> <name>hive.metastore.local</name> <value>true</value> <description>controls whether to connect to remove metastore server or open a newmetastore server in Hive Client JVM</description> </property>
<property> <name>javax.jdo.option.ConnectionURL</name> <value>jdbc:mysql://localhost:3306/hive?createDatabaseIfNotExist=true</value> <description>JDBC connect string for a JDBC metastore</description></property>
<property> <name>javax.jdo.option.ConnectionDriverName</name> <value>com.mysql.jdbc.Driver</value> <description>Driver class name for a JDBC metastore</description> </property>
<property> <name>javax.jdo.option.ConnectionUserName</name> <value>root</value> <description>username to use against metastore database</description> </property>
<property> <name>javax.jdo.option.ConnectionPassword</name> <value><fill in with password></value> <description>password to use against metastore database</description> </property>
<property> <name>hive.metastore.uris</name> <value>thrift://localhost:9083</value> </property>
</configuration>
Hive-HBase Integration
You can create HBase tables from Hive that can be accessed by both Hive and HBase. This allows you to run Hive queries on HBase tables. Youcan also convert existing HBase tables into Hive-HBase tables and run Hive queries on those tables as well.
In this section:
Install and Configure Hive and HBaseGetting Started with Hive-HBase IntegrationGetting Started with Hive-MapR Integration
Install and Configure Hive and HBase
1. if it is not already installed.Install and configure Hive
2. if it is not already installed.Install and configure HBase
3. Execute the command and ensure that all relevant Hadoop, HBase and Zookeeper processes are running.jps

Example:
$ jps21985 HRegionServer1549 jenkins.war15051 QuorumPeerMain30935 Jps15551 CommandServer15698 HMaster15293 JobTracker15328 TaskTracker15131 WardenMain
Configure the Filehive-site.xml
1. Open the file with your favorite editor, or create a file if it doesn't already exist:hive-site.xml hive-site.xml
$ cd $HIVE_HOME$ vi conf/hive-site.xml
2. Copy the following XML code and paste it into the file.hive-site.xml
Note: If you already have an existing file with a element block, just copy the element block codehive-site.xml configuration property
below and paste it inside the element block in the file.configuration hive-site.xml
Example configuration:
<configuration>
<property> <name>hive.aux.jars.path</name> <value>file:///opt/mapr/hive/hive-0.10.0/lib/hive-hbase-handler-0.10.0-mapr.jar,file:///opt/mapr/hbase/hbase-0.94.5/hbase-0.94.5-mapr.jar,file:///opt/mapr/zookeeper/zookeeper-3.4.5/zookeeper-3.4.5.jar</value> <description>A comma separated list (with no spaces) of the jar files required forHive-HBase integration</description></property>
<property> <name>hbase.zookeeper.quorum</name> <value>xx.xx.x.xxx,xx.xx.x.xxx,xx.xx.x.xxx</value> <description>A comma separated list (with no spaces) of the IP addresses of allZooKeeper servers in the cluster.</description></property>
<property> <name>hbase.zookeeper.property.clientPort</name> <value>5181</value> <description>The Zookeeper client port. The MapR default clientPort is5181.</description></property>
</configuration>

3. Save and close the file.hive-site.xml
If you have successfully completed all the steps in this Install and Configure Hive and HBase section, you're ready to begin the Getting Startedwith Hive-HBase Integration tutorial in the next section.
Getting Started with Hive-HBase Integration
In this tutorial you will:
Create a Hive tablePopulate the Hive table with data from a text fileQuery the Hive tableCreate a Hive-HBase tableIntrospect the Hive-HBase table from HBasePopulate the Hive-Hbase table with data from the Hive tableQuery the Hive-HBase table from HiveConvert an existing HBase table into a Hive-HBase table
Be sure that you have successfully completed all the steps in the Install and Configure Hive and HBase section before beginning this GettingStarted tutorial.
This Getting Started tutorial closely parallels the section of the Apache Hive Wiki, and thanks to Samuel Guo and otherHive-HBase Integrationcontributors to that effort. If you are familiar with their approach to Hive-HBase integration, you should be immediately comfortable with thismaterial.
However, please note that there are some significant differences in this Getting Started section, especially in regards to configuration andcommand parameters or the lack thereof. Follow the instructions in this Getting Started tutorial to the letter so you can have an enjoyable andsuccessful experience.
Create a Hive table with two columns:
Change to your Hive installation directory if you're not already there and start Hive:
$ cd $HIVE_HOME$ bin/hive
Execute the CREATE TABLE command to create the Hive pokes table:
hive> CREATE TABLE pokes (foo INT, bar STRING);
To see if the pokes table has been created successfully, execute the SHOW TABLES command:
hive> SHOW TABLES;OKpokesTime taken: 0.74 seconds
The table appears in the list of tables. pokes
Populate the Hive pokes table with data
Execute the LOAD DATA LOCAL INPATH command to populate the Hive table with data from the file.pokes kv1.txt
The file is provided in the directory.kv1.txt $HIVE_HOME/examples

hive> LOAD DATA LOCAL INPATH './examples/files/kv1.txt' OVERWRITE INTO TABLE pokes;
A message appears confirming that the table was created successfully, and the Hive prompt reappears:
Copying data from file:...OKTime taken: 0.278 secondshive>
Execute a SELECT query on the Hive pokes table:
hive> SELECT * FROM pokes WHERE foo = 98;
The SELECT statement executes, runs a MapReduce job, and prints the job output:
OK98 val_9898 val_98Time taken: 18.059 seconds
The output of the SELECT command displays two identical rows because there are two identical rows in the Hive table with a key of 98. pokes
Note: This is a good illustration of the concept that Hive tables can have multiple identical keys. As we will see shortly, HBase tables cannot havemultiple identical keys, only unique keys.
To create a Hive-HBase table, enter these four lines of code at the Hive prompt:
hive> CREATE TABLE hbase_table_1(key int, value string) > STORED BY 'org.apache.hadoop.hive.hbase.HBaseStorageHandler' > WITH SERDEPROPERTIES ("hbase.columns.mapping" = ":key,cf1:val") > TBLPROPERTIES ("hbase.table.name" = "xyz");
After a brief delay, a message appears confirming that the table was created successfully:
OKTime taken: 5.195 seconds
Note: The TBLPROPERTIES command is not required, but those new to Hive-HBase integration may find it easier to understand what's going onif Hive and HBase use different names for the same table.
In this example, Hive will recognize this table as "hbase_table_1" and HBase will recognize this table as "xyz".
Start the HBase shell:
Keeping the Hive terminal session open, start a new terminal session for HBase, then start the HBase shell:

$ cd $HBASE_HOME$ bin/hbase shellHBase Shell; enter 'help<RETURN>' for list of supported commands.Type "exit<RETURN>" to leave the HBase ShellVersion 0.90.4, rUnknown, Wed Nov 9 17:35:00 PST 2011
hbase(main):001:0>
Execute the list command to see a list of HBase tables:
hbase(main):001:0> listTABLExyz1 row(s) in 0.8260 seconds
HBase recognizes the Hive-HBase table named . This is the same table known to Hive as .xyz hbase_table_1
Display the description of the xyz table in the HBase shell:
hbase(main):004:0> describe "xyz"DESCRIPTION ENABLED {NAME => 'xyz', FAMILIES => [{NAME => 'cf1', BLOOMFILTER => 'NONE', REPLICATI true ON_SCOPE => '0', COMPRESSION => 'NONE', VERSIONS => '3', TTL => '2147483647', BL OCKSIZE => '65536', IN_MEMORY => 'false', BLOCKCACHE => 'true'}]}1 row(s) in 0.0190 seconds
From the Hive prompt, insert data from the Hive table pokes into the Hive-HBase table hbase_table_1:
hive> INSERT OVERWRITE TABLE hbase_table_1 SELECT * FROM pokes WHERE foo=98;...2 Rows loaded to hbase_table_1OKTime taken: 13.384 seconds
Query hbase_table_1 to see the data we have inserted into the Hive-HBase table:
hive> SELECT * FROM hbase_table_1;OK98 val_98Time taken: 0.56 seconds
Even though we loaded two rows from the Hive table that had the same key of 98, only one row was actually inserted into pokes hbase_table_
. This is because is an HBASE table, and although Hive tables support duplicate keys, HBase tables only support unique1 hbase_table_1

keys. HBase tables arbitrarily retain only one key, and will silently discard all the data associated with duplicate keys.
Convert a pre-existing HBase table to a Hive-HBase table
To convert a pre-existing HBase table to a Hive-HBase table, enter the following four commands at the Hive prompt.
Note that in this example the existing HBase table is .my_hbase_table
hive> CREATE EXTERNAL TABLE hbase_table_2(key int, value string) > STORED BY 'org.apache.hadoop.hive.hbase.HBaseStorageHandler' > WITH SERDEPROPERTIES ("hbase.columns.mapping" = "cf1:val") > TBLPROPERTIES("hbase.table.name" = "my_hbase_table");
Now we can run a Hive query against the pre-existing HBase table that Hive sees as :my_hbase_table hbase_table_2
hive> SELECT * FROM hbase_table_2 WHERE key > 400 AND key < 410;Total MapReduce jobs = 1Launching Job 1 out of 1Number of reduce tasks is set to 0 since there's no reduce operator...OK401 val_401402 val_402403 val_403404 val_404406 val_406407 val_407409 val_409Time taken: 9.452 seconds
Getting Started with Hive-MapR Tables Integration
MapR tables, introduced in version 3.0 of the MapR distribution for Hadoop, use the native MapR-FS storage layer. A full tutorial on integratingHive with MapR tables is available at .Integrating Hive and MapR Tables
Zookeeper Connections
If you see the following error message, ensure that and arehbase.zookeeper.quorum hbase.zookeeper.property.clientPort
properly defined in the file.$HIVE_HOME/conf/hive-site.xml
Failed with exceptionjava.io.IOException:org.apache.hadoop.hbase.ZooKeeperConnectionException:HBase is able to connect to ZooKeeper but the connection closes immediately. Thiscould be asign that the server has too many connections (30 is the default). Consider inspectingyourZK server logs for that error and then make sure you are reusing HBaseConfiguration asoften asyou can. See HTable's javadoc for more information.
Mahout
Apache Mahout™ is a scalable machine learning library. For more information about Mahout, see the project.Apache Mahout

On this page:
Installing MahoutConfiguring the Mahout EnvironmentGetting Started with Mahout
Installing Mahout
Mahout can be installed when MapR services are initially installed as discussed in . If Mahout wasn't installed during theInstalling MapR Servicesinitial MapR services installation, Mahout can be installed at a later date by executing the instructions in this section. These procedures may beperformed on a node in a MapR cluster (see the ) or on a client (see ).Advanced Installation Topics Setting Up the Client
The Mahout installation procedures below use the operating system's package manager to download and install Mahout from the MapRRepository. If you want to install this component manually from packages files, see .Packages and Dependencies for MapR Software
Installing Mahout on a MapR Node
Mahout only needs to be installed on the nodes in the cluster from which Mahout applications will be executed. So you may only need to installMahout on one node. However, depending on the number of Mahout users and the number of scheduled Mahout jobs, you may need to installMahout on more than one node.
Mahout applications may run MapReduce programs, and by default Mahout will use the cluster's default JobTracker to execute MapReduce jobs.
Install Mahout on a MapR node running Ubuntu
Install Mahout on a MapR node running Ubuntu as or using by executing the following command:root sudo apt-get install
# apt-get install mapr-mahout
Install Mahout on a MapR node running Red Hat or CentOS
Install Mahout on a MapR node running Red Hat or CentOS as or using by executing the following command:root sudo yum install
# yum install mapr-mahout
Installing Mahout on a Client
If you install Mahout on a Linux client, you can run Mahout applications from the client that execute MapReduce jobs on the cluster that your clientis configured to use.
Tip: You don't have to install Mahout on the cluster in order to run Mahout applications from your client.
Install Mahout on a client running Ubuntu
Install Mahout on a client running Ubuntu as or using by executing the following command:root sudo apt-get install
# apt-get install mapr-mahout
Install Mahout on a client running Red Hat or CentOS
Install Mahout on a client running Red Hat or CentOS as or using by executing the following command:root sudo yum install
# yum install mapr-mahout

Configuring the Mahout Environment
After installation the Mahout executable is located in the following directory:/opt/mapr/mahout/mahout-<version>/bin/mahout
Example: /opt/mapr/mahout/mahout-0.7/bin/mahout
To use Mahout with MapR, set the following environment variables:
MAHOUT_HOME - the path to the Mahout directory. Example:
$ export MAHOUT_HOME=/opt/mapr/mahout/mahout-0.7
JAVA_HOME - the path to the Java directory. Example for Ubuntu:
$ export JAVA_HOME=/usr/lib/jvm/java-6-sun
JAVA_HOME - the path to the Java directory. Example for Red Hat and CentOS:
$ export JAVA_HOME=/usr/java/jdk1.6.0_24
HADOOP_HOME - the path to the Hadoop directory. Example:
$ export HADOOP_HOME=/opt/mapr/hadoop/hadoop-0.20.2
HADOOP_CONF_DIR - the path to the directory containing Hadoop configuration parameters. Example:
$ export HADOOP_CONF_DIR=/opt/mapr/hadoop/hadoop-0.20.2/conf
You can set these environment variables persistently for all users by adding them to the file as or using . The/etc/environment root sudo
order of the environment variables in the file doesn't matter.
Example entries for setting environment variables in the /etc/environment file for Ubuntu:
JAVA_HOME=/usr/lib/jvm/java-6-sun
MAHOUT_HOME=/opt/mapr/mahout/mahout-0.7
HADOOP_HOME=/opt/mapr/hadoop/hadoop-0.20.2
HADOOP_CONF_DIR=/opt/mapr/hadoop/hadoop-0.20.2/conf
Example entries for setting environment variables in the /etc/environment file for Red Hat and CentOS:
JAVA_HOME=/usr/java/jdk1.6.0_24
MAHOUT_HOME=/opt/mapr/mahout/mahout-0.7
HADOOP_HOME=/opt/mapr/hadoop/hadoop-0.20.2
HADOOP_CONF_DIR=/opt/mapr/hadoop/hadoop-0.20.2/conf
After adding or editing environment variables to the file, you can activate them without rebooting by executing the c/etc/environment source
ommand:
$ source /etc/environment
Note: A user who doesn't have or permissions can add these environment variable entries to his or her file. Theroot sudo ~/.bashrc
environment variables will be set each time the user logs in.
Getting Started with Mahout
To see the sample applications bundled with Mahout, execute the following command:
$ ls $MAHOUT_HOME/examples/bin
To run the Twenty Newsgroups Classification Example, execute the following commands:

1.
2.
3.
$ cd $MAHOUT_HOME$ ./examples/bin/classify-20newsgroups.sh
The output from this example will look similar to the following:
MultiTool
The command is the wrapper around Cascading.Multitool, a command line tool for processing large text files and datasets (like sed and grepmt
on unix). The command is located in the directory. To use , change to the directory.mt /opt/mapr/contrib/multitool/bin mt multitool
Example:
cd /opt/mapr/contrib/multitool./bin/mt
Oozie
Oozie is a workflow system for Hadoop. Using Oozie, you can set up that execute MapReduce jobs and that manageworkflows coordinatorsworkflows.
Installing Oozie
The following procedures use the operating system package managers to download and install from the MapR Repository. To install thepackages manually, refer to .Preparing Packages and Repositories
To install Oozie on a MapR cluster:
Oozie's client/server architecture requires you to install two packages, and , on the server node. Clientmapr-oozie mapr-oozie-internal
Oozie nodes require only the role package .mapr-oozie
Execute the following commands as or using .root sudo
This procedure is to be performed on a MapR cluster with the MapR repository properly set. If you have not installed MapR, see the Adva.nced Installation Topics
If you are installing on Ubuntu, update the list of available packages:

3.
4.
1. 2.
apt-get update
Install and on the Oozie server node:mapr-oozie mapr-oozie-internal
RHEL/CentOS:
yum install mapr-oozie mapr-oozie-internal
SUSE:
zypper install mapr-oozie mapr-oozie-internal
Ubuntu:
apt-get install mapr-oozie mapr-oozie-internal
Managing Oozie
As of MapR version 3.0.2, the Oozie server is started automatically by the warden at installation time. You can start and stop Oozie in three ways:
Using the service commandUsing the maprcli node services command - Using this command, you can start Oozie on multiple nodes at one time.Using the MapR Control System
To start Oozie using the service command:
Type the following command at the shell prompt:
service mapr-oozie start
The command returns immediately, but it might take a few minutes for Oozie to start.
Use the following command to see if Oozie has started:
service mapr-oozie status
To stop Oozie using the service command:
Type the following command at the shell prompt:
service mapr-oozie stop
To start Oozie using the maprcli:
Make a list of nodes on which Oozie is configured.Issue the maprcli node services command, specifying the nodes on which Oozie is configured, separated by spaces. Example:

2.
1. 2.
1. 2. 3. 4.
1.
2.
3.
4.
maprcli node services -name oozie -action start -nodes node001 node002 node003
To stop Oozie using the maprcli:
Make a list of nodes on which Oozie is configured.Issue the maprcli node services command, specifying the nodes on which Oozie is configured, separated by spaces. Example:
maprcli node services -name oozie -action stop -nodes node001 node002 node003
To start Oozie using the MapR Control System:
In the Navigation pane, expand the Cluster Views pane and click .DashboardIn the Services pane, click to open the Nodes screen displaying all the nodes on which Oozie is configured.OozieOn the Nodes screen, click the hostname of each node to display its Node Properties screen.On each Node Properties screen, use the button in the Oozie row under Manage Services to start Oozie.Stop/Start
Starting Oozie from the MapR Control System requires MapR version 3.0.2 or later.
Enabling the Oozie web UI
The Oozie web UI can display your job status, logs, and other related information. The file must include the library to enableoozie.war extjs
the web UI. After installing Oozie, perform the following steps to add the ExtJS library to your file:oozie.war
Download the library.extjs
wget http://extjs.com/deploy/ext-2.2.zip
If Oozie is running, shut it down:
service mapr-oozie stop
Run the script and specify the path to the file.oozie-setup.sh extjs
cd /opt/mapr/oozie/oozie-<version>bin/oozie-setup.sh prepare-war -extjs ~/ext-2.2.zip
Start Oozie.

1.
2.
3.
4.
1.
Checking the Status of Oozie
Once Oozie is installed, you can check the status using the command line or the Oozie web console.
To check the status of Oozie using the command line:
Use the command:oozie admin
/opt/mapr/oozie/oozie-<version>/bin/oozie admin -ooziehttp://localhost:11000/oozie -status
The following output indicates normal operation:
System mode: NORMAL
To check the status of Oozie using the web console:
Point your browser to http://localhost:11000/oozie
Examples
After verifying the status of Oozie, set up and try the examples, to get familiar with Oozie.
To set up the examples and copy them to the cluster:
Extract the oozie examples archive :oozie-examples.tar.gz
cd /opt/mapr/oozie/oozie-<version>tar xvfz ./oozie-examples.tar.gz
Copy the examples to MapR-FS. Example:
hadoop fs -put examples maprfs:///oozie/examples
Change permissions on the examples to make them accessible to all users. Example:
hadoop fs -chmod -R 777 maprfs:///oozie/examples
Set the OOZIE_URL environment variable. You do not have to provide the -oozie option when you run each job:
export OOZIE_URL="http://localhost:11000/oozie"
To run the examples:
Choose an example and run it with the oozie job command. Example:

1.
2. 3.
1.
2. 3.
4.
/opt/mapr/oozie/oozie-<version>/bin/oozie job -config/opt/mapr/oozie/oozie-<version>/examples/apps/map-reduce/job.properties -run
Make a note of the returned job ID.Using the job ID, check the status of the job using the command line or the Oozie web console, as shown below.
Using the command line, type the following (substituting the job ID for the placeholder):<job id>
/opt/mapr/oozie/oozie-<version>/bin/oozie job -info <job id>
Using the Oozie web console, point your browser to and click . http://localhost:11000/oozie All Jobs
Pig
Apache Pig is a platform for parallelized analysis of large data sets via a language called PigLatin. For more information about Pig, see the Pig.project page
Once Pig is installed, the executable is located at: /opt/mapr/pig/pig-<version>/bin/pig
Make sure the environment variable is set correctly. Example:JAVA_HOME
# export JAVA_HOME=/usr/lib/jvm/java-6-sun
Installing Pig
The following procedures use the operating system package managers to download and install Pig from the MapR Repository. For instructions onsetting up the ecosystem repository (which includes Pig), see .Preparing Packages and Repositories
If you want to install this component manually from packages files, see .Packages and Dependencies for MapR Software
To install Pig on an Ubuntu cluster:
Execute the following commands as or using .root sudo
This procedure is to be performed on a MapR cluster. If you have not installed MapR, see the .Advanced Installation TopicsUpdate the list of available packages:
apt-get update
On each planned Pig node, install :mapr-pig
apt-get install mapr-pig
To run the packaged Hive examples, make /tmp on MapR-FS world-writable. Set /tmp to 777. Example:
hadoop fs -chmod -R 777 /tmp
If /tmp does not exist, create /tmp and then set it to 777.

1.
2. 3.
1.
2.
3.
To install Pig on a Red Hat or CentOS cluster:
Execute the following commands as or using .root sudo
This procedure is to be performed on a MapR cluster. If you have not installed MapR, see the .Advanced Installation TopicsOn each planned Pig node, install :mapr-pig
yum install mapr-pig
Getting Started with Pig
In this tutorial, we'll use of Pig to run a MapReduce job that counts the words in the file in the user'version 0.11 /in/constitution.txt mapr
s directory on the cluster, and store the results in the file .wordcount.txt
First, make sure you have downloaded the file: On the page , select Tools > Attachments andA Tour of the MapR Virtual Machineright-click to save it.constitution.txtMake sure the file is loaded onto the cluster, in the directory . If you are not sure how, look at the tutorial on /user/mapr/in NFS A Tour
.of the MapR Virtual Machine
Open a Pig shell and get started:
In the terminal, type the command to start the Pig shell.pig
At the prompt, type the following lines (press ENTER after each):grunt>
A = LOAD '/user/mapr/in' USING TextLoader() AS (words:chararray);
B = FOREACH A GENERATE FLATTEN(TOKENIZE(*));
C = GROUP B BY $0;
D = FOREACH C GENERATE group, COUNT(B);
STORE D INTO '/user/mapr/wordcount';
After you type the last line, Pig starts a MapReduce job to count the words in the file .constitution.txt
When the MapReduce job is complete, type to exit the Pig shell and take a look at the contents of the directory quit /myvolume/wordc
to see the results.ount
Sqoop
Sqoop transfers data between MapR-FS and relational databases. You can use Sqoop to transfer data from a relational database managementsystem (RDBMS) such as MySQL or Oracle into MapR-FS and use MapReduce on the transferred data. Sqoop can export this transformed databack into an RDBMS. For more information about Sqoop, see the .Apache Sqoop Documentation
Installing Sqoop
The following procedures use the operating system package managers to download and install from the MapR Repository. If you want to installthis component manually from packages files, see .Packages and Dependencies for MapR Software

1.
2. 3.
4.
1.
2. 3.
1.
2. 3.
4.
To install Sqoop on an Ubuntu cluster:
Execute the following commands as or using .root sudo
Perform this procedure on a MapR cluster. If you have not installed MapR, see the .Advanced Installation TopicsUpdate the list of available packages:
apt-get update
On each planned Sqoop node, install :mapr-sqoop
apt-get install mapr-sqoop
To install Sqoop on a Red Hat or CentOS cluster:
Execute the following commands as or using .root sudo
Perform this procedure on a MapR cluster. If you have not installed MapR, see the .Advanced Installation TopicsOn each planned Sqoop node, install :mapr-sqoop
yum install mapr-sqoop
Using Sqoop
For information about configuring and using Sqoop, see the following documents:
Sqoop User GuideSqoop Developer's Guide
Whirr
Apache Whirr™ is a set of libraries for running cloud services. Whirr provides:
A cloud-neutral way to run services. You don't have to worry about the idiosyncrasies of each provider.A common service API. The details of provisioning are particular to the service.Smart defaults for services. You can get a properly configured system running quickly, while still beingable to override settings as needed.
You can also use Whirr as a command line tool for deploying clusters.
Installing Whirr
The following procedures use the operating system package managers to download and install from the MapRRepository. To install the packages manually, refer to .Preparing Packages and Repositories
To install Whirr on an Ubuntu cluster:
Execute the following commands as or using .root sudo
This procedure is to be performed on a MapR cluster. If you have not installed MapR, see the .Advanced Installation TopicsUpdate the list of available packages:
apt-get update
On each planned Whirr node, install :mapr-whirr
apt-get install mapr-whirr

1.
2. 3.
1.
2.
To install Whirr on a Red Hat or CentOS cluster:
Execute the following commands as or using .root sudo
This procedure is to be performed on a MapR cluster. If you have not installed MapR, see the .Advanced Installation TopicsOn each planned Whirr node, install :mapr-cascading
yum install mapr-whirr
Installing Hue
Hue is the open source UI that interacts with Apache Hadoop and its ecosystem components, such as Hive,Pig, and Oozie. It is also a framework for creating interactive Web applications. Note that Hue requires file clientimpersonation, which is supported in MapR version 3.0.2 and above.
Hue is supported on the following browsers:
Windows Linux Mac
Chrome Chrome Chrome
Firefox 3.6+ Firefox 3.6+ Firefox 3.6+
Safari 5+ Safari 5+
Internet Explorer 8+
Installing Hue
The following procedures use package managers to download and install from the MapR Repository. To install the packages manually, refer to Pr. eparing Packages and Repositories
Before you begin, make sure the MapR repository is properly set. If you have not installed MapR, see the .Advanced Installation Topics
The Hue package, , can be installed on either a MapR cluster node (recommended) or a client (edge) node. Follow the instructionsmapr-hue
below for installing on a cluster node or a client node. If you choose to install on a client node, follow the additional instructions under Installing.Hue on a Client Node
To install Hue using Ubuntu:
Execute the following commands as or using .root sudo
Update the list of available packages and install the package.mapr-hue
apt-get updateapt-get install mapr-hue
Install package dependencies.
This is a list of commands to install some of the required packages if they are not already installed:
To use Hue successfully, you must use MapR version 3.0.2 along with a patch which you can obtain from Customer Support. Hue will nwork with MapR version 3.0.1 or earlier.ot
An error message alerts you to missing package dependencies, and those are the only ones you need to install.

2.
1.
apt-get install mysql-common
wgethttp://launchpadlibrarian.net/94808408/libmysqlclient16_5.1.58-1ubuntu5_amd64.debsudo dpkg -i libmysqlclient16_5.1.58-1ubuntu5_amd64.deb
apt-get install libssl0.9.8 add-apt-repository ppa:fkrull/deadsnakesapt-get updateapt-get install python2.6 apt-get install libxslt1.1apt-get install libsasl2-modules-gssapi-mit
To install Hue using RHEL/CentOS:
Execute the following commands as or using root sudo:
Update the list of available packages and install the package:mapr-hue
yum updateyum install mapr-hue
Installing Hue on a Client Node
You can install Hue on a non-cluster node (a client node), but this is not recommended. Configuring Hue on a non-cluster node is morecomplicated than configuring Hue on a cluster node. If you still want to install Hue on a non-cluster node, keep in mind that Hue directories areowned by the user who installed Hue.
To determine who the is, enter:<INSTALL_USER>
logname
Once you know the name of the , set the following properties in to that user name.<INSTALL_USER> hue.ini
server_user=<INSTALL_USER>server_group=<INSTALL_USER>default_user=<INSTALL_USER>
In addition, you must also change the property to the owner of on the cluster.default_hdfs_superuser /var
Installing other Services
Install the following services on at least one node in the cluster. Each of these dependencies provides important functionality, and Hue needs tobe configured to use them (see for more information).Configuring Hue
The must exist on the cluster on nodes, and it must be set as the proxy user in configuration files listed in <INSTALL_USER> all all Conf
.iguring Hue

Package Name Description
mapr-httpfs Required for viewing files in MapR-FS through Hue file browser
mapr-hive Provides Hive libraries so beeswax can run
mapr-oozie Required for Oozie workflows
Next Steps
When you finish installing Hue, the next step is to configure Hue and set up users. For more information, see . Configuring Hue
Installing Impala on MapR
Installation Overview
Impala is comprised of a set of components that you install and run on a single node or on multiple nodes in a cluster. To run Impala in yourcluster, install the required Impala packages on designated nodes. The Impala packages contain the following Impala components:
Impala daemonImpala statestore
The following table lists the Impala packages and their descriptions:
Package Description
mapr-impala A package that contains all of the Impala binaries, including theImpala server, impala-shell, and statestore.
mapr-impala-server The role package that installs the Impala daemon role on the node.This package enables Warden to manage the service. The Impaladaemon must be installed on a node with fileserver.
mapr-impala-statestore The role package that installs the Impala statestore role on the node.This package enables Warden to manage the service.
Package Location
You can access the required Impala packages in the following location:
http://package.mapr.com/releases/ecosystem/redhat/
Before you install Impala, verify that your system meets all of the prerequisites.
Prerequisites
To successfully install and run Impala, verify that the system meets all of the hardware and software requirements.
The following table contains a list of prerequisites with their associated requirements:
Prerequisite Requirements
Operating System MapR provides packages for the following 64-bit operating systems:
Redhat 6.x, CentOS 6.x
Hue version 2.5.0 does not support Hive version 0.9 because Hue relies on beeswax, which is tied to Hive version 0.10 and above. Thisproblem will be fixed in Hue version 3.0, which does not rely on beeswax.
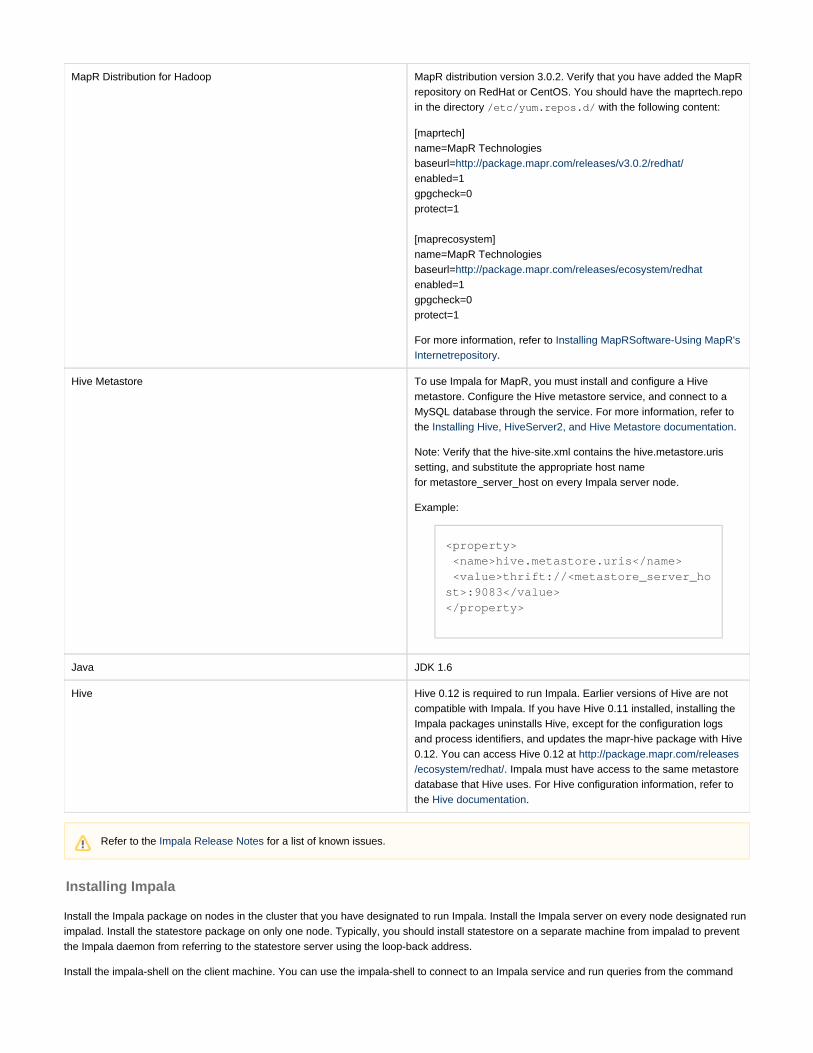
MapR Distribution for Hadoop MapR distribution version 3.0.2. Verify that you have added the MapRrepository on RedHat or CentOS. You should have the maprtech.repoin the directory with the following content:/etc/yum.repos.d/
[maprtech]name=MapR Technologiesbaseurl=http://package.mapr.com/releases/v3.0.2/redhat/enabled=1gpgcheck=0protect=1
[maprecosystem]name=MapR Technologiesbaseurl=http://package.mapr.com/releases/ecosystem/redhatenabled=1gpgcheck=0protect=1
For more information, refer to Installing MapRSoftware-Using MapR's.Internetrepository
Hive Metastore To use Impala for MapR, you must install and configure a Hivemetastore. Configure the Hive metastore service, and connect to aMySQL database through the service. For more information, refer tothe .Installing Hive, HiveServer2, and Hive Metastore documentation
Note: Verify that the hive-site.xml contains the hive.metastore.urissetting, and substitute the appropriate host namefor metastore_server_host on every Impala server node.
Example:
<property> <name>hive.metastore.uris</name> <value>thrift://<metastore_server_host>:9083</value></property>
Java JDK 1.6
Hive Hive 0.12 is required to run Impala. Earlier versions of Hive are notcompatible with Impala. If you have Hive 0.11 installed, installing theImpala packages uninstalls Hive, except for the configuration logsand process identifiers, and updates the mapr-hive package with Hive0.12. You can access Hive 0.12 at http://package.mapr.com/releases/ecosystem/redhat/. Impala must have access to the same metastoredatabase that Hive uses. For Hive configuration information, refer tothe Hive documentation.
Installing Impala
Install the Impala package on nodes in the cluster that you have designated to run Impala. Install the Impala server on every node designated runimpalad. Install the statestore package on only one node. Typically, you should install statestore on a separate machine from impalad to preventthe Impala daemon from referring to the statestore server using the loop-back address.
Install the impala-shell on the client machine. You can use the impala-shell to connect to an Impala service and run queries from the command
Refer to the for a list of known issues.Impala Release Notes

1.
2.
3.
4.
5.
line.
Complete the following steps to install impala, impala-server, statestore, and the impala-shell:
Install the Impala components using the relevant installation commands in the following table:To install the Impala server, issue the following install command:
$ sudo yum install mapr-impala mapr-impala-server
To install the statestore service, issue the following install command:
sudo yum install mapr-impala mapr-impala-statestore
Modify the statestore address in to change the statestore address to the/opt/mapr/impala/impala-1.1.1/conf/env.sh
address where you plan to run the statestore service. Refer to for a list of other options you canAdditional Impala Configuration Optionsmodify in env.sh.Example:IMPALA_STATE_STORE_HOST=<IP address hosting statestore>
Verify that the following property is configured in on all the nodes:hive-site.xml
<property> <name>hive.metastore.uris</name> <value>thrift://<metastore_server_host>:9083</value></property>
Run to refresh the node configuration. configure.sh
Example:/opt/mapr/server/configure.sh -R
Install on the client machine you plan to issue queries from. mapr-impala
To install , issue the following install command:mapr-impala
$ sudo yum install mapr-impala
At this point, the Impala server and statestore should be running.
For instructions on how to run a simple Impala query and how to query HBase tables, refer to .Working with Impala
Additional Impala Configuration Options
You can modify the file to edit certain Impala startup settings. env.sh
Modifying Startup Options
The file contains values that the Impala server and Impala statestore use during start up./opt/mapr/impala/impala-1.1.1/conf/env.sh
The file also has information about resources allocated for Impala. Most of the default values in the file should work effectively, howeverenv.sh
there are some values that you should modify. You can check the current value of all the settings through the Impala web interface, available bydefault at .http://<impala-node-hostname>:25000/varz
You may want to modify the following content in the file:env.sh
Statestore address.Amount of memory available to Impala.Core dump enablement.Password protection for the Impala web UI, which listens on port 25000 by default.Options that control the behavior of queries performed by impalad instance.
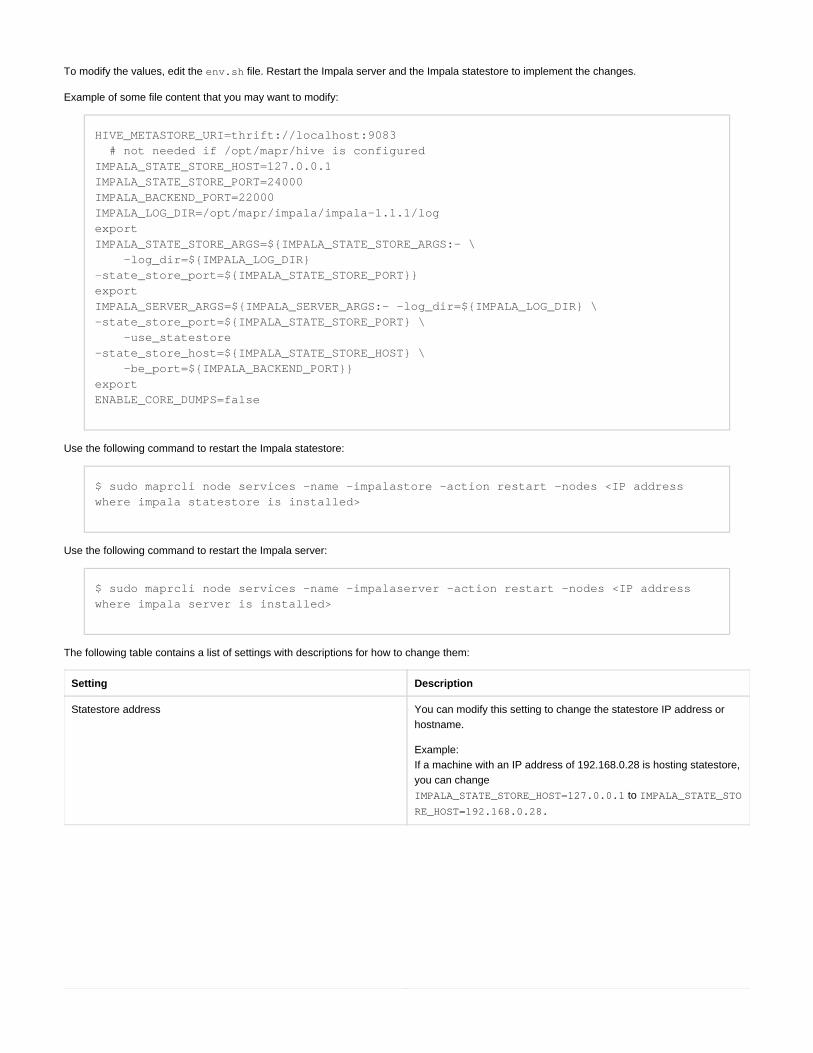
To modify the values, edit the file. Restart the Impala server and the Impala statestore to implement the changes.env.sh
Example of some file content that you may want to modify:
HIVE_METASTORE_URI=thrift://localhost:9083 # not needed if /opt/mapr/hive is configuredIMPALA_STATE_STORE_HOST=127.0.0.1IMPALA_STATE_STORE_PORT=24000IMPALA_BACKEND_PORT=22000IMPALA_LOG_DIR=/opt/mapr/impala/impala-1.1.1/logexportIMPALA_STATE_STORE_ARGS=${IMPALA_STATE_STORE_ARGS:- \ -log_dir=${IMPALA_LOG_DIR}-state_store_port=${IMPALA_STATE_STORE_PORT}}exportIMPALA_SERVER_ARGS=${IMPALA_SERVER_ARGS:- -log_dir=${IMPALA_LOG_DIR} \ -state_store_port=${IMPALA_STATE_STORE_PORT} \ -use_statestore-state_store_host=${IMPALA_STATE_STORE_HOST} \ -be_port=${IMPALA_BACKEND_PORT}}exportENABLE_CORE_DUMPS=false
Use the following command to restart the Impala statestore:
$ sudo maprcli node services -name -impalastore -action restart -nodes <IP addresswhere impala statestore is installed>
Use the following command to restart the Impala server:
$ sudo maprcli node services -name -impalaserver -action restart -nodes <IP addresswhere impala server is installed>
The following table contains a list of settings with descriptions for how to change them:
Setting Description
Statestore address You can modify this setting to change the statestore IP address orhostname.
Example:If a machine with an IP address of 192.168.0.28 is hosting statestore,you can changeIMPALA_STATE_STORE_HOST=127.0.0.1 to IMPALA_STATE_STO
RE_HOST=192.168.0.28.

Memory limits You can limit the amount of memory available to Impala. Useabsolute notation, such as 500m or 2G, or a percentage of physicalmemory, such as 50% to specify the memory limit. Impala aborts aquery if it exceeds the specified memory limit. Percentage limits arebased on the physical memory of the machine.
Example:
To limit Impala to 50% of system memory, modify:
exportIMPALA_SERVER_ARGS=${IMPALA_SERVER_ARGS:- \ -log_dir=${IMPALA_LOG_DIR} \ -state_store_port=${IMPALA_STATE_STORE_PORT} \ -use_statestore-state_store_host=${IMPALA_STATE_STORE_HOST} \ -be_port=${IMPALA_BACKEND_PORT}}
to
exportIMPALA_SERVER_ARGS=${IMPALA_SERVER_ARGS:- \ -log_dir=${IMPALA_LOG_DIR}-state_store_port=${IMPALA_STATE_STORE_PORT} \ -use_statestore-state_store_host=${IMPALA_STATE_STORE_HOST} \ -be_port=${IMPALA_BACKEND_PORT}-mem_limit=50%}
Core dump enablement Core dump file locations can vary depending on your operatingsystem configuration. Other security settings may prevent Impalafrom writing core dumps when you enable this option.
To enable core dumps, change the following:export ENABLE_CORE_DUMPS=false
toexport ENABLE_CORE_DUMPS=true
Next Steps After InstallationAfter installing the MapR core and any desired Hadoop components, you might need to perform additional steps to ready the cluster forproduction. Review the topics below for next steps that might apply to your cluster.
Setting up the MapR Metrics DatabaseSetting up TopologySetting Up VolumesSetting Up Central ConfigurationDesignating NICs for MapR

Setting up MapR NFSConfiguring AuthenticationConfiguring PermissionsSetting Usage QuotasConfiguring alarm notificationsSetting up a Client to Access the ClusterWorking with Multiple Clusters
Setting up the MapR Metrics Database
In order to use MapR Metrics you have to set up a MySQL database where metrics data will be logged. For details see Setting up the MapR.Metrics Database
Setting up Topology
Your node topology describes the locations of nodes and racks in a cluster. The MapR software uses node topology to determine the location ofreplicated copies of data. Optimally defined cluster topology results in data being replicated to separate racks, providing continued data availabilityin the event of rack or node failure. For details see .Node Topology
Setting Up Volumes
A well-structured volume hierarchy is an essential aspect of your cluster's performance. As your cluster grows, keeping your volume hierarchyefficient maximizes your data's availability. Without a volume structure in place, your cluster's performance will be negatively affected. For detailssee .Managing Data with Volumes
Setting Up Central Configuration
MapR services can be configured globally across the cluster, from master configuration files stored in a MapR-FS, eliminating the need to editconfiguration files on all nodes individually. For details see .Central Configuration
Designating NICs for MapR
If multiple NICs are present on nodes, you can configure MapR to use one or more of them, depending on the cluster's need for bandwidth. Fordetails on configuring NICs, see . Review for details on provisioning NICs according to dataDesignating NICs for MapR Planning the Clusterworkload.
Setting up MapR NFS
The MapR NFS service lets you access data on a licensed MapR cluster via the NFS protocol. You can mount the MapR cluster via NFS and usestandard shell scripting to read and write live data in the cluster. NFS access to cluster data can be faster than accessing the same data with the
commands. For details, see . You also might also be interested in and hadoop fs Setting Up MapR NFS High Availability NFS Setting Up VIPs
.for NFS
Configuring Authentication
If you use Kerberos, LDAP, or another authentication scheme, make sure PAM is configured correctly to give MapR access. See PAM.Configuration
Configuring Permissions
By default, users are able to log on to the MapR Control System, but do not have permission to perform any actions. You can grant specificpermissions to individual users and groups. See .Managing Permissions
Setting Usage Quotas
You can set specific quotas for individual users and groups. See .Managing Quotas

Configuring alarm notifications
If an alarm is raised on the cluster, MapR sends an email notification. For example, if a volume goes over its allotted quota, MapR raises an alarmand sends email to the volume creator. To configure notification settings, see . Checking AlarmsTo configure email settings see .Configuring Email for Alarm Notifications
Setting up a Client to Access the Cluster
You can access the cluster either by logging into a node on the cluster, or by installing MapR client software on a machine with access to thecluster's network. For details see .Setting Up the Client
Working with Multiple Clusters
If you need to access multiple clusters or mirror data between clusters, see .Working with Multiple Clusters
Setting Up the ClientMapR provides several interfaces for working with a cluster from a client computer:
MapR Control System - manage the cluster, including nodes, volumes, users, and alarmsDirect Access NFS™ - mount the cluster in a local directoryMapR client - work with MapR Hadoop directly
Mac OS XRed Hat/CentOSSUSEUbuntuWindows
MapR Control System
The MapR Control System allows you to control the cluster through a comprehensive graphical user interface.
Browser Compatibility
The MapR Control System is web-based, and works with the following browsers:
ChromeSafari
Version 5.1 and below with unsigned or signed SSL certificatesVersion 6.1 and above with signed SSL certificates
Firefox 3.0 and aboveInternet Explorer 10 and above
Launching MapR Control System
To use the MapR Control System (MCS), navigate to the host that is running the WebServer in the cluster. MapR Control System access to thecluster is typically via HTTP on port 8080 or via HTTPS on port 8443; you can specify the protocol and port in the dialog. YouConfigure HTTPshould disable pop-up blockers in your browser to allow MapR to open help links in new browser tabs.
The first time you open the MCS via HTTPS from a new browser, the browser alerts you that the security certificate is unrecognized. This isnormal behavior for a new connection. Add an exception in your browser to allow the connection to continue.
Direct Access NFS™
You can mount a MapR cluster locally as a directory on a Mac, Linux, or Windows computer.
Before you begin, make sure you know the hostname and directory of the NFS share you plan to mount.Example:
usa-node01:/mapr - for mounting from the command line

1.
2.
1.
2.
3.
4.
1. 2.
3.
nfs://usa-node01/mapr - for mounting from the Mac Finder
Mounting NFS to MapR-FS on a Cluster Node
To mount NFS to MapR-FS on the cluster at the mount point, add the following line to automatically my.cluster.com /mapr /opt/mapr/conf
:/mapr_fstab
<hostname>:/mapr /mapr hard,nolock
Every time your system is rebooted, the mount point is automatically reestablished according to the configuration file.mapr_fstab
To mount NFS to MapR-FS at the mount point:manually /mapr
Set up a mount point for an NFS share. Example:sudo mkdir /mapr
Mount the cluster via NFS. Example:sudo mount -o nolock usa-node01:/mapr /mapr
Mounting NFS on a Linux Client
To mount when your system starts up, add an NFS mount to . Example:automatically /etc/fstab
# device mountpoint fs-type options dump fsckorder...usa-node01:/mapr /mapr nfs rw 0 0...
To mount NFS on a Linux client :manually
Make sure the NFS client is installed. Examples: sudo yum install nfs-utils (Red Hat or CentOS)
sudo apt-get install nfs-common (Ubuntu)
sudo zypper install nfs-client (SUSE)
List the NFS shares exported on the server. Example:showmount -e usa-node01
Set up a mount point for an NFS share. Example:sudo mkdir /mapr
Mount the cluster via NFS. Example:sudo mount -o nolock usa-node01:/mapr /mapr
Mounting NFS on a Mac Client
To mount the cluster manually from the command line:
Open a terminal (one way is to click on Launchpad > Open terminal).At the command line, enter the following command to become the root user:sudo bash
The change to will not take effect until warden is restarted./opt/mapr/conf/mapr_fstab
When you mount manually from the command line, the mount point does persist after a reboot.not
The mount point does not persist after reboot when you mount manually from the command line.

3.
4.
5.
6.
1. 2. 3. 4. 5.
List the NFS shares exported on the server. Example:showmount -e usa-node01
Set up a mount point for an NFS share. Example:sudo mkdir /mapr
Mount the cluster via NFS. Example:sudo mount -o nolock usa-node01:/mapr /mapr
List all mounted filesystems to verify that the cluster is mounted.mount
Mounting NFS on a Windows Client
Setting up the Windows NFS client requires you to mount the cluster and configure the user ID (UID) and group ID (GID) correctly, as described inthe sections below. In all cases, the Windows client must access NFS using a valid UID and GID from the Linux domain. Mismatched UID or GIDwill result in permissions problems when MapReduce jobs try to access files that were copied from Windows over an NFS share.
Mounting the cluster
To mount the cluster on Windows 7 Ultimate or Windows 7 Enterprise
Open .Start > Control Panel > ProgramsSelect .Turn Windows features on or offSelect .Services for NFSClick .OKMount the cluster and map it to a drive using the tool or from the command line. Example:Map Network Drive
Because of Windows directory caching, there may appear to be no directory in each volume's root directory. To work around.snapshotthe problem, force Windows to re-load the volume's root directory by updating its modification time (for example, by creating an emptyfile or directory in the volume's root directory).
With Windows NFS clients, use the option on the NFS server to prevent the Linux NLM from registering with the-o nolock
portmapper.The native Linux NLM conflicts with the MapR NFS server.

5.
1. 2.
3.
1. 2. 3. 4. 5.
6. 7.
mount -o nolock usa-node01:/mapr z:
To mount the cluster on other Windows versions
Download and install (SFU). You only need to install the NFS Client and the User Name Mapping.Microsoft Windows Services for UnixConfigure the user authentication in SFU to match the authentication used by the cluster (LDAP or operating system users). You canmap local Windows users to cluster Linux users, if desired.Once SFU is installed and configured, mount the cluster and map it to a drive using the tool or from the commandMap Network Driveline. Example:mount -o nolock usa-node01:/mapr z:
Mapping a network drive
To map a network drive with the Map Network Drive tool
Open .Start > My ComputerSelect .Tools > Map Network DriveIn the Map Network Drive window, choose an unused drive letter from the drop-down list.DriveSpecify the by browsing for the MapR cluster, or by typing the hostname and directory into the text field.FolderBrowse for the MapR cluster or type the name of the folder to map. This name must follow UNC. Alternatively, click the Browse… buttonto find the correct folder by browsing available network shares.Select to reconnect automatically to the MapR cluster whenever you log into the computer.Reconnect at loginClick Finish.
See for more information.Accessing Data with NFS
MapR Client
The MapR client lets you interact with MapR Hadoop directly. With the MapR client, you can submit Map/Reduce jobs and run and hadoop fs h
commands. The MapR client is compatible with the following operating systems:adoop mfs
CentOS 5.5 or aboveMac OS X (Intel)Red Hat Enterprise Linux 5.5 or aboveUbuntu 9.04 or aboveSUSE Enterprise 11.1 or aboveWindows 7 and Windows Server 2008
Do not install the client on a cluster node. It is intended for use on a computer that has no other MapR server software installed. Do notinstall other MapR server software on a MapR client computer. MapR server software consists of the following packages:
mapr-core
mapr-tasktracker

1.
2.
3.
4.
To configure the client, you will need the cluster name and the IP addresses and ports of the CLDB nodes on the cluster. The configuration script
has the following syntax:configure.sh
Linux —
configure.sh [-N <cluster name>] -c -C <CLDB node>[:<port>][,<CLDBnode>[:<port>]...]
Windows —
server\configure.bat -c -C <CLDB node>[:<port>][,<CLDB node>[:<port>]...]
To use the client with a secure cluster, add the option to the (or ) command.-secure configure.sh configure.bat
Linux or Mac Example:
/opt/mapr/server/configure.sh -N my.cluster.com -c -C 10.10.100.1:7222
Windows Example:
server\configure.bat -c -C 10.10.100.1:7222
Installing the MapR Client on CentOS or Red Hat
The MapR Client supports Red Hat Enterprise Linux 5.5 or above.
Remove any previous MapR software. You can use to get a list of installed MapR packages, then type therpm -qa | grep mapr
packages separated by spaces after the command. Example:rpm -e
rpm -qa | grep mapr
rpm -e mapr-fileserver mapr-core
Install the MapR client for your target architecture:yum install mapr-client.i386
yum install mapr-client.x86_64
Run to configure the client, using the (uppercase) option to specify the CLDB nodes, and the (lowercase) optionconfigure.sh -C -c
to specify a client configuration. To use this client with a cluster, add the option to the command.secure -secure configure.sh
Example:/opt/mapr/server/configure.sh -N my.cluster.com -c -C 10.10.100.1:7222
or on a secure cluster/opt/mapr/server/configure.sh -N my.cluster.com -c -secure -C 10.10.100.1:7222
To use this client with a secure cluster or clusters, copy the file from the directory on the cluster tossl_truststore /opt/mapr/conf
the directory on the client. If this client will connect to multiple clusters, merge the files with the /opt/mapr/conf ssl_truststore /o
tool.pt/mapr/server/manageSSLKeys.sh
mapr-fileserver
mapr-nfs
mapr-jobtracker
mapr-webserver
To run commands, establish an session to a node in the cluster.MapR CLI ssh

1.
2.
3.
4.
1.
2.
3.
4.
5.
1. 2. 3.
4.
5.
6.
Installing the MapR Client on SUSE
The MapR Client supports SUSE Enterprise 11.1 or above.
Remove any previous MapR software. You can use to get a list of installed MapR packages, then type therpm -qa | grep mapr
packages separated by spaces after the command. Example:zypper rm
rpm -qa | grep mapr
zypper rm mapr-fileserver mapr-core
Install the MapR client: zypper install mapr-client
Run to configure the client, using the (uppercase) option to specify the CLDB nodes, and the (lowercase) optionconfigure.sh -C -c
to specify a client configuration. To use this client with a cluster, add the option to the command.secure -secure configure.sh
Example:/opt/mapr/server/configure.sh -N my.cluster.com -c -C 10.10.100.1:7222
or on a secure cluster/opt/mapr/server/configure.sh -N my.cluster.com -c -secure -C 10.10.100.1:7222
To use this client with a secure cluster or clusters, copy the file from the directory on the cluster tossl_truststore /opt/mapr/conf
the directory on the client. If this client will connect to multiple clusters, merge the files with the /opt/mapr/conf ssl_truststore /o
tool.pt/mapr/server/manageSSLKeys.sh
Installing the MapR Client on Ubuntu
The MapR Client supports Ubuntu 9.04 or above.
Remove any previous MapR software. You can use to get a list of installed MapR packages, then type thedpkg -list | grep mapr
packages separated by spaces after the command. Example:dpkg -r
dpkg -l | grep mapr
dpkg -r mapr-core mapr-fileserver
Update your Ubuntu repositories. Example:
apt-get update
Install the MapR client: apt-get install mapr-client
Run to configure the client, using the (uppercase) option to specify the CLDB nodes, and the (lowercase) optionconfigure.sh -C -c
to specify a client configuration. To use this client with a cluster, add the option to the command.secure -secure configure.sh
Example:/opt/mapr/server/configure.sh -N my.cluster.com -c -C 10.10.100.1:7222
or on a secure cluster/opt/mapr/server/configure.sh -N my.cluster.com -c -secure -C 10.10.100.1:7222
To use this client with a secure cluster or clusters, copy the file from the directory on the cluster tossl_truststore /opt/mapr/conf
the directory on the client. If this client will connect to multiple clusters, merge the files with the /opt/mapr/conf ssl_truststore /o
tool.pt/mapr/server/manageSSLKeys.sh
Installing the MapR Client on Mac OS X
The MapR Client supports Mac OS X (Intel).
Download the archive http://package.mapr.com/releases/v3.1.0/mac/mapr-client-3.1.0.23703.GA-1.x86_64.tar.gzOpen the application.TerminalCreate the directory :/opt
sudo mkdir -p /optExtract mapr-client-2.1.2.18401.GA-1.x86_64.tar.gz into the directory. Example:/opt
*sudo tar -C /opt -xvf mapr-client-2.1.2.18401.GA-1.x86_64.tar.gz *Run to configure the client, using the (uppercase) option to specify the CLDB nodes, and the (lowercase) optionconfigure.sh -C -c
to specify a client configuration. To use this client with a cluster, add the option to the command.secure -secure configure.sh
Example:sudo /opt/mapr/server/configure.sh -N MyCluster -c -C 10.10.100.1:7222To use this client with a secure cluster or clusters, copy the file from the directory on the cluster tossl_truststore /opt/mapr/conf

6.
1.
2. 3.
4.
5.
6.
7. 8.
9.
the directory on the client. If this client will connect to multiple clusters, merge the files with the /opt/mapr/conf ssl_truststore /o
tool.pt/mapr/server/manageSSLKeys.sh
Installing the MapR Client on Windows
The MapR Client supports Windows 7 and Windows Server 2008.
Make sure Java is installed on the computer, and set correctly.JAVA_HOME
Open the command line.Create the directory on your drive (or another hard drive of your choosing)--- either use Windows Explorer, or type the\opt\mapr c:
following at the command prompt:mkdir c:\opt\maprSet to the directory you created in the previous step. Example:MAPR_HOME
SET MAPR_HOME=c:\opt\maprNavigate to :MAPR_HOME
cd %MAPR_HOME%Download the correct archive into :MAPR_HOME
On a 64-bit Windows machine, download http://package.mapr.com/releases/v3.1.0/windows/mapr-client-3.1.0.23703GA-1.amd64.zipOn a 32-bit Windows machine, download http://package.mapr.com/releases/v3.1.0/windows/mapr-client-3.1.0.23703GA-1.x86.zip
Extract the archive by right-clicking on the file and selecting Extract All...From the command line, run to configure the client, using the (uppercase) option to specify the CLDB nodes, andconfigure.bat -C
the (lowercase) option to specify a client configuration. To use this client with a cluster, add the option to the -c secure -secure config
command.Example:ure.bat
server\configure.bat -c -C 10.10.100.1:7222To use this client with a secure cluster or clusters, copy the file from the directory on the cluster tossl_truststore /opt/mapr/conf
the directory on the client. If this client will connect to multiple clusters, merge the files with the c:\opt\mapr\conf ssl_truststore
tool.c:\opt\mapr\server\manageSSLKeys.bat
On the Windows client, you can run MapReduce jobs using the command the way you would normally use the command.hadoop.bat hadoop
For example, to list the contents of a directory, instead of you would type the following:hadoop fs -ls
hadoop.bat fs -ls
Before running jobs on the Windows client, set the following properties in %MAPR_HOME%\hadoop\hadoop-<version>\conf\core-site.xm
on the Windows machine to match the username, user ID, and group ID that have been set up for you on the cluster:l
<property> <name>hadoop.spoofed.user.uid</name> <value>{UID}</value></property><property> <name>hadoop.spoofed.user.gid</name> <value>{GID}</value></property><property> <name>hadoop.spoofed.user.username</name> <value>{id of user who has UID}</value></property>
To determine the correct UID and GID values for your username, log into a cluster node and type the command. In the following example, theid
UID is 1000 and the GID is 2000:
You must use the values for and , not the text names.numeric UID GID

1. 2. 3. 4.
$ iduid=1000(juser) gid=2000(juser)groups=4(adm),20(dialout),24(cdrom),46(plugdev),105(lpadmin),119(admin),122(sambashare),2000(juser)
Upgrade GuideThis guide describes the process of upgrading the software version on a MapR cluster. This page contains:
Upgrade Process OverviewUpgrade Methods: Offline Upgrade vs. Rolling UpgradeWhat Gets Upgraded
Goals for Upgrade ProcessVersion-Specific Considerations
When upgrading from MapR v1.xWhen upgrading from MapR v2.xWhen upgrading from any version to MapR 3.0.2
Throughout this guide we use the terms version to mean the MapR version you are upgrading , and version to mean a laterexisting from newversion you are upgrading .to
Upgrade Process Overview
The upgrade process proceeds in the following order.
Planning the upgrade process – Determine how and when to perform the upgrade.Preparing to upgrade – Prepare the cluster for upgrade while it is still operational.Upgrading MapR packages – Perform steps that upgrade MapR software in a maintenance window.Configuring the new version – Do any final steps to transition the cluster to the new version.
You will spend the bulk of time for the upgrade process in planning an appropriate upgrade path and then preparing the cluster for upgrade. Onceyou have established the right path for your needs, the steps to prepare the cluster are straight-forward, and the steps to upgrade the softwaremove rapidly and smoothly. Read through all steps in this guide so that you understand the whole process before you begin to upgrade softwarepackages.
This Upgrade Guide does not address the following “upgrade” operations, which are part of day-to-day cluster administration:
Upgrading license. Paid features can be enabled by simply applying a new license. If you are upgrading from M3, revisit the cluster’s serv to enable High Availability features.ice layout
Adding nodes to the cluster. See .Adding Nodes to a ClusterAdding disk, memory or network capacity to cluster hardware. See and .Adding Disks Preparing Each Node in the Installation GuideAdding Hadoop ecosystem components, such as HBase and Hive. See for links to appropriate component guides.Related TopicsUpgrading local OS on a node. This is not recommended while a node is in service.
Upgrade Methods: Offline Upgrade vs. Rolling Upgrade
You can perform either or , and either method has trade-offs. Offline upgrade is the most popular option, taking therolling upgrade offline upgradeleast amount of time, but requiring the cluster to go completely offline for maintenance. Rolling upgrade keeps the filesystem online throughout theupgrade process, accepting reads and writes, but extends the duration of the upgrade process. Rolling upgrade cannot be used for clustersrunning Hadoop ecosystem components such as HBase and Hive.
The figures below show the high-level sequence of events for a offline upgrade and a rolling upgrade. (The arrow lengths do not accurately depictthe relative time spent in each stage.)
Figure 1. Offline Upgrade
On the Windows client, because the native Hadoop library is not present, the command is not available.hadoop fs -getmerge
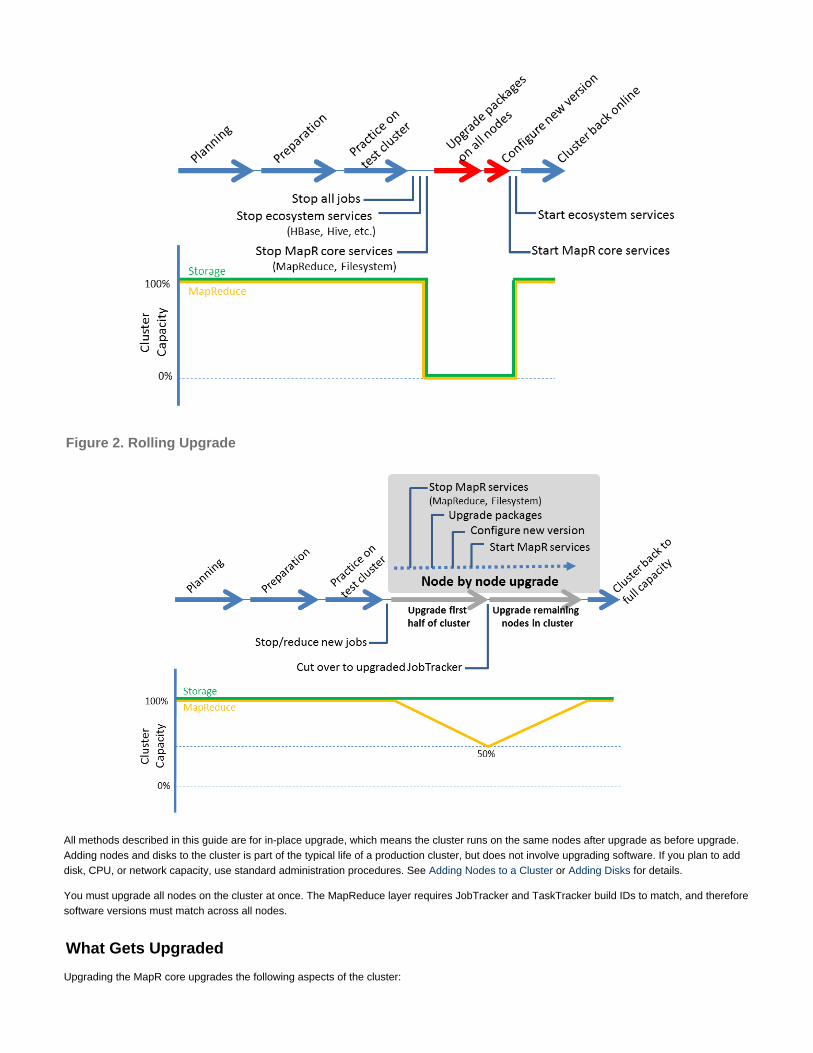
Figure 2. Rolling Upgrade
All methods described in this guide are for , which means the cluster runs on the same nodes after upgrade as before upgrade.in-place upgradeAdding nodes and disks to the cluster is part of the typical life of a production cluster, but does not involve upgrading software. If you plan to adddisk, CPU, or network capacity, use standard administration procedures. See or for details.Adding Nodes to a Cluster Adding Disks
You must upgrade all nodes on the cluster at once. The MapReduce layer requires JobTracker and TaskTracker build IDs to match, and thereforesoftware versions must match across all nodes.
What Gets Upgraded
Upgrading the MapR core upgrades the following aspects of the cluster:

Hadoop MapReduce Layer: JobTracker and TaskTracker servicesStorage Layer: MapR-FS fileserver and Container Location Database (CLDB) servicesCluster Management Services: ZooKeeper and WardenNFS serverWeb server, including the MapR Control System user interface and REST API to cluster servicesThe commands for managing cluster services from a clientmaprcli
Any new features and performance enhancements introduced with the new version. You typically have to enable new features manuallyafter upgrade, which minimizes uncontrolled changes in cluster behavior during upgrade.
This guide focuses on upgrading MapR core software packages, not the Hadoop ecosystem components such as HBase, Hive, Pig, etc.Considerations for ecosystem components are raised where appropriate in this guide, because changes to the MapR core can impact othercomponents in the Hadoop ecosystem. For instructions on upgrading ecosystem components, see the documentation for each specificcomponent. See . If you plan to upgrade both the MapR core and Hadoop ecosystem components, MapR recommends#Related Topicsupgrading the core first, and ecosystem second.
Upgrading the MapR core does not impact data format of other Hadoop components storing data on the cluster. For example, HBase 0.92.2 dataand metadata stored on a MapR 2.1 cluster will work as-is after upgrade to MapR 3.0. Components such as HBase and Hive have their own datamigration processes when upgrading the component version, but this is independent of the MapR core version.
Once cluster services are started with a new major version, the cluster cannot be rolled back to a previous major version, because the newversion writes updated data formats to disk which cannot be reverted. For most minor releases and service updates it is possible to downgradeversions (for example, x.2 to x.1).
Goals for Upgrade Process
Your MapR deployment is unique to your data workload and the needs of your users. Therefore, your upgrade plan will also be unique. Byfollowing this guide, you will make an upgrade plan that fits your needs. This guide bases recommendations on the following principles, regardlessof your specific upgrade path.
Reduce riskIncremental changeFrequent verification of successMinimize down timePlan, prepare and practice first. Then execute.
You might also aspire to touch each node the fewest possible times, which can be counteractive to the goal of minimizing down-time. Some stepsfrom can be moved into the flow, reducing the number of times you have to access each node,Preparing to Upgrade Upgrading MapR Packagesbut increasing the node’s down-time during upgrade.
Version-Specific Considerations
This section lists upgrade considerations that apply to specific versions of MapR software.
When upgrading from MapR v1.x
Starting with v1.2.8, a change in NFS file format necessitates remounting NFS mounts after upgrade. See NFS incompatible when.upgrading to MapR v1.2.8 or later
Hive release 0.7.x, which is included in the MapR v1.x distribution, does not work with MapR core v2.1 and later. If you plan to upgrade toMapR v2.1 or later, you must also upgrade Hive to 0.9.0 or higher, available in MapR's .repositoryNew features are not enabled automatically. You must enable them as described in .Configuring the New VersionTo enable the cluster to run as a non-root user, you must explicitly switch to non-root usage as described in .Configuring the New VersionWhen you are upgrading from MapR v1.x to MapR v2.1.3 or later, run the script after installing the upgradeupgrade2maprexecute
packages but before starting the Warden in order to incorporate changes in how MapR interacts with .sudo
When upgrading from MapR v2.x
If the existing cluster is running as root and you want to transition to a non-root user as part of the upgrade process, perform the stepsdescribed in before proceeding with the upgrade.Converting a Cluster from Root to Non-root UserFor performance reasons, version 2.1.1 of the MapR core made significant changes to the default MapReduce propeties stored in thefiles and in the directory .core-site.xml mapred-site.xml /opt/mapr/hadoop/hadoop-<version>/conf/

New filesystem features are not enabled automatically. You must enable them as described in .Configuring the New VersionIf you are using the table features added to MapR-FS in version 3.0, note the following considerations:
You need to apply an M7 Edition license. M3 and M5 licenses do not include MapR table features.A MapR HBase client package must be installed in order to access table data in MapR-FS. If the existing cluster is alreadyrunning Apache HBase, you must upgrade the MapR HBase client to a version that can access tables in MapR-FS.The HBase package named changes to as of the 3.0 releasemapr-hbase-internal-<version> mapr-hbase-<version>
(May 1, 2013).When you upgrade to MapR v2.1.3 or later from an earlier version of MapR v2, run the /opt/mapr/server/upgrade2maprexecute
script after installing the upgrade packages but before starting the Warden in order to incorporate changes in how MapR interacts with su
.do
When upgrading from any version to MapR 3.0.2
In version 3.0.2 of the MapR distribution for Hadoop, you must manually invoke the following post-install commands to set the correct permissionsfor the binary:maprexecute
$ /opt/mapr/server/configure.sh -R$ /opt/mapr/server/upgrade2maprexecute
Related Topics
Relevant topics from the MapR Installation GuidePlanning the ClusterPreparing Each Node
Upgrade topics for Hadoop Ecosystem ComponentsWorking with CascadingWorking with FlumeWorking with HBaseWorking with HCatalogWorking with HiveWorking with MahoutWorking with OozieWorking with PigWorking with SqoopWorking with Whirr
Planning the Upgrade Process
The first stage to a successful upgrade process is to plan it ahead of time. This page helps you map out an upgrade process that fits the needs ofyour cluster and users. This page contains the following topics:
Choosing Upgrade MethodOffline Upgrade
When you upgrade from MapR v2.1.3 to v2.1.3.1 or later, run the script on/opt/mapr/server/upgrade2maprexecute
each node in the cluster after upgrading the package to set the correct permissions for the binary.mapr-core maprexecute

Rolling UpgradeScheduling the UpgradeConsidering Ecosystem ComponentsReviewing Service Layout
Choosing Upgrade Method
Choose the upgrade method and form your upgrade plans based on this choice. MapR provides a method, as well as a Offline Upgrade Rolling method for clusters that meet certain criteria. The method you choose impacts the flow of events while upgrading packages on nodes,Upgrade
and also impacts the duration of the maintenance window. See below for more details.
Offline Upgrade
In general, MapR recommends offline upgrade because the process is simpler than rolling upgrade, and usually completes faster. Offline upgradeis the default upgrade method when other methods cannot be used. During the maintenance window the administrator stops all jobs on thecluster, stops all cluster services, upgrades packages on all nodes (which can be done in parallel), and then brings the cluster back online atonce.
Figure 1. Offline Upgrade
Rolling Upgrade
Rolling upgrade keeps the filesystem online throughout the upgrade process, which allows for reads and writes for critical data streams. With thismethod, the administrator runs the script to upgrade software node by node (or, with the utility, in batches of up to 4rollingupgrade.sh pssh
nodes at a time), while the other nodes stay online with active fileservers and TaskTrackers. After all the other nodes have been upgraded, the ro
script stages a graceful failover of the cluster's JobTracker to activate it on the upgraded nodes on the cluster.llingupgrade.sh
The following restrictions apply to rolling upgrade:
Rolling upgrades only upgrade MapR packages, not open source components.The administrator should block off a maintenance window, during which only critical jobs are allowed to run and users expectlonger-than-average run times. The cluster’s compute capacity diminishes by 1 to 4 nodes at a time the upgrade, and then recovers to100% capacity by the end of the maintenance window.
Scheduling the Upgrade

Plan the optimal time window for the upgrade. Below are factors to consider when scheduling the upgrade:
When will preparation steps be performed? How much of the process can be performed before the maintenance window?What calendar time would minimize disruption in terms of workload, access to data, and other stakeholder needs?How many nodes need to be upgraded? How long will the upgrade process take for each node, and for the cluster as a whole?When should the cluster stop accepting new non-critical jobs?When (or will) existing jobs be terminated?How long will it take to clear the pipeline of current workload?Will other Hadoop ecosystem components (such as HBase or Hive) get upgraded during the same maintenance window?When and how will stakeholders be notified?
Considering Ecosystem Components
If your cluster runs other Hadoop ecosystem components such as HBase or Hive, consider them in your upgrade plan. In most cases upgradingthe MapR core does not necessitate upgrading the ecosystem components. For example, the Hive 0.10.0 package which runs on MapR 2.1 cancontinue running on MapR 3.0. However, there are some specific cases when upgrading the MapR core requires you to also upgrade one or moreHadoop ecosystem components.
Below are related considerations:
Will you upgrade ecosystem component(s) too? Upgrading ecosystem components is considered a separate process from upgrading theMapR core. If you choose to also upgrade an ecosystem component, you will first upgrade the MapR core, and then proceed to upgradethe ecosystem component.Do you need to upgrade MapR core services? If your goal is to upgrade an ecosystem component, in most cases you do need tonotupgrade the MapR core packages. Simply upgrade the component which needs to be upgraded. See .Related TopicsDoes the new MapR version necessitate a component upgrade? Verify that all installed ecosystem components support the new versionof MapR core. See .Related TopicsWhich ecosystem components need upgrading? Each component constitutes a separate upgrade process. You can upgrade componentsindependently of each other, but you must verify that the resulting version combinations are supported.Can the component upgrade occur without service disruption? In most cases, upgrading an ecosystem component (except for HBase)does not necessitate a maintenance window for the whole cluster.
Reviewing Service Layout
While planning for upgrade, it is a good time to review the layout of services on nodes. Confirm that the service layout still meets the needs of thecluster. For example, as you grow the cluster over time, you typically move toward isolating cluster management services, such as ZooKeeperand CLDB, onto their own nodes.
See in the for a review of MapR’s recommendations. For guidance on moving services,Service Layout in a Cluster Advanced Installation Topicssee the following topics:
Managing Roles on a NodeIsolating ZooKeeper NodesIsolating CLDB Nodes
Preparing to Upgrade
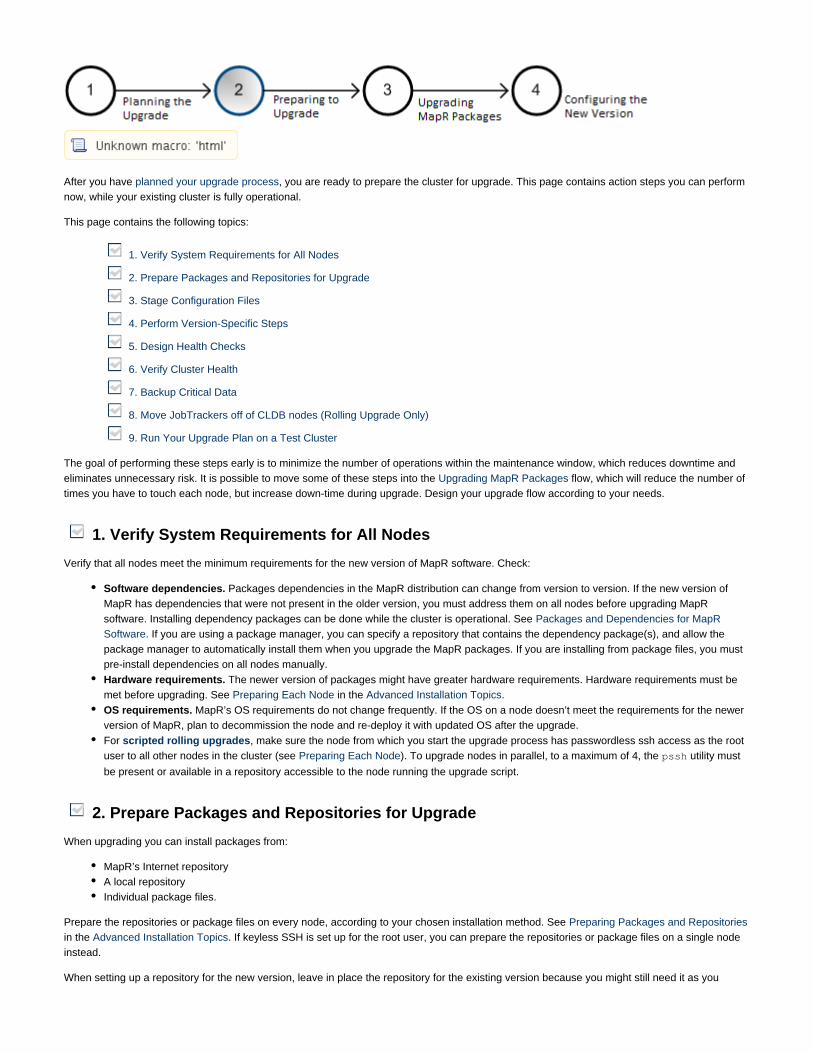
After you have , you are ready to prepare the cluster for upgrade. This page contains action steps you can performplanned your upgrade processnow, while your existing cluster is fully operational.
This page contains the following topics:
1. Verify System Requirements for All Nodes
2. Prepare Packages and Repositories for Upgrade
3. Stage Configuration Files
4. Perform Version-Specific Steps
5. Design Health Checks
6. Verify Cluster Health
7. Backup Critical Data
8. Move JobTrackers off of CLDB nodes (Rolling Upgrade Only)
9. Run Your Upgrade Plan on a Test Cluster
The goal of performing these steps early is to minimize the number of operations within the maintenance window, which reduces downtime andeliminates unnecessary risk. It is possible to move some of these steps into the flow, which will reduce the number ofUpgrading MapR Packagestimes you have to touch each node, but increase down-time during upgrade. Design your upgrade flow according to your needs.
1. Verify System Requirements for All Nodes
Verify that all nodes meet the minimum requirements for the new version of MapR software. Check:
Software dependencies. Packages dependencies in the MapR distribution can change from version to version. If the new version ofMapR has dependencies that were not present in the older version, you must address them on all nodes before upgrading MapRsoftware. Installing dependency packages can be done while the cluster is operational. See Packages and Dependencies for MapR
. If you are using a package manager, you can specify a repository that contains the dependency package(s), and allow theSoftwarepackage manager to automatically install them when you upgrade the MapR packages. If you are installing from package files, you mustpre-install dependencies on all nodes manually.Hardware requirements. The newer version of packages might have greater hardware requirements. Hardware requirements must bemet before upgrading. See in the .Preparing Each Node Advanced Installation TopicsOS requirements. MapR’s OS requirements do not change frequently. If the OS on a node doesn’t meet the requirements for the newerversion of MapR, plan to decommission the node and re-deploy it with updated OS after the upgrade.For , make sure the node from which you start the upgrade process has passwordless ssh access as the rootscripted rolling upgradesuser to all other nodes in the cluster (see ). To upgrade nodes in parallel, to a maximum of 4, the utility mustPreparing Each Node pssh
be present or available in a repository accessible to the node running the upgrade script.
2. Prepare Packages and Repositories for Upgrade
When upgrading you can install packages from:
MapR’s Internet repositoryA local repositoryIndividual package files.
Prepare the repositories or package files on every node, according to your chosen installation method. See Preparing Packages and Repositoriesin the . If keyless SSH is set up for the root user, you can prepare the repositories or package files on a single nodeAdvanced Installation Topicsinstead.
When setting up a repository for the new version, leave in place the repository for the existing version because you might still need it as you

1.
2. 3. 4. 5.
prepare to upgrade.
2a. Update Repository Cache
If you plan to install from a repository, update the repository cache on all nodes.On RedHat and CentOS
# yum clean all
On Ubuntu
# apt-get update
On SUSE
# zypper refresh
3. Stage Configuration Files
You probably want to re-apply existing configuration customizations after upgrading to the new version of MapR software. New versionscommonly introduce changes to configuration properties. It is common for new properties to be introduced and for the default values of existingproperties to change. This is true for the MapReduce layer, the storage layer, and all other aspects of cluster behavior. This section guides youthrough the steps to stage configuration files for the new version, so they are ready to be applied as soon as you perform the upgrade.
Active configuration files for the current version of the MapR core are in the following locations:
/opt/mapr/conf/
/opt/mapr/hadoop/hadoop-<version>/conf/
When you install or upgrade MapR software, fresh configuration files containing default values are installed to parallel directories /opt/mapr/co
and . Configuration files in these directories are not active unless younf.new /opt/mapr/hadoop/hadoop-<version>/conf.new .new
copy them to the active directory.conf
If your existing cluster uses default configuration properties only, then you might choose to use the defaults for the new version as well. In thiscase, you do not need to prepare configuration files, because you can simply copy to after upgrading a node to use the newconf.new conf
version's defaults.
If you want to propagate customizations in your existing cluster to the new version, you will need to find your configuration changes and applythem to the new version. Below are guidelines to stage configuration files for the new version.
Install the existing version of MapR on a test node to get the default configurations files. You will find the files in the /opt/mapr/conf.n
and directories.ew /opt/mapr/hadoop/hadoop-<version>/conf.new
For each node, diff your existing configuration files with the defaults to produce a list of changes and customizations.Install the new version of MapR on a test node to get the default configuration files.For each node, merge changes in the existing version into the new version’s configuration files.Copy the merged configuration files to a staging directory, such as . You will use these files when/opt/mapr/conf.staging/
upgrading packages on each node in the cluster.
Figure 1. Staging Configuration Files for the New Version
The procedure does not work on clusters running SUSE.Scripted Rolling Upgrade

1.
2.
3.
Note that the Central Configuration feature, which is enabled by default in MapR version 2.1 and later, automatically updates configuration files. Ifyou choose to enable Centralized Configuration as part of your upgrade process, it could overwrite manual changes you've made to configurationfiles. See and for more details.Central Configuration Configuring the New Version
4. Perform Version-Specific Steps
This section contains version-specific preparation steps. If you are skipping over a major version (for example, upgrading from 1.2.9 to 3.0),perform the preparation steps for the skipped version(s) as well (in this case, 2.x).
Upgrading from Version 1.x
4a. Set TCP Retries
On each node, set the number of TCP retries to 5 so that the cluster detects unreachable nodes earlier. This also benefits the rolling upgradeprocess, by reducing the graceful failover time for TaskTrackers and JobTrackers.
Edit the file and add the following line:/etc/sysctl.conf
net.ipv4.tcp_retries2=5
Save the file and run to refresh system settings. For example:sysctl -p
# sysctl -p ...lines removed...net.ipv4.ip_forward = 0net.ipv4.conf.default.rp_filter = 1net.ipv4.conf.default.accept_source_route = 0net.ipv4.tcp_retries2 = 5
Ensure that the setting has taken effect. Issue the following command, and verify that the output is 5:
# cat /proc/sys/net/ipv4/tcp_retries25
4b. Create non-root user and group for MapR services
If you plan for MapR services to run as non-root after upgrading, create a new “mapr user” and group on every node. The mapr user is the user

that runs MapR services, instead of root.
For example, the following commands create a new group and new user, both called , and then sets a password. You do not have to usemapr
1001 for and , but the values must be consistent across all nodes. The username is typically or , but can be any valid login.uid gid mapr hadoop
# groupadd --gid 1001 mapr# useradd --uid 1001 --gid mapr --create-home mapr# passwd mapr
To test that the mapr user has been created, switch to the new user with . Verify that a home directory has been created (usually su mapr /home
) and that the mapr user has read-write access to it. The mapr user must have write access to the directory, or the warden will fail to/mapr /tmp
start services.
Later, after MapR software has been upgraded on all nodes, you must perform additional steps to enable cluster services to run as the user.mapr
Upgrading from Version 2.x
4c. Obtain license for new v3.x features
If you are upgrading to gain access to the native table features available in v3.x, you must obtain an M7 license which enables table storage. Login at and go to the area to manage your license.mapr.com My Clusters
5. Design Health Checks
Plan what kind of test jobs and scripts you will use to verify cluster health as part of the upgrade process. You will verify cluster health severaltimes before, during, and after upgrade to ensure success at every step, and to isolate issues whenever they occur. Create both simple tests toverify that cluster services start and respond, as well as non-trivial tests that verify workload-specific aspects of your cluster.
5a. Design Simple Tests
Examples of simple tests:
Check node health using commands to verify if any alerts exist and that services are running where they are expected to be.maprcli
For example:
# maprcli node list -columns svcservice hostname ip
tasktracker,cldb,fileserver,hoststats centos55 10.10.82.55
tasktracker,hbregionserver,fileserver,hoststats centos56 10.10.82.56
fileserver,tasktracker,hbregionserver,hoststats centos57 10.10.82.57
fileserver,tasktracker,hbregionserver,webserver,hoststats centos58 10.10.82.58
...lines deleted...# maprcli alarm listalarm state description entity alarm name alarm statechange time 1 One or more licenses is about to expire within 25 days CLUSTER CLUSTER_ALARM_LICENSE_NEAR_EXPIRATION 1366142919009 1 Can not determine if service: nfs is running. Check logs at:/opt/mapr/logs/nfsserver.log centos58 NODE_ALARM_SERVICE_NFS_DOWN 1366194786905

1.
In this example you can see that an alarm is raised indicating that MapR is expecting an NFS server to be running on node ,centos58
and the of running services confirms that the service is not running on this node.node list nfs
Batch create a set of test files.Submit a MapReduce job.Run simple checks on installed Hadoop ecosystem components. For example:
Make a Hive query.Do a put and get from Hbase.Run to verify consistency of the HBase datastore. Address any issues that are found.hbase hbck
5b. Design Non-trivial Tests
Appropriate non-trivial tests will be specific to your particular cluster’s workload. You may have to work with users to define an appropriate set oftests. Run tests on the existing cluster to calibrate expectations for “healthy” task and job durations. On future iterations of the tests, inspectresults for deviations. Some examples:
Run performance benchmarks relevant the cluster’s typical workload.Run a suite of common jobs. Inspect for correct results and deviation from expected completion times.Test correct inter-operation of all components in the Hadoop stack and third-party tools.Confirm integrity of critical data stored on cluster.
6. Verify Cluster Health
Verify cluster health before beginning the upgrade process. Proceed with the upgrade only if the cluster is in an expected, healthy state.Otherwise, if cluster health does not check out after upgrade, you can’t isolate the cause to be related to the upgrade.
6a. Run Simple Health Checks
Run the suite of simple tests to verify that basic features of the MapR core are functioning correctly, and that any alarms are known andaccounted for.
6b. Run Non-trivial Health Checks
Run your suite of non-trivial tests to verify that the cluster is running as expected for typical workload, including integration with Hadoopecosystem components and third-party tools.
7. Backup Critical Data
Data in the MapR cluster persists across upgrades from version to version. However, as a precaution you might want to backup critical databefore upgrading. If you deem it practical and necessary, you can do any of the following:
Copy data out of the cluster using to a separate, non-Hadoop datastore.distcp
Mirror critical volume(s) into a separate MapR cluster, creating a read-only copy of the data which can be accessed via the other cluster.
When services for the new version are activated, MapR-FS will update data on disk automatically. The migration is transparent to users andadministrators. Once the cluster is active with the new version, you typically cannot roll back. The data format for the MapR filesystem changesbetween major releases (for example, 2.x to 3.x). For some (but not all) minor releases and service updates (for example, x.1 to x.2, or y.z.1 toy.z.2), it is possible to revert versions.
8. Move JobTrackers off of CLDB nodes (Rolling Upgrade Only)
For the manual rolling upgrade process, JobTracker and CLDB services cannot co-exist on the same node. This restriction does not apply to theoffline upgrade process. If necessary, move JobTracker services to non-CLDB nodes. You may need to to record thisrevisit your service layoutchange in design. Below are steps to remove the JobTracker role from CLDB nodes, and add it to other nodes.
If the active JobTracker is among the JobTrackers that need to move, move it . In this case, removing the active JobTracker will cause thelastcluster to failover and activate a standby JobTracker. Partially-completed MapReduce jobs in progress will resume when the new JobTrackercomes online, typically within seconds. If this is an unacceptable disruption of service on your active cluster, you can perform these steps duringthe upgrade maintenance window.

1.
2. a.
b.
3. a.
b.
Determine where JobTracker, CDLB and ZooKeeper are installed, and where JobTracker is running, by executing the maprcli node
and commands. For the , the option lists where a service is installed to run (butlist maprcli node listcldbzks node list csvc
might not currently be running), and the option lists where a service is running. Note in the list which node is running thesvc actively svc
active JobTracker.
# maprcli node list -columns svc,csvc# maprcli node listcldbzks
The command is not available prior to MapR version 2.0.node listcldbzks
For each JobTracker on a CLDB node, use the commands below to add one replacement JobTracker on a non-CLDB node.Install the JobTracker package. Substitute with the specific version.<version>
On RedHat and CentOS
# yum install mapr-jobtracker-<version>
On Ubuntu
# apt-get install mapr-jobtracker=<version>
On SUSE
# zypper install mapr-jobtracker-<version>
Run the script to remove the node role.configure.sh
# /opt/mapr/server/configure.sh -R
A successful result will produce output like the following, showing that is configured on this node:jobtracker
# /opt/mapr/server/configure.sh -RNode setup configuration: fileserver jobtracker webserverLog can be found at: /opt/mapr/logs/configure.log
Remove the JobTracker from any CLDB node(s) where it is installed. If you have to remove the active JobTracker, remove it .lastIf the node is running the active JobTracker, stop the service.
# maprcli node services -nodes <JobTracker node> -jobtracker stop
Remove the package.mapr-jobtracker
On RedHat and CentOS
# yum remove mapr-jobtracker
Install the version of MapR when moving the JobTrackers, because that is the active version on the cluster atexistingthis stage. Explicitly specify a version number when installing to make sure you don't accidentally install the newerversion. Alternatively, you can temporarily disable the repository for the new version.

3.
b.
c.
1. 2.
On Ubuntu
# apt-get purge mapr-jobtracker
On SUSE
# zypper remove mapr-jobtracker
Run the script so the cluster recognizes the changed roles on the node. Confirm that is no longerconfigure.sh jobtracker
configured on the node.
# /opt/mapr/server/configure.sh -RNode setup configuration: cldb fileserver tasktracker zookeeperLog can be found at: /opt/mapr/logs/configure.log
9. Run Your Upgrade Plan on a Test Cluster
Before executing your upgrade plan on the production cluster, perform a complete "dry run" on a test cluster. You can perform the dry run on asmaller cluster than the production cluster, but make the dry run as similar to the real-world circumstances as possible. For example, install allHadoop ecosystem components that are in use in production, and replicate data and jobs from the production cluster on the test cluster.
The goals for the dry run are:
Eliminate surprises. Get familiar with all upgrade operations you will perform as you upgrade the production cluster.Uncover any upgrade-related issues as early as possible so you can accommodate them in your upgrade plan. Look for issues in theupgrade process itself, as well as operational and integration issues that could arise after the upgrade.
When you have successfully run your upgrade plan on a test cluster, you are ready for .Upgrading MapR Packages
Upgrading MapR Packages
After you have and performed all , you are ready to upgrade the MapR packages on all nodes inplanned your upgrade process preparation stepsthe cluster. The upgrade process differs depending on whether you are performing offline upgrade or rolling upgrade. Choose your plannedinstallation flow:
Offline UpgradeRolling UpgradeScripted Rolling Upgrade

1. 2. 3.
To complete the upgrade process and end the maintenance window, you need to perform additional cluster configuration steps described in Confi.guring the New Version
Offline Upgrade
The package upgrade process for the offline upgrade follows the sequence below.
1. Halt Jobs
2. Stop Cluster Services
2a. Disconnect NFS Mounts and Stop NFS Server
2b. Stop Hive and Apache HBase Services
2c. Stop MapR Core Services
3. Upgrade Packages and Configuration Files
3a. Upgrade or Install HBase Client for MapR Tables
3b. Run upgrade2maprexecute
4. Restart Cluster Services
4a. Restart MapR Core Services
4b. Run Simple Health Check
4c. Set the New Cluster Version
4d. Restart Hive and Apache HBase Services
5. Verify Success on Each Node
Perform these steps on all nodes in the cluster. For larger clusters, these steps are commonly performed on all nodes in parallel using scriptsand/or remote management tools.
1. Halt Jobs
As defined by your upgrade plan, halt activity on the cluster in the following sequence before you begin upgrading packages:
Notify stakeholders.Stop accepting new jobs.At some later point, terminate any running jobs. The following commands can be used to terminate MapReduce jobs, and you might alsoneed specific commands to terminate custom applications.

3.
1.
2.
3.
1.
2.
a.
# hadoop job -list# hadoop job -kill <job-id># hadoop job -kill-task <task-id>
At this point the cluster is ready for maintenance but still operational. The goal is to perform the upgrade and get back to normal operation assafely and quickly as possible.
2. Stop Cluster Services
The following sequence will stop cluster services gracefully. When you are done, the cluster will be offline. The commands used in thismaprcli
section can be executed on any node in the cluster.
2a. Disconnect NFS Mounts and Stop NFS Server
Use the steps below to stop the NFS service.
Unmount the MapR NFS share from all clients connected to it, including other nodes in the cluster. This allows all processes accessingthe cluster via NFS to disconnect gracefully. Assuming the cluster is mounted at :/mapr
# umount /mapr
Stop the NFS service on all nodes where it is running:
# maprcli node services -nodes <list of nodes> -nfs stop
Verify that the MapR NFS server is not running on any node. Run the following command and confirm that is not included on anynfs
node.
# maprcli node list -columns svc | grep nfs
2b. Stop Hive and Apache HBase Services
For nodes running Hive or Apache HBase, stop these services so they don’t hit an exception when the filesystem goes offline. Stop the servicesin this order:
HiveServer - The HiveServer runs as a Java process on a node. You can use to find if HiveServer is running on a node, andjps -m
use to stop it. For example:kill -9
# jps -m16704 RunJar /opt/mapr/hive/hive-0.10.0/lib/hive-service-0.10.0.jarorg.apache.hadoop.hive.service.HiveServer32727 WardenMain /opt/mapr/conf/warden.conf2508 TaskTracker17993 Jps -m# kill -9 16704
HBase Master - For all nodes running the HBase Master service, stop HBase services. By stopping the HBase Master first, it won’tdetect individual regionservers stopping later, and therefore won’t trigger any fail-over responses.
Use the following commands to find nodes running the HBase Master service and to stop it.

2.
a.
b.
3. a.
b.
1.
# maprcli node list -columns svc# maprcli node services -nodes <list of nodes> -hbmaster stop
You can the HBase master log file on nodes running the HBase master to track shutdown progress, as shown in thetail
example below. The in the log filename will match the cluster's MapR user which runs services.mapr
# tail /opt/mapr/hbase/hbase-0.92.2/logs/hbase-mapr-master-centos55.log...lines removed...2013-04-15 08:10:53,277 INFO org.apache.hadoop.hbase.master.LoadBalancer:Skipping load balancing because balanced cluster; servers=3 regions=3average=1.0 mostloaded=2 leastloaded=0Mon Apr 15 08:14:14 PDT 2013 Killing master
HBase regionservers - Soon after stopping the HBase Master, stop the HBase regionservers on all nodes.Use the following commands to find nodes running the HBase Regionserver service and to stop it. It can take a regionserverseveral minutes to shut down, depending on the cleanup tasks it has to do.
# maprcli node list -columns svc# maprcli node services -nodes <list of nodes> -hbregionserver stop
You can the regionserver log file on nodes running the HBase regionserver to track shutdown progress, as shown in thetail
example below.
# tail/opt/mapr/hbase/hbase-0.92.2/logs/hbase-mapr-regionserver-centos58.log...lines removed...2013-04-15 08:15:16,583 INFOorg.apache.hadoop.hbase.regionserver.HRegionServer: stopping servercentos58,60020,1366023348995; zookeeper connection closed.2013-04-15 08:15:16,584 INFOorg.apache.hadoop.hbase.regionserver.HRegionServer: regionserver60020exiting2013-04-15 08:15:16,584 INFOorg.apache.hadoop.hbase.regionserver.ShutdownHook: Starting fs shutdownhook thread.2013-04-15 08:15:16,585 INFOorg.apache.hadoop.hbase.regionserver.ShutdownHook: Shutdown hook finished.
If a regionserver's log show no progress and the process does not terminate, you might have to kill it manually. For example:
# kill -9 `cat /opt/mapr/logs/hbase-mapr-regionserver.pid`
2c. Stop MapR Core Services
Stop MapR core services in the following sequence.
Note where CLDB and ZooKeeper services are installed, if you do not already know.

1.
2.
3.
4.
1.
2.
# maprcli node list -columns hostname,csvccentos55 tasktracker,hbmaster,cldb,fileserver,hoststats 10.10.82.55centos56 tasktracker,hbregionserver,cldb,fileserver,hoststats 10.10.82.56...more nodes...centos98 fileserver,zookeeper 10.10.82.98centos99 fileserver,webserver,zookeeper 10.10.82.99
Stop the warden on all nodes with CLDB installed:
# service mapr-warden stopstopping WARDENlooking to stop mapr-core processes not started by warden
Stop the warden on all remaining nodes:
# service mapr-warden stopstopping WARDENlooking to stop mapr-core processes not started by warden
Stop the ZooKeeper on all nodes where it is installed:
# service mapr-zookeeper stopJMX enabled by defaultUsing config: /opt/mapr/zookeeper/zookeeper-3.4.5/conf/zoo.cfgStopping zookeeper ... STOPPED
At this point the cluster is completely offline. commands will not work, and the browser-based MapR Control System will be unavailable.maprcli
3. Upgrade Packages and Configuration Files
Perform the following steps to upgrade the MapR core packages on every node.
Use the following command to determine which packages are installed on the node: On Red Hat:yum list installed 'mapr-*'On Ubuntu:dpkg --list 'mapr-*'On SUSE:zypper se -i mapr
Upgrade the following packages on all nodes where they exist:mapr-cldb
mapr-core
mapr-fileserver
mapr-hbase-<version> - You must specify a version that matches the version of HBase API used by your applications. See #
for details.3a. Upgrade or Install HBase Client for MapR Tablesmapr-jobtracker
mapr-metrics
mapr-nfs

2.
3.
4.
mapr-tasktracker
mapr-webserver
mapr-zookeeper
mapr-zk-internal
On Red Hat:yum update mapr-cldb mapr-core mapr-fileserver mapr-hbase-<version> mapr-jobtracker mapr-metrics mapr-nfsmapr-tasktracker mapr-webserver mapr-zookeeper mapr-zk-internalOn Ubuntu:apt-get install mapr-cldb mapr-core mapr-fileserver mapr-hbase=<version> mapr-jobtracker mapr-metrics mapr-nfsmapr-tasktracker mapr-webserver mapr-zookeeper mapr-zk-internalOn SUSE:zypper update mapr-cldb mapr-core mapr-fileserver mapr-jobtracker mapr-metrics mapr-nfs mapr-tasktracker mapr-webservermapr-zookeeper mapr-zk-internal
Verify that packages installed successfully on all nodes. Confirm that there were no errors duringinstallation, and check that /opt/mapr/MapRBuildVersion contains the expected value.
Example:
# cat /opt/mapr/MapRBuildVersion
2.1.2.18401.GA
Copy the staged configuration files for the new version to /opt/mapr/conf, if you created them as part
of Preparing to Upgrade.
3a. Upgrade or Install HBase Client for MapR Tables
If you are upgrading from a pre-3.0 version of MapR and you will use MapR tables, you have to install (or upgrade) the MapR HBase client. If youare upgrading the Apache HBase component as part of your overall upgrade plan, then the MapR HBase client will get upgraded as part of thatprocess. See .Upgrading HBase
All nodes that access table data in Map-FS must have the MapR HBase Client installed. This typically includes all TaskTracker nodes and anyother node that will access data in MapR tables. The package name is , where matches the version ofmapr-hbase-<version> <version>
HBase API to support, such as 0.92.2 or 0.94.5. This version has no impact on the underlying storage format used by the MapR-FS file server. Ifyou have existing applications written for a specific version of the HBase API, install the MapR HBase client package with the same version. If youare developing new applications to use MapR tables exclusively, use the highest available version of the MapR HBase Client.
On Red Hat:yum install mapr-hbase-<version>On Ubuntu:apt-get install mapr-hbase=<version>On SUSE:zypper install mapr-hbase-<version>
3b. Run upgrade2maprexecute
If you are upgrading from a previous version of MapR to version 2.1.3 or later, run the script on/opt/mapr/server/upgrade2maprexecute
every node, after installing packages but before bringing up the cluster, in order to apply changes in MapR's interaction with .sudo
4. Restart Cluster Services
After you have upgraded packages on all nodes, perform the following sequence on all nodes to restart the cluster.
Do not use a wildcard such as " " to upgrade all MapR packages, which could erroneously include Hadoopmapr-*
ecosystem components such as and .mapr-hive mapr-pig

1.
2.
3.
4a. Restart MapR Core Services
Run the script using one of the following sets of options:configure.sh
If services on nodes remain constant during the upgrade use the option as shown in the example below.-R
# /opt/mapr/server/configure.sh -RNode setup configuration: fileserver nfs tasktrackerLog can be found at: /opt/mapr/logs/configure.log
If you have added or removed packages on a node, use the and options to reconfigure the expected services on the node,-C -Z
as shown in the example below.
# /opt/mapr/server/configure.sh -C <CLDB nodes> -Z <Zookeeper nodes> [-N<cluster name>]Node setup configuration: fileserver nfs tasktrackerLog can be found at: /opt/mapr/logs/configure.log
If ZooKeeper is installed on the node, start it:
# service mapr-zookeeper startJMX enabled by defaultUsing config: /opt/mapr/zookeeper/zookeeper-3.4.5/conf/zoo.cfgStarting zookeeper ... STARTED
Start the warden:
# service mapr-warden startStarting WARDEN, logging to /opt/mapr/logs/warden.log..For diagnostics look at /opt/mapr//logs/ for createsystemvolumes.log, warden.logand configured services log files
At this point, MapR core services are running on all nodes.
4b. Run Simple Health Check
Run simple health-checks targeting the filesystem and MapReduce services only. Address any issues or alerts that might have come up at thispoint.
4c. Set the New Cluster Version
After restarting MapR services on all nodes, issue the following command on any node in the cluster to update and verify the configured version.The version of the installed MapR software is stored in the file ./opt/mapr/MapRBuildVersion
# maprcli config save -values {mapr.targetversion:"`cat /opt/mapr/MapRBuildVersion`"}
You can verify that the command worked, as shown in the example below.

1.
2.
# maprcli config load -keys mapr.targetversionmapr.targetversion3.1.0.23703.GA
4d. Restart Hive and Apache HBase Services
For all nodes with Hive and/or Apache HBase installed, restart the the services.
HBase Master and - Start the HBase Master service first, followed immediately by regionservers. On any node inHBase Regionserversthe cluster, use these commands to start HBase services.
# maprcli node services -nodes <list of nodes> -hbmaster start# maprcli node services -nodes <list of nodes> -hbregionserver start
You can the log files on specific nodes to track status. For example:tail
# tail /opt/mapr/hbase/hbase-<version>/logs/hbase-<mapr user>-master-<hostid>.log# tail /opt/mapr/hbase/hbase-<version>/logs/hbase-<mapruser>-regionserver-<hostid>.log
HiveServer - The HiveServer or (HiveServer2) process must be started on the node where Hive is installed. The method to start-up isdependent on whether you are using HiveServer or HiveServer2. See for more information.Working with Hive
5. Verify Success on Each Node
Below are some simple checks to confirm that the packages have upgraded successfully:
All expected nodes show up in a cluster node listing, and the expected services are configured on each node. For example:
# maprcli node list -columns hostname,csvchostname configuredservice ipcentos55 tasktracker,hbmaster,cldb,fileserver,hoststats 10.10.82.55centos56 tasktracker,hbregionserver,cldb,fileserver,hoststats 10.10.82.56centos57 fileserver,tasktracker,hbregionserver,hoststats,jobtracker 10.10.82.57centos58 fileserver,tasktracker,hbregionserver,webserver,nfs,hoststats,jobtracker10.10.82.58...more nodes...
If a node is not connected to the cluster, commands will not work at all.maprcli
A master CLDB is active, and all nodes return the same result. For example:
# maprcli node cldbmastercldbmasterServerID: 8851109109619685455 HostName: centos56
Only one ZooKeeper service claims to be the ZooKeeper leader, and all other ZooKeepers are followers. For example:

# service mapr-zookeeper qstatusJMX enabled by defaultUsing config: /opt/mapr/zookeeper/zookeeper-3.4.5/conf/zoo.cfgMode: follower
At this point, MapR packages have been upgraded on all nodes. You are ready to .configure the cluster for the new version
Rolling Upgrade
This page contains the following topics:
OverviewPlanning the Order of NodesWhy Node Order Matters
Move JobTracker Service Off of CLDB NodesUpgrade ZooKeeper packages on All ZooKeeper NodesUpgrade Half the Nodes, One-by-One, up to the Active JobTrackerUpgrade All Remaining Nodes, Starting with the Active JobTracker
Overview
In the rolling upgrade process, you upgrade the MapR software one node at a time so that the cluster as a whole remains operational throughoutthe process. The fileserver service on each node goes offline while packages are upgraded, but its absence is short enough that the cluster doesnot raise the data under-replication alarm.
The rolling upgrade process follows the steps shown in the figure below. In the figure, each table cell represents a service running on a node. Forexample, stands for a TaskTracker service running the existing version of MapR, and stands for the TaskTracker service upgraded to theT T’new version. The MapR fileserver service is assumed to run on every node, and it gets upgraded at the same time as TaskTracker.
Before you begin, make sure you understand the restrictions for rolling upgrade described in .Planning the Upgrade Process


1.
2.
3.
4.
5.
Planning the Order of Nodes
Plan the order of nodes before you begin upgrading. The particular services running on each node determines the order to upgrade. The noderunning the JobTracker is of particular interest, because it can change over time.active
You will upgrade nodes in the following order:
Upgrade ZooKeeper on all ZooKeeper nodes. This establishes a stable ZooKeeper quorum on the new version, which will remain activethrough the rest of the upgrade process.Upgrade MapR packages on all CLDB nodes. The upgraded CLDB nodes can support both the existing and the new versions offileservers, which enables all fileservers to remain in service throughout the upgrade.Upgrade MapR packages on half the nodes, including all JobTracker nodes the active JobTracker node. This step upgradesexcept forthe fileserver, TaskTracker and (where present) JobTracker to the new version.Upgrade the active JobTracker node. This node marks the half-way point in the upgrade. Stopping the active JobTracker (running theexisting version) causes the cluster to fail-over to a standby JobTracker (running the new version). At this cross-over point, all the newTaskTrackers become active. All existing-version TaskTrackers become inactive, because they cannot accept tasks from the newJobTracker.Upgrade MapR packages on all remaining nodes in the cluster. The cluster’s MapReduce capacity increases with every TaskTrackernode that gets upgraded.
Going node by node has the following effects:
You avoid compromising high-availability (HA) services, such as CLDB and JobTracker, by leaving as many redundant nodes online aspossible throughout the upgrade process.You avoid triggering aggressive data replication (or making certain data unavailable altogether), which could result if too many fileserversgo offline at once. The cluster alarm VOLUME_ALARM_DATA_UNDER_REPLICATED might trigger when a node’s fileserver goesoffline. By default, the cluster will not begin replicating data for several minutes, which allows each node’s upgrade process to complete

1.
without incurring any replication burden. Downtime per node will be on the order of 1 minute.
To find the node currently running the active JobTracker
Shortly before beginning to upgrade nodes, determine where the active JobTracker is running. The following command lists the active servicesrunning on each node. The service will appear on exactly one node.jobtracker
# maprcli node list -columns hostname,svchostname service ipcentos55 tasktracker,cldb,fileserver,hoststats 10.10.82.55centos56 tasktracker,cldb,fileserver,hoststats 10.10.82.56centos57 fileserver,tasktracker,hbregionserver,hoststats 10.10.82.57centos58 fileserver,tasktracker, webserver,nfs,hoststats,jobtracker 10.10.82.58...more nodes...
To find where ZooKeeper and CLDB are running
Use either of the following command to list which nodes have the ZooKeeper and CLDB service configured.
# maprcli node listcldbzksCLDBs: centos55,centos56 Zookeepers: centos10:5181,centos11:5181,centos12:5181
# maprcli node list -columns hostname,csvchostname configuredservice ipcentos55 tasktracker,cldb,fileserver,hoststats 10.10.82.55centos56 tasktracker,cldb,fileserver,hoststats 10.10.82.56centos57 fileserver,tasktracker,hoststats,jobtracker 10.10.82.57centos58 fileserver,tasktracker,webserver,nfs,hoststats,jobtracker 10.10.82.58...more nodes...
The command is not available prior to MapR version 2.0.node listcldbzks
Why Node Order Matters
The following aspects of Hadoop and the MapR software are at the root of why node order matters when upgrading.
Maintaining a ZooKeeper quorum throughout the upgrade process is critical. Newer versions of ZooKeeper are backward compatible.Therefore, we upgrade ZooKeeper packages first to get this step out of the way while ensuring a stable quorum throughout the rest of theupgrade.Newer versions of the CLDB service can recognize older versions of the fileserver service. The reverse is not true, however. Therefore,after you upgrade the CLDB service on a node (which also updates the fileserver on the node), both the upgraded fileservers and existingfileservers can still access the CLDB.MapReduce binaries and filesystem binaries are installed at the same time, and cannot be separated. When you upgrade the mapr-fil
package, the binaries for and also get installed, and vice-versa.eserver mapr-tasktracker mapr-jobtracker
Move JobTracker Service Off of CLDB Nodes
If you have not already done so as part of preparing to upgrade, move JobTrackers to non-CLDB nodes. This is a preparation step toaccommodate the fact that the MapR installer cannot upgrade the CLDB binaries independently of JobTracker. See Move JobTrackers off of
in for details.CLDB nodes Preparing to Upgrade
Upgrade ZooKeeper packages on All ZooKeeper Nodes
Upgrade to the new version on all nodes configured to run the ZooKeeper service. Upgrade one node at a time so that amapr-zookeeper
ZooKeeper quorum is maintained at all times through the process.
Stop ZooKeeper.

1.
2.
3.
4.
1.
# service mapr-zookeeper stop JMX enabled by default Using config: /opt/mapr/zookeeper/zookeeper-3.4.5/conf/zoo.cfg Stopping zookeeper ... STOPPED
Upgrade the package.mapr-zookeeper
On RedHat and CentOS...
# yum upgrade 'mapr-zookeeper*'
On Ubuntu...
# apt-get install 'mapr-zookeeper*'
On SUSE...
# zypper upgrade 'mapr-zookeeper*'
Restart ZooKeeper.
# service mapr-zookeeper startJMX enabled by defaultUsing config: /opt/mapr/zookeeper/zookeeper-3.4.5/conf/zoo.cfgStarting zookeeper ... STARTED
Verify quorum status to make sure the service is started.
# service mapr-zookeeper qstatusJMX enabled by defaultUsing config: /opt/mapr/zookeeper/zookeeper-3.4.5/conf/zoo.cfgMode: follower
Upgrade Half the Nodes, One-by-One, up to the Active JobTracker
You will now begin upgrading packages on nodes, proceeding one node at a time.
Perform the following steps, one node at a time, following your planned order of upgrade until you have upgraded half the nodes in the cluster. Donot upgrade the JobTracker node.active
Stop the warden:
# service mapr-warden stopstopping WARDENlooking to stop mapr-core processes not started by warden
Before you begin to upgrade MapR packages in your planned order, verify that the active JobTracker is still running on the node youexpect.
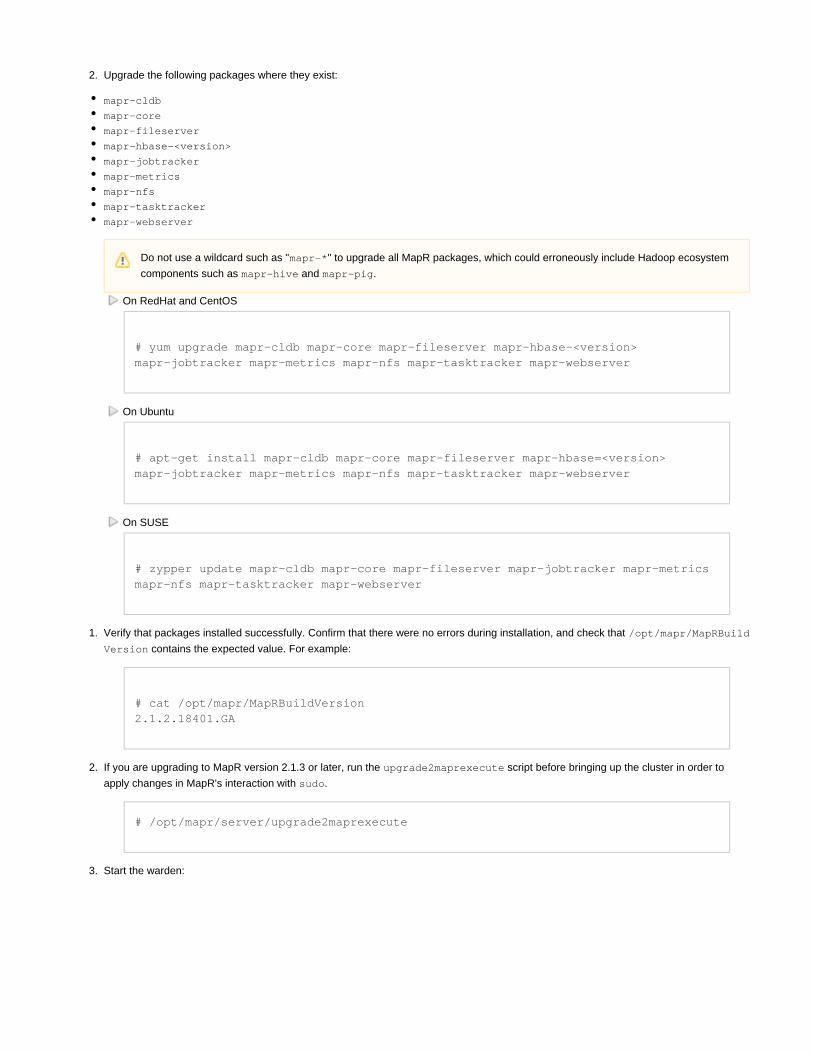
2.
1.
2.
3.
Upgrade the following packages where they exist:
mapr-cldb
mapr-core
mapr-fileserver
mapr-hbase-<version>
mapr-jobtracker
mapr-metrics
mapr-nfs
mapr-tasktracker
mapr-webserver
On RedHat and CentOS
# yum upgrade mapr-cldb mapr-core mapr-fileserver mapr-hbase-<version>mapr-jobtracker mapr-metrics mapr-nfs mapr-tasktracker mapr-webserver
On Ubuntu
# apt-get install mapr-cldb mapr-core mapr-fileserver mapr-hbase=<version>mapr-jobtracker mapr-metrics mapr-nfs mapr-tasktracker mapr-webserver
On SUSE
# zypper update mapr-cldb mapr-core mapr-fileserver mapr-jobtracker mapr-metricsmapr-nfs mapr-tasktracker mapr-webserver
Verify that packages installed successfully. Confirm that there were no errors during installation, and check that /opt/mapr/MapRBuild
contains the expected value. For example:Version
# cat /opt/mapr/MapRBuildVersion 2.1.2.18401.GA
If you are upgrading to MapR version 2.1.3 or later, run the script before bringing up the cluster in order toupgrade2maprexecute
apply changes in MapR's interaction with .sudo
# /opt/mapr/server/upgrade2maprexecute
Start the warden:
Do not use a wildcard such as " " to upgrade all MapR packages, which could erroneously include Hadoop ecosystemmapr-*
components such as and .mapr-hive mapr-pig

3.
4.
5.
# service mapr-warden startStarting WARDEN, logging to /opt/mapr/logs/warden.log..For diagnostics look at /opt/mapr//logs/ for createsystemvolumes.log, warden.logand configured services log files
Verify that the node recognizes the CLDB master and that the command returns expected results. For example:maprcli node list
# maprcli node cldbmastercldbmaster ServerID: 8191791652701999448 HostName: centos55# maprcli node list -columns hostname,csvc,health,diskshostname configuredservice health disks ip centos55 tasktracker,cldb,fileserver,hoststats 0 6 10.10.82.55centos56 tasktracker,cldb,fileserver,hoststats 0 6 10.10.82.56centos57 fileserver,tasktracker,hoststats,jobtracker 0 6 10.10.82.57centos58 fileserver,tasktracker,webserver,nfs,hoststats,jobtracker 0 6 10.10.82.58...more nodes...
Copy the staged configuration files for the new version to , if you created them as part of ./opt/mapr/conf Preparing to Upgrade
Upgrade All Remaining Nodes, Starting with the Active JobTracker
At this point, half the nodes in the cluster are upgraded. The (old) JobTracker is still running, and only the TaskTrackers areexisting existingactive. When you upgrade the active JobTracker node, you will stop the active JobTracker, and a graceful failover event will activate a stand-byJobTracker. The JobTracker runs the new version, and therefore issues tasks only to TaskTrackers. The existing TaskTrackers willnew newbecome inactive until you upgrade them.
Starting from the active JobTracker node, follow your planned order of upgrade and continue upgrading the remaining nodes in the cluster. Usethe same instructions outlined in section .#Upgrade Half the Nodes, One-by-One, up to the Active JobTracker
After upgrading the final, active JobTracker, verify that a new JobTracker is active.
# maprcli node list -columns hostname,svchostname service ipcentos55 tasktracker,cldb,fileserver,hoststats 10.10.82.55centos56 tasktracker,cldb,fileserver,hoststats 10.10.82.56centos57 fileserver,tasktracker,hbregionserver,hoststats,jobtracker 10.10.82.57centos58 fileserver,tasktracker, webserver,nfs,hoststats 10.10.82.58...more nodes...
At this point, MapR packages have been upgraded on all nodes. You are ready to .configure the cluster for the new version

Scripted Rolling Upgrade
The script upgrades the core packages on each node, logging output to the rolling upgrade log (rollingupgrade.sh /opt/mapr/logs/roll
). The core design goal for the scripted rolling upgrade process is to keep the cluster running at the highest capacity possibleingupgrade.log
during the upgrade process. As of the 3.0.1 release of the MapR distribution for Hadoop, the JobTracker can continue working with a TaskTrackerof an earlier version, which allows job execution to continue during the upgrade. Individual node progress, status, and command output is loggedto the file on each node. You can use the option to specify a directory that contains the/opt/mapr/logs/singlenodeupgrade.log -p
upgrade packages. You can use the option to fetch packages from the or a local repository.-v MapR repository
Usage Tips
If you specify a local directory with the option, you must either ensure that the directory that contains the packages has the same-p
name and is on the same path on on all nodes in the cluster or use the option to automatically copy packages out to each node with-x
SCP. If you use the option, the upgrade process copies the packages from the directory specified with the option into the same-x -p
directory path on each node. See the page for the path where you can download MapR software.Release NotesIn a multi-cluster setting, use to specify which cluster to upgrade. If is not specified, the default cluster is upgraded.-c -c
When specifying the version with the parameter, use the format to specify the major, minor, and revision numbers of the target-v x.y.z
version. Example: 3.0.1
The package (Red Hat) or (Ubuntu) enables automatic rollback if the upgrade fails. The script attempts torpmrebuild dpkg-repack
install these packages if they are not already present.To determine whether or not the appropriate package is installed on each node, run the following command to see a list of all installedversions of the package:
On Red Hat and Centos nodes:
rpm -qa | grep rpmrebuild
On Ubuntu nodes:
dpkg -l | grep dpkg-repack
Specify the option to the script to disable rollback on a failed upgrade.-n rollingupgrade.sh
Installing a newer version of MapR software might introduce new package dependencies. Dependency packages must be installed on allnodes in the cluster in addition to the updated MapR packages. If you are upgrading using a package manager such as or ,yum apt-get
then the package manager on each node must have access to repositories for dependency packages. If installing from package files, youmust pre-install dependencies on all nodes in the cluster prior to upgrading the MapR software. See Packages and Dependencies for
.MapR Software
The script does not support SUSE. Clusters on SUSE must be upgraded with a manual rolling upgrade or anrollingupgrade.sh
offline upgrade.

1. 2. 3. 4. 5.
6. 7.
8. 9.
1.
2.
3.
1.
2.
3.
Jobs in progress on the cluster will continue to run throughout the upgrade process unless they were submitted from a node in the clusterinstead of from a client.
There are two ways to perform a rolling upgrade:
Via SSH - If passwordless SSH for the root user is set up to all nodes from the node where you run the script, userollingupgrade.sh
the option to automatically upgrade all nodes without user intervention. See for more information about setting-s Preparing Each Node
up passwordless SSH.Node by node - If SSH is not available, the script prepares the cluster for upgrade and guides the user through upgrading each node. In anode-by-node installation, you must individually run the commands to upgrade each node when instructed by the rollingupgrade.sh
script.
After upgrading your cluster to MapR 2.x, you can run MapR as a .non-root user
Upgrade Process Overview
The scripted rolling upgrade goes through the following steps:
Checks the old and new version numbers.Identifies critical service nodes: CLDB nodes, ZooKeeper nodes, and JobTracker nodes.Builds a list of all other nodes in the cluster.Verifies the hostnames and IP addresses for the nodes in the cluster.If the options are specified, copies packages to the other nodes in the cluster using SCP.-p -x
Pretests functionality by building a dummy volume.If the utility is not already installed and the repository is available, installs .pssh pssh
Upgrades nodes in batches of 2 to 4 nodes, in an order determined by the presence of critical services.Post-upgrade check and removal of dummy volume.
Requirements
On the computer from which you will be starting the upgrade, perform the following steps:
Change to the user (or use for the following commands).root sudo
If you are starting the upgrade from a computer that is not a MapR client or a MapR cluster node, you must add the MapR repository (see) and install :Preparing Packages and Repositories mapr-core
CentOS or Red Hat: yum install mapr-core
Ubuntu: apt-get install mapr-core
Run , using to specify the cluster CLDB nodes and to specify the cluster ZooKeeper nodes. Example:configure.sh -C -Z
/opt/mapr/server/configure.sh -C 10.10.100.1,10.10.100.2,10.10.100.3 -Z10.10.100.1,10.10.100.2,10.10.100.3
To enable a fully automatic rolling upgrade, ensure that keyless SSH is enabled to all nodes for the user , from the computer onroot
which the upgrade will be started.
IF you are using the option, perform the following steps on the computer from which you will be starting the upgrade. If you are not using the -s -
option, perform the following steps on all nodes:s
Change to the user (or use for the following commands).root sudo
If you are using the option, add the MapR software repository (see ).-v Preparing Packages and Repositories
Install rolling upgrade scripts:CentOS or Red Hat: yum install mapr-upgrade
The rolling upgrade script only upgrades MapR core packages, not any of the Hadoop ecosystem components. (See Packages and for a list of the MapR packages and Hadoop ecosystem packages.) Follow the procedures in Dependencies for MapR Software Manual
to upgrade your cluster's Hadoop ecosystem components.Upgrade for Hadoop Ecosystem Components
Your MapR installation must be version 1.2 or newer to use the scripted rolling upgrade.

3.
4.
1.
2.
3.
Ubuntu: apt-get install mapr-upgrade
If you are planning to upgrade from downloaded packages instead of the repository, prepare a directory containing the package files. Thisdirectory should reside at the same absolute path on each node unless you are using the options to automatically copy the-s -x
packages from the upgrade node.
Each NFS node in your cluster must have the utility installed. Type the following command on each NFS node in your cluster to verifyshowmount
the presence of the utilty:
which showmount
Upgrading the Cluster via SSH
On the node from which you will be starting the upgrade, issue the command as (or with ) to upgrade therollingupgrade.sh root sudo
cluster:
If you have prepared a directory of packages to upgrade, issue the following command, substituting the path to the directory for the <dir
placeholder:ectory>
/opt/upgrade-mapr/rollingupgrade.sh -s -p -x <directory>
If you are upgrading from the MapR software repository, issue the following command, substituting the version (x.y.z) for the <version>
placeholder:
/opt/upgrade-mapr/rollingupgrade.sh -s -v <version>
Upgrading the Cluster Node by Node
On the node from which you will be starting the upgrade, use the command as (or with ) to upgrade the cluster:rollingupgrade.sh root sudo
Start the upgrade:If you have prepared a directory of packages to upgrade, issue the following command, substituting the path to the directory forthe placeholder:<directory>
/opt/upgrade-mapr/rollingupgrade.sh -p <directory>
If you are upgrading from the MapR software repository, issue the following command, substituting the version (x.y.z) for the <ve
placeholder:rsion>
/opt/upgrade-mapr/rollingupgrade.sh -v <version>
When prompted, run on all nodes other than the active JobTracker and master CLDB node, following thesinglenodeupgrade.sh
on-screen instructions.When prompted, run on the active JobTracker node, then the master CLDB node, following the on-screensinglenodeupgrade.sh
instructions.
After upgrading, as usual.configure the new version

Configuring the New Version
After you have successfully upgraded MapR packages to the new version, you are ready to configure the cluster to enable new features. Not allnew features are enabled by default, so that administrators have the option to make the change-over at a specific time. Follow the steps in thissection to enable new features. Note that you do not have to enable all new features.
This page contains the following topics:
Enabling v3.1 FeaturesEnabling v3.0 Features
Enable New Filesystem FeaturesConfigure CLDB for the New VersionApply a License to Use Tables
Enabling v2.0 FeaturesEnable new filesystem featuresEnable Centralized ConfigurationEnable/Disable Centralized LoggingEnable Non-Root UserInstall MapR Metrics
Verify Cluster HealthSuccess!
If your upgrade process skips a major release boundary (for example, MapR version 1.2.9 to version 3.0), perform the steps for the skippedversion too (in this example, 2.0).
Enabling v3.1 Features
When you upgrade from version 3.0.x of the MapR distribution for Hadoop to version 3.1 or later, issue the following commands to enable supportfor (ACEs) and :Access Control Expressions table region merges
# maprcli config save -values '{"mfs.feature.db.ace.support":"1"}'
# maprcli config save -values '{"mfs.feature.db.regionmerge.support":"1"}'
These features are automatically enabled with a fresh install of version 3.1 or when you upgrade from a version earlier than 3.0.x.
After enabling for a 3.1 cluster, issue the following command to enable encryption of network traffic to or from a file, directory, or security features:MapR table
# maprcli config save -values '{"mfs.feature.filecipherbit.support":"1"}'
After enabling ACEs for MapR tables, table access is enforced by table ACEs instead of the file system. As a result, all newly createdtables are owned by root and have their mode bits set to 777.
Clusters with active security features will experience job failure until this configuration value is set.

Enabling v3.0 Features
The following are operations to enable features available as of MapR version 3.0.
Enable New Filesystem Features
To enable v3.0 features related to the filesystem, issue the following command on any node in the cluster. The cluster will raise the alarm CLUSTE
until you perform this command.R_ALARM_NEW_FEATURES_DISABLED
# maprcli config save -values {"cldb.v3.features.enabled":"1"}
You can verify that the command worked, as shown in the example below.
# maprcli config load -keys cldb.v3.features.enabledcldb.v3.features.enabled1
Configure CLDB for the New Version
Because some CLDB nodes are shut down during the upgrade, those nodes aren't notified of the change in version number, resulting in the NOD alarm raising once the nodes are back up. To set the version number manually, use the following command toE_ALARM_VERSION_MISMATCH
make the CLDB aware of the new version:
maprcli config save -values {"mapr.targetversion":"'cat /opt/mapr/MapRBuildVersion'"}
Apply a License to Use Tables
MapR version 3.0 introduced native table storage in the cluster filesystem. To use MapR tables you must purchase and apply an M7 Editionlicense. Log into the MapR Control System and click to apply an M7 license file.Manage Licenses
Enabling v2.0 Features
The following are operations to enable features available as of MapR version 2.0.
Enable new filesystem features
To enable v2.0 features related to the filesystem, issue the following command on any node in the cluster. The cluster will raise the alarm CLUSTE
until you perform this command.R_ALARM_NEW_FEATURES_DISABLED
Note:
This command is mandatory when upgrading to version 3.x.Once enabled, it cannot be disabled.After enabling v3.0 features, nodes running a pre-3.0 version of the service will fail to register with the cluster.mapr-mfs
This command will also enable v2.0 filesystem features.
The system raises the alarm if you upgrade your cluster to an M7 license without havingNODE_ALARM_M7_CONFIG_MISMATCH
configured the FileServer nodes for M7. To clear the alarm, restart the FileServer service on all of the nodes using the instructions onthe page.Services

1.
2.
# maprcli config save -values {"cldb.v2.features.enabled":"1"}
You can verify that the command worked, as shown in the example below.
# maprcli config load -keys cldb.v2.features.enabledcldb.v2.features.enabled1
Enable Centralized Configuration
To enable centralized configuration:
On each node in the cluster, add the following lines to the file ./opt/mapr/conf/warden.conf
centralconfig.enabled=truepollcentralconfig.interval.seconds=300
Restart the warden to pick up the new configuration.
# service mapr-warden restart
Note that the Central Configuration feature, which is enabled by default in MapR version 2.1 and later, automatically updates configuration files. Ifyou choose to enable Centralized Configuration as part of your upgrade process, it could overwrite manual changes you've made to configurationfiles. See for more details.Central Configuration
Enable/Disable Centralized Logging
Depending on the MapR version, the Centralized Logging feature may be on or off in the default configuration files. MapR recommends disablingthis feature unless you plan to you use it. Centralized logging is enabled by the parameter in the file HADOOP_TASKTRACKER_ROOT_LOGGER /op
. Setting this parameter to disables centralized logging, and settingt/mapr/hadoop/hadoop-<version>/conf/hadoop-env.sh INFO,DRFA
to enables it.INFO,maprfsDRFA
If you make changes to , restart TaskTracker on all touched nodes to make the changes take effect:hadoop-env.sh
# maprcli node services -nodes <nodes> -tasktracker restart
Enable Non-Root User
If you want to run MapR services as a non-root user, follow the steps in this section. Note that you do not have to switch the cluster to a non-rootuser if you do not need this additional level of security.
This procedure converts a MapR cluster running as to run as a non-root user. Non-root operation is available from MapR version 2.0 androot
later. In addition to converting the MapR user to a non-root user, you can also disable superuser privileges to the cluster for the root user foradditional security.
Note:
This command is mandatory when upgrading to version 2.x.Once enabled, it cannot be disabled.After enabling, nodes running a pre-2.0 version of the service will fail to register with the cluster.mapr-mfs

1.
2. a.
b.
c.
3.
To convert a MapR cluster from running as root to running as a non-root user:
Create a user with the same UID/GID across the cluster. Assign that user to the environment variable.MAPR_USER
On each node:Stop the warden and the ZooKeeper (if present).
# service mapr-warden stop# service mapr-zookeeper stop
Run the config-mapr-user.sh script to configure the cluster to start as the non-root user.
# /opt/mapr/server/config-mapr-user.sh -u <MapR user> [-g <MapR group>]
Start the ZooKeeper (if present) and the warden.
# service mapr-zookeeper start# service mapr-warden start
After the previous step is complete on all nodes in the cluster, run the script on all nodes.upgrade2mapruser.sh
# /opt/mapr/server/upgrade2mapruser.sh
This command may take several minutes to return. The script waits ten minutes for the process to complete across the entire cluster. Ifthe cluster-wide operation takes longer than ten minutes, the script fails. Re-run the script on all nodes where the script failed.
To disable superuser access for the root user
To disable root user (UID 0) access to the MapR filesystem on a cluster that is running as a non-root user, use either of the following commands:
The configuration value treats all requests from UID 0 as coming from UID -2 (nobody):squash root
# maprcli config save -values {"cldb.squash.root":"1"}
The configuration value automatically fails all filesystem requests from UID 0:reject root
# maprcli config save -values {"cldb.reject.root":"1"}
You can verify that these commands worked, as shown in the example below.
You must perform these steps on all nodes on a stable cluster. Do not perform this procedure concurrently while upgrading packages.
The alarm may raise during this process. The alarm will clear when this process is complete onMAPR_UID_MISMATCH
all nodes.

1. 2.
3. 4. 5. 6.
7.
# maprcli config load -keys cldb.squash.root,cldb.reject.rootcldb.reject.root cldb.squash.root1 1
Install MapR Metrics
MapR Metrics is a separately-installable package. For details on adding and activating the mapr-metrics service, see tManaging Roles on a Nodeo add the service and to configure it.Setting up the MapR Metrics Database
Verify Cluster Health
At this point, the cluster should be fully operational again with new features enabled. Run your simple and non-trivial health checks to verifycluster health. If you experience problems, see .Troubleshooting Upgrade Issues
Success!
Congratulations! At this point, your cluster is fully upgraded.
Troubleshooting Upgrade IssuesThis section provides information about troubleshooting upgrade problems. Click a subtopic below for more detail.
NFS incompatible when upgrading to MapR v1.2.8 or later
NFS incompatible when upgrading to MapR v1.2.8 or later
Starting in MapR release 1.2.8, a change in the NFS file handle format makes NFS file handles incompatible between NFS servers running MapRversion 1.2.7 or earlier and servers running MapR 1.2.8 and following.
NFS clients that were originally mounted to NFS servers on nodes running MapR version 1.2.7 or earlier must remount the file system when thenode is upgraded to MapR version 1.2.8 or following.
If you are performing a rolling upgrade and need to maintain NFS service throughout the upgrade process, you can use the guidelines below.
Upgrade a subset of the existing NFS server nodes, or install the newer version of MapR on a set of new nodes.If the selected NFS server nodes are using virtual IP numbers (VIPs), reassign those VIPs to other NFS server nodes that are stillrunning the previous version of MapR.Apply the upgrade to the selected set of NFS server nodes.Start the NFS servers on nodes upgraded to the newer version.Unmount the NFS clients from the NFS servers of the older version.Remount the NFS clients on the upgraded NFS server nodes. Stage these remounts in groups of 100 or fewer clients to preventperformance disruptions.After remounting all NFS clients, stop the NFS servers on nodes running the older version, then continue the upgrade process.
Due to changes in file handles between versions, cached file IDs cannot persist across this upgrade.
Setting up a MapR Cluster on Amazon ElasticMapReduce

1.
2. 3. 4. 5.
6.
The MapR distribution for Hadoop adds enterprise-grade features to the Hadoop platform that make Hadoop easier to use and more dependable.The MapR distribution for Hadoop is fully integrated with Amazon's (EMR) framework, allowing customers to deploy a MapRElastic MapReducecluster with ready access to Amazon's cloud infrastructure. MapR provides network file system (NFS) and open database connectivity (ODBC)interfaces, a comprehensive management suite, and automatic compression. MapR provides high availability with a no-NameNode architectureand data protection with snapshots, disaster recovery, and cross-cluster mirroring. For more details on EMR with MapR, visit the Amazon EMR
detail page.with the MapR Distribution for Hadoop
Starting an EMR Job Flow with the MapR Distribution for Hadoop fromthe AWS Management Console
Log in to your Amazon Web Services Account: Use your normal Amazon Web Services (AWS) credentials to log in to your AWSaccount.From the AWS Management Console, select .Elastic MapReduceFrom the drop-down selector at the upper right, select a region where your job flow will run.Click the button in the center of the page.Create New Job FlowSelect a MapR Edition and version from the drop-down selector: , , or Hadoop Version MapR M3 Edition MapR M5 Edition MapR M7
.Edition
MapR M3 Edition is a complete Hadoop distribution that provides many unique capabilities such as industry-standard NFS andODBC interfaces, end-to-end management, high reliability and automatic compression. You can manage a MapR cluster via theAWS Management Console, the command line, or a REST API. Amazon EMR's standard rates include the full functionality ofMapR M3 at no additional cost.MapR M5 Edition expands the capabilities of M3 with enterprise-grade capabilities such as , and high availability snapshots mirror
.ingMapR M7 Edition provides native MapR table functionality on MapR-FS, enabling responsive HBase-style flat table databasescompatible with snapshots and mirroring.
Continue to specify your job flow as described in .Creating a Job Flow
Amazon EMR with MapR provides a Debian environment with MapR software running on each node. MapR's NFS interface mounts the cluster ismounted on localhost at the directory. Packages for Hadoop ecosystem components are in the directory./mapr /home/hadoop/mapr-pkgs
The MapR distribution for Hadoop does not support Apache HBase on Amazon EMR.
For general information on EMR Job Flows, see Amazon's .documentation

Starting Pig and Hive Sessions as Individual Job Flows
To start an interactive Pig session directly, select when you create the job flow, then select Pig program Start an Interactive Pig.Session
To start an interactive Hive session directly, select when you create the job flow, then select Hive program Start an Interactive Hive.Session
Starting an EMR Job Flow with the MapR Distribution for Hadoop fromthe Command Line Interface
Use the parameter with the command to specify a MapR distribution. Specify the MapR--supported-product mapr elastic-mapreduce
edition and version by passing arguments with the parameter in the following format:--args
--args "--edition,<edition label>,--version,<version number>"
You can use to specify the following editions:--edition
m3m5m7
You can use to specify the following versions:--version
1.2.82.1.23.0
Use the parameter to specify how much of the instance's storage space to reserve for the MapR file system. This parametermfs-percentage
has a ceiling of 100 and a floor of 50. Specifying percentages outside this range will result in the floor or ceiling being applied instead, and amessage written to the log.
Storage space not reserved for MapR is available for native Linux file storage.
The following table lists parameters that you can specify at the command line and the results as interpreted by MapR:
EMR Command Line Parameter Command Processed by MapR
--supported-product mapr --edition m3
--supported-product mapr-m5 --edition m5
--supported-product mapr-m3 --edition m3
--with-supported-products mapr-m3 --edition m3
--with-supported-products mapr-m5 --edition m5
--supported-product mapr-m5 --args "--version,1.1" --edition m5 --version 1.1
--supported-product mapr-m5 --args "--edition,m3" Returns an error
--supported-product mapr --args "--edition,m5" --edition m5
--supported-product mapr --args "--version,1.1" --edition m3 --version1.1
--supported-product mapr --args "--edition,m5,--key1 value1" --edition m5 --key1 value1
To use the command line interface commands, download and install the .Amazon Elastic MapReduce Ruby Client
The parameter is deprecated and does not support arguments such as , , or --with-supported-products --edition --version

Launching a job flow with MapR M3
The following command launches a job flow with one EC2 Large instance as a master that uses the MapR M3 Edition distribution, version 2.1.2.This instance reserves 75 percent of the storage space for the MapR file system and keeps 25 percent of the storage space available for nativeLinux file storage.
./elastic-mapreduce --create --alive \ --instance-type m1.xlarge\ --num-instances 5 \ --supported-product mapr \--args "--edition,m3,--version,2.1.2,--mfs-percentage,75"
To pass bootstrap parameters, add the and parameters before the parameter. The--bootstrap-action --args --instance-type
following command launches a job flow and passes a value of 4 to the parameter as a bootstrapmapred.tasktracker.map.tasks.maximum
action:
./elastic-mapreduce --create --alive \ --bootstrap-action s3://elasticmapreduce/bootstrap-actions/configure-hadoop \--args -m,mapred.tasktracker.map.tasks.maximum=4--instance-type m1.xlarge\ --num-instances 5 \ --supported-product mapr \--args "--edition,m3,--version,2.1.2" \
See for more information about the command's options.the linked article elastic-mapreduce
To use MapR commands with a REST API, include the following mandatory parameters:
SupportedProducts.member.1=mapr-m3bootstrap-action=s3://elasticmapreduce/thirdparty/mapr/scripts/mapr_emr_install.shargs="--base-path,s3://elasticmapreduce/thirdparty/mapr/"
In the request to , set a member of the list to a value that corresponds to the MapR edition you'd like to runRunJobFlow SupportedProducts
the job flow on.
See for more information on how to interact with your EMR cluster using a REST API.the documentation
Launching an M3 edition MapR cluster with the REST API
.--keyN valueN
On a Windows system, use the command instead of .ruby elastic-mapreduce elastic-mapreduce

1.
2. 3. 4. 5.
6.
1.
2.
https://elasticmapreduce.amazonaws.com?Action=RunJobFlow &Name=MyJobFlowName &LogUri=s3n%3A%2F%2Fmybucket%2Fsubdir &Instances.MasterInstanceType=m1.xlarge &Instances.SlaveInstanceType=m1.xlarge &Instances.InstanceCount=4 &Instances.Ec2KeyName=myec2keyname &Instances.Placement.AvailabilityZone=us-east-1a &Instances.KeepJobFlowAliveWhenNoSteps=true &Instances.TerminationProtected=true &Steps.member.1.Name=MyStepName &Steps.member.1.ActionOnFailure=CONTINUE &Steps.member.1.HadoopJarStep.Jar=MyJarFile &Steps.member.1.HadoopJarStep.MainClass=MyMainClass &Steps.member.1.HadoopJarStep.Args.member.1=arg1 &Steps.member.1.HadoopJarStep.Args.member.2=arg2 &SupportedProducts.member.1=mapr-m3&AuthParams
Enabling MCS access for your EMR Cluster
After your MapR job flow is running, you need to open port 8453 to enable access to the (MCS) from hosts other than theMapR Control Systemhost that launched the cluster. Follow these steps to open the port.
Select your job from the list of jobs displayed in in the tab of the AWSYour Elastic MapReduce Job Flows Elastic MapReduceManagement Console, then select the tab in the lower pane. Make a note of the Master Public DNS Name value. Click the Description A
tab in the AWS Management Console to open the Amazon EC2 Console Dashboard.mazon EC2Select from the group in the pane at the left of the EC2 Console Dashboard.Security Groups Network & Security NavigationSelect from the list displayed in .Elastic MapReduce-master Security GroupsIn the lower pane, click the tab.InboundIn , type . Leave the default value in the : field.Port Range: 8453 Source
Click , then click .Add Rule Apply Rule Changes
You can now navigate to the master node's DNS address. Connect to port 8453 to log in to the MapR Control System. Use the string forhadoop
both login and password at the MCS login screen.
Testing Your ClusterFollow these steps to create a file and run your first MapReduce job:
Connect to the master node with SSH as user hadoop. Pass your .pem credentials file to ssh with the -i flag, as in this example:
ssh -i /path_to_pemfile/credentials.pem [email protected]
Create a simple text file:
The standard MapR port is 8443. Use port number 8453 instead of 8443 when you use the MapR REST API calls to a MapRon Amazon EMR cluster.
For M5 and M7 Edition MapR clusters on EMR, the MCS web server runs on the primary and secondary CLDB nodes, giving youanother entry point to the MCS if the primary fails.

2.
3.
4.
cd /mapr/MapR_EMR.amazonaws.commkdir inecho "the quick brown fox jumps over the lazy dog" > in/data.txt
Run the following command to perform a word count on the text file:
hadoop jar /opt/mapr/hadoop/hadoop-0.20.2/hadoop-0.20.2-dev-examples.jarwordcount /mapr/MapR_EMR.amazonaws.com/in /mapr/MapR_EMR.amazonaws.com/out
As the job runs, you should see terminal output similar to the following:
12/06/09 00:00:37 INFO fs.JobTrackerWatcher: Current running JobTracker is:ip-10-118-194-139.ec2.internal/10.118.194.139:900112/06/09 00:00:37 INFO input.FileInputFormat: Total input paths to process : 112/06/09 00:00:37 INFO mapred.JobClient: Running job: job_201206082332_000412/06/09 00:00:38 INFO mapred.JobClient: map 0% reduce 0%12/06/09 00:00:50 INFO mapred.JobClient: map 100% reduce 0%12/06/09 00:00:57 INFO mapred.JobClient: map 100% reduce 100%12/06/09 00:00:58 INFO mapred.JobClient: Job complete: job_201206082332_000412/06/09 00:00:58 INFO mapred.JobClient: Counters: 2512/06/09 00:00:58 INFO mapred.JobClient: Job Counters12/06/09 00:00:58 INFO mapred.JobClient: Launched reduce tasks=112/06/09 00:00:58 INFO mapred.JobClient: Aggregate execution time ofmappers(ms)=619312/06/09 00:00:58 INFO mapred.JobClient: Total time spent by all reduces waitingafter reserving slots (ms)=012/06/09 00:00:58 INFO mapred.JobClient: Total time spent by all maps waitingafter reserving slots (ms)=012/06/09 00:00:58 INFO mapred.JobClient: Launched map tasks=112/06/09 00:00:58 INFO mapred.JobClient: Data-local map tasks=112/06/09 00:00:58 INFO mapred.JobClient: Aggregate execution time ofreducers(ms)=487512/06/09 00:00:58 INFO mapred.JobClient: FileSystemCounters12/06/09 00:00:58 INFO mapred.JobClient: MAPRFS_BYTES_READ=38512/06/09 00:00:58 INFO mapred.JobClient: MAPRFS_BYTES_WRITTEN=27612/06/09 00:00:58 INFO mapred.JobClient: FILE_BYTES_WRITTEN=9444912/06/09 00:00:58 INFO mapred.JobClient: Map-Reduce Framework12/06/09 00:00:58 INFO mapred.JobClient: Map input records=112/06/09 00:00:58 INFO mapred.JobClient: Reduce shuffle bytes=9412/06/09 00:00:58 INFO mapred.JobClient: Spilled Records=1612/06/09 00:00:58 INFO mapred.JobClient: Map output bytes=8012/06/09 00:00:58 INFO mapred.JobClient: CPU_MILLISECONDS=153012/06/09 00:00:58 INFO mapred.JobClient: Combine input records=912/06/09 00:00:58 INFO mapred.JobClient: SPLIT_RAW_BYTES=12512/06/09 00:00:58 INFO mapred.JobClient: Reduce input records=812/06/09 00:00:58 INFO mapred.JobClient: Reduce input groups=812/06/09 00:00:58 INFO mapred.JobClient: Combine output records=812/06/09 00:00:58 INFO mapred.JobClient: PHYSICAL_MEMORY_BYTES=32924467212/06/09 00:00:58 INFO mapred.JobClient: Reduce output records=812/06/09 00:00:58 INFO mapred.JobClient: VIRTUAL_MEMORY_BYTES=325296947212/06/09 00:00:58 INFO mapred.JobClient: Map output records=912/06/09 00:00:58 INFO mapred.JobClient: GC time elapsed (ms)=18

4. Check the /mapr/MapR_EMR.amazonaws.com/out directory for a file named part-r-00000 with the results of the job.
cat out/part-r00000brown 1dog 1fox 1jumps 1lazy 1over 1quick 1the 2
Note that the ability to use standard Linux tools such as and in this example are made possible by MapR's ability to mount the clusterecho cat
on NFS at ./mapr/MapR_EMR.amazonaws.com
Launching a MapR Cluster on the Google ComputeEngineThe MapR distribution for Hadoop adds enterprise-grade features to the Hadoop platform that make Hadoop easier to use and more dependable.The MapR distribution for Hadoop is fully integrated with the Google Compute Engine (GCE) framework, allowing customers to deploy a MapRcluster with ready access to Google's cloud infrastructure. MapR provides network file system (NFS) and open database connectivity (ODBC)interfaces, a comprehensive management suite, and automatic compression. MapR provides high availability with a no-NameNode architectureand data protection with snapshots, disaster recovery, and cross-cluster mirroring.
Before You Start: PrerequisitesThese instructions assume you meet the following prerequisites:
You have an active account.Google Cloud PlatformYou have a client machine with the client installed and in your environment variable.gcutil $PATH
You have access to a GCE project where you can add instances.(Optional) You have a valid license in a text file on the system where the MapR launch scripts are located.
Deploying a MapR cluster within GCE relies on the following scripts:
launch-mapr-cluster.sh
prepare-mapr-image.sh
configure-mapr-instance.sh
You can download these scripts from the .MapR github repository
Launching a MapR Cluster on GCEInvoke the script from the directory where the script is installed:launch-mapr-cluster.sh
# ./launch-mapr-cluster.sh --project <project ID> --cluster <cluster name>--mapr-version <version number> --config-file <config file> --image <image name>--machine-type <type> --zone <zone> --license-file <path_to_license>
Parameter Description
--project The GCE project ID of the project where you want the cluster to bedeployed. Note that the GCE project ID, the GCE project's name, andthe cluster's name are all distinct.
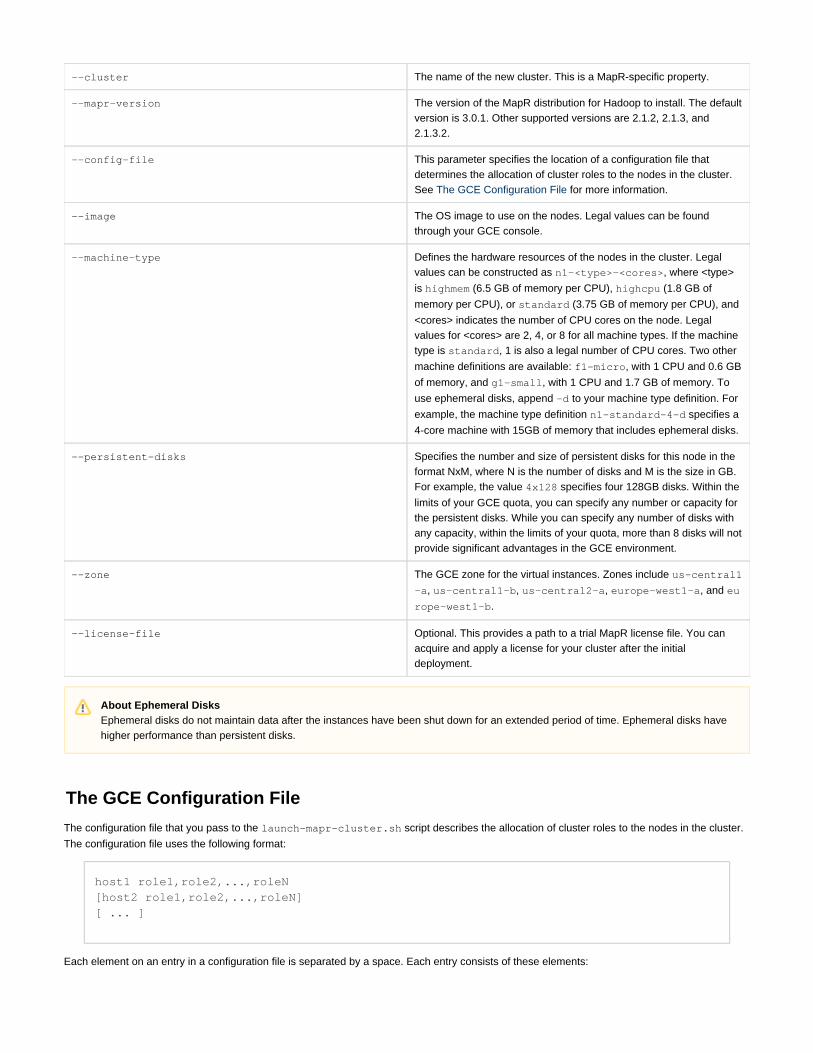
--cluster The name of the new cluster. This is a MapR-specific property.
--mapr-version The version of the MapR distribution for Hadoop to install. The defaultversion is 3.0.1. Other supported versions are 2.1.2, 2.1.3, and2.1.3.2.
--config-file This parameter specifies the location of a configuration file thatdetermines the allocation of cluster roles to the nodes in the cluster.See for more information.The GCE Configuration File
--image The OS image to use on the nodes. Legal values can be foundthrough your GCE console.
--machine-type Defines the hardware resources of the nodes in the cluster. Legalvalues can be constructed as , where <type>n1-<type>-<cores>
is (6.5 GB of memory per CPU), (1.8 GB ofhighmem highcpu
memory per CPU), or (3.75 GB of memory per CPU), andstandard
<cores> indicates the number of CPU cores on the node. Legalvalues for <cores> are 2, 4, or 8 for all machine types. If the machinetype is , 1 is also a legal number of CPU cores. Two otherstandard
machine definitions are available: , with 1 CPU and 0.6 GBf1-micro
of memory, and , with 1 CPU and 1.7 GB of memory. Tog1-small
use ephemeral disks, append to your machine type definition. For-d
example, the machine type definition specifies an1-standard-4-d
4-core machine with 15GB of memory that includes ephemeral disks.
--persistent-disks Specifies the number and size of persistent disks for this node in theformat NxM, where N is the number of disks and M is the size in GB.For example, the value specifies four 128GB disks. Within the4x128
limits of your GCE quota, you can specify any number or capacity forthe persistent disks. While you can specify any number of disks withany capacity, within the limits of your quota, more than 8 disks will notprovide significant advantages in the GCE environment.
--zone The GCE zone for the virtual instances. Zones include us-central1
, , , , and -a us-central1-b us-central2-a europe-west1-a eu
.rope-west1-b
--license-file Optional. This provides a path to a trial MapR license file. You canacquire and apply a license for your cluster after the initialdeployment.
The GCE Configuration File
The configuration file that you pass to the script describes the allocation of cluster roles to the nodes in the cluster.launch-mapr-cluster.sh
The configuration file uses the following format:
host1 role1,role2,...,roleN[host2 role1,role2,...,roleN][ ... ]
Each element on an entry in a configuration file is separated by a space. Each entry consists of these elements:
About Ephemeral DisksEphemeral disks do not maintain data after the instances have been shut down for an extended period of time. Ephemeral disks havehigher performance than persistent disks.

The host name of a node in the clusterA comma-delimited list of roles for that node
Nodes in a MapR cluster can assume the following roles:
cldb
zookeeper
fileserver
tasktracker
jobtracker
nfs
webserver
metrics
For more information about roles, see the regarding planning service layout on a cluster.main MapR documentation
Sample M3 Configuration File
This sample configuration file sets up a typical M3-licensed three-node cluster.
node0:zookeeper,cldb,fileserver,tasktracker,nfs,webservernode1:fileserver,tasktracker,node2:fileserver,tasktracker,jobtracker
Sample M5 Configuration File
This sample configuration file sets up a typical M5-licensed five-node cluster to illustrate MapR's high-availability features, such as redundantCLDB nodes, redundant JobTracker nodes, and redundant NFS servers.
user@host: cat /tmp/myrolesfile.txt
node1:zookeeper,cldb,fileserver,tasktracker,nfs,webserver,metricsnode2:zookeeper,cldb,fileserver,tasktracker,nfsnode3:zookeeper,fileserver,tasktracker,nfs,webserver,metricsnode4:fileserver,tasktracker,nfs,jobtracker,metricsnode5:fileserver,tasktracker,nfs,jobtracker,metrics
Using SSH to Access NodesYou can use the command to log in to the nodes on your cluster. Use the following command:gcutil ssh
# gcutil ssh --project <project ID> --zone=<zone> <node name>
LicensingInstall the M5 after installing the cluster to enable the High Availability features.trial license