Embed Size (px)
Citation preview

Outlook Guide
If you have any questions please contact the MMA Helpdesk by creating a Helpdesk ticket, sending an email to [email protected], or calling (207) 326-2240.

2
Table of Contents Introduction .............................................................................................................................................. 3
What is Exchange? .................................................................................................................................... 3
How do I access my email through Microsoft Exchange? ........................................................................ 3
Definitions ................................................................................................................................................. 4
Accessing OWA ......................................................................................................................................... 5
Using OWA email ...................................................................................................................................... 6
Accessing OWA email ............................................................................................................................ 6
Composing or reply to an email ............................................................................................................ 9
Using OWA calendaring .......................................................................................................................... 13
Accessing OWA calendaring ................................................................................................................ 13
Creating a meeting or appointment ................................................................................................... 15
Configuring Outlook ................................................................................................................................ 18
Using the Outlook desktop client email .................................................................................................. 20
Basic email interface ........................................................................................................................... 20
Compose or reply to an email ............................................................................................................. 21
Recalling a sent message .................................................................................................................... 24
Using the Outlook desktop client calendaring ........................................................................................ 26
Accessing your calendar ...................................................................................................................... 26
Scheduling a meeting or appointment ............................................................................................... 28
Advanced Meeting Settings ................................................................................................................ 32
Configuring the mobile Outlook client .................................................................................................... 33
Accessing your email archive .................................................................................................................. 35
Search for archived mail ..................................................................................................................... 36
Viewing all archived mail from folders ............................................................................................... 39
Other Exchange topics ............................................................................................................................ 41
Setup text messaging services ............................................................................................................ 41

3
Introduction This document is designed to introduce you to Maine Maritime’s new email system, Microsoft Exchange. It will help you understand what Exchange is, what you can do with it and how to access it. And remember, if you have any questions, the IT Helpdesk can be reached at extension 2240, through our ticketing system at helpdesk.mma.edu, or in person in the basement of Leavitt Hall.
What is Exchange? Exchange is Microsoft’s email and calendaring backend. It runs on MMA’s servers and provides email services for everyone with an MMA account.
How do I access my email through Microsoft Exchange? There are several ways you can access your email. One way is through the desktop client, Outlook. Accessing your email through the Outlook client is a powerful way to view emails, calendars, and other information that Outlook provides. While it is the most feature-rich way to access your emails, it does require a small amount of setup.
You can also access your emails through the Outlook Web Access portal, or OWA. OWA requires no setup aside from a simple login and is available anywhere with internet access. There are some features that work better with the Outlook desktop client, however the majority of day to day tasks work excellently in OWA.
You can also access Exchange on a mobile device, either through the Outlook app, which is available for both Android and Apple’s iOS, or a mobile web browser like Chrome or Safari.
Exchange can also be accessed through a number of third party email applications. There are several popular options, both for Windows and mobile phones. However, because of the number of these applications, we won’t be going over how to set them up.

4
Definitions OWA: An acronym meaning Outlook Web Access. This is the interface you use when you access your email through a web browser, like Google Chrome, Microsoft Edge, Internet Explorer, or Firefox. It requires little to no setup and you can use it anywhere you have internet. While OWA is easy to use, it lacks some more advanced features of the Outlook Desktop client.
Meeting: An invitation you can send to multiple people or mailing lists. People who accept a meeting request will be listed as busy in their calendar.
Appointment: An Appointment can’t be sent to multiple people. Instead it marks you as busy. Useful when scheduling out tasks you have that require your full attention, so people know not to send you meeting requests for those times.
Outlook: a Microsoft program used to access Microsoft’s email backend, called Exchange. Outlook is a desktop program and is a member of the Microsoft Office Suite of programs. It’s installed for free through the MMA Helpdesk. It is more advanced than OWA, but requires more setup.
Exchange: Microsoft’s email and calendaring system. It runs on an MMA server and provides these services to anyone with an MMA account. Exchange is accessed through Outlook.
Add-in: third party programs and scripts that add functionality to Outlook. There are many add-ins available and range in usefulness. Many large 3rd parties have developed Outlook add-ins to augment their software suites. An even greater number of independent programmers have created add-ins to improve any given aspect of Outlook or add additional functionalities.
Recall: a function in the desktop Outlook client that allows you to unsend an email. This feature will only work in an unread message sent to someone with an MMA email account. It won’t work with 3rd party email servers like Gmail or Yahoo.

5
Accessing OWA Accessing your email through OWA is a very straightforward process.
• Open your browser of choice and navigate to http://mailx.mma.edu. It will load a page that looks similar to the image below.
• Log in using your MMA account
o Your username is usually firstname.lastname • Enter your password

6
Using OWA email Accessing OWA email The default view for OWA email looks like this:

7
As you can see, the page is divided into three columns:
Column 1 is your main navigational tool. It is where you can see how many unread emails you have, your different email folders, your unsent draft emails, and your deleted items.
Column 2 is your folder view. Once you click on a folder to access, the emails in that folder will appear in this column. Unread emails will always have a blue line next to the message on the left, signified by the red arrow. In the sample above, you can see that there is one email in the folder and that it is unread.

8
Column 3 is the preview pane. Clicking on an email once will open the message in this column.
As you can see, the email is now open in the preview pane.

9
Composing or reply to an email You can write a new email by clicking on new, highlighted by the left arrow. After you’ve read the email, you can access options through the menu highlighted by the right red arrow. Note that the default option for a reply is “Reply All”, which may not be the best option for each email you receive.

10
When clicked, the following options will appear:
You can select the option that’s best.

11
Replying to an email looks like this:
Here is a guide to the icons in OWA:
allows you to upload an attachment
allows you to insert an image directly into the body of an email
opens the emoji menu
enables the font format bar, which allows you to change the color, fontface, and size of text
enables add-ins

12
Once you have typed your response, you can send your email by clicking on the “Send” icon shown below:
You can also discard your message by clicking the discard icon:

13
Using OWA calendaring Accessing OWA calendaring You can also access your calendars through the web interface. You can access your emails by clicking the icon highlighted below:
This opens the main OWA menu. From here, click on Calendar.
This is the default view for OWA’s calendaring. There are three main panels:
1) The overview panel 2) The calendar panel 3) The agenda panel

14
The overview panel allows you to easily swap between months and calendars you have permission to view. You can swap through months by clicking the arrows next to the name of the current month.
Clicking the icon will hide the Overview panel. In order to access it again, click the icon again.
15
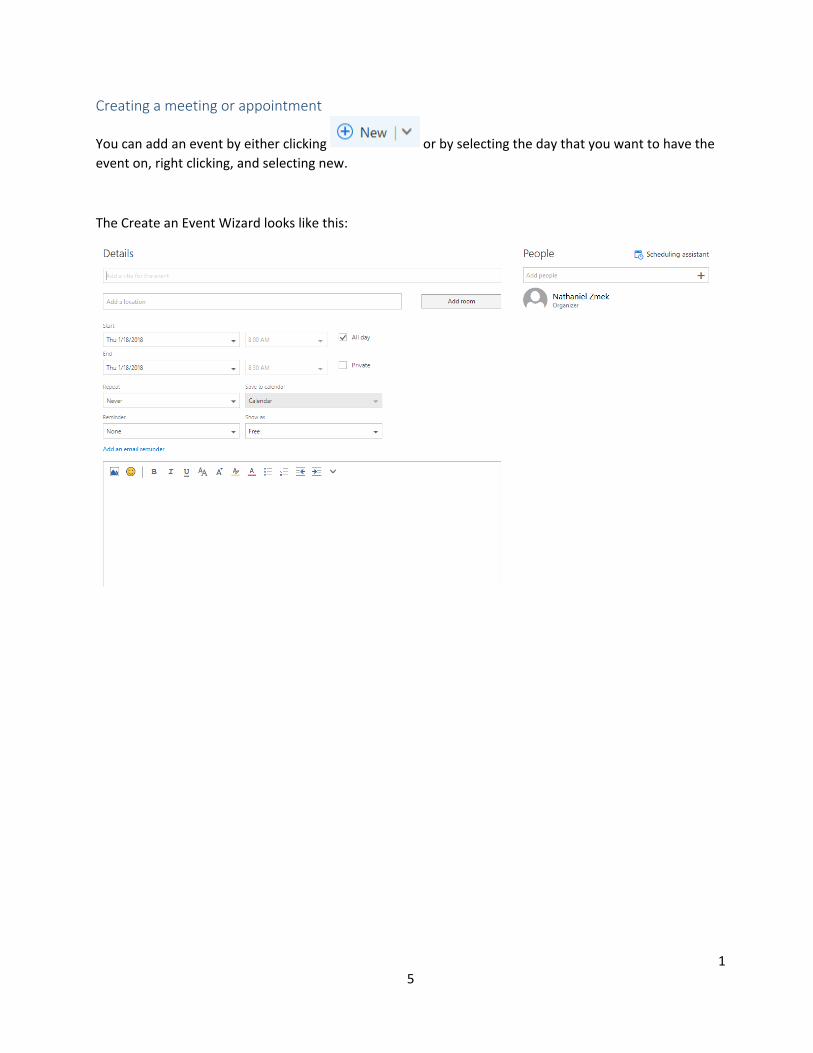
Creating a meeting or appointment
You can add an event by either clicking or by selecting the day that you want to have the event on, right clicking, and selecting new.
The Create an Event Wizard looks like this:
16
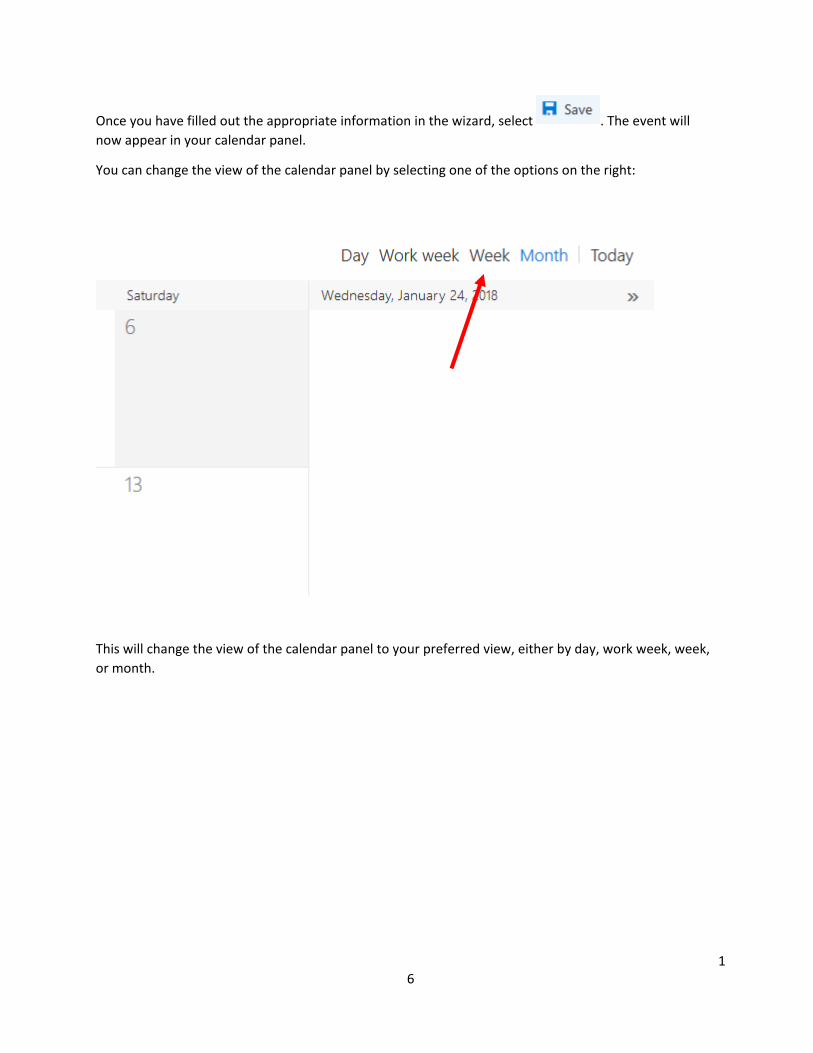
Once you have filled out the appropriate information in the wizard, select . The event will now appear in your calendar panel.
You can change the view of the calendar panel by selecting one of the options on the right:
This will change the view of the calendar panel to your preferred view, either by day, work week, week, or month.

17
The agenda panel displays your events and meetings in a single column view. It will sort them by time.

18
Configuring Outlook Configuring the Outlook desktop client on your Academy issued computer is a very straightforward process. You will need to be connected to the internet for first-time setup.
First, open Outlook. The initial account setup screen will be displayed.
Click next.
Click next.

19
As you can see, Outlook has populated the required fields. Now click next.
This confirmation is the last step. Assuming there were no errors, you should now have the Outlook desktop client configured! Outlook will begin downloading your mail and will be synced in a couple minutes.
20
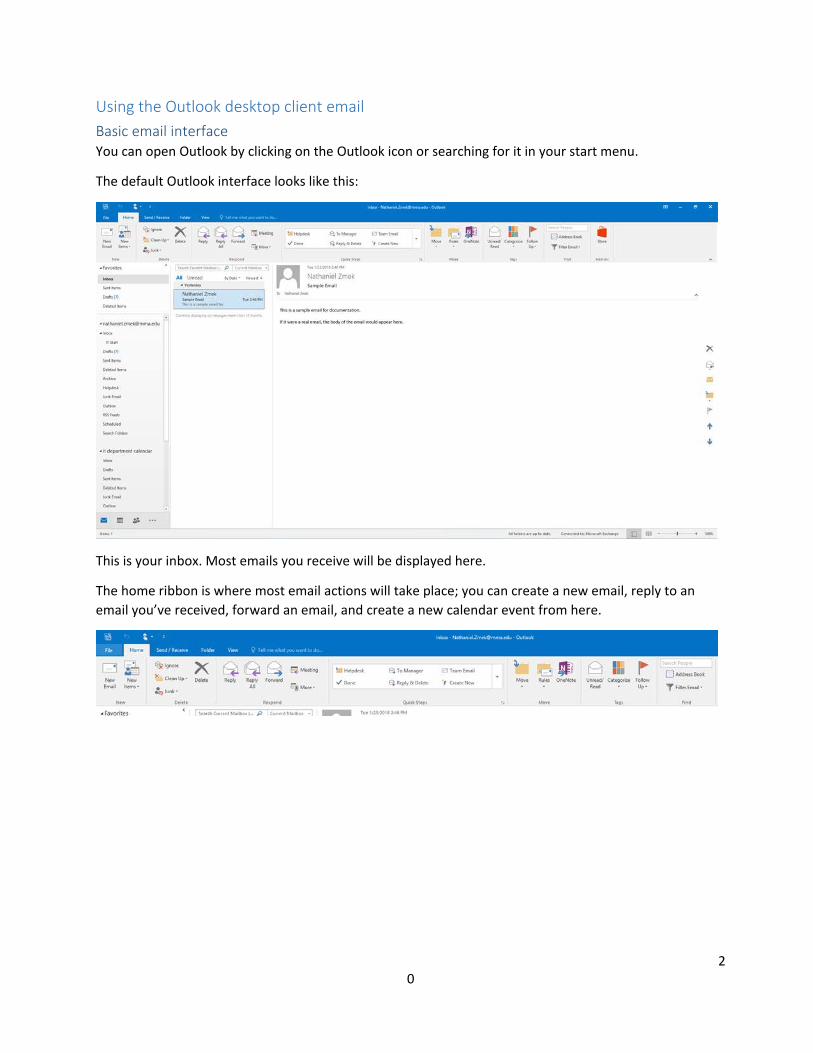
Using the Outlook desktop client email Basic email interface You can open Outlook by clicking on the Outlook icon or searching for it in your start menu.
The default Outlook interface looks like this:
This is your inbox. Most emails you receive will be displayed here.
The home ribbon is where most email actions will take place; you can create a new email, reply to an email you’ve received, forward an email, and create a new calendar event from here.

21
Compose or reply to an email In order to write a new email, click here:
This will open up the new message interface.
You can type the email recipient in the To line of the email. Separate email addresses are separated with a semicolon. Outlook will recognize when you are looking to send an email to someone you have already sent mail to and will offer to auto-complete the address for you.

22
Notice that there is no line for a BCC address. In order to add a BCC recipient, click on the To… box, as shown below:
This will open the Contacts Manager.
Here, you can search for the email address of someone you would like to send an email to and add a BCC recipient to your email in the bottom of the dialog and highlighted with an arrow.

23
You can set Outlook to always display the BCC line in your New Message dialog by creating a new email, clicking the Options ribbon, and selecting the BCC option in the “Show Fields” section.
Replying to an email looks very similar to creating one, and is done by selecting an email you would like to reply to and clicking the reply button on the Home ribbon, as shown below.
This will open the same message dialog as creating a new email. You can also forward and reply all to a message from the same section in the Home ribbon.

24
Recalling a sent message If you sent an email to the wrong person or you noticed that you need to make a revision, Outlook includes a recall feature that will allow you to unsend an email.
This feature currently only works if the recipient has an Exchange account in the same organization. So this feature will not recall an email you send to an outside source, like Gmail or Yahoo.
In order to recall an email you have sent, go to your Sent folder, as shown below.
From here, open the message you would like to recall by double clicking on the message. This will open in a new window.
In the Message tab in the ribbon, go to the Move section. There, you will see the “More Action Items” drop down, highlighted below. Select “Recall this message…”

25
This will open the recall dialog.
From here, you can select either option. However, “Delete unread copies of this message” is more flexible in that it gives you more time to write an alternate message.
Once you hit OK, Exchange will then attempt to recall the message from any recipient you sent the email to. The system will send you a message, notifying you that the email either successfully or unsuccessfully recalled the message.
Please note that recalling a message is not available in OWA.

26
Using the Outlook desktop client calendaring Accessing your calendar The Outlook desktop client includes a robust calendaring and event system. You can access it by clicking on the calendar icon on the lower right hand side of the Outlook interface:

27
This is the default calendar view:
The column marked 1 allows you to select the month of the calendar being displayed as well as view any shared calendars you have permissions to view.
Most actions you will need for calendars is done in the Home ribbon, which is on the top of the calendar interface.
It includes shortcuts to many frequently used tasks, such as creating new appointments and meetings as well as changing the view duration from a single day, up to a month. It will also let you open a .cal file and will allow you to publish your calendar as well.

28
Scheduling a meeting or appointment Outlook calls events that only you have or need access to Appointments. If you would like to invite someone else to an event, create a Meeting.
Creating a new Meeting opens the Meeting dialog.
This dialog will allow you to create and send a meeting invitation to anyone using an email system with a calendaring function built in.
To create your meeting, first enter the addresses of the people you would like to invite. You can send an invite to individuals or to mailing lists. If you don’t know the address of someone you would like to invite, click the To… box.
29
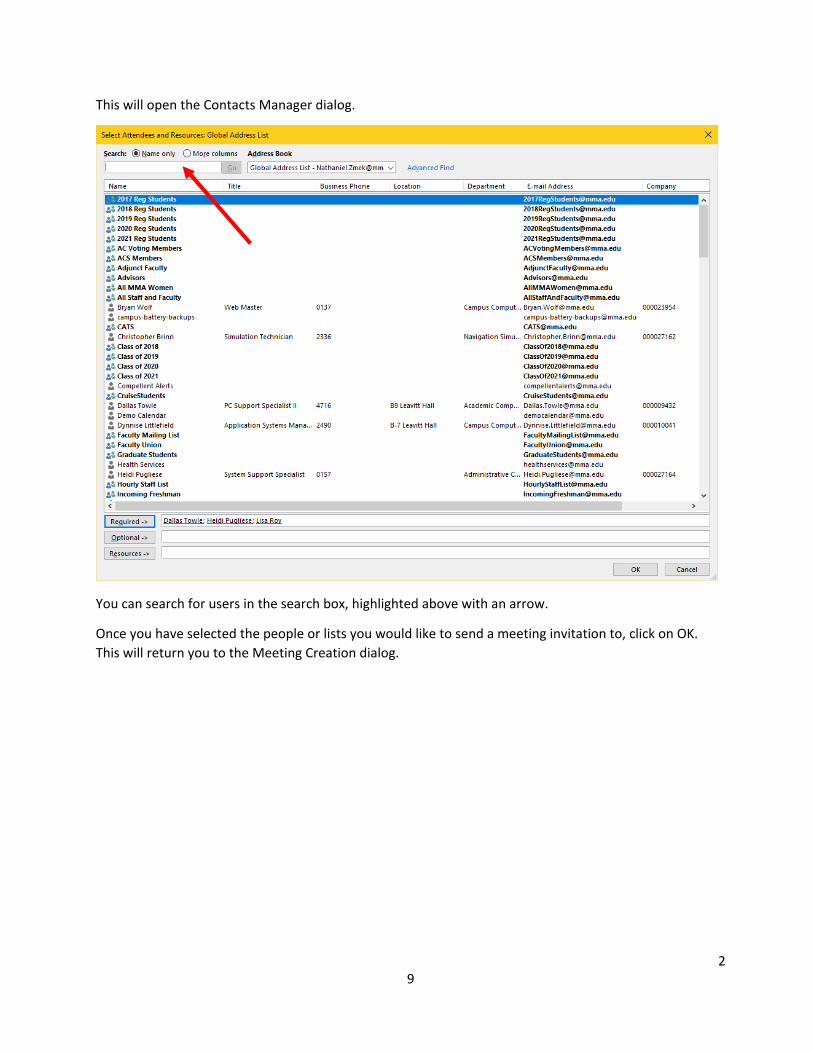
This will open the Contacts Manager dialog.
You can search for users in the search box, highlighted above with an arrow.
Once you have selected the people or lists you would like to send a meeting invitation to, click on OK. This will return you to the Meeting Creation dialog.

30
The right hand column of the Meeting Creation dialog includes the Find a Room and Conflicts section.
This function searches rooms at the Academy that are not scheduled for meetings at the meeting time specified and will automatically check the room out for your meeting.
The Conflicts section displays all possible timeframes and whether or not a person listed as a meeting participant has anything scheduled at those listed times.
If you’re having difficulty scheduling a meeting, you can use Outlook’s Scheduling Assistant. You can access the Scheduling Assistant by clicking the Scheduling Assistant icon in the Meetings Ribbon:

31
The Scheduling Assistant looks like this:
It shows in a spreadsheet the times each person you’ve included in the To line. Times that people are marked as busy are blocked off with blue.
It is important that you use Outlook as your calendar management software, as the Conflicts Manager and Room Finder only work if everyone enters their meetings in Outlook. This will not work with meetings entered in any other calendaring system, like Google or Yahoo. So please, if MMA is going to have this as a function that everyone can use effectively, do your part by scheduling your Meetings and Appointments through Outlook.

32
Advanced Meeting Settings Outlook has several features that will allow you to customize your Meetings and Appointments.
You can make a Meeting or Appointment recurring by clicking on the Recurrence button in the Options section of the Meetings Ribbon. This will allow you to set how frequently a meeting happens. The Recurrence Dialog looks like this:
Once you have selected your options, click OK.

33
Configuring the mobile Outlook client Configuring the mobile Outlook client is a bit more difficult than setting up the desktop client and will require a small amount of setup.
First, download the app from your phone’s app store, either Google Play or Apple’s App Store. The icon should look like this:
Once the application is installed, open it. You will be greeted with the following screen:

34
Enter your email address into the prompt, which is [email protected]. After a short while, the app will then ask you what your email provider is. Tap Exchange.
This will load the Exchange configuration dialogue. Make sure the “Use advanced settings” slider is checked and then enter the following information into each input:
Email Your [email protected]. Password Your email password Description Can be whatever you like. This setting names
your inbox in the app only. Server Mailx.mma.edu Domain Campus Username Firstname.lastname
Once you have entered this information, tap “Sign In”. The app will then ask you if you would like to add another account. For now, tap “Maybe Later”.
The app will now load your inbox along with a tutorial on how to use it. It is highly recommended that you follow the tutorial in order to learn how the app works.

35
Accessing your email archive You may find that you have deleted or lost an email that you need. Maine Maritime has an email archive service that can help you recover your messages. MMA keeps email archived for up to 2 years.
In order to access the MMA email archive, go to xarchive.campus.mma. This will bring you to the following site:
Log in using your MMA account information.
The default interface for the archive looks like this:

36
Search for archived mail You can search for specific mail though our email archive.
First, click search in the left column of the page:
This brings you to the email search interface:
37
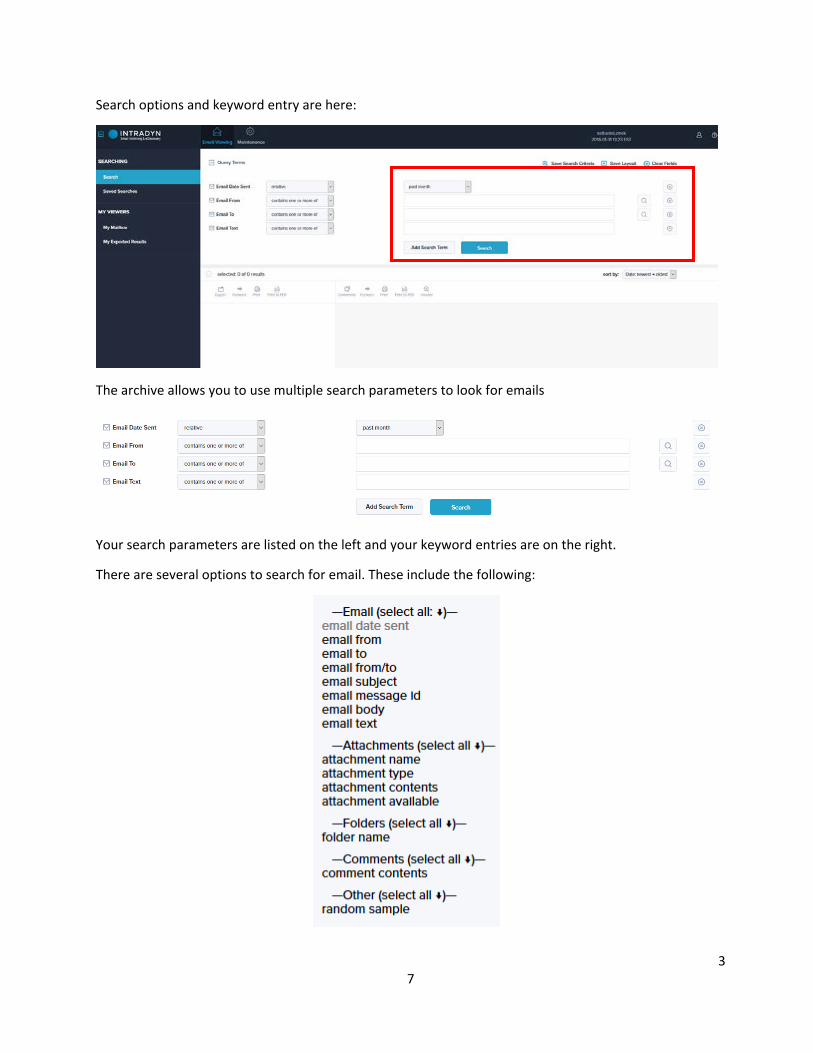
Search options and keyword entry are here:
The archive allows you to use multiple search parameters to look for emails
Your search parameters are listed on the left and your keyword entries are on the right.
There are several options to search for email. These include the following:

38
The email category includes commonly used features of email messages to search, such as subject, the from line, and body text.
You can also use the attachment category to search through your email attachments by name, filetype (such as a PDF or Word Document), and sample attachment content.
Folder name will search or exclude folders depending on your settings, and comment contents will search through comments you have added to your emails.
Once you have picked your email search parameters, you may notice drop down boxes next to each parameter:
These drop down menus will allow you granular control over your search parameters. They are different with each search parameter, but generally they will allow you to make your parameter strictly search for the keyword, exclude keywords, search between dates, and other useful options. It’s encouraged that you try different combinations of search queries and controls to find emails. You can also call the Helpdesk at x2240 if you need any assistance.
To remove a search parameter, click on the circled x icon on the right of the menu, shown below:

39
Viewing all archived mail from folders In order to view all your mail in the archive, first select a timeframe to search and the folder(s) you want to display, then click the highlighted View button:
This will display all mail in that folder from the timeframe you selected. Your mail will display in the bottom section of the page:
In order to read a specific piece of email, click on it in the column labeled 1. It will then display in the pane on the right, labeled 2.
40
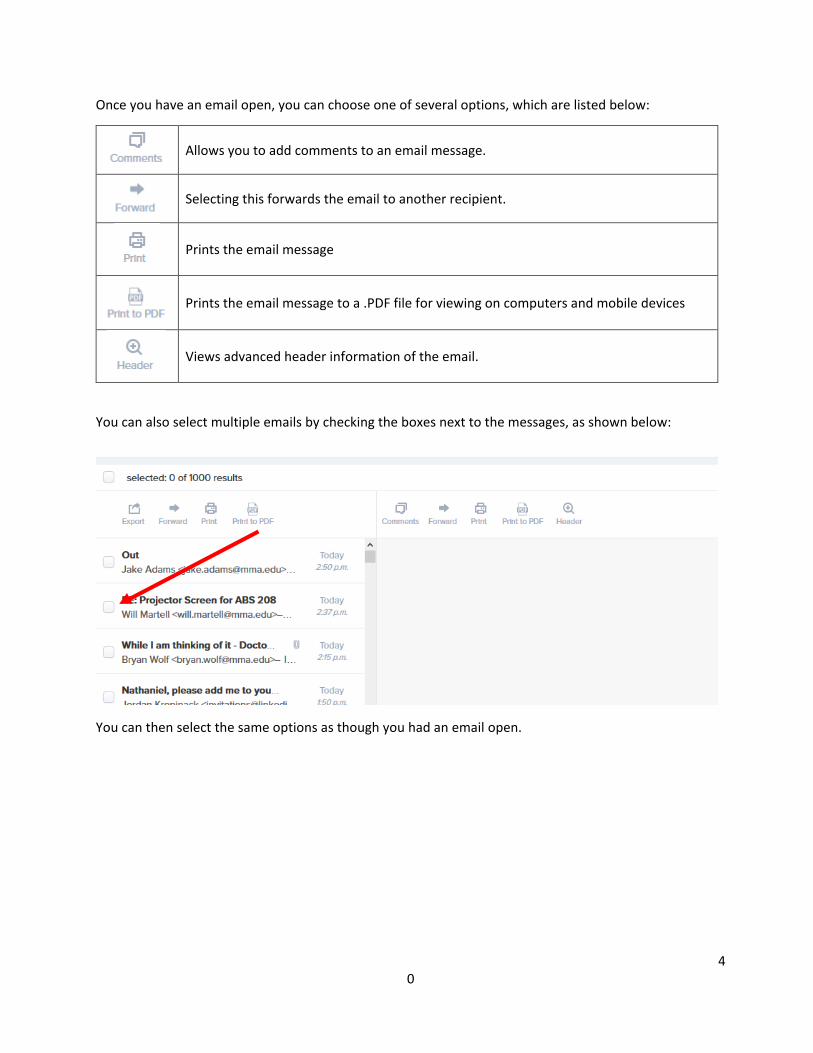
Once you have an email open, you can choose one of several options, which are listed below:
Allows you to add comments to an email message.
Selecting this forwards the email to another recipient.
Prints the email message
Prints the email message to a .PDF file for viewing on computers and mobile devices
Views advanced header information of the email.
You can also select multiple emails by checking the boxes next to the messages, as shown below:
You can then select the same options as though you had an email open.

41
Other Exchange topics Setup text messaging services You can receive text message alerts for calendar events, voicemail notifications, and/or specific email notifications.
To do this, open Outlook OWA (mailx.mma.edu) and once it opens, select the gear icon and select “Options”.
You will now see the general options page for Outlook OWA.

42
From here, click on General>Text Messaging
This will open the following page:

43
Click on “Set up text messaging”, which will open a sidebar.
Select United States and your mobile provider. If you don’t see your mobile operator listed, you won’t be able to receive text message updates.
Enter your mobile phone number and press next. This will send a text message with a code to your phone.

44
Once you have received the code, enter it in the box below:
Once you enter your code, select finish. This lets Exchange know that the number you entered is your own.
You should now see the following options on the screen:

45
Edit text messaging settings allows you to update your phone number. Delete text messaging settings will remove your number from Exchange and you will need to reconfigure messaging again if you wish to receive text message alerts again.