Embed Size (px)
Citation preview

Last edited
4-Mar-14
Outlook 2010 and 2013 Guides
1
Outlook 2010 and 2013
Email Setup
Account Types 2
Exchange account 3
POP account 5
Adding additional email accounts 7
Maintenance
Setting up an Email signature 8
Checking Email Storage 10
Archiving Emails 12
Sharing Calendars
Giving Access Permission 14
Opening a Shared Calendar 15
Last edited
4-Mar-14
Outlook 2010 and 2013 Guides
2
Email Setup
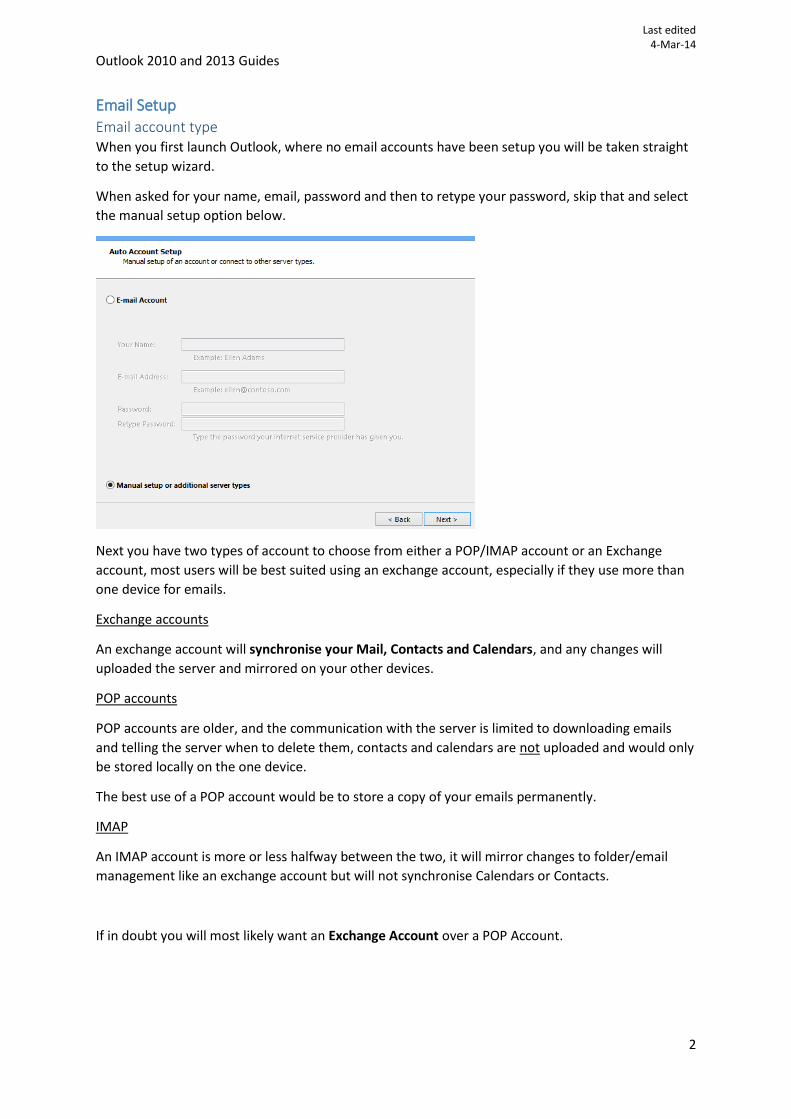
Email account type When you first launch Outlook, where no email accounts have been setup you will be taken straight
to the setup wizard.
When asked for your name, email, password and then to retype your password, skip that and select
the manual setup option below.
Next you have two types of account to choose from either a POP/IMAP account or an Exchange
account, most users will be best suited using an exchange account, especially if they use more than
one device for emails.
Exchange accounts
An exchange account will synchronise your Mail, Contacts and Calendars, and any changes will
uploaded the server and mirrored on your other devices.
POP accounts
POP accounts are older, and the communication with the server is limited to downloading emails
and telling the server when to delete them, contacts and calendars are not uploaded and would only
be stored locally on the one device.
The best use of a POP account would be to store a copy of your emails permanently.
IMAP
An IMAP account is more or less halfway between the two, it will mirror changes to folder/email
management like an exchange account but will not synchronise Calendars or Contacts.
If in doubt you will most likely want an Exchange Account over a POP Account.
Last edited
4-Mar-14
Outlook 2010 and 2013 Guides
3
Setting up an Exchange account
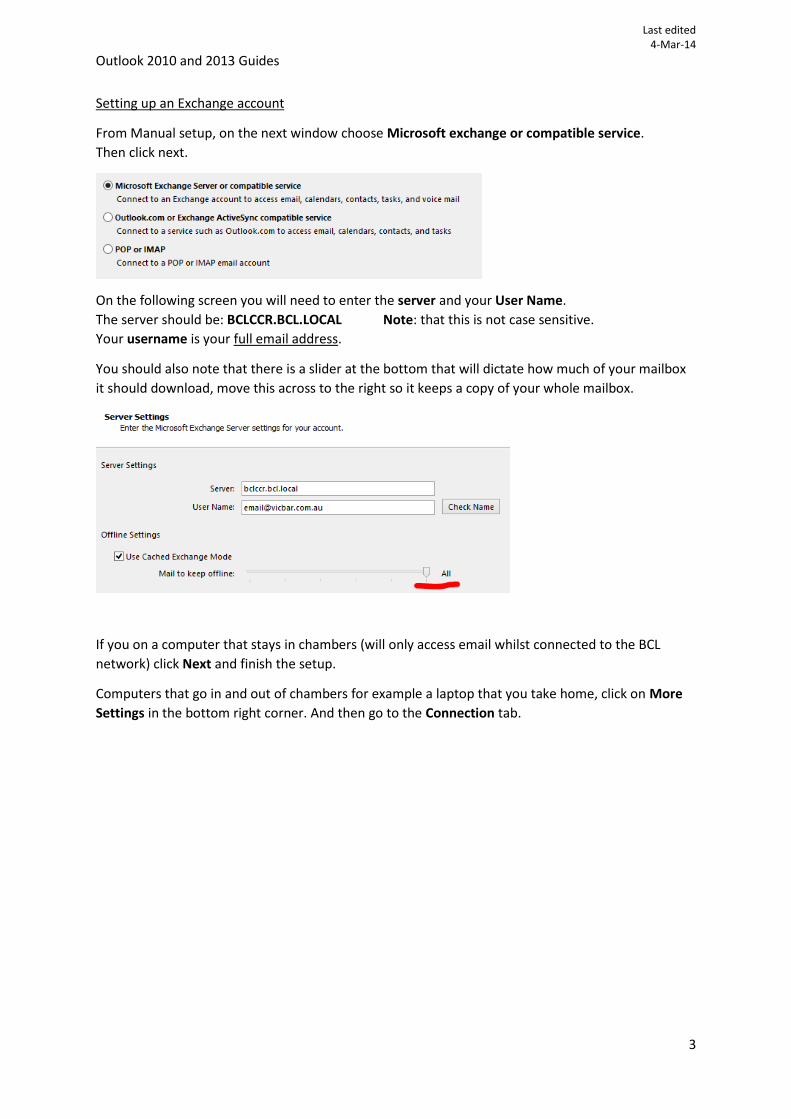
From Manual setup, on the next window choose Microsoft exchange or compatible service.
Then click next.
On the following screen you will need to enter the server and your User Name.
The server should be: BCLCCR.BCL.LOCAL Note: that this is not case sensitive.
Your username is your full email address.
You should also note that there is a slider at the bottom that will dictate how much of your mailbox
it should download, move this across to the right so it keeps a copy of your whole mailbox.
If you on a computer that stays in chambers (will only access email whilst connected to the BCL
network) click Next and finish the setup.
Computers that go in and out of chambers for example a laptop that you take home, click on More
Settings in the bottom right corner. And then go to the Connection tab.
Last edited
4-Mar-14
Outlook 2010 and 2013 Guides
4
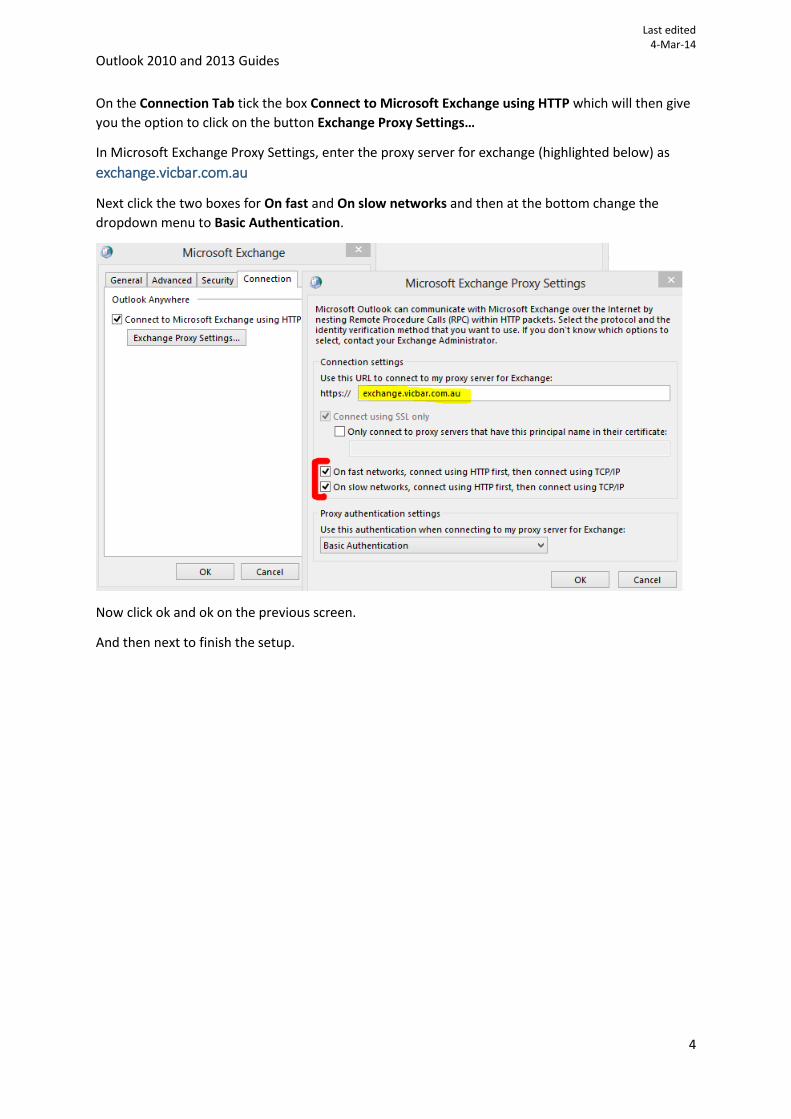
On the Connection Tab tick the box Connect to Microsoft Exchange using HTTP which will then give
you the option to click on the button Exchange Proxy Settings…
In Microsoft Exchange Proxy Settings, enter the proxy server for exchange (highlighted below) as
exchange.vicbar.com.au
Next click the two boxes for On fast and On slow networks and then at the bottom change the
dropdown menu to Basic Authentication.
Now click ok and ok on the previous screen.
And then next to finish the setup.
Last edited
4-Mar-14
Outlook 2010 and 2013 Guides
5
Setting up a POP account
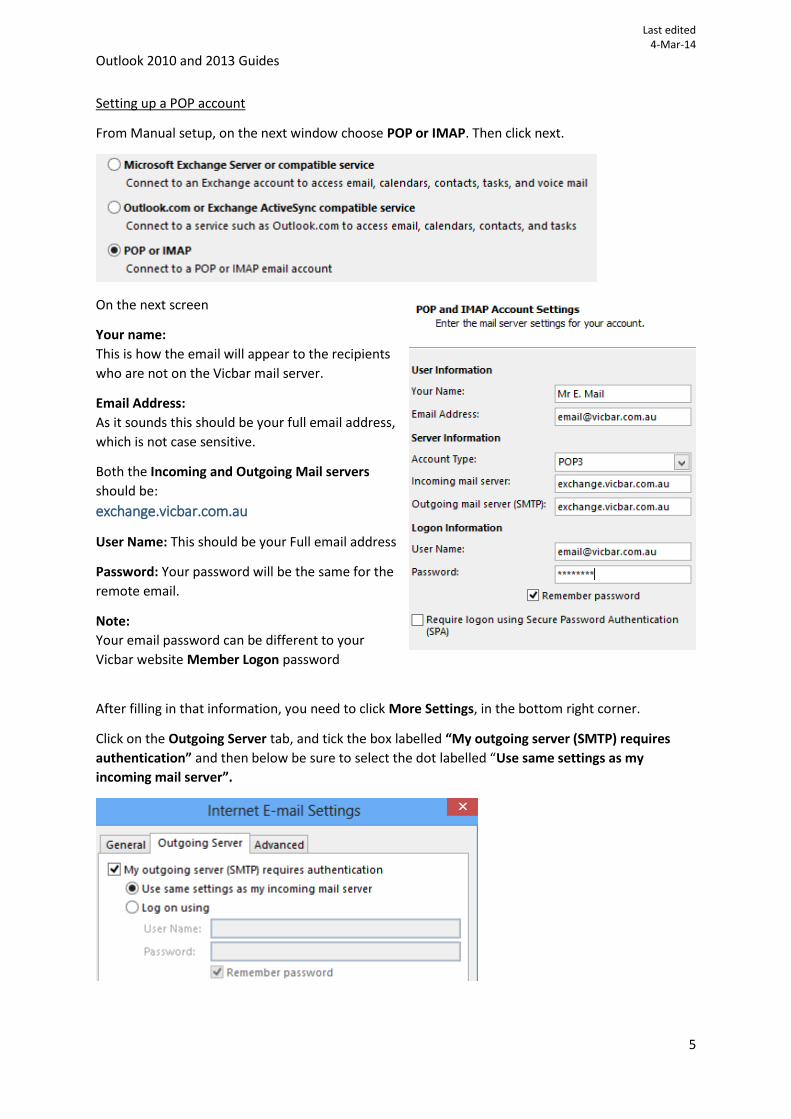
From Manual setup, on the next window choose POP or IMAP. Then click next.
On the next screen
Your name:
This is how the email will appear to the recipients
who are not on the Vicbar mail server.
Email Address:
As it sounds this should be your full email address,
which is not case sensitive.
Both the Incoming and Outgoing Mail servers
should be:
exchange.vicbar.com.au
User Name: This should be your Full email address
Password: Your password will be the same for the
remote email.
Note:
Your email password can be different to your
Vicbar website Member Logon password
After filling in that information, you need to click More Settings, in the bottom right corner.
Click on the Outgoing Server tab, and tick the box labelled “My outgoing server (SMTP) requires
authentication” and then below be sure to select the dot labelled “Use same settings as my
incoming mail server”.
Last edited
4-Mar-14
Outlook 2010 and 2013 Guides
6
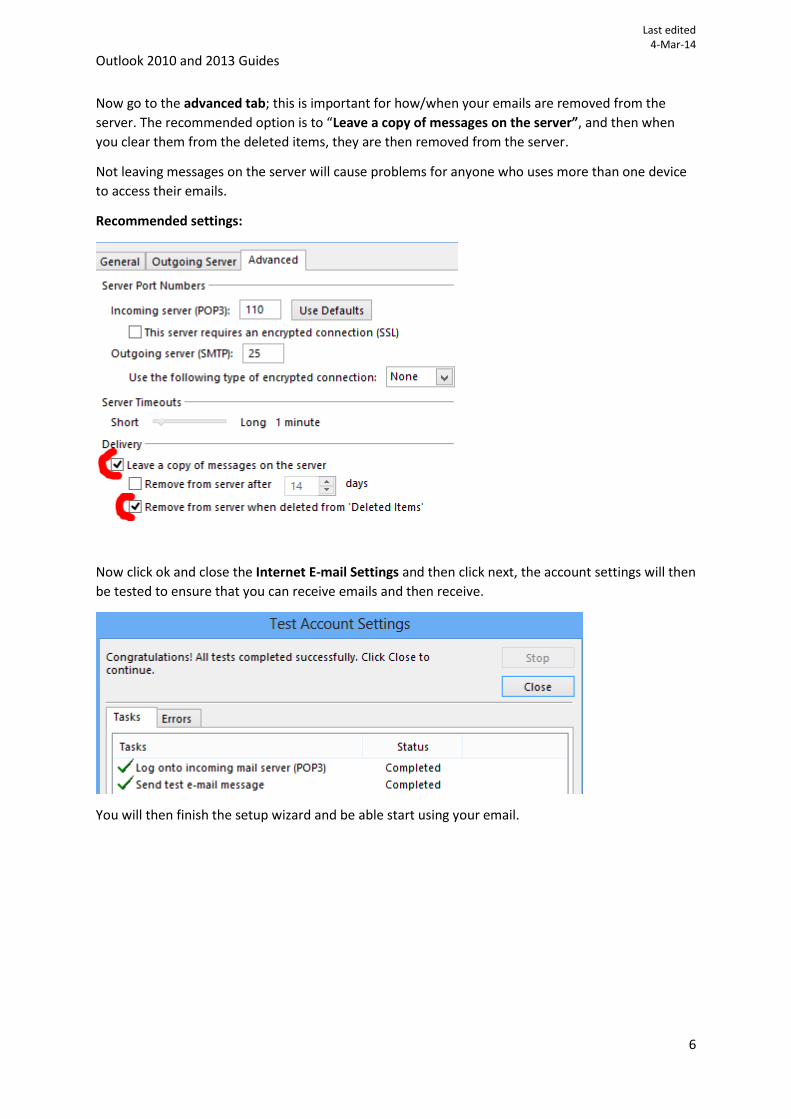
Now go to the advanced tab; this is important for how/when your emails are removed from the
server. The recommended option is to “Leave a copy of messages on the server”, and then when
you clear them from the deleted items, they are then removed from the server.
Not leaving messages on the server will cause problems for anyone who uses more than one device
to access their emails.
Recommended settings:
Now click ok and close the Internet E-mail Settings and then click next, the account settings will then
be tested to ensure that you can receive emails and then receive.
You will then finish the setup wizard and be able start using your email.
Last edited
4-Mar-14
Outlook 2010 and 2013 Guides
7
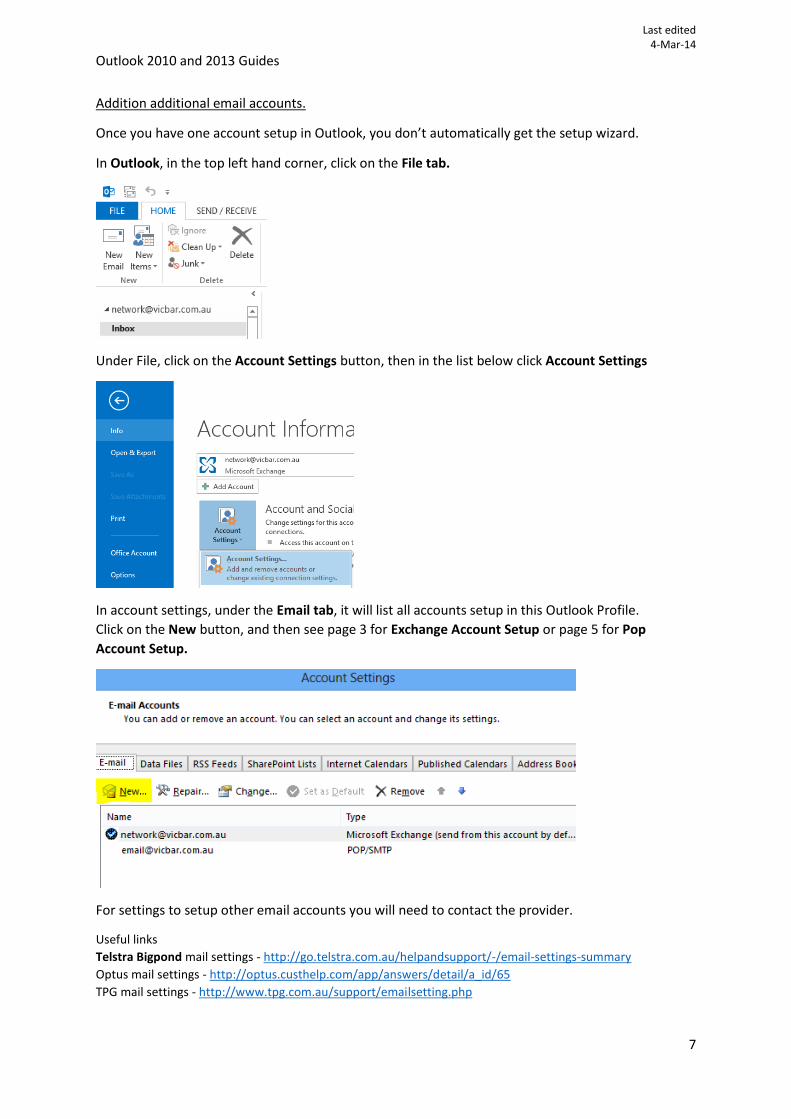
Addition additional email accounts.
Once you have one account setup in Outlook, you don’t automatically get the setup wizard.
In Outlook, in the top left hand corner, click on the File tab.
Under File, click on the Account Settings button, then in the list below click Account Settings
In account settings, under the Email tab, it will list all accounts setup in this Outlook Profile.
Click on the New button, and then see page 3 for Exchange Account Setup or page 5 for Pop
Account Setup.
For settings to setup other email accounts you will need to contact the provider.
Useful links
Telstra Bigpond mail settings - http://go.telstra.com.au/helpandsupport/-/email-settings-summary
Optus mail settings - http://optus.custhelp.com/app/answers/detail/a_id/65
TPG mail settings - http://www.tpg.com.au/support/emailsetting.php

Last edited
4-Mar-14
Outlook 2010 and 2013 Guides
8
Maintenance
Setting up an Email signature
In Outlook, in the top left hand corner, click on the File tab.
Under file go to Options
In Options, on the left choose Mail, in the main panel, there will be button for Signatures.
Last edited
4-Mar-14
Outlook 2010 and 2013 Guides
9
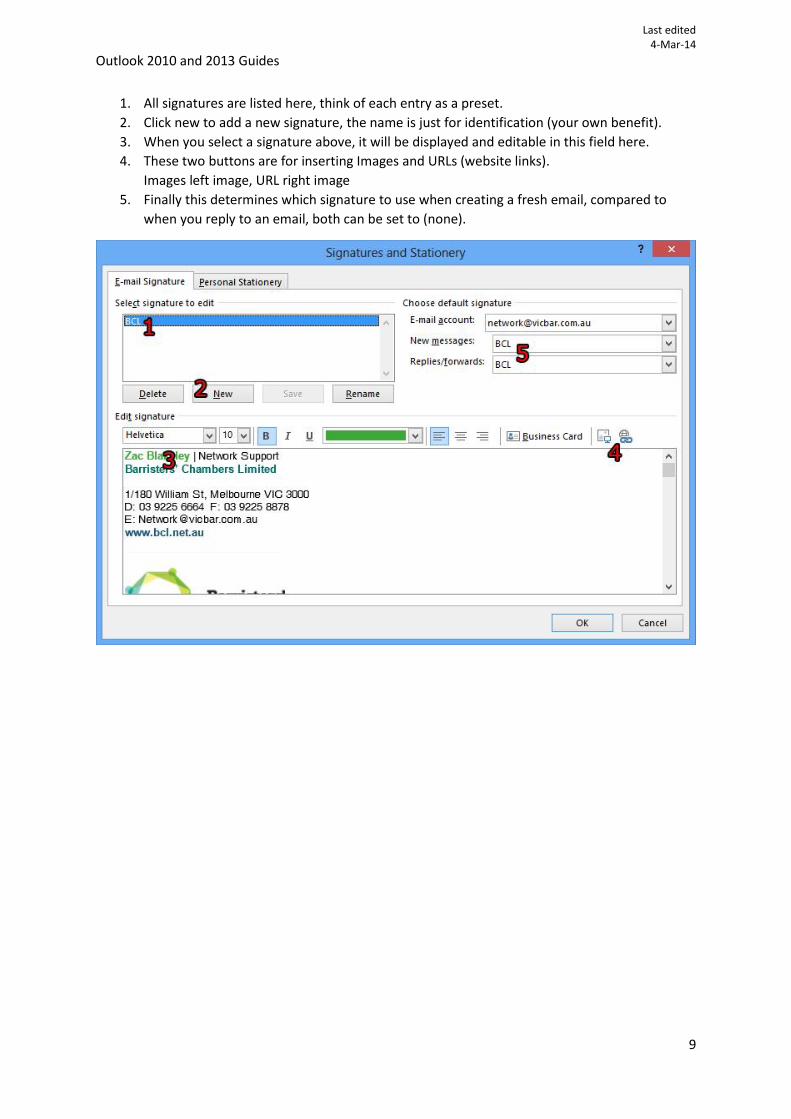
1. All signatures are listed here, think of each entry as a preset.
2. Click new to add a new signature, the name is just for identification (your own benefit).
3. When you select a signature above, it will be displayed and editable in this field here.
4. These two buttons are for inserting Images and URLs (website links).
Images left image, URL right image
5. Finally this determines which signature to use when creating a fresh email, compared to
when you reply to an email, both can be set to (none).

Last edited
4-Mar-14
Outlook 2010 and 2013 Guides
10
Checking Email Storage
In Outlook, in the top left hand corner, click on the File tab.
Here under the info heading, you can see an indication of how much storage is in use.
For more information on specific folders, Click on Cleanup Tools, and then Mailbox Cleanup.
In the next window click the button View Mailbox Size…
Last edited
4-Mar-14
Outlook 2010 and 2013 Guides
11
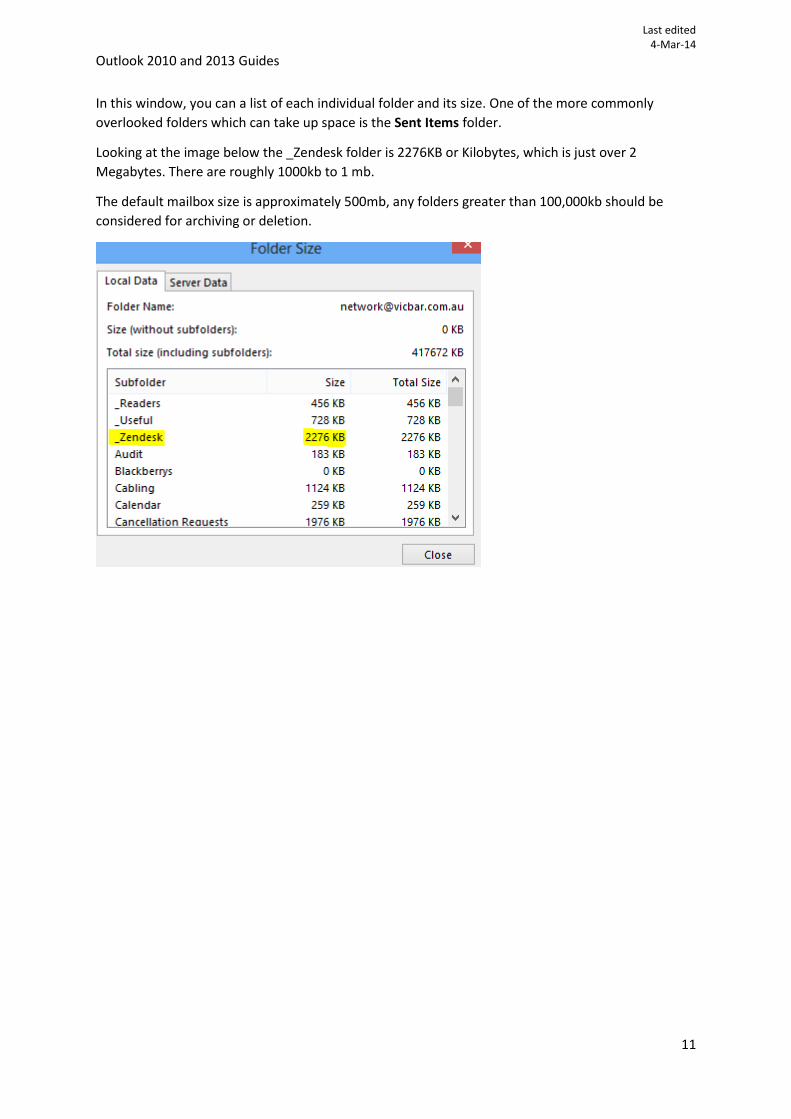
In this window, you can a list of each individual folder and its size. One of the more commonly
overlooked folders which can take up space is the Sent Items folder.
Looking at the image below the _Zendesk folder is 2276KB or Kilobytes, which is just over 2
Megabytes. There are roughly 1000kb to 1 mb.
The default mailbox size is approximately 500mb, any folders greater than 100,000kb should be
considered for archiving or deletion.
Last edited
4-Mar-14
Outlook 2010 and 2013 Guides
12
Archiving emails
Archiving is simply a matter of moving emails from being stored on the server, and keeping them
locally on your computer. There is only so much storage on the server, but there is several times that
available on your computers local storage.
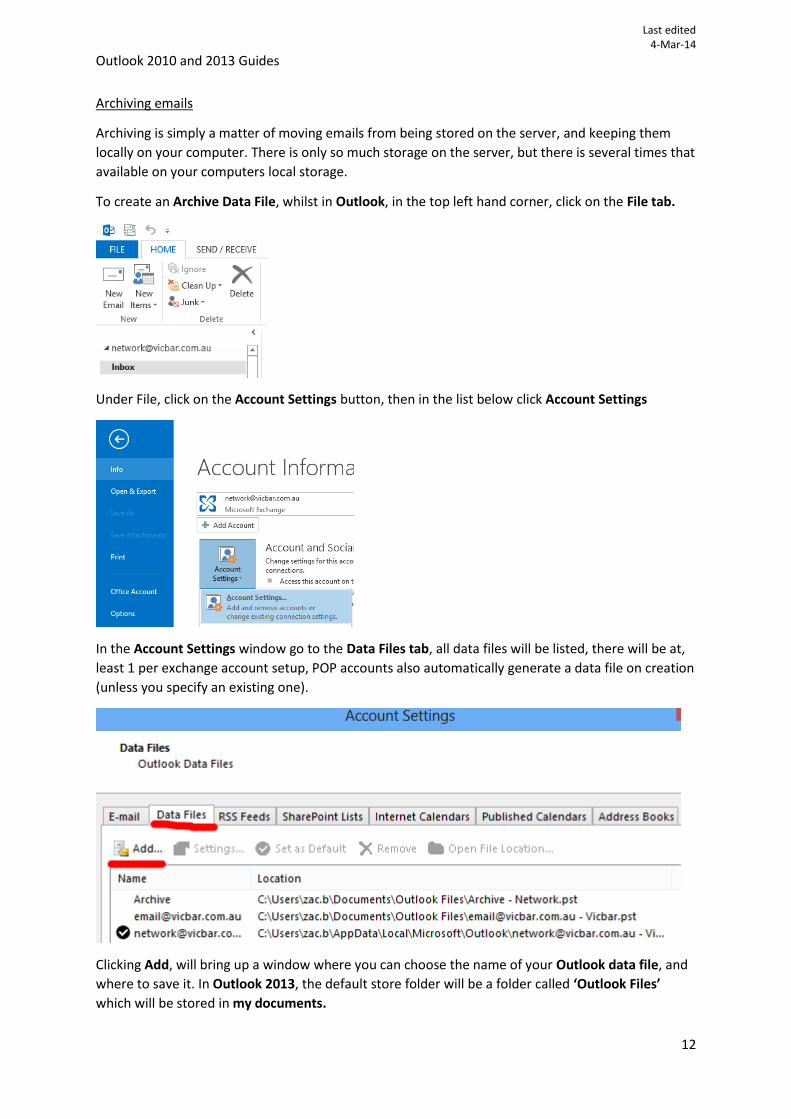
To create an Archive Data File, whilst in Outlook, in the top left hand corner, click on the File tab.
Under File, click on the Account Settings button, then in the list below click Account Settings
In the Account Settings window go to the Data Files tab, all data files will be listed, there will be at,
least 1 per exchange account setup, POP accounts also automatically generate a data file on creation
(unless you specify an existing one).
Clicking Add, will bring up a window where you can choose the name of your Outlook data file, and
where to save it. In Outlook 2013, the default store folder will be a folder called ‘Outlook Files’
which will be stored in my documents.
Last edited
4-Mar-14
Outlook 2010 and 2013 Guides
13
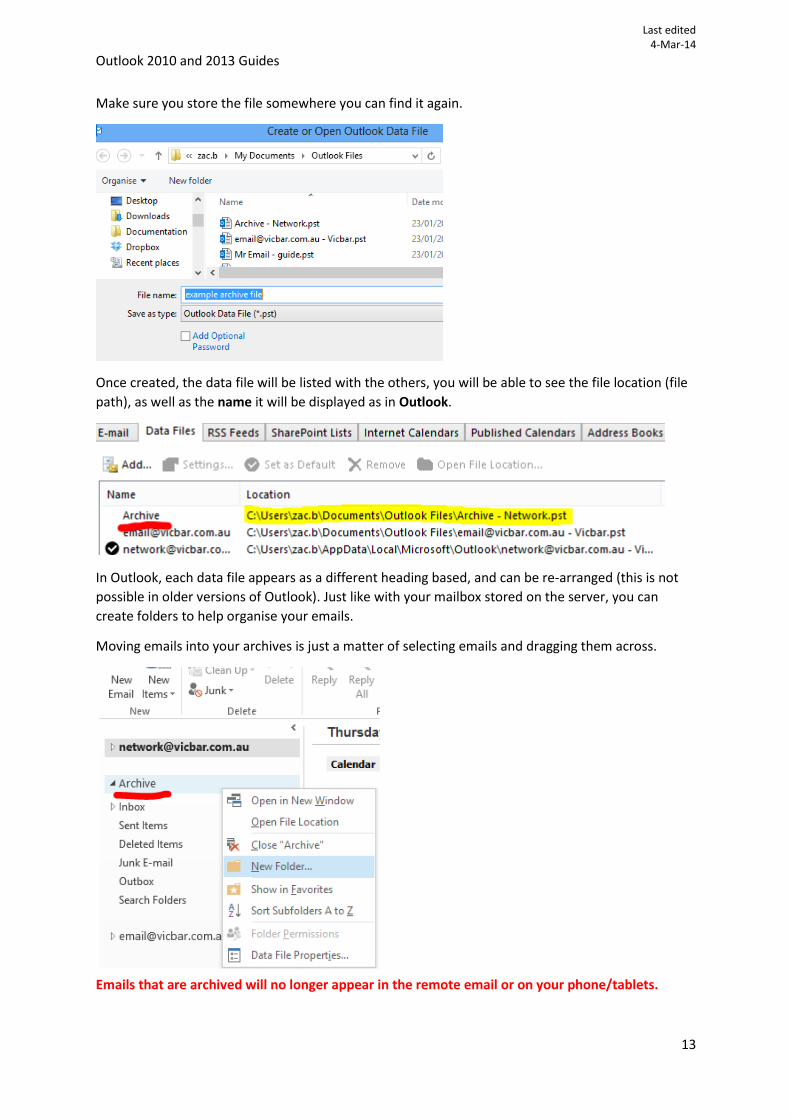
Make sure you store the file somewhere you can find it again.
Once created, the data file will be listed with the others, you will be able to see the file location (file
path), as well as the name it will be displayed as in Outlook.
In Outlook, each data file appears as a different heading based, and can be re-arranged (this is not
possible in older versions of Outlook). Just like with your mailbox stored on the server, you can
create folders to help organise your emails.
Moving emails into your archives is just a matter of selecting emails and dragging them across.
Emails that are archived will no longer appear in the remote email or on your phone/tablets.

Last edited
4-Mar-14
Outlook 2010 and 2013 Guides
14
Calendar Sharing
Giving Access to another user To allow another user to see your calendar you need to add their email address to the permissions
list, and then they can add a shared calendar (page 16) which they have permission to view.
In Outlook, Go to your Calendar, across the top (Under the Home Tab)
Click on Calendar Permissions
In Calendar Properties, Under the Permissions Tab there is a list of people, to include more people
to that list Click Add.
You can search for users by display name, the display name is how an email from that person
appears in your inbox.
Double click the name in the list, to add it to the “Add” line at the bottom of the Window.
Note that you can add more than one person at a time. Once you’ve included all the intended
delegates in the “add field” click ok.
Last edited
4-Mar-14
Outlook 2010 and 2013 Guides
15
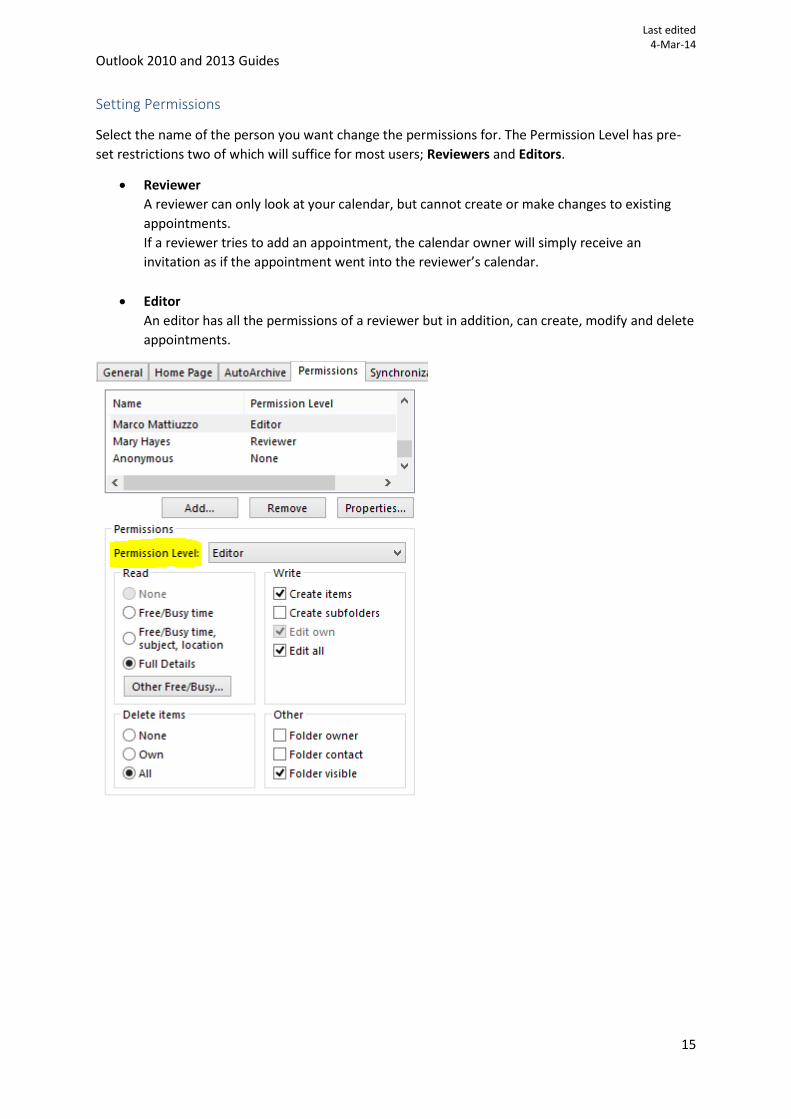
Setting Permissions
Select the name of the person you want change the permissions for. The Permission Level has pre-
set restrictions two of which will suffice for most users; Reviewers and Editors.
Reviewer
A reviewer can only look at your calendar, but cannot create or make changes to existing
appointments.
If a reviewer tries to add an appointment, the calendar owner will simply receive an
invitation as if the appointment went into the reviewer’s calendar.
Editor
An editor has all the permissions of a reviewer but in addition, can create, modify and delete
appointments.
Last edited
4-Mar-14
Outlook 2010 and 2013 Guides
16
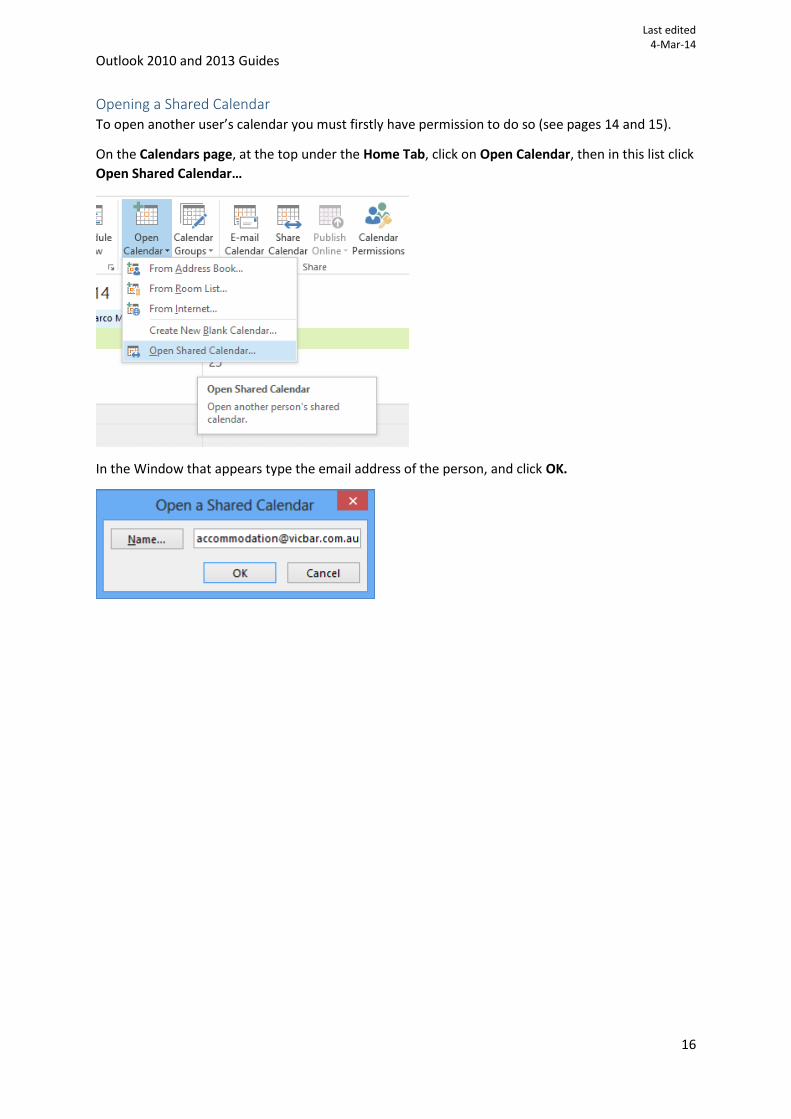
Opening a Shared Calendar To open another user’s calendar you must firstly have permission to do so (see pages 14 and 15).
On the Calendars page, at the top under the Home Tab, click on Open Calendar, then in this list click
Open Shared Calendar…
In the Window that appears type the email address of the person, and click OK.


![Property 452 Reviewer-[Vena Verga] Property Midterms Reviewer](https://img.pdfslide.us/doc/110x75/55cf8a9355034654898bef13/property-452-reviewer-vena-verga-property-midterms-reviewer.jpg)