Embed Size (px)
Citation preview

OutlineOutline
Review Visual Basic .NET Review Visual Basic .NET EnvironmentEnvironment
First Visual Basic Planning and First Visual Basic Planning and ProgrammingProgramming
Finding and Fixing Errors – Finding and Fixing Errors – Debugging Debugging
SummarySummary
Using Microsoft Visual Using Microsoft Visual Studio .NETStudio .NET

Using Microsoft Visual Using Microsoft Visual Studio .NET Studio .NET (continue)(continue)
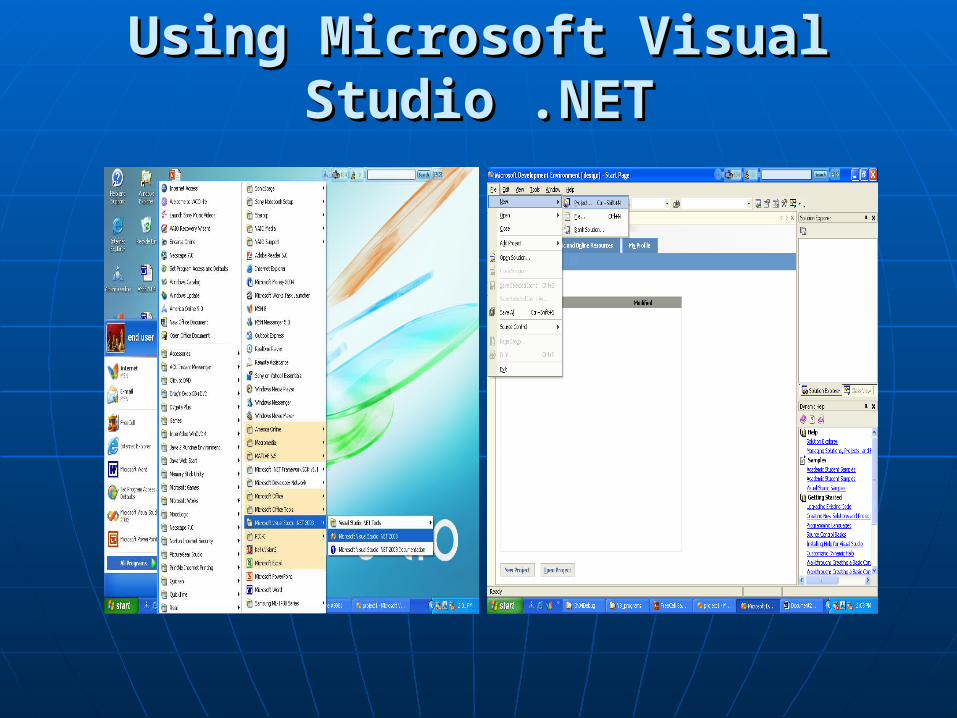
Naming Rules and ConventionNaming Rules and Convention
Examples:Examples:ObjectObject PrefixPrefix ExampleExampleFormForm frmfrm frmHellofrmHelloButtonButton btnbtn btnPushbtnPushTextboxTextbox txttxt txtNametxtNameLabelLabel lbllbl lblMessagelblMessageRadio button Radio button radrad radBoldradBoldCheck BoxCheck Box chkchk chkPrintchkPrint

A First Program ExampleA First Program Example
Develop a simple program thatDevelop a simple program that• Display a titleDisplay a title• Has one Label that display data when a Has one Label that display data when a
button is pressedbutton is pressed• Has two ButtonsHas two Buttons
Write procedure code for each eventWrite procedure code for each event Save the formSave the form Save the projectSave the project Run the programRun the program
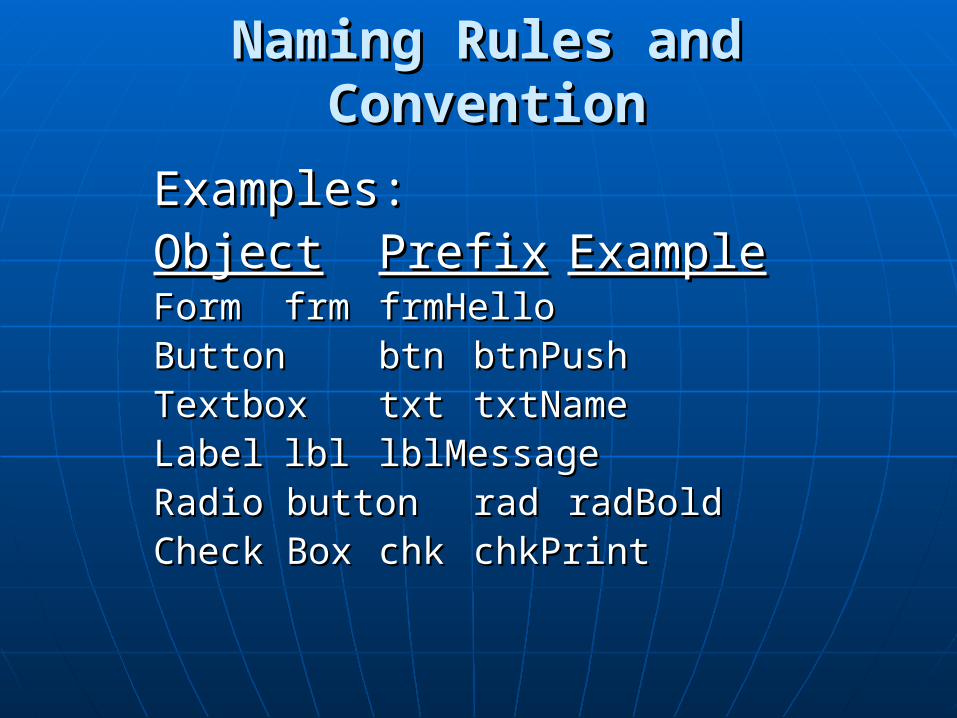
Planning: GUI DesignPlanning: GUI Design
Text displayed hereText displayed here
Push MePush Me
ExitExit
frmHellolblMessage
btnPush
btnExit
Text property
ECET/CS 114Label
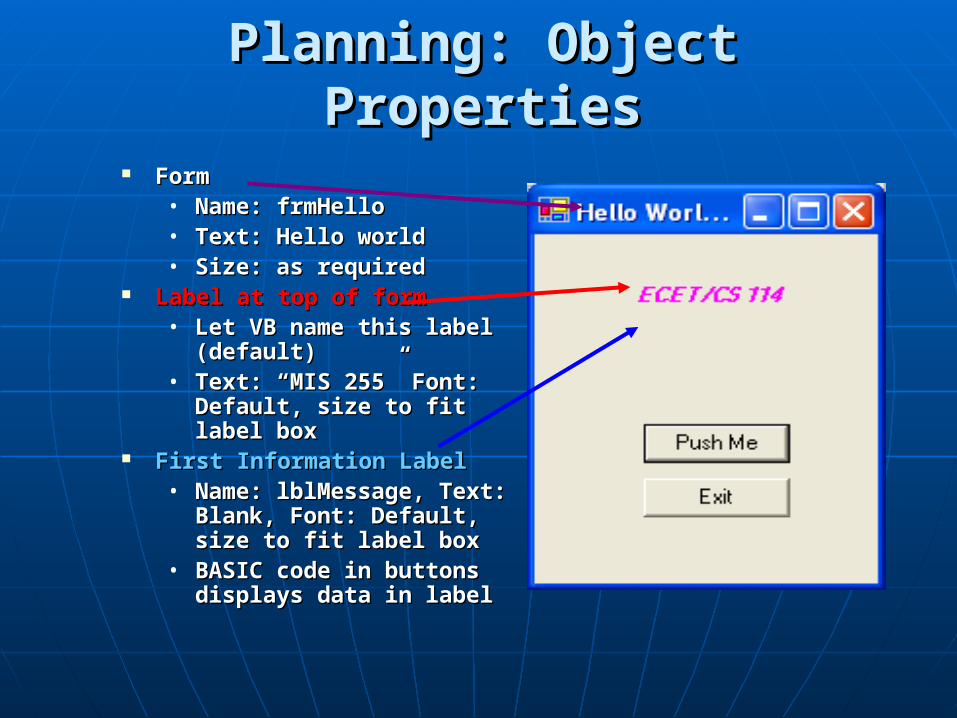
Planning: Object PropertiesPlanning: Object Properties
FormForm• Name: frmHelloName: frmHello• Text: Hello worldText: Hello world• Size: as requiredSize: as required
Label at top of formLabel at top of form• Let VB name this label Let VB name this label
(default) (default) • Text: “MIS 255” Font: Default, Text: “MIS 255” Font: Default,
size to fit label boxsize to fit label box First Information LabelFirst Information Label
• Name: lblMessage, Text: Name: lblMessage, Text: Blank, Font: Default, size to Blank, Font: Default, size to fit label boxfit label box
• BASIC code in buttons BASIC code in buttons displays data in labeldisplays data in label
Program Development ExampleProgram Development Example
Event StatementEvent StatementWrite a VB.NET program that displays the Write a VB.NET program that displays the
information when a display button is information when a display button is clicked; and exit the program when the clicked; and exit the program when the exit button is clicked:exit button is clicked:• Press button to display “Hello World”Press button to display “Hello World”• Press button to ExitPress button to Exit
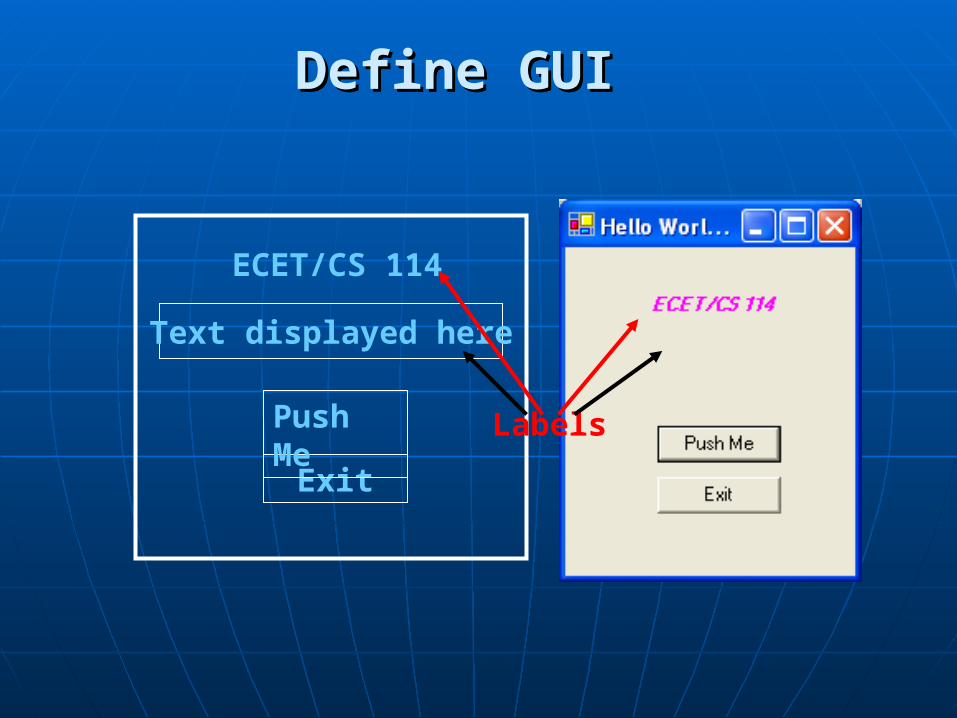
Define GUIDefine GUI
Text displayed here
ECET/CS 114
Exit
Push Me Labels

Define the User InterfaceDefine the User Interface- - Create a FormCreate a Form
• Plan the Plan the project – project – one label, one label, two buttonstwo buttons
• Resize the Resize the form by form by drag a drag a corner of corner of the form the form handle ithandle it
• Text –Form1 Text –Form1 at the at the Properties Properties windowwindow

Define the User Interface Define the User Interface (continued)(continued)
- - Place Control on the FormPlace Control on the Form
• Point to Point to the toolbox the toolbox icon to icon to open the open the toolbox on toolbox on the left the left sideside
• Place Place controls controls on the on the formform
• Point to A Point to A Label and Label and drag, drop drag, drop on the on the formform

Define the User Interface Define the User Interface (continued)(continued)
- Create Label- Create Label
Drag the Drag the mouse mouse pointer to pointer to the spot the spot where you where you want to want to
Pointer to Pointer to a corner a corner and resize and resize the label the label on the on the formform

Define the User Interface Define the User Interface (continued)(continued)
- Set Label Properties- Set Label Properties
Click on the label you Click on the label you place on the formplace on the form
Object boxObject box
Settings boxSettings box
Value in the Value in the Settings boxSettings box
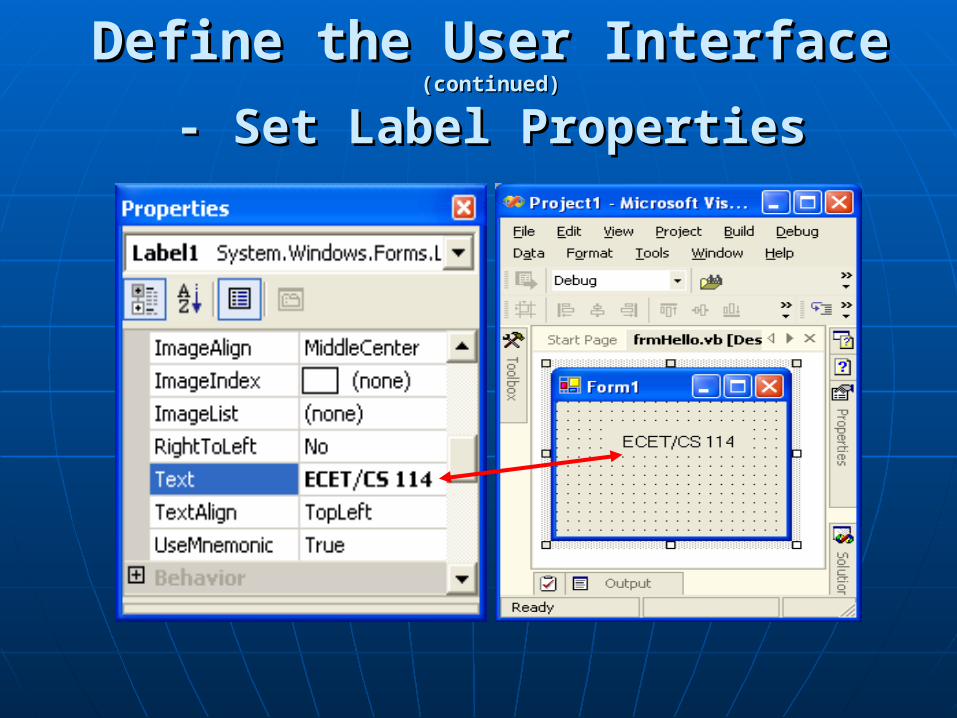
Define the User Interface Define the User Interface (continued)(continued)
- Set Label Properties- Set Label Properties

Define the User InterfaceDefine the User Interface (continued(continued))
- Label Properties- Label Properties

Define the User Interface Define the User Interface (continued)(continued)
- - Place Control on the FormPlace Control on the Form
Point toPoint toLabelLabel in in the Toolbox the Toolbox and drag,and drag,drop on thedrop on theForm toForm toCreateCreateAnotherAnotherlabel label

Define the User Interface Define the User Interface (continued)(continued)
- - Place Control on the FormPlace Control on the Form
TextAlign TextAlign property property
Text Text property property
NameNameproperty property
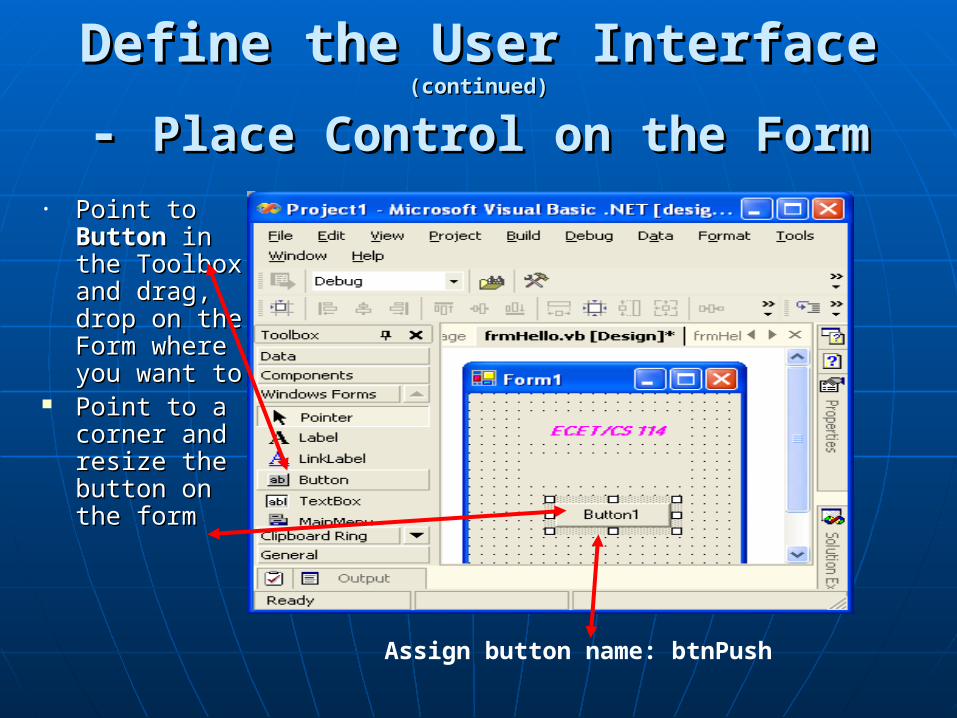
Define the User Interface Define the User Interface (continued)(continued)
- - Place Control on the FormPlace Control on the Form
• Point toPoint toButtonButton in in the Toolbox the Toolbox and drag,and drag,drop on thedrop on theForm where Form where you want to you want to
Point to a Point to a corner and corner and resize the resize the button on the button on the formform
Assign button name: btnPush
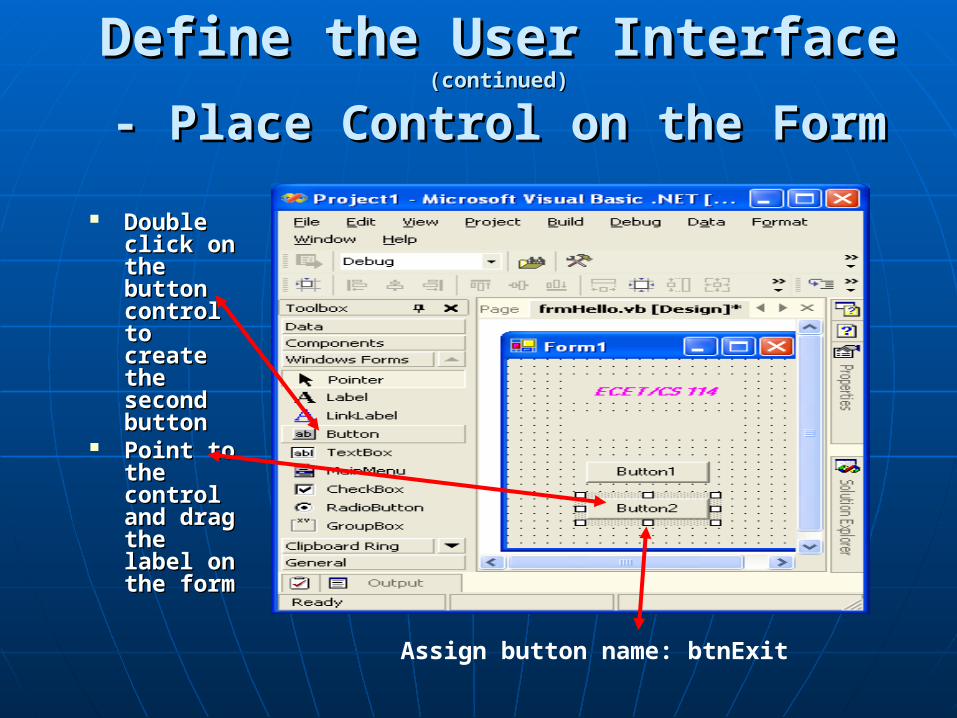
Define the User Interface Define the User Interface (continued)(continued)
- Place Control on the Form- Place Control on the Form
Double Double click on click on the the button button control to control to create create the the second second buttonbutton
Point to Point to the the control control and drag and drag the label the label on the on the formform
Assign button name: btnExit
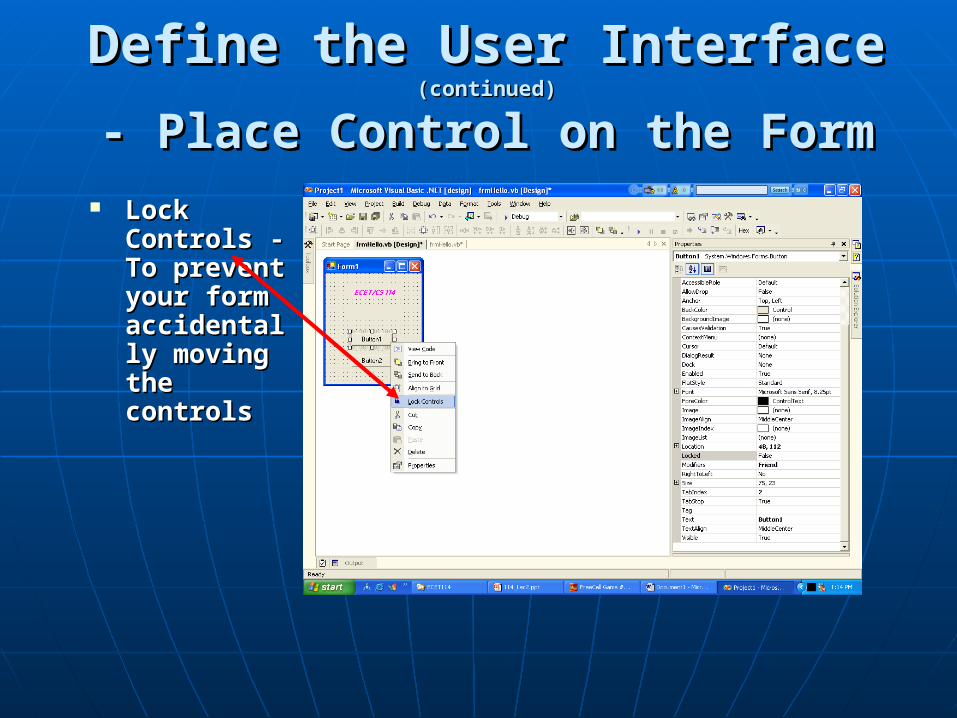
Define the User InterfaceDefine the User Interface (continued)(continued)
- Place Control on the Form- Place Control on the Form
Lock Lock Controls -To Controls -To prevent prevent your form your form accidentally accidentally moving the moving the controlscontrols
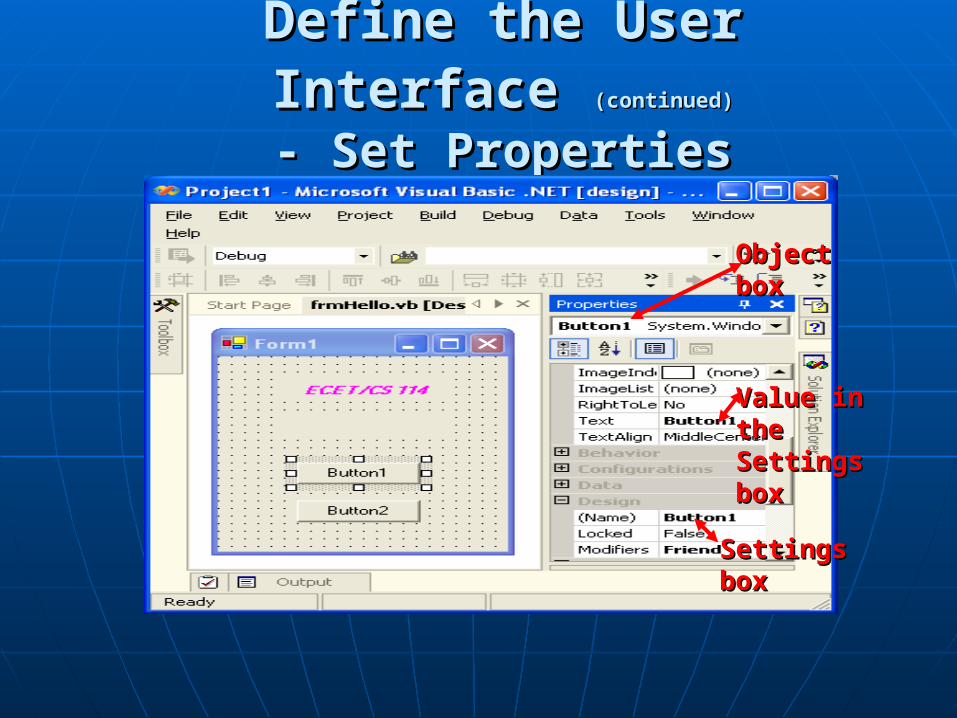
Define the User InterfaceDefine the User Interface (continued)(continued)
- Set Properties- Set Properties
Object boxObject box
Settings boxSettings box
Value in the Value in the Settings boxSettings box

Define the User InterfaceDefine the User Interface (continued)(continued)
- Set Properties for Buttons- Set Properties for Buttons

Define the User InterfaceDefine the User Interface (continued)(continued)
- Set Properties for From1- Set Properties for From1
DoubleDoubleclick on click on Form1Form1 Click Click AnywhereAnywhereon the on the Form toForm toChangeChange PropertiesPropertiesof the Formof the Form

Define the User InterfaceDefine the User Interface (continued)(continued)
- Set Properties- Set Properties Change Change
the Text the Text property property to “Hello to “Hello World by World by Melissa”Melissa”
Hello Hello World by World by Melissa Melissa is is displayed displayed at the at the title of title of the Formthe Form
Change Change the Name the Name property property to to frmHellofrmHello
Define the User InterfaceDefine the User Interface (continued)(continued)
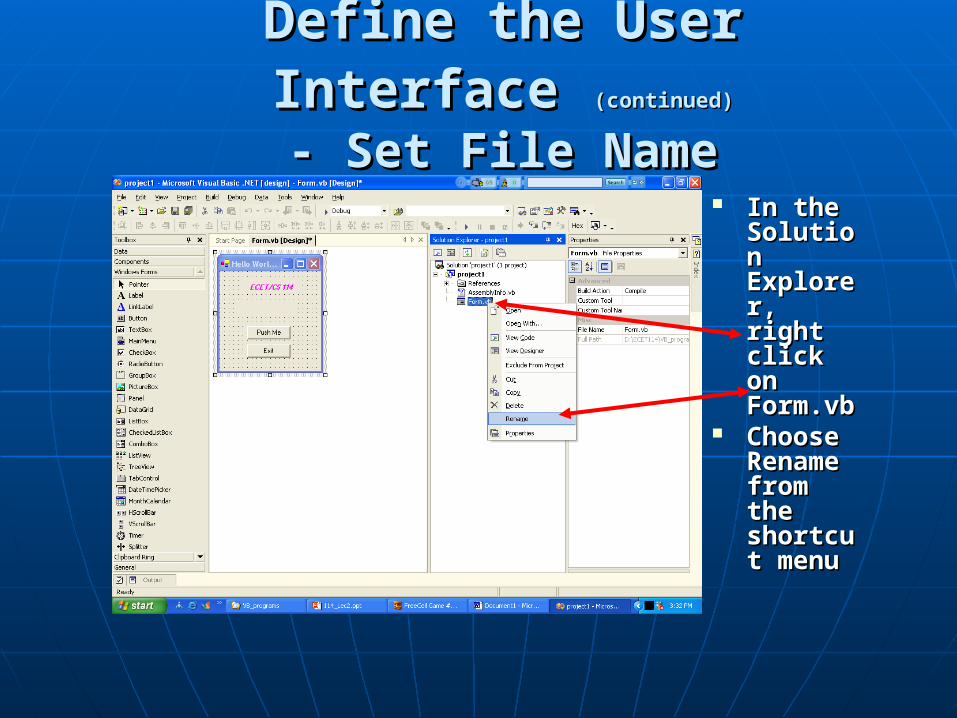
- Set File Name- Set File Name
In the In the Solution Solution Explorer, Explorer, right right click on click on Form.vbForm.vb
Choose Choose Rename Rename from the from the shortcut shortcut menumenu

Define the User InterfaceDefine the User Interface (continued)(continued)
- File Name- File Name
Change the file name fromChange the file name fromForm1.vb to frmHello.vbForm1.vb to frmHello.vb
Define the User InterfaceDefine the User Interface (continued)(continued)
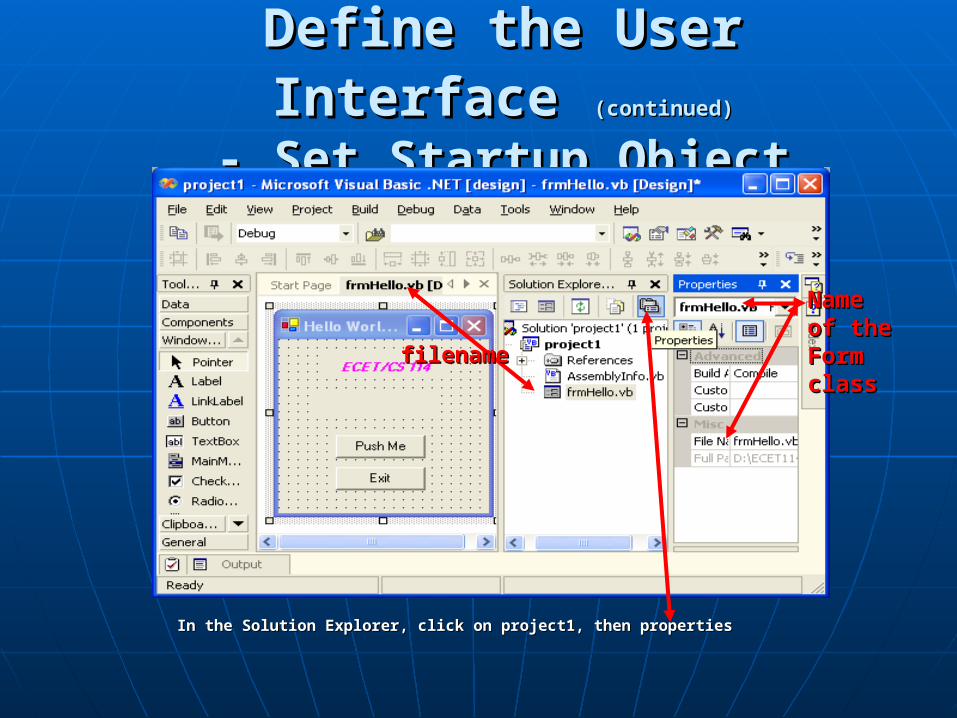
- Set Startup Object- Set Startup Object
In the Solution Explorer, click on project1, then properties In the Solution Explorer, click on project1, then properties
filenamefilename
Name Name of theof theFormFormclassclass

Define the User InterfaceDefine the User Interface (continued)(continued)
- Set Startup Object- Set Startup Object
In the In the Project Project Property Property dialog dialog box, drop box, drop down the down the list for list for Startup Startup Object Object and and select select frmHellofrmHello
Click Click Apply Apply then click then click OKOK

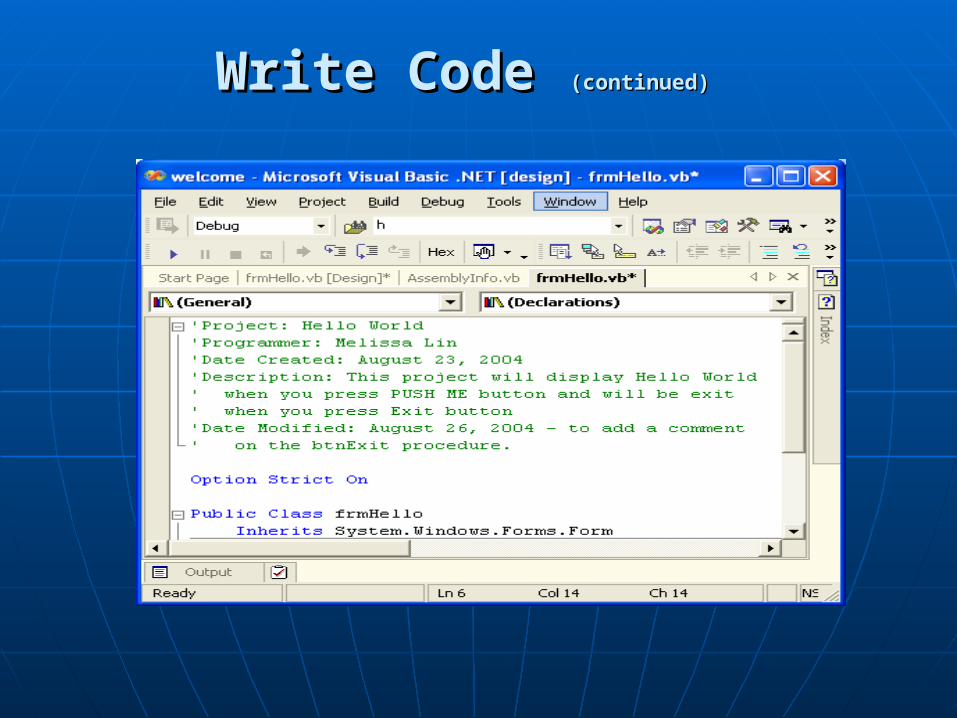
Comments and the Comments and the Assignment StatementAssignment Statement
CommentComment• used to document codeused to document code• Syntax exampleSyntax example
' this is a comment' this is a comment AssignmentAssignment
• used to assign a value to a property (or a variable)used to assign a value to a property (or a variable)• SyntaxSyntax
variable = valuevariable = value• ExamplesExamples
Pi = 3.14Pi = 3.14 lblMessage.ForeColor = Color.RedlblMessage.ForeColor = Color.Red lblMessage.BackColor = Color.YellowlblMessage.BackColor = Color.Yellow lblMessage.Text = "WebCT is a pretty good tool."lblMessage.Text = "WebCT is a pretty good tool."
Write CodeWrite Code
Develop a Visual Basic code in ProceduresDevelop a Visual Basic code in Procedures A sub procedure begins with A sub procedure begins with Private SubPrivate Sub
and ends with and ends with End SubEnd Sub The Remark statementThe Remark statement
• CommentsComments The Assignment StatementThe Assignment Statement
• Assigns a value to a property or variableAssigns a value to a property or variable• Ex: btnHello.Hide()Ex: btnHello.Hide()
lblMessage.Show()lblMessage.Show() Me.Close()Me.Close()

Write Code Write Code (continue)(continue)
A Space then an Underline enables you to press the enter key and continue a line of code on a new line.
Each method is defined as Each method is defined as a VB procedurea VB procedure
For methods which For methods which correspond to events, VB correspond to events, VB automatically names the automatically names the procedureprocedure
Private Sub btnPush_Click(ByVal sender As System.Object, _ ByVal e As System.EventArgs) Handles btnPush.ClickEnd Sub
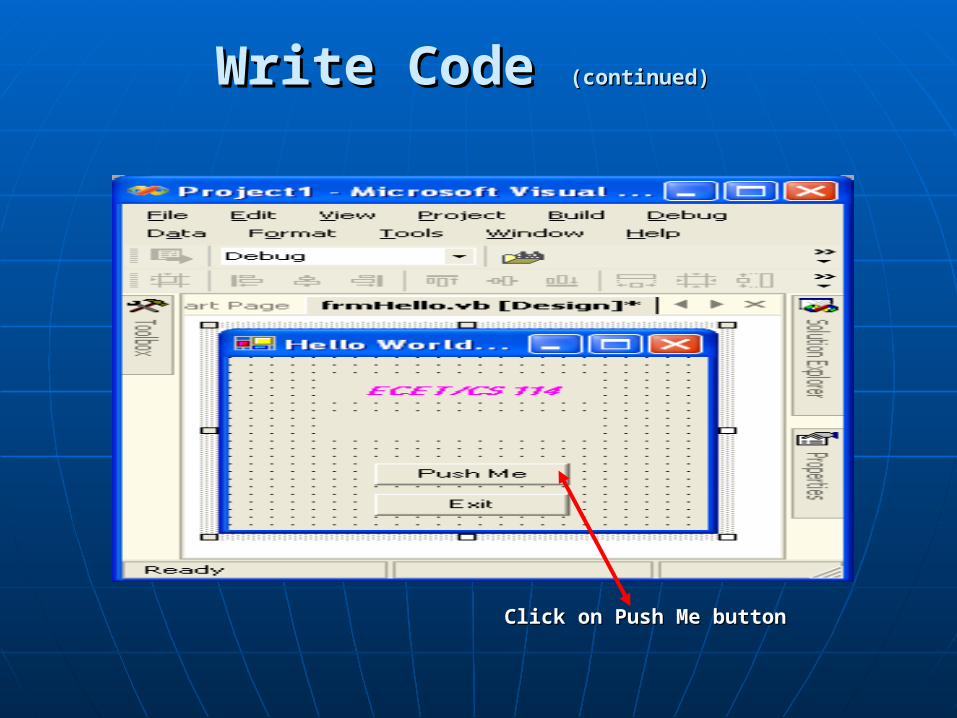
Write CodeWrite Code (continued)(continued)
Click on Push Me buttonClick on Push Me button
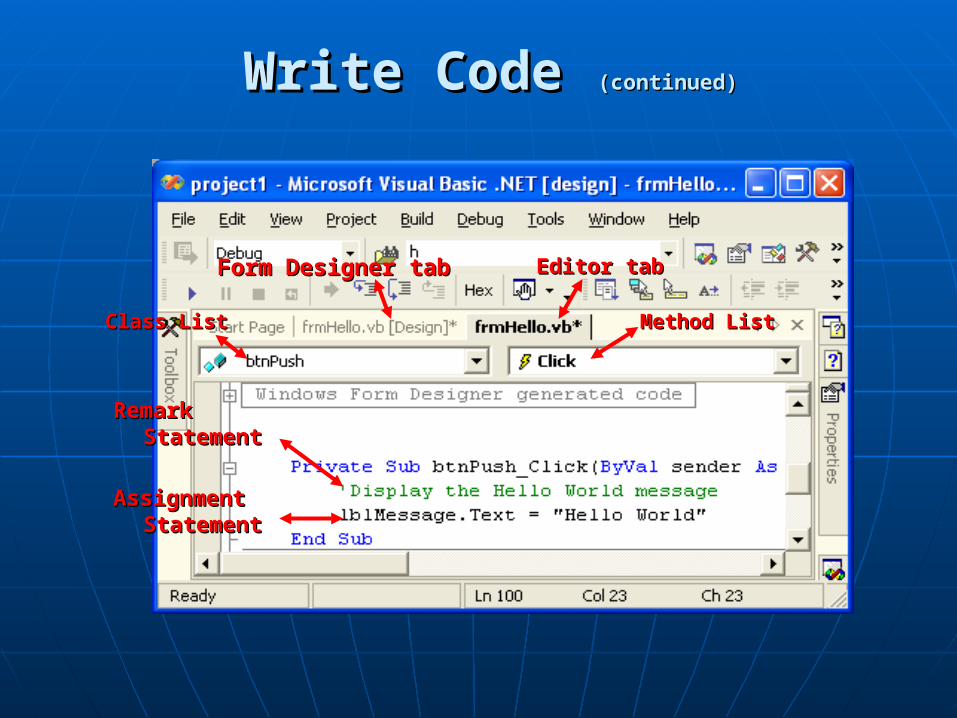
Write CodeWrite Code (continued)(continued)
Method ListMethod List
Assignment Assignment StatementStatement
Remark Remark StatementStatement
Editor tabEditor tabForm Designer tabForm Designer tab
Class ListClass List

Write CodeWrite Code (continued)(continued)
Click on Exit buttonClick on Exit button
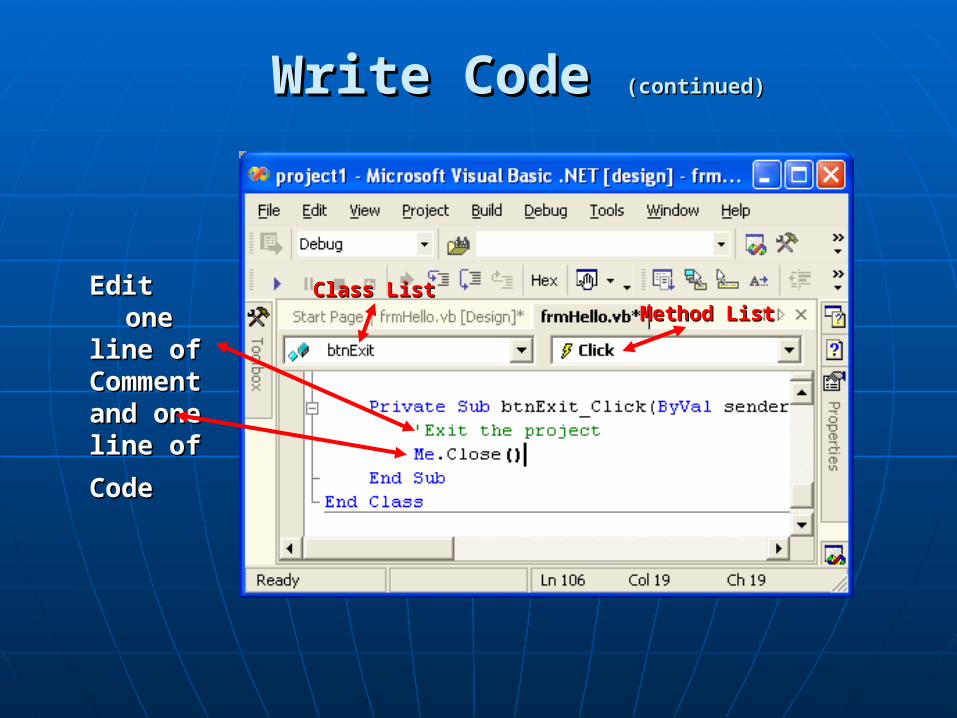
Write CodeWrite Code (continued)(continued)
Edit one Edit one line ofline ofCommentCommentand oneand oneline of line of
CodeCode
Class ListClass ListMethod ListMethod List
Write CodeWrite Code (continued)(continued)

Save the ProjectSave the Project
• Open the Open the File menuFile menu
• Choose Choose Save AllSave All
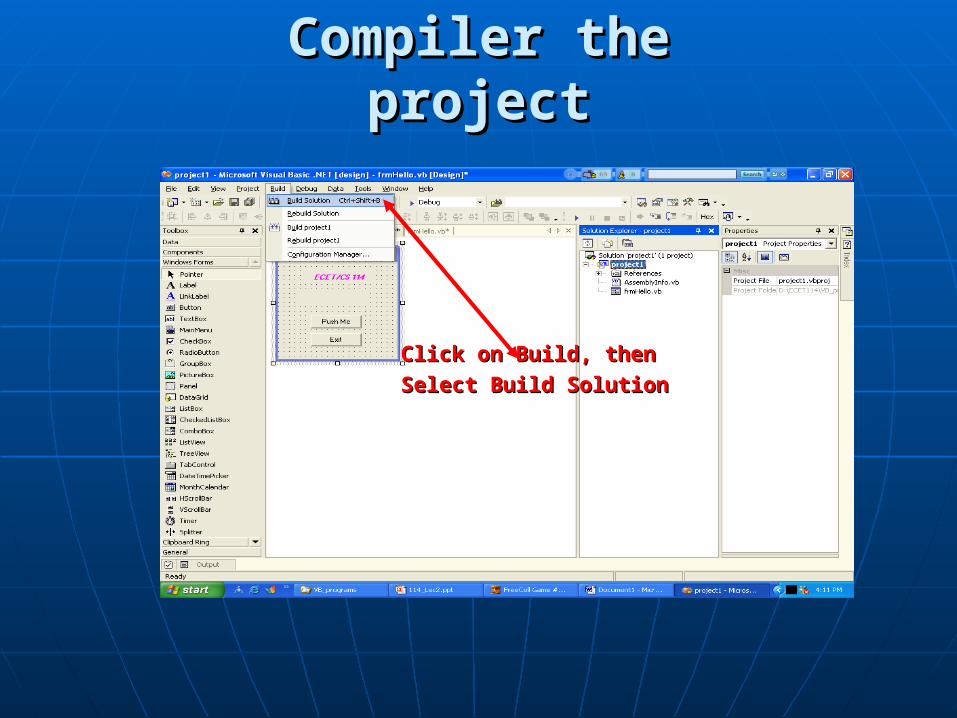
Compiler the projectCompiler the project
Click on Build, then Click on Build, then
Select Build SolutionSelect Build Solution
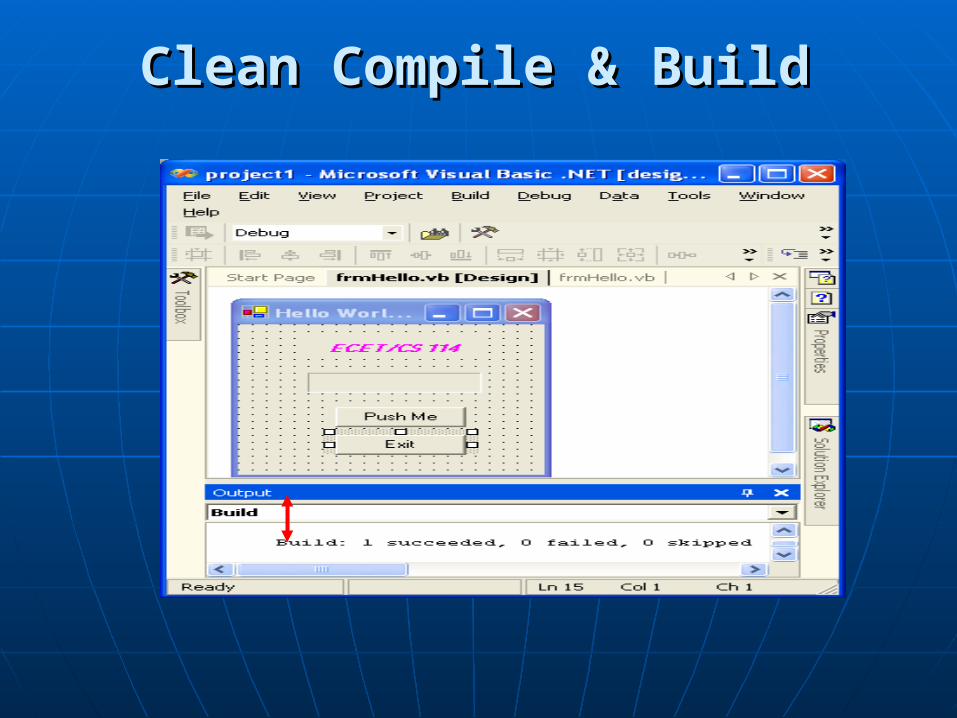
Clean Compile & BuildClean Compile & Build
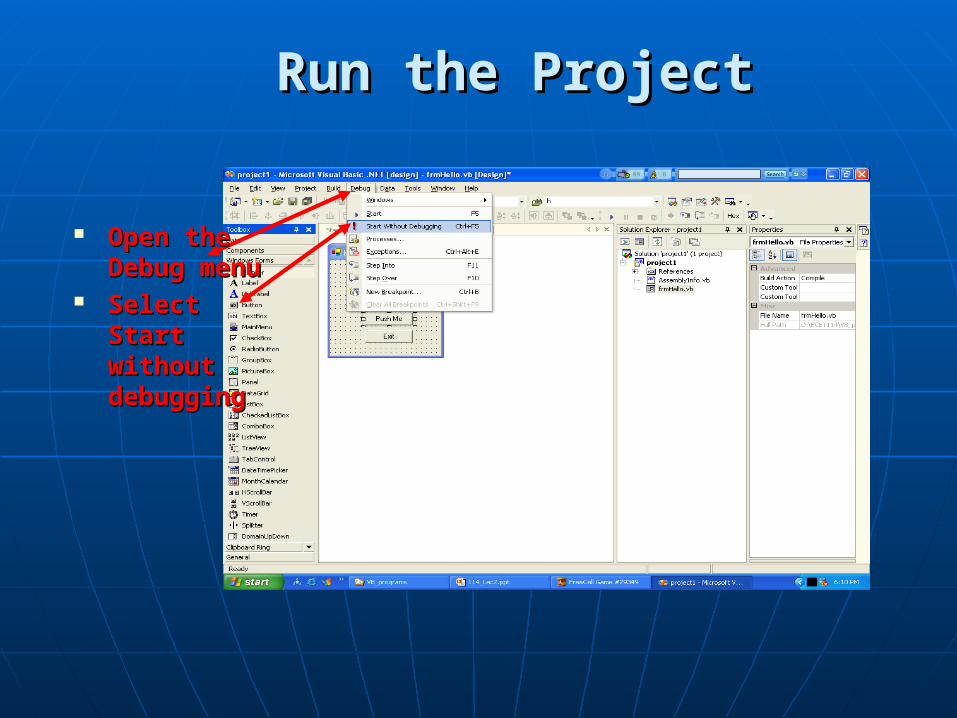
Run the ProjectRun the Project
Open the Open the Debug Debug menumenu
Select Start Select Start without without debuggingdebugging

Result of the ProjectResult of the Project
• When Click on When Click on Push Me Push Me button – button – display Hello display Hello WorldWorld
• When Click on When Click on Exit button – Exit button – Close the Close the windowwindow
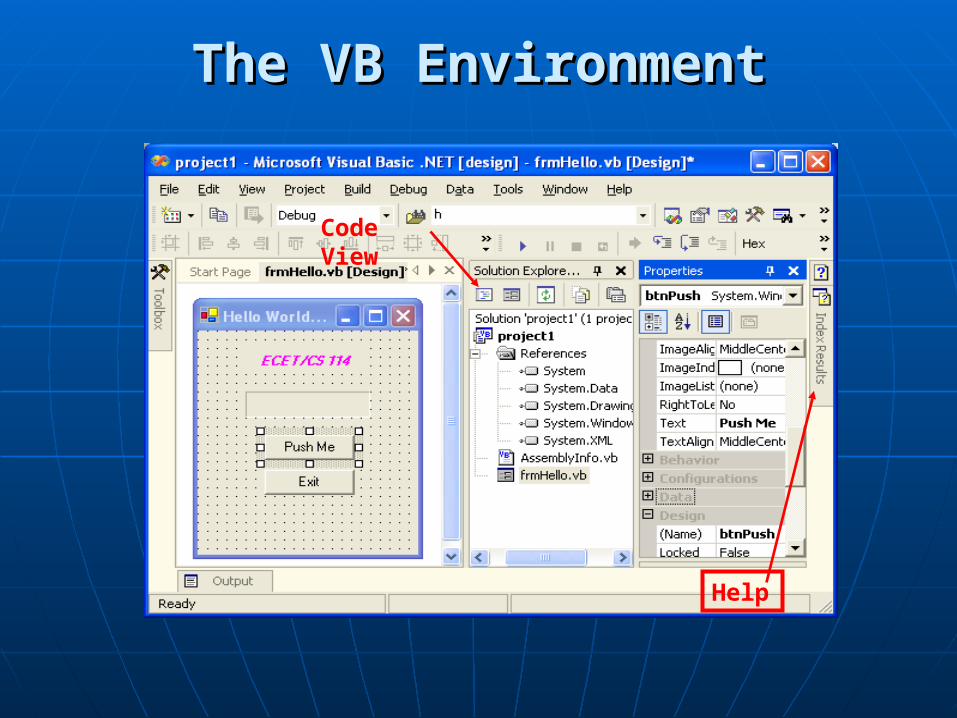
Code View
Help
The VB EnvironmentThe VB Environment
SummarySummary
Program Planning and GUIProgram Planning and GUI Visual Basic ProgrammingVisual Basic Programming
• Use ToolboxUse Toolbox
• Edit propertiesEdit properties
• Write codeWrite code
• Run the project Run the project


![Programación en Visual Basic.NET []](https://img.pdfslide.us/doc/110x75/577d2ab81a28ab4e1ea9e775/programacion-en-visual-basicnet-wwwe-book-tutorialesblogspotcom.jpg)