Embed Size (px)
Citation preview
• Step by Step constructioninstruction.
• A complete bill of materials.
• Exploded view and elevationdrawings.
• How-to photos with instructivecaptions.
• Tips to help you complete theproject and become a betterwoodworker.
To download these plans,you will need Adobe Reader
installed on your computer. If you want to geta free copy, you can get it at: Adobe Reader.
Having trouble downloading the plans?• If you're using Microsoft Internet
Explorer, right click on the download linkand select "Save Target As" to downloadto your local drive.
• If you're using Netscape, right click onthe download link and select "Save LinkAs" to download to your local drive.
WJ096
“America’s leading woodworking authority”™
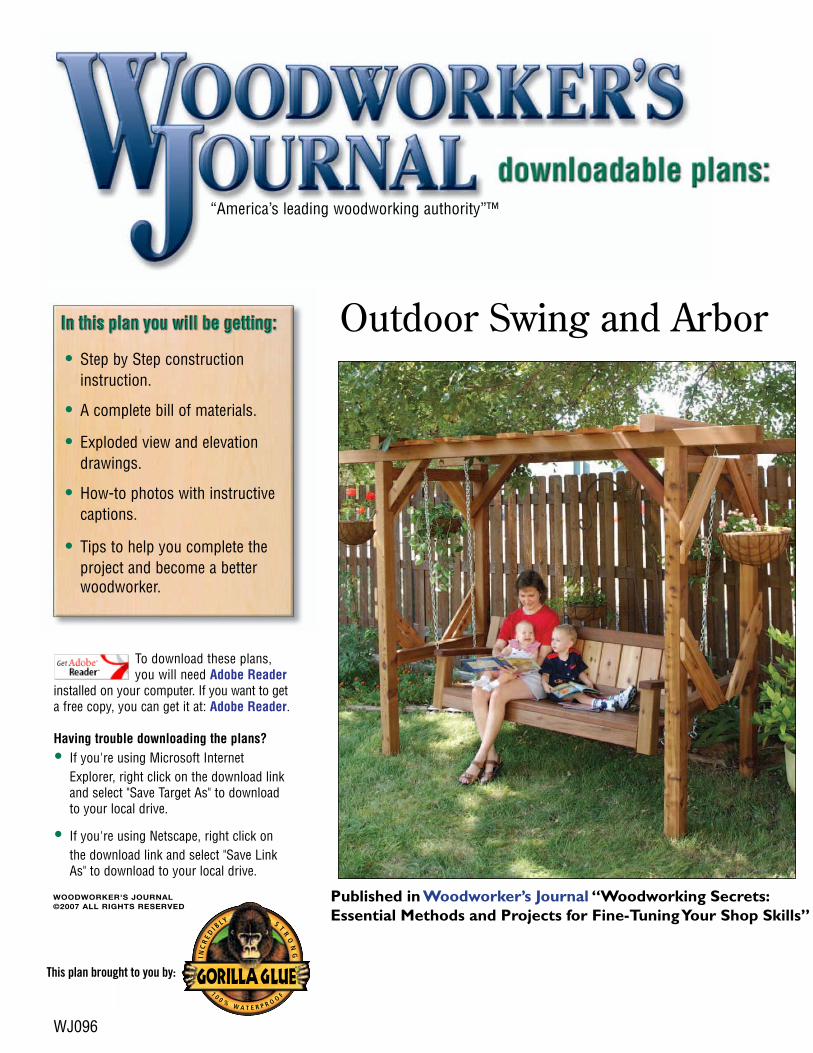
Outdoor Swing and Arbor
Published in Woodworker’s Journal “Woodworking Secrets:Essential Methods and Projects for Fine-Tuning Your Shop Skills”
WOODWORKER'S JOURNAL ©2007 ALL RIGHTS RESERVED
This plan brought to you by:
Published in Woodworker’s Journal “Woodworking Secrets: Essential Methods and Projects for Fine-Tuning Your Shop Skills”
66 HOME PROJECTS WOODWORKER'S JOURNAL ©2007 ALL RIGHTS RESERVED
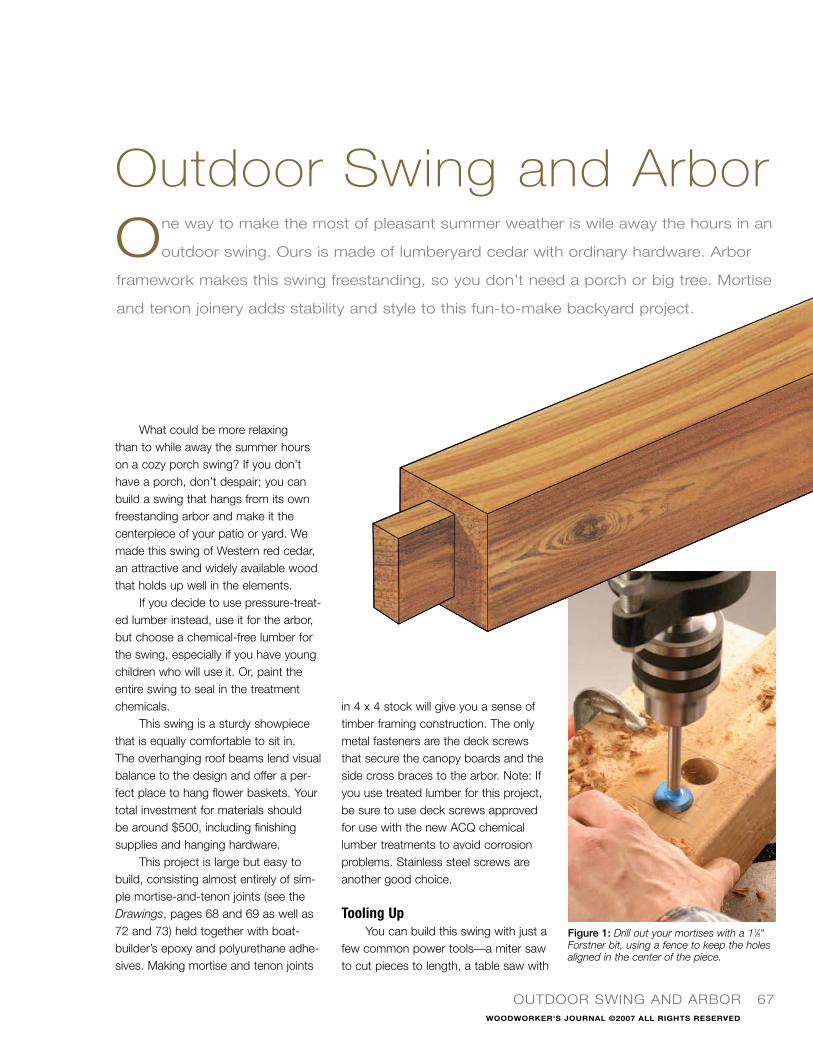
Figure 1: Drill out your mortises with a 11⁄8"Forstner bit, using a fence to keep the holesaligned in the center of the piece.
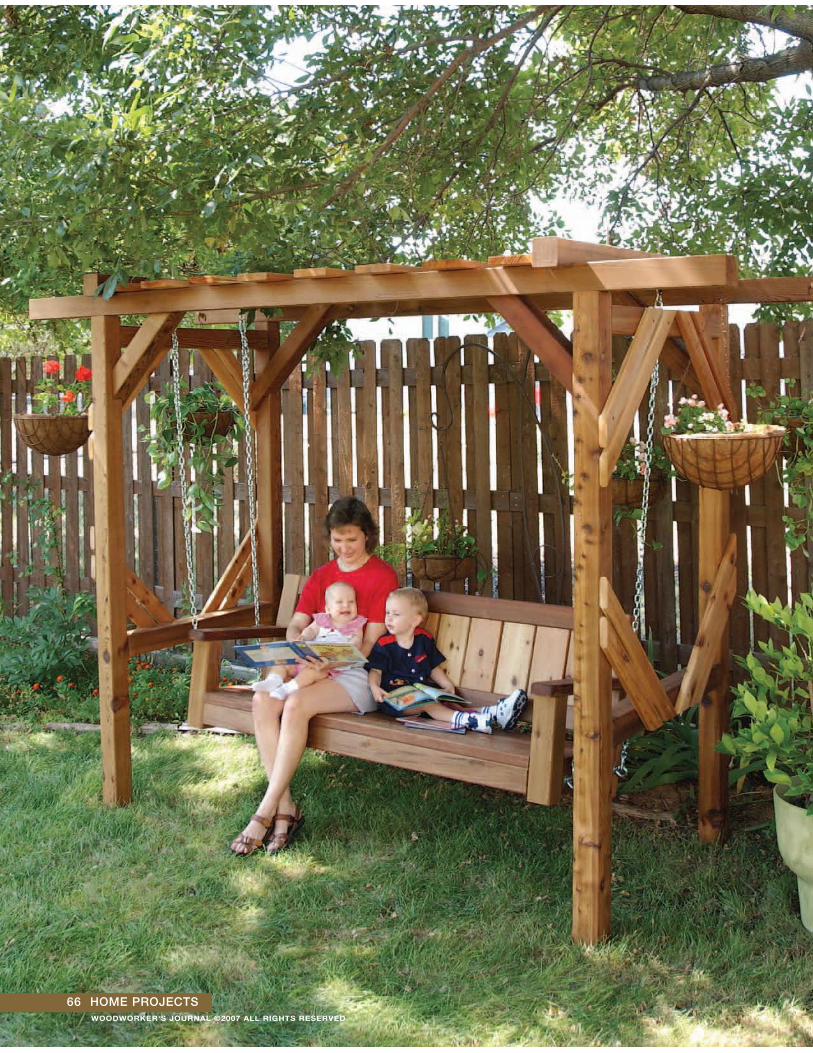
What could be more relaxing than to while away the summer hourson a cozy porch swing? If you don’thave a porch, don’t despair; you canbuild a swing that hangs from its ownfreestanding arbor and make it the centerpiece of your patio or yard. Wemade this swing of Western red cedar,an attractive and widely available woodthat holds up well in the elements.
If you decide to use pressure-treat-ed lumber instead, use it for the arbor,but choose a chemical-free lumber forthe swing, especially if you have youngchildren who will use it. Or, paint theentire swing to seal in the treatmentchemicals.
This swing is a sturdy showpiecethat is equally comfortable to sit in. The overhanging roof beams lend visualbalance to the design and offer a per-fect place to hang flower baskets. Yourtotal investment for materials should be around $500, including finishing supplies and hanging hardware.
This project is large but easy tobuild, consisting almost entirely of sim-ple mortise-and-tenon joints (see theDrawings, pages 68 and 69 as well as72 and 73) held together with boat-builder’s epoxy and polyurethane adhe-sives. Making mortise and tenon joints
OUTDOOR SWING AND ARBOR 67
Outdoor Swing and ArborOne way to make the most of pleasant summer weather is wile away the hours in an
outdoor swing. Ours is made of lumberyard cedar with ordinary hardware. Arbor
framework makes this swing freestanding, so you don’t need a porch or big tree. Mortise
and tenon joinery adds stability and style to this fun-to-make backyard project.
in 4 x 4 stock will give you a sense oftimber framing construction. The onlymetal fasteners are the deck screwsthat secure the canopy boards and theside cross braces to the arbor. Note: Ifyou use treated lumber for this project,be sure to use deck screws approvedfor use with the new ACQ chemicallumber treatments to avoid corrosionproblems. Stainless steel screws areanother good choice.
Tooling UpYou can build this swing with just a
few common power tools—a miter sawto cut pieces to length, a table saw with
WOODWORKER'S JOURNAL ©2007 ALL RIGHTS RESERVED
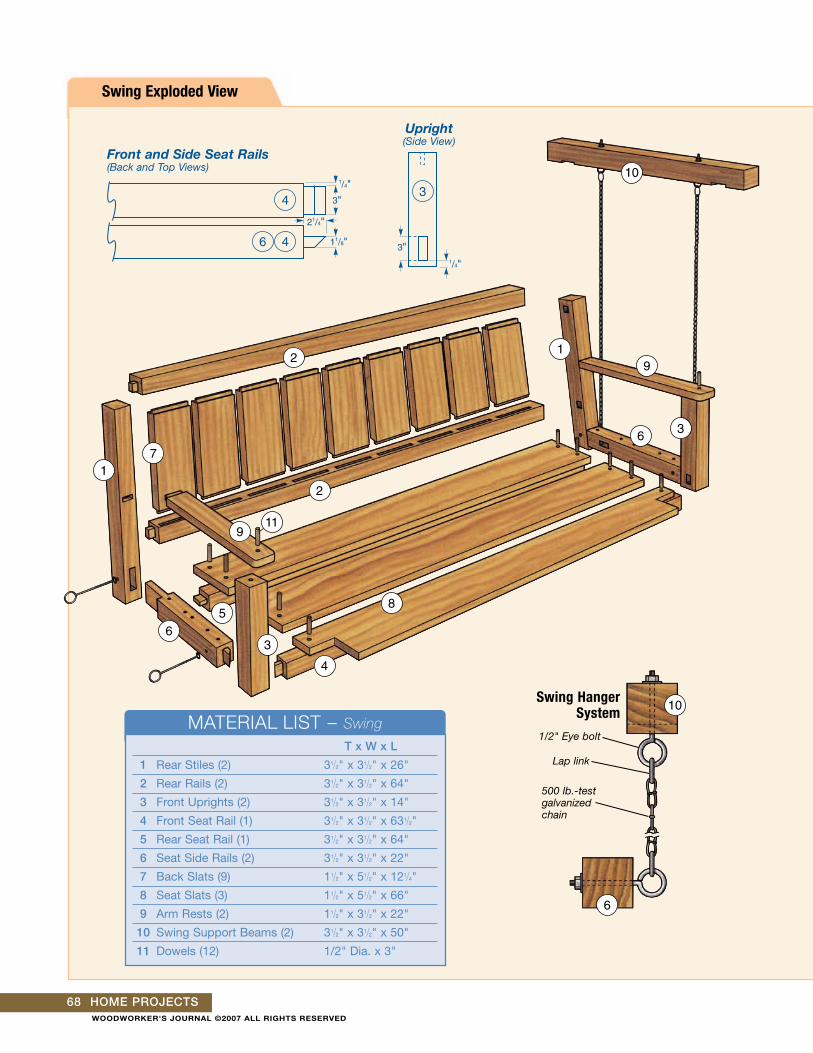
Swing Exploded View
4
46
3/4" 3/4"
115/16"
1/4"
21/4"
11/8"
3"
Swing HangerSystem
Front and Side Seat Rails (Back and Top Views)
500 lb.-testgalvanizedchain
Lap link
1/2" Eye bolt
4
3
46
1/4"
21/4"
11/8"
3"
1/4"
3"
Upright(Side View)
10
6
1
1
10
2
2
3
3
4
56
67
8
9
9
11
68 HOME PROJECTS
MATERIAL LIST – Swing
T x W x L
1 Rear Stiles (2) 31⁄2" x 31⁄2" x 26"
2 Rear Rails (2) 31⁄2" x 31⁄2" x 64"
3 Front Uprights (2) 31⁄2" x 31⁄2" x 14"
4 Front Seat Rail (1) 31⁄2" x 31⁄2" x 631⁄2"
5 Rear Seat Rail (1) 31⁄2" x 31⁄2" x 64"
6 Seat Side Rails (2) 31⁄2" x 31⁄2" x 22"
7 Back Slats (9) 11⁄2" x 51⁄2" x 121⁄4"
8 Seat Slats (3) 11⁄2" x 51⁄2" x 66"
9 Arm Rests (2) 11⁄2" x 31⁄2" x 22"
10 Swing Support Beams (2) 31⁄2" x 31⁄2" x 50"
11 Dowels (12) 1/2" Dia. x 3"
WOODWORKER'S JOURNAL ©2007 ALL RIGHTS RESERVED

1
2
2
2
4
5
6
775/8"
1/2"
33/4"
41/2"
11/8"
201/2"
143/4"15/16" 1"
91/4"
15/16"
1
2
2
2
4
5
6
775/8"
1/2"
33/4"
41/2"
11/8"
201/2"
143/4"15/16" 1"
91/4"
15/16"
1
3
6
9
3/4"
213/8"
11/2"
1/4"
13/4"
11"
151/4"
10
91/2"
93/4"
31/2"
11/2"
1/4"
1/4"
21/2"
3"
11/8"
5
5
1/4"
21/2"
11/8"
2
2
13/4"
Swing Back Subassembly (Front View)
Rear Rails(Front and Top Views)
Swing Elevation(Side View)
1
10
2
3
4
5
6
7
8
9
11
12
13
14
15
3/4"3/8"
5/8"
51/2"
Back Slat(Front andSide Views)
Rear Rail(Section View)
Rear Seat Elevation(Top and Front Views)
Note that thetenon shoulderson the arm restsand seat siderails are angledat 10˚.
Swing Support Beam(Side View)
Swing Seat Subassembly (Top View)
103/4"
31/2"4"
Arm Rest(Top and Side Views)
4
46
1/4"
21/4"
11/8"
3"
9
1/4"
1/4"
5/8"
3"
OUTDOOR SWING AND ARBOR 69WOODWORKER'S JOURNAL ©2007 ALL RIGHTS RESERVED

70 HOME PROJECTS
Water-resistant (epoxy and polyurethane)adhesives are excellent choices for buildingthis project. To secure the seat slats, weused 1/2"-diameter hardwood dowels andadhesive to peg the boards in place.
a dado head to cut the tenons and aForstner bit in a drill press to rough outthe mortises. You’ll also need a sharpchisel to square the mortises, and arouter will help you form the mortises inthe seat rails for the back slats.
It’s important to remember that thisis a rustic outdoor project, not a fancypiece of furniture. We designed it to usestandard construction lumber sizeswithout significant modification. Whenyou lay out your parts, select pieceswith as few knots and other defects aspossible for the back and bottom railsof the swing itself. These are the mostcritical weight-bearing parts.
The Material List on page 68includes an allowance for the tenons inthe total length of the pieces. Afteryou’ve cut the lumber to length (pieces1 through 10), you’re almost ready tocut the tenons. But first, to make sureyou end up with just the right tenonthicknesses, you’ll need to make up atest mortise, so you can check andadjust the fit of the first tenon. In fact,it’s best to make a test mortise for eachsize mortise and tenon in the project.(There will be five, counting those thataccept the back slats.)
Most of the mortises in this projectare large and deep (see Figure 1, page67), so routers and hollow-chisel mor-tisers aren’t effective options. Instead,here’s a time-honored, two-stepmethod: First, drill out most of thewaste with a 11⁄8" Forstner bit in a drillpress, using a fence to center the mor-tise on the stock and keep the holes inperfect alignment; then square up thecorners with a sharp chisel and mallet.The sides of the holes act as a visualgauge for chiseling the mortise wallsand ends (see Figure 2, next page.)
The mortises that enter the frontface of the rear stiles (pieces 1) areangled at 10˚. For that reason the
shoulders of the complimentary tenonsneed to be angled to match. Refer tothe Elevation Drawings for constructiondetails. To drill the angled through mor-tises in the backrest uprights, tilt yourdrill press table to 10˚. If your tabledoesn’t tilt, you can build a wedge-shaped auxiliary table instead.
With your test mortises in hand,step to the table saw and dial in thethickness of your tenons by fine-tuningthe height of your dado head. Cuttingfrom both sides of the stock assuresthat your tenons will be perfectly cen-tered and exactly the right thickness.One caution: If there’s any variation inthe thickness of your 4 x 4s, it’s a goodidea to plane them to uniform thicknessbefore tenoning, or your tenon thick-nesses will also vary.
When you’ve got the first tenonright, cut all of them (of each size),using your miter gauge (see Figure 3)to keep the shoulders square. For theangled shoulders (where the swing seatmeets the back) set the gauge to 10˚.
After you’ve cut the tenons tothickness, use the same dado method
to cut them to height (see Drawings).Also, note that the tenons that meet inthe uprights at the front corners of theswing seat must be mitered.
The final step before assembly is to mortise the back rails and cut thefull-width tenons on the back slats tomatch. Use a 3/4" router bit to rout the5/8"-deep mortises, then chisel theends square. Position the mortises sothe faces of the slats will be set backabout 1/8" from the faces of the rails,just behind the edge roundover.
Assembling the Swing At this point, you’re ready to glue
everything up. Use polyurethane adhe-sive for the arbor and dowels andepoxy for the swing joints.
Start by assembling the swingback. Insert the slats (don’t use gluehere) between the two back rails andthen glue on the uprights at either end, checking for square. Glue up theseat assembly separately (pieces 3, 4, 5 and 6) and follow up by gluing this subassembly to the back. Add the arm rests and peg them to the topsof the uprights. We used 1/2"-diametermahogany dowels (pieces 11) for a nicecolor contrast to the cedar as well asfor strength and weather resistance.
The seat slats aren’t glued down.Just position them and dowel them intoplace. (Notch the front slat to fit.)
One nice thing about this design is that the swing can be mounted (with caution to be sure it is strongenough…be sure to hit a joist) to theceiling of a porch; no arbor needed. Butif you want to put the swing out in youryard, the arbor is the next task at hand.
Cut your lumber (pieces 12 through18) to length using a miter saw asbefore. Use the same drilling and chop-ping technique to create mortises in themajor structural members (pieces 12
WOODWORKER'S JOURNAL ©2007 ALL RIGHTS RESERVED

OUTDOOR SWING AND ARBOR 71
Figure 2: Square up the mortises with a sharp chisel and mallet. Thesides of the drilled holes serve as a visual guide.
Figure 3: Cut the tenons to thickness with a stacked dado head,machining from both sides of the workpiece to keep the tenon centered. Be sure to start with consistently sized stock.
and 13). Form the corresponding tenons to fit and you’reready to start assembly. Glue and clamp each end of thearbor using polyurethane glue. Cedar is soft, so use clampingcauls to avoid marring your wood. Make sure the ends aresquare. After the glue has cured, lay the long top rails (pieces13) on a level surface and glue and insert the side subassem-blies into their mortises. Use temporary supports clamped tothe rails and subassemblies to ensure that they are square asthe glue dries. Now use your dado head and miter gauge tonotch out the angled lap joints on the front and rear crossbraces (pieces 15). With the whole unit still upside down,attach the braces with dowels and polyurethane glue. Allow
the glue to cure. Now get a buddy to help you turn the wholeshebang right-side-up.
The side cross braces (pieces 16 and 17) are attachednext. Mark a center line on the outside face of the side rails(see Elevation Drawings). This will help you fit the long crossbraces accurately. Pre-drill the ends of the braces for thedeck screws, and counterbore the holes to accept themahogany plugs (piece 20). Secure them as shown in theDrawings. Stainless steel deck screws to secure these…thestainless steel screws will not discolor the cedar as it weath-ers. The last construction step is to attach the canopy boardsto the top rails (pieces 18).
QuickTip
Preventing Tablesaw KickbackTablesaw kickback is caused by one or both of the following: an underpowered saw and incorrect bladeheight. If your saw is heavy and powerful enough, it will keep cutting through a twist, bind or improperlyfed piece of stock. If your blade is set too low, the teeth are meeting the wood horizontally instead of vertically. In the latter case, they would force the wood down on the table, but in the former they arepushing the stock right at you. Be sure to check the alignment of your rip fence as well—it should alwaysbe kept parallel to the blade to prevent binding.
WOODWORKER'S JOURNAL ©2007 ALL RIGHTS RESERVED
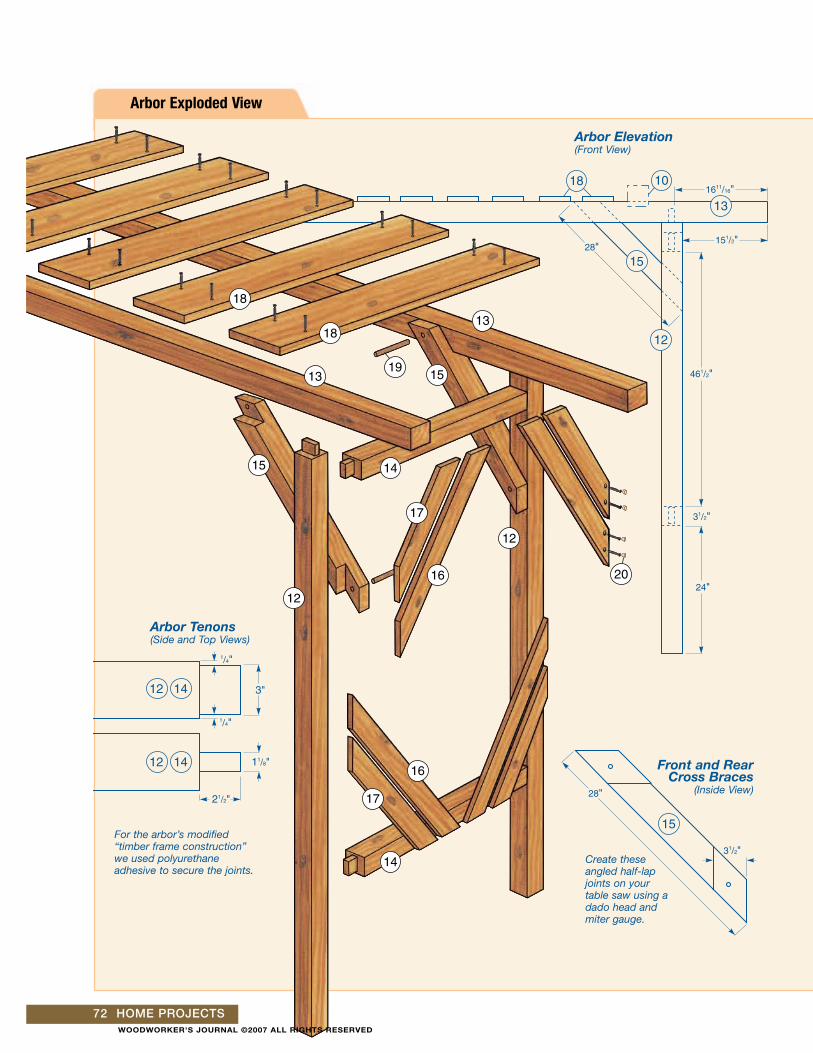
Arbor Exploded View
72 HOME PROJECTS
12
12
13
18 10
18
14
1617
14
15
15
3/4"
28"
24"
3/4"
151/2"
461/2"
31/2"
31/2"
1611/16"
28"
CL
293/4"
35"
1"
Arbor Elevation(Front View)
12
12
13
18 10
18
14
1617
14
15
15
3/4"
28"
24"
3/4"
151/2"
461/2"
31/2"
31/2"
1611/16"
28"
CL
293/4"
35"
1"
Create theseangled half-lapjoints on yourtable saw using adado head andmiter gauge.
For the arbor’s modified “timber frame construction”we used polyurethane adhesive to secure the joints.
Front and RearCross Braces
(Inside View)
1/4"
1/4"
21/2"
3"
11/8"
1412
1412
Arbor Tenons(Side and Top Views)
12
12
13
13
14
14
15
15
16
16
17
17
18
18
19
20
WOODWORKER'S JOURNAL ©2007 ALL RIGHTS RESERVED

OUTDOOR SWING AND ARBOR 73
12
12
13
18 10
18
14
1617
14
15
15
3/4"
28"
24"
3/4"
151/2"
461/2"
31/2"
31/2"
1611/16"
28"
CL
293/4"
35"
1"
Mark a line bisecting the center of theside rails (pieces 14). Locate the miteredends of the long side cross braces tojust touch the center line. The shortcross braces are held 1" away from thelong braces.
Arbor Elevation(End View)
Use stainless steelscrews to avoiddiscoloration ofthe cedar.
MATERIAL LIST – Arbor
T x W x L
12 Posts (4) 31⁄2" x 31⁄2" x 811⁄2"
13 Top Rails (2) 31⁄2" x 31⁄2" x 120"
14 Side Rails (4) 31⁄2" x 31⁄2" x 40"
15 Cross Braces (4) 31⁄2" x 31⁄2" x 28"
16 Long Side Cross Braces (8) 7/8" x 21⁄2" x 293⁄4"
17 Short Side Cross Braces (8) 7/8" x 21⁄2" x 223⁄4"
18 Canopy Boards (8) 7/8" x 51⁄2" x 46"
19 Dowels (8) 3/8" Dia. x 3"
20 Mahogany Plugs (32) 3/8" Dia.
The swing’s arbor not only provides a sturdy framework but alsoadds softscaping potential to your yard.
Hanging the SwingTechnically, this swing is more of a glider, because it is
suspended on four separate chains. (Our idea of a “swing”has just two main vertical chains, splitting to two points ofattachment on each end.)
We used inexpensive, 500 lb.-test galvanized chain, butyou could easily get away with 350 lb. test depending onyour requirements. Attach the chain to the swing and thesupport beams (pieces 10) above with 1/2" eye bolts and laplinks. See the Swing Hanger System drawing on page 68.
The support beams are notched to fit over the top rails,but they aren’t permanently attached. If you leave them mov-able, you can easily remove the swing from the arbor duringthe winter months without undoing the chains.
The final step is to sand and stain everything, then sitback and relax in your comfortable new swing and arbor. Weused Behr™ “White Cedar” deck sealer to bring out the wetlook of the wood with minimal tinting. Like any piece of out-door wooden furniture, this project will have to be cleanedeach year and have its sealer “freshened up” every few years.Or, you could leave the cedar unfinished so it weathers to asilvery gray color naturally.
WOODWORKER'S JOURNAL ©2007 ALL RIGHTS RESERVED