Embed Size (px)
Citation preview

Outdoor HD P2P Network Camera Pro.
(with H.264 image compression)
Model: S631N
Instruction Manual

2
CONTENTS
1. INTRODUCTION...........................................................................................................................................................4
1.1 Features.............................................................................................................................................................5
1.2 Packing List.......................................................................................................................................................5
1.3 Product Views...................................................................................................................................................5
1.4 PC System Requirements.............................................................................................................................. 7
1.5 Hardware Installation.......................................................................................................................................7
2. INSTALLATION AND SETTINGS............................................................................................................................... 9
2.1 Network Connection........................................................................................................................................... 9
2.2 Browser Settings (For IE only)........................................................................................................................10
2.3 UPnP Service.....................................................................................................................................................11
2.4 IPCam IP Address Search Tool (for IE browser only)................................................................................. 12
2.5 Install the OCX ActiveX (For IE only).............................................................................................................13
3. SOFTWARE OPERATION........................................................................................................................................ 15
3.3 Functions ..........................................................................................................................................................17
3.4 For Live Video (for IE browser).......................................................................................................................18
4. SETTINGS................................................................................................................................................................... 25
4.1 Status----Device Info........................................................................................................................................ 25
4.2 Setup...................................................................................................................................................................25
4.2.2 Multi-Device Settings.................................................................................................................................... 26
4.2.3 Date & Time....................................................................................................................................................27
4.2.4 Audio Settings................................................................................................................................................ 27
4.3 Network Settings...............................................................................................................................................28
4.3.1 IP......................................................................................................................................................................28
4.3.2 Upnp Settings.................................................................................................................................................28
4.3.3 DDNS Settings...............................................................................................................................................29
4.3.4 P2P Settings...................................................................................................................................................29
4.3.5 FTP Settings...................................................................................................................................................29
4.3.6 E-mail(SMTP) Settings.................................................................................................................................30
4.4 Video Info...........................................................................................................................................................31
4.5 Alarm Settings................................................................................................................................................... 32
4.5.1 Motion Detection............................................................................................................................................32
4.5.2 Alarm Settings................................................................................................................................................33
4.6 Record................................................................................................................................................................ 34
4.6.2 SD Card info...................................................................................................................................................35
4.7 System................................................................................................................................................................35

3
4.7.1 Log...................................................................................................................................................................35
4.7.2 Auto Maintain..................................................................................................................................................36
4.7.3 System............................................................................................................................................................ 36
5. PLAYBACK for IE browser only................................................................................................................................38
6. FREQUENTLY ASKED QUESTIONS......................................................................................................................40
7. SPECIFICATIONS...................................................................................................................................................... 45
8. OBTAINING TECHNICAL SUPPORT......................................................................................................................46

4
1. INTRODUCTION
This user manual will show the details to set up your camera with your computer;if you are viewing with a Smartphone, pls check Quick Start Guide, as it is very easyto set up.
IMPORTANT NOTICE
The various screens throughout this owner’s manual will look different dependingon the browser you use. Full functionality is available when using Internet Explorer(IE) with ActiveX (OCX) installed. Limited functionality is available with otherbrowsers, such as Safari, Chrome, and Firefox.
Please Read this manual carefully, according to the browser you are using.
This is an integrated IP Camera. It combines a high quality digital Video Camera with networkconnectivity and a powerful web server to bring clear pictures to your Desktop from anywhereon your local network or over the Internet.
The main function of the camera is to transmit remote video over IP network. The high qualityvideo image can be transmitted with 30fps speed on the LAN/WAN by using H.264, MJPEGcompression technology.
It is based on the TCP/IP standard, build-in WEB server which supports Internet Explorer.Therefore the management and maintenance of your camera becomes simple by using thenetwork to achieve the remote configuration, start-up and to upgrade firmware.You can use your IP Camera to monitor your home or your office. Also, controlling andmanaging images are simple by visiting the web site.

5
1.1 Features
☆ Powerful high-speed video protocol processor☆ High-sensitivity 1/4’’ CMOS sensor☆ Picture total 1000K pixels (1megapixel)☆ Optimized H.264 MJPEG video compression for transmission☆ Multi-level user management and passwords definition☆ Embedded Web Server for users to visit by IE☆ Supports Dynamic IP (DDNS) and UPNP LAN and Internet (ADSL, Cable Modem)☆ Gives an alarm in case of motion detection☆ Supports image snapshot☆ Supports multiple protocols:TCP/IP HTTP DNS DHCP PPPoE SMTP FTP SSL TFTP NTP
ARP/RARP NFS RTSP RTP RTCP.☆ Supports WEP/WPA/WPA2 encryption☆ Supports IE, Firefox, Safari, and Google chrome browsers
1.2 Packing List
● IP Camera● User Manual & Quick Setup Guide● DC Power Supply● CD● Network Cable● Mounting
1.3 Product Views
1.3.1 Rear View

6
Figure 1.1
Light Sensitive Hole: For light sensitive photocell.Infrared LEDs: For night Vision.LENS: CMOS sensor with fixed focus lens. (3.6mm).Sliding Shell: For protection from sun and waterproofing.
Figure 1.2
Network Indicator LED: The green LED is on when connected to the network, the yellow LED

7
blinks when data is transferred.RJ45 Port: RJ-45/10-100 base T, connect the network cable here.Power Jack: DC 5V/2A power supply.RESET BUTTON: Press and hold the RESET BUTTON for 10 Seconds to reset the cameraback to the factory default settings. (Please keep the power on when doing a RESET)
1.4 PC System Requirements
System configuration requirements:CPU: 2.06 GHZ or above.Memory: 256M or above.Network Card: 10M or above.Display Card: 64M or above memory.Recommended Operating system: Windows XP, Windows Vista, Windows 7, Windows 8,Mac OS
1.5 Hardware Installation
Follow the steps below to set up your camera hardware.
1. Plug the power adaptor into the camera and into an AC outlet.2. Plug the network cable into the camera and router/switch.3. It takes approx 30 seconds to boot up the camera, then you will find the IP address from “IP
Camera Tool” (Figure 2.1.5).4. When the power is on and the network cable is connected, the green LED on the rear panel
will stay on.The yellow LED will keep flashing, and the Indicator LED on the front of the camera will flash.

8

9
2. INSTALLATION AND SETTINGSSystem Requirement:
Operating System: Windows 2000 / XP / Vista / 7/8/10/Mac OS
Network Protocol: TCP/IP
Network Structure: Applies to all network connections 10/100M LAN platform
Browser: Internet Explorer 6.0 or above. Firefox, Google, Safari, or Chrome.
2.1 Network ConnectionIntranet and Extranet Connection Reference:Extranet means public IP (i.e. The Internet), Intranet means private IP. If your IP belongs to the follow range,
then it’s a private IP :
Category A: 10.0.0.0 - 10.255.255.255
Category B: 172.16.0.0 - 172.31.255.255
Category C: 192.168.0.0 - 192.168.255.255
Intranet Connection: The IP camera and your computer (device) should be under the same network
environment, and both of the IPs should be under the same subnet, pictured as below:
Extranet Connection: there are 2 ways as below:
(1). IP camera connects to the Internet via a router, here camera’s IP is a private IP, client needs to connect
to the IP camera through a router, with port forwarding to be connected correctly, as below:
(2). IP camera connects to the Internet directly, if it’s a fixed IP provided by your ISP, just input it. If it’s a
floating IP, then input the account and password provided by your ISP to dial-up connection.

10
2.2 Browser Settings (For IE only)
OCX will be downloaded automatically when you login to the IP Camera, but you might have to set the IE
browser to enable the OCX to be downloaded automatically after signing in. Steps as below:
1. Close the firewall of your computer.
2. Change the ActiveX settings, “IE” browser > “Tool” > “Internet Options” > “Security”> “Custom Level” >
“ActiveX control and Plug-ins”, all the ActiveX options set to be “Enable”:
Especially:
Enable: Download unsigned ActiveX controls
Enable: Initialize and script ActiveX controls not marked as safe
Enable: Run ActiveX controls and plug-ins

11
You can also click “Start” menu->“Internet Explorer”, and choose “Internet attributes”, or via “Control
Panel” ->“Internet Explorer”, to access Security settings.
NOTE: Make sure that your firewall or anti-virus software doesn’t block the software or ActiveX. If you couldn’t
see live video, please close your firewall or anti-virus software, and try again.
2.3 UPnP Service
UPnP could help you to find your camera’s IP more quickly. For Window XP, from “Control Panel” > “Add or
remove applications” > “Add or remove Windows component” > “Network service” > “Detailed data” >
“UPnP users interface”, the factory default settings is disabled. Enable it, then it can allow your operating
system to support UPnP.
Alternatively, you can also click “Start” menu>“Internet Explorer”, and choose “Internet attributes”, or via
“Control Panel” >“Internet Explorer”, enter to Security settings.

12
2.4 IPCam IP Address Search Tool (for IE browser only)
Step 1: Use tool “SearchIPCam.exe” to find IP address of LAN.
Step 2: Double click “Search IPCam” on your desktop, the camera’s IP & MAC address will be displayed. If
you want to search again, click “Search”.
Step 3: Double-click the IP address of your camera to enter the login interface.(default user: admin; password:
sumpple)

13
2.5 Install the OCX ActiveX (For IE only)Install the OCX ActiveX for the first time login; You will get tips after enter user and password in login page.
Download the OCX file, then double click to install it automatically.
After OCX installed fully, then input the user and password to login the camera.
2.5.1 For other Browsers, e.g., Safari, Firefox, Chrome, there is no needto install the ActiveX control, see below:
User can input the ip address in the other broswers, select the view mode such as Server Puch; VLC, Quick
time to view
If User can not find the correct IP address,The default IP address for each camera is 192.168.1.155. You can
run the browser, and input the IP address directly into your browser to login to the camera.
NOTE: If the IP segment of the computer is different from the camera, such as 192.168.0.xx, please change
the IP segment of the computer’s to the same as camera’s, such as 192.168.1.xx, then connect the IP
Camera to the computer via network cable directly, run the browser, input the IP address and the login screen
below will pop-up:

14

15
3. SOFTWARE OPERATION3.1 Software operation for IE Browser
Choose your desired language, input correct user name and password, then click “Login”
User name: admin Password: sumpple,
: Choose languages here
3.2 Software Operation For Chrome, Firefox, Safari:Choose the suitable language, input correct user name and password, then click “Login”
User name: admin Password: sumpple

16
Choose the login mode.QuickTime: Choose QuickTime, login to the camera directly. if there is prompt for installing the QuickTime
player, just download and install it.
Sever Push: For Firefox, Chrome, or Safari browser.
VLC: If you use VLC, should download the VLC player first.
During the VLC installation, you must enable Mozilla plug-in as the picture shows below:

17
Choose languages
here
Figure 2.3
3.3 Functions
3.3.1 Three main functions (For IE):
Live video: Click it, back to live video window from “Playback” or “Params settings”
Playback:Click to query and playback the video files (Details see 5 Playback)
Params Settings:Setting the camera’s parameters (Details see 4 Params settings)
Log out: you will back to the login page
3.3.2 Two main functions (For Safari, Chrome, Firefox)

18
Live video: Click it, back to live video window from “Playback” or “Params settings”
Params Settings:Setting the camera’s parameters (Details see 4 Params settings)
Log out: you will back to the login page
3.4 For Live Video (for IE browser)
3.4.1 Video Menu:
Play: Play the live video.
Stop: Stop the live video.
Snapshot: Click to take snapshot, the picture be saved in the PC to its appointed path as JPG format,
and pop-up the prompt as below:(you can click “Save” to save the snapshot)
Record: Click to start record manually, the icon will change to green color. Record file will be
saved in the PC to its appointed path as AVI format. Click it again, will stop record function.

19
Clear Alarm: Click to stop the alarm manually when there is an alarm triggered, and pop-up prompt as
below:
Fullscreen: Double click/Click to get fullscreen view;
OSD Settings: Click it will pop-up the OSD settings interface, including OSD Color,
Frequency, Image Mirror and Flip.
OSD: Means “On-Screen Display”
OSD Color: Including Disabled, Black, Red, Green, Blue, Purple, Gray, Silver, Yellow, Olive, Turquoise, White,
Light Blue etc.
Frequency: Including 50HZ, 60HZ, Outdoor.
50HZ/60HZ for the users who use 50HZ/60HZ frequency, outdoor for the users who want to use this camera
to monitor an outdoor environment (through a window).

20
Mirror and Flip
Mirror: Select this checkbox to see a mirror image. Uncheck it to go back to normal.
Flip: Select this checkbox to flip the image upside down. Uncheck it to go back to normal.
NOTE: You can choose Mirror and Flip function if you set up the camera in a special position, upside down for
example.
3.5 Live Video for Safari, Chrome, Firefox:
3.5.1 Play Menu For QuickTime Mode:
Capture: Click to take snapshot, the picture be saved in the PC to its appointed path as JPG format,
will pop-up the snapshot, right click the picture to save it.
Fullscreen: Click to have fullscreen view;
: Click to exit fullscreen.
OSD Settings: Click it will pop-up the OSD settings interface, including
OSD Color, Frequency, Image Mirror and Flip.
OSD: Means “On-Screen Display”
OSD Color: Including Disabled, Black, Red, Green, Blue, Purple, Gray, Silver, Yellow, Olive, Turquoise, White,
Light Blue etc.

21
Frequency: Including 50HZ, 60HZ, Outdoor.
50HZ/60HZ for the users who use 50HZ/60HZ frequency, outdoor for the users who want to use this camera
to monitor an outdoor environment (through a window).
Mirror and Flip
Mirror: Select this checkbox to see a mirror image. Uncheck it to go back to normal.
Flip: Select this checkbox to flip the image upside down. Uncheck it to go back to normal.
NOTE: You can choose Mirror and Flip function if you set up the camera in a special position, upside down for
example.
3.5.2 Top Menu For VLC Mode:
This will be the same as 3.3.1 TOP Menu For QuickTime Mode.
3.6 Left Side Menu:
3.6.1 Left Side Menu For IE browser
There are some basic operation icons listed on the left side menu as below:

22
Click this one, you can view the main channel of the camera you login to, move the mouse to the
icon, the frame will change to red color .
Click this one; you can view 4 Channels of cameras that are connected, from CH1 to CH4. Move
the mouse to the icon, the frame will change to red color .
Click this one; you can view 9 Channels of cameras that are connected, from CH1 to CH9. Move
the mouse to the icon, the frame will change to red color .
NOTE: If you want to view 4/9 channels, you should set the Multi-Device firstly (See section 4.13 Multi-Device
Settings).

23
Brightness: set value from 0 to 255, click the icon, it will change back to the factory settings.
Contrast: set value from 0 to 255, click the icon, it will change back to the factory settings.
Hue: set value from -128 to 127, click the icon, it will change back to the factory settings.
Saturation: Set video saturation here.
3.4.2 Left Side Menu for Safari, Chrome, Firefox:
There are some basic operation icons listed on the left side menu as below:
Figure 4.4

24
Figure 4.6
Brightness: set value from 0 to 255, click the icon to go back to the factory settings.
Contrast: set value from 0 to 255, click the icon to go back to the factory settings.
Hue: set value from -128 to 127, click the icon to go back to the factory settings.
Saturation: Set video saturation here.

25
4. SETTINGS
4.1 Status----Device Info.
Click “ Settings” icon select “Status”, it will show the basic information such as “Device ID”,“Device Client Version”, “Device System Version”, “Description”, “IP Address”, “UPNP Status”, “DDNS
Status” etc.
Default device name is “IP Camera”, users can change the camera’s description here, picture as below:
4.1.2 For IE, camera will show as below:
Figure 4.7
4.1.3 For Safari, Chrome, Firefox, camera will show like picture as below:
Figure 4.8
4.2 Setup4.2.1 User Permission
User can set 10 different usernames and passwords for different permission; Permission:
Administrator,Operator; Visitor;

26
Super Administrator:Every device has a super administrator, it has the highest permission, can set all the
parameters.
Administrator:Lower permission than super administrator, it can set most of the parameters except adding
or editing other administrator accounts.
Operator: Lower permission than administrator, can do some operation such as pan/tilt control and set some
parameters.
Visitor: The lowest permission, only can view live video, can’t control the pan/tilt, parameter settings etc.
4.2.2 Multi-Device SettingsNote: Multi-Device only can be set under IE Browser, for Firefox, Safari, Chrome, you cannot see these
setting, as they do not support ActiveX.
Click “Multi-Device Settings” to enter the interface:

27
If you have more cameras in same LAN network, software can auto-detect them and list in “Device List in
LAN”
Enable the channel you want to add; Choose the IP, input host(for camera in different network, you will need
to input external ip address/DDNS address), web port, media port, username, and password manually, click
Add to submit.
4.2.3 Date & TimeDate Time: Display the current date and time
Time Zone: Set the current time zone Selest the working time server.
Time Mode: Can choose PC Time or NTP Time.
PC Timing: Camera will set the time the same as your PC.
NTP Server: User will need to select a working time server, and select the time zone.
4.2.4 Audio SettingsExternal Headset: User need to enable this feature, and connect external audio device like speak, Mic. So
that this feature work.
Built-in Headset: This means the built-in Headset port; with located in the cable. User can connect to the
audio devices;
Microphone Volume: User can adjust the volume of Microphone.
Speaker Volume: User can adjust the volume of Speaker.
28
4.3 Network Settings
4.3.1 IPNetwork Type: User can set Dynamic Address to obtain IP directly from router, or set a Static IP manually.
Media Port: User can set the Media port to transfer video if need to view camera remotely.(Work with DDNS
or external IP)
Web Port: User can set the web port to transfer video if need to view camera remotely.(Work with DDNS or
external IP)
Onvif: User can set Onvif port to work with other Onvif device like NVR..etc;
RTSP Port: Default 554;
DNS server: User can change DNS IP settings.
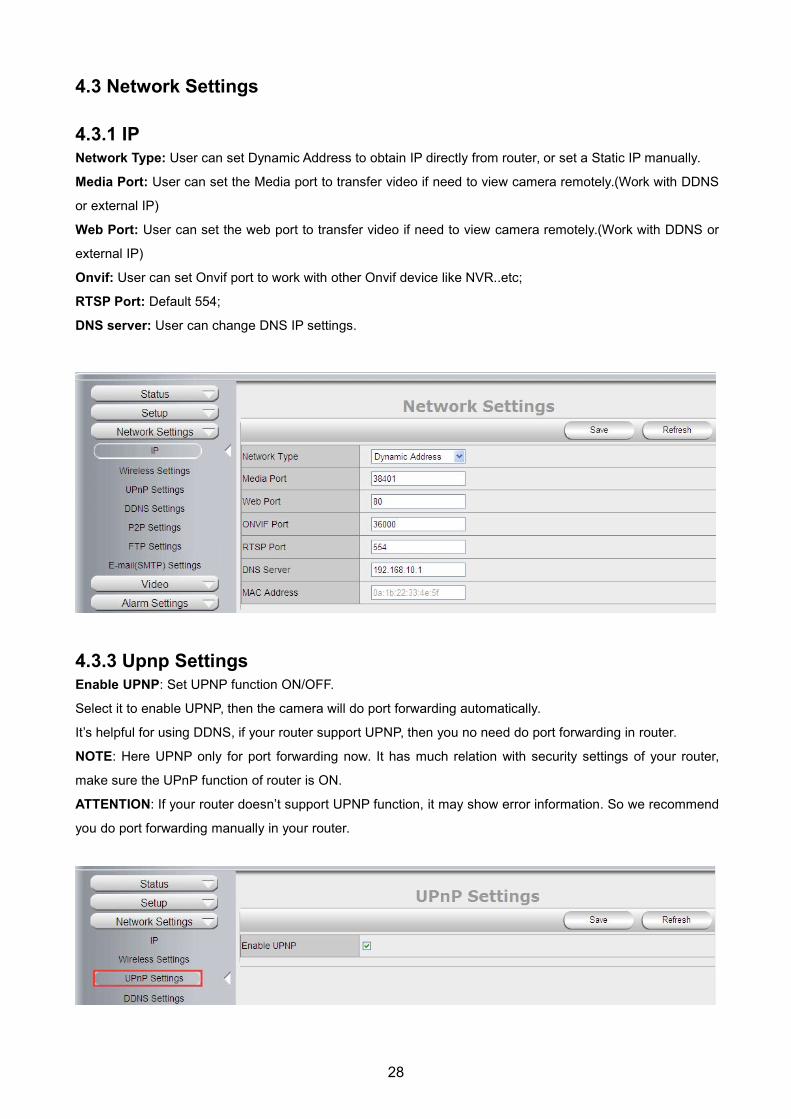
4.3.3 Upnp SettingsEnable UPNP: Set UPNP function ON/OFF.
Select it to enable UPNP, then the camera will do port forwarding automatically.
It’s helpful for using DDNS, if your router support UPNP, then you no need do port forwarding in router.
NOTE: Here UPNP only for port forwarding now. It has much relation with security settings of your router,
make sure the UPnP function of router is ON.
ATTENTION: If your router doesn’t support UPNP function, it may show error information. So we recommend
you do port forwarding manually in your router.

29
4.3.4 DDNS SettingsThere are 2 options:
Factory DDNS: This domain is provided by the manufacturer.
Third Party DDNS: This domain is provided by a 3rd party, such as Dyndns, 3322 etc.
● Enable DDNS: Set DDNS function ON/OFF.
● DDNS Server Type: Set DDNS server type, such as factory DDNS or third party DDNS server provider.
● DDNS User: Registered user name from DDNS server. (If you use factory DDNS, it can’t be modified.)
● DDNS Password: Registered password from DDNS server. (If you use factory DDNS, it can’t be modified.)
● DDNS Host Name: Domain name set by user. (If you use factory DDNS, it can’t be modified.)
For the third party DDNS, you have to register an account first, keep the user, password, host, then input it.
NOTE: Only one DDNS can be chosen, for example, if you use manufacturer’s DDNS, the 3rd one won’t work,
if you use a 3rd DDNS, the manufacturer’s one won’t work.
4.3.5 P2P SettingsUser can see and change P2P GUID here
Factory will provide a factory P2P GUID for free using. Default user: admin; password: admin;User can
change the password here or change a new P2P GUID here.
4.3.6 FTP SettingsSet FTP service, Snapshots will be delivered to appointed FTP server when alarmed.
Enable FTP: Set FTP function ON/OFF.
FTP Server: Set FTP server address.

30
FTP Port: Set the port of FTP server, default is 21.
FTP User: Set the user name of FTP server.
FTP Password: Set the password of FTP server.
Upload Folder: Set the path of remote FTP server. Make sure that the folder you plan to store images exists.
(The camera cannot create the folder itself). Also, the folder must be erasable.
FTP Mode: It supports standard (POST) mode and passive (PASV) mode.
Click save to submit, click test to check the settings.
NOTE: When alarmed, there will be 3 snapshots sent to the FTP server every 1 second
4.3.7 E-mail(SMTP) SettingsEnable Email: Set e-mail function ON/OFF.
Sender: Set sender’s name or email address
Sender’s email: Set sender’s email address.
Receiver: Set receiver’s email box. (Supports 3 receivers’ emails simultaneously)
SMTP Server: The sender address SMTP server.
SMTP Port: The sender’s SMTP Port, usually is 25, some SMTP servers have their own port, e.g., the smtp
port for Gmail is 465.
Auth User: Verify the user settings.
SMTP Username: Set sender’s user name or email address.
SMTP password: Set sender’s email address password.
Note: User can save the settings first, then click Test buttom to see if settings working. If not, pls double check
your settings or spelling.

31
4.4 Video Info.
Click “Video Info” to enter the interface as below:
There are two options for stream, Main-Stream and Sub-Stream, you can set the stream based on the actual
operation environment, for example, if the bandwidth is good enough, set Main-Stream as Initial-Stream, or
choose Sub-Stream if better.
Set the parameters of Main-Stream and Sub-Stream as below:
Resolution: 1280 x 720, 640 x 368, 320 x 208 optional.
Frame Rate: Set the frame rate according to the bandwidth. Frame rate could be “Auto” or “from 1 fps to 30
fps (Real time)”. If the network situation is not ideal, you can reduce the frame rate to control the coding rate,
make the moving pictures smoother.

32
Bit Rate: Higher bite rate means better quality images, but takes more bandwidth, so adjust the settings
according to the actual bandwidth available. The range of bit rate from 128 Kbps ~ 4 Mbps.
Image Quality: Better image quality, higher bit rate value, but it will take more bandwidth, the image quality
parameters could be set as below:
NOTE: When the device runs, only can select Bit Rate or Image Quality either.
4.5 Alarm Settings
4.5.1 Motion Detection
Motion Detection Zone Armed:
Can set all zones to be armed, or a specified zone armed.
Before setting a specified zone, you should set "Motion Detection" to "ON", then press left mouse, drag the
mouse onto video area to set the detection zone, and save it, supports 3 areas.

33
● Detect All: Setting the whole video window as the motion detect armed zone.
● Clear Detect: Clear all armed zone.
● Motion Detection: Set motion detection armed function ON/OFF.
● Sensitivity: Set detection sensitivity as Low, Middle, High, Higher, Highest.
● Alarm Duration: Set each alarm duration, can be forever, 5s, 10s, 15s, 30s, 60s.
Action with Alarm
These are linkage actions optional for motion detection. User can select the alarm relative alarm convience to
them.
Alarm output: Select it to enable alarm output, unselect to stop.
SD-Card Record: Select it to enable record to SD card, unselect to stop.- --(Only Support SD Card Version)
Send E-mail: Select it to enable E-mail alert function, unselect to stop.
FTP Upload: Select it to enable FTP upload function, unselect to stop. .
Click Save to save all the settings.
Click Update to refresh the settings.
4.5.2 Alarm SettingsExternal Alarm: Set external alarm function ON/OFF.
● Alarm Duration: Set external alarm output duration (Relay close time), can be Forever, 5s, 10s, 15s, 30s,
60s.
● Lose SD-Card Alarm: Set alarm triggered ON/OFF if the SD-Card is lost.- --(Only Support SD Card
Version)

34
● Alarm Input: Set alarm input ON/OFF, it supports NO/NC external alarm device, choose the correct mode
to make sure it works well, it refers to the I/O pin6 (Input2) and pin7 (Input1).
Alarm output: Select it to enable alarm output, unselect to stop.
SD-Card Record: Select it to enable record to SD card, unselect to stop.
Send E-mail: Select it to enable E-mail alert function, unselect to stop.
FTP Upload: Select it to enable FTP upload function, unselect to stop. .
Click Save to save all the settings.
Click Update to refresh the settings.
4.6 Record4.6.1 Local SettingsNote: This feature will suitable for IE only, as other broswers not support IE activeX.
Enable Alarm Record: Camera will record to the path user set when Alarm happens.
Alarm Record time: User can set the record time when Alarm happens. Such as 2 mins.
Manual Record Pack time: User can set the manual record time, such as 2 hours. Once click the “Record”
button under the live video screen, camera will record as long as user set.
Path: This belongs to the PC path, user can set the PC path to store all records.

35
4.6.2 SD Card info--(Only Support SD Card Version)Device Name: Display the name of SD card.
Total Size: Display the total size of SD card
Balance Space: Display the free space of SD card
Status: Display the state of SD card.
Format: Click it to delete all data and format the SD card. (All data will be lost if formatted).
Open Auto cover: Set SD card auto cover when it’s full.
Open Pre-recording: Set Pre-recording function (Record the video before alarm triggered).
Pre-recording Time: Set the Pre-recording time, can be from 1 to 6 seconds.
Record Stream: Choose the stream here:Main Stream and Sub Stream.
4.7 System
4.7.1 LogLog provides information of camera, login, log out, alarm, power on/off..etc;

36
4.7.2 Auto MaintainAuto Maintain provides an auto protection of hardware; Set a time such as 24:00; Then camera will auto
reboot; and refresh the hardware proformance.
4.7.3 SystemReboot Device: Camera will get reboot.
Restore factory settings: User can restore factory settings once forget password, settings..etc.
Upgrade Device Firmware: To upgrade or degrade the camera firmware.(The firmware needs to store in the
same camera you are viewing camera.)
Upgrade Device Web ui: To upgrade or degrade the camera web ui. (The firmware needs to store in the
same camera you are viewing camera.)

37

38
5. PLAYBACK for IE browser onlyNote: Playback function shows under IE ActiveX mode only. Other broswers not support this feature.
Click login the playback interface, this is for SD Card files playback. So If User not haveSD card in the camera or not have any file in SD card, will not work.
Search Mode: User can search the record, snapshot..etc by different methods.
Search Type: External Alarm and Motion detection optional; Select External Alarm; Camera will
search the alarm file from External alarm which comes from other device; Select motion detection,
Camera will search the alarm file from motion detection.
Search All: Camera will search all file in SD Card.
File type: External Alarm and Motion detectio optional. This option works only work when user select
Search Type from Search mode
Begin Time and End Time: This feature work when user select Search Time from Seach mode; Select
a begin time, and end time, camera will search these files in the time area.
Click “OK” icon, will pop-up a window for search file, set the mode or time, click OK to submit, then all
the correlative files will be listed on the left side.
After searching, files will be listed on the left side window, choose the file, double click it or click play icon
to start replay. Users can check the replay file information here, do other operation such as Stop,
Pause, Previous, Next, Fast Backward, Fast Forward etc.

39

40
6. FREQUENTLY ASKED QUESTIONS
1. I have forgotten the administrator username and/or passwordThere is a [RST] button on the rear panel, keep the power on, hold the reset button for 30 seconds, it will
restore back to factory default settings as below:
Username: admin
Password: sumpple
NOTE: Please don’t press RST button unless you are sure you want to do it.
2. There is no picture displayed in IE browser (For IE only)It maybe the ActiveX problem,
If using the IE browser for the first time, you should install the ActiveX control, details as below:
Before login, click the ActiveX icon at the right side of interface to download, save the file, run
it to install the ActiveX.
3. Fail to visit IP camera via IE after upgrading (For IE Only)Solution: Clear the browser buffer.
Steps: Open IE>click “Tools”> “Internet Options”>“General”>“Delete”> “Internet temporary files”, delete
the cookies and temporary files, then click “OK” and re-login.
4. The video is not smoothPossible reason 1: The frame rate value is too small.
Solution: Increase the frame rate value.
Possible reason 2: Too many users are connecting to the device.
Solution: Close some connection or reduce the video frame rate.
Possible reason 3: Network bandwidth is too low, lots of lost packets.
Solution: Reduce the video frame rate or video compression bit rate.
5. Fail to visit IP camera via IE browserPossible Reason 1: Network is disconnected.
Solution: Connect your PC to network, check whether the network works well or not. Check if there’s a
problem with the cable connection, or network problem caused by PC virus.
Possible reason 2: IP Address has been occupied by other devices.
Solution: Stop the connection between IP camera and network; connect the IP camera to PC.
Directly reset IP address according to the proper operations recommended.
Possible reason 3: IP addresses are in different subnets.
Solution: Check IP address, Subnet masking and Gateway.
Possible reason 4: Physical address of network conflicts with the IP camera.

41
Solution: modify the physical address of IP camera.
Possible Reason 5: Web port has been modified.
Solution: Contact as Network Administrator to obtain related information.
Possible Reason 6: Unknown.
Solution: Press RESET to restore to factory settings then connect it again, the default IP address is
192.168.1.155, subnet mask is 255.255.255.0
6. The color of image is abnormal (Green or other color)Sometimes the IP camera images cannot be displayed properly because of different graphics cards, the
images appears to be green or other colors, then you should run the program “Config.exe” from the
downloaded OCT files.
(or run C:\windows\system32\Config.exe) to set the following parameters for the display buffer: auto-detection,
used display card memory or system memory, then run IE, connect IP camera again.
7. There is no voice while monitoringPossible Reason 1: No audio input connection.
Solution: Check audio connection of the host.
Possible Reason 2: the relative audio option of IP camera is OFF.
Solution: Check audio parameter settings to see if you have set the audio option ON, but without external
audio input.
8. Image processing doesn’t work properlyPossible Reason 1: System problem, DirectX function is disabled, which will cause slow display of images
and abnormal color.
Possible Reason 2: Hardware problem, graphics card doesn’t support image acceleration and hardware
zooming functions. (For hardware issue, the only solution is to change your graphics card).
Solution: Install DirectX image driver, then click “Start”>”Run”>input “dxdiag”, set enable "DirectDraw
Acceleration" "Direct3D Acceleration" "AGP Texture Acceleration" functions.
.
Figure 13.0

42
Note: If you are unable to do it, it means your DirectX is not installed properly or hardware doesn't support this
function.
9. Fail to use DDNSPossible Reason 1: The PC or IP Camera can’t connect to the internet.
Solution: Check the internet connection and settings.
Possible Reason 2: Port forward is not set in router.
Solution: Set the port forward of extranet in router correctly.
For example, if IP Camera address is: 192.168.1.100, Media port is 38401, Web port is 85, factory DDNS is
http://test.aipcam.com.
Set Port Forwarding in the router.
This is an important step. You need to set port forwarding in your router, to refer to the IP of your camera
correctly, for DDNS to work. There are so many kinds of routers, so it’s difficult to show fixed steps, but here
are some samples of different router’s port forwarding settings, just for reference:
TP-LINK:
1. Login to the router.
2. Choose “Forwarding”, select “Virtual Servers”
3. Click the Add New button, pop-up below:
Figure 13.1
Fill in the service port (don’t use 80), IP address of the camera, then click SaveNOTE: The port and IP address should be the same as the camera.

43
Fill in the web port, for example port 85, IP address as 192.168.1.100, click Save.
(1) Repeat step 3 above, it will pop-up the window again, fill in the media port as 38401, IP address as
192.168.1.100, then save.
(2) Then check the “Device Info” –“DDNS Status”,
It will show DDNS: http://test.aipcam.com:85 , input this link in IE, then you can visit this camera remotely.
BELKIN:
1. Login to the router.2. Choose “Firewall”, select “Virtual Servers”3. Input the port (don’t use 80) and IP address, then click save.NOTE: The port and IP address should be the same as the camera.
Figure 13.2
DLINK:
1. Login to the router.2. Choose “Advanced”, select “Virtual Servers”3. Input the port, IP address, Protocol, then click save.NOTE: The “public port” & “private port” should be the same as camera’s port, choose theprotocol to be “both”.

44
Figure 13.3

45
7. SPECIFICATIONS
Image Sensor
Image Sensor 1/4" Color CMOS Sensor
Display Resolution 1280 x 720 Pixels (1000K Pixels, i.e. 1.0 Megapixel)
Lens 3.6mm
Mini. Illumination 0.5 Lux
Viewing Angle 60-90 Degree
Audio
Input Not supported
Output Not supported
Audio Not supported
Video
Image Compression H.264, MJPEG
Image Frame Rate 30fps (VGA),30fps (QVGA)
Resolution 1280 x 720 (VGA), 640 x 368 (VGA), 320 x 208 (QVGA)
Flip Mirror Images Vertical / Horizontal
Light Frequency 50Hz, 60Hz, Outdoor
Video Parameters Brightness, Saturation, Contrast, Hue
Communication
Ethernet Interface Build in 10/100Mbps,Auto MDI/MDIX , RJ-45
Supported ProtocolTCP/IP HTTP DNS DHCP PPPoE SMTP FTP SSL TFTP NTP
ARP/RARP NFS RTSP RTP RTCP
Compress rate level 128Kbps~4Mbps
Data Rate802.11b: 11Mbps (max.), 802.11g: 54Mbps (max.), 802.11n: 150Mbps (max.)
Physical
Pan/Tilt Angle Not supported
Infrared Light 24 IR LEDs, Night visibility up to 15 meters
Alarm Input Not supported
Alarm Output Not Supported
PowerPower Supply DC 5V/2.0A (EU,US,AU adapter or other types optional)
Power Consumption 7 Watts (Max.)
Environment
Operate Temper. 0° ~ 55°C (14°F ~ 131°F)
Operating Humidity 20% ~ 85% non-condensing
Storage Temper. -10°C ~ 60° (14°F ~ 140°F)
Storage Humidity 0% ~ 90% non-condensing
PC System
Requirements
CPU 2.0GHZ or above (suggested 3.0GHz)
Memory Size 256MB or above (suggested 1.0GHz)
Display Card 64M or above
Supported OS Microsoft Windows 2000/XP/Vista/7/8/10/Mac OS
Browser IE6.0/7.0/8.0/Firefox/Safari/Google chrome or other standard browsers
Certification CE, FCC, RoHS

46
8. OBTAINING TECHNICAL SUPPORT
We hope your experience with your IP network camera is enjoyable, but if you experience any issues or have
any questions that this User's Guide has not answered, please email us.
If your camera does not support some special functions shown in this manual, please contact our technical
support team to obtain the latest Firmware and WEB UI file for upgrading.
Statement: If you found any bug of software, pls kindly not discuss in the public place or
website, contact us by email or phone, we will give you a quick shot.
FCC CautionTHIS DEVICE COMPLIES WITH PART 15 OF THE FCC RULES.
OPERATION IS SUBJECT TO THE FOLLOWING TWO CONDITIONS:
(1) THIS DEVICE MAY NOT CAUSE HARMFUL INTERFERENCE, AND
(2) THIS DEVICE MUST ACCEPT ANY INTERFERENCE RECEIVED, INCLUDING INTERFERENCE THAT
MAY CAUSE UNDESIRED OPERATION.
This equipment generates and uses radio frequency energy, and if not installed and used properly, that is, in
strict accordance with the manufacturer’s instructions, it may cause interference to radio and television
reception. It has been type tested and found to comply with the limits for remote control devices in accordance
with the specifications in Sub-Parts B and C of Part 15 of FCC Rules, which are designed to provide
reasonable protection against such interference in a residential installation. However, there is no guarantee
that interference will not occur in a particular installation. If this equipment does cause interference to radio or
television reception, which can be determined by unplugging the equipment, try to correct the interference by
one or more of the following measures.
• Reorient the antenna of the radio/TV experiencing the interference.
• Relocate the equipment with respect to the radio/TV.
• Move the equipment away from the radio/TV.
• Plug the equipment into an outlet on a different electrical circuit from the radio/TV experiencing the
interference.
• If necessary, consult your local dealer for additional suggestions.
NOTE: Modifications to this product will void the user’s authority to operate this equipment.