Embed Size (px)
Citation preview
OUA – Engineering Standard Operating Procedure 028
GP1-12 Recording Studio Mawson Lakes Document tracking
Creation Date 2 August 2016 Author Sue Tyerman Reviewer Current version 0.1 Current status Awaiting review
Modification history Date Author Details of modification 10 October 2016 Sue Tyerman • Updated instructions to reflect
testing of room 7 November 2016 Sue Tyerman • Added images
• Created version for AV support 21 November 2016 Sue Tyerman • Corrections 28 November 2016 Sue Tyerman • Corrections from Anne’s
comments 29 November 2016 Sue Tyerman • Corrections from Anne’s testing of
the instructions 30 November 2016 Sue Tyerman • Relabelled items in room to be
consistent with instructions • Still waiting on instructions from
the AV team re HDMI input 6 December 2016 Sue Tyerman • Corrections from testing with
Pramila 7 December 2016 Sue Tyerman • Corrections from testing with
Robert 11 December 2016 Sue Tyerman • Added images from testing with
Robert 13 January 2017 Robert Moller • Created more graphical version of
the instructions
SOP 028 version 1.2 – GP1-12 Recording Studio Mawson Lakes – Page 1 of 21
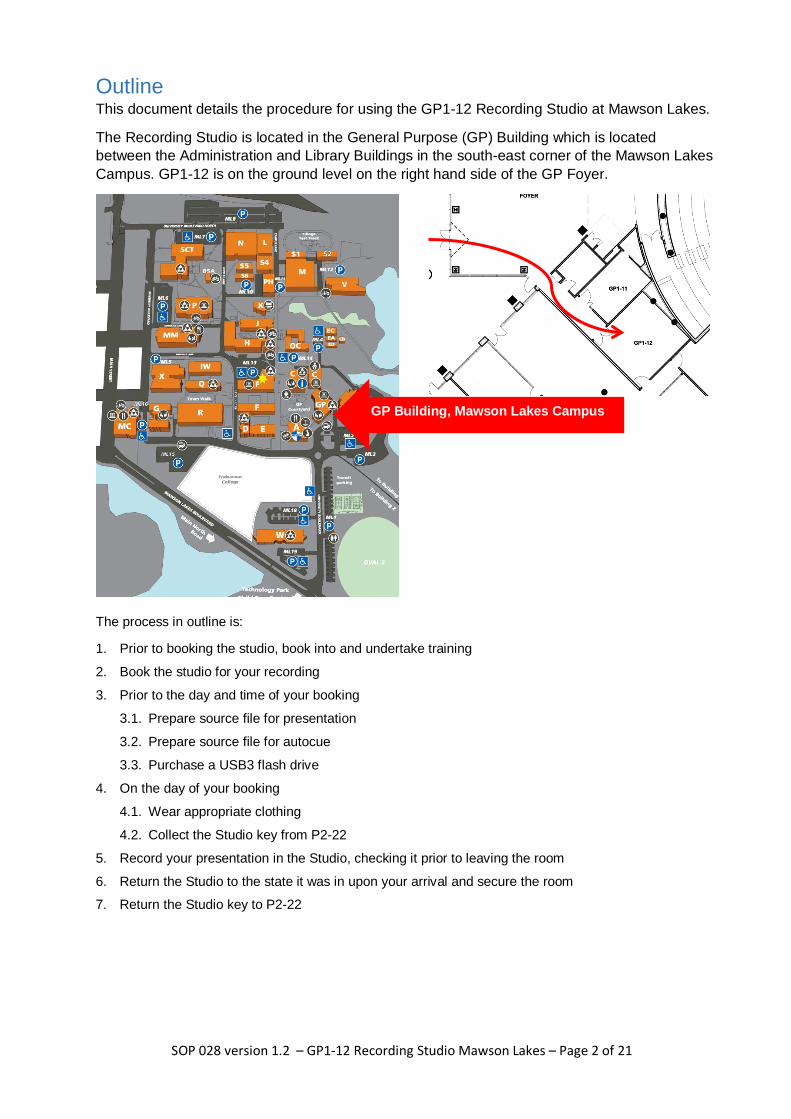
Outline This document details the procedure for using the GP1-12 Recording Studio at Mawson Lakes.
The Recording Studio is located in the General Purpose (GP) Building which is located between the Administration and Library Buildings in the south-east corner of the Mawson Lakes Campus. GP1-12 is on the ground level on the right hand side of the GP Foyer.
The process in outline is:
1. Prior to booking the studio, book into and undertake training
2. Book the studio for your recording
3. Prior to the day and time of your booking
3.1. Prepare source file for presentation
3.2. Prepare source file for autocue
3.3. Purchase a USB3 flash drive
4. On the day of your booking
4.1. Wear appropriate clothing
4.2. Collect the Studio key from P2-22
5. Record your presentation in the Studio, checking it prior to leaving the room
6. Return the Studio to the state it was in upon your arrival and secure the room
7. Return the Studio key to P2-22
GP Building, Mawson Lakes Campus
SOP 028 version 1.2 – GP1-12 Recording Studio Mawson Lakes – Page 2 of 21
Procedure
Before you use the studio Before you use the recording studio make sure you...
1. have booked enough time for your session via the GP1-12 Recording Studio room booking calendar;
2. make an appointment with one of the ITEE Online Education team members for training or set aside 30 minutes at the start of your booked time;
3. think about what you want to achieve and what you want your audience to learn from the video session;
4. know what you want to say (script your session if necessary);
5. keep your recordings to shorter snippets of information (no more than 7 minutes if possible);
6. know what presentation style you want to use (lectern, free standing or interview);
7. have saved your PowerPoint presentation in On-screen Show (16:9) format (you can change the format via the Page Setup icon on the Design tab);
8. have your autocue source on a USB stick;
9. have your PowerPoint, image, movie or other media on a USB stick or laptop with HDMI port;
10. have a USB stick that has a high write speed (minimum of 3.0);
11. think about what you are going to wear for the recording session (no stripes/checks or green);
12. are present at all times if students or external parties are using the recording studio;
13. make sure any students or external participants have signed a Talent Release Form;
14. be aware that your recording may take several minutes to upload to the UniSA Media Server if the file size is large.
Training prior to using the GP1-12 Recording Studio Training must be completed before staff or students can use the recording studio.
The training is conducted by members of the OUA Academic Services Team and takes approximately 30 minutes.
A staff member must be present at all times if students or external parties are using the recording studio.
To book a training session, email [email protected] with a subject line Request Recording Studio Training. A team member will contact you to arrange a training session.
SOP 028 version 1.2 – GP1-12 Recording Studio Mawson Lakes – Page 3 of 21
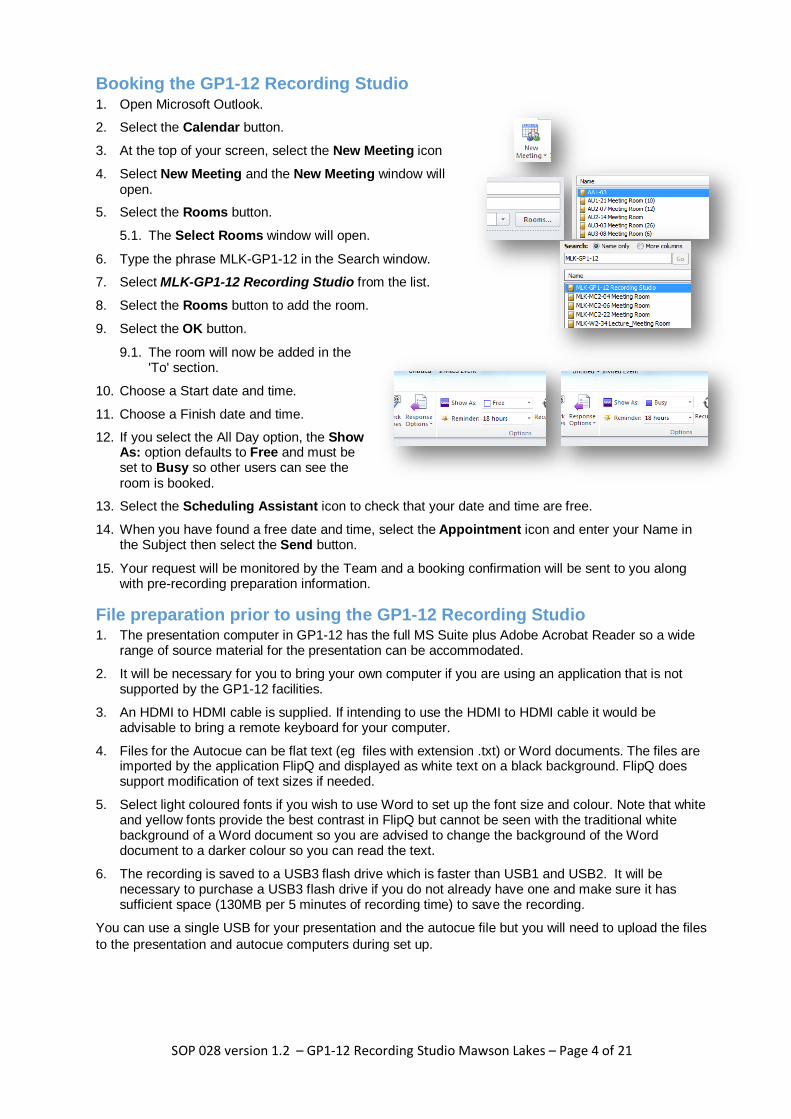
Booking the GP1-12 Recording Studio 1. Open Microsoft Outlook.
2. Select the Calendar button.
3. At the top of your screen, select the New Meeting icon
4. Select New Meeting and the New Meeting window will open.
5. Select the Rooms button.
5.1. The Select Rooms window will open.
6. Type the phrase MLK-GP1-12 in the Search window.
7. Select MLK-GP1-12 Recording Studio from the list.
8. Select the Rooms button to add the room.
9. Select the OK button.
9.1. The room will now be added in the 'To' section.
10. Choose a Start date and time.
11. Choose a Finish date and time. 12. If you select the All Day option, the Show
As: option defaults to Free and must be set to Busy so other users can see the room is booked.
13. Select the Scheduling Assistant icon to check that your date and time are free.
14. When you have found a free date and time, select the Appointment icon and enter your Name in the Subject then select the Send button.
15. Your request will be monitored by the Team and a booking confirmation will be sent to you along with pre-recording preparation information.
File preparation prior to using the GP1-12 Recording Studio 1. The presentation computer in GP1-12 has the full MS Suite plus Adobe Acrobat Reader so a wide
range of source material for the presentation can be accommodated.
2. It will be necessary for you to bring your own computer if you are using an application that is not supported by the GP1-12 facilities.
3. An HDMI to HDMI cable is supplied. If intending to use the HDMI to HDMI cable it would be advisable to bring a remote keyboard for your computer.
4. Files for the Autocue can be flat text (eg files with extension .txt) or Word documents. The files are imported by the application FlipQ and displayed as white text on a black background. FlipQ does support modification of text sizes if needed.
5. Select light coloured fonts if you wish to use Word to set up the font size and colour. Note that white and yellow fonts provide the best contrast in FlipQ but cannot be seen with the traditional white background of a Word document so you are advised to change the background of the Word document to a darker colour so you can read the text.
6. The recording is saved to a USB3 flash drive which is faster than USB1 and USB2. It will be necessary to purchase a USB3 flash drive if you do not already have one and make sure it has sufficient space (130MB per 5 minutes of recording time) to save the recording.
You can use a single USB for your presentation and the autocue file but you will need to upload the files to the presentation and autocue computers during set up.
SOP 028 version 1.2 – GP1-12 Recording Studio Mawson Lakes – Page 4 of 21
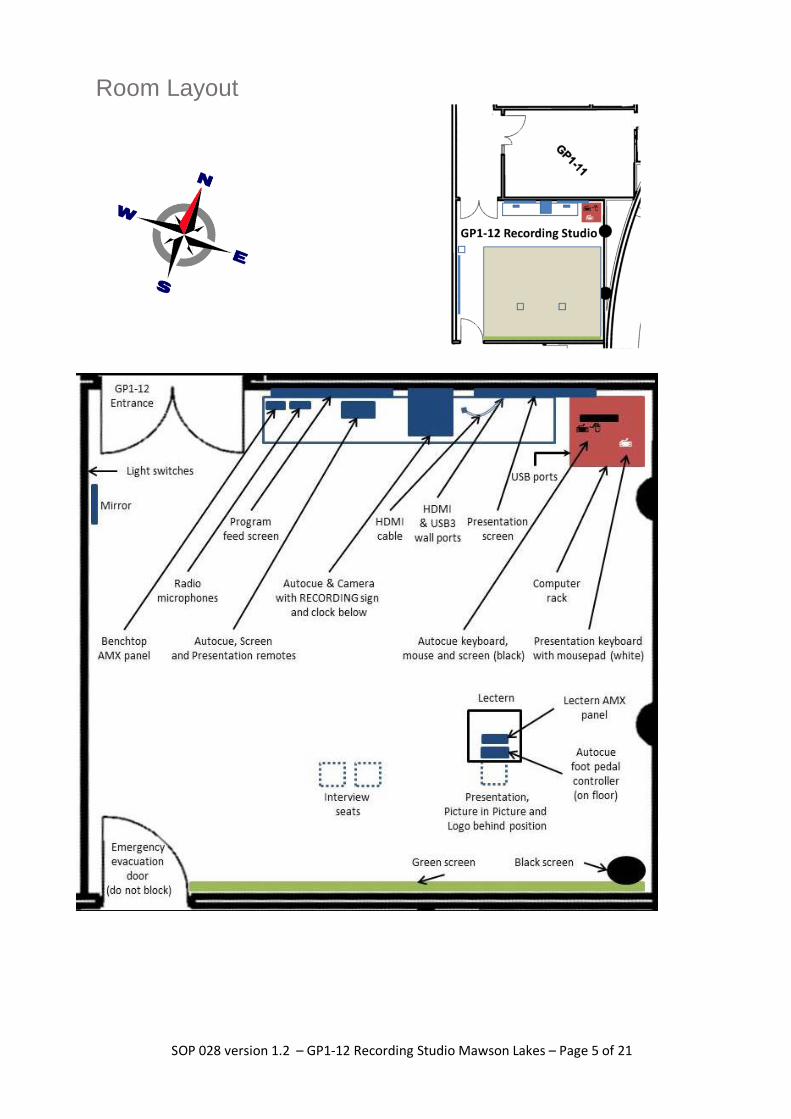
Room Layout
SOP 028 version 1.2 – GP1-12 Recording Studio Mawson Lakes – Page 5 of 21
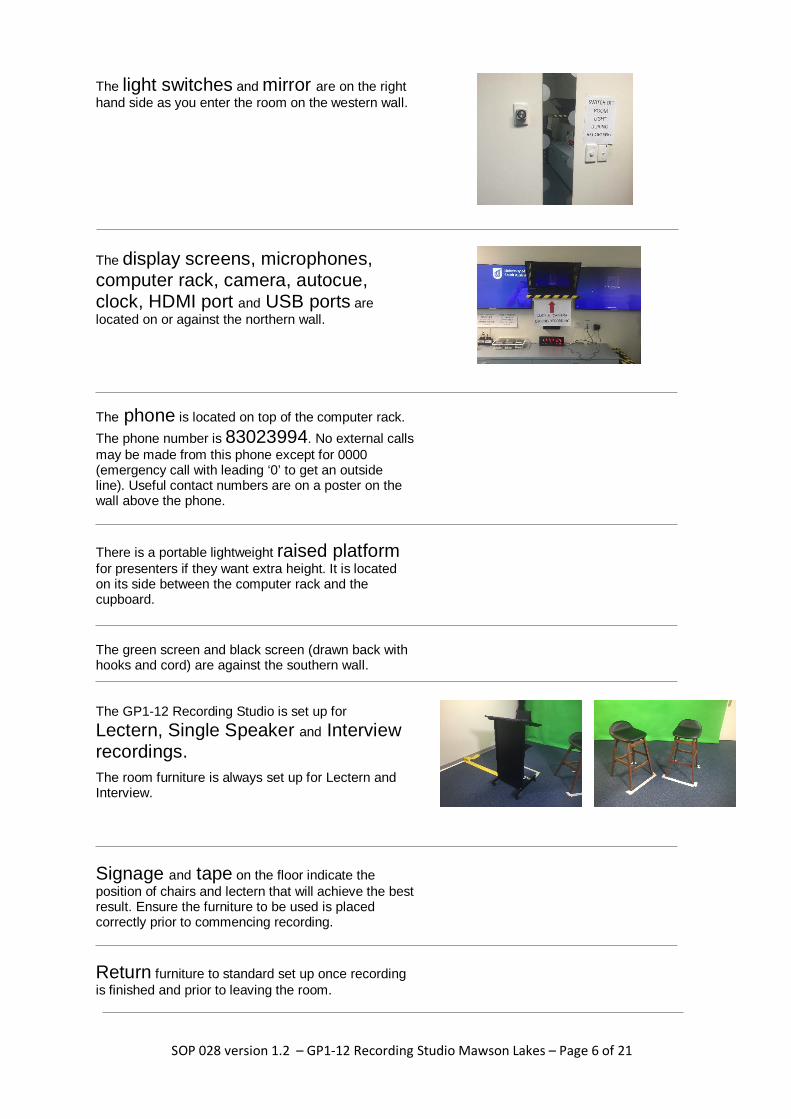
The light switches and mirror are on the right hand side as you enter the room on the western wall.
The display screens, microphones, computer rack, camera, autocue, clock, HDMI port and USB ports are located on or against the northern wall.
The phone is located on top of the computer rack. The phone number is 83023994. No external calls may be made from this phone except for 0000 (emergency call with leading ‘0’ to get an outside line). Useful contact numbers are on a poster on the wall above the phone.
There is a portable lightweight raised platform for presenters if they want extra height. It is located on its side between the computer rack and the cupboard.
The green screen and black screen (drawn back with hooks and cord) are against the southern wall.
The GP1-12 Recording Studio is set up for Lectern, Single Speaker and Interview recordings. The room furniture is always set up for Lectern and Interview.
Signage and tape on the floor indicate the position of chairs and lectern that will achieve the best result. Ensure the furniture to be used is placed correctly prior to commencing recording.
Return furniture to standard set up once recording is finished and prior to leaving the room.
SOP 028 version 1.2 – GP1-12 Recording Studio Mawson Lakes – Page 6 of 21
Tips and Tricks Please view our Tips and Tricks video before using the GP1-12 Recording Studio. It will give you valuable insight into industry 'tips' and 'tricks' that will assist you prior to and during your recording session.
Bring water to drink and a comb or brush.
Select clothing that is not green, is not too busy (avoid “fuzzy” clothes such as angora, stripes and strong check patterns) and has low reflectance (avoid white and very light colours). Block dark colours produce the best results.
If you intend to use the raised platform, do not wear stiletto heels. Standard high heels are ok.
Pick up the key from P2-22 or arrange to meet staff at GP1-12
GP1-12 Recording Studio Instructions Please read the Before you use the studio section on page 3 prior to your session and view the Tips and Tricks video.
Switch off your phone/pager or set it to silent
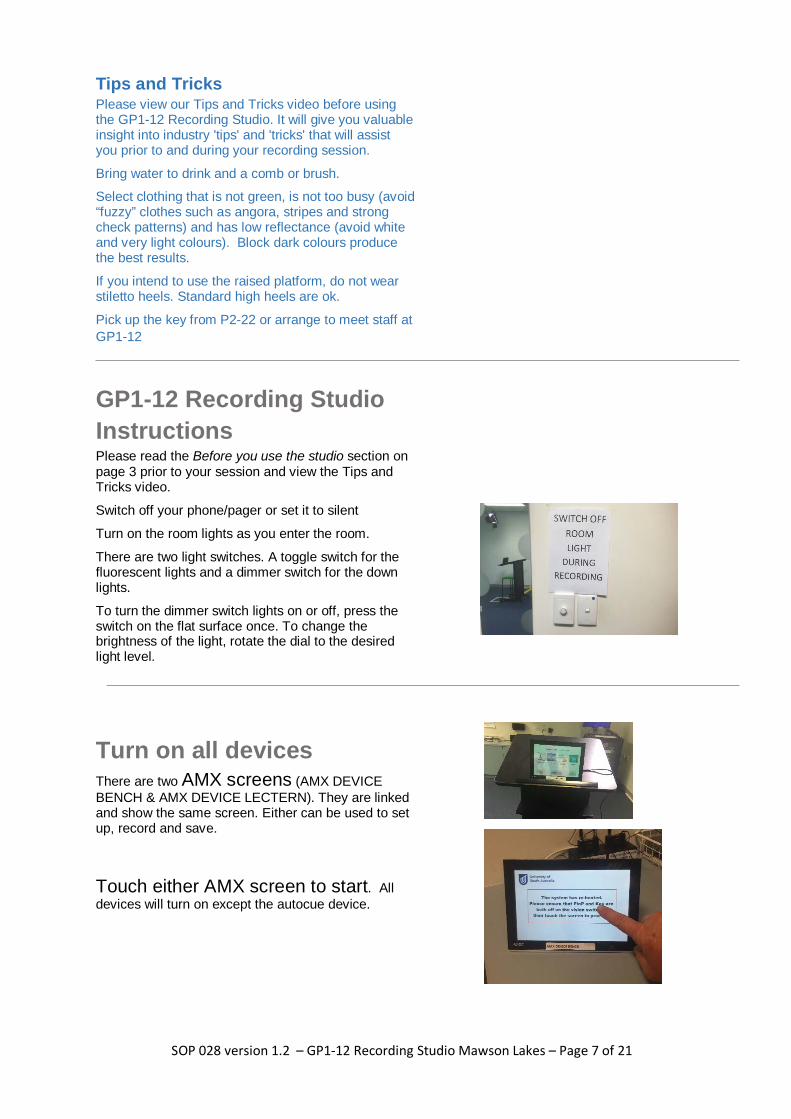
Turn on the room lights as you enter the room.
There are two light switches. A toggle switch for the fluorescent lights and a dimmer switch for the down lights.
To turn the dimmer switch lights on or off, press the switch on the flat surface once. To change the brightness of the light, rotate the dial to the desired light level.
Turn on all devices There are two AMX screens (AMX DEVICE BENCH & AMX DEVICE LECTERN). They are linked and show the same screen. Either can be used to set up, record and save.
Touch either AMX screen to start. All devices will turn on except the autocue device.
SOP 028 version 1.2 – GP1-12 Recording Studio Mawson Lakes – Page 7 of 21
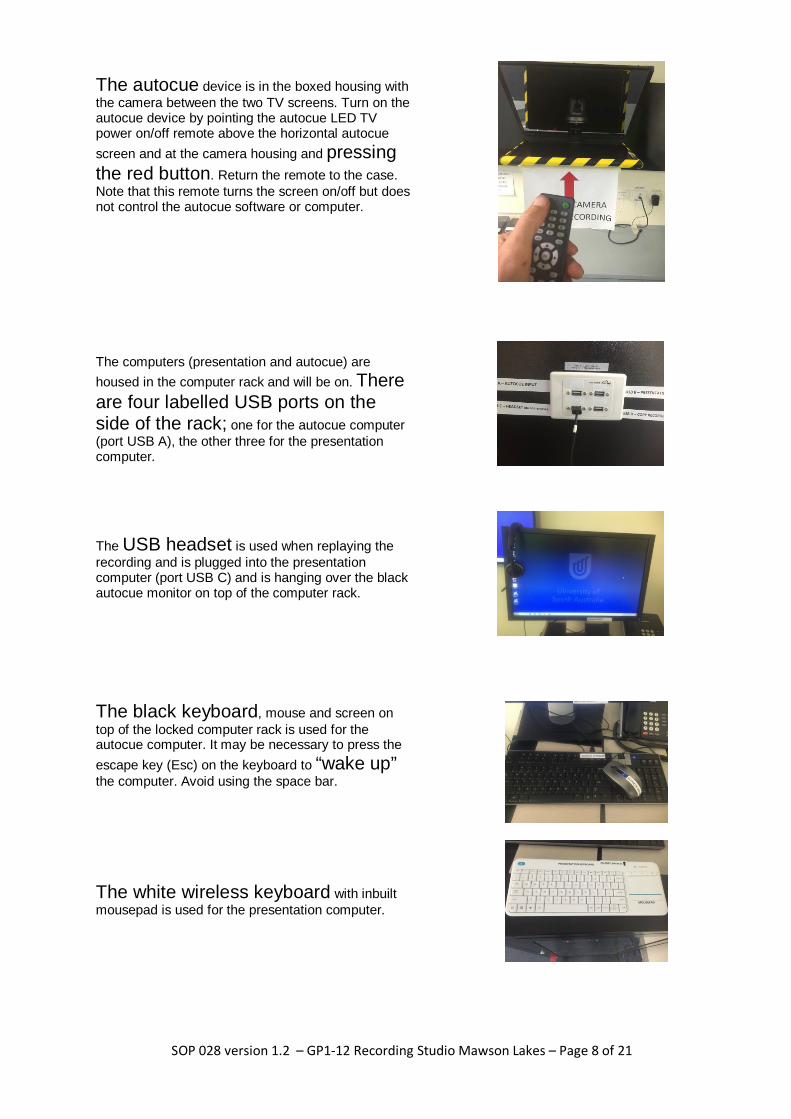
The autocue device is in the boxed housing with the camera between the two TV screens. Turn on the autocue device by pointing the autocue LED TV power on/off remote above the horizontal autocue screen and at the camera housing and pressing the red button. Return the remote to the case. Note that this remote turns the screen on/off but does not control the autocue software or computer.
The computers (presentation and autocue) are housed in the computer rack and will be on. There are four labelled USB ports on the side of the rack; one for the autocue computer (port USB A), the other three for the presentation computer.
The USB headset is used when replaying the recording and is plugged into the presentation computer (port USB C) and is hanging over the black autocue monitor on top of the computer rack.
The black keyboard, mouse and screen on top of the locked computer rack is used for the autocue computer. It may be necessary to press the escape key (Esc) on the keyboard to “wake up” the computer. Avoid using the space bar. The white wireless keyboard with inbuilt mousepad is used for the presentation computer. SOP 028 version 1.2 – GP1-12 Recording Studio Mawson Lakes – Page 8 of 21
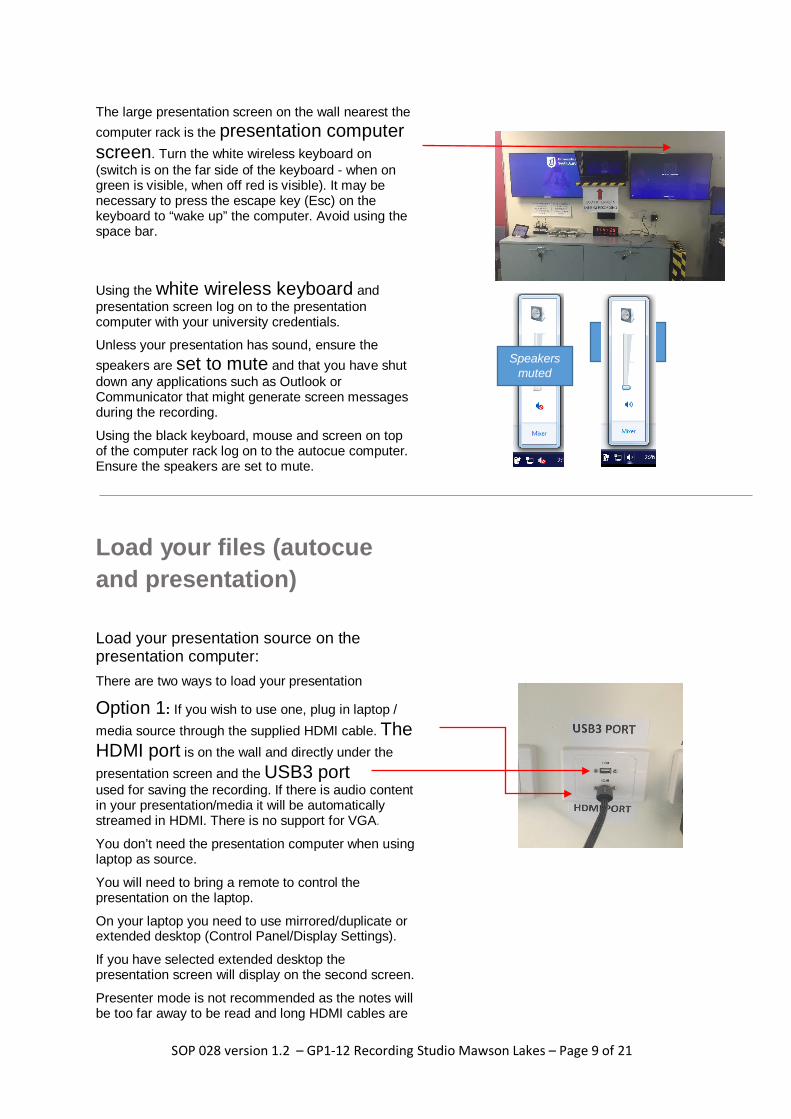
The large presentation screen on the wall nearest the computer rack is the presentation computer screen. Turn the white wireless keyboard on (switch is on the far side of the keyboard - when on green is visible, when off red is visible). It may be necessary to press the escape key (Esc) on the keyboard to “wake up” the computer. Avoid using the space bar.
Using the white wireless keyboard and presentation screen log on to the presentation computer with your university credentials.
Unless your presentation has sound, ensure the speakers are set to mute and that you have shut down any applications such as Outlook or Communicator that might generate screen messages during the recording.
Using the black keyboard, mouse and screen on top of the computer rack log on to the autocue computer. Ensure the speakers are set to mute.
Load your files (autocue and presentation) Load your presentation source on the presentation computer: There are two ways to load your presentation
Option 1: If you wish to use one, plug in laptop / media source through the supplied HDMI cable. The HDMI port is on the wall and directly under the presentation screen and the USB3 port used for saving the recording. If there is audio content in your presentation/media it will be automatically streamed in HDMI. There is no support for VGA.
You don’t need the presentation computer when using laptop as source.
You will need to bring a remote to control the presentation on the laptop.
On your laptop you need to use mirrored/duplicate or extended desktop (Control Panel/Display Settings).
If you have selected extended desktop the presentation screen will display on the second screen.
Presenter mode is not recommended as the notes will be too far away to be read and long HDMI cables are
Speakers muted
Speakers unmuted
SOP 028 version 1.2 – GP1-12 Recording Studio Mawson Lakes – Page 9 of 21
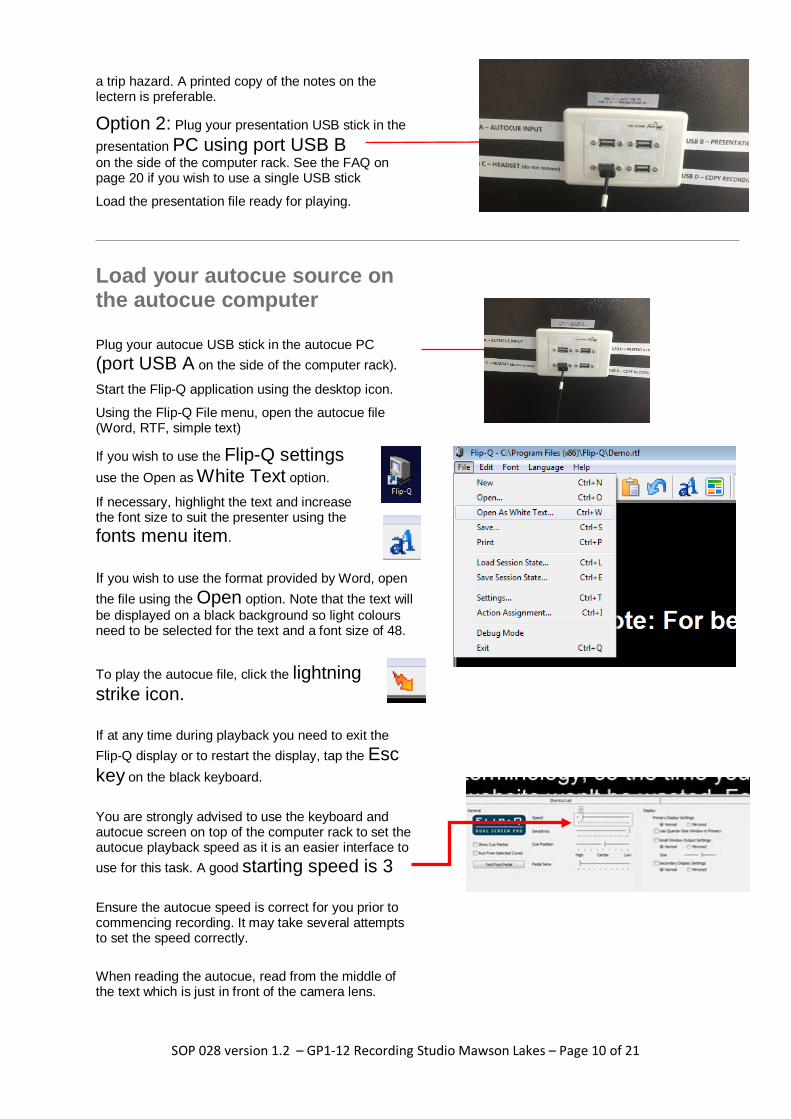
a trip hazard. A printed copy of the notes on the lectern is preferable.
Option 2: Plug your presentation USB stick in the presentation PC using port USB B on the side of the computer rack. See the FAQ on page 20 if you wish to use a single USB stick
Load the presentation file ready for playing.
Load your autocue source on the autocue computer Plug your autocue USB stick in the autocue PC (port USB A on the side of the computer rack). Start the Flip-Q application using the desktop icon.
Using the Flip-Q File menu, open the autocue file (Word, RTF, simple text)
If you wish to use the Flip-Q settings use the Open as White Text option.
If necessary, highlight the text and increase the font size to suit the presenter using the fonts menu item.
If you wish to use the format provided by Word, open the file using the Open option. Note that the text will be displayed on a black background so light colours need to be selected for the text and a font size of 48.
To play the autocue file, click the lightning strike icon.
If at any time during playback you need to exit the Flip-Q display or to restart the display, tap the Esc key on the black keyboard.
You are strongly advised to use the keyboard and autocue screen on top of the computer rack to set the autocue playback speed as it is an easier interface to use for this task. A good starting speed is 3
Ensure the autocue speed is correct for you prior to commencing recording. It may take several attempts to set the speed correctly.
When reading the autocue, read from the middle of the text which is just in front of the camera lens.
SOP 028 version 1.2 – GP1-12 Recording Studio Mawson Lakes – Page 10 of 21
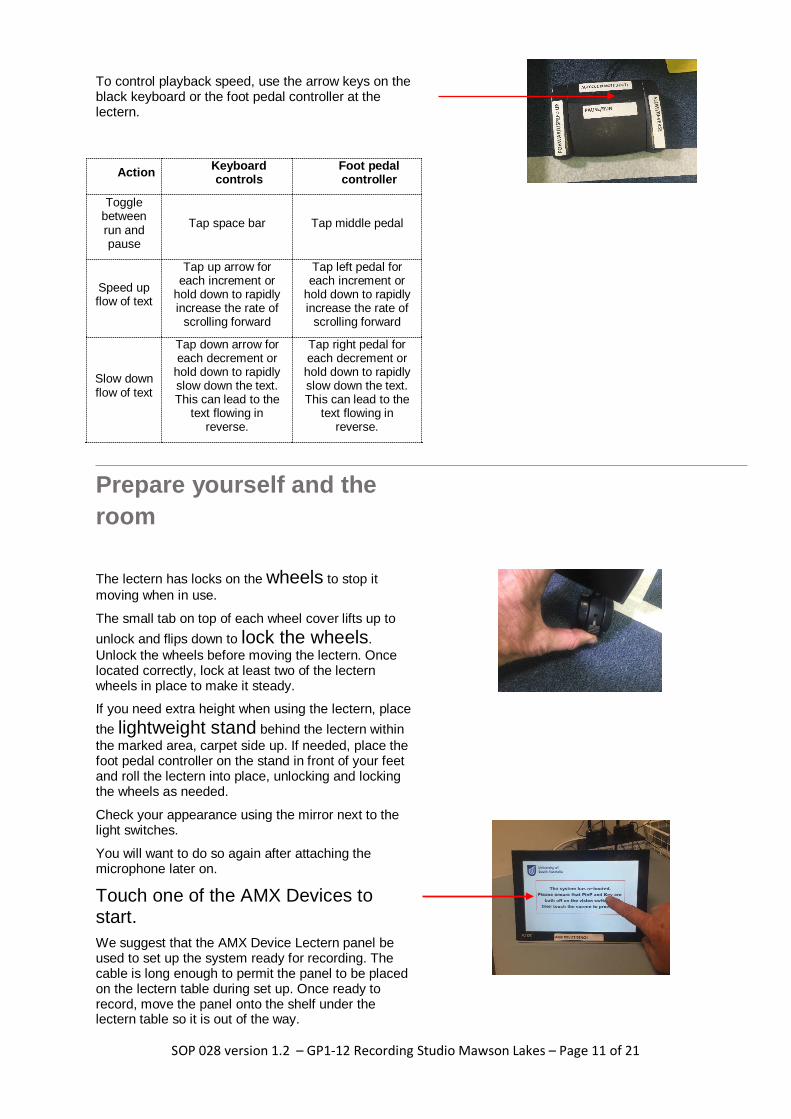
To control playback speed, use the arrow keys on the black keyboard or the foot pedal controller at the lectern.
Action Keyboard controls
Foot pedal controller
Toggle between run and pause
Tap space bar Tap middle pedal
Speed up flow of text
Tap up arrow for each increment or
hold down to rapidly increase the rate of
scrolling forward
Tap left pedal for each increment or
hold down to rapidly increase the rate of
scrolling forward
Slow down flow of text
Tap down arrow for each decrement or
hold down to rapidly slow down the text. This can lead to the
text flowing in reverse.
Tap right pedal for each decrement or hold down to rapidly slow down the text. This can lead to the
text flowing in reverse.
Prepare yourself and the room The lectern has locks on the wheels to stop it moving when in use.
The small tab on top of each wheel cover lifts up to unlock and flips down to lock the wheels. Unlock the wheels before moving the lectern. Once located correctly, lock at least two of the lectern wheels in place to make it steady.
If you need extra height when using the lectern, place the lightweight stand behind the lectern within the marked area, carpet side up. If needed, place the foot pedal controller on the stand in front of your feet and roll the lectern into place, unlocking and locking the wheels as needed.
Check your appearance using the mirror next to the light switches.
You will want to do so again after attaching the microphone later on.
Touch one of the AMX Devices to start. We suggest that the AMX Device Lectern panel be used to set up the system ready for recording. The cable is long enough to permit the panel to be placed on the lectern table during set up. Once ready to record, move the panel onto the shelf under the lectern table so it is out of the way.
SOP 028 version 1.2 – GP1-12 Recording Studio Mawson Lakes – Page 11 of 21
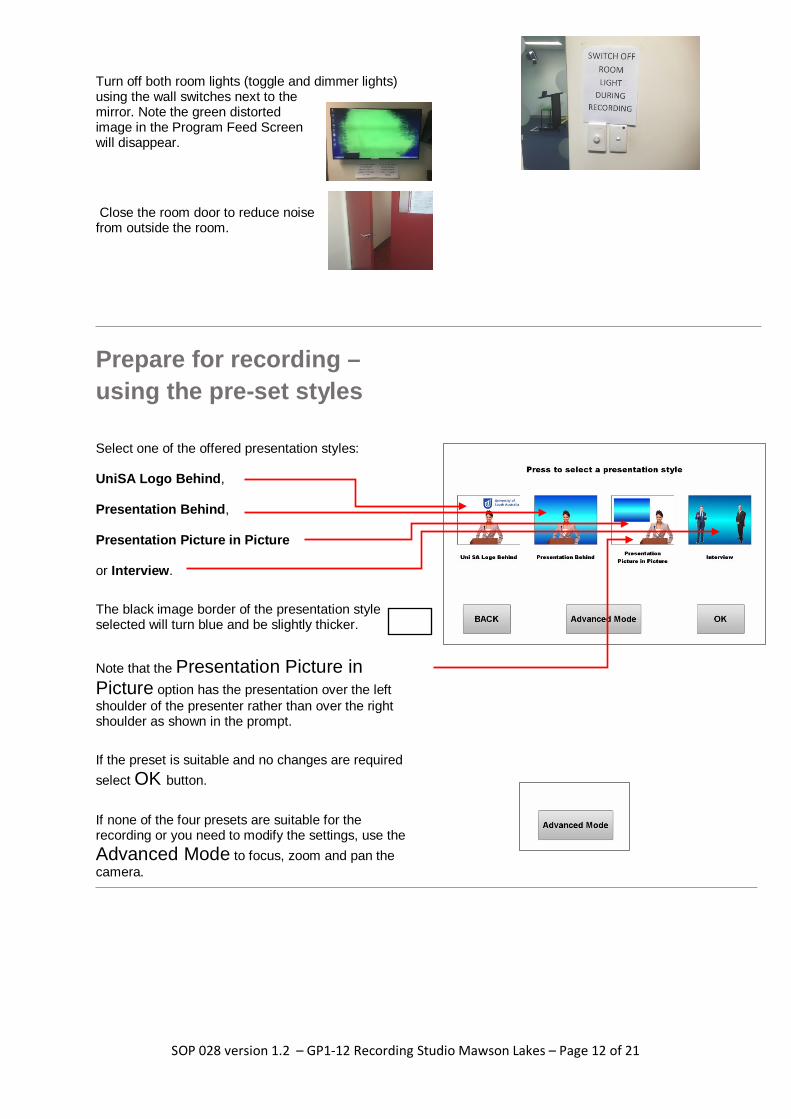
Turn off both room lights (toggle and dimmer lights) using the wall switches next to the mirror. Note the green distorted image in the Program Feed Screen will disappear.
Close the room door to reduce noise from outside the room.
Prepare for recording – using the pre-set styles Select one of the offered presentation styles: UniSA Logo Behind, Presentation Behind, Presentation Picture in Picture or Interview.
The black image border of the presentation style selected will turn blue and be slightly thicker.
Note that the Presentation Picture in Picture option has the presentation over the left shoulder of the presenter rather than over the right shoulder as shown in the prompt.
If the preset is suitable and no changes are required select OK button.
If none of the four presets are suitable for the recording or you need to modify the settings, use the Advanced Mode to focus, zoom and pan the camera.
SOP 028 version 1.2 – GP1-12 Recording Studio Mawson Lakes – Page 12 of 21
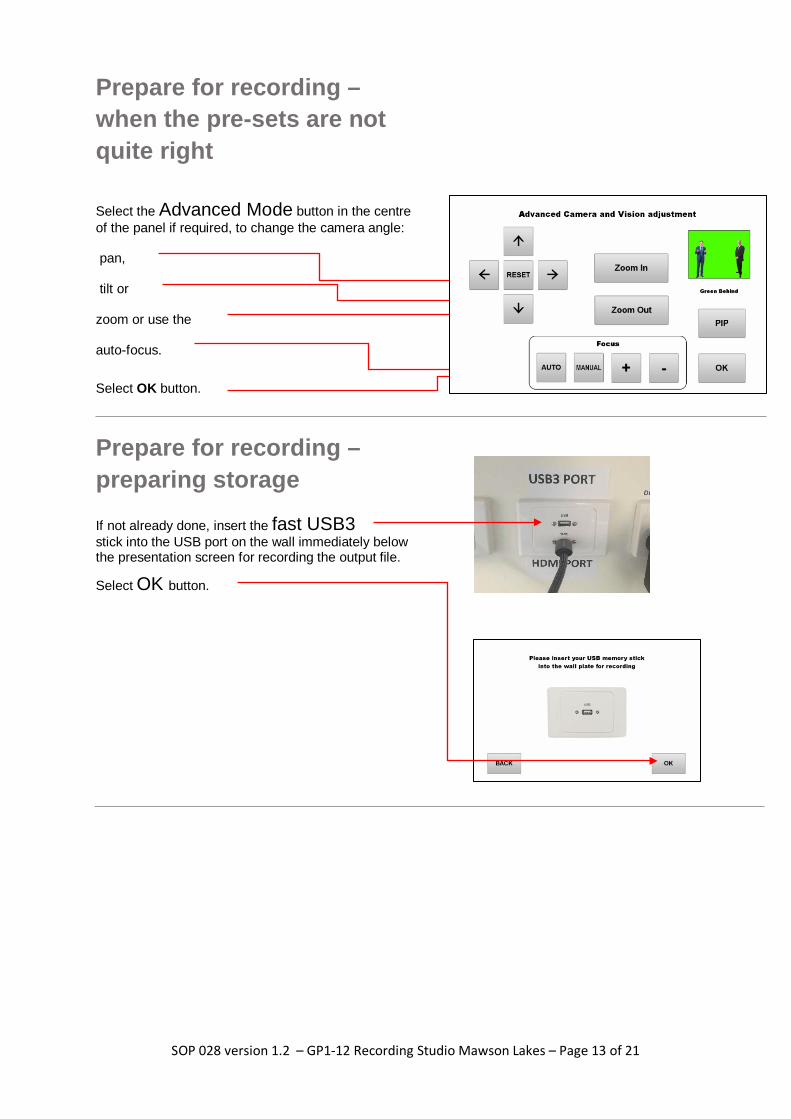
Prepare for recording – when the pre-sets are not quite right
Select the Advanced Mode button in the centre of the panel if required, to change the camera angle: pan, tilt or zoom or use the auto-focus.
Select OK button.
Prepare for recording – preparing storage If not already done, insert the fast USB3 stick into the USB port on the wall immediately below the presentation screen for recording the output file.
Select OK button.
SOP 028 version 1.2 – GP1-12 Recording Studio Mawson Lakes – Page 13 of 21
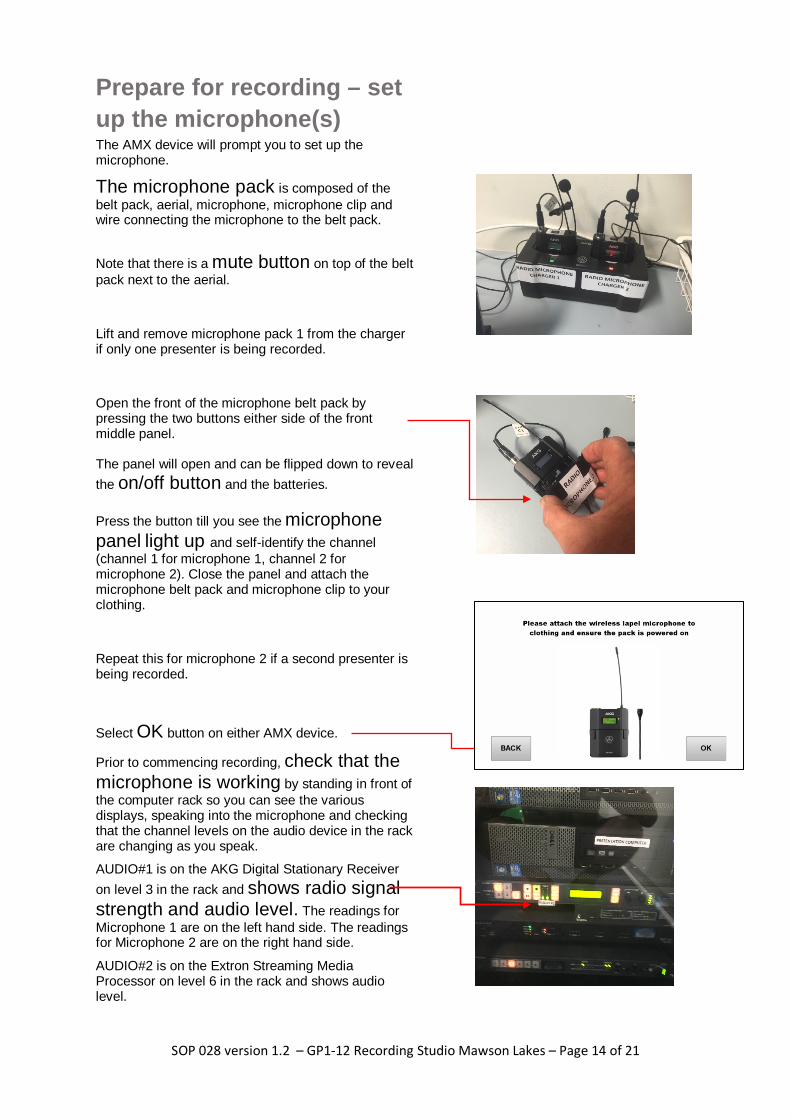
Prepare for recording – set up the microphone(s) The AMX device will prompt you to set up the microphone.
The microphone pack is composed of the belt pack, aerial, microphone, microphone clip and wire connecting the microphone to the belt pack.
Note that there is a mute button on top of the belt pack next to the aerial.
Lift and remove microphone pack 1 from the charger if only one presenter is being recorded.
Open the front of the microphone belt pack by pressing the two buttons either side of the front middle panel. The panel will open and can be flipped down to reveal the on/off button and the batteries. Press the button till you see the microphone panel light up and self-identify the channel (channel 1 for microphone 1, channel 2 for microphone 2). Close the panel and attach the microphone belt pack and microphone clip to your clothing.
Repeat this for microphone 2 if a second presenter is being recorded.
Select OK button on either AMX device.
Prior to commencing recording, check that the microphone is working by standing in front of the computer rack so you can see the various displays, speaking into the microphone and checking that the channel levels on the audio device in the rack are changing as you speak.
AUDIO#1 is on the AKG Digital Stationary Receiver on level 3 in the rack and shows radio signal strength and audio level. The readings for Microphone 1 are on the left hand side. The readings for Microphone 2 are on the right hand side.
AUDIO#2 is on the Extron Streaming Media Processor on level 6 in the rack and shows audio level.
SOP 028 version 1.2 – GP1-12 Recording Studio Mawson Lakes – Page 14 of 21
Prior to commencing recording, check your appearance one last time in the mirror to make sure the microphone, wire and belt pack are all hidden. You may need to temporarily turn the room lights on while doing this. Remember to turn the room lights off once satisfied.
Recording If using the lectern, move the white wireless keyboard to the lectern table.
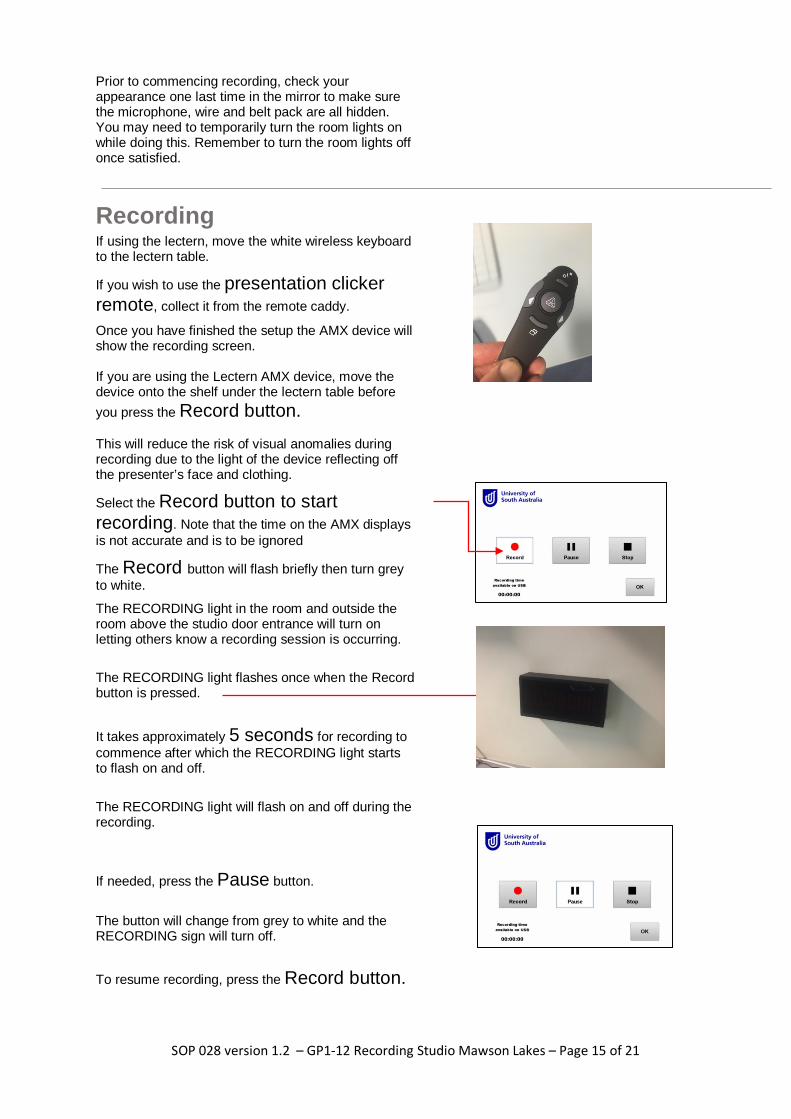
If you wish to use the presentation clicker remote, collect it from the remote caddy.
Once you have finished the setup the AMX device will show the recording screen. If you are using the Lectern AMX device, move the device onto the shelf under the lectern table before you press the Record button. This will reduce the risk of visual anomalies during recording due to the light of the device reflecting off the presenter’s face and clothing.
Select the Record button to start recording. Note that the time on the AMX displays is not accurate and is to be ignored
The Record button will flash briefly then turn grey to white.
The RECORDING light in the room and outside the room above the studio door entrance will turn on letting others know a recording session is occurring.
The RECORDING light flashes once when the Record button is pressed.
It takes approximately 5 seconds for recording to commence after which the RECORDING light starts to flash on and off.
The RECORDING light will flash on and off during the recording.
If needed, press the Pause button.
The button will change from grey to white and the RECORDING sign will turn off.
To resume recording, press the Record button.
SOP 028 version 1.2 – GP1-12 Recording Studio Mawson Lakes – Page 15 of 21
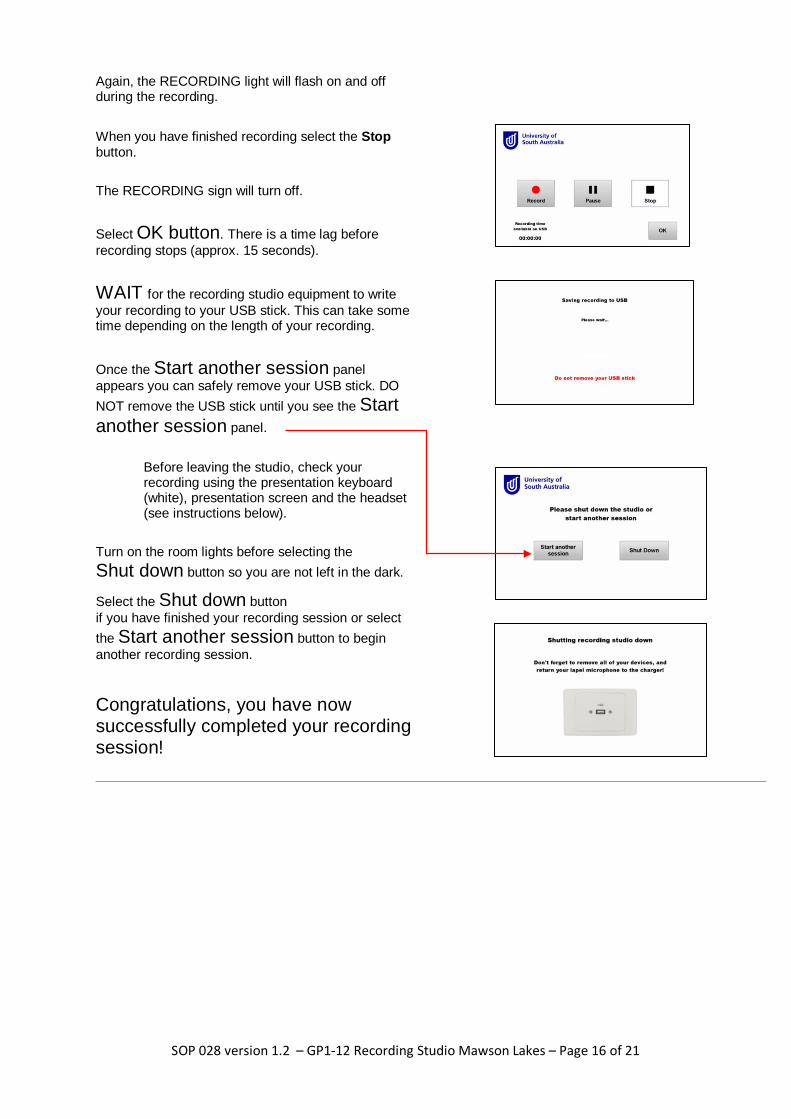
Again, the RECORDING light will flash on and off during the recording.
When you have finished recording select the Stop button.
The RECORDING sign will turn off.
Select OK button. There is a time lag before recording stops (approx. 15 seconds).
WAIT for the recording studio equipment to write your recording to your USB stick. This can take some time depending on the length of your recording.
Once the Start another session panel appears you can safely remove your USB stick. DO NOT remove the USB stick until you see the Start another session panel.
Before leaving the studio, check your recording using the presentation keyboard (white), presentation screen and the headset (see instructions below).
Turn on the room lights before selecting the Shut down button so you are not left in the dark.
Select the Shut down button if you have finished your recording session or select the Start another session button to begin another recording session.
Congratulations, you have now successfully completed your recording session!
SOP 028 version 1.2 – GP1-12 Recording Studio Mawson Lakes – Page 16 of 21
Check your recording If you have not already done so, turn on the room lights.
Remove the USB3 from the wall port and plug it into the computer rack USB D – COPY RECORDING port
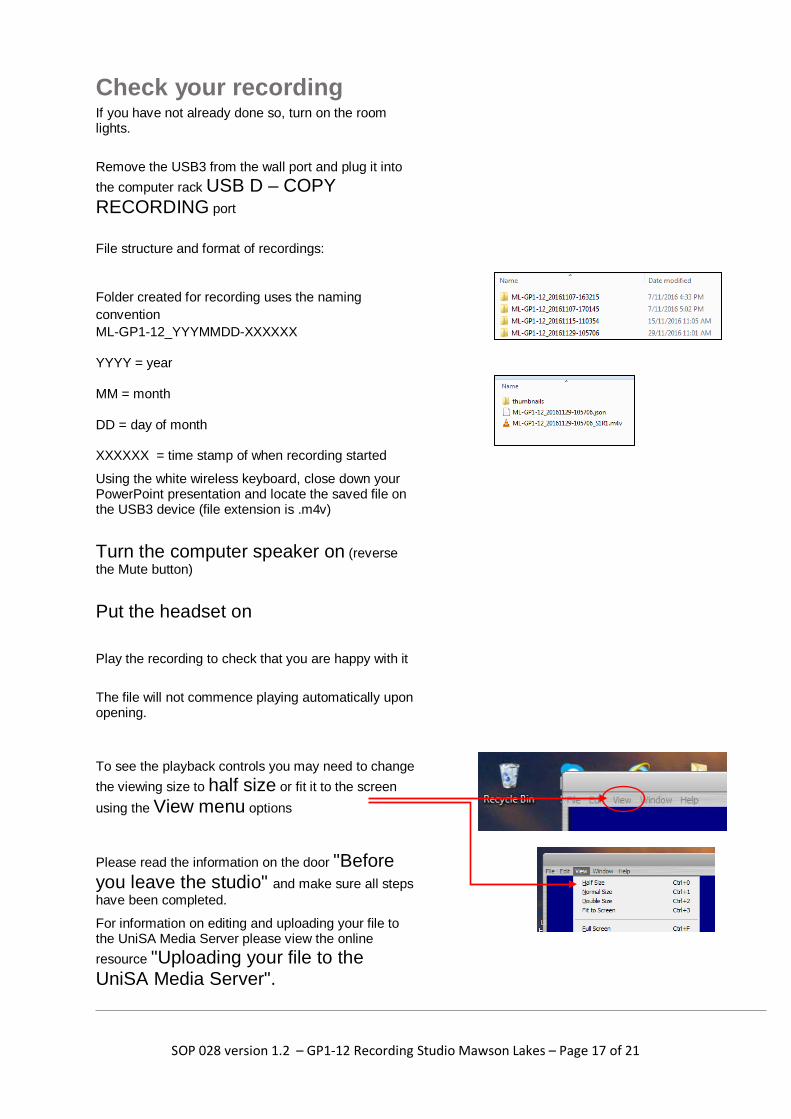
File structure and format of recordings:
Folder created for recording uses the naming convention ML-GP1-12_YYYMMDD-XXXXXX
YYYY = year
MM = month
DD = day of month
XXXXXX = time stamp of when recording started
Using the white wireless keyboard, close down your PowerPoint presentation and locate the saved file on the USB3 device (file extension is .m4v)
Turn the computer speaker on (reverse the Mute button)
Put the headset on Play the recording to check that you are happy with it
The file will not commence playing automatically upon opening.
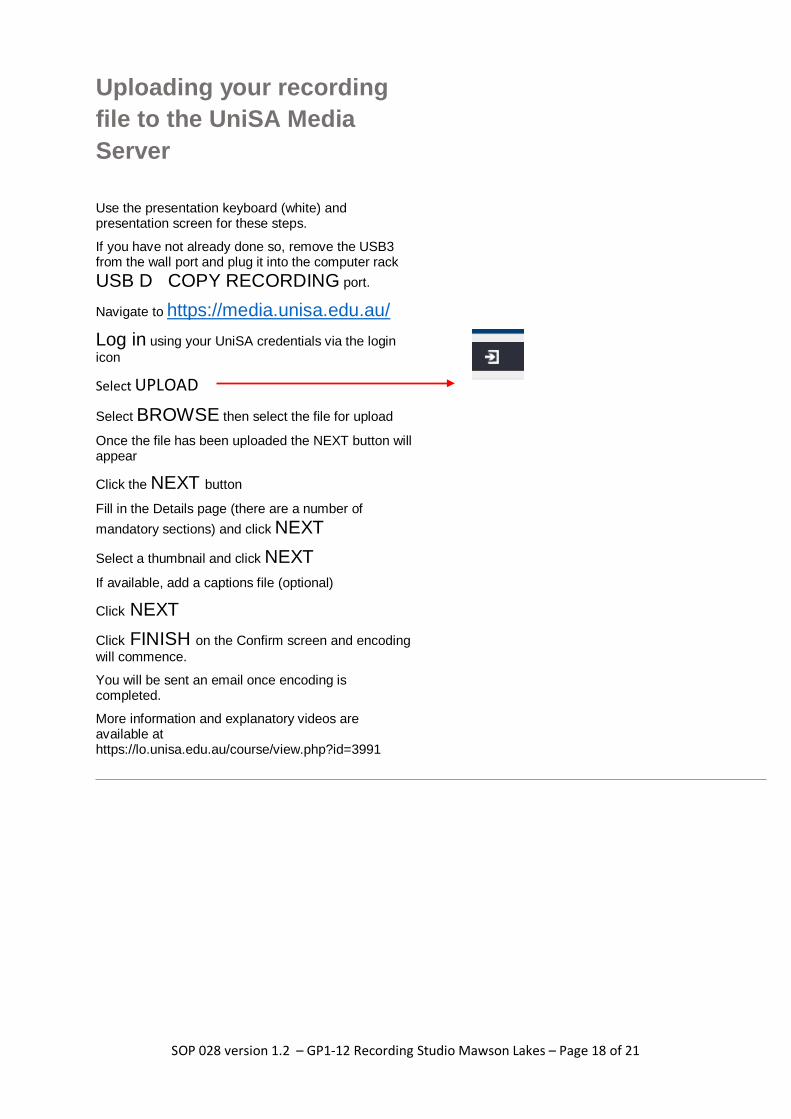
To see the playback controls you may need to change the viewing size to half size or fit it to the screen using the View menu options
Please read the information on the door "Before you leave the studio" and make sure all steps have been completed.
For information on editing and uploading your file to the UniSA Media Server please view the online resource "Uploading your file to the UniSA Media Server".
SOP 028 version 1.2 – GP1-12 Recording Studio Mawson Lakes – Page 17 of 21
Uploading your recording file to the UniSA Media Server Use the presentation keyboard (white) and presentation screen for these steps.
If you have not already done so, remove the USB3 from the wall port and plug it into the computer rack USB D COPY RECORDING port.
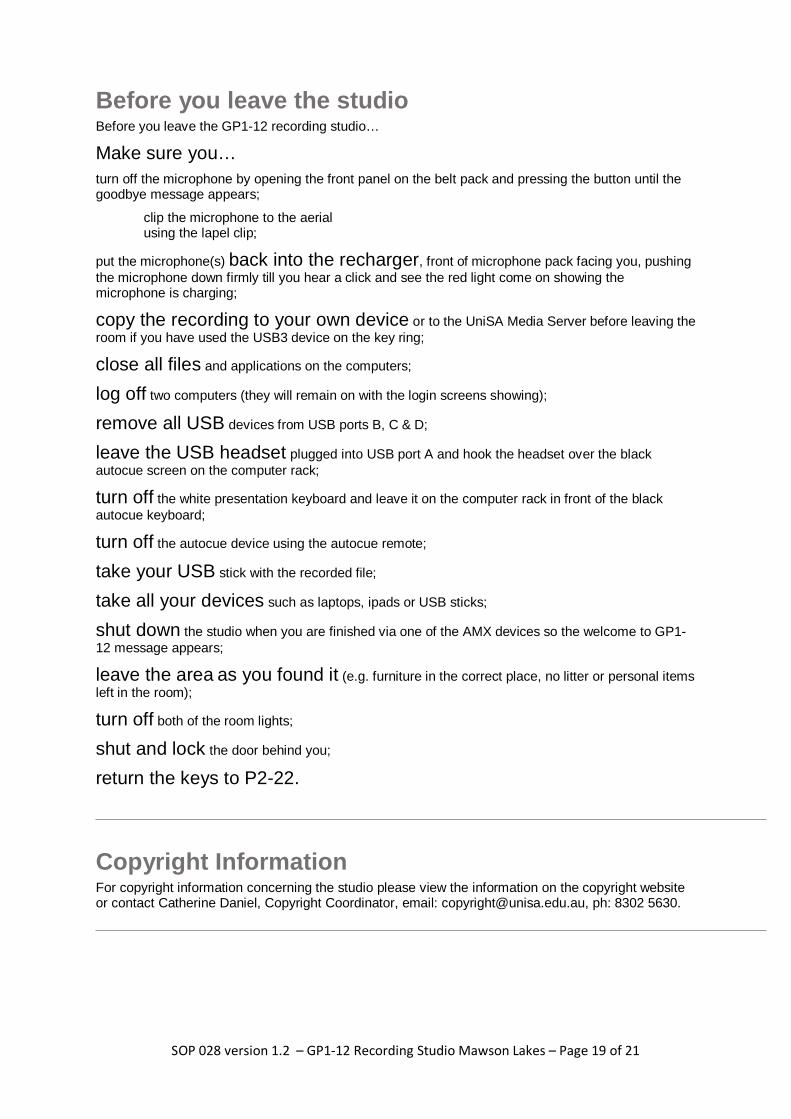
Navigate to https://media.unisa.edu.au/ Log in using your UniSA credentials via the login icon
Select UPLOAD
Select BROWSE then select the file for upload
Once the file has been uploaded the NEXT button will appear
Click the NEXT button
Fill in the Details page (there are a number of mandatory sections) and click NEXT
Select a thumbnail and click NEXT
If available, add a captions file (optional)
Click NEXT
Click FINISH on the Confirm screen and encoding will commence.
You will be sent an email once encoding is completed.
More information and explanatory videos are available at https://lo.unisa.edu.au/course/view.php?id=3991
SOP 028 version 1.2 – GP1-12 Recording Studio Mawson Lakes – Page 18 of 21
Before you leave the studio Before you leave the GP1-12 recording studio…
Make sure you… turn off the microphone by opening the front panel on the belt pack and pressing the button until the goodbye message appears;
clip the microphone to the aerial using the lapel clip;
put the microphone(s) back into the recharger, front of microphone pack facing you, pushing the microphone down firmly till you hear a click and see the red light come on showing the microphone is charging;
copy the recording to your own device or to the UniSA Media Server before leaving the room if you have used the USB3 device on the key ring;
close all files and applications on the computers;
log off two computers (they will remain on with the login screens showing);
remove all USB devices from USB ports B, C & D;
leave the USB headset plugged into USB port A and hook the headset over the black autocue screen on the computer rack;
turn off the white presentation keyboard and leave it on the computer rack in front of the black autocue keyboard;
turn off the autocue device using the autocue remote;
take your USB stick with the recorded file;
take all your devices such as laptops, ipads or USB sticks;
shut down the studio when you are finished via one of the AMX devices so the welcome to GP1-12 message appears;
leave the area as you found it (e.g. furniture in the correct place, no litter or personal items left in the room);
turn off both of the room lights;
shut and lock the door behind you;
return the keys to P2-22.
Copyright Information For copyright information concerning the studio please view the information on the copyright website or contact Catherine Daniel, Copyright Coordinator, email: [email protected], ph: 8302 5630.
SOP 028 version 1.2 – GP1-12 Recording Studio Mawson Lakes – Page 19 of 21
Frequently Asked Questions Can I use just one USB memory stick for all files?
Yes you can if the files will all fit on the one device. The recordings are approximately 130MB per 5 minutes of recording. If you want to use a single USB memory device for all files, it will need to be a USB3.0 memory device as the recording system requires the faster speed that other slower devices do not have.
After you have logged into the autocue and presentation computers copy
• the autocue file to the autocue computer desktop using USB port A on the computer rack and black keyboard and mouse and
• the presentation file to the presentation computer desktop using USB port B on the computer rack and the white keyboard.
Plug the USB into the USB3.0 wall plug ready for recording the session
Can I use a network drive for the files?
Only for the presentation and autocue files. If you have saved the autocue and presentation files to a University network drive you will be able to access the files by creating a network connection and copying the files across to the autocue and presentation computer desktops. The recording of the session can only be through the USB3 port to a USB3.0 memory device but you can transfer the file to the network drive once the recording is saved.
The Program Feed Screen has a weird green light or blob on it. What is it?
This is caused by the room lights in the room. They need to be turned off prior to commencing recording.
Why do I need to move the AMX panel from the lectern desktop to the shelf below it during recording?
There are two reasons.
• Depending on the settings used, the top of the AMX panel may be in field of view which is not ideal for the recording.
• The light of the AMX panel reflects off the presenter and can produce odd, undesireable effects in the recording.
The pre-set styles and the layout of the room do not suit the needs of my recording. What can I do about it?
Feel free to move furniture about and use the Advanced Mode to set the settings you would like to use.
When moving the furniture note that
• the seats are light and easy to move
• the lectern has brakes on all four wheels and these need to be unlocked before moving the lectern
• the AMX panel and the autocue foot pedal are both connected to the computer rack by Ethernet cables that run along the floor. The safety mat needs to be lifted so the cables can move freely and not pull the AMX device to the floor.
• all furniture must be returned to the original layout of the room at the end of the session
My presentation has a black bar either side of the display. How do I get rid of it?
Save your PowerPoint presentation in On-screen Show (16:9) format (you can change the format via the Page Setup icon on the Design tab)
SOP 028 version 1.2 – GP1-12 Recording Studio Mawson Lakes – Page 20 of 21
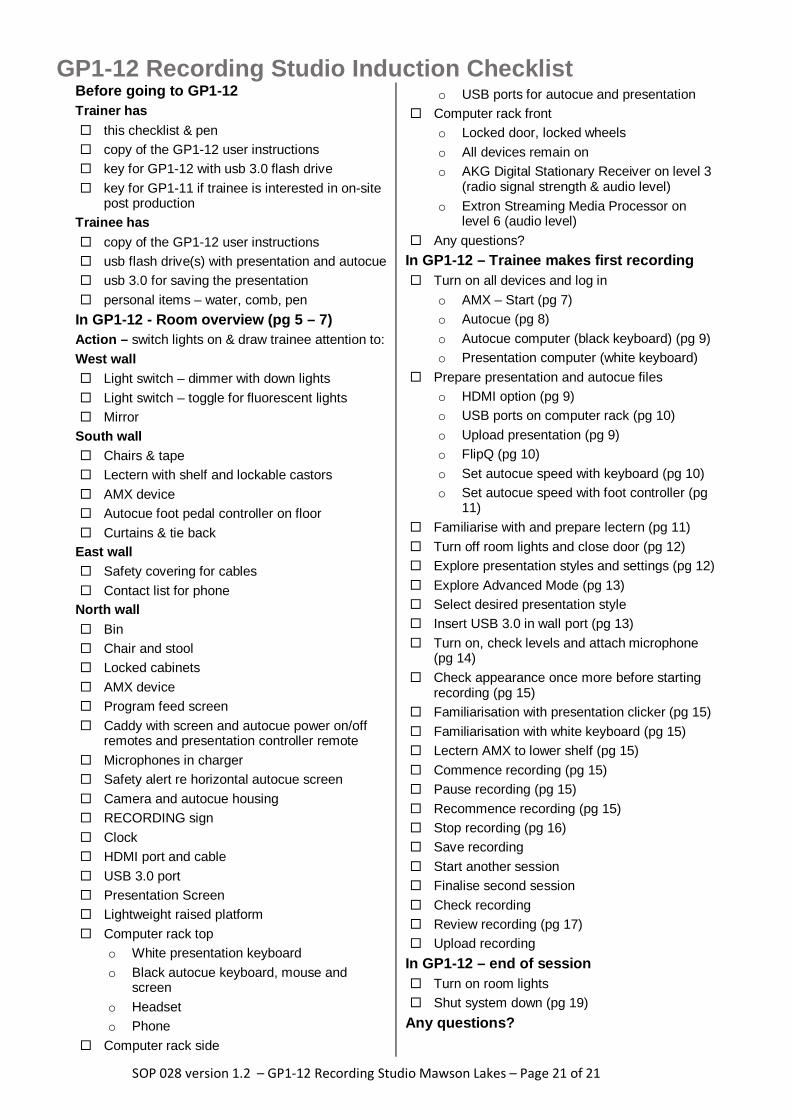
GP1-12 Recording Studio Induction Checklist Before going to GP1-12 Trainer has this checklist & pen copy of the GP1-12 user instructions key for GP1-12 with usb 3.0 flash drive key for GP1-11 if trainee is interested in on-site
post production Trainee has copy of the GP1-12 user instructions usb flash drive(s) with presentation and autocue usb 3.0 for saving the presentation personal items – water, comb, pen
In GP1-12 - Room overview (pg 5 – 7) Action – switch lights on & draw trainee attention to: West wall Light switch – dimmer with down lights Light switch – toggle for fluorescent lights Mirror
South wall Chairs & tape Lectern with shelf and lockable castors AMX device Autocue foot pedal controller on floor Curtains & tie back
East wall Safety covering for cables Contact list for phone
North wall Bin Chair and stool Locked cabinets AMX device Program feed screen Caddy with screen and autocue power on/off
remotes and presentation controller remote Microphones in charger Safety alert re horizontal autocue screen Camera and autocue housing RECORDING sign Clock HDMI port and cable USB 3.0 port Presentation Screen Lightweight raised platform Computer rack top
o White presentation keyboard o Black autocue keyboard, mouse and
screen o Headset o Phone
Computer rack side
o USB ports for autocue and presentation Computer rack front
o Locked door, locked wheels o All devices remain on o AKG Digital Stationary Receiver on level 3
(radio signal strength & audio level) o Extron Streaming Media Processor on
level 6 (audio level) Any questions?
In GP1-12 – Trainee makes first recording Turn on all devices and log in
o AMX – Start (pg 7) o Autocue (pg 8) o Autocue computer (black keyboard) (pg 9) o Presentation computer (white keyboard)
Prepare presentation and autocue files o HDMI option (pg 9) o USB ports on computer rack (pg 10) o Upload presentation (pg 9) o FlipQ (pg 10) o Set autocue speed with keyboard (pg 10) o Set autocue speed with foot controller (pg
11) Familiarise with and prepare lectern (pg 11) Turn off room lights and close door (pg 12) Explore presentation styles and settings (pg 12) Explore Advanced Mode (pg 13) Select desired presentation style Insert USB 3.0 in wall port (pg 13) Turn on, check levels and attach microphone
(pg 14) Check appearance once more before starting
recording (pg 15) Familiarisation with presentation clicker (pg 15) Familiarisation with white keyboard (pg 15) Lectern AMX to lower shelf (pg 15) Commence recording (pg 15) Pause recording (pg 15) Recommence recording (pg 15) Stop recording (pg 16) Save recording Start another session Finalise second session Check recording Review recording (pg 17) Upload recording
In GP1-12 – end of session Turn on room lights Shut system down (pg 19)
Any questions?
SOP 028 version 1.2 – GP1-12 Recording Studio Mawson Lakes – Page 21 of 21


![GP1 Chap3 KJF Vectors Lect1 s11.pptfaculty.chas.uni.edu/~shand/GP1_Lecture_Notes/GP1... · Microsoft PowerPoint - GP1_Chap3_KJF_Vectors_Lect1_s11.ppt [Compatibility Mode] Author:](https://img.pdfslide.us/doc/110x75/5f327f5e5361284da15902f1/gp1-chap3-kjf-vectors-lect1-s11-shandgp1lecturenotesgp1-microsoft-powerpoint.jpg)


![GP1[1].Global Processing-R10.01.pdf](https://img.pdfslide.us/doc/110x75/577cc48f1a28aba71199baf3/gp11global-processing-r1001pdf.jpg)


![[GP1] Guiding Principles](https://img.pdfslide.us/doc/110x75/56816858550346895dde8352/gp1-guiding-principles.jpg)

