Embed Size (px)
Citation preview
Page 1 of 28
OTRUM Digital Signage V3.11
Content
The Overview page ............................................................................................................................................. 3
The Calendar View .............................................................................................................................................. 5
How to add presentations................................................................................................................................ 6
Add text presentation ................................................................................................................................... 6
Add images ....................................................................................................................................................... 8
Add videos ...................................................................................................................................................... 10
Add price or lunch lists .............................................................................................................................. 11
Add an RSS or XML feed ........................................................................................................................... 14
2
Add a web page (HTML) ........................................................................................................................... 15
Add Flash......................................................................................................................................................... 16
Add content to touch displays (interactive content) ...................................................................... 16
Add animation............................................................................................................................................... 17
Archive display group ..................................................................................................................................... 19
Conferences ........................................................................................................................................................ 20
the Notifications tool ..................................................................................................................................... 24
Troubleshooting ................................................................................................................................................ 27
All added presentations aren’t shown on the display(s) ................................................................... 27
The text on the display is blurry .................................................................................................................. 27
Red dot shown on a display group in the Overview page ............................................................... 27
Yellow dot shown on a display group in the Overview page .......................................................... 27
Tips and FAQ ................................................................................................................................................... 28
How to add images to an existing presentation? ................................................................................ 28
How to remove one image of an existing presentation that has many images in it? ............ 28
How to add text to a ready made template ot animation? .............................................................. 28
How to stop an existing presentation without removing it? ........................................................... 28
How do I activate a presentation again? ................................................................................................. 28
How do I make a presentation to be shown continuously over all other presentations? .... 28
3
Welcome to use the Otrum Digital Signage Manager user interface! With the help of this user
manual you’ll learn how to update the material on your displays. In other words you’ll learn how
to create, schedule, and modify presentations.
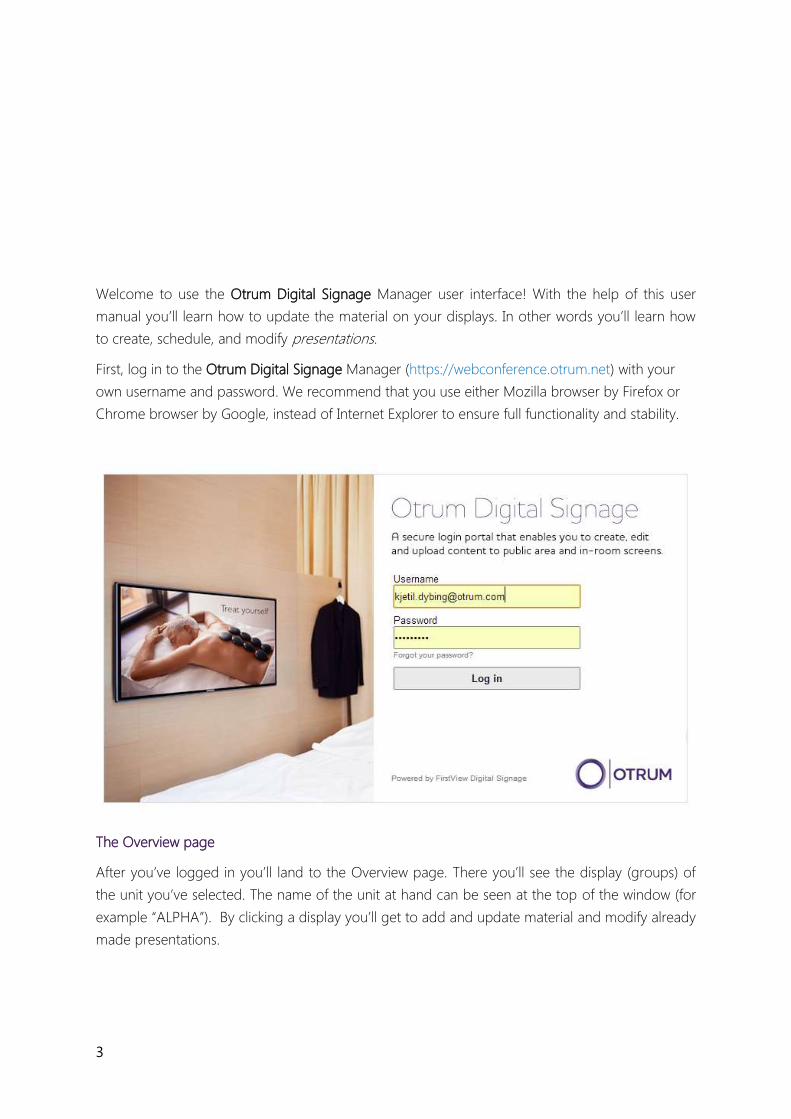
First, log in to the Otrum Digital Signage Manager (https://webconference.otrum.net) with your
own username and password. We recommend that you use either Mozilla browser by Firefox or
Chrome browser by Google, instead of Internet Explorer to ensure full functionality and stability.
The Overview page
After you’ve logged in you’ll land to the Overview page. There you’ll see the display (groups) of
the unit you’ve selected. The name of the unit at hand can be seen at the top of the window (for
example “ALPHA”). By clicking a display you’ll get to add and update material and modify already
made presentations.

4
The content of the left side menu bar depends on the access level granted for your username.
Organization and Zone Admins can add users, create animation templates, and name display
groups. These are not visible for lower access users (such as Advanced users). The “Conferences”
tab is only visible when the conference and guidance features are used within the organization.
“Select Zone” in the upper right corner is only visible for Organization Admins. The notification
tool in the upper right corner enables Admins to send messages to Otrum Digital Signage
Manager users (see page 27).
The small screens on the Overview page show the order of the presentations and predict the
length of the loop.
A green circle at the lower left corner of the screen signifies that the displays and network within
that particular display (group) are functioning normally. A red circle signifies that one or more
media players have lost connection to the server (see Troubleshooting page 29). A yellow circle
signifies that the memory of a media player is full. In this case the media player isn’t able to
receive any more material (presentations) before old material has been deleted.
The number on the lower right corner of the screen tells the amount of presentations scheduled
for the display (group) altogether (also the presentations scheduled to start in the future).
5
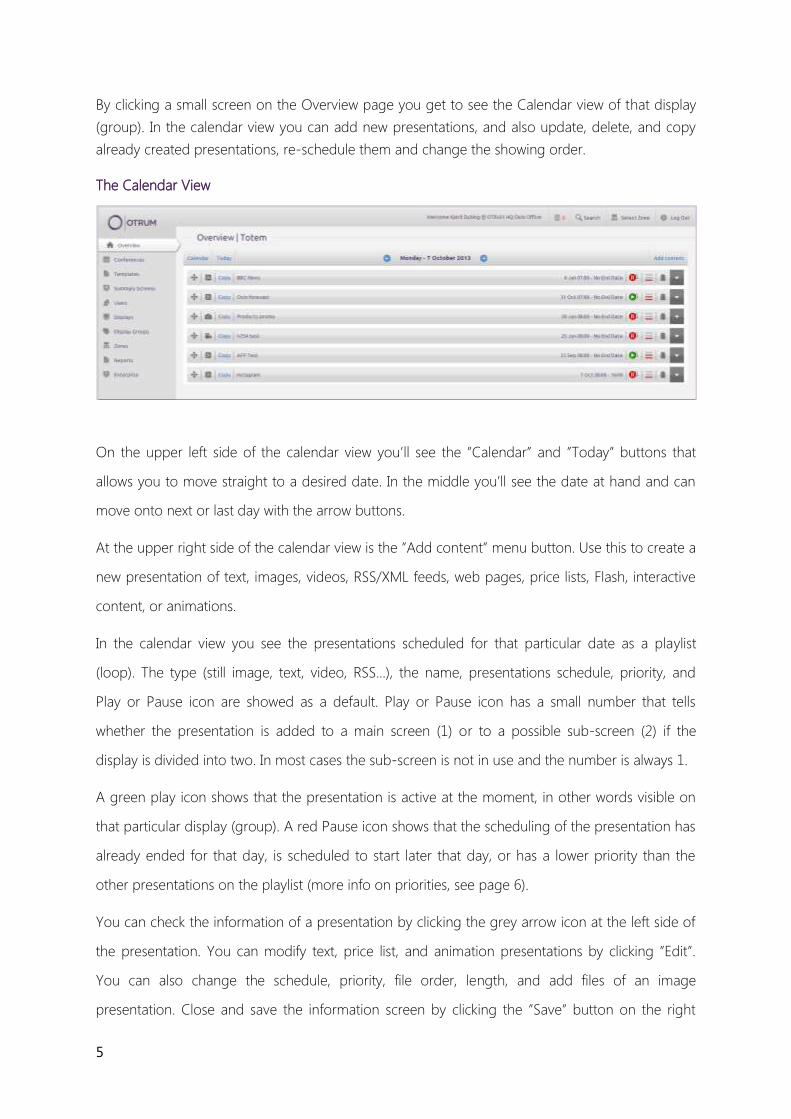
By clicking a small screen on the Overview page you get to see the Calendar view of that display
(group). In the calendar view you can add new presentations, and also update, delete, and copy
already created presentations, re-schedule them and change the showing order.
The Calendar View
On the upper left side of the calendar view you’ll see the ”Calendar” and ”Today” buttons that
allows you to move straight to a desired date. In the middle you’ll see the date at hand and can
move onto next or last day with the arrow buttons.
At the upper right side of the calendar view is the ”Add content” menu button. Use this to create a
new presentation of text, images, videos, RSS/XML feeds, web pages, price lists, Flash, interactive
content, or animations.
In the calendar view you see the presentations scheduled for that particular date as a playlist
(loop). The type (still image, text, video, RSS...), the name, presentations schedule, priority, and
Play or Pause icon are showed as a default. Play or Pause icon has a small number that tells
whether the presentation is added to a main screen (1) or to a possible sub-screen (2) if the
display is divided into two. In most cases the sub-screen is not in use and the number is always 1.
A green play icon shows that the presentation is active at the moment, in other words visible on
that particular display (group). A red Pause icon shows that the scheduling of the presentation has
already ended for that day, is scheduled to start later that day, or has a lower priority than the
other presentations on the playlist (more info on priorities, see page 6).
You can check the information of a presentation by clicking the grey arrow icon at the left side of
the presentation. You can modify text, price list, and animation presentations by clicking ”Edit”.
You can also change the schedule, priority, file order, length, and add files of an image
presentation. Close and save the information screen by clicking the ”Save” button on the right

6
corner. If you don’t want to save, just click the grey arrow icon again to close the information
screen. You can delete a presentation with the trashcan icon next to the presentation. NOTE! The
presentation will also be deleted from other display (groups) that it has been added.
How to add presentations
The following gives instructions on how to create presentations (add content) to displays. You can
add Text, Image, Video, Price list, HTML, RSS/XML, Flash, Interactive, and Animation presentations.
All presentations can be shown on selected displays, on a selected time, in a selected order. Same
display can have multiple presentations at the same time. As a default the presentations are
shown on display at the order they’ve been added. The order can be changed by dragging a
presentation to a desired place by using the arrow icon at the left side of the presentation.
All presentations are added by clicking a selected display (group) at the Overview page and by
choosing the desired material format from the “Add content” menu at the right corner of the
Calendar view.
Text, price list, RSS/XML, and animation presentations are template based. A user can add for
example text, the URL of an RSS feed, images, or other information to ready-made templates.
Organization and Zone Admins can create animation templates. Other templates (text, RSS, price
list) are created by the service provider. All users have initial default templates to use for every
tool.
Add text presentation
1. Click a selected display (group) from the Overview page
7
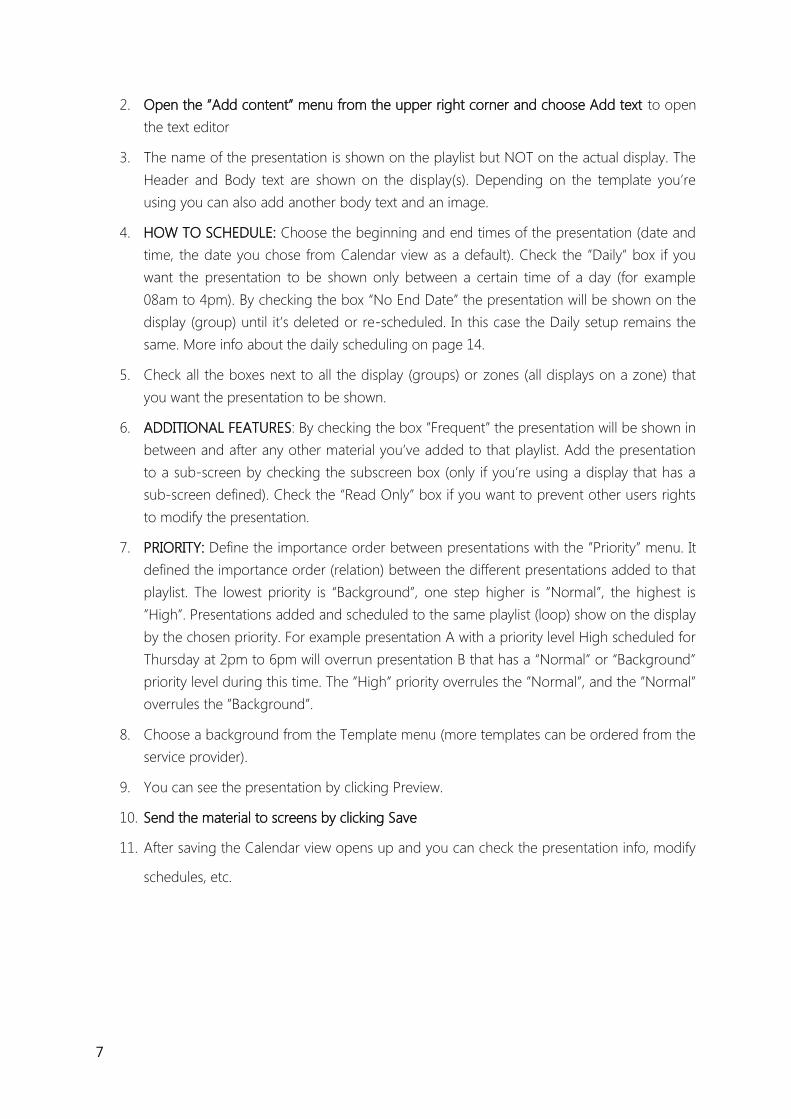
2. Open the ”Add content” menu from the upper right corner and choose Add text to open
the text editor
3. The name of the presentation is shown on the playlist but NOT on the actual display. The
Header and Body text are shown on the display(s). Depending on the template you’re
using you can also add another body text and an image.
4. HOW TO SCHEDULE: Choose the beginning and end times of the presentation (date and
time, the date you chose from Calendar view as a default). Check the ”Daily” box if you
want the presentation to be shown only between a certain time of a day (for example
08am to 4pm). By checking the box “No End Date” the presentation will be shown on the
display (group) until it’s deleted or re-scheduled. In this case the Daily setup remains the
same. More info about the daily scheduling on page 14.
5. Check all the boxes next to all the display (groups) or zones (all displays on a zone) that
you want the presentation to be shown.
6. ADDITIONAL FEATURES: By checking the box ”Frequent” the presentation will be shown in
between and after any other material you’ve added to that playlist. Add the presentation
to a sub-screen by checking the subscreen box (only if you’re using a display that has a
sub-screen defined). Check the “Read Only” box if you want to prevent other users rights
to modify the presentation.
7. PRIORITY: Define the importance order between presentations with the ”Priority” menu. It
defined the importance order (relation) between the different presentations added to that
playlist. The lowest priority is “Background”, one step higher is ”Normal”, the highest is
”High”. Presentations added and scheduled to the same playlist (loop) show on the display
by the chosen priority. For example presentation A with a priority level High scheduled for
Thursday at 2pm to 6pm will overrun presentation B that has a “Normal” or “Background”
priority level during this time. The ”High” priority overrules the ”Normal”, and the ”Normal”
overrules the ”Background”.
8. Choose a background from the Template menu (more templates can be ordered from the
service provider).
9. You can see the presentation by clicking Preview.
10. Send the material to screens by clicking Save
11. After saving the Calendar view opens up and you can check the presentation info, modify
schedules, etc.
8
Add images
You can add images with the same logic as text presentations (scheduling, features..). You need to
have the images in JPEG (.jpg, .jpeg) or PNG. Preferable resolution for images used on normal
sized displays (32” to 55” displays) is HD resolution 1080 x 1920 px, 72dpi, with color setup RGB.
All images in the same presentation have the same configuration (schedule, display time, priority,
effect).
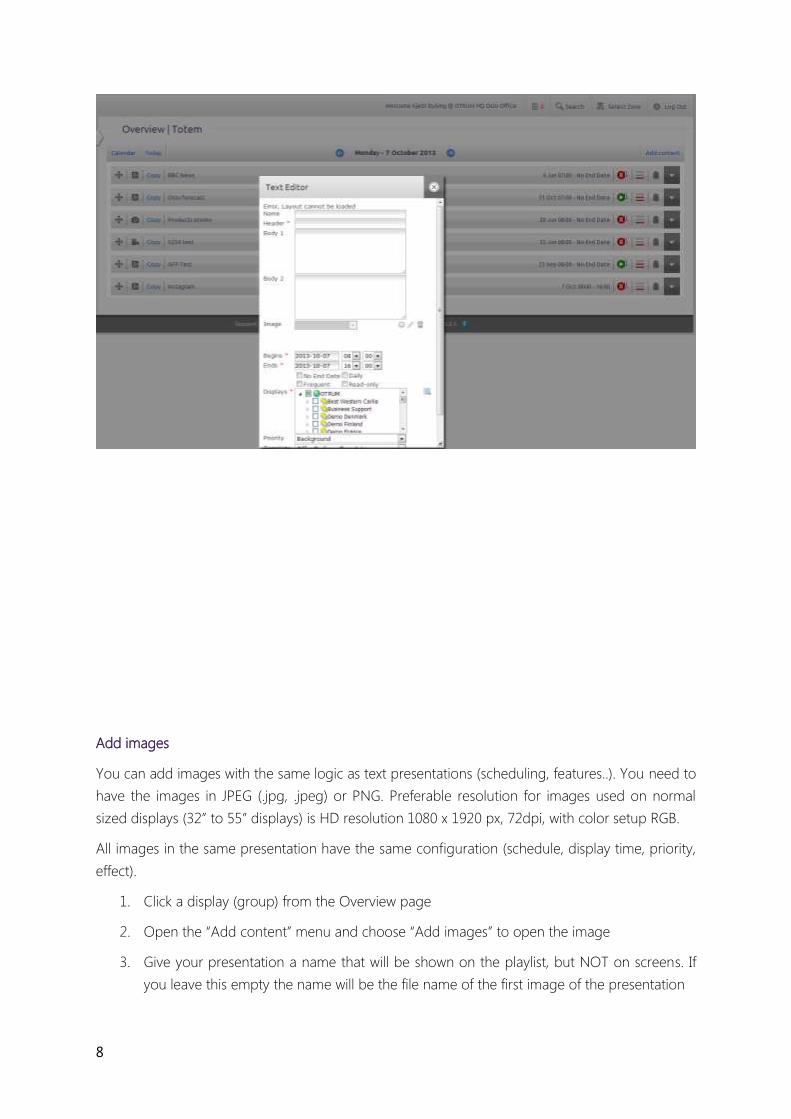
1. Click a display (group) from the Overview page
2. Open the “Add content” menu and choose “Add images” to open the image
3. Give your presentation a name that will be shown on the playlist, but NOT on screens. If
you leave this empty the name will be the file name of the first image of the presentation
9
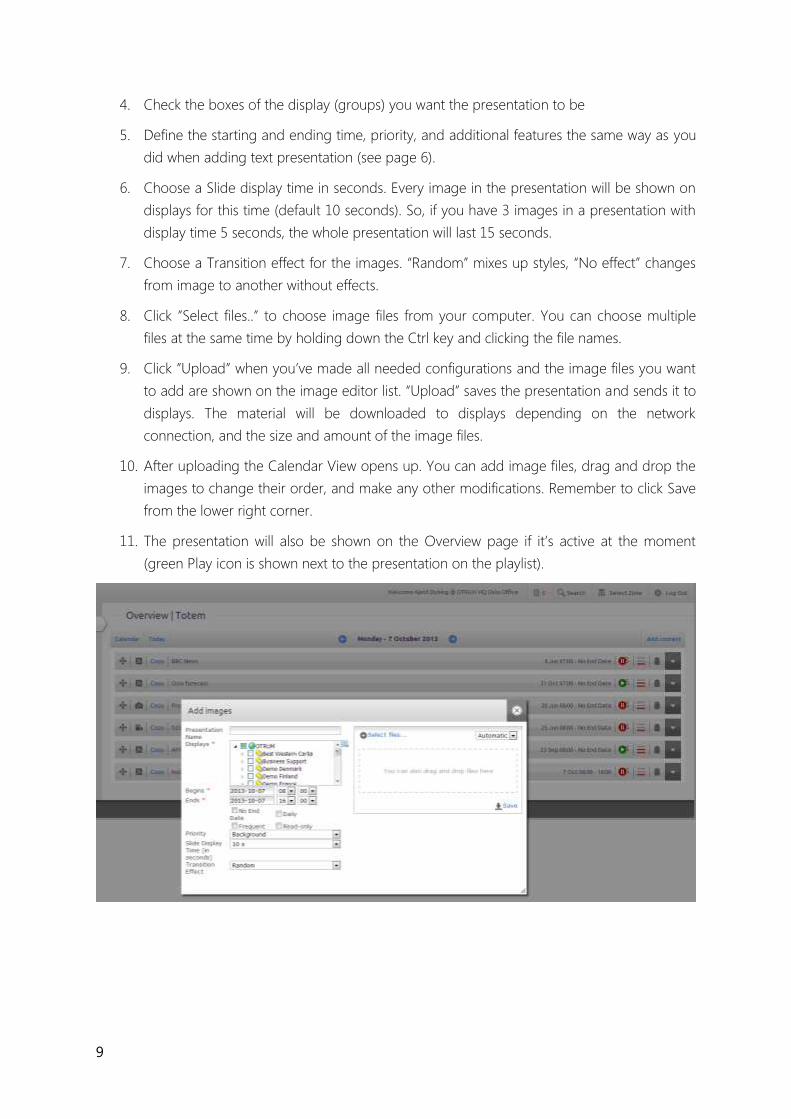
4. Check the boxes of the display (groups) you want the presentation to be
5. Define the starting and ending time, priority, and additional features the same way as you
did when adding text presentation (see page 6).
6. Choose a Slide display time in seconds. Every image in the presentation will be shown on
displays for this time (default 10 seconds). So, if you have 3 images in a presentation with
display time 5 seconds, the whole presentation will last 15 seconds.
7. Choose a Transition effect for the images. “Random” mixes up styles, “No effect” changes
from image to another without effects.
8. Click ”Select files..” to choose image files from your computer. You can choose multiple
files at the same time by holding down the Ctrl key and clicking the file names.
9. Click ”Upload” when you’ve made all needed configurations and the image files you want
to add are shown on the image editor list. “Upload” saves the presentation and sends it to
displays. The material will be downloaded to displays depending on the network
connection, and the size and amount of the image files.
10. After uploading the Calendar View opens up. You can add image files, drag and drop the
images to change their order, and make any other modifications. Remember to click Save
from the lower right corner.
11. The presentation will also be shown on the Overview page if it’s active at the moment
(green Play icon is shown next to the presentation on the playlist).
10
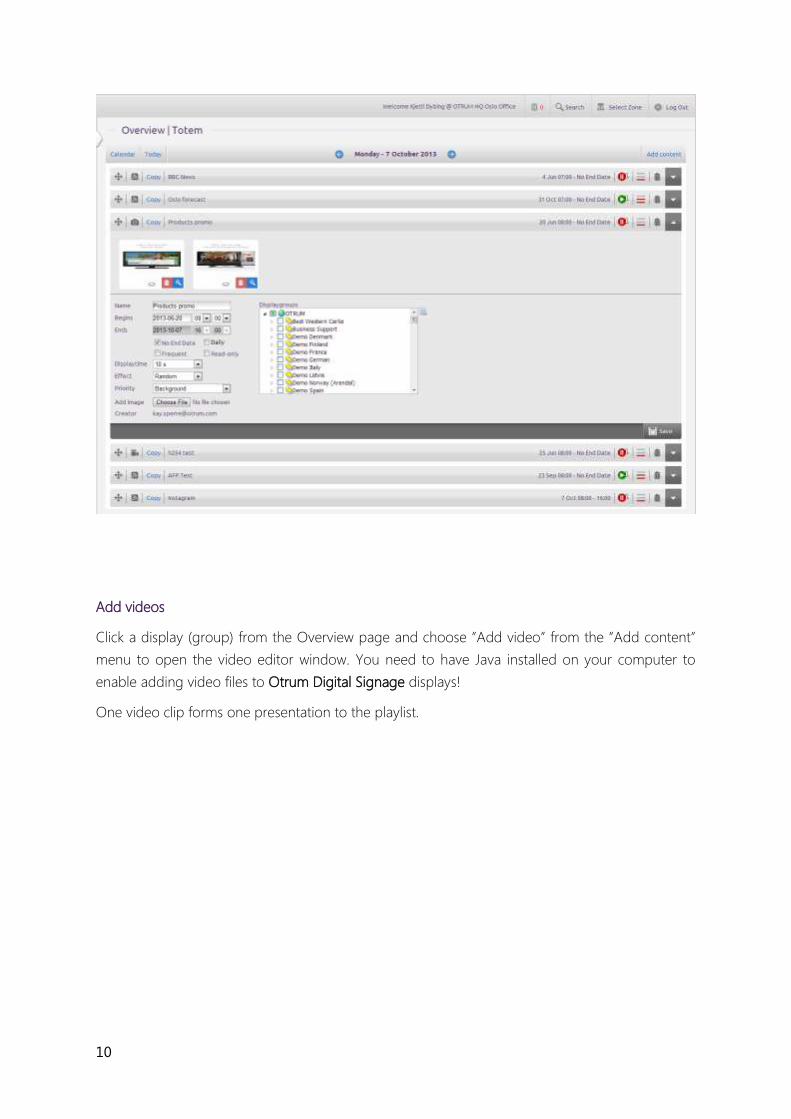
Add videos
Click a display (group) from the Overview page and choose ”Add video” from the ”Add content”
menu to open the video editor window. You need to have Java installed on your computer to
enable adding video files to Otrum Digital Signage displays!
One video clip forms one presentation to the playlist.
11
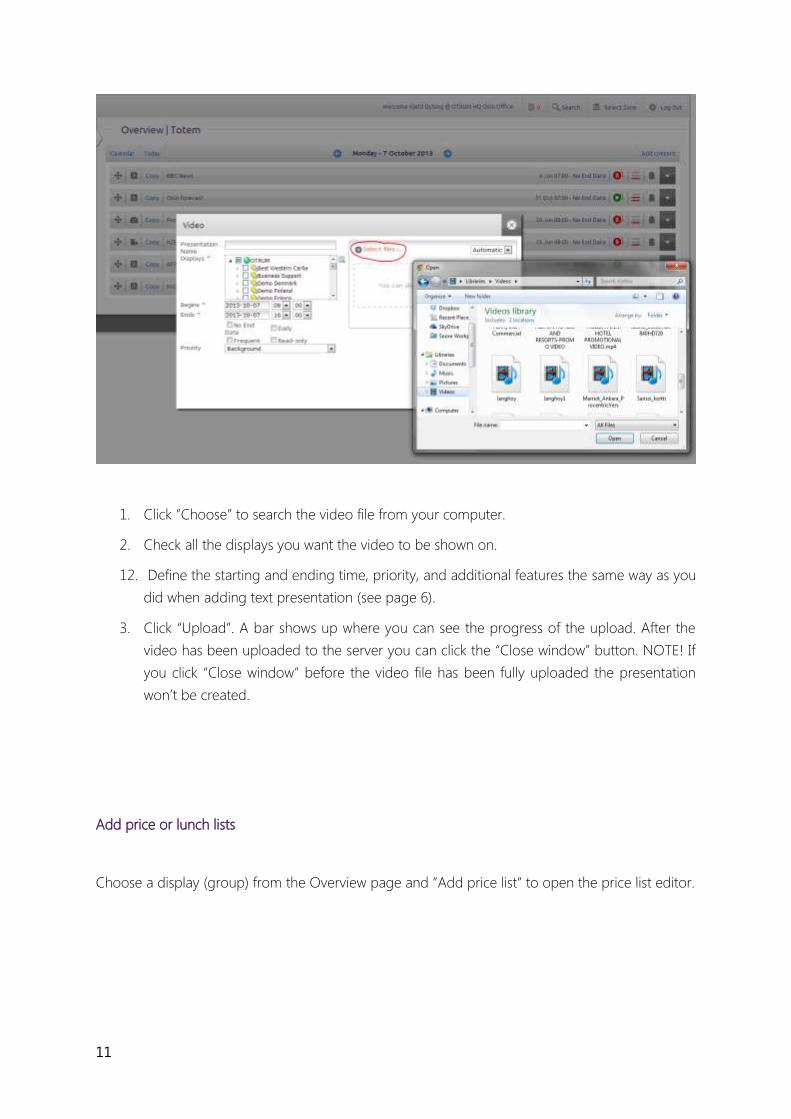
1. Click ”Choose” to search the video file from your computer.
2. Check all the displays you want the video to be shown on.
12. Define the starting and ending time, priority, and additional features the same way as you
did when adding text presentation (see page 6).
3. Click “Upload”. A bar shows up where you can see the progress of the upload. After the
video has been uploaded to the server you can click the “Close window” button. NOTE! If
you click “Close window” before the video file has been fully uploaded the presentation
won’t be created.
Add price or lunch lists
Choose a display (group) from the Overview page and ”Add price list” to open the price list editor.

12
1. Name your presentation, and give a headline (that will be shown on screens)
2. Define the starting and ending time, priority, and additional features the same way as you
did when adding text presentation (see page 6).
3. Choose the displays (display groups) that you want the presentation to be shown on.
4. Choose a template for your presentation and click OK.
5. Write the name of the product, price and possible description (e.g. House wine 4,00€, 16cl
Chablis)
6. You can define the order of the products on screen (from top to bottom) with the right
side arrow menu. When you change the order number of one product, the other products
will automatically be redefined.
7. By checking the box ‘Disable’ you can remove that product from the list, for example if
you run out of this product.
8. By clicking ’Clear’ you can remove all information of that row
9. You can preview the list by clicking “Preview”
10. Send your presentation to screen(s) by clicking Save
11. After saving the Calendar view will open where you can edit and copy the presentation
12. By clicking ’Edit’ you get back to the price list editor to modify text, prices, etc. With the
‘Copy’ button you can create a copy of the presentation for example in case you need to
add more products under the same header
13. The presentation will also be seen on the Overview page if it’s active at the moment
(green Play icon)

13
Scheduling: the DAILY
box
Click ”Daily” below the
calendar scheduling of
the presentation.
You can schedule a
presentation to be shown
(of to be off) only
between certain time of
a day or only few days
of the week 8e.g. lunch
time or weekends).
Adjust by dragging the
squares on the timeline.
The yellow color shows
when the presentation
will be shown on
screens. “Scheduled on”
and “Scheduled off” sets
the show time in hours,
“Today on” and “Today
off” sets the show time
for the whole day.”
Click the small clock
icon on the right to
copy a setting to other
days.
14
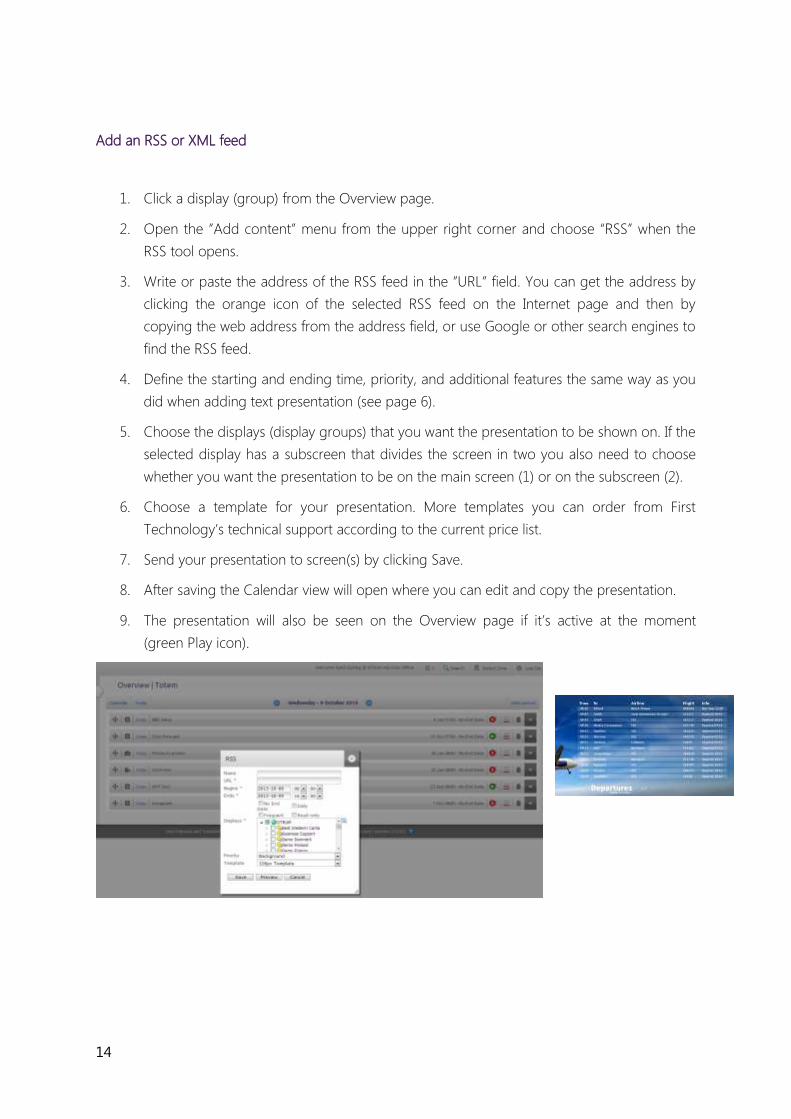
Add an RSS or XML feed
1. Click a display (group) from the Overview page.
2. Open the ”Add content” menu from the upper right corner and choose “RSS” when the
RSS tool opens.
3. Write or paste the address of the RSS feed in the ”URL” field. You can get the address by
clicking the orange icon of the selected RSS feed on the Internet page and then by
copying the web address from the address field, or use Google or other search engines to
find the RSS feed.
4. Define the starting and ending time, priority, and additional features the same way as you
did when adding text presentation (see page 6).
5. Choose the displays (display groups) that you want the presentation to be shown on. If the
selected display has a subscreen that divides the screen in two you also need to choose
whether you want the presentation to be on the main screen (1) or on the subscreen (2).
6. Choose a template for your presentation. More templates you can order from First
Technology’s technical support according to the current price list.
7. Send your presentation to screen(s) by clicking Save.
8. After saving the Calendar view will open where you can edit and copy the presentation.
9. The presentation will also be seen on the Overview page if it’s active at the moment
(green Play icon).
15
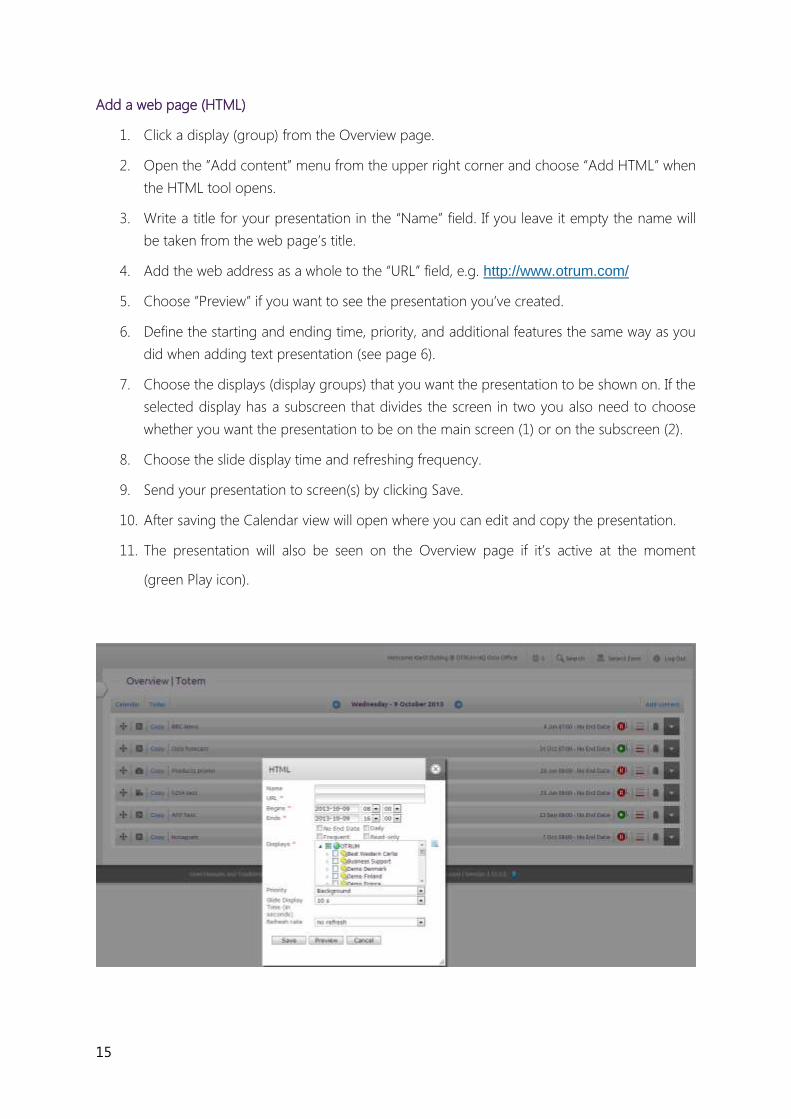
Add a web page (HTML)
1. Click a display (group) from the Overview page.
2. Open the ”Add content” menu from the upper right corner and choose “Add HTML” when
the HTML tool opens.
3. Write a title for your presentation in the “Name” field. If you leave it empty the name will
be taken from the web page’s title.
4. Add the web address as a whole to the “URL” field, e.g. http://www.otrum.com/
5. Choose ”Preview” if you want to see the presentation you’ve created.
6. Define the starting and ending time, priority, and additional features the same way as you
did when adding text presentation (see page 6).
7. Choose the displays (display groups) that you want the presentation to be shown on. If the
selected display has a subscreen that divides the screen in two you also need to choose
whether you want the presentation to be on the main screen (1) or on the subscreen (2).
8. Choose the slide display time and refreshing frequency.
9. Send your presentation to screen(s) by clicking Save.
10. After saving the Calendar view will open where you can edit and copy the presentation.
11. The presentation will also be seen on the Overview page if it’s active at the moment
(green Play icon).

16
Add Flash
Click a display (group) from the Overview page. Open the ”Add content” menu from the upper
right corner and choose “Add Flash” when the HTML tool opens. You need to have Java installed
on your computer to enable adding Flash presentations to Otrum Digital Signage displays!
One flash file forms one presentation to the playlist.
1. Click ”Choose” to search the video file from your computer.
2. Define the starting and ending time, priority, and additional features the same way as you
did when adding text presentation (see page 6).
3. Choose the displays (display groups) that you want the presentation to be shown on. If the
selected display has a subscreen that divides the screen in two you also need to choose
whether you want the presentation to be on the main screen (1) or on the subscreen (2).
4. Define the runtime for the presentation. The runtime can’t be under five seconds.
Depending on the file format Manager searches the duration of the presentation
automatically. If it stays as a zero insert the selected runtime by hand.
5. Click “Upload” on the bottom right corner. To the upper corner of the window appears a
line that illustrates the progress of the uploading. When the file is uploaded click “Close
window”. NB: If you close the window before the uploading is ready the creating of the
presentation is discontinued.
6. The presentation opens in the Calendar view.
Add content to touch displays (interactive content)
Interactive content is added to the touch screens in use the same way that normal HTML and
Flash presentations (see pages 15 and 17). The only difference is that when touching the screen,
17
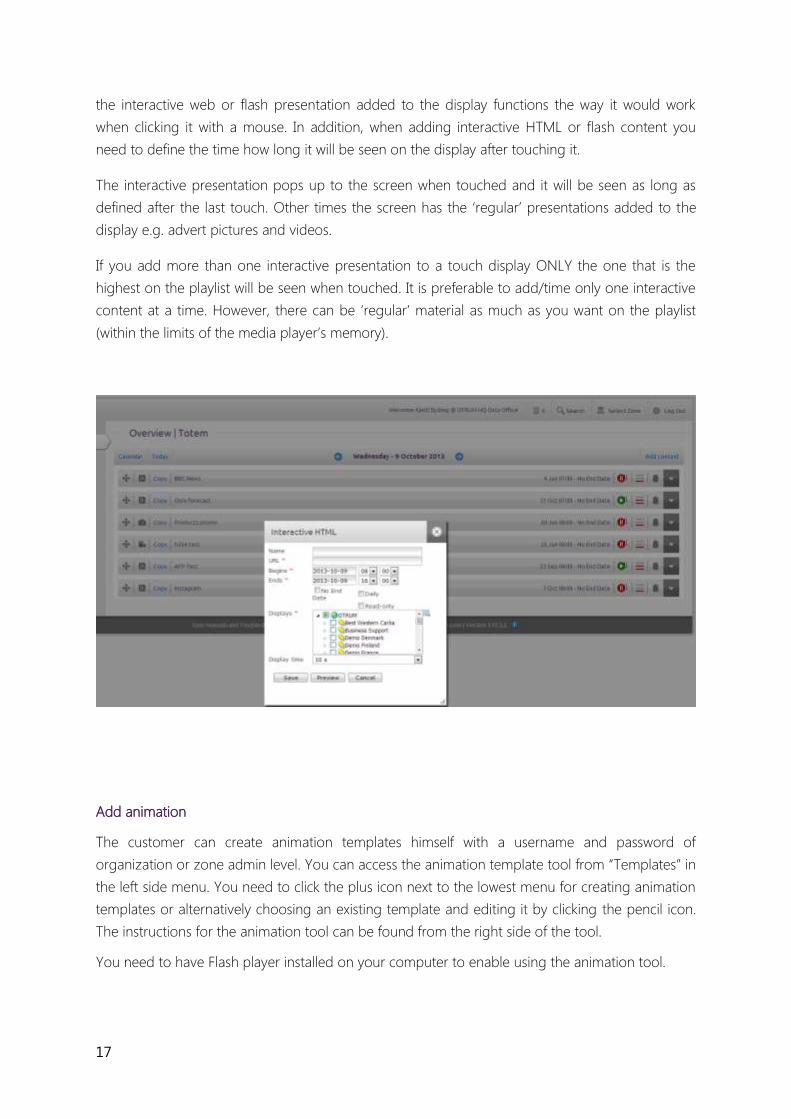
the interactive web or flash presentation added to the display functions the way it would work
when clicking it with a mouse. In addition, when adding interactive HTML or flash content you
need to define the time how long it will be seen on the display after touching it.
The interactive presentation pops up to the screen when touched and it will be seen as long as
defined after the last touch. Other times the screen has the ‘regular’ presentations added to the
display e.g. advert pictures and videos.
If you add more than one interactive presentation to a touch display ONLY the one that is the
highest on the playlist will be seen when touched. It is preferable to add/time only one interactive
content at a time. However, there can be ‘regular’ material as much as you want on the playlist
(within the limits of the media player’s memory).
Add animation
The customer can create animation templates himself with a username and password of
organization or zone admin level. You can access the animation template tool from “Templates” in
the left side menu. You need to click the plus icon next to the lowest menu for creating animation
templates or alternatively choosing an existing template and editing it by clicking the pencil icon.
The instructions for the animation tool can be found from the right side of the tool.
You need to have Flash player installed on your computer to enable using the animation tool.
18
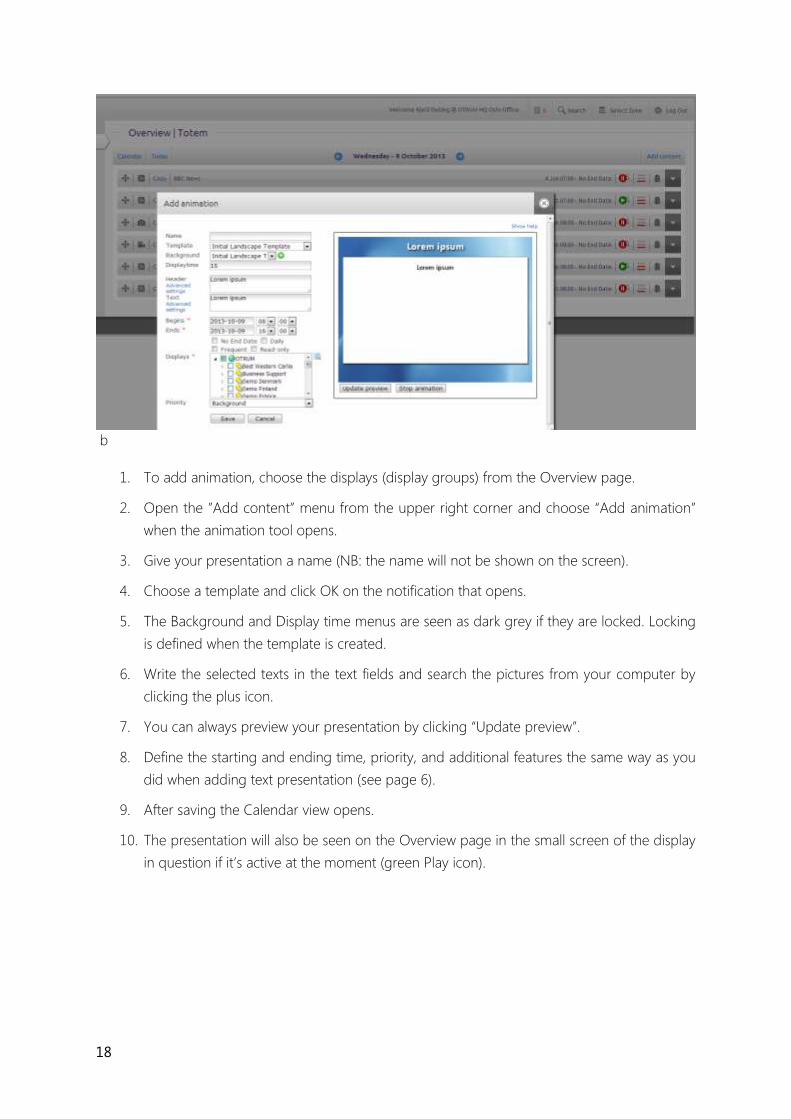
b
1. To add animation, choose the displays (display groups) from the Overview page.
2. Open the ”Add content” menu from the upper right corner and choose “Add animation”
when the animation tool opens.
3. Give your presentation a name (NB: the name will not be shown on the screen).
4. Choose a template and click OK on the notification that opens.
5. The Background and Display time menus are seen as dark grey if they are locked. Locking
is defined when the template is created.
6. Write the selected texts in the text fields and search the pictures from your computer by
clicking the plus icon.
7. You can always preview your presentation by clicking “Update preview”.
8. Define the starting and ending time, priority, and additional features the same way as you
did when adding text presentation (see page 6).
9. After saving the Calendar view opens.
10. The presentation will also be seen on the Overview page in the small screen of the display
in question if it’s active at the moment (green Play icon).
19
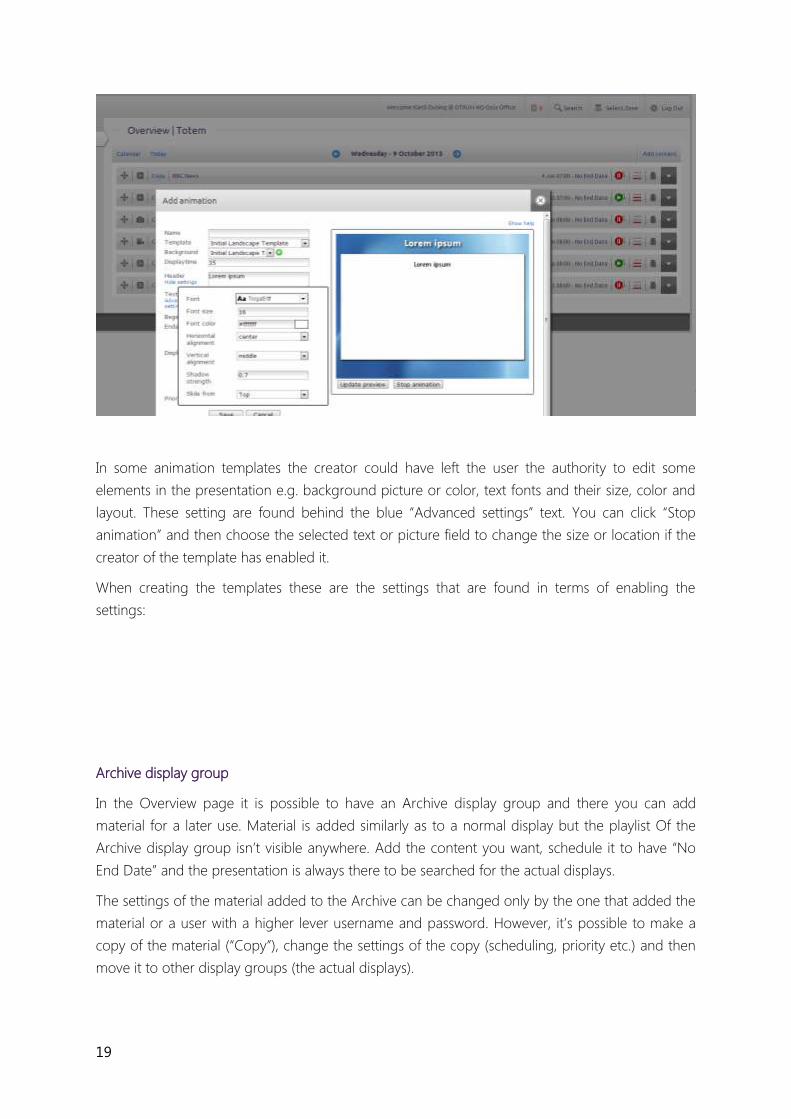
In some animation templates the creator could have left the user the authority to edit some
elements in the presentation e.g. background picture or color, text fonts and their size, color and
layout. These setting are found behind the blue “Advanced settings” text. You can click “Stop
animation” and then choose the selected text or picture field to change the size or location if the
creator of the template has enabled it.
When creating the templates these are the settings that are found in terms of enabling the
settings:
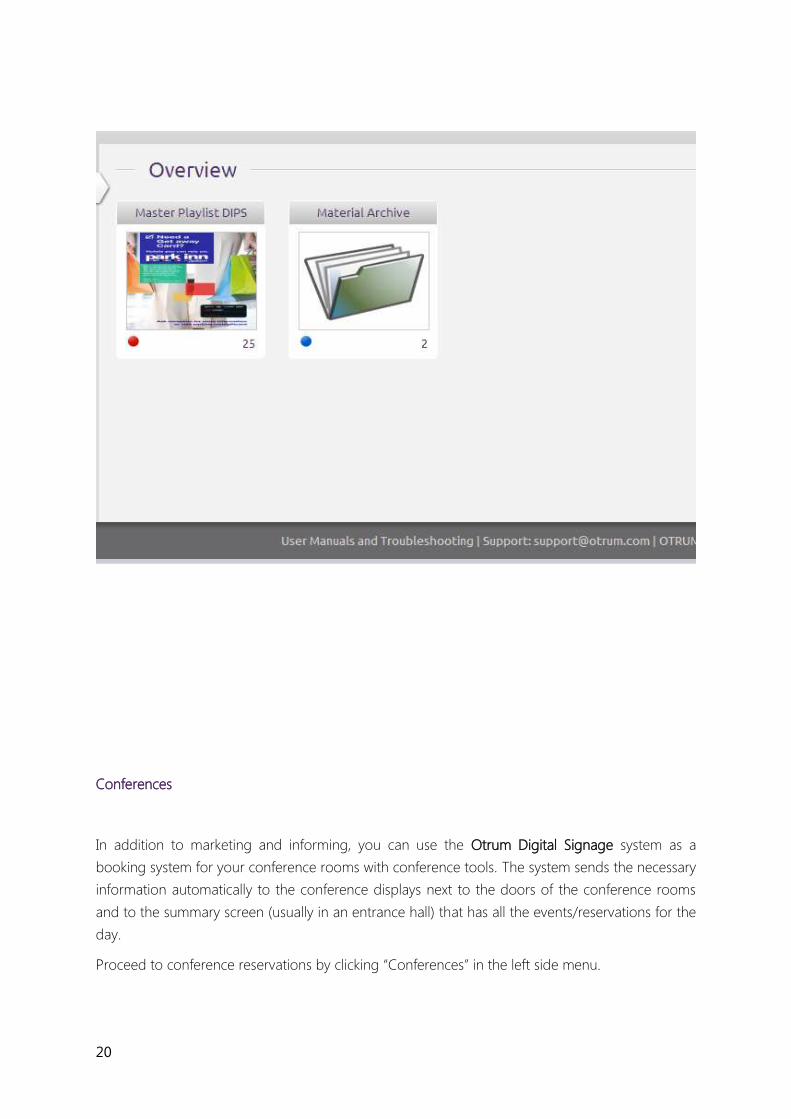
Archive display group
In the Overview page it is possible to have an Archive display group and there you can add
material for a later use. Material is added similarly as to a normal display but the playlist Of the
Archive display group isn’t visible anywhere. Add the content you want, schedule it to have “No
End Date” and the presentation is always there to be searched for the actual displays.
The settings of the material added to the Archive can be changed only by the one that added the
material or a user with a higher lever username and password. However, it’s possible to make a
copy of the material (“Copy”), change the settings of the copy (scheduling, priority etc.) and then
move it to other display groups (the actual displays).
20
Conferences
In addition to marketing and informing, you can use the Otrum Digital Signage system as a
booking system for your conference rooms with conference tools. The system sends the necessary
information automatically to the conference displays next to the doors of the conference rooms
and to the summary screen (usually in an entrance hall) that has all the events/reservations for the
day.
Proceed to conference reservations by clicking “Conferences” in the left side menu.
21
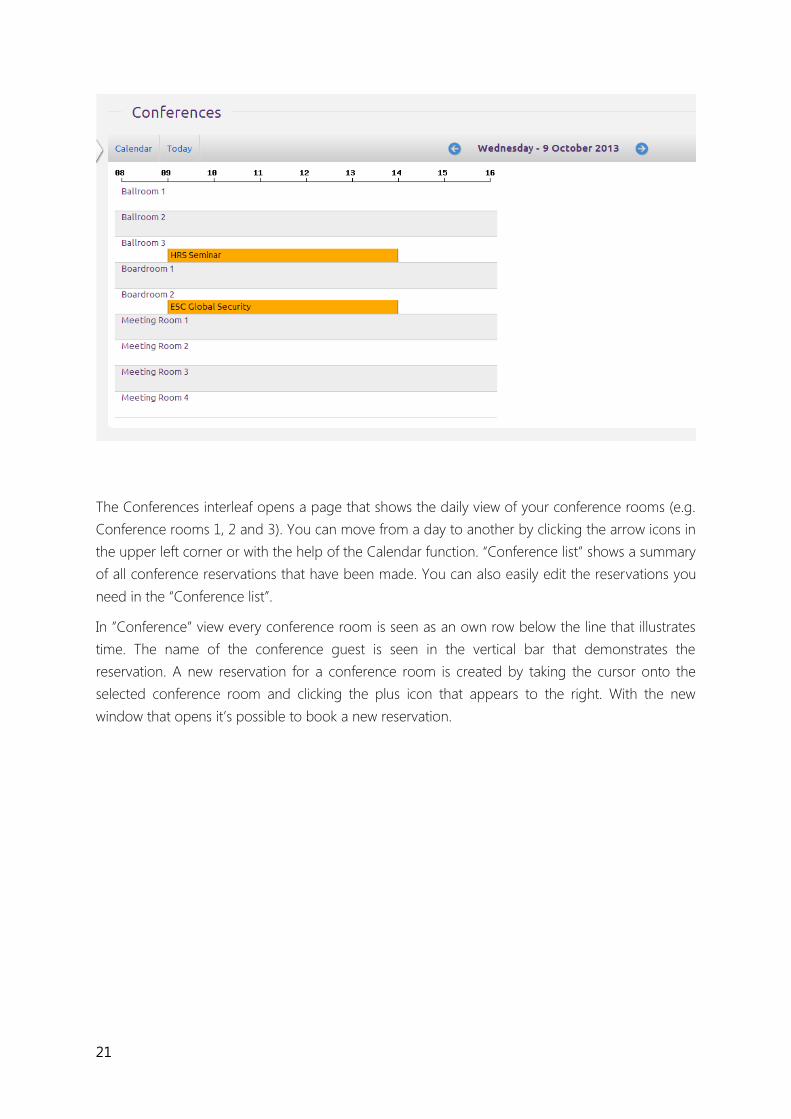
The Conferences interleaf opens a page that shows the daily view of your conference rooms (e.g.
Conference rooms 1, 2 and 3). You can move from a day to another by clicking the arrow icons in
the upper left corner or with the help of the Calendar function. “Conference list” shows a summary
of all conference reservations that have been made. You can also easily edit the reservations you
need in the “Conference list”.
In ”Conference” view every conference room is seen as an own row below the line that illustrates
time. The name of the conference guest is seen in the vertical bar that demonstrates the
reservation. A new reservation for a conference room is created by taking the cursor onto the
selected conference room and clicking the plus icon that appears to the right. With the new
window that opens it’s possible to book a new reservation.

22
How to add a conference (reservation):
1. Write the name of the customer to the ”Customer” field. If you want to add a logo you can
either choose an existing logo from the drop down menu or search one you’re your
computer by clicking the green plus icon. The logo must be in either JPEG or PNG format.
2. Write the agenda (schedule, purpose, etc..) of the meeting. This information will only be
seen on door side displays, not on the summary screen.
3. Set the date and time of the meeting
4. Choose the meeting room(s)
5. Choose a template to be used on possible door side displays. More templates can be
ordered from First Technology technical support according to the existing price list.
6. From the “Display in advance” drop down menu choose how long the information will be
shown on displays before the meeting on the door side displays. Bookings made to a
same room one after the other are shown on the door side display in turns.
7. You can preview the door side display by clicking ”Preview”
8. Send the information to display(s) by clicking “Save”
9. After saving the system will automatically add the information to the summary screen
(usually in the lobby)
After a meeting has been added it will be shown as a bar on the timeline of the meeting room.
You can edit, copy, and delete the booking by clicking the bar.
23
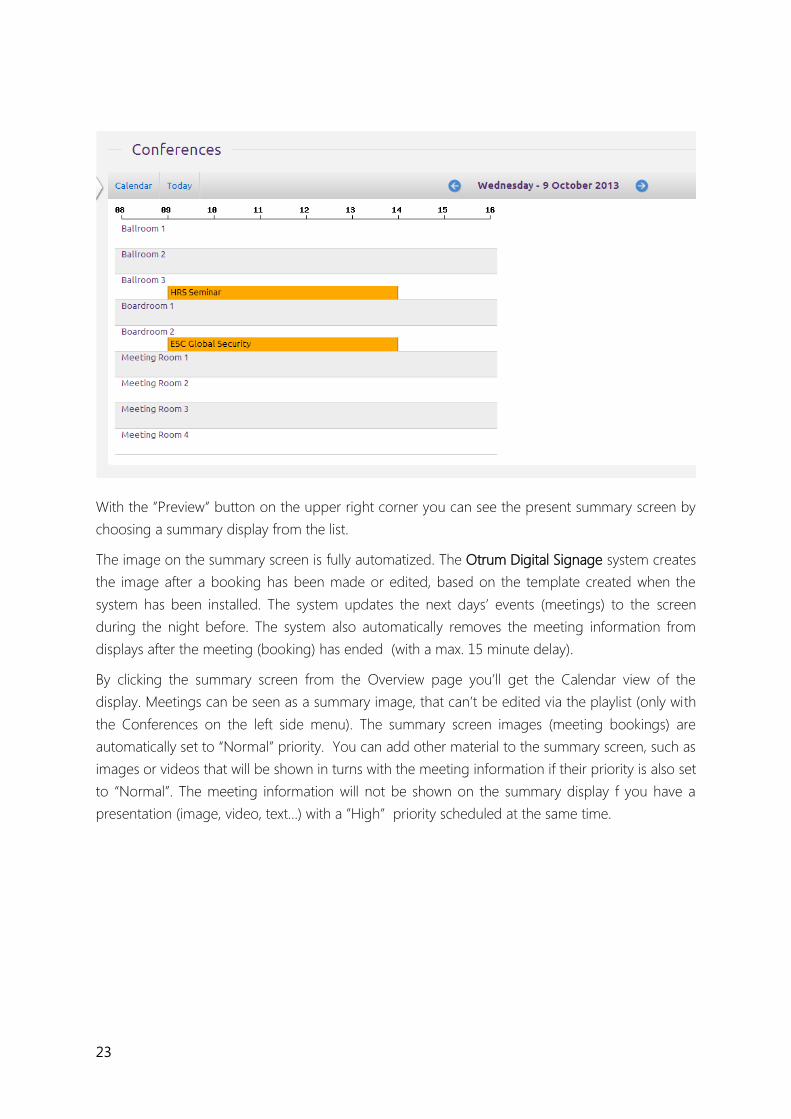
With the ”Preview” button on the upper right corner you can see the present summary screen by
choosing a summary display from the list.
The image on the summary screen is fully automatized. The Otrum Digital Signage system creates
the image after a booking has been made or edited, based on the template created when the
system has been installed. The system updates the next days’ events (meetings) to the screen
during the night before. The system also automatically removes the meeting information from
displays after the meeting (booking) has ended (with a max. 15 minute delay).
By clicking the summary screen from the Overview page you’ll get the Calendar view of the
display. Meetings can be seen as a summary image, that can’t be edited via the playlist (only with
the Conferences on the left side menu). The summary screen images (meeting bookings) are
automatically set to “Normal” priority. You can add other material to the summary screen, such as
images or videos that will be shown in turns with the meeting information if their priority is also set
to “Normal”. The meeting information will not be shown on the summary display f you have a
presentation (image, video, text…) with a ”High” priority scheduled at the same time.
24
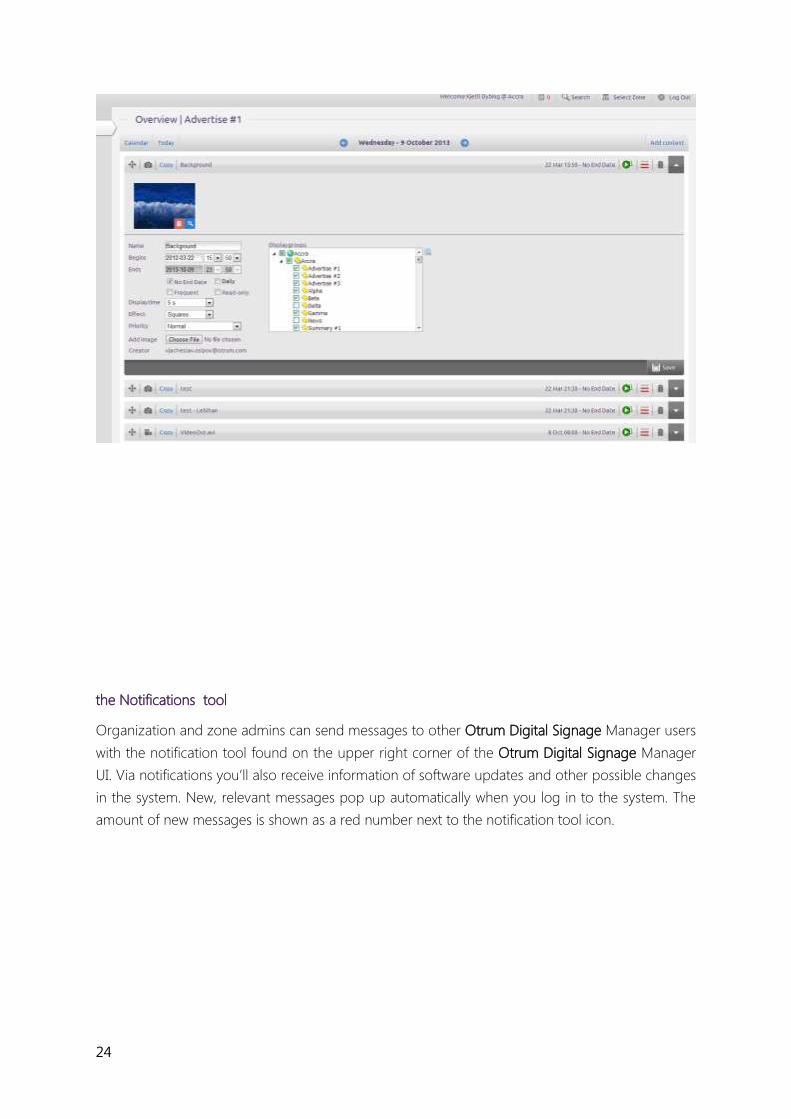
the Notifications tool
Organization and zone admins can send messages to other Otrum Digital Signage Manager users
with the notification tool found on the upper right corner of the Otrum Digital Signage Manager
UI. Via notifications you’ll also receive information of software updates and other possible changes
in the system. New, relevant messages pop up automatically when you log in to the system. The
amount of new messages is shown as a red number next to the notification tool icon.
25
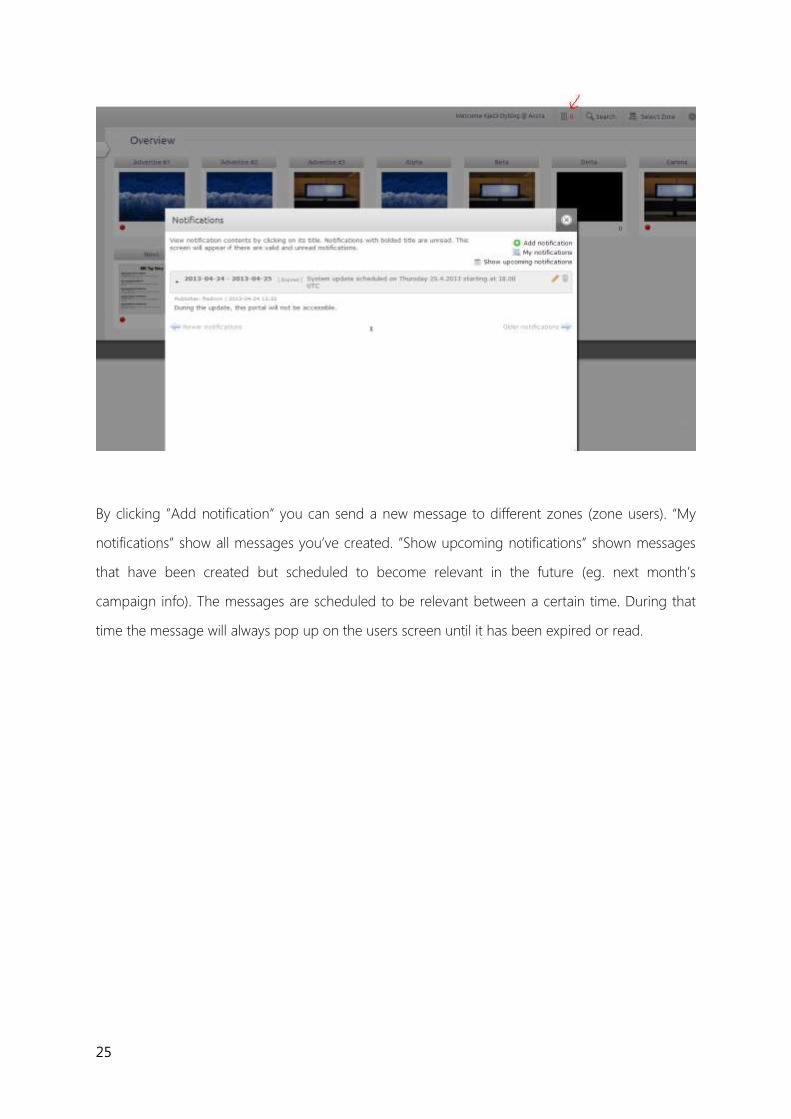
By clicking ”Add notification” you can send a new message to different zones (zone users). “My
notifications” show all messages you’ve created. ”Show upcoming notifications” shown messages
that have been created but scheduled to become relevant in the future (eg. next month’s
campaign info). The messages are scheduled to be relevant between a certain time. During that
time the message will always pop up on the users screen until it has been expired or read.
26
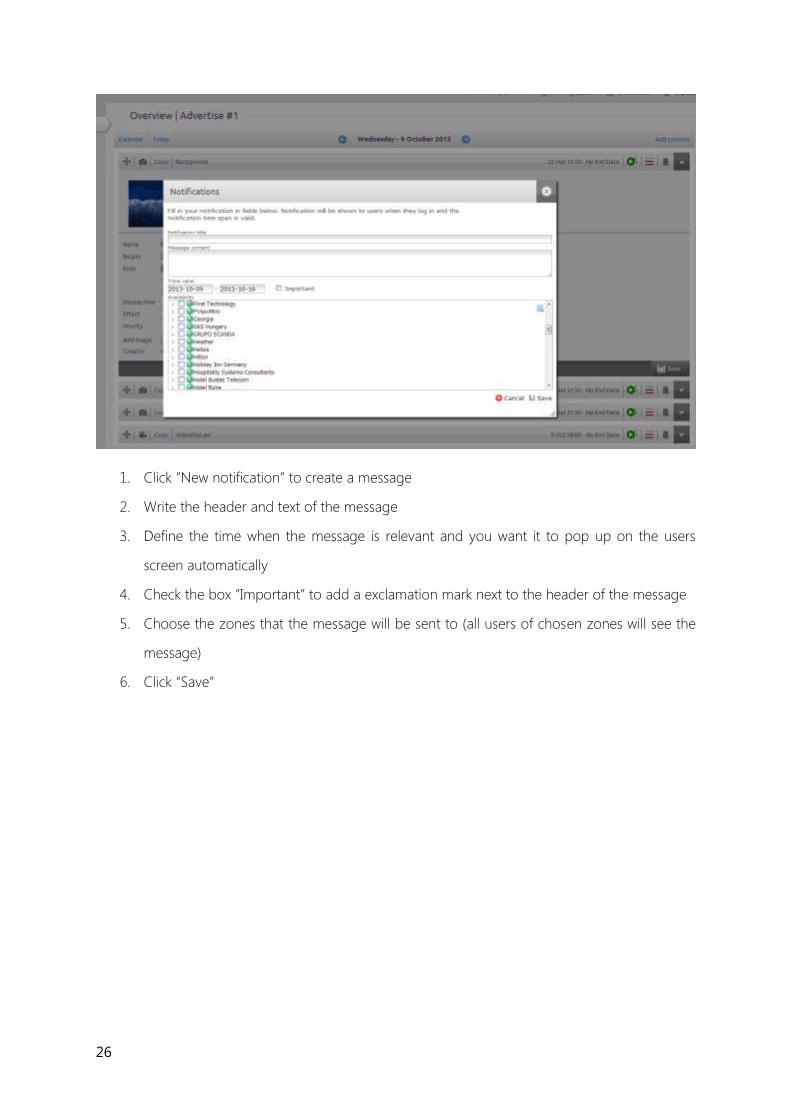
1. Click ”New notification” to create a message
2. Write the header and text of the message
3. Define the time when the message is relevant and you want it to pop up on the users
screen automatically
4. Check the box ”Important” to add a exclamation mark next to the header of the message
5. Choose the zones that the message will be sent to (all users of chosen zones will see the
message)
6. Click “Save”
27
Troubleshooting
Check these things BEFORE contacting the technical support. The most common reason why
displays are black is that there are no presentations (material) added to them, the scheduling is
not done right or has already ended. Check also that the display (TV) is on and check with the
remote control that the input is PC or RGB. Also check that all cables are properly attached on the
display and media player. When you add presentations wait approximately 4 minutes for them to
upload from the server to your displays.
All added presentations aren’t shown on the display(s)
Check that the priority level of the presentation is same or above as other presentations
scheduled for that time for that particular display (group). Priority of the presentations can be seen
as red lines next to the presentation on the calendar view (1 line= background, 2 lines=normal, 3
lines=high). All presentations set to the same priority are seen on displays one after another. A
higher priority will overrule the lower ones (normal overrules background, high overrules normal
The text on the display is blurry
JPEG image format is especially suitable for photos and visual image material, and sometimes
doesn’t make the text clear. Preferably use the PNG format is your presentation has a lot of text or
small fonts in them. Also check the resolution of the material (minimum 1366 x 768 on normal size
displays)
Red dot shown on a display group in the Overview page
One or more media players have lost their connection to the Otrum Digital Signage server. Check
that the cables are connected, there’s electricity available, and the network is working properly.
You can turn off the media player power to reboot it. Usually this helps the device to search for
the network connection.
Yellow dot shown on a display group in the Overview page
One or more media players within this display (group) have their memory full. Delete
presentations via the Calendar view with the Trash can icon until the dot appear green on the
Overview page. NOTE! It might take several minutes for the dot color to change.
28
Tips and FAQ
How to add images to an existing presentation?
Go to the display (group) Calendar view and click the gray arrow icon on the right side of the
presentation to open the info of the presentation. Search for an image file from your computer by
clicking ”add image’’. Save the changes by clicking “Save” on the bottom right corner.
How to remove one image of an existing presentation that has many images in it?
Click the grey arrow icon next to the presentation. Click the red trash can icon shown on top of
the image you want to remove. Save the changes by clicking “Save” from the bottom right corner.
How to add text to a ready made template ot animation?
Go to a display (group), click ”Add content”, and choose the type of presentation you want. Give
your presentation a name (won’t be shown on screens), and fill in the desired information on the
empty fields of your chosen template. Choose the time, date, and displays you want the
presentation to be shown on, as well as the priority of the presentation. You can preview your
presentation by clicking “Preview” (text presentation) or “Update preview” (animation).
How to stop an existing presentation without removing it?
Click the grey arrow icon next to the presentation. Set the schedule to end at the present time and
date. Yu can also change the priority of the presentation. If the priority is now “Normal” change it
to ”Background”, if the priority is now ”High”, change it to ”Normal”. Save the changes by clicking
“Save” from the bottom right corner. You can also remove the presentation completely by clicking
the trash can icon.
How do I activate a presentation again?
Click the grey arrow icon next to the presentation. Set new time and date for the presentation, or
make the priority higher to make the presentation be shown on displays again. Save the changes
by clicking “Save” from the bottom right corner.
How do I make a presentation to be shown continuously over all other presentations?
Preferably use the priority ”Normal” with all your presentations. Then you can set the priority of
one presentation to “High”, and it will overrule all other presentations.