Embed Size (px)
Citation preview
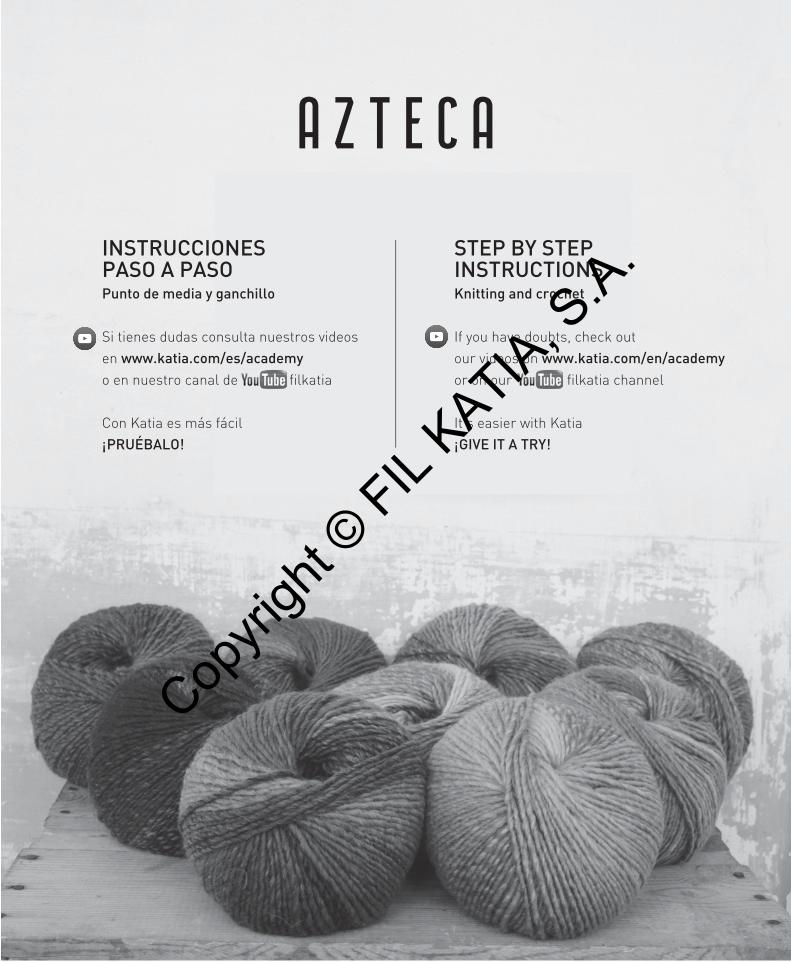
INSTRUCCIONESPASO A PASOPunto de media y ganchillo
Si tienes dudas consulta nuestros videos en www.katia.com/es/academy o en nuestro canal de filkatia
Con Katia es más fácil¡PRUÉBALO!
STEP BY STEPINSTRUCTIONSKnitting and crochet
If you have doubts, check outour videos on www.katia.com/en/academyor on our filkatia channel
It’s easier with Katia¡GIVE IT A TRY!
6 , 9 5 €
O T O Ñ O · I N V I E R N O A U T U M N · W I N T E R
O T O Ñ O · I N V I E R N O A U T U M N · W I N T E R
www.katia.com
8435407
963573
AZTECA
AZTECA
A Z T E C A
o en nuestro canal de filkatia or on our filkatia channel
Copyri
ght ©
FIL KATIA, S
.A.

2
PARA LEER CON FACILIDAD UNA EXPLICACIÓN DADA EN VARIAS TALLASAntes de comenzar a tejer, marque con un lápiz rojo las cifras correspondientes a la talla elegida y tenga en cuenta que en los casos en que figura una sola cifra es válida para todas las tallas. Es una manera fácil y clara para evitar confusiones.
Ver ejemplo.
TO EASILY FOLLOW INSTRUCTIONS WHEN MORE THAN ONE SIZE IS OFFEREDBefore beginning to work, circle or highlight all the numbers or instructions pertaining to the size you are making. This will prevent any confusion with the other sizes offered in the same instructions.See example.
Muy Importante / Very Important
ABREVIATURAS ABBREVIATIONS
p. = punto
der. = derecho
rev. = revés
vta. = vuelta
cm = centímetro
ag. = aguja
trab. = trabajar
aum. = aumento
col. = color
pág. = página
aux. = auxiliar
st = stitch
k = knit
p = purl
cm = centimetre
“ = inch
inc = increase
col = colour
pg = page
cn = cable needle
[ES]TALLAS: –a) 38-40 –b) 42-44 –c) 46-48 –d) 50-52El modelo fotografiado corresponde a la talla –a) 38-40
MATERIALESAZTECA col. 7873: –a) 6 –b) 6 –c) 6 –d) 7 ovillos
Agujas Puntos empleados
Nº 5 ½
• P. elástico 1x1• P. jersey der.• Costura a p. de lado- P. trenzas (ver gráfico A)
• Ver instrucciones en puntos básicos
MUESTRA DEL PUNTOA p. jersey der., ag. nº 5 ½10x10 cm = 15 p. y 22 vtas.A p. trenzado, ag. nº 5 ½10x10 cm = 17 p. y 22 vtas.
ESPALDAMontar –a) 90 p. –b) 98 p. –c) 104 p. –d) 112 p. Trab. a p. elástico 1x1.A 7 cm de largo total, continuar trab. a p. jersey der. menguando en ambos lados a 1 p. de las orillas en cada 14ª vta.: 4 veces 1 p.Quedarán: –a) 82 p. –b) 90 p. –c) 96 p. –d) 104 p.Sisas: A 39 cm de largo total, cerrar en ambos lados en cada inicio de vta.:–a) 1 vez 4 p., 1 vez 3 p., 1 vez 2 p., 2 veces 1 p.–b) 1 vez 4 p., 1 vez 3 p., 2 veces 2 p., 2 veces 1 p.–c) 1 vez 4 p., 1 vez 3 p., 2 veces 2 p., 3 veces 1 p.–d) 1 vez 4 p., 1 vez 3 p., 2 veces 2 p., 4 veces 1 p.Quedarán: –a) 60 p. –b) 64 p. –c) 68 p. –d) 74 p.
MO
DELO
08
P
ág. 2
2-23
Copyri
ght ©
FIL KATIA, S
.A.
3
ÍNDICE INDEXBases para aprender a tejer
Ganchillo Crochet
Learning to knit
INICIACIÓN AL PUNTO DE MEDIA .................... 4
FORMAS DE EMPEZAR ...................................... 4 Montado simple...................................................... 4 Montado tubular ..................................................... 4
BASES PARA EL PUNTO DE MEDIA ................. 5 Punto derecho........................................................ 5 Punto revés ............................................................ 5 Hebra o baga ......................................................... 5 Punto sin hacer o Punto alargado .......................... 6 Dos puntos juntos derecho .................................... 6 Punto retorcido ...................................................... 6
MUESTRA DEL PUNTO ....................................... 7
PUNTOS BÁSICOS MÁS UTILIZADOS .............. 7 Punto jersey derecho ............................................. 7 Punto jersey revés .................................................. 7 Punto bobo ............................................................ 7 Punto elástico 1x1 .................................................. 8 Punto elástico 2x2 .................................................. 8 Punto jacquard ....................................................... 8 Intarsia ................................................................... 8
TRENZAS .............................................................. 9 Puntos cruzados hacia la derecha .......................... 9 Puntos cruzados hacia la izquierda ........................ 9
FORMAS DE CERRAR......................................... 10 Cerrado simple ....................................................... 10 Cerrado tubular ...................................................... 10
ACABADOS .......................................................... 11 Ojales redondos ..................................................... 11 Ojales horizontales ................................................. 11
COSTURAS .......................................................... 11 Punto de lado ......................................................... 11
BORDADOS .......................................................... 11 Punto de nudo ...................................................... 11 Punto de tallo ......................................................... 11 Punto de cruz ........................................................ 11 Punto margarita ..................................................... 11
INTRODUCTION TO KNITTING .......................... 4
HOW TO BEGIN ................................................... 4 Simple cast on ....................................................... 4 Tubular cast on ...................................................... 4
BASIC KNITTING STITCHES .............................. 5 Knit ......................................................................... 5 Purl ......................................................................... 5 Yarn over ................................................................ 5 Slip stitch ............................................................... 6 Knitting two stitches together ................................. 6 Knit through back of loop ....................................... 6
GAUGE ................................................................ 7
MOST FREQUENTLY USED BASIC STITCHES .. 7 Stockinette Stitch ................................................... 7 Reverse Stockinette Stitch ...................................... 7 Garter Stitch ........................................................... 7 1x1 Ribbing ............................................................ 8 2x2 Ribbing ............................................................ 8 Jacquard ................................................................ 8 Intarsia ................................................................... 8
CABLES ................................................................ 9 Stitches crossed over to the right ........................... 9 Stitches crossed over to the left ............................. 9
BINDING (CASTING) OFF .................................... 10 Simple Bind Off ...................................................... 10 Tubular Bind Off ..................................................... 10
FINISHES .............................................................. 11 Round Buttonholes ................................................. 11 Horizontal Buttonholes ........................................... 11
SEAMS .................................................................. 11 Side Seams ............................................................ 11
EMBROIDERY ...................................................... 11 French Knot .......................................................... 11 Stem Stitch ........................................................... 11 Cross Stitch .......................................................... 11 Lazy Daisy Stitch ................................................... 11
INICIACIÓN AL GANCHILLO .............................. 12 PUNTOS BASICOS .............................................. 13 Punto de cadeneta ................................................. 13 Punto enano ........................................................... 13 Punto bajo .............................................................. 14 Punto medio alto .................................................... 14 Punto alto ............................................................... 15
INTRODUCTION TO CROCHET ......................... 12 BASIC STITCHES ................................................ 13 Chain stitch: (ch) .................................................... 13 Slip stitch: (sl st) ..................................................... 13 Single crochet: (sc) ................................................. 14 Half double crochet: (hdc) ...................................... 14 Double crochet: (dc) ............................................... 15
Copyri
ght ©
FIL KATIA, S
.A.
4
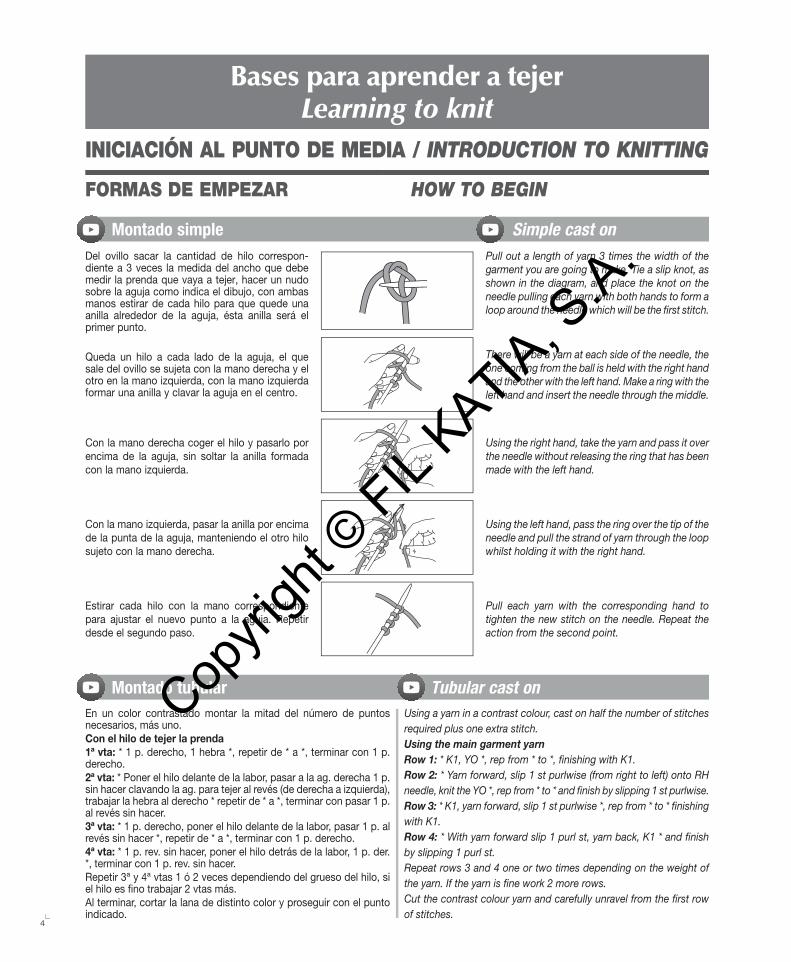
Montado simple Simple cast onDel ovillo sacar la cantidad de hilo correspon-diente a 3 veces la medida del ancho que debe medir la prenda que vaya a tejer, hacer un nudo sobre la aguja como indica el dibujo, con ambas manos estirar de cada hilo para que quede una anilla alrededor de la aguja, ésta anilla será el primer punto.
Pull out a length of yarn 3 times the width of the garment you are going to make. Tie a slip knot, as shown in the diagram, and place the knot on the needle pulling each yarn with both hands to form a loop around the needle which will be the first stitch.
Queda un hilo a cada lado de la aguja, el que sale del ovillo se sujeta con la mano derecha y el otro en la mano izquierda, con la mano izquierda formar una anilla y clavar la aguja en el centro.
There will be a yarn at each side of the needle, the one coming from the ball is held with the right hand and the other with the left hand. Make a ring with the left hand and insert the needle through the middle.
Con la mano derecha coger el hilo y pasarlo por encima de la aguja, sin soltar la anilla formada con la mano izquierda.
Using the right hand, take the yarn and pass it over the needle without releasing the ring that has been made with the left hand.
Con la mano izquierda, pasar la anilla por encima de la punta de la aguja, manteniendo el otro hilo sujeto con la mano derecha.
Using the left hand, pass the ring over the tip of the needle and pull the strand of yarn through the loop whilst holding it with the right hand.
Estirar cada hilo con la mano correspondiente para ajustar el nuevo punto a la aguja. Repetir desde el segundo paso.
Pull each yarn with the corresponding hand to tighten the new stitch on the needle. Repeat the action from the second point.
Montado tubular Tubular cast onEn un color contrastado montar la mitad del número de puntos necesarios, más uno.Con el hilo de tejer la prenda1ª vta: * 1 p. derecho, 1 hebra *, repetir de * a *, terminar con 1 p. derecho.2ª vta: * Poner el hilo delante de la labor, pasar a la ag. derecha 1 p. sin hacer clavando la ag. para tejer al revés (de derecha a izquierda), trabajar la hebra al derecho * repetir de * a *, terminar con pasar 1 p. al revés sin hacer.3ª vta: * 1 p. derecho, poner el hilo delante de la labor, pasar 1 p. al revés sin hacer *, repetir de * a *, terminar con 1 p. derecho.4ª vta: * 1 p. rev. sin hacer, poner el hilo detrás de la labor, 1 p. der. *, terminar con 1 p. rev. sin hacer.Repetir 3ª y 4ª vtas 1 ó 2 veces dependiendo del grueso del hilo, si el hilo es fino trabajar 2 vtas más.Al terminar, cortar la lana de distinto color y proseguir con el punto indicado.
Using a yarn in a contrast colour, cast on half the number of stitches required plus one extra stitch.Using the main garment yarnRow 1: * K1, YO *, rep from * to *, finishing with K1.Row 2: * Yarn forward, slip 1 st purlwise (from right to left) onto RH needle, knit the YO *, rep from * to * and finish by slipping 1 st purlwise.Row 3: * K1, yarn forward, slip 1 st purlwise *, rep from * to * finishing with K1.Row 4: * With yarn forward slip 1 purl st, yarn back, K1 * and finish by slipping 1 purl st.Repeat rows 3 and 4 one or two times depending on the weight of the yarn. If the yarn is fine work 2 more rows.Cut the contrast colour yarn and carefully unravel from the first row of stitches.
INICIACIÓN AL PUNTO DE MEDIA / INTRODUCTION TO KNITTING
FORMAS DE EMPEZAR HOW TO BEGIN
Bases para aprender a tejerLearning to knit
Copyri
ght ©
FIL KATIA, S
.A.
5
BASES PARA EL PUNTO DE MEDIA / HOW TO WORK THE STITCHES
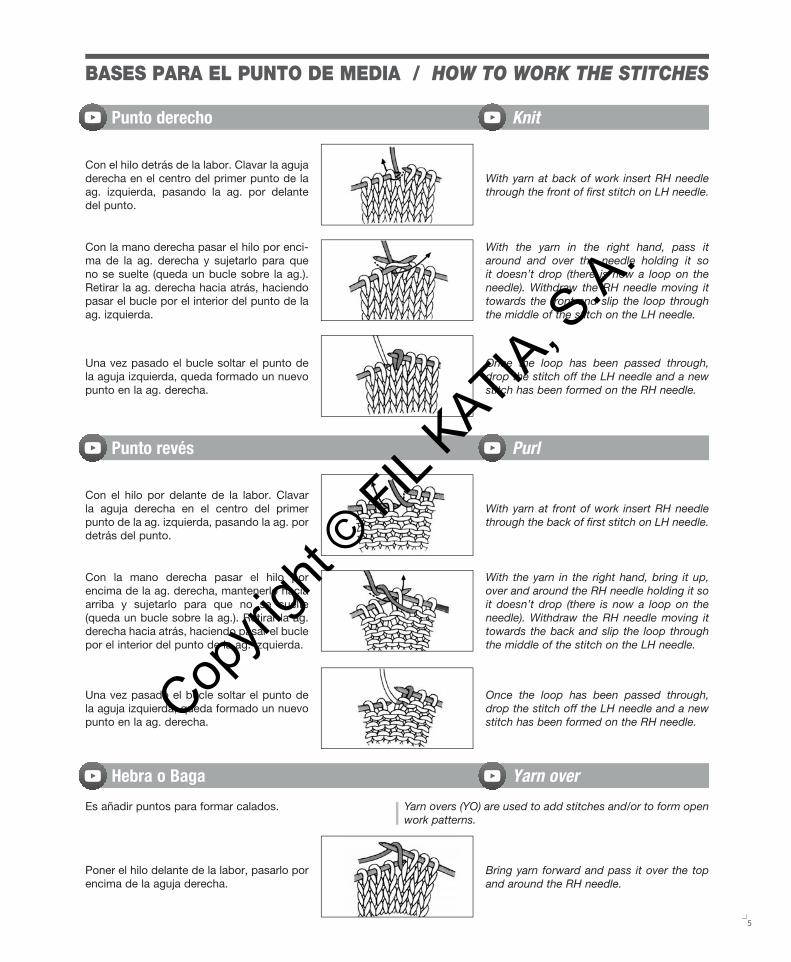
Con el hilo detrás de la labor. Clavar la aguja derecha en el centro del primer punto de la ag. izquierda, pasando la ag. por delante del punto.
With yarn at back of work insert RH needle through the front of first stitch on LH needle.
Con la mano derecha pasar el hilo por enci-ma de la ag. derecha y sujetarlo para que no se suelte (queda un bucle sobre la ag.). Retirar la ag. derecha hacia atrás, haciendo pasar el bucle por el interior del punto de la ag. izquierda.
With the yarn in the right hand, pass it around and over the needle holding it so it doesn’t drop (there is now a loop on the needle). Withdraw the RH needle moving it towards the front and slip the loop through the middle of the stitch on the LH needle.
Una vez pasado el bucle soltar el punto de la aguja izquierda, queda formado un nuevo punto en la ag. derecha.
Once the loop has been passed through, drop the stitch off the LH needle and a new stitch has been formed on the RH needle.
Punto derecho Knit
Con el hilo por delante de la labor. Clavar la aguja derecha en el centro del primer punto de la ag. izquierda, pasando la ag. por detrás del punto.
With yarn at front of work insert RH needle through the back of first stitch on LH needle.
Con la mano derecha pasar el hilo por encima de la ag. derecha, mantenerlo hacia arriba y sujetarlo para que no se suelte (queda un bucle sobre la ag.). Retirar la ag. derecha hacia atrás, haciendo pasar el bucle por el interior del punto de la ag. izquierda.
With the yarn in the right hand, bring it up, over and around the RH needle holding it so it doesn’t drop (there is now a loop on the needle). Withdraw the RH needle moving it towards the back and slip the loop through the middle of the stitch on the LH needle.
Una vez pasado el bucle soltar el punto de la aguja izquierda, queda formado un nuevo punto en la ag. derecha.
Once the loop has been passed through, drop the stitch off the LH needle and a new stitch has been formed on the RH needle.
Punto revés Purl
Hebra o Baga Yarn over
Poner el hilo delante de la labor, pasarlo por encima de la aguja derecha.
Bring yarn forward and pass it over the top and around the RH needle.
Es añadir puntos para formar calados. Yarn overs (YO) are used to add stitches and/or to form open work patterns.
Copyri
ght ©
FIL KATIA, S
.A.
6
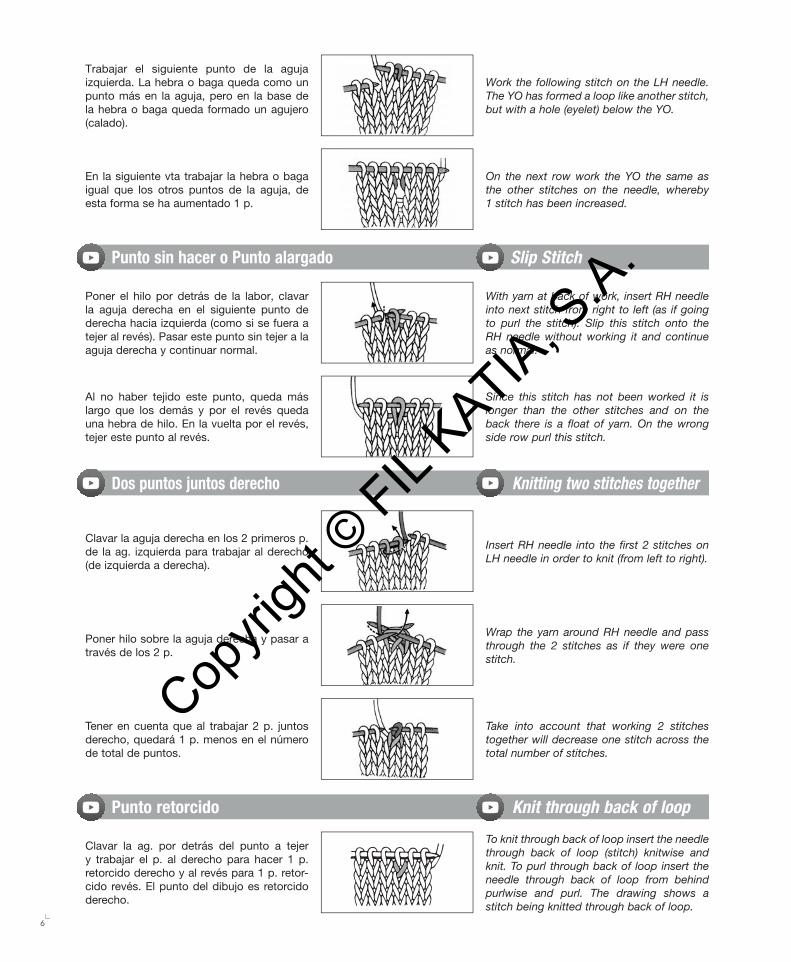
Trabajar el siguiente punto de la aguja izquierda. La hebra o baga queda como un punto más en la aguja, pero en la base de la hebra o baga queda formado un agujero (calado).
Work the following stitch on the LH needle. The YO has formed a loop like another stitch, but with a hole (eyelet) below the YO.
En la siguiente vta trabajar la hebra o baga igual que los otros puntos de la aguja, de esta forma se ha aumentado 1 p.
On the next row work the YO the same as the other stitches on the needle, whereby 1 stitch has been increased.
Poner el hilo por detrás de la labor, clavar la aguja derecha en el siguiente punto de derecha hacia izquierda (como si se fuera a tejer al revés). Pasar este punto sin tejer a la aguja derecha y continuar normal.
With yarn at back of work, insert RH needle into next stitch from right to left (as if going to purl the stitch). Slip this stitch onto the RH needle without working it and continue as normal.
Punto sin hacer o Punto alargado Slip Stitch
Al no haber tejido este punto, queda más largo que los demás y por el revés queda una hebra de hilo. En la vuelta por el revés, tejer este punto al revés.
Since this stitch has not been worked it is longer than the other stitches and on the back there is a float of yarn. On the wrong side row purl this stitch.
Clavar la aguja derecha en los 2 primeros p. de la ag. izquierda para trabajar al derecho (de izquierda a derecha).
Insert RH needle into the first 2 stitches on LH needle in order to knit (from left to right).
Dos puntos juntos derecho Knitting two stitches together
Poner hilo sobre la aguja derecha y pasar a través de los 2 p.
Wrap the yarn around RH needle and pass through the 2 stitches as if they were one stitch.
Tener en cuenta que al trabajar 2 p. juntos derecho, quedará 1 p. menos en el número de total de puntos.
Take into account that working 2 stitches together will decrease one stitch across the total number of stitches.
Clavar la ag. por detrás del punto a tejer y trabajar el p. al derecho para hacer 1 p. retorcido derecho y al revés para 1 p. retor-cido revés. El punto del dibujo es retorcido derecho.
To knit through back of loop insert the needle through back of loop (stitch) knitwise and knit. To purl through back of loop insert the needle through back of loop from behind purlwise and purl. The drawing shows a stitch being knitted through back of loop.
Punto retorcido Knit through back of loop
Copyri
ght ©
FIL KATIA, S
.A.
7
MUESTRA DEL PUNTO GAUGE
Antes de empezar una prenda es muy importante hacer una muestra de 10 x 10 cm. en el mismo punto en el que se va a realizar la prenda y comprobar que se ajusta a la muestra indicada en la revista, sino no coincidirán las medidas con las de la revista. Si tienes un número menor de puntos y vueltas, deberás repetir la muestra con agujas más finas, si por el contrario tienes un número mayor de puntos y vueltas deberás usar agujas más gruesas. El número de agujas que figura en la revista es el número que utilizó la persona que realizó la prenda pero cada persona tiene un sistema de trabajo distinto. Lo importante no es el número de agujas que se utiliza sino que la muestra de 10 x 10 coincida exactamente con la de la revista, de esta manera nos aseguramos de que la prenda tenga las medidas indicadas en el patrón.
It is very important to make the 4x4” tension gauge before starting the garment to ensure that the finished garment will be the same size and shape as given in the instructions. The needle size given in the gauge is only a suggestion. Since no two people will knit exactly the same you should work a 4x4” swatch using the designated yarn and pattern stitch. If you have too many stitches and rows in your swatch, try again with a larger needle. If you do not have enough stitches and rows make another swatch with smaller needles. It doesn’t matter which needle size you use as long as you obtain the correct gauge that coincides exactly with the one given in the magazine. Sometimes you may have to work with two different size needles to achieve the correct gauge: one for the right side and the other for the wrong side.
PUNTOS BÁSICOS MÁS UTILIZADOS / MOST FREQUENTLY USED BASIC STITCHES
NOTA IMPORTANTE
En la explicación o gráfico de cualquier punto, la 1ª vta siempre corresponde al derecho de la labor; de no ser así, ya se indica en el texto. También es muy importante tener en cuenta que en los gráficos se muestra como deben tra-bajarse los p. vta por vta (o sea, derecho de la labor y revés de la labor), no tal como se ven en la fotografía.
IMPORTANT NOTE:
On the graph of any stitch the 1st row always refers to the right side of the work unless otherwise indicated on the text.
It is also very important to bear in mind that the graphs indicate how the stitches must be worked row by row (right side or wrong side of work): the first row will be worked from the right edge of the graph to the left edge and the 2nd row from the left edge of the graph to the right edge.
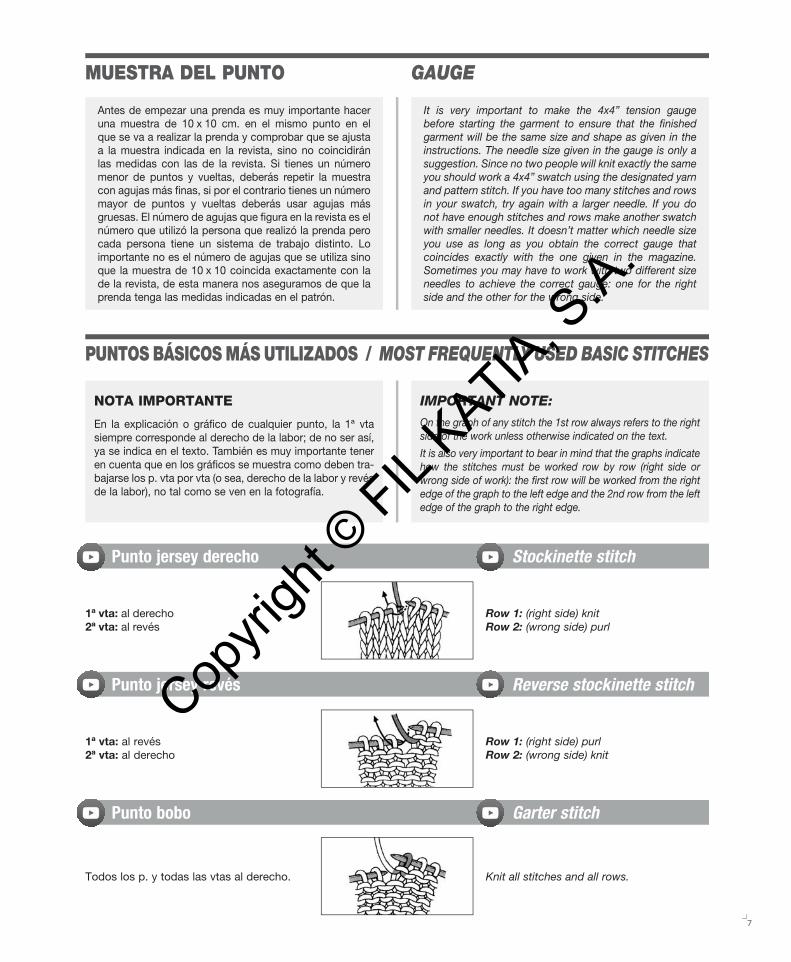
1ª vta: al derecho2ª vta: al revés
Row 1: (right side) knitRow 2: (wrong side) purl
Punto jersey derecho Stockinette stitch
1ª vta: al revés2ª vta: al derecho
Row 1: (right side) purlRow 2: (wrong side) knit
Punto jersey revés Reverse stockinette stitch
Todos los p. y todas las vtas al derecho. Knit all stitches and all rows.
Punto bobo Garter stitch
Copyri
ght ©
FIL KATIA, S
.A.
8
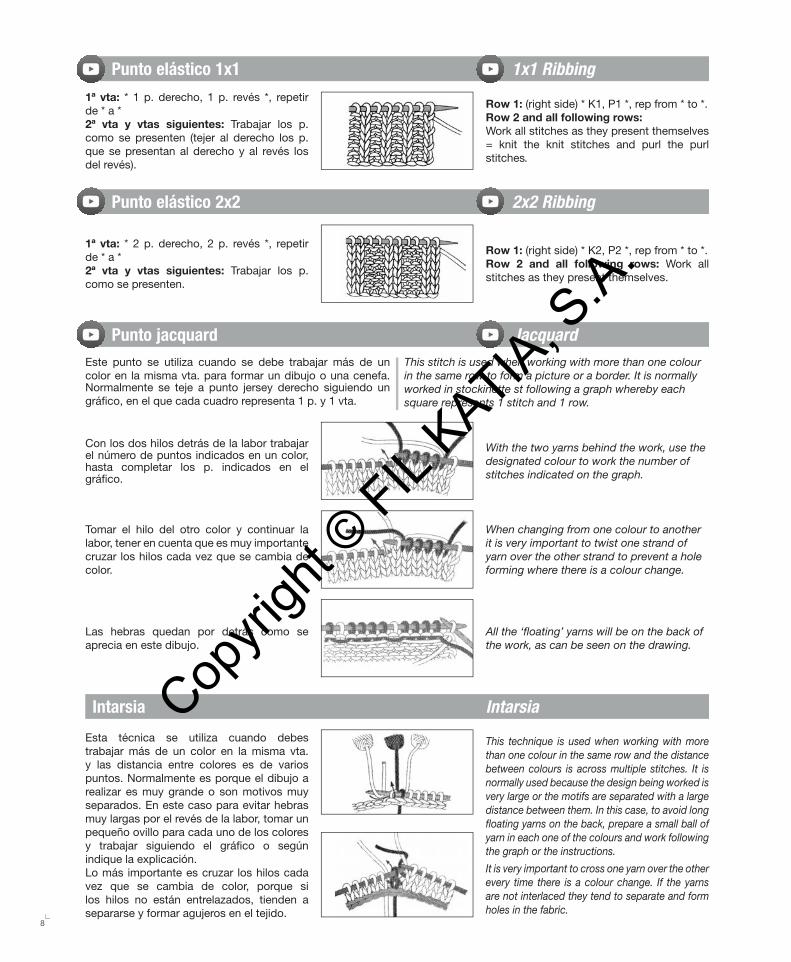
1ª vta: * 2 p. derecho, 2 p. revés *, repetir de * a *2ª vta y vtas siguientes: Trabajar los p. como se presenten.
Row 1: (right side) * K2, P2 *, rep from * to *.Row 2 and all following rows: Work all stitches as they present themselves.
Punto elástico 2x2 2x2 Ribbing
Esta técnica se utiliza cuando debes trabajar más de un color en la misma vta. y las distancia entre colores es de varios puntos. Normalmente es porque el dibujo a realizar es muy grande o son motivos muy separados. En este caso para evitar hebras muy largas por el revés de la labor, tomar un pequeño ovillo para cada uno de los colores y trabajar siguiendo el gráfico o según indique la explicación.Lo más importante es cruzar los hilos cada vez que se cambia de color, porque si los hilos no están entrelazados, tienden a separarse y formar agujeros en el tejido.
This technique is used when working with more than one colour in the same row and the distance between colours is across multiple stitches. It is normally used because the design being worked is very large or the motifs are separated with a large distance between them. In this case, to avoid long floating yarns on the back, prepare a small ball of yarn in each one of the colours and work following the graph or the instructions.
It is very important to cross one yarn over the other every time there is a colour change. If the yarns are not interlaced they tend to separate and form holes in the fabric.
Intarsia Intarsia
Tomar el hilo del otro color y continuar la labor, tener en cuenta que es muy importante cruzar los hilos cada vez que se cambia de color.
When changing from one colour to another it is very important to twist one strand of yarn over the other strand to prevent a hole forming where there is a colour change.
Las hebras quedan por detrás como se aprecia en este dibujo.
All the ‘floating’ yarns will be on the back of the work, as can be seen on the drawing.
Punto jacquard Jacquard
Con los dos hilos detrás de la labor trabajar el número de puntos indicados en un color, hasta completar los p. indicados en el gráfico.
With the two yarns behind the work, use the designated colour to work the number of stitches indicated on the graph.
Este punto se utiliza cuando se debe trabajar más de un color en la misma vta. para formar un dibujo o una cenefa. Normalmente se teje a punto jersey derecho siguiendo un gráfico, en el que cada cuadro representa 1 p. y 1 vta.
This stitch is used when working with more than one colour in the same row to form a picture or a border. It is normally worked in stockinette st following a graph whereby each square represents 1 stitch and 1 row.
1ª vta: * 1 p. derecho, 1 p. revés *, repetir de * a *2ª vta y vtas siguientes: Trabajar los p. como se presenten (tejer al derecho los p. que se presentan al derecho y al revés los del revés).
Row 1: (right side) * K1, P1 *, rep from * to *.Row 2 and all following rows:Work all stitches as they present themselves = knit the knit stitches and purl the purl stitches.
Punto elástico 1x1 1x1 Ribbing
Copyri
ght ©
FIL KATIA, S
.A.
9
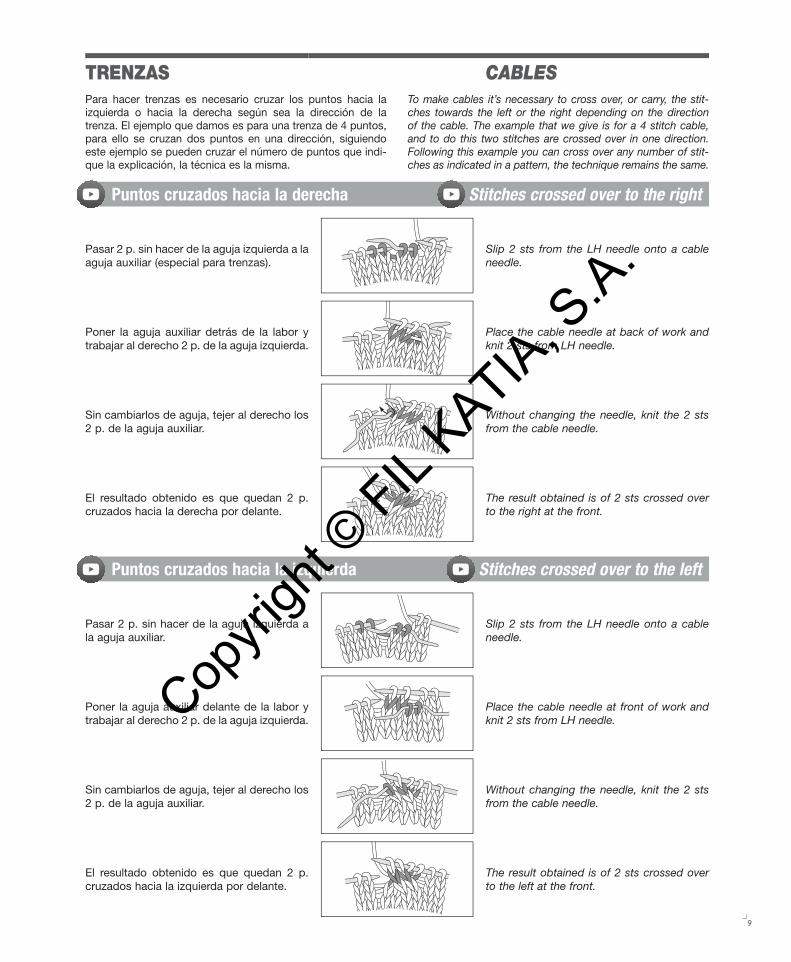
Pasar 2 p. sin hacer de la aguja izquierda a la aguja auxiliar (especial para trenzas).
Slip 2 sts from the LH needle onto a cable needle.
Pasar 2 p. sin hacer de la aguja izquierda a la aguja auxiliar.
Slip 2 sts from the LH needle onto a cable needle.
Poner la aguja auxiliar detrás de la labor y trabajar al derecho 2 p. de la aguja izquierda.
Place the cable needle at back of work and knit 2 sts from LH needle.
Poner la aguja auxiliar delante de la labor y trabajar al derecho 2 p. de la aguja izquierda.
Place the cable needle at front of work and knit 2 sts from LH needle.
Sin cambiarlos de aguja, tejer al derecho los 2 p. de la aguja auxiliar.
Without changing the needle, knit the 2 sts from the cable needle.
Sin cambiarlos de aguja, tejer al derecho los 2 p. de la aguja auxiliar.
Without changing the needle, knit the 2 sts from the cable needle.
El resultado obtenido es que quedan 2 p. cruzados hacia la derecha por delante.
The result obtained is of 2 sts crossed over to the right at the front.
El resultado obtenido es que quedan 2 p. cruzados hacia la izquierda por delante.
The result obtained is of 2 sts crossed over to the left at the front.
Para hacer trenzas es necesario cruzar los puntos hacia la izquierda o hacia la derecha según sea la dirección de la trenza. El ejemplo que damos es para una trenza de 4 puntos, para ello se cruzan dos puntos en una dirección, siguiendo este ejemplo se pueden cruzar el número de puntos que indi-que la explicación, la técnica es la misma.
To make cables it’s necessary to cross over, or carry, the stit-ches towards the left or the right depending on the direction of the cable. The example that we give is for a 4 stitch cable, and to do this two stitches are crossed over in one direction. Following this example you can cross over any number of stit-ches as indicated in a pattern, the technique remains the same.
TRENZAS CABLES
Puntos cruzados hacia la derecha Stitches crossed over to the right
Puntos cruzados hacia la izquierda Stitches crossed over to the left
Copyri
ght ©
FIL KATIA, S
.A.

10
FORMAS DE CERRAR BINDING/CASTING OFF
Pasar el primer p. sin hacer y trabajar el siguiente al derecho
Slip first stitch on needle and knit the follow-ing stitch.
Cerrado simple Single bind/cast off
Con la ag. izquierda tomar el p. sin hacer de la ag. derecha y pasarlo por encima del p. derecho
Using the tip of the LH needle, pass the slipped stitch over the knitted stitch.
Tejer otro p. al derecho, con la ag. izquierda tomar el 1º p. de la ag. derecha y pasar por encima del otro p. derecho, de esta forma en la ag. derecha sólo queda 1 p.
Knit the next stitch and with the tip of the LH needle pick up the first stitch on the RH needle and pass it over the other knit stitch, so we are left with only one stitch is on the RH needle.
Una vez cerrados todos los p. cortar el hilo, pasarlo por el interior del último p. y tirar para que quede fijado y no se suelte.
After all the stitches have been bound/cast off, cut yarn, pass end through the inside of the last stitch and pull firmly so that the stitches don’t come loose.
Una vez terminada la labor, cortar el hilo dejando una hebra de aproximadamente el doble de la medida que vayamos a cerrar. Enhebrar una ag. lanera y clavar en los dos primeros puntos.
After completing the knitting, stitches remain on the needle. Leaving a length of yarn which equals twice the length of the edge you are fin-ishing, cut yarn. Thread yarn into a wool sewing needle and insert through the first 2 sts.
Cerrado tubular Tubular bind off
Clavarla de nuevo en el primer p. y después en el tercero.
Insert the needle through the first stitch again and then through the third stitch.
Pasar del 2º p. al 4º.Insert the needle through the second and fourth stitches.
Se usa normalmente después de tejer el elástico, para conseguir un tipo de cerrado con más elasticidad.
Used when an elastic edge is needed.
A continuación del 3º al 5º y así sucesiva-mente.
Go back to the third stitch, then into the fifth stitch and continue working in this sequence.
Una vez llegado al último p. clavar la aguja de nuevo desde el penúltimo al último, rematar y cortar el hilo.
After reaching the last stitch insert the nee-dle through the penultimate stitch again then into the last stitch. Cut yarn and fasten off.
Copyri
ght ©
FIL KATIA, S
.A.
11
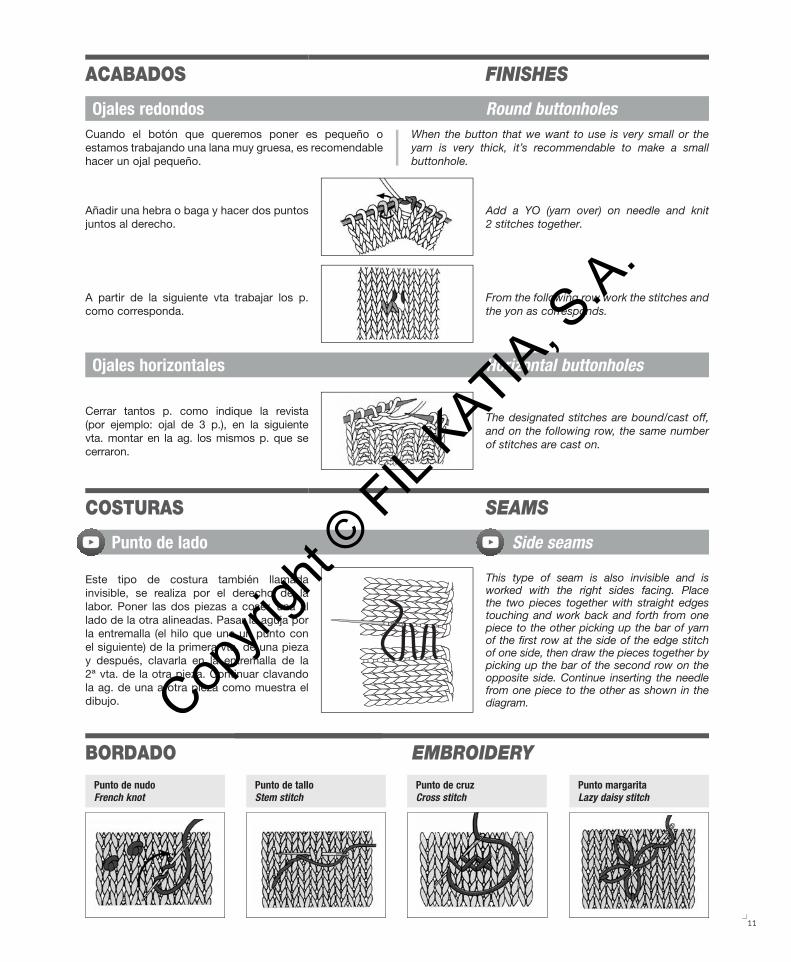
ACABADOS FINISHES
Añadir una hebra o baga y hacer dos puntos juntos al derecho.
Add a YO (yarn over) on needle and knit 2 stitches together.
Ojales redondos Round buttonholes
A partir de la siguiente vta trabajar los p. como corresponda.
From the following row work the stitches and the yon as corresponds.
Cuando el botón que queremos poner es pequeño o estamos trabajando una lana muy gruesa, es recomendable hacer un ojal pequeño.
When the button that we want to use is very small or the yarn is very thick, it’s recommendable to make a small buttonhole.
Cerrar tantos p. como indique la revista (por ejemplo: ojal de 3 p.), en la siguiente vta. montar en la ag. los mismos p. que se cerraron.
The designated stitches are bound/cast off, and on the following row, the same number of stitches are cast on.
Ojales horizontales Horizontal buttonholes
Este tipo de costura también llamada invisible, se realiza por el derecho de la labor. Poner las dos piezas a coser, una al lado de la otra alineadas. Pasar la aguja por la entremalla (el hilo que une un punto con el siguiente) de la primera vta. de una pieza y después, clavarla en la entremalla de la 2ª vta. de la otra pieza. Continuar clavando la ag. de una a otra pieza como muestra el dibujo.
This type of seam is also invisible and is worked with the right sides facing. Place the two pieces together with straight edges touching and work back and forth from one piece to the other picking up the bar of yarn of the first row at the side of the edge stitch of one side, then draw the pieces together by picking up the bar of the second row on the opposite side. Continue inserting the needle from one piece to the other as shown in the diagram.
Punto de lado Side seams
COSTURAS SEAMS
Punto de nudoFrench knot
Punto de talloStem stitch
Punto de cruz Cross stitch
BORDADO EMBROIDERYPunto margaritaLazy daisy stitch
Copyri
ght ©
FIL KATIA, S
.A.
12
INICIACIÓN AL GANCHILLOKatia ha desarrollado paso a paso y con detalle las bases y explicaciones para quien quiera iniciarse en el punto a ganchillo. Léelas detenidamente y si aún le surge alguna duda KATIA se pone a su disposición para cualquier consulta.
Con el ganchillo se pueden hacer infinidad de labores fácilmente y con resultados extraordinarios.
El Punto a Ganchillo se compone básicamente de 4 puntos:
P. Cadeneta P. Bajo
P. Enano P. Alto
Combinando estos puntos se pueden hacer toda clase de labores, desde las más simples a las más laboriosas, con efectos sorprendentes.
Existen varias medidas de ganchillo que se utilizan según el grosor de la lana.
Todas las labores se explican con gráficos, más adelante daremos las instrucciones de cómo seguir una explicación.
Seguidamente pasamos a explicar en detalle y con dibujos los puntos básicos y algunas de sus combinaciones, acabados
etc. En la explicación de cada punto figura el signo que encontrará en los gráficos.
INTRODUCTION TO CROCHETKatia has developed detailed step by step instructions for learning how to crochet. After reading through the instructions, if you have any questions they can be answered through the Katia website.
In crochet, you can make many items easily and with extraordinary results.
Crochet has four basic stitches:
Chain st Single crochet
Slip st Double crochet
Combining these stitches you can work simple or more difficult patterns with surprising effects.
Many different combinations can be made in crochet using fine thread to bulky yarns.
All models contain necessary graphs, diagrams and complete easy-to- read instructions.
The instructions explain the stitches in detail, how they are combined, and how to finish your project. Symbols that are used in the graphs are fully explained.
Ganchillo / Crochet
Copyri
ght ©
FIL KATIA, S
.A.
13
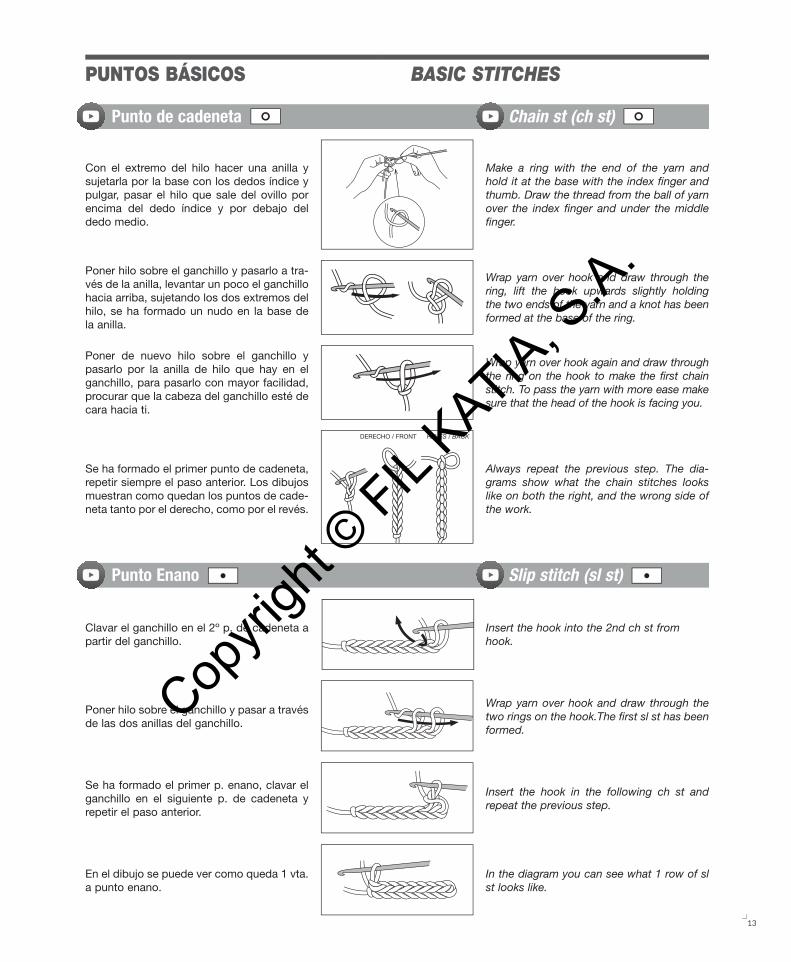
Punto de cadeneta Chain st (ch st)
Punto Enano Slip stitch (sl st)
PUNTOS BÁSICOS BASIC STITCHES
Con el extremo del hilo hacer una anilla y sujetarla por la base con los dedos índice y pulgar, pasar el hilo que sale del ovillo por encima del dedo índice y por debajo del dedo medio.
Make a ring with the end of the yarn and hold it at the base with the index finger and thumb. Draw the thread from the ball of yarn over the index finger and under the middle finger.
Poner hilo sobre el ganchillo y pasarlo a tra-vés de la anilla, levantar un poco el ganchillo hacia arriba, sujetando los dos extremos del hilo, se ha formado un nudo en la base de la anilla.
Wrap yarn over hook and draw through the ring, lift the hook upwards slightly holding the two ends of the yarn and a knot has been formed at the base of the ring.
Poner de nuevo hilo sobre el ganchillo y pasarlo por la anilla de hilo que hay en el ganchillo, para pasarlo con mayor facilidad, procurar que la cabeza del ganchillo esté de cara hacia ti.
Wrap yarn over hook again and draw through the ring on the hook to make the first chain stitch. To pass the yarn with more ease make sure that the head of the hook is facing you.
Clavar el ganchillo en el 2º p. de cadeneta a partir del ganchillo.
Insert the hook into the 2nd ch st from hook.
Poner hilo sobre el ganchillo y pasar a través de las dos anillas del ganchillo.
Wrap yarn over hook and draw through the two rings on the hook.The first sl st has been formed.
Se ha formado el primer p. enano, clavar el ganchillo en el siguiente p. de cadeneta y repetir el paso anterior.
Insert the hook in the following ch st and repeat the previous step.
En el dibujo se puede ver como queda 1 vta. a punto enano.
In the diagram you can see what 1 row of sl st looks like.
Se ha formado el primer punto de cadeneta, repetir siempre el paso anterior. Los dibujos muestran como quedan los puntos de cade-neta tanto por el derecho, como por el revés.
Always repeat the previous step. The dia-grams show what the chain stitches looks like on both the right, and the wrong side of the work.
DERECHO / FRONT REVÉS / BACK
Copyri
ght ©
FIL KATIA, S
.A.
14
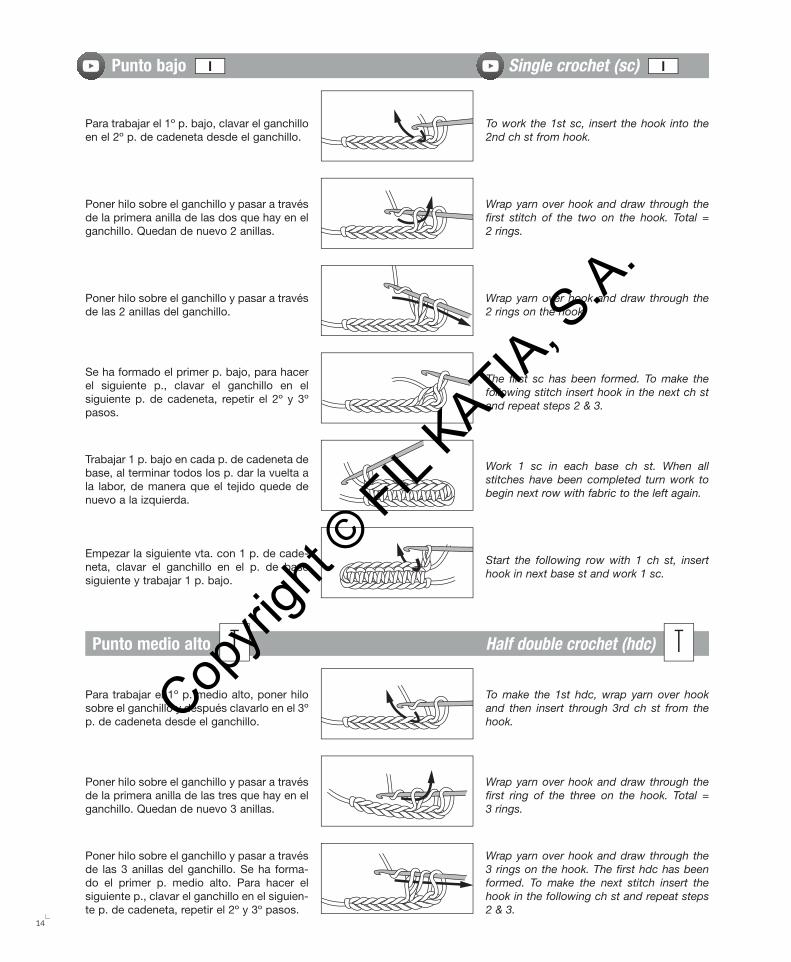
Para trabajar el 1º p. bajo, clavar el ganchillo en el 2º p. de cadeneta desde el ganchillo.
To work the 1st sc, insert the hook into the 2nd ch st from hook.
Poner hilo sobre el ganchillo y pasar a través de la primera anilla de las dos que hay en el ganchillo. Quedan de nuevo 2 anillas.
Wrap yarn over hook and draw through the first stitch of the two on the hook. Total = 2 rings.
Poner hilo sobre el ganchillo y pasar a través de las 2 anillas del ganchillo.
Wrap yarn over hook and draw through the 2 rings on the hook.
Se ha formado el primer p. bajo, para hacer el siguiente p., clavar el ganchillo en el siguiente p. de cadeneta, repetir el 2º y 3º pasos.
The first sc has been formed. To make the following stitch insert hook in the next ch st and repeat steps 2 & 3.
Trabajar 1 p. bajo en cada p. de cadeneta de base, al terminar todos los p. dar la vuelta a la labor, de manera que el tejido quede de nuevo a la izquierda.
Work 1 sc in each base ch st. When all stitches have been completed turn work to begin next row with fabric to the left again.
Empezar la siguiente vta. con 1 p. de cade-neta, clavar el ganchillo en el p. de base siguiente y trabajar 1 p. bajo.
Start the following row with 1 ch st, insert hook in next base st and work 1 sc.
Punto bajo 6 Single crochet (sc) 6
Para trabajar el 1º p. medio alto, poner hilo sobre el ganchillo y después clavarlo en el 3º p. de cadeneta desde el ganchillo.
To make the 1st hdc, wrap yarn over hook and then insert through 3rd ch st from the hook.
Poner hilo sobre el ganchillo y pasar a través de la primera anilla de las tres que hay en el ganchillo. Quedan de nuevo 3 anillas.
Wrap yarn over hook and draw through the first ring of the three on the hook. Total = 3 rings.
Punto medio alto Half double crochet (hdc)
Poner hilo sobre el ganchillo y pasar a través de las 3 anillas del ganchillo. Se ha forma-do el primer p. medio alto. Para hacer el siguiente p., clavar el ganchillo en el siguien-te p. de cadeneta, repetir el 2º y 3º pasos.
Wrap yarn over hook and draw through the 3 rings on the hook. The first hdc has been formed. To make the next stitch insert the hook in the following ch st and repeat steps 2 & 3.
Copyri
ght ©
FIL KATIA, S
.A.
15
Punto alto Double crochet (dc)
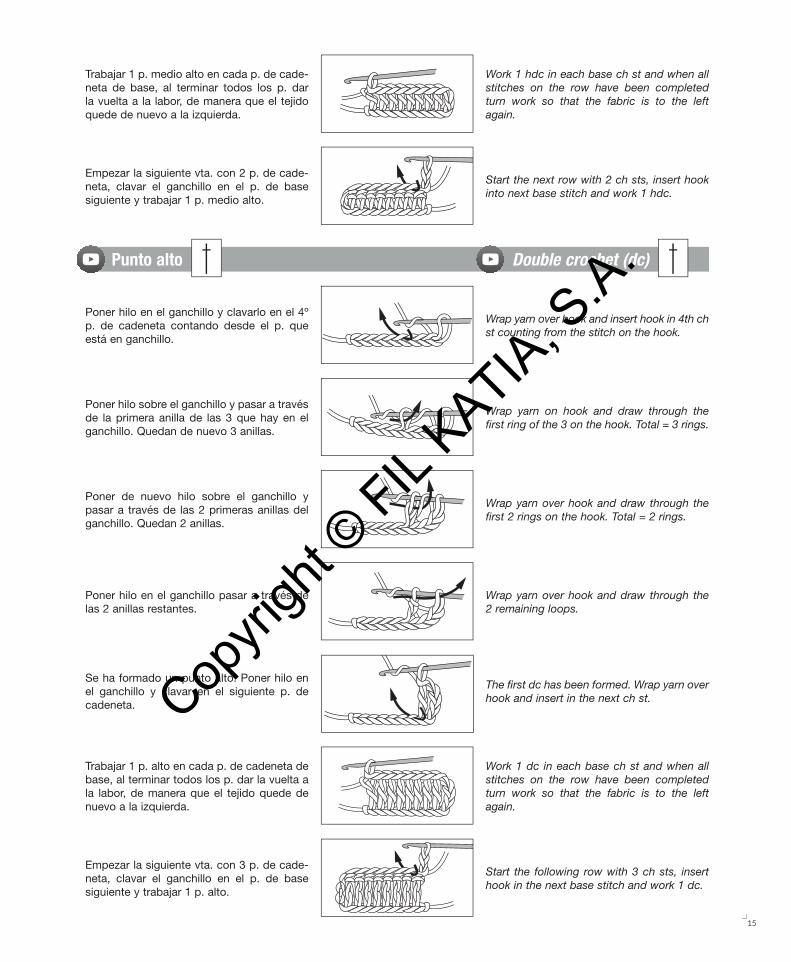
Trabajar 1 p. medio alto en cada p. de cade-neta de base, al terminar todos los p. dar la vuelta a la labor, de manera que el tejido quede de nuevo a la izquierda.
Work 1 hdc in each base ch st and when all stitches on the row have been completed turn work so that the fabric is to the left again.
Poner hilo en el ganchillo y clavarlo en el 4º p. de cadeneta contando desde el p. que está en ganchillo.
Wrap yarn over hook and insert hook in 4th ch st counting from the stitch on the hook.
Poner de nuevo hilo sobre el ganchillo y pasar a través de las 2 primeras anillas del ganchillo. Quedan 2 anillas.
Wrap yarn over hook and draw through the first 2 rings on the hook. Total = 2 rings.
Se ha formado un punto alto. Poner hilo en el ganchillo y clavar en el siguiente p. de cadeneta.
The first dc has been formed. Wrap yarn over hook and insert in the next ch st.
Empezar la siguiente vta. con 2 p. de cade-neta, clavar el ganchillo en el p. de base siguiente y trabajar 1 p. medio alto.
Start the next row with 2 ch sts, insert hook into next base stitch and work 1 hdc.
Poner hilo sobre el ganchillo y pasar a través de la primera anilla de las 3 que hay en el ganchillo. Quedan de nuevo 3 anillas.
Wrap yarn on hook and draw through the first ring of the 3 on the hook. Total = 3 rings.
Poner hilo en el ganchillo pasar a través de las 2 anillas restantes.
Wrap yarn over hook and draw through the 2 remaining loops.
Trabajar 1 p. alto en cada p. de cadeneta de base, al terminar todos los p. dar la vuelta a la labor, de manera que el tejido quede de nuevo a la izquierda.
Work 1 dc in each base ch st and when all stitches on the row have been completed turn work so that the fabric is to the left again.
Empezar la siguiente vta. con 3 p. de cade-neta, clavar el ganchillo en el p. de base siguiente y trabajar 1 p. alto.
Start the following row with 3 ch sts, insert hook in the next base stitch and work 1 dc.
Copyri
ght ©
FIL KATIA, S
.A.