Embed Size (px)
Citation preview


Citizen and going and being human are registered trademarks of Citizen Bike Inc. Other marks are the properties of their respective owners.

TW Bpb Bbmc As
ThaWe
Befopropbe ab
Be subicycmaxicomp
Also,setup
ankelco
re usper foble to
ure tocle is imizeplete
, pleap and
k yome
sing yoldingo fold
o follimpo
e youely.
ase vd ope
ou foe to
your g andd you
ow tortan
ur rid
isit weratio
or pgoi
new d unfur bic
he sent foring p
www.on of
purcing
Citizfoldincycle
equer youperfo
.citizf you
chaand
zen Bng pr
e quic
ence our saforman
zenbur fold
Pleawwfor andbike
asind be
Bike, procedckly a
of stefety ance a
bike.cding
ase ww.c
instd use. E
ng aeing
pleasdureand e
eps cand eand e
com/bike
visicitiztrucing njo
a Citg hu
se fos. Wi
easily
carefuenjoyenjoy
/setue.
t zenbction
youy!
tizeum
llow th a
y.
ully. ymenymen
up fo
bikens four n
en® an.
the sbit o
Propnt. Tont, rea
or info
e.coor seew
fol. En
setupf pra
per opo avoad th
orma
om/ettinfold
dinnjoy
p stepctice
peratid inj
his m
ation
/setng uding
ng by!
ps ane, you
tion ojury a
manua
rega
up up g
bike
nd pru sho
of yoand al
ardin
e!
racticould
our
g the
ce
e
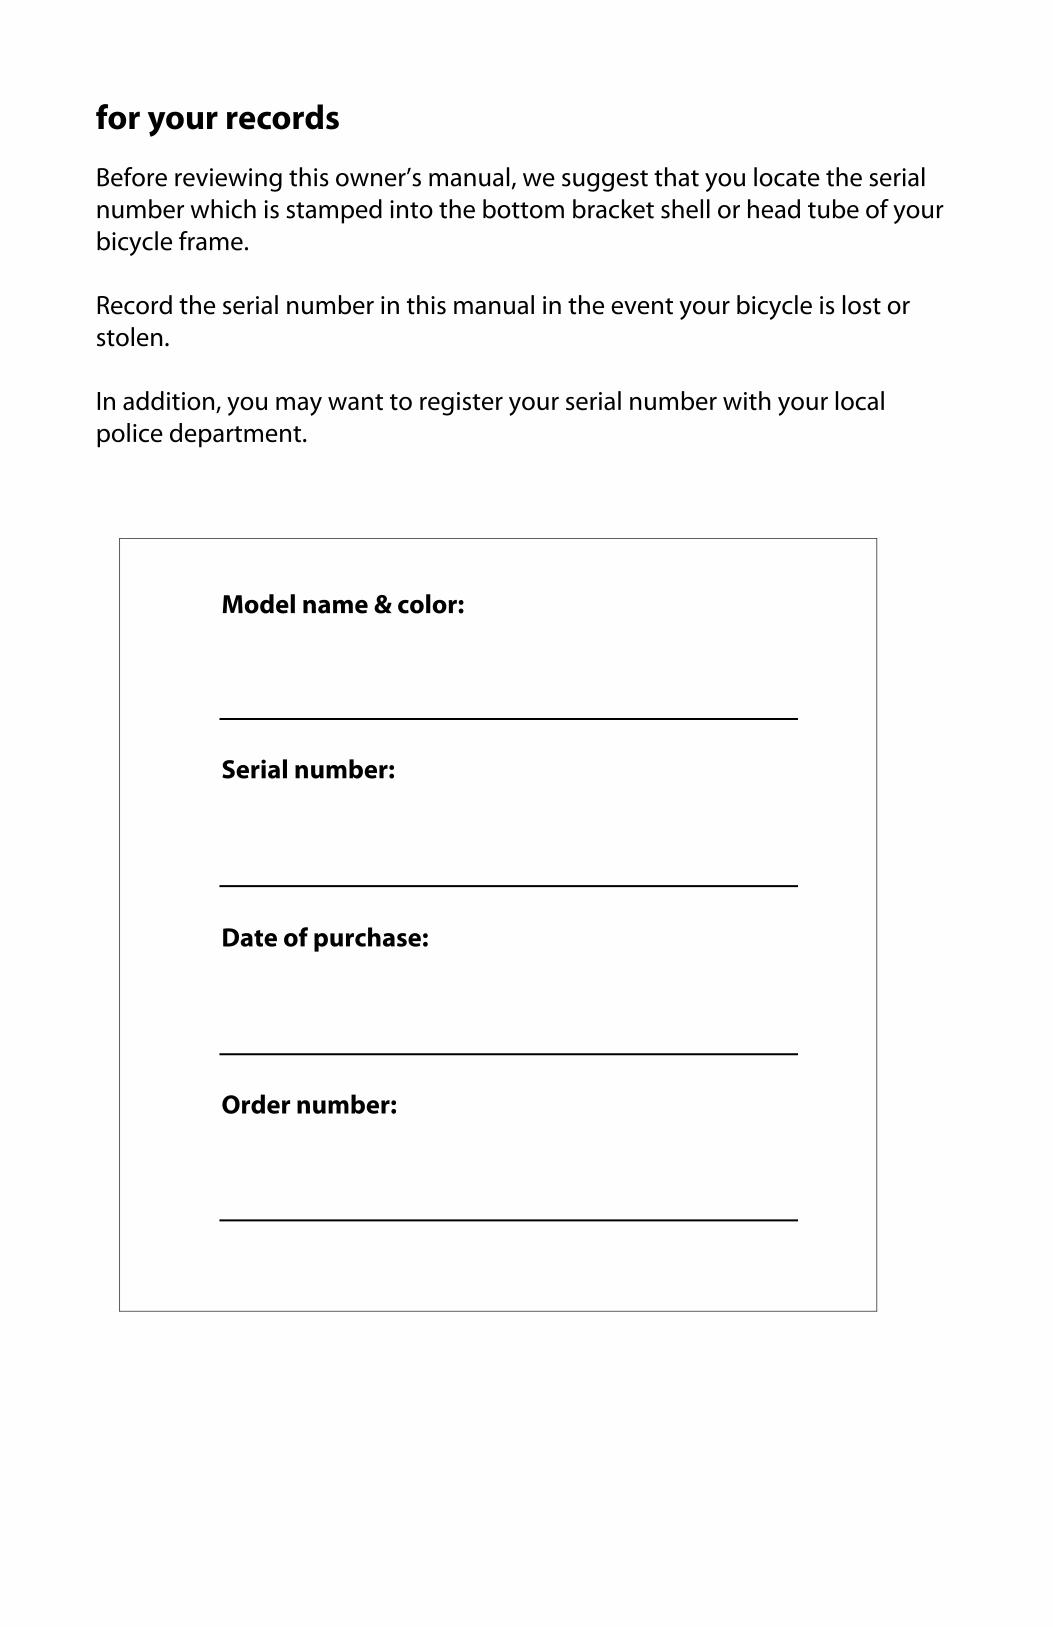
for your records
Before reviewing this owner’s manual, we suggest that you locate the serial number which is stamped into the bottom bracket shell or head tube of your bicycle frame. Record the serial number in this manual in the event your bicycle is lost or stolen. In addition, you may want to register your serial number with your local police department.
Model name & color: Serial number: Date of purchase: Order number:
safety
Like any sport, bicycling involves risk of injury and even death. Proper use and maintenance of your bicycle reduces the risk of injury and damage. A bicycle is smaller and less powerful than other vehicles, so bicycle safety cannot be over-emphasized. This manual explains how to ride your new bicycle safely, and how to maintain your bicycle to keep it operating safely. Even if you consider yourself familiar and comfortable with riding a bicycle, it is important to read this manual completely. This manual is not intended to function as a bicycle repair manual. It is to function as a basic introduction to safety, assembly and maintenance.
special notes for parents Due to the extra care that is required to setup your bicycle for safe operation, our folding bicycles are recommended for adults only. As a parent or guardian, you are responsible for the activities and safety of your minor child, including bicycle safety. In general, it is imperative to always make sure that a bicycle is properly fitted to a child; that it is in good repair and safe operating condition; that you and your child have learned and understand the safe operation of a bicycle; and that you and your child have learned, understand and obey not only the applicable local motor vehicle, bicycle and traffic laws, but also the common sense rules of safe and responsible bicycling. assembly by a professional
It is always advisable to have your bicycle properly assembled by a bicycle professional.
Proper setup and ongoing maintenance will ensure safe setup and long life for your new folding bike.
your bicycle’s break-in period
Every new bicycle has a break-in period where your control cables and wheel spokes may stretch and settle.
A break-in period is expected on new bicycles after the first few weeks of use. After the break-in period, your brake cables, shifter cables and wheel spokes may need to be adjusted. We strongly suggest that you have a professional bicycle mechanic make any necessary adjustments after your initial rides.
quick safety tips Before your first ride, be sure you know all local traffic regulations.
Remember to comply with all bicycling safety laws and use common
sense, especially in adverse weather conditions.
Before riding your folding bike for the first time, make sure to comprehensively familiarize yourself with the location and operation of all the quick release levers on your folding Citizen Bike.
Before each ride, check to make sure all latches and quick releases are
properly secured.
Before each ride, always check your brake system and tire pressure. Proper inflation for your tires is indicated on the tire’s sidewall.
Do not over-tighten the quick release levers. Always hand tighten until
clamping is snug. Never use a tool or wrench to tighten the quick release levers.
Never operate the folding bicycle if the frame, wheels or quick release
levers are damaged. Rider’s weight including luggage should not exceed 100 kg or 220 lbs.
Make sure that the seat post quick release is securely fastened and that
the seat post does not slip or move before you ride. Proper maintenance and adjustment of your Citizen Bike will greatly
increase riding safety and performance. To keep bicycle in optimum operating condition, always dry the bicycle
after use in wet riding conditions. Reflectors alone are not adequate for riding at night. Front and rear
lighting systems are recommended to increase visibility. Your Citizen Bike is designed for adult riders only.
Always wear a helmet when riding your Citizen Bike.
know your folding bike
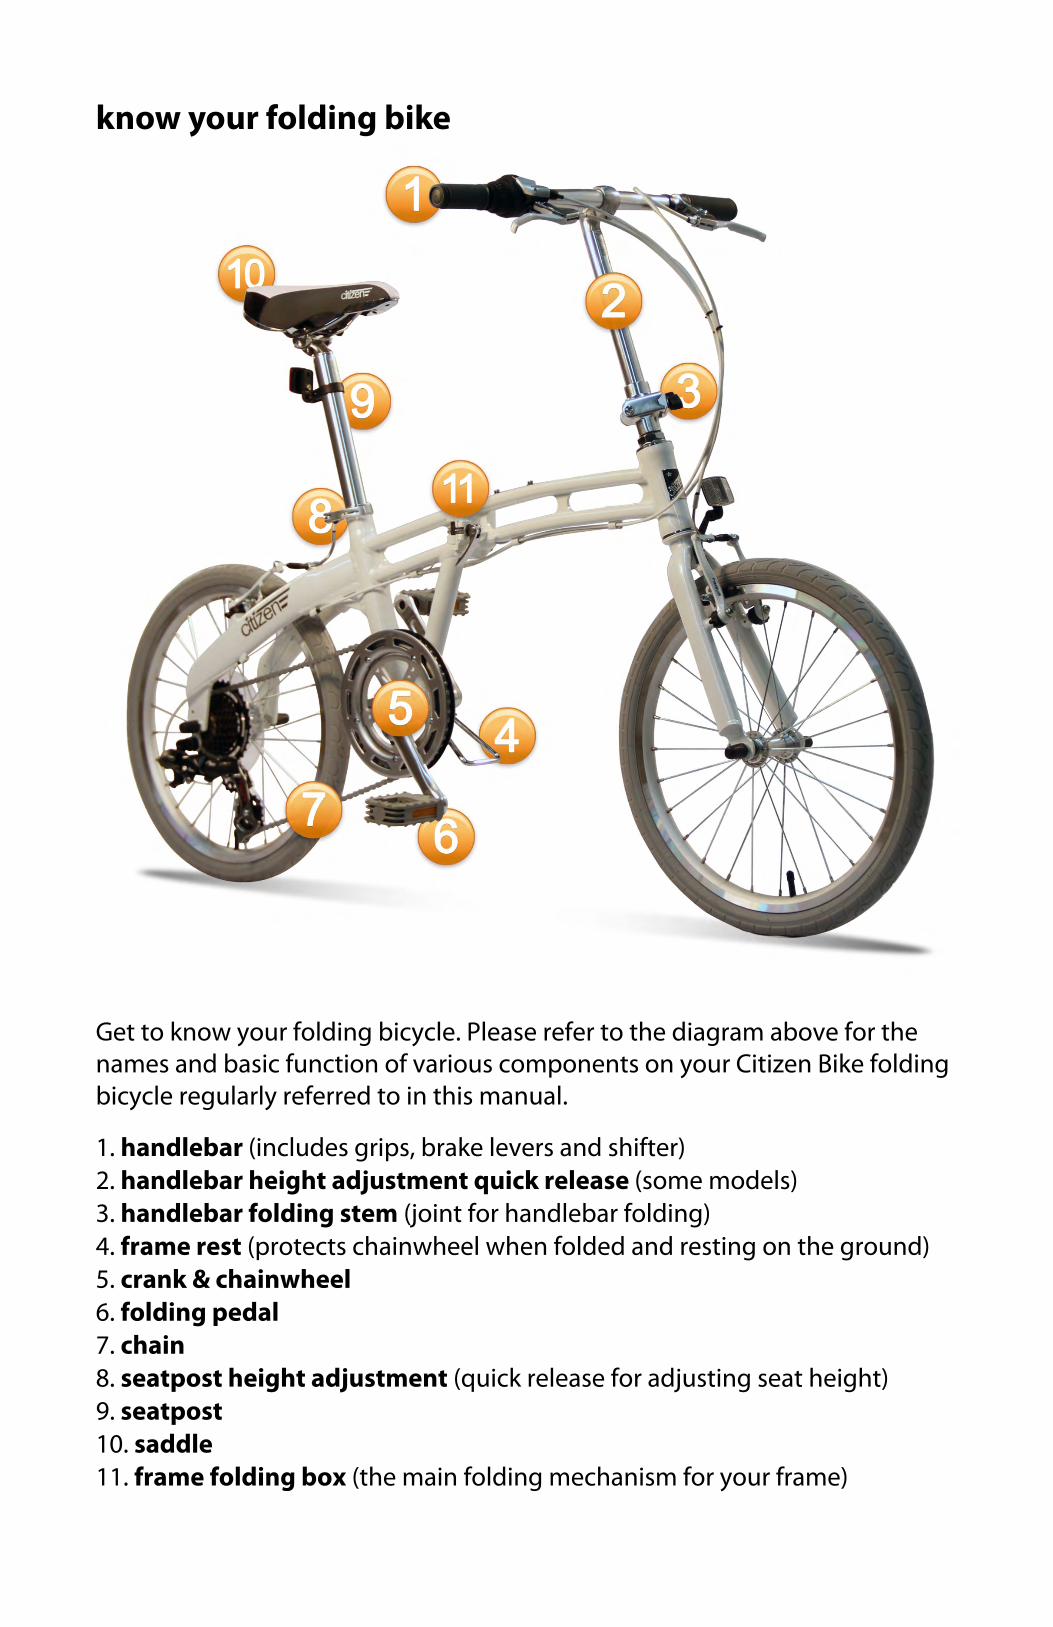
Get to know your folding bicycle. Please refer to the diagram above for the names and basic function of various components on your Citizen Bike folding bicycle regularly referred to in this manual.
1. handlebar (includes grips, brake levers and shifter) 2. handlebar height adjustment quick release (some models) 3. handlebar folding stem (joint for handlebar folding) 4. frame rest (protects chainwheel when folded and resting on the ground) 5. crank & chainwheel 6. folding pedal 7. chain 8. seatpost height adjustment (quick release for adjusting seat height) 9. seatpost 10. saddle 11. frame folding box (the main folding mechanism for your frame)
initial folding bike setup
Thanks for purchasing a folding bike by Citizen Bike. Review these instructions completely to get your bike set up for your first ride. Please note that the directions left, right, front and rear are used here as seen by a rider while seated on the bicycle. WARNING: Bicycling can be a hazardous activity even under the best of circumstances. Proper assembly and maintenance of this bicycle is your responsibility, as it helps reduce the risk of injury. Riding a bicycle which is improperly assembled or maintained can result in possible injury or death.
It is always advisable to have your bicycle properly assembled by a bicycle professional. This setup and ongoing maintenance will ensure a proper and safe setup and long life for your new folding bike.
unpacking Please remove your Citizen Bike folding bike from the delivery package.
Carefully remove all other packing material from the bicycle. This includes all zip ties, axle caps and material protecting the frame. You can cut the zip ties with scissors, a knife, or with wire cutters, but please use caution not to cut or damage any of the bicycle components or cables.
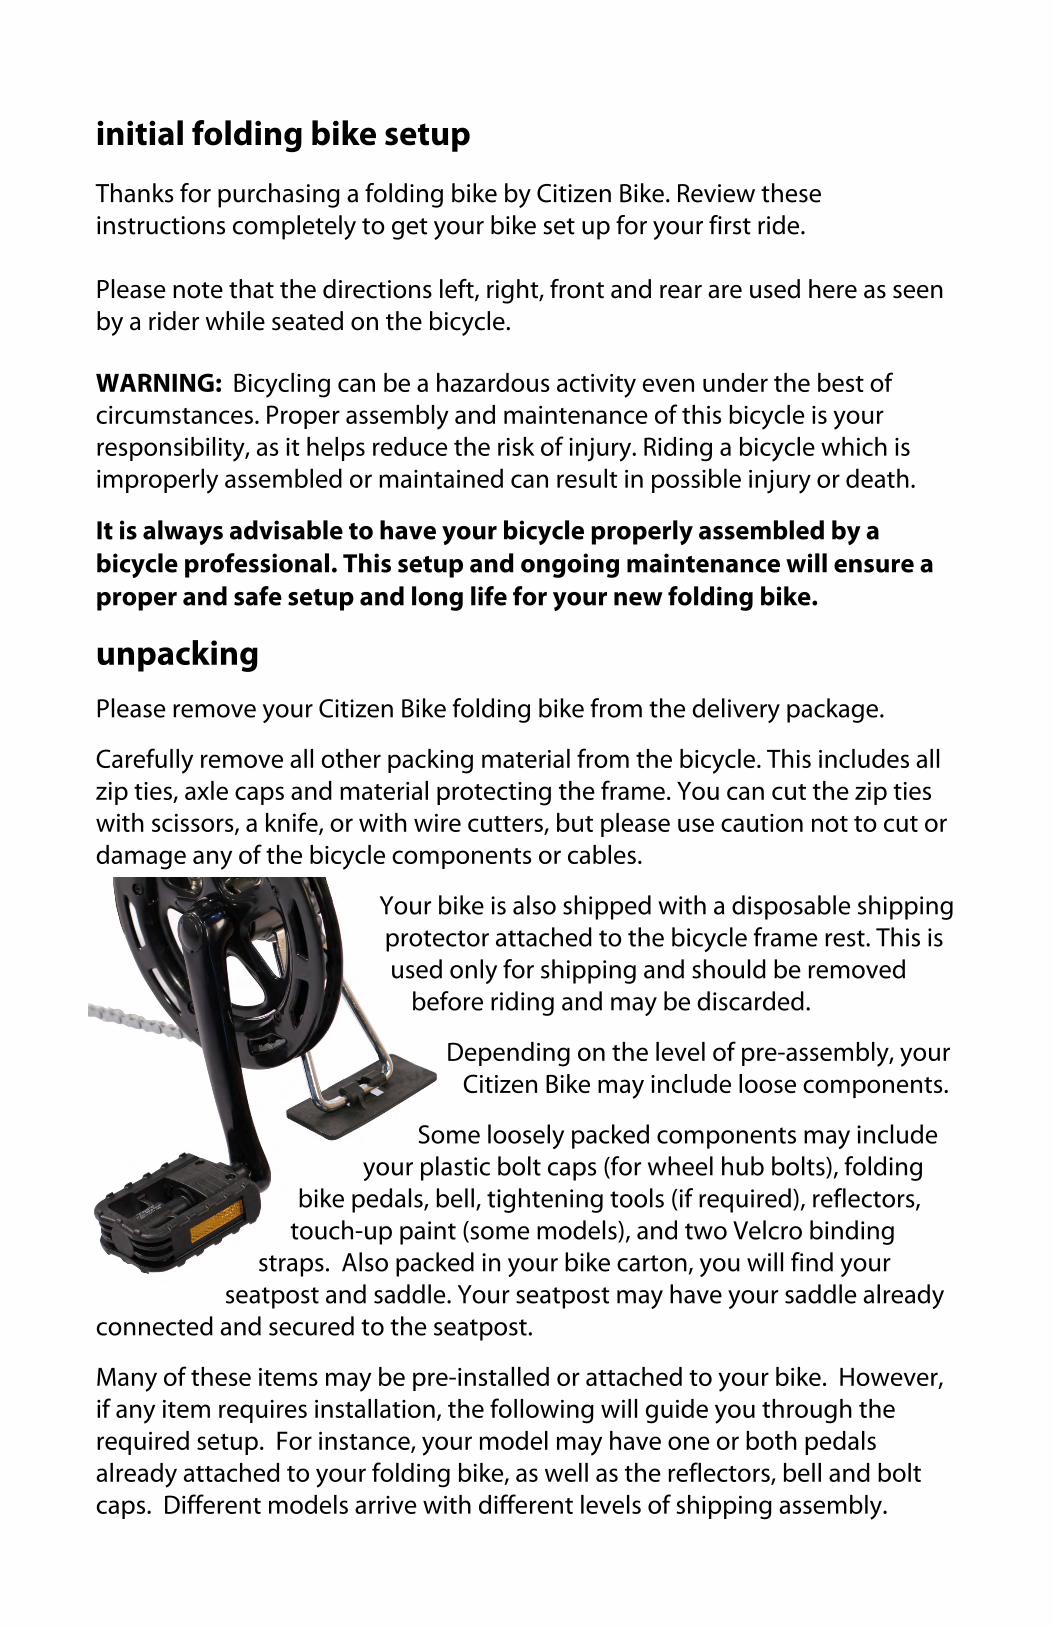
Your bike is also shipped with a disposable shipping protector attached to the bicycle frame rest. This is used only for shipping and should be removed
before riding and may be discarded.
Depending on the level of pre-assembly, your Citizen Bike may include loose components.
Some loosely packed components may include your plastic bolt caps (for wheel hub bolts), folding
bike pedals, bell, tightening tools (if required), reflectors, touch-up paint (some models), and two Velcro binding
straps. Also packed in your bike carton, you will find your seatpost and saddle. Your seatpost may have your saddle already
connected and secured to the seatpost.
Many of these items may be pre-installed or attached to your bike. However, if any item requires installation, the following will guide you through the required setup. For instance, your model may have one or both pedals already attached to your folding bike, as well as the reflectors, bell and bolt caps. Different models arrive with different levels of shipping assembly.
P
uTdtuf
cI
Cpsi
Ttlrwtctt
Icln
Pe
Witsa Ws
Pleas
usinThe Vdesigto seusedfor m
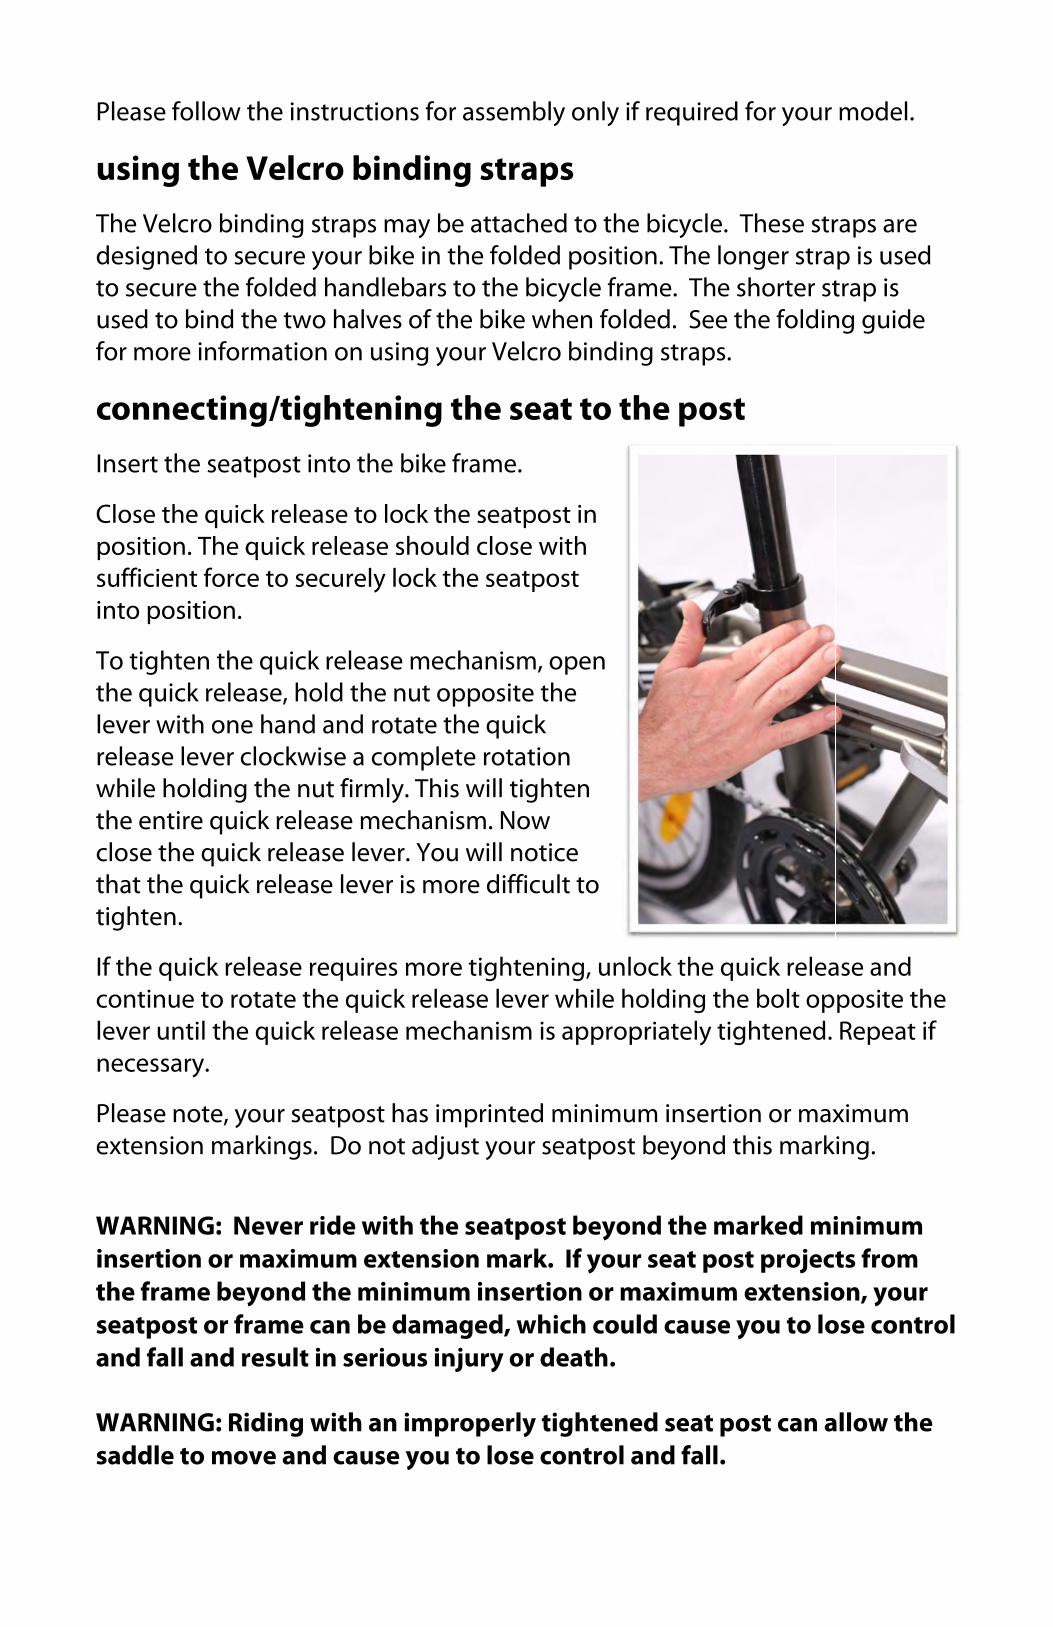
conInser
Closepositsufficinto
To tigthe qleverreleawhilethe eclosethat ttight
If thecontilevernece
Pleasexten
WARinserthe fseatpand f
WARsadd
se fol
ng tVelcrgnedecure
to bmore
nnecrt the
e thetion. cientposit
ghtequickr withase lee holentiree the the q
ten.
e quicinue r unti
essary
se nonsion
RNINrtionframpostfall a
RNINdle to
llow
the ro bind to se
the bind t
infor
ctine seat
e quicThe q
t forction.
n thek releh oneever cding
e quiquic
quick
ck reto ro
il they.
ote, yn ma
G: Nn or me be
t or frand r
G: Rio mo
the i
Velndingecurefoldethe twrmati
ng/titpost
ck relquicke to
e quiase, e hanclock
g the ck re
ck relk rele
leaseotatee quic
your srking
Nevermaxiyondrameresul
idingove a
nstru
crog strae youed hawo hion o
ightt into
leasek relesecu
ck rehold
nd ankwise
nut feleaseease
ease l
e reqe the ck re
seatpgs. D
r rideimumd thee canlt in s
g witnd c
uctio
binaps mur bikandle
halveson us
teno the
e to loease rely
elease the
nd roe a cofirmlye me leveever
uiresquiclease
post hDo no
e witm exte minn be dserio
th ancause
ons fo
ndinmay bke in ebarss of ting y
ing bike
ock tshoulock
e menut otate
ompley. Th
echaner. Yo is m
s mok rele
e mec
has iot adj
th thtensnimudam
ous in
n impe you
or ass
ng sbe atthe f
s to tthe byour
thee fram
he seuld clthe s
echanoppothe qete ris wi
nism.ou wi
ore d
re tigease chan
mprijust y
he seaion m
um inmaged
njury
propeu to l
semb
straptachfoldehe b
bike wVelcr
e seme.
eatpolose wseatp
nism,osite tquickotatill tig. Nowll notdiffic
ghtenleve
nism i
ntedyour
atpomarknsertd, why or d
erly lose c
bly on
psed to
ed poicycle
whenro bi
eat t
ost inwith
post
, opethe
k on hten
w tice ult to
ning,r whis ap
d minseatp
ost bek. If ytion ohich deat
tighcont
nly if
o theositioe fram
n foldndin
to th
n
en
o
, unloile hoprop
nimumpost
eyonyouror mcoul
th.
tenetrol a
f requ
bicyon. Thme.
ded. g str
he p
ock tholdin
priate
m insbeyo
nd thr seat
maximld ca
ed seand f
uired
ycle. he loThe sSee taps.
post
he qung theely tig
sertioond t
he mat pos
mumause y
eat pofall.
d for y
Thesngershortthe fo
t
uick e boghten
on orthis m
arkest pro exteyou
ost c
your
se strr strater stoldin
relealt opned.
r maxmark
ed miojectensioto lo
can a
mod
raps ap is utrap ing gu
ase anpositRepe
ximuing.
inimts froon, y
ose co
allow
del.
are used is
uide
nd te theat if
um
um om
your ontr
w the
e f
ol
c Yt RMf Ote Wipheh Ctmtt
Pob
Wtbs Waf
con
Yourthe h
RemoMakefram
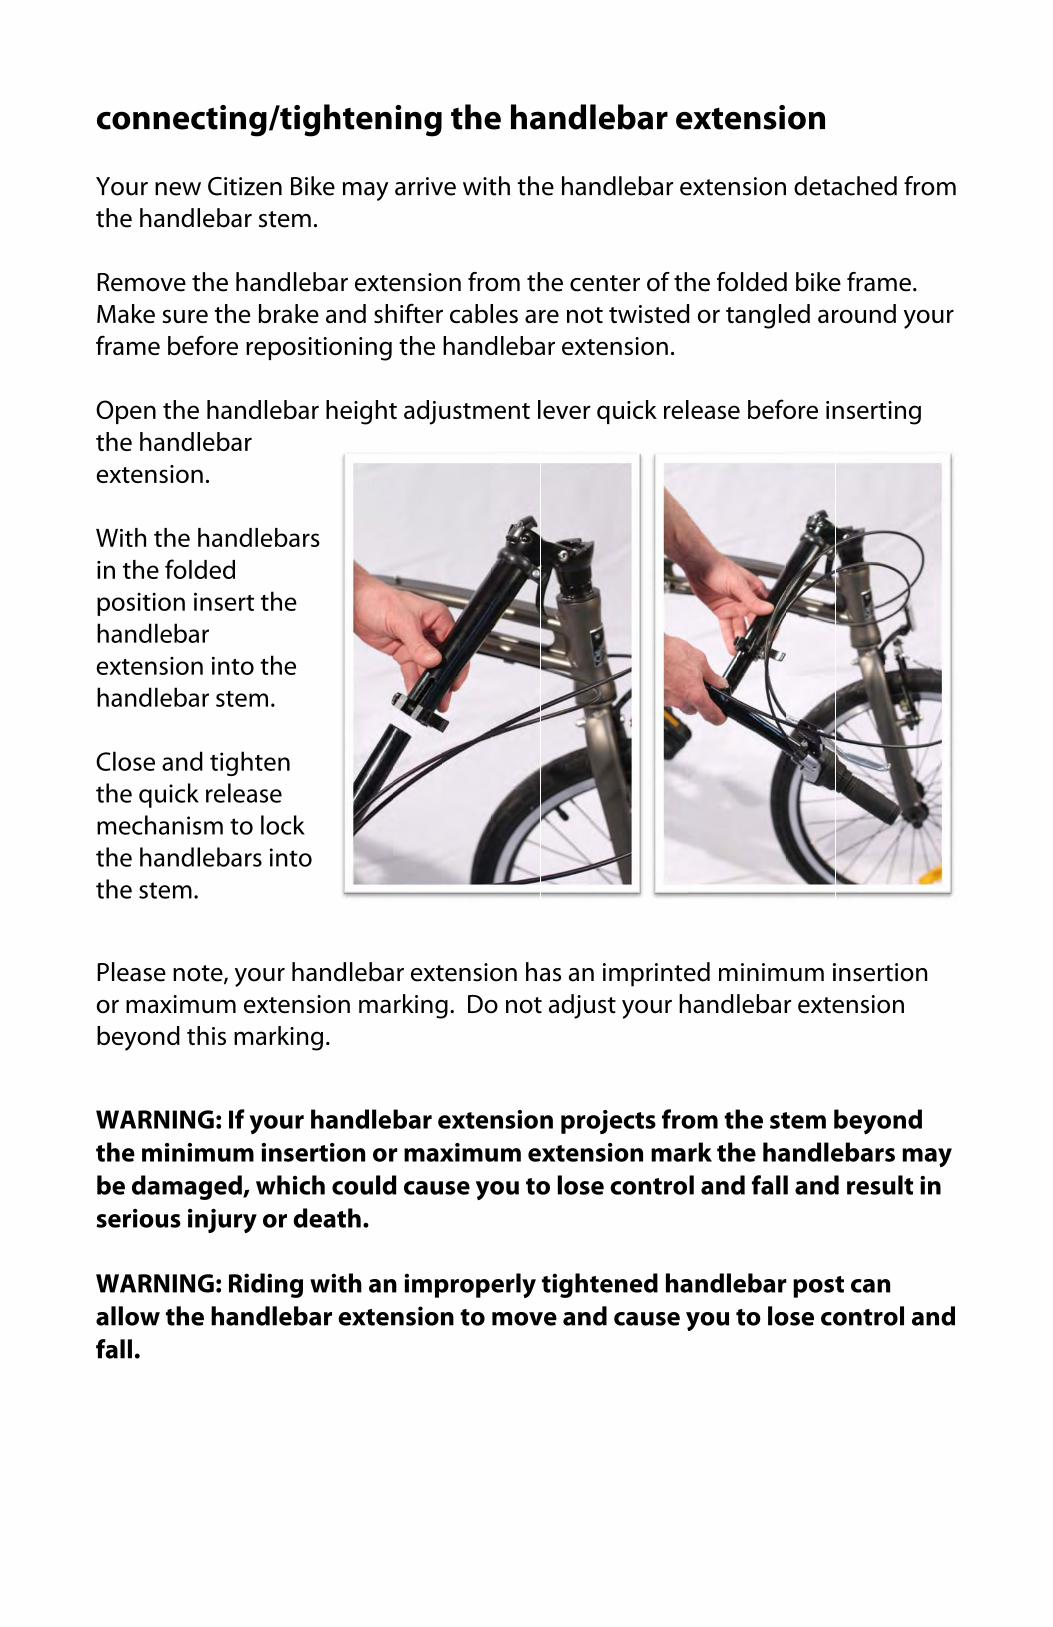
Openthe hexten
Within theposithandextenhand
Closethe qmechthe hthe s
Pleasor mbeyo
WARthe mbe dserio
WARallowfall.
nnec
r newhand
ove te suree bef
n thehandnsion
the e foldtion idlebansiondleba
e andquickhanishandstem.
se noaxim
ond t
RNINminimama
ous in
RNINw the
ctin
w Citizlebar
the he thefore
e hanlebar
n.
handded inserar n intoar ste
d tighk relesm tolebar.
ote, ymum e
his m
G: If mumged,njury
G: Rie han
ng/ti
zen Br stem
handle brarepo
ndlebr
dleba
t the
o theem.
hten ase
o lockrs int
your hexten
marki
youm ins
, whiy or d
idingndleb
ight
Bike mm.
lebarke an
ositio
bar he
ars
e
e
k to
handnsionng.
r hanertioich cdeat
g witbar e
ten
may
r extend shning
eight
dleban ma
ndleon orould
th.
th anexten
ing
arriv
ensiohifter the
t adju
ar extrking
bar er max
d cau
n impnsion
the
ve wit
on fror cablhand
ustm
tensiog. Do
extenximu
use yo
propen to
e ha
th th
om thles ardleba
ment l
on hao not
nsionum eou to
erly mov
and
e han
he cere noar ext
ever
as ant adju
n proexteno los
tighve an
leba
ndleb
enterot twitensi
r quic
n impust yo
ojectnsion
e con
tenend ca
ar e
bar e
r of thistedon.
ck rel
printeour h
ts fron mantro
ed hause y
exte
exten
he fod or ta
lease
ed mhandl
om thrk thl and
andleyou t
ensi
nsion
oldedangle
e befo
minimlebar
he sthe had fall
ebarto lo
on
deta
d bikeed ar
ore in
mum ir exte
tem bandlel and
postose co
ached
e framround
nsert
inserensio
beyoebar
d resu
t canontro
d fro
me. d you
ting
tion on
ond s mault in
n ol an
om
ur
ay n
nd

connecting the pedals Your Citizen Bike includes a set of folding pedals. Your bike may have one or both pedals pre-installed.
The pedals are marked on the end of the pedal axle: “R” for “Right” and “L” for “Left.” Look for the letter “L” or “R” on the side or end of each pedal spindle.
When seated on the bike, your right foot would correspond to the right pedal and your left foot would correspond to the left pedal.
If your pedals are not pre-installed, first apply a small amount of grease to the threads of each pedal. Bicycle pedals always tighten in the direction of the front wheel. Turning the spindle clockwise by hand, thread the pedal marked “R” into the crank arm on the right (drive) side of the bicycle. Make sure that you are not “cross-threading”, which can strip the threads in the crank arm. If the threads do not turn easily, don’t force them. Back the spindle out and start over. Once the pedal is threaded into the crank, tighten the spindle securely to the crank arm with a 15mm open end or an adjustable wrench. Turning the spindle counterclockwise by hand, thread the pedal marked “L” into the crank arm on the left side of the bike. Make sure that you are not “cross-threading”, which can strip the threads in the crank arm. If the threads do not turn easily, don’t force them. Back the spindle out and start over. Once the pedal is threaded into the crank, tighten the spindle securely to the crank arm with a 15mm open end or an adjustable wrench. WARNING: Improperly installed and tightened pedals can work loose, damaging the bicycle and causing possible serious injury or death to the rider.
adjusting the angle of your handbrake levers Your Citizen Bike has front and rear hand brake levers. These levers may require angle adjustment and tightening for comfort and safety.
When your handlebars are properly set up, adjust the angle of the handbrake so that they are easily accessible when your hands are on the handlebars.
The angle of the handbrake levers is generally a straight line from your shoulders through your hands to the brakes. Tighten the position of the handbrake levers in this position by tightening the hex nut with a 5mm hex key or Allen wrench.
attaching your free bell Your Citizen Bike folding bike comes with a free bell. It is recommended to attach the bell to the left side of the handlebars. Loosen the screw on the attachment ring completely with a screwdriver. Place the attachment ring around the handlebars and replace and tighten the screw. The bell is rung by flicking the small tab. Ding!
handlebar angle
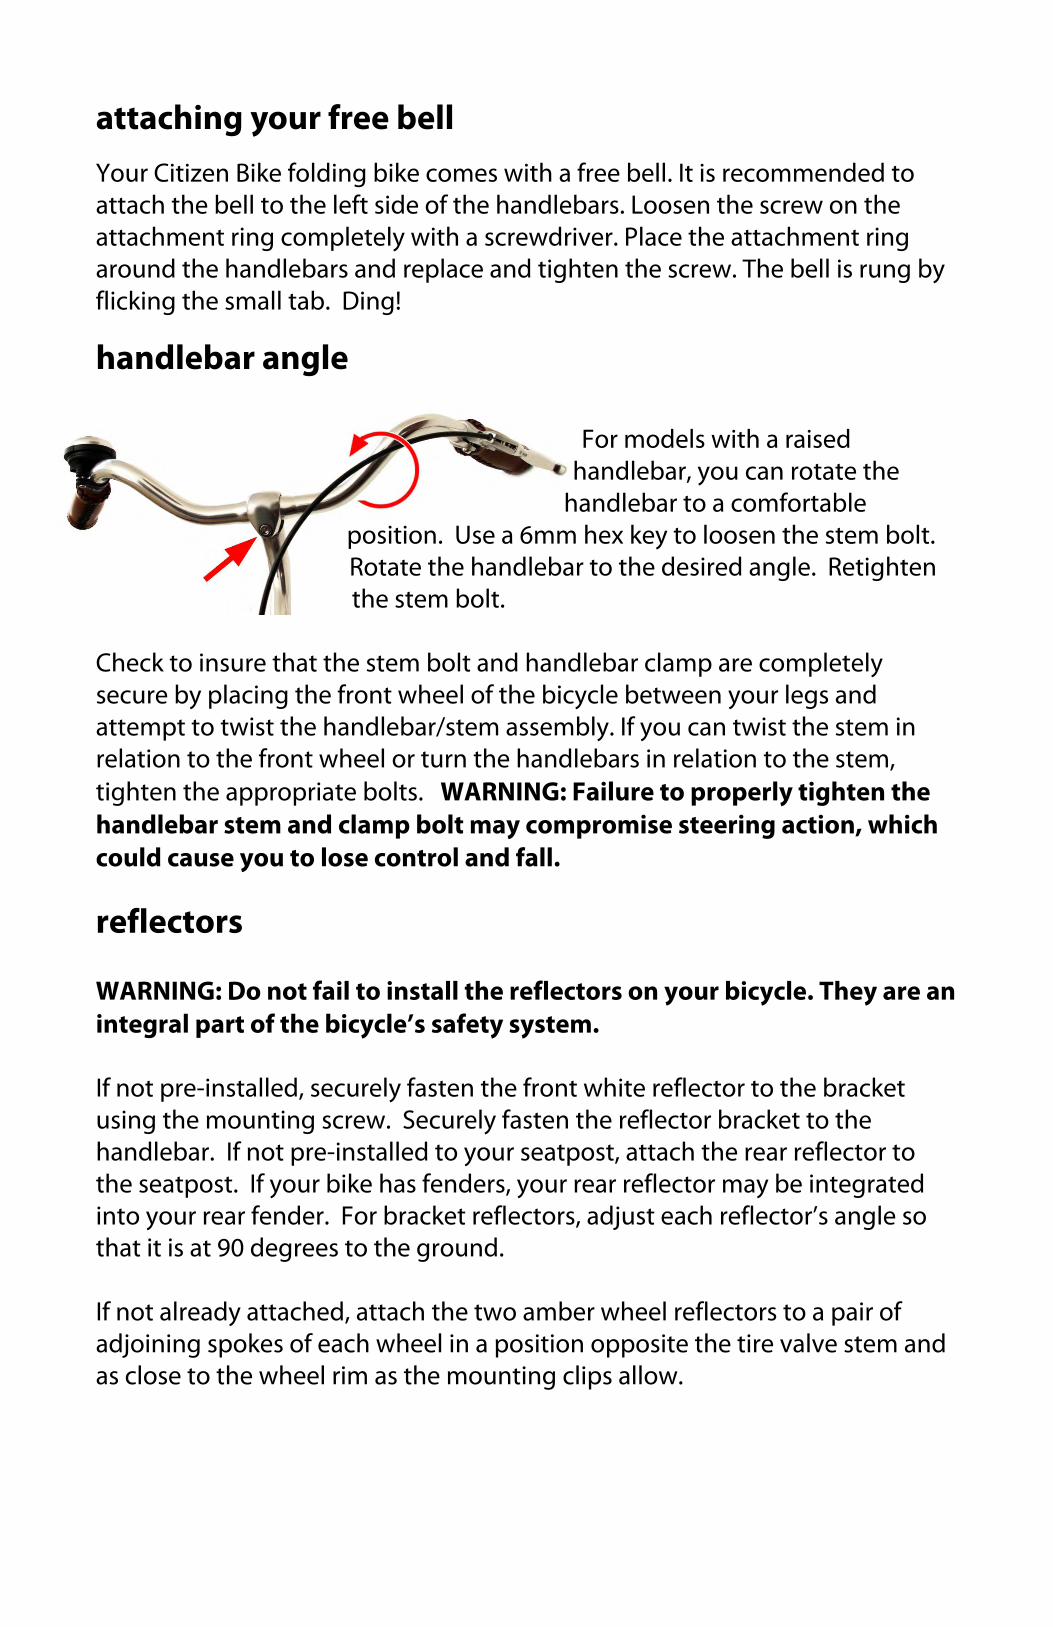
For models with a raised
handlebar, you can rotate the handlebar to a comfortable
position. Use a 6mm hex key to loosen the stem bolt. Rotate the handlebar to the desired angle. Retighten the stem bolt.
Check to insure that the stem bolt and handlebar clamp are completely secure by placing the front wheel of the bicycle between your legs and attempt to twist the handlebar/stem assembly. If you can twist the stem in relation to the front wheel or turn the handlebars in relation to the stem, tighten the appropriate bolts. WARNING: Failure to properly tighten the handlebar stem and clamp bolt may compromise steering action, which could cause you to lose control and fall.
reflectors WARNING: Do not fail to install the reflectors on your bicycle. They are an integral part of the bicycle’s safety system. If not pre-installed, securely fasten the front white reflector to the bracket using the mounting screw. Securely fasten the reflector bracket to the handlebar. If not pre-installed to your seatpost, attach the rear reflector to the seatpost. If your bike has fenders, your rear reflector may be integrated into your rear fender. For bracket reflectors, adjust each reflector’s angle so that it is at 90 degrees to the ground. If not already attached, attach the two amber wheel reflectors to a pair of adjoining spokes of each wheel in a position opposite the tire valve stem and as close to the wheel rim as the mounting clips allow.
y
Y Trstsnc Tg Nr Nt
Ft Srt Tga
youYour
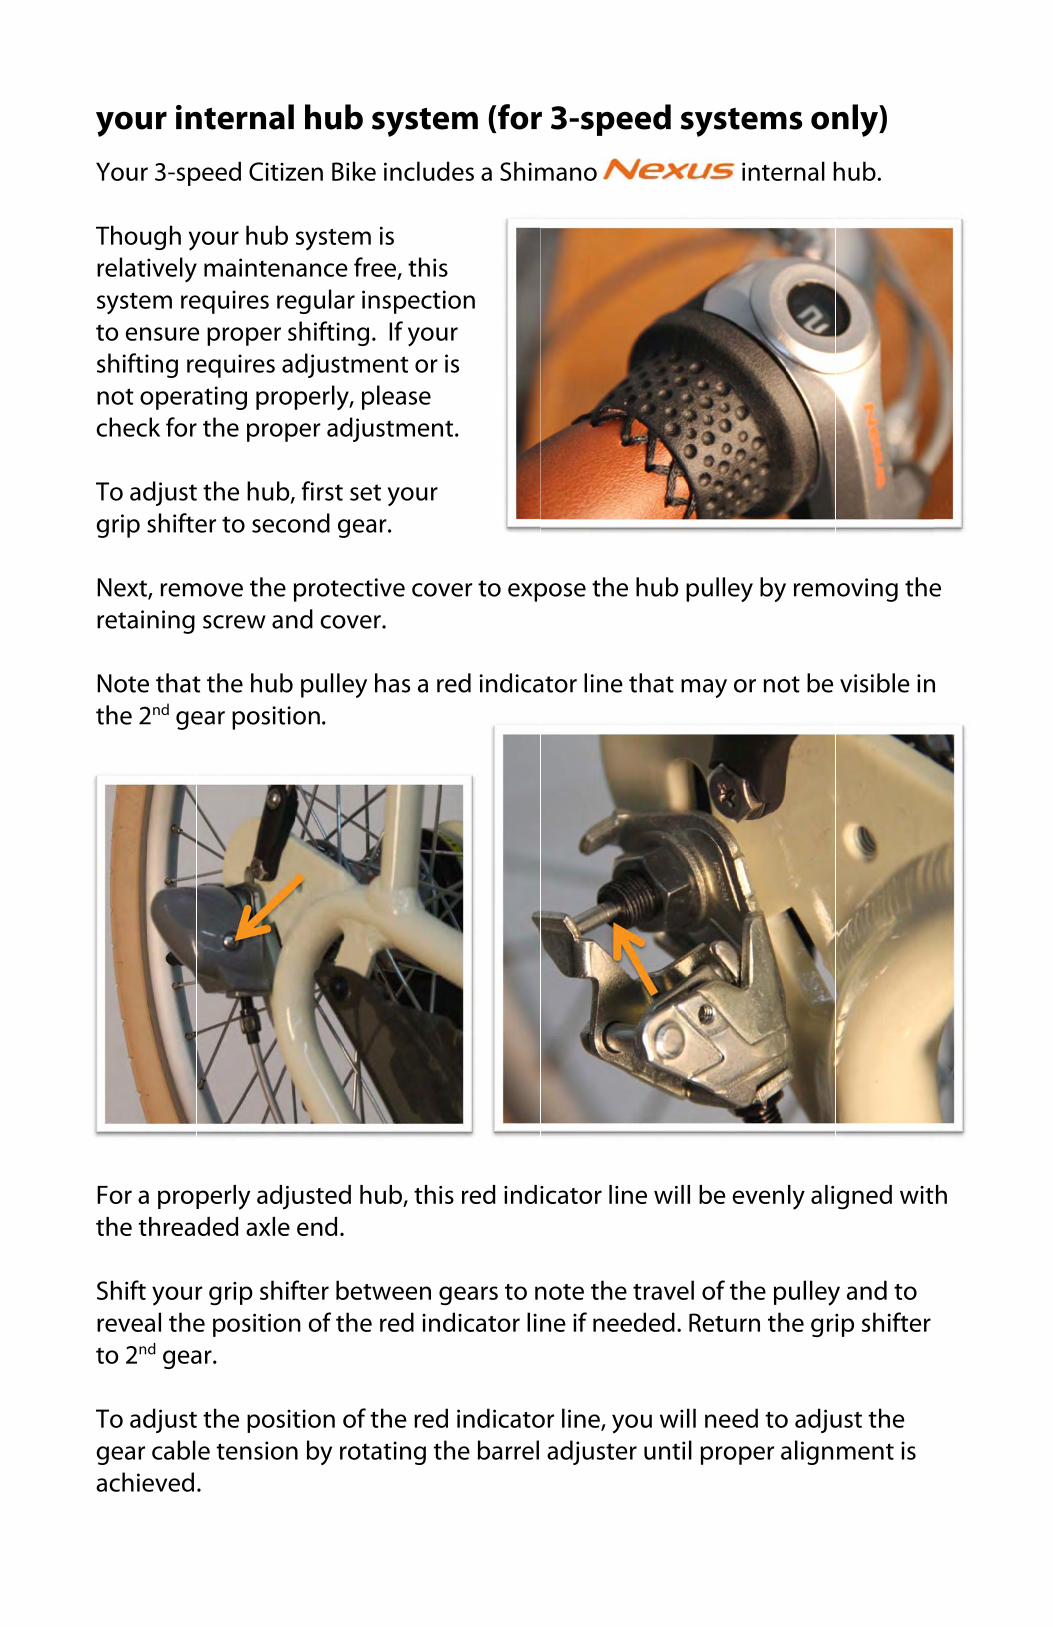
Thourelatisysteto enshiftinot ochec
To adgrip s
Nextretain
Notethe 2
For athe t
Shift reveato 2n
To adgear achie
ur inr 3-sp
ugh yively
em rensureing reoperak for
djustshifte
, remning
e that2nd ge
a prophrea
youral thed gea
djustcabl
eved
nterpeed
your y mainequire proequirating the
t the er to
move scre
t the ear p
perlyded
r gripe posar.
t the e ten.
rnalCitiz
hub ntenes reper sres a
g propprop
hub,seco
the pw an
hub ositio
y adjuaxle
p shifsition
positnsion
huzen B
systeance
egulashiftindjustperly
per ad
first ond g
protend co
pulleon.
ustedend.
fter bn of t
tion on by r
b syike in
em ise freear insng. Itmeny, pledjust
set ygear.
ectiveover.
ey ha
d hub
betwehe re
of throtat
ystenclud
s e, thispectf you
nt or ease tmen
your
e cov
as a r
b, thi
een ged in
e reding t
em (des a
s ion
ur is
nt.
ver to
red in
s red
gearsdicat
d indhe b
(fora Shim
o exp
ndica
d indi
s to ntor lin
icatoarrel
r 3-smano
pose
ator l
icato
note ne if
or line adju
speeo
the h
ine t
or line
the tneed
e, youster
ed s
hub p
hat m
e will
traveded.
u wilunti
syst
pulle
may o
l be e
el of tRetu
ll neel pro
teminter
ey by
or no
even
the prn th
ed toper a
s onrnal h
rem
ot be
ly ali
ulleyhe gri
o adjualign
nly)hub.
ovin
visib
gned
y andip sh
ust thmen
)
g the
ble in
d wit
d to ifter
he t is
e
n
h
f Wmt
fina
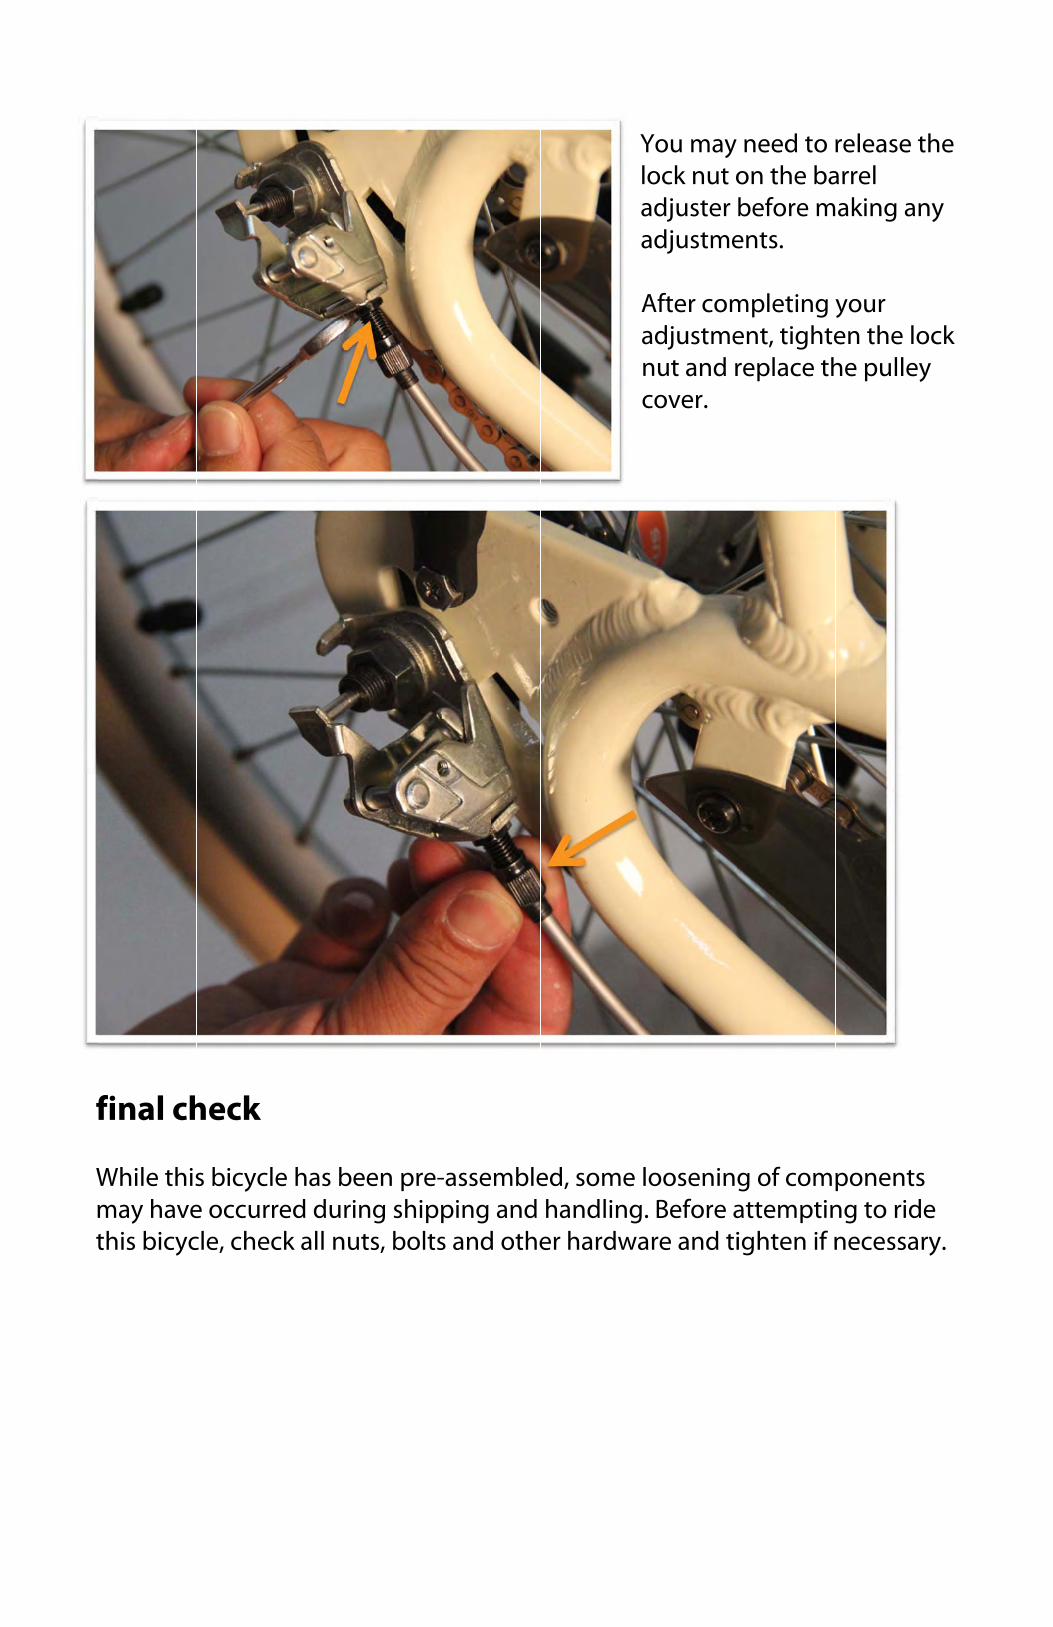
Whilemay this b
al ch
e thishave
bicyc
heck
s bicye occcle, ch
k
ycle curredheck
has bd duall n
beenring
nuts, b
pre-shippbolts
-asseping s and
mbleand
d othe
ed, sohander ha
ome dlingardwa
You lock adjuadju Afteadjunut acove
loosg. Befare a
may nut oster stme
r comustmeand rer.
eninfore aand ti
needon thbefoents.
mpletent, trepla
g of cattemighte
d to rhe bare m
ting ytighteace th
compmptinen if n
releaarrel aking
youren thhe pu
poneng tonece
ase th
g any
r he loculley
ents o rideessary
he
y
ck
e y.
fWe
pw
Ylm
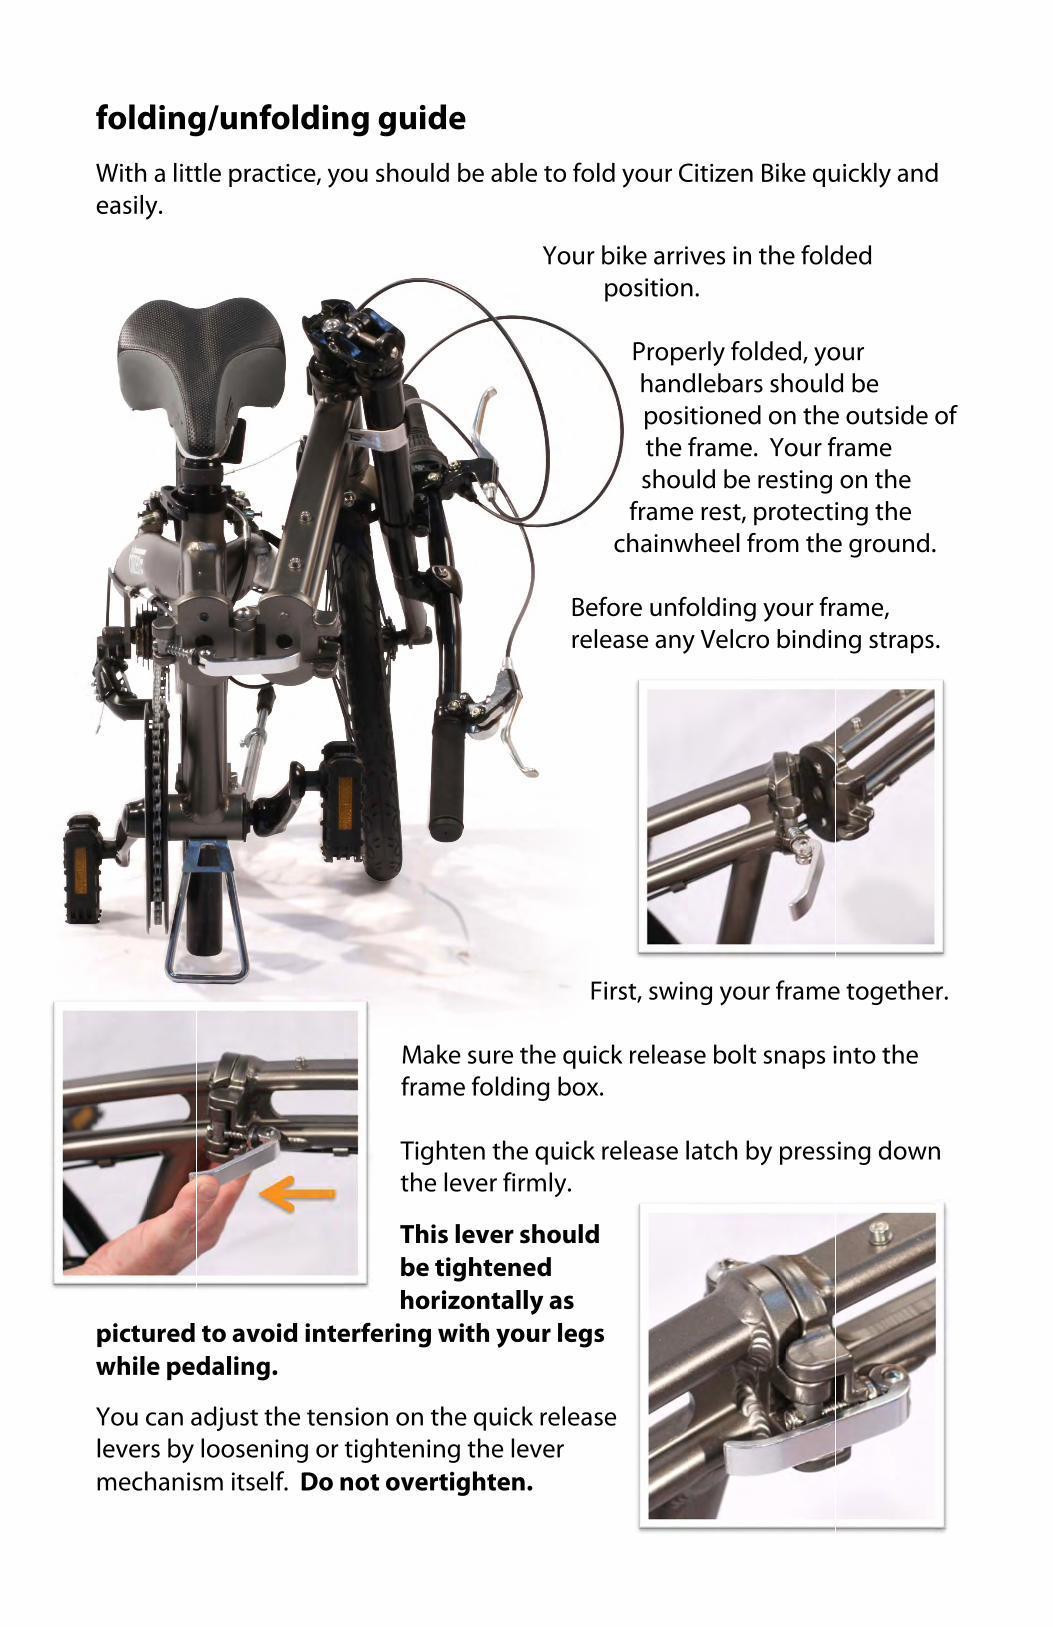
foldWitheasily
pictuwhile
You clevermech
ding a litty.
ured e ped
can ars by hanis
g/untle pr
to adalin
adjusloos
sm it
nfolractic
voidng.
st theeninself.
ldince, yo
d inte
e teng or Do n
ng gou sh
erfer
sion tightnot o
guidhould
Makfram Tighthe
Thisbe thori
ring w
on thteninovert
de d be a
ke sume fo
hten lever
s levetightizontwith
he qung thtight
able
re tholding
the qr firm
er shtenedtallyyou
uick re levten.
to fo
Your
Bere
he qug box
quickmly.
houldd
y as r leg
releaver
old yo
r bikepos
P
frch
eforeelease
First,
uick rex.
k rele
d
gs
ase
our C
e arrisition
Propehandposithe shourameainw
e unfoe any
, swin
eleas
ease l
Citize
ves in.
erly fdlebationefram
uld be rest
wheel
oldiny Velc
ng yo
se bo
latch
en Bik
n the
foldears shed on
me. Yoe rest, prol from
ng yocro b
our fr
olt sn
by p
ke qu
e fold
ed, yohouldn theour fsting otectim the
our frbindin
rame
aps i
press
uickly
ded
our d be e outsframe
on ting te gro
ame,ng st
e tog
into t
ing d
y and
side e he he
ound.
, traps
ethe
the
down
d
of
.
.
r.
n
S Tbc
emy
Pl
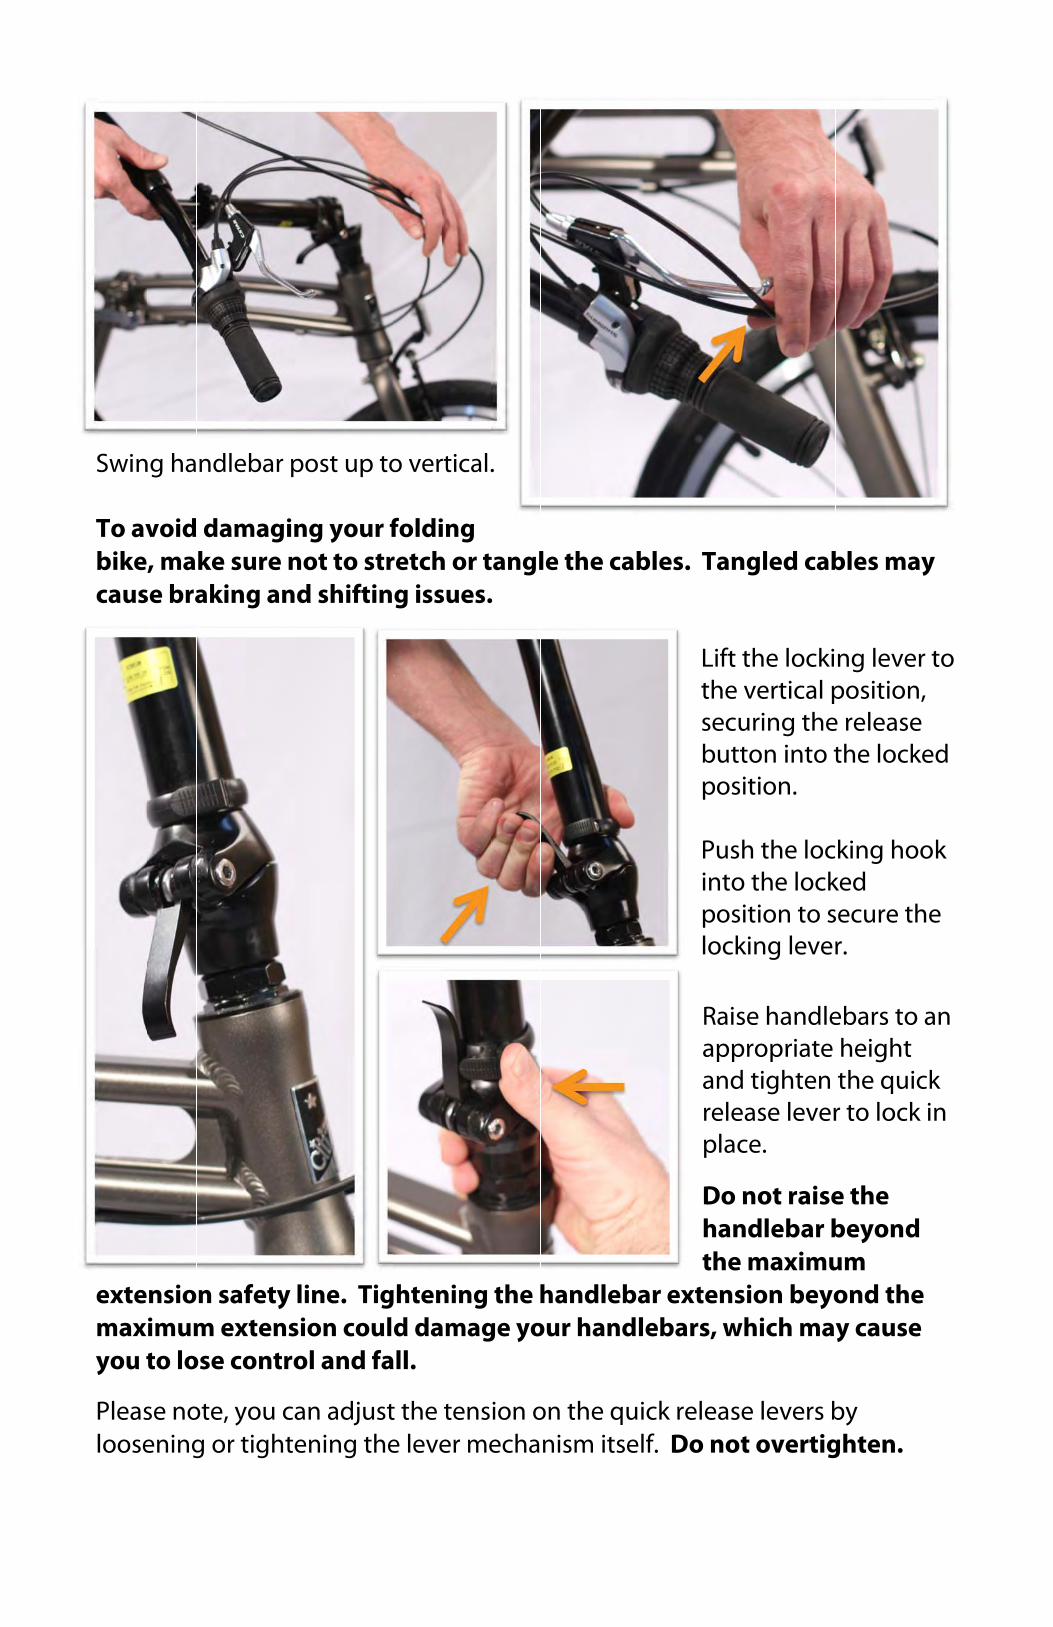
Swin
To avbike,caus
extemaxyou t
Pleasloose
ng ha
void, ma
se bra
nsioimumto lo
se noening
ndle
damke suakin
n safm ex
ose co
ote, yg or t
ebar p
maginure ng an
fety xtensontro
you catighte
post
ng yonot tod sh
line.sion col an
an adening
up to
our fo striftin
. Tigcoul
nd fa
djustg the
o ver
foldiretchg iss
ghtend da
all.
t the e leve
rtical.
ing h or tsues.
ning amag
tenser me
.
tangl.
the hge yo
ion oecha
le th
handour h
on thnism
e cab
dlebahandl
e qum itse
bles.
ar exleba
ick relf. D
. Tan
Lift thesecbutpos Pusintoposlock Raisappandreleplac
Do hanthe
xtensrs, w
eleaso no
ngled
the l verturing
tton isition
sh theo thesitionking
se haproprd tighease ce.
not ndlebe maxsion
which
se levot ove
d cab
lockiical p
g theinto t
n.
e loce lockn to slever
andleriate hten lever
raisebar bximubeyo
h may
vers bertig
bles
ng leposite relethe lo
king ked securr.
ebarsheigthe q
r to lo
e thebeyoum ond y cau
by ghten
may
ever tion, ase ocke
hoo
re the
s to aght quickock i
e ond
the use
n.
y
to
d
k
e
an
k n

Rh
Rap
An
Dsysw
Tus
Mlp
C
Y
Releaheigh
Raiseand tplace
Adjunece
Do nsafetyou rseatpwon
To unupwastep
Maklockeposs
Cong
Your
ase qht.
e the tighte.
st thessary
not raty linride post't slip
nfoldard. Kinte
e sured in
sible
gratu
r Citiz
quick
seatten th
e teny.
aise tne. Tomak
t are p.
d the Keep
erior
re thnto p
serio
ulatio
zen B
k relea
t posthe qu
nsion
the so avo
ke susecu
pedap fingto av
hat boplaceous i
ons!
Bike
ase le
t to auick r
n on t
seatpoid sre th
urely
als, ligers void
oth pe befoinjur
is rea
ever
a comrelea
the q
post seriohat thy fast
ift thclea seri
pedaore rry.
ady t
to ad
mfortse le
quick
beyoous inhe setened
e pedr of tous i
als arridin
to rid
djust
table ver t
k relea
ond njuryeat ad so
dal stthe pinjur
re seg to
de!
t seat
heigto loc
ase, i
the y, beand
they
tep pedary.
ecureavoi
t pos
ght ck in
if
fore
y
al
ely id
t
f
h
T
N
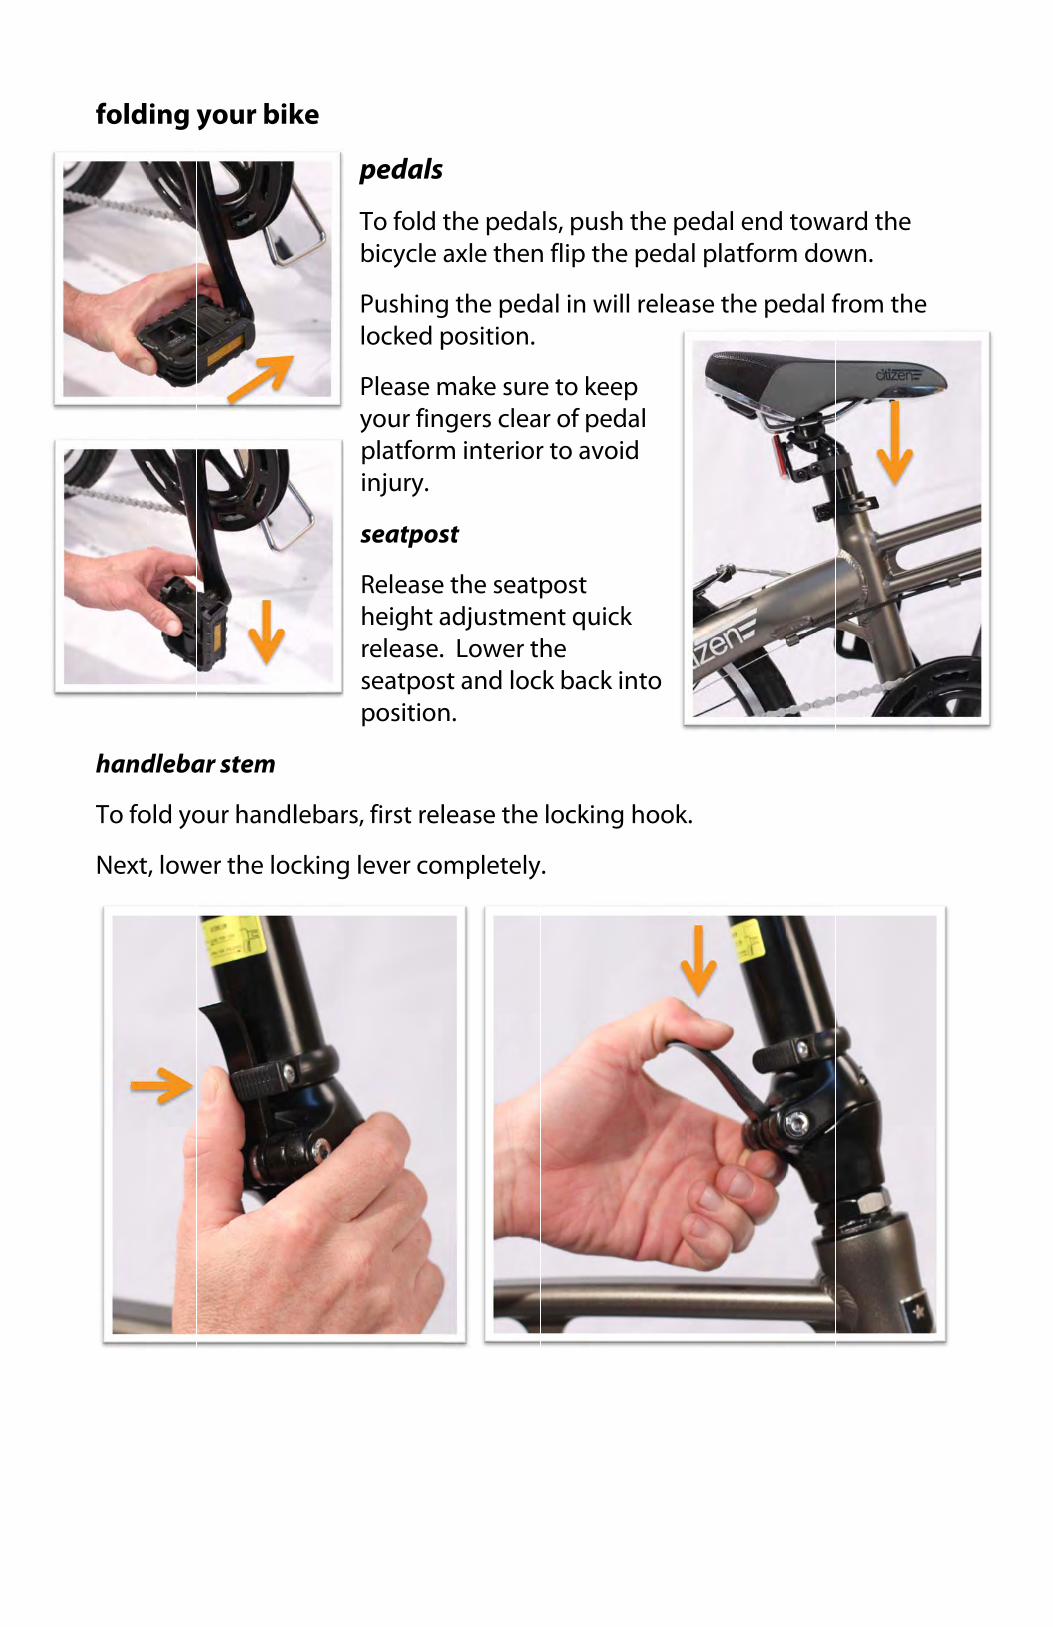
fold
hand
To fo
Next
ing y
dleba
old yo
, low
you
ar ste
our h
wer th
r bik
em
handl
he loc
ke
lebar
cking
ped
To bicy
Pusloc
Pleyouplainju
sea
Relheireleseapos
rs, fir
g leve
dals
fold ycle
shingked p
ase mur fintform
ury.
atpos
easeght a
ease.atpossition
st rel
er co
s
the paxle
g theposit
makengersm int
st
e the adjus. Lowst andn.
lease
mple
pedathen
pedtion.
e sure cleaerior
seatpstmewer thd loc
e the
etely
ls, pun flip
al in
e to kr of p
r to a
post ent quhe
ck bac
lock
.
ush tthe p
will r
keep pedavoid
uick
ck in
ing h
he ppeda
relea
l
to
hook
edal al plat
ase th
.
end tform
he pe
towam dow
edal f
ard twn.
from
he
the
Nw
f
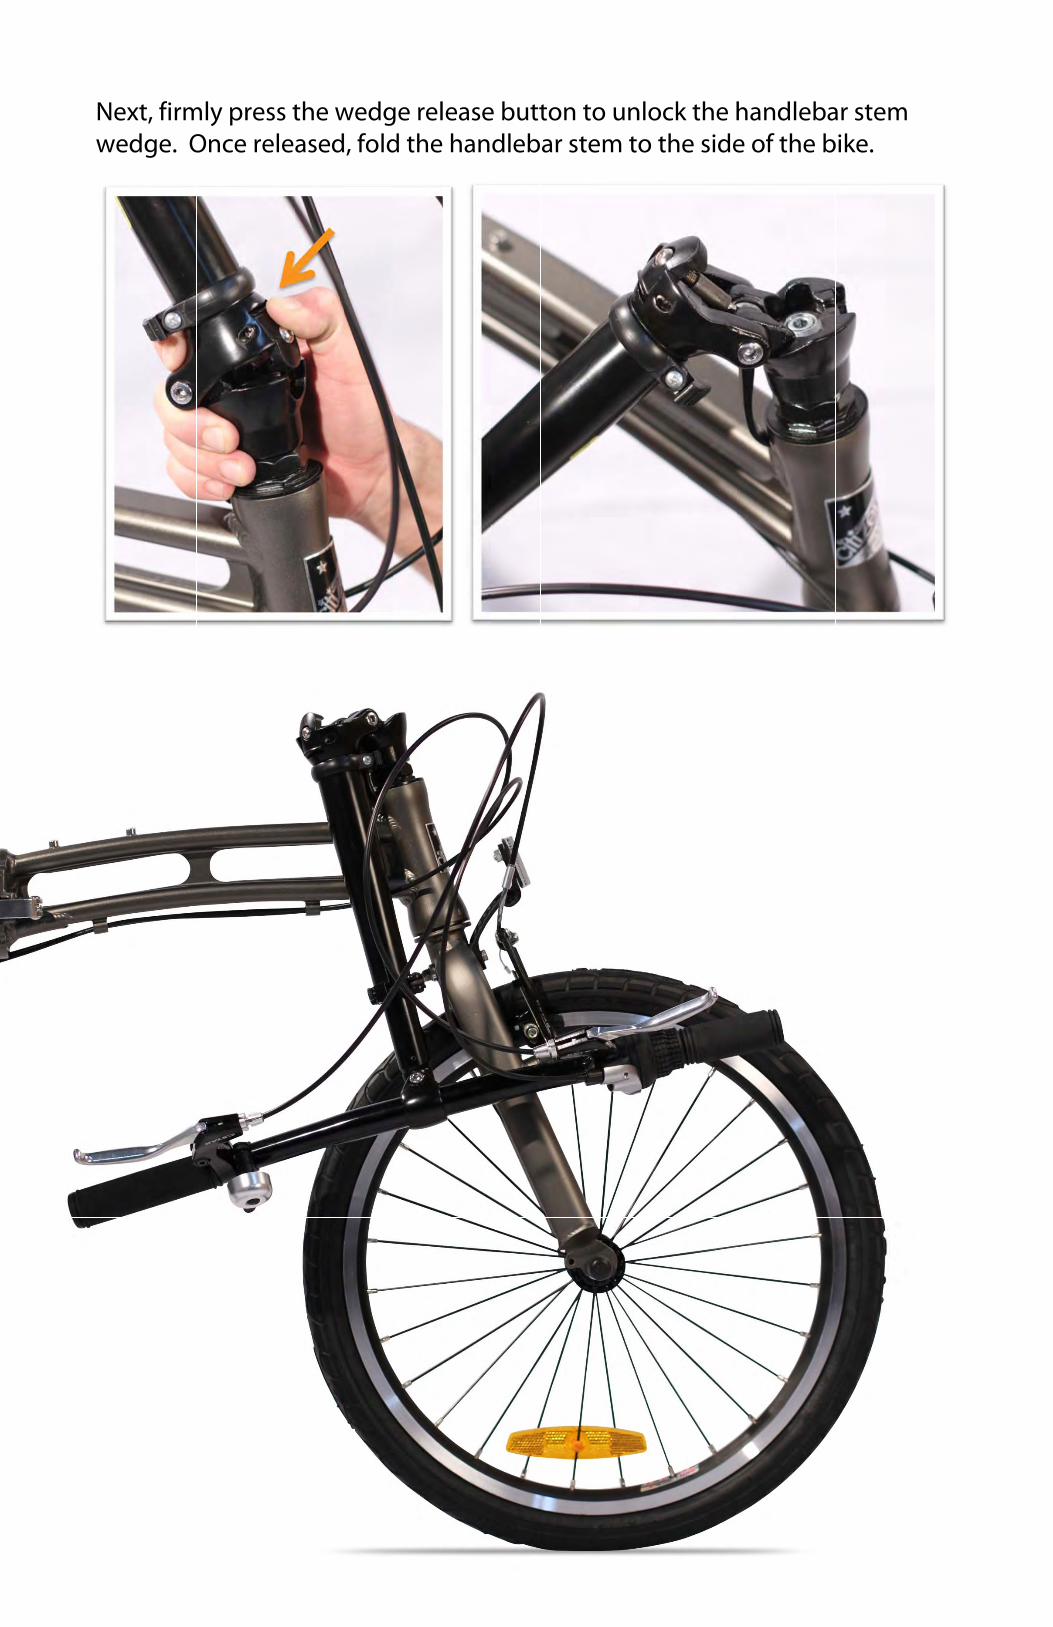
Nextwedg
fram
, firmge. O
me
mly prOnce
ress te rele
the wased
wedgd, fold
ge reld the
lease han
e buttdleb
ton tar ste
to unem to
nlock o the
the he side
hande of t
dlebathe b
ar stebike.
em
f T
Wpul To
S
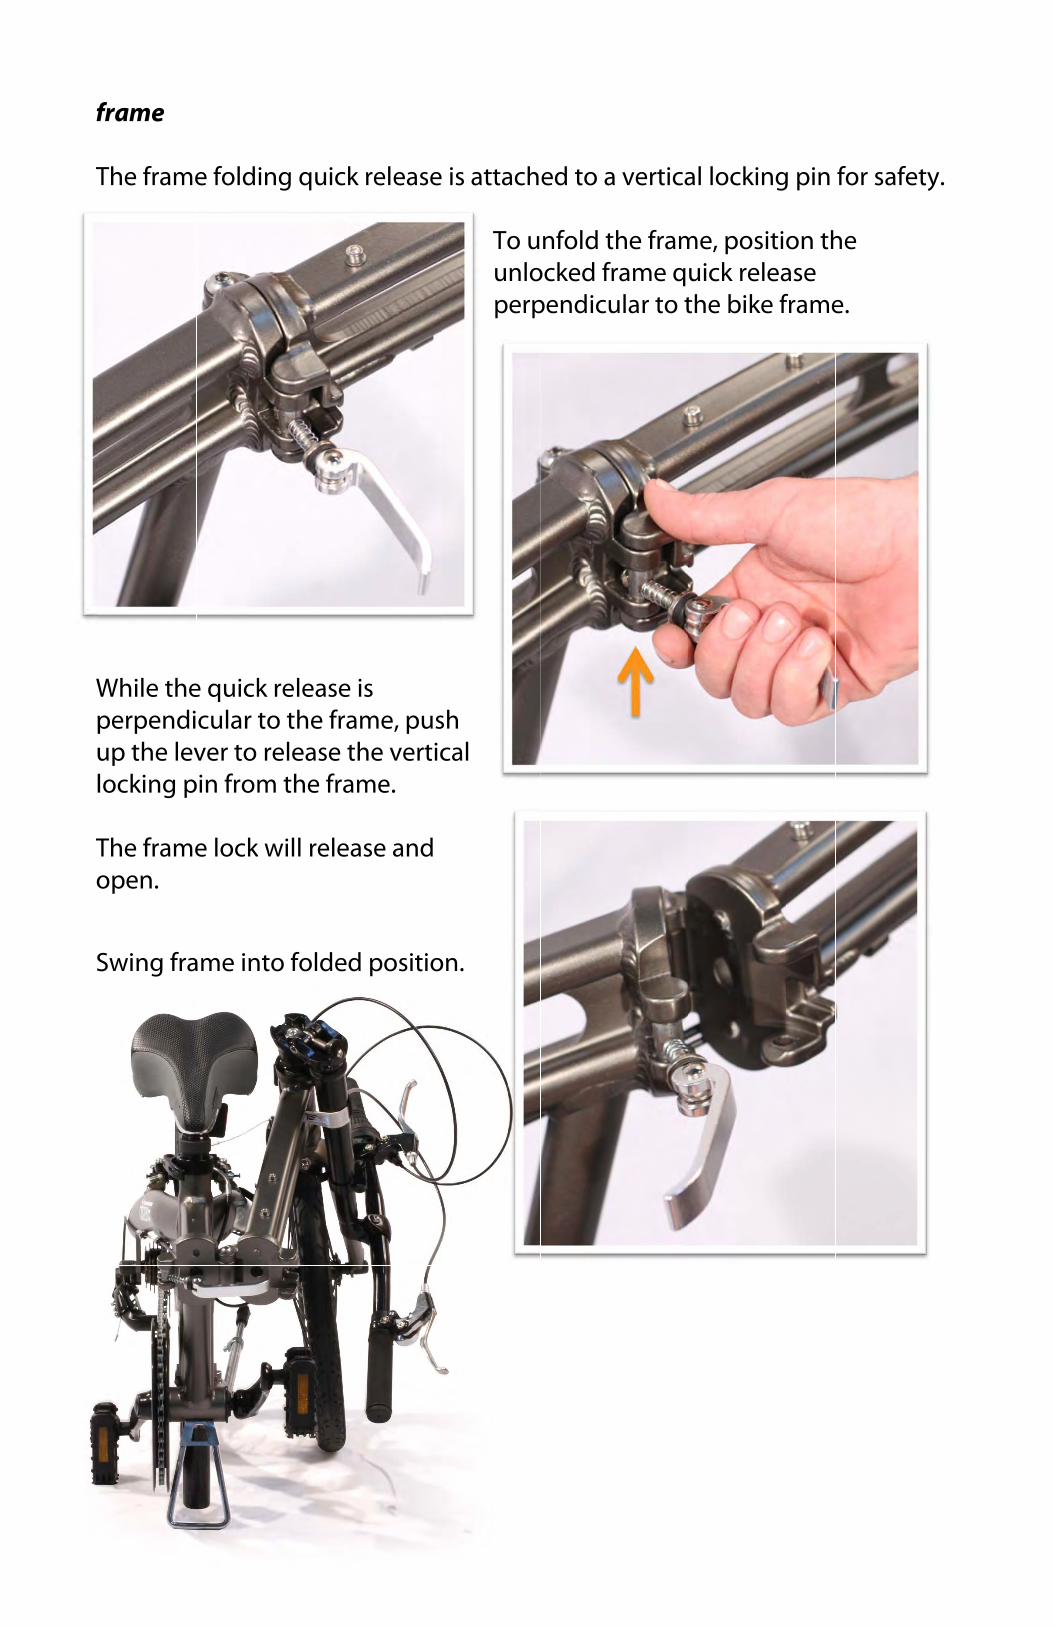
fram
The f
Whileperpup thlocki
The fopen
Swin
me
frame
e theendi
he levng p
framen.
ng fra
e fold
e quiccularver to
pin fro
e loc
ame i
ding
ck rer to to releom th
k wil
nto f
quic
leasehe frease he fra
l rele
folde
ck rel
e is ramethe vame.
ease a
ed po
ease
, pusvertic.
and
ositio
is at
sh cal
on.
ttach To uunloperp
ed to
nfoldockedpend
o a ve
d thed framicula
ertica
e framme qr to t
al loc
me, puick the b
cking
positiorelea
bike f
g pin
on thase frame
for s
he
e.
afetyy.
V
Ifcsp
Utt
Uf
t Uy Tabtet Af
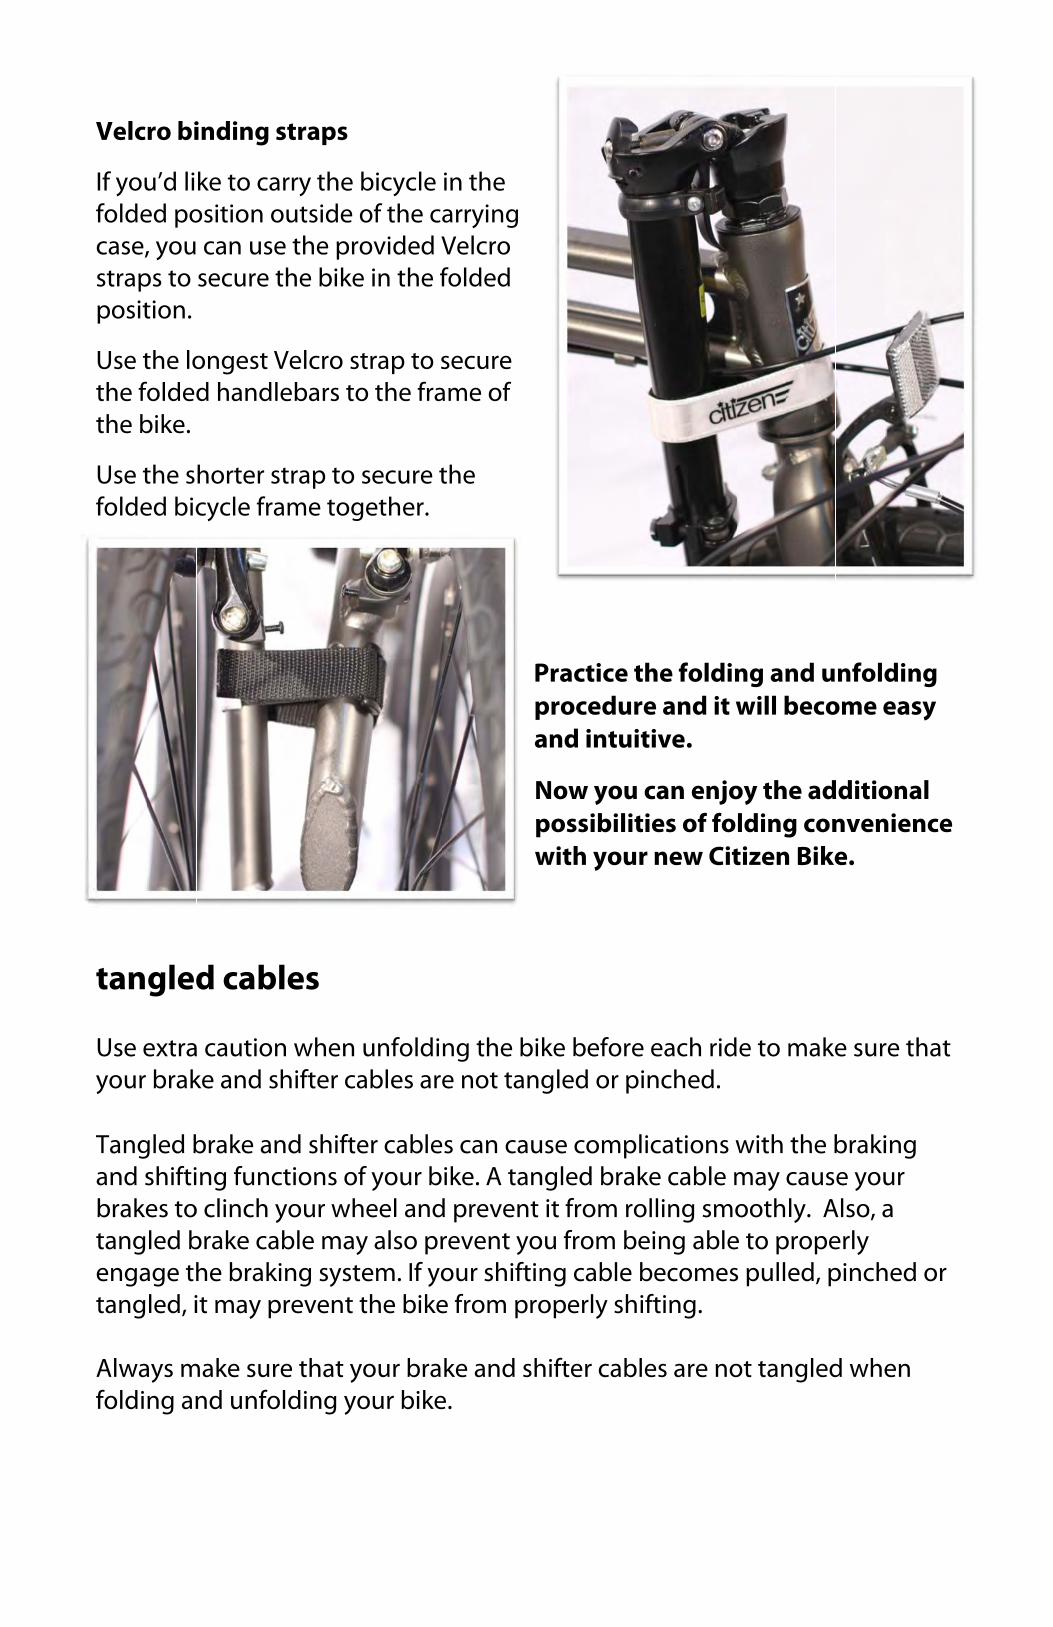
Velc
If youfoldecase,strapposit
Use tthe fothe b
Use tfolde
tan
Use eyour
Tangand sbraketangengatang
Alwafoldin
ro bi
u’d lied po, you
ps to tion.
the loolded
bike.
the sed bic
gled
extrabrak
gled bshifties toled b
age thled, i
ays mng an
indin
ke toositio can secu
onged han
hortecycle
d ca
a cautke an
brakeng fu
o clincbrakehe brit ma
make nd un
ng st
o carron ou
use tre th
est Vendleb
er stre fram
able
tion wnd sh
e andunctich yo
e cabrakin
ay pre
sure nfold
traps
ry theutsidethe p
he bik
elcro bars
rap tome to
es
whenifter
d shifions our wle ma
ng syseven
that ding y
s
e bicye of tprovidke in
strapto th
o secogeth
n unfcable
fter cof yo
wheeay alstemt the
youryour
ycle the caded Vthe f
p to she fra
cure ther.
foldies are
cableour bl andso pr
m. If yoe bike
r brar bike
in tharryiVelcrfolde
secuame o
the
ng the not
s canike. A
d prevrevenour se from
ke ane.
e ng ro ed
re of
Ppa
Npw
he bit tan
n cauA tanvent nt yoshiftinm pro
nd sh
Practproceand i
Now posswith
ke begled
use congled
it froou frong caoper
hifter
tice tedurintui
you ibilityou
eforeor p
ompd brakom room beable ly sh
r cab
the fre antive.
can ties or new
e eacinche
licatike caollingeing becoifting
les ar
oldinnd it w.
enjoof fow Cit
h rided.
ons wable mg smoable
omesg.
re no
ng anwill b
oy thldingtizen
e to
with may cooth
e to ps pull
ot tan
nd ubeco
he adg con
n Bike
make
the bcausly. A
propeed, p
ngled
nfoldome e
dditionvene.
e sur
brakie you
Also, aerly pinch
d whe
dingeasy
onal nienc
re tha
ing ur a
hed o
en
g y
ce
at
or
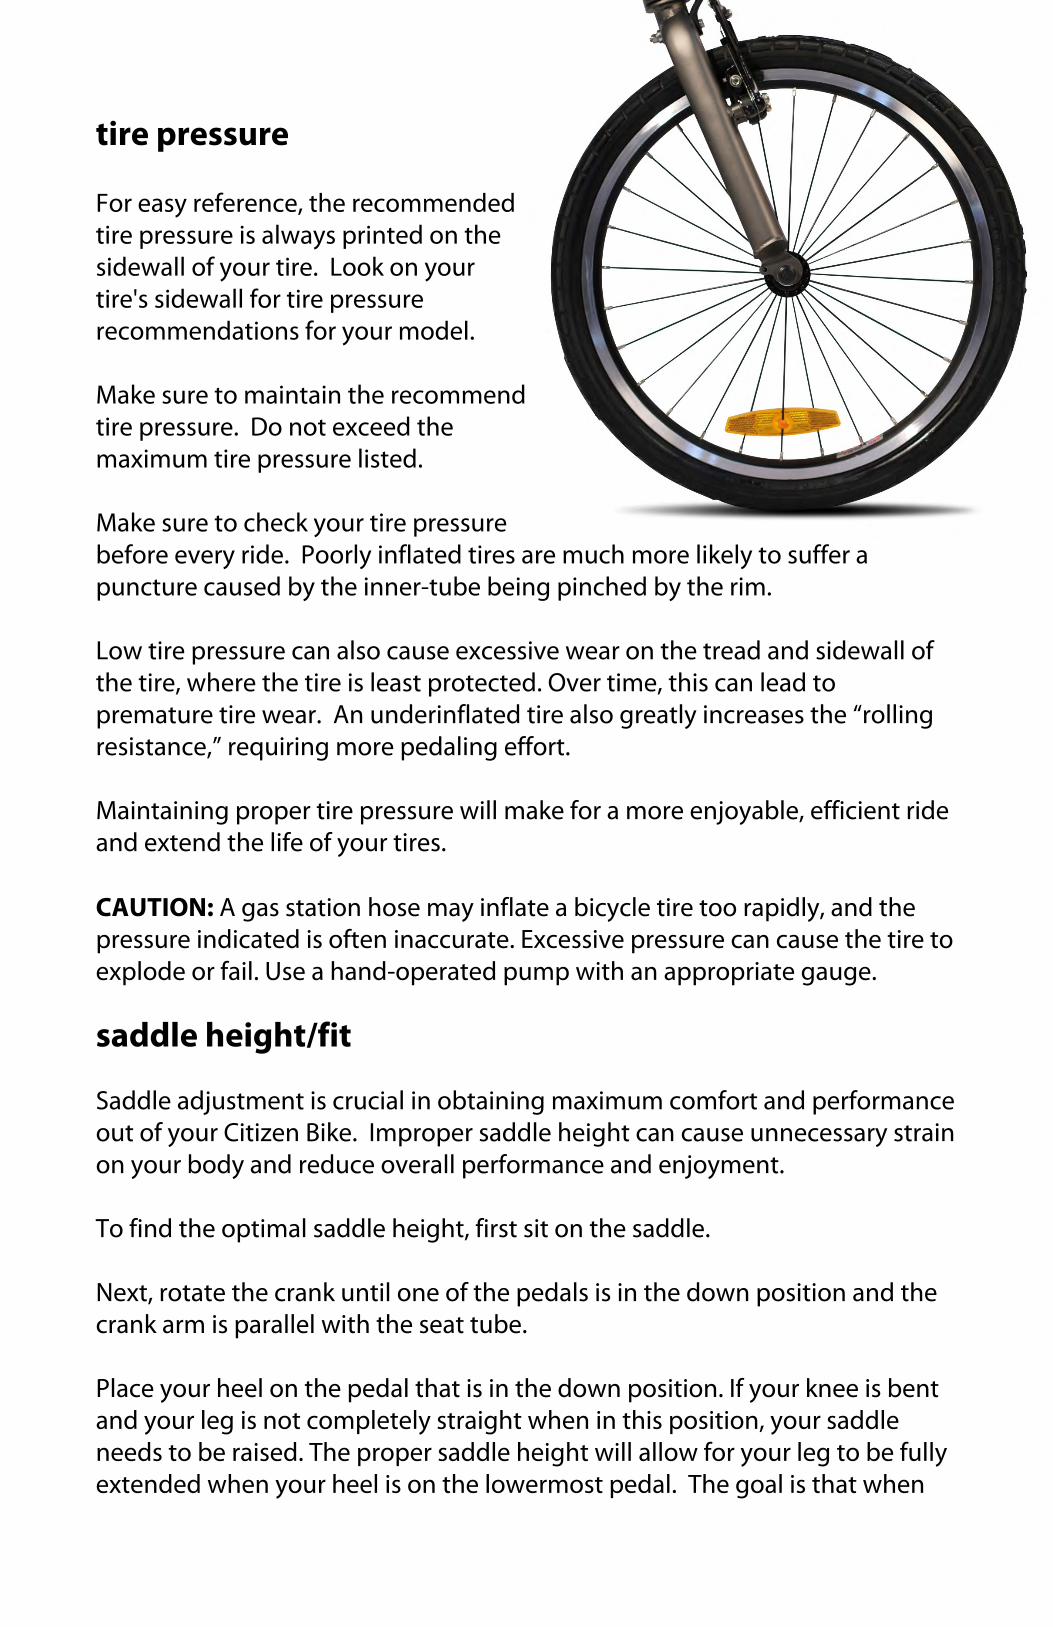
tire pressure For easy reference, the recommended tire pressure is always printed on the sidewall of your tire. Look on your tire's sidewall for tire pressure recommendations for your model. Make sure to maintain the recommend tire pressure. Do not exceed the maximum tire pressure listed. Make sure to check your tire pressure before every ride. Poorly inflated tires are much more likely to suffer a puncture caused by the inner-tube being pinched by the rim. Low tire pressure can also cause excessive wear on the tread and sidewall of the tire, where the tire is least protected. Over time, this can lead to premature tire wear. An underinflated tire also greatly increases the “rolling resistance,” requiring more pedaling effort. Maintaining proper tire pressure will make for a more enjoyable, efficient ride and extend the life of your tires. CAUTION: A gas station hose may inflate a bicycle tire too rapidly, and the pressure indicated is often inaccurate. Excessive pressure can cause the tire to explode or fail. Use a hand-operated pump with an appropriate gauge.
saddle height/fit Saddle adjustment is crucial in obtaining maximum comfort and performance out of your Citizen Bike. Improper saddle height can cause unnecessary strain on your body and reduce overall performance and enjoyment. To find the optimal saddle height, first sit on the saddle. Next, rotate the crank until one of the pedals is in the down position and the crank arm is parallel with the seat tube. Place your heel on the pedal that is in the down position. If your knee is bent and your leg is not completely straight when in this position, your saddle needs to be raised. The proper saddle height will allow for your leg to be fully extended when your heel is on the lowermost pedal. The goal is that when
you are pedaling with the ball of your foot there should be a slight bend in your knee. This allows for your legs to work at maximum efficiency and comfort while riding your bike.
bicycles, accidents and safety Your bicycle can be fun when used for transportation, recreation and exercise. But riding a bicycle can also be dangerous, especially if you try to ride beyond the limits of your ability or the limits of your bicycle. The skill of bicycle riders can vary greatly, just like the skill of automobile drivers. Do not ride in a manner that exceeds the limits of your ability. The first rule in safe bicycle riding is to use common sense. A bicycle is vulnerable –it cannot protect you in a crash, impact, or loss of control in the way a car can. A bicycle can tip over sideways or pitch you over the front wheel. Most dangerous situations are obvious. For example, a bad accident can occur if an object gets caught in your bicycle's spokes. But not all dangerous situations are obvious. However, you add to your risk when you make modifications to your bicycle, ride in an unusual location, ride over obstacles or debris, or ride in any other high-risk manner. an impact can weaken your bicycle Each bicycle and its parts have limits because of many properties: design, material, maintenance, use, surface of the road and more. If you crash or apply force that is higher than the limits of your bicycle or its parts, you are very likely to cause damage. If your bicycle or a part has damage and you crash or load it again later, this additional impact can cause a failure at a much lower load. a bicycle cannot protect you in an accident Bicycles are not designed to withstand every situation. In a crash or impact, it is not uncommon for the bicycle to have damage, and for you to fall. If you fall, your bicycle cannot prevent injury. Cars have bumpers, seat belts, air bags, and crumple zones. Bicycles do not, so even a fall at slow speed or an impact with a small object can cause serious injury. Higher speeds and larger impacts will only be worse.

before your first ride Check your bicycle fit and operation. You should make sure your bicycle fits before you ride it, and you should know how it works. Practice at slow speeds first. Before riding fast or in more difficult conditions, learn the function and performance of all the mechanisms of your bicycle by riding at slower speeds in a flat, empty parking lot. Use your pedals safely. The pedals are where your feet are placed on a bicycle; control and safety demand that your feet be secure on the pedals. Familiarize yourself with the braking system. Misuse of the braking system, including over-use of the front brake, can cause you to lose control and fall. Avoid improper braking by understanding and practicing proper application of your brakes. Make sure accessories are compatible and safe. To make your bicycle more personally useful, you may choose to change parts or add accessories. Not all parts or accessories are compatible or safe. If you choose to add accessories, read any instructions that are supplied with those accessories before riding your bicycle. CAUTION: Improper components or improper assembly can place unknown stress, or fatigue stress, on your bicycle or components. Stress can lead to failure, which can cause you to lose control and fall.
for your every ride Wear a helmet and safety equipment. An unprotected head is highly susceptible to injury, even from the slightest contact, but wearing a helmet that meets appropriate safety testing standards may help prevent injury. Helmets should be removed when not riding the bicycle. If the helmet is caught or stuck on or between objects, the wearer could choke. Eye protection and appropriate cycling clothes are also recommended. Wear light, bright, or reflective clothing, especially at night, to make yourself more visible.
Ride in an appropriate area. Avoid riding in conditions that are beyond the design of your bicycle. Also try to avoid high-traffic or congested areas where you are smaller than other vehicles and might be hard to see. Always keep a safe stopping distance between you and other vehicles or objects. Adjust stopping distances and braking forces to suit the riding conditions. Do not overuse the front-wheel brake. Apply both brakes at the same time. Over-use or misuse of a front-wheel brake, such as using only the front-wheel brake in an emergency, could cause the rear wheel to lift from the ground which could cause you to lose control. WARNING: Applying sudden or excessive stopping force with the front-wheel brake may cause the rear wheel to lift off the ground or the front wheel to slip out from under you, which can cause you to lose control and fall. Apply both brakes at the same time and shift your weight backward on the bicycle while braking. Know and observe local bicycle riding laws. Most state and local areas have specific laws for cyclists, and you should follow them. Local cycling clubs or your state’s Department of Transportation (or equivalent) should be able to supply this information to you. A few of the more important rules of riding include the following: Use proper hand signals Ride single file when riding with other cyclists Ride on the correct side of the road; never ride against traffic Ride defensively; expect the unexpected. A cyclist is hard to see, and
many drivers simply are not trained to recognize the rights and special considerations of a bicycle rider
Ride defensively. To motorists, pedestrians, or other bicyclists, you are not as visible as a car. Always watch for hazardous situations, and be ready to stop or take evasive action at all times. Avoid road hazards. Watch for and avoid potholes, drain grates, soft or low shoulders, and other deviations which could cause your wheels to slip or create an impact. When crossing railroad tracks or drain grates, do so carefully at a 90° angle. If you are not sure of the condition of the riding surface, walk your bicycle.
Avoid debris. If your tires contact debris such as sticks, rocks, trash, or any other loose object on the road, the debris can flip up. If the debris gets into your wheels, it could cause you to lose control or crash. It could also get caught in your spokes or chain, possibly damaging your bicycle. Watch the cars you are preparing to pass. If a car suddenly enters your lane, or someone unexpectedly opens the door of a parked car, you could be involved in a serious accident. Mount a horn or bell on your bicycle, and use it to alert others of your approach. Be careful when riding in low light conditions. Your bicycle is equipped with a full set of reflectors. Keep them clean and in position. As useful as these reflectors are, they do not help you see, nor do they help you be seen, unless light is directed on them. Use a working headlight and tail light when you ride in poorly lighted or low visibility conditions. Also wear light, bright, and reflective clothing, especially at night, to make yourself more visible. The important thing is to see and be seen. If you do any amount of riding at dusk, at night, or in any conditions with poor visibility, find appropriate products to aid your vision and make you more visible. WARNING: A bicycle rider without proper lighting and safety precautions may not have good vision and may not be visible to others, which can cause a collision resulting in severe injury. Use front and rear bicycle lights and additional safety procedures when riding in poor visibility conditions. Failure to provide visibility for yourself and be visible to others will increase your chance of being involved in an accident in low light conditions. Avoid unsafe or harmful conditions. Bicycles are not designed to be used in all conditions. Be careful when riding in wet conditions No brakes, whatever their design, work as effectively in wet weather as they do in dry. Even properly aligned, lubricated, and maintained brakes require greater lever pressure and longer stopping distances in wet weather; anticipate the extra distance it will take to stop. Wet weather causes reduced visibility for both you and motorists, and reduced traction. Use slower cornering when traction is reduced, like when riding over wet leaves, painted crosswalks, or manhole covers. Avoid introducing water to any bearings of your bicycle. The metal bearings in your bicycle allow the parts to rotate smoothly. Water in contact with metal causes corrosion, which will make the bearings lose their
smoothness. If any bearings on your bicycle get submerged in water, take your bicycle to a professional for service. Avoid high-pressure washing systems, like those at most car washes. The high pressure may force water into the bearings. As with anything mechanical, every part of a bicycle has a limited useful life due to wear. Avoid riding in a manner that is beyond the design of your bicycle, and avoid riding practices that increase stress and fatigue. Do not use unsafe riding practices. Do not ride "no hands." The slightest road imperfection could initiate a wheel shimmy or cause the front wheel to turn unexpectedly. Do not ride with a loose object attached to the handlebar or any other part of the bicycle. It could get caught in the wheel spokes, cause the handlebar to turn unexpectedly, or in other ways cause loss of control. Do not ride while intoxicated or while using medications which might make you drowsy. Bicycles require good coordination to ride in control, and riders must be alert for hazards. Do not "ride double." Standard bicycles are not designed to carry the additional load of a second rider. Also, extra weight makes a bicycle much harder to balance, steer, and stop. Do not ride with headphones or anything else which might prevent you from hearing traffic noise. In some areas, riding with headphones is illegal. In all areas, being aware of traffic is an important part of bicycle safety.
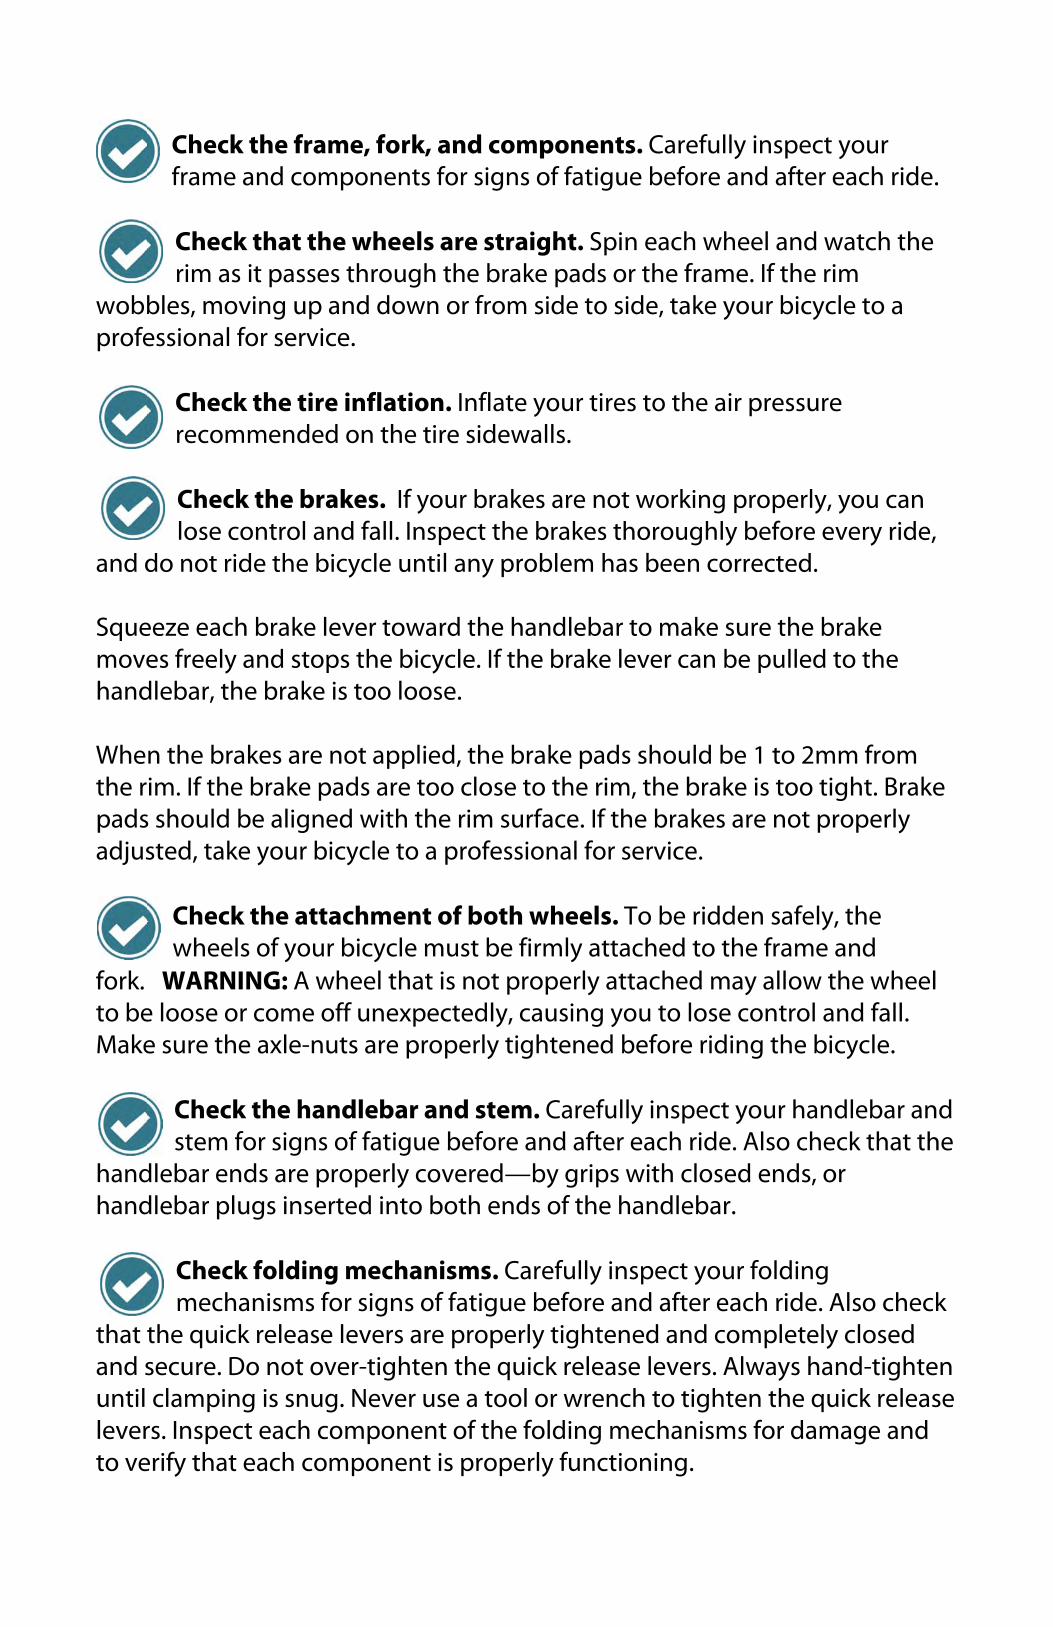
before every ride, check your bicycle Check your bicycle and its components against the following checklist before every ride. This is not a comprehensive maintenance program. If you are not certain if your bicycle has a problem, take your bicycle to a professional mechanic for service. In addition, if you have an impact, crash, or accident, even a minor one, always have the bicycle inspected thoroughly by a professional before riding the bicycle again. WARNING: A bicycle that does not work properly can cause you to lose control and fall. Inspect the entire bicycle thoroughly before every ride, and do not ride it until any problem has been corrected.
wp
a Smh Wtpa
ftM
hh
tault
wobbprofe
and d
Squemovehand
Whethe rpadsadjus
fork. to beMake
handhand
that tand suntil leverto ve
Chfra Chrim
bles, essio
Chre Chlo
do no
eeze ees fre
dleba
n theim. If
s shosted,
Chwh
WAe loose sure
Chste
dlebadleba
Chm
the qsecurclam
rs. Inserify t
heck ame a
heckm as
movnal fo
heckcom
heckose coot rid
eacheely aar, the
e braf the uld b, take
heck heels
ARNIse ore the
heckem fo
ar endar plu
heckecha
quickre. D
mpingspectthat e
the fand c
k thatit pa
ving uor se
k the men
k the ontrode th
h brakand se bra
kes abrak
be alie you
the s of yNG: A
r come axle
k the or sigds ar
ugs in
k foldanismk releo nog is st eaceach
framcomp
t thesses up an
ervice
tire ded
brakol ande bic
ke levstopsake is
are nke pagned
ur bic
attacyour bA wh
me offe-nut
handgns ore pronsert
ding ms foease l
t ovenug.
ch co com
me, fopone
e whethrond doe.
inflaon th
kes. d fallcycle
ver tos the s too
ot apds ar
d witcycle
chmbicycheel tf unets are
dlebof fatioperled in
mecr signever
er-tig Nevmpo
mpon
ork, aents f
eels augh own
ationhe tir
If yo. Inspunti
owarbicyloos
ppliedre tooth theto a
ent ocle mthat iexpece pro
bar aniguely cov
nto b
hanins of s are
ghtenver usonent
ent i
and cfor sig
are sthe bor fr
n. Inflre sid
our brpect l any
rd thycle. I
e.
d, tho cloe rimprofe
of bomust b
is notctedlperly
nd stbefovered
both e
ismsf fatige propn the se a tt of ths pro
compgns o
straigbrakeom s
ate ydewa
rakesthe b
y prob
e hanf the
e braose to
m surfessio
oth wbe firt proly, cay tigh
tem. ore and—bends
. Cargue bperlyquic
tool ohe fo
operl
poneof fat
ght. e padside t
your talls.
s are brakeblem
ndlebe brak
ake po the face. onal f
wheermly aoperlyausinhtene
Carend af
by gri of th
efullybefory tighck relor wroldingy fun
ents.tigue
Spin ds or to sid
tires
not wes tho
m has
bar toke lev
pads srim, If the
for se
els. Toattacy attag yoed be
efullyfter eips whe ha
y insre anhteneease
renchg me
nctio
. Caree befo
eachthe f
de, ta
to th
workoroubeen
o maver c
shouthe b
e braervice
o be chedacheu to efore
y inspeach with candle
pect d aft
ed ane leveh to techanning
efullyore a
h whframeake yo
he air
king pghlyn cor
ake sucan b
uld bebrakekes ae.
riddto thd malose
e ridin
pect yride.
closeebar.
youer ea
nd coers. Atightenism.
y inspand a
eel ae. If tour b
r pres
prop beforrecte
ure te pu
e 1 toe is toare n
en sahe fraay allcontng th
your Also
d en
r foldach riompleAlway
en ths for
pect fter e
and wthe ribicyc
ssure
erly, ore eved.
he blled t
o 2moo tigot pr
afely,ame aow t
trol ahe bic
hando cheds, o
ding ide. Aetely
ys hahe qu
dam
youreach
watchm
cle to
e
you very
rake to th
m froght. roper
, the and
the wnd facycle
dleback th
or
Also cy closnd-ti
uick rmage
r ride
h the
a
can ride,
e
om Brakerly
wheelall. e.
ar anhat th
checsed ighteeleasand
.
,
e
l
nd he
k
en se

warranty Citizen Bike warrants the frame and rigid fork of each new Citizen Bike brand bicycle to be free from defects in material and workmanship for a period of one (1) year from the date of purchase. All other original components and all Citizen Bike brand repair parts, replacement parts and accessories are warranted to be free from defects in material or workmanship for a period of sixty (60) days from the original date of purchase.
Limited Remedy: Unless otherwise provided, the sole remedy under the above warranty or any implied warranty is limited to the replacement of defective parts with those of equal or greater value at the sole discretion of Citizen Bike. You will be responsible for labor costs associated with warranty replacements. IN NO EVENT SHALL CITIZEN BIKE BE RESPONSIBLE FOR INCIDENTAL OR CONSEQUENTIAL DAMAGES, WHETHER BASED ON CONTRACT, WARRANTY, NEGLIGENCE, OR PRODUCT LIABILITY, OR ANY OTHER THEORY, INCLUDING, WITHOUT LIMITATION, PERSONAL INJURY DAMAGES, PROPERTY DAMAGE, OR ECONOMIC LOSSES.
Some states do not allow the exclusion or limitation of incidental or consequential damages, so the above limitation or exclusion may not apply to you.
EXCLUSIONS: THE ABOVE WARRANTY, OR ANY IMPLIED WARRANTY, DOES NOT COVER NORMAL WEAR AND TEAR, AND ALL WARRANTIES ARE VOID IF THE BICYCLE IS USED FOR OTHER THAN NORMAL ACTIVITIES. INCLUDING, BUT NOT LIMITED TO THE FAILURE TO FOLLOW THE OWNER’S MANUAL USING THE BICYCLE FOR COMMERCIAL ACTIVITIES OR IN COMPETITIVE EVENTS, INCLUDING BUT NOT LIMITED TO BICYCLE RACING, BICYCLE MOTORCROSS RACING, STUNT RIDING, RAMP JUMPING OR SIMILAR ACTIVITIES, AND TRAINING FOR SUCH ACTIVITIES OR EVENTS. CITIZEN BIKE MAKES NO OTHER WARRANTIES, EXPRESS OR IMPLIED. ALL IMPLIED WARRANTIES, INCLUDING THE WARRANTIES OF MERCHANTABILITY AND FITNESS FOR A PARTICULAR PURPOSE, ARE LIMITED IN DURATION TO THAT OF THE EXPRESS WARRANTIES STATED ABOVE.
Some states do not allow limitations on how long an implied warranty lasts, so the above limitation may not apply to you. This warranty gives you specific legal rights, and you may also have other rights which vary from state to state.

additional support For assistance with setting up your new folding bike, please contact us at [email protected] or at 1-800-682-9579.