Embed Size (px)
Citation preview

Osstem Digital Implant Solution
Andy Ryu
Head of Digital implant Product Business Leader(PBL)
Osstem Implant
2Contents
1. Library Structure
2. Scan Body
3. Custom Abutment (Link & Premilled)
4. Multi Ti-Base & Scan Body
5. Digital Lab Analog
6. Digital Devices
7. Q&A

3
1. Library Structure
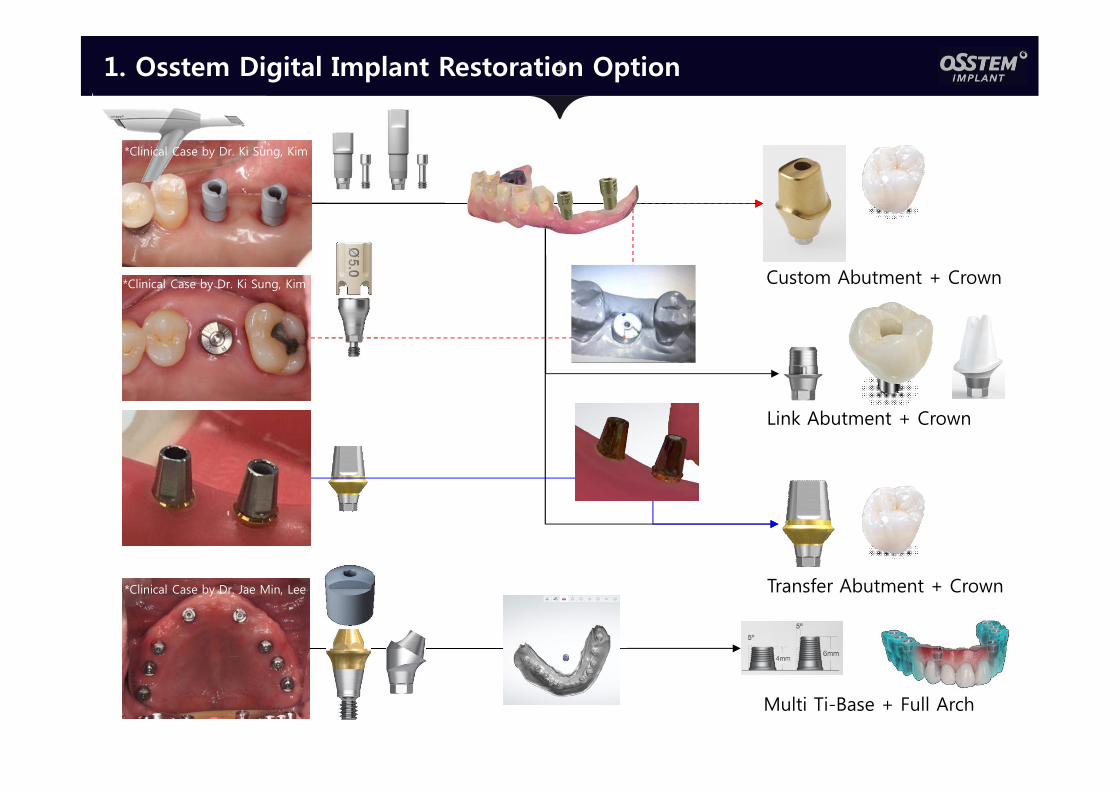
41. Osstem Digital Implant Restoration Option
Custom Abutment + Crown
Link Abutment + Crown
Transfer Abutment + Crown
Multi Ti-Base + Full Arch
*Clinical Case by Dr. Jae Min, Lee
*Clinical Case by Dr. Ki Sung, Kim
*Clinical Case by Dr. Ki Sung, Kim

52. Library Structure
Scan Choose Library Restoration
Custom Abutment + Crown
Link Abutment + Crown
Transfer Abutment + Crown
Scan body
1.Scan Body(SB) to Custom
2. Scan Body(SB) to Link
3. Scan Body(SB) to StockLongShort
*Clinical Case by Dr. Ki Sung, Kim
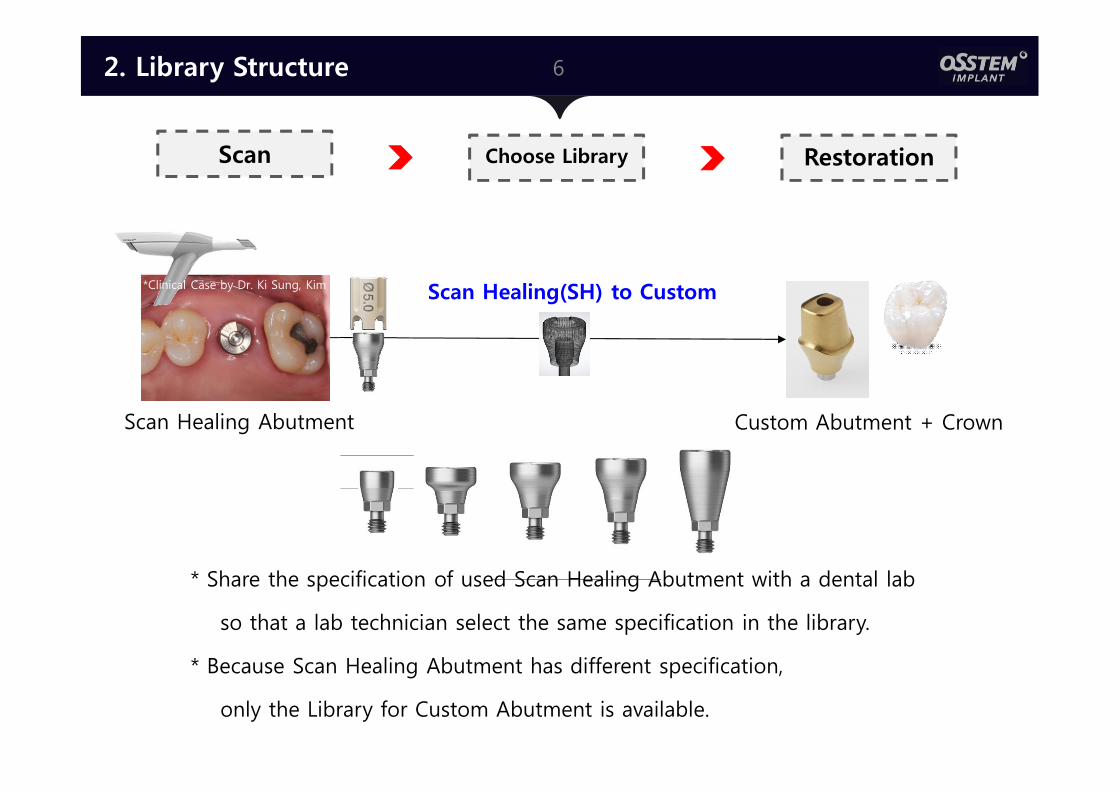
62. Library Structure
Custom Abutment + CrownScan Healing Abutment
Scan Healing(SH) to Custom
* Share the specification of used Scan Healing Abutment with a dental lab
so that a lab technician select the same specification in the library.
* Because Scan Healing Abutment has different specification,
only the Library for Custom Abutment is available.
Scan Choose Library Restoration
*Clinical Case by Dr. Ki Sung, Kim

72. Library Structure
Transfer Abutment Transfer Abutment + Crown
Stock to Stock
Scan Choose Library Restoration
* “Stock to Stock” is used when an implant are placed in the right position.
In case of multiple cases, maximum three-unit is recommended and
in order to use “Stock to Stock,” all implants should be parallel
as well as placed in the right position.
* Share the specification of selected Transfer Abutment with a dental lab
so that a lab technician selects the same specification in the library.
* Submargined case could be also available, however, when Transfer Abutment
was modified from its original shape, digital process cannot be done.
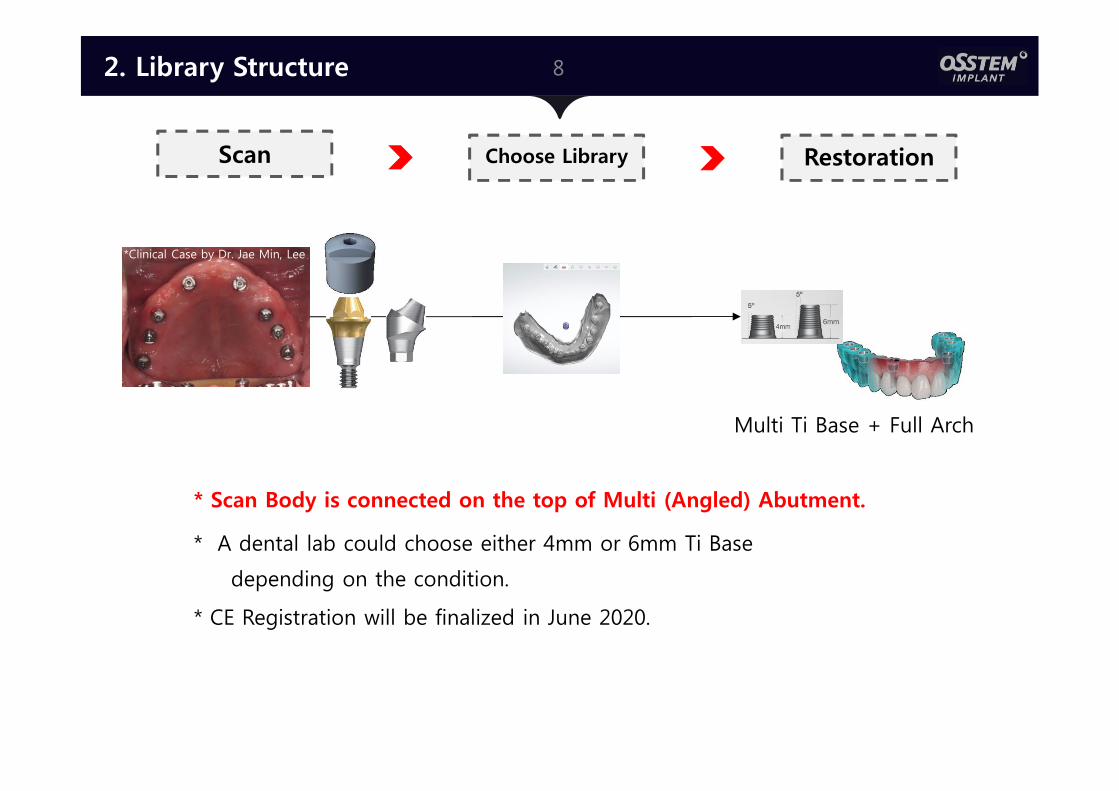
82. Library Structure
Scan Choose Library Restoration
Multi Ti Base + Full Arch
* Scan Body is connected on the top of Multi (Angled) Abutment.
* A dental lab could choose either 4mm or 6mm Ti Base
depending on the condition.
* CE Registration will be finalized in June 2020.
*Clinical Case by Dr. Jae Min, Lee

9
2. Scan Body
101. Feature of Osstem Scan Body
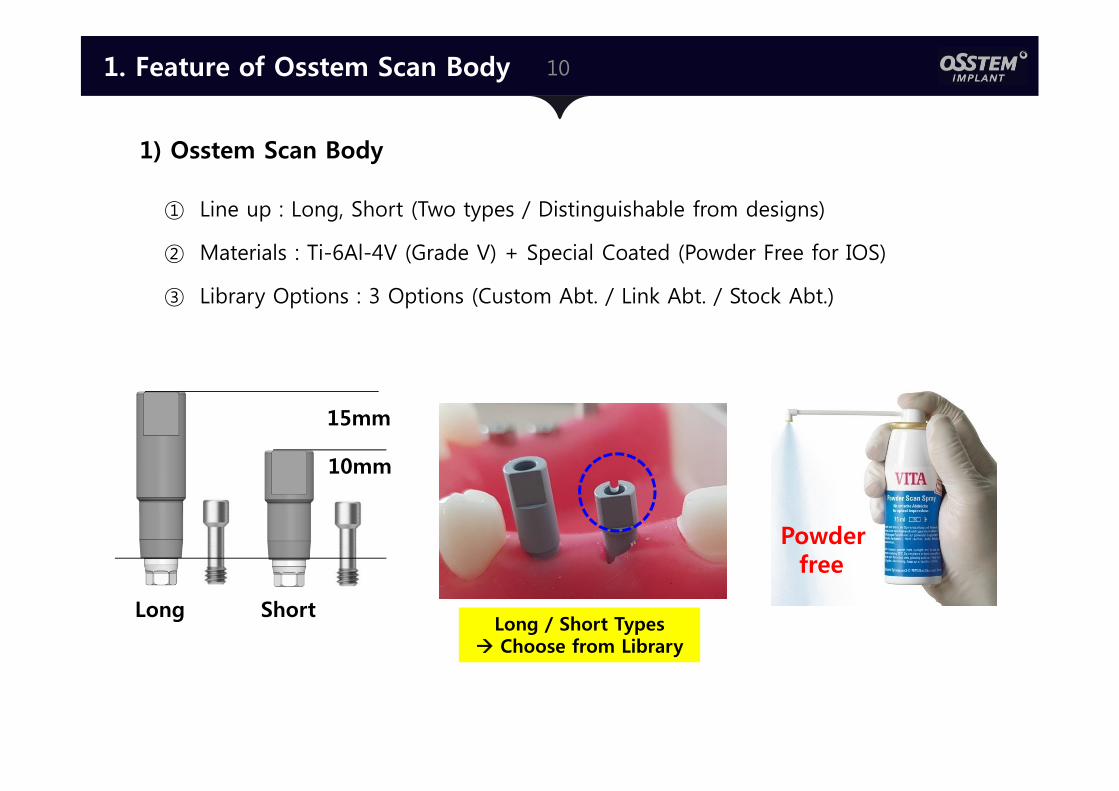
① Line up : Long, Short (Two types / Distinguishable from designs)
② Materials : Ti-6Al-4V (Grade V) + Special Coated (Powder Free for IOS)
③ Library Options : 3 Options (Custom Abt. / Link Abt. / Stock Abt.)
1) Osstem Scan Body
Powder free
Long / Short Types Choose from Library
15mm
10mm
Long Short
11
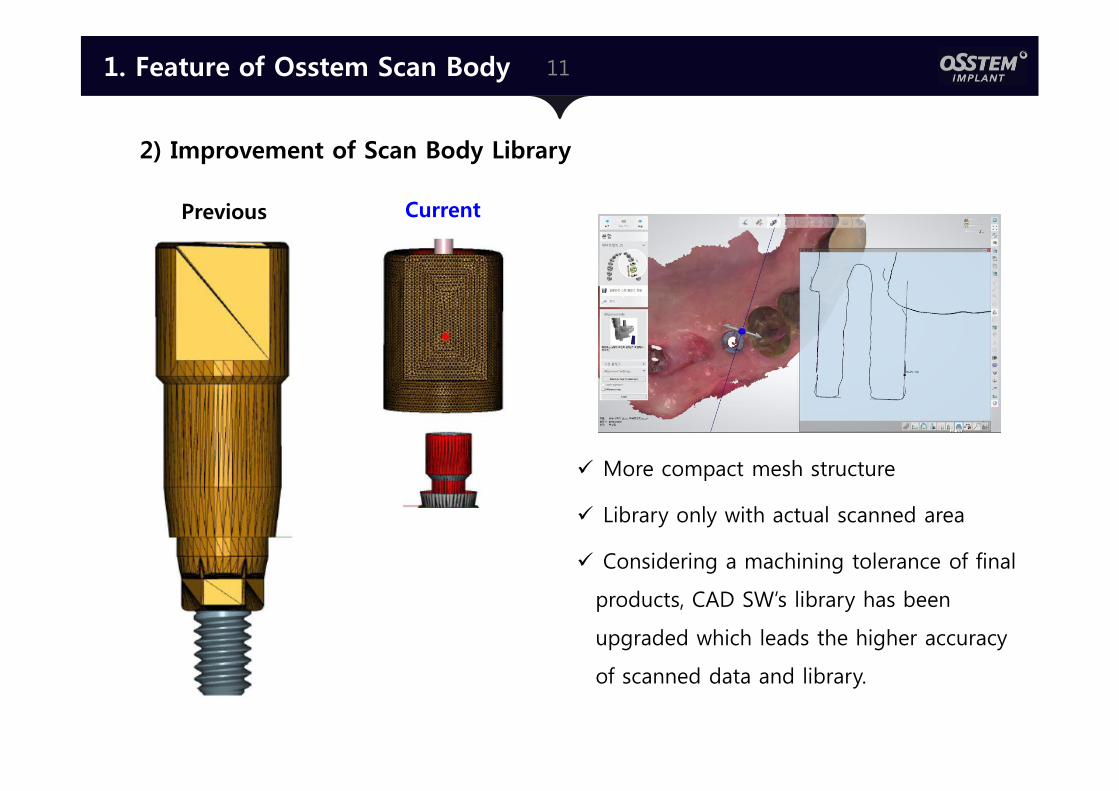
2) Improvement of Scan Body Library
Previous Current
1. Feature of Osstem Scan Body
More compact mesh structure
Library only with actual scanned area
Considering a machining tolerance of final
products, CAD SW’s library has been
upgraded which leads the higher accuracy
of scanned data and library.
12
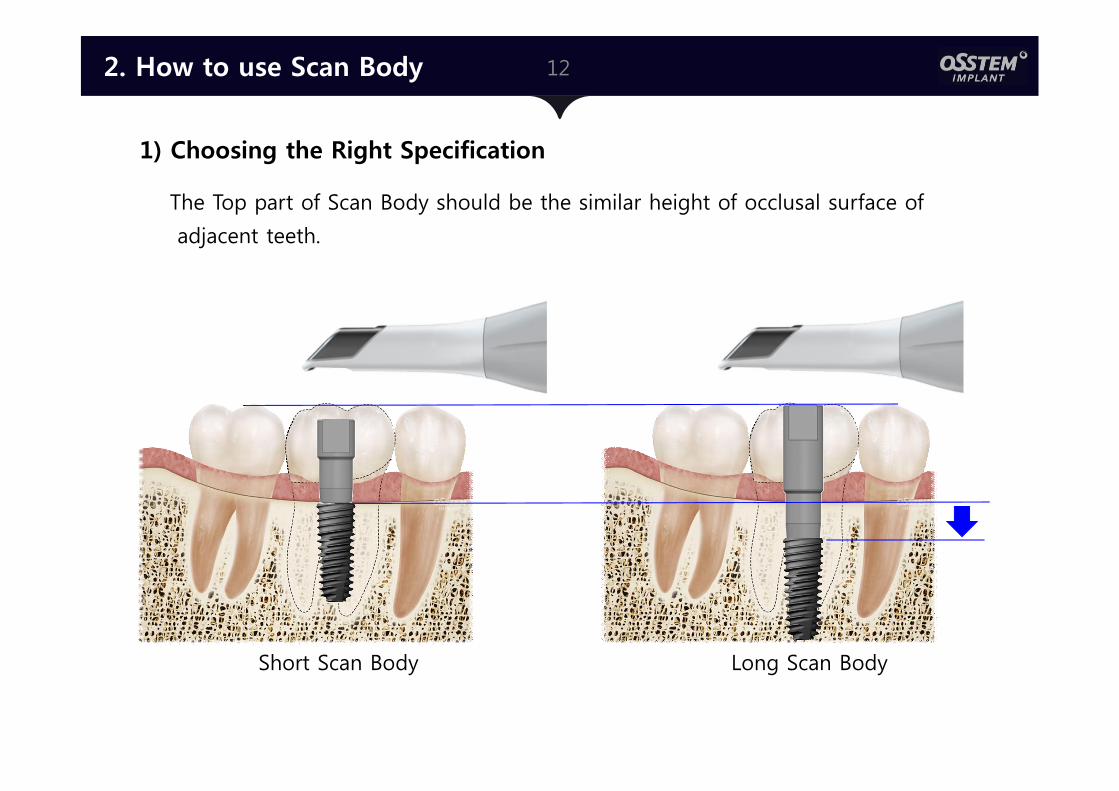
1) Choosing the Right Specification
Short Scan Body Long Scan Body
The Top part of Scan Body should be the similar height of occlusal surface of
adjacent teeth.
2. How to use Scan Body
132. How to use Scan Body
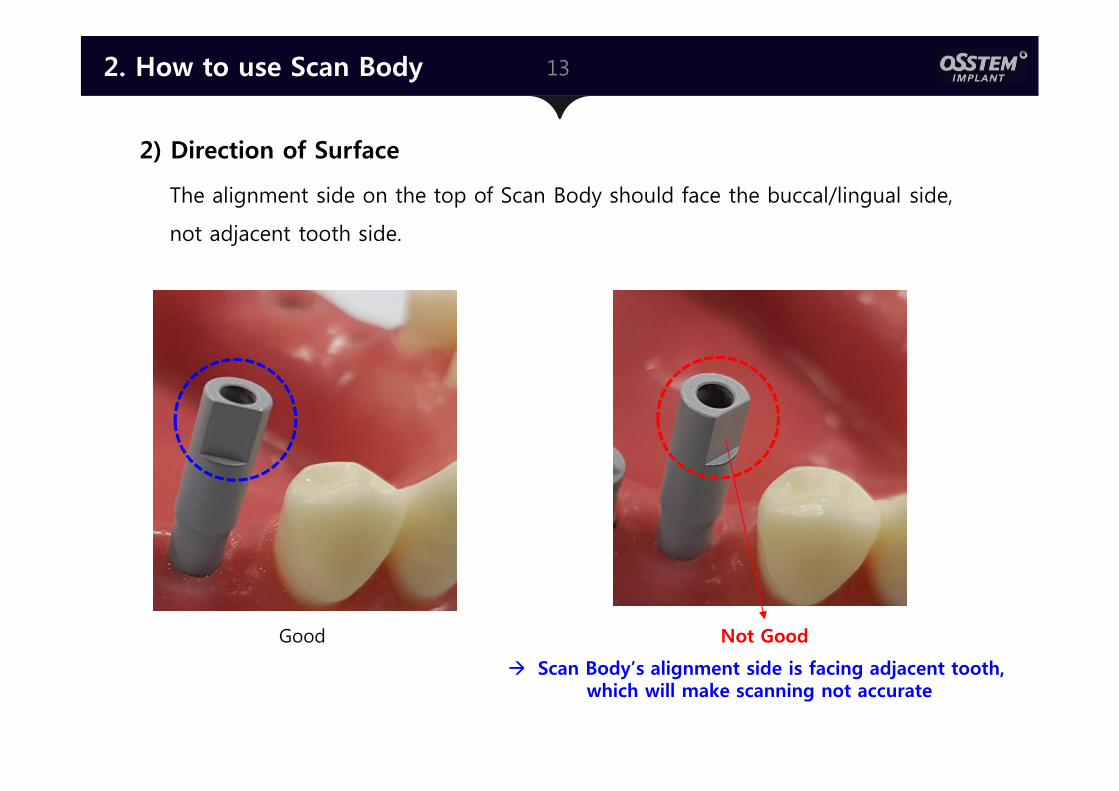
2) Direction of Surface
Good Not Good
Scan Body’s alignment side is facing adjacent tooth, which will make scanning not accurate
The alignment side on the top of Scan Body should face the buccal/lingual side,
not adjacent tooth side.
142. How to use Scan Body
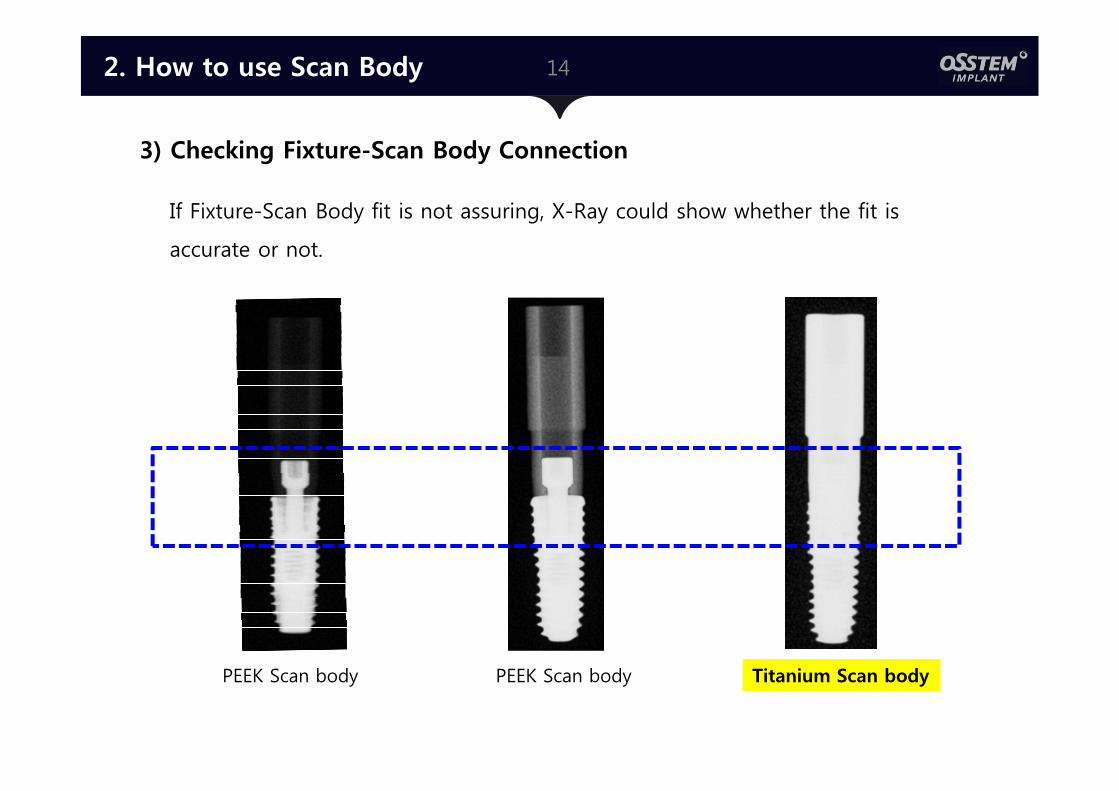
3) Checking Fixture-Scan Body Connection
PEEK Scan body Titanium Scan bodyPEEK Scan body
If Fixture-Scan Body fit is not assuring, X-Ray could show whether the fit is
accurate or not.
15
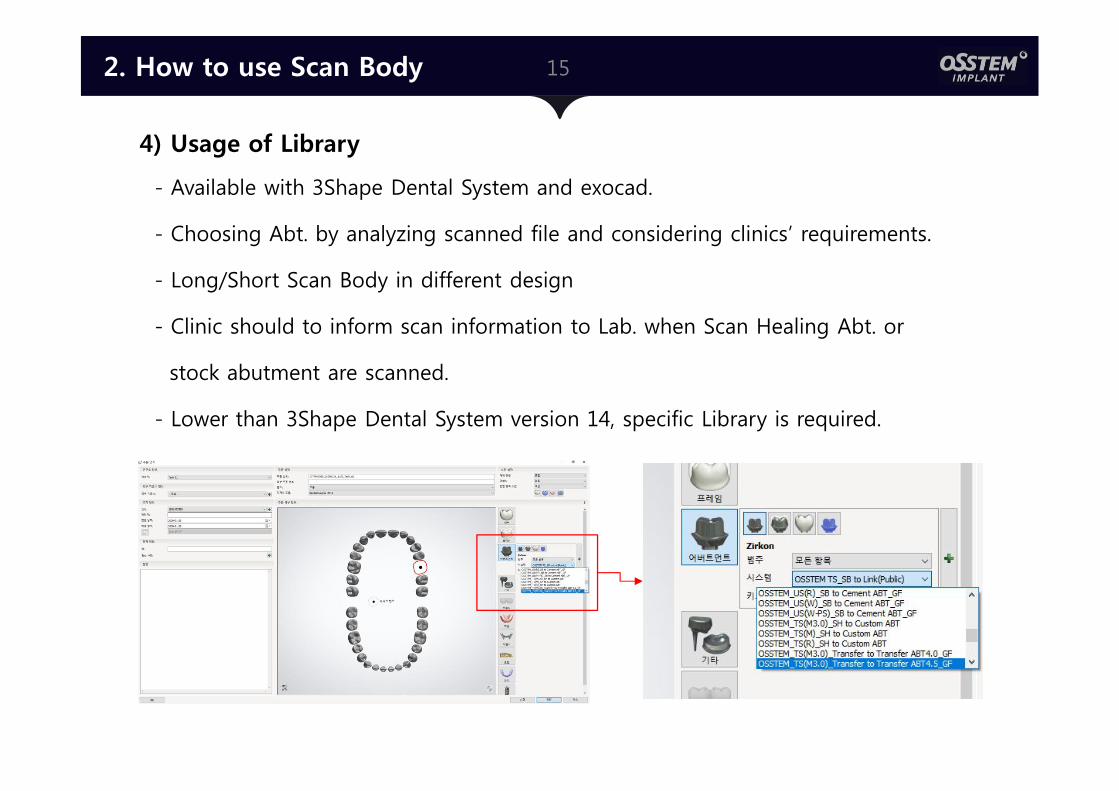
- Available with 3Shape Dental System and exocad.
- Choosing Abt. by analyzing scanned file and considering clinics’ requirements.
- Long/Short Scan Body in different design
- Clinic should to inform scan information to Lab. when Scan Healing Abt. or
stock abutment are scanned.
- Lower than 3Shape Dental System version 14, specific Library is required.
2. How to use Scan Body
4) Usage of Library
163. Next Scan body
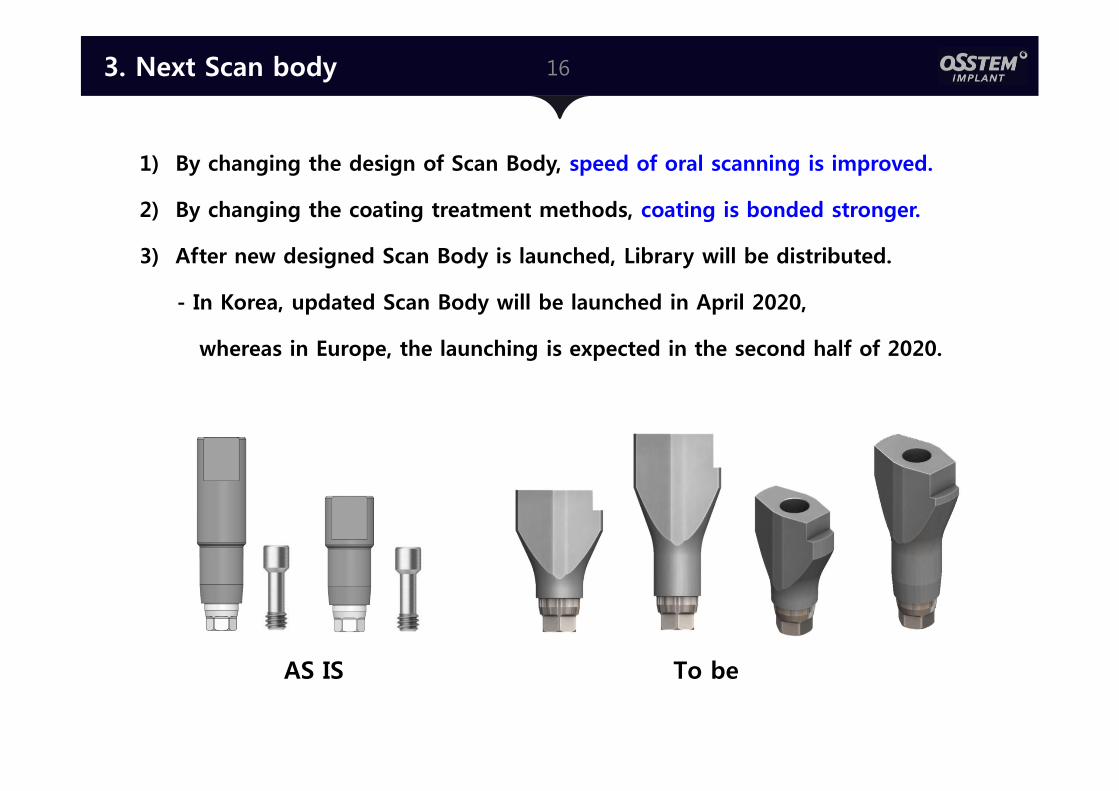
AS IS To be
1) By changing the design of Scan Body, speed of oral scanning is improved.
2) By changing the coating treatment methods, coating is bonded stronger.
3) After new designed Scan Body is launched, Library will be distributed.
- In Korea, updated Scan Body will be launched in April 2020,
whereas in Europe, the launching is expected in the second half of 2020.

171. Osstem Scan Healing Abutment
1) Feature of Scan Healing Abutment
Scan healing abutment Scan body
Having the samefuction structure
Having the samefuction structure
- By adding functions of Scan Body into Healing Abutment,
Healing Abutment could be scanned like Scan Body
without using actual Scan Body to process digital restoration.

18
2. Two Piece
Scan Healing Abutment Healing Abutment
2. One Piece
1. Use specific Carrier 1. Use 1.2Hex Driver
3. Hex Connection 3. Non-Hex Connection
- The purpose of using as Healing Abutment itself is the same.
- The structure and the connection way are different.
2) The Difference between Original and Scan Healing Abutment
1. Osstem Scan Healing Abutment
19
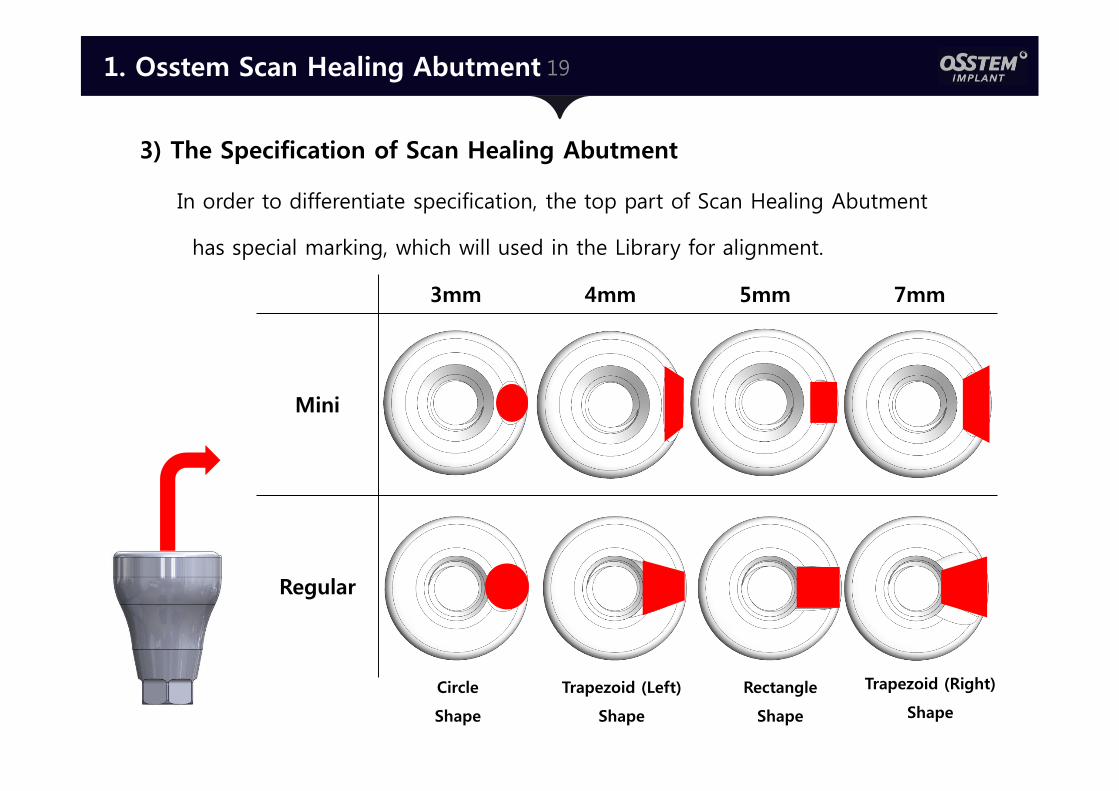
3mm 4mm 5mm 7mm
Mini
Regular
Circle
Shape
Trapezoid (Left)
Shape
Rectangle
Shape
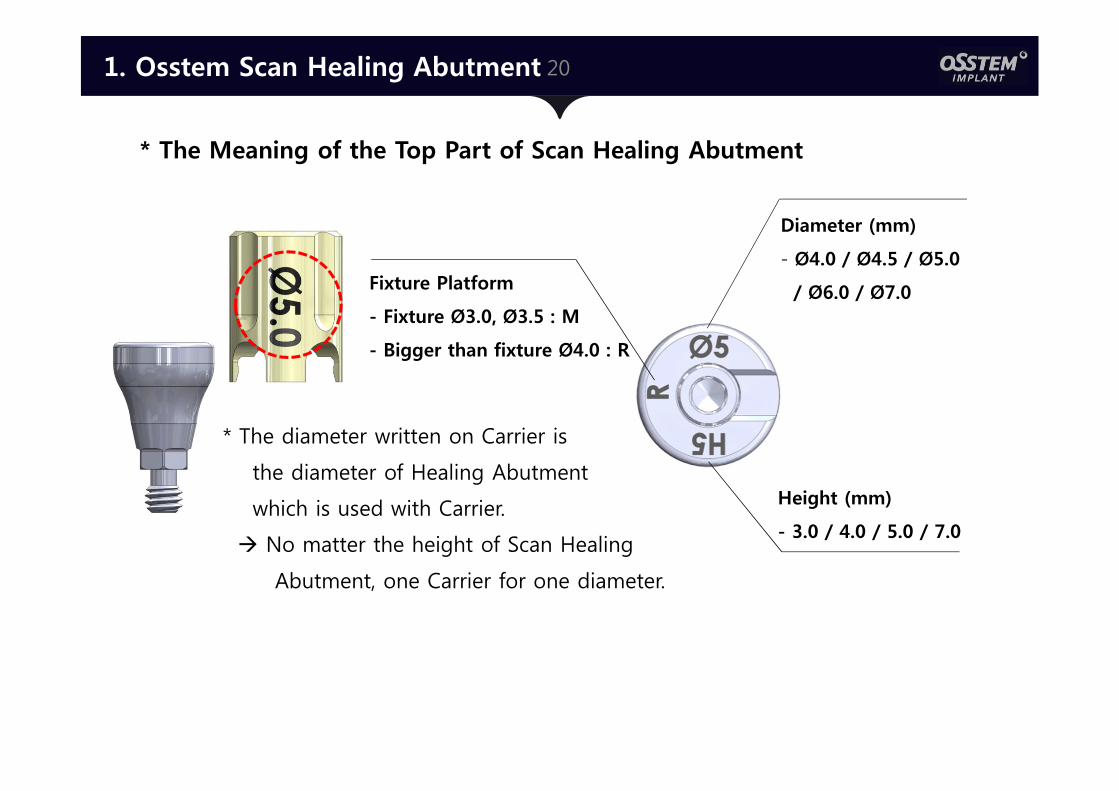
3) The Specification of Scan Healing Abutment
In order to differentiate specification, the top part of Scan Healing Abutment
has special marking, which will used in the Library for alignment.
Trapezoid (Right)
Shape
1. Osstem Scan Healing Abutment
20
Fixture Platform
- Fixture Ø3.0, Ø3.5 : M
- Bigger than fixture Ø4.0 : R
Height (mm)
- 3.0 / 4.0 / 5.0 / 7.0
Diameter (mm)
- Ø4.0 / Ø4.5 / Ø5.0
/ Ø6.0 / Ø7.0
* The diameter written on Carrier is
the diameter of Healing Abutment
which is used with Carrier.
No matter the height of Scan Healing
Abutment, one Carrier for one diameter.
* The Meaning of the Top Part of Scan Healing Abutment
1. Osstem Scan Healing Abutment
21
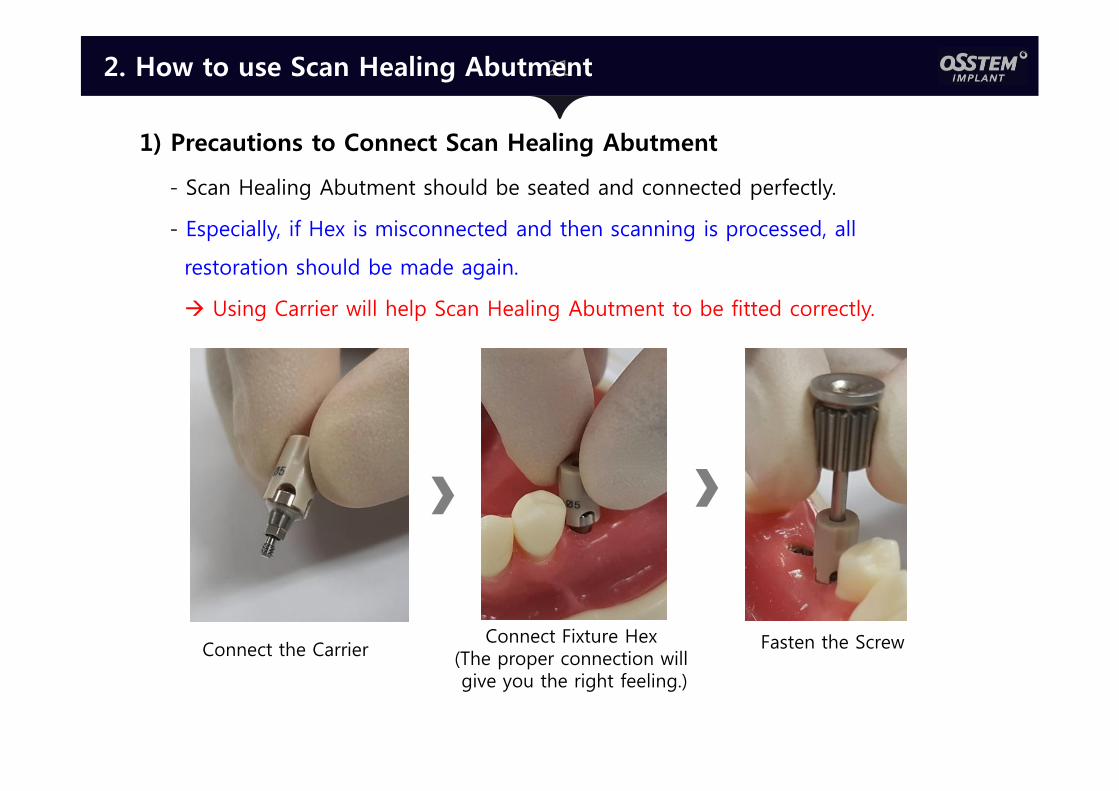
Connect the CarrierConnect Fixture Hex
(The proper connection will give you the right feeling.)
Fasten the Screw
2. How to use Scan Healing Abutment
1) Precautions to Connect Scan Healing Abutment
- Scan Healing Abutment should be seated and connected perfectly.
- Especially, if Hex is misconnected and then scanning is processed, all
restoration should be made again.
Using Carrier will help Scan Healing Abutment to be fitted correctly.

22
ProperConnection
Misconnection
2. How to use Scan Healing Abutment
* Using Carrier of Scan Healing Abutment will enable proper Hex connection.
23
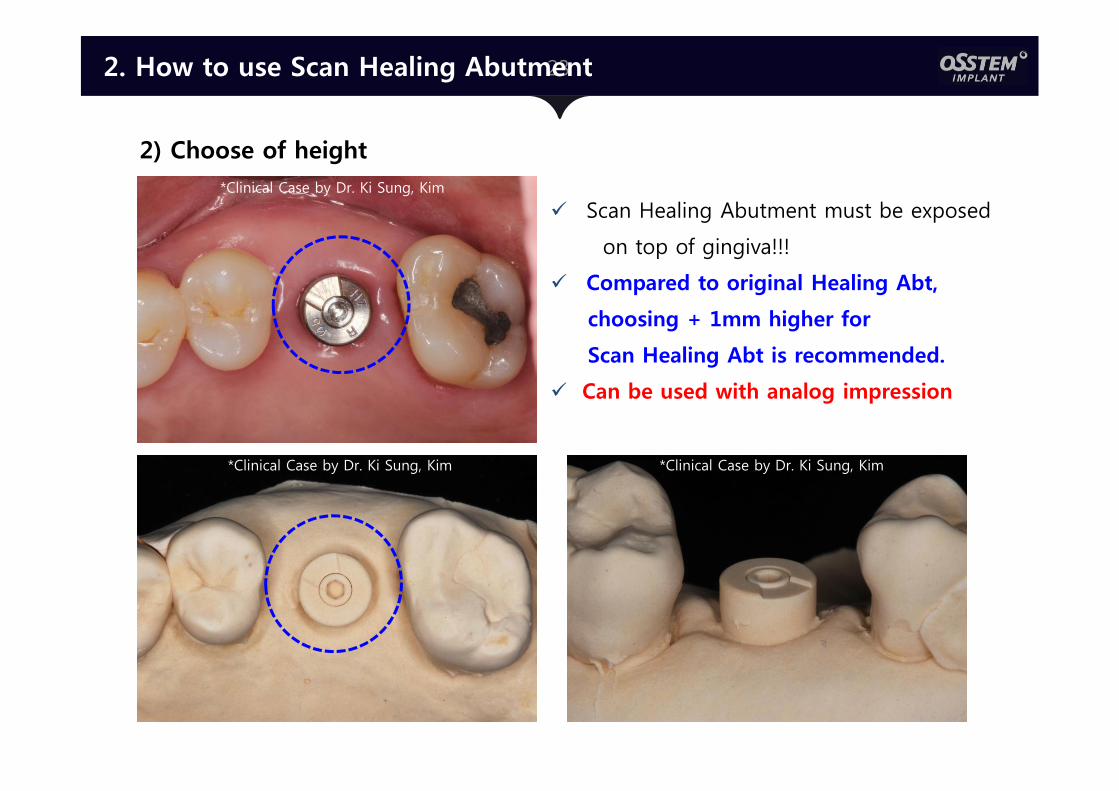
Scan Healing Abutment must be exposed
on top of gingiva!!!
Compared to original Healing Abt,
choosing + 1mm higher for
Scan Healing Abt is recommended.
Can be used with analog impression
2. How to use Scan Healing Abutment
2) Choose of height
*Clinical Case by Dr. Ki Sung, Kim
*Clinical Case by Dr. Ki Sung, Kim *Clinical Case by Dr. Ki Sung, Kim
24
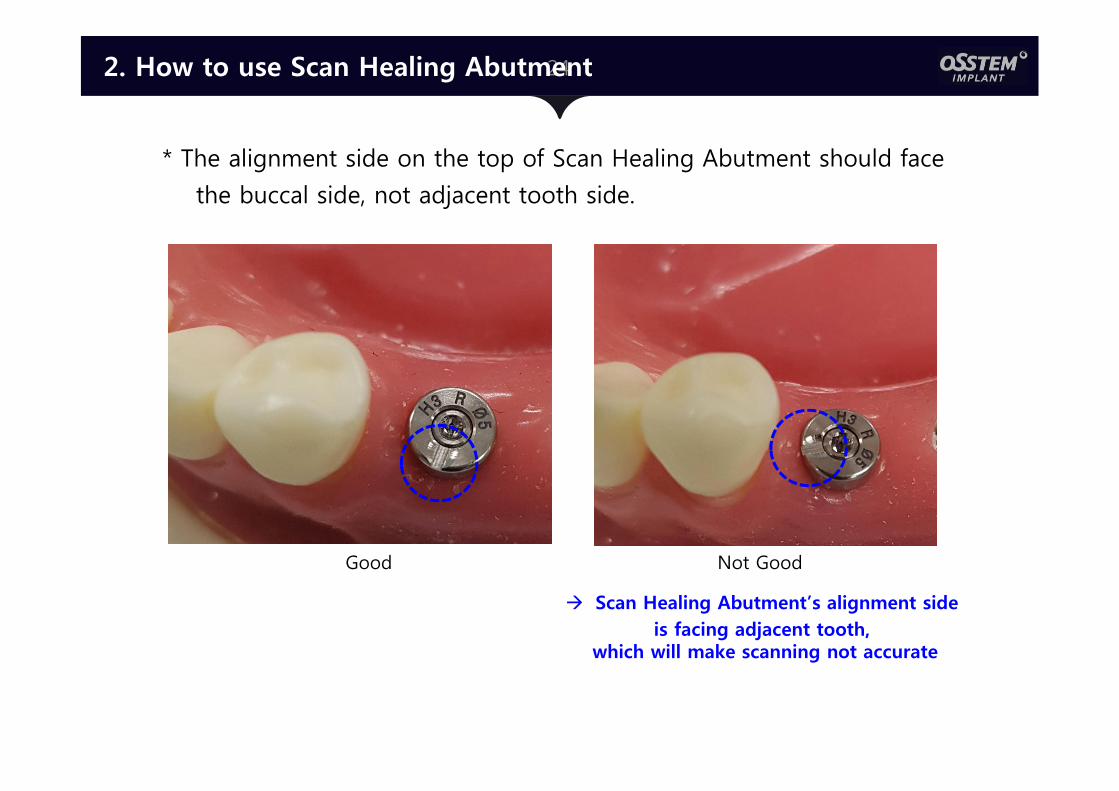
Good Not Good
2. How to use Scan Healing Abutment
* The alignment side on the top of Scan Healing Abutment should face
the buccal side, not adjacent tooth side.
Scan Healing Abutment’s alignment side
is facing adjacent tooth, which will make scanning not accurate
25
Scan BodyLibrary
Scan Healing AbutmentLibrary
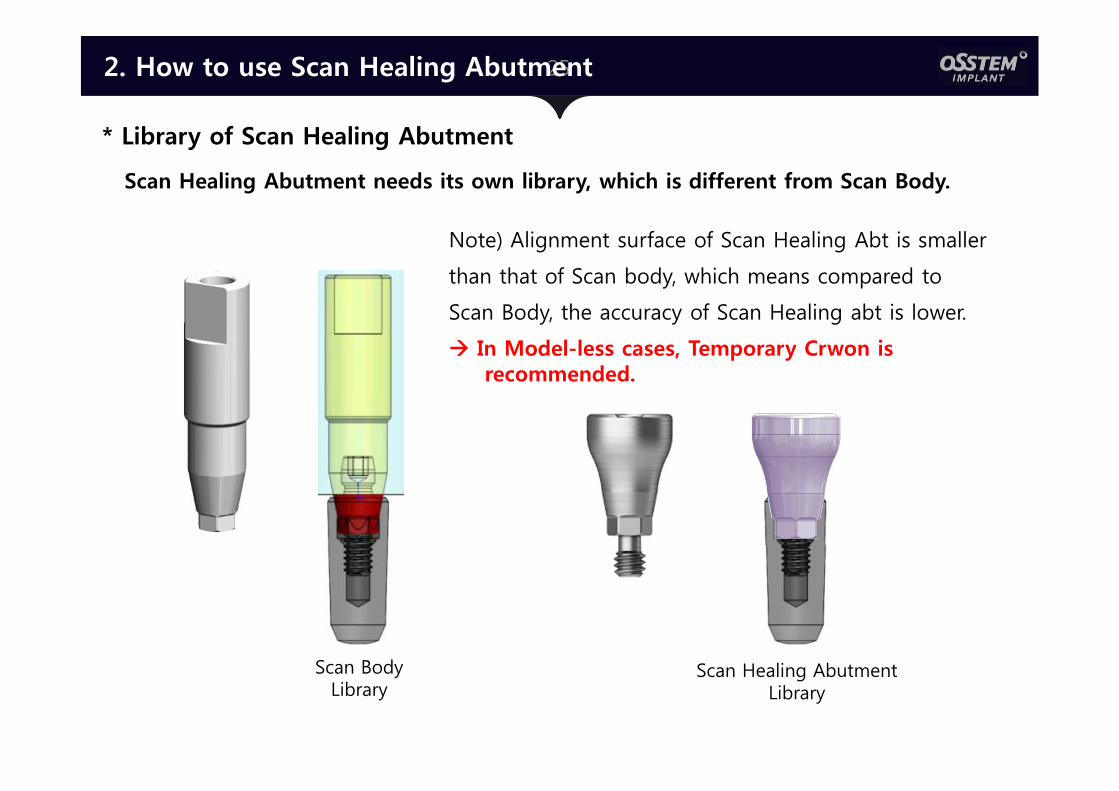
Note) Alignment surface of Scan Healing Abt is smaller
than that of Scan body, which means compared to
Scan Body, the accuracy of Scan Healing abt is lower.
In Model-less cases, Temporary Crwon is recommended.
2. How to use Scan Healing Abutment
* Library of Scan Healing Abutment
Scan Healing Abutment needs its own library, which is different from Scan Body.
26
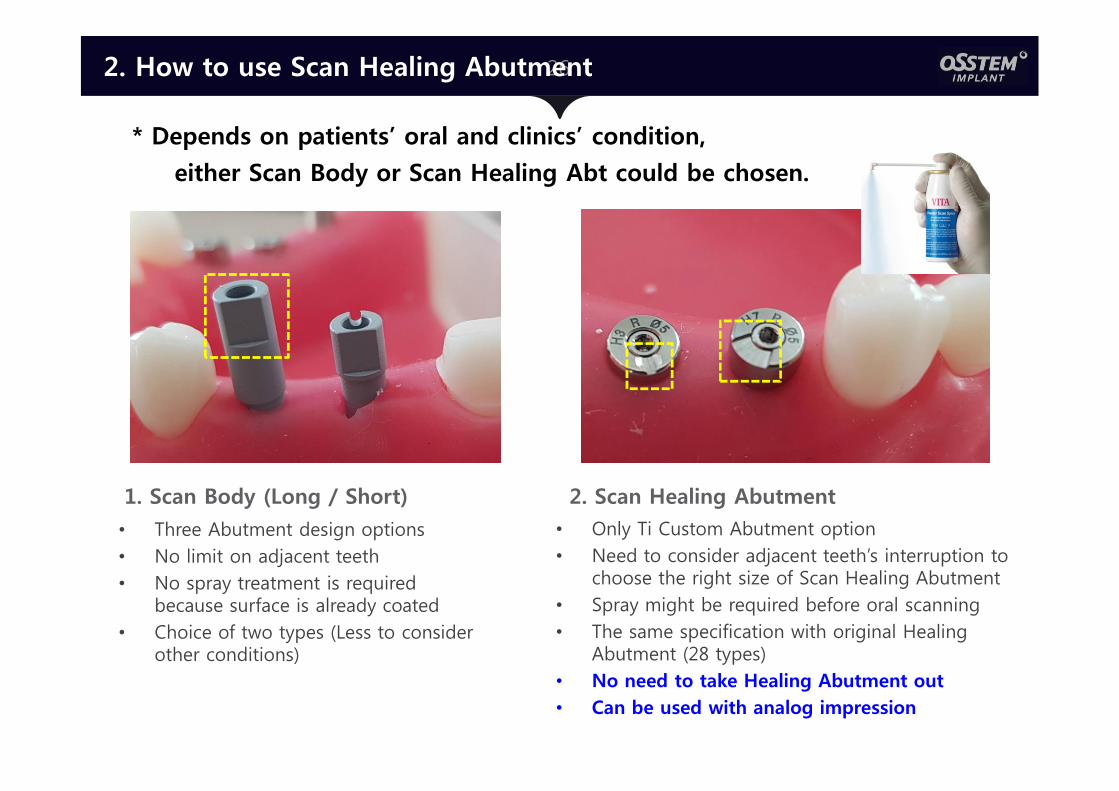
• Three Abutment design options
• No limit on adjacent teeth
• No spray treatment is required because surface is already coated
• Choice of two types (Less to consider other conditions)
1. Scan Body (Long / Short) 2. Scan Healing Abutment
• Only Ti Custom Abutment option
• Need to consider adjacent teeth’s interruption to choose the right size of Scan Healing Abutment
• Spray might be required before oral scanning
• The same specification with original Healing Abutment (28 types)
• No need to take Healing Abutment out
• Can be used with analog impression
2. How to use Scan Healing Abutment
* Depends on patients’ oral and clinics’ condition,
either Scan Body or Scan Healing Abt could be chosen.
27
3. Custom Abutment(Link & Premilled)
281. Osstem Link Abutment
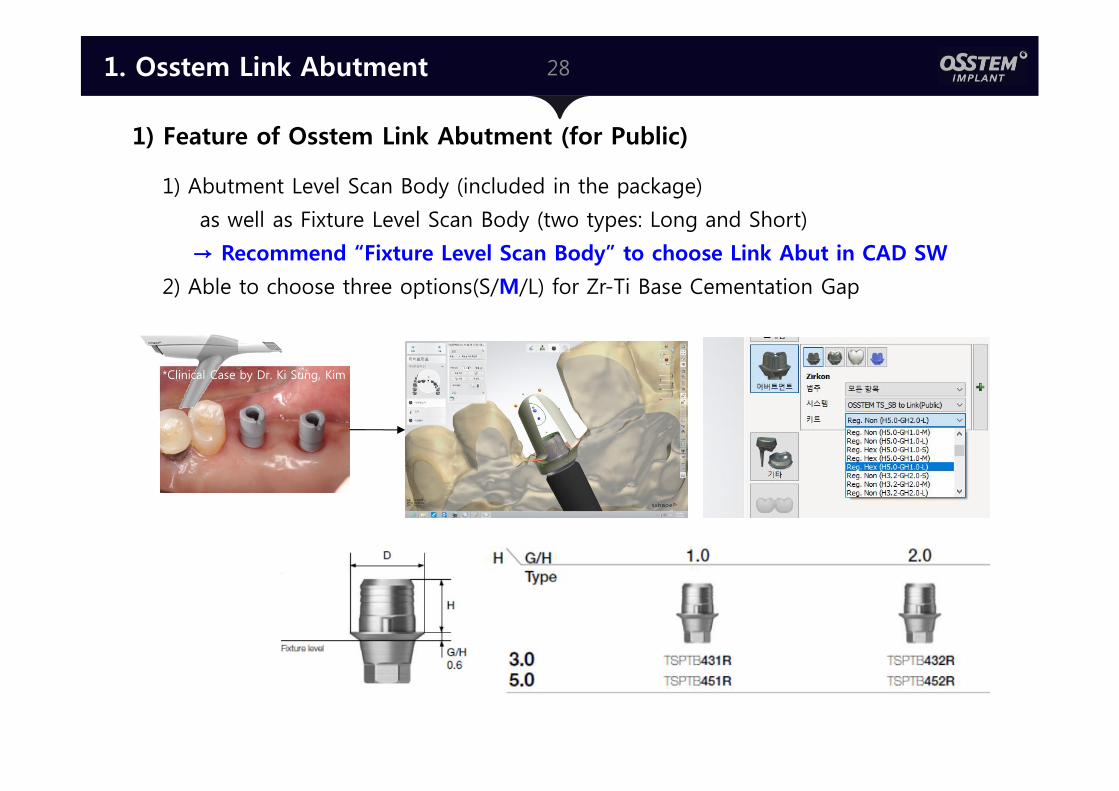
1) Feature of Osstem Link Abutment (for Public)
1) Abutment Level Scan Body (included in the package)
as well as Fixture Level Scan Body (two types: Long and Short)
→ Recommend “Fixture Level Scan Body” to choose Link Abut in CAD SW
2) Able to choose three options(S/M/L) for Zr-Ti Base Cementation Gap
*Clinical Case by Dr. Ki Sung, Kim
292. How to use Link Abutment
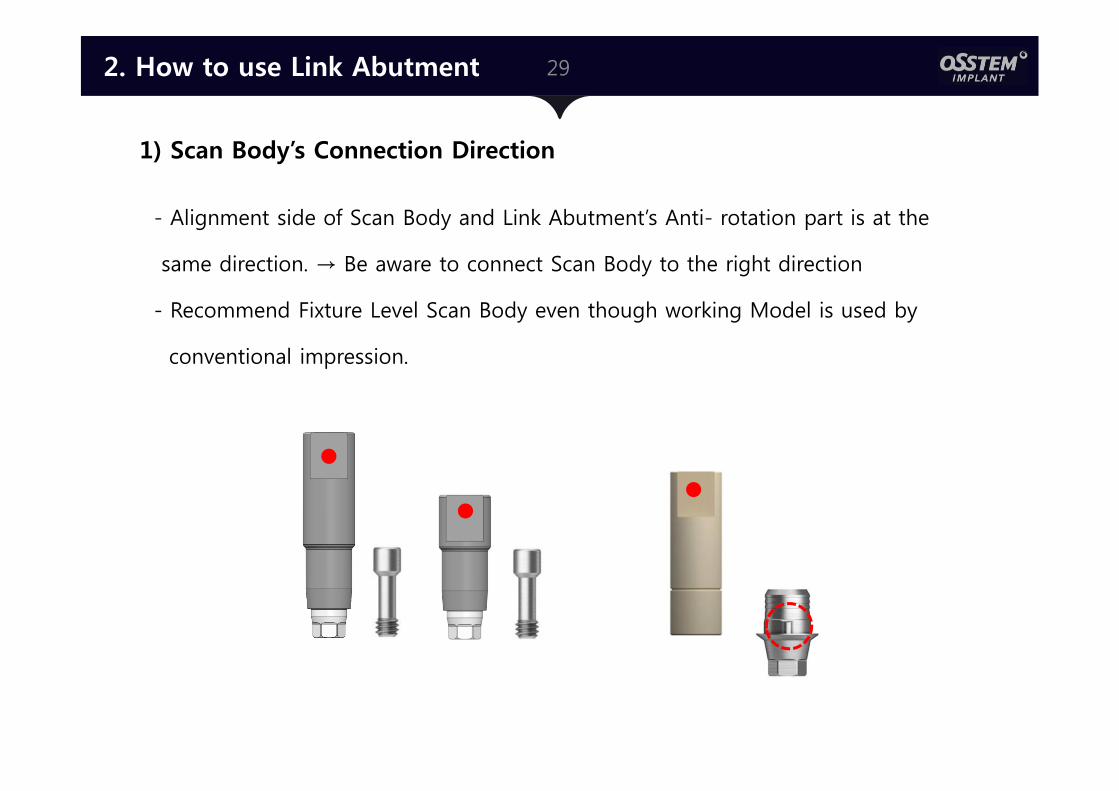
1) Scan Body’s Connection Direction
- Alignment side of Scan Body and Link Abutment’s Anti- rotation part is at the
same direction. → Be aware to connect Scan Body to the right direction
- Recommend Fixture Level Scan Body even though working Model is used by
conventional impression.
30
Recommended Recommended
2. How to use Link Abutment
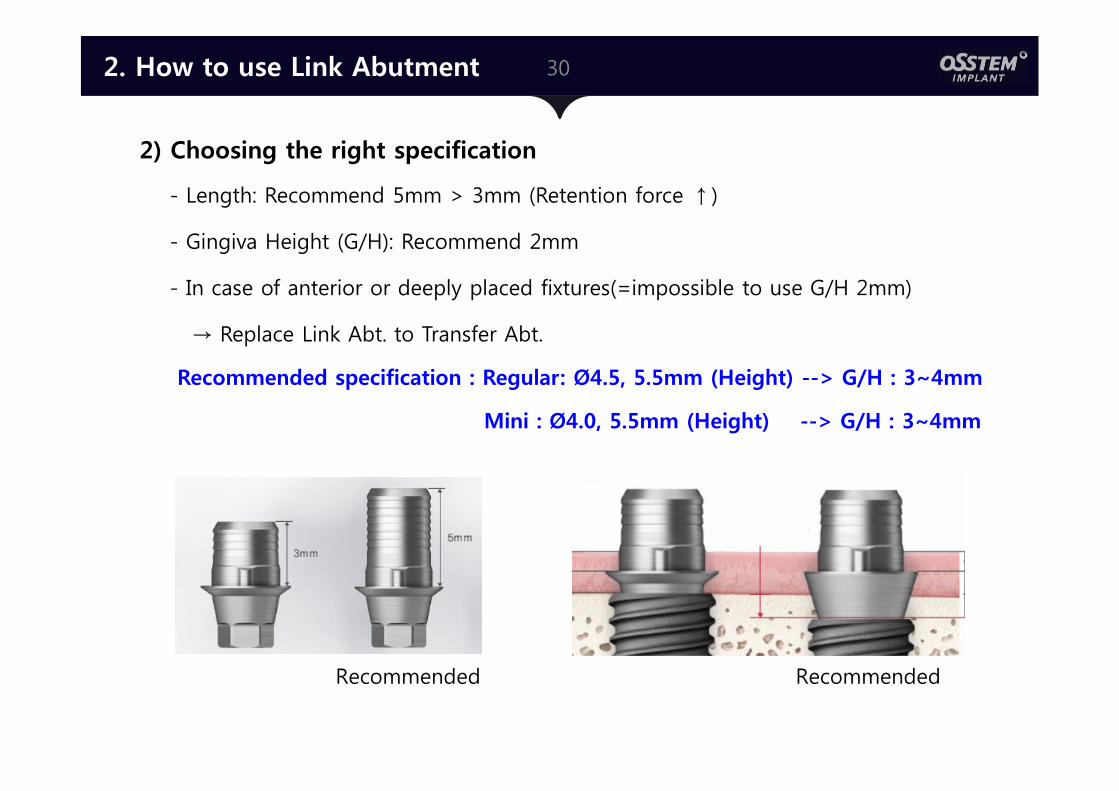
2) Choosing the right specification
- Length: Recommend 5mm > 3mm (Retention force ↑)
- Gingiva Height (G/H): Recommend 2mm
- In case of anterior or deeply placed fixtures(=impossible to use G/H 2mm)
→ Replace Link Abt. to Transfer Abt.
Recommended specification : Regular: Ø4.5, 5.5mm (Height) --> G/H : 3~4mm
Mini : Ø4.0, 5.5mm (Height) --> G/H : 3~4mm
31
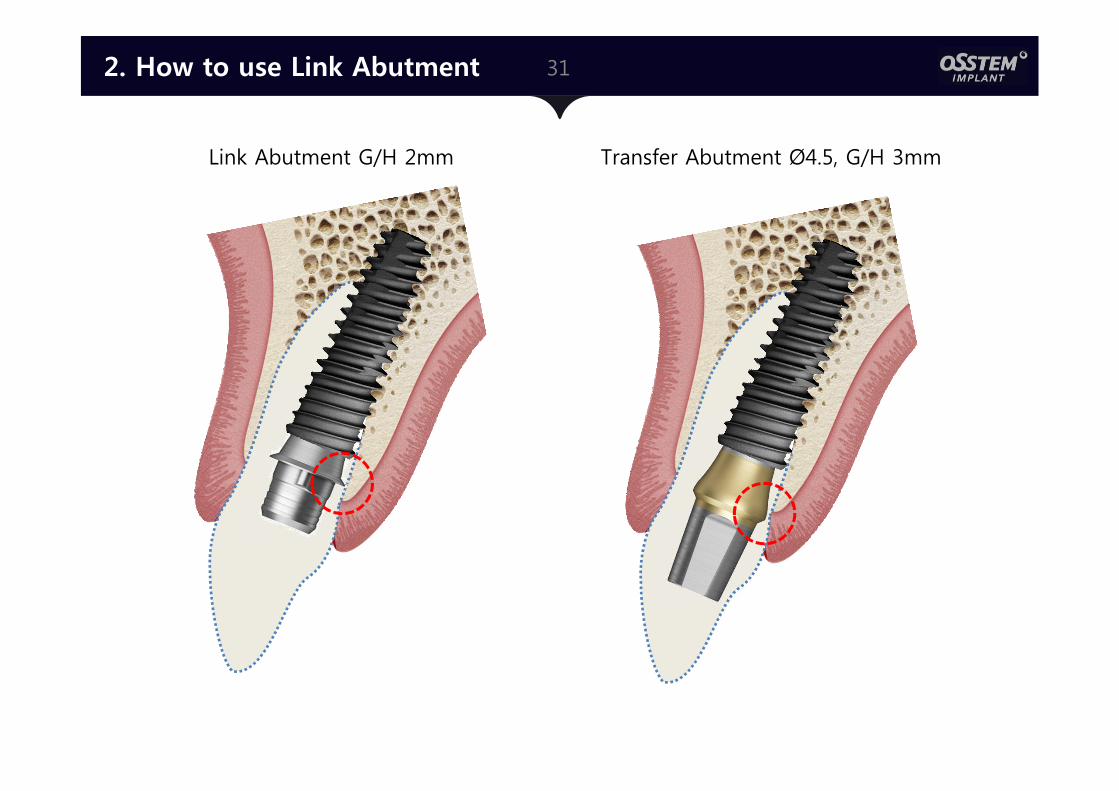
Link Abutment G/H 2mm Transfer Abutment Ø4.5, G/H 3mm
2. How to use Link Abutment
32
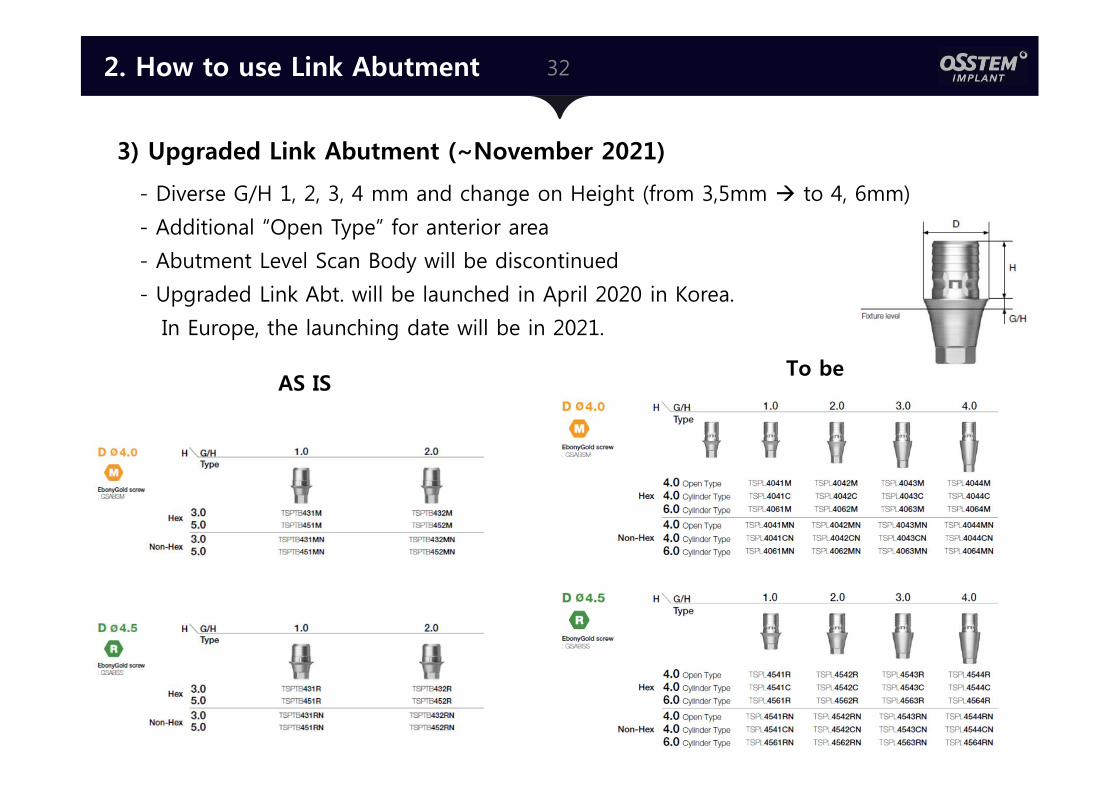
- Diverse G/H 1, 2, 3, 4 mm and change on Height (from 3,5mm to 4, 6mm)
- Additional “Open Type” for anterior area
- Abutment Level Scan Body will be discontinued
- Upgraded Link Abt. will be launched in April 2020 in Korea.
In Europe, the launching date will be in 2021.
AS ISTo be
2. How to use Link Abutment
3) Upgraded Link Abutment (~November 2021)
333. Premilled Abutment
< Original>< Copy >
< Original >
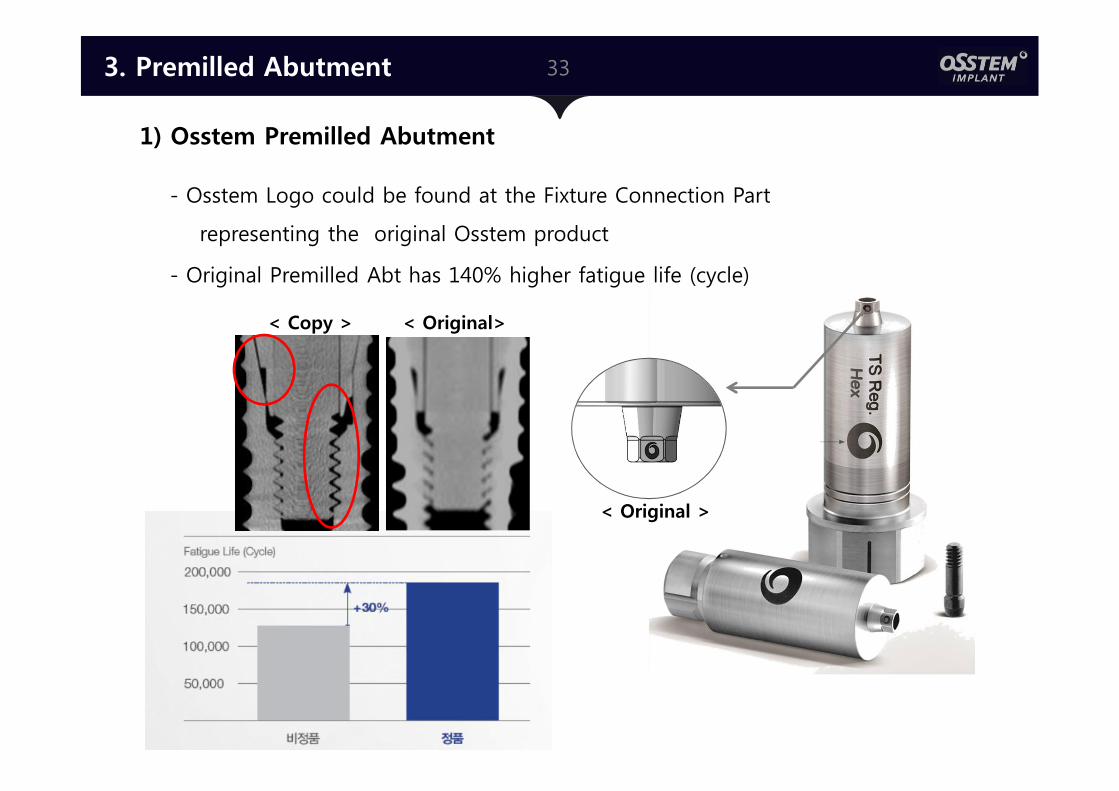
1) Osstem Premilled Abutment
- Osstem Logo could be found at the Fixture Connection Part
representing the original Osstem product
- Original Premilled Abt has 140% higher fatigue life (cycle)

343. Premilled abutment
Medentika Osstem
2) Osstem Premilled Abutment for Europe
- Premilled Abutment for Europe has the same zig part of Medentika
and the product already has CE.
35
4. Multi Ti Base & Scan Body
361. Osstem Multi Ti Base
Scan Body
5º
4mm 6mm
5º
One Body Scan Body
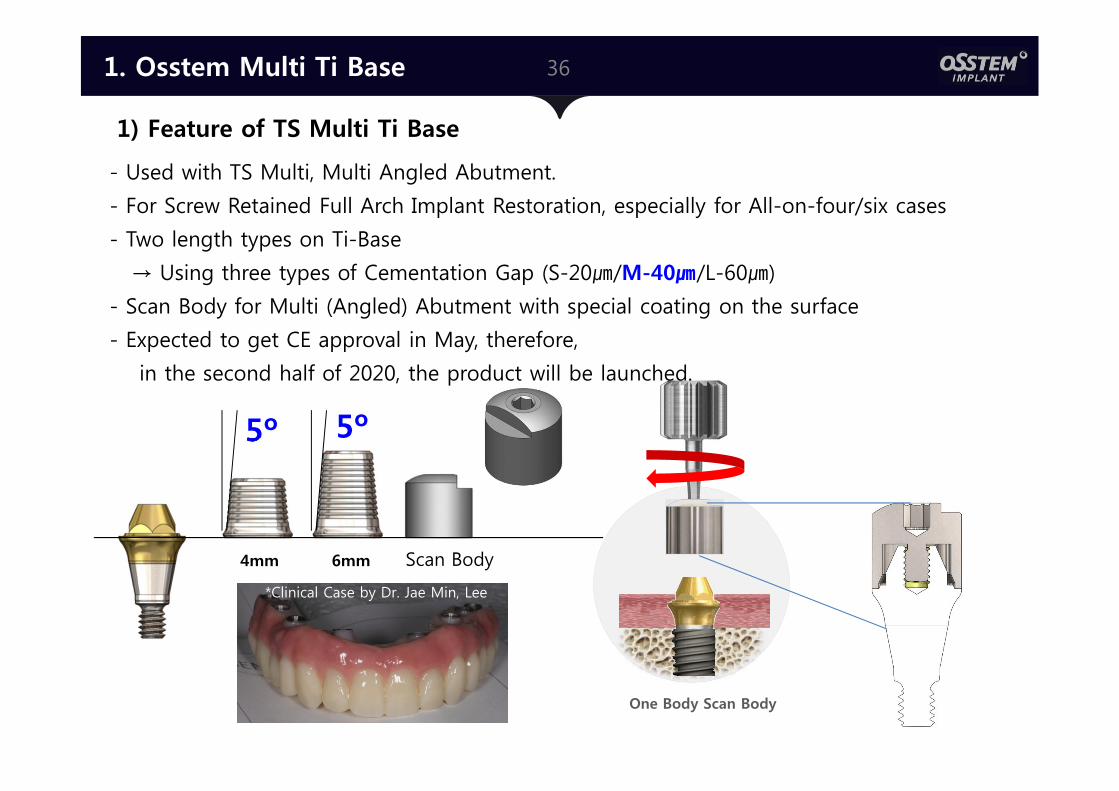
1) Feature of TS Multi Ti Base
- Used with TS Multi, Multi Angled Abutment.
- For Screw Retained Full Arch Implant Restoration, especially for All-on-four/six cases
- Two length types on Ti-Base
→ Using three types of Cementation Gap (S-20㎛/M-40㎛/L-60㎛)
- Scan Body for Multi (Angled) Abutment with special coating on the surface
- Expected to get CE approval in May, therefore,
in the second half of 2020, the product will be launched.
*Clinical Case by Dr. Jae Min, Lee
37
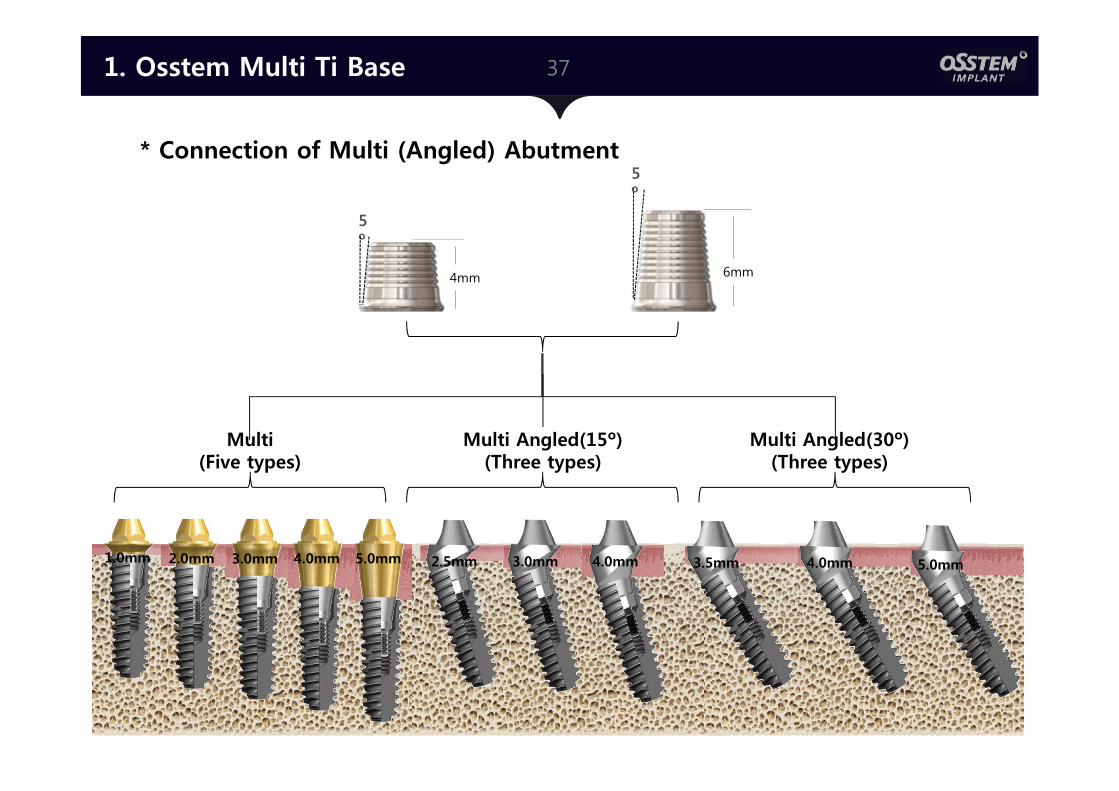
1.0mm 2.0mm 4.0mm 5.0mm3.0mm 2.5mm 4.0mm3.0mm 3.5mm 4.0mm
Multi (Five types)
Multi Angled(15º) (Three types)
Multi Angled(30º) (Three types)
5º
6mm4mm
5º
* Connection of Multi (Angled) Abutment
1. Osstem Multi Ti Base
5.0mm

38
5. Digital Lab Analog
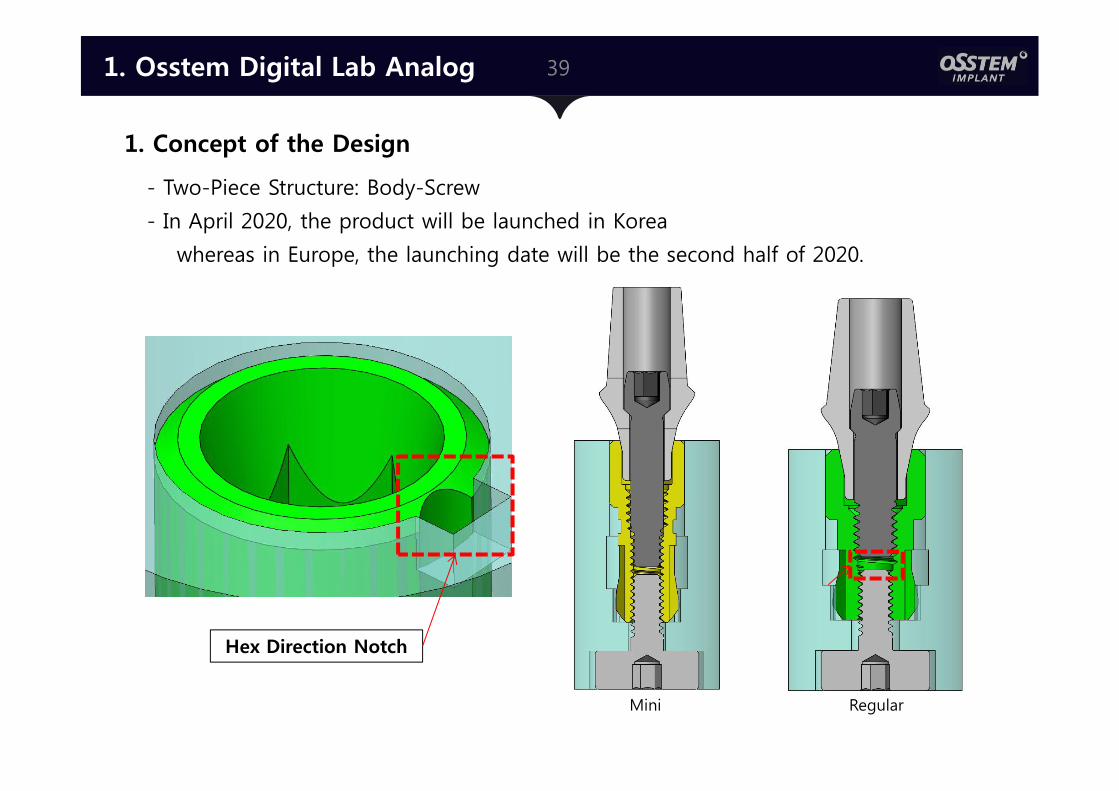
391. Osstem Digital Lab Analog
RegularMini
Hex Direction Notch
1. Concept of the Design
- Two-Piece Structure: Body-Screw
- In April 2020, the product will be launched in Korea
whereas in Europe, the launching date will be the second half of 2020.
40
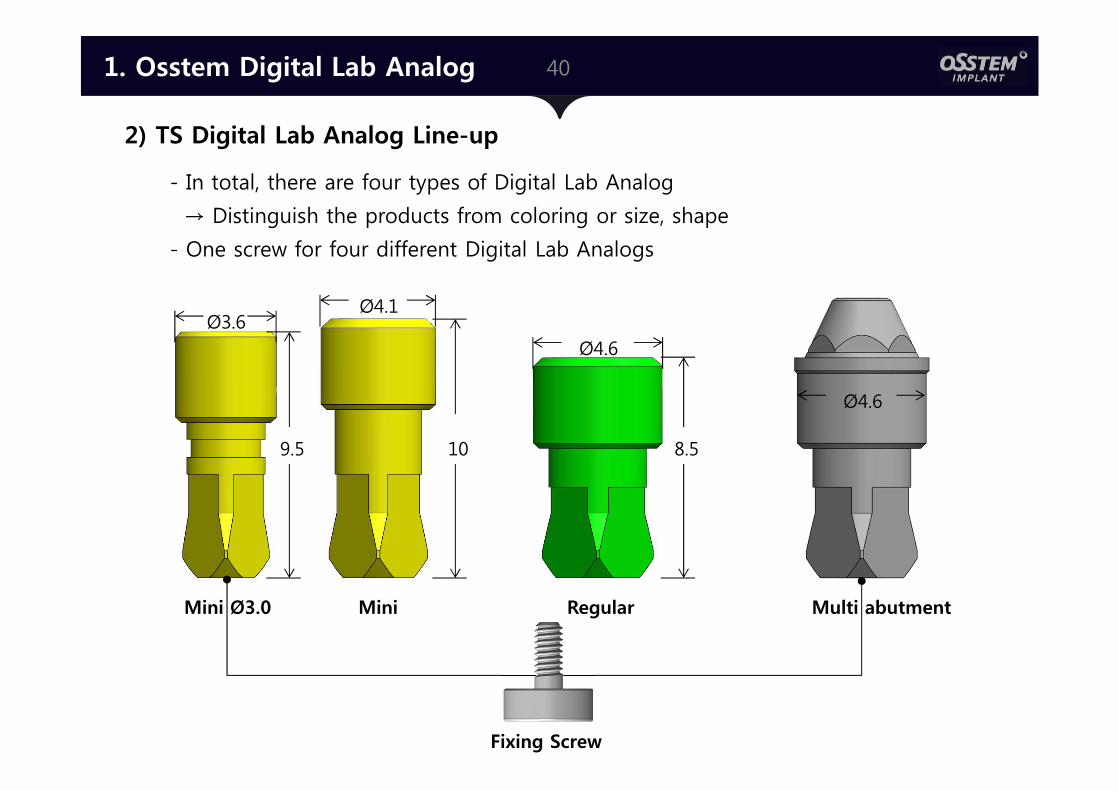
Mini Ø3.0 Mini Regular Multi abutment
Ø3.6Ø4.1
Ø4.6
Ø4.6
9.5 10 8.5
Fixing Screw
2) TS Digital Lab Analog Line-up
- In total, there are four types of Digital Lab Analog
→ Distinguish the products from coloring or size, shape
- One screw for four different Digital Lab Analogs
1. Osstem Digital Lab Analog
41
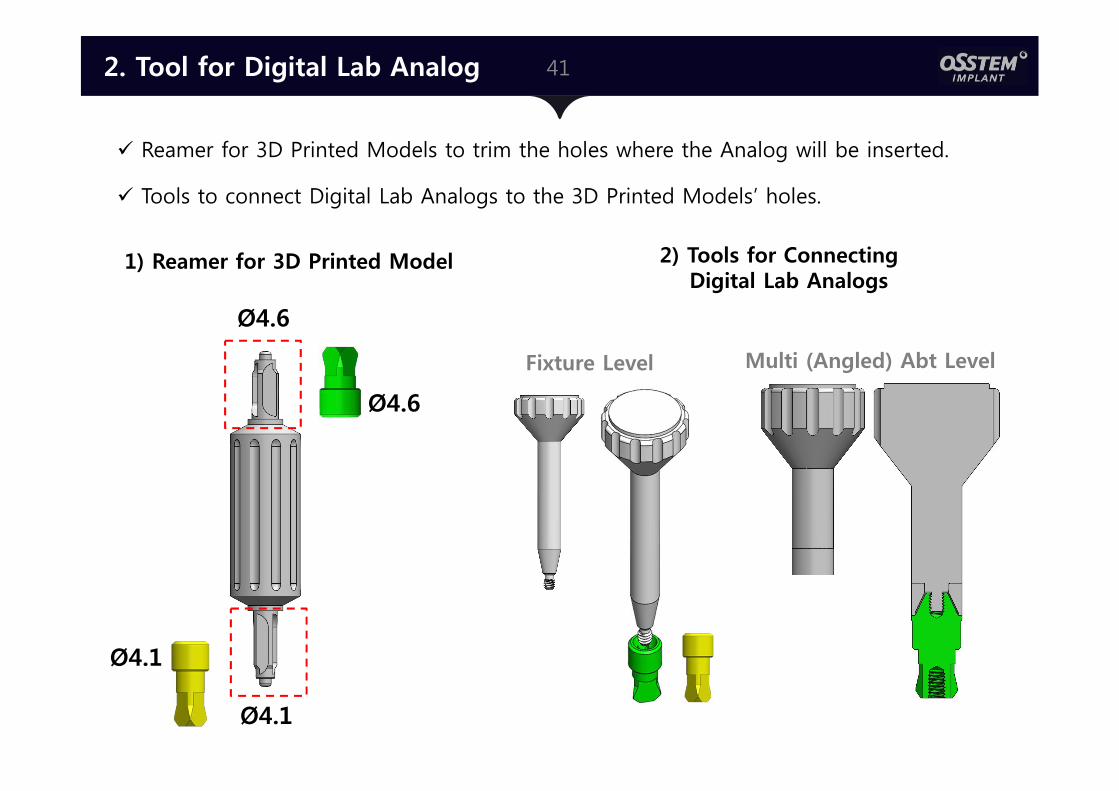
Ø4.1
Ø4.6
Ø4.6
Ø4.1
1) Reamer for 3D Printed Model 2) Tools for Connecting Digital Lab Analogs
Multi (Angled) Abt LevelFixture Level
Reamer for 3D Printed Models to trim the holes where the Analog will be inserted.
Tools to connect Digital Lab Analogs to the 3D Printed Models’ holes.
2. Tool for Digital Lab Analog

42
1) Reaming to control a hole size 2) Inserting the Analog
Check Hex Direction
3) Tightening a screw
2. Working process of Digital Lab Analog

43
6. Digital Device
441. Milling Solutions
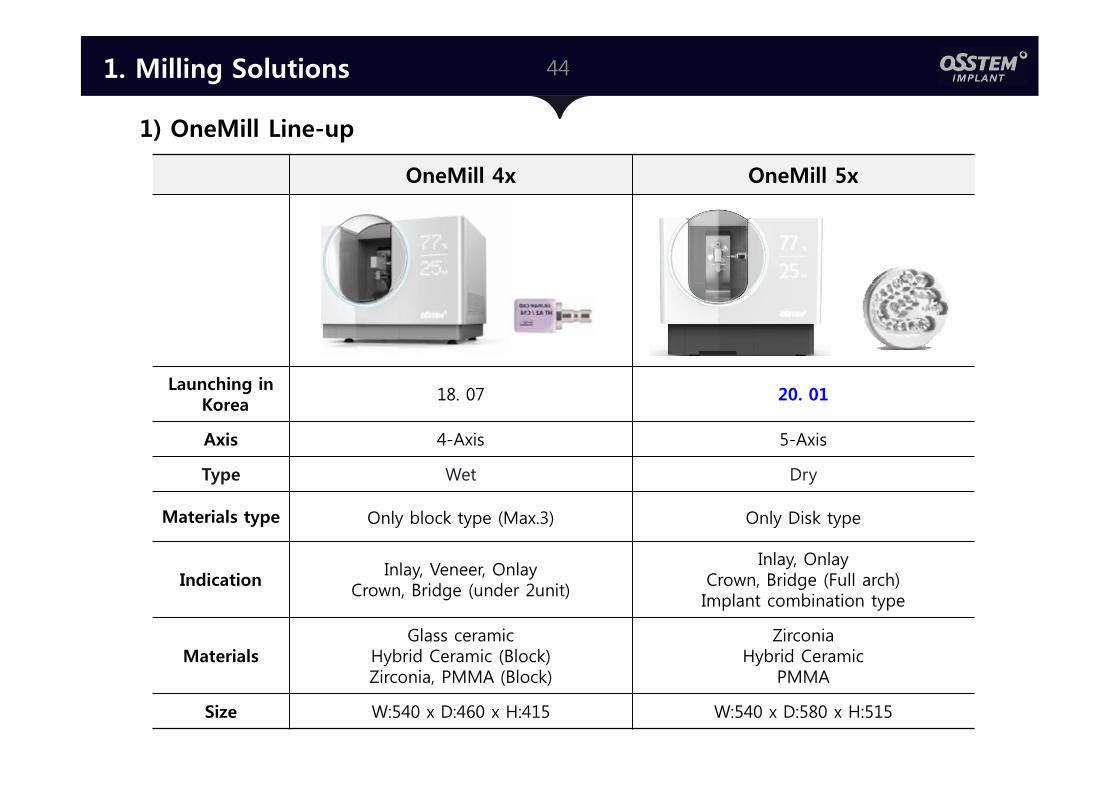
OneMill 4x OneMill 5x
Launching in Korea
18. 07 20. 01
Axis 4-Axis 5-Axis
Type Wet Dry
Materials type Only block type (Max.3) Only Disk type
IndicationInlay, Veneer, Onlay
Crown, Bridge (under 2unit)
Inlay, OnlayCrown, Bridge (Full arch)Implant combination type
MaterialsGlass ceramic
Hybrid Ceramic (Block)Zirconia, PMMA (Block)
Zirconia Hybrid Ceramic
PMMA
Size W:540 x D:460 x H:415 W:540 x D:580 x H:515
1) OneMill Line-up
45
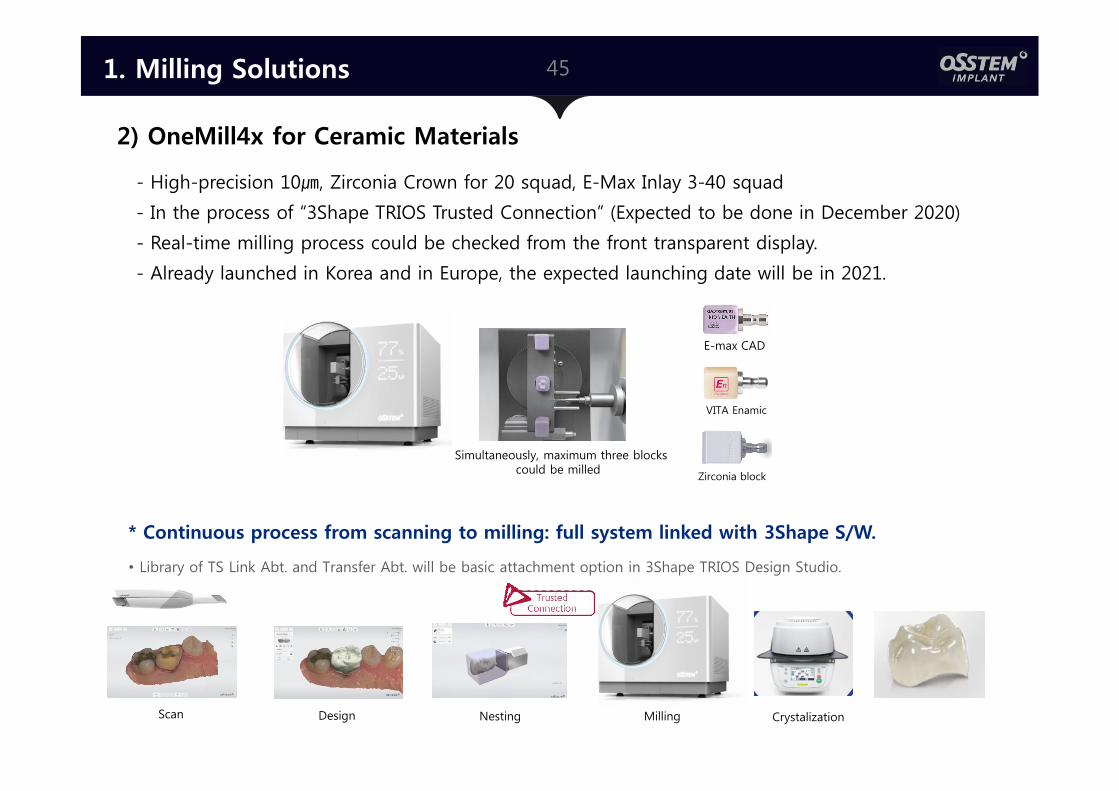
2) OneMill4x for Ceramic Materials
VITA Enamic
E-max CAD
Zirconia block
Simultaneously, maximum three blocks could be milled
* Continuous process from scanning to milling: full system linked with 3Shape S/W.
Scan Design Nesting Milling
• Library of TS Link Abt. and Transfer Abt. will be basic attachment option in 3Shape TRIOS Design Studio.
Crystalization
1. Milling Solutions
- High-precision 10㎛, Zirconia Crown for 20 squad, E-Max Inlay 3-40 squad
- In the process of “3Shape TRIOS Trusted Connection” (Expected to be done in December 2020)
- Real-time milling process could be checked from the front transparent display.
- Already launched in Korea and in Europe, the expected launching date will be in 2021.
46
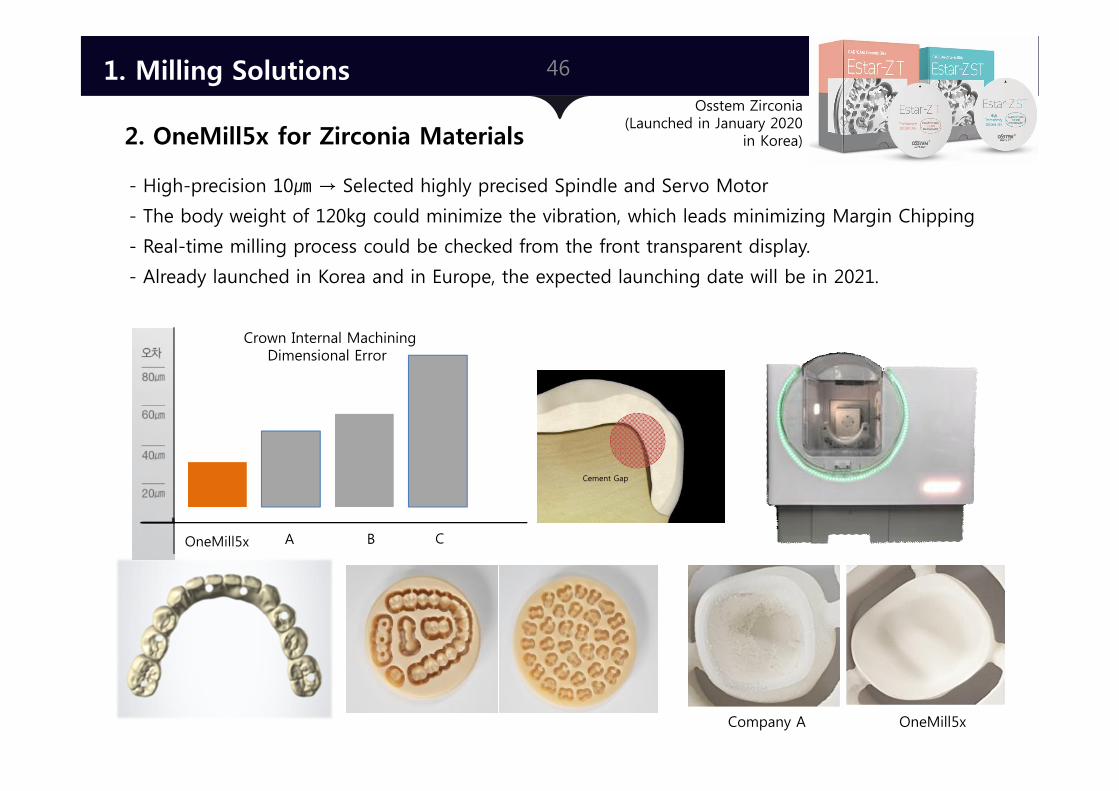
OneMill5x A B C
Crown Internal Machining Dimensional Error
Cement Gap
Company A OneMill5x
Osstem Zirconia (Launched in January 2020
in Korea)
1. Milling Solutions
2. OneMill5x for Zirconia Materials
- High-precision 10㎛ → Selected highly precised Spindle and Servo Motor
- The body weight of 120kg could minimize the vibration, which leads minimizing Margin Chipping
- Real-time milling process could be checked from the front transparent display.
- Already launched in Korea and in Europe, the expected launching date will be in 2021.
472. 3D Printing Solutions
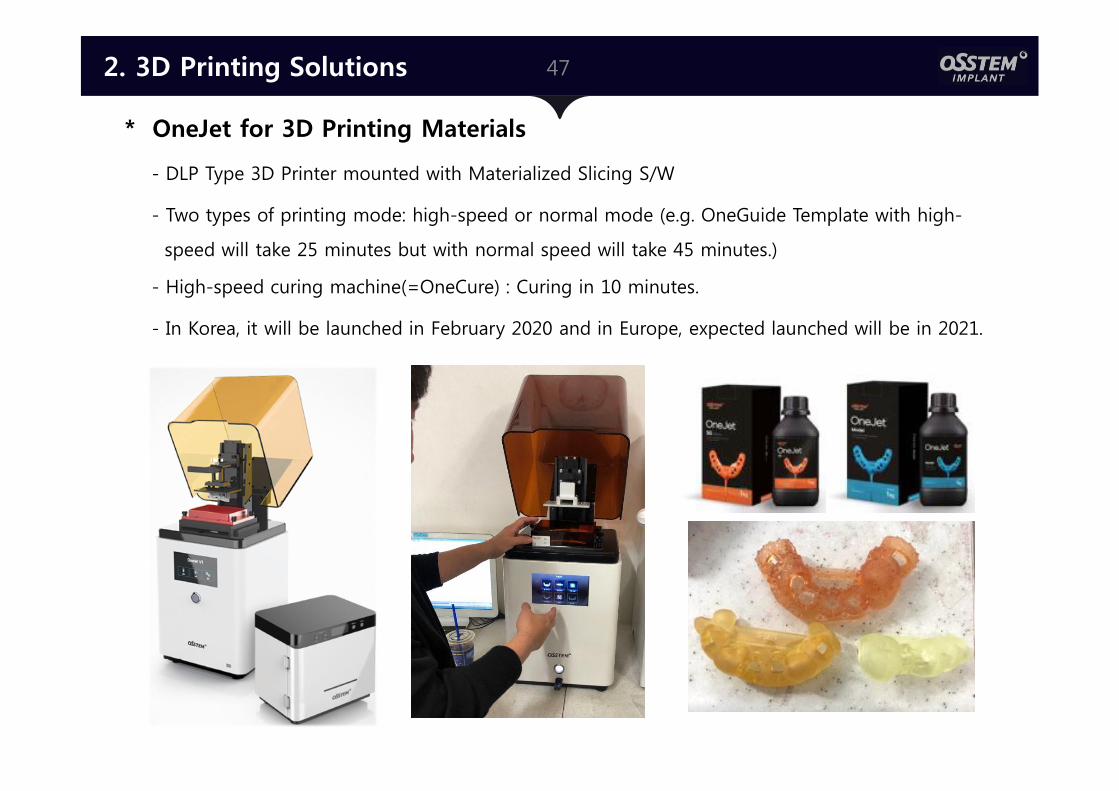
* OneJet for 3D Printing Materials
- DLP Type 3D Printer mounted with Materialized Slicing S/W
- Two types of printing mode: high-speed or normal mode (e.g. OneGuide Template with high-
speed will take 25 minutes but with normal speed will take 45 minutes.)
- High-speed curing machine(=OneCure) : Curing in 10 minutes.
- In Korea, it will be launched in February 2020 and in Europe, expected launched will be in 2021.
48
Q & A