Embed Size (px)
Citation preview

Page 1
Orthodontic Bonding Technique Manual
Prepared by:
Paul Gange
Questions? Email: [email protected]
Toll Free 1-800-323-4348 · Phone 630-773-4009 · Fax 630-250-7704
1540 West Thorndale Ave. Itasca IL 60143 USA
Page 2
KEYS TO SUCCESS WITH SELF-ETCHING PRIMERS
1. Thorough prophylaxis mandatory.
2. Apply a small amount of primer to the tooth surface (thin coat).
3. Longer agitation (5s.) vs. (3s.).
4. After drying, tooth must look “resin” shiny – not “water” shiny.
If there is saliva contamination after application, the process must be repeated.
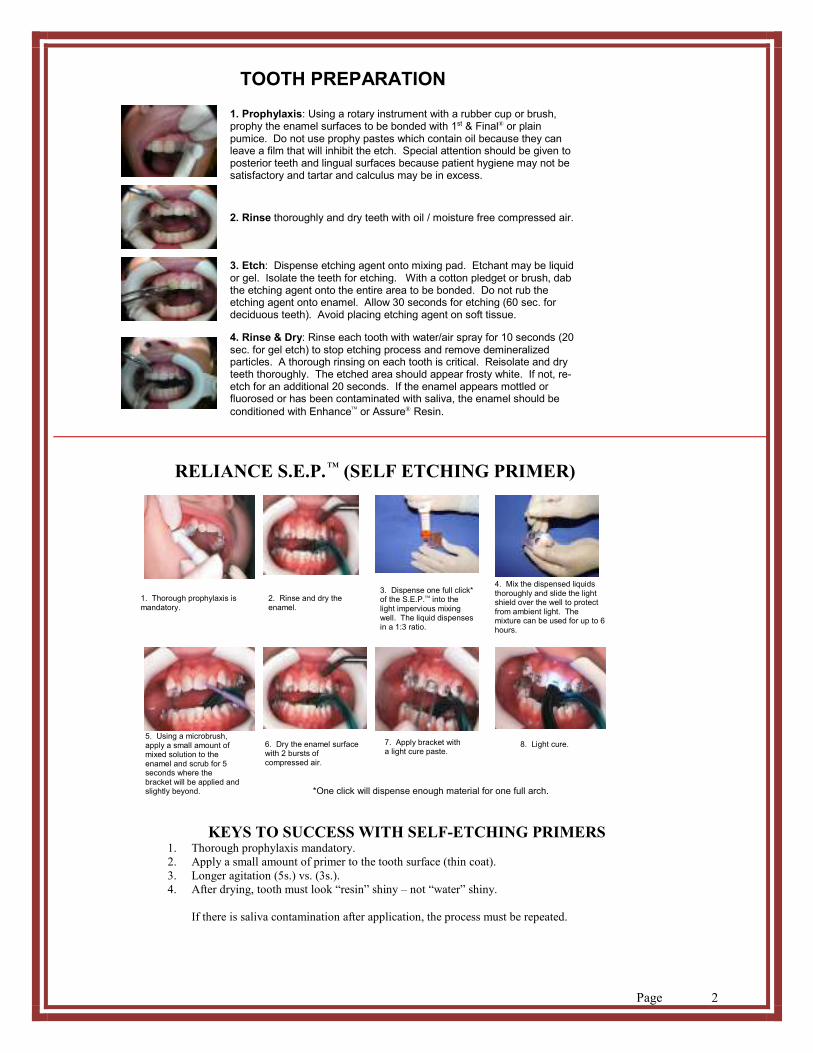
TOOTH PREPARATION
1. Prophylaxis: Using a rotary instrument with a rubber cup or brush, prophy the enamel surfaces to be bonded with 1st & Final® or plain pumice. Do not use prophy pastes which contain oil because they can leave a film that will inhibit the etch. Special attention should be given to posterior teeth and lingual surfaces because patient hygiene may not be satisfactory and tartar and calculus may be in excess.
2. Rinse thoroughly and dry teeth with oil / moisture free compressed air.
3. Etch: Dispense etching agent onto mixing pad. Etchant may be liquid or gel. Isolate the teeth for etching. With a cotton pledget or brush, dab the etching agent onto the entire area to be bonded. Do not rub the etching agent onto enamel. Allow 30 seconds for etching (60 sec. for deciduous teeth). Avoid placing etching agent on soft tissue.
4. Rinse & Dry: Rinse each tooth with water/air spray for 10 seconds (20 sec. for gel etch) to stop etching process and remove demineralized particles. A thorough rinsing on each tooth is critical. Reisolate and dry teeth thoroughly. The etched area should appear frosty white. If not, re-etch for an additional 20 seconds. If the enamel appears mottled or fluorosed or has been contaminated with saliva, the enamel should be
conditioned with Enhance or Assure® Resin.
RELIANCE S.E.P. ™ (SELF ETCHING PRIMER)
1. Thorough prophylaxis is mandatory.
2. Rinse and dry the enamel.
3. Dispense one full click* of the S.E.P.™ into the light impervious mixing well. The liquid dispenses in a 1:3 ratio.
4. Mix the dispensed liquids thoroughly and slide the light shield over the well to protect from ambient light. The mixture can be used for up to 6 hours.
5. Using a microbrush, apply a small amount of mixed solution to the enamel and scrub for 5 seconds where the bracket will be applied and slightly beyond.
6. Dry the enamel surface with 2 bursts of compressed air.
7. Apply bracket with a light cure paste.
8. Light cure.
*One click will dispense enough material for one full arch.
Page 3
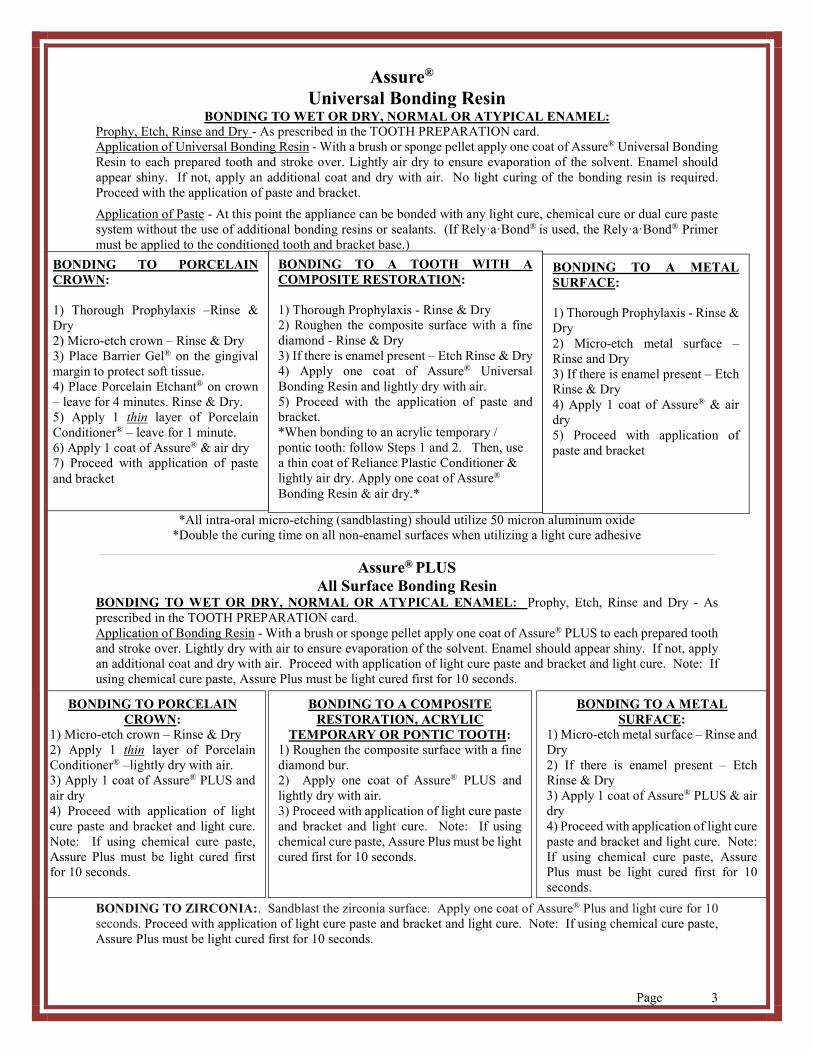
Assure®
Universal Bonding Resin BONDING TO WET OR DRY, NORMAL OR ATYPICAL ENAMEL:
Prophy, Etch, Rinse and Dry - As prescribed in the TOOTH PREPARATION card.
Application of Universal Bonding Resin - With a brush or sponge pellet apply one coat of Assure® Universal Bonding
Resin to each prepared tooth and stroke over. Lightly air dry to ensure evaporation of the solvent. Enamel should
appear shiny. If not, apply an additional coat and dry with air. No light curing of the bonding resin is required.
Proceed with the application of paste and bracket.
Application of Paste - At this point the appliance can be bonded with any light cure, chemical cure or dual cure paste
system without the use of additional bonding resins or sealants. (If Rely·a·Bond® is used, the Rely·a·Bond® Primer
must be applied to the conditioned tooth and bracket base.)
*All intra-oral micro-etching (sandblasting) should utilize 50 micron aluminum oxide
*Double the curing time on all non-enamel surfaces when utilizing a light cure adhesive
Assure® PLUS
All Surface Bonding Resin BONDING TO WET OR DRY, NORMAL OR ATYPICAL ENAMEL: Prophy, Etch, Rinse and Dry - As
prescribed in the TOOTH PREPARATION card.
Application of Bonding Resin - With a brush or sponge pellet apply one coat of Assure® PLUS to each prepared tooth
and stroke over. Lightly dry with air to ensure evaporation of the solvent. Enamel should appear shiny. If not, apply
an additional coat and dry with air. Proceed with application of light cure paste and bracket and light cure. Note: If
using chemical cure paste, Assure Plus must be light cured first for 10 seconds.
BONDING TO ZIRCONIA:. Sandblast the zirconia surface. Apply one coat of Assure® Plus and light cure for 10
seconds. Proceed with application of light cure paste and bracket and light cure. Note: If using chemical cure paste,
Assure Plus must be light cured first for 10 seconds.
BONDING TO A TOOTH WITH A
COMPOSITE RESTORATION:
1) Thorough Prophylaxis - Rinse & Dry
2) Roughen the composite surface with a fine
diamond - Rinse & Dry
3) If there is enamel present – Etch Rinse & Dry
4) Apply one coat of Assure® Universal
Bonding Resin and lightly dry with air.
5) Proceed with the application of paste and
bracket.
*When bonding to an acrylic temporary /
pontic tooth: follow Steps 1 and 2. Then, use
a thin coat of Reliance Plastic Conditioner &
lightly air dry. Apply one coat of Assure®
Bonding Resin & air dry.*
BONDING TO A METAL
SURFACE:
1) Thorough Prophylaxis - Rinse &
Dry
2) Micro-etch metal surface –
Rinse and Dry
3) If there is enamel present – Etch
Rinse & Dry
4) Apply 1 coat of Assure® & air
dry
5) Proceed with application of
paste and bracket
BONDING TO PORCELAIN
CROWN:
1) Thorough Prophylaxis –Rinse &
Dry
2) Micro-etch crown – Rinse & Dry
3) Place Barrier Gel® on the gingival
margin to protect soft tissue.
4) Place Porcelain Etchant® on crown
– leave for 4 minutes. Rinse & Dry.
5) Apply 1 thin layer of Porcelain
Conditioner® – leave for 1 minute.
6) Apply 1 coat of Assure® & air dry
7) Proceed with application of paste
and bracket
BONDING TO A COMPOSITE
RESTORATION, ACRYLIC
TEMPORARY OR PONTIC TOOTH:
1) Roughen the composite surface with a fine
diamond bur.
2) Apply one coat of Assure® PLUS and
lightly dry with air.
3) Proceed with application of light cure paste
and bracket and light cure. Note: If using
chemical cure paste, Assure Plus must be light
cured first for 10 seconds.
BONDING TO A METAL
SURFACE:
1) Micro-etch metal surface – Rinse and
Dry
2) If there is enamel present – Etch
Rinse & Dry
3) Apply 1 coat of Assure® PLUS & air
dry
4) Proceed with application of light cure
paste and bracket and light cure. Note:
If using chemical cure paste, Assure
Plus must be light cured first for 10
seconds.
BONDING TO PORCELAIN
CROWN:
1) Micro-etch crown – Rinse & Dry
2) Apply 1 thin layer of Porcelain
Conditioner® –lightly dry with air.
3) Apply 1 coat of Assure® PLUS and
air dry
4) Proceed with application of light
cure paste and bracket and light cure.
Note: If using chemical cure paste,
Assure Plus must be light cured first
for 10 seconds.
Page 4
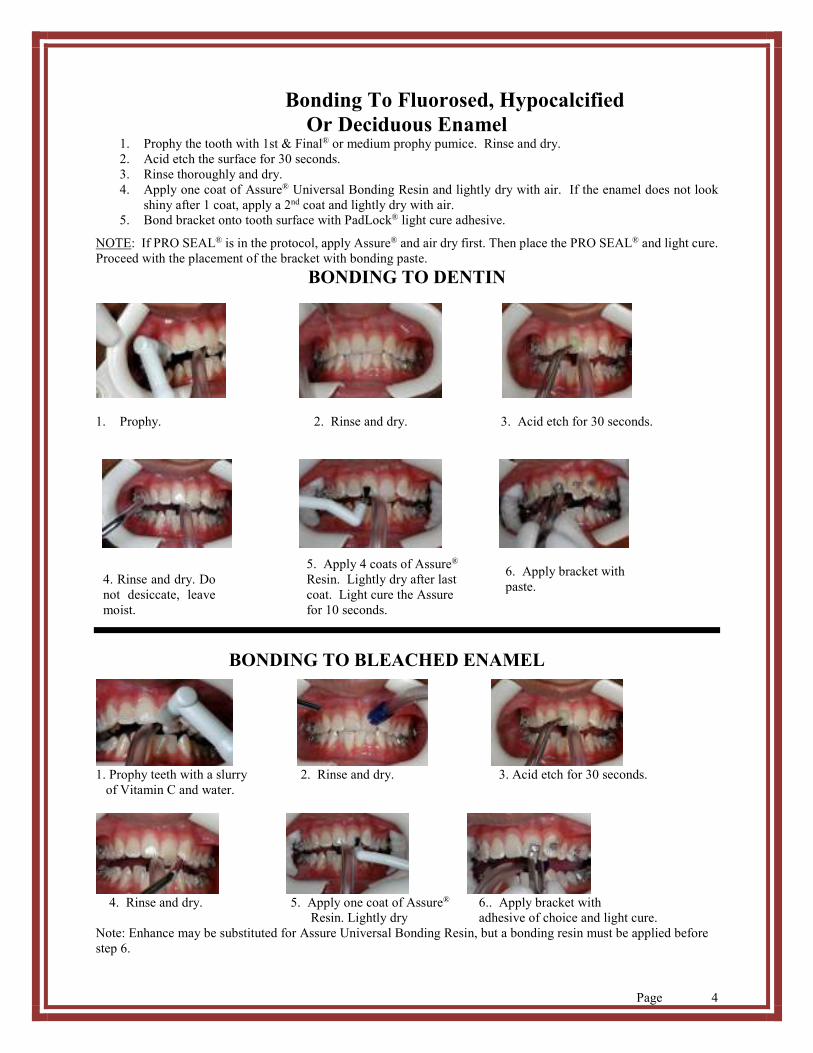
Bonding To Fluorosed, Hypocalcified
Or Deciduous Enamel 1. Prophy the tooth with 1st & Final® or medium prophy pumice. Rinse and dry.
2. Acid etch the surface for 30 seconds.
3. Rinse thoroughly and dry.
4. Apply one coat of Assure® Universal Bonding Resin and lightly dry with air. If the enamel does not look
shiny after 1 coat, apply a 2nd coat and lightly dry with air.
5. Bond bracket onto tooth surface with PadLock® light cure adhesive. NOTE: If PRO SEAL® is in the protocol, apply Assure® and air dry first. Then place the PRO SEAL® and light cure.
Proceed with the placement of the bracket with bonding paste.
BONDING TO DENTIN
1. Prophy. 2. Rinse and dry. 3. Acid etch for 30 seconds.
1. Prophy teeth with a slurry 2. Rinse and dry. 3. Acid etch for 30 seconds.
of Vitamin C and water.
4. Rinse and dry. 5. Apply one coat of Assure® 6.. Apply bracket with
Resin. Lightly dry adhesive of choice and light cure.
Note: Enhance may be substituted for Assure Universal Bonding Resin, but a bonding resin must be applied before
step 6.
BONDING TO BLEACHED ENAMEL
4. Rinse and dry. Do
not desiccate, leave
moist.
5. Apply 4 coats of Assure®
Resin. Lightly dry after last
coat. Light cure the Assure
for 10 seconds.
6. Apply bracket with
paste.

Page 5
Using
PRO SEAL® and L.E.D. PRO SEAL®
1. APPLICATION: Dispense a drop or two of PRO SEAL® onto a mixing pad. With a brush, apply a thin
uniform layer on the etched enamel surface. Stroke over with the same brush to ensure a thin layer and
proper coverage.
If using original PRO SEAL®, cure each tooth for 20 seconds with any corded halogen, plasma or LED
curing light in the purple range (390 – 440 nM). If using L.E.D. PRO SEAL®, cure each tooth for 20
seconds with any curing light (440-480 nM).
Note: In order for PRO SEAL® to remain on a normal tooth surface, it must be applied to properly
conditioned, dry enamel. Atypical enamel should be first etched and then conditioned with Assure®
Universal Bonding Resin, then lightly dried before the PRO SEAL® is applied.
If PRO SEAL® is cured and saliva contamination occurs, the contaminated tooth can be cleaned by
applying Assure® Bonding Resin and drying with air.
2. REMOVAL OF SEALANT RESIN: After the adhesive paste has been removed with a Renew® System
Bur (#118S, #118L or #218), removal of PRO SEAL® sealant is easy. Use the #383 Renew® System Point
on your choice of handpiece. Lightly polish the entire tooth surface with the #383 rubber point where PRO
SEAL® has been applied.
Note: If patient will visit the hygienist during treatment, the enamel should not be cleaned with a prophy
jet as this can remove the PRO SEAL®. Use fine pumice for cleaning.
If not applied in a thin layer or not fully polymerized, LED PRO SEAL® may appear yellow.
Direct Bonding Metal & Ceramic Brackets with a Light
Cure Adhesive
1. With a brush, apply a uniform layer of Assure® bonding resin on the etched enamel & air dry. If saliva contamination occurs after this
step, simply air dry the excess contamination off the surface - apply another coat of Assure® & air dry. If PRO SEAL® is used, cure the
PRO SEAL® prior to placing bracket.
3. Using the syringe tip or spatula, apply the light cure
paste and work it into the bracket base by firmly smearing
the paste into the mesh. Place
on the tooth and press firmly in the desired position.
4. With a metal or ceramic
bracket, light cure the first
increment from the incisal edge. Be sure to keep close
proximity for an initial 1-2
seconds - then physically touch the bracket and finish
light curing.
5. Finish the final increment from the gingival, distal, or mesial
edge.
Once the material has been properly cured, an active arch
wire can be placed immediately.
Page 6
“The 5 Keys to Success with a Light Cure Bonding Adhesive”
1. Light must be of proper intensity.
2. Divide your total curing time into 2 increments, one angle always being the incisal
(occlusal)…..
”Light behind a picture frame”.
3. Place light director as close to bracket base as possible for 1-2 seconds – then physically
touch the bracket to reduce divergent photon release.
4. Be sure light maintains intensity throughout entire curing process.
5. Adequate cure time – Never cure for less than 6 seconds per bracket
*Remember 10,000 units of energy *
Ex: 1,000mw2 = 10 seconds total cure time
500mw2= 20 seconds total cure time
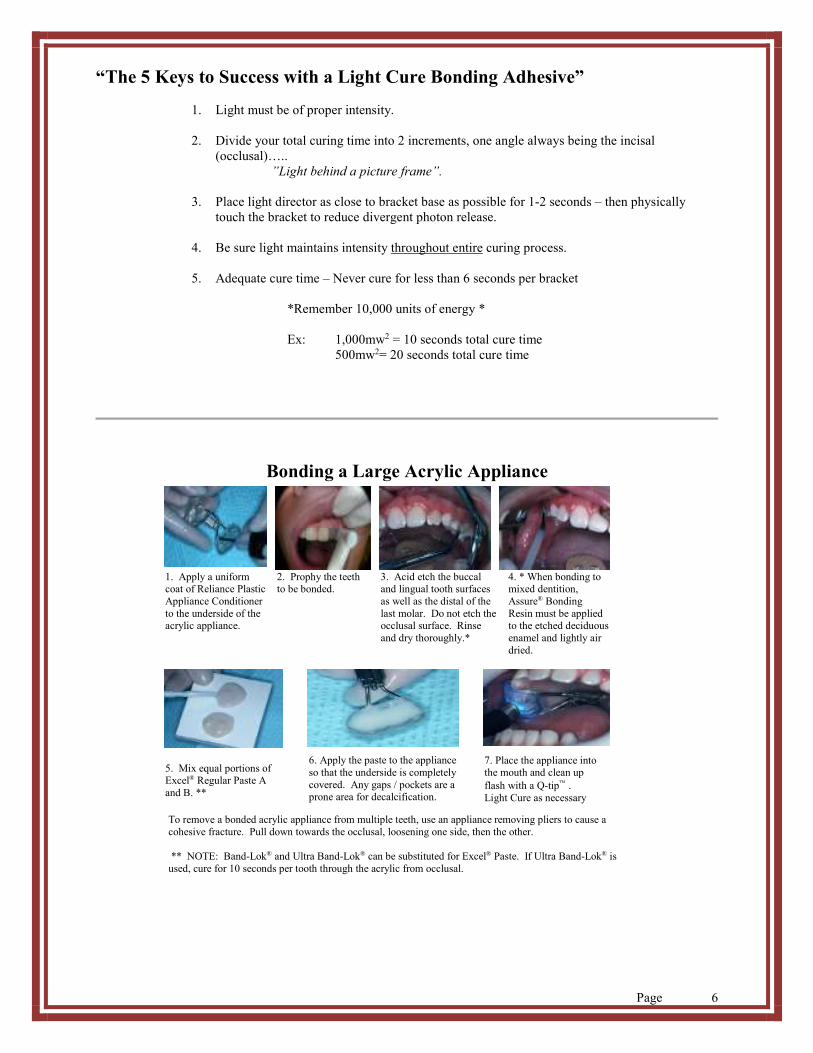
Bonding a Large Acrylic Appliance
1. Apply a uniform coat of Reliance Plastic
Appliance Conditioner
to the underside of the acrylic appliance.
2. Prophy the teeth to be bonded.
4. * When bonding to mixed dentition,
Assure® Bonding
Resin must be applied to the etched deciduous
enamel and lightly air
dried.
6. Apply the paste to the appliance
so that the underside is completely
covered. Any gaps / pockets are a prone area for decalcification.
3. Acid etch the buccal and lingual tooth surfaces
as well as the distal of the
last molar. Do not etch the occlusal surface. Rinse
and dry thoroughly.*
5. Mix equal portions of Excel® Regular Paste A
and B. **
7. Place the appliance into the mouth and clean up
flash with a Q-tip .
Light Cure as necessary To remove a bonded acrylic appliance from multiple teeth, use an appliance removing pliers to cause a
cohesive fracture. Pull down towards the occlusal, loosening one side, then the other.
** NOTE: Band-Lok® and Ultra Band-Lok® can be substituted for Excel® Paste. If Ultra Band-Lok® is
used, cure for 10 seconds per tooth through the acrylic from occlusal.
Page 7
BONDING TROUBLESHOOTING
TYPE I – BOND FAILURE:
Majority of adhesive on bracket
POSSIBLE CAUSES:
1. Improper prophy.
2. Rubbing acid etch on tooth.
3. Too short (<15s.) or too long of etch (>90s.).
4. Incomplete rinsing of etch.
5. Insufficient drying of tooth; or drying with contaminated air.
6. Saliva contamination after etch.
7. Excessive sealant (primer) on tooth.
8. Insufficient drying after scrubbing enamel with Self Etching Primer
9. Moving bracket during adhesive gel period.
10. Hard, acid resistant, fluorosed, hypocalcified or aprismatic enamel.
BONDING TROUBLE SHOOTING
TYPE II – BOND FAILURE:
Majority of adhesive on enamel surface CAUSES
METAL BRACKETS:
1. Paste not “buttered” into mesh.
CERAMIC BRACKETS:
1. Improper silination of bracket base.
2. Base contaminated by handling.
BONDING TROUBLE SHOOTING
TYPE III – BOND FAILURE:
COHESIVE
CAUSES
1. Patient abuse
2. Improper light cure
Page 8
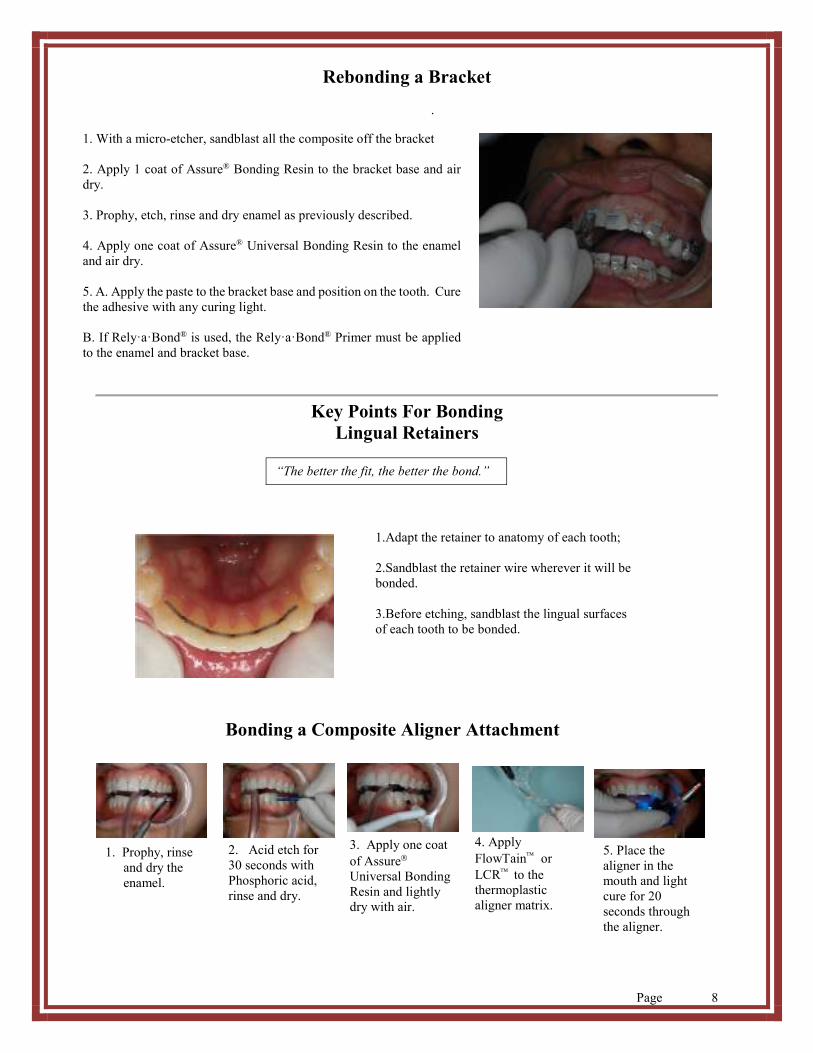
Rebonding a Bracket
.
Key Points For Bonding
Lingual Retainers
Bonding a Composite Aligner Attachment
2. Acid etch for
30 seconds with
Phosphoric acid,
rinse and dry.
4. Apply
FlowTain or
LCR to the
thermoplastic
aligner matrix.
1. Prophy, rinse
and dry the
enamel.
5. Place the
aligner in the
mouth and light
cure for 20
seconds through
the aligner.
3. Apply one coat
of Assure
Universal Bonding
Resin and lightly
dry with air.
1. With a micro-etcher, sandblast all the composite off the bracket
2. Apply 1 coat of Assure® Bonding Resin to the bracket base and air
dry.
3. Prophy, etch, rinse and dry enamel as previously described.
4. Apply one coat of Assure® Universal Bonding Resin to the enamel
and air dry.
5. A. Apply the paste to the bracket base and position on the tooth. Cure
the adhesive with any curing light.
B. If Rely·a·Bond® is used, the Rely·a·Bond® Primer must be applied
to the enamel and bracket base.
1.Adapt the retainer to anatomy of each tooth;
2.Sandblast the retainer wire wherever it will be
bonded.
3.Before etching, sandblast the lingual surfaces
of each tooth to be bonded.
“The better the fit, the better the bond.”

Page 9
Cementing Bands With:
Band-Lok®
Dual Cure Cement
Step 1. Lightly roughen the inside of the band with a fine diamond bur or microetcher.
Step 2. Prophy, rinse, dry and isolate tooth to be banded.
Step 3. On a mixing pad place equal parts of Band-Lok® Pastes A and B. A one inch strip of each part will
provide enough cement for four bands. (A ¼ inch strip of each will cement one band.) If paste is not
going to be mixed immediately, shield from light.
Step 4. Mix Pastes A and B thoroughly for 10 seconds and place in band. Seat band and clean off excess flash
(to prevent cement from sticking to metal instruments, wipe instrument in wax before touching cement).
Step 5. At this point you have three curing options:
A. With a dental curing light, cure the cement from occlusal for 10 seconds. Cement can be exposed to saliva at this point. Final cure will occur in five minutes.
B. With a dental curing light, cure the cement from the occlusal for 30 seconds. Cement is now
completely cured and can be exposed to headgear forces immediately.
C. Allow the cement to chemically cure on its own; complete polymerization will occur in 10
minutes.
GENERAL INFORMATION: In high stress situations (banded expanders), etching the enamel prior to band
placement will significantly increase the adhesion. Band-Lok® will adhere to a composite restoration or acrylic
jacket that has first been roughened and conditioned with Assure® Bonding Resin. When bonding to a porcelain
crown, condition first with Porc-Etch™ and Porcelain Conditioner. When bonding to amalgam, gold or a stainless
steel crown, sandblast and condition with Assure® Bonding Resin before seating band. To extend the working time
of Band-Lok® to seven minutes, mix on a paper covered frozen slab.
2. Acid etch for 30
seconds with
Phosphoric acid, rinse
and dry or
Condition with a Self
Etching Primer
3. Apply Ultra
Band-Lok or
LCR adhesive
to the
conditioned,
dried surface.
1. Prophy, rinse and
dry.
4. Light cure for 20
seconds.
Occlusal Buildup of Posterior Teeth
Page 10
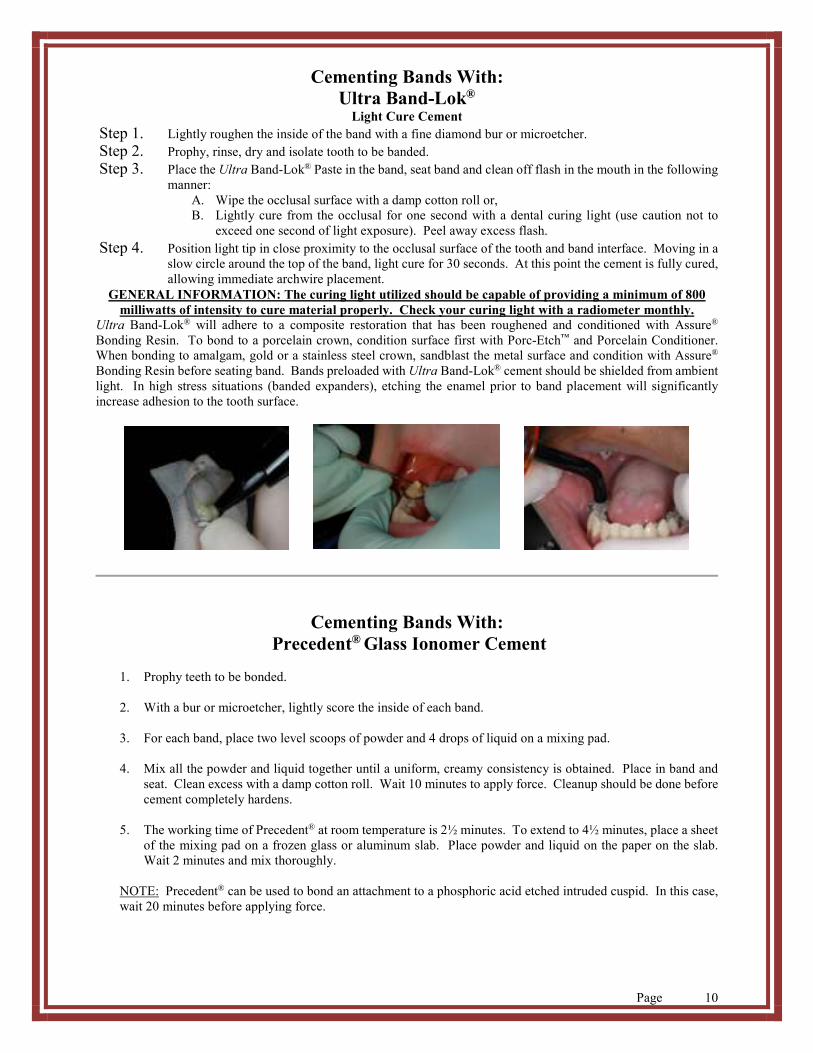
Cementing Bands With:
Ultra Band-Lok®
Light Cure Cement
Step 1. Lightly roughen the inside of the band with a fine diamond bur or microetcher.
Step 2. Prophy, rinse, dry and isolate tooth to be banded.
Step 3. Place the Ultra Band-Lok® Paste in the band, seat band and clean off flash in the mouth in the following
manner:
A. Wipe the occlusal surface with a damp cotton roll or,
B. Lightly cure from the occlusal for one second with a dental curing light (use caution not to
exceed one second of light exposure). Peel away excess flash.
Step 4. Position light tip in close proximity to the occlusal surface of the tooth and band interface. Moving in a
slow circle around the top of the band, light cure for 30 seconds. At this point the cement is fully cured,
allowing immediate archwire placement.
GENERAL INFORMATION: The curing light utilized should be capable of providing a minimum of 800
milliwatts of intensity to cure material properly. Check your curing light with a radiometer monthly. Ultra Band-Lok® will adhere to a composite restoration that has been roughened and conditioned with Assure®
Bonding Resin. To bond to a porcelain crown, condition surface first with Porc-Etch™ and Porcelain Conditioner.
When bonding to amalgam, gold or a stainless steel crown, sandblast the metal surface and condition with Assure®
Bonding Resin before seating band. Bands preloaded with Ultra Band-Lok® cement should be shielded from ambient
light. In high stress situations (banded expanders), etching the enamel prior to band placement will significantly
increase adhesion to the tooth surface.
Cementing Bands With:
Precedent® Glass Ionomer Cement
1. Prophy teeth to be bonded.
2. With a bur or microetcher, lightly score the inside of each band.
3. For each band, place two level scoops of powder and 4 drops of liquid on a mixing pad.
4. Mix all the powder and liquid together until a uniform, creamy consistency is obtained. Place in band and
seat. Clean excess with a damp cotton roll. Wait 10 minutes to apply force. Cleanup should be done before
cement completely hardens.
5. The working time of Precedent® at room temperature is 2½ minutes. To extend to 4½ minutes, place a sheet
of the mixing pad on a frozen glass or aluminum slab. Place powder and liquid on the paper on the slab.
Wait 2 minutes and mix thoroughly.
NOTE: Precedent® can be used to bond an attachment to a phosphoric acid etched intruded cuspid. In this case,
wait 20 minutes before applying force.
Page 11
Crown Lok™
Fluoride Releasing
Luting Cement
INTENDED USES: Crown Lok™ can be used to cement metal crowns, orthodontic bands and Maryland bridges.
DIRECTIONS FOR USE
PROPHYLAXIS: Using a rotary instrument with a rubber cup or brush, prophy the enamel surfaces to be bonded
with 1st & Final® or plain pumice. Do not use prophy paste which contains oil, which may leave a film. Special
attention should be given to posterior teeth and lingual surfaces, where patient hygiene may not be satisfactory and
tartar and calculas may be in excess. Rinse thoroughly and dry teeth with oil and moisture-free compressed air.
ETCH (OPTIONAL STEP): To further increase adhesion without making removal more difficult, etch a small area
on the buccal and lingual surface of the tooth. Rinse and dry thoroughly.
PREPARING THE CROWN OR BAND: With a microetcher, sandblast the inside of the crown, band or bridge. If
a sandblaster is not available, roughen with a medium diamond bur.
MIXING & CEMENTATION: Mix equal volumes of Crown Lok™ Paste A and Paste B for 15 seconds on the supplied
mixing pad and place inside the appliance. When loading a crown, caution should be taken to only line the crown
with cement. The working time from the start of mix is 2 minutes. Final set will occur 5 minutes from the start of
mix. To extend the working time to 4 minutes, mix the pastes on a paper covered frozen slab.
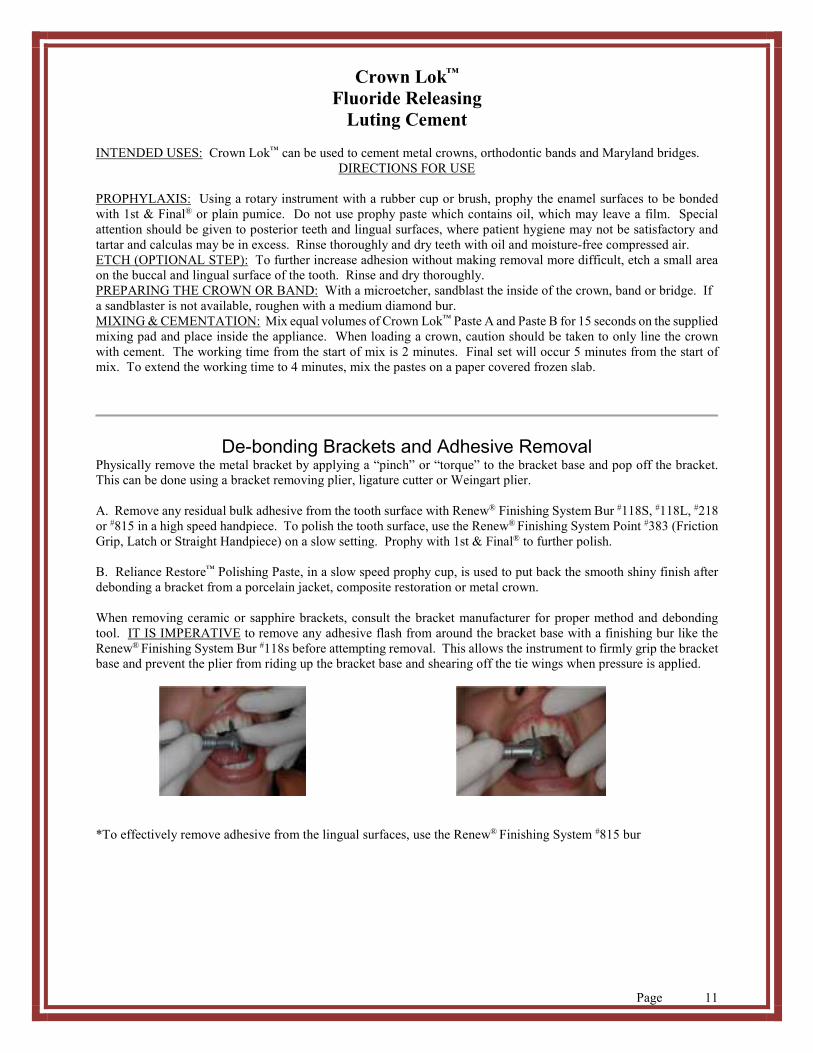
De-bonding Brackets and Adhesive Removal Physically remove the metal bracket by applying a “pinch” or “torque” to the bracket base and pop off the bracket.
This can be done using a bracket removing plier, ligature cutter or Weingart plier.
A. Remove any residual bulk adhesive from the tooth surface with Renew® Finishing System Bur #118S, #118L, #218
or #815 in a high speed handpiece. To polish the tooth surface, use the Renew® Finishing System Point #383 (Friction
Grip, Latch or Straight Handpiece) on a slow setting. Prophy with 1st & Final® to further polish.
B. Reliance Restore™ Polishing Paste, in a slow speed prophy cup, is used to put back the smooth shiny finish after
debonding a bracket from a porcelain jacket, composite restoration or metal crown.
When removing ceramic or sapphire brackets, consult the bracket manufacturer for proper method and debonding
tool. IT IS IMPERATIVE to remove any adhesive flash from around the bracket base with a finishing bur like the
Renew® Finishing System Bur #118s before attempting removal. This allows the instrument to firmly grip the bracket
base and prevent the plier from riding up the bracket base and shearing off the tie wings when pressure is applied.
*To effectively remove adhesive from the lingual surfaces, use the Renew® Finishing System #815 bur
Page 12
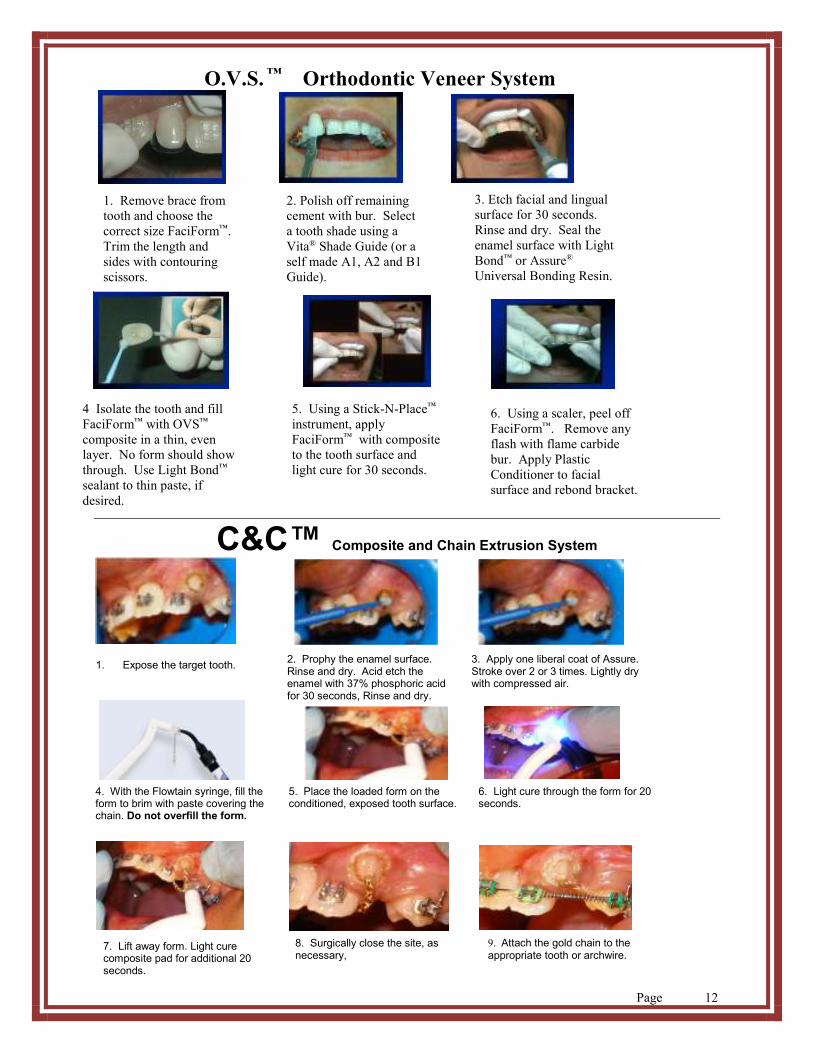
O.V.S. ™ Orthodontic Veneer System
C&C™ Composite and Chain Extrusion System
1. Expose the target tooth.
1. Remove brace from
tooth and choose the
correct size FaciForm™.
Trim the length and
sides with contouring
scissors.
2. Polish off remaining
cement with bur. Select
a tooth shade using a
Vita® Shade Guide (or a
self made A1, A2 and B1
Guide).
3. Etch facial and lingual
surface for 30 seconds.
Rinse and dry. Seal the
enamel surface with Light
Bond™ or Assure®
Universal Bonding Resin.
4 Isolate the tooth and fill
FaciForm™ with OVS™
composite in a thin, even
layer. No form should show
through. Use Light Bond™
sealant to thin paste, if
desired.
5. Using a Stick-N-Place™
instrument, apply
FaciForm™ with composite
to the tooth surface and
light cure for 30 seconds.
6. Using a scaler, peel off
FaciForm™. Remove any
flash with flame carbide
bur. Apply Plastic
Conditioner to facial
surface and rebond bracket.
2. Prophy the enamel surface. Rinse and dry. Acid etch the enamel with 37% phosphoric acid for 30 seconds, Rinse and dry.
3. Apply one liberal coat of Assure. Stroke over 2 or 3 times. Lightly dry with compressed air.
4. With the Flowtain syringe, fill the form to brim with paste covering the chain. Do not overfill the form.
5. Place the loaded form on the conditioned, exposed tooth surface.
6. Light cure through the form for 20 seconds.
7. Lift away form. Light cure composite pad for additional 20 seconds.
8. Surgically close the site, as necessary,
9. Attach the gold chain to the appropriate tooth or archwire.
Page 13
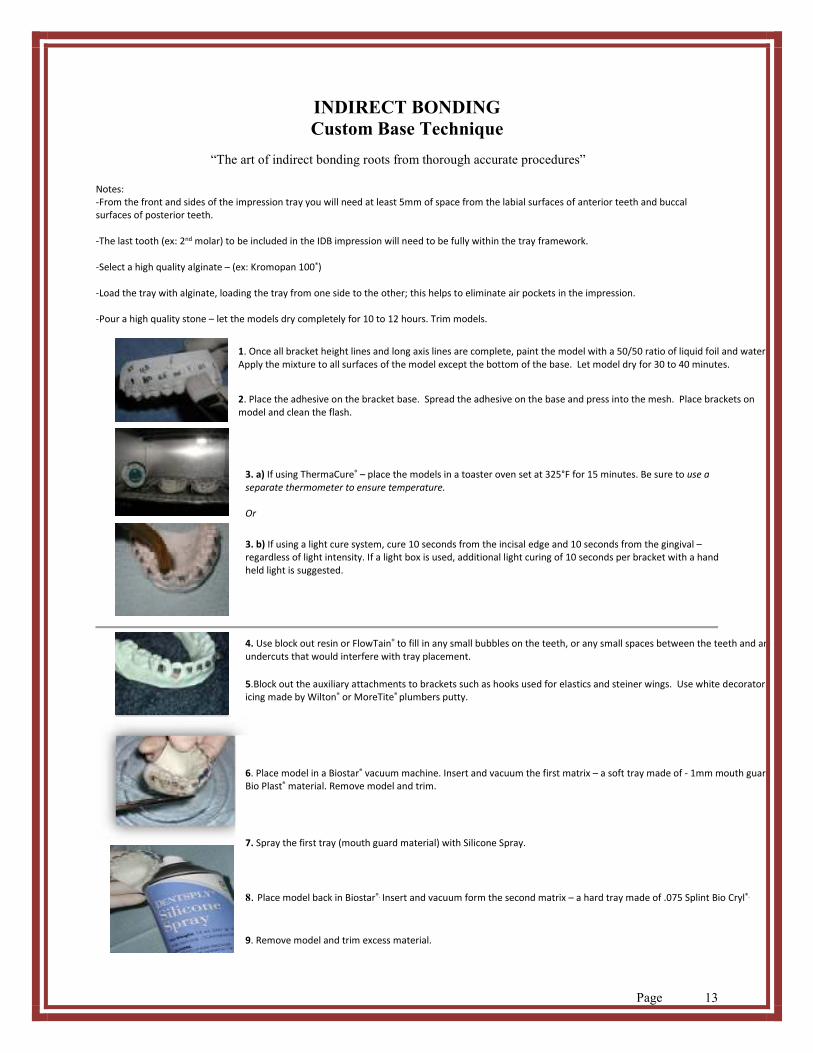
INDIRECT BONDING
Custom Base Technique
“The art of indirect bonding roots from thorough accurate procedures”
Notes:
-From the front and sides of the impression tray you will need at least 5mm of space from the labial surfaces of anterior teeth and buccal
surfaces of posterior teeth.
-The last tooth (ex: 2nd molar) to be included in the IDB impression will need to be fully within the tray framework.
-Select a high quality alginate – (ex: Kromopan 100®)
-Load the tray with alginate, loading the tray from one side to the other; this helps to eliminate air pockets in the impression.
-Pour a high quality stone – let the models dry completely for 10 to 12 hours. Trim models.
1. Once all bracket height lines and long axis lines are complete, paint the model with a 50/50 ratio of liquid foil and water.
Apply the mixture to all surfaces of the model except the bottom of the base. Let model dry for 30 to 40 minutes.
2. Place the adhesive on the bracket base. Spread the adhesive on the base and press into the mesh. Place brackets on
model and clean the flash.
3. a) If using ThermaCure® – place the models in a toaster oven set at 325°F for 15 minutes. Be sure to use a
separate thermometer to ensure temperature.
Or
3. b) If using a light cure system, cure 10 seconds from the incisal edge and 10 seconds from the gingival –
regardless of light intensity. If a light box is used, additional light curing of 10 seconds per bracket with a hand
held light is suggested.
4. Use block out resin or FlowTain® to fill in any small bubbles on the teeth, or any small spaces between the teeth and any
undercuts that would interfere with tray placement.
5.Block out the auxiliary attachments to brackets such as hooks used for elastics and steiner wings. Use white decorator
icing made by Wilton® or MoreTite® plumbers putty.
6. Place model in a Biostar® vacuum machine. Insert and vacuum the first matrix – a soft tray made of - 1mm mouth guard
Bio Plast® material. Remove model and trim.
7. Spray the first tray (mouth guard material) with Silicone Spray.
8. Place model back in Biostar®. Insert and vacuum form the second matrix – a hard tray made of .075 Splint Bio Cryl®.
9. Remove model and trim excess material.
Page 14
.
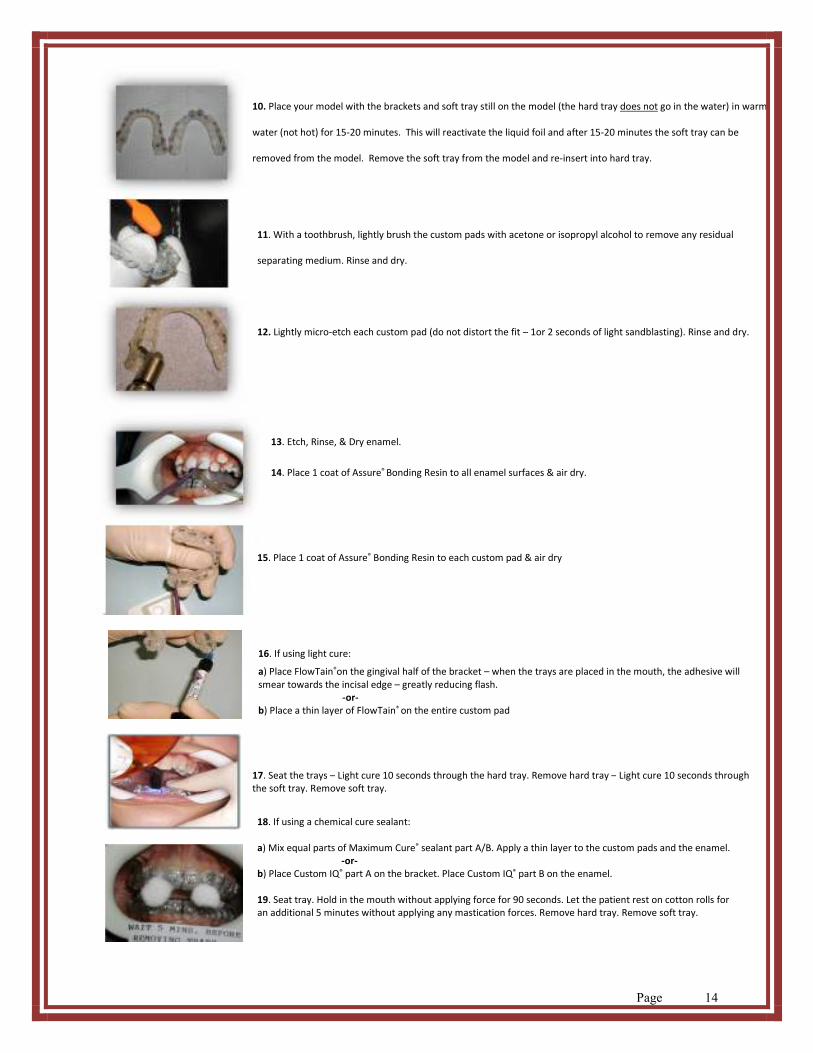
10. Place your model with the brackets and soft tray still on the model (the hard tray does not go in the water) in warm
water (not hot) for 15-20 minutes. This will reactivate the liquid foil and after 15-20 minutes the soft tray can be
removed from the model. Remove the soft tray from the model and re-insert into hard tray.
11. With a toothbrush, lightly brush the custom pads with acetone or isopropyl alcohol to remove any residual
separating medium. Rinse and dry.
12. Lightly micro-etch each custom pad (do not distort the fit – 1or 2 seconds of light sandblasting). Rinse and dry.
13. Etch, Rinse, & Dry enamel.
14. Place 1 coat of Assure® Bonding Resin to all enamel surfaces & air dry.
15. Place 1 coat of Assure® Bonding Resin to each custom pad & air dry
16. If using light cure:
a) Place FlowTain®on the gingival half of the bracket – when the trays are placed in the mouth, the adhesive will
smear towards the incisal edge – greatly reducing flash.
-or-
b) Place a thin layer of FlowTain® on the entire custom pad
17. Seat the trays – Light cure 10 seconds through the hard tray. Remove hard tray – Light cure 10 seconds through
the soft tray. Remove soft tray.
18. If using a chemical cure sealant:
a) Mix equal parts of Maximum Cure® sealant part A/B. Apply a thin layer to the custom pads and the enamel.
-or-
b) Place Custom IQ® part A on the bracket. Place Custom IQ® part B on the enamel.
19. Seat tray. Hold in the mouth without applying force for 90 seconds. Let the patient rest on cotton rolls for
an additional 5 minutes without applying any mastication forces. Remove hard tray. Remove soft tray.
Page 15
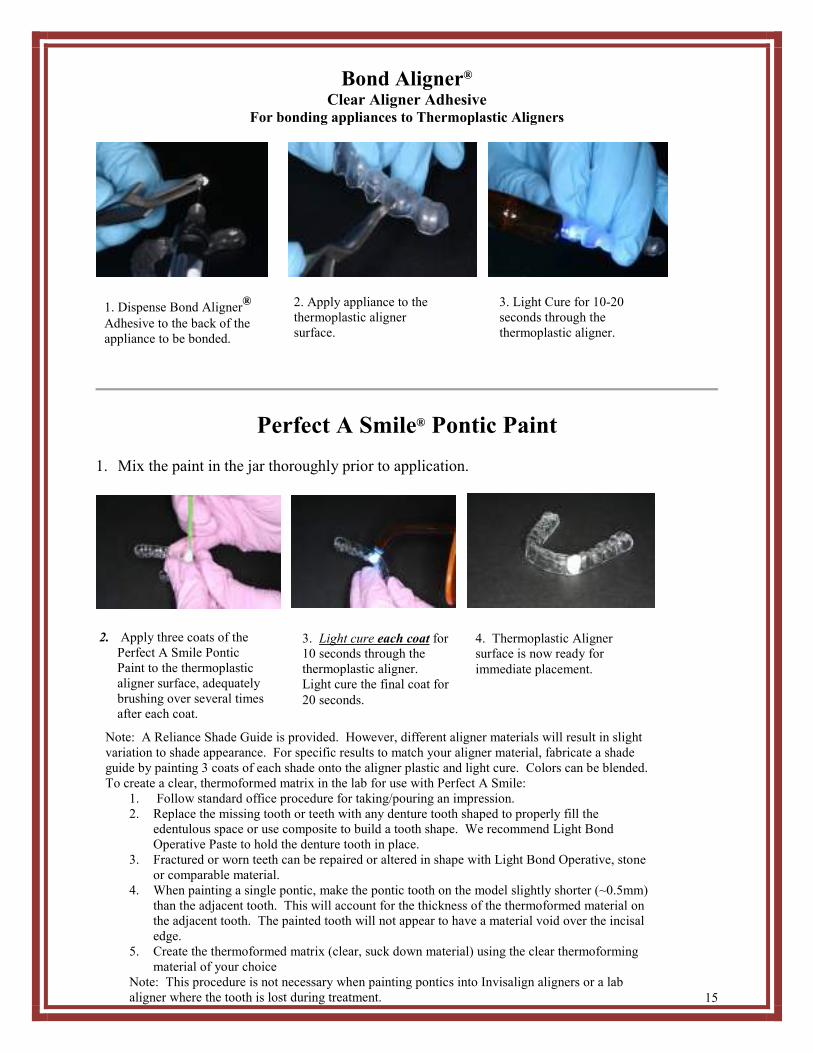
Bond Aligner® Clear Aligner Adhesive
For bonding appliances to Thermoplastic Aligners
Perfect A Smile® Pontic Paint
1. Mix the paint in the jar thoroughly prior to application.
1. Dispense Bond Aligner®
Adhesive to the back of the
appliance to be bonded.
2. Apply appliance to the
thermoplastic aligner
surface.
3. Light Cure for 10-20
seconds through the
thermoplastic aligner.
3. Light cure each coat for
10 seconds through the
thermoplastic aligner.
Light cure the final coat for
20 seconds.
2. Apply three coats of the
Perfect A Smile Pontic
Paint to the thermoplastic
aligner surface, adequately
brushing over several times
after each coat.
4. Thermoplastic Aligner
surface is now ready for
immediate placement.
Note: A Reliance Shade Guide is provided. However, different aligner materials will result in slight
variation to shade appearance. For specific results to match your aligner material, fabricate a shade
guide by painting 3 coats of each shade onto the aligner plastic and light cure. Colors can be blended.
To create a clear, thermoformed matrix in the lab for use with Perfect A Smile:
1. Follow standard office procedure for taking/pouring an impression.
2. Replace the missing tooth or teeth with any denture tooth shaped to properly fill the
edentulous space or use composite to build a tooth shape. We recommend Light Bond
Operative Paste to hold the denture tooth in place.
3. Fractured or worn teeth can be repaired or altered in shape with Light Bond Operative, stone
or comparable material.
4. When painting a single pontic, make the pontic tooth on the model slightly shorter (~0.5mm)
than the adjacent tooth. This will account for the thickness of the thermoformed material on
the adjacent tooth. The painted tooth will not appear to have a material void over the incisal
edge.
5. Create the thermoformed matrix (clear, suck down material) using the clear thermoforming
material of your choice
Note: This procedure is not necessary when painting pontics into Invisalign aligners or a lab
aligner where the tooth is lost during treatment.