Embed Size (px)
Citation preview
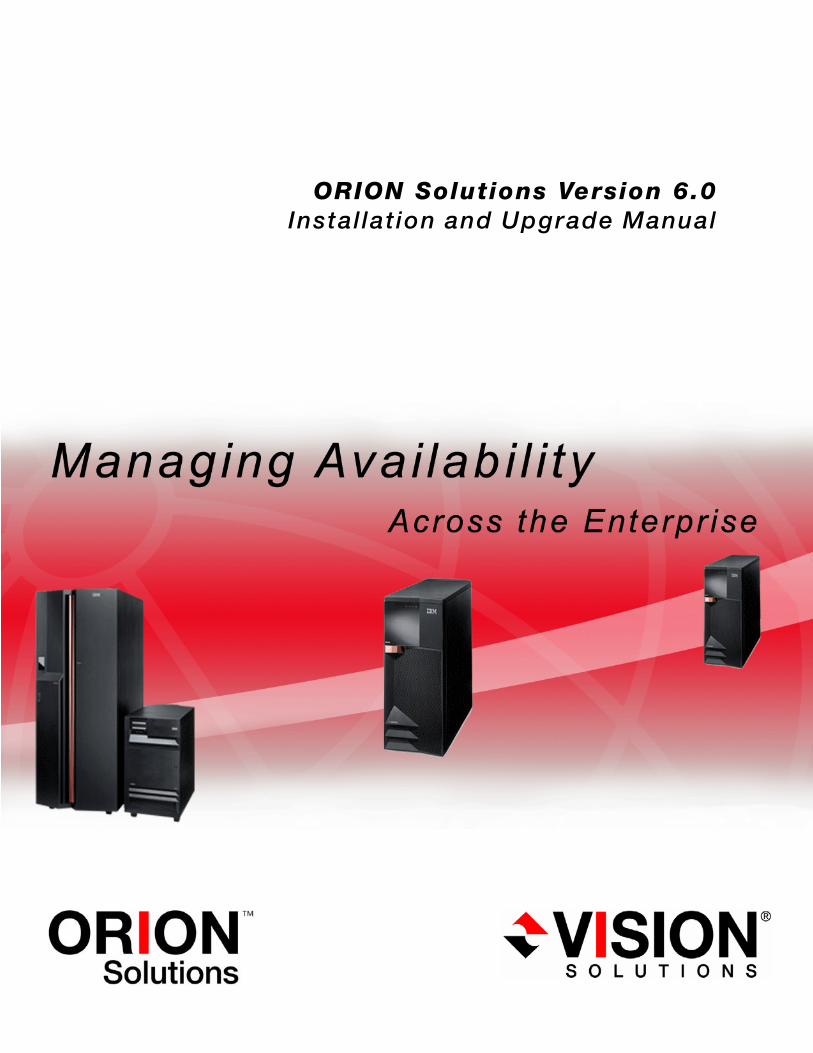
ORION Solutions Version 6.0Instal lat ion and Upgrade Manual
October, 2009
ORION Solutions Version 6.0 Installation and Upgrade Manual
Copyright Vision Solutions®, Inc. 2003–2009
All rights reserved.
The information in this document is subject to change without notice and is furnished under a license agreement. This document is proprietary to Vision Solutions, Inc., and may be used only as authorized in our license agreement. No portion of this manual may be copied or otherwise reproduced without the express written consent of Vision Solutions, Inc.
Vision Solutions provides no expressed or implied warranty with this manual.
The following are trademarks or registered trademarks of their respective organizations or companies:
• Vision Solutions is a registered trademark and ORION Solutions, Integrator, Director, Data Manager, Vision Suite, ECS/400, OMS/400, ODS/400, SAM/400, Replicate1, EchoCluster, EchoStream, RecoverNow and iTERA HA are trademarks of Vision Solutions, Inc.
• DB2, IBM, i5/OS, iSeries, System i, System i5, AIX5L, Informix, System p, System x, and System z, and WebSphere—International Business Machines Corporation.
• Adobe and Acrobat Reader—Adobe Systems, Inc.
• Double-Take, GeoCluster, and NSI—NSI Software, Inc.
• HP-UX—Hewlett-Packard Company.
• Teradata—Teradata Corporation.
• Intel—Intel Corporation.
• Java, all Java-based trademarks, and Solaris—Sun Microsystems, Inc.
• Linux—Linus Torvalds.
• Microsoft and Windows—Microsoft Corporation.
• Mozilla and Firefox—Mozilla Foundation.
• Netscape—Netscape Communications Corporation.
• Oracle—Oracle Corporation.
• Red Hat—Red Hat, Inc.
• Sybase—Sybase, Inc.
• Symantec and NetBackup—Symantec Corporation.
• UNIX and UNIXWare—the Open Group.
All other brands and product names are trademarks or registered trademarks of their respective owners.
If you need assistance, please contact Vision Solutions’ SCP Certified CustomerCare team at:
CustomerCareVision Solutions, Inc.Telephone: 1.800.337.8214 or 1.949.724.5465Email: [email protected] Site: www.visionsolutions.com/Support/Contact-CustomerCare.aspx
ORION Solutions v6.0 Installation and Upgrade Manual iii
Chapter 1—Introduction . . . . . . . . . . . . . . . . . . . . . . . . . . . . . . . . . . . . 1System Requirements . . . . . . . . . . . . . . . . . . . . . . . . . . . . . . . . . . . . . . . . . . . . . . . . . . . . . . . . . . 2
Authentication . . . . . . . . . . . . . . . . . . . . . . . . . . . . . . . . . . . . . . . . . . . . . . . . . . . . . . . . . . . . . 3
Installation and Upgrade Overview . . . . . . . . . . . . . . . . . . . . . . . . . . . . . . . . . . . . . . . . . . . . . . . . 4
Selecting a Standard or Custom Installation . . . . . . . . . . . . . . . . . . . . . . . . . . . . . . . . . . . . . . 4
Chapter 2—Completing a New Installation . . . . . . . . . . . . . . . . . . . . . 7Run the ORION Solutions Entitlement Wizard . . . . . . . . . . . . . . . . . . . . . . . . . . . . . . . . . . . . . . . . 7
Run the Automated Procedure . . . . . . . . . . . . . . . . . . . . . . . . . . . . . . . . . . . . . . . . . . . . . . . . 8
Run the Manual Procedure . . . . . . . . . . . . . . . . . . . . . . . . . . . . . . . . . . . . . . . . . . . . . . . . . . . 9
Before you Install . . . . . . . . . . . . . . . . . . . . . . . . . . . . . . . . . . . . . . . . . . . . . . . . . . . . . . . . . . . . . . 9
Pre-Installation Tasks. . . . . . . . . . . . . . . . . . . . . . . . . . . . . . . . . . . . . . . . . . . . . . . . . . . . . . . . 9
Deciding What to Mirror. . . . . . . . . . . . . . . . . . . . . . . . . . . . . . . . . . . . . . . . . . . . . . . . . . . . . 10
Preparing Your Source System . . . . . . . . . . . . . . . . . . . . . . . . . . . . . . . . . . . . . . . . . . . . . . . 11
Preparing your Target System . . . . . . . . . . . . . . . . . . . . . . . . . . . . . . . . . . . . . . . . . . . . . . . . 11
Installing the Replication Engine and Navigator Agent . . . . . . . . . . . . . . . . . . . . . . . . . . . . . . . . 11
Installing the Navigator Consolidator . . . . . . . . . . . . . . . . . . . . . . . . . . . . . . . . . . . . . . . . . . . . . . 25
Installing on a Windows Server . . . . . . . . . . . . . . . . . . . . . . . . . . . . . . . . . . . . . . . . . . . . . . . 25
Install on an IBM i Server . . . . . . . . . . . . . . . . . . . . . . . . . . . . . . . . . . . . . . . . . . . . . . . . . . . . 30
Starting the Navigator Consolidator on an IBM i Server . . . . . . . . . . . . . . . . . . . . . . . . . 34
Installing the Navigator Client. . . . . . . . . . . . . . . . . . . . . . . . . . . . . . . . . . . . . . . . . . . . . . . . . . . . 35
Enable ORION Solutions for the IBM Systems Director Navigator . . . . . . . . . . . . . . . . . . . . . . . 40
Chapter 3—Completing an Upgrade . . . . . . . . . . . . . . . . . . . . . . . . . 43Selecting an Upgrade Path . . . . . . . . . . . . . . . . . . . . . . . . . . . . . . . . . . . . . . . . . . . . . . . . . . . . . 44
Using the User Index Utility . . . . . . . . . . . . . . . . . . . . . . . . . . . . . . . . . . . . . . . . . . . . . . . . . . . . . 45
Running the User Index Utility . . . . . . . . . . . . . . . . . . . . . . . . . . . . . . . . . . . . . . . . . . . . . . . . 45
Troubleshooting the User Index Utility. . . . . . . . . . . . . . . . . . . . . . . . . . . . . . . . . . . . . . . . . . 47
Run the ORION Solutions Entitlement Wizard . . . . . . . . . . . . . . . . . . . . . . . . . . . . . . . . . . . . . . . 48
Run the Automated Procedure . . . . . . . . . . . . . . . . . . . . . . . . . . . . . . . . . . . . . . . . . . . . . . . 48
Run the Manual Procedure . . . . . . . . . . . . . . . . . . . . . . . . . . . . . . . . . . . . . . . . . . . . . . . . . . 49
Contents
Contents
iv ORION Solutions v6.0 Installation and Upgrade Manual
Replication Engine Upgrade Requirements . . . . . . . . . . . . . . . . . . . . . . . . . . . . . . . . . . . . . . . . 49
OMS/400 Upgrade Requirements . . . . . . . . . . . . . . . . . . . . . . . . . . . . . . . . . . . . . . . . . . . . 49
ODS/400 Upgrade Requirements . . . . . . . . . . . . . . . . . . . . . . . . . . . . . . . . . . . . . . . . . . . . 50
ECS/400 Upgrade Requirements . . . . . . . . . . . . . . . . . . . . . . . . . . . . . . . . . . . . . . . . . . . . . 50
Completing Pre-Upgrade Tasks. . . . . . . . . . . . . . . . . . . . . . . . . . . . . . . . . . . . . . . . . . . . . . 50
Preparing the Environment for an Upgrade . . . . . . . . . . . . . . . . . . . . . . . . . . . . . . . . . . . . . 51
Clustering Requirements and Configuration . . . . . . . . . . . . . . . . . . . . . . . . . . . . . . . . . 52
Set the Network Attribute (ALWADDCLU). . . . . . . . . . . . . . . . . . . . . . . . . . . . . . . . . 53
Verify Status of Loopback Port . . . . . . . . . . . . . . . . . . . . . . . . . . . . . . . . . . . . . . . . . 53
Verify Status of TCP Server *INETD . . . . . . . . . . . . . . . . . . . . . . . . . . . . . . . . . . . . . 54
Disable Line Controller Heartbeat . . . . . . . . . . . . . . . . . . . . . . . . . . . . . . . . . . . . . . . 54
Providing Communications . . . . . . . . . . . . . . . . . . . . . . . . . . . . . . . . . . . . . . . . . . . . 55
Performing Environment Changes for an Upgrade . . . . . . . . . . . . . . . . . . . . . . . . . . . . . . . 55
Remove Temporary Libraries from a Previous Upgrade . . . . . . . . . . . . . . . . . . . . . . . . 56
End OMS/400 and ODS/400 for the Upgrade . . . . . . . . . . . . . . . . . . . . . . . . . . . . . . . . 57
Verify There Are No Locks on OMS/400 Objects . . . . . . . . . . . . . . . . . . . . . . . . . . . . . 59
Back Up Existing OMS/400 and ODS/400 Installations . . . . . . . . . . . . . . . . . . . . . . . . 60
Upgrading the Replication Engine and Navigator Agent . . . . . . . . . . . . . . . . . . . . . . . . . . . . . . 61
Upgrading the Navigator Consolidator . . . . . . . . . . . . . . . . . . . . . . . . . . . . . . . . . . . . . . . . . . . . 73
Upgrading on a Windows Server . . . . . . . . . . . . . . . . . . . . . . . . . . . . . . . . . . . . . . . . . . . . . 73
Upgrade on an IBM i Server . . . . . . . . . . . . . . . . . . . . . . . . . . . . . . . . . . . . . . . . . . . . . . . . . 78
Starting the Navigator Consolidator on an IBM i Server . . . . . . . . . . . . . . . . . . . . . . . . 83
Upgrading the Navigator Client . . . . . . . . . . . . . . . . . . . . . . . . . . . . . . . . . . . . . . . . . . . . . . . . . 84
Enable ORION Solutions for the IBM Systems Director Navigator. . . . . . . . . . . . . . . . . . . . . . . 89
Appendix A—Stop Services . . . . . . . . . . . . . . . . . . . . . . . . . . . . . . . . 91Stopping Services. . . . . . . . . . . . . . . . . . . . . . . . . . . . . . . . . . . . . . . . . . . . . . . . . . . . . . . . . . . . 91
Appendix B—Update License Key . . . . . . . . . . . . . . . . . . . . . . . . . . . 93Updating a License Key . . . . . . . . . . . . . . . . . . . . . . . . . . . . . . . . . . . . . . . . . . . . . . . . . . . . . . . 93
ORION Solutions v6.0 Installation and Upgrade Manual 1
Introduction 1
NOTE
Vision Solutions recommends that you read this entire document before beginning an installation or upgrade.
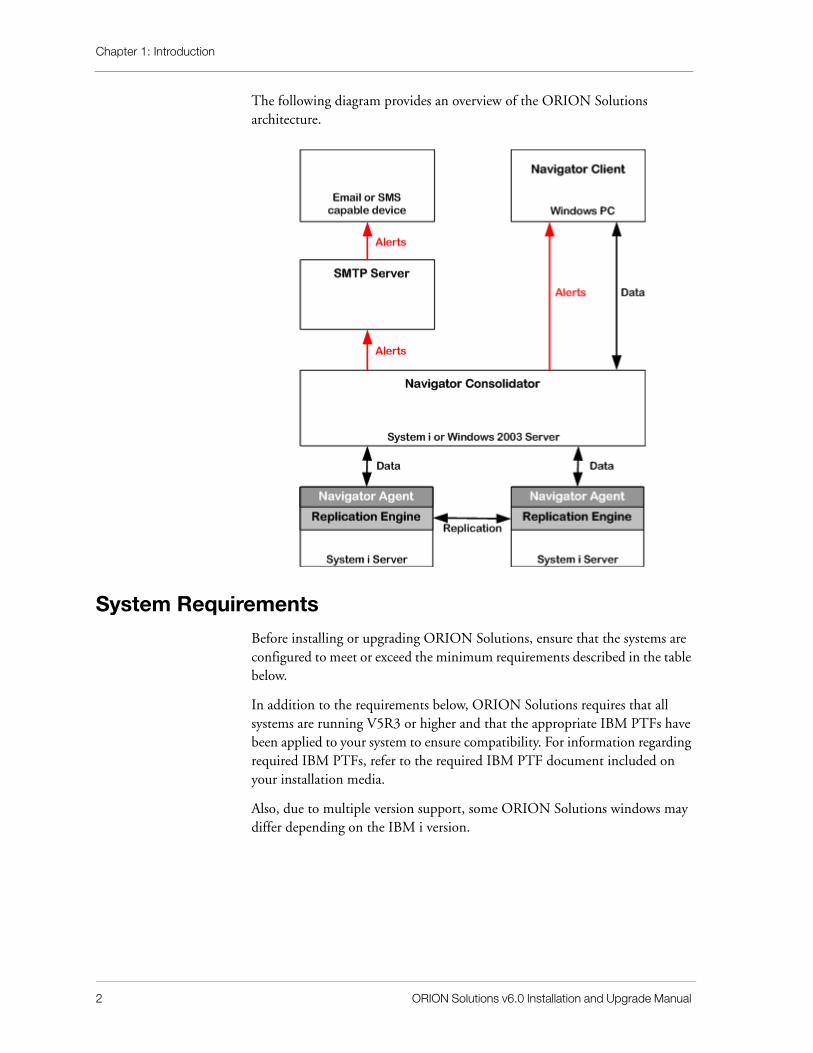
Welcome to ORION Solutions from Vision Solutions. ORION Solutions allows IT administrators to maximize the availability of their applications and data environments by facilitating the real-time replication of all data and objects.
ORION Solutions comprises these components:
• Replication Engine (OMS/400 and ODS/400)—provides the replication functionality in the ORION Solutions product.
• Navigator Agent—installed on the IBM i as part of the Replication Engine installation. It provides the listener interface from Navigator Clients to process client requests. The Navigator Agent does not need to be in the same domain as the Navigator Consolidator. It does not require internet access, but does require IP connectivity from the Navigator Consolidator through port 32001.
• Navigator Consolidator–aggregates and consolidates data received from the servers on which the Navigator Agent is installed. It manages server discovery, connections, alert notification, and communication between the Navigator Client and the Navigator Agent. Navigator Consolidator can be installed on either a IBM i or Windows server.
• Navigator Client—provides the graphical user interface for monitoring replication and procedure activity. Navigator Client is installed on a Windows PC platform.
NOTE
Navigator Client can only be installed if you have purchased it or if it is part of your upgrade.
Chapter 1: Introduction
2 ORION Solutions v6.0 Installation and Upgrade Manual
The following diagram provides an overview of the ORION Solutions architecture.
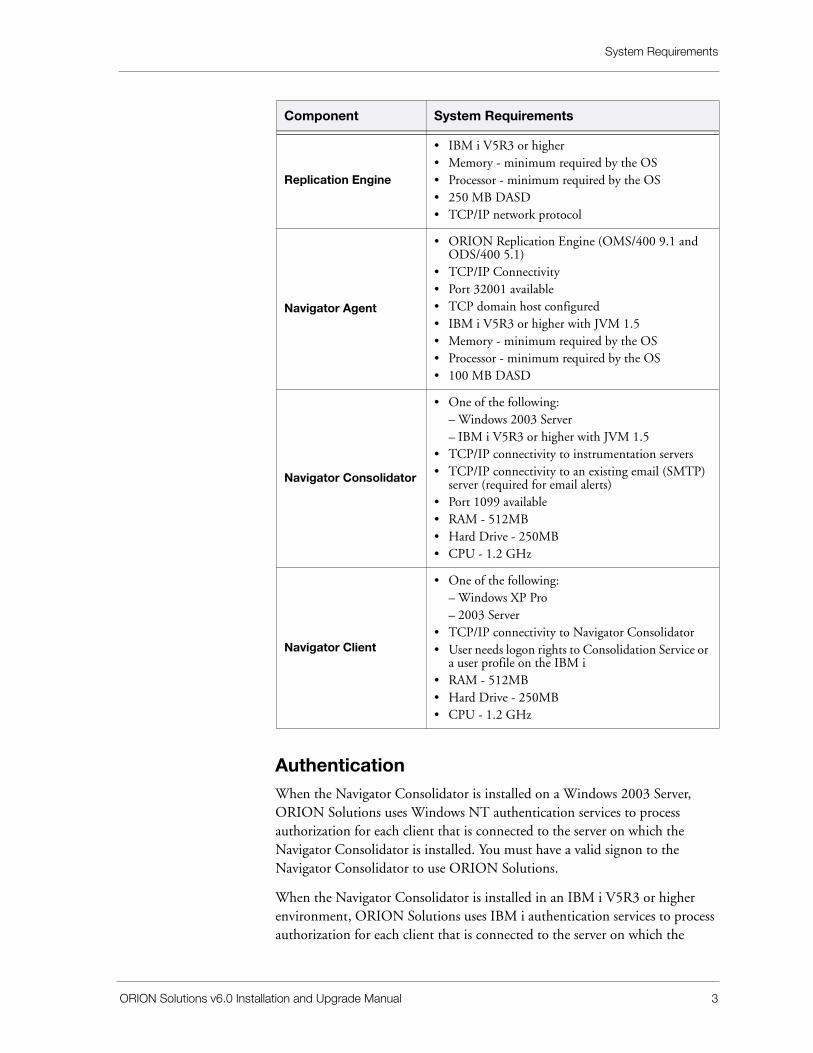
System RequirementsBefore installing or upgrading ORION Solutions, ensure that the systems are configured to meet or exceed the minimum requirements described in the table below.
In addition to the requirements below, ORION Solutions requires that all systems are running V5R3 or higher and that the appropriate IBM PTFs have been applied to your system to ensure compatibility. For information regarding required IBM PTFs, refer to the required IBM PTF document included on your installation media.
Also, due to multiple version support, some ORION Solutions windows may differ depending on the IBM i version.
System Requirements
ORION Solutions v6.0 Installation and Upgrade Manual 3
AuthenticationWhen the Navigator Consolidator is installed on a Windows 2003 Server, ORION Solutions uses Windows NT authentication services to process authorization for each client that is connected to the server on which the Navigator Consolidator is installed. You must have a valid signon to the Navigator Consolidator to use ORION Solutions.
When the Navigator Consolidator is installed in an IBM i V5R3 or higher environment, ORION Solutions uses IBM i authentication services to process authorization for each client that is connected to the server on which the
Component System Requirements
Replication Engine
• IBM i V5R3 or higher• Memory - minimum required by the OS• Processor - minimum required by the OS• 250 MB DASD• TCP/IP network protocol
Navigator Agent
• ORION Replication Engine (OMS/400 9.1 and ODS/400 5.1)
• TCP/IP Connectivity• Port 32001 available• TCP domain host configured• IBM i V5R3 or higher with JVM 1.5• Memory - minimum required by the OS• Processor - minimum required by the OS• 100 MB DASD
Navigator Consolidator
• One of the following: – Windows 2003 Server– IBM i V5R3 or higher with JVM 1.5
• TCP/IP connectivity to instrumentation servers• TCP/IP connectivity to an existing email (SMTP)
server (required for email alerts)• Port 1099 available• RAM - 512MB• Hard Drive - 250MB• CPU - 1.2 GHz
Navigator Client
• One of the following: – Windows XP Pro– 2003 Server
• TCP/IP connectivity to Navigator Consolidator• User needs logon rights to Consolidation Service or
a user profile on the IBM i• RAM - 512MB• Hard Drive - 250MB• CPU - 1.2 GHz
Chapter 1: Introduction
4 ORION Solutions v6.0 Installation and Upgrade Manual
Navigator Consolidator is installed. You must have a valid signon to the Navigator Consolidator to use ORION Solutions.
Installation and Upgrade OverviewUsing the ORION Solutions product CD and the instructions in this manual, you can perform any of the following:
• new installation of ORION Solutions (no previous installation of OMS/400 and ODS/400)
• upgrade of ORION Datacenter Edition or ORION for OS/400
• upgrade of an existing VSEE v8.1/4.1 SR-1 ASP11 or v8.2/4.2 SR-2 Product installation to ORION Solutions
NOTE
Upgrade paths are discussed in the section “Selecting an Upgrade Path” on page 44.
To complete the installation, install the ORION Solutions components as follows:
NOTE
The ORION Solutions components must be installed in the following order.
1. Install the Replication Engine (OMS/400 and ODS/400).
2. If installing the Navigator Client, install the following:
a. Navigator Agent
b. Navigator Consolidator
c. Navigator Client
Selecting a Standard or Custom InstallationDuring an ORION Solutions installation or upgrade, you can perform either a Standard Install or a Custom Install, as described below. Use the following table to make the appropriate selection for your system.
Installation and Upgrade Overview
ORION Solutions v6.0 Installation and Upgrade Manual 5
After deciding which installation option is right for your environment, go to one of the following to prepare your system for the installation or upgrade.
• If you are installing ORION Solutions for the first time (not upgrading) go to “Completing a New Installation” on page 7.
• If you are upgrading ORION Solutions software, go to “Completing an Upgrade” on page 43.
• If you are upgrading VSEE to ORION Solutions, go to “Completing an Upgrade” on page 43.
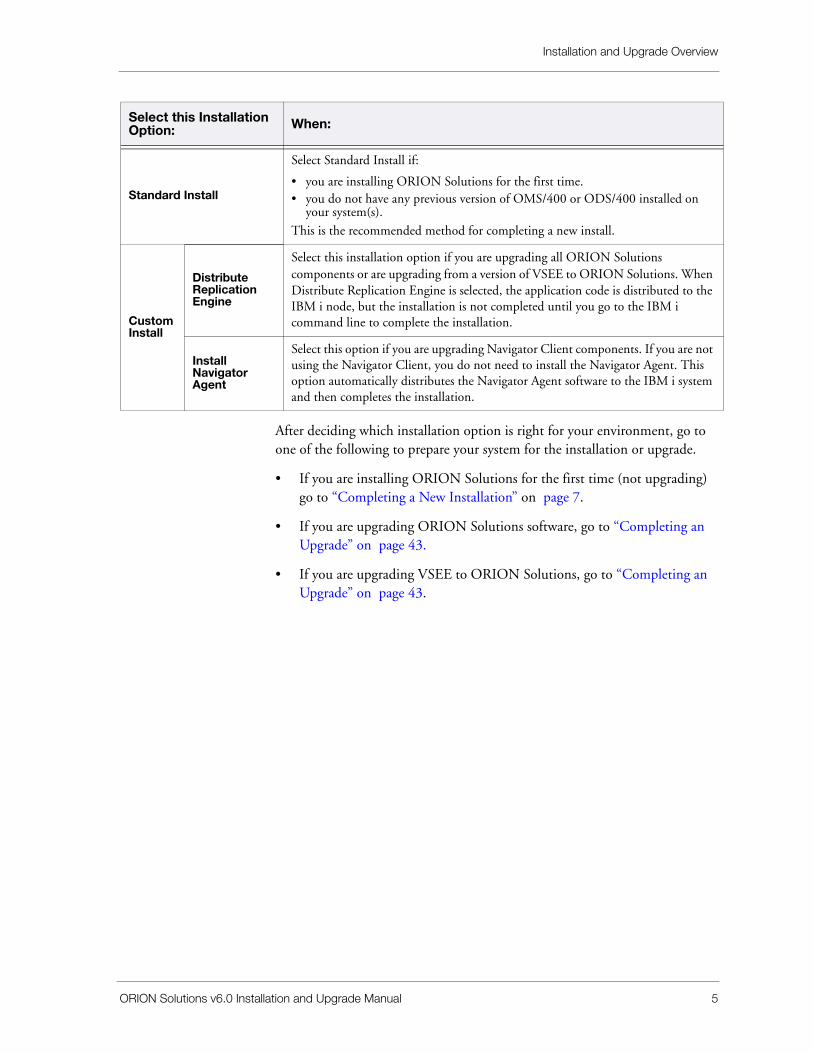
Select this Installation Option: When:
Standard Install
Select Standard Install if:
• you are installing ORION Solutions for the first time.• you do not have any previous version of OMS/400 or ODS/400 installed on
your system(s).
This is the recommended method for completing a new install.
Custom Install
Distribute Replication Engine
Select this installation option if you are upgrading all ORION Solutions components or are upgrading from a version of VSEE to ORION Solutions. When Distribute Replication Engine is selected, the application code is distributed to the IBM i node, but the installation is not completed until you go to the IBM i command line to complete the installation.
Install Navigator Agent
Select this option if you are upgrading Navigator Client components. If you are not using the Navigator Client, you do not need to install the Navigator Agent. This option automatically distributes the Navigator Agent software to the IBM i system and then completes the installation.

Chapter 1: Introduction
6 ORION Solutions v6.0 Installation and Upgrade Manual
ORION Solutions v6.0 Installation and Upgrade Manual 7
Completing a New Installation 2
This section contains pre-installation tasks and information for completing an ORION Solutions new installation. If you are upgrading previously installed ORION Solutions software, or if you have a previously installed version of VSEE go to “Completing an Upgrade” on page 43.
IMPORTANT
There must be no previous installation of either ORION Solutions or VSEE to complete installation instructions in this chapter.
To complete a new installation, do the following:
❏ Run the ORION Solutions Entitlement Wizard (see “Run the ORION Solutions Entitlement Wizard” on page 7)
❏ Complete the installation pre-requisites (see “Before you Install” on page 9).
❏ Install the Replication Engine and Navigator Agent (see “Installing the Replication Engine and Navigator Agent” on page 11).
❏ If installing the Navigator Client, verify that services are running and install the Navigator Consolidator (see “Installing the Navigator Consolidator” on page 25).
❏ If applicable, install the Navigator Client (see “Installing the Navigator Client” on page 35).
❏ If applicable, enable ORION Solutions for the IBM Systems Director Navigator (see “Enable ORION Solutions for the IBM Systems Director Navigator” on page 40).
Run the ORION Solutions Entitlement WizardInstalling ORION Solutions requires new license keys for your Vision Solutions product. To verify and obtain new license keys, you must run the ORION Solutions Entitlement Wizard before running the ORION Solutions Installation Wizard.
Chapter 2: Completing a New Installation
8 ORION Solutions v6.0 Installation and Upgrade Manual
1. Obtain the following information for each system in your HA environ-ment:
• System Serial Number
• Processor Group
• System Processor Feature Code
In many cases, you may already have this information recorded in your business systems. If so, it may be a simple matter of running a report and sending it to us at [email protected]. Otherwise, we have provided both an automated wizard (see “Run the Automated Procedure” on page 8) and a manual procedure (see “Run the Manual Procedure” on page 9) tomahawk gathering this information from your systems as simple as possible.
2. Send the requested information to Vision Solutions.
3. Please wait until you have received the following response from Vision Solutions before installing or upgrading.
Dear Vision Solutions Customer,
We have received your email and the entitlement information you have provided has been updated and verified. We appreciate your prompt response.
Thank you again for your business.
Your assistance in gathering the information to respond to this request is greatly appreciated!
Run the Automated ProcedureYour system must meet the following minimum requirements to run the automated ORION Solutions Entitlement Wizard:
• 128MB free RAM
• One of the following operating systems: Windows® 2000, Windows® XP, or Windows® Vista
• Minimum 8-bit color depth (256 colors)
• Minimum of 1024x768 resolution
Before you Install
ORION Solutions v6.0 Installation and Upgrade Manual 9
1. Download the ORION Solutions Entitlement Wizard from the Vision Extranet (Click Customer/Partner Login at www.visionsolutions.com) under the License Keys menu option.
2. Run the wizard from a PC and follow the instructions to connect to each system in your HA environment. The wizard will generate a file on the PC containing the required information for automated entitlement purposes.
3. Email the file generated by the wizard to: [email protected]
4. Please include your company name and contact information so we can contact you if follow-up is necessary.
Run the Manual Procedure1. Run the following command to get the System Serial Number and Proces-
sor Group (e.g. P05, P10, P20 etc.):
WRKLICINF
2. Run the following command to get the System Processor Feature Code:
DSPSYSVAL QPRCFEAT
3. Email the values for each system in your HA environment to [email protected]
4. Please include your company name and contact information so we can contact you if follow-up is necessary.
Before you InstallBefore installing ORION Solutions, do the following:
• Complete the new installation pre-installation tasks (see “Pre-Installation Tasks” on page 9).
• Decide what to mirror (see “Deciding What to Mirror” on page 10).
• Prepare your source and target systems (see “Preparing Your Source System” on page 11 and “Preparing your Target System” on page 11).
Pre-Installation TasksThe table below provides a list of pre-installation tasks involved with installing ORION Solutions software. Verify that these tasks have been completed before continuing.
Chapter 2: Completing a New Installation
10 ORION Solutions v6.0 Installation and Upgrade Manual
Deciding What to MirrorInstead of trying to mirror everything on your systems, it is more efficient to identify the items that are critically important. That way, you are not consuming bandwidth sending updates for objects that are not necessary to mirror. To determine what to mirror:
❏ Identify any mission-critical applications that are necessary for day-to-day functioning. For these applications, identify which libraries are required.
❏ Complete the application/journal matrix supplied by Vision Solutions Professional Services. This will help identify which objects need to be mirrored and which journals should have links configured for them.
❏ Identify any work file exclusions, and any other files or other objects to exclude within OMS/400.
❏ Review the types of objects to be mirrored for QSYS, QGPL, and QUSRSYS, and identify objects to be excluded from ODS/400 mirroring.
This preparation ensures correct replication across your environment.
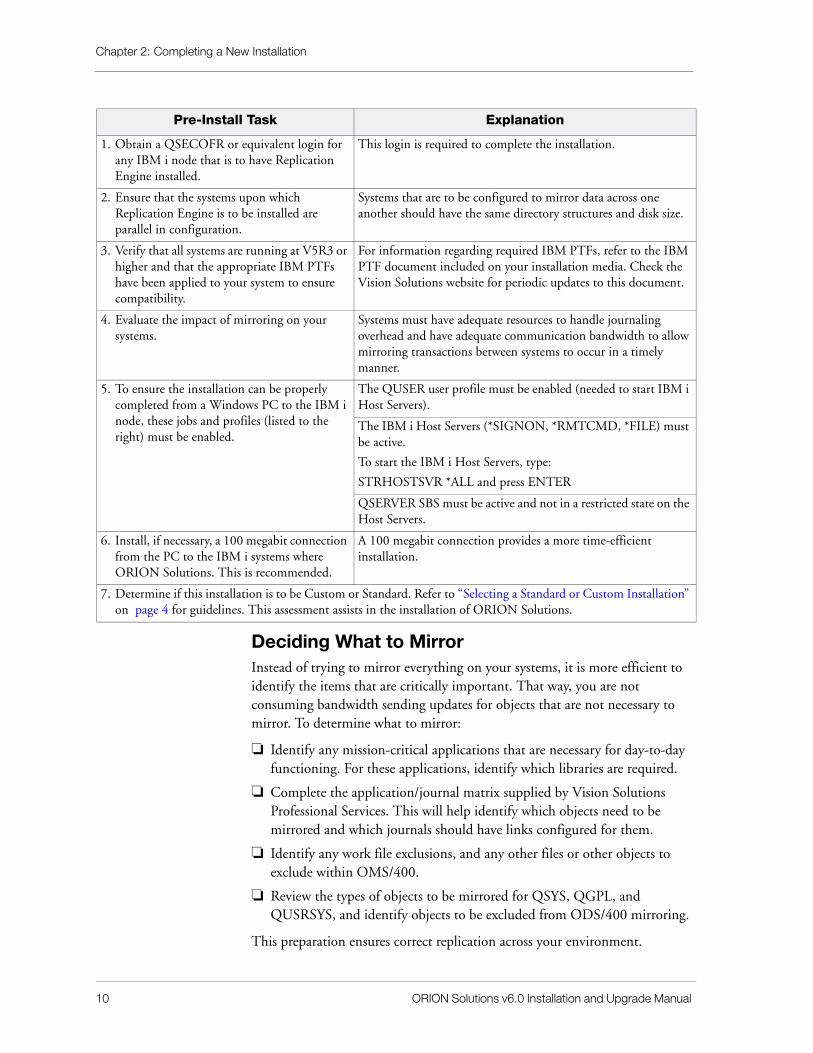
Pre-Install Task Explanation
1. Obtain a QSECOFR or equivalent login for any IBM i node that is to have Replication Engine installed.
This login is required to complete the installation.
2. Ensure that the systems upon which Replication Engine is to be installed are parallel in configuration.
Systems that are to be configured to mirror data across one another should have the same directory structures and disk size.
3. Verify that all systems are running at V5R3 or higher and that the appropriate IBM PTFs have been applied to your system to ensure compatibility.
For information regarding required IBM PTFs, refer to the IBM PTF document included on your installation media. Check the Vision Solutions website for periodic updates to this document.
4. Evaluate the impact of mirroring on your systems.
Systems must have adequate resources to handle journaling overhead and have adequate communication bandwidth to allow mirroring transactions between systems to occur in a timely manner.
5. To ensure the installation can be properly completed from a Windows PC to the IBM i node, these jobs and profiles (listed to the right) must be enabled.
The QUSER user profile must be enabled (needed to start IBM i Host Servers).
The IBM i Host Servers (*SIGNON, *RMTCMD, *FILE) must be active.
To start the IBM i Host Servers, type:
STRHOSTSVR *ALL and press ENTER
QSERVER SBS must be active and not in a restricted state on the Host Servers.
6. Install, if necessary, a 100 megabit connection from the PC to the IBM i systems where ORION Solutions. This is recommended.
A 100 megabit connection provides a more time-efficient installation.
7. Determine if this installation is to be Custom or Standard. Refer to “Selecting a Standard or Custom Installation” on page 4 for guidelines. This assessment assists in the installation of ORION Solutions.
Installing the Replication Engine and Navigator Agent
ORION Solutions v6.0 Installation and Upgrade Manual 11
Preparing Your Source System❏ Analyze the state of your IBM i environment before you begin to install
ORION Solutions. Ensure that your system has the required IBM PTFs installed. Also, it is recommended that all your systems run the same level of IBM i.
❏ Verify that communications such as DDM, FTP, Telnet, or TCP/IP are active between your intended source machine and your intended target.
❏ Ensure that there is enough disk space for the journals that will be created during the mirroring process.
Preparing your Target System❏ Do one of the following to prepare your target system:
• For a brand-new system that you are priming to become a target system, load the system with the source system image save using option 23 (Restore) at the green screen.
• For a system already primed, save and restore the objects that you will be replicating and perform a test run of your applications on the target.
❏ Ensure that your system has the required IBM PTFs installed.
❏ Verify that communications such as DDM, FTP, Telnet, or TCP/IP are active between your intended target machine and your intended source.
Installing the Replication Engine and Navigator AgentThis section contains procedures for a new installation of the Replication Engine and the Navigator Agent. Before beginning the installation ensure that:
• the pre-installation tasks on page 9 have been performed.
• the PC is connected to the network and has a connection with the IBM i node on which the Navigator Agent and the Replication Engine will be installed.
Chapter 2: Completing a New Installation
12 ORION Solutions v6.0 Installation and Upgrade Manual
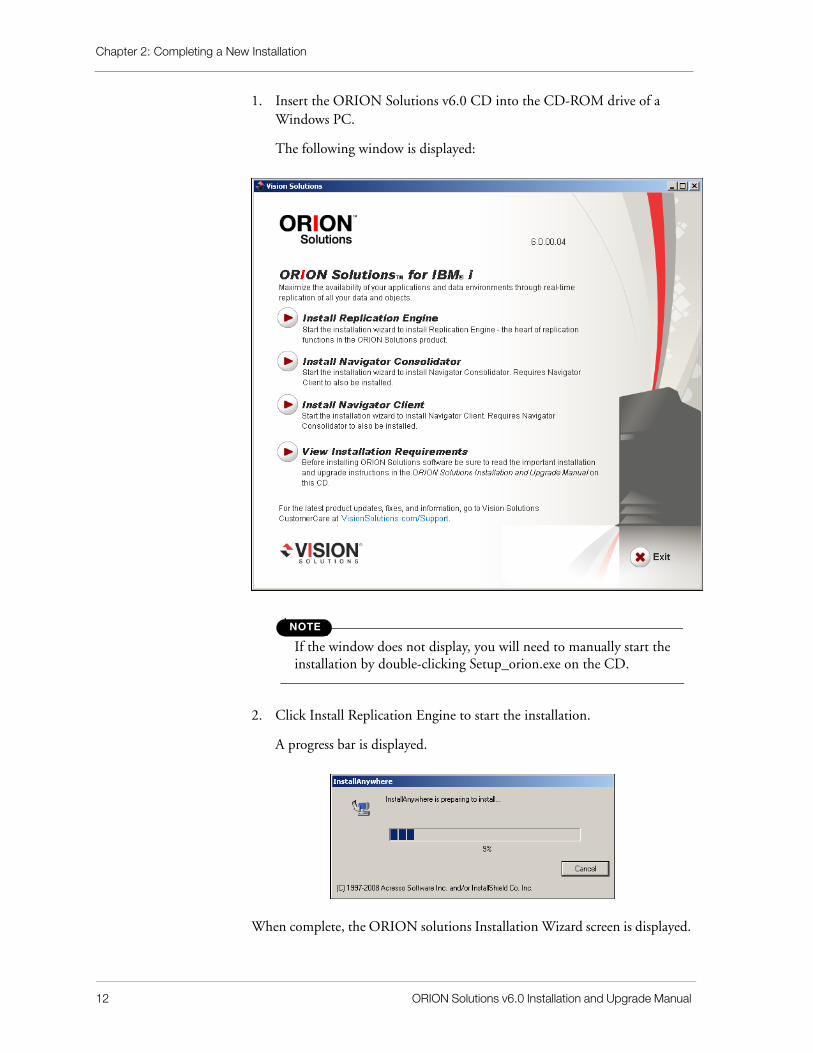
1. Insert the ORION Solutions v6.0 CD into the CD-ROM drive of a Windows PC.
The following window is displayed:
NOTE
If the window does not display, you will need to manually start the installation by double-clicking Setup_orion.exe on the CD.
2. Click Install Replication Engine to start the installation.
A progress bar is displayed.
When complete, the ORION solutions Installation Wizard screen is displayed.
Installing the Replication Engine and Navigator Agent
ORION Solutions v6.0 Installation and Upgrade Manual 13
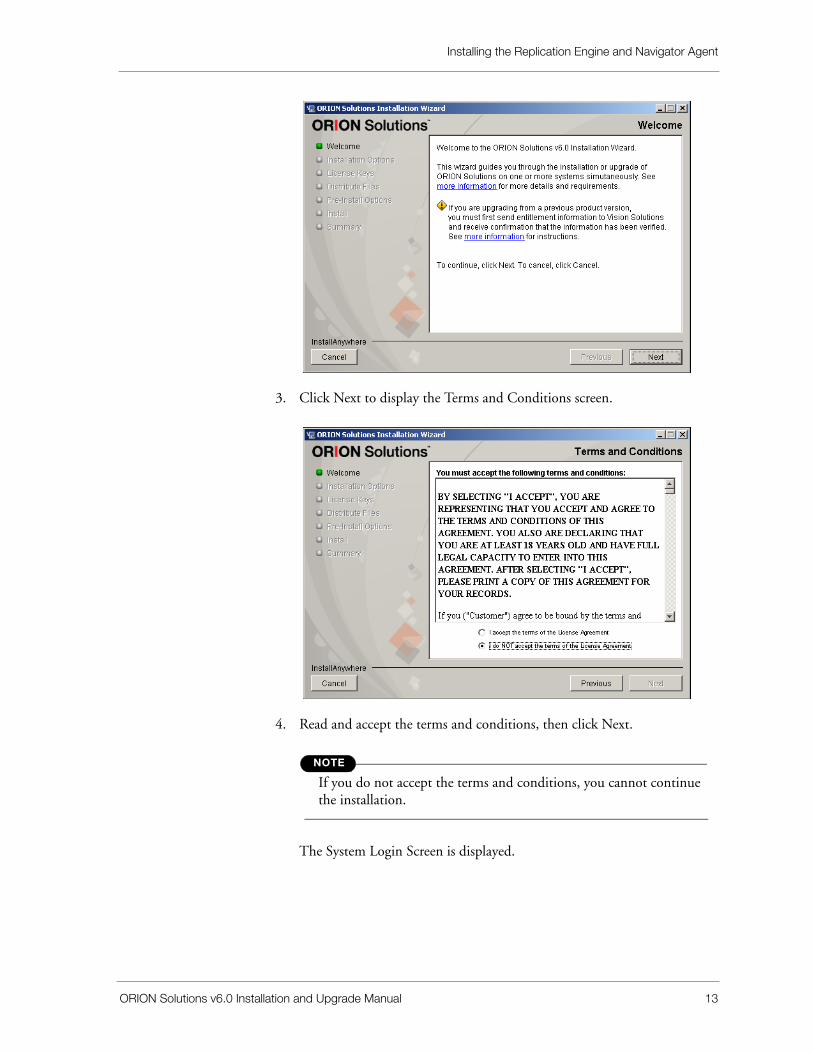
3. Click Next to display the Terms and Conditions screen.
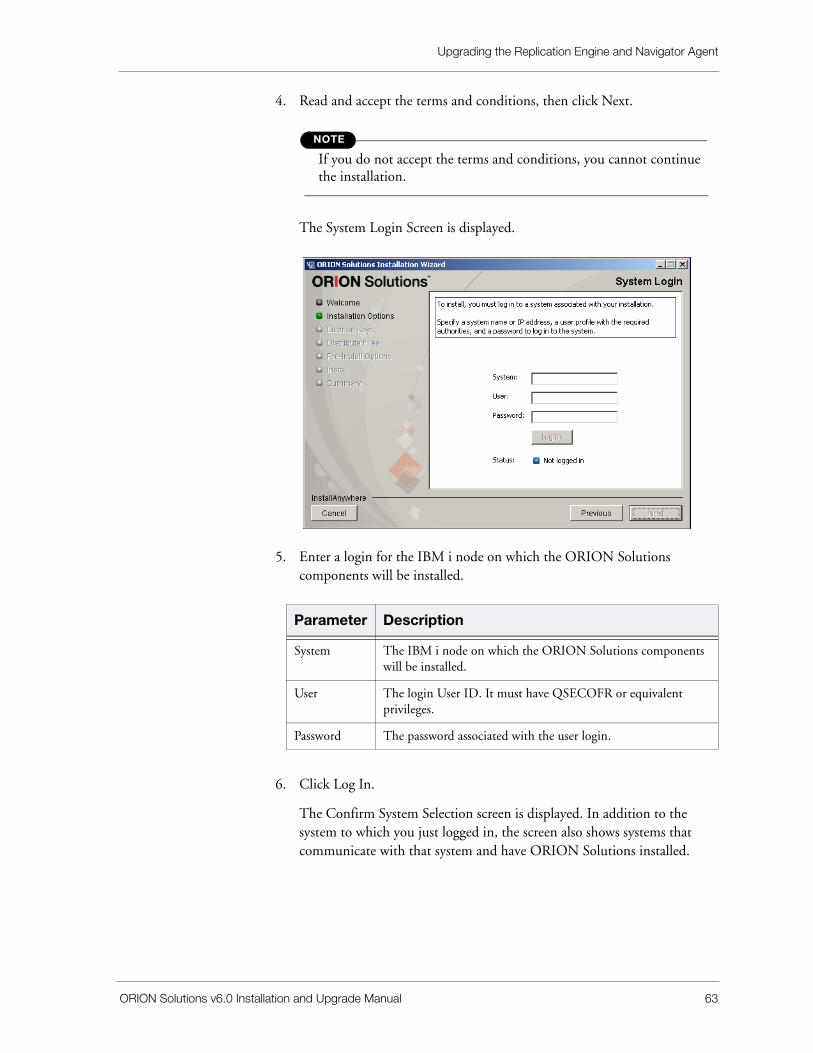
4. Read and accept the terms and conditions, then click Next.
NOTE
If you do not accept the terms and conditions, you cannot continue the installation.
The System Login Screen is displayed.
Chapter 2: Completing a New Installation
14 ORION Solutions v6.0 Installation and Upgrade Manual
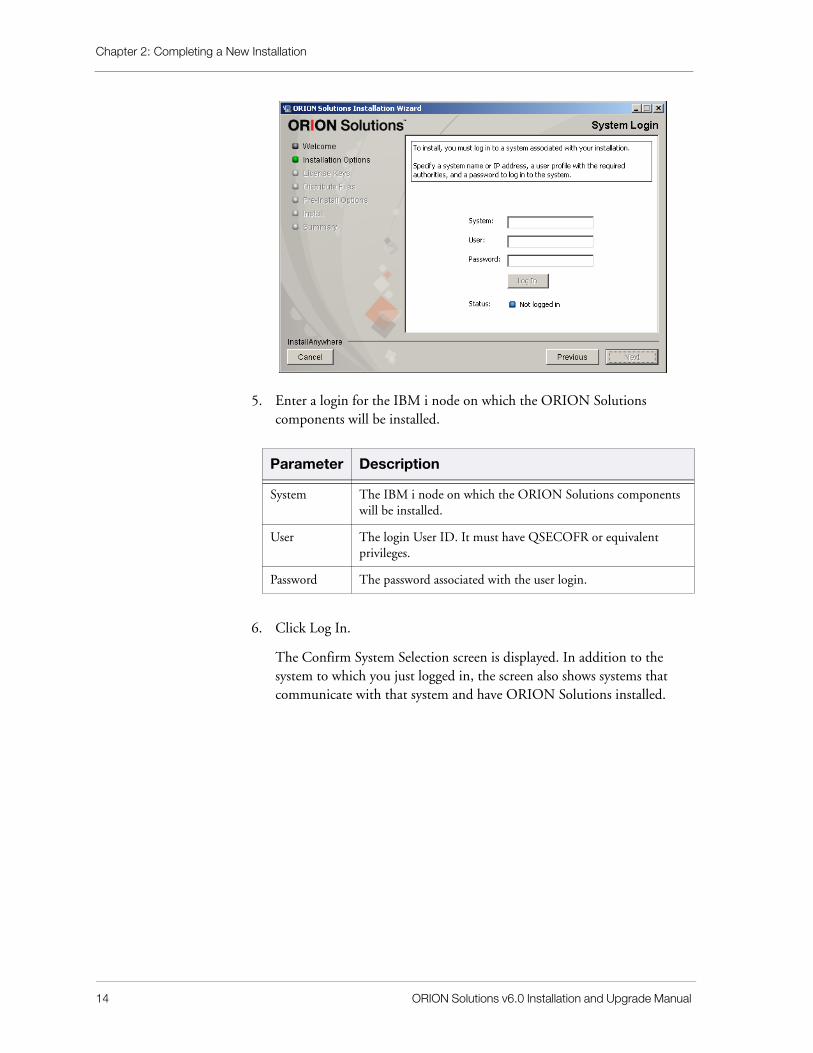
5. Enter a login for the IBM i node on which the ORION Solutions components will be installed.
6. Click Log In.
The Confirm System Selection screen is displayed. In addition to the system to which you just logged in, the screen also shows systems that communicate with that system and have ORION Solutions installed.
Parameter Description
System The IBM i node on which the ORION Solutions components will be installed.
User The login User ID. It must have QSECOFR or equivalent privileges.
Password The password associated with the user login.
Installing the Replication Engine and Navigator Agent
ORION Solutions v6.0 Installation and Upgrade Manual 15
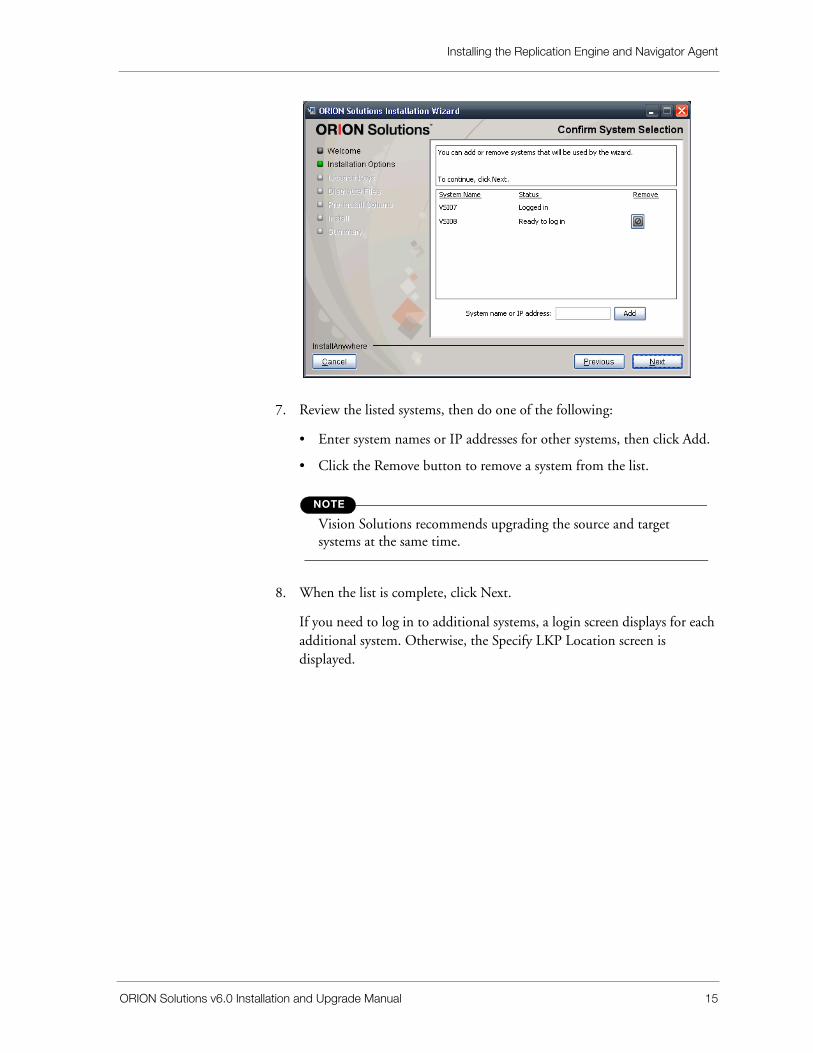
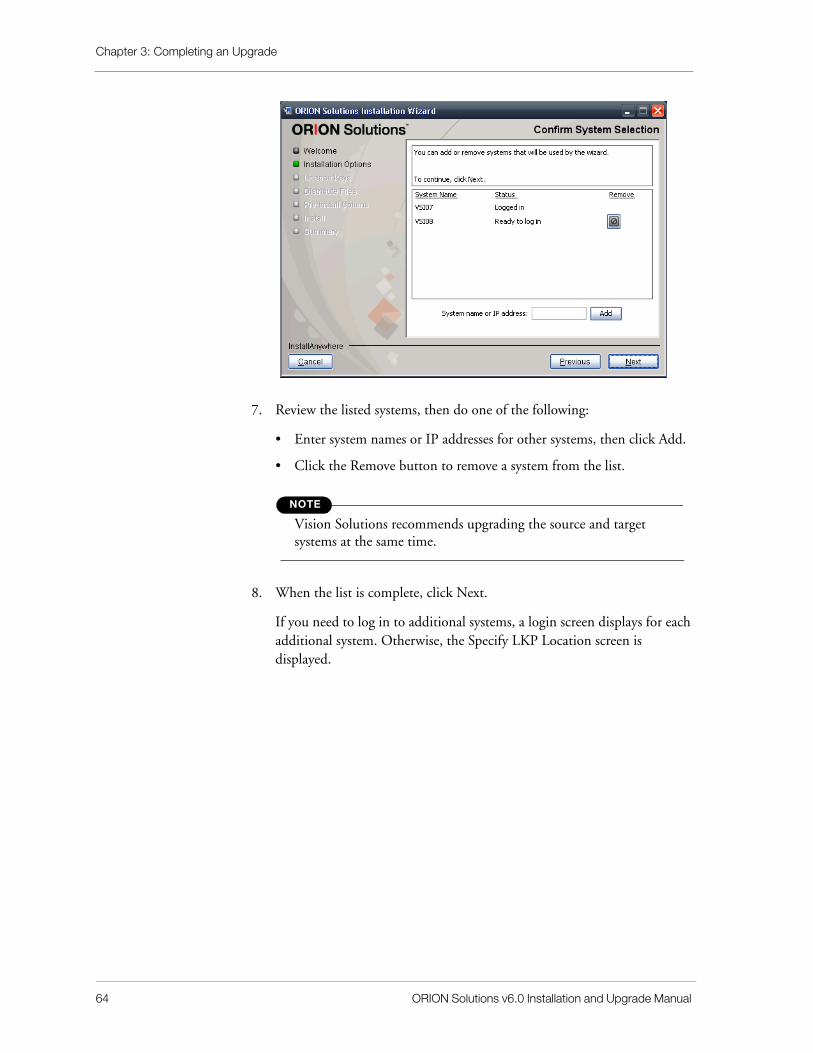
7. Review the listed systems, then do one of the following:
• Enter system names or IP addresses for other systems, then click Add.
• Click the Remove button to remove a system from the list.
NOTE
Vision Solutions recommends upgrading the source and target systems at the same time.
8. When the list is complete, click Next.
If you need to log in to additional systems, a login screen displays for each additional system. Otherwise, the Specify LKP Location screen is displayed.
Chapter 2: Completing a New Installation
16 ORION Solutions v6.0 Installation and Upgrade Manual
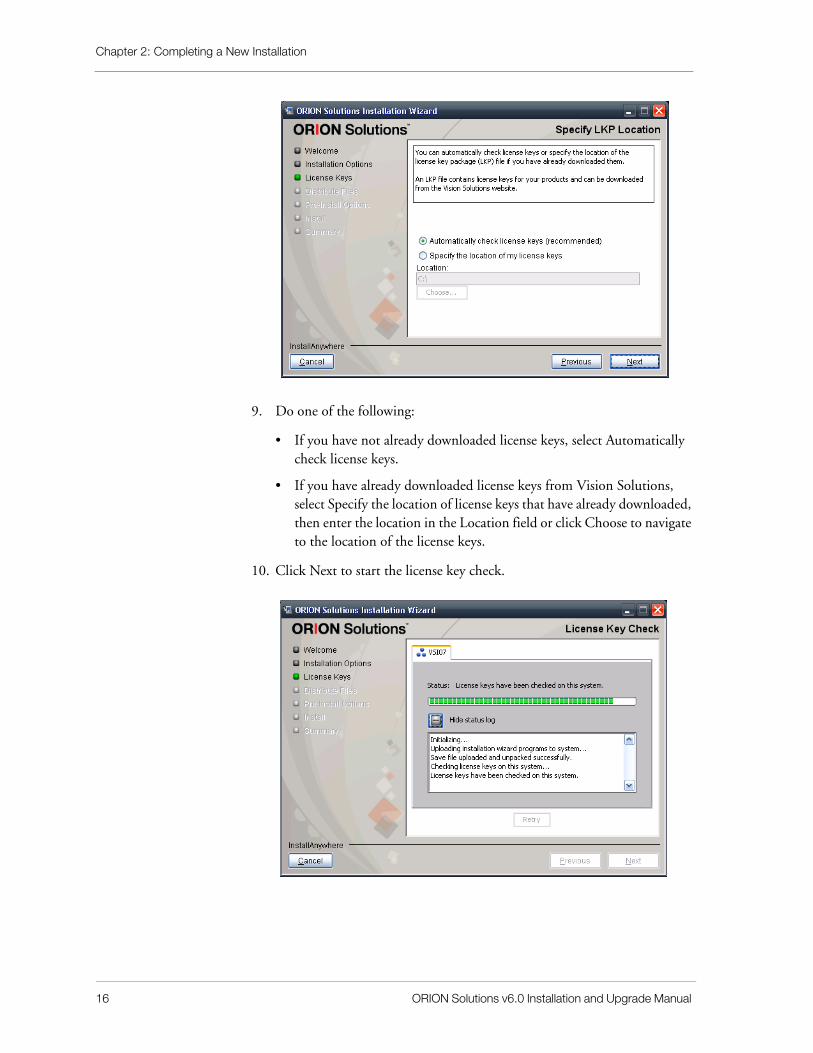
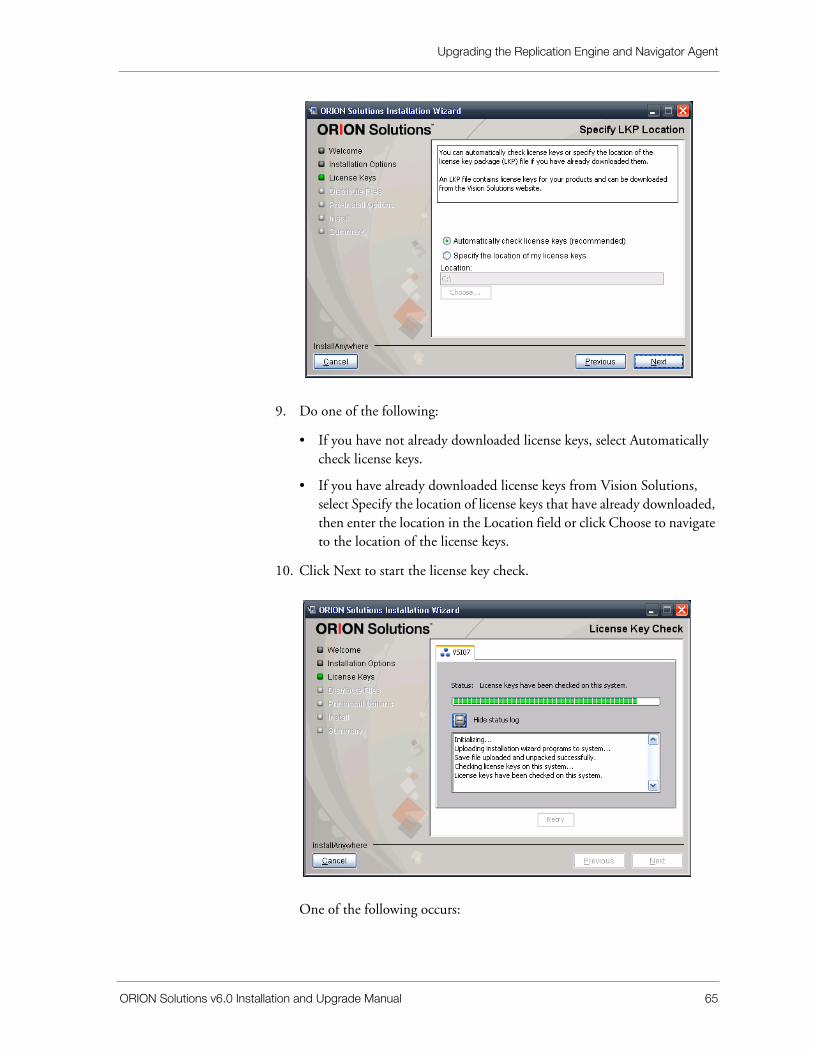
9. Do one of the following:
• If you have not already downloaded license keys, select Automatically check license keys.
• If you have already downloaded license keys from Vision Solutions, select Specify the location of license keys that have already downloaded, then enter the location in the Location field or click Choose to navigate to the location of the license keys.
10. Click Next to start the license key check.
Installing the Replication Engine and Navigator Agent
ORION Solutions v6.0 Installation and Upgrade Manual 17
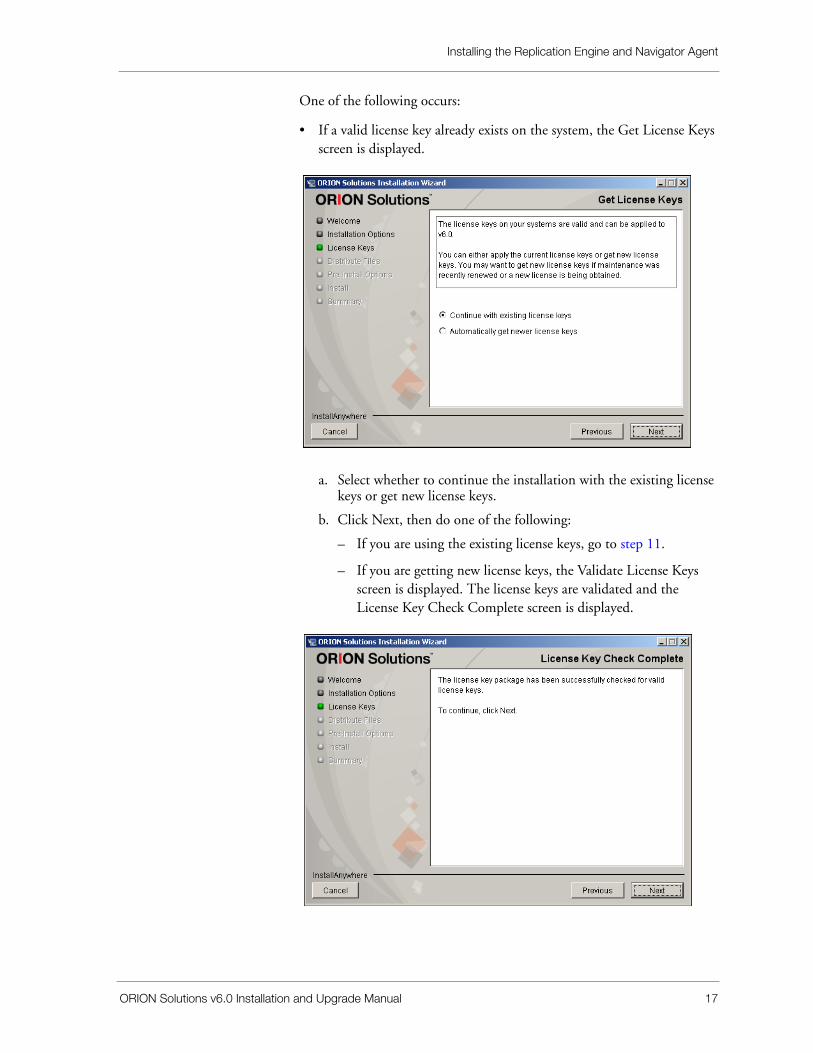
One of the following occurs:
• If a valid license key already exists on the system, the Get License Keys screen is displayed.
a. Select whether to continue the installation with the existing license keys or get new license keys.
b. Click Next, then do one of the following:
– If you are using the existing license keys, go to step 11.
– If you are getting new license keys, the Validate License Keys screen is displayed. The license keys are validated and the License Key Check Complete screen is displayed.
Chapter 2: Completing a New Installation
18 ORION Solutions v6.0 Installation and Upgrade Manual
• If a valid license key does not currently exist on the system, the Get License Key screen is displayed.
a. Do one of the following:
– Select Automatically get license keys to get license keys for the product before continuing the installation, then click Next.
– Select Complete the installation without license keys to finish the installation without obtaining license keys, then click Next and go to step 11.
NOTE
If you choose to finish the installation without obtaining license keys, you will not be able to use the product until valid license keys are applied.
The Validate License Keys screen is displayed.
One of the following occurs:
– The license keys are validated and the License Key Check Complete screen is displayed. Go to step 11.
Installing the Replication Engine and Navigator Agent
ORION Solutions v6.0 Installation and Upgrade Manual 19
– If the keys cannot be generated, the Cannot Generate License Keys screen is displayed. Continue with the procedure.
b. Click Next to continue the installation without License Keys.
The License Key Package Check screen is displayed, followed by the License Key Check Complete screen.
Chapter 2: Completing a New Installation
20 ORION Solutions v6.0 Installation and Upgrade Manual
11. Click Next to display the Ready to Distribute Files screen.
12. Click Next to distribute files.
Installing the Replication Engine and Navigator Agent
ORION Solutions v6.0 Installation and Upgrade Manual 21
The Distribute Files screen is displayed while the files are distributed.
Once the distribution is complete, the File Distribution Complete screen is displayed.
NOTE
Once the files are distributed, if you cancel the installation, you can restart the installation and select Use the existing files in the Trust Files on System screen.
13. Click Next to display the VSIOWNER Password screen.
Chapter 2: Completing a New Installation
22 ORION Solutions v6.0 Installation and Upgrade Manual
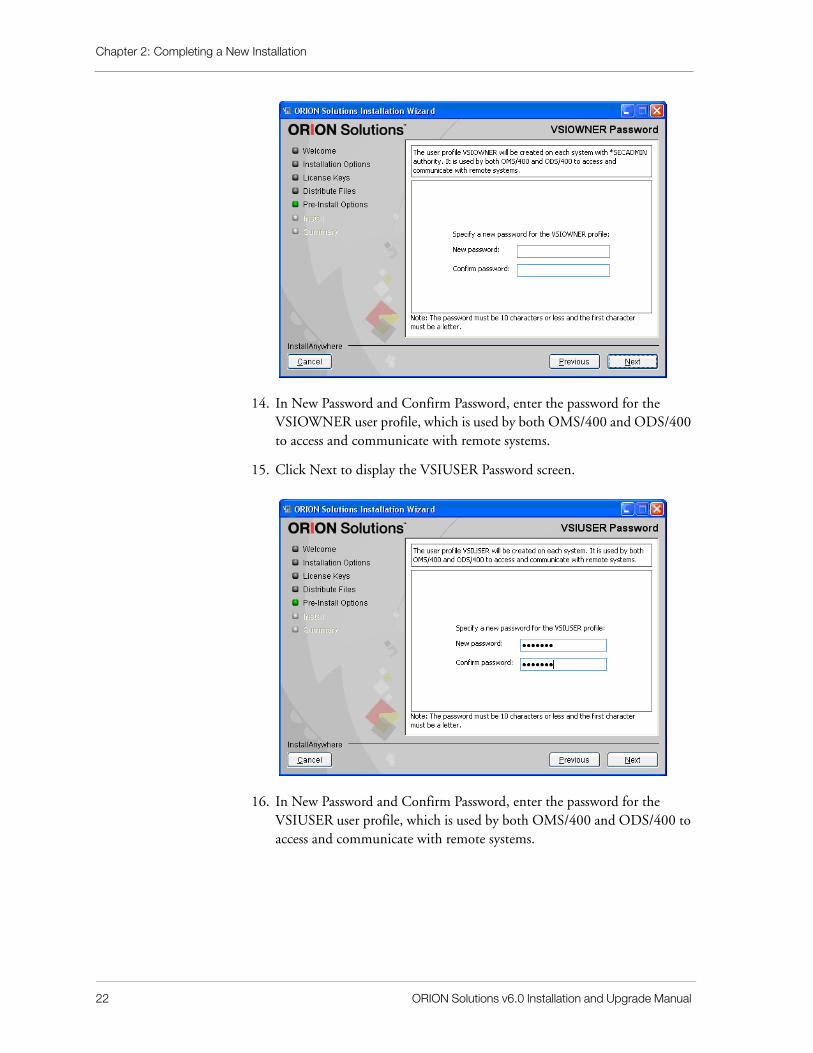
14. In New Password and Confirm Password, enter the password for the VSIOWNER user profile, which is used by both OMS/400 and ODS/400 to access and communicate with remote systems.
15. Click Next to display the VSIUSER Password screen.
16. In New Password and Confirm Password, enter the password for the VSIUSER user profile, which is used by both OMS/400 and ODS/400 to access and communicate with remote systems.
Installing the Replication Engine and Navigator Agent
ORION Solutions v6.0 Installation and Upgrade Manual 23
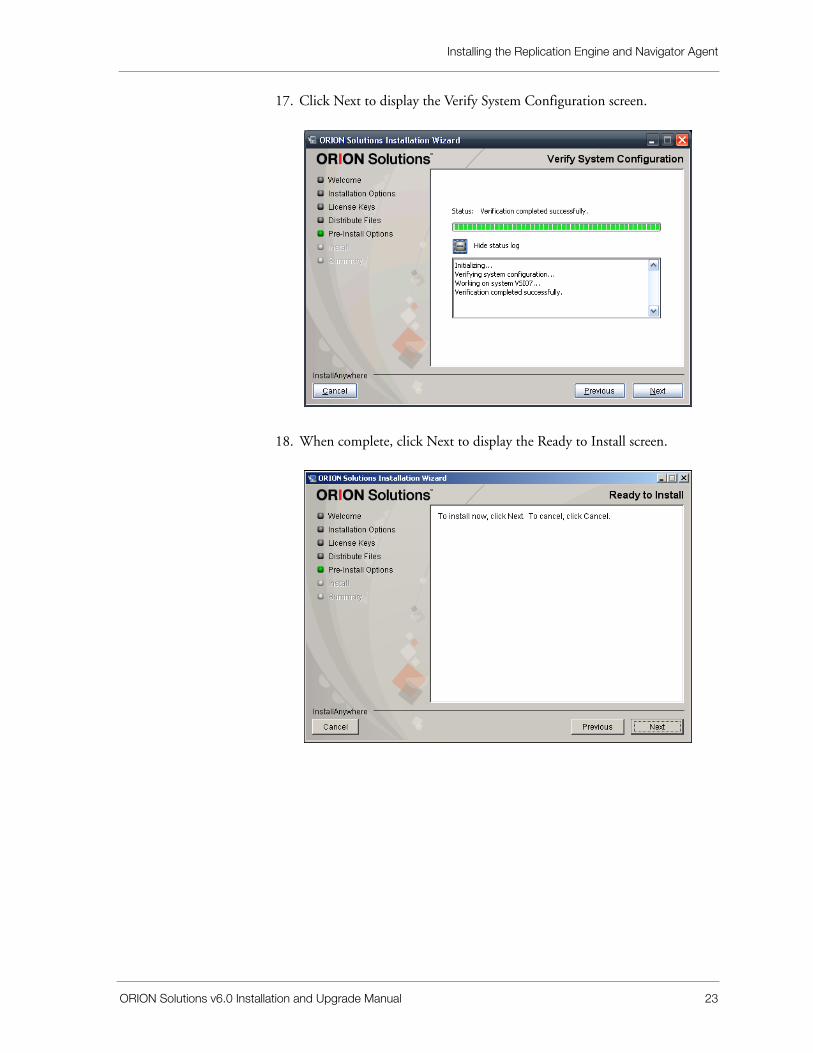
17. Click Next to display the Verify System Configuration screen.
18. When complete, click Next to display the Ready to Install screen.
Chapter 2: Completing a New Installation
24 ORION Solutions v6.0 Installation and Upgrade Manual
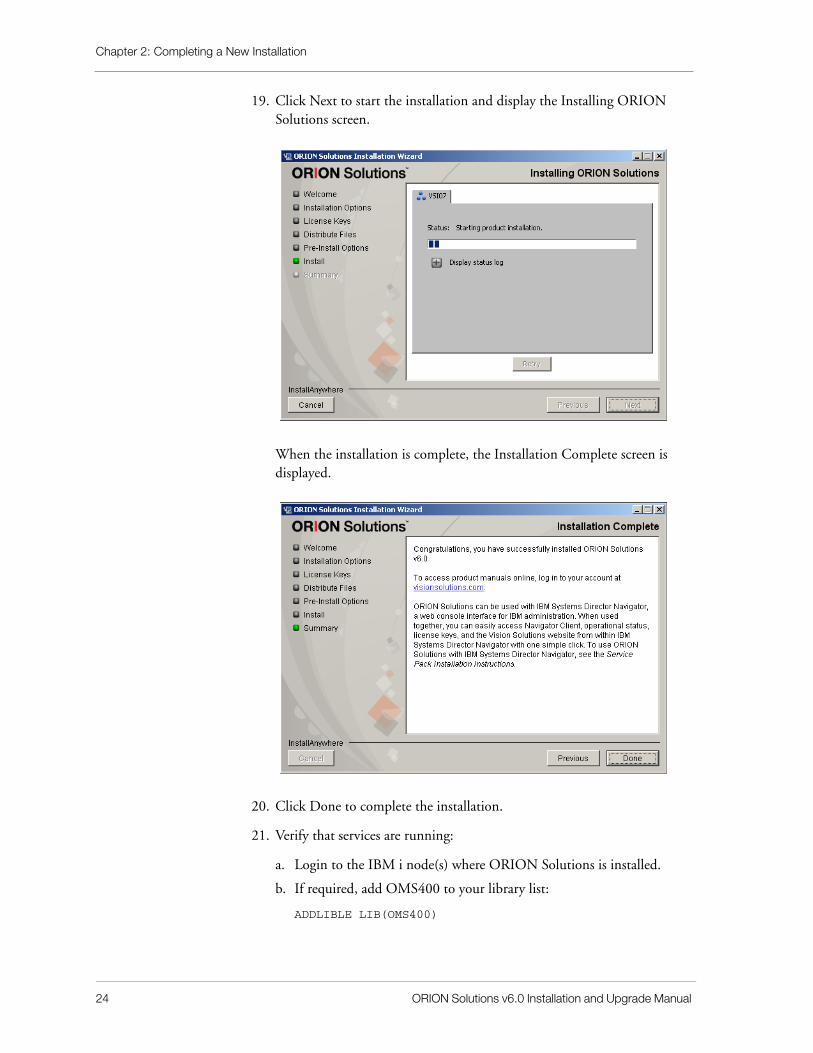
19. Click Next to start the installation and display the Installing ORION Solutions screen.
When the installation is complete, the Installation Complete screen is displayed.
20. Click Done to complete the installation.
21. Verify that services are running:
a. Login to the IBM i node(s) where ORION Solutions is installed.
b. If required, add OMS400 to your library list:
ADDLIBLE LIB(OMS400)
Installing the Navigator Consolidator
ORION Solutions v6.0 Installation and Upgrade Manual 25
c. Verify that the OMS400 subsystem is active by entering the following command from the IBM i command line:
WRKACTJOB SBS(OMS400)
At least the following job must be active in the OMS400 subsystem:
OMSJRNMGR (journal manager job)
d. Only if the OMS400 subsystem is not active, enter these start commands:
STRSBS OMS400/OMS400
STRSBS OMS400/VSIGPL
These commands start the OMS400 subsystem, and the VSIGPL subsystem.
e. Do one of the following:
• If the Navigator Client will be installed, when the subsystems are active, enter the following command from the IBM i command line to start the Navigator Agent:
strnavmon
• If the Navigator Client will not be installed, go to step 22.
22. If you are installing the Navigator Client, first install the Navigator Consolidator (see “Installing the Navigator Consolidator” on page 25).
Installing the Navigator ConsolidatorIf you are installing the Navigator Client, you must first install the Navigator Consolidator. You can install the Navigator Consolidator on either:
• a Windows server (“Installing on a Windows Server” on page 25)
• a IBM i server (“Install on an IBM i Server” on page 30)
Installing on a Windows ServerBefore installing Navigator Consolidator, ensure the following:
• The Windows server where the Navigator Consolidator will be installed has network access to the IBM i server.
• Replication Engine and the Navigator Agent are installed on the IBM i server.

Chapter 2: Completing a New Installation
26 ORION Solutions v6.0 Installation and Upgrade Manual
1. Insert the ORION Solutions CD into the CD-ROM drive of a Windows PC. The following window displays:
NOTE
If the window does not display, you will need to manually start the installation by double-clicking Setup_orion.exe on the CD.
2. Click Install Navigator Consolidator.
The following progress bar is displayed.
NOTE
If you receive a Security Warning dialog, click Run to continue with the installation.
Installing the Navigator Consolidator
ORION Solutions v6.0 Installation and Upgrade Manual 27
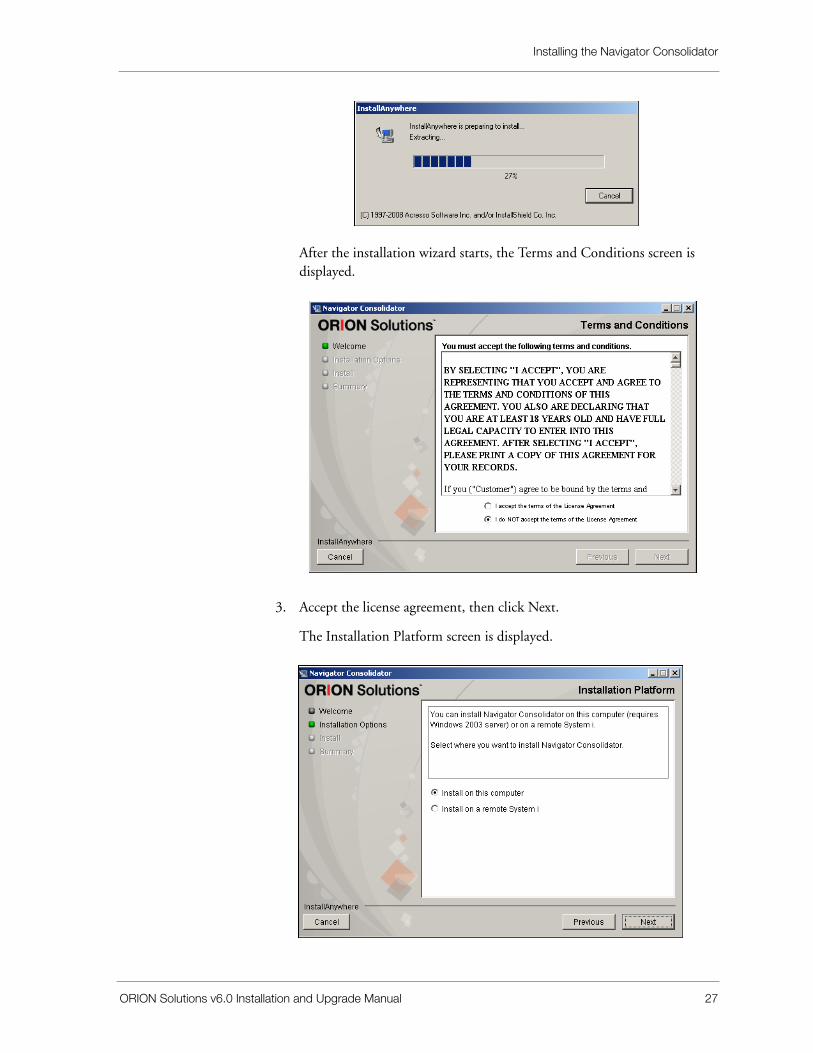
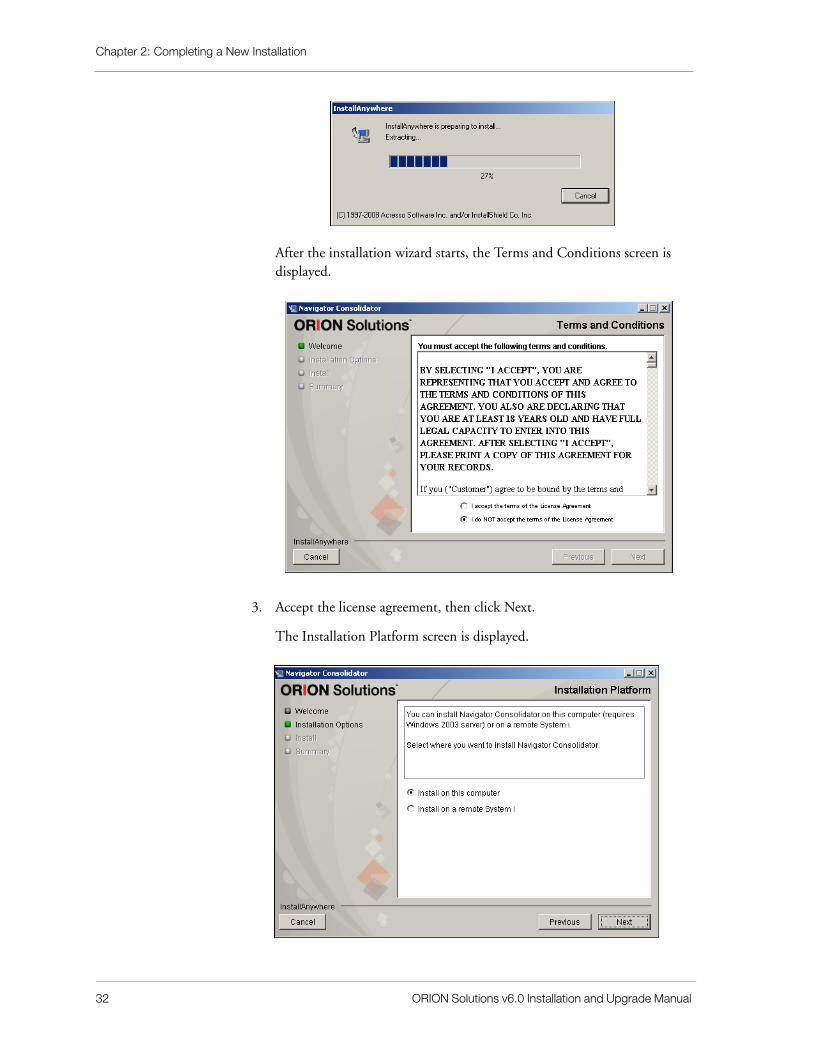
After the installation wizard starts, the Terms and Conditions screen is displayed.
3. Accept the license agreement, then click Next.
The Installation Platform screen is displayed.

Chapter 2: Completing a New Installation
28 ORION Solutions v6.0 Installation and Upgrade Manual
4. Select Install on this computer, then click Next to display the Windows Domain screen.
5. Specify the Windows domain name, then click Next to display the Installation Summary screen.
Installing the Navigator Consolidator
ORION Solutions v6.0 Installation and Upgrade Manual 29
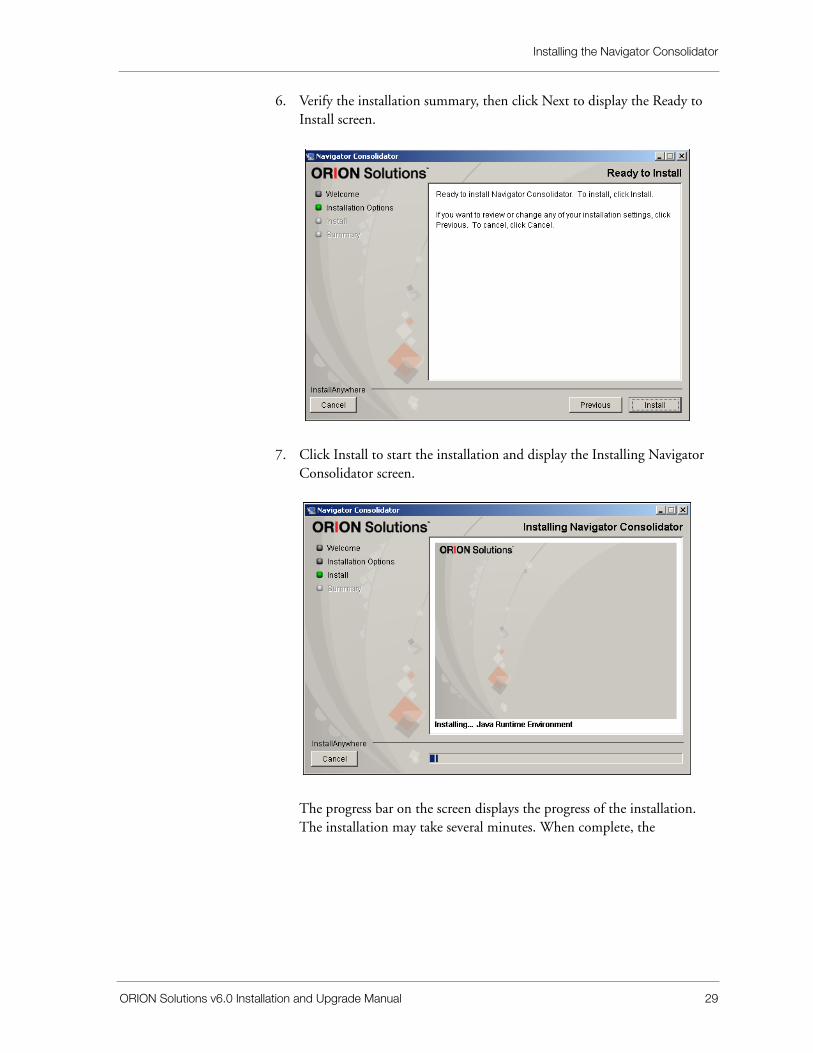
6. Verify the installation summary, then click Next to display the Ready to Install screen.
7. Click Install to start the installation and display the Installing Navigator Consolidator screen.
The progress bar on the screen displays the progress of the installation. The installation may take several minutes. When complete, the

Chapter 2: Completing a New Installation
30 ORION Solutions v6.0 Installation and Upgrade Manual
Installation Complete screen is displayed.
8. Click Done to exit the installation wizard.
NOTE
On a Windows server, the Navigator Consolidator starts automatically at the completion of the installation.
Install on an IBM i ServerBefore installing Navigator Consolidator, ensure the following:
• The Windows server where the Navigator Consolidator will be installed has network access to the IBM i server.
• Replication Engine and the Navigator Agent are installed on the IBM i server.
Installing the Navigator Consolidator
ORION Solutions v6.0 Installation and Upgrade Manual 31
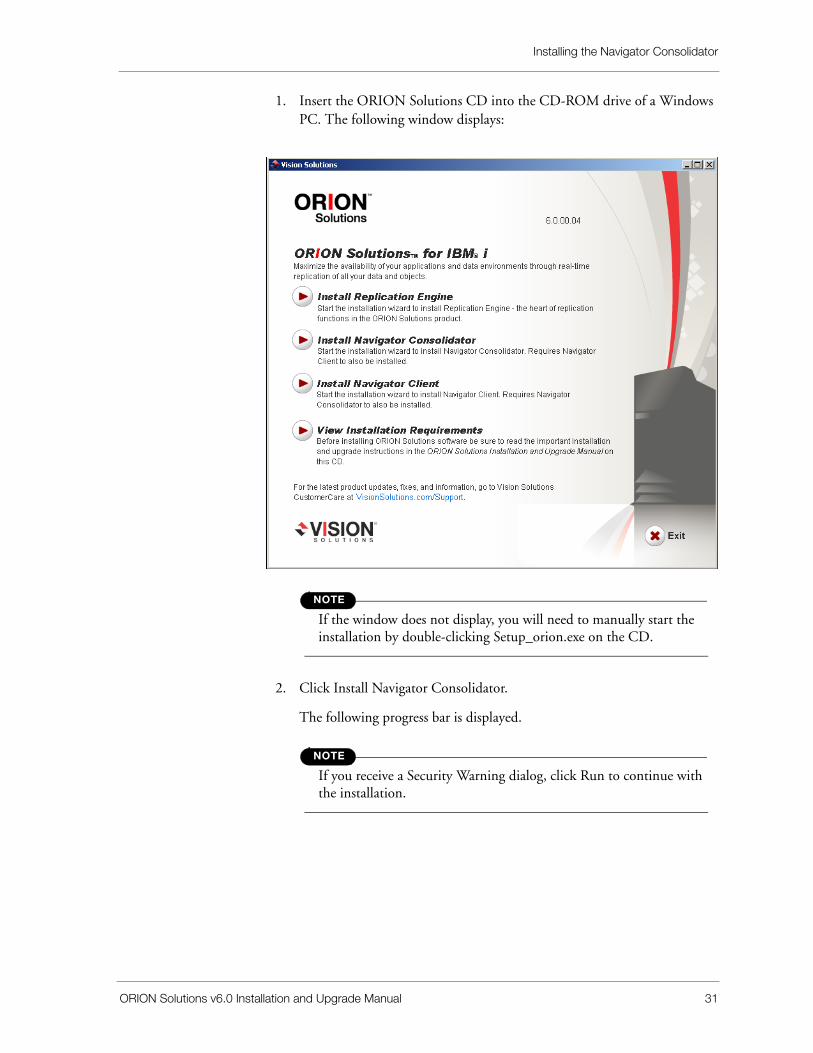
1. Insert the ORION Solutions CD into the CD-ROM drive of a Windows PC. The following window displays:
NOTE
If the window does not display, you will need to manually start the installation by double-clicking Setup_orion.exe on the CD.
2. Click Install Navigator Consolidator.
The following progress bar is displayed.
NOTE
If you receive a Security Warning dialog, click Run to continue with the installation.
Chapter 2: Completing a New Installation
32 ORION Solutions v6.0 Installation and Upgrade Manual
After the installation wizard starts, the Terms and Conditions screen is displayed.
3. Accept the license agreement, then click Next.
The Installation Platform screen is displayed.
Installing the Navigator Consolidator
ORION Solutions v6.0 Installation and Upgrade Manual 33
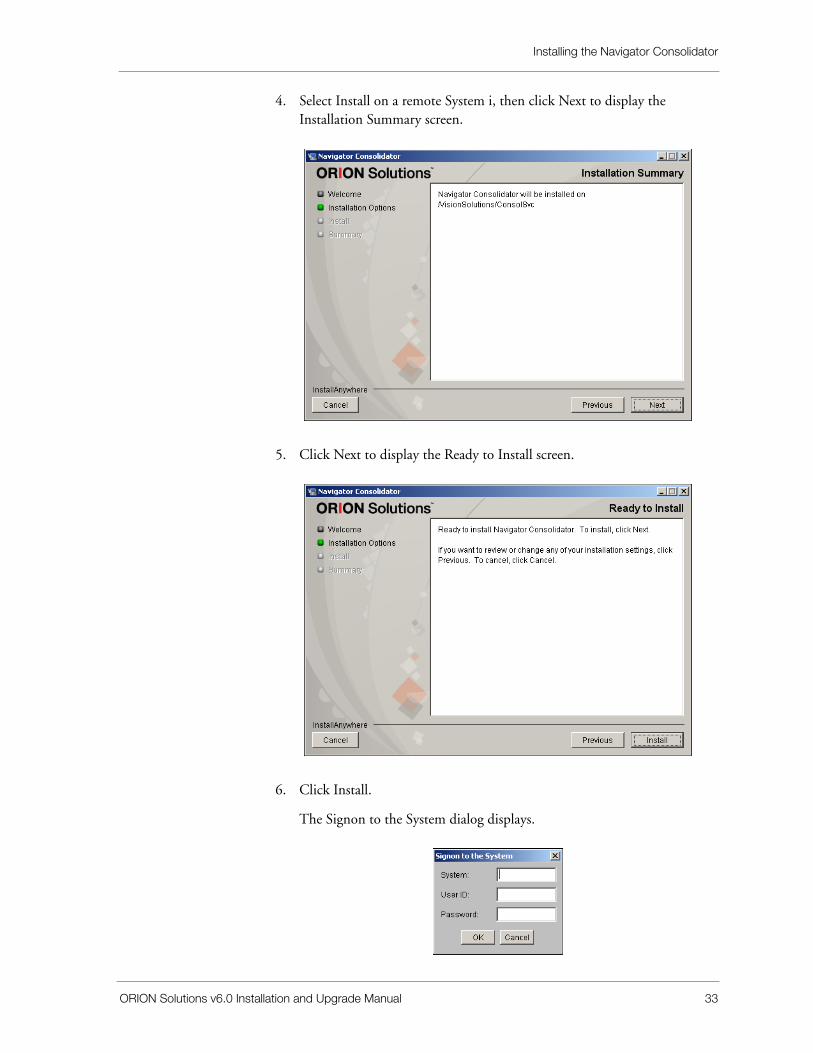
4. Select Install on a remote System i, then click Next to display the Installation Summary screen.
5. Click Next to display the Ready to Install screen.
6. Click Install.
The Signon to the System dialog displays.
Chapter 2: Completing a New Installation
34 ORION Solutions v6.0 Installation and Upgrade Manual
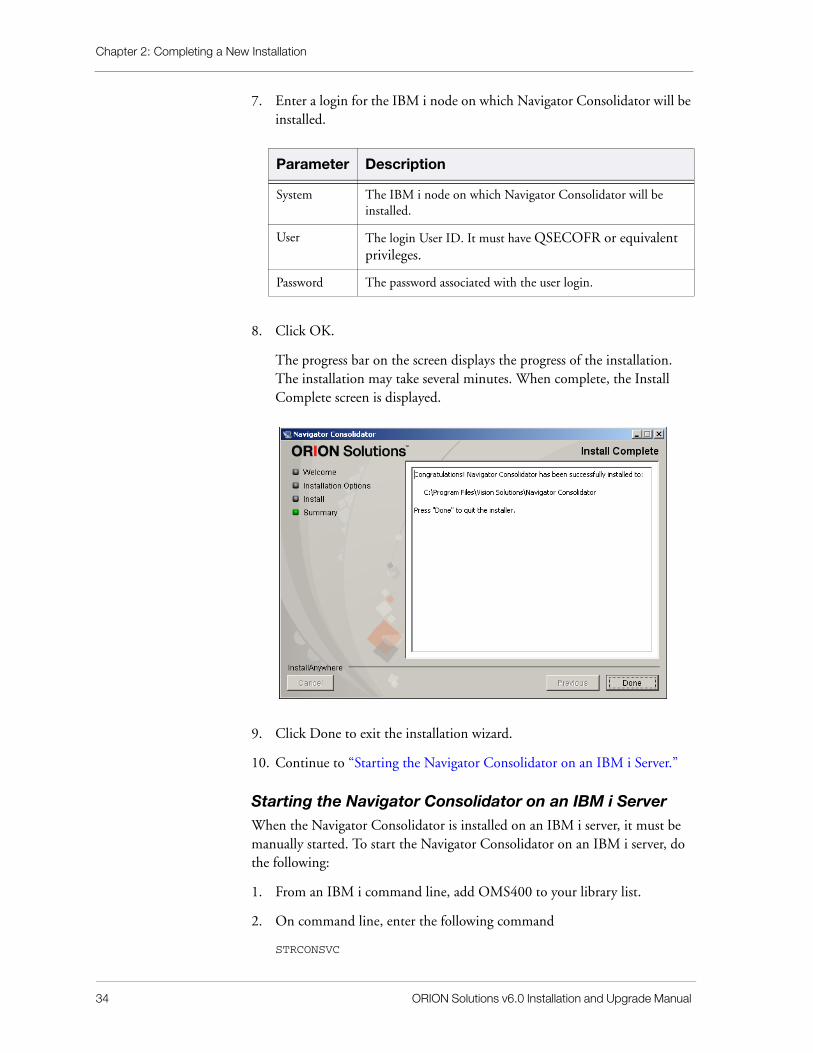
7. Enter a login for the IBM i node on which Navigator Consolidator will be installed.
8. Click OK.
The progress bar on the screen displays the progress of the installation. The installation may take several minutes. When complete, the Install Complete screen is displayed.
9. Click Done to exit the installation wizard.
10. Continue to “Starting the Navigator Consolidator on an IBM i Server.”
Starting the Navigator Consolidator on an IBM i ServerWhen the Navigator Consolidator is installed on an IBM i server, it must be manually started. To start the Navigator Consolidator on an IBM i server, do the following:
1. From an IBM i command line, add OMS400 to your library list.
2. On command line, enter the following command
STRCONSVC
Parameter Description
System The IBM i node on which Navigator Consolidator will be installed.
User The login User ID. It must have QSECOFR or equivalent privileges.
Password The password associated with the user login.
Installing the Navigator Client
ORION Solutions v6.0 Installation and Upgrade Manual 35
If the command is not found, the Replication Engine has not been installed.
NOTE
When initially starting the Replication Engine, it will take approximately 5 minutes. To subsequently start the Replication Engine, it will take approximately 3-4 minutes.
3. Verify that the CONSOLSVC job under the VSIGPL subsystem is running.
NOTE
The NAVCONSOL job should be in a Java wait (JVAW) status and is spawned by CONSOLSVC.
Installing the Navigator ClientBefore beginning the new installation, ensure that the PC on which the Navigator Client will be installed has network access to the server on which the Navigator Consolidator was installed.
IMPORTANT
When installed on a Windows server, the Navigator Consolidator must be installed on a separate server from the Navigator Client. Running the Navigator Consolidator and Navigator Client on the same server is not supported.
The Navigator Client does not need to be installed on the same domain as the Navigator Consolidator. The only requirement is that the user must have a user name and password access to the domain.
Chapter 2: Completing a New Installation
36 ORION Solutions v6.0 Installation and Upgrade Manual
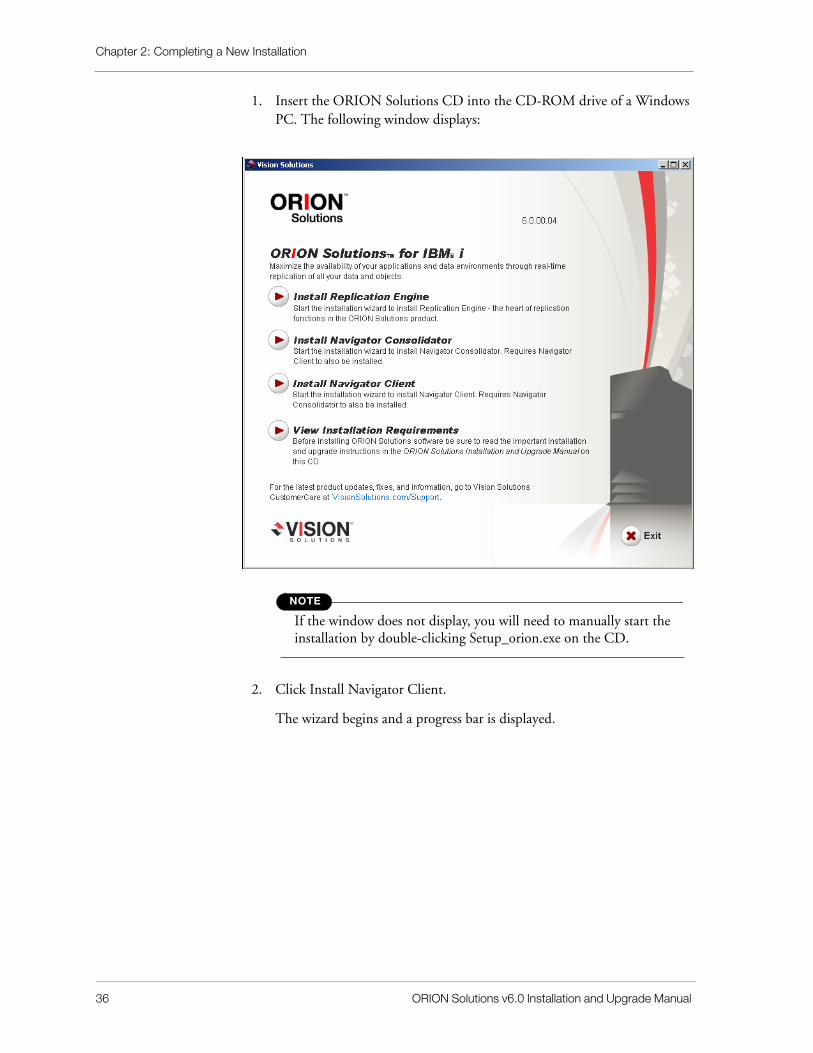
1. Insert the ORION Solutions CD into the CD-ROM drive of a Windows PC. The following window displays:
NOTE
If the window does not display, you will need to manually start the installation by double-clicking Setup_orion.exe on the CD.
2. Click Install Navigator Client.
The wizard begins and a progress bar is displayed.
Installing the Navigator Client
ORION Solutions v6.0 Installation and Upgrade Manual 37
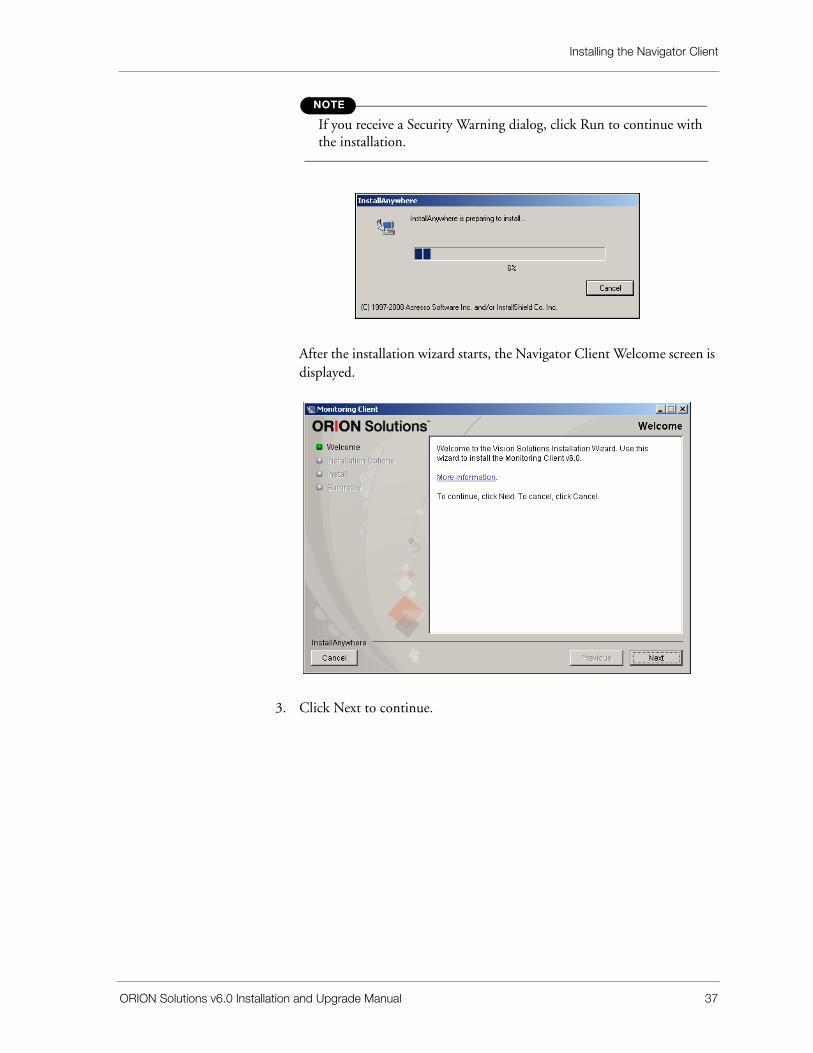
NOTE
If you receive a Security Warning dialog, click Run to continue with the installation.
After the installation wizard starts, the Navigator Client Welcome screen is displayed.
3. Click Next to continue.
Chapter 2: Completing a New Installation
38 ORION Solutions v6.0 Installation and Upgrade Manual
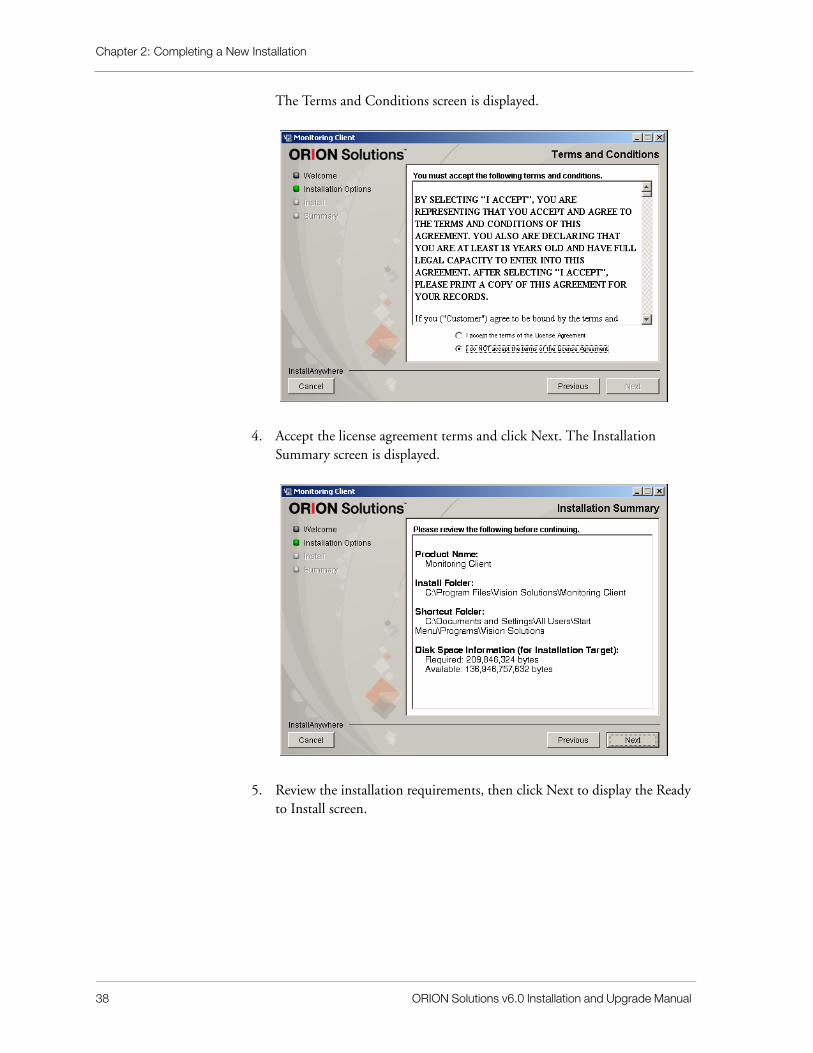
The Terms and Conditions screen is displayed.
4. Accept the license agreement terms and click Next. The Installation Summary screen is displayed.
5. Review the installation requirements, then click Next to display the Ready to Install screen.
Installing the Navigator Client
ORION Solutions v6.0 Installation and Upgrade Manual 39
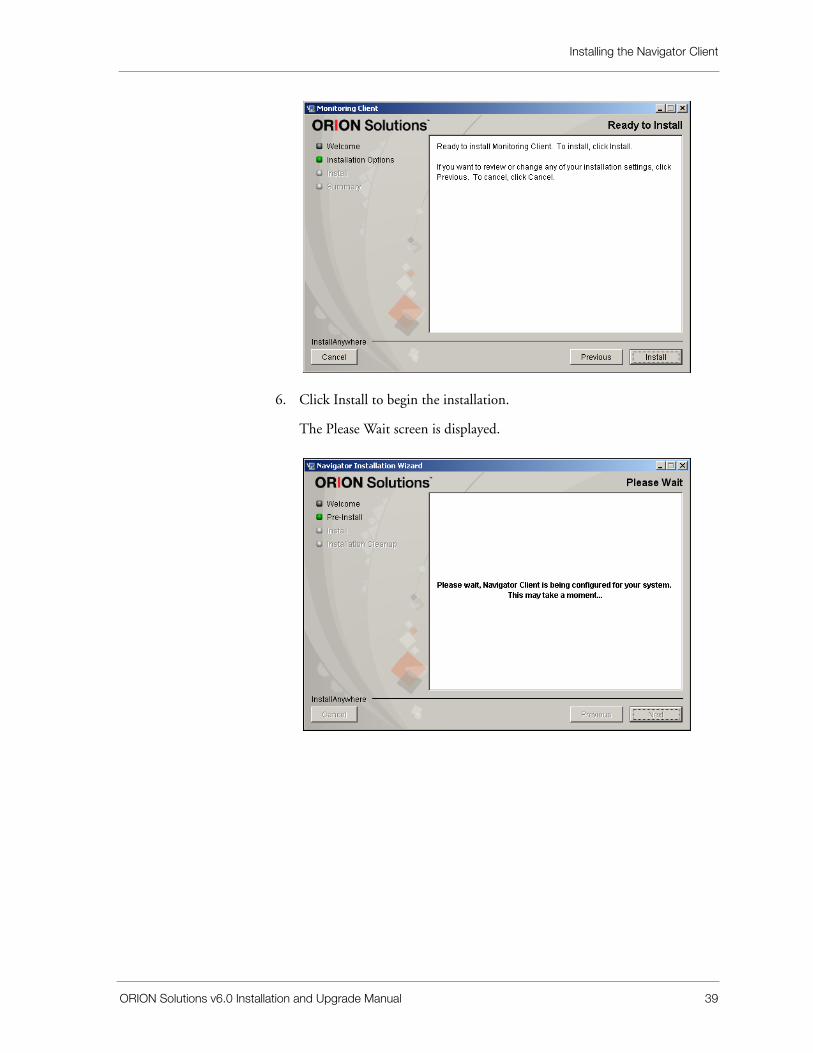
6. Click Install to begin the installation.
The Please Wait screen is displayed.

Chapter 2: Completing a New Installation
40 ORION Solutions v6.0 Installation and Upgrade Manual
Once the Navigator Client is ready, the installation begins.
When the installation is complete, the Installation Complete screen is displayed.
7. Click Done to complete the installation.
Enable ORION Solutions for the IBM Systems Director Navigator
ORION Solutions can be used with the IBM Systems Director Navigator, a console interface for IBM administration. When used together, you can easily
Enable ORION Solutions for the IBM Systems Director Navigator
ORION Solutions v6.0 Installation and Upgrade Manual 41
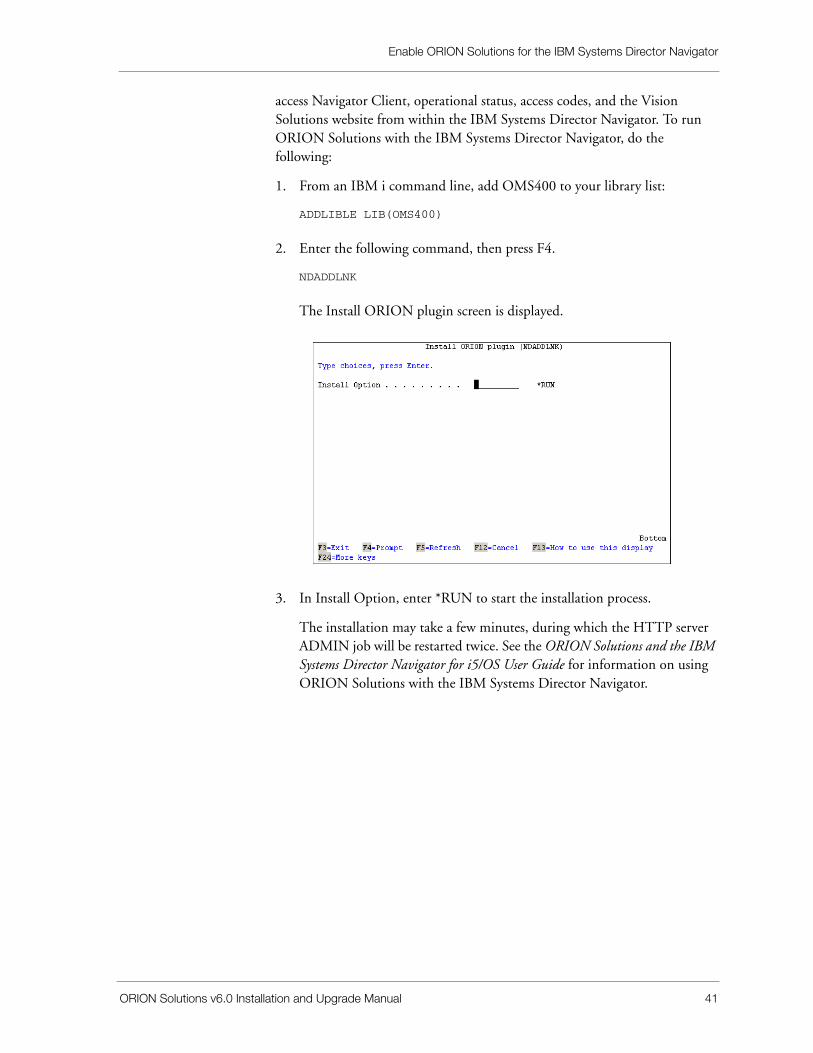
access Navigator Client, operational status, access codes, and the Vision Solutions website from within the IBM Systems Director Navigator. To run ORION Solutions with the IBM Systems Director Navigator, do the following:
1. From an IBM i command line, add OMS400 to your library list:
ADDLIBLE LIB(OMS400)
2. Enter the following command, then press F4.
NDADDLNK
The Install ORION plugin screen is displayed.
3. In Install Option, enter *RUN to start the installation process.
The installation may take a few minutes, during which the HTTP server ADMIN job will be restarted twice. See the ORION Solutions and the IBM Systems Director Navigator for i5/OS User Guide for information on using ORION Solutions with the IBM Systems Director Navigator.

Chapter 2: Completing a New Installation
42 ORION Solutions v6.0 Installation and Upgrade Manual
ORION Solutions v6.0 Installation and Upgrade Manual 43
Completing an Upgrade 3
This chapter contains pre-installation tasks and information for upgrades only. If you are installing ORION Solutions software for the first time, go to “Completing a New Installation” on page 7.
NOTE
Generally, configurations specified in your previous installation are retained during the upgrade process. However, if you are upgrading the Navigator Consolidator and Navigator Client from 1.1 SR-2 to 6.0, configured email notifications and email addresses are not retained. In addition, previously discovered boxes are still monitored, but they do not appear in the Discovery dialog box.
If you currently have any version of ORION Solutions or VSEE installed and want to upgrade to ORION Solutions v6.0, you must plan and prepare for the upgrade (see “Selecting an Upgrade Path” on page 44 to determine how to perform the upgrade on your system).
NOTE
As you prepare to upgrade your software, stay in touch with Vision Solutions for help, advice, and education about your mirroring environment.
To complete an upgrade, do the following:
❏ Determine the appropriate upgrade path (see “Selecting an Upgrade Path” on page 44).
❏ If required, run the user index utility (see “Using the User Index Utility” on page 45).
❏ Run the entitlement wizard (see “Run the ORION Solutions Entitlement Wizard” on page 48)
❏ Complete the upgrade pre-requisites (see “Replication Engine Upgrade Requirements” on page 49)
Chapter 3: Completing an Upgrade
44 ORION Solutions v6.0 Installation and Upgrade Manual
❏ Upgrade the Replication Engine and Navigator Agent (see “Upgrading the Replication Engine and Navigator Agent” on page 61)
❏ Upgrade the Navigator Consolidator, if applicable (see “Upgrading the Navigator Consolidator” on page 73)
❏ Upgrade the Navigator Client, if applicable (see “Upgrading the Navigator Client” on page 84)
Selecting an Upgrade PathThe following table lists the paths for upgrading to ORION Solutions v6.0.
IMPORTANT
For guidance in upgrading, contact CustomerCare at: http://www.visionsolutions.com/Support/Contact-CustomerCare.aspx
NOTE
For further information, contact Vision Solutions CustomerCare.
From Version Upgrade Instructions
ORION v1.2 SR-2 ASP01
Upgrade to ORION Solutions v6.0 using the procedures in this chapter.
ORION v1.1 SR-1 ASP11
1. Upgrade to V5R3.
2. Run the index utility (see “Using the User Index Utility” on page 45).
3. Upgrade to ORION Solutions v6.0 using the procedures in this chapter.
VSEE 8.2/4.2 SR-2 Upgrade to ORION Solutions v6.0 using the procedures in this chapter.
VSEE 8.1/4.1 SR-1 ASP11
1. Upgrade to V5R3.
2. Run the index utility (see “Using the User Index Utility” on page 45.
3. Upgrade to ORION Solutions v6.0 using the procedures in this chapter.
Using the User Index Utility
ORION Solutions v6.0 Installation and Upgrade Manual 45
Using the User Index Utility
IMPORTANT
Perform this procedure when you are upgrading from ORION Datacenter Edition, ORION for OS/400, or VSEE to ORION Solutions v6.0.
A change in format to the user index MRRIFAL requires that old format user indexes be deleted from each link library before upgrading to OMS/400 9.1 (part of the ORION Server Engine for i5/OS). Before deleting the user indexes, existing open failed transactions for each link should be completed or the deletion of the user index may result in lost transactions. You must run the CVSSR1 utility to detect these open failed transactions. It will delete user indexes MRRIFAL, MRRIFALRRN, and MRRIFALTMP only if there are no open transactions.
You may need to run the CVSSR1 utility several times to reach a successful completion if there are open failed transactions.
Running the User Index UtilityBefore upgrading, you must execute the User Index Utility. The User Index Utility was provided previously in the VSEE 8.1/4.1 SR-1 release and was installed in the OMS400 library. Run the utility as described in the procedure below. If you are upgrading a VSEE product with a version earlier than VSEE 8.1/4.1 SR-1 ASP11, contact Vision Solutions SCP Certified CustomerCare before you proceed with an upgrade.
1. Sign on to the IBM i system as QSECOFR (or equivalent).
2. Verify the existence of the CVSSR1 *CMD and *PGM in the OMS400 library.
3. Add OMS400 to your library list.

Chapter 3: Completing an Upgrade
46 ORION Solutions v6.0 Installation and Upgrade Manual
4. Prompt the CVSSR1 command with the following parameters:
NOTE
As the utility runs, interim messages may display in the status pane at the bottom of the screen. Scroll down to view the final message.
The utility has run successfully when it determines that there are no open failed transactions and the utility has deleted user indexes MRRIFAL, MRRIFALRRN, and MRRIFALTMP for all links. The following message is displayed:
OME0892 “User index cleanup completed successfully for all links”.
5. When the utility has successfully run and deleted all the user indexes, execute the following command to verify the deletions:
WRKOBJ OBJ(*ALLUSR/MRRIF*) OBJTYPE(*USRIDX)
If no objects are displayed, the user indexes have been deleted. After performing the upgrade, and starting the links, the new versions of the user indexes will be created.
Parameter Value Description
DURATION 30 minutes (recommended)
Enter a value in number of minutes for the utility to continue to run while trying to reach a successful completion.
The index utility will continue to run until either all the outstanding entries have been processed by the apply job or the maximum time set by the DURATION parameter has been reached.
The utility will end sooner if it reaches a successful completion. Successful completion is determined by receiving completion message OME0892.
ENDLNK *YES If *YES is selected for each link and the link is still active, the utility ends the link once it has determined that there are no failed transactions contained within the user index for that link. Selecting *YES to end the link applies only to the target side; the utility is looking for an active apply job. The source side of the link is not ended.
*NO If *NO is selected, if links are still active, the utility does not attempt to end the links.
Using the User Index Utility
ORION Solutions v6.0 Installation and Upgrade Manual 47
NOTE
All links must be current before upgrading the product. The user index utility may need to be run more than once in order to ensure that all links are current and that a successful completion of the user index utility has been achieved.
6. Do one of the following:
• If the links are not current, bring them current. This will include ending the source side of each link, and then running the user index utility again.
• If the links are current and all the specified user indexes are deleted, then you can proceed to upgrade the product.
• If you receive an error message, see “Troubleshooting the User Index Utility” on page 47.
7. Signoff the system after a successful completion of the user index utility and then sign back on to the system as QSECOFR (or equivalent) to proceed with the next procedure for removing old user spaces from a source system.
Troubleshooting the User Index UtilityYou will receive the following messages if there are error conditions. Suggestions for resolving the conditions are given for each message. If you continue to receive either of these two messages, call CustomerCare.
Message Condition
Message OME0893:
“User indexes could not be cleaned up for link (linkname) - Link is active.”
You may see several of these messages, one for each link that is active.
If the ENDLNK parameter selected is *NO, you must manually end your link(s) and run the utility again until the last message is OME0892 “User index cleanup completed successfully for all links.”
Message OME0894:
“User indexes could not be cleaned up for link (linkname) - Unprocessed transactions exist.”
Make sure the link is running and start it if it is inactive, then run the utility again.
If the link is active, continue to run the utility until the last message is OME0892 “User index cleanup completed successfully for all links.”
Chapter 3: Completing an Upgrade
48 ORION Solutions v6.0 Installation and Upgrade Manual
Run the ORION Solutions Entitlement WizardUpgrading ORION Solutions may require new license keys for your Vision Solutions product. To verify and obtain new license keys, you must run the ORION Solutions Entitlement Wizard before running the ORION Solutions Installation Wizard.
1. Obtain the following information for each system in your HA environment:
• System Serial Number
• Processor Group
• System Processor Feature Code
In many cases, you may already have this information recorded in your business systems. If so, it may be a simple matter of running a report and sending it to us at [email protected]. Otherwise, we have provided both an automated wizard (see “Run the Automated Procedure” on page 48) and a manual procedure (see “Run the Manual Procedure” on page 49) to make gathering this information from your systems as simple as possible.
2. Send the requested information to Vision Solutions.
3. Please wait until you have received the following response from Vision Solutions before installing or upgrading.
Dear Vision Solutions Customer,
We have received your email and the entitlement information you have provided has been updated and verified. We appreciate your prompt response.
Thank you again for your business.
Your assistance in gathering the information to respond to this request is greatly appreciated!
Run the Automated ProcedureYour system must meet the following minimum requirements to run the automated ORION Solutions Entitlement Wizard:
• 128MB free RAM
• One of the following operating systems: Windows® 2000, Windows® XP, or Windows® Vista
• Minimum 8-bit color depth (256 colors)
• Minimum of 1024x768 resolution
Replication Engine Upgrade Requirements
ORION Solutions v6.0 Installation and Upgrade Manual 49
1. Download the ORION Solutions Entitlement Wizard from the Vision Extranet (Click Customer/Partner Login at www.visionsolutions.com) under the License Keys menu option.
2. Run the wizard from a PC and follow the instructions to connect to each system in your HA environment. The wizard will generate a file on the PC containing the required information for automated entitlement purposes.
3. Email the file generated by the wizard to: [email protected]
4. Please include your company name and contact information so we can contact you if follow-up is necessary.
Run the Manual Procedure1. Run the following command to get the System Serial Number and Proces-
sor Group (e.g. P05, P10, P20 etc.):
WRKLICINF
2. Run the following command to get the System Processor Feature Code:
DSPSYSVAL QPRCFEAT
3. Email the values for each system in your HA environment to [email protected]
4. Please include your company name and contact information so we can contact you if follow-up is necessary.
Replication Engine Upgrade RequirementsWhen you upgrade to ORION Solutions v6.0, you must first upgrade the Replication Engine (which includes OMS/400 and ODS/400). See the following for upgrade requirements:
• “OMS/400 Upgrade Requirements” on page 49
• “ODS/400 Upgrade Requirements” on page 50
• “ECS/400 Upgrade Requirements” on page 50
• “Completing Pre-Upgrade Tasks” on page 50
• “Preparing the Environment for an Upgrade” on page 51
• “Performing Environment Changes for an Upgrade” on page 55
OMS/400 Upgrade RequirementsOMS/400 v9.1 has the following installation requirements:
Chapter 3: Completing an Upgrade
50 ORION Solutions v6.0 Installation and Upgrade Manual
• Upgrade to OMS/400 v9.1 on all source and target systems.
• Upgrade is compatible only with ODS/400 v5.1 (both OMS/400 and ODS/400 must be upgraded before you resume mirroring).
• End all batch jobs that use ODS/400 and OMS/400 commands or functions.
• End ODS/400 and OMS/400.
• Use a QSECOFR or a user profile of equivalent authority for installation.
• Set the QVFYOBJRST system value to a value of 3 or lower to install OMS/400.
ODS/400 Upgrade RequirementsODS/400 v5.1 has the following installation requirements:
• ODS/400 v5.1 must be upgraded on all source and target systems.
• ODS/400 v5.1 is only compatible with OMS/400 v9.1. Both OMS/400 and ODS/400 must be upgraded before you resume mirroring.
• OMS/400 v5.1 must be installed on each system running ODS/400.
• All batch jobs that use ODS/400 and OMS/400 commands or functions must be ended.
• The target systems must have sufficient storage space to accommodate all the objects to be mirrored.
• The system value QVFYOBJRST must be set to 3 or lower.
• Library QSYS2 must be in the system library list below QSYS and above QUSRSYS.
ECS/400 Upgrade RequirementsIt is recommended that you install ECS/400 (Electronic Customer Support) to allow Vision Solutions CustomerCare representatives access to your system to aid in the diagnosis of replication problems should they arise.
Completing Pre-Upgrade TasksThe table below provides a list of tasks that you must complete to upgrade. Verify that these tasks have been completed before continuing to “Preparing the Environment for an Upgrade” on page 51.

Replication Engine Upgrade Requirements
ORION Solutions v6.0 Installation and Upgrade Manual 51
Preparing the Environment for an UpgradeIn order to upgrade OMS/400 and ODS/400, you must prepare your environment to ensure that the process can be completed with a minimum of downtime. Preparation focuses on changes to the products that may be required when performing the upgrade, as follows:
❏ Ending processes that will interfere with the upgrade (OMS/400 or IBM i processes).
❏ Ending mirroring such that all transactions read by OMS/400 have been routed and applied on the target.
❏ Ending ODS/400 mirroring.
Pre-Install Task Explanation
1. Read the Readme file found on the ORION Solutions v6.0 product CD.
IMPORTANT! Prior to performing any upgrade, you must first read the Readme file for special instructions that must be performed before beginning an upgrade.
The Readme file is located at the root directory of the ORION Solutions v6.0 product CD.
1. Obtain a QSECOFR or equivalent login for any IBM i node to which Replication Engine will be installed.
This login is required to complete the installation.
2. Ensure that the systems where the Replication Engine is to be installed are parallel in configuration.
Systems that are to be configured to mirror data across one another must have the same directory structures and disk size.
3. Verify that all systems are running at V5R3 or higher and that the appropriate IBM PTFs have been applied to your system to ensure compatibility.
For information regarding required IBM PTFs, refer to the IBM PTF document included on your installation media. Check the Vision Solutions website for periodic updates to this document.
4. Evaluate the impact of mirroring on your systems.
Systems must have adequate resources to handle journaling overhead and have adequate communication bandwidth to allow mirroring transactions between systems to occur in a timely manner.
5. To ensure the installation can be properly completed from a Windows PC to the IBM i node, verify that these jobs and profiles (listed to the right) are enabled.
The QUSER user profile must be enabled (needed to start IBM i Host Servers).
The IBM i Host Servers (*SIGNON, *RMTCMD, *FILE) must be active.
To start the IBM i Host Servers, type: STRHOSTSVR *ALL and press ENTER.
QSERVER SBS must be active and not in a restricted state on the Host Servers.
6. A 100 megabit connection from the PC to the IBM i systems, is recommended. Install if necessary.
A 100 megabit connection provides a more time-efficient installation.
7. Repeat for all other systems.
8. Cleanup - delete old upgrade libraries.
Chapter 3: Completing an Upgrade
52 ORION Solutions v6.0 Installation and Upgrade Manual
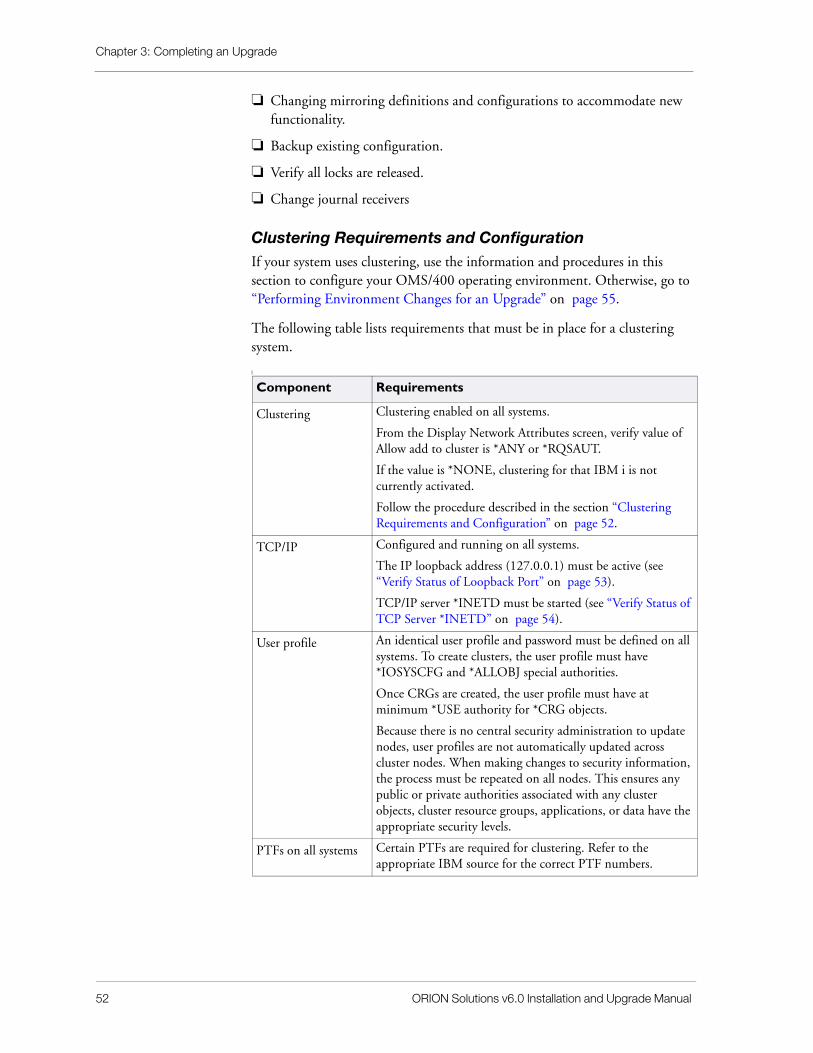
❏ Changing mirroring definitions and configurations to accommodate new functionality.
❏ Backup existing configuration.
❏ Verify all locks are released.
❏ Change journal receivers
Clustering Requirements and ConfigurationIf your system uses clustering, use the information and procedures in this section to configure your OMS/400 operating environment. Otherwise, go to “Performing Environment Changes for an Upgrade” on page 55.
The following table lists requirements that must be in place for a clustering system.
l
Component Requirements
Clustering Clustering enabled on all systems.
From the Display Network Attributes screen, verify value of Allow add to cluster is *ANY or *RQSAUT.
If the value is *NONE, clustering for that IBM i is not currently activated.
Follow the procedure described in the section “Clustering Requirements and Configuration” on page 52.
TCP/IP Configured and running on all systems.
The IP loopback address (127.0.0.1) must be active (see “Verify Status of Loopback Port” on page 53).
TCP/IP server *INETD must be started (see “Verify Status of TCP Server *INETD” on page 54).
User profile An identical user profile and password must be defined on all systems. To create clusters, the user profile must have *IOSYSCFG and *ALLOBJ special authorities.
Once CRGs are created, the user profile must have at minimum *USE authority for *CRG objects.
Because there is no central security administration to update nodes, user profiles are not automatically updated across cluster nodes. When making changes to security information, the process must be repeated on all nodes. This ensures any public or private authorities associated with any cluster objects, cluster resource groups, applications, or data have the appropriate security levels.
PTFs on all systems Certain PTFs are required for clustering. Refer to the appropriate IBM source for the correct PTF numbers.
Replication Engine Upgrade Requirements
ORION Solutions v6.0 Installation and Upgrade Manual 53
NOTE
Cluster version 1 is no longer supported by OMS/400.
After verifying that the above requirements have been met, perform the following procedures on all nodes to enable clustering.
Set the Network Attribute (ALWADDCLU)
You use the Change Network Attribute (CHGNETA) command on all system that you want to set up as a cluster node. The ALWADDCLU network attribute specifies whether a node can be added to a cluster.
1. From any command line, prompt the CHGNETA command.
The Change Network Attributes (CHGNETA) screen is displayed.
Page down to the bottom of the list to see the Allow add to cluster value.
2. Enter one of the following values:
If you select *RQSAUT, the ALWADDCLU network attribute is checked to see if the node that is being added is allowed to be part of the cluster and whether to validate the cluster request through the use of digital certificates. Validation of cluster requests via digital certificates requires both nodes to have the Digital Certificate Manager.
Verify Status of Loopback Port
The TCP/IP loopback port must be active for clustering.
1. On a command line type NETSTAT and press Enter.
The Work with TCP/IP Network Status menu is displayed.
2. Select option 1 (Work with TCP/IP Interface Status).
3. On the menu that is displayed, select option 1 (Work with TCP/IP Interfaces) and press Enter.
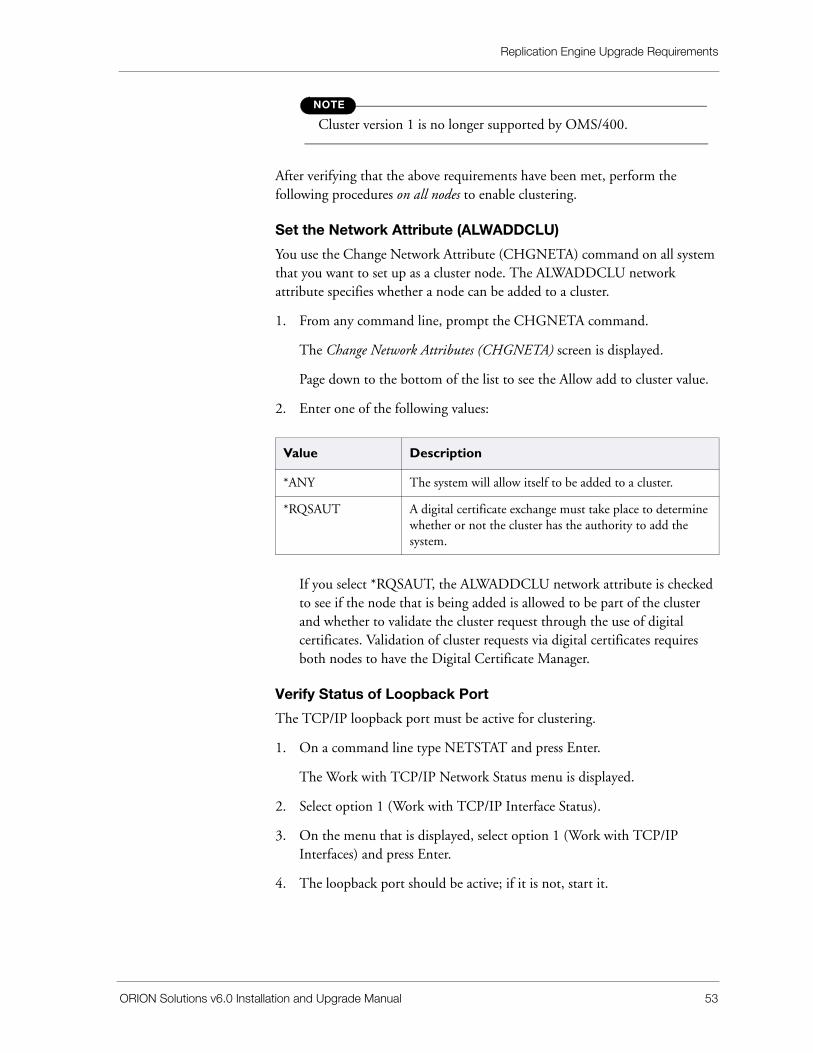
4. The loopback port should be active; if it is not, start it.
Value Description
*ANY The system will allow itself to be added to a cluster.
*RQSAUT A digital certificate exchange must take place to determine whether or not the cluster has the authority to add the system.
Chapter 3: Completing an Upgrade
54 ORION Solutions v6.0 Installation and Upgrade Manual
Verify Status of TCP Server *INETD
1. On a command line type NETSTAT and press Enter.
The Work with TCP/IP Network Status menu is displayed.
2. Select option 3 and press Enter.
3. Verify that local port as400-c is started and the State is listen.
4. If as400-c is not present, start TCP/IP server *INETD with the following command:
STRTCPSVR *INETD
NOTE
You can verify the status of this server job on the WRKACTJOB screen. Locate the QSYSWRK/QTOGINTD entry. If it is not shown, then the server is not started.
Disable Line Controller Heartbeat
The communication line controller detects and records line errors. Within the line description are parameters that determine at what point the system operator is notified of line errors.
In a clustering environment, the default Recovery Limits associated with a line can interfere with Cluster Services and its heartbeat time-out and recovery counters.
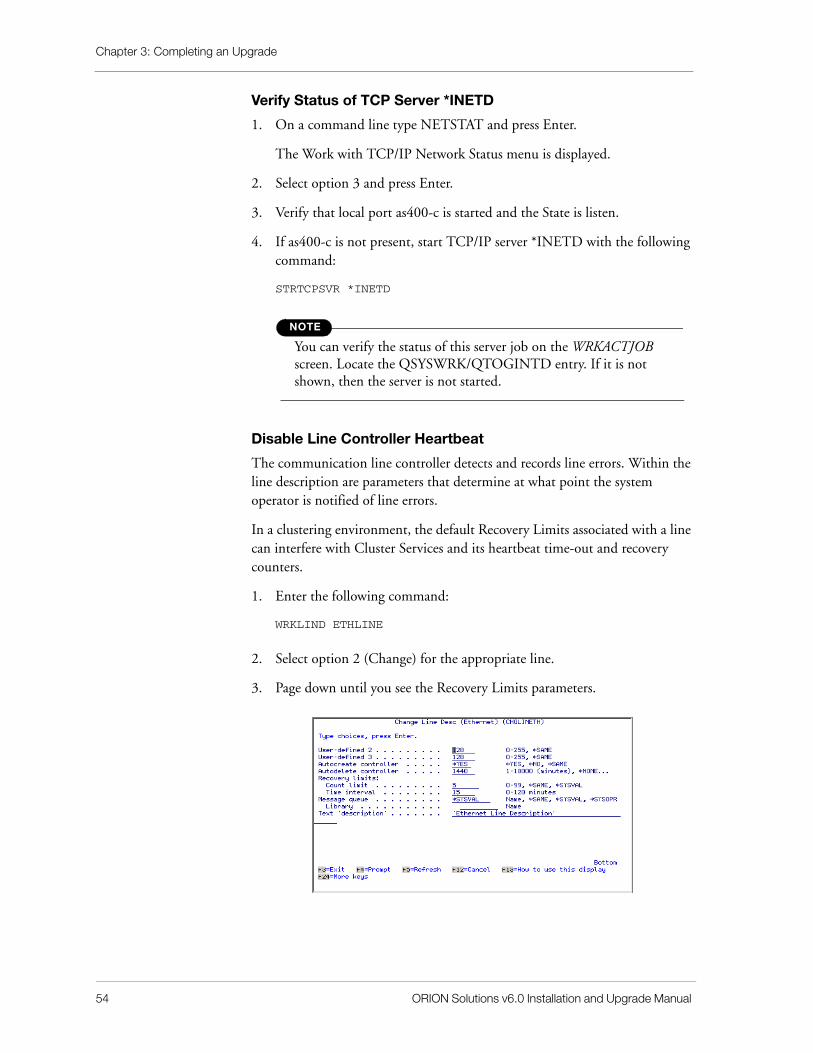
1. Enter the following command:
WRKLIND ETHLINE
2. Select option 2 (Change) for the appropriate line.
3. Page down until you see the Recovery Limits parameters.
Replication Engine Upgrade Requirements
ORION Solutions v6.0 Installation and Upgrade Manual 55
The recovery limit parameters indicate that if the value for the count limit occurs within the specified time interval, then the system operator is notified with a message that requires a response.
If your LAN cable is disconnected, this results in one line error. Every 10 to 15 seconds a retry is attempted, resulting in additional errors. With the default settings, an operator message will be generated in about one minute or less (depending on your line type).
Use the following step to eliminate this manual intervention so that the cluster heartbeat time-outs can take control.
4. Change the default to the following recommended settings on the LAN line used for cluster heartbeat.
Providing Communications
We recommend that you establish redundant communications lines on all nodes to be included in a recovery domain.
Additionally, you should use separate line adapters and I/O processors to eliminate the possibility of both lines going down because of a single point of failure.
If you anticipate very high data volume between primary and backup nodes, you should dedicate one network connection to OMS/400 for transaction data, and another to carry the clustering communications.
Performing Environment Changes for an UpgradeAfter reviewing all the information to prepare your environment for an upgrade, you may have procedures that must be accomplished before you begin installing from the ORION Solutions v6.0 product CD. Review the following information before you begin the upgrade procedure.
The following steps must be performed on all interconnected systems. It is essential that mirroring be ended on all systems in your mirroring environment before you begin the upgrade. You should be ready to do a full backup of your systems later in the process.
Field Value Description
Count limit 8 (or default) A non-zero count limit with a zero time interval disables this counter.
Time interval 0
Chapter 3: Completing an Upgrade
56 ORION Solutions v6.0 Installation and Upgrade Manual
IMPORTANT
When the OMS400 subsystem is ended, the Journal Manager is also ended. Because Journal Manager will not be available for the duration of the upgrade, if there is a chance that a journal receiver change threshold will be reached during the upgrade, perform a receiver change before beginning the upgrade.
If you also use ODS/400, you must upgrade to ODS/400 V5.1 before you resume mirroring on any system in your mirroring environment. In preparing your system for the OMS/400 upgrade, you will also be performing the steps necessary to prepare for an ODS/400 upgrade.
Remove Temporary Libraries from a Previous UpgradeIf the current version of OMS/400 on your system is an upgrade from a previous version, all OMS* libraries were renamed as OMSOLD* during the previous upgrade.
To remove old upgrade libraries:
1. Sign on to your system with QSECOFR or equivalent profile.
2. On each system in your mirroring environment, make sure no users are in any OMS/400 or ODS/400 screen.
You may wish to send a message to all users on the system that they must not access any OMS/400 or ODS/400 screens for the duration of the installation. You should also check the OMS/400 and ODS/400 product libraries for locks from user jobs.
NOTE
Do not execute the installation from within OMS/400 or ODS/400 screens.
3. Before beginning the upgrade to v9.1, check whether any OMSOLD* libraries exist by entering the following command:
WRKLIB OMSOLD*
4. For any old libraries that are found, enter option 4 (Delete) to delete them.
It may be necessary to clear job queues and out queues in the OMSOLD library. If any messages appear indicating that a queue was not deleted, clear the queue and attempt to delete the library again.
5. If you also use ODS/400, check whether the ODSOLD* libraries exist by entering the following command:
WRKLIB ODSOLD*.
Replication Engine Upgrade Requirements
ORION Solutions v6.0 Installation and Upgrade Manual 57
6. For any old libraries that are found, enter option 4 (Delete) to delete them.
It may be necessary to clear job queues and out queues in the ODSOLD library. If any messages appear indicating that a queue was not deleted, clear the queue and attempt to delete the library again.
7. Repeat step 1 through step 6 for each system in your mirroring environment.
End OMS/400 and ODS/400 for the Upgrade
IMPORTANT
When ending OMS/400 and ODS/400 prior to the upgrade, it is essential that all products be current (all transactions processed by the reader on all source systems have been sent to the targets and all transactions received on the targets have been applied).
To end OMS/400 and ODS/400:
1. Verify that mirroring is active for all links on all systems.
If any links are inactive, start them on both source and target sides. This allows any links that are not current to process transactions.
2. On all systems, end any batch jobs that use OMS/400 or ODS/400 commands or functions.
If you are not certain which processes in your environment utilize OMS/400 or ODS/400 functions, consult your system administrator. Calling OMS/400 or ODS/400 commands or functions during the installation process can cause the installation and the functions or commands called to fail.
3. On each ODS/400 source system, enter the following command:
ENDODS
4. On the source system, access the System Activity display for each link.
From this screen you will be ending the source side of the link.
5. Press F18 (End OMS).
This ends OMS/400 for the current link. End the source side of the link, then press Enter. When this command finishes executing, press F12 to exit.
6. Press F5 (Refresh) until the sequence numbers are the same for the sender on the source and the receiver and apply on the target.
Chapter 3: Completing an Upgrade
58 ORION Solutions v6.0 Installation and Upgrade Manual
When ending OMS/400 for an upgrade, it is essential that OMS/400 be current. If the sequence numbers for the sender and the apply jobs do not match, do not continue with the upgrade. If the sequence numbers differ between the jobs and do not continue processing with subsequent refreshes, restart the link ID and allow it to continue processing. After a few minutes try ending the link again.
NOTE
It is essential that all transactions read by the OMS/400 sender job on the source be routed and applied on the target before you begin the upgrade.
7. As you look at each link, record its sequence number.
NOTE
If, after the upgrade, you experience difficulties in resuming mirroring, having the last sequence number allows you to resume mirroring with the correct transaction.
8. Repeat step 4 through step 7 for each link, until all links on all source systems have been ended.
9. On all target systems, enter the following command:
ENDOMS LINKID(*ALL)
When the system prompts you if you want to end the subsystem, specify YES.
10. Exit the OMS/400 product.
11. On each system in your mirroring environment, enter the following command:
ENDSBS SBS(VSIGPL) OPTION(*IMMED)
12. On each system in your mirroring environment, access the WRKACTJOB screen and verify that the OMS400, ODS400, and VSIGPL subsystems are ended.
13. On each system in your mirroring environment, enter the following commands:
RMVLIBLE LIB(OMS400)
RMVLIBLE LIB(ODS400)

Replication Engine Upgrade Requirements
ORION Solutions v6.0 Installation and Upgrade Manual 59
These libraries may not appear in the library list. If messages display indicating that the library was not removed, view the second level message text to identify any problems. If necessary, sign off and sign back on to resolve the problem. Do not proceed with the upgrade until these libraries are removed.
Verify There Are No Locks on OMS/400 ObjectsAll locks must be released from all OMS/400 objects. Use the following procedure to verify that there are no locks on any OMS/400 objects.
1. Use the WRKOBJLCK command for the file MRMOBJP in each link library to verify that all locks on the MRMOBJP files have been released.
For example, enter the following command to check MRMOBJP in link library OMSSYS0001:
WRKOBJLCK OBJ(OMSSYS0001/MRMOBJP) OBJTYPE(*FILE)
The link library names are listed on the Remote Link Selection screen and will be named sequentially as OMSSYS0001, OMSSYS0002, for example. Press F6 to check for member locks on each link.
2. If there are any jobs that still have open data paths into the link libraries, they must be ended and restarted to release the locks.
You should record the names of the jobs that you end.
3. Use the WRKOBJLCK command as follows to verify that there are no locks on any of the product or link libraries (where nnnn is the number of the link library):
WRKOBJLCK OBJ(OMS400) OBJTYPE(*LIB)
WRKOBJLCK OBJ(ODS400) OBJTYPE(*LIB)
WRKOBJLCK OBJ(OMSSYSnnnn) OBJTYPE(*LIB)
IMPORTANT
If locks are present on any files in OMS400 or any OMS/400 link libraries, do not continue with the upgrade until the locks are released. Failure to do so could affect your applications, cause data loss, and cause the upgrade to fail.

Chapter 3: Completing an Upgrade
60 ORION Solutions v6.0 Installation and Upgrade Manual
Back Up Existing OMS/400 and ODS/400 InstallationsCreate a backup of your existing OMS/400 and ODS/400 installations. If you encounter problems during the upgrade, the backup will allow you to restore your original configuration.
If the installation fails or if you complete the installation process, but are not able to resume mirroring on some or all link IDs, do not attempt to restore your mirroring environment from the following backup without first contacting Vision Solutions CustomerCare to discuss your recovery options.
NOTE
Never attempt to backup OMS/400 or ODS/400 while the product is still running. End OMS/400 and ODS/400 before proceeding.
To backup existing OMS/400 objects:
1. Using your preferred method for backups, save the following objects on each system in your mirroring environment:
• Libraries—OMS400, OMSSYS0001–OMSSYS00nn (the OMS/400 link libraries), and VSIQSYS.
• Objects in QGPL—OMS*, VSWRK*, and VSILIB.
2. If you also use ODS/400, save the following objects on each system in your mirroring environment:
• QGPL/ODS*
• QSYS/ODS*
• QUSRSYS/ODS*
• ODS400/*ALL
3. Once you have created your backups, go to “Upgrading the Replication Engine and Navigator Agent” on page 61.
Upgrading the Replication Engine and Navigator Agent
ORION Solutions v6.0 Installation and Upgrade Manual 61
Upgrading the Replication Engine and Navigator AgentThis section contains procedures for upgrading the Replication Engine (OMS/400 and ODS/400) and Navigator Agent.
Before beginning the installation ensure that:
• the pre-installation tasks have been performed.
• the PC is connected to the network and has a connection with the IBM i node where the Navigator Agent and the Replication Engine will be installed.
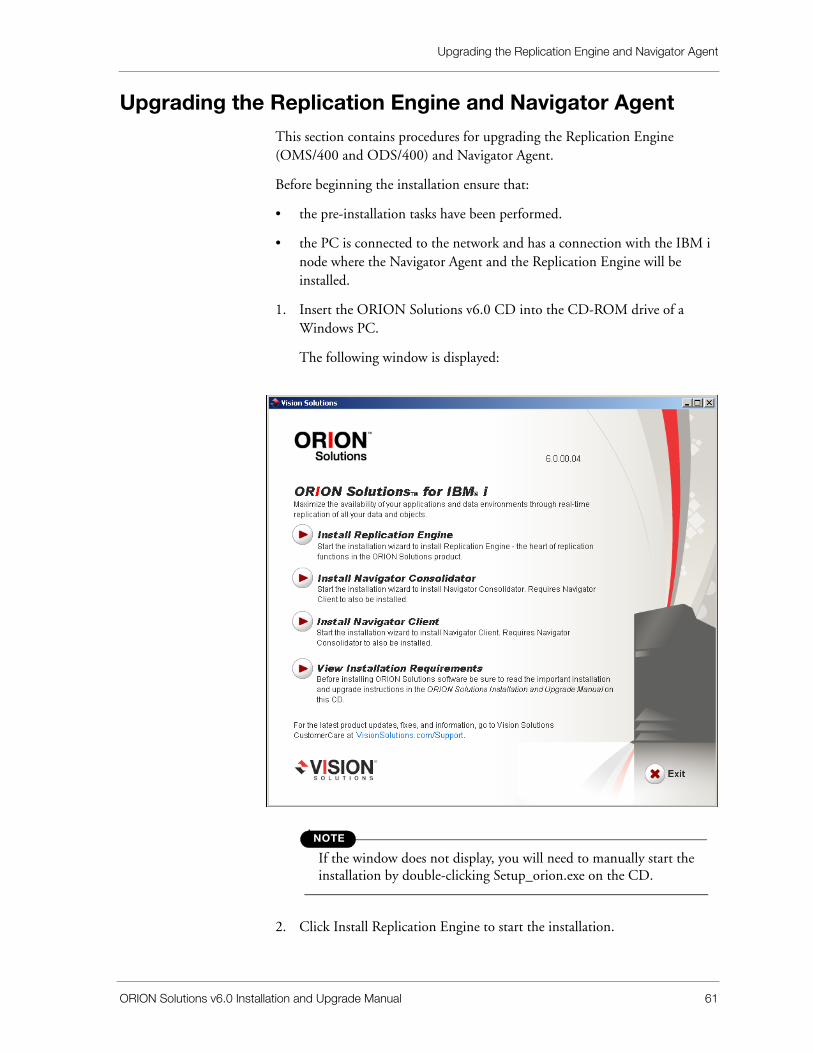
1. Insert the ORION Solutions v6.0 CD into the CD-ROM drive of a Windows PC.
The following window is displayed:
NOTE
If the window does not display, you will need to manually start the installation by double-clicking Setup_orion.exe on the CD.
2. Click Install Replication Engine to start the installation.
Chapter 3: Completing an Upgrade
62 ORION Solutions v6.0 Installation and Upgrade Manual
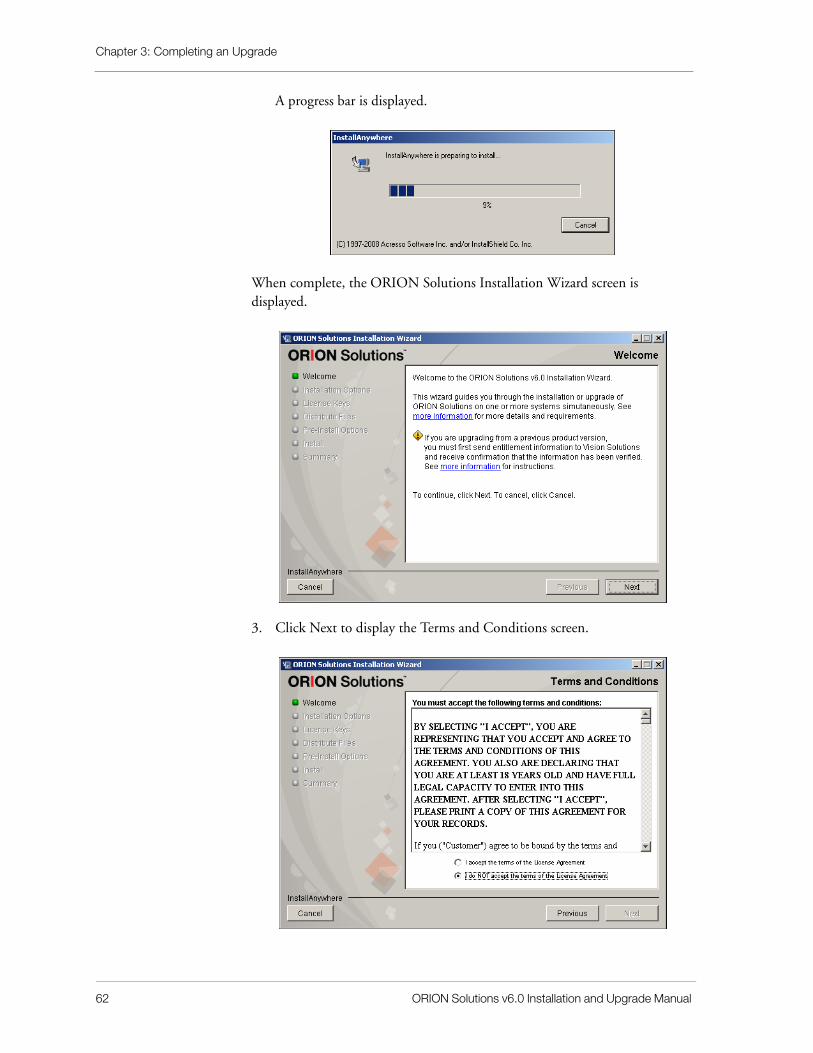
A progress bar is displayed.
When complete, the ORION Solutions Installation Wizard screen is displayed.
3. Click Next to display the Terms and Conditions screen.
Upgrading the Replication Engine and Navigator Agent
ORION Solutions v6.0 Installation and Upgrade Manual 63
4. Read and accept the terms and conditions, then click Next.
NOTE
If you do not accept the terms and conditions, you cannot continue the installation.
The System Login Screen is displayed.
5. Enter a login for the IBM i node on which the ORION Solutions components will be installed.
6. Click Log In.
The Confirm System Selection screen is displayed. In addition to the system to which you just logged in, the screen also shows systems that communicate with that system and have ORION Solutions installed.
Parameter Description
System The IBM i node on which the ORION Solutions components will be installed.
User The login User ID. It must have QSECOFR or equivalent privileges.
Password The password associated with the user login.
Chapter 3: Completing an Upgrade
64 ORION Solutions v6.0 Installation and Upgrade Manual
7. Review the listed systems, then do one of the following:
• Enter system names or IP addresses for other systems, then click Add.
• Click the Remove button to remove a system from the list.
NOTE
Vision Solutions recommends upgrading the source and target systems at the same time.
8. When the list is complete, click Next.
If you need to log in to additional systems, a login screen displays for each additional system. Otherwise, the Specify LKP Location screen is displayed.
Upgrading the Replication Engine and Navigator Agent
ORION Solutions v6.0 Installation and Upgrade Manual 65
9. Do one of the following:
• If you have not already downloaded license keys, select Automatically check license keys.
• If you have already downloaded license keys from Vision Solutions, select Specify the location of license keys that have already downloaded, then enter the location in the Location field or click Choose to navigate to the location of the license keys.
10. Click Next to start the license key check.
One of the following occurs:
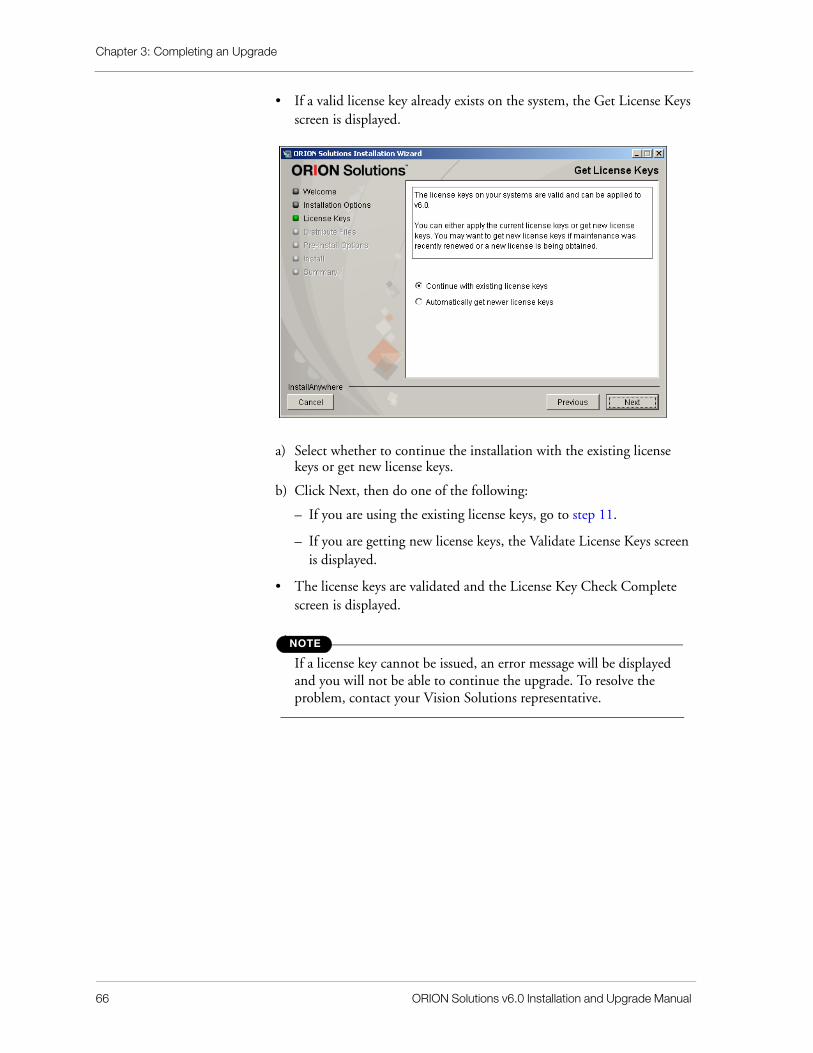
Chapter 3: Completing an Upgrade
66 ORION Solutions v6.0 Installation and Upgrade Manual
• If a valid license key already exists on the system, the Get License Keys screen is displayed.
a) Select whether to continue the installation with the existing license keys or get new license keys.
b) Click Next, then do one of the following:
– If you are using the existing license keys, go to step 11.
– If you are getting new license keys, the Validate License Keys screen is displayed.
• The license keys are validated and the License Key Check Complete screen is displayed.
NOTE
If a license key cannot be issued, an error message will be displayed and you will not be able to continue the upgrade. To resolve the problem, contact your Vision Solutions representative.
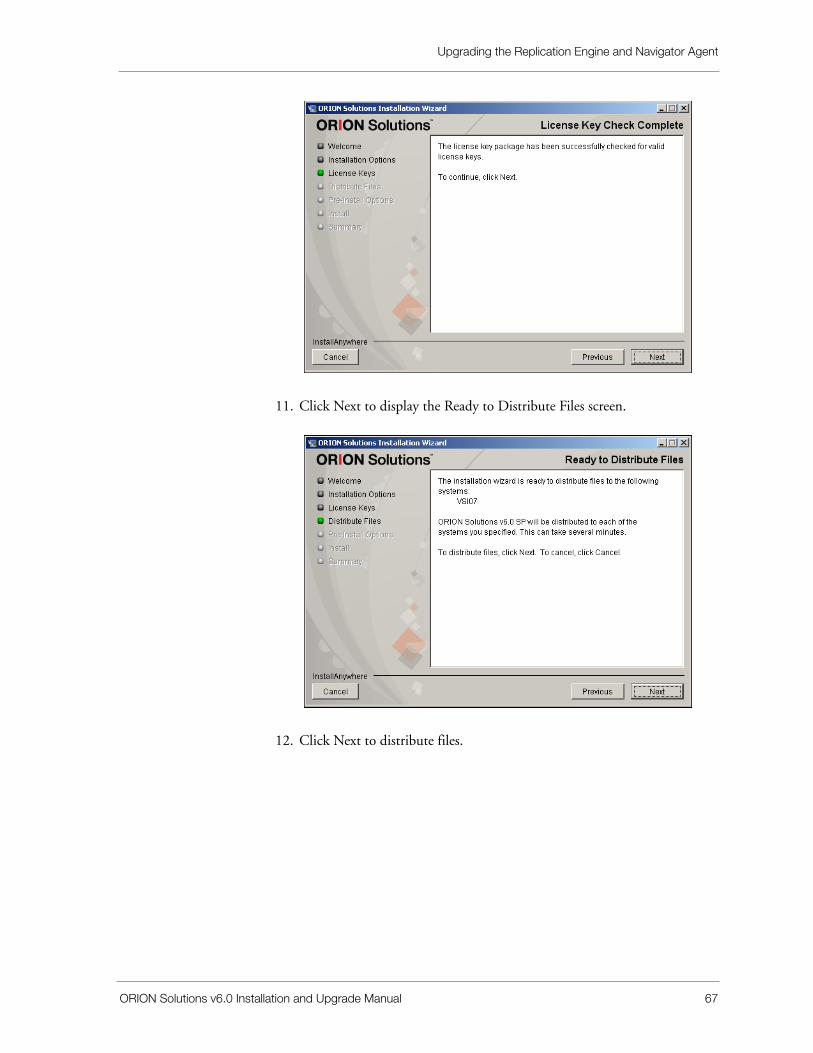
Upgrading the Replication Engine and Navigator Agent
ORION Solutions v6.0 Installation and Upgrade Manual 67
11. Click Next to display the Ready to Distribute Files screen.
12. Click Next to distribute files.
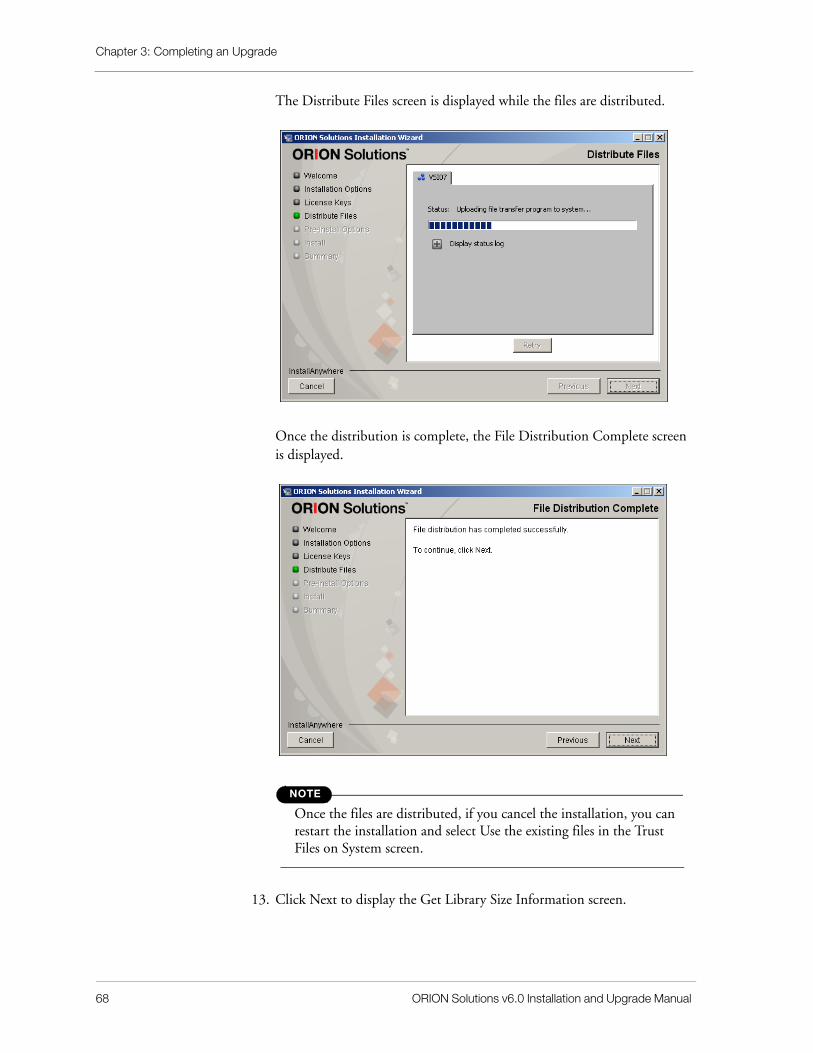
Chapter 3: Completing an Upgrade
68 ORION Solutions v6.0 Installation and Upgrade Manual
The Distribute Files screen is displayed while the files are distributed.
Once the distribution is complete, the File Distribution Complete screen is displayed.
NOTE
Once the files are distributed, if you cancel the installation, you can restart the installation and select Use the existing files in the Trust Files on System screen.
13. Click Next to display the Get Library Size Information screen.
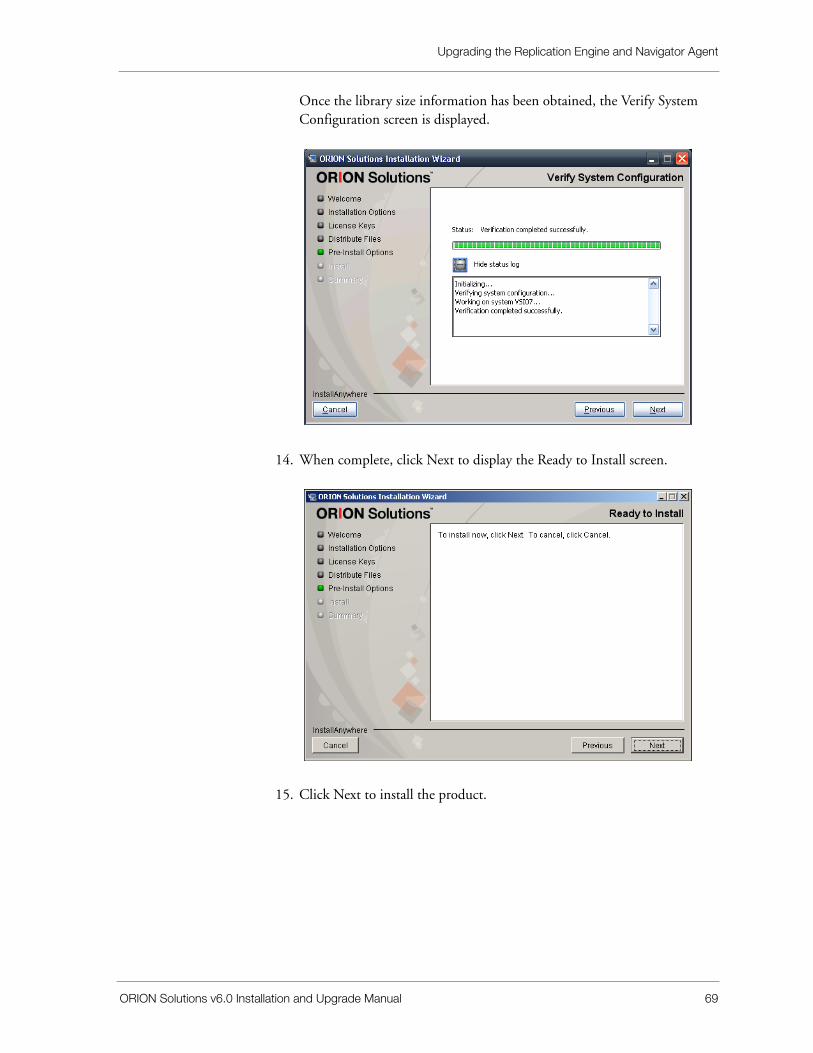
Upgrading the Replication Engine and Navigator Agent
ORION Solutions v6.0 Installation and Upgrade Manual 69
Once the library size information has been obtained, the Verify System Configuration screen is displayed.
14. When complete, click Next to display the Ready to Install screen.
15. Click Next to install the product.
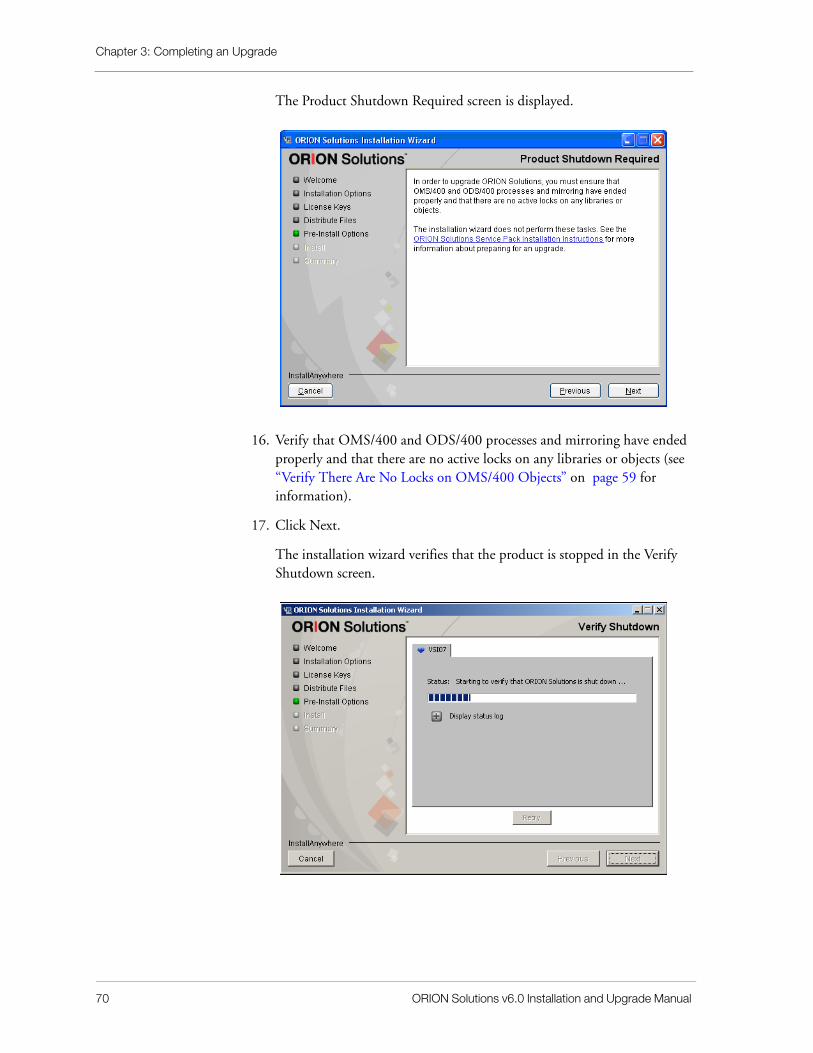
Chapter 3: Completing an Upgrade
70 ORION Solutions v6.0 Installation and Upgrade Manual
The Product Shutdown Required screen is displayed.
16. Verify that OMS/400 and ODS/400 processes and mirroring have ended properly and that there are no active locks on any libraries or objects (see “Verify There Are No Locks on OMS/400 Objects” on page 59 for information).
17. Click Next.
The installation wizard verifies that the product is stopped in the Verify Shutdown screen.
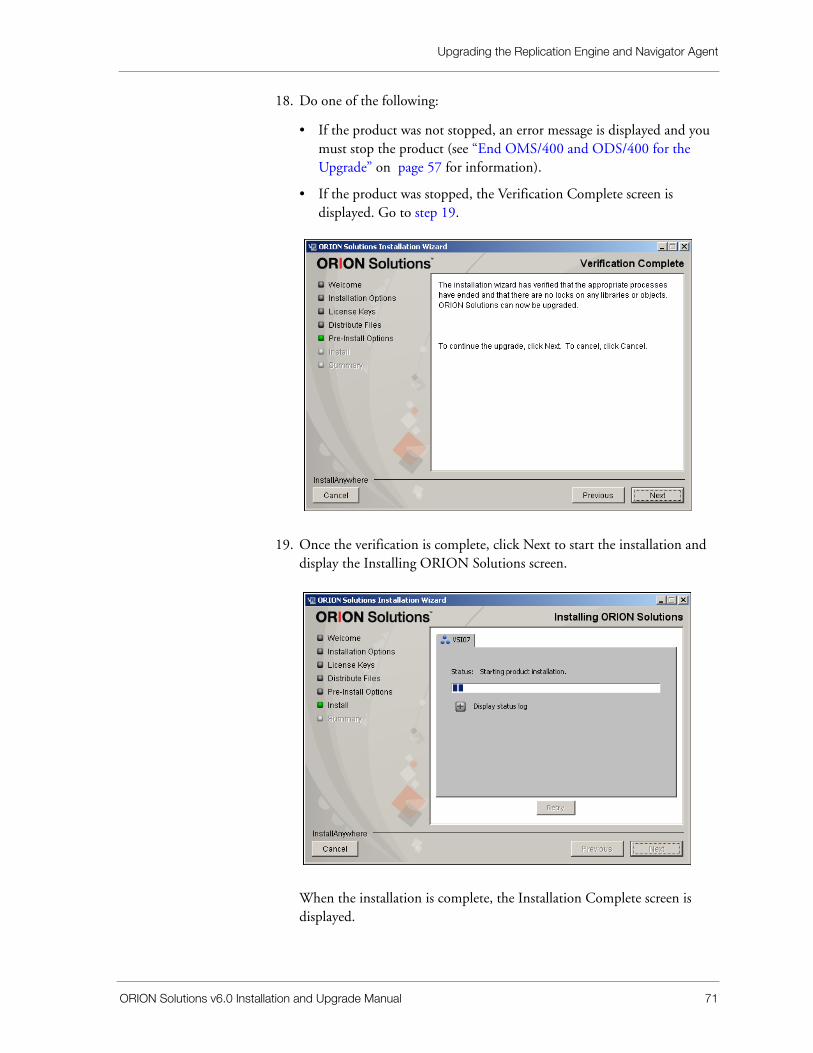
Upgrading the Replication Engine and Navigator Agent
ORION Solutions v6.0 Installation and Upgrade Manual 71
18. Do one of the following:
• If the product was not stopped, an error message is displayed and you must stop the product (see “End OMS/400 and ODS/400 for the Upgrade” on page 57 for information).
• If the product was stopped, the Verification Complete screen is displayed. Go to step 19.
19. Once the verification is complete, click Next to start the installation and display the Installing ORION Solutions screen.
When the installation is complete, the Installation Complete screen is displayed.
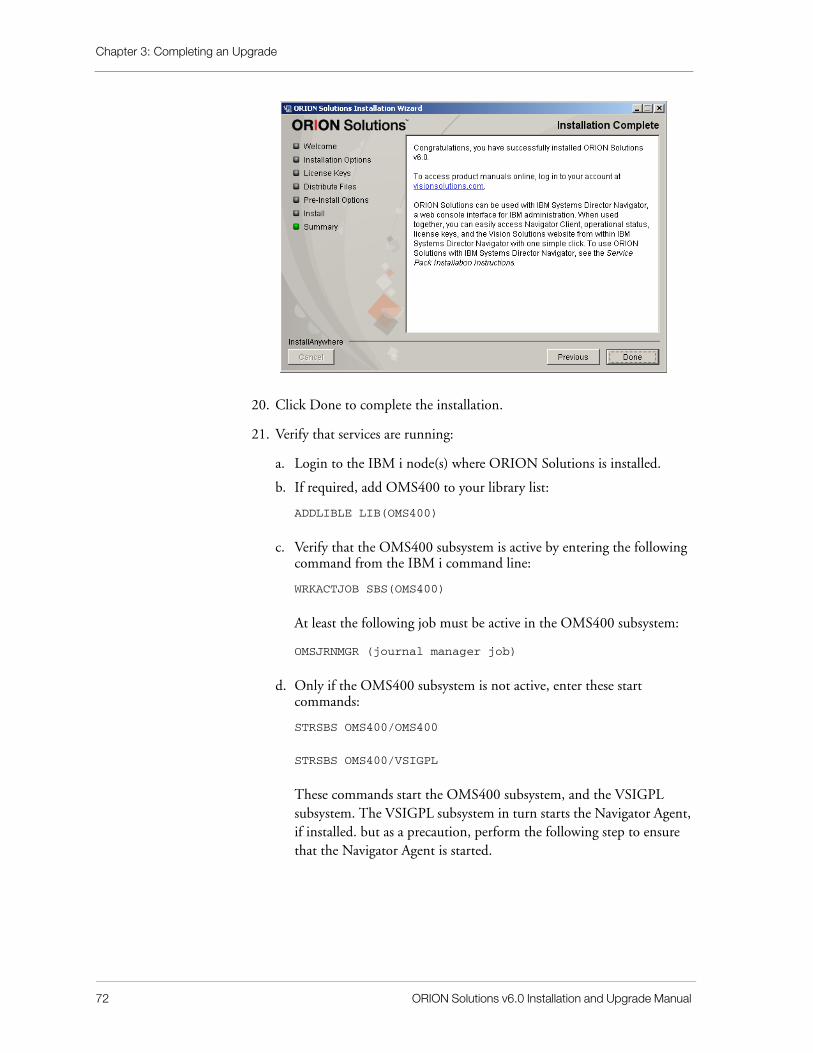
Chapter 3: Completing an Upgrade
72 ORION Solutions v6.0 Installation and Upgrade Manual
20. Click Done to complete the installation.
21. Verify that services are running:
a. Login to the IBM i node(s) where ORION Solutions is installed.
b. If required, add OMS400 to your library list:
ADDLIBLE LIB(OMS400)
c. Verify that the OMS400 subsystem is active by entering the following command from the IBM i command line:
WRKACTJOB SBS(OMS400)
At least the following job must be active in the OMS400 subsystem:
OMSJRNMGR (journal manager job)
d. Only if the OMS400 subsystem is not active, enter these start commands:
STRSBS OMS400/OMS400
STRSBS OMS400/VSIGPL
These commands start the OMS400 subsystem, and the VSIGPL subsystem. The VSIGPL subsystem in turn starts the Navigator Agent, if installed. but as a precaution, perform the following step to ensure that the Navigator Agent is started.
Upgrading the Navigator Consolidator
ORION Solutions v6.0 Installation and Upgrade Manual 73
e. Do one of the following:
• If the Navigator Client will be installed, when the subsystems are active, enter the following command from the IBM i command line to start the Navigator Agent:
strnavmon
• If the Navigator Client will not be installed, go to step 22.
22. If you are installing the Navigator Client, install the Navigator Consolidator (see “Upgrading the Navigator Consolidator” on page 73).
Upgrading the Navigator ConsolidatorIf you are upgrading the Navigator Client, you must first upgrade the Navigator Consolidator. You can upgrade the Navigator Consolidator on either:
• a Windows server (“Upgrading on a Windows Server” on page 73)
• a IBM i server (“Upgrade on an IBM i Server” on page 78)
Upgrading on a Windows ServerBefore upgrading Navigator Consolidator, ensure the following:
• The Windows server where the Navigator Consolidator will be upgraded has network access to the IBM i server.
• Replication Engine and the Navigator Agent are upgraded on the IBM i server.
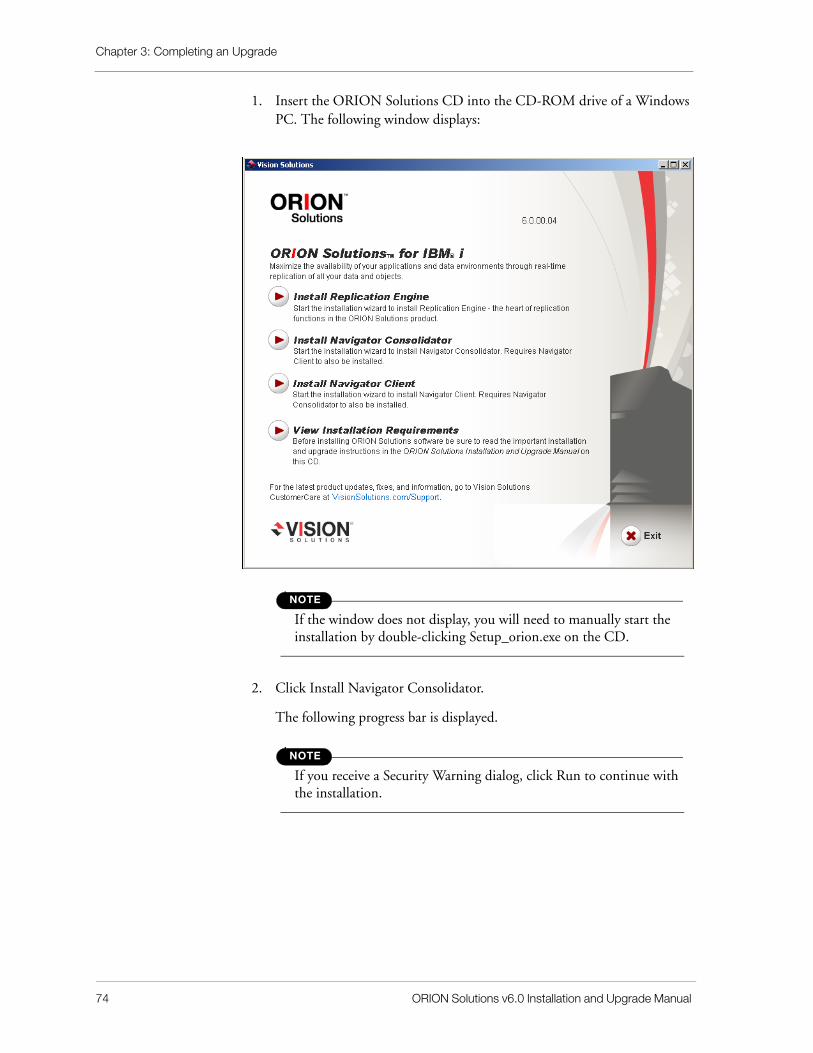
Chapter 3: Completing an Upgrade
74 ORION Solutions v6.0 Installation and Upgrade Manual
1. Insert the ORION Solutions CD into the CD-ROM drive of a Windows PC. The following window displays:
NOTE
If the window does not display, you will need to manually start the installation by double-clicking Setup_orion.exe on the CD.
2. Click Install Navigator Consolidator.
The following progress bar is displayed.
NOTE
If you receive a Security Warning dialog, click Run to continue with the installation.

Upgrading the Navigator Consolidator
ORION Solutions v6.0 Installation and Upgrade Manual 75
After the installation wizard starts, the Terms and Conditions screen is displayed.
3. Accept the license agreement, then click Next.
The Installation Platform screen is displayed.
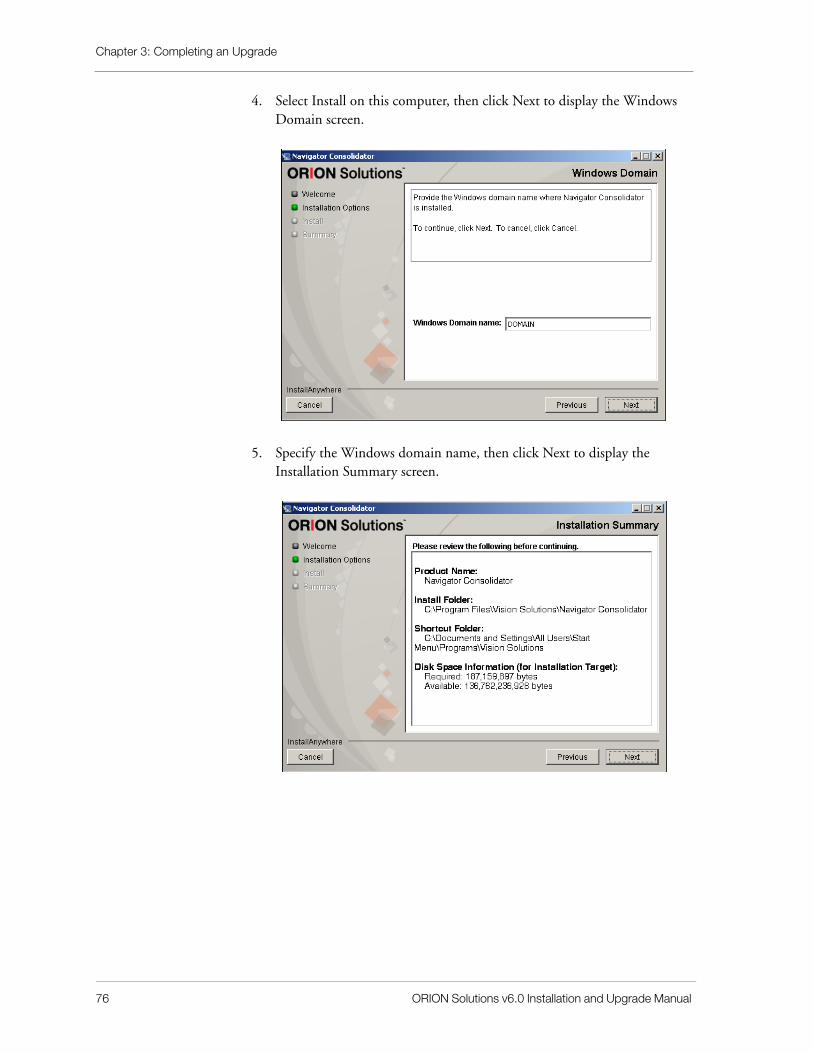
Chapter 3: Completing an Upgrade
76 ORION Solutions v6.0 Installation and Upgrade Manual
4. Select Install on this computer, then click Next to display the Windows Domain screen.
5. Specify the Windows domain name, then click Next to display the Installation Summary screen.
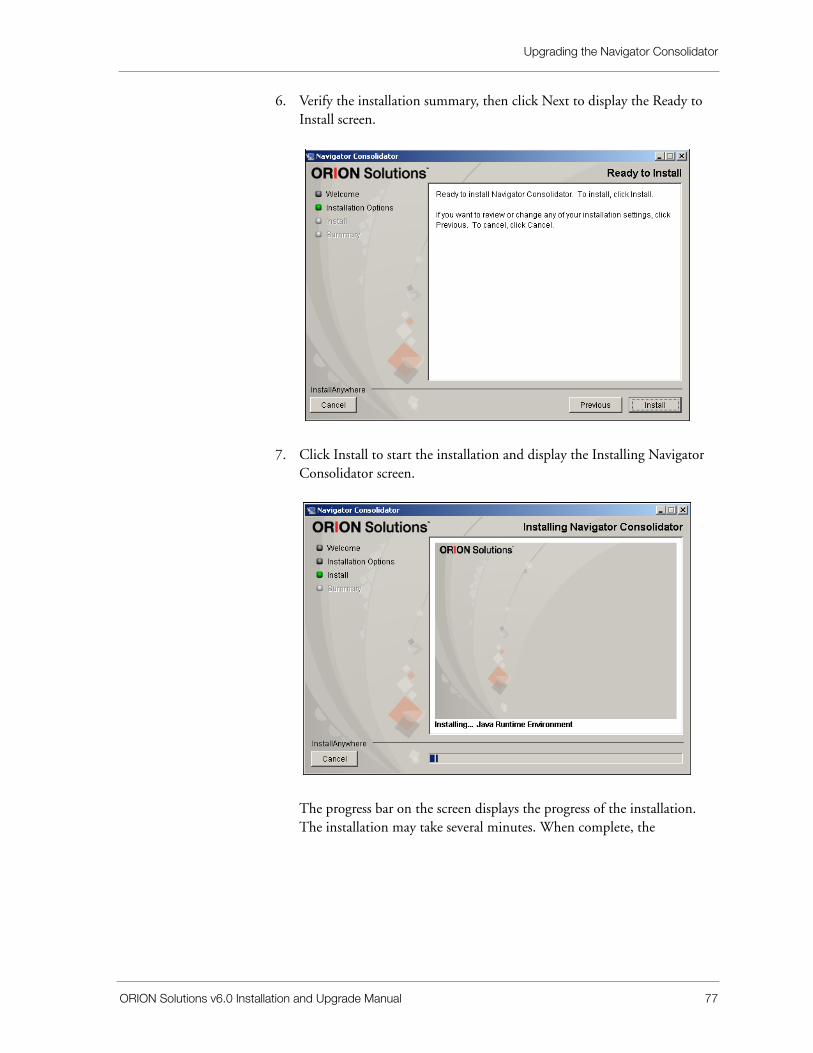
Upgrading the Navigator Consolidator
ORION Solutions v6.0 Installation and Upgrade Manual 77
6. Verify the installation summary, then click Next to display the Ready to Install screen.
7. Click Install to start the installation and display the Installing Navigator Consolidator screen.
The progress bar on the screen displays the progress of the installation. The installation may take several minutes. When complete, the
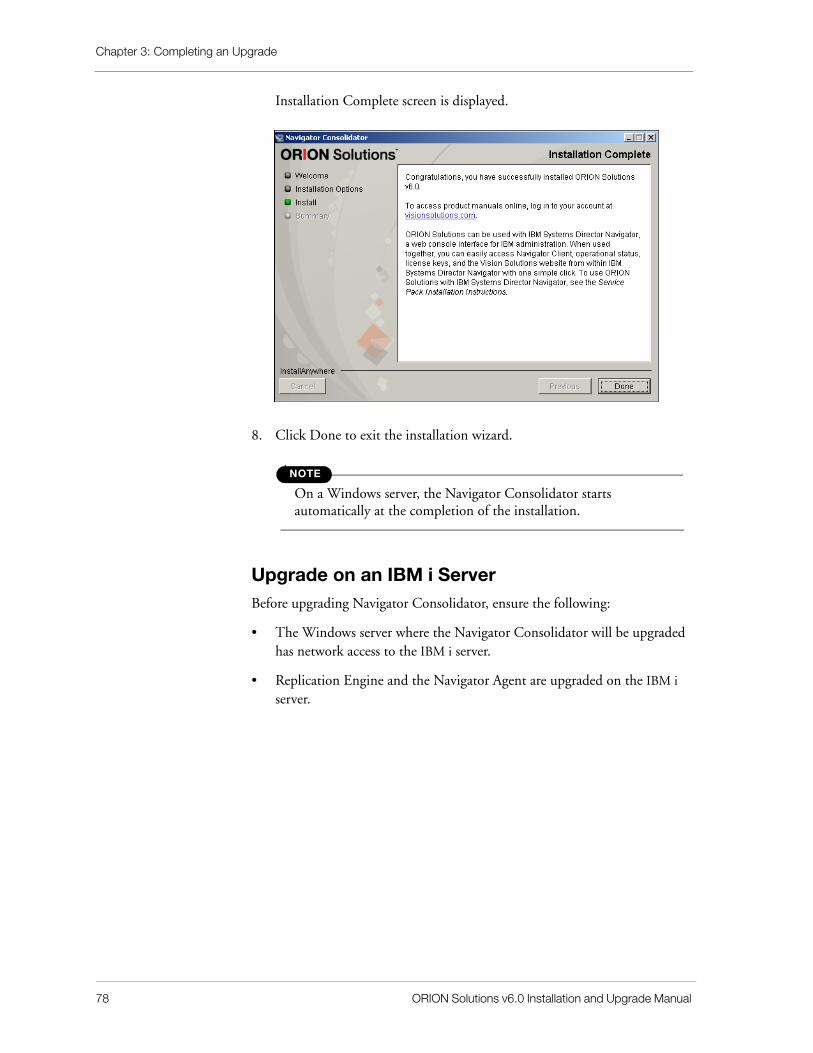
Chapter 3: Completing an Upgrade
78 ORION Solutions v6.0 Installation and Upgrade Manual
Installation Complete screen is displayed.
8. Click Done to exit the installation wizard.
NOTE
On a Windows server, the Navigator Consolidator starts automatically at the completion of the installation.
Upgrade on an IBM i ServerBefore upgrading Navigator Consolidator, ensure the following:
• The Windows server where the Navigator Consolidator will be upgraded has network access to the IBM i server.
• Replication Engine and the Navigator Agent are upgraded on the IBM i server.
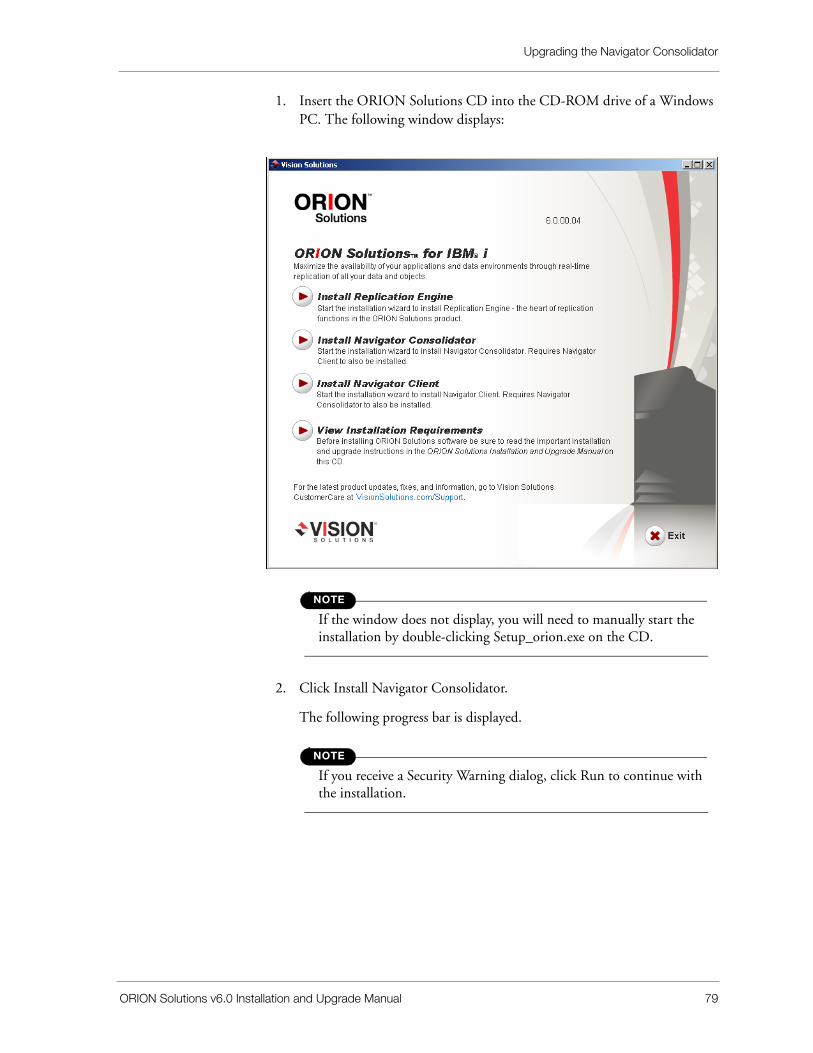
Upgrading the Navigator Consolidator
ORION Solutions v6.0 Installation and Upgrade Manual 79
1. Insert the ORION Solutions CD into the CD-ROM drive of a Windows PC. The following window displays:
NOTE
If the window does not display, you will need to manually start the installation by double-clicking Setup_orion.exe on the CD.
2. Click Install Navigator Consolidator.
The following progress bar is displayed.
NOTE
If you receive a Security Warning dialog, click Run to continue with the installation.
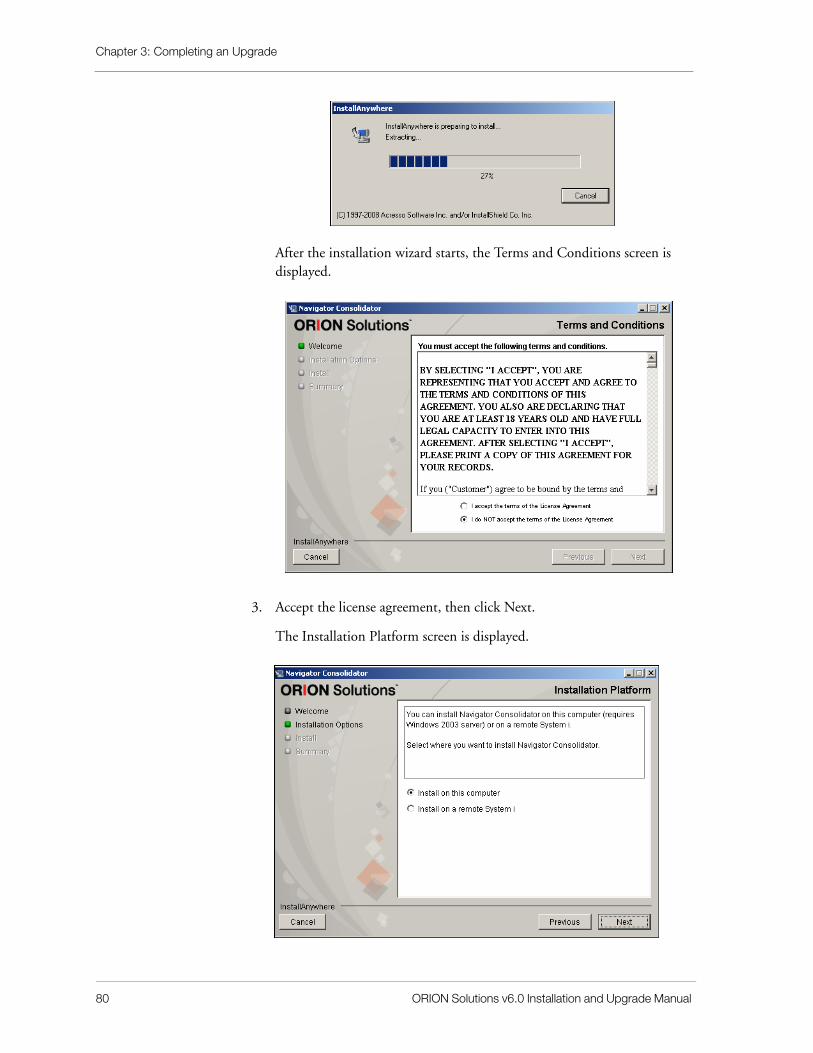
Chapter 3: Completing an Upgrade
80 ORION Solutions v6.0 Installation and Upgrade Manual
After the installation wizard starts, the Terms and Conditions screen is displayed.
3. Accept the license agreement, then click Next.
The Installation Platform screen is displayed.
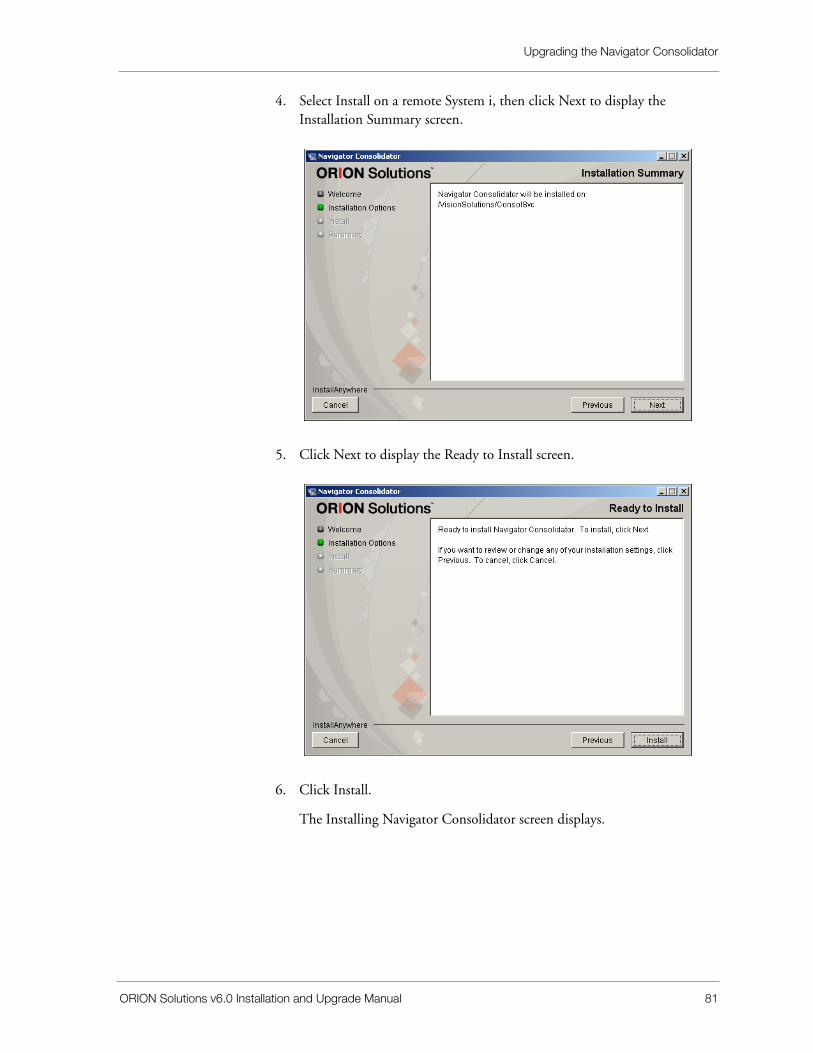
Upgrading the Navigator Consolidator
ORION Solutions v6.0 Installation and Upgrade Manual 81
4. Select Install on a remote System i, then click Next to display the Installation Summary screen.
5. Click Next to display the Ready to Install screen.
6. Click Install.
The Installing Navigator Consolidator screen displays.
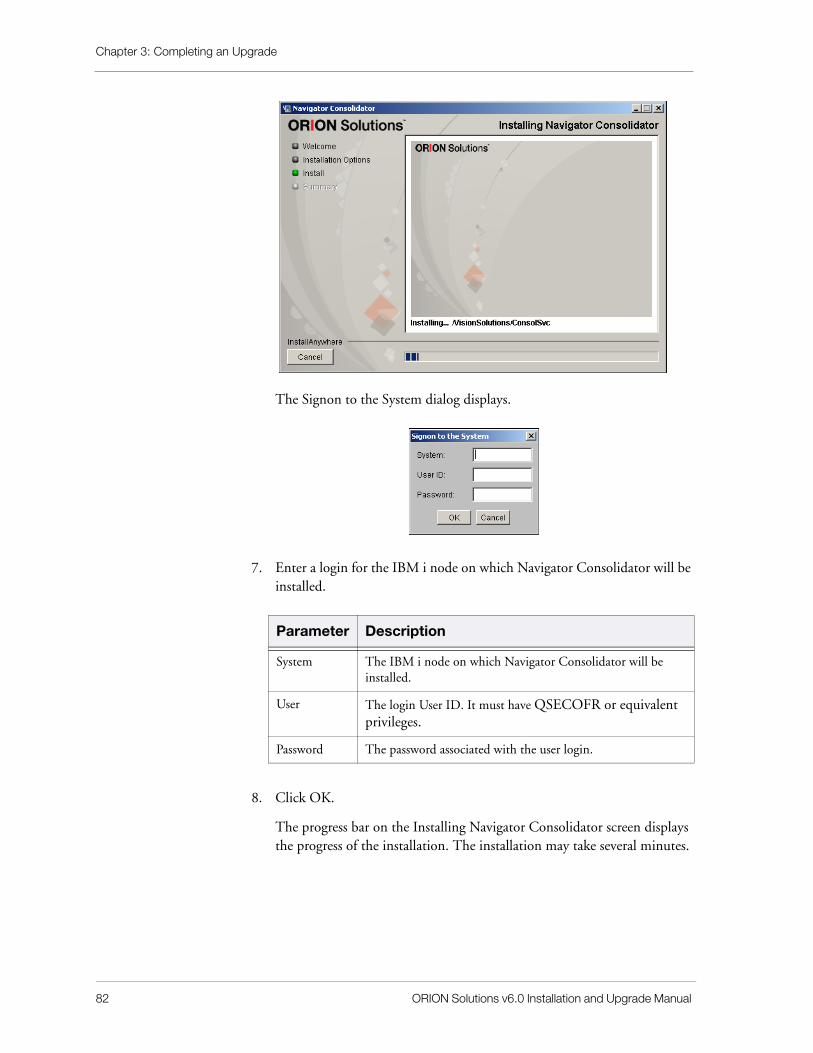
Chapter 3: Completing an Upgrade
82 ORION Solutions v6.0 Installation and Upgrade Manual
The Signon to the System dialog displays.
7. Enter a login for the IBM i node on which Navigator Consolidator will be installed.
8. Click OK.
The progress bar on the Installing Navigator Consolidator screen displays the progress of the installation. The installation may take several minutes.
Parameter Description
System The IBM i node on which Navigator Consolidator will be installed.
User The login User ID. It must have QSECOFR or equivalent privileges.
Password The password associated with the user login.
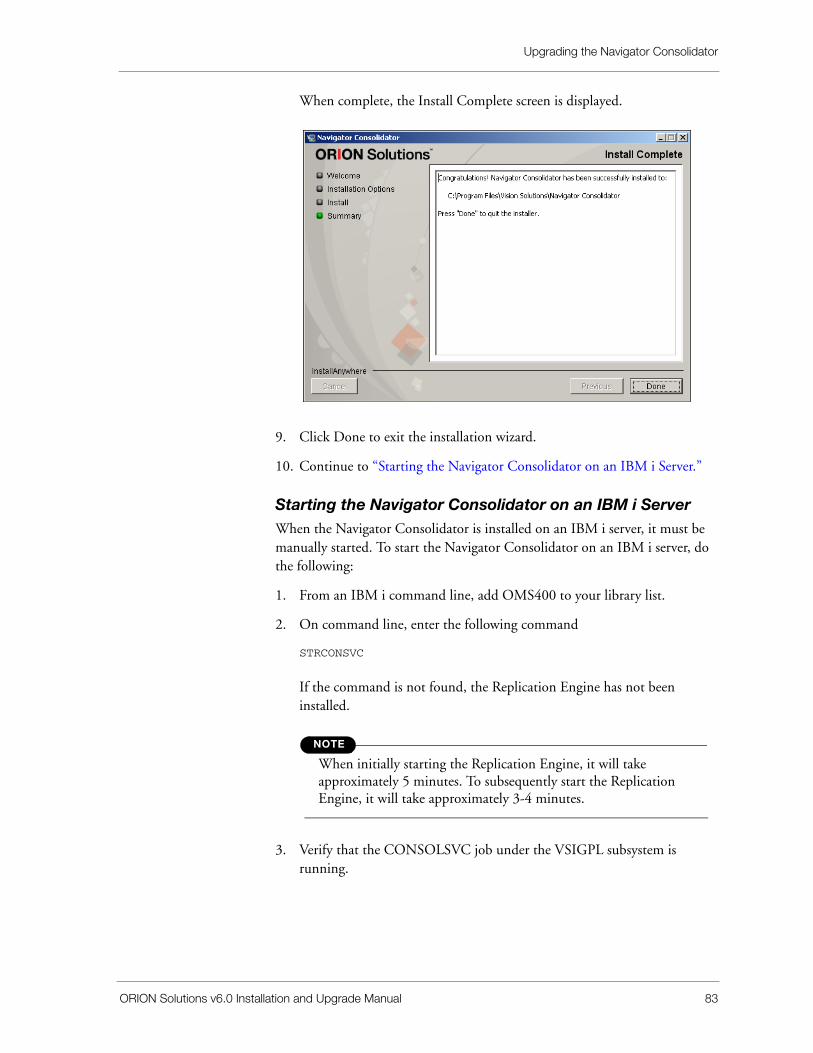
Upgrading the Navigator Consolidator
ORION Solutions v6.0 Installation and Upgrade Manual 83
When complete, the Install Complete screen is displayed.
9. Click Done to exit the installation wizard.
10. Continue to “Starting the Navigator Consolidator on an IBM i Server.”
Starting the Navigator Consolidator on an IBM i ServerWhen the Navigator Consolidator is installed on an IBM i server, it must be manually started. To start the Navigator Consolidator on an IBM i server, do the following:
1. From an IBM i command line, add OMS400 to your library list.
2. On command line, enter the following command
STRCONSVC
If the command is not found, the Replication Engine has not been installed.
NOTE
When initially starting the Replication Engine, it will take approximately 5 minutes. To subsequently start the Replication Engine, it will take approximately 3-4 minutes.
3. Verify that the CONSOLSVC job under the VSIGPL subsystem is running.
Chapter 3: Completing an Upgrade
84 ORION Solutions v6.0 Installation and Upgrade Manual
NOTE
The NAVCONSOL job should be in a Java wait (JVAW) status and is spawned by CONSOLSVC.
Upgrading the Navigator ClientBefore beginning the upgrade, ensure that the PC on which the Navigator Client will be installed has network access to the server on which the Navigator Consolidator was installed.
IMPORTANT
When installed on a Windows server, the Navigator Consolidator must be installed on a separate server from the Navigator Client. Running the Navigator Consolidator and Navigator Client on the same server is not supported.
The Navigator Client does not need to be installed in the same domain as the Navigator Consolidator. The only requirement is that the user must have a user name and password access to the domain.
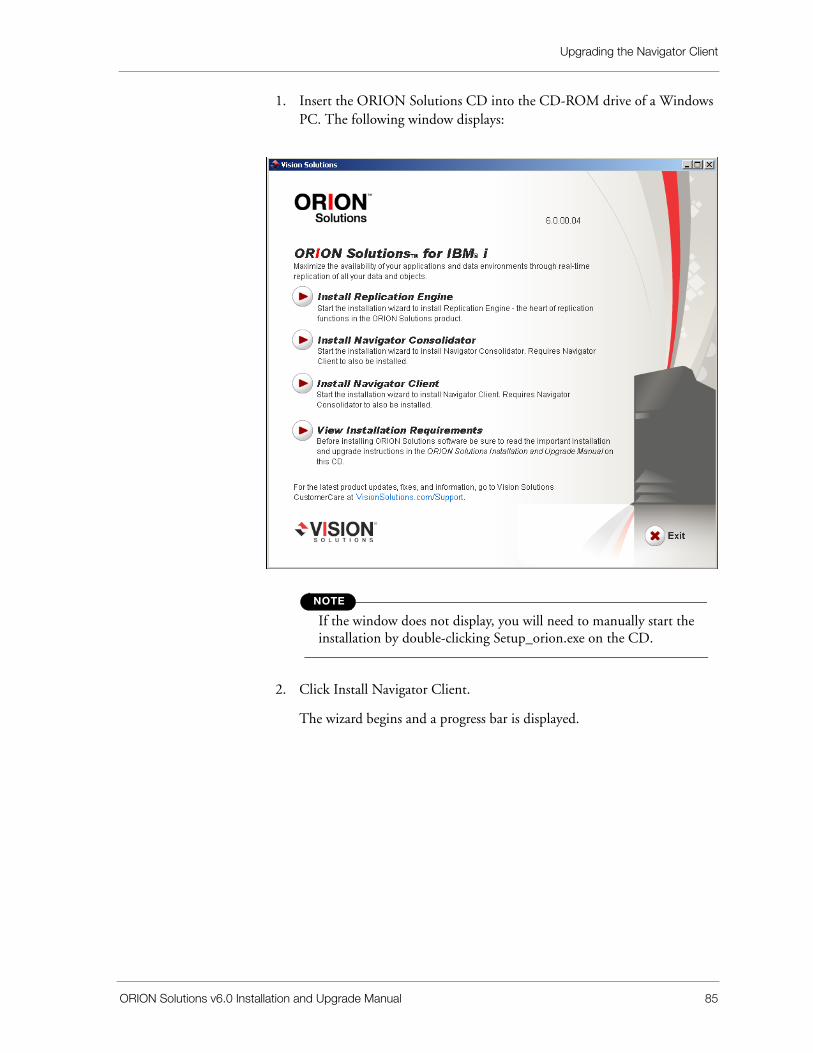
Upgrading the Navigator Client
ORION Solutions v6.0 Installation and Upgrade Manual 85
1. Insert the ORION Solutions CD into the CD-ROM drive of a Windows PC. The following window displays:
NOTE
If the window does not display, you will need to manually start the installation by double-clicking Setup_orion.exe on the CD.
2. Click Install Navigator Client.
The wizard begins and a progress bar is displayed.
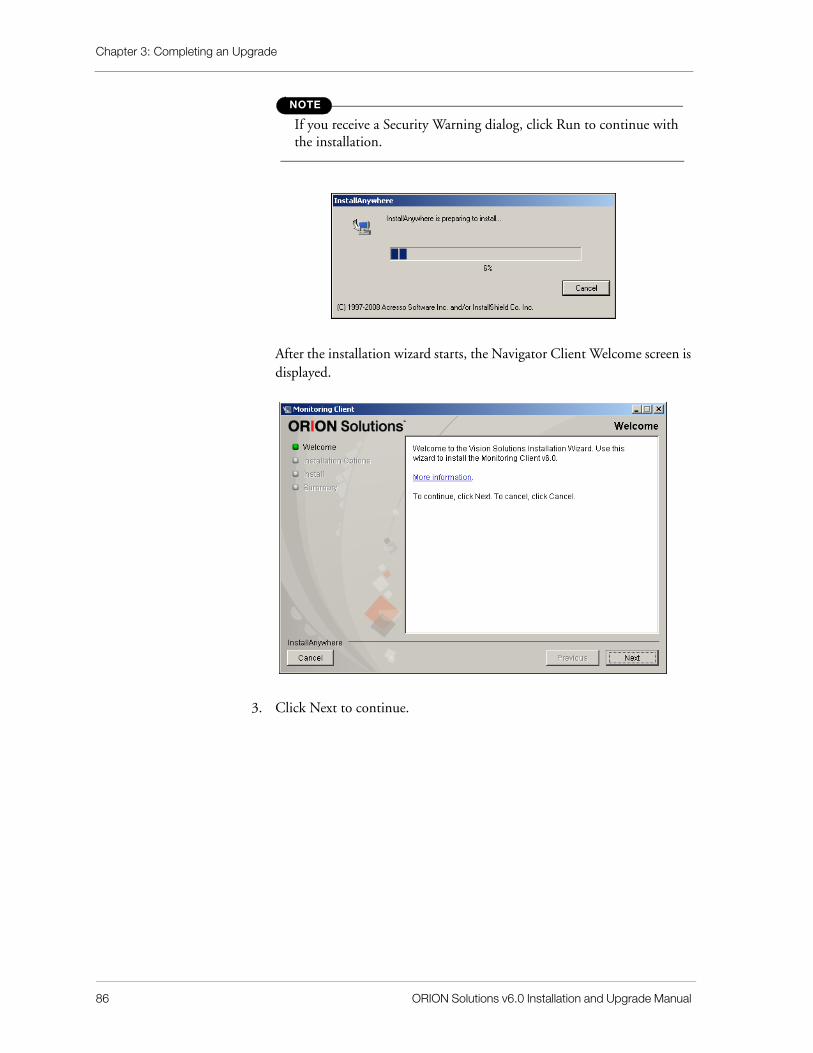
Chapter 3: Completing an Upgrade
86 ORION Solutions v6.0 Installation and Upgrade Manual
NOTE
If you receive a Security Warning dialog, click Run to continue with the installation.
After the installation wizard starts, the Navigator Client Welcome screen is displayed.
3. Click Next to continue.
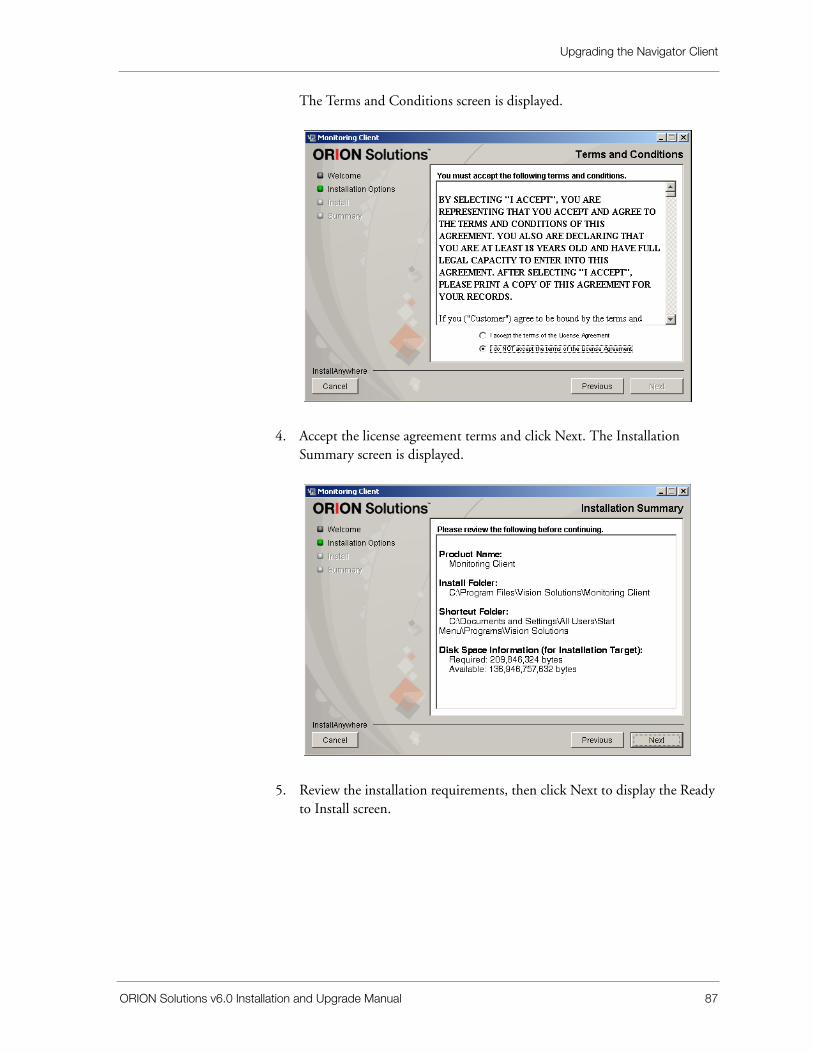
Upgrading the Navigator Client
ORION Solutions v6.0 Installation and Upgrade Manual 87
The Terms and Conditions screen is displayed.
4. Accept the license agreement terms and click Next. The Installation Summary screen is displayed.
5. Review the installation requirements, then click Next to display the Ready to Install screen.
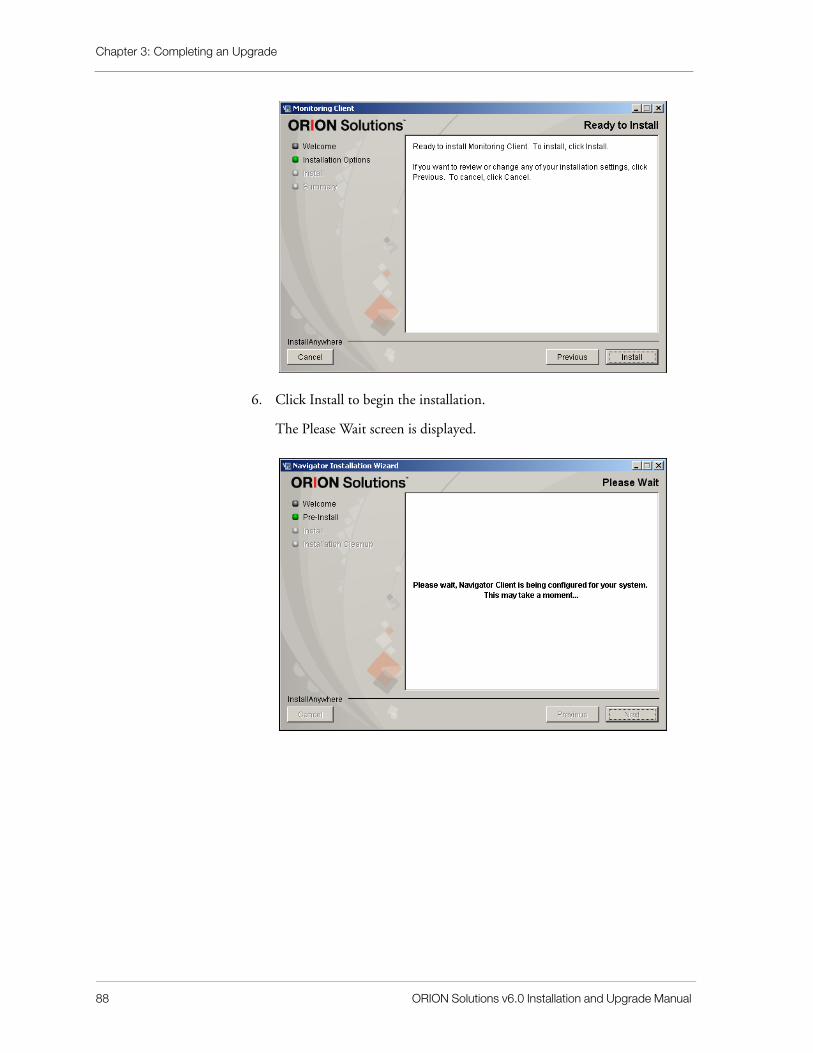
Chapter 3: Completing an Upgrade
88 ORION Solutions v6.0 Installation and Upgrade Manual
6. Click Install to begin the installation.
The Please Wait screen is displayed.

Enable ORION Solutions for the IBM Systems Director Navigator
ORION Solutions v6.0 Installation and Upgrade Manual 89
Once the Navigator Client is ready, the installation begins.
When the installation is complete, the Installation Complete screen is displayed.
7. Click Done to complete the installation.
Enable ORION Solutions for the IBM Systems Director Navigator
ORION Solutions can be used with the IBM Systems Director Navigator, a console interface for IBM administration. When used together, you can easily
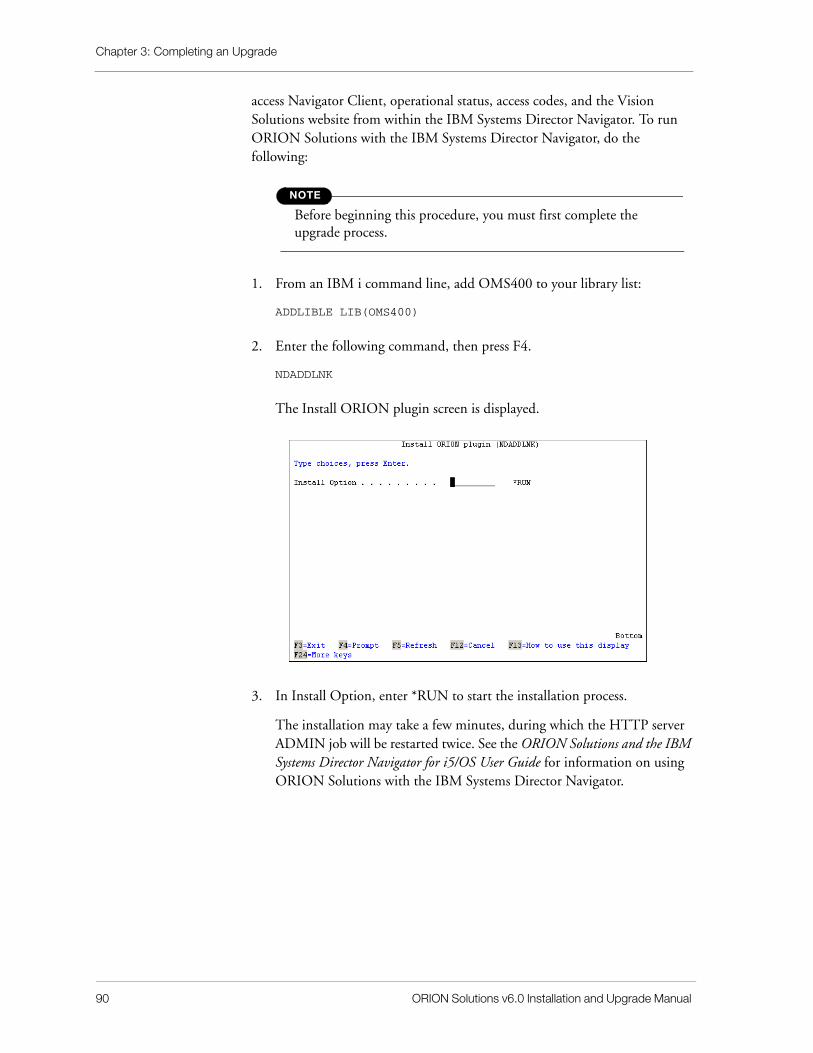
Chapter 3: Completing an Upgrade
90 ORION Solutions v6.0 Installation and Upgrade Manual
access Navigator Client, operational status, access codes, and the Vision Solutions website from within the IBM Systems Director Navigator. To run ORION Solutions with the IBM Systems Director Navigator, do the following:
NOTE
Before beginning this procedure, you must first complete the upgrade process.
1. From an IBM i command line, add OMS400 to your library list:
ADDLIBLE LIB(OMS400)
2. Enter the following command, then press F4.
NDADDLNK
The Install ORION plugin screen is displayed.
3. In Install Option, enter *RUN to start the installation process.
The installation may take a few minutes, during which the HTTP server ADMIN job will be restarted twice. See the ORION Solutions and the IBM Systems Director Navigator for i5/OS User Guide for information on using ORION Solutions with the IBM Systems Director Navigator.

ORION Solutions v6.0 Installation and Upgrade Manual 91
Stop Services A
Stopping ServicesIf it is necessary to stop Navigator Agent, use this procedure.
1. From the IBM i command line, enter:
ADDLIBLE OMS400
2. Run the following commandIBM i:
WRKACTJOB SBS(VSIGPL)
3. End the Navigator Agent.
ENDNAVMON
4. End Navigator Consolidator.
ENDCONSVC
IMPORTANT
Vision Solutions recommends that you never stop ORION Solutions by stopping the OMS400 subsystem. This could cause damage to the replication environment.

Appendix A: Stop Services
92 ORION Solutions v6.0 Installation and Upgrade Manual
ORION Solutions v6.0 Installation and Upgrade Manual 93
Update License Key B
Updating a License KeyDo the following to update your license key. This is required, for example, if you received a temporary license key or your license key has expired.
NOTE
These steps are not part of an installation or upgrade. They are only required when updating a license key.
1. Sign on to the IBM i.
2. Add OMS400 to the library list.
ADDLIBLE OMS400
3. Run the following command:
UPDLICKEY
The Update License Key screen is displayed.
NOTE
The LRP file name may not be identical to the one shown below.
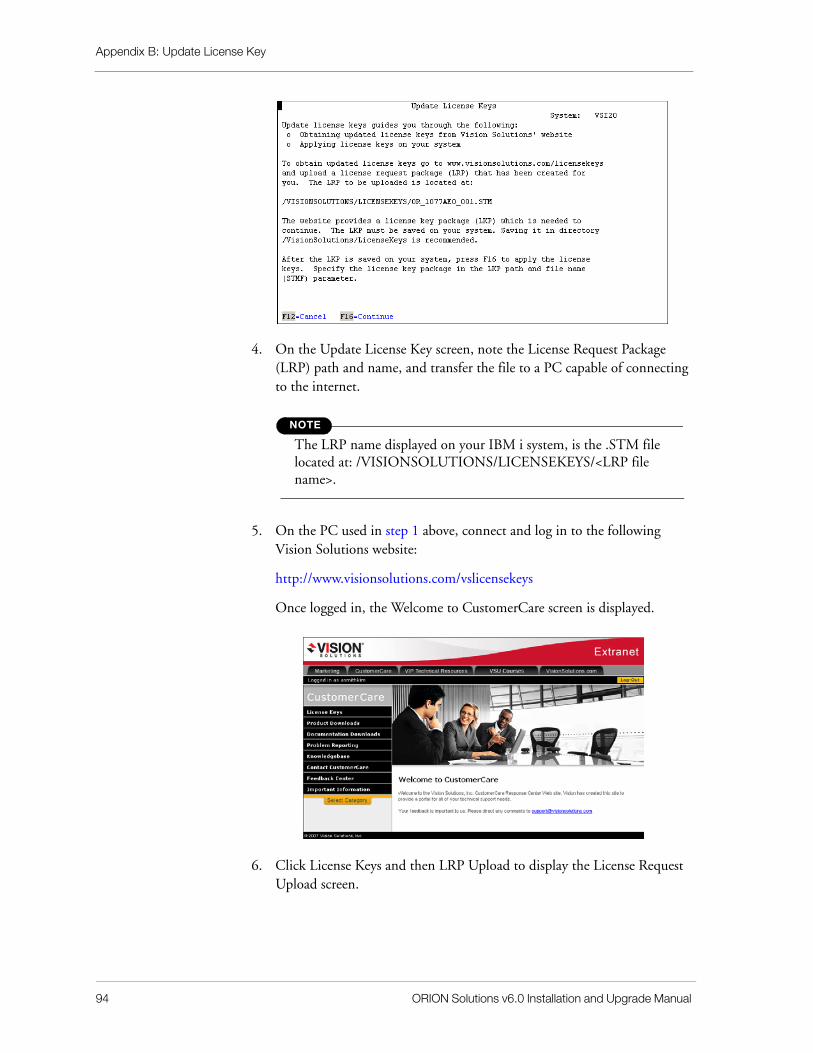
Appendix B: Update License Key
94 ORION Solutions v6.0 Installation and Upgrade Manual
4. On the Update License Key screen, note the License Request Package (LRP) path and name, and transfer the file to a PC capable of connecting to the internet.
NOTE
The LRP name displayed on your IBM i system, is the .STM file located at: /VISIONSOLUTIONS/LICENSEKEYS/<LRP file name>.
5. On the PC used in step 1 above, connect and log in to the following Vision Solutions website:
http://www.visionsolutions.com/vslicensekeys
Once logged in, the Welcome to CustomerCare screen is displayed.
6. Click License Keys and then LRP Upload to display the License Request Upload screen.
Updating a License Key
ORION Solutions v6.0 Installation and Upgrade Manual 95
7. Click Browse, navigate to the location on the PC that contains the License Request Package (LRP), then click Upload.
The LRP displays.
8. Repeat step 7 for each LRP.
9. Once all the LRPs have been uploaded, click Generate License Keys to generate the license key package (LKP).
When complete, a message is displayed.
Appendix B: Update License Key
96 ORION Solutions v6.0 Installation and Upgrade Manual
z
10. Click Download LKP to save the LKP to your PC.
11. Click Save, then select the location and save.
12. Transfer the LKP from your PC to your IBM i system. It is recommended that you save the LKP to the following directory on your IBM i system:
/VISIONSOLUTIONS/LICENSEKEYS/
NOTE
Note the full path name when saving.
13. Return to the Update License Key screen.
14. If the screen is not currently displayed, enter the following command to display it:
UPDLICKEY
15. Press F16.
Updating a License Key
ORION Solutions v6.0 Installation and Upgrade Manual 97
The Apply License Key (APYLICKEY) screen is displayed.
16. In LKP path and file name, enter the path and file name of the LKP file saved in step 12 (for example, /VISIONSOLUTIONS/LICENSEKEYS/<LKP name>).

Appendix B: Update License Key
98 ORION Solutions v6.0 Installation and Upgrade Manual