Embed Size (px)
Citation preview

Analyze • Detect • Measure • Control™
Orion pH MeterI N S T R U C T I O N M A N U A L
Orion 620
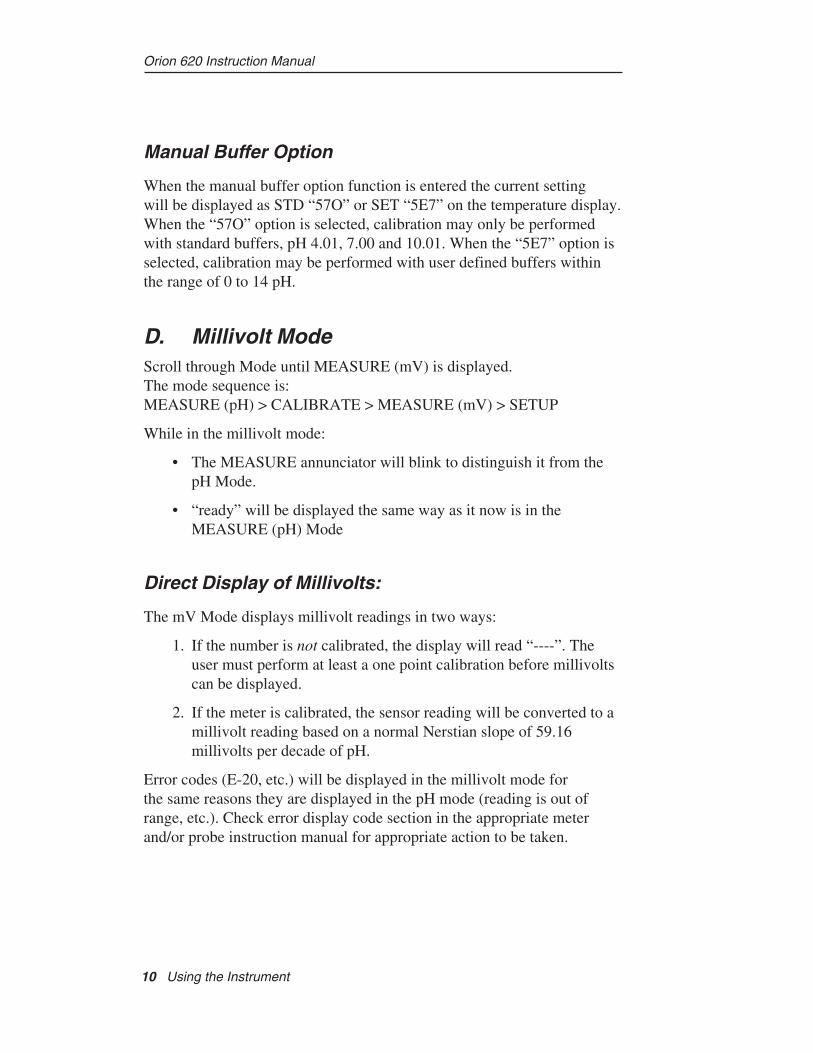
mode
4 7 10 man
measure
°C
yes
no
power
SETUP:1-1 RESOLUTION2-1 SLOPE3-1 CAL. BUFFER OPTIONERROR CODES:
E-20 OUT OF RANGEE-22 CAL. STANDARD ERRORE-23 ELECTRODE NOT
CONNECTEDE-29 PRINTER ERRORE-31 BAD VALUE
Orion 620

AQUAfast, Cahn, EZ Flash, Ionalyzer, ionplus, KNIpHE, No Cal, ORION, perpHect, PerpHecT, PerpHecTion, pHISA, pHix, pHuture, Pure Water, Sage, Sensing the Future, SensorLink, ROSS Ultra, Sure-Flow, TEA Analyzer, Titrator PLUS, TURBO2 and Wine Master are registered trademarks of Thermo Electron Corporation.
1-888-pHAX-ION, A+, All in One, Aplus, AQUAsnap, AssuredAccuracy, AUTO-BAR, AUTO-CAL, AUTO DISPENSER, Auto-ID, AUTO-LOG, AUTO-READ, AUTO-STIR, Auto-Test, BOD AutoEZ, Cable-Free, CERTI-CAL, CISA, DataCOLLECT, DataPLUS, digital LogR, DirectCal, DuraProbe, Environmental Product Authority, Extra Easy/Extra Value, FAST QC, Flash Titration, Flash Titrator, GAP, GLPcal, GLPcheck, GLPdoc, ISEasy, KAP, LabConnect, LogR, Low Maintenance Triode, Minimum Stir Requirement, MSR, NISS, One-Touch, One-Touch Calibration, One-Touch Measurement, Optimum Results, Pentrode, pHuture MMS, pHuture Pentrode, pHuture Quatrode, pHuture Triode, Quatrode, QuiKcheK, rf link, ROSS, ROSS Resolution, SAOB, Smart CheK, Stacked, Stat Face, The Enhanced Lab, ThermaSense, Triode, TRIUMpH, Unbreakable pH, Universal Access are trademarks of Thermo.
Guaranteed Success and The Technical Edge are service marks of Thermo.
PerpHecT meters are protected by U.S. patent 6,168,707.
PerpHecT ROSS are protected by U.S. patent 6,168,707.
ORION Series A meters and 900A printer are protected by U.S. patents 5,108,578, 5,198,093, and German patents D334,208 and D346,753.
Sure-Flow electrodes are protected by European Patent 278,979 and Canadian Patent 1,286,720.
ionplus electrodes and Optimum Results solutions are protected by US Patent 5,830,338.
ROSS Ultra electrodes have patents pending.
ORION ORP Standard is protected by US Patent 6,350,367.
ORION Series A conductivity meters are protected by US Patent 5,872,454.
© Copyright 2003, Thermo Electron Corporation. All rights reserved. Question everything, and Analyze. Detect. Measure. Control are trademarks of Thermo Electron Corporation.
The specifications, descriptions, drawings, ordering information and part numbers within this document are subject to change without notice.
This publication supersedes all previous publications on this subject.

Orion 620 Instruction Manual
Quick Start Guide ......................................................................... I
Chapter I General InformationA. Introduction ............................................................................. 1
B. Operation of pHuture Solid State System ............................... 2
Chapter II Instrument DescriptionA. Display ..................................................................................... 3
B. Keypad ..................................................................................... 4
Chapter III Instrument Set UpA. Power Source ........................................................................... 5
B. Stand Adjustment .................................................................... 5
C. Electrode Connections ............................................................. 6
Chapter IV Using the InstrumentA. Power Up ................................................................................. 7
B. Instrument Check Out Procedure ............................................ 8
C. Set Up Mode ............................................................................ 9
D. Millivolt Mode ....................................................................... 10
Chapter V Calibration and MeasurementA. Autocalibration ...................................................................... 11
B. Autocalibration with One Buffer ........................................... 12
C. Autocalibration with Two Buffers ......................................... 13
D. Autocalibration with Three Buffers ....................................... 14
E. Manual Calibration with Non-Standard Buffers ................... 15
F. Setting Manual Buffer Option ............................................... 16
G. Non-Standard Buffer Calibrationwith Two Buffers ................................................................... 17
Chapter VI Use with AccessoriesA. Use with Printers and Computers .......................................... 19
B. Using Calibration Interface Cable ......................................... 20
Chapter VII Self-Test ....................................................................................... 21
Chapter VIII Operator Assistance Codes ........................................................ 23
Chapter IX Troubleshooting Guide ............................................................... 27
Chapter X Repair and Service ...................................................................... 35
Chapter XI Instrument Warranty ................................................................. 37
Chapter XII Notice of Compliance .................................................................. 41
Chapter XIII Ordering Information ................................................................ 43
Chapter XIV Specifications ............................................................................... 45

Orion 620 Instruction Manual

Orion 620 Instruction Manual
General Information
Chapter IGeneral Information
A. IntroductionOrion’s Benchtop pHuture® Solid State pH System is comprised of theOrion 620 microprocessor based pHuture Solid State pH Meter, and theOrion 6165 Sure-Flow® pHuture Solid State pH Probe. Designed to be areliable workhorse, this system is ideal for busy, multi-user, laboratory orplant environments, anywhere conventional glass pH electrode cleaning orbreakage is a problem.
The Orion 620 Meter is durable, compact, easy to use, and designed foruse with Orion pHuture Solid State probes to provide fast, accurate,temperature compensated pH measurements in any environment. pHmeasurements are easy with the help of advanced features such asautocalibration, user prompting, choice of 0.1, 0.01 and 0.001 pHresolution, automatic temperature compensation, and diagnosticoperator assistance codes. Record data via RS232 communicationusing the Orion 900A Printer or computer.
The Orion Sure-Flow pHuture Solid State Probe features a completelynon-glass sensing element making it ideal for virtually any sample matrix.Combined with the Sure-Flow reference junction for easy cleaning, and“on-chip” temperature measurement, temperature compensated pHanalysis becomes routine even in difficult samples ranging from viscousdetergents to dirty waters and tomato paste to bread dough.
1

Orion 620 Instruction Manual
General Information
B. Operation of pHuture ® Solid State System
The Orion 620 pHuture Solid State System utilizes solid state technologyto measure pH and temperature. This system is an active electronic one,where the potential developed at the sensing surface is dependent on thesolution pH. This surface potential is measured with a transistor. Thechange in potential is translated to a temperature compensated pH readingby the meter.
Due to these special characteristics of this system care must be taken toensure that the device is handled properly:
• Always turn the meter off prior to connecting or disconnectingthe probe.
• The system is protected against electrostatic discharge (ESD).However, as with any electronic device, care should be taken toprevent large static discharges from contacting the probe.
2

Orion 620 Instruction Manual
Instrument Description
SETUP CALIBRATE MEASURE
ONOFF
°CATC
2ndreadyhold
timerbat.
7 10 Man4
Chapter IIInstrument Description
A. DisplayThe Orion 620 has a large custom LCD display. pH results are displayedin the large main field. Temperature readings in degrees centigrade, °C,are displayed in the lower field. The current mode is indicated along thetop of the display. The buffer(s) used during the last calibration performedare indicated by the buffer indicators, along the bottom of the display.
Display Function
SETUP Indicates meter is in the setup mode which isused to define or view operating parameters.
CALIBRATE Indicates meter is in the calibration mode.
MEASURE Indicates meter is in the measure mode.
ready Displayed when the pHuture Solid State probesignal has stabilized.
3

Orion 620 Instruction Manual
Instrument Description
B. KeypadThe Orion 620 Meter has a 4 button keypad with tactile and audiblefeedback to control all functions of the meter. Each keypress isacknowledged by the meter via an audible beep.
Key Function
mode Press to select operating mode:SETUP, CALIBRATE, MEASURE
yes Press to accept settings or calibration points.May also be used to scroll through the setupmenu without changing any parameters.
no Press to cancel a change to a parameter beforethe parameter is entered. May also be used toinitiate a change in current setup parameter.
print Press to print calibration or measurement data.
power Press to turn meter on or off.
4

Orion 620 Instruction Manual
Instrument Set-Up
Chapter IIIInstrument Set-Up
A. Power SourceThe Orion 620 Meter is designed to operate with Orion LineAdapter 020125 for 110V operation or Orion 020130 for 220V operation.
Plug the line adapter securely into the meter power receptacle theninto an appropriate wall outlet.
NOTE: The meter has a gasket to help preventmoisture penetration. Firmly push the poweradaptor into the jack on the back of the meter.
B. Stand AdjustmentThe Orion 620 Meter can be adjusted to provide the optimal viewing anglevia a two-position flip stand. Adjust the viewing angle by gently lifting thestand with both hands and rotating to a 90° angle. Gently pull the standand rotate beyond 90° to lock in the second position. The first positionallows easy viewing from across the lab, the second position is moreuseful for working with the meter at the lab bench.
5

Orion 620 Instruction Manual
Instrument Set-Up
���� ���� � � ������ ����� ����� � ������ ���� ����������
C. Electrode Connections
NOTE: Always turn meter off before connecting ordisconnecting pHuture Solid State probe. Failure todo so may damage your probe.
Attach Orion pHuture Solid State pH Probe 61-57 or 61-65 to the sensorinput on the meter by sliding the connector on straight until firmly inplace. The connector has a special sealing mechanism to prevent moisturefrom penetrating the meter. It is sealed when the connector is properlyattached.
6

Orion 620 Instruction Manual
Using the Instrument
Chapter IVUsing the Instrument
A. Power UpPressing the power key will turn on the meter. The entire display (allannunciators) will be displayed for 2 seconds. Next, the number “620”will then be displayed for 2 seconds. Then the calibration buffer(s) usedfor any previous calibration will be displayed in the lower display field for2 seconds.
The calibration buffer indicator(s), ▼ , along the bottom of the display,will then light up and remain displayed along the bottom of the display,until a new calibration is performed. For example:
• If a one-point calibration had been previously performed, thepH 7 buffer indicator will be displayed.
• If a two-point calibration with pH 7 and pH 4 buffer had beenpreviously performed, the pH 7 and pH 4 indicators will bedisplayed.
Once all power up procedures have been completed the meterautomatically advances to measure mode.
NOTE: If this is the first time the meter has beenpowered up it is recommended that the InstrumentCheck Out procedure be performed before using themeter for pH measurements.
7

Orion 620 Instruction Manual
Using the Instrument
B. Instrument Check Out ProcedureIt is recommended this procedure be performed when the meter is receivedand any time operation problems arise. This procedure verifies the properoperation of the Orion 620 Meter.
1. With the meter power off, attach Orion pHuture Solid State pHProbe 615700 or 616500 to the meter.
2. Press power and quickly press yes to start the self-test. The meterautomatically performs electronic and hardware diagnostic tests.See Self-Test, page 21, for more detailed information.
3. When a zero appears in the display field, press each key,including the power key. A numeric digit will be displayed uponeach key press.
4. After the self-test is completed the meter will automatically shutoff. To restart the meter press the power key.
5. If any problems are found during the self-test the meter will beepand the error will be displayed. See Operator Assistance Codes,page 23.
8

Orion 620 Instruction Manual
Using the Instrument
C. SETUP ModeThe SETUP mode is used to define, change or view meter operatingparameters. While in the SETUP mode, the yes key is used to scrollthrough the menu without changing parameters and to enter newparameters into meter memory. The no key is used to scroll throughoptions within each parameter. To exit the SETUP mode, press themode key at any time.
To access the SETUP mode press the mode key.
The following parameters are accessed in the SETUP mode:
Resolution
The current pH resolution will be displayed. The default setting is twodecimal places (i.e. pH 7.00). Press yes to agree with setting or press no tochange to 7.0, 7.000, etc., and then press yes to accept the desired setting.
Slope
The current electrode slope in meter memory will be displayed. The valueis displayed as a percent of theoretical slope. The default setting is 100%.This function is for display purposes only. The value can not be changedin the SETUP menu. To change the slope value perform at least a twobuffer calibration. Press yes to advance to next menu option.
Print Function
The current print function setting will be displayed. The default is off,“00” and “P” will be displayed. The unit will print on ready. To changethe value press no and “01” will be displayed. The unit will only print oncommand. Press yes when the desired setting is displayed.
9
Orion 620 Instruction Manual
Using the Instrument
Manual Buffer Option
When the manual buffer option function is entered the current settingwill be displayed as STD “57O” or SET “5E7” on the temperature display.When the “57O” option is selected, calibration may only be performedwith standard buffers, pH 4.01, 7.00 and 10.01. When the “5E7” option isselected, calibration may be performed with user defined buffers withinthe range of 0 to 14 pH.
D. Millivolt ModeScroll through Mode until MEASURE (mV) is displayed.The mode sequence is:MEASURE (pH) > CALIBRATE > MEASURE (mV) > SETUP
While in the millivolt mode:
• The MEASURE annunciator will blink to distinguish it from thepH Mode.
• “ready” will be displayed the same way as it now is in theMEASURE (pH) Mode
Direct Display of Millivolts:
The mV Mode displays millivolt readings in two ways:
1. If the number is not calibrated, the display will read “----”. Theuser must perform at least a one point calibration before millivoltscan be displayed.
2. If the meter is calibrated, the sensor reading will be converted to amillivolt reading based on a normal Nerstian slope of 59.16millivolts per decade of pH.
Error codes (E-20, etc.) will be displayed in the millivolt mode forthe same reasons they are displayed in the pH mode (reading is out ofrange, etc.). Check error display code section in the appropriate meterand/or probe instruction manual for appropriate action to be taken.
10

Orion 620 Instruction Manual
Calibration and Measurement
Chapter VCalibration and Measurement
A one or two buffer calibration should be performed before pH ismeasured. It is recommended that at least two buffer calibration usingbuffers that bracket the expected sample range be performed at thebeginning of each day to determine the slope of the electrode. Thisserves the dual purpose of determining if the pHuture Solid State systemis working properly and storing the slope value in the meter memory.The Orion 620 Meter features both autocalibration when using standardbuffers, 4.01, 7.00 and 10.01, as well as manual calibration whennon-standard buffers are required.
A. AutocalibrationAutocalibration is a feature of the Orion 620 Meter that automaticallyrecognizes the standard buffers 7.00, 4.01 and 10.01. Simply select thebuffer sequence that best fits your application, choose between, a onepoint autocalibration with pH 7, a 2 point calibration using 7-10 or 7-4and a 3 point calibration using 4, 7, 10. During calibration wait for “ready”to be displayed indicating electrode stability and then press yes. The Orion620 Meter automatically calibrates to the correct buffer valueusing automatic temperature compensation.
11

Orion 620 Instruction Manual
Calibration and Measurement
B. Autocalibration with One Buffer
NOTE: Autocalibration with one buffer can only beperformed using buffer 7.00
1. With the power off, connect the pHuture Solid State electrode tothe meter.
2. Place the electrode into 7.00 buffer. Press power to turn meter onif meter had been powered down to attach the electrode.
3. Dashes and a temperature reading will be displayed in themeasure mode.
4. Select calibration mode by pressing the mode key untilCALIBRATE is displayed.
5. The last buffer sequence used will be displayed for 2 seconds.Press yes to use this sequence, or press no to scroll through otherchoices, and then press yes.
6. The buffer indicator along the bottom of display will indicate thebuffer selected and “P1” will be displayed in the lower field.The buffer reading will be displayed in the main field.Note: Dashes continue to be displayed.
7. When “ready” is displayed, indicating electrode stability, pressyes. The temperature corrected value for that buffer is entered intothe memory of the meter.
8. “SLP” will appear in the lower display field and the currentelectrode slope in memory is displayed in the main field for5 seconds.
The meter will then automatically advance to the measure modeand MEASURE is displayed above the main display field.
9. Remove electrode from 7.00 buffer and rinse with deionized water.Place electrode into sample. Both the temperature corrected pHreading and temperature reading are displayed. Record readingwhen “ready” is displayed.
12

Orion 620 Instruction Manual
Calibration and Measurement
C. Autocalibration with Two Buffers1. With the power off, connect the pHuture Solid State electrode to
the meter.
2. Choose either 4.01 and 7.00 , or 7.00 and 10.01 buffers, whicheverwill bracket your expected sample range.
3. Dashes and a temperature reading will be displayed in themeasure mode.
4. Place electrode into 7.00 buffer. Press power to turn meter on if it hadbeen turned off to attach the electrode.
5. Select calibration mode by pressing the mode key until CALIBRATEis displayed.
6. The last buffer sequence used will be displayed for 2 seconds. Pressyes to use this sequence, or press no to scroll through other choices,and then press yes.
7. Buffer indicator along bottom of the display will indicate the bufferchosen. “P1” will be displayed in lower display field and bufferreading will be displayed in the main field.
8. When “ready” is displayed, indicating electrode stability, press yes.The temperature corrected value for that buffer is automaticallyentered into the memory of the meter. Then “P2” will be displayed inthe lower display field indicating the meter is ready for the secondbuffer. The buffer indicator along the bottom of the display willindicate the second buffer of the calibration sequence selected.
Note: Dashes continue to be displayed.
9. Remove the electrode from 7.00 buffer and rinse with deionizedwater. Place the electrode into the second buffer.
10. When “ready” is displayed press yes.
11. After the second buffer value has been entered the electrode slope willbe displayed. “SLP” appears in the lower field while the actualelectrode slope (in percent) appears in the main field for 5 seconds.The meter will then automatically advance to the measure mode andMEASURE is displayed above the main display field.
12. Remove the electrode from the second buffer and rinse with deionizedwater. Place electrode into sample. Both the temperature corrected pHreading and temperature reading are displayed. Record reading when“ready” is displayed.
13

Orion 620 Instruction Manual
Calibration and Measurement
D. Autocalibration with Three Buffers1. With the power off, connect the pHuture Solid State electrode
to the meter.
2. Place electrode into 4.01 buffer. Press power to turn meter on if ithad been turned off to attach the electrode.
3. Select calibration mode by pressing the mode key untilCALIBRATE is displayed.
4. The last buffer sequence used will be displayed for 2 seconds. Pressyes to use this sequence, or press no to scroll through other choices,and then press yes when “3P7” is displayed.
5. Buffer indicator along bottom of the display will indicate the bufferchosen. “P1” will be displayed in lower display field and bufferreading will be displayed in the main field.
6. When “ready” is displayed, indicating electrode stability, press yes.The temperature corrected value for that buffer is automaticallyentered into the memory of the meter. Then “P2” will be displayed inthe lower display field indicating the meter is ready for the secondbuffer. The buffer indicator along the bottom of the display willindicate the second buffer of the calibration sequence selected.
7. Remove the electrode from 4.01 buffer and rinse with deionizedwater. Place the electrode into the 7.00 buffer.
8. When “ready” is displayed press yes. “P3” will be displayed in thelower display field indicating the meter is ready for the third buffer.
9. Remove electrode from the 7.00 buffer and rinse with deionizedwater. Place electrode into the 10.01 buffer.
10. When “ready” is displayed press yes.
11. After the third buffer value has been entered the electrode slope willbe displayed. “SLP” appears in the lower field while the actualelectrode slope (in percent) appears in the main field for 5 seconds.
The meter will then automatically advance to the measure mode andMEASURE is displayed above the main display field.
12. Remove the electrode from the buffer and rinse with deionizedwater. Place electrode into sample. Both the temperature correctedpH reading and temperature reading are displayed. Record readingwhen “ready” is displayed.
14

Orion 620 Instruction Manual
Calibration and Measurement
E. Manual Calibration withNon-Standard Buffers
The Orion 620 Meter features a manual calibration option when the useof non-standard buffers is required for calibration. Simply enter the buffervalues of the buffers to be used into the memory of meter in the SETUPmenu. For best results, buffer values entered must be the value of thebuffers at the temperature at which calibration is being performed. Oncethese values have been entered SET, “5E7” will appear in the buffersequence selections. Select SET, “5E7” and the meter will automaticallyrecognize the buffer values which were entered in the SETUP menu.These values will remain in the meter memory until new values are entered.
15

Orion 620 Instruction Manual
Calibration and Measurement
F. Setting the Manual Buffer OptionTwo non-standard buffer values may be set for use in performingcalibrations. The manual buffer pH range is 0 - 14. After these values havebeen entered into the memory of the meter, the meter will automaticallyuse these values during calibration whenever the SET, “5E7” option isselected during buffer sequence selection at the start of calibration.
NOTE: The difference between the two non-standard buffers must be at least 1 pH unit and nomore than 4 pH units.
1. Select the SETUP mode, by pressing the mode key repeatedly untilSETUP is displayed. Press the yes key three times.
2. STD, “57O” will be displayed. Press the no key. SET, “5E7” willbe displayed. Press the yes key.
3. The value in the main display will blink and P1 will be displayedin the lower display indicating that the first buffer value isbeing set.
4. Begin editing with the left most digit. Pressing the no key willscroll the value between 0 and 1. Set digit to desired value andpress yes.
5. Continue editing the value for each digit until the desired buffervalue has been entered and press yes to enter the buffer value intothe meter memory.
6. The value in the main display will blink and P2 will be displayedin the lower display indicating that the second buffer value isbeing set.
7. Begin editing the value for each digit until the desired buffer valuehas been entered and press yes to enter the buffer value into themeter memory.
8. The meter will automatically return to the beginning of the SETUPmenu. Press the mode key to exit the SETUP menu.
16

Orion 620 Instruction Manual
Calibration and Measurement
G. Non-Standard Buffer Calibration withTwo Buffers
1. With the power off, connect the pHuture Solid State electrode tothe meter.
2. Place electrode into first the buffer. Press the power key to turn themeter on if it had been powered down to attach the electrode.
3. Enter the non-standard buffer values into meter memory asdescribed in Setting Manual Buffer Option page 13.
4. Select calibration mode by pressing the mode key repeatedly untilCALIBRATE is displayed.
5. The last buffer sequence used will be displayed for 2 seconds. IfSET, “5E7” is displayed press yes, otherwise press no repeatedlyuntil SET, “5E7” is displayed then press yes.
6. The buffer indicator along the bottom of the display will indicate“MAN” indicating manual buffer option selected. “P1” will bedisplayed in the lower display field and the buffer reading will bedisplayed in the main field.
7. When “ready” is displayed, indicating electrode stability, pressyes. “P2” will be displayed in the lower display field indicating themeter is ready for the second buffer.
8. Remove the electrode from the first buffer and rinse with deionizedwater. Place the electrode into the second buffer.
9. When “ready” is displayed press yes.
10. After the second buffer value has been accepted the electrode slopewill be displayed. “SLP” appears in the lower field while the actualelectrode slope (in percent) appears in the main field for 5 seconds.The meter will then automatically advance to the measure modeand MEASURE is displayed above the main display field. Thebuffer indicator, indicates “MAN”, manual buffer calibrationoption was used in the last calibration.
11. Remove the electrode from the second buffer and rinse withdeionized water. Place the electrode into sample. Both thetemperature corrected pH reading and temperature reading aredisplayed. Record the reading when “ready “ is displayed.
17

Orion 620 Instruction Manual

Orion 620 Instruction Manual
Use with Accessories
Chapter VIUse with Accessories
A. Use with Printers and ComputersThe Orion 620 Meter can send information to a printer or computer usingthe RS232-C port.
Thermo Electron Corporation provides a cable, Orion 0ACBL0, forinterfacing your meter to an IBM PC or compatible device. For othercomputers and communication devices a suitable cable must be fabricated.Use the information below in interfacing your meter and serial peripheraldevice. The RS232-C port settings are as follows:
Baud rate: 1200Eight data bits, no parityOne start bit, one stop bit.
Meter Pin Printer Pin
RXD 2
TXD 3 RXD 3
DSR 4
SIG GND 5 SIG GND 5
DTR 6
RTS 7
CTS 8 RTS 8
Jumper 4 and 6 together.
The RS232-C port on the meter is a nine pin D-shell subminiature maleconnector (DB -9 style).
19

Orion 620 Instruction Manual
Use with Accessories
Use with the 900A Printer
The meter, when used with the Orion 900A printer will provide a printedrecord of results. The 900A printer can be battery operated or connected tothe line power.
Plug the printer directly into the meter using the nine pin D shellconnector on the left side of the meter.
Press the print key to print the current measurement information.
B. Using Calibration Interface Cable:
Thermo Electron now sells a Calibration Interface Cable (Orion 0600CC)to interface the Orion 610 or 620 pHuture Solid State meter to a precisionmillivolt source (Customer supplied).
Detailed instructions are included with the Calibration Interface Cablethat explain how to connect either the 610 or 620 pHuture Solid StatepH meter to a precision millivolt source as well as what the anticipatedreadouts will be and what these readouts mean.
20

Orion 620 Instruction Manual
Self-Test
Chapter VIISelf-Test
During the self-test the meter will display various codes corresponding tothe section of the instrument being checked. If any problems are found anoperator assistance code corresponding to the test that failed will bedisplayed. Note the code and press yes key to continue. See Table 1 underOperator Assistance Codes. Should an operator assistance code appearduring self-test, check to make sure the pHuture Solid State electrode issecurely attached then repeat the test. If the problem persists contact TheTechnical Edge for Orion Products at 1-800-225-1480.
During the self test the meter displays TEST, “7E57” in the main field andthe number of the test in the lower field. Additional meter displays occurdepending on the test being performed.
NOTE: Ensure that the pHuture Solid Stateelectrode is securely attached to the meter sensorinput prior to self-test.
21

Orion 620 Instruction Manual
Self-Test
Test Function\Display
Test #1 Segment Display Checks meter display. Ensures thatall segments are lit.
Test #2 RAM Check Verifies the proper operation ofthe Random Access Memory.
Test #3 External Input Checks the electrode input channel.An Orion pHuture Solid Stateelectrode must be plugged in forthis test.
Test #4 Internal Check Internal function test.
Test #5 Internal Reference Checks the internal reference inthe meter.
Test #6 Ground Reference Checks the meter ground.
Test #7 Keypad Test Checks that the keypad isfunctioning properly. During this testall keys must be pressed at the “0”prompt. Press each key. As each keyis pressed a number corresponding toeach key press is displayed. When allkeys have been pressed “ready”will be displayed.
If no keys are pressed or there is aproblem with a key the meter willrecognize an error and display E-07.Press yes to continue.
Test #8 Shutoff Test Checks the meter shutoff feature.The meter will shut down. To restartthe meter press the power key.
22

Orion 620 Instruction Manual
Operator Assistance Codes
Chapter VIIIOperator Assistance Codes
Operator Assistance Codes are used to inform the user of an out-of-rangevalue or meter problem. The following tables outline the operatorassistance codes available in the Orion 620 Meter.
The meter has a self-test circuit which verifies proper electronic operation.During self-test a special series of codes, E-02 through E-08 indicate aproblem with the meter hardware. See Table 1. Should one of these codesappear contact The Technical Edge at 1-800-225-1480.
Table 1 Self-Test Operator Assistance Codes
E-02 RAM Check Error
E-03 Input Channel Error: ensure that the pHuture Solid Stateprobe is securely attached to the meter and repeat self-test.
E-04 Internal Check
E-05 Internal Reference Error
E-06 Ground Test Error
E-07 Internal Keypad Error: Press each key while in self-test,if code persists contact Thermo Electron Corporartion'sTechnical Edge for Orion Products.
E-08 Instrument Shutdown Error
23
Orion 620 Instruction Manual
Operator Assistance Codes
The Operator Assistance Codes E-20 through E-31 alert the user to apotential problem while calibrating or measuring. Several steps can betaken to eliminate the problem in each case. If the code persists aftertrying the suggested remedies contact Thermo Electron's TechnicalEdge for Orion Products.
Table 2
E-20 Out of Range 1. If this occurs when electrode isout of solution, code willdisappear when electrode isreturned to solution.
2. Sample may be out of range.Check with a buffer.
3. Recalibrate using fresh buffers.
4. Refer to pHuture Solid Stateelectrode manual for instructionson how to clean the electrode.
E-22 Calibration Standard The pH values being measured areError the same for two different buffers.
1. Press any key to acknowledge.
2. Check that two different buffersare being used and that thecorrect one is being measured.
3. Recalibrate using fresh buffers.
E-23 Bad Slope pH electrode slope not in the rangeof 70% to 130%
1. Press any key to acknowledge.
2. Recalibrate using fresh buffers.
3. Refer to pHuture Solid Stateelectrode instruction manualfor instructions on how toclean the electrode.
24

Orion 620 Instruction Manual
Operator Assistance Codes
E-25 Electrode not The pHuture Solid State electrode isConnected to Meter not firmly connected to electrode input.
1. Press power to turn meter off.
2. Detach and then reattach the solidstate probe. Press power to restartthe meter.
E-29 Printer Error The meter is sending information toa printer and there is no printerplugged into the meter or printer isnot turned on.
1. If a printer is being used checkthat the printer is properlyconnected.
2. If using the Orion 900A printerensure the battery has beenproperly charged.
3. If no printer is being used, go to aSETUP menu and turn the printfunction OFF.
E-31 Bad Value A value has been entered which isnot within the acceptable range forthat function.
1. Press any key to acknowledge error.
2. Re-enter a new value within theallowable range. Acceptable valuesare as follows: pH: 0.00 to 14.00.
25

Orion 620 Instruction Manual

Orion 620 Instruction Manual
Troubleshooting Guide
Chapter IXTroubleshooting Guide
Malfunction Possible Cause Remedy
No Display No power to meter Press the power key.Check to ensure batteryis inserted correctly andpolarity signs match.Replace batteries ifoperating on battery power.
If operating on linepower, check that theproper line converter isplugged in securely.
Autoshutoff may The Autoshutoff featurehave turned the meter will automaticallymeter off shut off the meter if no
keys have been pressedwithin 30 minutes.
Erratic Readings Meter or electrode Follow the Instrumentor Reading Out failure Check Out procedure inof Range this manual.
Dirty Electrode Follow instructions forproper cleaning inelectrode instructionmanual.
Improper Electrode Check the electrodeConnection operation by following
the instructions in thepHuture Solid Stateelectrode instructionmanual.
Ensure correct electrodeconnection.
Could be Sample Call Thermo's TechnicalEdge for Orion Products.
27

Orion 620 Instruction Manual
Troubleshooting Guide
E-25 1. Turn off the meter.
2. Make sure the DIN connectoris pushed in & fully seated.
3. Re-power the meter.
4. Is it OK? YES - Done,NO - Go to Step 5.
5. Turn off the meter & Removethe DIN connector.
6. Examine the pins forBreakage, Bending, Pushed in.
7. Call The Technical Edge.
E-23 1. Make sure buffers andintended CAL points match.
2. Use fresh buffers.
3. Re-calibrate.
4. Calibration OK?YES - Done, NO - Go to Step 5.
5. Is the electrode Gel or Sureflow?Go to GEL / SUREFLOWE-23 Troubleshooting procedure onthe next page.
28

Orion 620 Instruction Manual
Troubleshooting Guide
E-23 Troubleshooting 1. Clean with MethanolGEL Electrode (See attached procedure).
2. Re-calibrate.
3. Calibration OK?YES - Done, NO - Go to 4.
4. What type of calibration isbeing performed?4 - 7 Go to 57 - 10 Go to 6Others Go to 7
5. Soak the electrode in buffer 4,for 30 minutes, Go to 8.
6. Soak the electrode in buffer l0,for 30 minutes, Go to 8.
7. Soak the electrode in buffer 7,for 30 minutes, Go to 8.
8. Re-calibrate.
9. Calibration OK? NO - Call TheTechnical Edge, YES - Done.
SUREFLOW 1. Flush and clean the ElectrodeElectrode & make sure the cap is tight.
(See attached procedure.)
2. Fill with fresh fill solution -610011.
3. Re-calibrate.
4. Is calibration OK?YES - Done, NO - Go to 5.
5. Clean with methanol(See attached procedure.)
6. Re-calibrate.
7. Is calibration OK?YES - Done,NO - Call The Technical Edge.
29

Orion 620 Instruction Manual
Troubleshooting Guide
E-20 1. Is the meter calibrated?VALID TEMP READING YES - Go to 4, NO - Go to 2.
2. Calibrate, l point at 7.
3. Calibration OK?YES - Done, NO - Go to 4.
4. Is the electrode GEL orSUREFLOW?Go to GEL / SUREFLOWE-20 Troubleshooting procedure
E-20 TroubleshootingGEL Electrode 1. Clean with methanol.
(See attached procedure)
2. Re-calibrate.
3. Calibration OK?NO - Go to 4, YES - Done.
4. Soak the electrode in buffer 7for 30 minutes.
5. Re-calibrate at 7.
6. Is calibration OK? NO - Call TheTechnical Edge, YES - Done
E-20 Troubleshooting 1. Flush and clean the ElectrodeSUREFLOW & make sure the cap is tight.Electrode (See attached procedure.)
2. Fill with fresh fill solution -610011.
3. Re-calibrate.
4. Is calibration OK?NO - Go to 5, YES - Done.
5. Clean with methanol.(See attached procedure.)
6. Re-calibrate.
7. Is calibration OK? NO - Call TheTechnical Edge, YES - Done.
30

Orion 620 Instruction Manual
Troubleshooting Guide
E-20 1. Power down and re-powerINVALID TEMP READING the meter.
2. Is it E-20/pH and validtemperature? YES - Follow theprocedure for E-20/TEMP,NO - Go to 3.
3. Turn off the meter and removethe DIN connector.
4. Inspect the pins for Breakage,Bending, & Pushed in.
5. Are the pins OK? YES - Go to 6,NO - Call The Technical Edge.
6. Plug in electrode, and make sure itis fully seated.
7. Turn on the meter.
8. Is it E-20/pH and validtemperature? YES - Follow E-20/VALID TEMP, NO - Call TheTechnical Edge.
pH 1. Is the temperature within ± 1.0BAD TEMP degrees C? YES - Done,
NO - Call The Technical Edge.
Slow Response or Noisy: 1. Clean with methanol.(See attached procedure.)
2. Is electrode OK?YES - Done, NO - Go to 3.
3. Is the electrode GEL orSUREFLOW? Go to Gel/SUREFLOW E-20/INVALIDTEMPERATURE READINGtroubleshooting.
31

Orion 620 Instruction Manual
Troubleshooting Guide
E-20/INVALID TEMP READINGSUREFLOW 1. Flush & clean the electrodeElectrode and the pellet.
(See attached procedure.)
2. Fill with fresh fill solution -610011.
3. Calibrate at 7.
4. Is the electrode OK?YES - Done,NO - Call The Technical Edge.
GEL Electrode 1. Using D.I. water and a KimWipe,(Orion Rinse 911110 pad ispreferable), gently scrub the tip ofthe electrode with the KimWipesoaked in D.I. water.
2. Rinse the electrode with D.I.water, wipe clean.
3. Is the electrode OK?YES - Done, NO - Go to step 4.
4. Soak the electrode in pH 7buffer for 30 minutes.
5. Calibrate at 7.
6. Is the electrode OK?YES - Done,NO - Call The Technical Edge.
32

Orion 620 Instruction Manual
Troubleshooting Guide
METHANOL 1. Wash electrode withCLEANING D.I. water and dry.
2. Place electrode tip into 100%(absolute) methanol(submerging approximately 1/4'’).
3. Stir the electrode in methanolfor 30 seconds.
4. Rinse the electrode with D.Iwater and dry.
5. Allow electrode to soak in pH7 buffer for 30 minutes.
ADDITIONAL 1. Press the electrode cap whileSUREFLOW holding the body, make sureELECTRODE the fill hole near the cap isCLEANING not covered.
2. Release as much of the fillsolution as possible.
3. Using a wash bottle, fill andflush the electrode through thefill hole with D.I. water.
4. Empty the electrode.
5. Allow electrode to soak inpH 7 buffer for 30 minutes.
Cleaning the Pellet 1. To clean the pellet, unscrewthe cap, gently remove theinner element approximately2 inches, rinse with D.I. waterand wipe dry with KimWipe.
2. Insert the inner element thenpress and screw the cap back on.
33

Orion 620 Instruction Manual

Orion 620 Instruction Manual
Chapter XRepair and Service
After troubleshooting all components of your measurement system,contact The Technical EdgeSM for Orion products. Within the UnitedStates call 1.800.225.1480, outside the United States call 978.232.6000 orfax 978.232.6031. In Europe, the Middle East and Africa, contact yourlocal authorized dealer. For the most current contact information, visitwww.thermo.com.
For the most current warranty information, visit www.thermo.com.
Repair and Service 35

Orion 620 Instruction Manual

Orion 620 Instruction Manual
Instrument Warranty
Chapter XIInstrument WarrantyFor the most current warranty information, visit www.thermo.com.
The Thermo Electron Corporation, Orion products warranty covers failuresdue to manufacturer’s workmanship or material defects from the date ofpurchase by the user. User should return the warranty card and retain proof ofpurchase. Warranty is void if product has been abused, misused, or repairsattempted by unauthorized persons.
Warranties herein are for product sold/installed by Thermo or its authorizeddealers.
Any product sold by a U.S. or Canadian distributor must be returned toThermo for any warranty work. Please contact our Technical Servicedepartment for further information. A Return Authorization Number must beobtained from The Technical EDGESM for Orion Products before returningany product for in-warranty repair or replacement.
In the event of failure within the warranty period, Thermo will at thecompany’s option, repair or replace product not conforming to this warranty.There may be additional charges, including freight, for warranty serviceperformed in some countries. For service, call Thermo or its authorized dealeroutside the United States and Canada. Thermo reserves the right to ask forproof of purchase, such as the original invoice or packing slip.
Field Service is available on Orion BOD AutoEZ™, EZ Flash® GCAccessory and TEA Analyzer®. Contact our Field Service department fordetails on quotations and service, other field service-related activities.
The following products are warranted to be free from defects in material andworkmanship in the period listed below from the date of purchase from theuser or from the date of shipment from Thermo, whichever is earlier, provideduse is in accordance with the operating limitations and maintenanceprocedures in the instruction manual and when not having been subjected toaccident, alteration, misuse, abuse or breakage of electrodes:
37
Orion 620 Instruction Manual
Instrument Warranty
Thirty-six months from date of purchase by the user (or forty-twomonths from date of shipment from Thermo)
• Waterproof Meters (Orion 630, 635, 830A, 835A, 260A, 261S, 265A,266S, 130A, 131S, 135A and 136S), Conductivity Meters (Orion 105Aplus,115Aplus, 125Aplus, 145Aplus, 150Aplus and 162A), PerpHect® pH/ISEMeters (Orion 310, 320, 330, 350, 370) pH/ISE Meters (Orion 210Aplus,230Aplus, 250Aplus, 290Aplus, 410Aplus, 420Aplus, 520Aplus, 525Aplus,710Aplus, 720Aplus and 920Aplus), pHuture MMS™ Meters (Orion 535Aand 555A), pH/Conductivity Meter (Orion 550A), Dissolved Oxygen Meters(Orion 805Aplus, 810Aplus, 850Aplus and 862A).
Twenty-four months from date of purchase by the user (or thirty-sixmonths from date of shipment from Thermo)
• Orion ROSS Ultra® Electrodes, Orion AQUAfast® IV Colorimeters,Orion AQUAfast® IV Turbidimeter, Orion 925 Flash Titrator™, Series 100DuraProbe™ Conductivity Cells and Series 800 Dissolved Oxygen Probes.
Twelve months from date of purchase by the user (or eighteen monthsfrom date of shipment from Thermo)
• Laboratory pH Meters, (Orion 301, 611 and 940), SensorLink®, pHuture™pH Meters (Orion 610 and 620), Sage® Pumps, Cahn® Balances, 930Ionalyzer®, 950 ROSS™ FAST QC™ Titrator, 960 Titrator PLUS®, KarlFischer Titrators, Autosamplers, Liquid Handling Devices, Liquid HandlingAutomation Workstations (Orion AS2000, AS2500 and AS4000), Pumps(Orion SP201, SP201-HR, SP201-S, Peristaltic and Rinse), pHuture®Conversion Box, Wine Master®, 607 Switchbox, rf link™, AQUAfast® IIColorimeters, Vacuum Degasser and Flowmeter.
• Orion EZ Flash® GC Accessory, Orion TEA Analyzer® 610 and 510excluding consumable items carry twelve months warranty only.
• Orion Ion Selective Electrodes, ionplus® Electrodes, ROSS™ Electrodes,Sure-Flow® Electrodes, PerpHecT® Electrodes, AquaPro ProfessionalElectrodes, No Cal™ pH electrodes, Standard Line pH Electrodes, Tris pHElectrodes, KNIpHE® electrode, ORP Triode™ (Orion 9180BN), pHuture™pH Probes (Orion 616500) and pHuture MMS™ Quatrode™ and Triode™(Orion 616600 and 617900), Orion 97-08 DO Probe, Series 100 ConventionalConductivity Cells, temperature probes and compensators (except thoseproducts noted).
38

Orion 620 Instruction Manual
Instrument Warranty 39
• Orion 93 and 97 ionplus Series sensing modules are warranted to give sixmonths of operation if placed in service before the date indicated on thepackage, except 93-07 and 97-07 Nitrate modules are warranted to give ninetydays of operation if placed in service before the date indicated on the package.
Six months from date of purchase by the user (or twelve months fromdate of shipment from Thermo)
• Orion Flash Titration™ Probe (Orion 092518), pHuture™ Electrode (Orion615700), pHuture MMS™ Pentrode™ (Orion 617500), Quatrode™ (Orion617800) and Triode™ (Orion 615800), Low Maintenance Triode™ (Orion9107BN), ORP Low Maintenance Triode™ (Orion 9179BN), andPerpHecT® Low Maintenance Triode™ (Orion 9207BN), WaterproofTriode™ (Orion 9107WP, 9107WL, 9109WL and 9109WP), QuiKcheK®Meters and Micro Electrodes.
Three months from date of purchase by the user (or six months fromdate of shipment from Thermo)
• Economy Line Electrodes, Orion 91-05, 91-06, 91-15, 91-16, 91-25, 91-26,91-35, 91-36, 92-06. Warranty also includes failure for any reason (excludingbreakage), except abuse, provided the electrode is not used in solutionscontaining silver, sulfide, perchlorate, or hydrofluoric acid; or in solutionsmore than one (1) Molar in strong acid or base at temperatures above 50 °C.
“Out-of-Box” Warranty - Should any of the following products fail towork when first used, contact Thermo immediately for replacement.
• Orion Solutions, Standards, Reagents, Cables, Ferrules, Tubing, Lineadapters, Printers, Software, Cases, Stands, Probe Membranes, AQUAfast®Test Strips, EZ Flash® columns, Liquid Handling Probes, Adapter Plates andRacks and general accessories.
For products in the catalog not listed in this warranty statement, please visitour website at: www.thermo.com.

Orion 620 Instruction Manual
Instrument Warranty40
THE WARRANTIES DESCRIBED ARE EXCLUSIVE AND IN LIEU OFALL OTHER WARRANTIES WHETHER STATUTORY, EXPRESS ORIMPLIED INCLUDING, BUT NOT LIMITED TO, ANY IMPLIEDWARRANTY OF MERCHANTABILITY OR FITNESS FOR APARTICULAR PURPOSE AND ALL WARRANTIES ARISING FROMTHE COURSE OF DEALING OR USAGE OF TRADE. THE BUYER’SSOLE AND EXCLUSIVE REMEDY IS FOR REPAIR ORREPLACEMENT OF THE NON-CONFORMING PRODUCT OR PARTTHEREOF, OR REFUND OF THE PURCHASE PRICE, BUT IN NOEVENT SHALL THERMO (ITS CONTRACTORS AND SUPPLIERS OFANY TIER) BE LIABLE TO THE BUYER OR ANY PERSON FOR ANYSPECIAL, INDIRECT, INCIDENTAL, OR CONSEQUENTIALDAMAGES WHETHER THE CLAIMS ARE BASED IN CONTRACT, INTORT (INCLUDING NEGLIGENCE), OR OTHERWISE WITH RESPECTTO OR ARISING OUT OF THE PRODUCT FURNISHED HEREUNDER.
REPRESENTATION AND WARRANTIES MADE BY ANY PERSON,INCLUDING ITS AUTHORIZED DEALERS, REPRESENTATIVES ANDEMPLOYEES OF THERMO WHICH ALTER OR ARE IN ADDITION TOTHE TERMS OF THIS WARRANTY SHALL NOT BE BINDING UPONTHERMO UNLESS IN WRITING AND SIGNED BY ONE OF ITSOFFICERS.

Orion 620 Instruction Manual
Notice of Compliance
Chapter XIINotice of Compliance
WARNING: This meter may radiate radio frequency energy if notinstalled and used properly, that is in strict accordance with themanufacturer’s instructions, may cause interference to radiocommunications. It has been tested and found to comply with the limitsfor Class A computing device pursuant to Subpart J of Part 15 of FCCRules, which are designed to provide reasonable protection against suchinterference in a commercial environment. Operation of the meter in aresidential area may cause interference in which case the user at his ownexpense will be required to take whatever measures may be required tocorrect the interference.
NOTE: To meet FCC Compliance, Orion suppliedwall adaptors must be used with this product.
This digital apparatus does not exceed the Class A limits for radio noiseemissions from digital apparatus set out in the Radio InterferenceRegulations of the Canadian Department of Communications.
Le présent appareil numérique n’émet pas de bruits radioélectriquesdépassant les limites applicables aux appareils numériques de la class Aprescrites dans le Règlement sur le brouillage radioélectrique édicté par leministere des Communications du Canada.
41

Orion 620 Instruction Manual

Orion 620 Instruction Manual
Ordering Information
Chapter XIIIOrdering InformationOrion Description061000 Orion 610 Portable pHuture® Solid State pH Meter System,
includes Orion 610 meter; 615700 pHuture Solid State LowMaintenance pH/Temperature probe; 9V DC battery andinstruction manual.
062000 Orion 620 Benchtop pHuture Solid State pH Meter System,includes Orion 620 meter; 616500 pHuture Solid StateSure-Flow® pH/temperature Probe; 110V wall adapterand instruction manual.
062001 Orion 620 Benchtop pHuture Solid State pH Meter System,includes Orion 620 meter; 616500 pHuture Solid StateSure-Flow pH/temperature Probe; 220V wall adapterand instruction manual.
615700 Epoxy body, pHuture Solid State pH/Temperature probe,non-refillable with DIN connector. (For use on Orion 610 orOrion 620 meters only.)
616500 Sure-Flow, epoxy body, pHuture Solid State pH/Temperature probe with DIN connector. (For use onOrion 610 or Orion 620 meters only.)
0600CC Calibration Interface Cable to interface the Orion 610 or620 pHuture Solid State pH meters to a precisionmillivolt source.
910410 perpHect® Buffer 4, color coded, 10 pack
910425 perpHect Buffer 4, color coded, 25 pack
910710 perpHect Buffer 7, color coded, 10 pack
910725 perpHect Buffer 7, color coded, 25 pack
911010 perpHect Buffer 10, color coded, 10 pack
911025 perpHect Buffer 10, color coded, 25 pack
911110 perpHect Rinse, 10 pack
911125 perpHect Rinse, 25 pack
020125 110V Wall adapter
020130 220V Wall adapter
43

Orion 620 Instruction Manual

Orion 620 Instruction Manual
Specifications
Chapter XIVSpecifications
pHrange 0.000 to 14.000resolution 0.001\0.01\0.1relative accuracy +\- 0.01slope 70% to 130%
Temperaturerange -5 to 105 °Cresolution 1 °Crelative accuracy +\-1 °C
Display Custom LCD
Inputs DIN, power
Outputs RS232C
Power Requirements line adapter for either 110 or 220 VAC,50\60 Hz wall outlet
Environmental 5 to 45 °C, 5 to 85% relative humidity,Requirements noncondensing
Meter Dimensions 8.08 x 3.26 x 1.90 inches
Case Dust and Splash Resistant, Chemical Restraint
Specification subject to change without any notice.
45

227560-001 Rev.E
Analyze • Detect • Measure • Control™
Environmental InstrumentsWater Analysis
North America 166 Cummings CenterBeverly, MA 01915 USATel: 978-232-6000Dom. Fax: 978-232-6015Int’l. Fax: 978-232-6031
Europe12-16 Sedgeway Business ParkWitchford, CambridgeshireEngland, CB6 2HYTel: 44-1353-666111Fax: 44-1353-666001
Far EastRoom 904, Federal Building369 Lockhart RoadWanchai, Hong KongTel: 852-2836-0981Fax: 852-2834-5160
Customer Support Toll Free: 800-225-1480 www.thermo.com Dom. e-mail: [email protected]’l. e-mail: [email protected]
For updated contact information, visit www.thermo.com