Embed Size (px)
Citation preview

Shuki Kato - Western Dragon 1.
1. Colored side up. Fold and unfold.
2. Pinch in half and unfold.
Western Dragon V3 - 2011
3. Pinch and unfold.
4. Pinch and unfold. 5. Fold and unfold. 6. Fold and unfold.
Difficulty: ***** super-complexRecommended starting size: 20 inches (50 cm)Finished size: 5 1/2 inches tall (14 cm)Expected time needed to fold: 7 hours

Shuki Kato - Western Dragon 2.
7. Kite-fold behind. 8. Fold and unfold. 9. Fold and unfold.
10. Fold and unfold.
13. Unfold.
11. Close up. 12. Fold and unfold the small point into sixths.
14. Fold and unfold. 15. Fold and unfold.
16. Fold and unfold. 17. Fold and unfold. 18. Fold and unfold. Turn over.

Shuki Kato - Western Dragon 3.
19. Fold and unfold. 20. Fold and unfold. 21. Rabbit-ear the corner.
22. Valley-fold the corner. 23. Turn over. 24. Rabbit-ear the corners on existing creases.
26. Fold and unfold into thirds, crease through all layers.
27. Like this. Unfold everything.
28. Extend and reform the previous creases.
29. Fold and unfold.
25. Fold and unfold.
30. Pleat along the center.
Shuki Kato - Western Dragon 4.
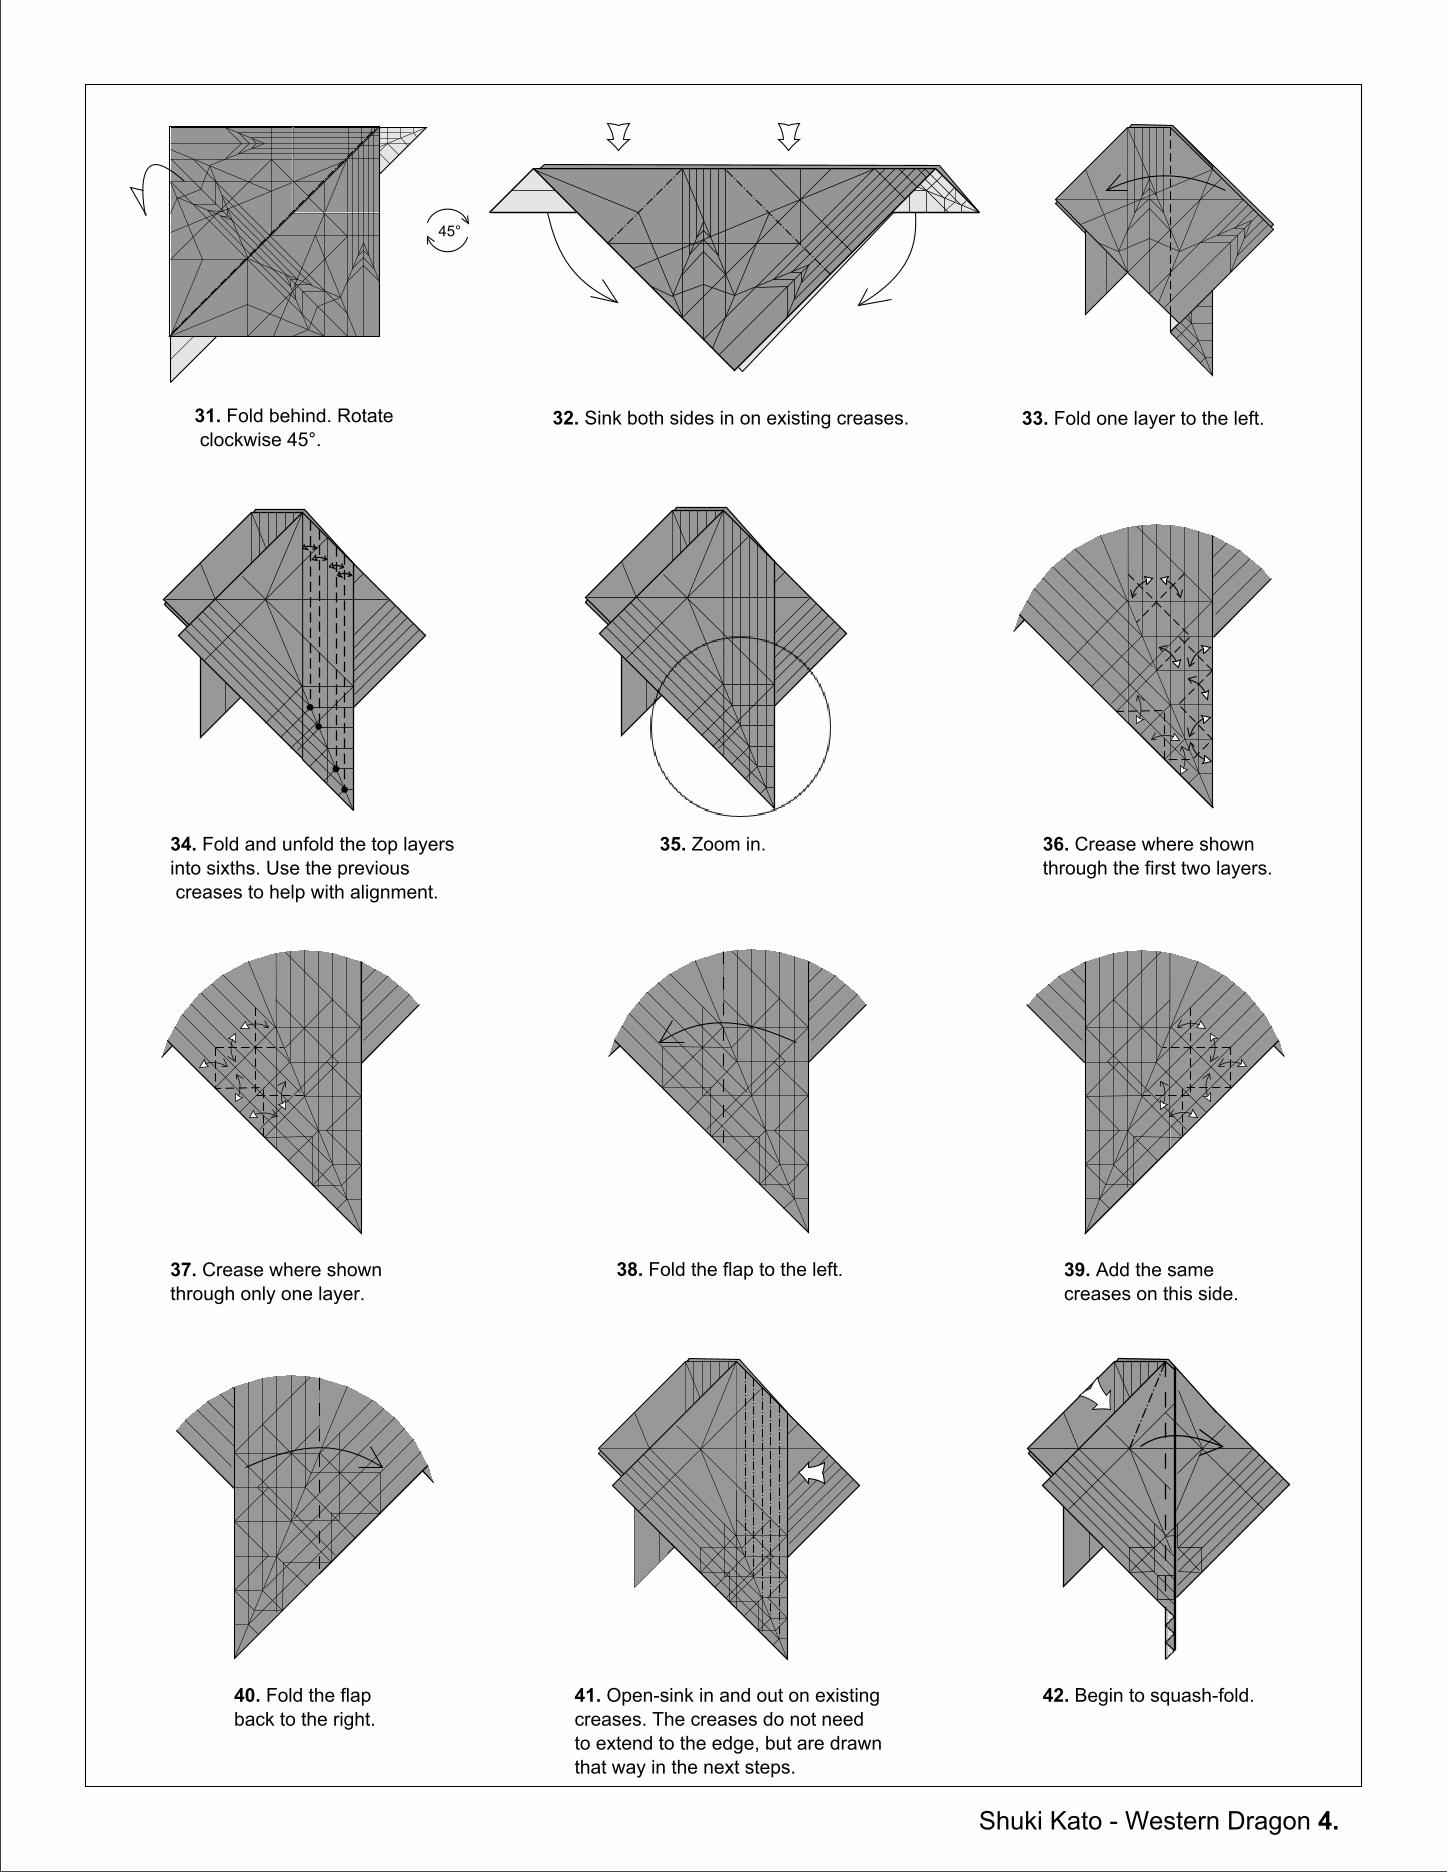
31. Fold behind. Rotate clockwise 45°.
45°
32. Sink both sides in on existing creases. 33. Fold one layer to the left.
34. Fold and unfold the top layers into sixths. Use the previous creases to help with alignment.
35. Zoom in. 36. Crease where shown through the first two layers.
37. Crease where shown through only one layer.
38. Fold the flap to the left. 39. Add the same creases on this side.
40. Fold the flap back to the right.
41. Open-sink in and out on existing creases. The creases do not needto extend to the edge, but are drawn that way in the next steps.
42. Begin to squash-fold.

Shuki Kato - Western Dragon 5.
43. Petal-fold. Fold the excess paper to the right.
44. Fold to the right noting the reference.
45. Fold to the left.
46. Unfold. 47. Open-sink in and out. 48. Sink (spread-sink and close back up) the small corner.
49. Fold one layer to the left. 50. Fold and unfold. 51. Open-sink.
52. Squash-fold. 53. Petal-fold. 54. Open sink the edge in andout and flatten completely.

Shuki Kato - Western Dragon 6.
55. Fold down. 56. Like this. Turn over. 57. Fold one layer to the right.
58. Repeat steps 42-55 on this side.
42-55
59. Fold one layer to the left.
60. Spread-sink the edge. 61. Reverse-fold the edges.
62. Fold two layers to the right.
63. Fold the assembly of layers to the left, the model will not lie flat. Repeat behind.
64. Fold the top edge downso that it points straight out. Repeat behind.
65. Pull the top layer up whilesqueezing the sides in extending a central mountain-fold.
66. Like this. 67. Fold the flap up while reverse-folding two edges
68. In progress.

Shuki Kato - Western Dragon 7.
69. Open both sides. 70. Reverse-fold in and out. These flaps will not lie flatfor some time to come.
71. Sink in and out on existing creases. The sinks must be performed simultaneously and form accordion-like folds at the base.
72. Close the sides back up.
73. Fold over as far as possible, squashing a hidden edge.
74. Fold back alongthe center line.
75. Unfold. 76. Closed sink.
Shuki Kato - Western Dragon 8.
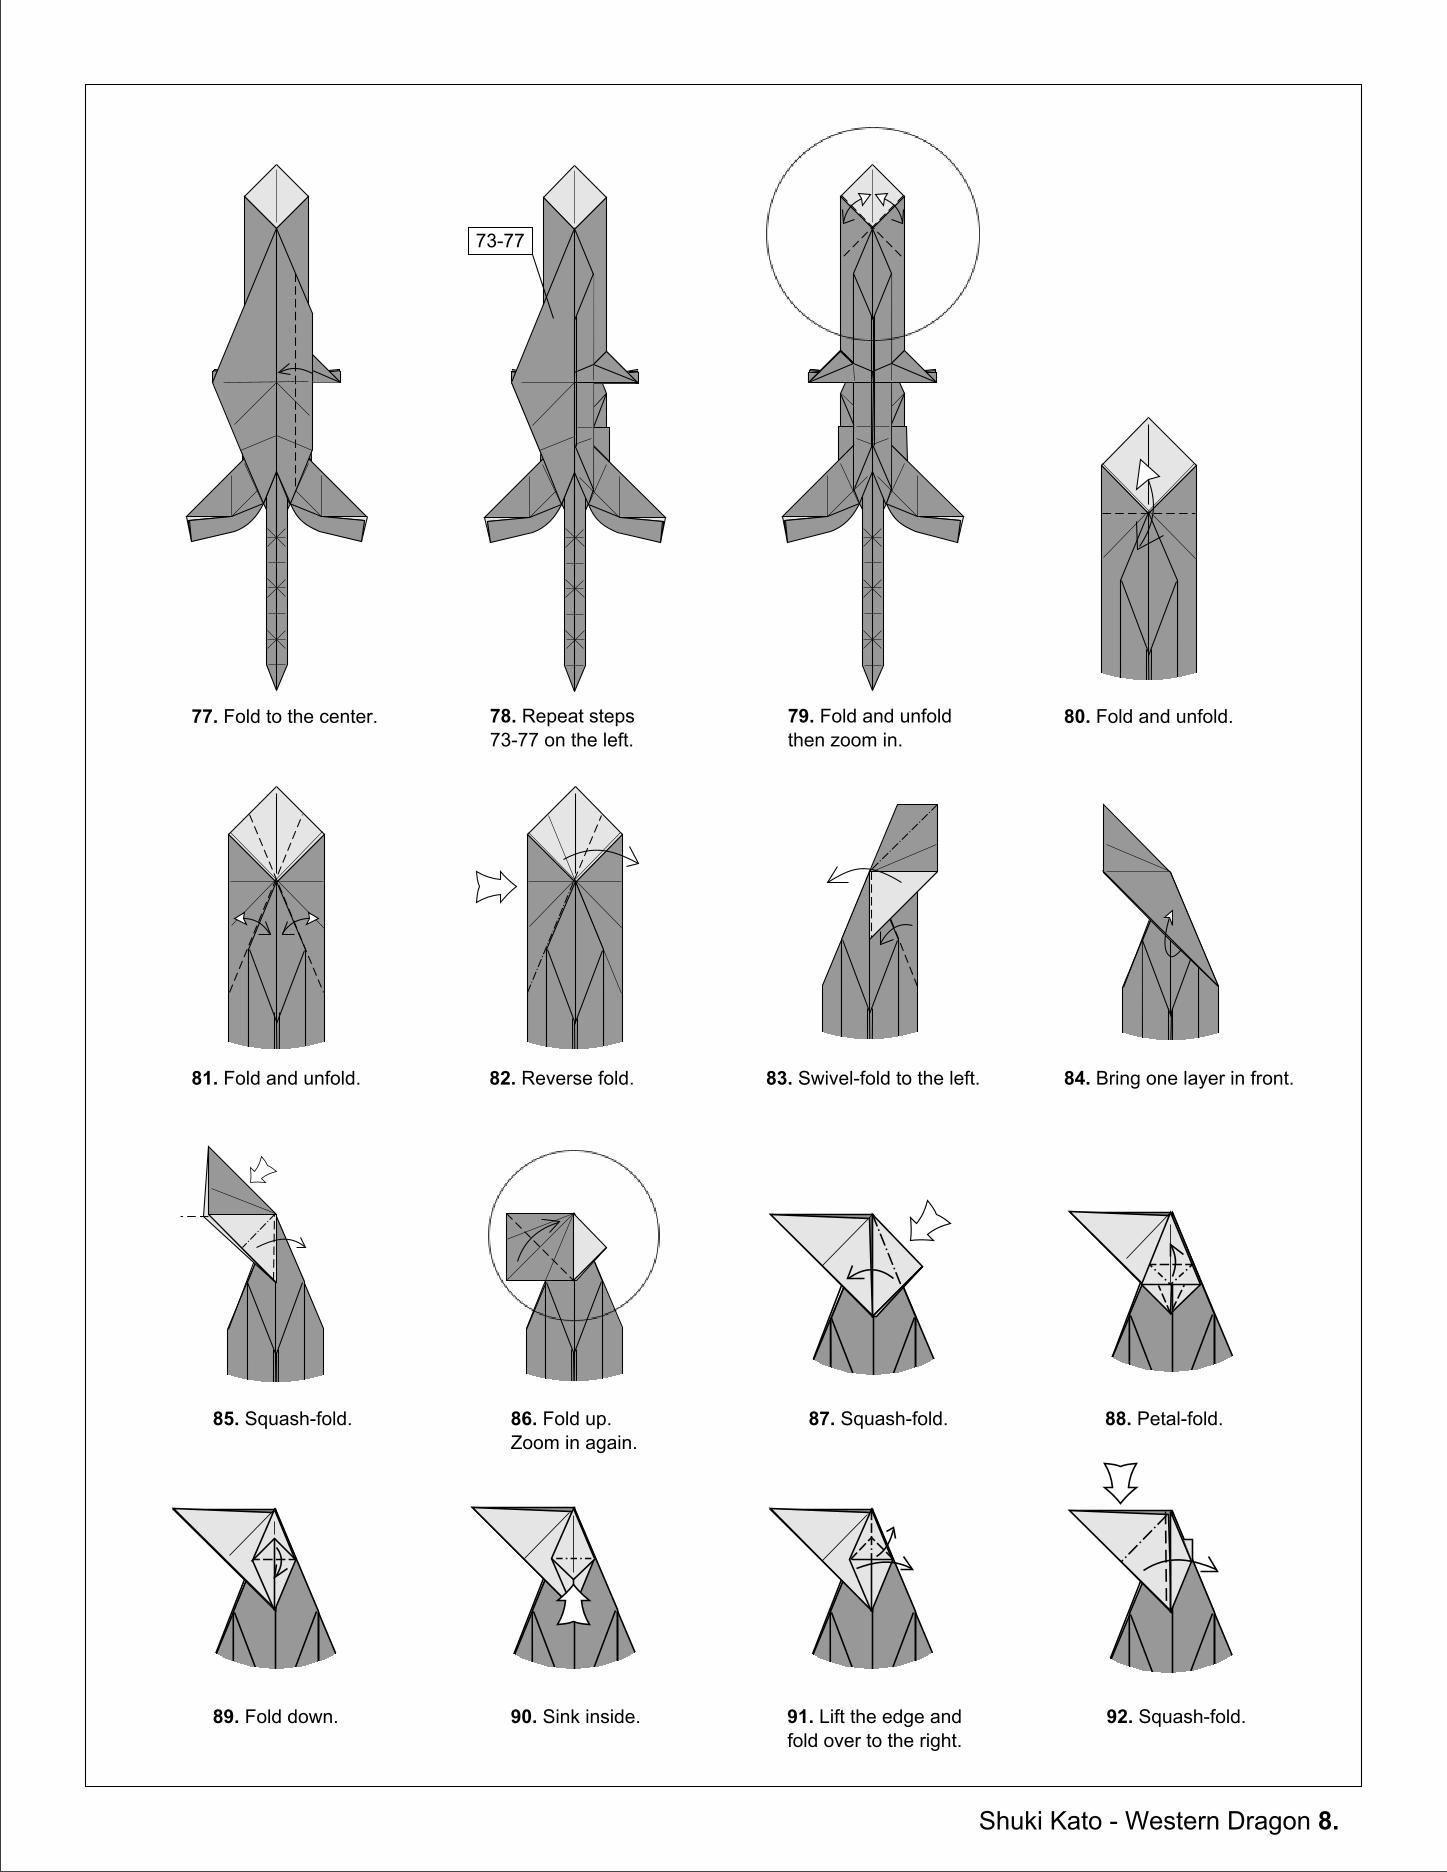
77. Fold to the center. 78. Repeat steps 73-77 on the left.
73-77
79. Fold and unfold then zoom in.
80. Fold and unfold.
81. Fold and unfold. 82. Reverse fold. 83. Swivel-fold to the left. 84. Bring one layer in front.
85. Squash-fold. 86. Fold up. Zoom in again.
87. Squash-fold. 88. Petal-fold.
89. Fold down. 90. Sink inside. 91. Lift the edge and fold over to the right.
92. Squash-fold.

Shuki Kato - Western Dragon 9.
93. Repeat steps 87-91 on the left.
87-91
94. Squash-fold. 95. Petal-fold. 96. Unwrap the top layer.
97. Squash-fold. 98. Reverse-fold both sides. 99. Fold up as far as possible.
100. Unwrap the top layers.
101. Rabbit-ear both corners.
102. Sink the sides in on existing creases.
103. Mountain-fold the top layerand valley-fold the second one.
104. Turn over.
105. Fold the small flap down. 106. Fold and unfold the top edge.
107. Open-sink both sides. 108. Fold the remaining edges behind.
109. Narrow the legs and tail simultaneously.
110. Fold the hidden layers down. 111. Swivel-fold the edges down. 112. Fold the edges back up.

Shuki Kato - Western Dragon 10.
113. Sink the small edges(or just mountain-fold them).
114. Fold and unfold. 115. Reverse-fold
116. Reverse-fold. 117. Reverse-fold. 118. Repeat steps 114-117 on the next 2 flaps.
114-117
114-117
119. Fold in half and rotate clockwise 90°.
120. Fold the wing up while swiveling the arm down.
121. Pull out the three narrow edges.
90°
Shuki Kato - Western Dragon 11.
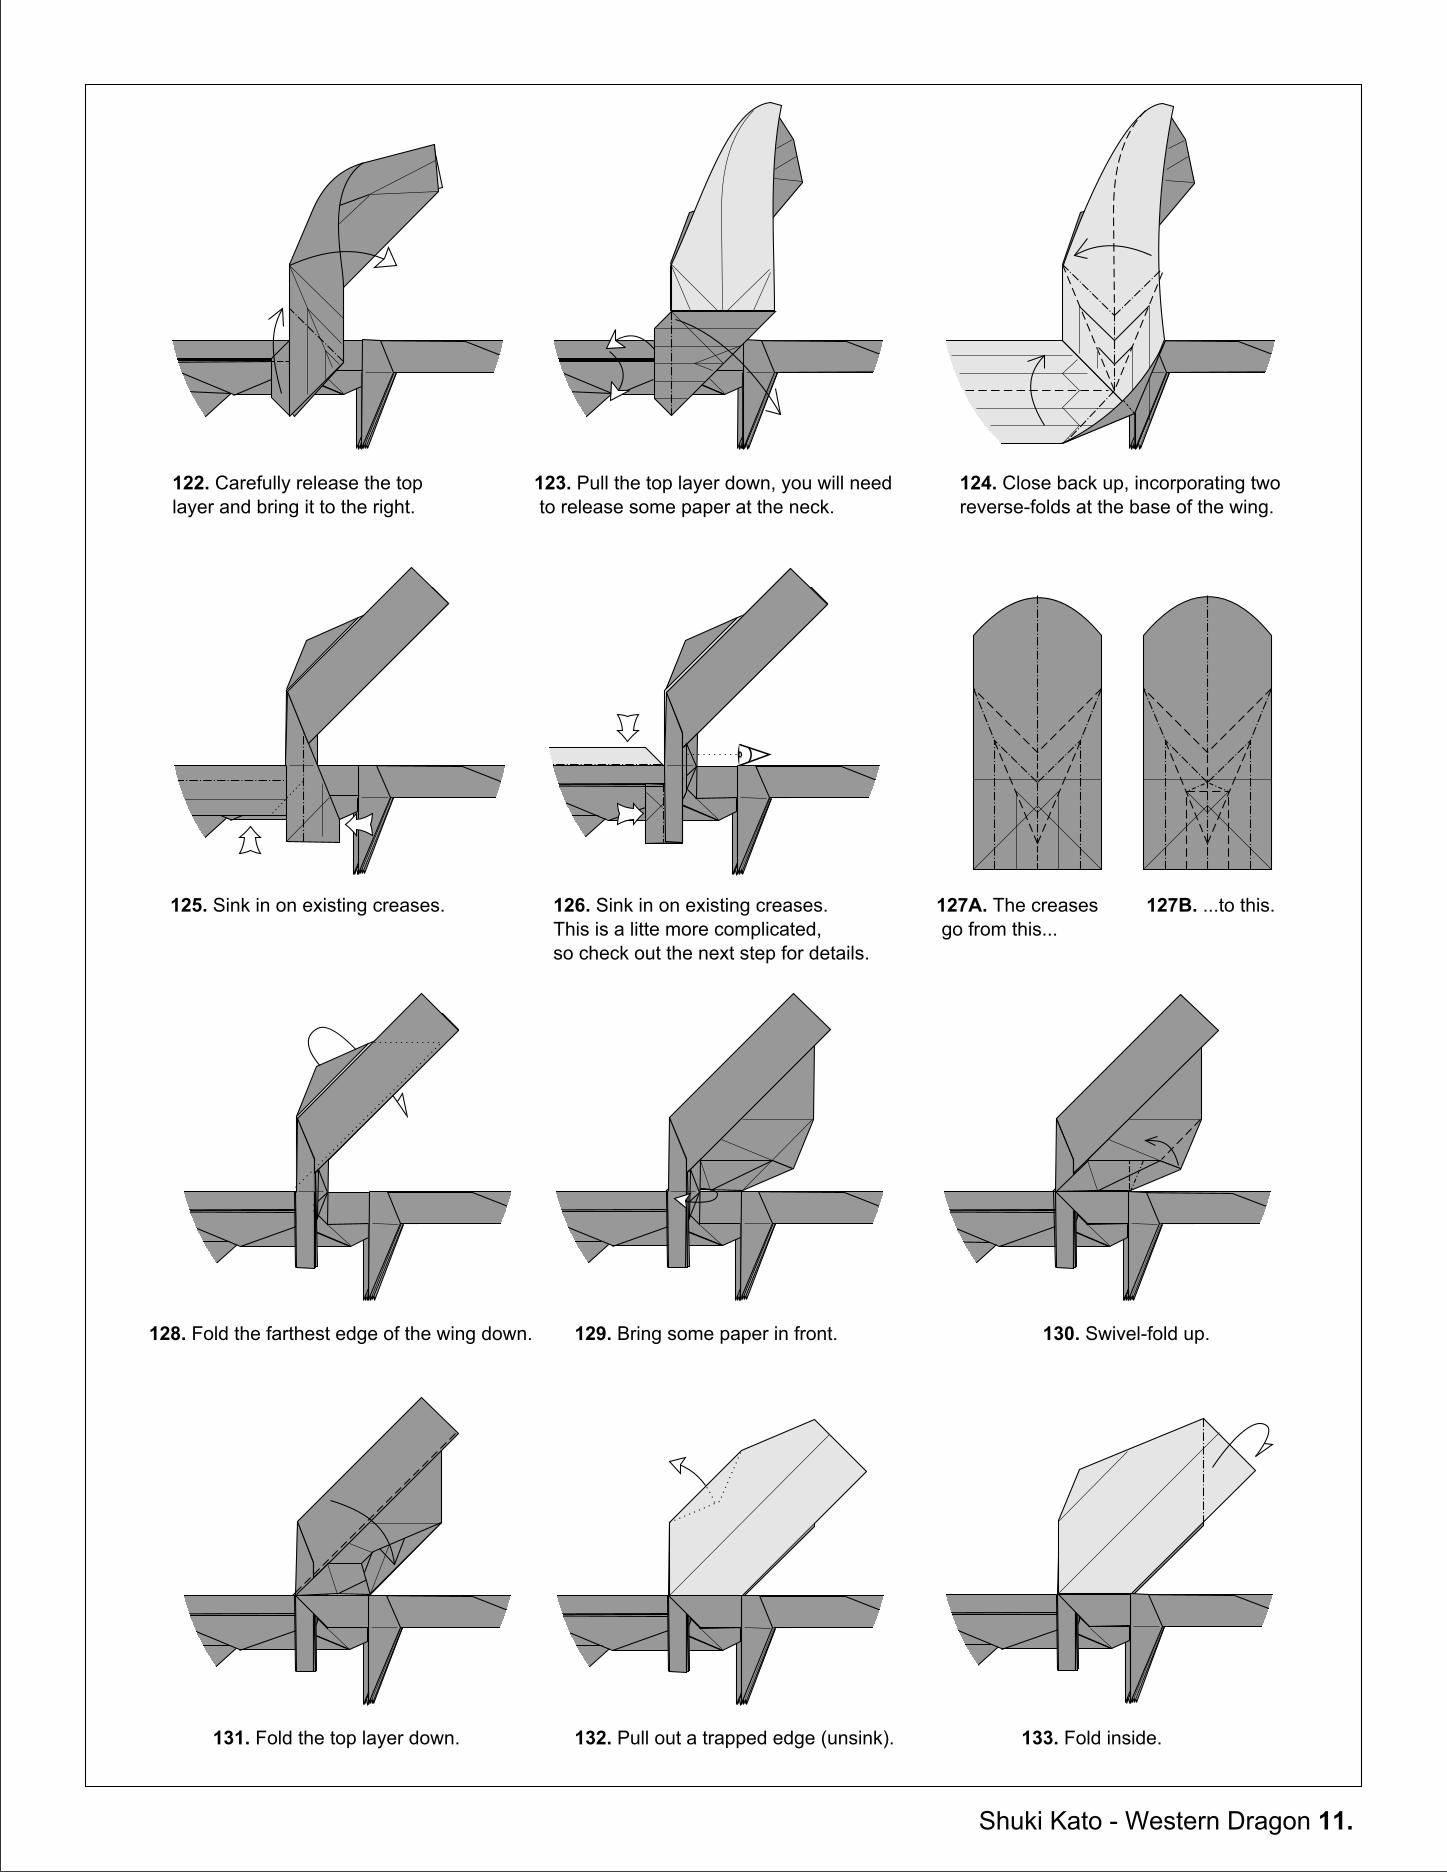
123. Pull the top layer down, you will need to release some paper at the neck.
122. Carefully release the toplayer and bring it to the right.
124. Close back up, incorporating two reverse-folds at the base of the wing.
125. Sink in on existing creases. 126. Sink in on existing creases. This is a litte more complicated, so check out the next step for details.
127A. The creases go from this...
127B. ...to this.
128. Fold the farthest edge of the wing down. 129. Bring some paper in front. 130. Swivel-fold up.
131. Fold the top layer down. 132. Pull out a trapped edge (unsink). 133. Fold inside.
Shuki Kato - Western Dragon 12.
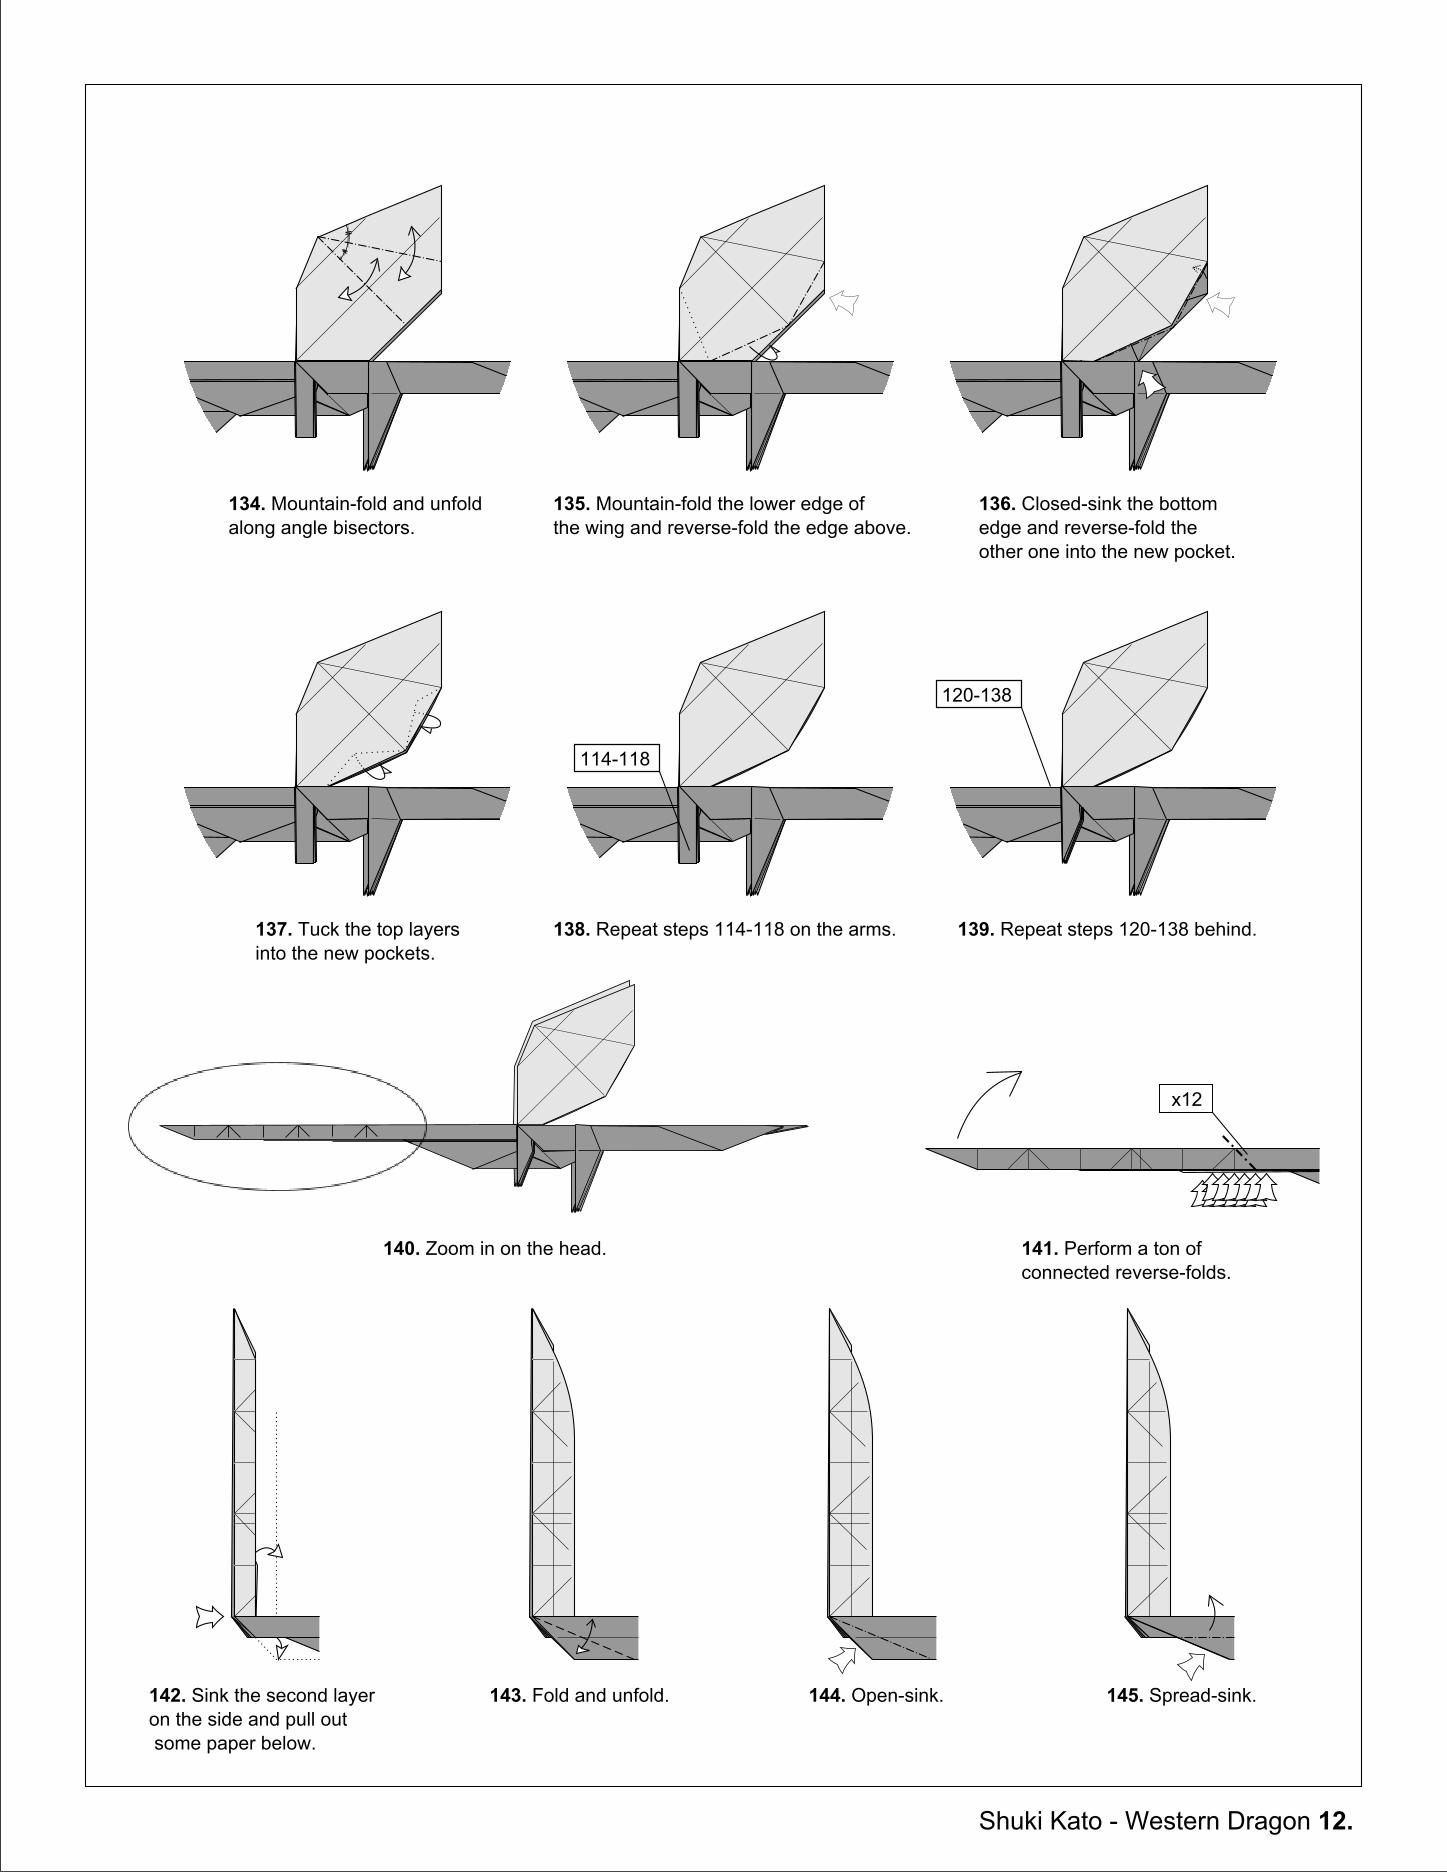
134. Mountain-fold and unfold along angle bisectors.
135. Mountain-fold the lower edge ofthe wing and reverse-fold the edge above.
136. Closed-sink the bottomedge and reverse-fold the other one into the new pocket.
137. Tuck the top layers into the new pockets.
138. Repeat steps 114-118 on the arms.
114-118
139. Repeat steps 120-138 behind.
120-138
140. Zoom in on the head. 141. Perform a ton of connected reverse-folds.
x12
142. Sink the second layeron the side and pull out some paper below.
143. Fold and unfold. 144. Open-sink. 145. Spread-sink.

Shuki Kato - Western Dragon 13.
146. Fold 2 layers up. 147. Open-sink. 148. Fold and unfold. 149. Open up.
150. Begin to collapse. 151. Fold up, this is actually a straight line.
152. Collapse back down. 153. Fold 2 more layers up.
154. Fepeat steps 142-145 on the next layer.
142-145
155. Fold all the layers back down. 156. Repeat steps 142-155 behind.
142-155
157. Now perform a series of connected outside reverse-folds.
x6
158. Pleat the top layer only.
159. Unfold.
160. Fold and unfold.
161. Open-sink. 162. Begin to spread-sink the edge. 163. Push the sides in on existing creases and swing the long flap up.

Shuki Kato - Western Dragon 14.
164. Fold down and incorporate a pleat. 165. Fold and unfold. 166. Open-sink. 167. Fold the sunken layers down.
168. Repeat steps 158-164 on the next edge.
158-164
169. Fold a couple layersup and open the pocket.
170. Carefully invert the pocket and bring it to the side.
171. Fold the point to the right.
172. Close back up. 173. Fold the first point to the right.
174. Reverse-fold the nextpoint to the right as youfold some layers down.
175. Fold two layers (including the small one) down.
176. Reverse-fold the next point into the last one.
177. Like this. Repeat steps 158-176 behind.
158-176
178. Fold half of the layers up behind.
179. Squash-fold evenly. Rotate clockwise 90°.
90°

Shuki Kato - Western Dragon 15.
180. Pull the edges out while you fold down.
181. Fold behind (this point is unused).
182. Unsink one layer. 183. Pull the top point up as far as possible.
184. Fold one layer to the right. 185. Fold two points up . 186. Bring one layer in front (unsink).
187. Fold and unfold like you did in steps 158-159.
189. Open-sink the next edge.188. Open-sink the top edge. 190. Begin to spread-sink the edge.
191. Untrap and fold one edge to the left.

Shuki Kato - Western Dragon 16.
192. Release some paper from the left.
193. Push the sides in and swing the long flap to the right.
194. Close back up. 195. Fold the first point down.
196. Fold the long flap to the left.
197. Repeat steps 185-195 on this side.
185-195
198. Open the center pocket. 199. Invert the pocket and fold up.
200. In progress. Pull a loose edge out and flatten it to the right.
201. Swivel the edge as youswing the large flap to the left.
202. Pull out a hidden edge. 203. Swivel the edge as you squash the large flap.
204. Squash-fold. 205. Swivel inside. 206. Swivel and close back up.
207. Reverse-fold the point out to the side.

Shuki Kato - Western Dragon 17.
208. Repeat steps 204-207 on the right.
204-207
209. Fold up. 210. Fold the corners in. 211. Fold to the sides whileincorporating a tiny reverse-foldon the first layer (skip the reverse-fold if the figure is too small).
212. Fold the top point down in between the eyes.
213. Fold behind. 214. Swivel behind.
216. Fold the model back in half and rotate counterclockwise 90°.
215. Fold behind to lock the last fold.
90°
217. Reverse-fold the jaw down.
218. Add some final details. 219. Like this.
220. Crimp the hips down. 221. Fold the edges inside.
Shuki Kato - Western Dragon 18.
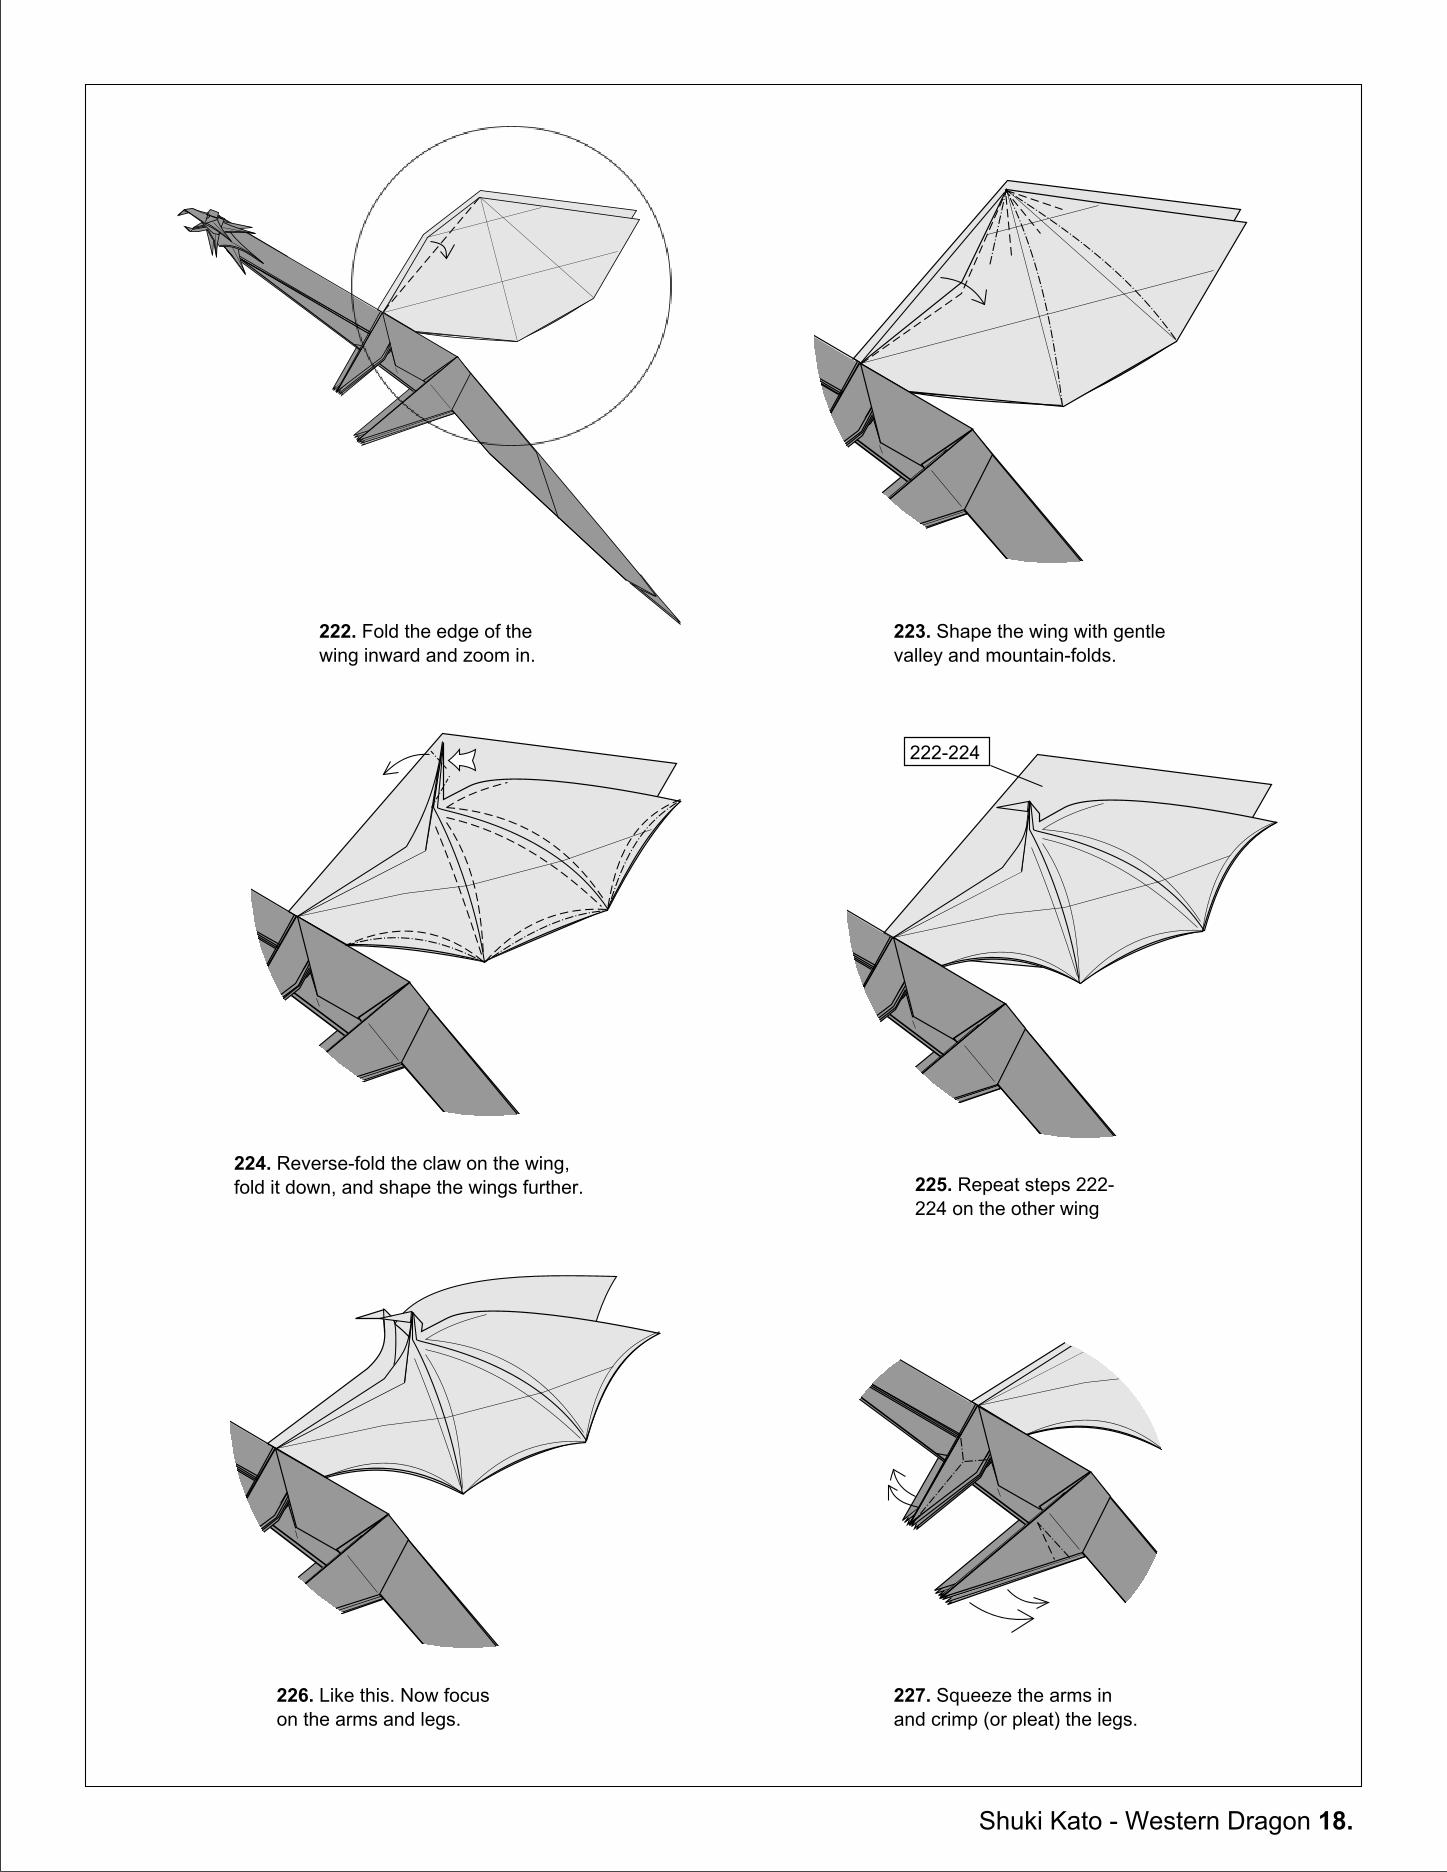
222. Fold the edge of the wing inward and zoom in.
223. Shape the wing with gentle valley and mountain-folds.
224. Reverse-fold the claw on the wing, fold it down, and shape the wings further. 225. Repeat steps 222-
224 on the other wing
222-224
226. Like this. Now focus on the arms and legs.
227. Squeeze the arms in and crimp (or pleat) the legs.

Shuki Kato - Western Dragon 19.
229. Outside reverse-fold each claw (only two are shown).
230. Like this. 231. Crimp the neck and tail.
233. Model complete.232. Add a couple rabbit-ears for spikes and shape the model to taste.
228. Crimp the arms and spread out the claws. Repeat similarly on the legs.