Embed Size (px)
DESCRIPTION
Orienteering, Pendidikan Luar, Rekreasi Luar, Geografi dalam Pendidikan Jasmani, Kompas
Citation preview

1
ORIENTEERINGORIENTEERING
Oleh:MOHD ZAIRI BIN HUSAIN
JABATAN PENDIDIKAN JASMANI & KESIHATANIPG KAMPUS TEMENGGONG IBRAHIM
JOHOR BAHRU
������������
Orienteering History
Orienteering began in Scandinavia in the nineteenth century. It was primarily a military event and was part of military training. It was not until 1919 that the modern version of orienteering was born in Sweden as a competitive sport. Ernst Killander, its creator, can be rightfully called the father of orienteering. In the early thirties, the sport received a technical boost with the invention of a new compass, more precise and faster to use. The Kjellstrom brothers, Bjorn and Alvan, and their friend, Brunnar Tillander, were responsible for this new compass. They were among the best Swedish orienteers of the thirties, with several individual championships among them. Orienteering was brought into the US in 1946 by Bjorn Kjellstrom.
2
What is Orienteering?
Orienteering is a sport in which orienteers use an accurate, detailed map and a compass to find points in the landscape. It can be enjoyed as a walk in the woods or as a competitive sport.
A standard orienteering course consists of a start, a series of control sites that are marked by circles, connected by lines and numbered in the order they are to be visited, and a finish. The control site circles are centered around the feature that is to be found; this feature is also defined by control descriptions (sometimes called clues). On the ground, a control flag marks the location that the orienteer must visit.
To verify a visit, the orienteer uses a punch hanging next to the flag to mark his or her control card. Different punches make different patterns of holes in the paper.
The route between "controls" (refers to the flag or the site) is not specified, and is entirely up to the orienteer; this element of route choice and the ability to navigate through the forest are the essence of orienteering.
Most orienteering events use staggered starts to ensure that each orienteer has a chance to do his or her own navigating, but there are several other popular formats, including relays and events in which the orienteer must find as many controls as possible within a specified time.
Types of Compasses
The lensatic compass is the most common and simplest instrument for measuring direction. It is discussed in detail below. The wrist/pocket compass is a small magnetic compass that can be attached to a wristwatch band. It contains a north-seeking arrow and a dial in degrees. A protractor can be used to determine azimuths when a compass is not available. However, it should be noted that when using the protractor on a map, only grid azimuths are obtained.
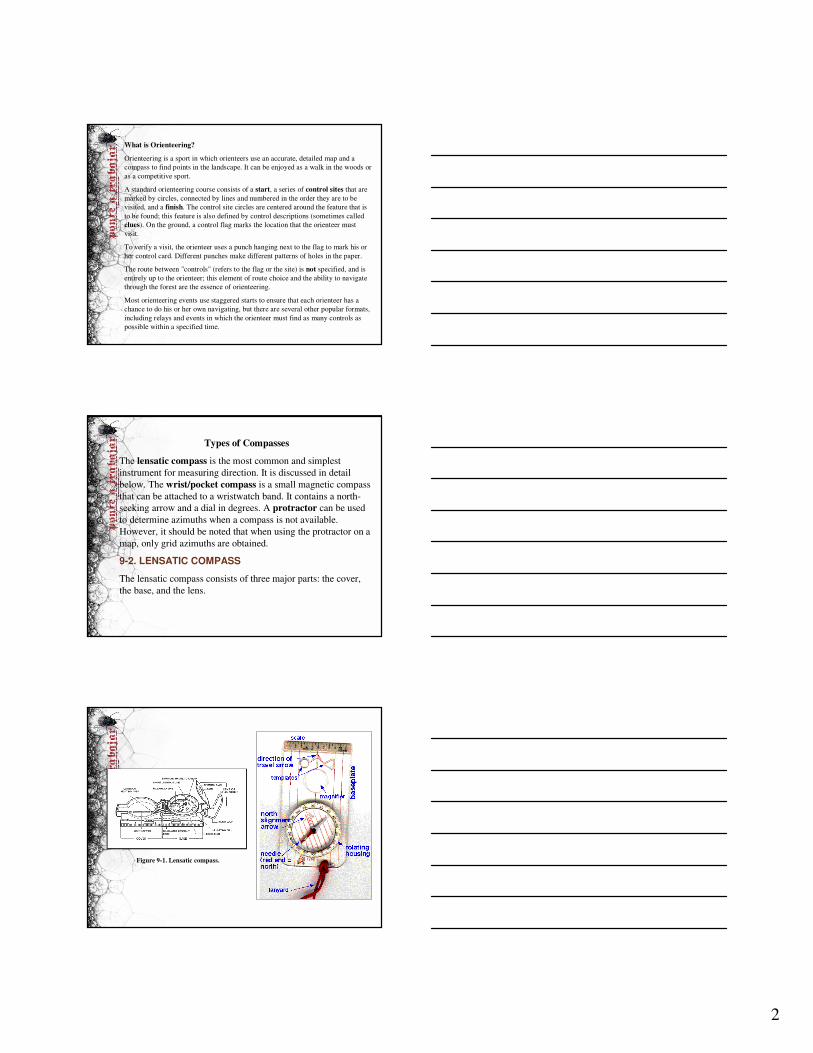
9-2. LENSATIC COMPASS
The lensatic compass consists of three major parts: the cover, the base, and the lens.
Figure 9-1. Lensatic compass.
3
BaseThe body of the compass contains the following movable parts:(1) The floating dial is mounted on a pivot so it can rotate freely when the compass is held level. Printed on the dial in luminous figures are an arrow and the letters E and W. The arrow always points to magnetic north and the letters fall at east (E) 90° and west (W) 270° on the dial. There are two scales; the outer scale denotes mils and the inner scale (normally in red) denotes degrees.(2) Encasing the floating dial is a glass containing a fixed black index line.(3) The bezel ring is a ratchet device that clicks when turned. It contains 120 clicks when rotated fully; each click is equal to 3°. A short luminous line that is used in conjunction with the north-seeking arrow during navigation is contained in the glass face of the bezel ring.(4) The thumb loop is attached to the base of the compass.
LensThe lens is used to read the dial, and it contains the rear-sight slot used in conjunction with the front for sighting on objects. The rear sight also serves as a lock and clamps the dial when closed for its protection. The rear sight must be opened more than 45° to allow the dial to float freely.
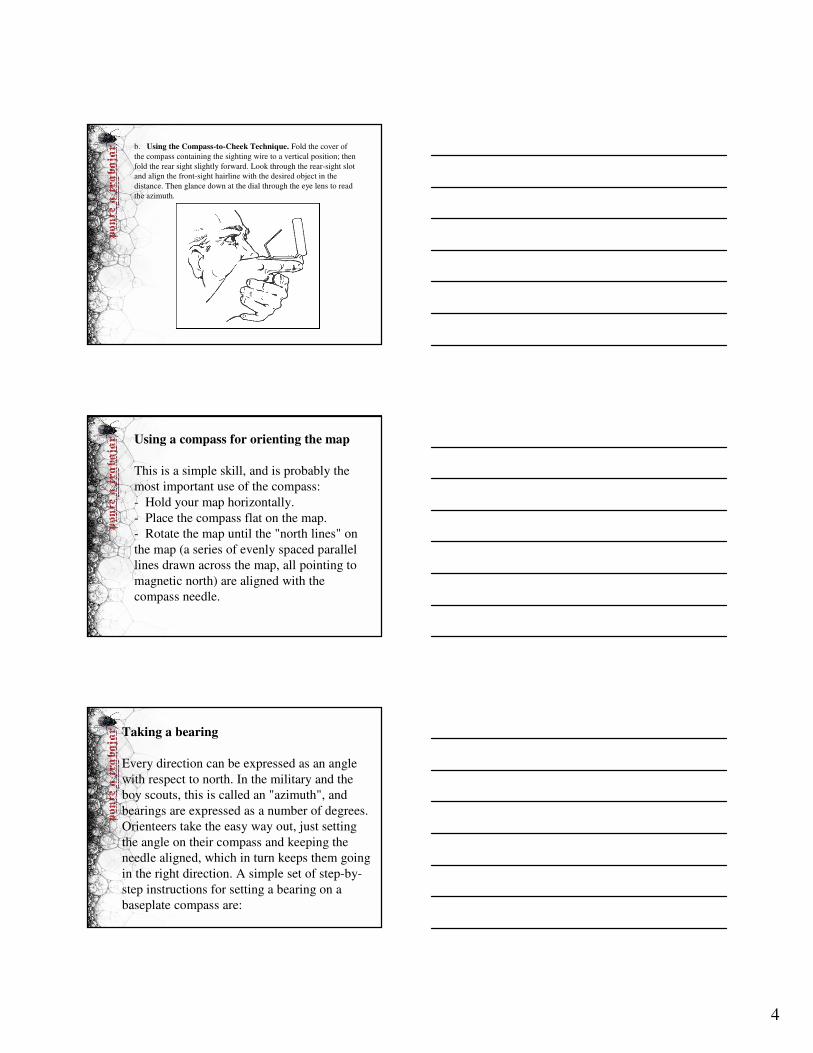
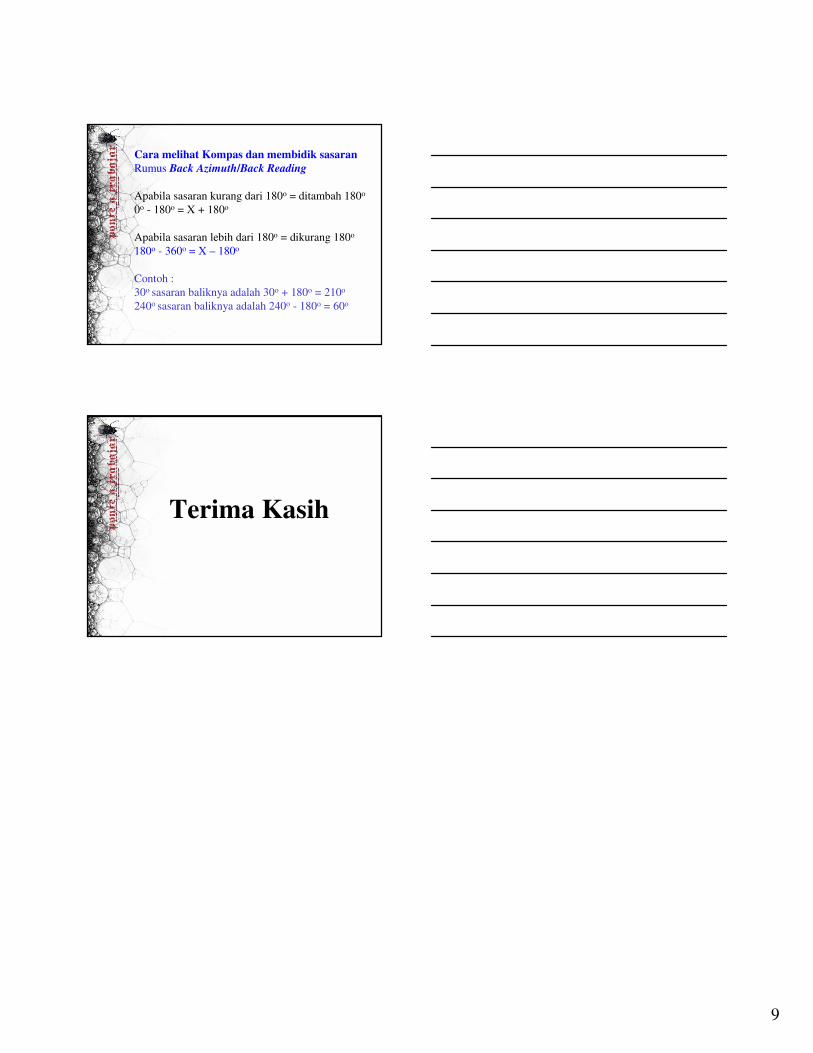
Using a CompassMagnetic azimuths are determined with the use of magnetic instruments, such as lensatic and M2 compasses. The techniques employed when using the lensatic compass are as follows:a. Using the Centerhold Technique. First, open the compass to its fullest so that the cover forms a straightedge with the base. Move the lens (rear sight) to the rearmost position, allowing the dial to float freely. Next, place your thumb through the thumb loop, form a steady base with your third and fourth fingers, and extend your index finger along the side of the compass. Place the thumb of the other hand between the lens (rear sight) and the bezel ring; extend the index finger along the remaining side of the compass, and the remaining fingers around the fingers of the other hand. Pull your elbows firmly into your sides; this will place the compass between your chin and your belt. To measure an azimuth, simply turn yourentire body toward the object, pointing the compass cover directly at the object. Once you are pointing at the object, look down and read the azimuth from beneath the fixed black index line.
Using the CenterholdTechnique
4
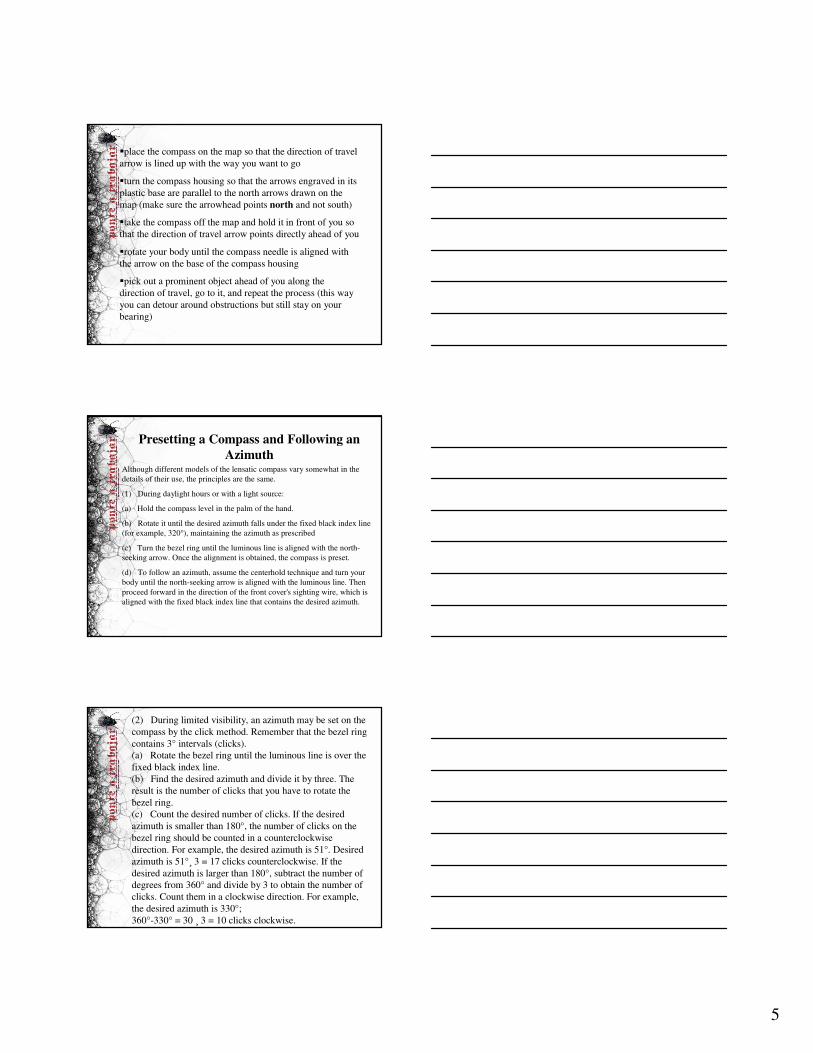
b. Using the Compass-to-Cheek Technique. Fold the cover of the compass containing the sighting wire to a vertical position; then fold the rear sight slightly forward. Look through the rear-sight slot and align the front-sight hairline with the desired object in the distance. Then glance down at the dial through the eye lens to read the azimuth.
Using a compass for orienting the map
This is a simple skill, and is probably the most important use of the compass: - Hold your map horizontally.- Place the compass flat on the map. - Rotate the map until the "north lines" on the map (a series of evenly spaced parallel lines drawn across the map, all pointing to magnetic north) are aligned with the compass needle.
Taking a bearing
Every direction can be expressed as an angle with respect to north. In the military and the boy scouts, this is called an "azimuth", and bearings are expressed as a number of degrees. Orienteers take the easy way out, just setting the angle on their compass and keeping the needle aligned, which in turn keeps them going in the right direction. A simple set of step-by-step instructions for setting a bearing on a baseplate compass are:
5
�place the compass on the map so that the direction of travel arrow is lined up with the way you want to go
�turn the compass housing so that the arrows engraved in its plastic base are parallel to the north arrows drawn on the map (make sure the arrowhead points north and not south)
�take the compass off the map and hold it in front of you so that the direction of travel arrow points directly ahead of you
�rotate your body until the compass needle is aligned with the arrow on the base of the compass housing
�pick out a prominent object ahead of you along the direction of travel, go to it, and repeat the process (this way you can detour around obstructions but still stay on your bearing)
Presetting a Compass and Following an Azimuth
Although different models of the lensatic compass vary somewhat in the details of their use, the principles are the same.
(1) During daylight hours or with a light source:
(a) Hold the compass level in the palm of the hand.
(b) Rotate it until the desired azimuth falls under the fixed black index line (for example, 320°), maintaining the azimuth as prescribed
(c) Turn the bezel ring until the luminous line is aligned with the north-seeking arrow. Once the alignment is obtained, the compass is preset.
(d) To follow an azimuth, assume the centerhold technique and turn your body until the north-seeking arrow is aligned with the luminous line. Then proceed forward in the direction of the front cover's sighting wire, which is aligned with the fixed black index line that contains the desired azimuth.
(2) During limited visibility, an azimuth may be set on the compass by the click method. Remember that the bezel ring contains 3° intervals (clicks).(a) Rotate the bezel ring until the luminous line is over the fixed black index line.(b) Find the desired azimuth and divide it by three. The result is the number of clicks that you have to rotate the bezel ring.(c) Count the desired number of clicks. If the desired azimuth is smaller than 180°, the number of clicks on the bezel ring should be counted in a counterclockwise direction. For example, the desired azimuth is 51°. Desired azimuth is 51°¸ 3 = 17 clicks counterclockwise. If the desired azimuth is larger than 180°, subtract the number of degrees from 360° and divide by 3 to obtain the number of clicks. Count them in a clockwise direction. For example, the desired azimuth is 330°; 360°-330° = 30 ¸ 3 = 10 clicks clockwise.
6
(d) With the compass preset as described above, assume a centerhold technique and rotate your body until the north-seeking arrow is aligned with the luminous line on the bezel. Then proceed forward in the direction of the front cover's luminous dots, which are aligned with the fixed black index line containing the azimuth.
(e) When the compass is to be used in darkness, an initial azimuth should be set while light is still available, if possible. With the initial azimuth as a base, any other azimuth that is a multiple of three can be established through the use of the clicking feature of the bezel ring.
KOMPAS
7
Kompas merupakan peralatan yang penting untuk setiappengembaraan. Ia merupakan bantuan yang tidakternilai pentingnya bagi navigasi dalam keadaan-keadaan terburuk.
Bahagian-bahagian di dalam setiap kompas. Sebuah kompas perlu kejab. (compact), lasak, ringandan mudah dikendalikan. Jarum kompas perlumengimbang balik sekiranya kompas tersebutberpusing. Untuk itu jarum tersebut perlu berada didalam tabung cecair. Kompas juga perlu mendapat satutanda yang senang untuk satu laluan perjalanan.
Kompas
Mata Pedoman Kompas. Utara, selatan. Timur dan barat adalah tanda matapedoman yang penting pada kompas. Ada lagi duabelas mata pedoman di antara mata-mata pedomanyang penting ini, umpanya Barat Daya. Kesemuasekali ada enam belas mata pedoman.
Untuk lebih tepat lagi, satu bulatan dibahagikankepada 360o . Keempat-empat tanda pedomanyang penting adalah 90o (timur), 180o (selatan), 270o (barat) dan 360o (utara).
Bering Bering memberikan tanda arah yang tepat darisatu tempat ke satu tempat yang lain. Bering adalah sudut yang diukur mrngikut perjalananarah jam, dari satu garisan dengan garisan yang ditetapkan. Garisan yang ditetapkan selalunyaadlah utara, melainkan garisan lain diberikan

8
Bering Belakang. Bering ke belakang memberi arah dari tempat yang anda lihat ke tempat anda sekarang. Bering kebelakang di ambil dari dua tempat atau lebih untukmencari kedudukan.
Pilih dua kedudukan atau lebih yang anda daapatlihat di atas tanah dan tentukan kedudukan, tempat diatas peta. Kedudukan ini mestilah jauh antara satusama lain untuk mendapatkan sudut siku apabilabering belakang dilukiskan di atas peta. Ambilbering kedudukan-kedudukan itu dan ubahkan kebering belakang. Caranya adalah seperti berikut:-
Utara : 0o atau 360o
Timur Laut : 45o
Timur : 90o
Tenggara : 135o
Selatan : 180o
Barat Daya : 225o
Barat : 270o
Barat Laut : 315o
Jika bering ke satu kedudukan itu kurang dari180o, tambah 180o.
Jika bering ke satu kedudukan itu lebih dari 180o , tolak 180o
Setiap bering kurang dari 180o di campur 180o . Bering belakang 120o = 120o + 180o = 300o .
Setiap bering melebihi 180o ditolak 180o
Bering belakang 200o = 200o - 180o = 20o .
9
Cara melihat Kompas dan membidik sasaranRumus Back Azimuth/Back Reading
Apabila sasaran kurang dari 180o = ditambah 180o
0o - 180o = X + 180o
Apabila sasaran lebih dari 180o = dikurang 180o
180o - 360o = X – 180o
Contoh : 30o sasaran baliknya adalah 30o + 180o = 210o
240o sasaran baliknya adalah 240o - 180o = 60o
Terima Kasih