Embed Size (px)
Citation preview
1
California Cash For
College Organization User Guide
2
Table of Contents
Table of Contents Overview ....................................................................................................................................................... 2
Register Organization .................................................................................................................................... 2
User Management ........................................................................................................................................ 9
Creating users ........................................................................................................................................... 9
Deactivating a user .................................................................................... Error! Bookmark not defined.
Changing your password / Edit your profile ........................................................................................... 17
Workshop Management ............................................................................................................................. 22
Create workshop ..................................................................................................................................... 22
Assign users to workshops ...................................................................................................................... 28
Overview This training guide is for the users of the California Cash for College (CCFC) Workshop Management System (WMS). WMS is used to streamline the CCFC workshop process that are hosted by the California Student Aid Commission’s CCFC Community Partners. CCFC workshops offer students hands-on assistance in completing the Federal Application for Federal Student Aid (FAFSA) or California Dream Act Application (CADA) and/or Chafee application for Foster Youth in a computer lab setting. There are several groups of users who will use WMS; therefore, this training document is divided into sections to help those users successfully navigate WMS. The first section is dedicated to Regional Coordinating Organizations (RCOs) admin users (termed Regional Admin) who oversee organizations in their corresponding regions throughout California. Organization users include the universities, colleges, high schools and partner agencies that host the CCFC workshops. The final section is for student users searching for and registering to attend a CCFC workshop
Register Organization
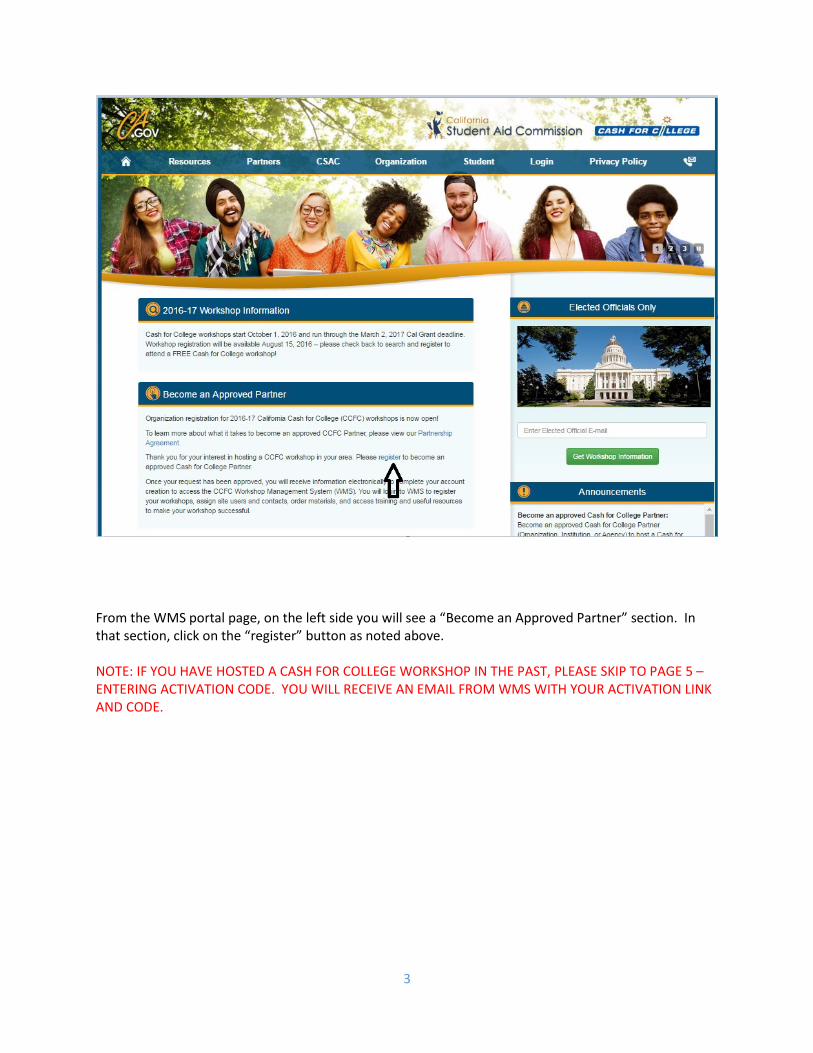
Organizations are the primary group that host student workshops, although RCOs also host some workshops. Organizations who want to host student workshops can register themselves at the Workshop Management System (WMS) website.
3
From the WMS portal page, on the left side you will see a “Become an Approved Partner” section. In that section, click on the “register” button as noted above. NOTE: IF YOU HAVE HOSTED A CASH FOR COLLEGE WORKSHOP IN THE PAST, PLEASE SKIP TO PAGE 5 – ENTERING ACTIVATION CODE. YOU WILL RECEIVE AN EMAIL FROM WMS WITH YOUR ACTIVATION LINK AND CODE.
4
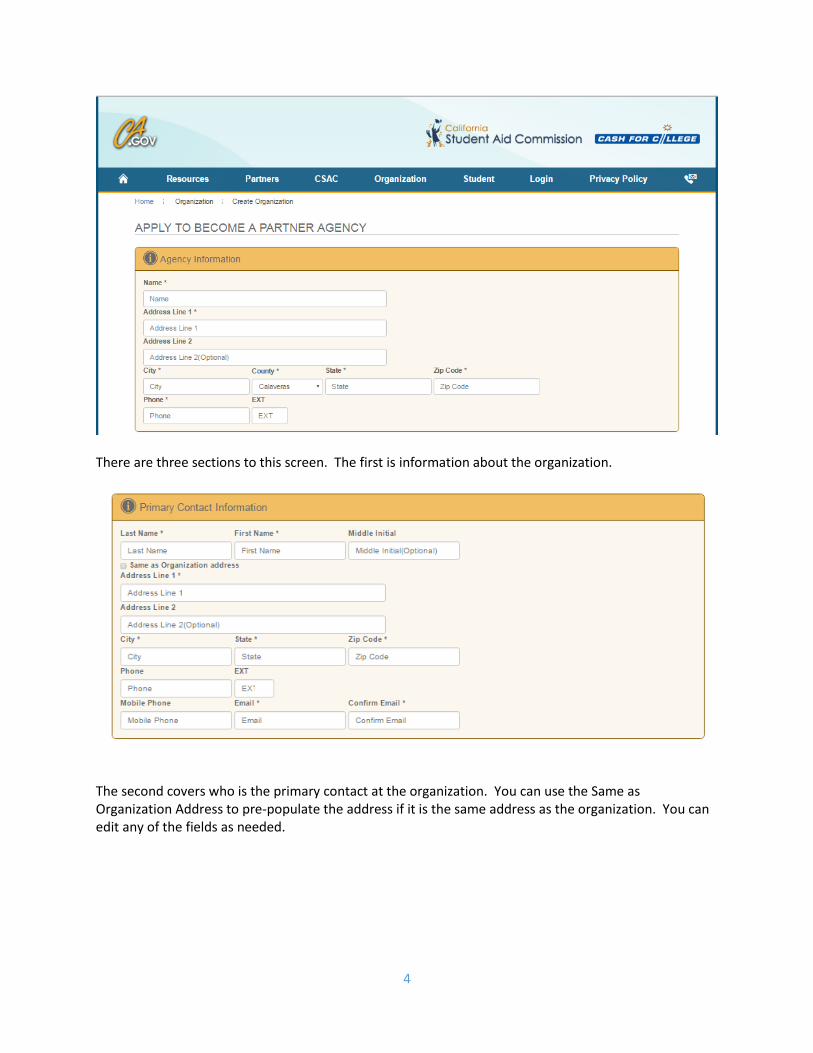
There are three sections to this screen. The first is information about the organization.
The second covers who is the primary contact at the organization. You can use the Same as Organization Address to pre-populate the address if it is the same address as the organization. You can edit any of the fields as needed.

5
The final section is the information on who is to receive the site support funding checks. Again you can use the Same as Primary Contact Information to pre-populate fields. Fill out each section on the screen and click on Submit button at the bottom of the screen. Once the registration information has been entered, the Regional Admin of your region will review your request. If your request is approved, you will receive an email confirming your registration. In that email will also be a link to a temporary web page. In another email you will receive a validation code that can be entered in the temporary web page.
Enter your activation code from the email and click Next.
6
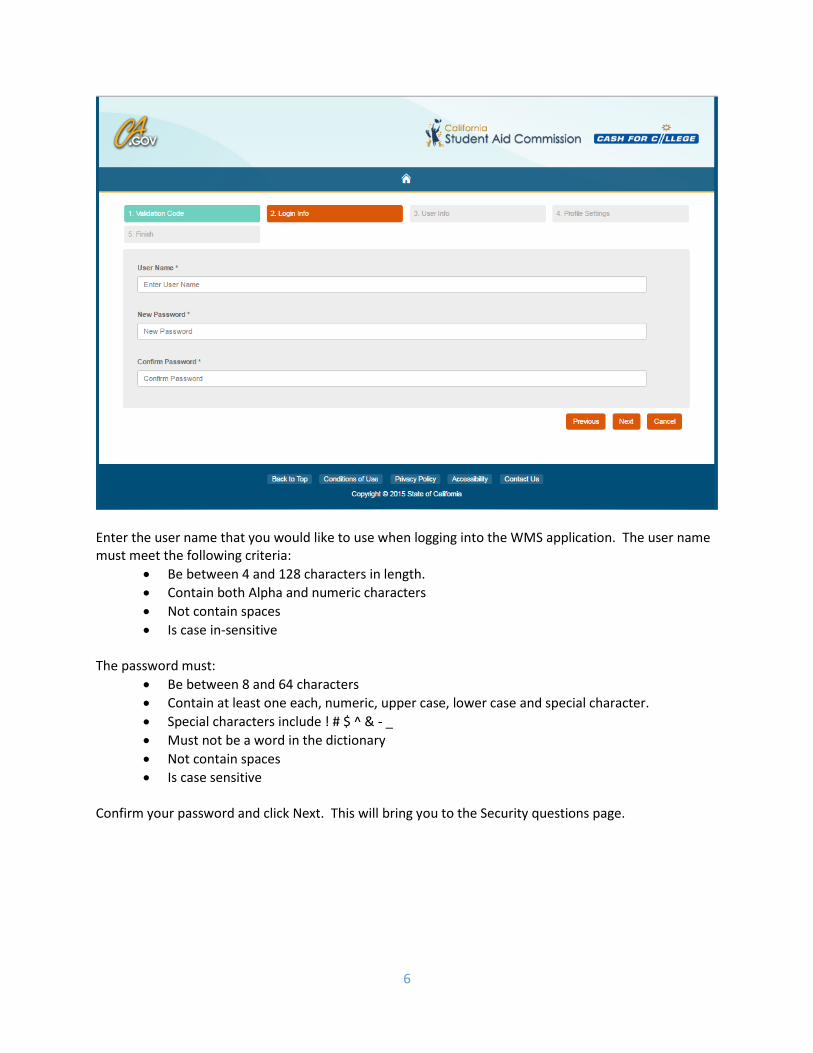
Enter the user name that you would like to use when logging into the WMS application. The user name must meet the following criteria:
Be between 4 and 128 characters in length.
Contain both Alpha and numeric characters
Not contain spaces
Is case in-sensitive The password must:
Be between 8 and 64 characters
Contain at least one each, numeric, upper case, lower case and special character.
Special characters include ! # $ ^ & - _
Must not be a word in the dictionary
Not contain spaces
Is case sensitive Confirm your password and click Next. This will bring you to the Security questions page.

7
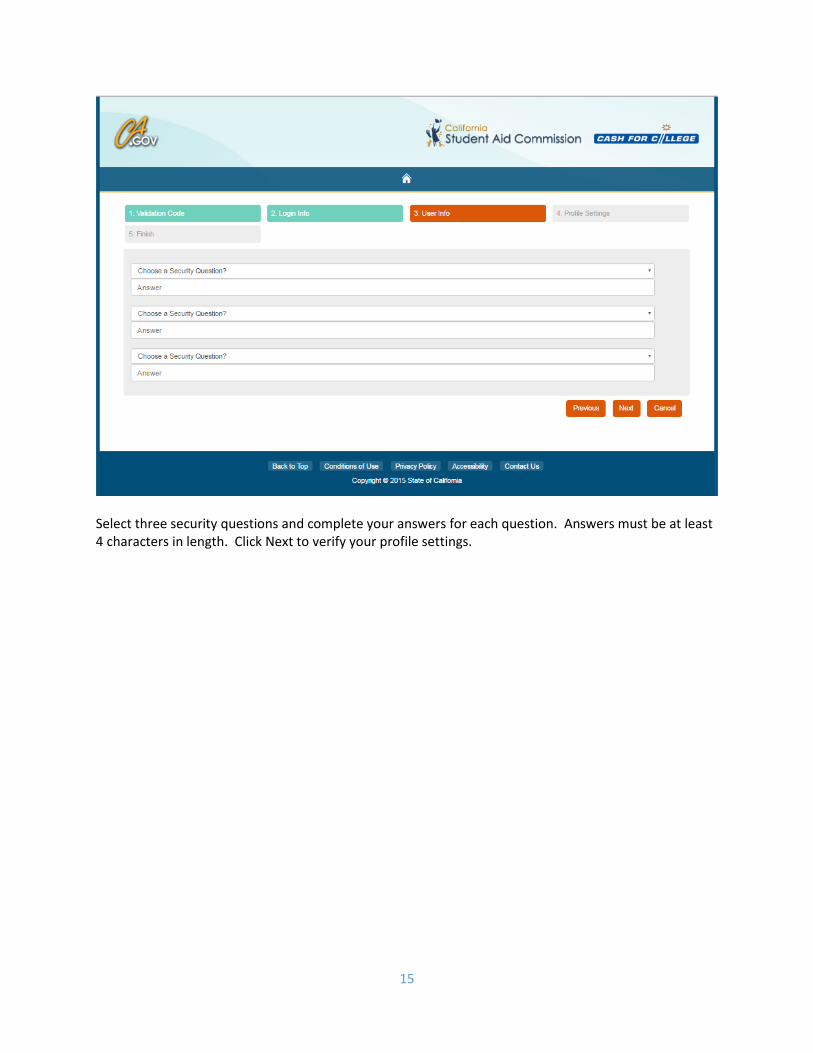
Select three security questions and complete your answers for each question. Answers must be at least 4 characters in length. Click Next to verify your profile settings.
8
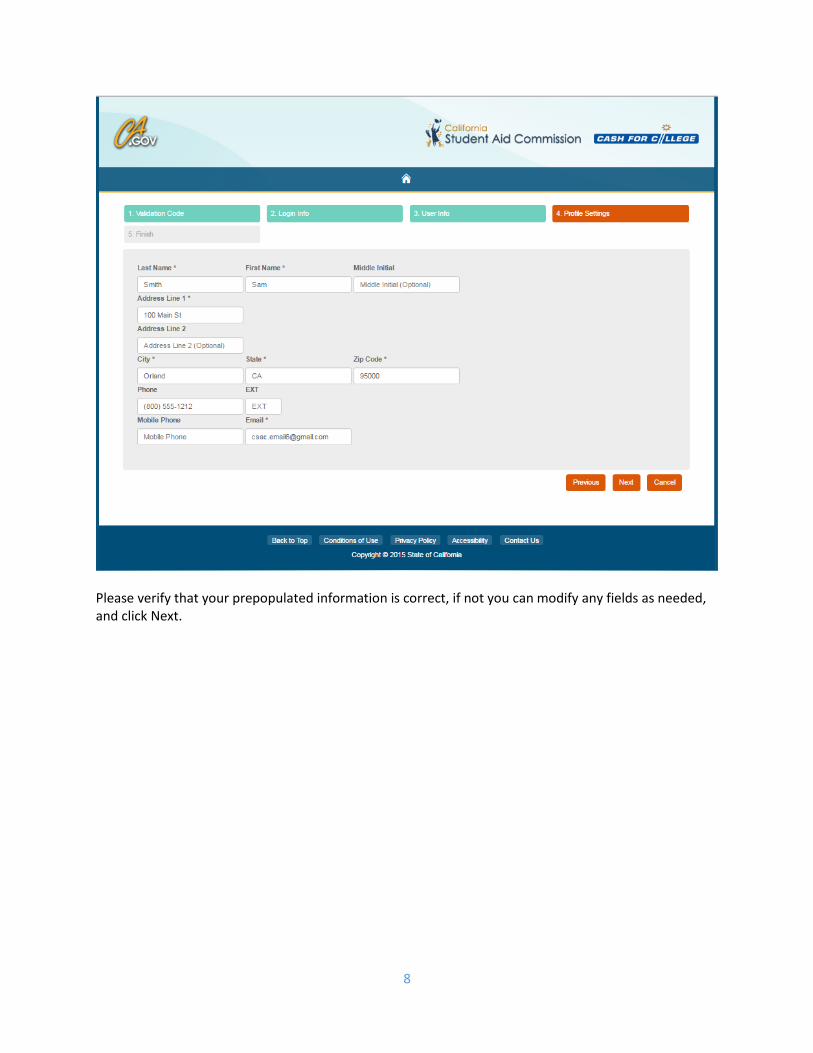
Please verify that your prepopulated information is correct, if not you can modify any fields as needed, and click Next.
9
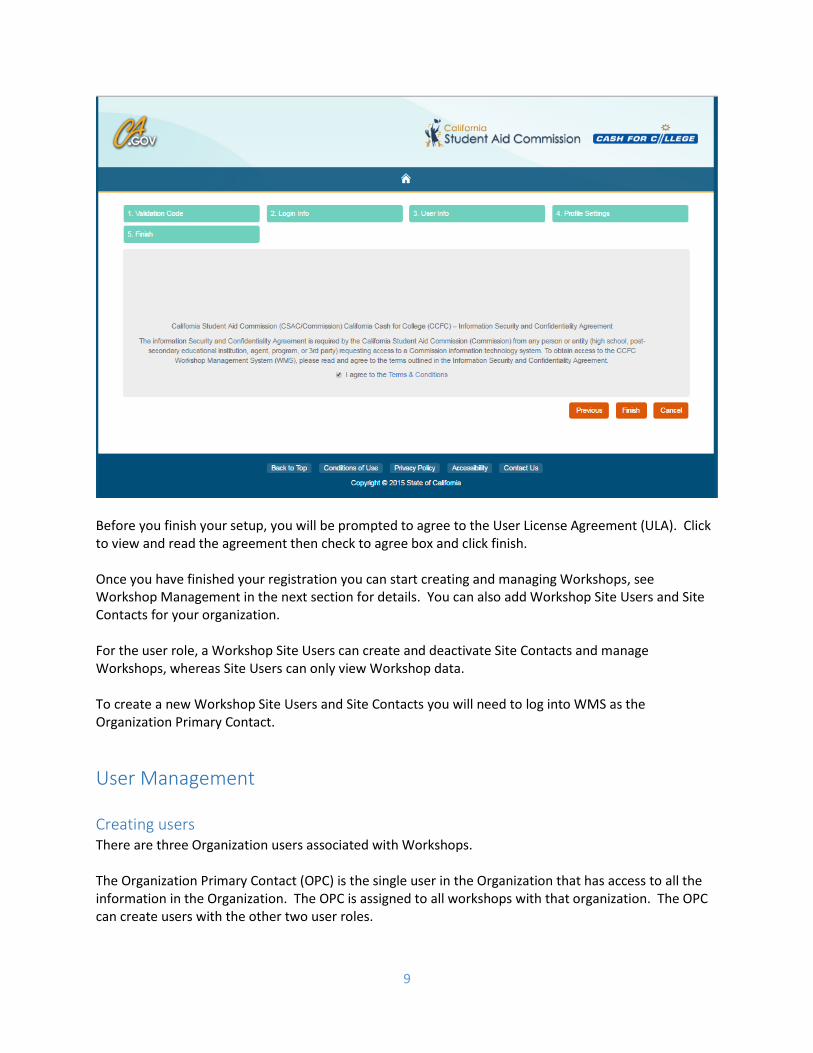
Before you finish your setup, you will be prompted to agree to the User License Agreement (ULA). Click to view and read the agreement then check to agree box and click finish. Once you have finished your registration you can start creating and managing Workshops, see Workshop Management in the next section for details. You can also add Workshop Site Users and Site Contacts for your organization. For the user role, a Workshop Site Users can create and deactivate Site Contacts and manage Workshops, whereas Site Users can only view Workshop data. To create a new Workshop Site Users and Site Contacts you will need to log into WMS as the Organization Primary Contact.
User Management
Creating users There are three Organization users associated with Workshops. The Organization Primary Contact (OPC) is the single user in the Organization that has access to all the information in the Organization. The OPC is assigned to all workshops with that organization. The OPC can create users with the other two user roles.
10
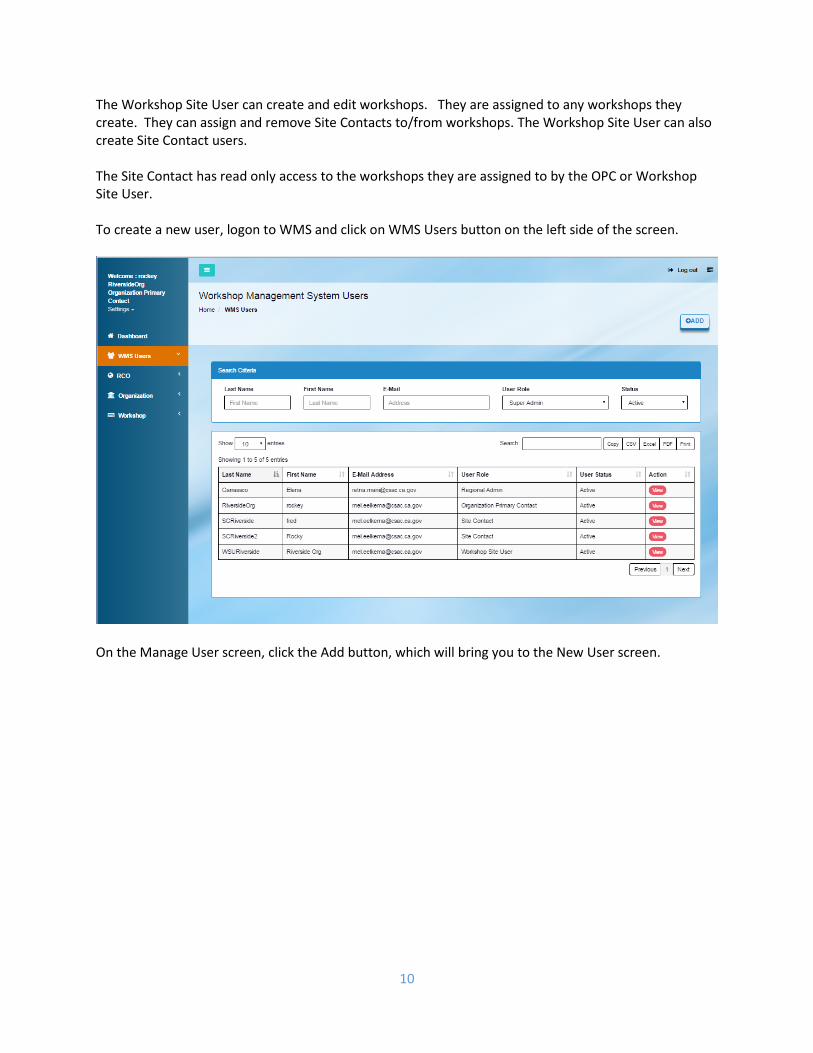
The Workshop Site User can create and edit workshops. They are assigned to any workshops they create. They can assign and remove Site Contacts to/from workshops. The Workshop Site User can also create Site Contact users. The Site Contact has read only access to the workshops they are assigned to by the OPC or Workshop Site User. To create a new user, logon to WMS and click on WMS Users button on the left side of the screen.
On the Manage User screen, click the Add button, which will bring you to the New User screen.
11
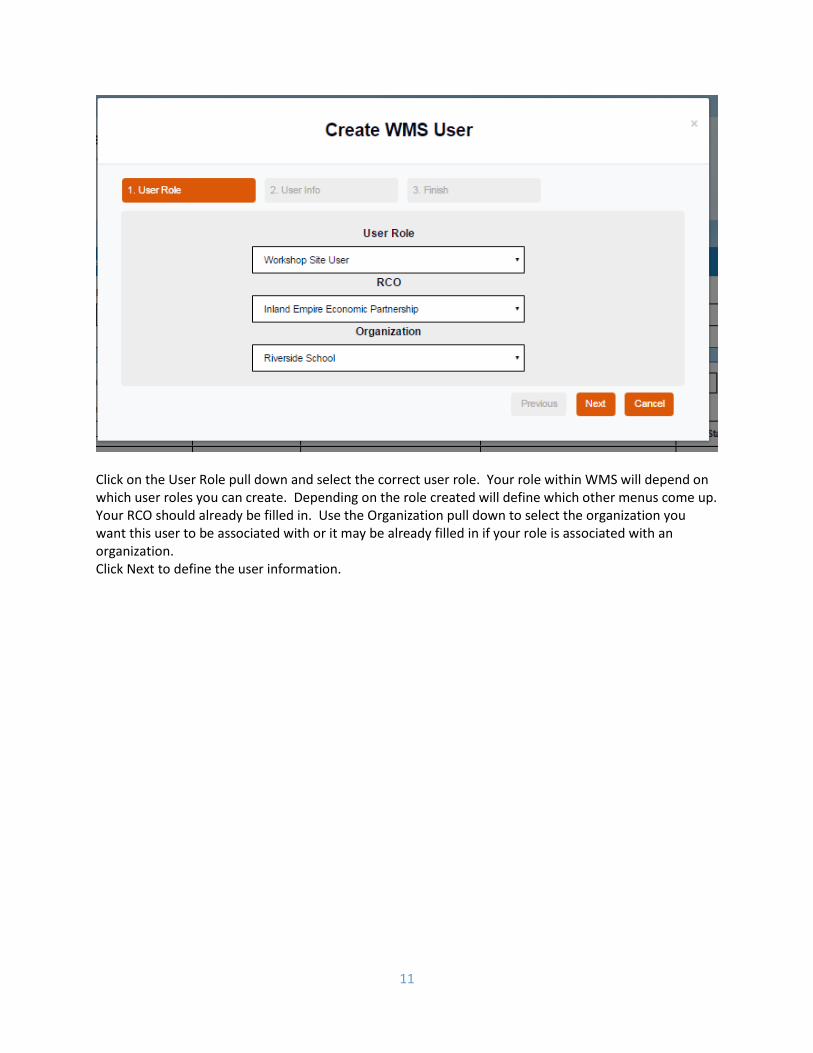
Click on the User Role pull down and select the correct user role. Your role within WMS will depend on which user roles you can create. Depending on the role created will define which other menus come up. Your RCO should already be filled in. Use the Organization pull down to select the organization you want this user to be associated with or it may be already filled in if your role is associated with an organization. Click Next to define the user information.
12
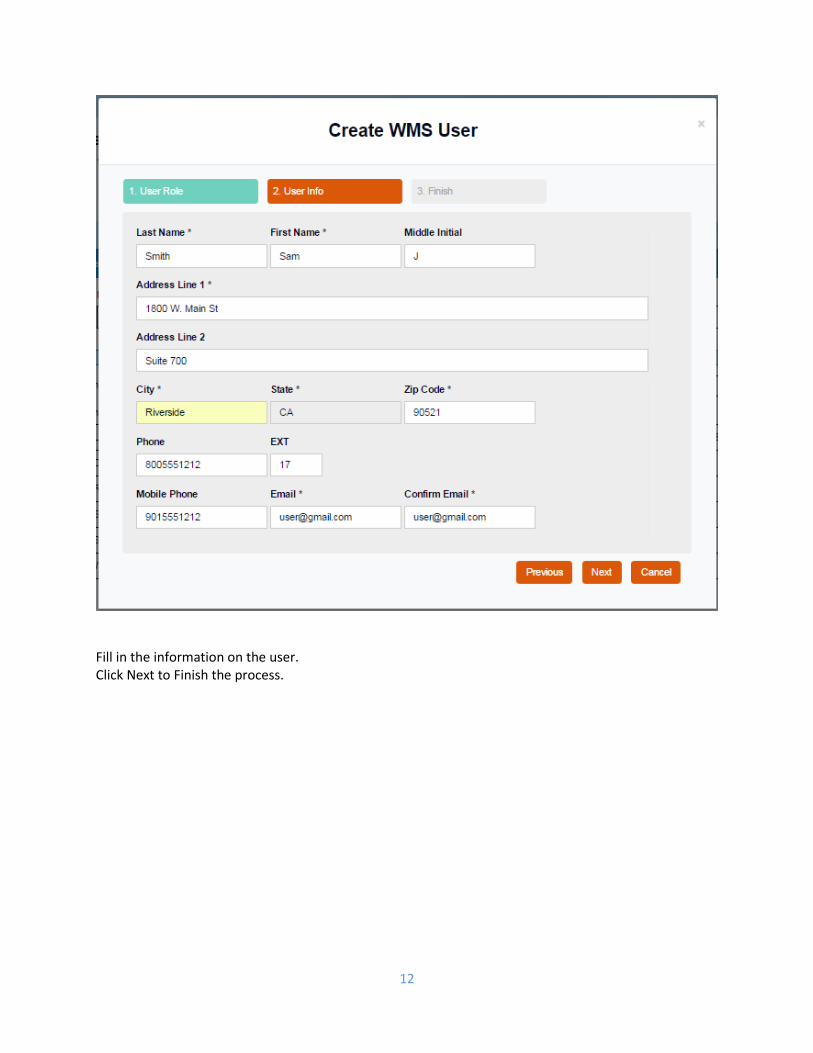
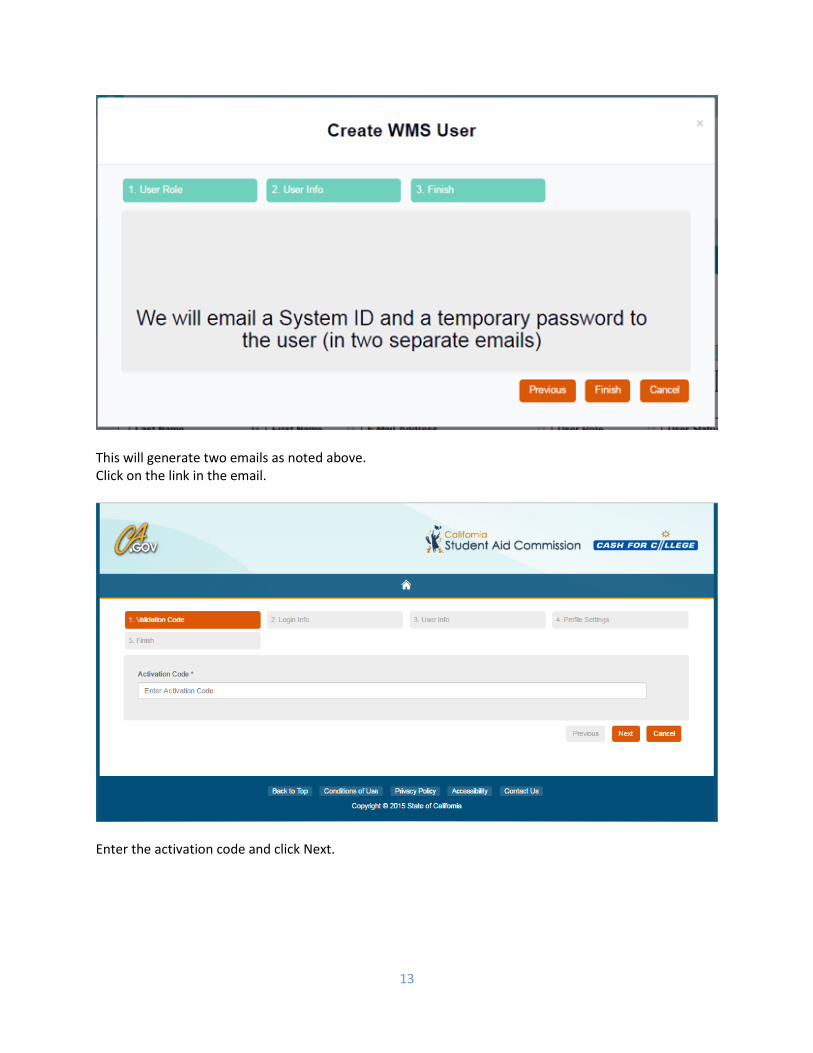
Fill in the information on the user. Click Next to Finish the process.
13
This will generate two emails as noted above. Click on the link in the email.
Enter the activation code and click Next.

14
Enter the user name that you would like to use when logging into the WMS application. The user name must meet the following criteria:
Be between 4 and 128 characters in length.
Contain both Alpha and numeric characters
Not contain spaces
Is case in-sensitive The password must:
Be between 8 and 64 characters
Contain at least one each, numeric, upper case, lower case and special character.
Special characters include ! # $ ^ & - _
Must not be a word in the dictionary
Not contain spaces
Is case sensitive Confirm your password and click Next. This will bring you to the Security questions page.
15
Select three security questions and complete your answers for each question. Answers must be at least 4 characters in length. Click Next to verify your profile settings.

16
Please verify that your prepopulated information is correct, if not you can modify any fields as needed, and click Next.

17
Before you finish your setup, you will be prompted to agree to the User License Agreement (ULA). Click to view and read the agreement then check to agree box and click finish.
Deactivating a user To deactivate a user, logon to WMS and click on WMS User.
18
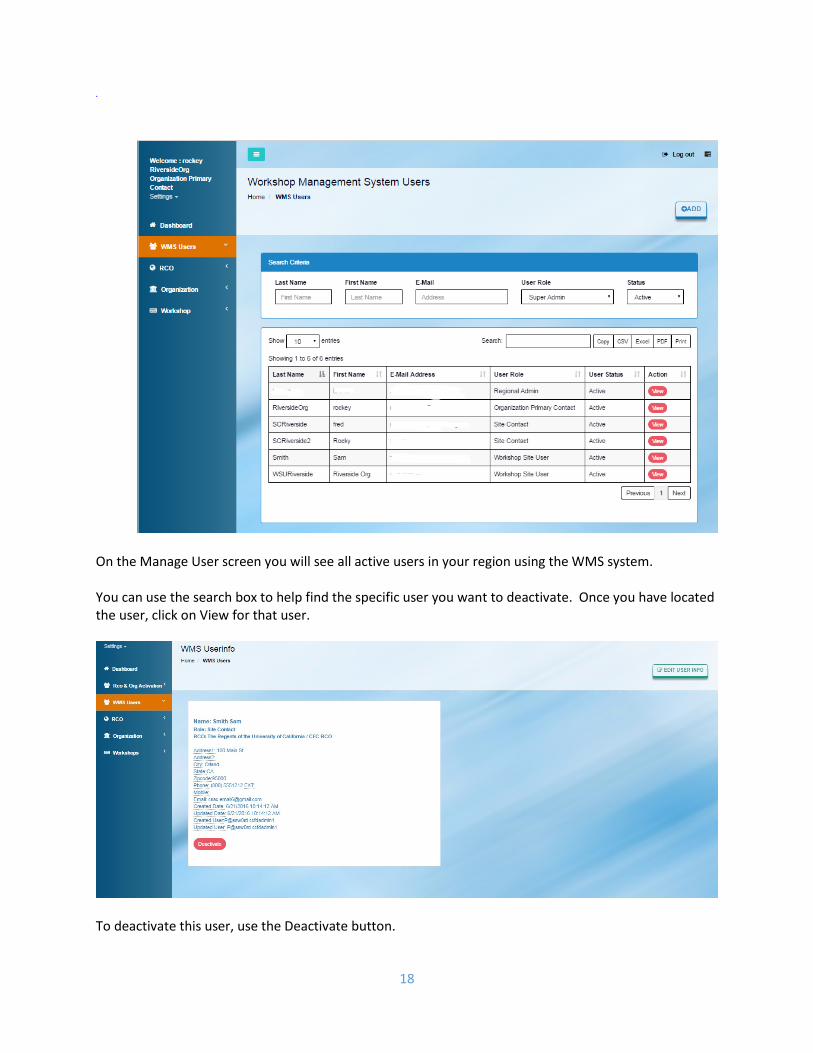
On the Manage User screen you will see all active users in your region using the WMS system. You can use the search box to help find the specific user you want to deactivate. Once you have located the user, click on View for that user.
To deactivate this user, use the Deactivate button.
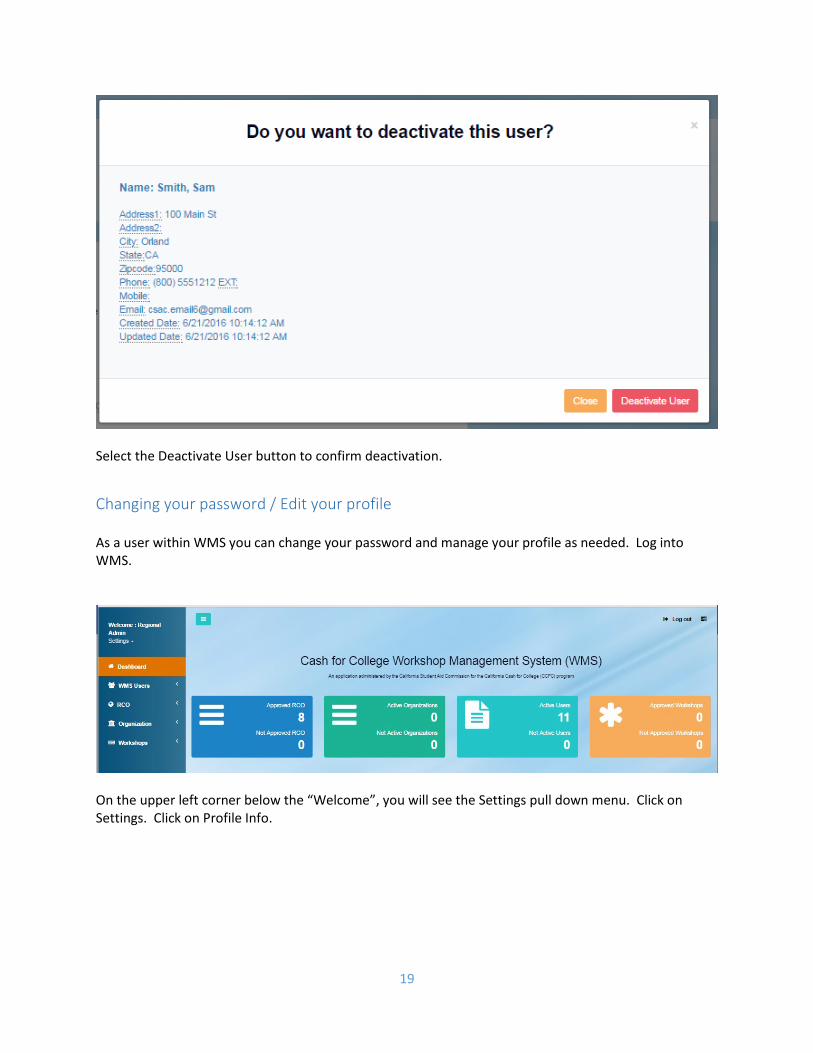
19
Select the Deactivate User button to confirm deactivation.
Changing your password / Edit your profile As a user within WMS you can change your password and manage your profile as needed. Log into WMS.
On the upper left corner below the “Welcome”, you will see the Settings pull down menu. Click on Settings. Click on Profile Info.
20
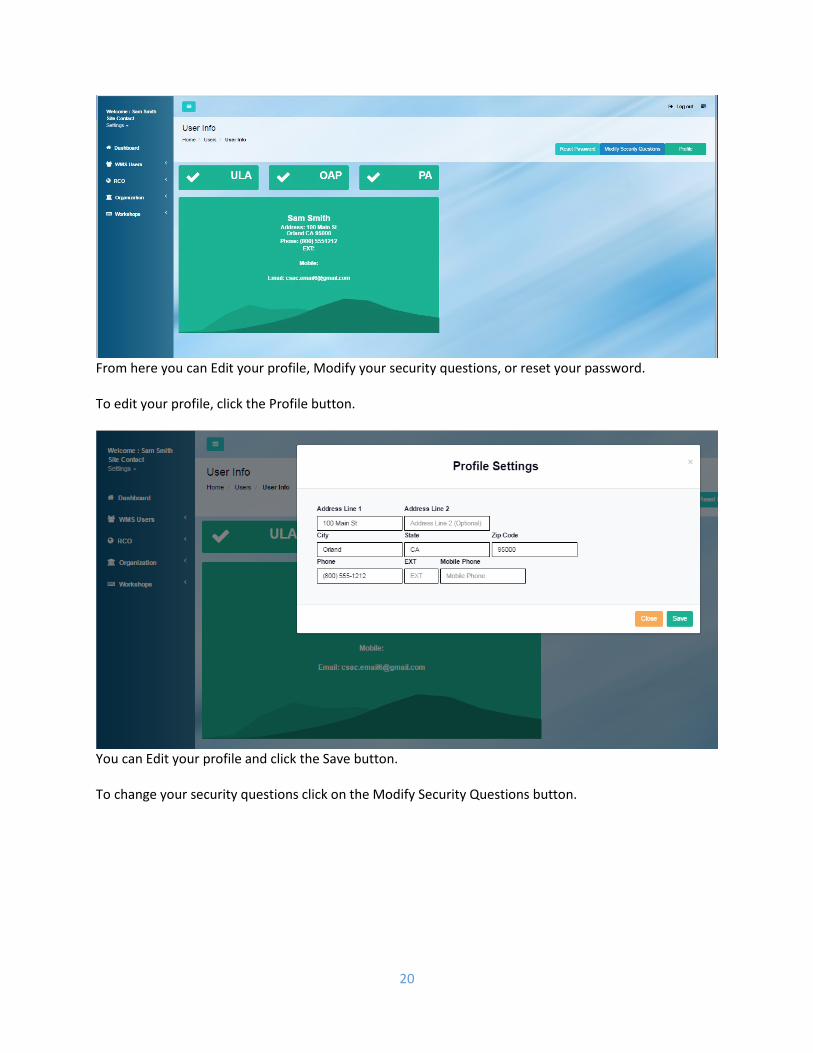
From here you can Edit your profile, Modify your security questions, or reset your password. To edit your profile, click the Profile button.
You can Edit your profile and click the Save button. To change your security questions click on the Modify Security Questions button.
21
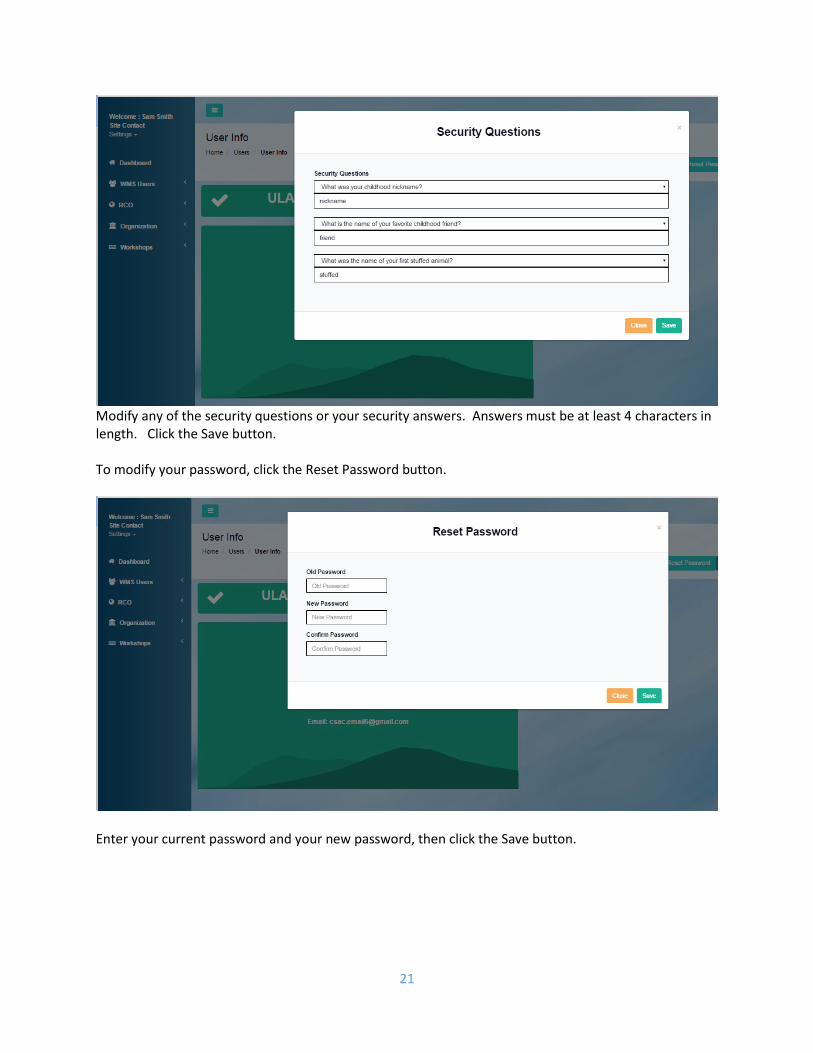
Modify any of the security questions or your security answers. Answers must be at least 4 characters in length. Click the Save button. To modify your password, click the Reset Password button.
Enter your current password and your new password, then click the Save button.
22
Workshop Management To manage Workshops in WMS, you need to log in as Organization Primary Contact or Workshop Site User (Site Contact can only view workshops). On the left side of the page, click on Workshop. If there are workshops that need to be approved you will not see them. Only approved workshops will be shown.
Create workshop To create a workshop, go to the main WMS page and click on the Workshop button on the left side of the page. From the Manage Workshop page, click on Create Workshop on the upper right part of your screen.
23
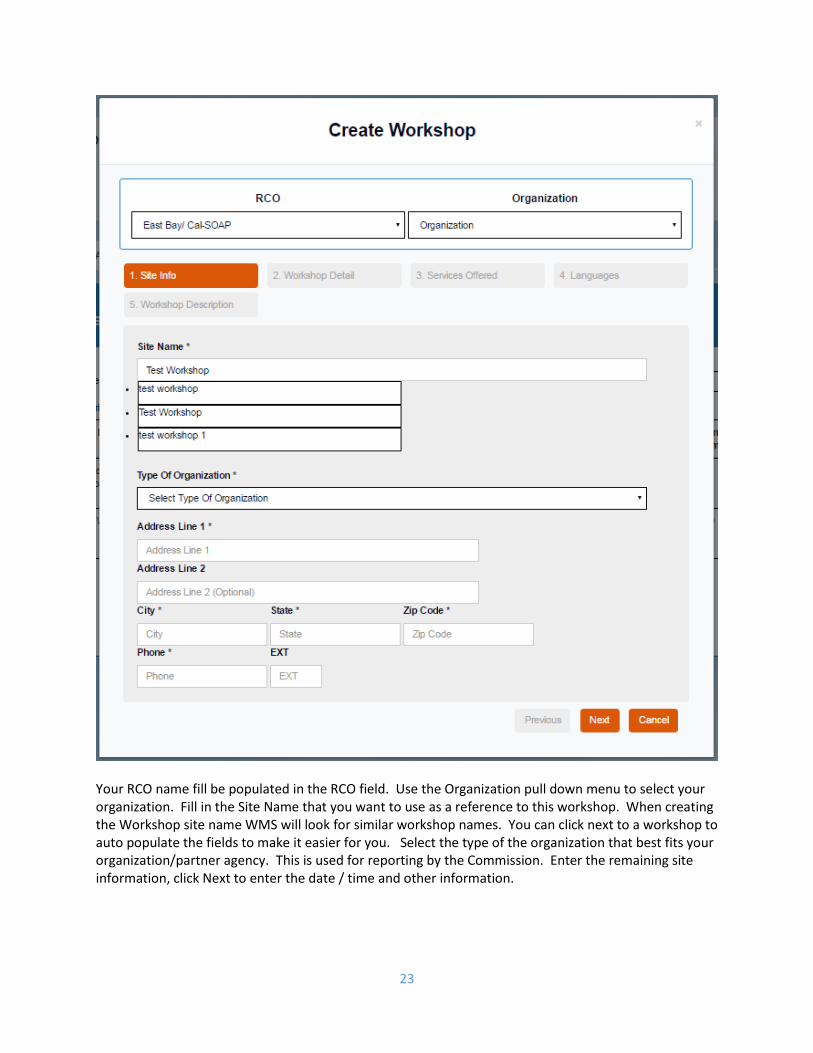
Your RCO name fill be populated in the RCO field. Use the Organization pull down menu to select your organization. Fill in the Site Name that you want to use as a reference to this workshop. When creating the Workshop site name WMS will look for similar workshop names. You can click next to a workshop to auto populate the fields to make it easier for you. Select the type of the organization that best fits your organization/partner agency. This is used for reporting by the Commission. Enter the remaining site information, click Next to enter the date / time and other information.
24
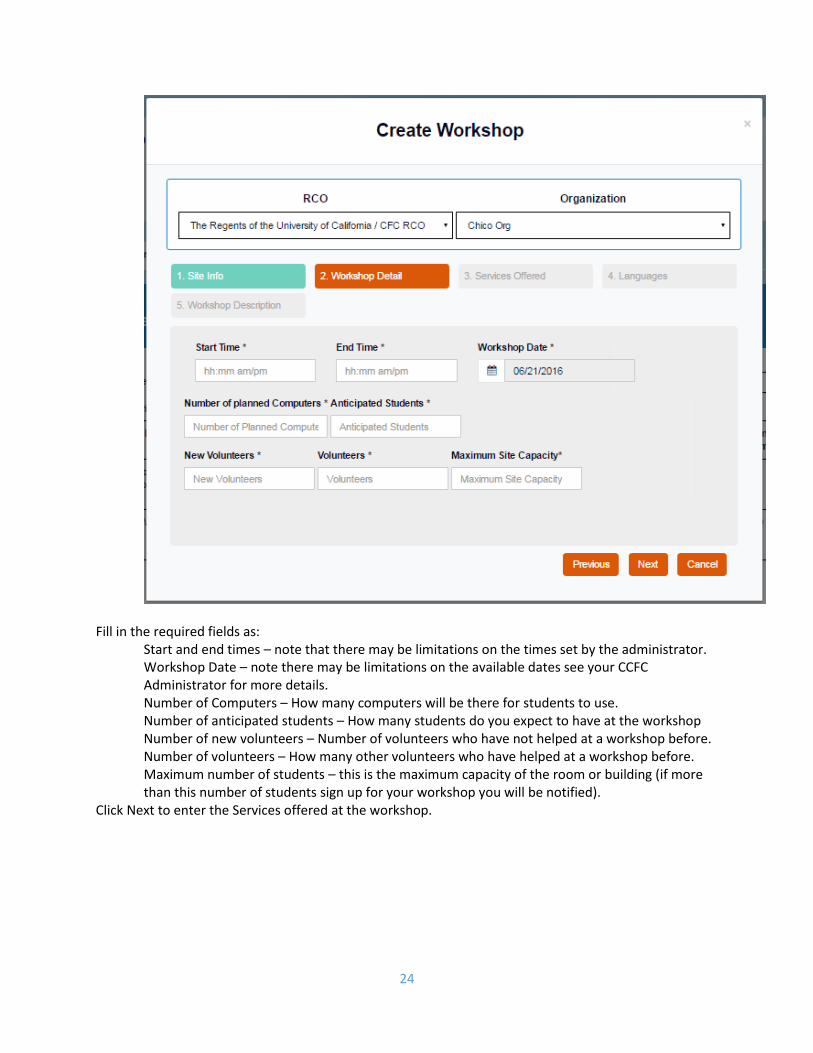
Fill in the required fields as: Start and end times – note that there may be limitations on the times set by the administrator. Workshop Date – note there may be limitations on the available dates see your CCFC Administrator for more details. Number of Computers – How many computers will be there for students to use. Number of anticipated students – How many students do you expect to have at the workshop Number of new volunteers – Number of volunteers who have not helped at a workshop before. Number of volunteers – How many other volunteers who have helped at a workshop before. Maximum number of students – this is the maximum capacity of the room or building (if more than this number of students sign up for your workshop you will be notified).
Click Next to enter the Services offered at the workshop.
25
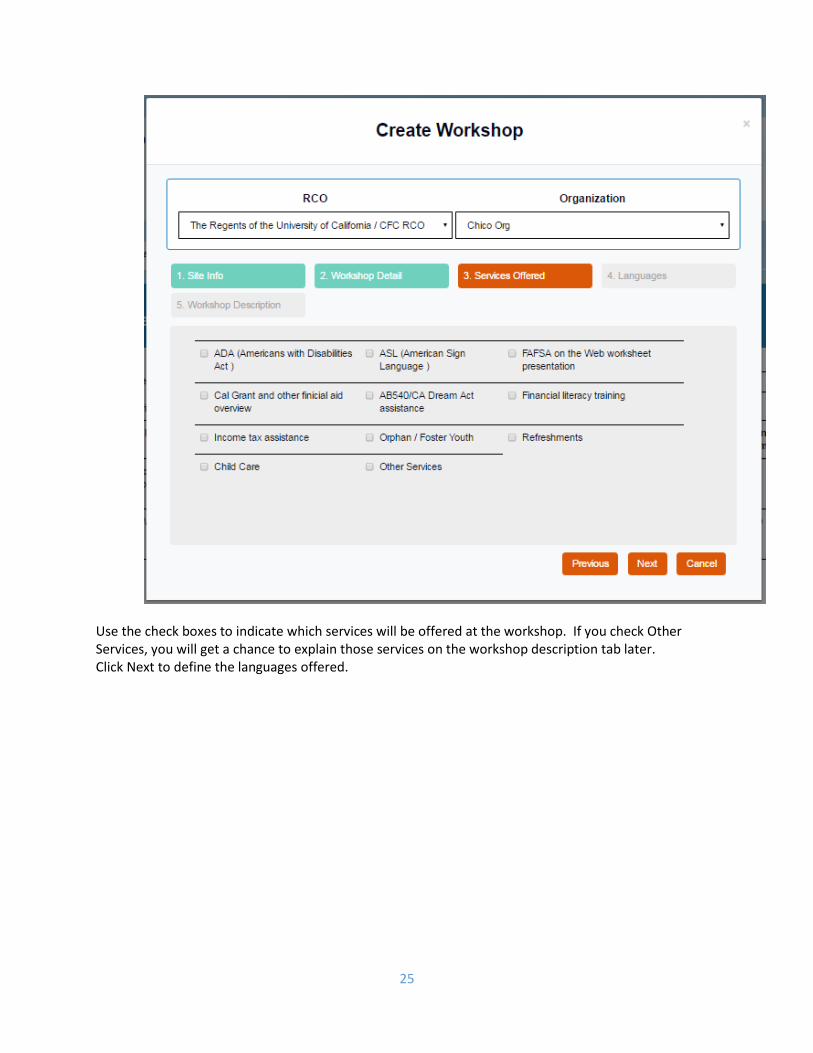
Use the check boxes to indicate which services will be offered at the workshop. If you check Other Services, you will get a chance to explain those services on the workshop description tab later. Click Next to define the languages offered.
26
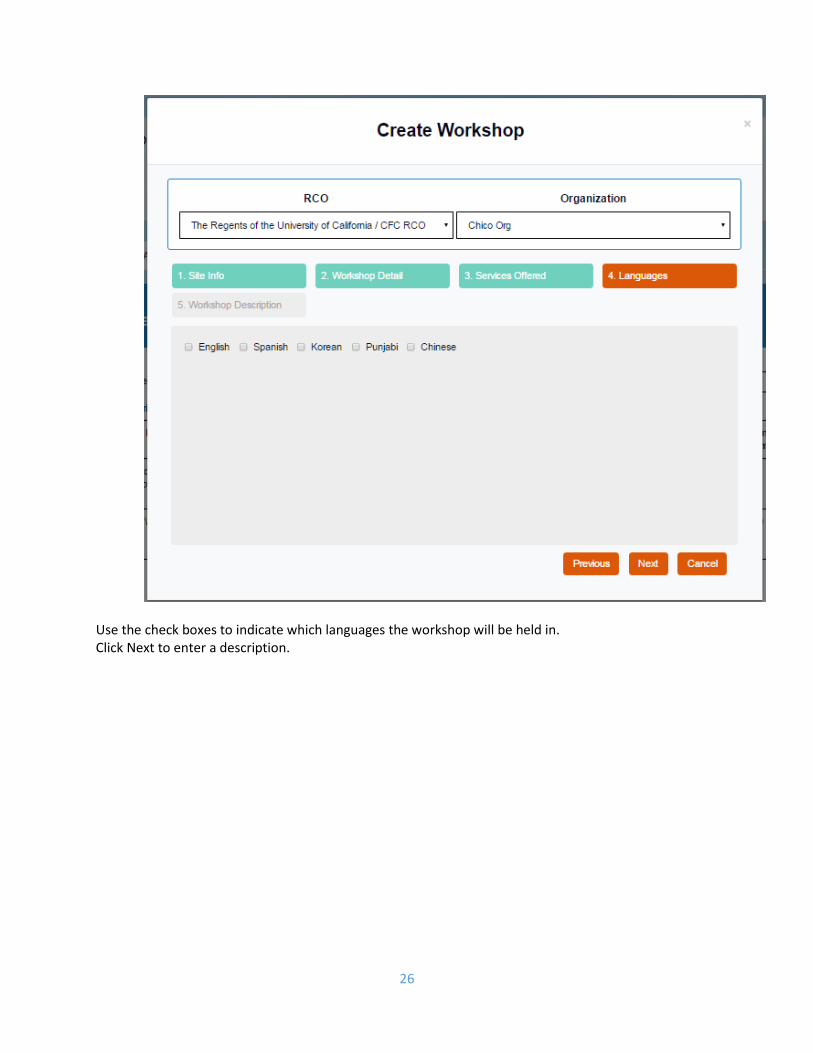
Use the check boxes to indicate which languages the workshop will be held in. Click Next to enter a description.
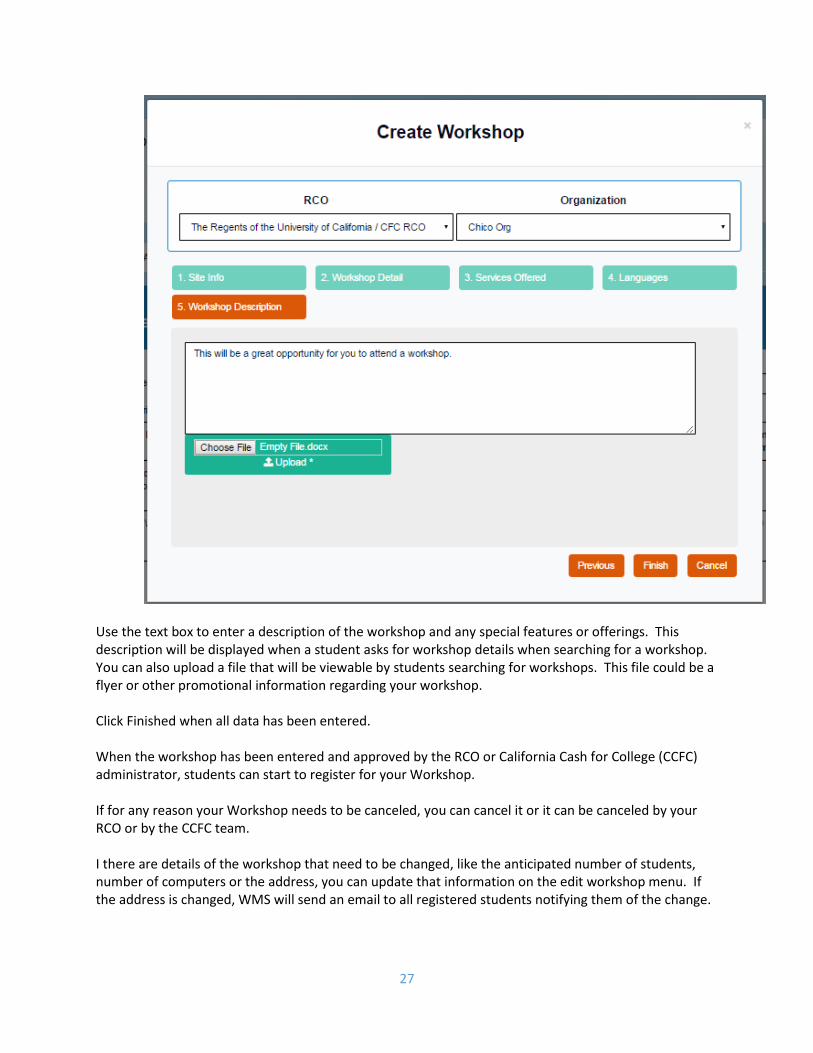
27
Use the text box to enter a description of the workshop and any special features or offerings. This description will be displayed when a student asks for workshop details when searching for a workshop. You can also upload a file that will be viewable by students searching for workshops. This file could be a flyer or other promotional information regarding your workshop. Click Finished when all data has been entered. When the workshop has been entered and approved by the RCO or California Cash for College (CCFC) administrator, students can start to register for your Workshop. If for any reason your Workshop needs to be canceled, you can cancel it or it can be canceled by your RCO or by the CCFC team. I there are details of the workshop that need to be changed, like the anticipated number of students, number of computers or the address, you can update that information on the edit workshop menu. If the address is changed, WMS will send an email to all registered students notifying them of the change.
28
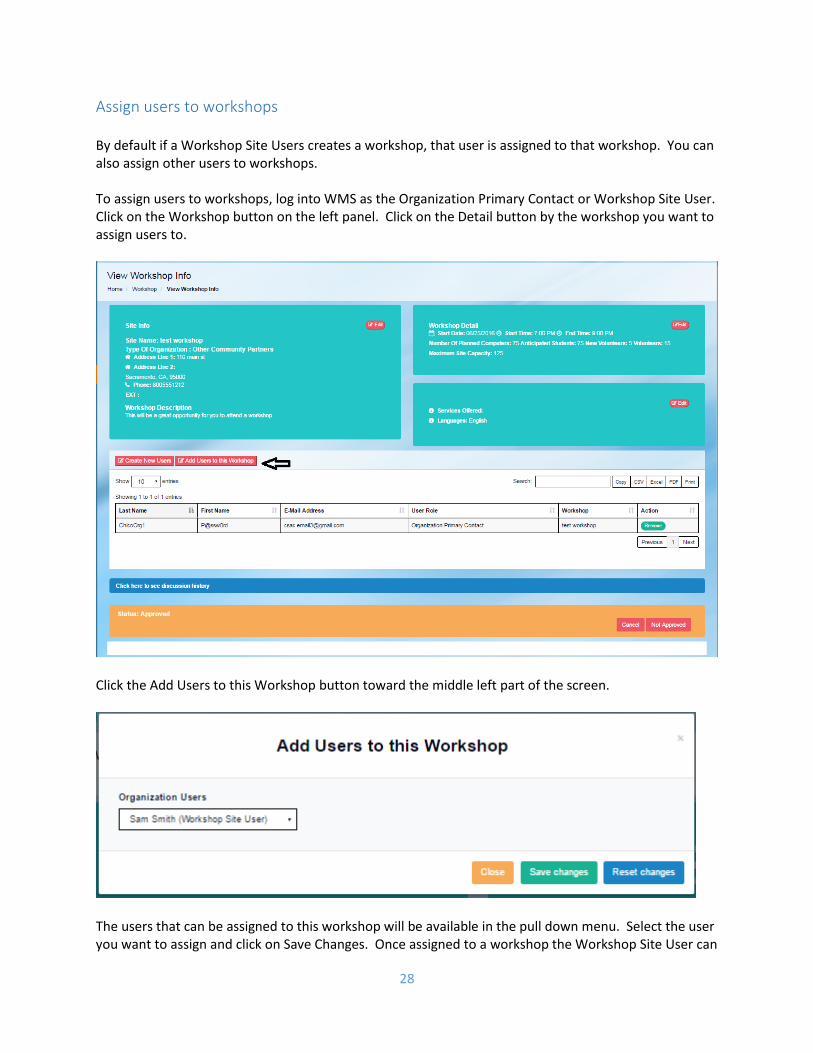
Assign users to workshops By default if a Workshop Site Users creates a workshop, that user is assigned to that workshop. You can also assign other users to workshops. To assign users to workshops, log into WMS as the Organization Primary Contact or Workshop Site User. Click on the Workshop button on the left panel. Click on the Detail button by the workshop you want to assign users to.
Click the Add Users to this Workshop button toward the middle left part of the screen.
The users that can be assigned to this workshop will be available in the pull down menu. Select the user you want to assign and click on Save Changes. Once assigned to a workshop the Workshop Site User can

29
view and edit the workshop. When a Site Contact has been assigned to a workshop they can then view the details of that workshop.

![Warehouse Management System [WMS] · w For better management and operational flexibility, WMS allows the user to divide cargo into more item details. By way of example, a receipt](https://img.pdfslide.us/doc/110x75/5f6c004a15e10e7fb659193d/warehouse-management-system-wms-w-for-better-management-and-operational-flexibility.jpg)