Embed Size (px)
Citation preview
Chief Financial Office ORPICS Project ORPICS
Data Entry Guide
orpics data entry guide.doc April 2020 Page 1 of 31
OREGON POSITION INFORMATION CONTROL SYSTEM (ORPICS)
Data Entry Guide
Department of Administrative Services Chief Financial Management
Chief Financial Office ORPICS Project ORPICS
Data Entry Guide
orpics data entry guide.doc April 2020 Page 2 of 31
ORPICS Overview Accessing ORPICS
CITRIX Login
ORBITS Login
Position Estimates
Window Functionality
Position Detail
Window Functionality
• Filters • Detail
o Sorting o Scroll Bars
• Command Buttons • Common Errors • Data Entry
• Detail Cross Reference Number Changes • Position Type Changes • Salary Step Changes • Months and Phase In/Out dates Changes • Adding a New Position • Adding a New Position with multiple DCR’s • Removing a Position • Fund Shift Changes • Re-Establishing a Position that was eliminated in a prior Package • Reclassifying a Position • Changes to a Position with multiple DCR’s • Remove one DCR from a multiple DCR position
Reporting
• POS100 PICS Budget Ledger • PICS100 Position Budget Report • POS102 ORPICS Freeze Report • PICS130 Position Count by Agency Report • PICS140 ORPICS Package Report
Chief Financial Office ORPICS Project ORPICS
Data Entry Guide
orpics data entry guide.doc April 2020 Page 3 of 31
Accessing ORPICS ORPICS is part of the ORBITS application, which means ORPICS users will need to sign into ORBITS to access the new ORPICS windows. There are two separate security logins that will be necessary.
CITRIX
The ORBITS application is available on the internet by using a front-end software product called Citrix. This allows the application to be accessed 24 hours a day and 7 days a week on State Networks. Access to Citrix is based on a User ID and Password.
ORBITS
The ORBITS application has a green and blue globe icon and is available in the “APPS” tab in Citrix. Select the application and the ORBITS login screen will appear
To gain access to both Logins please refer to the SABR Website, Web Services Section, for additional instructions.
https://www.oregon.gov/das/Financial/pages/SABRS.aspx

Chief Financial Office ORPICS Project ORPICS
Data Entry Guide
orpics data entry guide.doc April 2020 Page 4 of 31
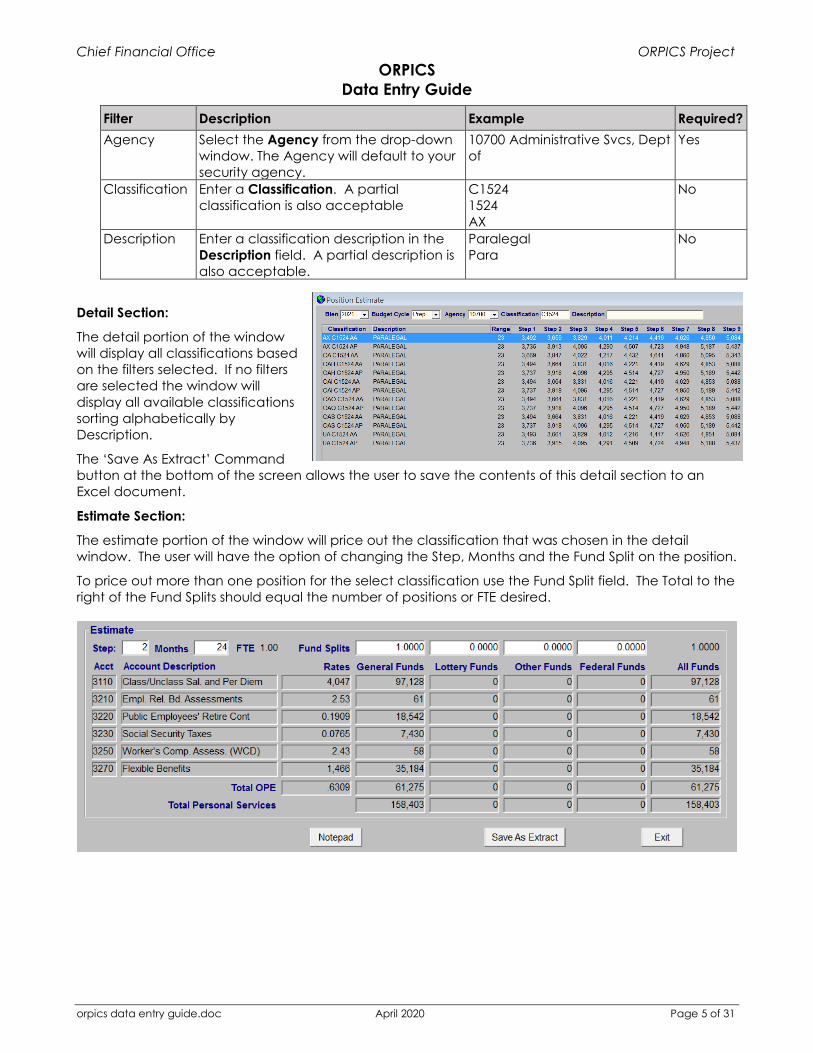
Position Estimates Window Functionality
Menu Path: ORPICS > Position Estimate
The Position Estimate window is used to price out one or more positions based on the classification chosen. This window allows the user to do ‘what if’ type scenarios without saving any of the values that are calculated. The window is made up of three sections.
1. The Filters or selection criteria.
2. The Detail section.
3. The Estimate section.
Filters:
The top portion of the Position Estimate window has several filters to allow the user to search for a specific classification(s).
o Drop Down Boxes: An arrow appearing in a window next to a particular field indicates a drop down box. This provides the user with available options to select from.
o Entry Boxes: An empty box is displayed allowing the user to type into the box.
Filter Description Example Required? Bien Select the Bien using the drop-down
window. 2023 Yes
Budget Cycle Select the Budget Cycle. This will determine which Compensation Plan that is used for estimating costs.
Prep Yes
Chief Financial Office ORPICS Project ORPICS
Data Entry Guide
orpics data entry guide.doc April 2020 Page 5 of 31
Filter Description Example Required? Agency Select the Agency from the drop-down
window. The Agency will default to your security agency.
10700 Administrative Svcs, Dept of
Yes
Classification Enter a Classification. A partial classification is also acceptable
C1524 1524 AX
No
Description Enter a classification description in the Description field. A partial description is also acceptable.
Paralegal Para
No
Detail Section:
The detail portion of the window will display all classifications based on the filters selected. If no filters are selected the window will display all available classifications sorting alphabetically by Description.
The ‘Save As Extract’ Command button at the bottom of the screen allows the user to save the contents of this detail section to an Excel document.
Estimate Section:
The estimate portion of the window will price out the classification that was chosen in the detail window. The user will have the option of changing the Step, Months and the Fund Split on the position.
To price out more than one position for the select classification use the Fund Split field. The Total to the right of the Fund Splits should equal the number of positions or FTE desired.
Chief Financial Office ORPICS Project ORPICS
Data Entry Guide
orpics data entry guide.doc April 2020 Page 6 of 31
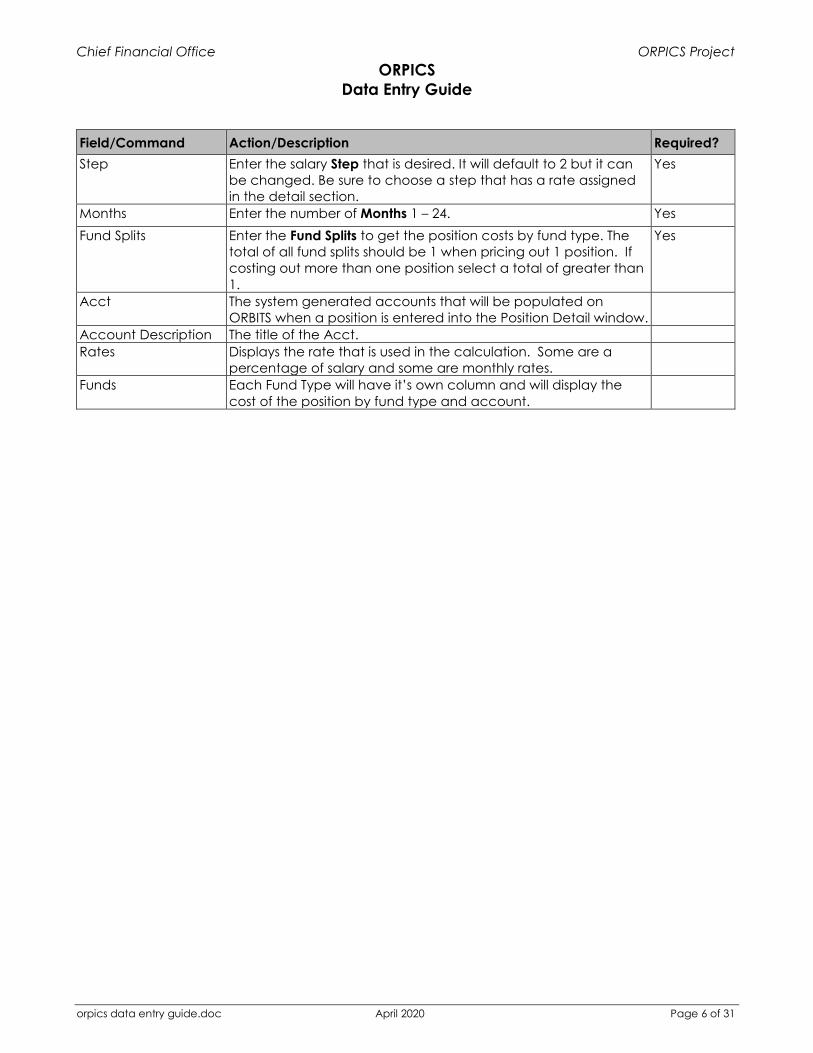
Field/Command Action/Description Required? Step Enter the salary Step that is desired. It will default to 2 but it can
be changed. Be sure to choose a step that has a rate assigned in the detail section.
Yes
Months Enter the number of Months 1 – 24. Yes Fund Splits Enter the Fund Splits to get the position costs by fund type. The
total of all fund splits should be 1 when pricing out 1 position. If costing out more than one position select a total of greater than 1.
Yes
Acct The system generated accounts that will be populated on ORBITS when a position is entered into the Position Detail window.
Account Description The title of the Acct. Rates Displays the rate that is used in the calculation. Some are a
percentage of salary and some are monthly rates.
Funds Each Fund Type will have it’s own column and will display the cost of the position by fund type and account.
Chief Financial Office ORPICS Project ORPICS
Data Entry Guide
orpics data entry guide.doc April 2020 Page 7 of 31
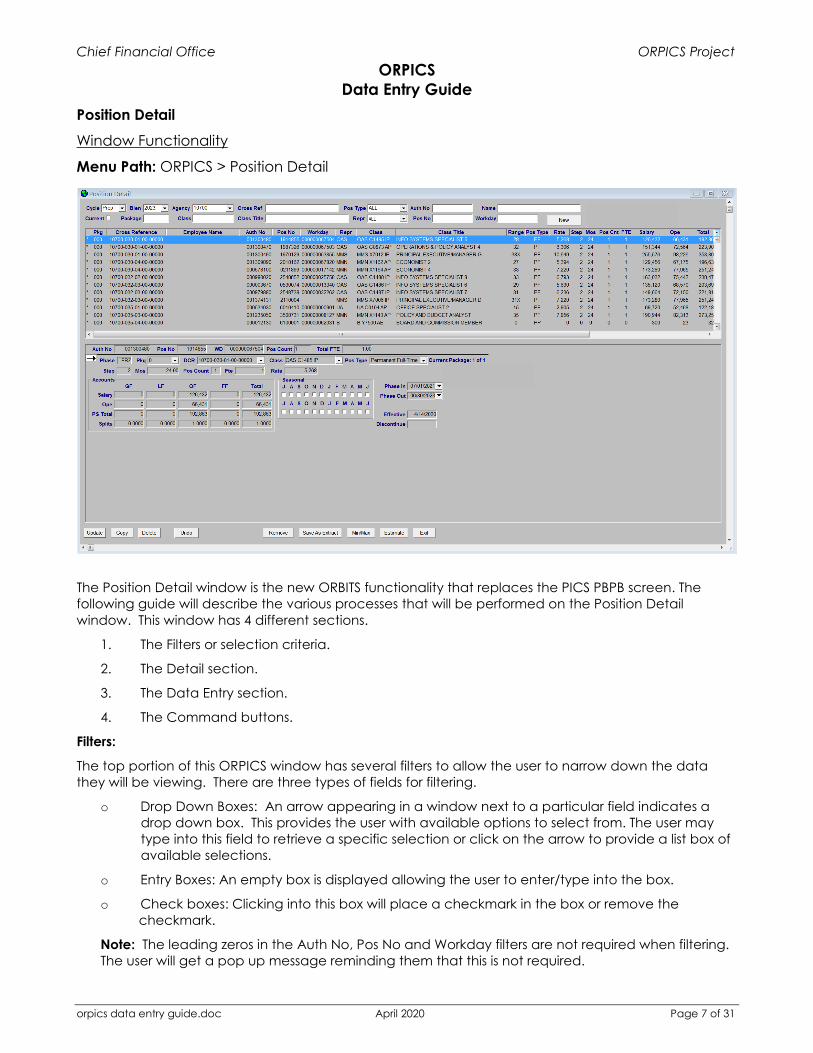
Position Detail Window Functionality
Menu Path: ORPICS > Position Detail
The Position Detail window is the new ORBITS functionality that replaces the PICS PBPB screen. The following guide will describe the various processes that will be performed on the Position Detail window. This window has 4 different sections.
1. The Filters or selection criteria.
2. The Detail section.
3. The Data Entry section.
4. The Command buttons.
Filters:
The top portion of this ORPICS window has several filters to allow the user to narrow down the data they will be viewing. There are three types of fields for filtering.
o Drop Down Boxes: An arrow appearing in a window next to a particular field indicates a drop down box. This provides the user with available options to select from. The user may type into this field to retrieve a specific selection or click on the arrow to provide a list box of available selections.
o Entry Boxes: An empty box is displayed allowing the user to enter/type into the box.
o Check boxes: Clicking into this box will place a checkmark in the box or remove the checkmark.
Note: The leading zeros in the Auth No, Pos No and Workday filters are not required when filtering. The user will get a pop up message reminding them that this is not required.
Chief Financial Office ORPICS Project ORPICS
Data Entry Guide
orpics data entry guide.doc April 2020 Page 8 of 31
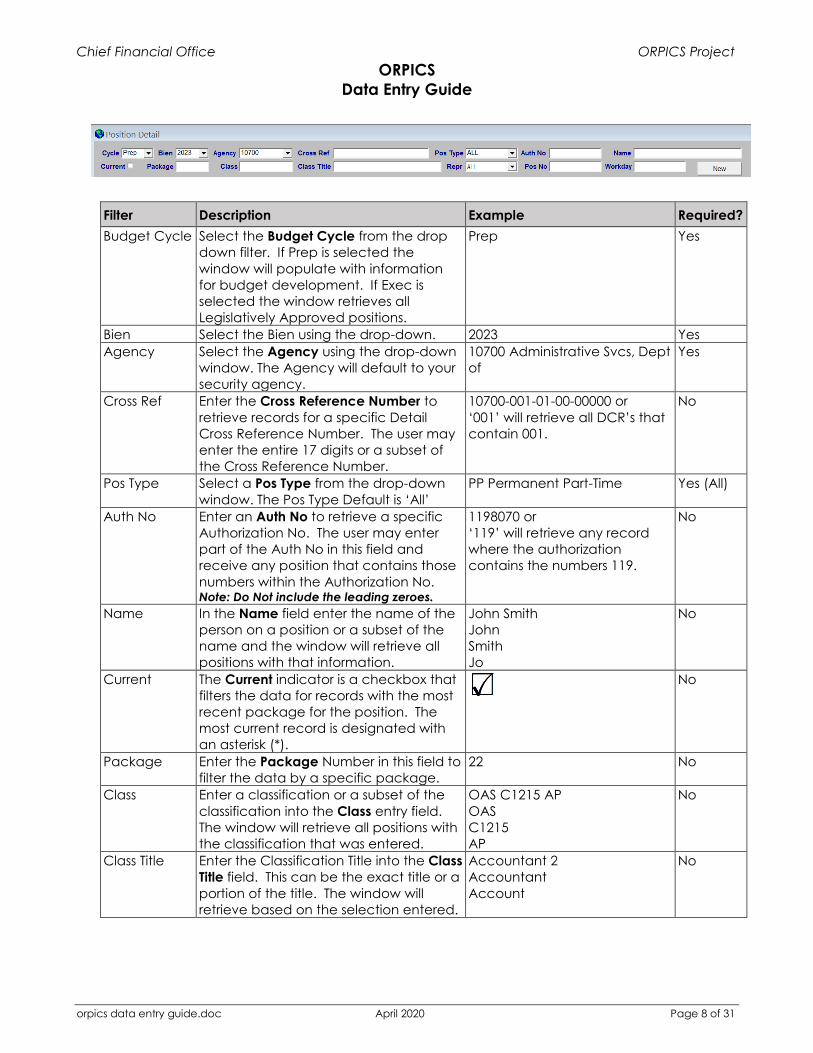
Filter Description Example Required? Budget Cycle Select the Budget Cycle from the drop
down filter. If Prep is selected the window will populate with information for budget development. If Exec is selected the window retrieves all Legislatively Approved positions.
Prep Yes
Bien Select the Bien using the drop-down. 2023 Yes Agency Select the Agency using the drop-down
window. The Agency will default to your security agency.
10700 Administrative Svcs, Dept of
Yes
Cross Ref Enter the Cross Reference Number to retrieve records for a specific Detail Cross Reference Number. The user may enter the entire 17 digits or a subset of the Cross Reference Number.
10700-001-01-00-00000 or ‘001’ will retrieve all DCR’s that contain 001.
No
Pos Type Select a Pos Type from the drop-down window. The Pos Type Default is ‘All’
PP Permanent Part-Time Yes (All)
Auth No Enter an Auth No to retrieve a specific Authorization No. The user may enter part of the Auth No in this field and receive any position that contains those numbers within the Authorization No. Note: Do Not include the leading zeroes.
1198070 or ‘119’ will retrieve any record where the authorization contains the numbers 119.
No
Name In the Name field enter the name of the person on a position or a subset of the name and the window will retrieve all positions with that information.
John Smith John Smith Jo
No
Current The Current indicator is a checkbox that filters the data for records with the most recent package for the position. The most current record is designated with an asterisk (*).
No
Package Enter the Package Number in this field to filter the data by a specific package.
22 No
Class Enter a classification or a subset of the classification into the Class entry field. The window will retrieve all positions with the classification that was entered.
OAS C1215 AP OAS C1215 AP
No
Class Title Enter the Classification Title into the Class Title field. This can be the exact title or a portion of the title. The window will retrieve based on the selection entered.
Accountant 2 Accountant Account
No
Chief Financial Office ORPICS Project ORPICS
Data Entry Guide
orpics data entry guide.doc April 2020 Page 9 of 31
Filter Description Example Required? Repr The Repr drop down selection is
populated with all representations available. Make a selection based on the representation that should be displayed in the window for your agency.
MMN Mgmt Svc Nonsupervisory Yes (All)
Pos No Enter the Position No to be populated on the window. This may be the exact position number or a subset of the position number.
2200104 0104
No
Workday Enter the Workday number in this field if you know the Workday number of the position and want to filter based on that.
67504 No
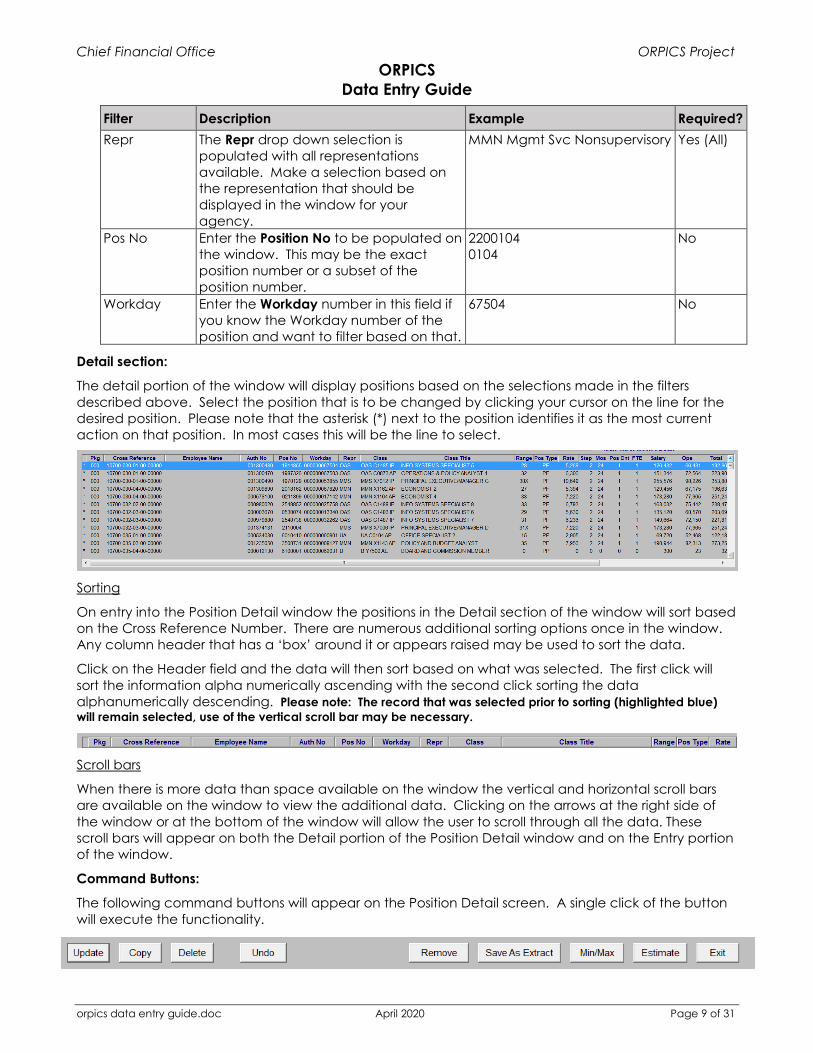
Detail section:
The detail portion of the window will display positions based on the selections made in the filters described above. Select the position that is to be changed by clicking your cursor on the line for the desired position. Please note that the asterisk (*) next to the position identifies it as the most current action on that position. In most cases this will be the line to select.
Sorting
On entry into the Position Detail window the positions in the Detail section of the window will sort based on the Cross Reference Number. There are numerous additional sorting options once in the window. Any column header that has a ‘box’ around it or appears raised may be used to sort the data.
Click on the Header field and the data will then sort based on what was selected. The first click will sort the information alpha numerically ascending with the second click sorting the data alphanumerically descending. Please note: The record that was selected prior to sorting (highlighted blue) will remain selected, use of the vertical scroll bar may be necessary.
Scroll bars
When there is more data than space available on the window the vertical and horizontal scroll bars are available on the window to view the additional data. Clicking on the arrows at the right side of the window or at the bottom of the window will allow the user to scroll through all the data. These scroll bars will appear on both the Detail portion of the Position Detail window and on the Entry portion of the window.
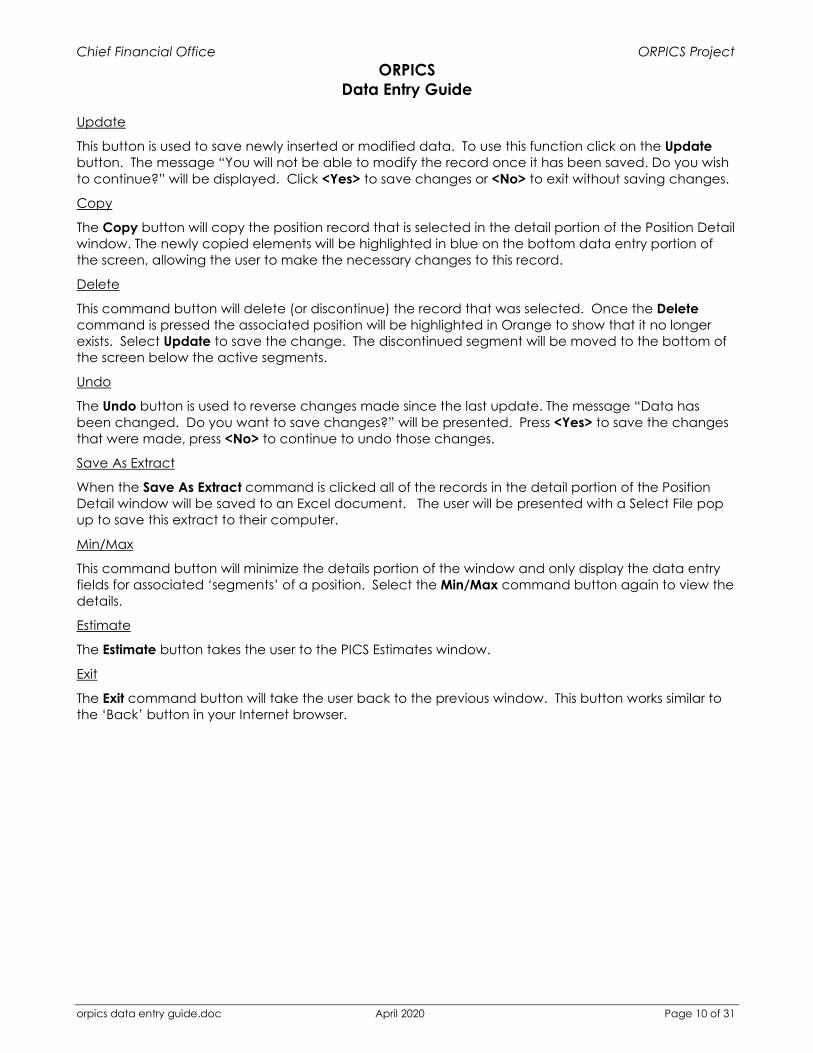
Command Buttons:
The following command buttons will appear on the Position Detail screen. A single click of the button will execute the functionality.
Chief Financial Office ORPICS Project ORPICS
Data Entry Guide
orpics data entry guide.doc April 2020 Page 10 of 31
Update
This button is used to save newly inserted or modified data. To use this function click on the Update button. The message “You will not be able to modify the record once it has been saved. Do you wish to continue?” will be displayed. Click <Yes> to save changes or <No> to exit without saving changes.
Copy
The Copy button will copy the position record that is selected in the detail portion of the Position Detail window. The newly copied elements will be highlighted in blue on the bottom data entry portion of the screen, allowing the user to make the necessary changes to this record.
Delete
This command button will delete (or discontinue) the record that was selected. Once the Delete command is pressed the associated position will be highlighted in Orange to show that it no longer exists. Select Update to save the change. The discontinued segment will be moved to the bottom of the screen below the active segments.
Undo
The Undo button is used to reverse changes made since the last update. The message “Data has been changed. Do you want to save changes?” will be presented. Press <Yes> to save the changes that were made, press <No> to continue to undo those changes.
Save As Extract
When the Save As Extract command is clicked all of the records in the detail portion of the Position Detail window will be saved to an Excel document. The user will be presented with a Select File pop up to save this extract to their computer.
Min/Max
This command button will minimize the details portion of the window and only display the data entry fields for associated ‘segments’ of a position. Select the Min/Max command button again to view the details.
Estimate
The Estimate button takes the user to the PICS Estimates window.
Exit
The Exit command button will take the user back to the previous window. This button works similar to the ‘Back’ button in your Internet browser.
Chief Financial Office ORPICS Project ORPICS
Data Entry Guide
orpics data entry guide.doc April 2020 Page 11 of 31
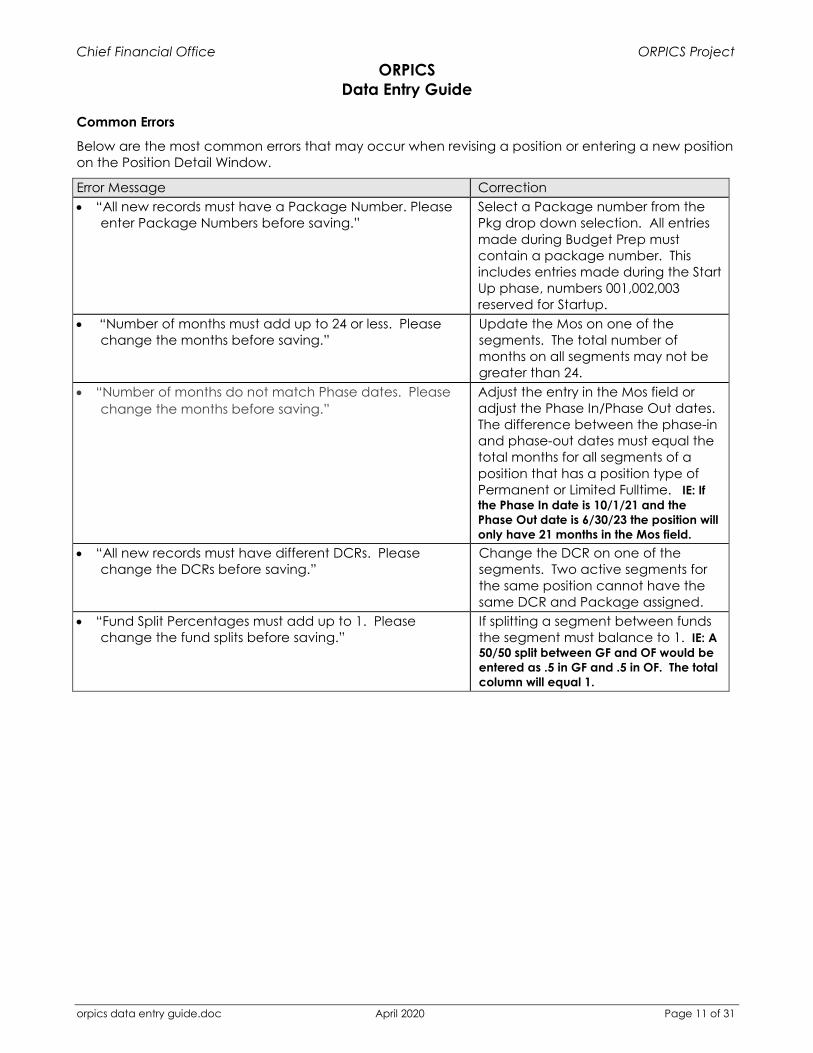
Common Errors
Below are the most common errors that may occur when revising a position or entering a new position on the Position Detail Window.
Error Message Correction • “All new records must have a Package Number. Please
enter Package Numbers before saving.” Select a Package number from the Pkg drop down selection. All entries made during Budget Prep must contain a package number. This includes entries made during the Start Up phase, numbers 001,002,003 reserved for Startup.
• “Number of months must add up to 24 or less. Please change the months before saving.”
Update the Mos on one of the segments. The total number of months on all segments may not be greater than 24.
• “Number of months do not match Phase dates. Please change the months before saving.”
Adjust the entry in the Mos field or adjust the Phase In/Phase Out dates. The difference between the phase-in and phase-out dates must equal the total months for all segments of a position that has a position type of Permanent or Limited Fulltime. IE: If the Phase In date is 10/1/21 and the Phase Out date is 6/30/23 the position will only have 21 months in the Mos field.
• “All new records must have different DCRs. Please change the DCRs before saving.”
Change the DCR on one of the segments. Two active segments for the same position cannot have the same DCR and Package assigned.
• “Fund Split Percentages must add up to 1. Please change the fund splits before saving.”
If splitting a segment between funds the segment must balance to 1. IE: A 50/50 split between GF and OF would be entered as .5 in GF and .5 in OF. The total column will equal 1.
Chief Financial Office ORPICS Project ORPICS
Data Entry Guide
orpics data entry guide.doc April 2020 Page 12 of 31
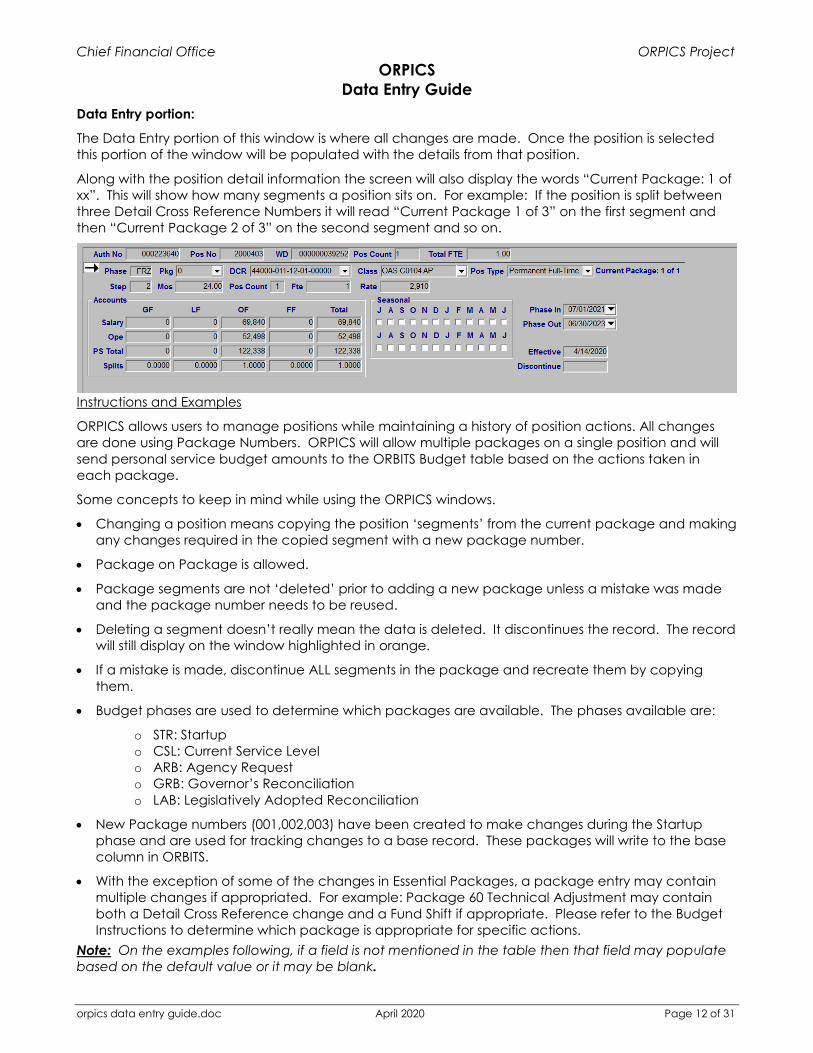
Data Entry portion:
The Data Entry portion of this window is where all changes are made. Once the position is selected this portion of the window will be populated with the details from that position.
Along with the position detail information the screen will also display the words “Current Package: 1 of xx”. This will show how many segments a position sits on. For example: If the position is split between three Detail Cross Reference Numbers it will read “Current Package 1 of 3” on the first segment and then “Current Package 2 of 3” on the second segment and so on.
Instructions and Examples
ORPICS allows users to manage positions while maintaining a history of position actions. All changes are done using Package Numbers. ORPICS will allow multiple packages on a single position and will send personal service budget amounts to the ORBITS Budget table based on the actions taken in each package.
Some concepts to keep in mind while using the ORPICS windows.
• Changing a position means copying the position ‘segments’ from the current package and making any changes required in the copied segment with a new package number.
• Package on Package is allowed.
• Package segments are not ‘deleted’ prior to adding a new package unless a mistake was made and the package number needs to be reused.
• Deleting a segment doesn’t really mean the data is deleted. It discontinues the record. The record will still display on the window highlighted in orange.
• If a mistake is made, discontinue ALL segments in the package and recreate them by copying them.
• Budget phases are used to determine which packages are available. The phases available are:
o STR: Startup o CSL: Current Service Level o ARB: Agency Request o GRB: Governor’s Reconciliation o LAB: Legislatively Adopted Reconciliation
• New Package numbers (001,002,003) have been created to make changes during the Startup phase and are used for tracking changes to a base record. These packages will write to the base column in ORBITS.
• With the exception of some of the changes in Essential Packages, a package entry may contain multiple changes if appropriated. For example: Package 60 Technical Adjustment may contain both a Detail Cross Reference change and a Fund Shift if appropriate. Please refer to the Budget Instructions to determine which package is appropriate for specific actions.
Note: On the examples following, if a field is not mentioned in the table then that field may populate based on the default value or it may be blank.
Chief Financial Office ORPICS Project ORPICS
Data Entry Guide
orpics data entry guide.doc April 2020 Page 13 of 31
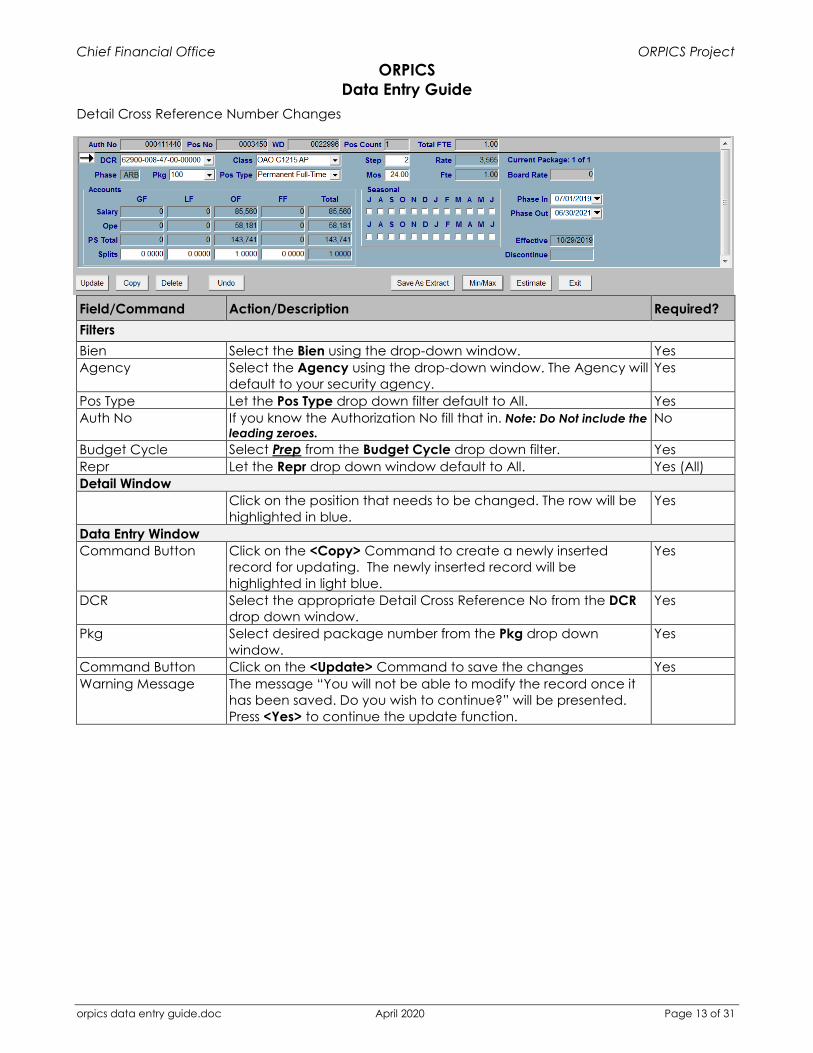
Detail Cross Reference Number Changes
Field/Command Action/Description Required? Filters Bien Select the Bien using the drop-down window. Yes Agency Select the Agency using the drop-down window. The Agency will
default to your security agency. Yes
Pos Type Let the Pos Type drop down filter default to All. Yes Auth No If you know the Authorization No fill that in. Note: Do Not include the
leading zeroes. No
Budget Cycle Select Prep from the Budget Cycle drop down filter. Yes Repr Let the Repr drop down window default to All. Yes (All) Detail Window Click on the position that needs to be changed. The row will be
highlighted in blue. Yes
Data Entry Window Command Button Click on the <Copy> Command to create a newly inserted
record for updating. The newly inserted record will be highlighted in light blue.
Yes
DCR Select the appropriate Detail Cross Reference No from the DCR drop down window.
Yes
Pkg Select desired package number from the Pkg drop down window.
Yes
Command Button Click on the <Update> Command to save the changes Yes Warning Message The message “You will not be able to modify the record once it
has been saved. Do you wish to continue?” will be presented. Press <Yes> to continue the update function.
Chief Financial Office ORPICS Project ORPICS
Data Entry Guide
orpics data entry guide.doc April 2020 Page 14 of 31
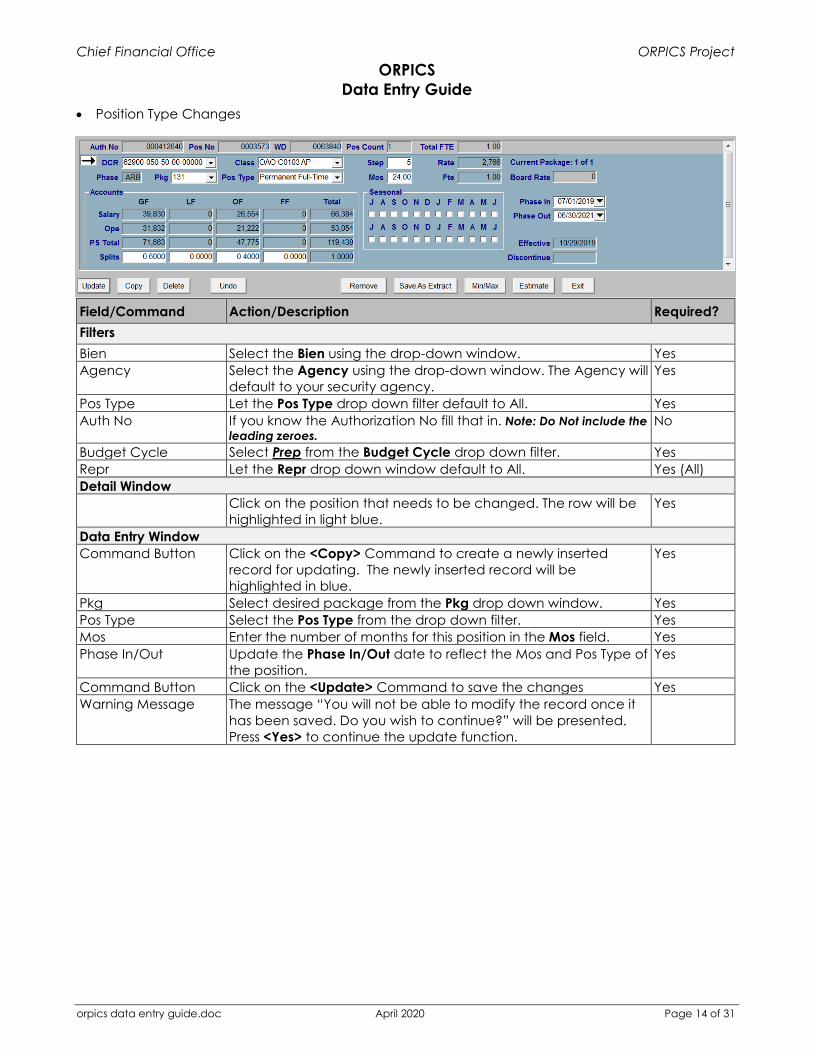
• Position Type Changes
Field/Command Action/Description Required? Filters Bien Select the Bien using the drop-down window. Yes Agency Select the Agency using the drop-down window. The Agency will
default to your security agency. Yes
Pos Type Let the Pos Type drop down filter default to All. Yes Auth No If you know the Authorization No fill that in. Note: Do Not include the
leading zeroes. No
Budget Cycle Select Prep from the Budget Cycle drop down filter. Yes Repr Let the Repr drop down window default to All. Yes (All) Detail Window Click on the position that needs to be changed. The row will be
highlighted in light blue. Yes
Data Entry Window Command Button Click on the <Copy> Command to create a newly inserted
record for updating. The newly inserted record will be highlighted in blue.
Yes
Pkg Select desired package from the Pkg drop down window. Yes Pos Type Select the Pos Type from the drop down filter. Yes Mos Enter the number of months for this position in the Mos field. Yes Phase In/Out Update the Phase In/Out date to reflect the Mos and Pos Type of
the position. Yes
Command Button Click on the <Update> Command to save the changes Yes Warning Message The message “You will not be able to modify the record once it
has been saved. Do you wish to continue?” will be presented. Press <Yes> to continue the update function.
Chief Financial Office ORPICS Project ORPICS
Data Entry Guide
orpics data entry guide.doc April 2020 Page 15 of 31
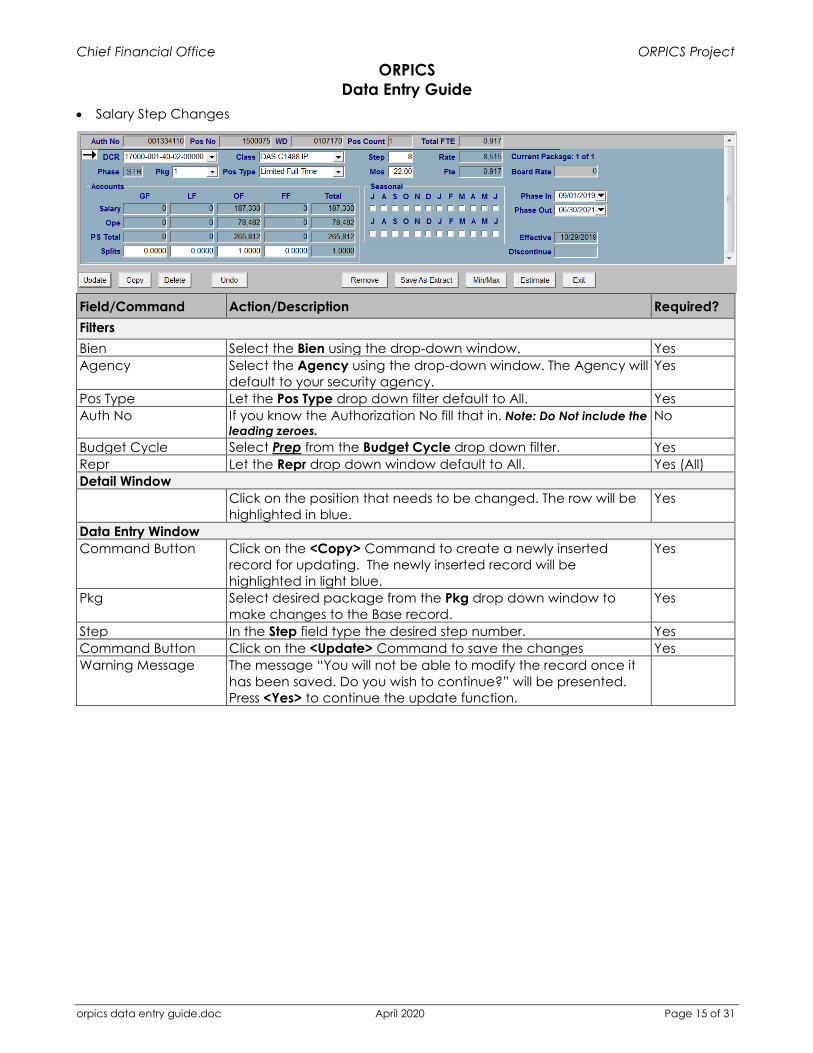
• Salary Step Changes
Field/Command Action/Description Required? Filters Bien Select the Bien using the drop-down window. Yes Agency Select the Agency using the drop-down window. The Agency will
default to your security agency. Yes
Pos Type Let the Pos Type drop down filter default to All. Yes Auth No If you know the Authorization No fill that in. Note: Do Not include the
leading zeroes. No
Budget Cycle Select Prep from the Budget Cycle drop down filter. Yes Repr Let the Repr drop down window default to All. Yes (All) Detail Window Click on the position that needs to be changed. The row will be
highlighted in blue. Yes
Data Entry Window Command Button Click on the <Copy> Command to create a newly inserted
record for updating. The newly inserted record will be highlighted in light blue.
Yes
Pkg Select desired package from the Pkg drop down window to make changes to the Base record.
Yes
Step In the Step field type the desired step number. Yes Command Button Click on the <Update> Command to save the changes Yes Warning Message The message “You will not be able to modify the record once it
has been saved. Do you wish to continue?” will be presented. Press <Yes> to continue the update function.
Chief Financial Office ORPICS Project ORPICS
Data Entry Guide
orpics data entry guide.doc April 2020 Page 16 of 31
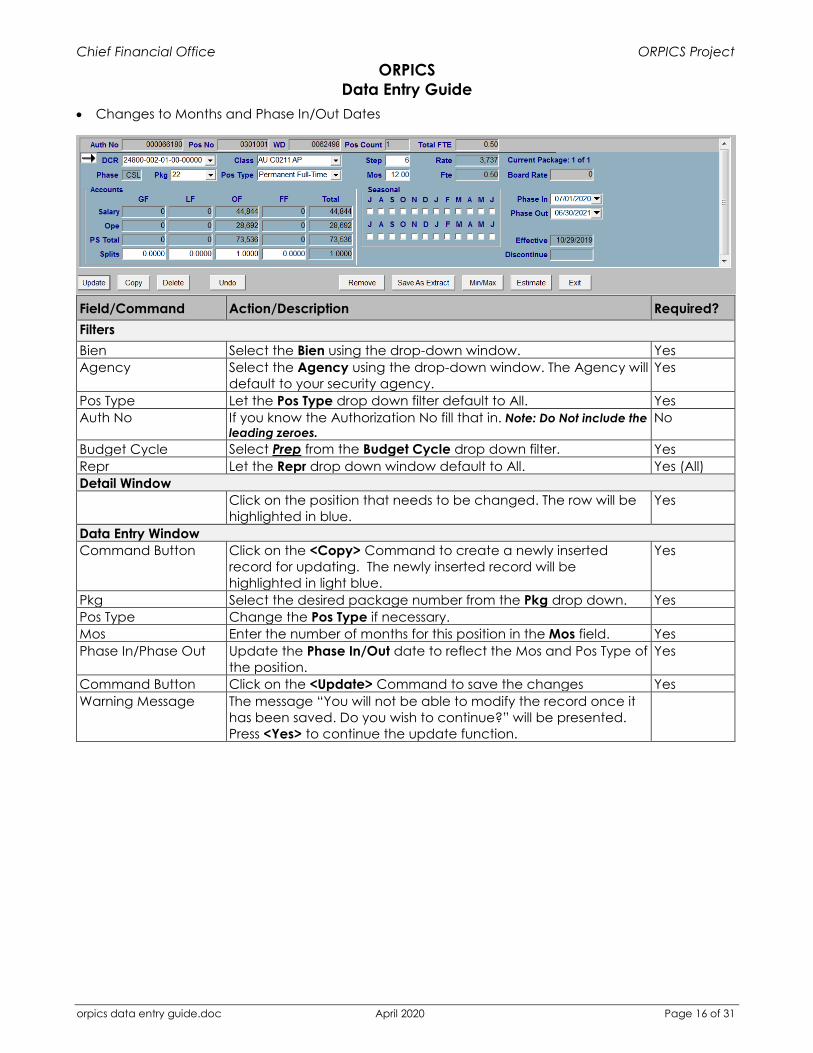
• Changes to Months and Phase In/Out Dates
Field/Command Action/Description Required? Filters Bien Select the Bien using the drop-down window. Yes Agency Select the Agency using the drop-down window. The Agency will
default to your security agency. Yes
Pos Type Let the Pos Type drop down filter default to All. Yes Auth No If you know the Authorization No fill that in. Note: Do Not include the
leading zeroes. No
Budget Cycle Select Prep from the Budget Cycle drop down filter. Yes Repr Let the Repr drop down window default to All. Yes (All) Detail Window Click on the position that needs to be changed. The row will be
highlighted in blue. Yes
Data Entry Window Command Button Click on the <Copy> Command to create a newly inserted
record for updating. The newly inserted record will be highlighted in light blue.
Yes
Pkg Select the desired package number from the Pkg drop down. Yes Pos Type Change the Pos Type if necessary. Mos Enter the number of months for this position in the Mos field. Yes Phase In/Phase Out Update the Phase In/Out date to reflect the Mos and Pos Type of
the position. Yes
Command Button Click on the <Update> Command to save the changes Yes Warning Message The message “You will not be able to modify the record once it
has been saved. Do you wish to continue?” will be presented. Press <Yes> to continue the update function.
Chief Financial Office ORPICS Project ORPICS
Data Entry Guide
orpics data entry guide.doc April 2020 Page 17 of 31
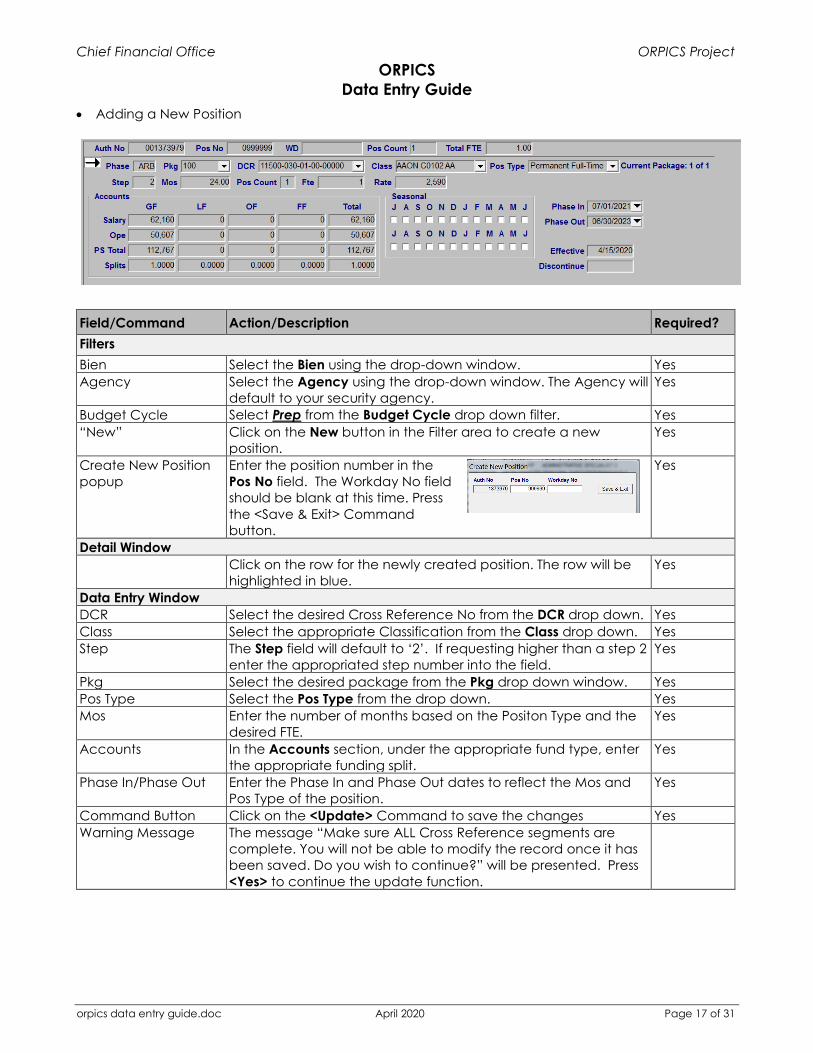
• Adding a New Position
Field/Command Action/Description Required? Filters Bien Select the Bien using the drop-down window. Yes Agency Select the Agency using the drop-down window. The Agency will
default to your security agency. Yes
Budget Cycle Select Prep from the Budget Cycle drop down filter. Yes “New” Click on the New button in the Filter area to create a new
position. Yes
Create New Position popup
Enter the position number in the Pos No field. The Workday No field should be blank at this time. Press the <Save & Exit> Command button.
Yes
Detail Window Click on the row for the newly created position. The row will be
highlighted in blue. Yes
Data Entry Window DCR Select the desired Cross Reference No from the DCR drop down. Yes Class Select the appropriate Classification from the Class drop down. Yes Step The Step field will default to ‘2’. If requesting higher than a step 2
enter the appropriated step number into the field. Yes
Pkg Select the desired package from the Pkg drop down window. Yes Pos Type Select the Pos Type from the drop down. Yes Mos Enter the number of months based on the Positon Type and the
desired FTE. Yes
Accounts In the Accounts section, under the appropriate fund type, enter the appropriate funding split.
Yes
Phase In/Phase Out Enter the Phase In and Phase Out dates to reflect the Mos and Pos Type of the position.
Yes
Command Button Click on the <Update> Command to save the changes Yes Warning Message The message “Make sure ALL Cross Reference segments are
complete. You will not be able to modify the record once it has been saved. Do you wish to continue?” will be presented. Press <Yes> to continue the update function.
Chief Financial Office ORPICS Project ORPICS
Data Entry Guide
orpics data entry guide.doc April 2020 Page 18 of 31
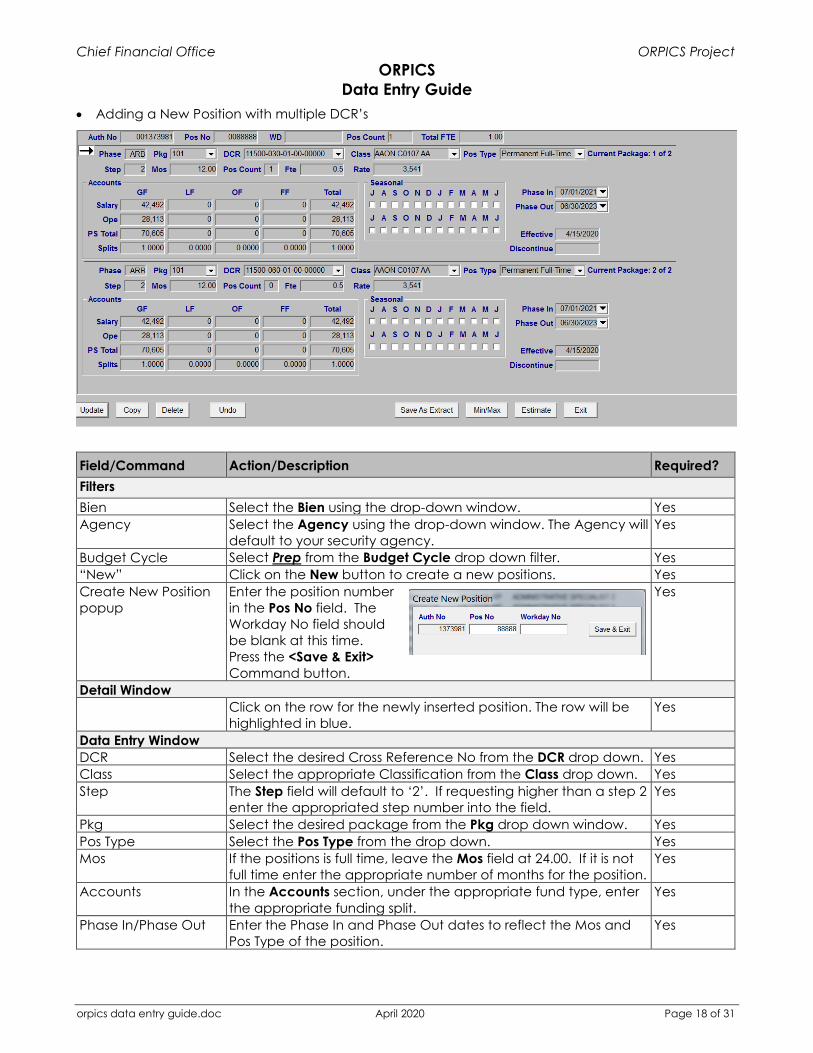
• Adding a New Position with multiple DCR’s
Field/Command Action/Description Required? Filters Bien Select the Bien using the drop-down window. Yes Agency Select the Agency using the drop-down window. The Agency will
default to your security agency. Yes
Budget Cycle Select Prep from the Budget Cycle drop down filter. Yes “New” Click on the New button to create a new positions. Yes Create New Position popup
Enter the position number in the Pos No field. The Workday No field should be blank at this time. Press the <Save & Exit> Command button.
Yes
Detail Window Click on the row for the newly inserted position. The row will be
highlighted in blue. Yes
Data Entry Window DCR Select the desired Cross Reference No from the DCR drop down. Yes Class Select the appropriate Classification from the Class drop down. Yes Step The Step field will default to ‘2’. If requesting higher than a step 2
enter the appropriated step number into the field. Yes
Pkg Select the desired package from the Pkg drop down window. Yes Pos Type Select the Pos Type from the drop down. Yes Mos If the positions is full time, leave the Mos field at 24.00. If it is not
full time enter the appropriate number of months for the position. Yes
Accounts In the Accounts section, under the appropriate fund type, enter the appropriate funding split.
Yes
Phase In/Phase Out Enter the Phase In and Phase Out dates to reflect the Mos and Pos Type of the position.
Yes
Chief Financial Office ORPICS Project ORPICS
Data Entry Guide
orpics data entry guide.doc April 2020 Page 19 of 31
Command Button Click on the <Insert> Command to insert a copy of the segment just created.
Yes
Additional ‘Segment’ changes
Update the newly inserted segment with the new DCR, Pkg, Mos, etc. Note: Clicking on the Min/Max Command button may be helpful to see both segments on the same page.
Yes
Command Button Click on the <Update> Command to save the changes Yes Warning Message The message “Make sure ALL Cross Reference segments are
completed. You will not be able to modify the record once it has been saved. Do you wish to continue?” will be presented. Press <Yes> to continue the update function.
Chief Financial Office ORPICS Project ORPICS
Data Entry Guide
orpics data entry guide.doc April 2020 Page 20 of 31
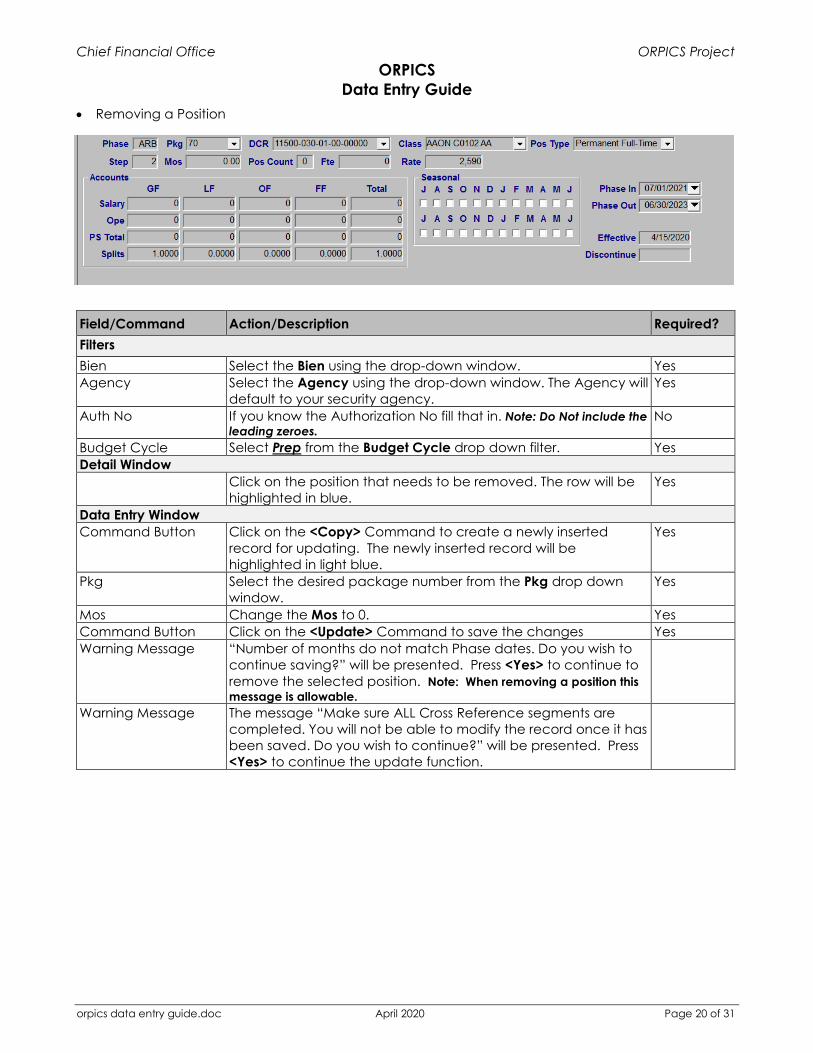
• Removing a Position
Field/Command Action/Description Required? Filters Bien Select the Bien using the drop-down window. Yes Agency Select the Agency using the drop-down window. The Agency will
default to your security agency. Yes
Auth No If you know the Authorization No fill that in. Note: Do Not include the leading zeroes.
No
Budget Cycle Select Prep from the Budget Cycle drop down filter. Yes Detail Window Click on the position that needs to be removed. The row will be
highlighted in blue. Yes
Data Entry Window Command Button Click on the <Copy> Command to create a newly inserted
record for updating. The newly inserted record will be highlighted in light blue.
Yes
Pkg Select the desired package number from the Pkg drop down window.
Yes
Mos Change the Mos to 0. Yes Command Button Click on the <Update> Command to save the changes Yes Warning Message “Number of months do not match Phase dates. Do you wish to
continue saving?” will be presented. Press <Yes> to continue to remove the selected position. Note: When removing a position this message is allowable.
Warning Message The message “Make sure ALL Cross Reference segments are completed. You will not be able to modify the record once it has been saved. Do you wish to continue?” will be presented. Press <Yes> to continue the update function.
Chief Financial Office ORPICS Project ORPICS
Data Entry Guide
orpics data entry guide.doc April 2020 Page 21 of 31
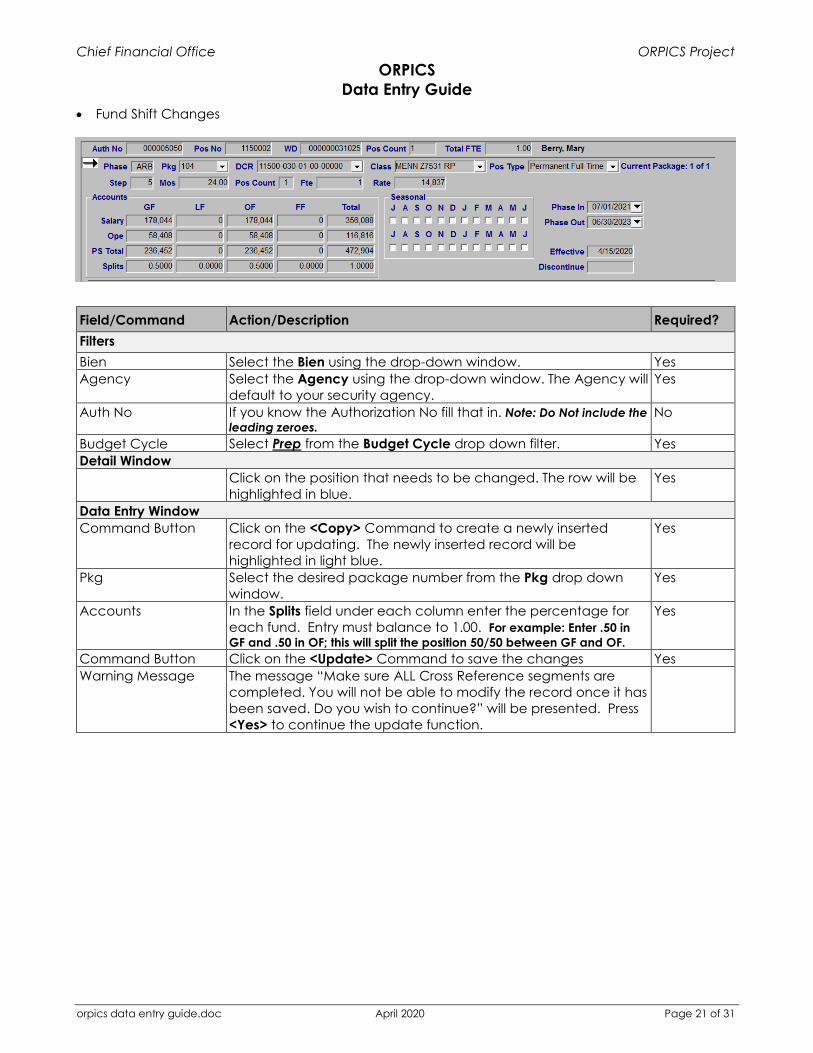
• Fund Shift Changes
Field/Command Action/Description Required? Filters Bien Select the Bien using the drop-down window. Yes Agency Select the Agency using the drop-down window. The Agency will
default to your security agency. Yes
Auth No If you know the Authorization No fill that in. Note: Do Not include the leading zeroes.
No
Budget Cycle Select Prep from the Budget Cycle drop down filter. Yes Detail Window Click on the position that needs to be changed. The row will be
highlighted in blue. Yes
Data Entry Window Command Button Click on the <Copy> Command to create a newly inserted
record for updating. The newly inserted record will be highlighted in light blue.
Yes
Pkg Select the desired package number from the Pkg drop down window.
Yes
Accounts In the Splits field under each column enter the percentage for each fund. Entry must balance to 1.00. For example: Enter .50 in GF and .50 in OF; this will split the position 50/50 between GF and OF.
Yes
Command Button Click on the <Update> Command to save the changes Yes Warning Message The message “Make sure ALL Cross Reference segments are
completed. You will not be able to modify the record once it has been saved. Do you wish to continue?” will be presented. Press <Yes> to continue the update function.
Chief Financial Office ORPICS Project ORPICS
Data Entry Guide
orpics data entry guide.doc April 2020 Page 22 of 31
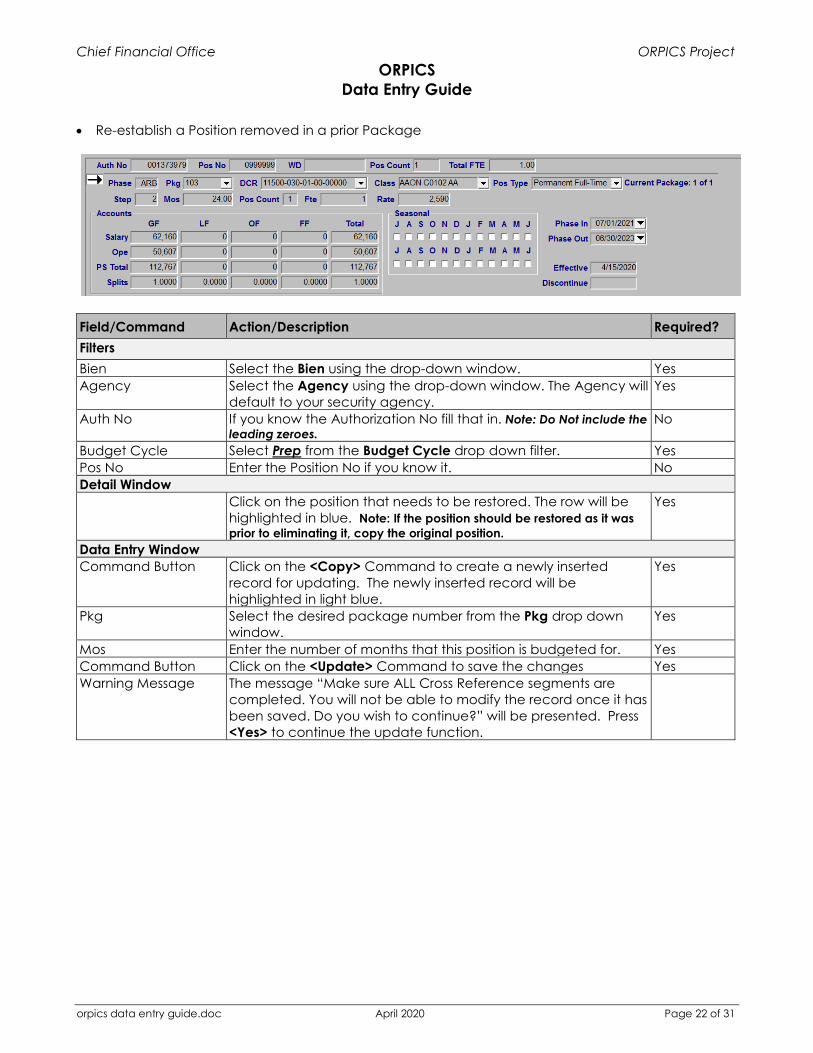
• Re-establish a Position removed in a prior Package
Field/Command Action/Description Required? Filters Bien Select the Bien using the drop-down window. Yes Agency Select the Agency using the drop-down window. The Agency will
default to your security agency. Yes
Auth No If you know the Authorization No fill that in. Note: Do Not include the leading zeroes.
No
Budget Cycle Select Prep from the Budget Cycle drop down filter. Yes Pos No Enter the Position No if you know it. No Detail Window Click on the position that needs to be restored. The row will be
highlighted in blue. Note: If the position should be restored as it was prior to eliminating it, copy the original position.
Yes
Data Entry Window Command Button Click on the <Copy> Command to create a newly inserted
record for updating. The newly inserted record will be highlighted in light blue.
Yes
Pkg Select the desired package number from the Pkg drop down window.
Yes
Mos Enter the number of months that this position is budgeted for. Yes Command Button Click on the <Update> Command to save the changes Yes Warning Message The message “Make sure ALL Cross Reference segments are
completed. You will not be able to modify the record once it has been saved. Do you wish to continue?” will be presented. Press <Yes> to continue the update function.
Chief Financial Office ORPICS Project ORPICS
Data Entry Guide
orpics data entry guide.doc April 2020 Page 23 of 31
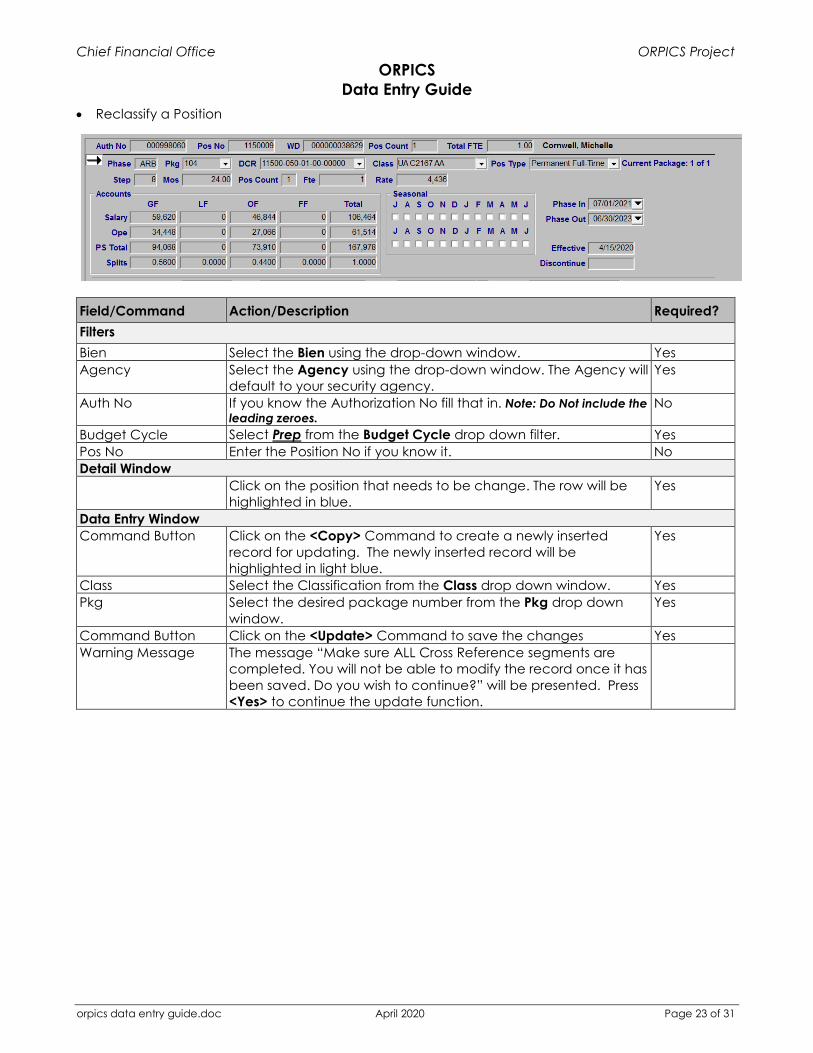
• Reclassify a Position
Field/Command Action/Description Required? Filters Bien Select the Bien using the drop-down window. Yes Agency Select the Agency using the drop-down window. The Agency will
default to your security agency. Yes
Auth No If you know the Authorization No fill that in. Note: Do Not include the leading zeroes.
No
Budget Cycle Select Prep from the Budget Cycle drop down filter. Yes Pos No Enter the Position No if you know it. No Detail Window Click on the position that needs to be change. The row will be
highlighted in blue. Yes
Data Entry Window Command Button Click on the <Copy> Command to create a newly inserted
record for updating. The newly inserted record will be highlighted in light blue.
Yes
Class Select the Classification from the Class drop down window. Yes Pkg Select the desired package number from the Pkg drop down
window. Yes
Command Button Click on the <Update> Command to save the changes Yes Warning Message The message “Make sure ALL Cross Reference segments are
completed. You will not be able to modify the record once it has been saved. Do you wish to continue?” will be presented. Press <Yes> to continue the update function.
Chief Financial Office ORPICS Project ORPICS
Data Entry Guide
orpics data entry guide.doc April 2020 Page 24 of 31
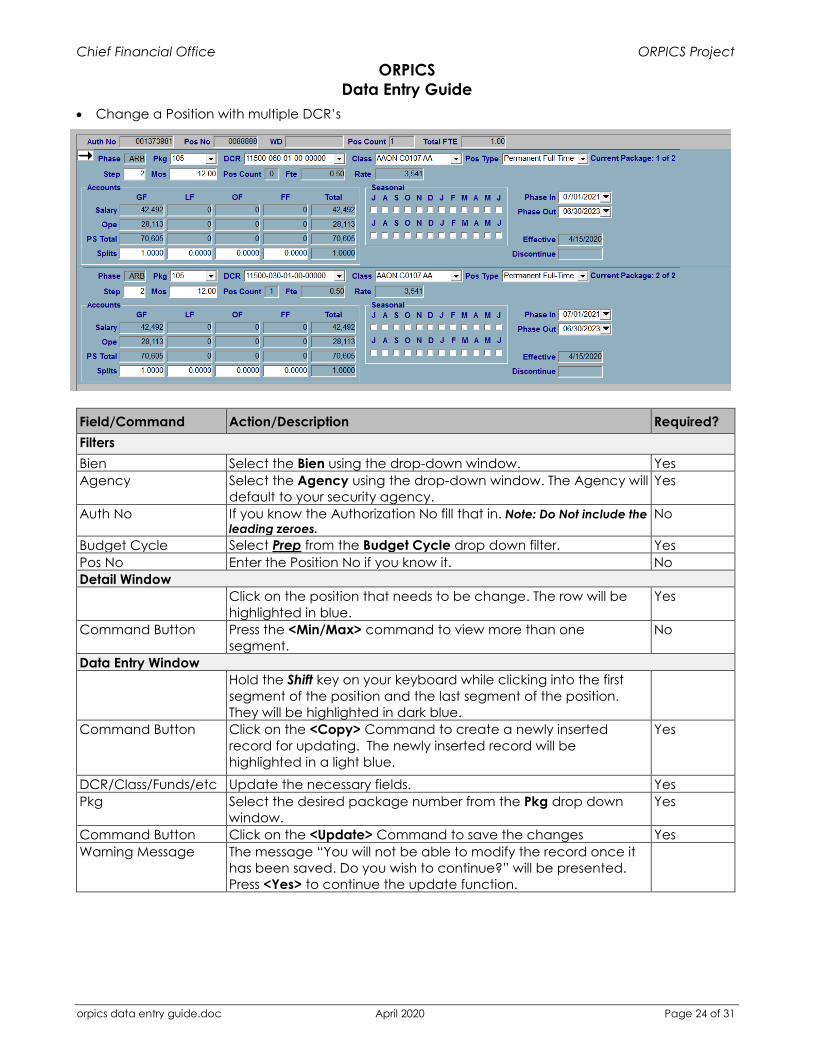
• Change a Position with multiple DCR’s
Field/Command Action/Description Required? Filters Bien Select the Bien using the drop-down window. Yes Agency Select the Agency using the drop-down window. The Agency will
default to your security agency. Yes
Auth No If you know the Authorization No fill that in. Note: Do Not include the leading zeroes.
No
Budget Cycle Select Prep from the Budget Cycle drop down filter. Yes Pos No Enter the Position No if you know it. No Detail Window Click on the position that needs to be change. The row will be
highlighted in blue. Yes
Command Button Press the <Min/Max> command to view more than one segment.
No
Data Entry Window Hold the Shift key on your keyboard while clicking into the first
segment of the position and the last segment of the position. They will be highlighted in dark blue.
Command Button Click on the <Copy> Command to create a newly inserted record for updating. The newly inserted record will be highlighted in a light blue.
Yes
DCR/Class/Funds/etc Update the necessary fields. Yes Pkg Select the desired package number from the Pkg drop down
window. Yes
Command Button Click on the <Update> Command to save the changes Yes Warning Message The message “You will not be able to modify the record once it
has been saved. Do you wish to continue?” will be presented. Press <Yes> to continue the update function.
Chief Financial Office ORPICS Project ORPICS
Data Entry Guide
orpics data entry guide.doc April 2020 Page 25 of 31
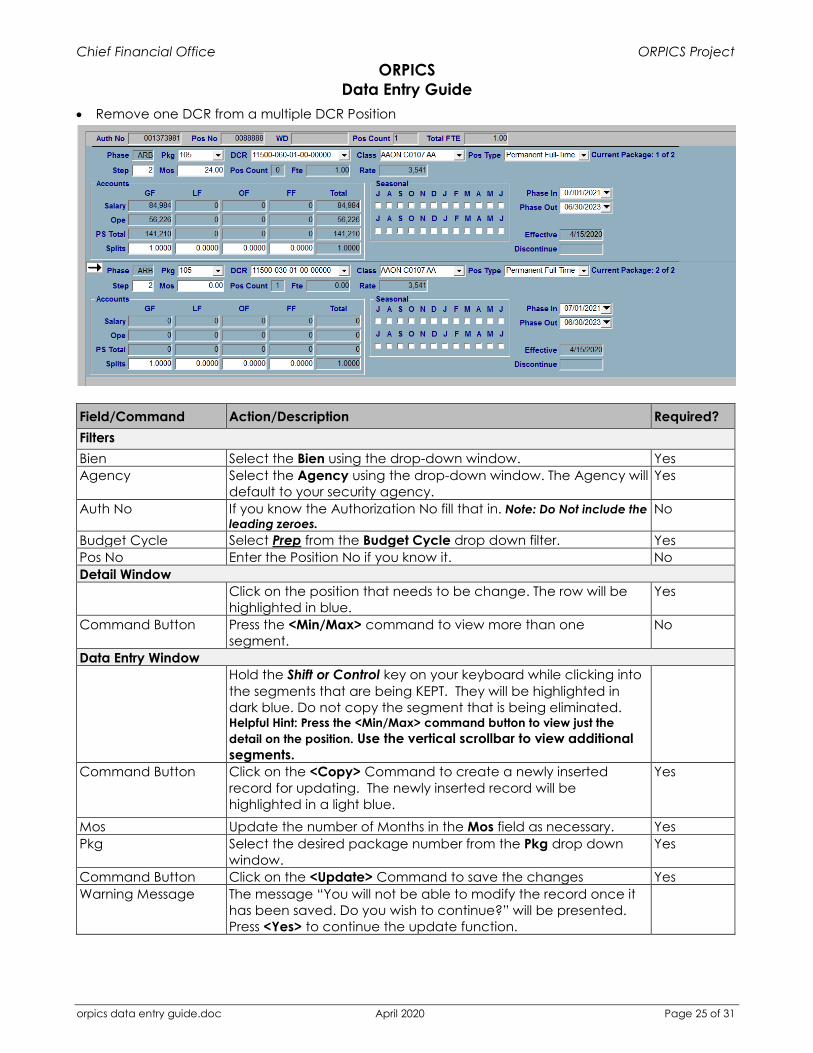
• Remove one DCR from a multiple DCR Position
Field/Command Action/Description Required? Filters Bien Select the Bien using the drop-down window. Yes Agency Select the Agency using the drop-down window. The Agency will
default to your security agency. Yes
Auth No If you know the Authorization No fill that in. Note: Do Not include the leading zeroes.
No
Budget Cycle Select Prep from the Budget Cycle drop down filter. Yes Pos No Enter the Position No if you know it. No Detail Window Click on the position that needs to be change. The row will be
highlighted in blue. Yes
Command Button Press the <Min/Max> command to view more than one segment.
No
Data Entry Window Hold the Shift or Control key on your keyboard while clicking into
the segments that are being KEPT. They will be highlighted in dark blue. Do not copy the segment that is being eliminated. Helpful Hint: Press the <Min/Max> command button to view just the detail on the position. Use the vertical scrollbar to view additional segments.
Command Button Click on the <Copy> Command to create a newly inserted record for updating. The newly inserted record will be highlighted in a light blue.
Yes
Mos Update the number of Months in the Mos field as necessary. Yes Pkg Select the desired package number from the Pkg drop down
window. Yes
Command Button Click on the <Update> Command to save the changes Yes Warning Message The message “You will not be able to modify the record once it
has been saved. Do you wish to continue?” will be presented. Press <Yes> to continue the update function.
Chief Financial Office ORPICS Project ORPICS
Data Entry Guide
orpics data entry guide.doc April 2020 Page 26 of 31
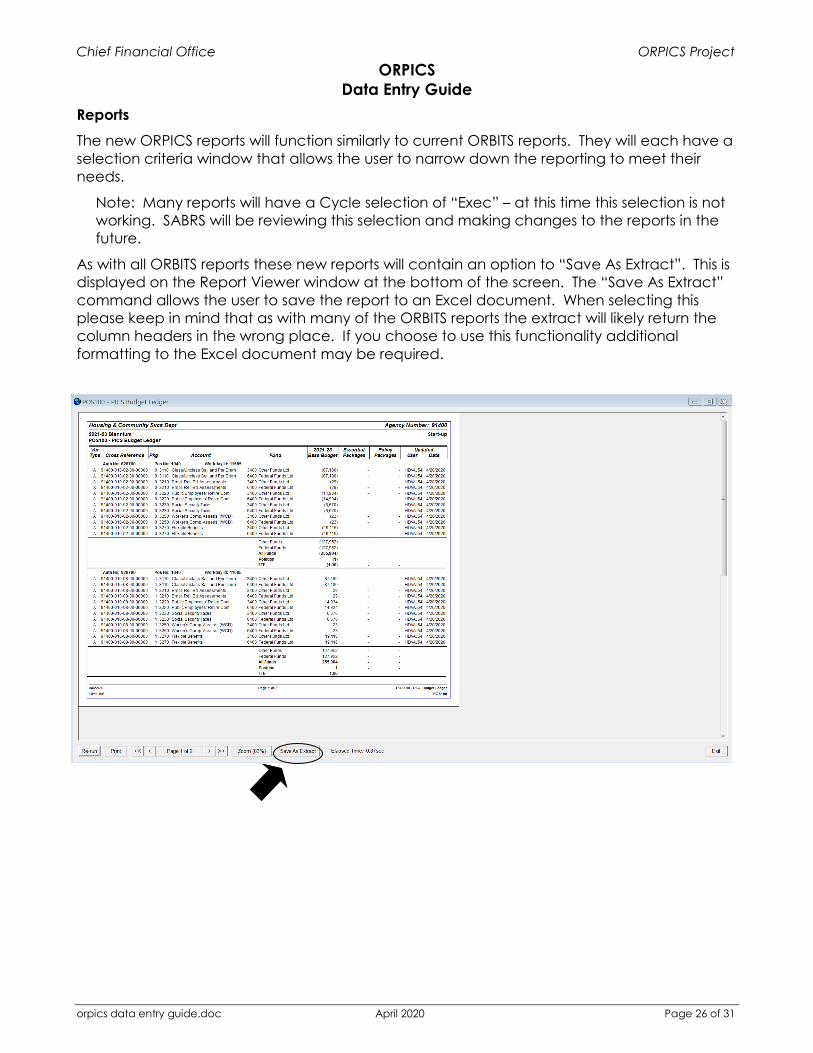
Reports The new ORPICS reports will function similarly to current ORBITS reports. They will each have a selection criteria window that allows the user to narrow down the reporting to meet their needs.
Note: Many reports will have a Cycle selection of “Exec” – at this time this selection is not working. SABRS will be reviewing this selection and making changes to the reports in the future.
As with all ORBITS reports these new reports will contain an option to “Save As Extract”. This is displayed on the Report Viewer window at the bottom of the screen. The “Save As Extract” command allows the user to save the report to an Excel document. When selecting this please keep in mind that as with many of the ORBITS reports the extract will likely return the column headers in the wrong place. If you choose to use this functionality additional formatting to the Excel document may be required.
Chief Financial Office ORPICS Project ORPICS
Data Entry Guide
orpics data entry guide.doc April 2020 Page 27 of 31
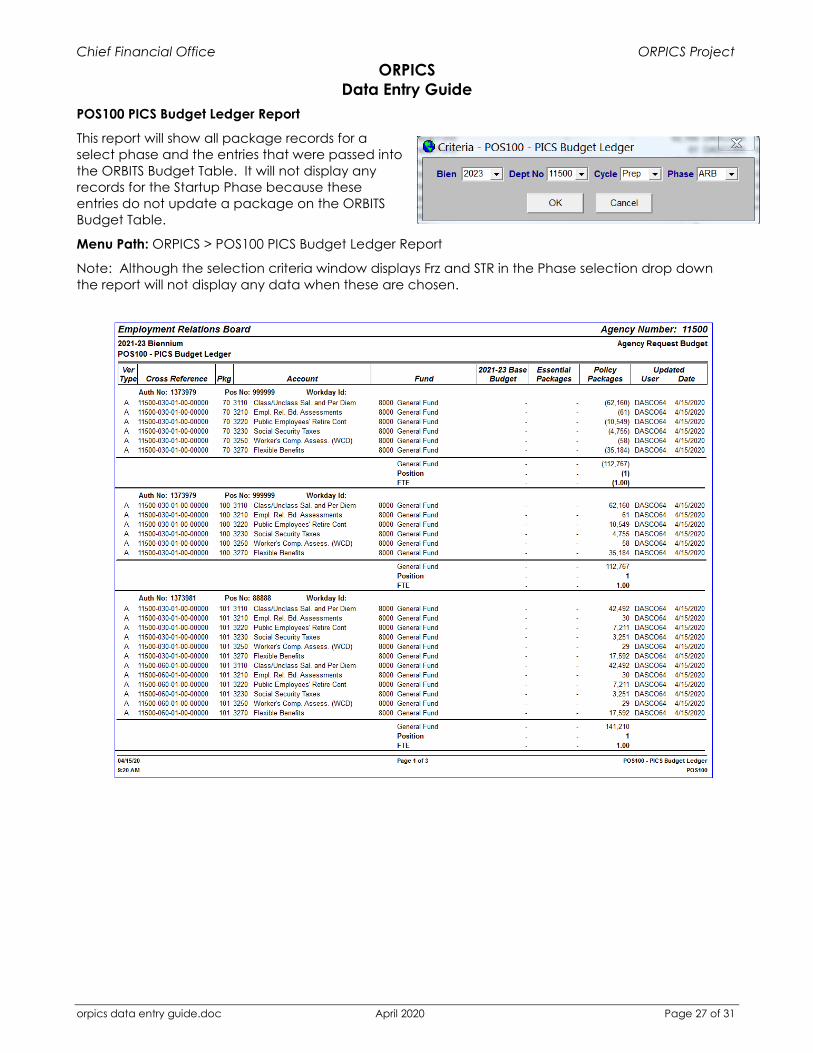
POS100 PICS Budget Ledger Report
This report will show all package records for a select phase and the entries that were passed into the ORBITS Budget Table. It will not display any records for the Startup Phase because these entries do not update a package on the ORBITS Budget Table.
Menu Path: ORPICS > POS100 PICS Budget Ledger Report
Note: Although the selection criteria window displays Frz and STR in the Phase selection drop down the report will not display any data when these are chosen.
Chief Financial Office ORPICS Project ORPICS
Data Entry Guide
orpics data entry guide.doc April 2020 Page 28 of 31
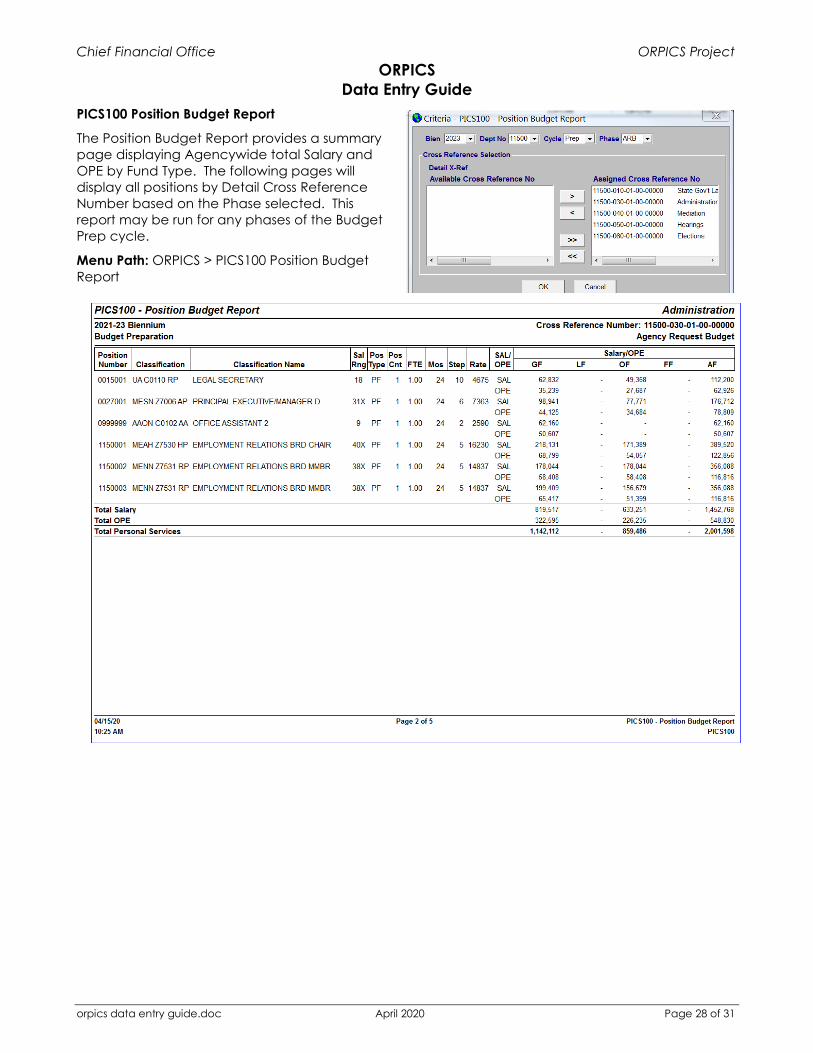
PICS100 Position Budget Report
The Position Budget Report provides a summary page displaying Agencywide total Salary and OPE by Fund Type. The following pages will display all positions by Detail Cross Reference Number based on the Phase selected. This report may be run for any phases of the Budget Prep cycle.
Menu Path: ORPICS > PICS100 Position Budget Report
Chief Financial Office ORPICS Project ORPICS
Data Entry Guide
orpics data entry guide.doc April 2020 Page 29 of 31
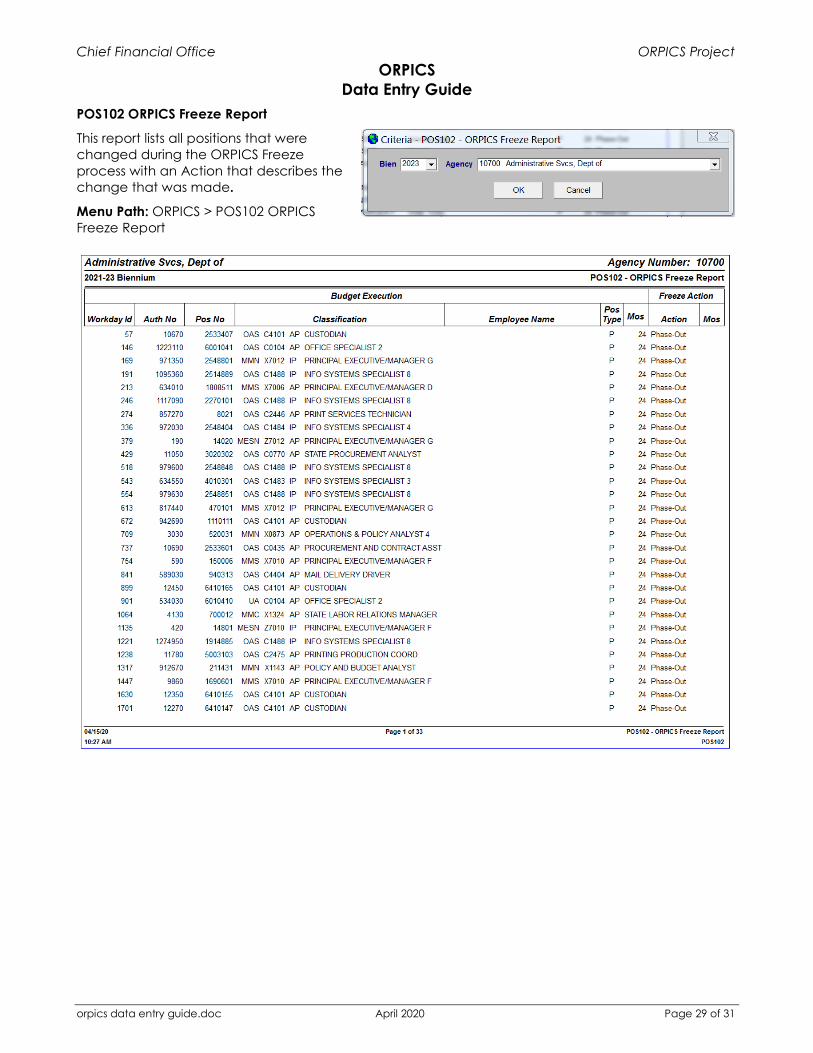
POS102 ORPICS Freeze Report
This report lists all positions that were changed during the ORPICS Freeze process with an Action that describes the change that was made.
Menu Path: ORPICS > POS102 ORPICS Freeze Report
Chief Financial Office ORPICS Project ORPICS
Data Entry Guide
orpics data entry guide.doc April 2020 Page 30 of 31
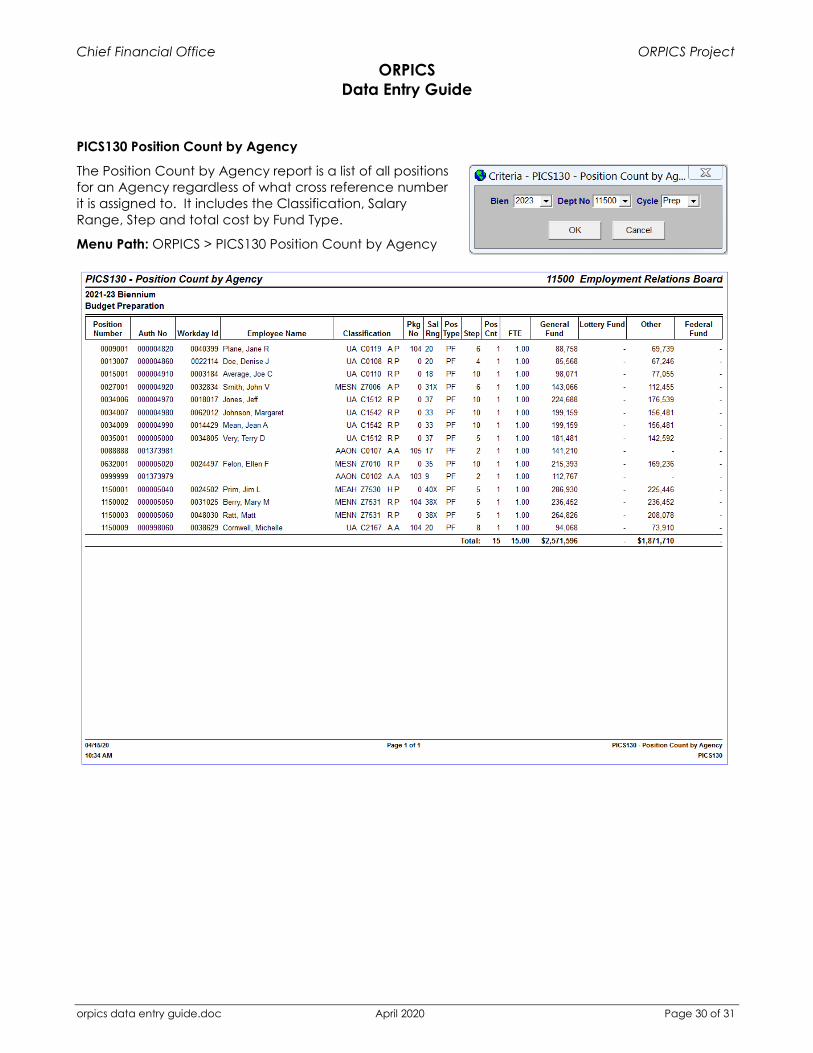
PICS130 Position Count by Agency
The Position Count by Agency report is a list of all positions for an Agency regardless of what cross reference number it is assigned to. It includes the Classification, Salary Range, Step and total cost by Fund Type.
Menu Path: ORPICS > PICS130 Position Count by Agency
Chief Financial Office ORPICS Project ORPICS
Data Entry Guide
orpics data entry guide.doc April 2020 Page 31 of 31
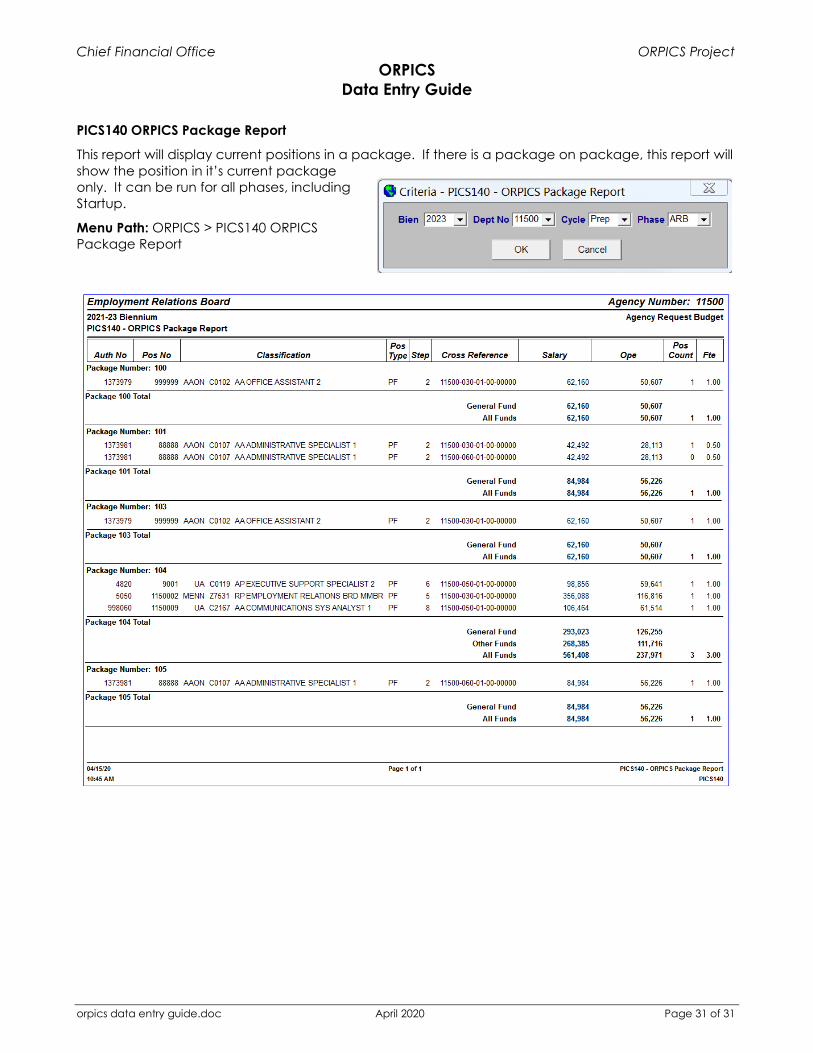
PICS140 ORPICS Package Report
This report will display current positions in a package. If there is a package on package, this report will show the position in it’s current package only. It can be run for all phases, including Startup.
Menu Path: ORPICS > PICS140 ORPICS Package Report