Embed Size (px)
Citation preview

OrderConnect
TraintheTrainerGuide‐Section1
OrderConnect User Guide
Page | 2
WelcometoOrderConnect!
We are very happy to have you as a customer. We would like to take a moment to orient you to the OrderConnect application. The OrderConnect application is designed to improve the overall medication management process, leading to improved pharmaceutical treatment and patient outcomes.
About the OrderConnect application
The OrderConnect application is a secure, confidential Web‐based application enabling clinicians to write and transmit electronic prescriptions, access clinical resources at the point of prescribing, and receive standard and custom reports to improve work flow efficiencies and clinical care. The Application interface is designed to be user‐friendly and can be utilized with an optional touch‐screen overlay.
We are sure you will find that the OrderConnect application will reduce the potential for medication errors and will enhance your care team communications. Of particular interest are the organization‐specific reports that the OrderConnect application can produce. These include workflow reports, prescribing patterns reports, medication schedules and medication usage.
OrderConnect Orientation
This training guide is arranged to familiarize you with the basic functions of the OrderConnect application.
If you have any questions or need assistance using the OrderConnect application, please call your OrderConnect Liaison within your facility. You may also contact our Member Support at (888) 227‐6130, or e‐mail us at [email protected].
Contact Member Support with any questions
or concerns at (888) 227‐6130. Monday‐Friday 8AM‐ 8:30 PM Eastern
Or you can e‐mail us at [email protected]
OrderConnect User Guide
Page | 3
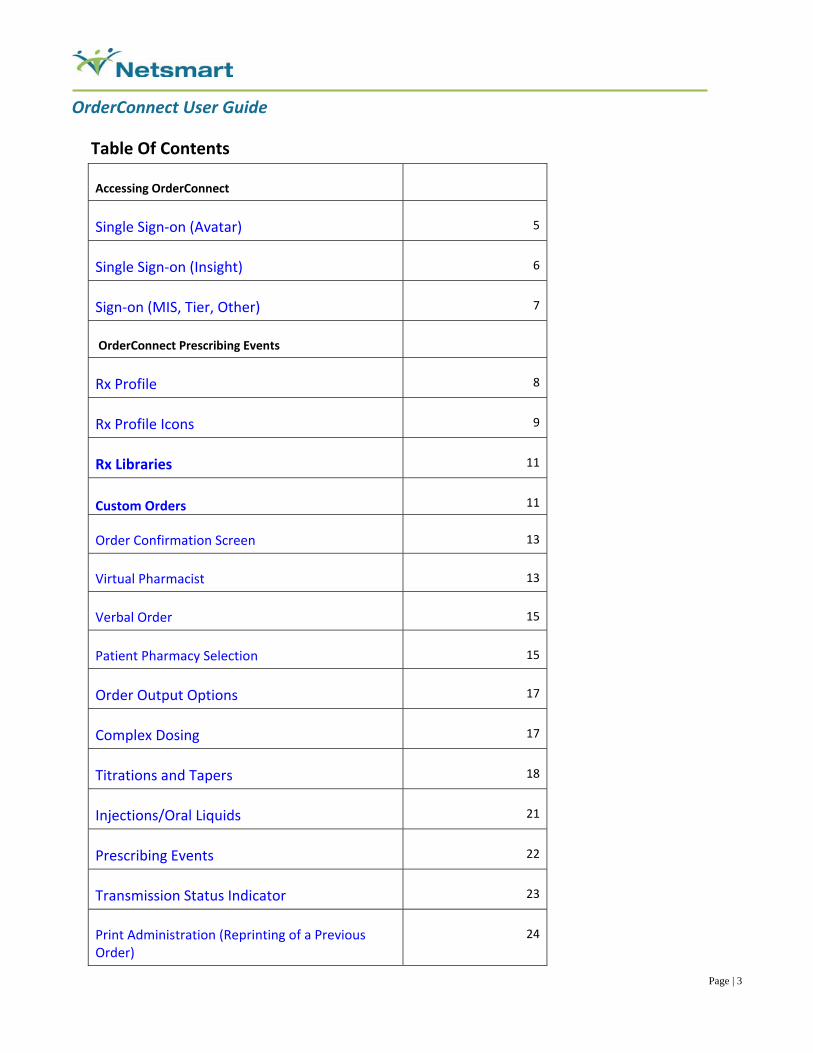
Table Of Contents
Accessing OrderConnect
Single Sign‐on (Avatar) 5
Single Sign‐on (Insight) 6
Sign‐on (MIS, Tier, Other) 7
OrderConnect Prescribing Events
Rx Profile 8
Rx Profile Icons 9
Rx Libraries 11
Custom Orders 11
Order Confirmation Screen 13
Virtual Pharmacist 13
Verbal Order 15
Patient Pharmacy Selection 15
Order Output Options 17
Complex Dosing 17
Titrations and Tapers 18
Injections/Oral Liquids 21
Prescribing Events 22
Transmission Status Indicator 23
Print Administration (Reprinting of a Previous Order)
24
OrderConnect User Guide
Page | 4
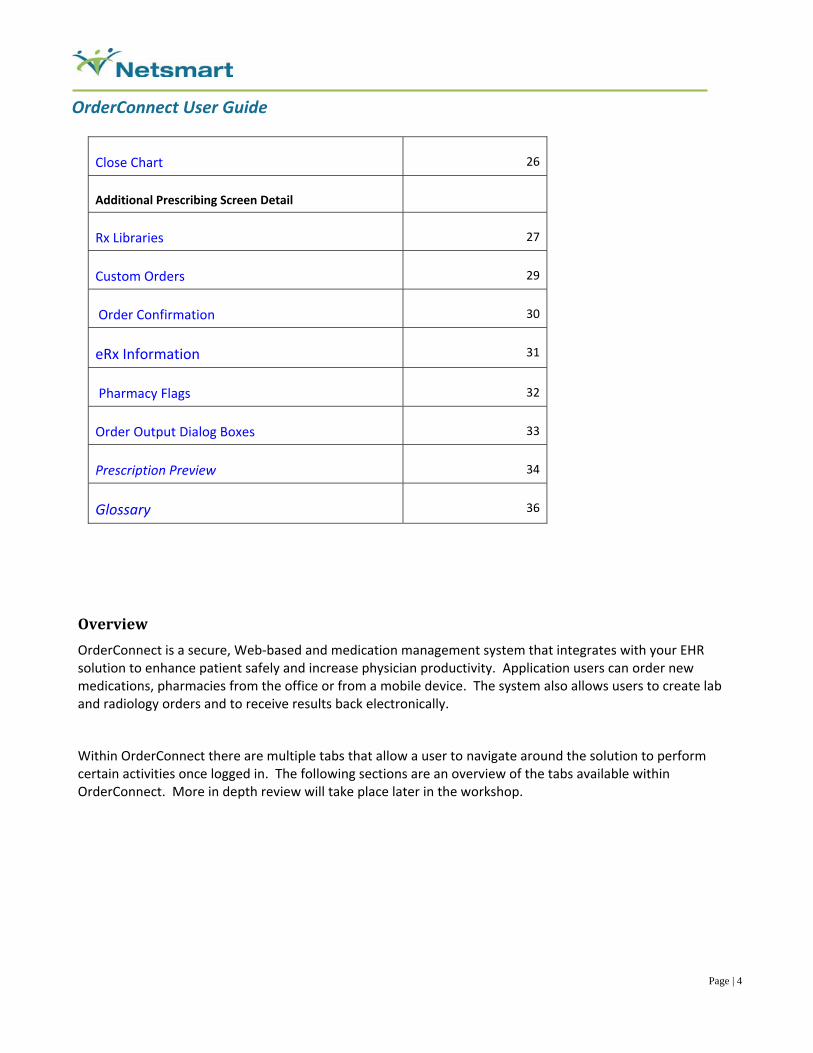
Close Chart 26
Additional Prescribing Screen Detail
Rx Libraries 27
Custom Orders 29
Order Confirmation 30
eRx Information 31
Pharmacy Flags 32
Order Output Dialog Boxes 33
Prescription Preview 34
Glossary 36
Overview
OrderConnect is a secure, Web‐based and medication management system that integrates with your EHR solution to enhance patient safely and increase physician productivity. Application users can order new medications, pharmacies from the office or from a mobile device. The system also allows users to create lab and radiology orders and to receive results back electronically.
Within OrderConnect there are multiple tabs that allow a user to navigate around the solution to perform certain activities once logged in. The following sections are an overview of the tabs available within OrderConnect. More in depth review will take place later in the workshop.

OrderConnect User Guide
Page | 5
Accessing OrderConnect
SingleSign‐on(Avatar)
Once logged into Avatar, users will perform the following steps to open OrderConnect/Infoscriber.
Steps Action
1) Click on Clinical Workstation (CWS)
2) Choose the “InfoScriber” option
3) Select “Launch InfoScriber”
4) In the Select Client window, enter the client number, then click on the “Select client Name/ID#Search button
Tip: You can also enter the client’s Last Name, First Name to search.
5) Select the client from the search results, then click “Select”
The Episode Selection Window will display
6) Select the client’s episode and click OK Launch InfoScriber options will display
7) Select “Launch InfoScriber Prescriptions” Launches OrderConnect and takes user to Rx Profile screen (option may say Launch OrderConnect Prescriptions)
Launch OrderConnect screen shot
(Return to table of contents)
OrderConnect User Guide
Page | 6
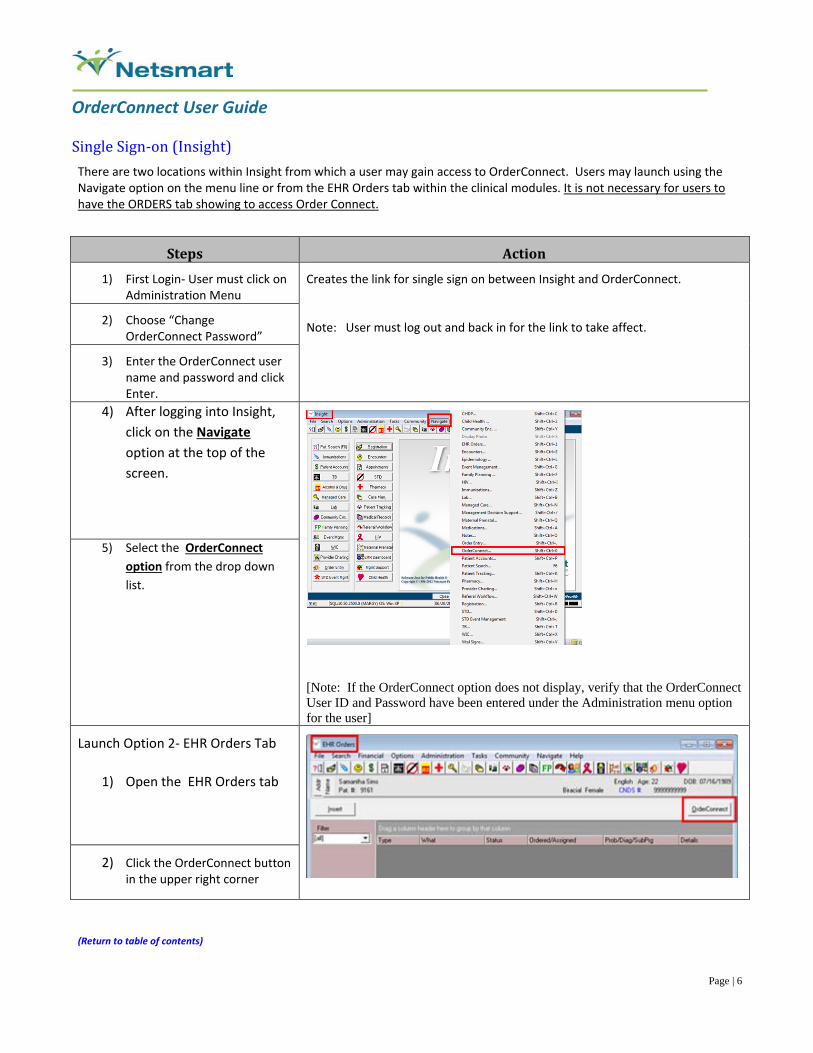
SingleSign‐on(Insight)
There are two locations within Insight from which a user may gain access to OrderConnect. Users may launch using the Navigate option on the menu line or from the EHR Orders tab within the clinical modules. It is not necessary for users to have the ORDERS tab showing to access Order Connect.
Steps Action
1) First Login‐ User must click on Administration Menu
Creates the link for single sign on between Insight and OrderConnect.
Note: User must log out and back in for the link to take affect. 2) Choose “Change
OrderConnect Password”
3) Enter the OrderConnect user name and password and click Enter.
4) After logging into Insight,
click on the Navigate
option at the top of the
screen.
[Note: If the OrderConnect option does not display, verify that the OrderConnect User ID and Password have been entered under the Administration menu option for the user]
5) Select the OrderConnect
option from the drop down
list.
Launch Option 2‐ EHR Orders Tab
1) Open the EHR Orders tab
2) Click the OrderConnect button
in the upper right corner
(Return to table of contents)
OrderConnect User Guide
Page | 7
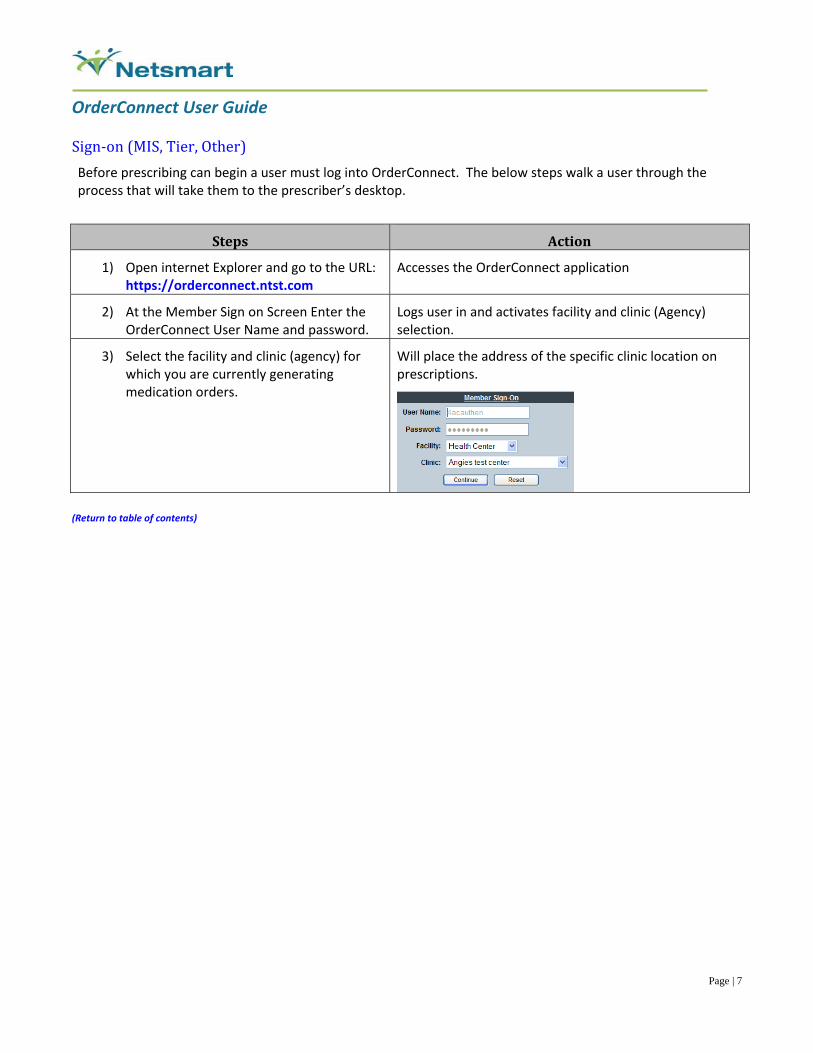
Sign‐on(MIS,Tier,Other)
Before prescribing can begin a user must log into OrderConnect. The below steps walk a user through the process that will take them to the prescriber’s desktop.
Steps Action
1) Open internet Explorer and go to the URL: https://orderconnect.ntst.com
Accesses the OrderConnect application
2) At the Member Sign on Screen Enter the OrderConnect User Name and password.
Logs user in and activates facility and clinic (Agency) selection.
3) Select the facility and clinic (agency) for which you are currently generating medication orders.
Will place the address of the specific clinic location on prescriptions.
(Return to table of contents)
OrderConnect User Guide
Page | 8
OrderConnect Prescribing Events
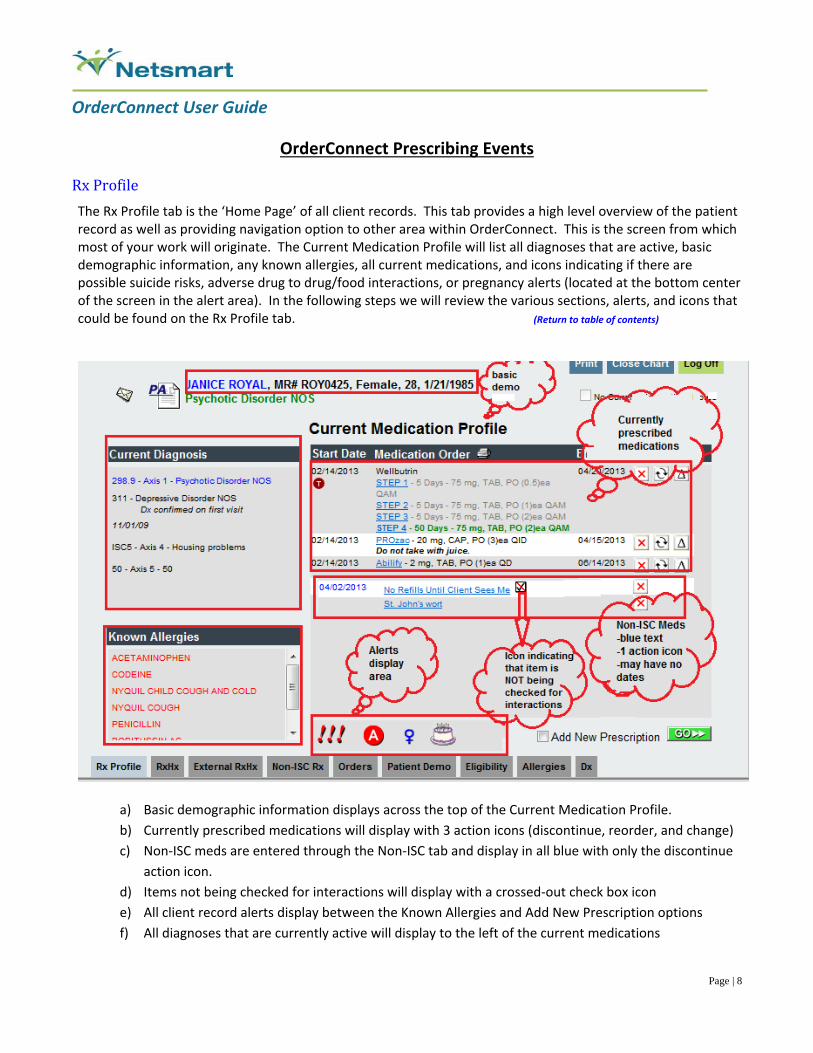
RxProfile
The Rx Profile tab is the ‘Home Page’ of all client records. This tab provides a high level overview of the patient record as well as providing navigation option to other area within OrderConnect. This is the screen from which most of your work will originate. The Current Medication Profile will list all diagnoses that are active, basic demographic information, any known allergies, all current medications, and icons indicating if there are possible suicide risks, adverse drug to drug/food interactions, or pregnancy alerts (located at the bottom center of the screen in the alert area). In the following steps we will review the various sections, alerts, and icons that could be found on the Rx Profile tab. (Return to table of contents)
a) Basic demographic information displays across the top of the Current Medication Profile.
b) Currently prescribed medications will display with 3 action icons (discontinue, reorder, and change)
c) Non‐ISC meds are entered through the Non‐ISC tab and display in all blue with only the discontinue
action icon.
d) Items not being checked for interactions will display with a crossed‐out check box icon
e) All client record alerts display between the Known Allergies and Add New Prescription options
f) All diagnoses that are currently active will display to the left of the current medications

OrderConnect User Guide
Page | 9
g) All Allergies that have been entered into OrderConnect will display on the lower left of the Current
Medication Profile screen.
RxProfileIcons(Return to table of contents)
Icons Description
1) Potential drug to drug/food interactions with the prescribed medication are represented by exclamation point(s)
The severity of the interaction will change the number of exclamation points (1=mild, 2=moderate, 3=major. Clicking on the icon will allow a user to review the interactions.
2) Unchecked items are indicated with a check mark crossed out in a white box.
Icon indicating that drug to drug/food, allergy, and pregnancy and lactation alerts are NOT being checked for this item.
3) Mini Rx Profile is represented by the double head icon located in the top left of the screen.
Pop up of the Rx Profile screen that is available on any tab for review.
4) Overdose Risk/Suicide is represented by a skull and cross bones icon.
This option is a manual setting selected on the patient demographics to alert any prescribers of a patient overdose potential. It will be in the alert area or replace the Mini Rx Profile icon when activated.
5) Medication Allergies are represented by an
“A” Icon.
This icon represents a medication prescribed to a patient that they may be allergic to.
6) Pregnancy or Lactation alerts are represented by the femail sign icon.
If the patient is female the pregnancy/lactation alert will appear when medication is prescribed.
7) Age‐Based Prescribing Guideline alerts are represented by a birthday cake icon.
If enabled, these guidelines will provide information for medications that have age based suggestions.
8) Lab Results are represented by a beaker icon.
If labs have been returned and are waiting in the queue to be reviewed this icon will.
OrderConnect User Guide
Page | 10
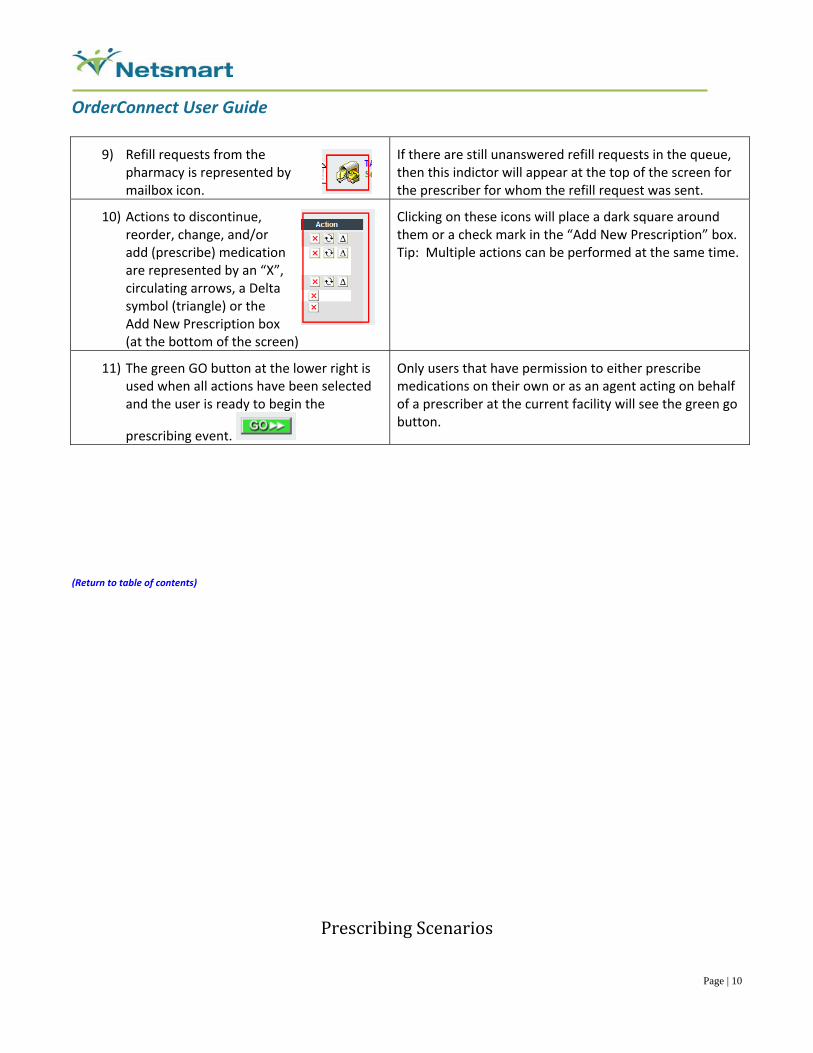
9) Refill requests from the pharmacy is represented by mailbox icon.
If there are still unanswered refill requests in the queue, then this indictor will appear at the top of the screen for the prescriber for whom the refill request was sent.
10) Actions to discontinue, reorder, change, and/or add (prescribe) medication are represented by an “X”, circulating arrows, a Delta symbol (triangle) or the Add New Prescription box (at the bottom of the screen)
Clicking on these icons will place a dark square around them or a check mark in the “Add New Prescription” box. Tip: Multiple actions can be performed at the same time.
11) The green GO button at the lower right is used when all actions have been selected and the user is ready to begin the
prescribing event.
Only users that have permission to either prescribe medications on their own or as an agent acting on behalf of a prescriber at the current facility will see the green go button.
(Return to table of contents)
PrescribingScenarios
OrderConnect User Guide
Page | 11
EnteringaNEWMedicationOrder(Return to table of contents)
Steps Actions
1) From the Rx Profile screen click the green “Go” button.
Opens the RXLibrariesscreen to add new medications to the record.
2) Select the appropriate ‘Library’ on the left (My Practice, My Group, InfoScriber Practice, All Drugs)
The default library selected will be the My Practice library. The All Drugs library results will display at the end of the My Practice results.
My Practice‐ Ways in which medications have previously been written by the current prescribing user logged into OrderConnect.
My Group‐ Ways in which medications have previously been written by all prescribing users at the facility (excludes currently logged‐in prescriber).
InfoScriber Practice‐ Ways in which medication orders have previously been written by all prescribing OrderConnect users across the US.
All Drugs‐ The names of all medications that are currently available within the OrderConnect medication listing.
3) In the drug name field on the left type in the first medication to be prescribed, then click “Search”
Returns the results of your search at the bottom of the page. Tip: It’s not necessary to type the whole medication name in order to return results.
4) From the results library returned at the bottom of the screen click on the desired medication name
Adds selected medication to the prescribing event
Tip: Repeat steps 2 and 3 to add multiple medications. There is no limit to the number of medications that can be ordered with a single pass through the application.
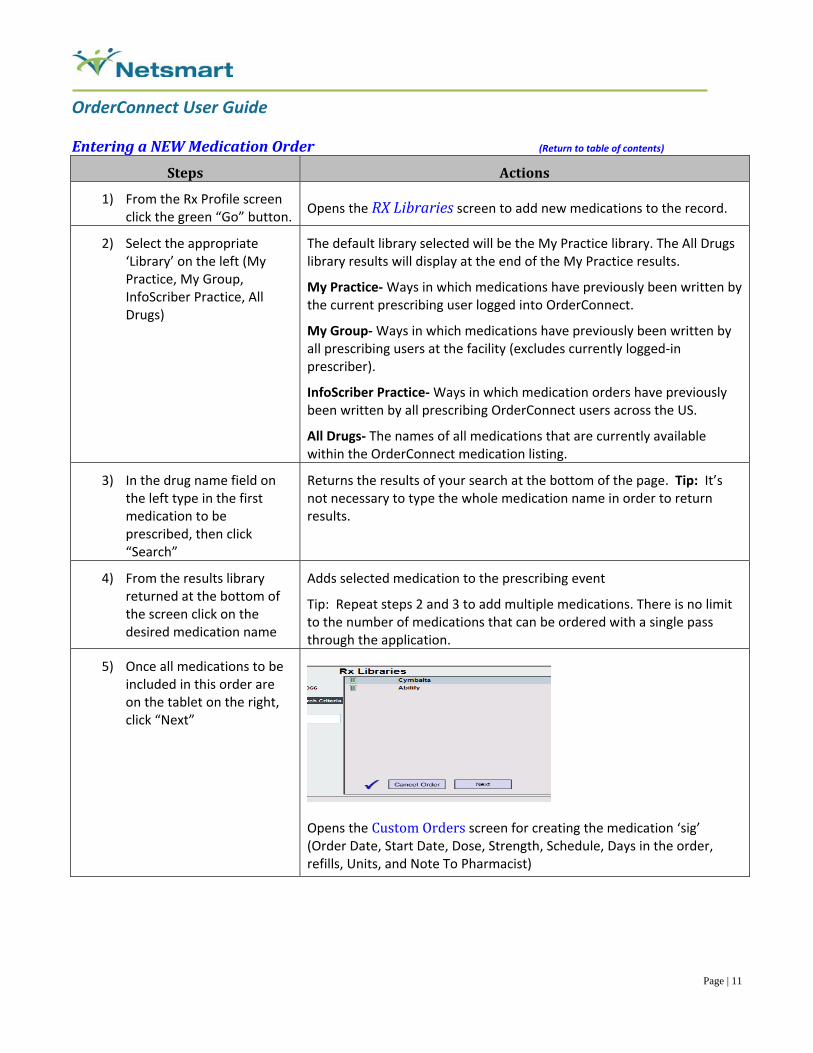
5) Once all medications to be included in this order are on the tablet on the right, click “Next”
Opens the CustomOrdersscreen for creating the medication ‘sig’ (Order Date, Start Date, Dose, Strength, Schedule, Days in the order, refills, Units, and Note To Pharmacist)
OrderConnect User Guide
Page | 12
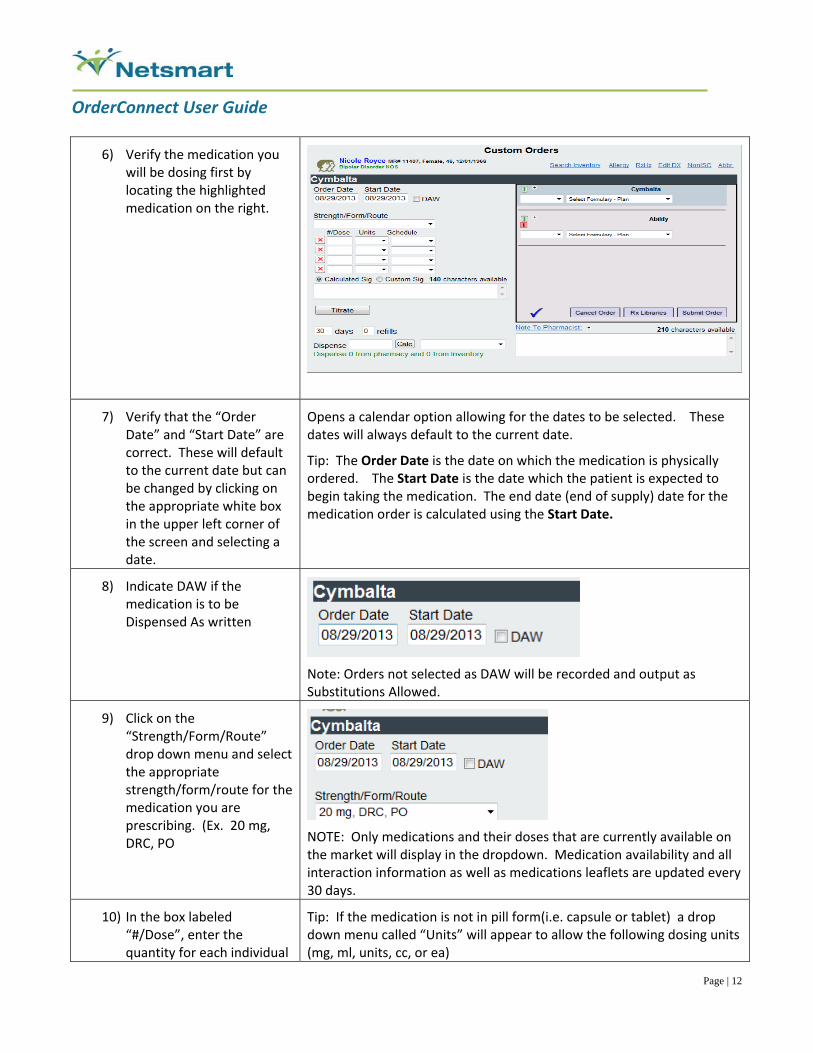
6) Verify the medication you will be dosing first by locating the highlighted medication on the right.
7) Verify that the “Order Date” and “Start Date” are correct. These will default to the current date but can be changed by clicking on the appropriate white box in the upper left corner of the screen and selecting a date.
Opens a calendar option allowing for the dates to be selected. These dates will always default to the current date.
Tip: The Order Date is the date on which the medication is physically ordered. The Start Date is the date which the patient is expected to begin taking the medication. The end date (end of supply) date for the medication order is calculated using the Start Date.
8) Indicate DAW if the medication is to be Dispensed As written
Note: Orders not selected as DAW will be recorded and output as Substitutions Allowed.
9) Click on the “Strength/Form/Route” drop down menu and select the appropriate strength/form/route for the medication you are prescribing. (Ex. 20 mg, DRC, PO
NOTE: Only medications and their doses that are currently available on the market will display in the dropdown. Medication availability and all interaction information as well as medications leaflets are updated every 30 days.
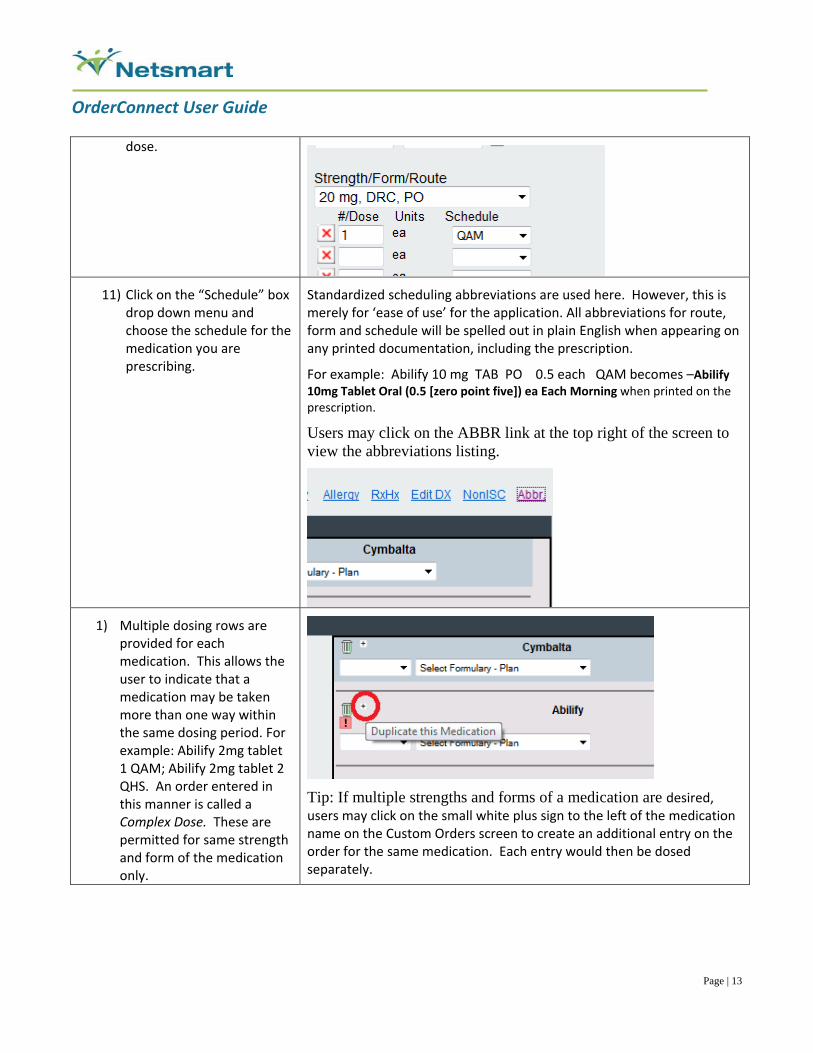
10) In the box labeled “#/Dose”, enter the quantity for each individual
Tip: If the medication is not in pill form(i.e. capsule or tablet) a drop down menu called “Units” will appear to allow the following dosing units (mg, ml, units, cc, or ea)
OrderConnect User Guide
Page | 13
dose.
11) Click on the “Schedule” box drop down menu and choose the schedule for the medication you are prescribing.
Standardized scheduling abbreviations are used here. However, this is merely for ‘ease of use’ for the application. All abbreviations for route, form and schedule will be spelled out in plain English when appearing on any printed documentation, including the prescription.
For example: Abilify 10 mg TAB PO 0.5 each QAM becomes –Abilify 10mg Tablet Oral (0.5 [zero point five]) ea Each Morning when printed on the prescription.
Users may click on the ABBR link at the top right of the screen to view the abbreviations listing.
1) Multiple dosing rows are provided for each medication. This allows the user to indicate that a medication may be taken more than one way within the same dosing period. For example: Abilify 2mg tablet 1 QAM; Abilify 2mg tablet 2 QHS. An order entered in this manner is called a Complex Dose. These are permitted for same strength and form of the medication only.
Tip: If multiple strengths and forms of a medication are desired, users may click on the small white plus sign to the left of the medication name on the Custom Orders screen to create an additional entry on the order for the same medication. Each entry would then be dosed separately.
OrderConnect User Guide
Page | 14
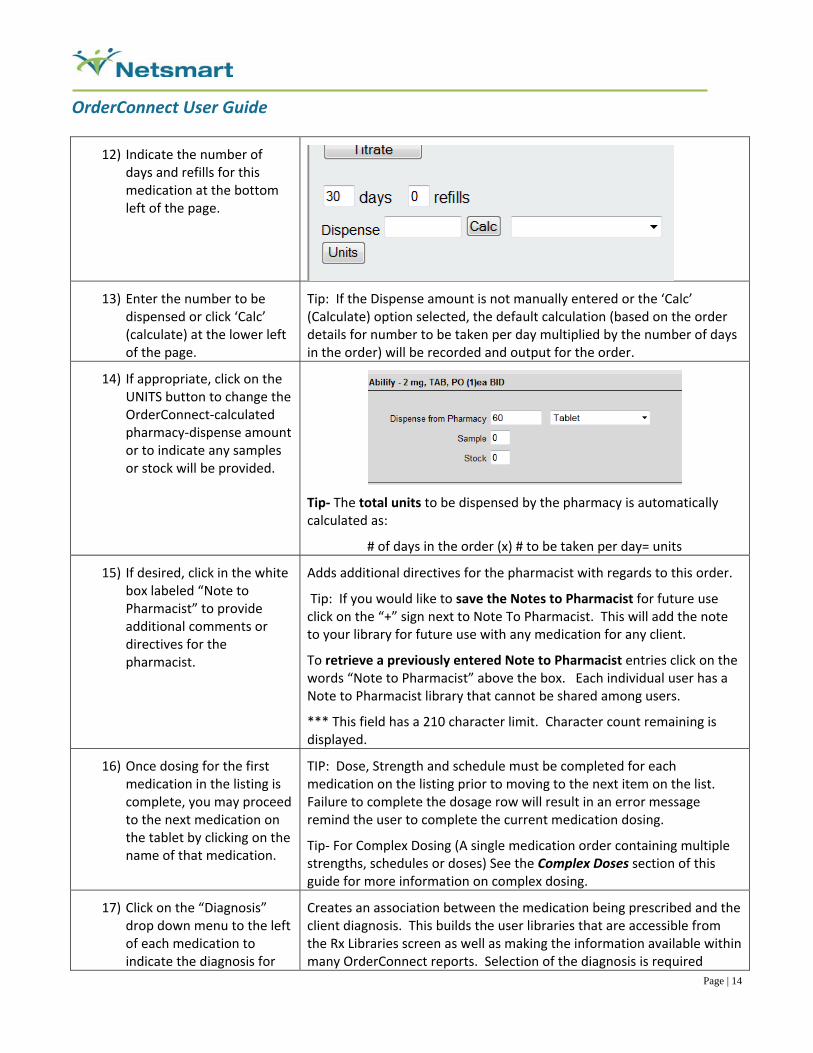
12) Indicate the number of days and refills for this medication at the bottom left of the page.
13) Enter the number to be dispensed or click ‘Calc’ (calculate) at the lower left of the page.
Tip: If the Dispense amount is not manually entered or the ‘Calc’ (Calculate) option selected, the default calculation (based on the order details for number to be taken per day multiplied by the number of days in the order) will be recorded and output for the order.
14) If appropriate, click on the UNITS button to change the OrderConnect‐calculated pharmacy‐dispense amount or to indicate any samples or stock will be provided.
Tip‐ The total units to be dispensed by the pharmacy is automatically calculated as:
# of days in the order (x) # to be taken per day= units
15) If desired, click in the white box labeled “Note to Pharmacist” to provide additional comments or directives for the pharmacist.
Adds additional directives for the pharmacist with regards to this order.
Tip: If you would like to save the Notes to Pharmacist for future use click on the “+” sign next to Note To Pharmacist. This will add the note to your library for future use with any medication for any client.
To retrieve a previously entered Note to Pharmacist entries click on the words “Note to Pharmacist” above the box. Each individual user has a Note to Pharmacist library that cannot be shared among users.
*** This field has a 210 character limit. Character count remaining is displayed.
16) Once dosing for the first medication in the listing is complete, you may proceed to the next medication on the tablet by clicking on the name of that medication.
TIP: Dose, Strength and schedule must be completed for each medication on the listing prior to moving to the next item on the list. Failure to complete the dosage row will result in an error message remind the user to complete the current medication dosing.
Tip‐ For Complex Dosing (A single medication order containing multiple strengths, schedules or doses) See the Complex Doses section of this guide for more information on complex dosing.
17) Click on the “Diagnosis” drop down menu to the left of each medication to indicate the diagnosis for
Creates an association between the medication being prescribed and the client diagnosis. This builds the user libraries that are accessible from the Rx Libraries screen as well as making the information available within many OrderConnect reports. Selection of the diagnosis is required

OrderConnect User Guide
Page | 15
which the medication is being prescribed. (Ex. Major Depressive)
before submitting order. Failure to select a diagnosis will result in an error message prompting the user to associate a diagnosis before proceeding. OrderConnect does not check for off‐label prescribing.
Tip: If the medication being ordered is not related to a listed diagnosis, the user may select “No Entry” to proceed with the order.
18) Once all medications have been dosed, verify everything looks correct within the order, then click on “Submit Order”.
Submits the order and takes the user to the OrderConfirmationScreen for final review of the order before submission.
On the OrderConfirmationScreen, review theVirtualPharmacist located on the right side of the screen
Utilizes any allergies, non‐isc medications and currently prescribed medication as well as the order currently being written to provide a preview of drug interactions, allergy alerts, or other alerts that will be present in the record if the current order is accepted.
NOTE: If your facility is utilizing the Triggers (Patient Care Suggestions) please look for these within the Virtual Pharmacist. These can be created based up on the type of prescribing event (New, Re‐Order) and may not be present after the current order is accepted.
19) Verify that the prescriber listed on the left side of the screen is selected.
Tip: If the user logged in is a prescriber, their name will automatically appear in the prescriber box. If the user logged in is entering an order on behalf of a prescriber, the dropdown box must be used to select the prescriber on whose behalf the VerbalOrder is being written. The order cannot be submitted without a valid prescriber name in the ‘prescriber’ box.
20) If this order will be transmitted to a pharmacy, verify the correct pharmacy is selected on the left. If not, select the pharmacy using the search function.
TIP: After pharmacy is selected, you may associate is as the patient’s PreferredPharmacybyclicking on the Preferred Pharmacy check box to the right of the pharmacy option. The word saved will appear in red when a new pharmacy is saved as the patient’s default.
Note: If the patient’s preferred pharmacy cannot be located in the pharmacy search, please contact your system administrator for assistance. OrderConnect support does not have access to add a pharmacy for a facility.
*NoteforinformationonthePharmacyFlags,refertothatsectionofthisguide.
OrderConnect User Guide
Page | 16
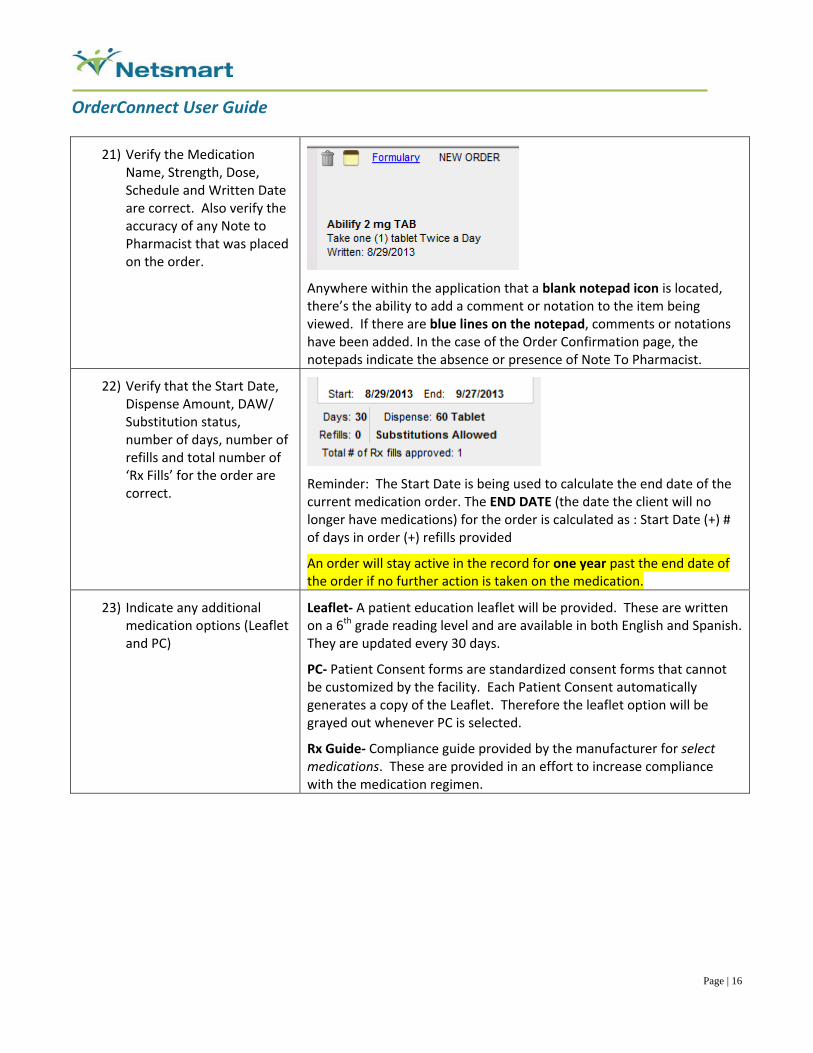
21) Verify the Medication Name, Strength, Dose, Schedule and Written Date are correct. Also verify the accuracy of any Note to Pharmacist that was placed on the order.
Anywhere within the application that a blank notepad icon is located, there’s the ability to add a comment or notation to the item being viewed. If there are blue lines on the notepad, comments or notations have been added. In the case of the Order Confirmation page, the notepads indicate the absence or presence of Note To Pharmacist.
22) Verify that the Start Date, Dispense Amount, DAW/ Substitution status, number of days, number of refills and total number of ‘Rx Fills’ for the order are correct.
Reminder: The Start Date is being used to calculate the end date of the current medication order. The END DATE (the date the client will no longer have medications) for the order is calculated as : Start Date (+) # of days in order (+) refills provided
An order will stay active in the record for one year past the end date of the order if no further action is taken on the medication.
23) Indicate any additional medication options (Leaflet and PC)
Leaflet‐ A patient education leaflet will be provided. These are written on a 6th grade reading level and are available in both English and Spanish. They are updated every 30 days.
PC‐ Patient Consent forms are standardized consent forms that cannot be customized by the facility. Each Patient Consent automatically generates a copy of the Leaflet. Therefore the leaflet option will be grayed out whenever PC is selected.
Rx Guide‐ Compliance guide provided by the manufacturer for select medications. These are provided in an effort to increase compliance with the medication regimen.
OrderConnect User Guide
Page | 17
Once all options or changes have been made, select the desired
OrderOutputOptions
1) (Print, Fax, eRx, None) for the order.
Print‐ Sends the order to a local printer using the computer’s Windows print manger.
Fax‐ Sends the order directly from the application to the fax number associate with the pharmacy selected at the top of the Order confirmation page. The fax option will be available as long as the selected pharmacy has a valid fax number within their listing in OrderConnect.
eRx‐ Sends the order via electronic means to the pharmacy selected at the top of the Order Confirmation page. eRx will be available for an order under the following circumstances.
‐ The client records contains a valid date of birth
‐ The Prescriber and Pharmacy are both Surescripts‐certified.
‐ The order does not contain a controlled substance or complex dose that is prohibited by Surescripts.
2) Select any additional items which you would like to output with the order (Chart Copy, Active Orders, History, Med Note)
Chart Copy‐ Duplicate prescription labeled as “Not a valid prescription”. Sometimes used as a patient ‘receipt’.
Active Orders‐ List of all medication that are now active in the record.
History‐ Running history of current orders.
Med Note‐ Facility defined note. This isn’t used by most facilities since it’s a non‐billable item.
(Return to table of contents)
ComplexDosingA complex order is defined as a single medication order containing more than one dosing instruction. Within OrderConnect, a complex order may only be written when the strength, form and route are the same. For example, a single order could be written for: Cymbalta 20mg tablet‐ 1 Each Morning; Cymbalta 20mg Tablet‐ 2 Each Evening However, a single order could not be written for: Cymbalta 20mg Tablet 1 Each Morning; Cymbalta 40mg tablet ‐1 Each Evening Whenever a mixed strength/form/route order is needed, this must be written as two separate orders. For Example:
Cymbalta 20mg Tablet ‐1 Each Morning
AND a separate order for
Cymbalta 40mg tablet ‐1 Each Evening
OrderConnect User Guide
Page | 18
TitrationsandTapers (Return to table of contents)
Steps Actions
1) After selecting the medication(s) from the Rx Libraries screen, proceed to the Custom Orders Screen to dose the medication(s).
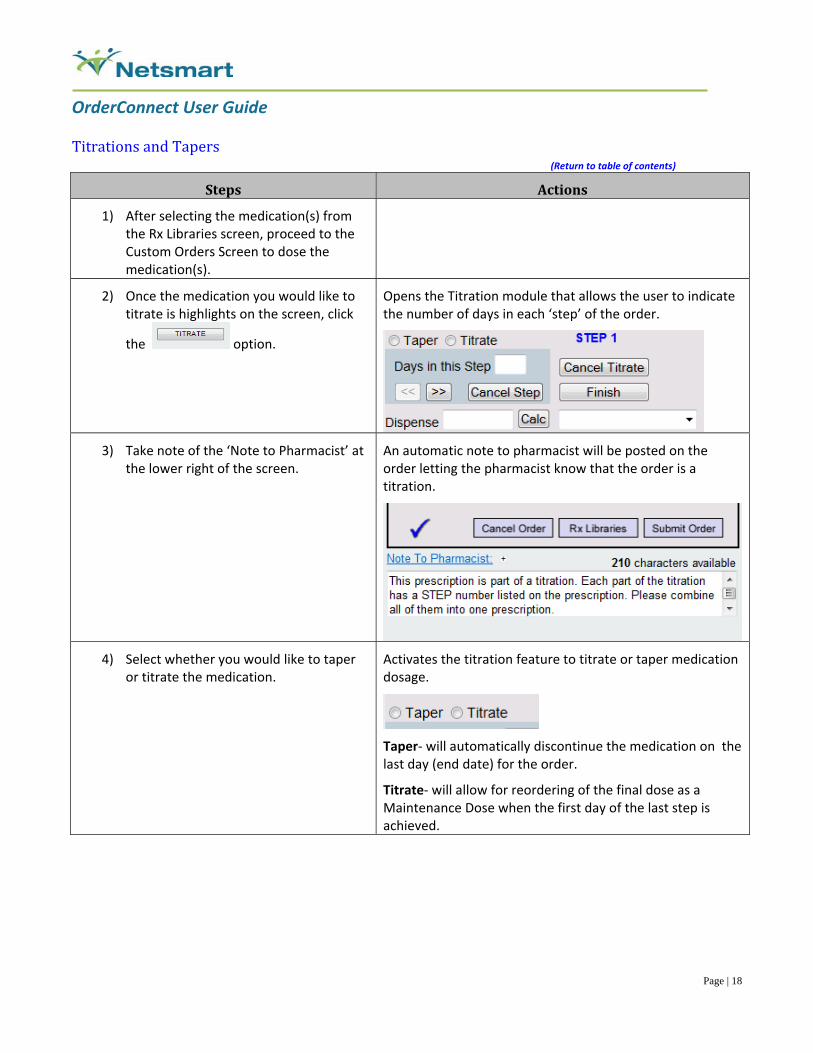
2) Once the medication you would like to titrate is highlights on the screen, click
the option.
Opens the Titration module that allows the user to indicate the number of days in each ‘step’ of the order.
3) Take note of the ‘Note to Pharmacist’ at the lower right of the screen.
An automatic note to pharmacist will be posted on the order letting the pharmacist know that the order is a titration.
4) Select whether you would like to taper or titrate the medication.
Activates the titration feature to titrate or taper medication dosage.
Taper‐ will automatically discontinue the medication on the last day (end date) for the order.
Titrate‐ will allow for reordering of the final dose as a Maintenance Dose when the first day of the last step is achieved.
OrderConnect User Guide
Page | 19
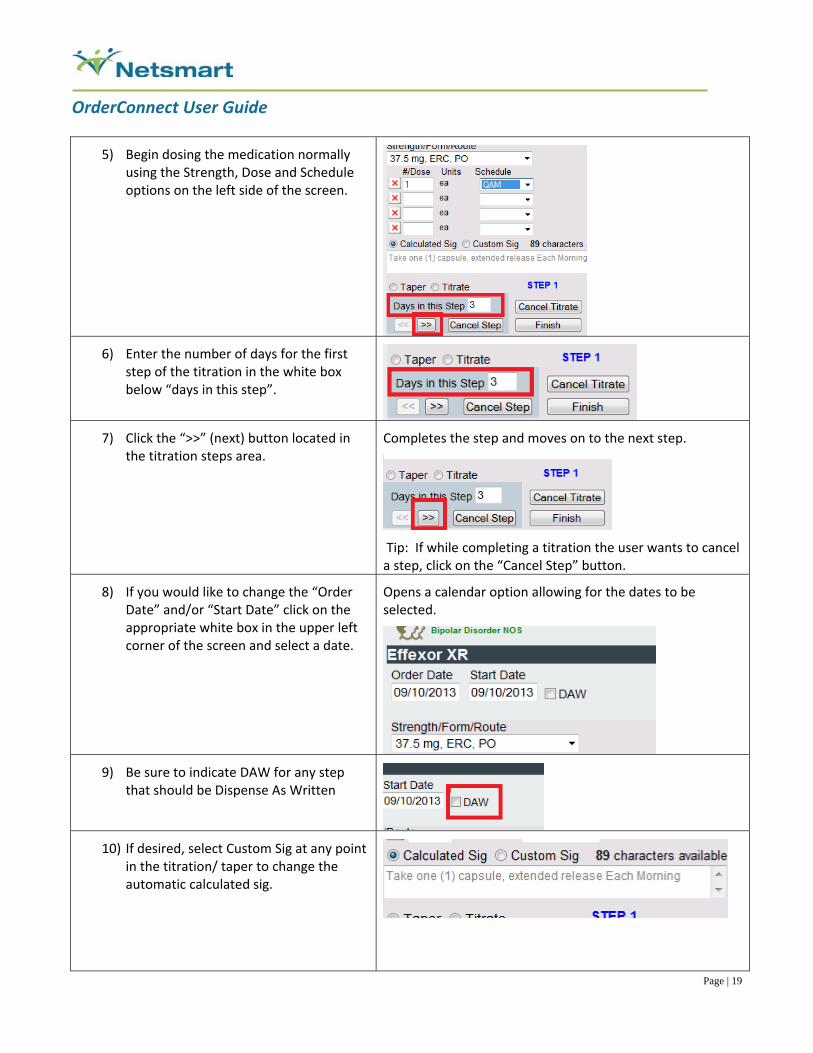
5) Begin dosing the medication normally using the Strength, Dose and Schedule options on the left side of the screen.
6) Enter the number of days for the first step of the titration in the white box below “days in this step”.
7) Click the “>>” (next) button located in the titration steps area.
Completes the step and moves on to the next step.
Tip: If while completing a titration the user wants to cancel a step, click on the “Cancel Step” button.
8) If you would like to change the “Order Date” and/or “Start Date” click on the appropriate white box in the upper left corner of the screen and select a date.
Opens a calendar option allowing for the dates to be selected.
9) Be sure to indicate DAW for any step that should be Dispense As Written
10) If desired, select Custom Sig at any point in the titration/ taper to change the automatic calculated sig.
OrderConnect User Guide
Page | 20
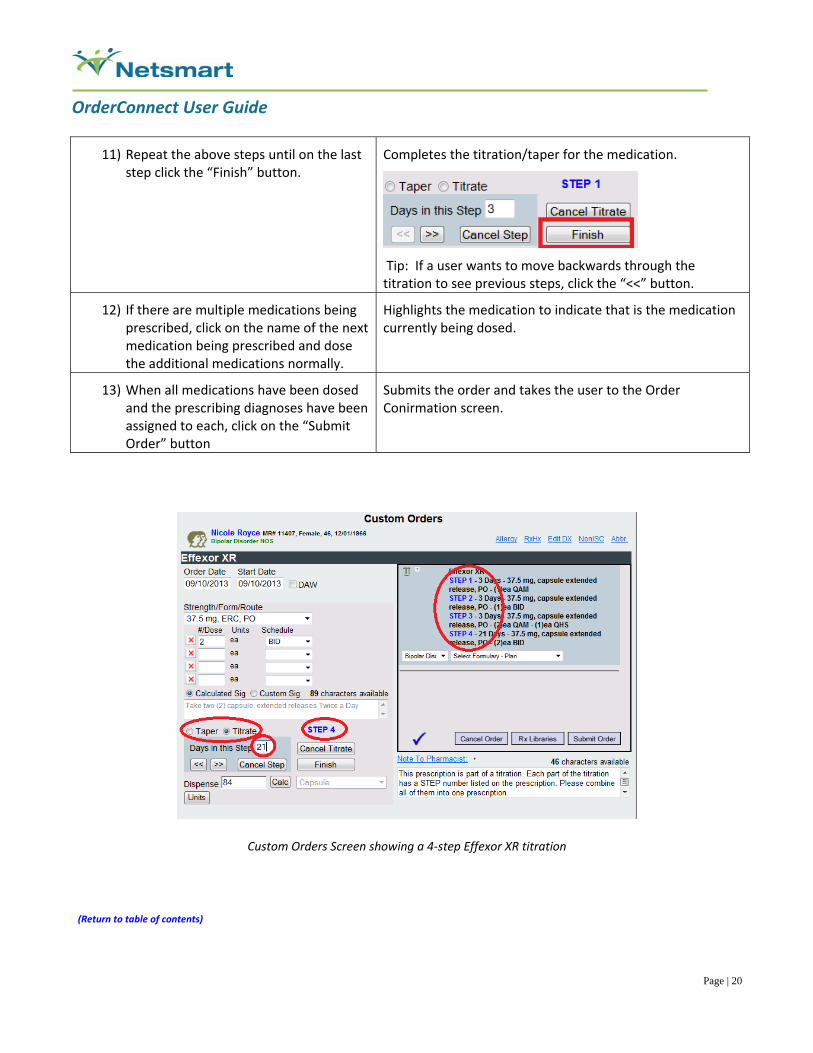
11) Repeat the above steps until on the last step click the “Finish” button.
Completes the titration/taper for the medication.
Tip: If a user wants to move backwards through the titration to see previous steps, click the “<<” button.
12) If there are multiple medications being prescribed, click on the name of the next medication being prescribed and dose the additional medications normally.
Highlights the medication to indicate that is the medication currently being dosed.
13) When all medications have been dosed and the prescribing diagnoses have been assigned to each, click on the “Submit Order” button
Submits the order and takes the user to the Order Conirmation screen.
Custom Orders Screen showing a 4‐step Effexor XR titration
(Return to table of contents)
OrderConnect User Guide
Page | 21
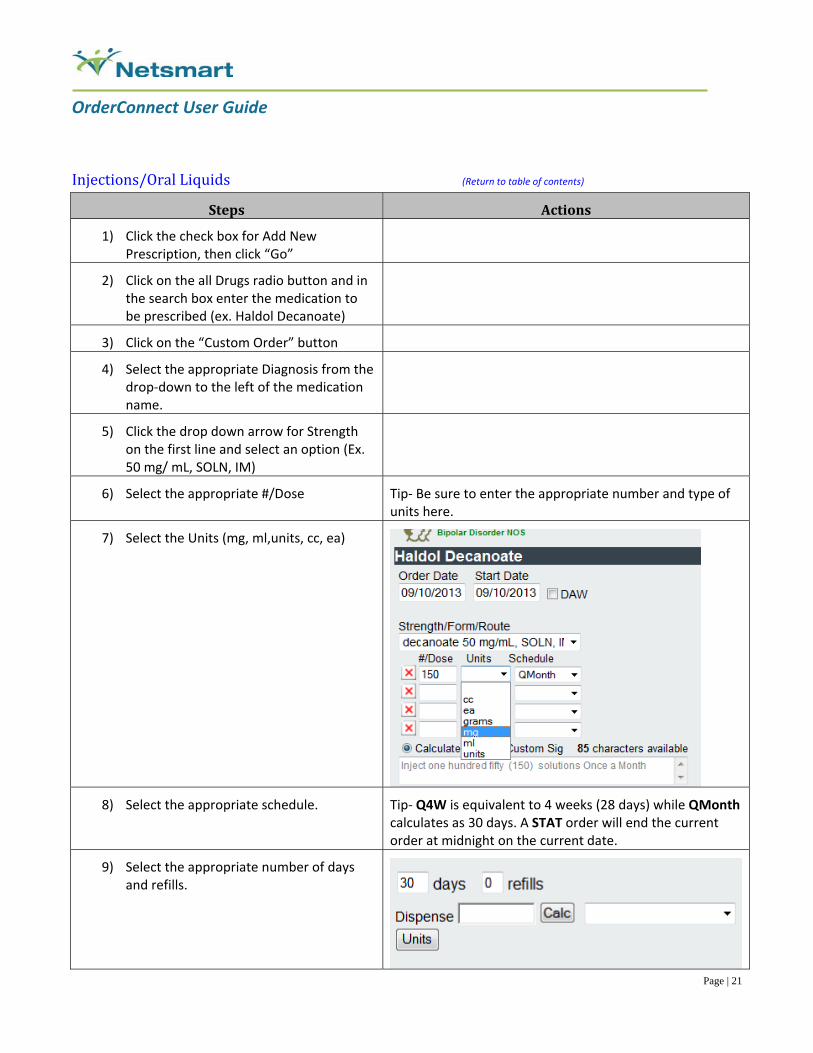
Injections/OralLiquids(Return to table of contents)
Steps Actions
1) Click the check box for Add New Prescription, then click “Go”
2) Click on the all Drugs radio button and in the search box enter the medication to be prescribed (ex. Haldol Decanoate)
3) Click on the “Custom Order” button
4) Select the appropriate Diagnosis from the drop‐down to the left of the medication name.
5) Click the drop down arrow for Strength on the first line and select an option (Ex. 50 mg/ mL, SOLN, IM)
6) Select the appropriate #/Dose Tip‐ Be sure to enter the appropriate number and type of units here.
7) Select the Units (mg, ml,units, cc, ea)
8) Select the appropriate schedule. Tip‐ Q4W is equivalent to 4 weeks (28 days) while QMonth calculates as 30 days. A STAT order will end the current order at midnight on the current date.
9) Select the appropriate number of days and refills.
OrderConnect User Guide
Page | 22
14) If there are multiple medications being prescribed, click on the name of the next medication being prescribed and dose the additional medications normally.
Highlights the medication to indicate that is the medication currently being dosed.
PrescribingEvents
OncemedicationshavebeenorderedandappearontheRxProfilescreen,Reorders,Discontinuesandmedicationchangesmaketheorderingprocessquicker.
Ausermayreorder,change,discontinueandaddnewmedicationsallwithasinglepassthroughtheapplication.There’snolimittotheamountofprescribingeventsthatcanbecontainedinasingleorder. (Return to table of contents)
Steps Actions
1) From the Rx Profile screen, click on the red X to the right of the current medication order to indicate the medication will be discontinued.
Once confirmed this will allow the user to discontinue the selected medication
2) From the Rx Profile screen, click on the circular arrows to the right of the current medication order to indicate the medication will be reordered.
Once taken to the Custom Orders screen, the user will be allowed to modify Order Date, Start Date, etc…
3) From the Rx Profile screen, click on the delta symbol to the right of the current medication order to indicate the medication order will be changed.
Will take user to the Custom Orders screen to change the details of the selected prescription
4) From the Rx Profile screen, click on the Add New Prescription Option at the bottom of the screen to indicate a new medication order will be added.
Will take the user through all pages of a prescribing event (RxLibraries, Custom Order, Order Confirmation) once the GO button is selected.
5) Once all order options have been chosen, click on the green GO button at the
Note: OrderConnect will only guide you to the screens that are necessary to complete the prescribing
OrderConnect User Guide
Page | 23
bottom of the screen to begin the prescribing event.
event(s) indicated prior to clicking on GO.
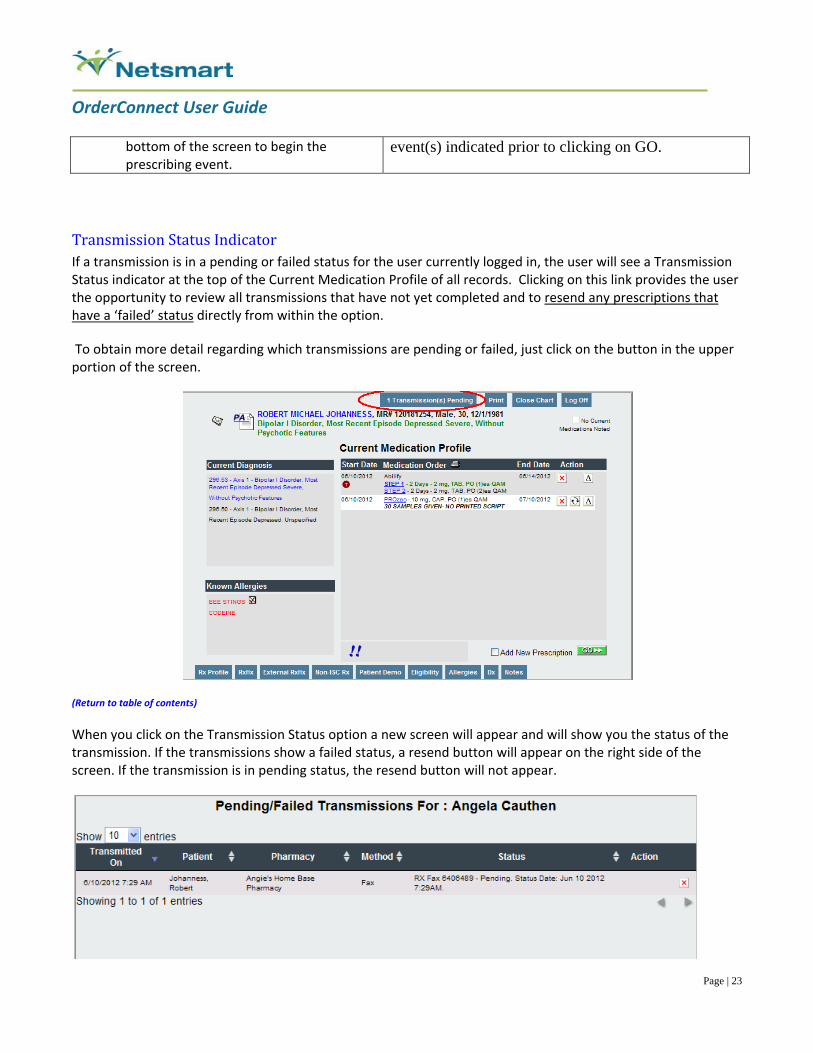
TransmissionStatusIndicatorIf a transmission is in a pending or failed status for the user currently logged in, the user will see a Transmission Status indicator at the top of the Current Medication Profile of all records. Clicking on this link provides the user the opportunity to review all transmissions that have not yet completed and to resend any prescriptions that have a ‘failed’ status directly from within the option.
To obtain more detail regarding which transmissions are pending or failed, just click on the button in the upper portion of the screen.
(Return to table of contents)
When you click on the Transmission Status option a new screen will appear and will show you the status of the transmission. If the transmissions show a failed status, a resend button will appear on the right side of the screen. If the transmission is in pending status, the resend button will not appear.
OrderConnect User Guide
Page | 24
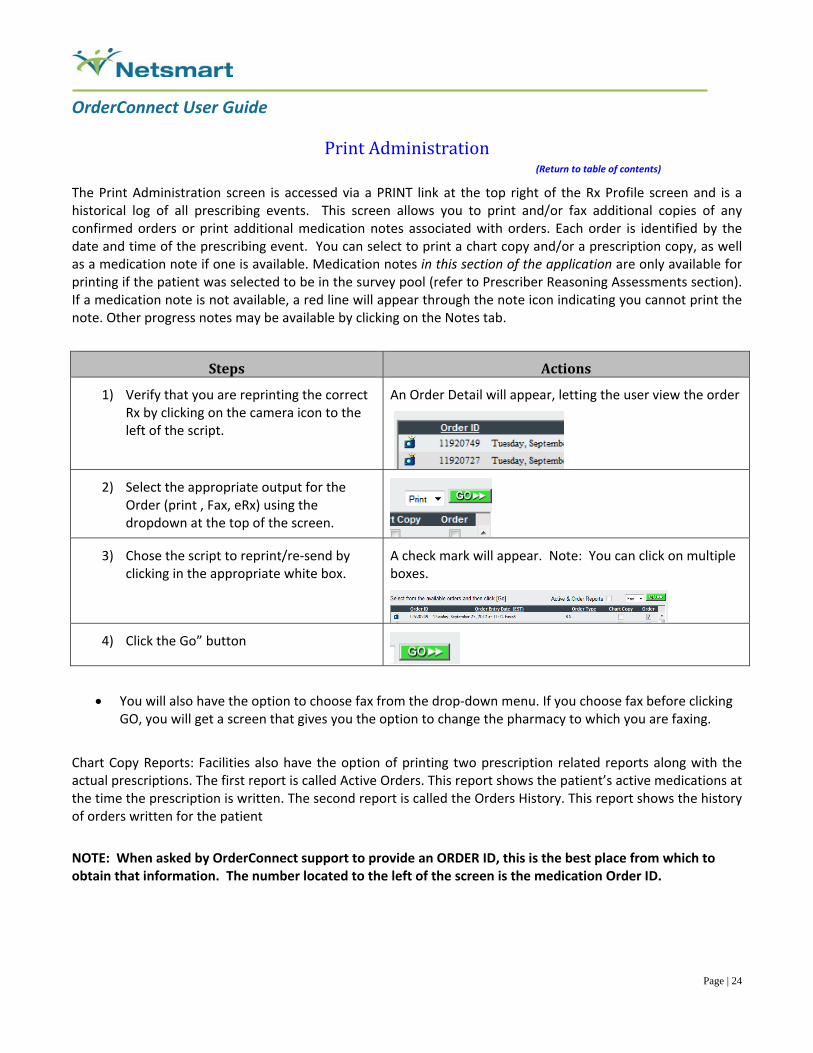
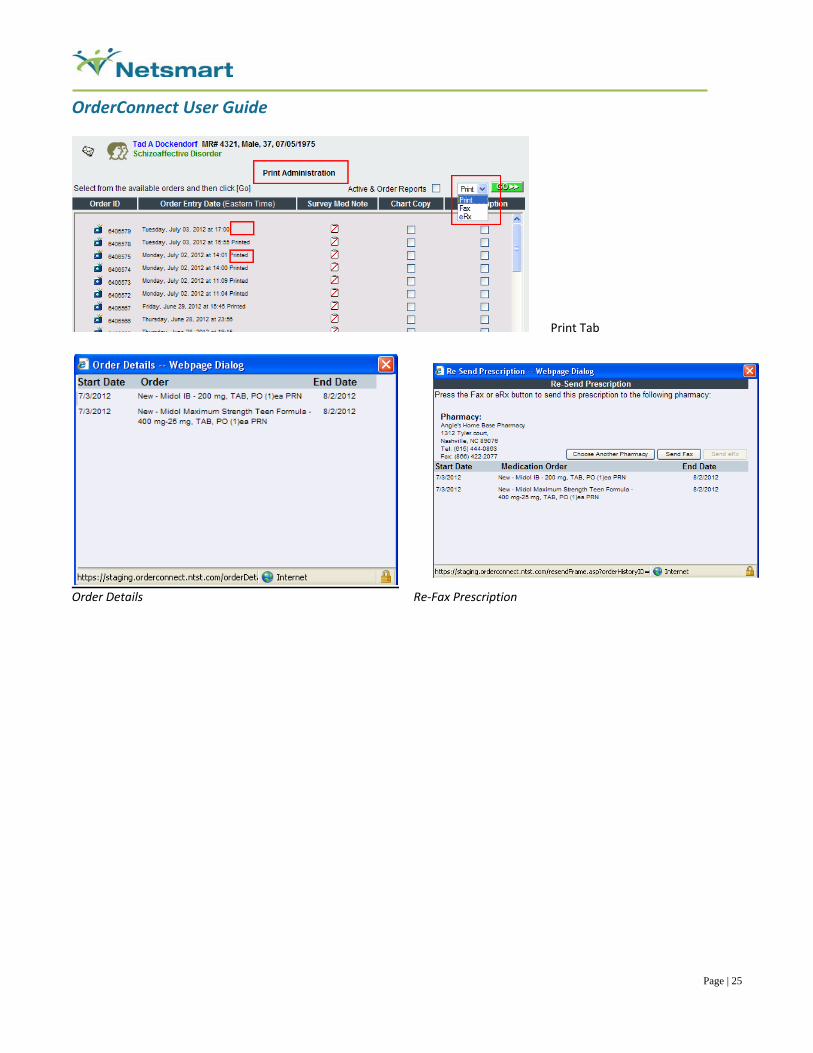
PrintAdministration (Return to table of contents)
The Print Administration screen is accessed via a PRINT link at the top right of the Rx Profile screen and is a historical log of all prescribing events. This screen allows you to print and/or fax additional copies of any confirmed orders or print additional medication notes associated with orders. Each order is identified by the date and time of the prescribing event. You can select to print a chart copy and/or a prescription copy, as well as a medication note if one is available. Medication notes in this section of the application are only available for printing if the patient was selected to be in the survey pool (refer to Prescriber Reasoning Assessments section). If a medication note is not available, a red line will appear through the note icon indicating you cannot print the note. Other progress notes may be available by clicking on the Notes tab.
Steps Actions
1) Verify that you are reprinting the correct Rx by clicking on the camera icon to the left of the script.
An Order Detail will appear, letting the user view the order
2) Select the appropriate output for the Order (print , Fax, eRx) using the dropdown at the top of the screen.
3) Chose the script to reprint/re‐send by clicking in the appropriate white box.
A check mark will appear. Note: You can click on multiple boxes.
4) Click the Go” button
You will also have the option to choose fax from the drop‐down menu. If you choose fax before clicking
GO, you will get a screen that gives you the option to change the pharmacy to which you are faxing.
Chart Copy Reports: Facilities also have the option of printing two prescription related reports along with the actual prescriptions. The first report is called Active Orders. This report shows the patient’s active medications at the time the prescription is written. The second report is called the Orders History. This report shows the history of orders written for the patient
NOTE: When asked by OrderConnect support to provide an ORDER ID, this is the best place from which to obtain that information. The number located to the left of the screen is the medication Order ID.
OrderConnect User Guide
Page | 25
Print Tab
Order Details Re‐Fax Prescription
OrderConnect User Guide
Page | 26
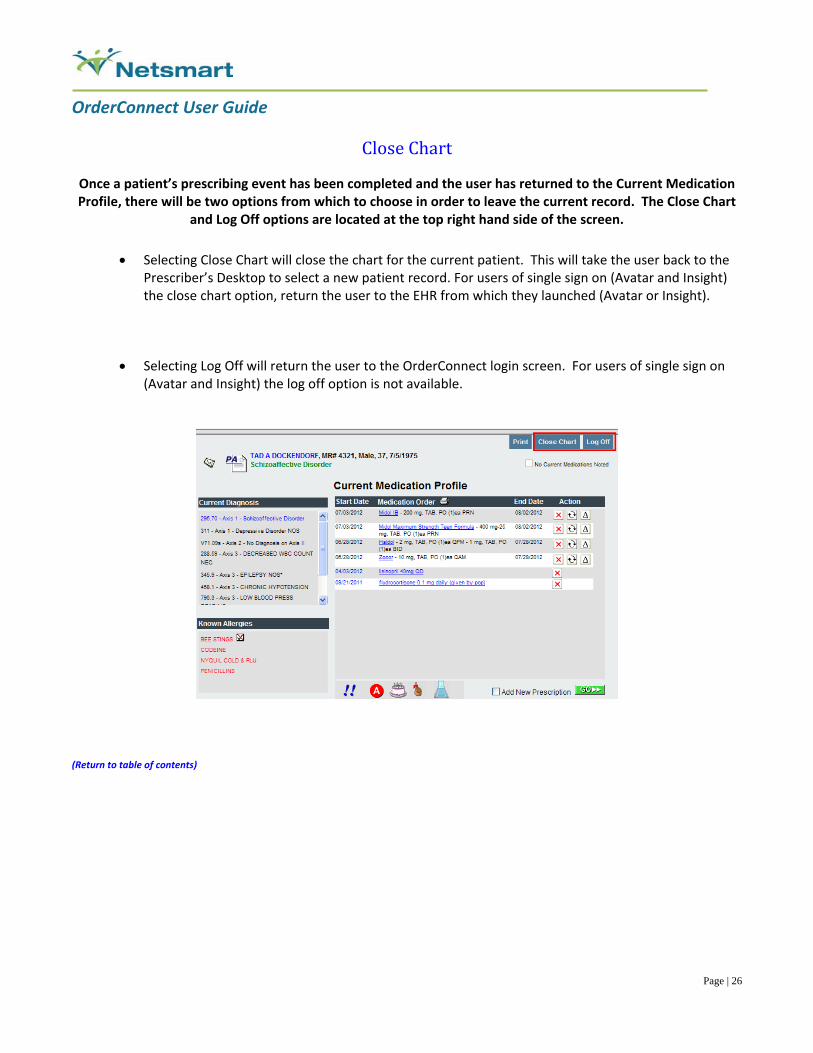
CloseChart
Once a patient’s prescribing event has been completed and the user has returned to the Current Medication Profile, there will be two options from which to choose in order to leave the current record. The Close Chart
and Log Off options are located at the top right hand side of the screen.
Selecting Close Chart will close the chart for the current patient. This will take the user back to the Prescriber’s Desktop to select a new patient record. For users of single sign on (Avatar and Insight) the close chart option, return the user to the EHR from which they launched (Avatar or Insight).
Selecting Log Off will return the user to the OrderConnect login screen. For users of single sign on (Avatar and Insight) the log off option is not available.
(Return to table of contents)
OrderConnect User Guide
Page | 27
AdditionalPrescribingScreenDetail
RxLibraries
The Rx Libraries screen will be seen anytime a user clicks on the words “Add New Prescription” and clicks on “GO” from the Rx Profile Screen. The Rx Libraries allows users to select medications using four libraries: My Practice (All orders previously written by the prescribing user that’s logged in), My Group (All orders previously written by all prescribing users at the facility, excluding the user logged in), InfoScriber Practice (All orders previously written by all OrderConnect prescribing users across the US), and All Drugs (All medications currently available on the market). These libraries are created automatically based upon the varying ways that OrderConnect prescribers order medications. This includes the Dose, Strength, Schedule and Associated Diagnosis. Users will see this screen whenever NEW medications are being added to the client record. The Rx Libraries will also provide an opportunity for the prescriber to check the medication listing against the patient’s insurance formulary when the patient’s payer is known.
OptionOverview(RxLibraries) (Return to table of contents)
Steps Actions
1) Select Add New Prescription and click on the green “Go” button on the Rx Profile screen.
Puts a check mark in the box and navigates user to the Rx Libraries tab.
2) Click on the “My Practice” radio button
When selected and a medication or diagnosis is indicated in the search option, the application will present a list containing all of the ways the current prescriber has written the medication (strength, route, schedule, etc.). The entries are cumulative, with the most common prescribing method being the top left option and the least common being on the lower right.
3) Click on the “My Group” radio button When selected and a medication or diagnosis is indicated in the search option, the application will present a list containing all of the ways prescribers at the facility (excluding the prescriber currently logged in) have written the indicated medication (strength, route, schedule, etc.). The entries are cumulative, with the most common prescribing method being the top left option and the least common being on the lower right.
4) Click on the “InfoScriber Practice” radio button.
When selected and a medication or diagnosis is indicated in the search option, the application will present a list containing all of the ways prescribers across the United States (excluding the prescriber currently logged in) have written the indicated medication (strength, route, schedule, etc.). The entries are cumulative, with the most common prescribing method being the top left option and the least common being on the lower right.
OrderConnect User Guide
Page | 28
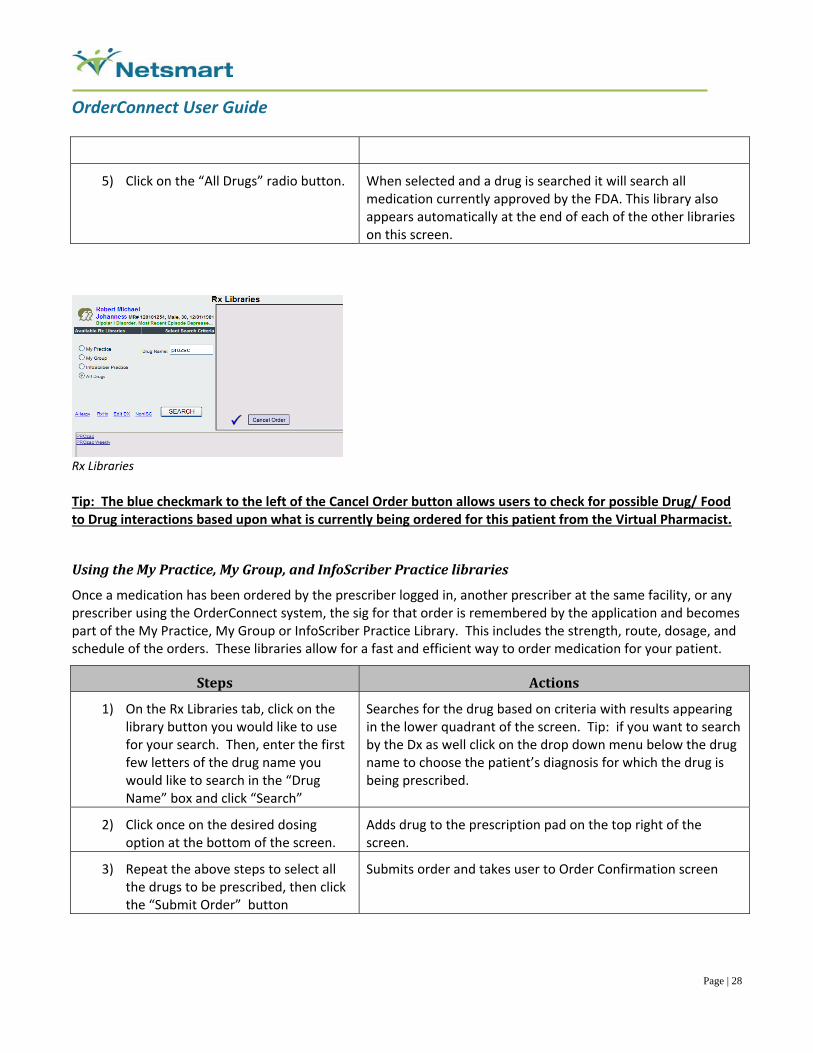
5) Click on the “All Drugs” radio button. When selected and a drug is searched it will search all medication currently approved by the FDA. This library also appears automatically at the end of each of the other libraries on this screen.
Rx Libraries
Tip: The blue checkmark to the left of the Cancel Order button allows users to check for possible Drug/ Food to Drug interactions based upon what is currently being ordered for this patient from the Virtual Pharmacist.
UsingtheMyPractice,MyGroup,andInfoScriberPracticelibraries
Once a medication has been ordered by the prescriber logged in, another prescriber at the same facility, or any prescriber using the OrderConnect system, the sig for that order is remembered by the application and becomes part of the My Practice, My Group or InfoScriber Practice Library. This includes the strength, route, dosage, and schedule of the orders. These libraries allow for a fast and efficient way to order medication for your patient.
Steps Actions
1) On the Rx Libraries tab, click on the library button you would like to use for your search. Then, enter the first few letters of the drug name you would like to search in the “Drug Name” box and click “Search”
Searches for the drug based on criteria with results appearing in the lower quadrant of the screen. Tip: if you want to search by the Dx as well click on the drop down menu below the drug name to choose the patient’s diagnosis for which the drug is being prescribed.
2) Click once on the desired dosing option at the bottom of the screen.
Adds drug to the prescription pad on the top right of the screen.
3) Repeat the above steps to select all the drugs to be prescribed, then click the “Submit Order” button
Submits order and takes user to Order Confirmation screen
OrderConnect User Guide
Page | 29
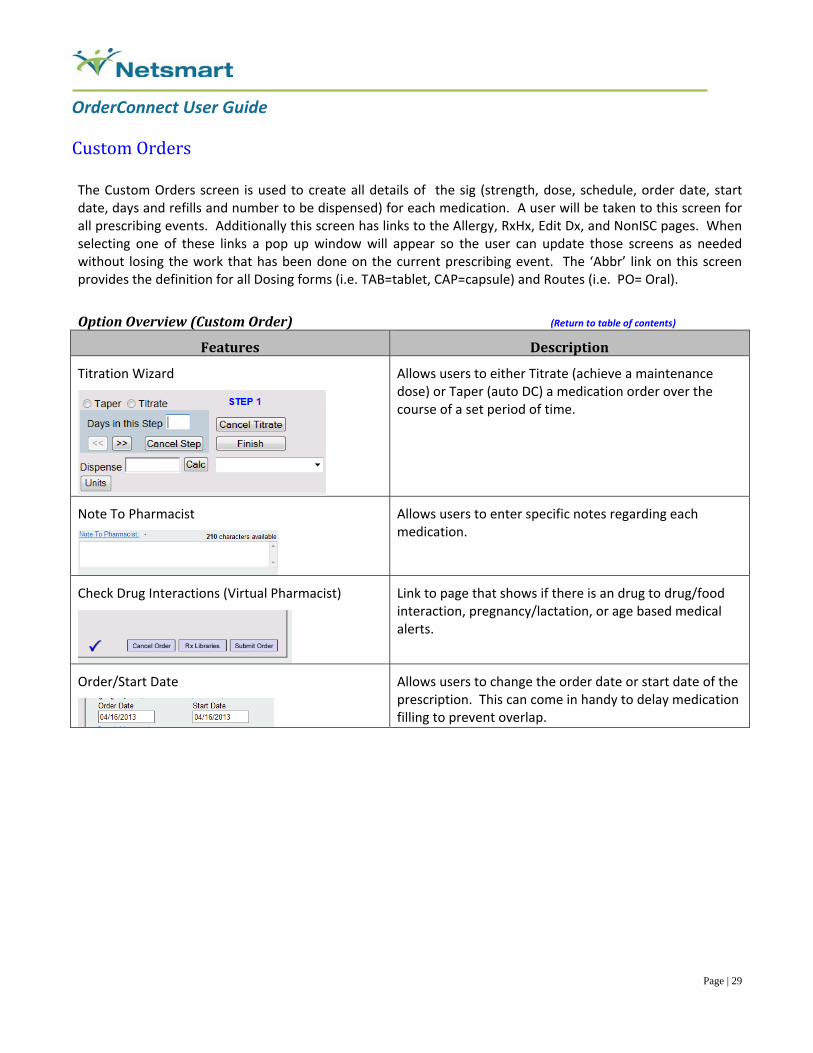
CustomOrders The Custom Orders screen is used to create all details of the sig (strength, dose, schedule, order date, start date, days and refills and number to be dispensed) for each medication. A user will be taken to this screen for all prescribing events. Additionally this screen has links to the Allergy, RxHx, Edit Dx, and NonISC pages. When selecting one of these links a pop up window will appear so the user can update those screens as needed without losing the work that has been done on the current prescribing event. The ‘Abbr’ link on this screen provides the definition for all Dosing forms (i.e. TAB=tablet, CAP=capsule) and Routes (i.e. PO= Oral).
OptionOverview(CustomOrder) (Return to table of contents)
Features Description
Titration Wizard
Allows users to either Titrate (achieve a maintenance dose) or Taper (auto DC) a medication order over the course of a set period of time.
Note To Pharmacist
Allows users to enter specific notes regarding each medication.
Check Drug Interactions (Virtual Pharmacist)
Link to page that shows if there is an drug to drug/food interaction, pregnancy/lactation, or age based medical alerts.
Order/Start Date
Allows users to change the order date or start date of the prescription. This can come in handy to delay medication filling to prevent overlap.
OrderConnect User Guide
Page | 30
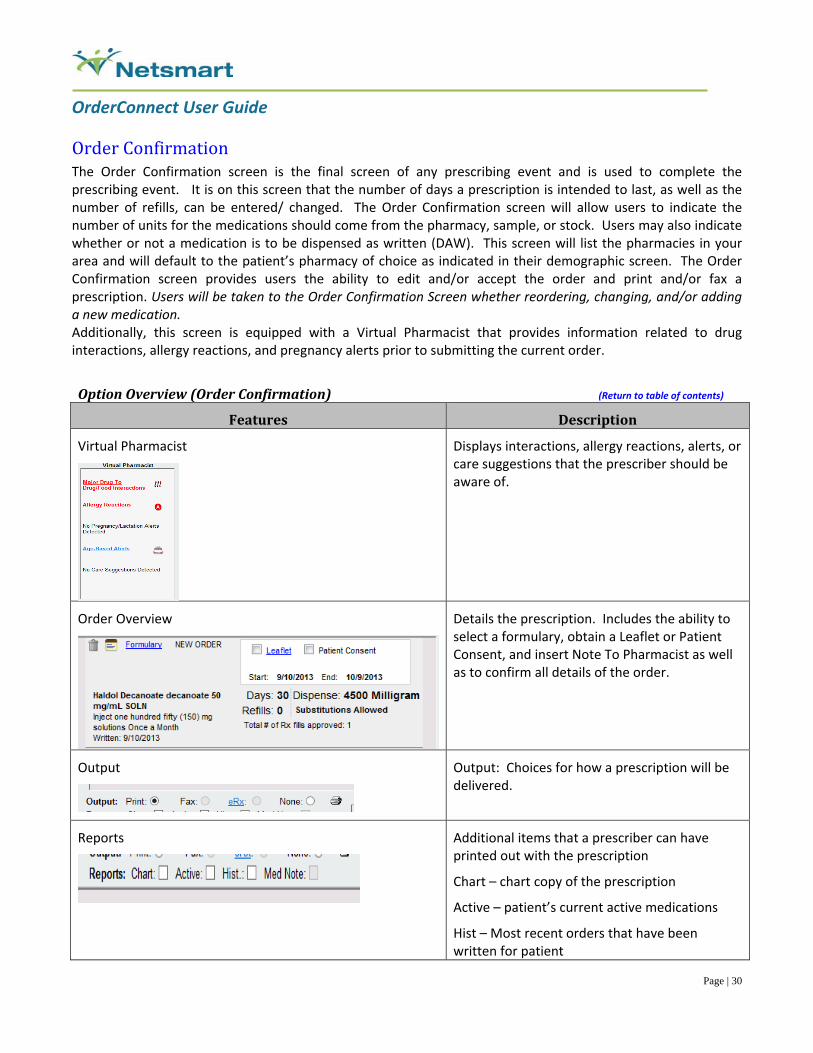
OrderConfirmation The Order Confirmation screen is the final screen of any prescribing event and is used to complete the prescribing event. It is on this screen that the number of days a prescription is intended to last, as well as the number of refills, can be entered/ changed. The Order Confirmation screen will allow users to indicate the number of units for the medications should come from the pharmacy, sample, or stock. Users may also indicate whether or not a medication is to be dispensed as written (DAW). This screen will list the pharmacies in your area and will default to the patient’s pharmacy of choice as indicated in their demographic screen. The Order Confirmation screen provides users the ability to edit and/or accept the order and print and/or fax a prescription. Users will be taken to the Order Confirmation Screen whether reordering, changing, and/or adding a new medication. Additionally, this screen is equipped with a Virtual Pharmacist that provides information related to drug interactions, allergy reactions, and pregnancy alerts prior to submitting the current order.
OptionOverview(OrderConfirmation) (Return to table of contents)
Features Description
Virtual Pharmacist
Displays interactions, allergy reactions, alerts, or care suggestions that the prescriber should be aware of.
Order Overview Details the prescription. Includes the ability to select a formulary, obtain a Leaflet or Patient Consent, and insert Note To Pharmacist as well as to confirm all details of the order.
Output
Output: Choices for how a prescription will be delivered.
Reports
Additional items that a prescriber can have printed out with the prescription
Chart – chart copy of the prescription
Active – patient’s current active medications
Hist – Most recent orders that have been written for patient
OrderConnect User Guide
Page | 31
Not – medication progress note has been chosen by administrator.
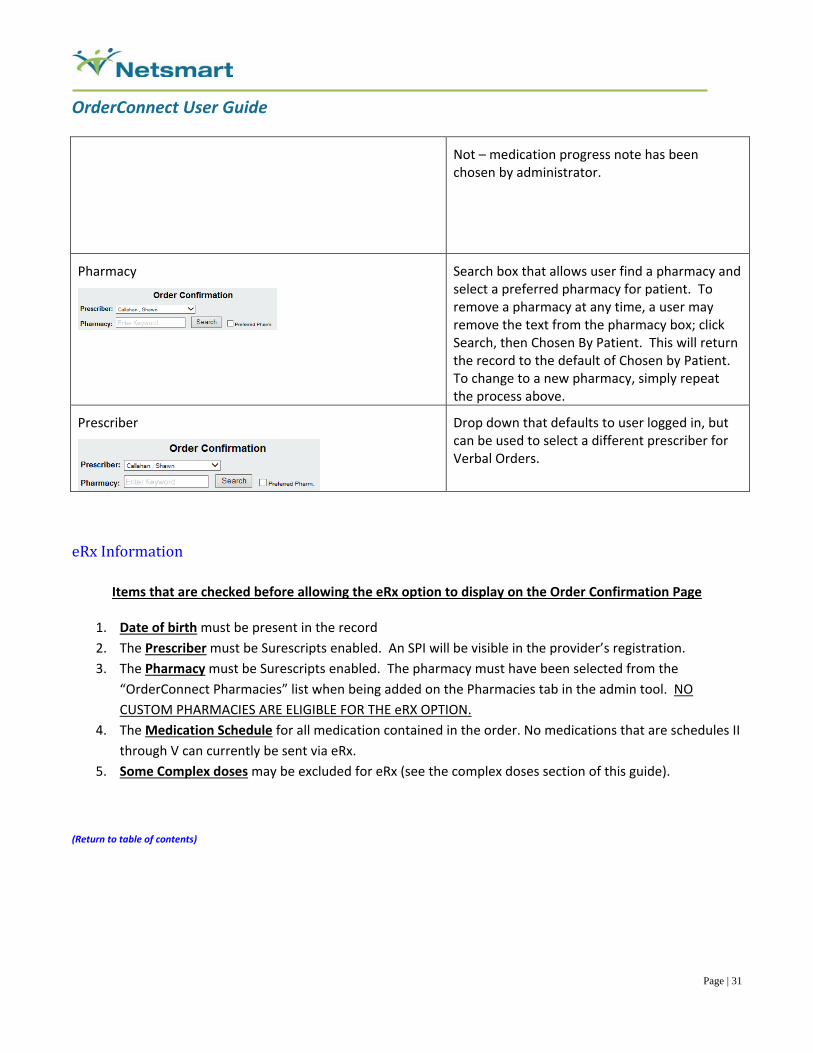
Pharmacy
Search box that allows user find a pharmacy and select a preferred pharmacy for patient. To remove a pharmacy at any time, a user may remove the text from the pharmacy box; click Search, then Chosen By Patient. This will return the record to the default of Chosen by Patient. To change to a new pharmacy, simply repeat the process above.
Prescriber
Drop down that defaults to user logged in, but can be used to select a different prescriber for Verbal Orders.
eRxInformation
Items that are checked before allowing the eRx option to display on the Order Confirmation Page
1. Date of birth must be present in the record
2. The Prescriber must be Surescripts enabled. An SPI will be visible in the provider’s registration.
3. The Pharmacy must be Surescripts enabled. The pharmacy must have been selected from the
“OrderConnect Pharmacies” list when being added on the Pharmacies tab in the admin tool. NO
CUSTOM PHARMACIES ARE ELIGIBLE FOR THE eRX OPTION.
4. The Medication Schedule for all medication contained in the order. No medications that are schedules II
through V can currently be sent via eRx.
5. Some Complex doses may be excluded for eRx (see the complex doses section of this guide).
(Return to table of contents)
OrderConnect User Guide
Page | 32
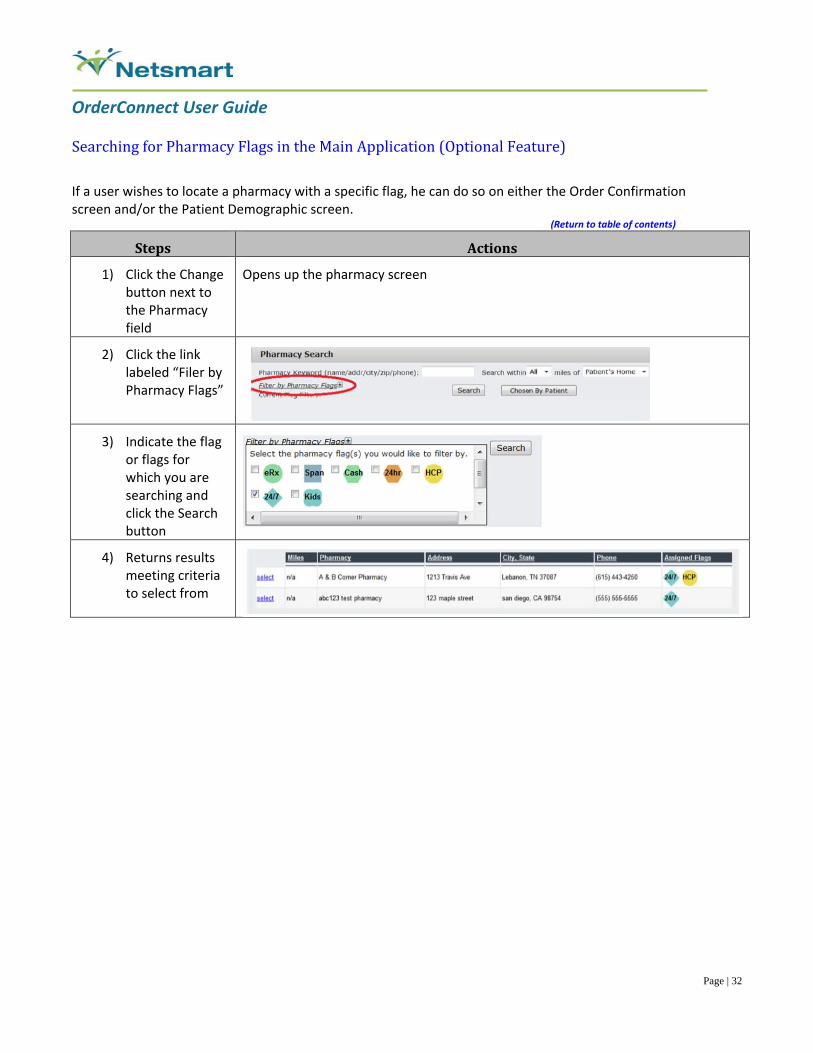
SearchingforPharmacyFlagsintheMainApplication(OptionalFeature)
If a user wishes to locate a pharmacy with a specific flag, he can do so on either the Order Confirmation screen and/or the Patient Demographic screen. (Return to table of contents)
Steps Actions
1) Click the Change button next to the Pharmacy field
Opens up the pharmacy screen
2) Click the link labeled “Filer by Pharmacy Flags”
3) Indicate the flag or flags for which you are searching and click the Search button
4) Returns results meeting criteria to select from
OrderConnect User Guide
Page | 33
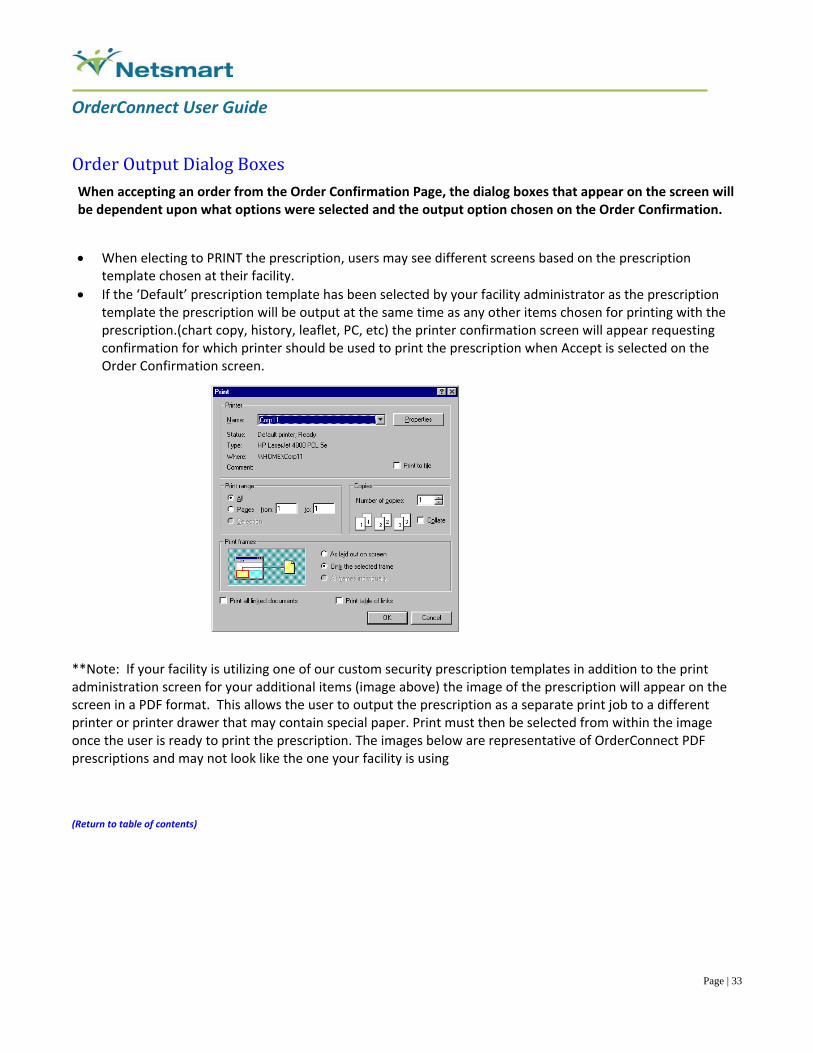
OrderOutputDialogBoxes
When accepting an order from the Order Confirmation Page, the dialog boxes that appear on the screen will be dependent upon what options were selected and the output option chosen on the Order Confirmation.
When electing to PRINT the prescription, users may see different screens based on the prescription template chosen at their facility.
If the ‘Default’ prescription template has been selected by your facility administrator as the prescription template the prescription will be output at the same time as any other items chosen for printing with the prescription.(chart copy, history, leaflet, PC, etc) the printer confirmation screen will appear requesting confirmation for which printer should be used to print the prescription when Accept is selected on the Order Confirmation screen.
**Note: If your facility is utilizing one of our custom security prescription templates in addition to the print administration screen for your additional items (image above) the image of the prescription will appear on the screen in a PDF format. This allows the user to output the prescription as a separate print job to a different printer or printer drawer that may contain special paper. Print must then be selected from within the image once the user is ready to print the prescription. The images below are representative of OrderConnect PDF prescriptions and may not look like the one your facility is using
(Return to table of contents)
OrderConnect User Guide
Page | 34
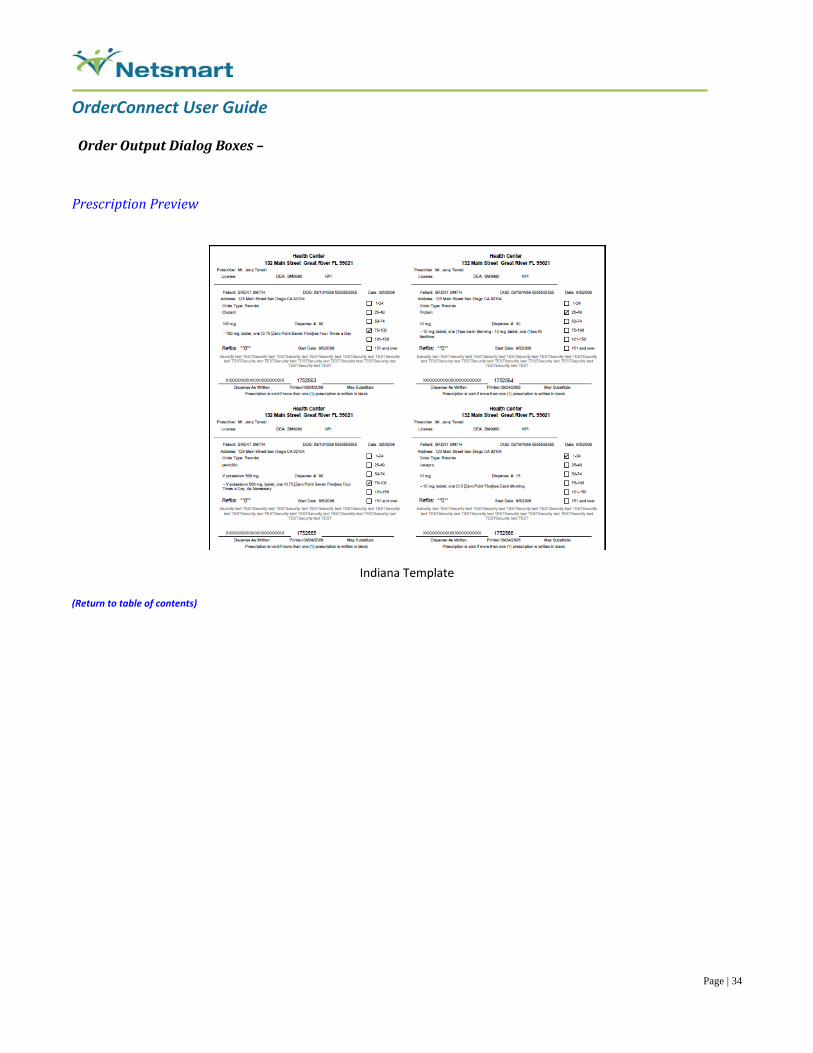
OrderOutputDialogBoxes–
PrescriptionPreview
Indiana Template
(Return to table of contents)
OrderConnect User Guide
Page | 35
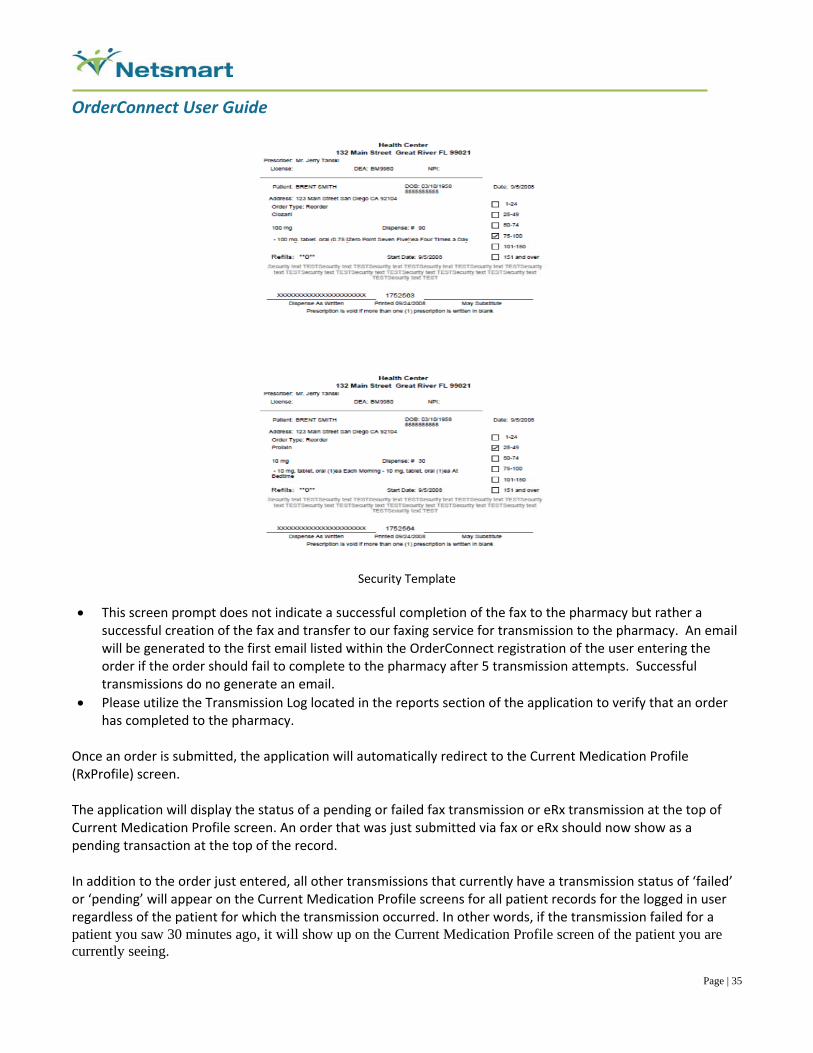
Security Template
This screen prompt does not indicate a successful completion of the fax to the pharmacy but rather a successful creation of the fax and transfer to our faxing service for transmission to the pharmacy. An email will be generated to the first email listed within the OrderConnect registration of the user entering the order if the order should fail to complete to the pharmacy after 5 transmission attempts. Successful transmissions do no generate an email.
Please utilize the Transmission Log located in the reports section of the application to verify that an order has completed to the pharmacy.
Once an order is submitted, the application will automatically redirect to the Current Medication Profile (RxProfile) screen. The application will display the status of a pending or failed fax transmission or eRx transmission at the top of Current Medication Profile screen. An order that was just submitted via fax or eRx should now show as a pending transaction at the top of the record. In addition to the order just entered, all other transmissions that currently have a transmission status of ‘failed’ or ‘pending’ will appear on the Current Medication Profile screens for all patient records for the logged in user regardless of the patient for which the transmission occurred. In other words, if the transmission failed for a patient you saw 30 minutes ago, it will show up on the Current Medication Profile screen of the patient you are currently seeing.
OrderConnect User Guide
Page | 36
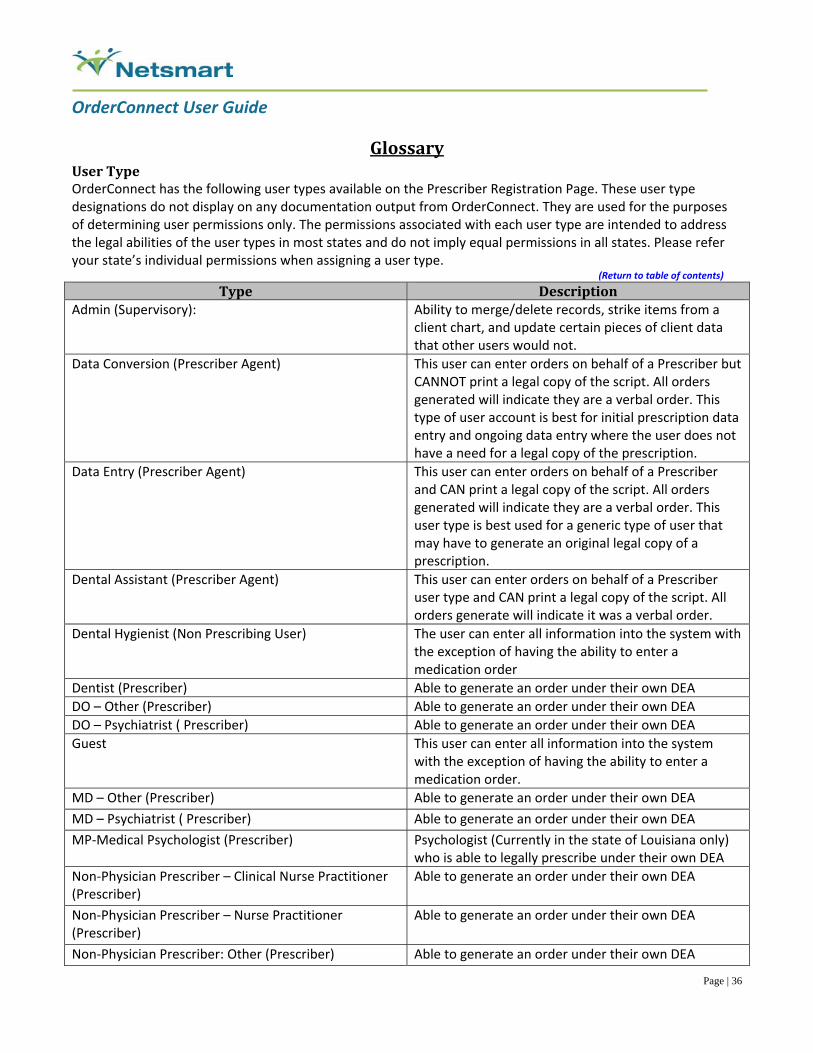
GlossaryUserTypeOrderConnect has the following user types available on the Prescriber Registration Page. These user type designations do not display on any documentation output from OrderConnect. They are used for the purposes of determining user permissions only. The permissions associated with each user type are intended to address the legal abilities of the user types in most states and do not imply equal permissions in all states. Please refer your state’s individual permissions when assigning a user type. (Return to table of contents)
Type DescriptionAdmin (Supervisory): Ability to merge/delete records, strike items from a
client chart, and update certain pieces of client data that other users would not.
Data Conversion (Prescriber Agent) This user can enter orders on behalf of a Prescriber but CANNOT print a legal copy of the script. All orders generated will indicate they are a verbal order. This type of user account is best for initial prescription data entry and ongoing data entry where the user does not have a need for a legal copy of the prescription.
Data Entry (Prescriber Agent) This user can enter orders on behalf of a Prescriber and CAN print a legal copy of the script. All orders generated will indicate they are a verbal order. This user type is best used for a generic type of user that may have to generate an original legal copy of a prescription.
Dental Assistant (Prescriber Agent) This user can enter orders on behalf of a Prescriber user type and CAN print a legal copy of the script. All orders generate will indicate it was a verbal order.
Dental Hygienist (Non Prescribing User) The user can enter all information into the system with the exception of having the ability to enter a medication order
Dentist (Prescriber) Able to generate an order under their own DEA
DO – Other (Prescriber) Able to generate an order under their own DEA
DO – Psychiatrist ( Prescriber) Able to generate an order under their own DEA
Guest This user can enter all information into the system with the exception of having the ability to enter a medication order.
MD – Other (Prescriber) Able to generate an order under their own DEA
MD – Psychiatrist ( Prescriber) Able to generate an order under their own DEA
MP‐Medical Psychologist (Prescriber) Psychologist (Currently in the state of Louisiana only) who is able to legally prescribe under their own DEA
Non‐Physician Prescriber – Clinical Nurse Practitioner (Prescriber)
Able to generate an order under their own DEA
Non‐Physician Prescriber – Nurse Practitioner (Prescriber)
Able to generate an order under their own DEA
Non‐Physician Prescriber: Other (Prescriber) Able to generate an order under their own DEA

OrderConnect User Guide
Page | 37
Non‐Physician Prescriber: Pharm D (Prescriber) Able to generate an order under their own DEA
Non‐Physician Prescriber: Physician Assistant (Prescriber)
Able to generate an order under their own DEA
Non‐Prescribing User This user can enter all information into the system with the exception of having the ability to enter a medication order.
Nurse: RN (Prescriber Agent) This user can enter orders on behalf of a Prescriber user type. All orders generate will indicate it was a verbal order.
Nursing: Other (Prescriber Agent) This user can enter orders on behalf of a Prescriber user type. All orders generate will indicate it was a verbal order.
Pharmacist
This user can enter all information into the system with the exception of having the ability to enter a medication order.
System Administrator (Prescriber Agent) This user can enter orders on behalf of a Prescriber user type. All orders generate will indicate it was a verbal order.
(Return to table of contents)