Embed Size (px)
Citation preview

www.awp.nhs.uk
Designed by Ged Wood, Learning Technologist, Learning & Development, Woodland View, Brentry Lane, Henbury, Bristol, BS10 6NB
Team / Ward
7
Quick Reference Guide Version April 2014, for RiO 7
p32
Print this Quick Reference Guide, double
sided, on only 4 sheets of A4 paper
Guillotine across the centre
The centre pages should be p16/p17, and
the cover should be on the front,
the correct way up
Check the other pages are in the right
order
Fold firmly in half, and staple the spine to
hold it together
and staple near the edge
Then fold
First cut, then set
pages in order
Diagnosis: Enter an ICD 10 for KPI 1. From the Clinical Portal—Client’s View, select Clinical Coding
2. Add New and Search for the Clinical code, or Text
3. Enter a Date of Diagnosis and Comments
4. Highlight the Diagnosis (Dark blue)
5. Click Add .. Sufficient for KPI
Matching SNOMED terms are shown, but not yet mandatory to enter
For Confirming a Diagnosis, (Qualified Clinicians only) see Ourspace User Guide
p17
Outcome a CPA Review
1. Access the CPA Review screen
2. Locate the Scheduled review and click the Green icon (chevron) on the blue line
The CPA Review screen is displayed
3. Complete all relevant Review Detail boxes
4. Click Save
5. The review status has changed from Scheduled to Un-validated (Green line)
Validate a CPA Review 1. From the CPA Review screen, on the green
line, click on the Green icon
The CPA Review Screen is displayed
2. Select the Validated box, located near the bottom of the screen (Within 72 hours!)
3. Click Save You may be reminded to update the Care Plan
4. Click Yes.. (2 weeks before or
after Validation) Outcome associated appointments on your HCP Diary
5. Click OK on that reminder
The review status has changed from Un-validated to Validated (pink line) p16

Contents Log on to RiO and Silverlight ………………………... 3
RiO Navigation / Logging Out of RiO ……………………. 4
Searching ………...……………….…………………….... 5
Synchronise a Client record / Registration …..……….... 6
Case Record (Clinical Portal - Client’s View) ..…….. 7
Referral (Entry / Exit) …………….……………..……. 8
Caseload …………………………………... ...………..….. 9
Caseload Transfer / Sharing …...……………….….. 10
HCP Diary (Client & Non-Client Appointments ……..….. 11
Recording an Outcome / Client Diary ……..……...……. 12
Progress Notes (& Print Progress Notes)…………….….. 13
Allocate a Care Co-ordinator / View CPA History……..... 14
Schedule a CPA Review ………..…………………...….. 15
Outcome a CPA Review / Validate a CPA Review ...…. 16
Diagnosis (Clinical Coding)…...………………….……….. 17
Care Planning …………………….………………..…….. 18
Ward View / Bed Icons / Client Admission ………...….. 19
Planning & Recording Leave (and returning), & AWOL.. 20
Client Discharge / Transfer (Named Nurse).………........ 21
DToC - Delayed Discharge ………………………………. 22
Editable Letters …………………..………………...…….. 23
Upload Documents……………………….…...….……...…. 24
Document List View / Clinic Plan ………….…………..…. 25
Clinic Diary View / Book Clinic Appointments ..…..….... 26
Outcome Clinic Appointment ………………………….… 27
Cancel an Appointment / Canc.Client from Appt……..…. 28
Scratch Pad / Drag and Drop Appointment rescheduling. 29
Auto-save …………………………………………….…… 30
Useful Web-links and Contacts ……………...……….…... 31
Quick Reference Guide assembly instruction…………… 32
Schedule a CPA Review
1. From the Client’s View, click Care Planning, CPA & Reviews
then select CPA Review The CPA Review screen is displayed
2. Click Schedule CPA Review
The CPA Schedule screen is displayed
3. Complete all mandatory (lilac-toned) fields
4. Enter location description as appropriate
5. Add additional HCPs as appropriate
6. Click Save
7. Unless already on Diary, Save & Book Appt.
8. Select the relevant Referral, and click
The CPA Reviews screen is displayed showing the Scheduled CPA in a blue line
p15
If you encounter any problems in the use of RiO, you may find these contact details and web links useful
From ‘Our Space’ >Systems > How to use RiO
http://ourspace/Systems/RiO/Pages/Home.aspx
Rio Champions are a good place for staff to start with as they should have good knowledge of the local SBU
http://ourspace/Systems/RIO/Pages/RiOchampions.aspx
AWOL help - AWOL [email protected]
Ourspace> Client Services> MHA admin> Pages> MHA Code of Practice
http://ourspace/ClientServices/MHAAdmin/Pages/MHACodeofPractice.aspx Then ‘Mental Health Act Code of Practice’ - Ch.22
- Complete Part 1 form within an hour
Ourspace page... Systems>RiO
Click help button
All User Guides
Clinical Manual
Documentation
Other Support
Online Smartcard Registration
[email protected], or phone 01225 731777
Images copyright and courtesy of CSE-Healthcare Systems Limited
p31 p18
Care Planning 1. From the Client View screen click
Care Planning, CPA and Reviews and select Care Planning
The Care Planning – Client screen is displayed 2. Click New Problem/Need 3. Select a Challenge/Need Category and Sub-Category.
This will then add a new selectable problem type for Progress Note linking
4. Enter a description (mandatory) (Auto-savable)
5. Click Save
You will return to the main Care Planning - Client screen
6. Select the new problem. Its colour will change from pale to mid blue
7. Click New Intervention
8. Complete Intervention information
9. Click Save
If not self-validating, it will need to be Validated
Medication Care Plan - Only one, editable. This needs to include current: Drugs/ Dose/ Route / Frequency.
p3
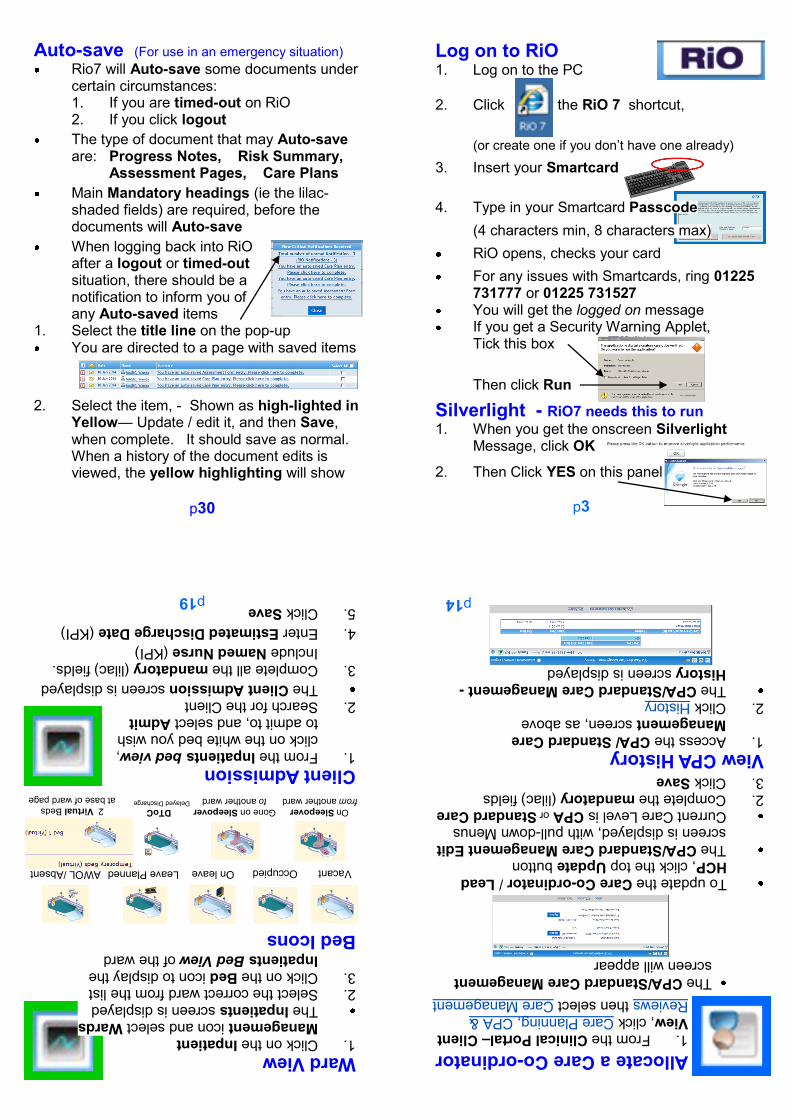
Log on to RiO
1. Log on to the PC
2. Click the RiO 7 shortcut,
(or create one if you don’t have one already)
3. Insert your Smartcard
4. Type in your Smartcard Passcode
(4 characters min, 8 characters max)
RiO opens, checks your card
For any issues with Smartcards, ring 01225 731777 or 01225 731527
You will get the logged on message
If you get a Security Warning Applet, Tick this box
Then click Run
Silverlight - RiO7 needs this to run
1. When you get the onscreen Silverlight Message, click OK
2. Then Click YES on this panel
p30
Auto-save (For use in an emergency situation)
Rio7 will Auto-save some documents under certain circumstances:
1. If you are timed-out on RiO 2. If you click logout
The type of document that may Auto-save are: Progress Notes, Risk Summary,
Assessment Pages, Care Plans
Main Mandatory headings (ie the lilac-shaded fields) are required, before the
documents will Auto-save
When logging back into RiO after a logout or timed-out situation, there should be a notification to inform you of any Auto-saved items
1. Select the title line on the pop-up You are directed to a page with saved items
2. Select the item, - Shown as high-lighted in Yellow— Update / edit it, and then Save, when complete. It should save as normal. When a history of the document edits is viewed, the yellow highlighting will show
Allocate a Care Co-ordinator
1. From the Clinical Portal– Client View, click Care Planning, CPA & Reviews then select Care Management
The CPA/Standard Care Management screen will appear
To update the Care Co-ordinator / Lead HCP, click the top Update button
The CPA/Standard Care Management Edit screen is displayed, with pull-down Menus Current Care Level is CPA or Standard Care
2. Complete the mandatory (lilac) fields
3. Click Save
View CPA History 1. Access the CPA/ Standard Care Management screen, as above
2. Click History
The CPA/Standard Care Management - History screen is displayed
p14
On Sleepover
from another ward Gone on Sleepover to another ward
2 Virtual Beds at base of ward page
On leave Vacant Occupied Leave Planned AWOL /Absent
Ward View 1. Click on the Inpatient Management icon and select Wards
The Inpatients screen is displayed 2. Select the correct ward from the list 3. Click on the Bed icon to display the Inpatients Bed View of the ward
Bed Icons
Client Admission
1. From the Inpatients bed view, click on the white bed you wish to admit to, and select Admit 2. Search for the Client
The Client Admission screen is displayed
3. Complete all the mandatory (lilac) fields. Include Named Nurse (KPI)
4. Enter Estimated Discharge Date (KPI)
5. Click Save p19
DToC Delayed Discharge

p4
RiO Navigation
Click The RiO icon to return to your Homepage at any time
Click on Main Menu Icons to access other sub-menus
Click the RiO Back Button to return to the previous screen, and NOT the blue Internet Explorer back button
Hover your mouse over the arrow to check where it will take you
Click the (blue background) clock to reset your RiO session to 30 more minutes
Click on a Client’s Hyperlink to access their Case Record
Refer to the blue Information Bar to check which page you are on, printers, your log-on name
Logging out of RiO
Click Logout in the top right corner of the RiO Window, then remove your Smart Card. Then log off from the PC Note: Although easiest and quickest to just remove your Smart Card from the keyboard reader slot, this action will not currently instigate the Auto-save mechanisms of RiO7 nb This action logs you off the Internet completely p29
Scratch Pad / Drag and Drop Appointment Rescheduling
Extreme caution should be exercised where the re-timing of the appointment involves an Initial Assessment, as this will NOT reset the clock for AWP deadlines to provide care… If the Client cancels, then the appointment MUST be cancelled, and then re-booked to maintain a ‘re-start’.
You should only use the Drag & Drop appointment rescheduling process for Clinical reasons, such as where the Facility or the HCP is not available.
To reschedule an appointment within the same date, either on HCP or Clinic Diaries, simply drag and drop the appointment onto the new time slot, following instructions on pop-ups as you progress.
To reschedule to other dates and/or a Colleague’s Diary, drag the appointment to the Scratch pad on the left of the diary page, and navigate to the required new Diary date / HCP, before dragging the appointment to the new slot, following instructions on pop-ups as you go
Planning Leave
1. From the Inpatients (Bed) view, click on the client’s
bed to record leave
2. Select Leave and Leave Details
3. Enter the Planned Date & Time and Leave Reason
4. Click
Recording Leave & Returning
1. Click Leave > Leave Details
Inpatient Leave screen displayed
2. Record Actual Leave Date&Time, Actual Return Date&Time and End Reason
3. Click
Recording AWOL
The recording of AWOL is a similar method to recording leave. The Trust can be fined heavily when a client is missing. The Rule is: online reporting within an hour, but be aware of Client’s Risk Assessments, and ALWAYS check the definitive ruling at Ourspace (See back page for AWOL policy links)
Make yourself aware of any implications Form Parts 1/2/3 are within 1hr/1 day/3 days
The time entered on RiO must match the time entered on the Ourspace forms
Informal clients record only as ‘Absent’ p20 p13
Progress Notes 1. From the Clinical Portal—Client’s 2. View screen, in the Case Record 3. Menu, click Progress Notes
The Progress Notes screen is displayed
2. Click Add New Note
3. Type the note in the large free text area Always prefix your progress note with your department, ward and location Note that, using the tools, your text can now be formatted
4. Ensure that the following are correct: Date & Time Associated Care Plan Problem Types Significant Event OR Add to Risk History Does the Note include Third Party Info ?
5. To validate the note tick the Validate this note box, if you have permission
6. Click Save Changes
7. You may get a reminder about un-outcomed appointments. See the list- Click YES, or NO.
Remember to record Uploaded Documents here!
The r/h panel gives several options to filter the notes
nb Client Related Data-views , and Progress Note View
is the route for Printing Progress Notes. It is logged.

p5
Searching 1. Click Client Record Menu Select Registration or Case Record
The Search screen is displayed
2. Ideally, enter the Client’s NHS Number, or other ID, such as MHIS, their RiO or Trustwide ID, and click
3. Failing that, a minimum of 2 fields must be completed in the lower section, and then click Search or
A list of matching Clients is displayed
4. Click on the Client’s name to view their demographic details OR Click Back to Search Criteria to search again OR Click Search National Record (Advanced Trace)
NB. If you get to this Access Reason
window, you must give a Reason and Comment and then Save
In the event that no client is found, create a new local record and contact : “Medical Records BHH” - 0117 378 4222
Urgent Blackberry Hill - 0117 378 4226 “Medical Records GLH” - 01380 731 313
Urgent Devizes - 01380 731 314.
p12
Recording an Outcome 1. Locate the appointment on diary (or via the Progress Note link) 2. Click hyperlink
Outcome screen is displayed 3. Complete, using 24 Hr clock
Report Summary: Answer No,
unless out-coming as discharged, then answer: Later
4. Then Click the Activities Tab, to confirm or change Intended Activities. Mark any activities not done 6. You must select Main Activity 7. Then Save
Click Close Outcome, to return to Diary
The Outcome reverts to original Orange/ Yellow
Client Diary 1. From the Clinical Portal-Client’s View, click Client-Related Data Views and select Client Diary View
Client Diary screen
is displayed
2. Choose Start Date / End Date and view filtered appointments.
Scroll over icons for further Information p28
Cancel an Appointment 1. From the Appointments Menu and Clinic Appointments, click the blue down arrow of the appointment and choose Cancel Appointment
The Cancel Appointment
screen is displayed
2. Enter a Cancellation Reason (and Comment). Click Cancel This Appointment and Confirm
Option to Rebook offered Return to diary shows cancellation
Cancel a Client from a Group Booking
1. To cancel 1 Client from a Group Booking, click the blue down arrow of the client from the Group Appointment.
2. Choose Cancel Appointment
The Cancel Appointment screen is displayed, listing all booked clients
3. Tick the box of the client to cancel and select a Cancellation Reason & Comment
4. Click Cancel this Appointment 5. Confirm 6. Click Close Cancellation
7. The Diary now displays the cancelled client, and the remaining people
p21
Client Discharge 1. From the Inpatients Bed view, click on the bed you wish to Discharge from and select Discharge and then
Discharge Patient
2. Enter the Discharge Date Time, Method and Destination/Address and click Save
3. Book a 48-hour follow-up appointment
Client Transfer (& Named Nurse) 1. From the Inpatients Bed view, click on the bed you wish to transfer the client from and select Transfer and Out
Inpatient – Transfer Out screen displays
2. Click on the top green arrow To simply add a Named Nurse, use this one
3. Select the Ward To Transfer to, click
4. Select the Bay to transfer to, click
5. Select the Bed to transfer to, click
6. Enter the Transfer date / Type of Stay
7. Adjust Consultant / Named Nurse if nec.
8. Click Save

p6
Synchronise a Client record/ Registration
Continuing from Searching, after ‘Search the National Record’
1. If a match is found, (verify the Date of Birth too), click on the Client’s Name
The Access Reason window is displayed
2. You MUST record an Access Reason and a Comment
3. Click Save to proceed to the record
The screen now displays the Client’s Local and NCRS National Details (If no tick boxes, Click ‘Edit this Client’)
5. Click the checkboxes on the correct side of the dividing line to select the information to transfer across
6. After entering (locally mandatory) Ethnicity, 7. Enter Marital Status (KPi for AWP) 8. Click Save
The synchronised categories will be shown as green ticks
HCP Diary & Appointments
Click regularly to ensure you have outcomed Appointments within 72hrs
1. Click the Appointments Menu and Select Diary
Diary – Today is displayed 2. Check HCP is correct
To book a Client Appointment,
click on a time hyperlink on the left
4. Search for the Client 5. Select Intended Location, Duration, Type (of apptmt)
6. Select and complete tabs. Include Intended Activity (+others if appropriate)
7. Only when all fields complete, click 8. Returned to the diary, the appointment will be entered
To Record Other Activities (Non-Client) 1. Find an appropriate time slot and click in the
Location/Other Activity column The Book Other Activity
page opens 2. Complete Activity Type, Location, HCPs invited, Repeat dates, comments
3. Click 4. Shown in green on Diary
5. Can be booked in Clinic Diary too ! p11 p22
DToC - Delayed Discharge
Three Stages : Admission Record, Delayed Discharge Form, Ending DToC Episode
Admission Record 1. Access via Ward, Bed View 2. Complete Ready for Discharge Date, Reason for Discharge Delay and Type of Stay (enter Other) 3. Save and Return to Bed View
Bed View shows Delayed Discharge icon
Delayed Discharge Form From Case Record, access Inpatient Management, then Delayed Discharge 1. Click Create New 2. Complete Date/Time, Inpatient Episode, Delayed Start Date, Reason for Delay, Delay Responsibility. (No need to enter no. of days) 3.Click Add 4. Click Save
Ending DtoC Episode 1. Access Delayed Discharge Form, as above 2. Select Edit Current 3. Add Delayed End Date and End Reason, then Save
p27
Outcome (Clinic) Appointment 1. From the Clinic Diary screen, click on the blue down arrow of the Appointment
2. Choose Record Outcome from the pop-up
Outcome screen is displayed
3. Click Outcome Tab. Set Arrival and Seen times and Actual Duration and select a pull-down Outcome. Comment if appropriate.
4. Choose No, for Report Summary, unless discharging Client,
when you should choose Later
5. Select the Activities tab
6. Identify the Actual AND Main Activity 7. Click Save 8. Select Follow-up Appointment, or not? 9. Select Close Outcome
10. The Clinic Diary page will refresh, showing the out-comed appointment, highlighted in green

p7
Case Record - (or Clinical Portal - Client’s View) 1. Click the Client Record Menu and select Case Record
2. Search for the Client
3. Select a Reason for accessing the Case Record and enter a supporting Comment, then click Save (if nec.)
The Case Record screen is displayed
On the right side, folders that allow you to access various client-related forms/ functions
This link accesses the demographics details screen
Alerts
Allergies
p26
Clinic Diary View 1. Click on the Appointments menu and select Clinic Appointments and Select your Clinic and Stream
The Clinic screen is displayed
2. Select the correct date and click return
A Clinic Diary View will be displayed for the clinic on the selected date
Book Clinic Appointments 1. From the Clinic Diary View screen, click on the blue down arrow to the right of the time you wish to book. Select New Appointment
2. Search for the client The Appointment Booking (Clinic) page will display
Ensure the following details are correct: Date/ Time/ Intended
Duration/ HCP/ Urgency/ Type (of appointment) & Comments Tabs are available for Additional HCPs/ Intended Activities/ Repeat Appointments (which should be set now if necessary)
3. Click Book to complete
You will be returned to the Clinic Diary page, showing the New Appointment
p10
Caseload Transfer/Sharing 1. Select the Client Record Menu and click Caseload Transfer
The Caseload Transfer screen is displayed
2. Within your OWN TEAM, select the correct Team and click this GO
3. ONLY when THIS panel is displayed, select the HCP who currently has the client
4. To Share or Reallocate client(s) with another HCP in your own team, choose the HCP from the Allocate To list, enter the Start Date and any Comment
5. Select the client(s) you wish to share or reallocate by clicking the Share or Reallocate checkbox for each client. This will highlight the client line in blue
6. Click Allocate Caseload Item(s) to save the changes
A transferred/shared successful message will be displayed at the top of the screen
NB To share/allocate to another HCP in a different team, start by selecting your HCP FIRST, then you will get the full list to allocate to next.
p23
Editable Letters 1. From the Client’s Case Record page, click Clinical Documentation, then Editable Letters
The Create Letter screen will appear
2. Choose a letter type, and click
A Word document will open up, in which all aspects are editable
3. On completion, the document can be printed, then saved to RiO by clicking on Add-Ins, then Send to RiO at the top left of the Word screen
4. Complete all Documents Details and Click OK
5. Then OK the File Uploaded box
Refer to the RiO Clinical Support (Wiki) and handouts
for further information on saving to other areas http://ourspace/Systems/RiO/ClinicalSupport/Wiki%20Pages/Home.aspx

p8
Referral (Entry/Exit)
1. From the Case Record screen click Client Referrals and select Entry/Exit
The Referrals screen is displayed
2. Click Create New Referral
The Referral Details screen is displayed
If this is the initial referral, Do NOT select an HCP. This is done when received by the team
The Receiving Team must add this name via the New Team Manager’s log-in
3. Complete all other mandatory (lilac) fields & click Save Referral
Click Transfer to transfer the referral to another team in the service
Click To Discharge to discharge the Referral
The Referral Screening form can be accessed from the Client Referrals folder p25
Document List View 1. From the Clinical Portal - Client’s View page, click Clinical Documentation, then Document List View
This will take you to
the Document List View screen, and will allow you to see all documents Uploaded to this Client’s file
Clinic Plan
1. Click on the Appointments icon and select Clinic Plan
The Clinic Plan screen is displayed
2. Select a clinic and click OK
3. The Date will default to today, and 2 clinics for today & tomorrow. Options for no. of Clinics & dates available
4. Click on a free time slot in a Clinic for options, as shown here:
5. Click on the Display Clients icon of a clinic session for a detailed view
Caseload 1. Click the Client Record icon and select Caseload - Or use the page bottom links
The Caseload Screen is displayed for the current HCP
The blue Menu Arrows give case specific access to various functions (See white View options panel below)
2. If you have access, drop down the list to view other HCP’s Caseloads
3. To view a Client Case Record, click on the Client’s name hyperlink
4. To see a Client Case Record snapshot, click the next to the client hyperlink
p9 p24
Upload Documents
1. From the Client’s Case Record, click on the Clinical Documentation folder, then click Document Upload
The Document Upload screen is displayed
2. Click Browse to search for file (N.B. Scans need to be converted to pdf from TIFF before upload)
3. Complete all the mandatory (lilac) fields Document Title Document Date Document type Description, if nec. Final Version is good
4. Click Upload Document
Assign one of the RiO
document types to your Uploaded documents
5. Enter a brief summary of the Uploaded Document in Progress Notes
See p24 to view uploaded documents in List View
Code Description
CP Care plans
CON Consent to share information
CTT Consent to treatment
DS Discharge summaries
GEN Genogram
CHART Images - Charts
OI Images - Other
PH Images - Photographs
XS Images - X-Rays/Scans
IR Investigation results
CL Letters - Clinic
OC Letters - Other
LET Letters - Referrals
MHA MHA documents
REP Reports/Assessments
RISK Risk