Embed Size (px)
Citation preview

___________________________________________________________________________________
1 GIPAT s.r.l.s.
PolyShaper®
ORANJE v1.0
USER MANUAL
ORANJE
HIGH PRECISION CNC FOAM CUTTER
USER MANUAL
Copyright (©) by GIPAT - 2018.
via Eusanio Stella, 17
67100 L’Aquila - ITALY

___________________________________________________________________________________
2 GIPAT s.r.l.s.
PolyShaper®
ORANJE v1.0
USER MANUAL
INDEX
1 FOREWORD ........................................................................................................................................................... 3
2 IDENTIFICATION and MARKING ............................................................................................................................ 5
3 MARKING .............................................................................................................................................................. 6
4 Package components ............................................................................................................................................ 7
5 Oranje’s components ........................................................................................................................................... 8
6 FINAL ASSEMBLING............................................................................................................................................. 10
7 Disassembly electronic case from CNC Foam Cutter ORANJE ............................................................................ 21
8 Environmental Conditions .................................................................................................................................. 27
9 SET-UP & USE ...................................................................................................................................................... 28
9.1 ShaCo Sw Use ............................................................................................................................................. 28
10 MAINTENANCE ............................................................................................................................................... 36
10.1 GENERAL PERIODIC CONTROLS .................................................................................................................. 36
10.2 WIRE REPLACEMENT .................................................................................................................................. 36
10.3 CLEANING ................................................................................................................................................... 39
11 Troubleshooting.............................................................................................................................................. 41
12 WEEE disposal of waste equipment in the European union .......................................................................... 43
13 WARRANTY ..................................................................................................................................................... 45
14 Acronyms and abbreviations .......................................................................................................................... 46

___________________________________________________________________________________
3 GIPAT s.r.l.s.
PolyShaper®
ORANJE v1.0
USER MANUAL
1 FOREWORD
The Customer documentation for High precision Foam Cutter – ORANJE (P/N PC205005005-1.0) is
Included into the following volumes:
• Technical Description (TED)
The Technical Description contains mainly instructions on packaging /un-packaging, mounting and
connecting the desktop CNC Foam Cutter ORANJE.
The Technical Description gives also an overview of the application, performance features, interfaces and
functions of CNC Foam Cutter ORANJE. It also contains the most important technical data.
• User Manual – Installation Guide (UM) - THIS DOCUMENT
The User Manual provides information on how to operate, monitor and maintain the desktop CNC Foam
Cutter ORANJE.
Symbols Used in the Documentation
Symbol for Warnings This symbol identifies notes which, if ignored, can result in personal injury or in permanent damage to
the equipment.
Symbols for Notes This symbol identifies notes providing information which extends beyond the immediate context.
Important Notice on Product Safety
Before taking any action on the equipment please read carefully the safety rules and precautions.
Keep these instructions carefully.

___________________________________________________________________________________
4 GIPAT s.r.l.s.
PolyShaper®
ORANJE v1.0
USER MANUAL
Non-observance of these conditions and the safety instructions can result in personal injury or in
property damage, therefore only trained personnel may install and maintain the system.
The system complies with the standards EN 61558-1, EN 61558-2-6.
All equipment connected has to comply with the applicable safety standards.
Important Notice on Product Operation
Every ORANJE machine has been carefully tested before shipping. It is assumed stable voltage at
electric socket. If this is not the case, insert a voltage stabilizer between machine and electric socket in
order to prevent equipment damages and to electronic and motor components
Always wear protective gloves
Some of the parts may have elevated operating temperatures
Always wear protective glasses

___________________________________________________________________________________
5 GIPAT s.r.l.s.
PolyShaper®
ORANJE v1.0
USER MANUAL
2 IDENTIFICATION and MARKING
User shall examine the shipping container for obvious damage prior to installing this product; notify the
supplier of any damage which he believes occurred during shipment or delivery; user shall inspect the
contents of this package for any sign of damage and ensure that the items listed below are included.
Before opening the package the user shall also verify that the label reports the correct supplied manufacturer’s P/N and trade mark/name on the shipping documents.

___________________________________________________________________________________
6 GIPAT s.r.l.s.
PolyShaper®
ORANJE v1.0
USER MANUAL
3 MARKING
The following figures show the marking on the external side of ORANJE
Produced by
GIPATS/N aammnnnn
ORANJE CNC Cutting Machine p/n PC205005005-1.0
Picture 1: GIPAT’s product code

___________________________________________________________________________________
7 GIPAT s.r.l.s.
PolyShaper®
ORANJE v1.0
USER MANUAL
4 Package components
BEFORE USE: carefully check whether all components listed below are present inside the package.
In case any of them were missing or damaged, contact our customer care and do not proceed with final assembling.
Item list present in the box:
a) Nr.1 Oranje’s base
b) Nr. 1 Oranje’s portal
c) Nr. 2 Brackets (supporting anchorages)
d) Nr.1 AC/DC Adapter
e) Nr.1 Cutting Wire rocket (mt.2)
f) Nr.1 USB cable
g) Nr.1 assembling key

___________________________________________________________________________________
8 GIPAT s.r.l.s.
PolyShaper®
ORANJE v1.0
USER MANUAL
5 Oranje’s components
Before using the CNC machine user should be aware of its components and safety issues.
Picture 2: ORANJE’s components-1

___________________________________________________________________________________
9 GIPAT s.r.l.s.
PolyShaper®
ORANJE v1.0
USER MANUAL
Picture 3: ORANJE’s components-2
Numbering below refers to above pictures
1. ON/OFF power button
2. Power interface (INPUT 100/230 V, OUTPUT 12 V), jack DC Power Supply 5,5mm
3. Electronics case and ‘orange’ cable
4. Styrofoam anchorages
5. Cutting wire ( hot during use)
6. USB interface type B

___________________________________________________________________________________
10 GIPAT s.r.l.s.
PolyShaper®
ORANJE v1.0
USER MANUAL
6 FINAL ASSEMBLING
ORANJE is provided partially assembled (due to better packaging and shipping):
it is composed of two main parts:
a) portal with cutting wire;
b) base including electronic case
Note:
Note that in order to assemble the ORANJE a specific tool – hex key – is included in the packaging box
Picture 4: ORANJE’s portal with wire

___________________________________________________________________________________
11 GIPAT s.r.l.s.
PolyShaper®
ORANJE v1.0
USER MANUAL
Picture 5: ORANJE’s base

___________________________________________________________________________________
12 GIPAT s.r.l.s.
PolyShaper®
ORANJE v1.0
USER MANUAL
To fix the two parts together, follow the steps below:
move the wire upwards so as to avoid cutting it during the assembly phase (Picture 4). Pass the base through
the portal on the opposite side of the electronics case. Pay attention to the directions as shown in Picture 6.
Picture 6: ORANJE’s portal assembling - 1

___________________________________________________________________________________
13 GIPAT s.r.l.s.
PolyShaper®
ORANJE v1.0
USER MANUAL
Proceed with the rotation of the portal keeping the base stationary (Picture 7):
Picture 7: ORANJE’s portal assembling - 2
Once the portal is in a vertical position, fix it permanently to the base with the screws provided (Picture 8), using
hex key tool provided as well.

___________________________________________________________________________________
14 GIPAT s.r.l.s.
PolyShaper®
ORANJE v1.0
USER MANUAL
Picture 8. Insertion of portal fixing screws
___________________________________________________________________________________
15 GIPAT s.r.l.s.
PolyShaper®
ORANJE v1.0
USER MANUAL
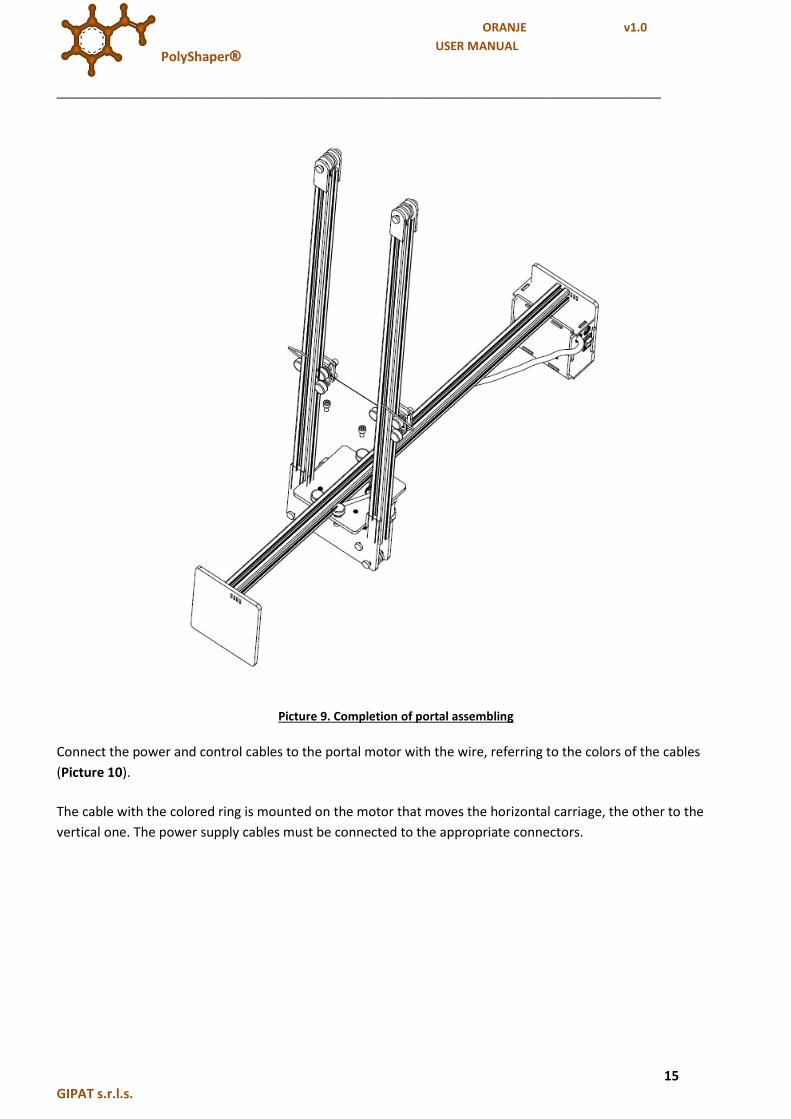
Picture 9. Completion of portal assembling
Connect the power and control cables to the portal motor with the wire, referring to the colors of the cables
(Picture 10).
The cable with the colored ring is mounted on the motor that moves the horizontal carriage, the other to the
vertical one. The power supply cables must be connected to the appropriate connectors.

___________________________________________________________________________________
16 GIPAT s.r.l.s.
PolyShaper®
ORANJE v1.0
USER MANUAL
Picture 10. Stepper motor – cable connection

___________________________________________________________________________________
17 GIPAT s.r.l.s.
PolyShaper®
ORANJE v1.0
USER MANUAL
Finally set the anchoring supports of the polystyrene: fixing is made possible thanks to the particular end of the
supports (Picture 11):
Picture 11. Anchoring support for polystyrene sheet.

___________________________________________________________________________________
18 GIPAT s.r.l.s.
PolyShaper®
ORANJE v1.0
USER MANUAL
Insert the two supports parallel to the profile, in order to allow the lower part entering inside the profile groove
(Pictures 12-13).
Picture 12. Anchoring supports insertion – 1

___________________________________________________________________________________
19 GIPAT s.r.l.s.
PolyShaper®
ORANJE v1.0
USER MANUAL
Picture 13. Anchoring support insertion-2
Once the anchoring supports are inside the profile, it is possible to rotate them in order to permanently block
them inside it. (Picture 14).

___________________________________________________________________________________
20 GIPAT s.r.l.s.
PolyShaper®
ORANJE v1.0
USER MANUAL
Picture 14. Anchoring supports insertion – 3
Connecting USB Cable
Connecting USB cable to the ORANJE machine is very simple and straightforward.
Using the proper cable (item f) in the list see § 4) present in the box, simply attach the cable end to the appropriate
connector indicate in Picture5 as connector ‘6’.
Connecting Power Cable
Using the proper cable (item d) in the list see § 4) present in the box, simply attach the cable end to the appropriate
connector indicate in Picture5 as connector ‘2 and insert the plug into the electric socket

___________________________________________________________________________________
21 GIPAT s.r.l.s.
PolyShaper®
ORANJE v1.0
USER MANUAL
7 Disassembly electronic case from CNC Foam Cutter ORANJE
In case of failure of electronics, follow these instructions in order to disassembly electronics case from ORANJE and send it for warranty/assistance.
Note
In order to extract the electronics from case:
First remove electrical cable, then USB cable from USB interface, then

___________________________________________________________________________________
22 GIPAT s.r.l.s.
PolyShaper®
ORANJE v1.0
USER MANUAL
Picture 15. Cable terminals disconnection
disconnect cable terminals from motors and wire heating as in Picture 15,

___________________________________________________________________________________
23 GIPAT s.r.l.s.
PolyShaper®
ORANJE v1.0
USER MANUAL
Picture 16. Strap removal - 1
Remove the strap from the holes as in Pictures 16 and 17

___________________________________________________________________________________
24 GIPAT s.r.l.s.
PolyShaper®
ORANJE v1.0
USER MANUAL
Picture 17. Strap removal – 2
finally unscrew the fixing of the module (Picture 18) and extract the module (together with orange cable, as per Picture 19

___________________________________________________________________________________
25 GIPAT s.r.l.s.
PolyShaper®
ORANJE v1.0
USER MANUAL
Picture 18. Unscrew the electronic module

___________________________________________________________________________________
26 GIPAT s.r.l.s.
PolyShaper®
ORANJE v1.0
USER MANUAL
Picture 19. Electronic module disassembled
once the case has been disassembled , the machine must be placed horizontally on a plane because it acts as a supporting element

___________________________________________________________________________________
27 GIPAT s.r.l.s.
PolyShaper®
ORANJE v1.0
USER MANUAL
8 Environmental Conditions
The recommended environment conditions are as follow:
• Operation temperature: 0 – +45°C
• Storage temperature: 0 – +40°C
• Humidity: 85% (not condensing)

___________________________________________________________________________________
28 GIPAT s.r.l.s.
PolyShaper®
ORANJE v1.0
USER MANUAL
9 SET-UP & USE
Use the machine only for the purposes indicated in these instructions. Use for any other purposes is strictly proihibited
Read all hazard warnings and operating instructions. Failure to follow the warnings on hazards and operating instructions can result in serious burns, fires and / or accidents.
The use of the machine with specific tools not explicitly indicated by GIPAT srls can create the risk of accidents!
For damages caused by improper use, the user is solely responsible.
BEFORE USE
Unpack the machine and assemble it according to the delivery status (assembled, partially assembled,
disassembled), connect to the 100/230 volt power supply, refer to assembling instructions at §6, then:
1. Orientate the machine in such a way that the USB port looks at us. Let's define it ‘front’.
‘Front Left’ is electronic case side, ‘Front Right’ right the opposite
2. As explained at pag. 20 insert the USB cable to the case and to the PC (where we have previously
installed ShaCo Sw package)
3. Insert the cable to the jack, the plug to the socket and switch to ON
4. Place the polystyrene sheet (max 50x50x5) between the 2 brackets
5. Manually bring ( Note: slowly and carefully procedures) the wire system on the top left corner
until it touches the polystyrene angle
9.1 ShaCo Sw Use
we assume user has already installed ShaCo Sw package and InkScape one and is familiar with shape
drawings. For related issues and tutorial please refer to www.polyshaper.eu/en/support.php

___________________________________________________________________________________
29 GIPAT s.r.l.s.
PolyShaper®
ORANJE v1.0
USER MANUAL
Picture 20. Main screen of PolyShaper 2D extension – Inkskape sw
Open Inkskape sw – already installed on your PC – and select "Extensions” menu of the plugin:
the extension PolyShaper is reached from the menu Extensions->PolyShaper->2D machine; it takes in input only
paths , not objects (written, polygons, shapes, etc.) and raster images. Pay attention: Open paths are not allowed.
Take the drawing as close as possible to the top left corner with respect to the Inkscape sheet, being careful not
to let it come out of the edges. Once you have selected the path you want to cut, open the plugin (picture 20). In
the main screen you can change the name, choose the PolyShaper machine by which you will cut the shape, set
the size of the work area and finally set the cutting speed. When everything is correctly set, click on Apply and the
cutting file will be generated in the PolyShaper folder located under the main folder of the computer.
Trouble Shooting
Path is not selected
Move plug-in window and select the path
Selection done is not a ‘path’
Case a): selection is an object
tenendo selezionato l’oggetto dal menu path, click on object to path
Case b): selection is a raster image

___________________________________________________________________________________
30 GIPAT s.r.l.s.
PolyShaper®
ORANJE v1.0
USER MANUAL
select the image, from the menu path, vectorize bitmap, then in the window that appears click
simply ‘OK’. If it is a purely black and white image, play with the parameters for other cases or refer
to more specific tutorials for the specific Inkscape tool.
Picture 21. Advanced tab - PolyShaper plug-in
Advanced ‘tab’ of Main Screen (picture 21):
flatness:
is a parameter that allows to discretize all the curves inside the drawing in small straight lines. 0.1 is a fair
compromise for normal applications. If a too coarse discretization is perceived on the cutting path, it is
suggested to reduce this parameter to 0.01.
It is not recommended to maintain this value or further reduce it, as the time required to calculate the cutting
path could increase strongly
margin thickness:
if different from 0 it creates a rectangular frame around the made drawing. Such trimming is cut only
after completing the entire drawing in order not to weaken the polystyrene sheet during the internal

___________________________________________________________________________________
31 GIPAT s.r.l.s.
PolyShaper®
ORANJE v1.0
USER MANUAL
path. A rectangle will be created that is larger than the dimensions of the drawing of the value
expressed in mm, set by user in the input window.
draw the path of the tool
if checked at the end of the calculation of the cutting path it will be drawn in red above the drawing.
automatically close….
the plugin does not handle open paths but only closed paths. Especially in the case of paths imported
from other drawing programs, it may happen that some nodes of the trace are open.
This function, if checked, automatically closes open nodes with the next open node. The algorithm used
for this function, although well structured, can create unwanted paths. Associate this function with the
"draw the path ...." function to immediately check the result.
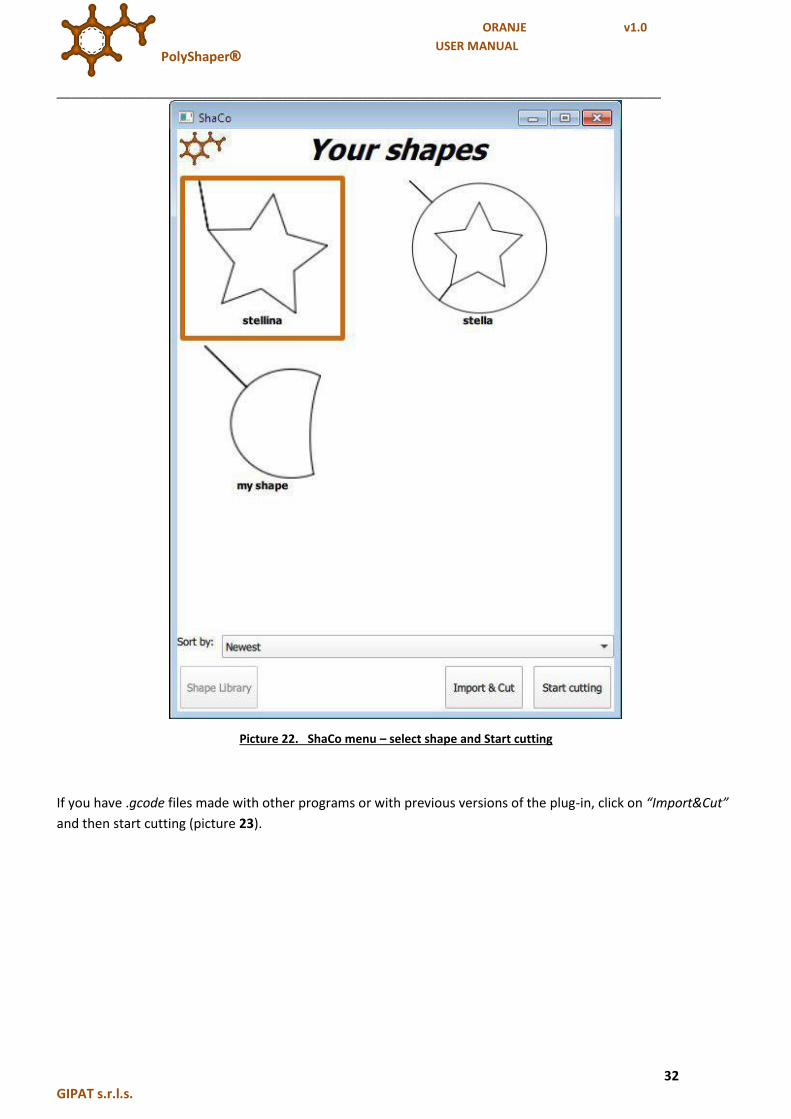
Once the cutting file has been created on the plug-in, open ShaCo. The shape made will be shown directly on the
main ShaCo page. If you want to proceed with the cut, select the desired shape (an orange box appears around
the shape preview) and then click on the button at the bottom right, namely "Start cutting" (picture 22).
___________________________________________________________________________________
32 GIPAT s.r.l.s.
PolyShaper®
ORANJE v1.0
USER MANUAL
Picture 22. ShaCo menu – select shape and Start cutting
If you have .gcode files made with other programs or with previous versions of the plug-in, click on “Import&Cut”
and then start cutting (picture 23).

___________________________________________________________________________________
33 GIPAT s.r.l.s.
PolyShaper®
ORANJE v1.0
USER MANUAL
Picture 23. ShaCo menu – Import & Cut
The thread temperature must be set on the “Preparing to cut” menu. If you do not know the right temperature It
is advisable to start with an high-enough temperature and then reduce it during cutting. Do not bring the wire to
the incandescence because it tends to wear out very quickly.

___________________________________________________________________________________
34 GIPAT s.r.l.s.
PolyShaper®
ORANJE v1.0
USER MANUAL
Picture 24. Preparing to cut menu
The animation of the machine suggests bringing the hot wire in the upper left corner of the piece of polystyrene
(just a little bit inside!). click on “Start!”

___________________________________________________________________________________
35 GIPAT s.r.l.s.
PolyShaper®
ORANJE v1.0
USER MANUAL
Picture 25. Cutting menu
Go to the Cutting menu where you can pause and then resume cutting, or stop (abort) or leave everything as it is
and go on with the processing.

___________________________________________________________________________________
36 GIPAT s.r.l.s.
PolyShaper®
ORANJE v1.0
USER MANUAL
10 MAINTENANCE
Note:
ORANJE’s repairs must be carried out by qualified personnel using only original spare parts. On the contrary, the
safety of the machine might not be guaranteed.
Make sure the machine is switched off and the plug is unplugged before performing any maintenance
checks or accessories substitution or simply machine storage.
10.1 GENERAL PERIODIC CONTROLS
Check regularly that all parts of the machine are in order, especially that the sliding guides work perfectly and that
the wire is not twisted and is at the correct operating voltage.
Note:
After 500 up to 600 cuts the spring due to thermal shocks could deform and lose its elasticity, in this case replace
it.
Check the correct alignment of all moving parts, check that they are not seized and that there are no faults that
could affect the operation of the instrument.
Note:
Keep the hot wire clean. If it is regularly maintained and cleaned, it works more precisely.
10.2 WIRE REPLACEMENT
In case of accidental break, it is possible to replace the wire in a very simple way

___________________________________________________________________________________
37 GIPAT s.r.l.s.
PolyShaper®
ORANJE v1.0
USER MANUAL
Picture 26. Wire replacement - 1
With key suitable for M3 nuts or pliers unscrew the nuts to remove the two plates that cover the wire(Picture 27).

___________________________________________________________________________________
38 GIPAT s.r.l.s.
PolyShaper®
ORANJE v1.0
USER MANUAL
Picture 17. Wire replacement - 2
Proceed by cutting a piece of wire that allows you to join the two ends of the portal. Pass the thread through the
eye of the spring at both ends as shown in Picture 28. Fixing is done by wrapping the thread on itself at both ends.

___________________________________________________________________________________
39 GIPAT s.r.l.s.
PolyShaper®
ORANJE v1.0
USER MANUAL
Picture 28. Wire replacement - 3
At this point it is possible to replace the two plates and screw the previously unscrewed nuts back on.
10.3 CLEANING
To guarantee good results in total safety, always keep the machine clean. Regularly check that dust or other external
objects have not penetrated the guides, buttons, sockets and plugs. Use a soft cloth to remove deposited dust or
compressed air.
Protect your eyes and your hands during cleaning by wearing glasses and gloves .
Use a damp cloth to clean the machine. A light detergent can be used.

___________________________________________________________________________________
40 GIPAT s.r.l.s.
PolyShaper®
ORANJE v1.0
USER MANUAL
Do not use alcohol, petrol or other solvents. The use of aggressive cleaners is not recommended
Avoid contact of the machine with water.

___________________________________________________________________________________
41 GIPAT s.r.l.s.
PolyShaper®
ORANJE v1.0
USER MANUAL
11 Troubleshooting
All CNC Foam Cutters are designed to provide reliability and consistently high performance in all network
environments. The installation of ORANJE machine is a straightforward procedure (see INSTALLATION, §6).
Should problems develop during installation or operation, this section is intended to help locate, identify and
correct these types of problems. Please follow the suggestions listed below prior to contacting your supplier.
However, if you are unsure of the procedures described in this section or if ORANJE is not performing as expected,
do not attempt to repair the unit; instead contact your supplier for assistance.
Note: for troubleshooting related to ShaCo Sw use refer to § 9.
ORANJE machine does not ‘move’
Make sure the power cable has been connected to the 2 extremes (see §6, section “Connect power cable”)
Make sure the USB cable has been connected to Oranje and to PC (see §6, section “Connect USB cable”)
Check the ON button is switched
Make sure you have correctly installed Shaco Sw
Make sure you have correctly connected the cable terminals to the 2 motors (see §6, section “Stepper motor
cable connection”)
Cutting wire does not heat
Check the connection of the cutting wire power cables to the portal (see §6, section “Stepper motor cable
connection”)
Make sure the power cable has been connected to the 2 extremes (see §6, section “Connect power cable”)
Make sure the USB cable has been connected to Oranje and to PC (see §6, section “Connect USB cable”)
Check the ON button is switched
Check that the cables that carry the power supply to the wire that have not accidentally been disconnected
refer to the picture replacement
Make sure you are in the appropriate section of the ShaCo Sw where it is possible, by means of appropriate
push buttons, to supply wire and adjust temperatures
Cut SHAPE is not as expected
the wire was not positioned in order to contact the polystyrene in the upper left
the piece of polystyrene was smaller than the design: the machine will slam either down or to the right
___________________________________________________________________________________
42 GIPAT s.r.l.s.
PolyShaper®
ORANJE v1.0
USER MANUAL
polystyrene has been placed too far to the right, overstepping the right limit of the working area
the wire is slow or the temperature is too low: you can see that all the sharp corners are smoothed
the problem could happen if the temperature has been adjusted for a different material (previously
used) and changing it with a thicker one the previous temperature may be too low
the polystyrene moved and was not well anchored
the design does not end where it starts: , it could be a problem of slow belt or on the horizontal or vertical
axis
GENERAL NOTES:
Check the cables and connectors to ensure that they have properly connected during installation. (About 90% of
network downtime can be attributed to wiring and connector problems.)
Make sure that each AC power cord is plugged into a functioning electrical outlet.
If the problem continues after checks above, contact your Supplier

___________________________________________________________________________________
43 GIPAT s.r.l.s.
PolyShaper®
ORANJE v1.0
USER MANUAL
12 WEEE disposal of waste equipment in the European union
GB – Disposal of Waste Equipment in the European Union
This symbol on the product or on its packaging indicates that this product must not be disposed of with your other
household waste. Instead, it is your responsibility to dispose of your waste equipment by handing it over to a
designated collection point for the recycling of waste electrical and electronic equipment. The separate collection
and recycling of your waste equipment at the time of disposal will help to conserve natural resources and ensure
that it is recycled in a manner that protects human health and the environment. For morew information about
where you can drop off your waste equipment for recycling, please contact your local city office, your household
waste disposal service or the shop where you purchased the product. For equipment used for professional use,
please contact your supplier to verify terms and conditions of the purchase contract. These products must be
disposed off separately from the other waste.
FR – Traitement des appareils sur le territoire de l’union europeenne
Le symbole present sur le produit ou sur la confection indique que le produit ne peut etre jetar avec les autre
dechets domestiques. L’utilisateur est responsible de consigner dans un centre de recolte hornologuè pour recycker
les appareils electriques et electroniques. Le recyclage de ces dechets permet de proteger l’individu et
l’ecosysteme. Pour informations supplementaires relative au centre de recolte des ces appareils, veuillez contacter
l’administration locale, ou bien, au magasin dans lequel l’appareil a etè achetè. Pour les appareils à usage
professional, les utilisateurs sont invites a contacter leur fornisseur et verifier les termes et conditions du contract
d’achat. Ce produit ne doit etre jeter avec les autres dechets commerciaux.
ES – Depòsito de desechos electrònicos en la Union Europe
Este sìmbolo presente en el producto o en su embalaje indica que no puede ser depositado junto a los desechos
domésticos. Es responsabilidad del usuario depositar el aparato entregàndolo proximo a un punto de recogida
destinado al reciclaje y desmantelamiento de aparatos electricos y electronicos. La recogida selectiva y reciclaje de
los aparatos electronicos permite proteger la salud del individuo y del medio ambiente. Para mas information sobre
puntos de recogida selectiva de aparatos, contacten con la entina local para depositar desechos, o con la tienda
mas proxima donde ha adquirido el producto. Para equipos usados de modo profesionel, por favor contacten con
su proveedor para verificar los terminos y condiciones del contart de compra. Este producto no debe ser depositado
unido a otros desechos comerciales.
IT – Smaltimento delle apparecchiature nel territorio dell’Unione Europea
Questo simbolo presente sul prodotto o sulla sua confezione indica che il prodotto non può essere smaltito insieme
ai rifiuti domestici. È responsabilità dell’utente smaltire le apparecchiature consegnandole presso un punto di
raccolta designata al riciclo e allo smaltimento di apparecchiature elettriche ed elettroniche. La raccolta

___________________________________________________________________________________
44 GIPAT s.r.l.s.
PolyShaper®
ORANJE v1.0
USER MANUAL
differenziata e il corretto riciclo delle apparecchiature da smaltire consente di proteggere la salute degli individui e
l’ecosistema. Per ulteriori informazioni relative ai punti di raccolta delle apparecchiature, contattare l’ente locale
per lo smaltimento dei rifiuti, oppure il negozio presso il quale è stato acquistato il prodotto. Per apparecchiature
provenienti da usi professionali, gli utenti professionali sono invitati a contattare il proprio fornitore e verificare i
termini e le condizioni di acquisto. Questo prodotto non deve essere smaltito unitamente ad altri rifiuti commerciali

___________________________________________________________________________________
45 GIPAT s.r.l.s.
PolyShaper®
ORANJE v1.0
USER MANUAL
13 WARRANTY
The warranty period for CNC foam cutter machines is valid from the date of shipping and complies with European
standards. GIPAT’s machines are not covered by warranty for damage caused by wear, overload or improper use.
The manufacturer guarantees that all non-functional parts due to defects in material and / or workmanship are
replaced. Warranty performance will be provided only if the requested machine is sent back appropriately to the
dealer, with original package.
Warranty does not cover shipping costs.
Note
Manufacturer reserves the right to make technical changes without prior notice. Technical specifications may
change from country to country.

___________________________________________________________________________________
46 GIPAT s.r.l.s.
PolyShaper®
ORANJE v1.0
USER MANUAL
14 Acronyms and abbreviations
CNC Computer Numerical Control
P/N Part Number
S/N Serial Number
TED Technical Description
UM User Manual