Embed Size (px)
Citation preview

Part No: E60186-01April 2015
Oracle® Switch ES2-72 and Oracle SwitchES2-64 Configuration Guide


Part No: E60186-01
Copyright © 2015, Oracle and/or its affiliates. All rights reserved.
This software and related documentation are provided under a license agreement containing restrictions on use and disclosure and are protected by intellectual property laws. Exceptas expressly permitted in your license agreement or allowed by law, you may not use, copy, reproduce, translate, broadcast, modify, license, transmit, distribute, exhibit, perform,publish, or display any part, in any form, or by any means. Reverse engineering, disassembly, or decompilation of this software, unless required by law for interoperability, isprohibited.
The information contained herein is subject to change without notice and is not warranted to be error-free. If you find any errors, please report them to us in writing.
If this is software or related documentation that is delivered to the U.S. Government or anyone licensing it on behalf of the U.S. Government, then the following notice is applicable:
U.S. GOVERNMENT END USERS. Oracle programs, including any operating system, integrated software, any programs installed on the hardware, and/or documentation, deliveredto U.S. Government end users are "commercial computer software" pursuant to the applicable Federal Acquisition Regulation and agency-specific supplemental regulations. Assuch, use, duplication, disclosure, modification, and adaptation of the programs, including any operating system, integrated software, any programs installed on the hardware, and/ordocumentation, shall be subject to license terms and license restrictions applicable to the programs. No other rights are granted to the U.S. Government.
This software or hardware is developed for general use in a variety of information management applications. It is not developed or intended for use in any inherently dangerousapplications, including applications that may create a risk of personal injury. If you use this software or hardware in dangerous applications, then you shall be responsible to take allappropriate fail-safe, backup, redundancy, and other measures to ensure its safe use. Oracle Corporation and its affiliates disclaim any liability for any damages caused by use of thissoftware or hardware in dangerous applications.
Oracle and Java are registered trademarks of Oracle and/or its affiliates. Other names may be trademarks of their respective owners.
Intel and Intel Xeon are trademarks or registered trademarks of Intel Corporation. All SPARC trademarks are used under license and are trademarks or registered trademarks ofSPARC International, Inc. AMD, Opteron, the AMD logo, and the AMD Opteron logo are trademarks or registered trademarks of Advanced Micro Devices. UNIX is a registeredtrademark of The Open Group.
This software or hardware and documentation may provide access to or information about content, products, and services from third parties. Oracle Corporation and its affiliates arenot responsible for and expressly disclaim all warranties of any kind with respect to third-party content, products, and services unless otherwise set forth in an applicable agreementbetween you and Oracle. Oracle Corporation and its affiliates will not be responsible for any loss, costs, or damages incurred due to your access to or use of third-party content,products, or services, except as set forth in an applicable agreement between you and Oracle.
Documentation Accessibility
For information about Oracle's commitment to accessibility, visit the Oracle Accessibility Program website at http://www.oracle.com/pls/topic/lookup?ctx=acc&id=docacc.
Access to Oracle Support
Oracle customers that have purchased support have access to electronic support through My Oracle Support. For information, visit http://www.oracle.com/pls/topic/lookup?ctx=acc&id=info or visit http://www.oracle.com/pls/topic/lookup?ctx=acc&id=trs if you are hearing impaired.

Référence: E60186-01
Copyright © 2015, Oracle et/ou ses affiliés. Tous droits réservés.
Ce logiciel et la documentation qui l’accompagne sont protégés par les lois sur la propriété intellectuelle. Ils sont concédés sous licence et soumis à des restrictions d’utilisation etde divulgation. Sauf stipulation expresse de votre contrat de licence ou de la loi, vous ne pouvez pas copier, reproduire, traduire, diffuser, modifier, breveter, transmettre, distribuer,exposer, exécuter, publier ou afficher le logiciel, même partiellement, sous quelque forme et par quelque procédé que ce soit. Par ailleurs, il est interdit de procéder à toute ingénierieinverse du logiciel, de le désassembler ou de le décompiler, excepté à des fins d’interopérabilité avec des logiciels tiers ou tel que prescrit par la loi.
Les informations fournies dans ce document sont susceptibles de modification sans préavis. Par ailleurs, Oracle Corporation ne garantit pas qu’elles soient exemptes d’erreurs et vousinvite, le cas échéant, à lui en faire part par écrit.
Si ce logiciel, ou la documentation qui l’accompagne, est concédé sous licence au Gouvernement des Etats-Unis, ou à toute entité qui délivre la licence de ce logiciel ou l’utilise pourle compte du Gouvernement des Etats-Unis, la notice suivante s’applique:
U.S. GOVERNMENT END USERS. Oracle programs, including any operating system, integrated software, any programs installed on the hardware, and/or documentation, deliveredto U.S. Government end users are "commercial computer software" pursuant to the applicable Federal Acquisition Regulation and agency-specific supplemental regulations. Assuch, use, duplication, disclosure, modification, and adaptation of the programs, including any operating system, integrated software, any programs installed on the hardware, and/ordocumentation, shall be subject to license terms and license restrictions applicable to the programs. No other rights are granted to the U.S. Government.
Ce logiciel ou matériel a été développé pour un usage général dans le cadre d’applications de gestion des informations. Ce logiciel ou matériel n’est pas conçu ni n’est destinéà être utilisé dans des applications à risque, notamment dans des applications pouvant causer des dommages corporels. Si vous utilisez ce logiciel ou matériel dans le cadre d’applications dangereuses, il est de votre responsabilité de prendre toutes les mesures de secours, de sauvegarde, de redondance et autres mesures nécessaires à son utilisation dans desconditions optimales de sécurité. Oracle Corporation et ses affiliés déclinent toute responsabilité quant aux dommages causés par l’utilisation de ce logiciel ou matériel pour ce typed’applications.
Oracle et Java sont des marques déposées d’Oracle Corporation et/ou de ses affiliés. Tout autre nom mentionné peut correspondre à des marques appartenant à d’autres propriétairesqu’Oracle.
Intel et Intel Xeon sont des marques ou des marques déposées d’Intel Corporation. Toutes les marques SPARC sont utilisées sous licence et sont des marques ou des marquesdéposées de SPARC International, Inc. AMD, Opteron, le logo AMD et le logo AMD Opteron sont des marques ou des marques déposées d’Advanced Micro Devices. UNIX est unemarque déposée d’The Open Group.
Ce logiciel ou matériel et la documentation qui l’accompagne peuvent fournir des informations ou des liens donnant accès à des contenus, des produits et des services émanant detiers. Oracle Corporation et ses affiliés déclinent toute responsabilité ou garantie expresse quant aux contenus, produits ou services émanant de tiers, sauf mention contraire stipuléedans un contrat entre vous et Oracle. En aucun cas, Oracle Corporation et ses affiliés ne sauraient être tenus pour responsables des pertes subies, des coûts occasionnés ou desdommages causés par l’accès à des contenus, produits ou services tiers, ou à leur utilisation, sauf mention contraire stipulée dans un contrat entre vous et Oracle.
Accessibilité de la documentation
Pour plus d’informations sur l’engagement d’Oracle pour l’accessibilité à la documentation, visitez le site Web Oracle Accessibility Program, à l'adresse http://www.oracle.com/pls/topic/lookup?ctx=acc&id=docacc.
Accès au support électronique
Les clients Oracle qui ont souscrit un contrat de support ont accès au support électronique via My Oracle Support. Pour plus d'informations, visitez le site http://www.oracle.com/pls/topic/lookup?ctx=acc&id=info ou le site http://www.oracle.com/pls/topic/lookup?ctx=acc&id=trs si vous êtes malentendant.

5
Contents
Using This Documention .................................................................................... 9
Administering the Switch .................................................................................. 11Oracle ILOM Overview .................................................................................. 11▼ Connect to the Serial Console for Initial Configuration .................................... 13▼ Configure Network Management on the SP .................................................. 14▼ Configure the Host Network Management From the CLI ................................. 16▼ Configure Other Network Settings (Oracle ILOM Web Interface) ...................... 18Stopping, Starting, and Restarting the Host ........................................................ 19
▼ Stop the Host .................................................................................. 19▼ Start the Host .................................................................................. 20▼ Restart the Host ............................................................................... 20
▼ Log Out of the Oracle ILOM CLI ............................................................... 21
Administering SEFOS ....................................................................................... 23SEFOS Setup Tasks ....................................................................................... 23Understanding SEFOS Basics .......................................................................... 24
Basic SEFOS Topology .......................................................................... 25Port Terminology .................................................................................. 25▼ Connect to SEFOS ........................................................................... 26▼ Disconnect From SEFOS ................................................................... 27▼ Stop and Start SEFOS ....................................................................... 27
▼ Create a Local User .................................................................................. 28▼ Change a SEFOS User Privilege Level ........................................................ 29Configuring the SEFOS Environment ............................................................... 30
▼ Enable or Disable the Timeout for Line Connections ............................... 31▼ Configure the IP Address for an Interface ............................................. 31▼ Configure the Name of the Configuration File ....................................... 32▼ Configure the Default VLAN ID ......................................................... 33▼ Enable or Disable Trap Generation on an Interface ................................. 34

Contents
6 Oracle Switch ES2-72 and Oracle Switch ES2-64 Configuration Guide • April 2015
▼ Configure Debug Logging ................................................................. 36▼ Configure ACL Filters ...................................................................... 36▼ Configure QoS ................................................................................ 39▼ Configure Port Mirroring ................................................................... 42▼ Configure Rate Limiting .................................................................... 44Configuring Save Parameters ................................................................... 45
Managing Configuration Files ......................................................................... 47▼ Save the Configuration to a File ......................................................... 47▼ Erase a Configuration File ................................................................. 48▼ Copy a Configuration File to a Remote Location .................................... 49▼ Copy a Configuration File From a Remote Location to Flash .................... 50▼ Copy a Configuration File From One Remote Location or Flash to AnotherRemote Location or Flash ....................................................................... 51
Managing Log Files ....................................................................................... 51▼ Copy a System Log to a Remote Location ............................................ 51▼ View Debug Logs ............................................................................ 52
Configuring the Switching Feature ................................................................... 55Switching Feature Topology ............................................................................ 55Port Terminology .......................................................................................... 56▼ Configure Initial Settings ........................................................................... 57▼ Verify the Configuration ............................................................................ 59▼ Configure VLAN Forwarding ..................................................................... 60▼ Verify VLAN Membership ......................................................................... 61▼ Configure RSTP ...................................................................................... 62▼ Configure LA .......................................................................................... 64
Configuring the Routing Feature ...................................................................... 69Routing Feature Topology ............................................................................... 70Configuring Static Routing .............................................................................. 71
▼ Configure Static Unicast Route Entries ................................................ 71▼ Add Static Routes ............................................................................ 76
Configuring Dynamic Routing ......................................................................... 77▼ Configure RIP Dynamic Routing ........................................................ 77▼ Configure OSPF Dynamic Routing ...................................................... 79
Disabling Routing .......................................................................................... 81▼ Remove Static Routes ....................................................................... 82▼ Disable RIP Dynamic Routing ............................................................ 82▼ Disable OSPF Dynamic Routing ......................................................... 83

Contents
7
Glossary ............................................................................................................ 85
Index .................................................................................................................. 87

8 Oracle Switch ES2-72 and Oracle Switch ES2-64 Configuration Guide • April 2015
Using This Documention 9
Using This Documention
■ Overview – Provides basic configuration steps needed to setup the Oracle Switch ES2-72and Oracle Switch ES2-64. Basic L2/L3 examples describe how to use the Sun EthernetFabric Operating System (SEFOS) features
■ Audience – Enterprise network and system administrators■ Required knowledge – Advanced experience working with software
Product Documentation Library
Documentation and other resources for this product are included in the documentation library athttp://www.oracle.com/goto/es2-72_es2-64/docs.
Feedback
Provide feedback about this documentation at http://www.oracle.com/goto/docfeedback.

10 Oracle Switch ES2-72 and Oracle Switch ES2-64 Configuration Guide • April 2015
Administering the Switch 11
Administering the Switch
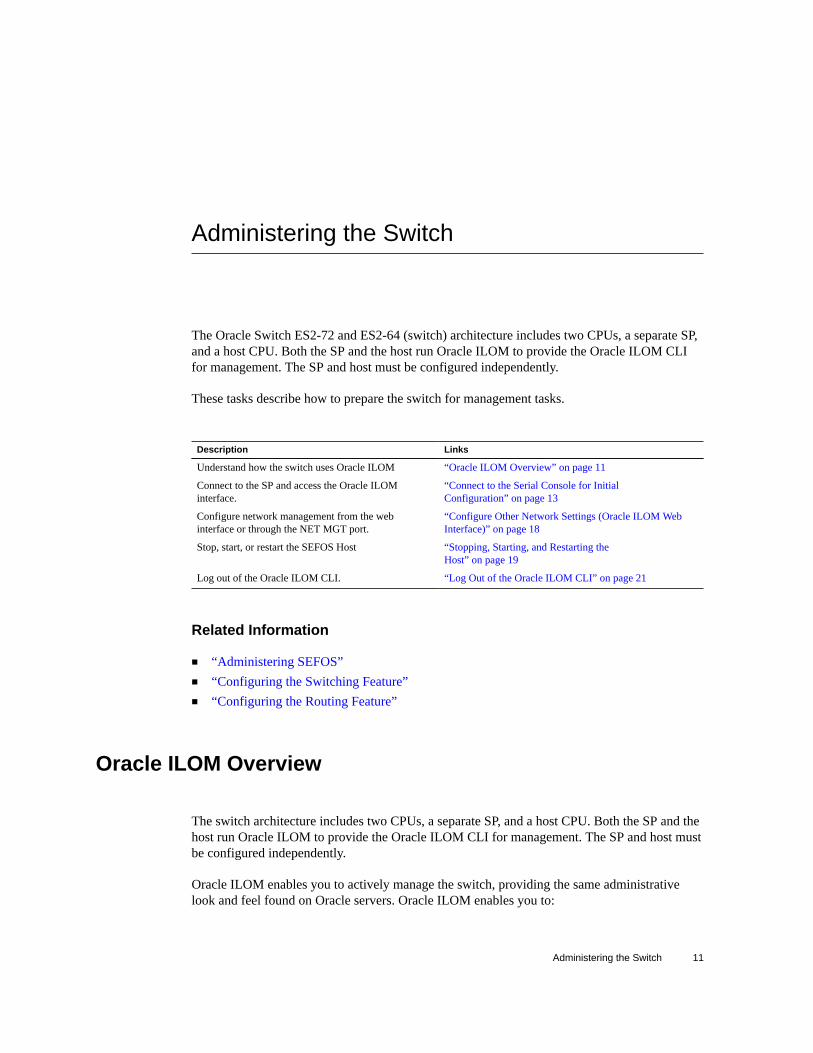
The Oracle Switch ES2-72 and ES2-64 (switch) architecture includes two CPUs, a separate SP,and a host CPU. Both the SP and the host run Oracle ILOM to provide the Oracle ILOM CLIfor management. The SP and host must be configured independently.
These tasks describe how to prepare the switch for management tasks.
Description Links
Understand how the switch uses Oracle ILOM “Oracle ILOM Overview” on page 11
Connect to the SP and access the Oracle ILOMinterface.
“Connect to the Serial Console for InitialConfiguration” on page 13
Configure network management from the webinterface or through the NET MGT port.
“Configure Other Network Settings (Oracle ILOM WebInterface)” on page 18
Stop, start, or restart the SEFOS Host “Stopping, Starting, and Restarting theHost” on page 19
Log out of the Oracle ILOM CLI. “Log Out of the Oracle ILOM CLI” on page 21
Related Information
■ “Administering SEFOS”■ “Configuring the Switching Feature”■ “Configuring the Routing Feature”
Oracle ILOM Overview
The switch architecture includes two CPUs, a separate SP, and a host CPU. Both the SP and thehost run Oracle ILOM to provide the Oracle ILOM CLI for management. The SP and host mustbe configured independently.
Oracle ILOM enables you to actively manage the switch, providing the same administrativelook and feel found on Oracle servers. Oracle ILOM enables you to:

Oracle ILOM Overview
12 Oracle Switch ES2-72 and Oracle Switch ES2-64 Configuration Guide • April 2015
■ Connect to SEFOS.■ View the current status of sensors and indicators on the system.■ Determine the hardware configuration of your system.■ Receive generated alerts about system events in advance by using IPMI PETs or SNMP
traps.■ Manage SEFOS users.■ Upgrade firmware for all components on the switch through either CLI or web interface.■ Configure standard Oracle ILOM services, such as:
■ Clock/NTP■ Serial port■ Network■ Syslog■ SNMP■ SMTP■ Email alert notification■ Web server■ SSH■ IPMI■ CLI
Note - For details on how to configure these services, refer to the Oracle Integrated Lights OutManager (ILOM) 3.0 Daily Management – CLI Procedures Guide at: http://www.oracle.com/pls/topic/lookup?ctx=ilom30
Oracle ILOM does not support the following features on the switch.
■ Server-oriented features, such as:■ Power management■ Storage redirection■ Remote console
Related Information
■
■

Connect to the Serial Console for Initial Configuration
Administering the Switch 13
Connect to the Serial Console for Initial Configuration
The instructions in this topic assume that you are connecting to Oracle ILOM using a serialconnection directly to the switch. For SER MGT pinout, baud rate, and parity information, referto Switch Installation, SER MGT port.
1. If the switch is not already powered on, connect the switch power supplies to apower source.
2. For the initial configuration of the switch, connect a serial console to the SERMGT port on the switch.For more information about connecting devices to the SER MGT and NET MGT ports, refer toSwitch Installation.
3. Press Enter on the console keyboard to open a connection to Oracle ILOMrunning on the SP.
SUNSPnnnnnnnnnn login:
4. Log in to Oracle ILOM running on the SP.The default user is root. The default password is changeme.
ORACLESP-AKCH444444 login: root
Password: changemeDetecting screen size; please wait...done
Oracle(R) Integrated Lights Out Manager
Version 3.2.x rxxxxCopyright (c) 2015, Oracle and/or its affiliates. All rights reserved.
Warning: password is set to factory default.
Warning: HTTPS certificate is set to factory default.
Hostname: xxxxxxxx->
5. Configure network management on the SP.See “Configure Network Management on the SP” on page 14.
Related Information
■ “Configure Network Management on the SP” on page 14■ “Configure the Host Network Management From the CLI” on page 16■ “Configure Other Network Settings (Oracle ILOM Web Interface)” on page 18■ “Log Out of the Oracle ILOM CLI” on page 21

Configure Network Management on the SP
14 Oracle Switch ES2-72 and Oracle Switch ES2-64 Configuration Guide • April 2015
Configure Network Management on the SP
dhcp is enabled by default, so the SP can get the network configuration automatically if there isa DHCP server on the network.
The names and addresses in the following examples are only for demonstration.
Note - Management network configuration is not needed if you plan to only use a serialconsole to access the switch. However, configuring network management will allow multipleadministrators to manage the switch remotely.
1. Log in to Oracle ILOM running on the SP.
ORACLESP-AKCH444444 login: root
Password: changemeDetecting screen size; please wait...done
Oracle(R) Integrated Lights Out Manager
Version 3.2.5.60 r98416
Copyright (c) 2015, Oracle and/or its affiliates. All rights reserved.
Warning: password is set to factory default.
Warning: HTTPS certificate is set to factory default.
Hostname: ORACLESP-AKCH444444
->
2. Discover the network configuration.
-> cd /SP/network/SP/network
-> show /SP/network
Targets:
ipv6
test
Properties:
commitpending = (Cannot show property)
dhcp_clientid = none
dhcp_server_ip = 10.134.178.5
ipaddress = 10.134.178.170
ipdiscovery = dhcp <---------
ipgateway = 10.134.178.1
ipnetmask = 255.255.255.0
macaddress = 00:21:28:79:8B:58
pendingipaddress = 10.134.178.170
pendingipdiscovery = dhcp
pendingipgateway = 10.134.178.1
pendingipnetmask = 255.255.255.0
pendingvlan_id = (none)
state = enabled

Configure Network Management on the SP
Administering the Switch 15
vlan_id = (none)
Commands:
cd
set
show
3. Configure static network settings on the SP (optional).
-> set pendingipaddress=10.134.178.170Set 'pendingipaddress' to '10.134.178.170'
-> set pendingipnetmask=255.255.255.0Set 'pendingipnetmask' to '255.255.255.0'
-> set pendingipgateway=10.134.178.1Set 'pendingipgateway' to '10.134.178.1'
-> set pendingipdiscovery=staticSet 'pendingipdiscovery' to 'static'
-> set commitpending=trueSet 'commitpending' to 'true'
-> show/SP/network
Targets:
ipv6
test
Properties:
commitpending = (Cannot show property)
dhcp_clientid = none
dhcp_server_ip = none
ipaddress = 10.134.178.170
ipdiscovery = static <---------
ipgateway = 10.134.178.1
ipnetmask = 255.255.255.0
macaddress = 00:21:28:79:8B:58
pendingipaddress = 10.134.178.170
pendingipdiscovery = static
pendingipgateway = 10.134.178.1
pendingipnetmask = 255.255.255.0
pendingvlan_id = (none)
state = enabled
vlan_id = (none
4. Set the SP hostname.
-> set /SP/ hostname=ES2-72-swi-spSet 'hostname' to 'ES2-72-swi-sp'
Once the network configuration is done on the SP, it can be accessed and modified via ssh.

Configure the Host Network Management From the CLI
16 Oracle Switch ES2-72 and Oracle Switch ES2-64 Configuration Guide • April 2015
Note - You can also use the Oracle ILOM web interface to configure other managementrelated settings. See “Configure Other Network Settings (Oracle ILOM WebInterface)” on page 18.
Related Information■ “Connect to the Serial Console for Initial Configuration” on page 13■ “Configure the Host Network Management From the CLI” on page 16■ “Configure Other Network Settings (Oracle ILOM Web Interface)” on page 18■ “Log Out of the Oracle ILOM CLI” on page 21
Configure the Host Network Management From the CLIOnce the network configuration is done on the SP (“Configure Network Management on theSP” on page 14), it can be accessed via ssh. Host configuration can be done by logging intothe SP's serial console or by ssh.
1. ssh to the SP's IP address.
# ssh [email protected]
Password: changemeOracle(R) Integrated Lights Out Manager
Version 3.2.5.60 r98416
Copyright (c) 2015, Oracle and/or its affiliates. All rights reserved.
Warning: password is set to factory default.
Warning: HTTPS certificate is set to factory default.
Hostname: ES2-72-swi-sp
->
2. Power on the host and connect to the host's serial console.
-> start /SYS
Are you sure you want to start /SYS (y/n)? yStarting /SYS
-> start /HOST/console
Are you sure you want to start /HOST/console (y/n)? y
The switch host's Oracle ILOM login prompt appears.
3. Log in to the Oracle ILOM CLI on the host.The default user is root. The default password is changeme.The switch Oracle ILOM login prompt appears.

Configure the Host Network Management From the CLI
Administering the Switch 17
Detecting screen size; please wait...done
Oracle(R) Integrated Lights Out Manager
Version xxxxxxxCopyright (c) 2015, Oracle and/or its affiliates. All rights reserved.
...
Hostname: ES2-72-primary
ES2->
4. Discover the network configuration for the host.
ES2-> cd /SP/network//SP/network
ES2-> show /SP/network
Targets:
ipv6
test
Properties:
commitpending = (Cannot show property)
dhcp_clientid = none
dhcp_server_ip = 10.134.178.5
ipaddress = 10.134.178.167
ipdiscovery = dhcp
ipgateway = 10.134.178.1
ipnetmask = 255.255.255.0
macaddress = 00:19:0F:16:D4:19
pendingipaddress = 10.134.178.167
pendingipdiscovery = dhcp
pendingipgateway = 10.134.178.1
pendingipnetmask = 255.255.255.0
state = enabled
vlan_id = (none)
Commands:
cd
set
show
5. Configure the network configuration for the host (optional).dhcp is enabled by default, so the host can get the network configuration automatically if thereis a dhcp server on the network.The names and addresses in the following examples are only for demonstration.
Note - Management network configuration is not needed if you plan to only use a serialconsole to access the switch. However, configuring network management will allow multipleadministrators to manage the switch remotely.
ES2-> set pendingipaddress=10.134.178.167Set 'pendingipaddress' to '10.134.178.167'

Configure Other Network Settings (Oracle ILOM Web Interface)
18 Oracle Switch ES2-72 and Oracle Switch ES2-64 Configuration Guide • April 2015
ES2-> set pendingipnetmask=255.255.255.0Set 'pendingipnetmask' to '255.255.255.0'
ES2-> set pendingipgateway=10.134.178.1Set 'pendingipgateway' to '10.134.178.1'
ES2-> set pendingipdiscovery=staticSet 'pendingipdiscovery' to 'static'
ES2-> set commitpending=trueSet 'commitpending' to 'true'
ES2-> show/SP/network
Targets:
ipv6
test
Properties:
commitpending = (Cannot show property)
dhcp_clientid = none
dhcp_server_ip = none
ipaddress = 10.134.178.170
ipdiscovery = static
ipgateway = 10.134.178.1
ipnetmask = 255.255.255.0
macaddress = 00:21:28:79:8B:58
pendingipaddress = 10.134.178.170
pendingipdiscovery = static
pendingipgateway = 10.134.178.1
pendingipnetmask = 255.255.255.0
pendingvlan_id = (none)
state = enabled
vlan_id = (none
Related Information
■ “Connect to the Serial Console for Initial Configuration” on page 13■ “Configure Network Management on the SP” on page 14■ “Configure Other Network Settings (Oracle ILOM Web Interface)” on page 18■ “Log Out of the Oracle ILOM CLI” on page 21
Configure Other Network Settings (Oracle ILOM WebInterface)
1. In a web browser's location bar, type the IP address of the SP as configuredearlier.See “Configure Network Management on the SP” on page 14.
The switch Oracle ILOM login screen appears. The default user name is root. The defaultpassword is changeme.

Stopping, Starting, and Restarting the Host
Administering the Switch 19
2. Select Configuration from the first row of tabs.
3. Select Network from the second row of tabs.The Network Settings page for the switch appears.
4. Configure the network settings as desired.
5. Click Save.
Note - When you click Save, connections to the web interface might be lost. You mustreestablish connection to the web interface.
Related Information
■ “Connect to the Serial Console for Initial Configuration” on page 13■ “Configure Network Management on the SP” on page 14■ “Configure the Host Network Management From the CLI” on page 16■ “Log Out of the Oracle ILOM CLI” on page 21
Stopping, Starting, and Restarting the HostYou can start, stop, or restart the host from the SP prompt.
■ “Stop the Host” on page 19■ “Start the Host” on page 20■ “Restart the Host” on page 20
Stop the Host1. If you are at the host prompt, get to the SP prompt.
■ You can press Esc and Shift-9 to get the SP prompt.
ES2-72-primary SEFOS# Esc+Shift-9Serial console stopped.
->
■ You can exit from SEFOS before returning to the SP prompt.
ES2-72-primary SEFOS# exit

Start the Host
20 Oracle Switch ES2-72 and Oracle Switch ES2-64 Configuration Guide • April 2015
Connection closed by foreign host.
cd: The session with /SYS/fs_cli has ended.
ES2-> Esc+Shift-9Serial console stopped.
->
2. Stop the host.
■ You can gracefully stop the host.
-> stop /SYS
Are you sure you want to stop /SYS (y/n)? yStopping /SYS
■ You can forcefully the host.
-> stop -f /SYS
Are you sure you want to immediately stop /SYS (y/n)? yStopping /SYS immediately
Related Information
■ “Start the Host” on page 20■ “Restart the Host” on page 20
Start the HostStart SEFOS from the switch SP prompt.
-> start /SYS
Are you sure you want to start /SYS (y/n)? yStarting /SYS
->
Related Information
■ “Stop the Host” on page 19■ “Restart the Host” on page 20
Restart the HostRestart (reset) SEFOS when it is already running.

Log Out of the Oracle ILOM CLI
Administering the Switch 21
-> reset /SYS
Are you sure you want to reset /SYS (y/n)? yPerforming hard reset on /SYS
->
Related Information
■ “Stop the Host” on page 19■ “Start the Host” on page 20
Log Out of the Oracle ILOM CLI
When you are finished with Oracle ILOM, exit the Oracle ILOM CLI.
-> exit
Related Information
■ “Connect to the Serial Console for Initial Configuration” on page 13■ “Configure Network Management on the SP” on page 14■ “Configure the Host Network Management From the CLI” on page 16■ “Configure Other Network Settings (Oracle ILOM Web Interface)” on page 18

22 Oracle Switch ES2-72 and Oracle Switch ES2-64 Configuration Guide • April 2015

Administering SEFOS 23
Administering SEFOS
These topics describe how to use SEFOS for common management tasks.
■ “SEFOS Setup Tasks” on page 23■ “Understanding SEFOS Basics” on page 24■ “Create a Local User” on page 28■ “Change a SEFOS User Privilege Level” on page 29■ “Configuring the SEFOS Environment” on page 30■ “Managing Configuration Files” on page 47■ “Managing Log Files” on page 51
Related Information
■ “Administering the Switch”■ “Configuring the Switching Feature”■ “Configuring the Routing Feature”
SEFOS Setup Tasks
This table describes the tasks to prepare the SEFOS interface for subsequent managementactivities.
No. Description Links
1. Familiarize yourself with basic SEFOS topologies and thedefault configuration.
“Understanding SEFOS Basics” on page 24
2. Connect to SEFOS. “Connect to SEFOS” on page 26
3. (Optional) Configure the environment to give yourself moretime for learning.
“Enable or Disable the Timeout for LineConnections” on page 31
4. Create the interfaces that you will be using. “Configure the IP Address for an Interface” on page 31
5. Create a name for the file that will contain configurationinformation.
“Configure the Name of the Configuration File” on page 32

Understanding SEFOS Basics
24 Oracle Switch ES2-72 and Oracle Switch ES2-64 Configuration Guide • April 2015
No. Description Links
6. Set the default VLAN ID. “Configure the Default VLAN ID” on page 33
7. Configure where to display the debug file. “Configure Debug Logging” on page 36
8. Configure ACL filters on interfaces. “Configure ACL Filters” on page 36
9. Classify packets to a service based on the ACL filters. “Configure QoS” on page 39
10. Monitor packets from port 25 on port 26. “Configure Port Mirroring” on page 42
11. Limit interface traffic. “Configure Rate Limiting” on page 44
12. (Optional) Set up how you want save configurations, as theychange (incremental) or saving them periodically (auto-save).
“Configuring Save Parameters” on page 45
13. Save configuration information to the backup file. “Save the Configuration to a File” on page 47
14. Save a copy of the config file to a remote location. “Copy a Configuration File to a RemoteLocation” on page 49
Related Information
■ “Understanding SEFOS Basics” on page 24■ “Configuring the SEFOS Environment” on page 30■ “Managing Configuration Files” on page 47■ “Managing Log Files” on page 51
Understanding SEFOS Basics
These topics describe the features of SEFOS.
■ “Basic SEFOS Topology” on page 25■ “Port Terminology” on page 25■ “Stop and Start SEFOS” on page 27■ “Connect to SEFOS” on page 26■ “Disconnect From SEFOS” on page 27
Related Information
■ “SEFOS Setup Tasks” on page 23■ “Configuring the SEFOS Environment” on page 30■ “Managing Configuration Files” on page 47■ “Managing Log Files” on page 51

Understanding SEFOS Basics
Administering SEFOS 25
Basic SEFOS Topology
Related Information
■ “Connect to SEFOS” on page 26■ “Disconnect From SEFOS” on page 27
Port Terminology■ 40G-capable ports are labeled as XL-Ethernet (xl).

Connect to SEFOS
26 Oracle Switch ES2-72 and Oracle Switch ES2-64 Configuration Guide • April 2015
■ 10G-capable ports are labeled extreme-ethernet (ex).
Oracle Switch ES2-72 has 18 QSFP+ ports that are 40G-capable. Ports on Oracle Switch ES2-72 are referred to as xl-ethernet 0/1-72.
Oracle Switch ES2-64 has 6 QSFP+ ports which are 40G-capable and 40 RJ45 ports which are10G-capable. Ports on Oracle Switch ES2-64 are referred to as xl-ethernet 0/1-24 and extreme-ethernet 0/25-64.
Connect to SEFOS
To configure the SEFOS software, you must first establish a connection to your system and thenconnect to SEFOS through Oracle ILOM.
1. Log in to the Oracle ILOM CLI.See “Connect to the Serial Console for Initial Configuration” on page 13.
2. Connect to SEFOS.
ES2-> cd /SYS/fs_clicd: connecting to Fabric Switch CLI
ES2-72-primary SEFOS#
ES2-72-primary SEFOS# show system information
Hardware Version : 3.3.11_00306215
Firmware Version : ES2-R72-2.0.0.1
Hardware Part Number : 1-0-0
Software Serial Number : 1-0-0
Software Version : 7.3.2
Switch Name : Oracle-ES2-72
System Contact :
System Location :
Logging Option : Console Logging
Device Uptime : 0 Days, 0 Hrs, 6 Mins, 51 Secs
Login Authentication Mode : Local
Config Save Status : Not Initiated
Remote Save Status : Not Initiated
Config Restore Status : Not Initiated
Traffic Separation Control : none
ES2-72-primary SEFOS#
You are now connected to SEFOS, and you can begin to configure the SEFOS features.
Related Information■ “Basic SEFOS Topology” on page 25

Disconnect From SEFOS
Administering SEFOS 27
■ “Disconnect From SEFOS” on page 27
Disconnect From SEFOS
1. When you are finished using SEFOS, return to the Oracle ILOM prompt.
SEFOS-1# exitConnection closed by foreign host.
cd: The session with /SYS/fs_cli has ended.
->
2. When you are finished using Oracle ILOM, exit the interface.
-> exit
Related Information■ “Basic SEFOS Topology” on page 25■ “Connect to SEFOS” on page 26
Stop and Start SEFOS
If you are accessing the switch through ssh or the SER MGT port, return to the SP prompt tostop SEFOS on the host.
1. Exit from SEFOS and return to the host ILOM prompt.
ES2-72-primary SEFOS# exitConnection closed by foreign host.
cd: The session with /SYS/fs_cli has ended.
ES2->
2. Stop SEFOS.
ES2-> stop /SYS/sefos/
Are you sure you want to stop /SYS/sefos (y/n)? ystop: SEFOS stopped successfully.
3. Start SEFOS.

Create a Local User
28 Oracle Switch ES2-72 and Oracle Switch ES2-64 Configuration Guide • April 2015
ES2-> start /SYS/sefos
Are you sure you want to start /SYS/sefos (y/n)? ystart: Please wait while sefos comes up, this can take anywhere from 30 seconds to 2 minutes
depending on the configuration
........................
start: SEFOS started successfully.
Create a Local User
1. Log in to the Oracle ILOM CLI on the host.See “Connect to the Serial Console for Initial Configuration” on page 13.
2. Create a user and set the user fs_privilege attribute upon creation.
ES2-> create /SP/users/username fs_privilege=level
where:
■ username is the user name.■ level is the privilege level (1 for read-only, 15 for full administrative).
For example:
ES2-> create /SP/users/user15 fs_privilege=15Creating user...
Enter new password: ********
Enter new password again: ********
Created /SP/users/user15
3. View the user parameters.
ES2-> show /SP/users/user15
/SP/users/user15
Targets:
ssh
Properties:
role = o
password = *****
fs_privilege = 15
Commands:
cd
set
show

Change a SEFOS User Privilege Level
Administering SEFOS 29
ES2->
4. Repeat Step 2 and Step 3 for each SEFOS user.
Note - You can perform similar steps from the Oracle ILOM CLI on the SP to create local userson SP.
5. After you configure all SEFOS users, configure SEFOS.See “Administering SEFOS”.
Related Information■ “SEFOS Setup Tasks” on page 23■ “Understanding SEFOS Basics” on page 24■ “Change a SEFOS User Privilege Level” on page 29■ “Configuring the SEFOS Environment” on page 30■ “Managing Configuration Files” on page 47■ “Managing Log Files” on page 51
Change a SEFOS User Privilege Level
1. Log in to the Oracle ILOM CLI.See “Connect to the Serial Console for Initial Configuration” on page 13.
2. Change into the directory for that user.
ES2-> cd /SP/users/user15
3. Change a user privilege level for an existing user.Level 1 allows read-only, and level 15 allows full administrative privileges.For example:
ES2-> set fs_privilege=15Set 'fs_privilege' to '15'
4. Verify the user privileges.
ES2-> show
/SP/users/user15
Targets:
ssh

Configuring the SEFOS Environment
30 Oracle Switch ES2-72 and Oracle Switch ES2-64 Configuration Guide • April 2015
Properties:
role = o
password = *****
fs_privilege = 15
Commands:
cd
set
show
ES2->
Related Information
■ “SEFOS Setup Tasks” on page 23■ “Understanding SEFOS Basics” on page 24■ “Create a Local User” on page 28■ “Configuring the SEFOS Environment” on page 30■ “Managing Configuration Files” on page 47■ “Managing Log Files” on page 51
Configuring the SEFOS Environment
Use these tasks to configure the SEFOS environment for the switch.
■ “Enable or Disable the Timeout for Line Connections” on page 31■ “Configure the IP Address for an Interface” on page 31■ “Configure the Name of the Configuration File” on page 32■ “Configure the Default VLAN ID” on page 33■ “Enable or Disable Trap Generation on an Interface” on page 34■ “Configure Debug Logging” on page 36■ “Configure ACL Filters” on page 36■ “Configure QoS” on page 39■ “Configure Port Mirroring” on page 42■ “Configure Rate Limiting” on page 44■ “Configuring Save Parameters” on page 45
Related Information
■ “SEFOS Setup Tasks” on page 23■ “Understanding SEFOS Basics” on page 24

Enable or Disable the Timeout for Line Connections
Administering SEFOS 31
■ “Managing Configuration Files” on page 47■ “Managing Log Files” on page 51
Enable or Disable the Timeout for LineConnections
If you leave a session idle for too long, the session might get disconnected and return you to theOracle ILOM prompt. This task clears the timeout for line connections so that idle sessions arenot disconnected.
1. Connect to SEFOS.See “Connect to SEFOS” on page 26.
2. Enter Global Configuration mode.
SEFOS-1# configure terminal
3. Enable or disable the timeout for line connections.
SEFOS-1(config)# line vty
SEFOS-1(config-line)# no exec-timeout
SEFOS-1(config-line)# exit
Related Information
■ “SEFOS Setup Tasks” on page 23■ “Enable or Disable Trap Generation on an Interface” on page 34■ “Disconnect From SEFOS” on page 27
Configure the IP Address for an Interface
This task describes how to configure the IP address for sending and receiving the packets.
1. Connect to SEFOS.See “Connect to SEFOS” on page 26.
2. Enter Global Configuration mode.

Configure the Name of the Configuration File
32 Oracle Switch ES2-72 and Oracle Switch ES2-64 Configuration Guide • April 2015
SEFOS-1# configure terminal
3. Enter Interface Configuration mode.
SEFOS-1(config)# interface vlan 1
4. Shut down the VLAN interface.
Note - You must shut down the interface before you can configure the IP address for thatinterface.
SEFOS-1(config-if)# shutdown
5. Configure the IP address and subnet mask.
SEFOS-1(config-if)# ip address 12.0.0.1 255.0.0.0
6. Bring up the VLAN interface.
SEFOS-1(config-if)# no shutdown
7. Exit Interface Configuration mode.
SEFOS-1(config)# end
8. View the configured interface IP address.
SEFOS-1# show ip interface
vlan1 is up, line protocol is up
Internet Address is 12.0.0.1/8
Broadcast Address 12.255.255.255
Related Information
■ “SEFOS Setup Tasks” on page 23
Configure the Name of the Configuration File
This task describes how to write the configuration file to flash. This file is used as therestoration configuration file.

Configure the Default VLAN ID
Administering SEFOS 33
1. Connect to SEFOS.See “Connect to SEFOS” on page 26.
2. Configure the configuration file name.
a. Enter Global Configuration mode.
SEFOS-1# configure terminal
b. Configure the restoration configuration file name for the switch.For example:
SEFOS-1(config)# default restore-file myconfig.conf
c. Exit Global Configuration mode.
SEFOS-1(config)# end
3. View the default configuration file name.
SEFOS-1# show nvram...
Config Restore Filename : myconfig.conf...
Related Information
■ “SEFOS Setup Tasks” on page 23■ “Managing Configuration Files” on page 47
Configure the Default VLAN ID
This task describes how to write the VLAN ID to the flash. This ID is used as the defaultVLAN ID when the switch is restarted. Do not change the default VLAN ID when someconfigurations are already saved.
1. Connect to SEFOS.See “Connect to SEFOS” on page 26.
2. Configure the default VLAN identifier.

Enable or Disable Trap Generation on an Interface
34 Oracle Switch ES2-72 and Oracle Switch ES2-64 Configuration Guide • April 2015
a. Enter Global Configuration mode.
SEFOS-1# configure terminal
b. Configure the default VLAN ID as 10.
SEFOS-1(config)# default vlan id 10
c. Exit Global Configuration mode.
SEFOS-1(config)# end
3. View the default VLAN ID.
SEFOS-1# show nvram...
Config Save IP Address : 0.0.0.0
...
Default VLAN Identifier : 10...
Note - After you have configured the default VLAN ID, you must restart the switch beforesaving any configuration.
Related Information■ “SEFOS Setup Tasks” on page 23■ “Configure Initial Settings” on page 57■ “Configure VLAN Forwarding” on page 60■ “Verify VLAN Membership” on page 61
Enable or Disable Trap Generation on an Interface
This task describes how to enable or disable trap generation either on the physical interface oron the port-channel interface.
Note - Refer to the Oracle ILOM 3.0 Daily Management – CLI Procedures Guide forinformation to configure the SNMP manager for trap generation.
1. Connect to SEFOS.

Enable or Disable Trap Generation on an Interface
Administering SEFOS 35
See “Connect to SEFOS” on page 26.
2. Disable the SNMP trap on the interface xl-ethernet 0/1.
a. Enter Global Configuration mode.
SEFOS-1# configure terminal
b. Enter Interface Configuration mode for xl-ethernet 0/1.
SEFOS-1(config)# interface xl-ethernet 0/1
c. Type one of the following commands:
SEFOS-1(config-if)# snmp trap link-status
SEFOS-1(config-if)# no snmp trap link-status
d. Exit Interface Configuration mode.
SEFOS-1(config-if)# end
3. View the trap state for the interface xl-ethernet 0/1.
SEFOS-1# show interface xl-ethernet 0/1...
Link Up/Down Trap is enabled...
or,
SEFOS-1# show interface xl-ethernet 0/1...
Link Up/Down Trap is disabled...
If the trap is enabled, the switch sends trap messages to the SNMP manager on specific eventssuch as link up, link down, and so on.
Related Information
■ “SEFOS Setup Tasks” on page 23
Configure Debug Logging
36 Oracle Switch ES2-72 and Oracle Switch ES2-64 Configuration Guide • April 2015
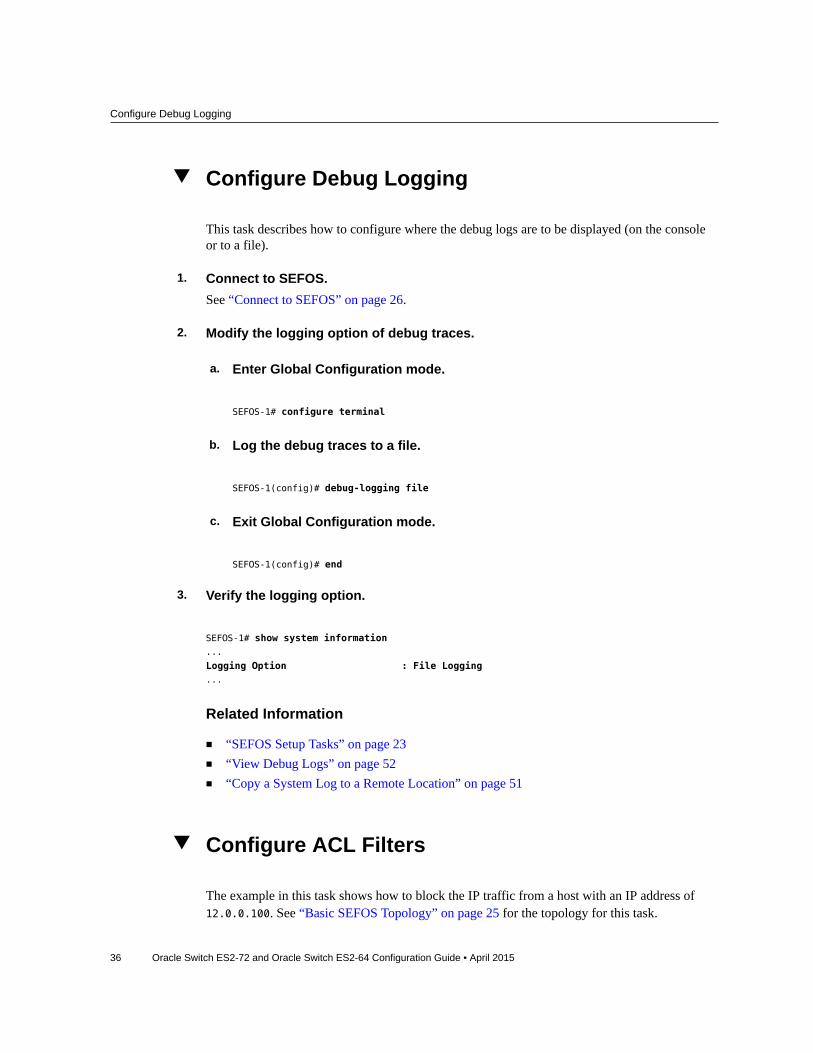
Configure Debug Logging
This task describes how to configure where the debug logs are to be displayed (on the consoleor to a file).
1. Connect to SEFOS.See “Connect to SEFOS” on page 26.
2. Modify the logging option of debug traces.
a. Enter Global Configuration mode.
SEFOS-1# configure terminal
b. Log the debug traces to a file.
SEFOS-1(config)# debug-logging file
c. Exit Global Configuration mode.
SEFOS-1(config)# end
3. Verify the logging option.
SEFOS-1# show system information...
Logging Option : File Logging...
Related Information
■ “SEFOS Setup Tasks” on page 23■ “View Debug Logs” on page 52■ “Copy a System Log to a Remote Location” on page 51
Configure ACL Filters
The example in this task shows how to block the IP traffic from a host with an IP address of12.0.0.100. See “Basic SEFOS Topology” on page 25 for the topology for this task.

Configure ACL Filters
Administering SEFOS 37
The filter type can be extended or standard. Standard filters filter the traffic based on the sourceIP address and the destination IP address. Extended filters can also specify the protocol ID,TCP/UDP port numbers, DSCP values, and flow label. In this example, the IP packets with12.0.0.100 as the source address are filtered.
ACL filters filter packets at the hardware based on certain filtering criteria configured orprogrammed in the switch. The switch examines each packet to determine if it should beblocked or if it should be forwarded based on the configured access lists. Type the followingcommands on the SEFOS-1 switch.
1. Connect to SEFOS.See “Connect to SEFOS” on page 26.
2. Configure the IP address of the switch to 12.0.0.1.
SEFOS-1# configure terminal
SEFOS-1(config)# interface vlan 1
SEFOS-1(config-if)# shutdown
SEFOS-1(config-if)# ip address 12.0.0.1 255.0.0.0
SEFOS-1(config-if)# no shutdown
SEFOS-1(config-if)# exit
SEFOS-1(config)# interface xl-ethernet 0/25
SEFOS-1(config-if)# no shutdown
SEFOS-1(config-if)# exit
SEFOS-1(config)# interface xl-ethernet 0/26
SEFOS-1(config-if)# no shutdown
SEFOS-1(config-if)# exit
3. Create an IP filter with ID 11.
SEFOS-1(config)# ip access-list extended 11
4. Deny the IP traffic from host 12.0.0.100 to any network or host.
SEFOS-1(config-ext-nacl)# deny ip host 12.0.0.100 any
SEFOS-1(config-ext-nacl)# end
5. Ping from host A to host B.
# ping 12.0.0.1712.0.0.17 is alive
6. Apply the IP filter 11 to port 25.

Configure ACL Filters
38 Oracle Switch ES2-72 and Oracle Switch ES2-64 Configuration Guide • April 2015
SEFOS-1(config)# interface xl-ethernet 0/25
SEFOS-1(config-if)# ip access-group 11 in
SEFOS-1(config-if)# exit
SEFOS-1(config)# vlan 1
SEFOS-1(config-vlan)# ports xl-ethernet 0/25 xl-ethernet
0/26 untagged xl-ethernet 0/25 xl-ethernet 0/26
Note - You might see the following message if ports 25 and 26 are already in VLAN 1. If you seethis message, you can ignore it.
% Member Ports cannot be added/deleted on Default VLAN
SEFOS-1(config-vlan)# end
7. View the configuration details.
SEFOS-1# show access-lists...
IP address Type : IPV4...
In Port List : X10/25...
Filter Action : Deny
Status : Active
8. Send the forwarding traffic from host A to host B in the same fashion as the pingfrom host A to host B in Step 5.Packets sent from host A are not forwarded to port 26 because the filter action is set to deny.The ping to 12.0.0.17 from host A fails with no answer from 12.0.0.17.
9. Remove the IP filter from port 25.
SEFOS-1# configure terminal
SEFOS-1(config)# interface xl-ethernet 0/25
SEFOS-1(config-if)# no ip access-group 11 in
SEFOS-1(config-if)# end
SEFOS-1# show access-lists...
Status : InActive
10. Send the forwarding traffic from host A to host B in the same fashion as the pingfrom host A to host B in Step 5.The ping is answered from host B. Packets sent from host A are forwarded to port 26. Thefollowing two consecutive ping commands show that the deny filter action set in the ACL listwas applied to one port and was removed from another port.

Configure QoS
Administering SEFOS 39
# ping 12.0.0.17no answer from 12.0.0.17
# ping 12.0.0.1712.0.0.17 is alive
Related Information
■ “SEFOS Setup Tasks” on page 23■ “Configure QoS” on page 39■ “Configure Port Mirroring” on page 42■ “Configure Rate Limiting” on page 44
Configure QoS
Packets received at the switch can be classified to a particular class of service based on thefilters configured. Certain policies can be applied before forwarding the packets. The followingtask illustrates the classification of the TCP packets received in the switch and changing theDSCP value in the IP header of the TCP packets to 46.
See “Basic SEFOS Topology” on page 25 for the topology of this task. Connect port 25 tohost A and port 26 to host B. Host B should have a command to dump traffic over a networkinterface such as tcpdump or snoop. If not, port 25 and port 26 can be connected to a datacapturing device as shown in “Basic SEFOS Topology” on page 25.
1. Connect to SEFOS.See “Connect to SEFOS” on page 26.
2. Enable port 1 and port 2.
SEFOS-1# configure terminal
SEFOS-1(config)# interface xl-ethernet 0/26
SEFOS-1(config-if)# no shutdown
SEFOS-1(config-if)# exit
SEFOS-1(config)# interface xl-ethernet 0/25
SEFOS-1(config-if)# no shutdown
SEFOS-1(config-if)# exit
SEFOS-1(config)# vlan 1
SEFOS-1(config-vlan)# ports xl-ethernet 0/25 xl-ethernet
0/26 untagged xl-ethernet 0/25 xl-ethernet 0/26
You might see the following message if both interfaces are already in VLAN 1.
% Member Ports cannot be added/deleted on Default VLAN
SEFOS-1(config-vlan)# end

Configure QoS
40 Oracle Switch ES2-72 and Oracle Switch ES2-64 Configuration Guide • April 2015
3. Enable QoS.
SEFOS-1# configure terminal
SEFOS-1(config)# qos enable
SEFOS-1(config)# end
4. Create an access control list filter for TCP packets.
SEFOS-1# configure terminal
SEFOS-1(config)# ip access-list extended 11
SEFOS-1(config-ext-nacl)# permit tcp any any
SEFOS-1(config-ext-nacl)# exit
SEFOS-1(config)# interface xl-ethernet 0/25
SEFOS-1(config-if)# ip access-group 11 in
SEFOS-1(config-if)# end
5. Specify the class mapping for the incoming packet and policy mapping for theclassified packet.
a. Enter Global Configuration mode.
SEFOS-1# configure terminal
b. Create a class map and enter Class Map Configuration mode.
SEFOS-1(config)# class-map 10
c. Configure the match criteria for the class map with the criteria specified bythe access list 11 (configured in Step 4 as all TCP packets).
SEFOS-1(config-cls-map)# match access-group ip-access-list 11
SEFOS-1(config-cls-map)# set class 100
d. Exit Class Map Configuration mode.
SEFOS-1(config-cls-map)# exit
e. Create a policy map to apply to the packet before forwarding it.
SEFOS-1(config)# policy-map 10
f. Create a policy map for class 100 packets and set the DSCP value in the IPheader for the outgoing packets matched by this class as 46.

Configure QoS
Administering SEFOS 41
SEFOS-1(config-ply-map)# set policy class 100 default-priority-type ipdscp 46
SEFOS-1(config-ply-map)# exit
46 (0x2e) is a decimal number. If an 8-bit TOS value is shown, it is shown as 0xb8 because0x2e must be shifted left 2 bits to get the 6 bits of the DSCP value.
6. View the configuration details.
SEFOS-1# show access-lists...
Filter Protocol Type : TCP
IP address Type : IPV4...
In Port List : X10/25...
Filter Action : Permit
Status : Active...
L3FilterId : 11
PriorityMapId : None
CLASS : 100
PolicyMapId : 10...
SEFOS-1# show policy-map 10QoS Policy Map Entries
----------------------
PolicyMapId : 10IfIndex : 0
Class : 100
DefaultPHB : IP DSCP 46...
7. Verify the functionality of the policy configuration by generating 100 TCPpackets.From host A to host B, send TCP packets to host B and use the host-supported packet dumpingcommand to verify the DSCP value.
# tcpdump -xx -n -i eth3 ip...
16:34:27.979962 IP 12.0.0.100.905 > 12.0.0.17.shell:...
16:34:27.980163 IP 12.0.0.17.shell > 12.0.0.100.905:0x0000: 0014 4f6c 7de9 001b 2147 d479 0800 4500
0x0000: 001b 2147 d479 0014 4f6c 7de9 0800 45b8...

Configure Port Mirroring
42 Oracle Switch ES2-72 and Oracle Switch ES2-64 Configuration Guide • April 2015
These packets are received at port 26 and have a DSCP value 46. In this example, the dumpcommand shows a DSCP value of 0xb8.
Related Information
■ “SEFOS Setup Tasks” on page 23■ “Configure ACL Filters” on page 36■ “Configure Port Mirroring” on page 42■ “Configure Rate Limiting” on page 44
Configure Port Mirroring
Port mirroring monitors the packets of a particular port on another port. The following exampleshows how to mirror all incoming packets on port 25 to port 26.
See “Basic SEFOS Topology” on page 25 for the topology for this task. Type the followingcommands on the SEFOS-1 switch.
1. Connect to SEFOS.See “Connect to SEFOS” on page 26.
2. Configure the IP address of the switch as 12.0.0.1.
SEFOS-1# configure terminal
SEFOS-1(config)# interface vlan 1
SEFOS-1(config-if)# shutdown
SEFOS-1(config-if)# ip address 12.0.0.1 255.0.0.0
SEFOS-1(config-if)# no shutdown
SEFOS-1(config-if)# end
3. View the ping between the host and the switch.
SEFOS-1# ping 12.0.0.100
Reply Received From :12.0.0.100, TimeTaken : 60 msecs
Reply Received From :12.0.0.100, TimeTaken : 100 msecs
Reply Received From :12.0.0.100, TimeTaken : 90 msecs
--- 12.0.0.100 Ping Statistics ---
3 Packets Transmitted, 3 Packets Received, 0% Packets Loss
The ping reply from host A to the switch is not captured at port 26, which is connected to thepacket capturing device prior to the port-mirroring configuration.

Configure Port Mirroring
Administering SEFOS 43
4. Type the following commands on the SEFOS-1 switch to enable mirroring forincoming packets at port 25 to port 26:
a. Enter Global Configuration mode.
SEFOS-1# configure terminal
b. Configure the destination interface for mirroring as port 26.
SEFOS-1(config)# monitor session destination interface xl-ethernet 0/26
c. Configure the source interface for mirroring as port 25 and apply mirroringfor incoming packets.
SEFOS-1(config)# monitor session source interface xl-ethernet 0/25 rx
d. Exit Global Configuration mode.
SEFOS-1(config-if)# end
e. View the configuration details.
SEFOS-1# show port-monitoring
Port Monitoring is enabled
Monitor Port : X10/26
Port Ingress-Monitoring Egress-Monitoring
---- ------------------ -----------------
X10/25 Enabled Disabled...
5. Ping 12.0.0.100 and verify that the ICMP reply was received at port 26.
SEFOS-1# ping 12.0.0.100
6. Verify that the ping reply from host A to the SEFOS-1 switch is captured at host Bor using the packet-capturing device, such as IXIA or SmartBits.
# tcpdump -xx -n -i eth3 icmp...
listening on eth3, link-type EN10MB (Ethernet), capture size 96 bytes
17:09:58.595583 IP 12.0.0.100 > 12.0.0.1: ICMP echo reply, id 0, seq 1, length 40...

Configure Rate Limiting
44 Oracle Switch ES2-72 and Oracle Switch ES2-64 Configuration Guide • April 2015
0x0010: 003c 68e6 4000 ff01 fa75 0c00 0064 0c00
17:09:58.617899 IP 12.0.0.100 > 12.0.0.1: ICMP echo reply, id 0, seq 2, length 40...0x0030: a5a5 a5a5 a5a5 a5a5 a5a5 a5a5 a5a5 a5a5
17:09:58.698280 IP 12.0.0.100 > 12.0.0.1: ICMP echo reply, id 0, seq 3, length 40...
Related Information
■ “SEFOS Setup Tasks” on page 23■ “Configure ACL Filters” on page 36■ “Configure QoS” on page 39■ “Configure Rate Limiting” on page 44
Configure Rate Limiting
SEFOS can be configured to limit the rate of traffic received on a particular interface. If thetraffic is above the configured threshold level, the packet gets dropped. The following exampleillustrates the configuration for limiting a multicast traffic at port 25 to a rate of 50 packets persecond.
See “Basic SEFOS Topology” on page 25 for the topology for this task. port 25 and port 26are connected to IXIA/Smartbits to monitor the rate of packet forwarding. Configure the ratelimiting for multicast packets on port 25 as 50 packets per second and then generate a multicasttraffic from IXIA at the rate of 1 Mbps. Packets received at port 26 must be at the rate of 50packets per second.
1. Connect to SEFOS.See “Connect to SEFOS” on page 26.
2. Type the following commands in the switch to enable port 25 and port 26:
SEFOS-1# configure terminal
SEFOS-1(config)# interface xl-ethernet 0/25
SEFOS-1(config-if)# no shutdown
SEFOS-1(config-if)# exit
SEFOS-1(config)# interface xl-ethernet 0/26
SEFOS-1(config-if)# no shutdown
SEFOS-1(config-if)# end
3. Set the rate limit to 50 packets per second.
a. Enter Global Configuration mode.
SEFOS-1# configure terminal
Configure Rate Limiting
Administering SEFOS 45
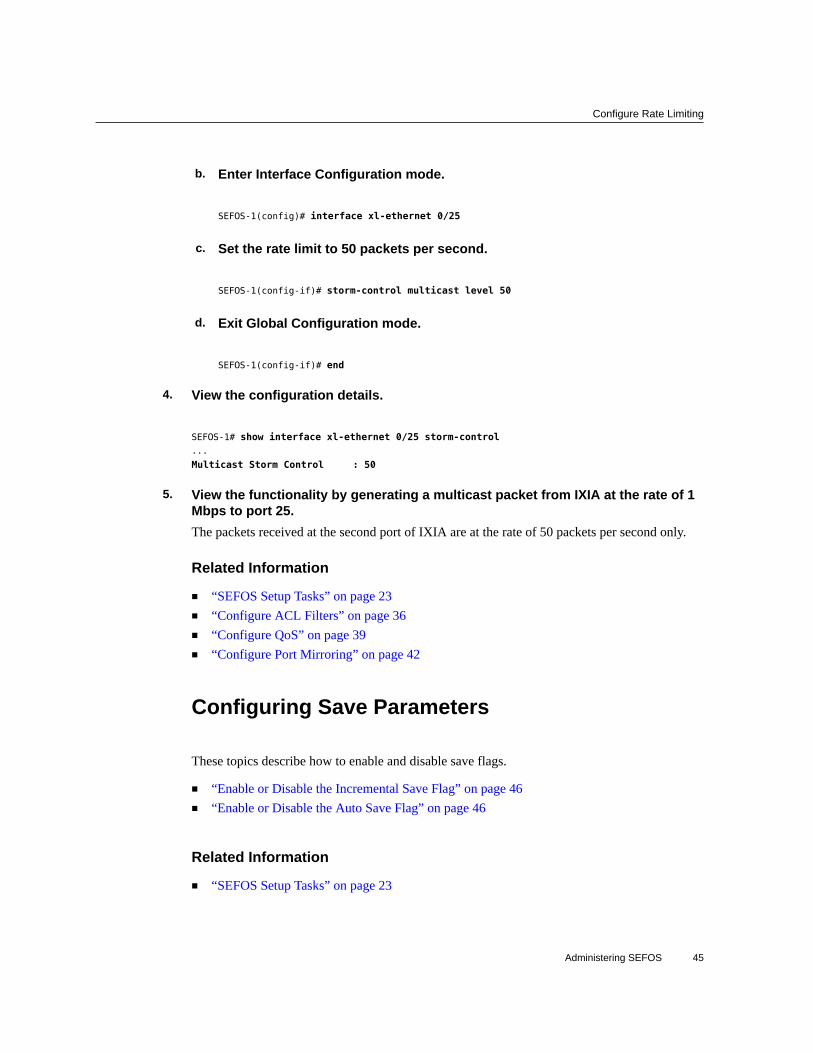
b. Enter Interface Configuration mode.
SEFOS-1(config)# interface xl-ethernet 0/25
c. Set the rate limit to 50 packets per second.
SEFOS-1(config-if)# storm-control multicast level 50
d. Exit Global Configuration mode.
SEFOS-1(config-if)# end
4. View the configuration details.
SEFOS-1# show interface xl-ethernet 0/25 storm-control...
Multicast Storm Control : 50
5. View the functionality by generating a multicast packet from IXIA at the rate of 1Mbps to port 25.The packets received at the second port of IXIA are at the rate of 50 packets per second only.
Related Information
■ “SEFOS Setup Tasks” on page 23■ “Configure ACL Filters” on page 36■ “Configure QoS” on page 39■ “Configure Port Mirroring” on page 42
Configuring Save Parameters
These topics describe how to enable and disable save flags.
■ “Enable or Disable the Incremental Save Flag” on page 46■ “Enable or Disable the Auto Save Flag” on page 46
Related Information
■ “SEFOS Setup Tasks” on page 23

Enable or Disable the Incremental Save Flag
46 Oracle Switch ES2-72 and Oracle Switch ES2-64 Configuration Guide • April 2015
■ “Managing Configuration Files” on page 47
Enable or Disable the Incremental Save Flag
Enabling the incremental save flag updates the in-memory database for every configuration atruntime.
1. Connect to SEFOS.See “Connect to SEFOS” on page 26.
2. Enter Global Configuration mode.
SEFOS-1# configure terminal
3. Enable or disable the incremental save flag on the switch.
SEFOS-1(config)# incremental-save state
where state is enable or disable.
4. Exit Global Configuration mode.
SEFOS-1(config)# end
Related Information
■ “Enable or Disable the Auto Save Flag” on page 46
Enable or Disable the Auto Save Flag
This task describes how to enable updates of the runtime configuration in the configuration file.
1. Connect to SEFOS.See “Connect to SEFOS” on page 26.
2. Enter Global Configuration mode.
SEFOS-1# configure terminal
3. Enable the auto save flag on the switch.

Managing Configuration Files
Administering SEFOS 47
SEFOS-1(config)# auto-save trigger state
where state is enable or disable.
4. Exit Global Configuration mode.
SEFOS-1(config)# end
Related Information
■ “Enable or Disable the Incremental Save Flag” on page 46
Managing Configuration Files
These topics describe how to manage configuration files.
■ “Save the Configuration to a File” on page 47■ “Erase a Configuration File” on page 48■ “Copy a Configuration File to a Remote Location” on page 49■ “Copy a Configuration File From a Remote Location to Flash” on page 50■ “Copy a Configuration File From One Remote Location or Flash to Another Remote
Location or Flash” on page 51
Related Information
■ “SEFOS Setup Tasks” on page 23■ “Understanding SEFOS Basics” on page 24■ “Configuring the SEFOS Environment” on page 30■ “Managing Log Files” on page 51
Save the Configuration to a File
This task describes how to write the running configuration to a flash file, a startup configurationfile, or a remote site.
1. Connect to SEFOS.See “Connect to SEFOS” on page 26.
2. Save the configuration that is currently running to a file.

Erase a Configuration File
48 Oracle Switch ES2-72 and Oracle Switch ES2-64 Configuration Guide • April 2015
SEFOS-1# write startup-config
3. View the current restoration settings.
SEFOS-1# show nvram...
Config Restore Option : Restore
Config Save Option : Startup save...
4. View the restoration status.
SEFOS-1# show system information...
Config Restore Status : Not Initiated
5. Reboot the switch to verify that the current configurations were saved properly.If you do not want to reboot the switch at this time, you do not have to complete the last step inthis task.
6. View the restoration status after rebooting the switch.The Config Restore Status shows Successful after the reboot.
SEFOS-1# show system information...
Config Restore Status : Successful
Related Information■ “Configure the Name of the Configuration File” on page 32■ “Configuring Save Parameters” on page 45■ “Erase a Configuration File” on page 48■ “Copy a Configuration File to a Remote Location” on page 49■ “Copy a Configuration File From a Remote Location to Flash” on page 50■ “Copy a Configuration File From One Remote Location or Flash to Another Remote
Location or Flash” on page 51
Erase a Configuration File
This task describes how to clear the contents of the startup configuration or set the parametersin flash to their default values.

Copy a Configuration File to a Remote Location
Administering SEFOS 49
1. Connect to SEFOS.See “Connect to SEFOS” on page 26.
2. Erase the saved configuration file.
SEFOS-1# erase startup-config
3. View the erase status settings.
SEFOS-1# show nvram...
Config Restore Option : No restore
Config Save Option : No save
Auto Save : Disable...
Config Save Filename : switch.conf
Config Restore Filename : switch.conf...
The switch starts with the default configurations when you reboot the switch.
Related Information
■ “Configure the Name of the Configuration File” on page 32■ “Configuring Save Parameters” on page 45■ “Save the Configuration to a File” on page 47■ “Copy a Configuration File to a Remote Location” on page 49■ “Copy a Configuration File From a Remote Location to Flash” on page 50■ “Copy a Configuration File From One Remote Location or Flash to Another Remote
Location or Flash” on page 51
Copy a Configuration File to a Remote Location
This task describes how to save the initial configuration file to flash or to a remote location.
See “Basic SEFOS Topology” on page 25 for the topology for this task.
1. Connect to SEFOS.See “Connect to SEFOS” on page 26.
2. Ping host A from switch SEFOS-1.

Copy a Configuration File From a Remote Location to Flash
50 Oracle Switch ES2-72 and Oracle Switch ES2-64 Configuration Guide • April 2015
SEFOS-1# ping 12.0.0.100
3. Save the configuration that is currently running to a file.
SEFOS-1# write startup-config
4. Copy the configuration file to host A, giving it the name switch.conf_date.
SEFOS-1# copy startup-config tftp://12.0.0.100/switch.conf_dateSEFOS-1#
Related Information
■ “Copy a Configuration File From a Remote Location to Flash” on page 50■ “Copy a Configuration File From One Remote Location or Flash to Another Remote
Location or Flash” on page 51
Copy a Configuration File From a RemoteLocation to Flash
This task describes how to copy the backup configuration file from a remote location to thelocation of the default configuration directory path (/conf/sefos) for restoration. The remotelocation must be on a host connected to one of the 72 or 64 ports on the switch.
1. Connect to SEFOS.See “Connect to SEFOS” on page 26.
2. Copy the startup configuration file switch.conf stored in the host 12.0.0.100 tothe current path (/conf/sefos).
SEFOS-1# copy tftp://12.0.0.100/switch.conf startup-configSEFOS-1#
Related Information
■ “Copy a Configuration File to a Remote Location” on page 49■ “Copy a Configuration File From One Remote Location or Flash to Another Remote
Location or Flash” on page 51
Copy a Configuration File From One Remote Location or Flash to Another Remote Location or Flash
Administering SEFOS 51
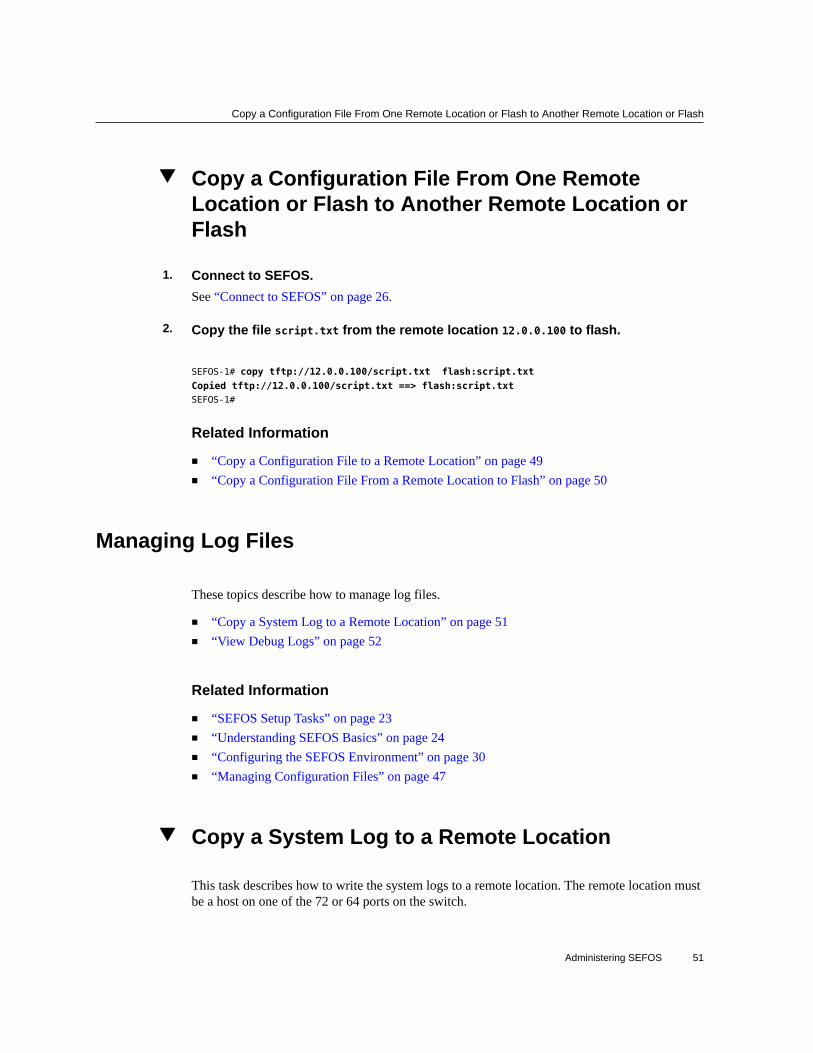
Copy a Configuration File From One RemoteLocation or Flash to Another Remote Location orFlash
1. Connect to SEFOS.See “Connect to SEFOS” on page 26.
2. Copy the file script.txt from the remote location 12.0.0.100 to flash.
SEFOS-1# copy tftp://12.0.0.100/script.txt flash:script.txt
Copied tftp://12.0.0.100/script.txt ==> flash:script.txtSEFOS-1#
Related Information
■ “Copy a Configuration File to a Remote Location” on page 49■ “Copy a Configuration File From a Remote Location to Flash” on page 50
Managing Log Files
These topics describe how to manage log files.
■ “Copy a System Log to a Remote Location” on page 51■ “View Debug Logs” on page 52
Related Information
■ “SEFOS Setup Tasks” on page 23■ “Understanding SEFOS Basics” on page 24■ “Configuring the SEFOS Environment” on page 30■ “Managing Configuration Files” on page 47
Copy a System Log to a Remote Location
This task describes how to write the system logs to a remote location. The remote location mustbe a host on one of the 72 or 64 ports on the switch.

View Debug Logs
52 Oracle Switch ES2-72 and Oracle Switch ES2-64 Configuration Guide • April 2015
In this task, you first execute several commands to customize system logs. You also clear thesystem buffers so that the log file can be copied over to the remote site.
1. Connect to SEFOS.See “Connect to SEFOS” on page 26.
2. Save the log file to the remote location 12.0.0.100.
SEFOS# debug npapi transmission
SEFOS# show debug-logging...
SEFOS# configure terminal
SEFOS(config)# clear logs
SEFOS(config)# endSEFOS#
SEFOS-1# copy logs tftp://12.0.0.100/logfile% Log Upload Successful
SEFOS#
SEFOS# no debug npapi transmissionSEFOS#
SEFOS# show debugging
Note - Ensure that you type the no debug npapi transmission command as shown so that thedebugging function is disabled.
Related Information
■ “View Debug Logs” on page 52
View Debug Logs
1. Connect to SEFOS.See “Connect to SEFOS” on page 26.
2. Enable the debug trace for any of the modules, such as the PNAC module.
SEFOS-1# debug dot1x all
SEFOS-1# show debugging
DOT1x :
DOT1x packet dump debugging is on
DOT1x management debugging is on

View Debug Logs
Administering SEFOS 53
DOT1x init and shutdown debugging is on
DOT1x error debugging is on
DOT1x control path debugging is on
...
3. View the debug logs in the file.
SEFOS-1# show debug-logging...
4. Disable the PNAC module debug trace.
SEFOS-1# no debug dot1x all
Related Information
■ “Copy a System Log to a Remote Location” on page 51

54 Oracle Switch ES2-72 and Oracle Switch ES2-64 Configuration Guide • April 2015

Configuring the Switching Feature 55
Configuring the Switching Feature
These topics describe how to configure the layer 2 switching feature using SEFOS. Review andperform these topics in order.
■ “Switching Feature Topology” on page 55■ “Configure Initial Settings” on page 57■ “Verify the Configuration” on page 59■ “Configure VLAN Forwarding” on page 60■ “Verify VLAN Membership” on page 61■ “Configure RSTP” on page 62■ “Configure LA” on page 64
Related Information
■ “Administering the Switch”■ “Administering SEFOS”■ “Configuring the Routing Feature”
Switching Feature Topology
Note - All ports in this topology are in VLAN 101.

Port Terminology
56 Oracle Switch ES2-72 and Oracle Switch ES2-64 Configuration Guide • April 2015
Related Information
■ “Configure Initial Settings” on page 57■ “Configure VLAN Forwarding” on page 60■ “Configure RSTP” on page 62■ “Configure LA” on page 64
Port Terminology
■ 40G-capable ports are labeled as XL-Ethernet (xl).■ 10G-capable ports are labeled extreme-ethernet (ex).
Configure Initial Settings
Configuring the Switching Feature 57
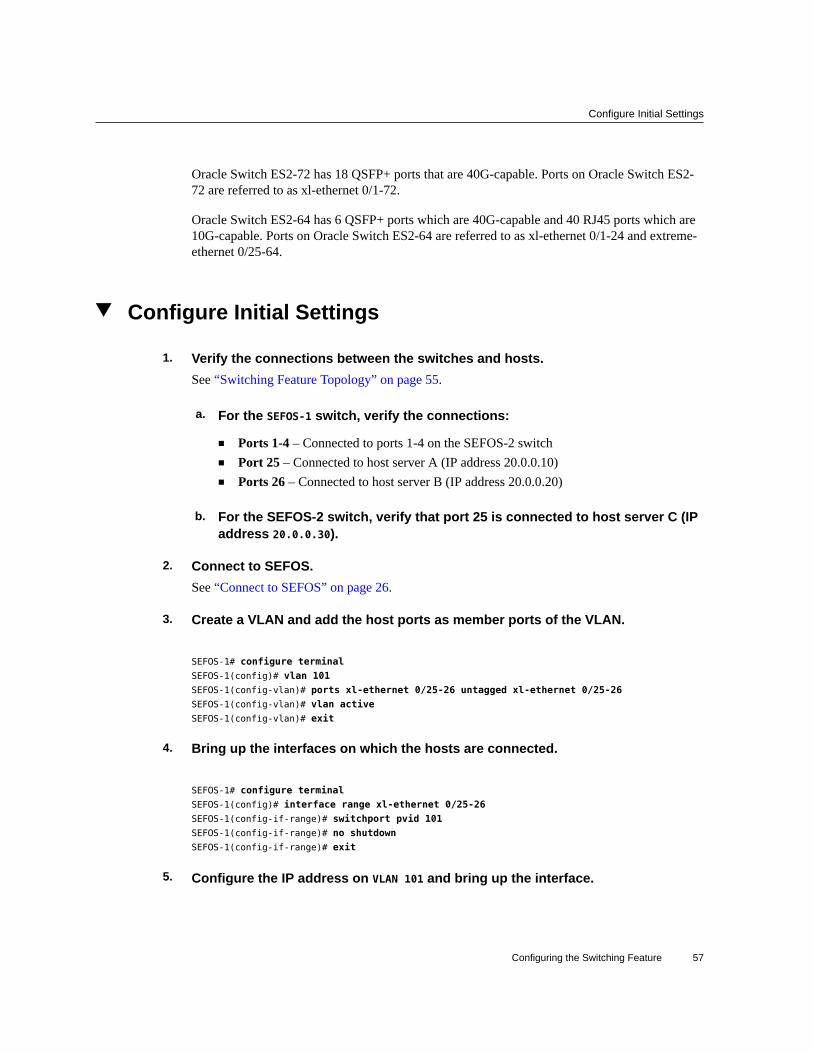
Oracle Switch ES2-72 has 18 QSFP+ ports that are 40G-capable. Ports on Oracle Switch ES2-72 are referred to as xl-ethernet 0/1-72.
Oracle Switch ES2-64 has 6 QSFP+ ports which are 40G-capable and 40 RJ45 ports which are10G-capable. Ports on Oracle Switch ES2-64 are referred to as xl-ethernet 0/1-24 and extreme-ethernet 0/25-64.
Configure Initial Settings
1. Verify the connections between the switches and hosts.See “Switching Feature Topology” on page 55.
a. For the SEFOS-1 switch, verify the connections:
■ Ports 1-4 – Connected to ports 1-4 on the SEFOS-2 switch■ Port 25 – Connected to host server A (IP address 20.0.0.10)■ Ports 26 – Connected to host server B (IP address 20.0.0.20)
b. For the SEFOS-2 switch, verify that port 25 is connected to host server C (IPaddress 20.0.0.30).
2. Connect to SEFOS.See “Connect to SEFOS” on page 26.
3. Create a VLAN and add the host ports as member ports of the VLAN.
SEFOS-1# configure terminal
SEFOS-1(config)# vlan 101
SEFOS-1(config-vlan)# ports xl-ethernet 0/25-26 untagged xl-ethernet 0/25-26
SEFOS-1(config-vlan)# vlan active
SEFOS-1(config-vlan)# exit
4. Bring up the interfaces on which the hosts are connected.
SEFOS-1# configure terminal
SEFOS-1(config)# interface range xl-ethernet 0/25-26
SEFOS-1(config-if-range)# switchport pvid 101
SEFOS-1(config-if-range)# no shutdown
SEFOS-1(config-if-range)# exit
5. Configure the IP address on VLAN 101 and bring up the interface.

Configure Initial Settings
58 Oracle Switch ES2-72 and Oracle Switch ES2-64 Configuration Guide • April 2015
SEFOS-1# configure terminal
SEFOS-1(config-int)# interface vlan 101
SEFOS-1(config-int)# ip address 20.0.0.1 255.0.0.0
SEFOS-1(config-int)# no shutdown
SEFOS-1(config-int)# exit
6. Verify that the VLAN 101 interface is up.
SEFOS-1# show ip interfacevlan1 is down, line protocol is down
Internet Address is 10.0.0.1/8
Broadcast Address 10.255.255.255
vlan101 is up, line protocol is up
Internet Address is 20.0.0.1/8
Broadcast Address 10.255.255.255
7. Check the status of the interfaces.
SEFOS-1# show interface status
Port Status Duplex Speed Negotiation Capability
---- ------ ------ ----- ----------- ----------
Xl0/1 not connected Full 10 Gbps Auto-Negotiation Auto-MDIX on
Xl0/2 not connected Full 10 Gbps Auto-Negotiation Auto-MDIX on
...
Xl0/25 connected Full 10 Gbps Auto-Negotiation Auto-MDIX on
Xl0/26 connected Full 10 Gbps Auto-Negotiation Auto-MDIX on
...
SEFOS-1# show interface description
Interface Status Protocol
--------- ------ --------
Xl0/1 down down
Xl0/2 down down
...
Xl0/25 up up
Xl0/26 up up
...
vlan101 up up
8. Ping host A (20.0.0.10) from the SEFOS-1 switch.The ping should be successful.
9. Check the MAC address entry.
SEFOS-1# show mac-address-tableVlan Mac Address Type Ports
---- ----------- ---- -----
101 00:14:4f:6c:7d:e9 Learnt Xl0/25
Total Mac Addresses displayed: 1

Verify the Configuration
Configuring the Switching Feature 59
Note - The MAC address displayed must correspond to the MAC address of host A.
10. Repeat Step 3 through Step 5 on the SEFOS-2 switch to bring up the requiredports and configure the IP address of VLAN 101 to 20.0.0.2.
11. Configure the topology.To configure the topology, all of the interfaces should be up. If they are not up, use the noshutdown command to bring up the ports.
SEFOS-1# configure terminal
SEFOS-1(config)# interface range xl 0/1-2
SEFOS-1(config-if-range)# switchport pvid 101
SEFOS-1(config-if-range)# no shutdown
SEFOS-1(config-if-range)# end
In both switches, ensure that the following interfaces are up: 0/1, 0/2, 0/25, 0/26.
Related Information
■ “Switching Feature Topology” on page 55■ “Verify the Configuration” on page 59■ “Configure VLAN Forwarding” on page 60■ “Configure RSTP” on page 62■ “Configure LA” on page 64
Verify the Configuration
1. From host A, ping the SEFOS-1 switch.
# ping 20.0.0.120.0.0.1 is alive
2. From host B, ping the SEFOS-1 switch.
# ping 20.0.0.1
3. From the SEFOS-1 switch, ping host A.
SEFOS-1# ping 20.0.0.10
4. From the SEFOS-1 switch, ping host B.

Configure VLAN Forwarding
60 Oracle Switch ES2-72 and Oracle Switch ES2-64 Configuration Guide • April 2015
SEFOS-1# ping 20.0.0.20
5. From host C, ping the SEFOS-2 switch (20.0.0.2).
SEFOS-1# ping 20.0.0.30
6. For the port connected to the switch, use a packet-capture device or dumpingutility to capture packets on host A, B, and C.All three hosts should receive STP, GMRP, and GVRP packets continuously, unless theseprotocols were disabled with SEFOS commands. By default, all the ports on a target aremembers of default VLAN 1.
Related Information■ “Configure Initial Settings” on page 57■ “Verify VLAN Membership” on page 61
Configure VLAN Forwarding
This task describes how to configure and test the VLAN forwarding feature of SEFOS runningon a switch target. This task tests whether the incoming packets are properly switched on themember ports of the VLAN.
See “Switching Feature Topology” on page 55 for the topology of this task.
1. Connect to SEFOS.See “Connect to SEFOS” on page 26.
2. Change the member ports on the SEFOS-1 switch.
SEFOS-1# configure terminal
SEFOS-1(config)# vlan 101
SEFOS-1(config-vlan)# ports xl-ethernet 0/1-2,0/25-26 untagged xl-ethernet 0/1-2,0/25-26
SEFOS-1(config-vlan)# vlan active
SEFOS-1(config-vlan)# exit
Related Information■ “Configure the Default VLAN ID” on page 33■ “Configure Initial Settings” on page 57■ “Configure RSTP” on page 62■ “Configure LA” on page 64

Verify VLAN Membership
Configuring the Switching Feature 61
Verify VLAN Membership
This task tests whether the incoming packets are properly switched on the member ports of theVLAN.
1. Connect to SEFOS.See “Connect to SEFOS” on page 26.
2. Display the current VLAN interface.
SEFOS-1# show vlanVlan database
-------------
Vlan ID : 101
Member Ports : X10/1,X10/2,X10/21,X10/22
Untagged Ports : X10/1,X10/2,X10/21,X10/22
Forbidden Ports : None
Reflective-Relay : Disabled
Name :
Status : Other
3. Ping from host A to host B.
# ping -s 20.0.0.20
4. Ping from host B to host A.
# ping 20.0.0.10
5. Change the member ports of VLAN 101 on SEFOS-2 switch.
SEFOS-2# configure terminal
SEFOS-2(config)# vlan 101
SEFOS-1(config-vlan)# ports xl-ethernet 0/25,0/1-2 untagged xl-ethernet 0/25,0/1-2
6. Enable port 25, which is connected to host C.
SEFOS-2# config terminal
SEFOS-2(config)# interface xl-ethernet 0/25
SEFOS-2(config-if)# no shutdown
SEFOS-2(config-if)# end
7. Display the VLAN interface.

Configure RSTP
62 Oracle Switch ES2-72 and Oracle Switch ES2-64 Configuration Guide • April 2015
SEFOS-2# show vlanVlan database
-------------
Vlan ID : 101
Member Ports : X10/1,X10/21, X10/22
Untagged Ports : X10/1,X10/21, X10/22
Forbidden Ports : None
Reflective-Relay : Disabled
Name :
Status : Other
8. Ping from host A to host B, or to host C.The ping should be successful.
# ping -s 20.0.0.20
# ping -s 20.0.0.30
Related Information
■ “Configure the Default VLAN ID” on page 33■ “Configure VLAN Forwarding” on page 60■ “Verify the Configuration” on page 59
Configure RSTP
This task shows the traffic flow in the RSTP configuration on SEFOS running on the switchtargets. This task verifies whether a loop is present in the topology, if it is detected, and if thetraffic is blocked for the alternate port.
See “Switching Feature Topology” on page 55 for the topology of this task.
1. Configure the initial settings.See “Configure Initial Settings” on page 57.
2. Configure VLAN forwarding in SEFOS-1 and SEFOS-2.See “Configure VLAN Forwarding” on page 60.
3. On SEFOS-1, verify the port status in RSTP mode.
SEFOS-1# show spanning-treeRoot Id Priority 32768
Address 00:14:4f:6c:63:0f
Cost 0
Port 0 [0]
Max Age 20 Sec, Forward Delay 15 Sec
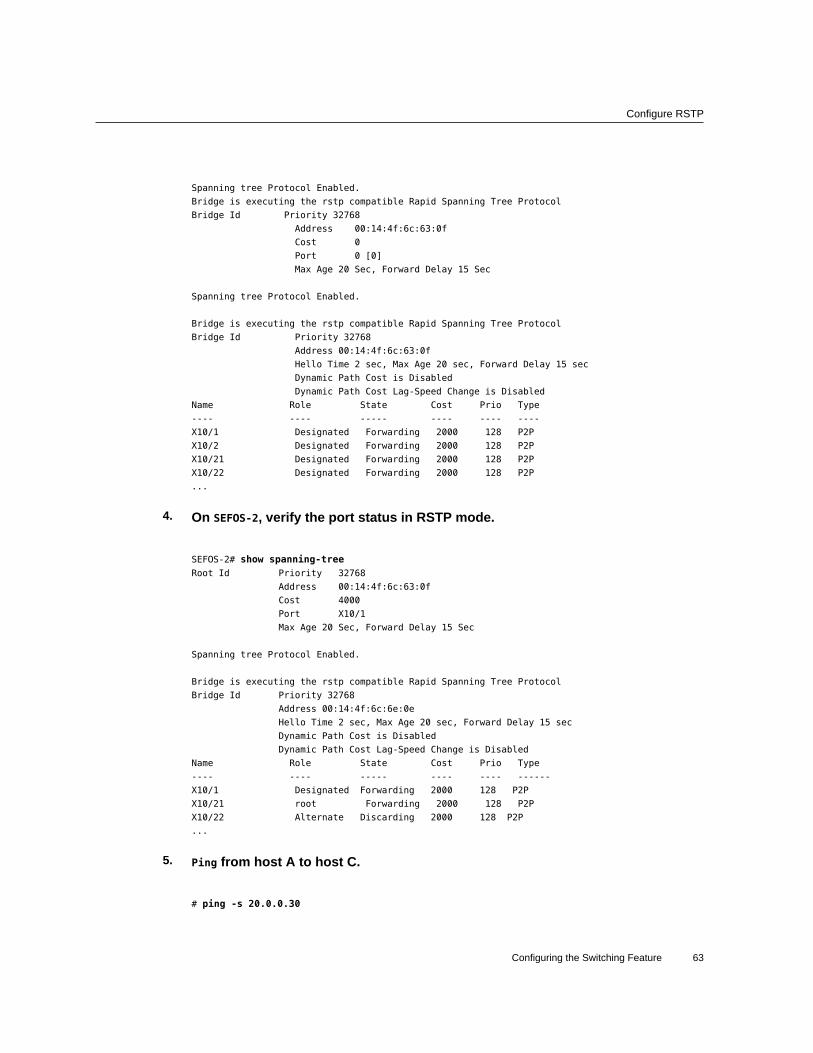
Configure RSTP
Configuring the Switching Feature 63
Spanning tree Protocol Enabled.
Bridge is executing the rstp compatible Rapid Spanning Tree Protocol
Bridge Id Priority 32768
Address 00:14:4f:6c:63:0f
Cost 0
Port 0 [0]
Max Age 20 Sec, Forward Delay 15 Sec
Spanning tree Protocol Enabled.
Bridge is executing the rstp compatible Rapid Spanning Tree Protocol
Bridge Id Priority 32768
Address 00:14:4f:6c:63:0f
Hello Time 2 sec, Max Age 20 sec, Forward Delay 15 sec
Dynamic Path Cost is Disabled
Dynamic Path Cost Lag-Speed Change is Disabled
Name Role State Cost Prio Type
---- ---- ----- ---- ---- ----
X10/1 Designated Forwarding 2000 128 P2P
X10/2 Designated Forwarding 2000 128 P2P
X10/21 Designated Forwarding 2000 128 P2P
X10/22 Designated Forwarding 2000 128 P2P
...
4. On SEFOS-2, verify the port status in RSTP mode.
SEFOS-2# show spanning-treeRoot Id Priority 32768
Address 00:14:4f:6c:63:0f
Cost 4000
Port X10/1
Max Age 20 Sec, Forward Delay 15 Sec
Spanning tree Protocol Enabled.
Bridge is executing the rstp compatible Rapid Spanning Tree Protocol
Bridge Id Priority 32768
Address 00:14:4f:6c:6e:0e
Hello Time 2 sec, Max Age 20 sec, Forward Delay 15 sec
Dynamic Path Cost is Disabled
Dynamic Path Cost Lag-Speed Change is Disabled
Name Role State Cost Prio Type
---- ---- ----- ---- ---- ------
X10/1 Designated Forwarding 2000 128 P2P
X10/21 root Forwarding 2000 128 P2P
X10/22 Alternate Discarding 2000 128 P2P
...
5. Ping from host A to host C.
# ping -s 20.0.0.30

Configure LA
64 Oracle Switch ES2-72 and Oracle Switch ES2-64 Configuration Guide • April 2015
Traffic is forwarded through the xl-ethernet 0/21 port on SEFOS-1 to SEFOS-2 port 21.
6. Shut down the xl-ethernet 0/21 port from SEFOS-2 and verify the port status.
SEFOS-2# configure terminal
SEFOS-2(config)# int xl 0/1
SEFOS-2(config)# shut
SEFOS-2(config)# exit
SEFOS-2# show spanning-treeRoot Id Priority 32768
Address 00:14:4f:6c:69:0f
Cost 4000
Port Xl0/2
Max Age 20 Sec, Forward Delay 15 Sec
Spanning tree Protocol Enabled.
Bridge is executing the rstp compatible Rapid Spanning Tree Protocol
Bridge Id Priority 32768
Address 00:14:4f:6c:6e:0e
Hello Time 2 sec, Max Age 20 sec, Forward Delay 15 sec
Dynamic Path Cost is Disabled
Dynamic Path Cost Lag-Speed Change is Disabled
Name Role State Cost Prio Type
---- ---- ----- ---- ---- ------
Xl0/2 root Forwarding 2000 128 P2P
Xl0/25 root Forwarding 2000 128 P2P
Xl0/25 root Forwarding 2000 128 P2P
...
7. Ping from host A to host C.
# ping 20.0.0.30
Traffic should be forwarded through the xl-ethernet 0/2 port on SEFOS-1. If RSTP is working,there will be a change in the port state.
Related Information■ “Configure Initial Settings” on page 57■ “Configure VLAN Forwarding” on page 60■ “Configure LA” on page 64
Configure LA
This task describes how to configure and test the LA feature of SEFOS running on a switchtarget.

Configure LA
Configuring the Switching Feature 65
See “Switching Feature Topology” on page 55 for the topology of this task.
1. Configure the initial settings.See “Configure Initial Settings” on page 57.
2. Create a port-channel group 100 on SEFOS-1 and link the ports in the group.
SEFOS-1# configure terminal
SEFOS-1(config)# set port-channel enable
SEFOS-1(config)# interface port-channel 100
SEFOS-1(config-if)# no shutdown
SEFOS-1(config-if)# exit
SEFOS-1(config)# interface range xl-ethernet 0/1-2
SEFOS-1(config-if)# no shutdown
SEFOS-1(config-if)# channel-group 100 mode active
SEFOS-1(config-if)# exit
SEFOS-1(config)# vlan 101
SEFOS-1(config-vlan)# ports xl-ethernet 0/1-2 port-channel
SEFOS-1(config-vlan)# ports xl-ethernet 0/25-26 port-channel 100 untagged xl-ethernet
0/25-26 port-channel 100
3. Repeat Step 2 on SEFOS-2.
4. Verify the VLAN membership.
SEFOS-1# show vlanVlan database
-------------
Vlan ID : 101
Member Ports : X10/25,X10/26,po100
Untagged Ports : X10/25,X10/26,po100
Forbidden Ports : None
Reflective-Relay : Disabled
Name :
Status : Other
5. Verify the STP port status on SEFOS-1.
SEFOS-1# show spanning-treeRoot Id Priority 32768
Address 00:14:4f:6c:69:ee
Cost 0
Port 0 [0]
Max age 20 Sec, forward delay 15 Sec
Hello Time 2 Sec
MST00

Configure LA
66 Oracle Switch ES2-72 and Oracle Switch ES2-64 Configuration Guide • April 2015
Spanning tree Protocol has been enabled
MST00 is executing the mstp compatible Multiple Spanning Tree Protocol
Bridge Id Priority 32768
Address 00:14:4f:6c:69:ee
Max age is 20 sec, forward delay is 15 sec
Hello Time is 2 sec
Dynamic Path Cost is Disabled
Dynamic Path Cost Lag-Speed Change is Disabled
Name Role State Cost Prio Type
---- ---- ----- ---- ---- ------
X10/25 Designated Forwarding 2000 128 P2P
X10/26 Designated Forwarding 2000 128 P2P
po100 Designated Forwarding 2000 128 P2P
...
6. Ping continuously from host A to host C.There should not be any data loss during traffic forwarding.
7. Verify the port channel summary.
SEFOS-1# show etherchannel summary
Port-channel Module Admin Status is enabled
Port-channel Module Oper Status is enabled
Port-channel System Identifier is 00:14:4f:6c:69:ee
Flags:
D - down P - in port-channel
I - stand-alone H - Hot-standby (LACP only)
AD - Admin Down AU - Admin Up
OD - Operative Down OU - Operative Up
Number of channel-groups in use: 1
Number of aggregators: 1
Group Port-channel Protocol Ports
-------------------------------------------------------------------------
100 Po100(P)[AU,OD] LACP X10/1(P),X10/2(P)
...
8. Shut down the port xl-ethernet 0/1 and verify the port channel summary
SEFOS-1# configure terminal
SEFOS-1(config)# int xl 0/1
SEFOS-1(config-if)# shut
SEFOS-1(config-if)# end
SEFOS-1# show etherchannel summary
Port-channel Module Admin Status is enabled

Configure LA
Configuring the Switching Feature 67
Port-channel Module Oper Status is enabled
Port-channel System Identifier is 00:14:4f:6c:69:ee
Flags:
D - down P - in port-channel
I - stand-alone H - Hot-standby (LACP only)
AD - Admin Down AU - Admin Up
OD - Operative Down OU - Operative Up
Number of channel-groups in use: 1
Number of aggregators: 1
Group Port-channel Protocol Ports
-----------------------------------------------------------------
100 Po100(P)[AU,OD] LACP X10/1(D),X10/2(P)
...
LA was configured properly if traffic flows through the port channel group.
Related Information
■ “Configure Initial Settings” on page 57■ “Configure VLAN Forwarding” on page 60■ “Configure RSTP” on page 62

68 Oracle Switch ES2-72 and Oracle Switch ES2-64 Configuration Guide • April 2015

Configuring the Routing Feature 69
Configuring the Routing Feature
These topics describe how to configure the routing feature with SEFOS and blade servers.
■ “Routing Feature Topology” on page 70■ “Configuring Static Routing” on page 71■ “Configuring Dynamic Routing” on page 77■ “Disabling Routing” on page 81
Related Information
■ “Administering the Switch”■ “Administering SEFOS”■ “Configuring the Switching Feature”

Routing Feature Topology
70 Oracle Switch ES2-72 and Oracle Switch ES2-64 Configuration Guide • April 2015
Routing Feature Topology
Switch or Host Name VLAN ID IP Address
SEFOS-1 VLAN 10
VLAN 20
10.0.0.201
20.0.0.201
Host A connected to SEFOS-1, port 25 VLAN 10 10.0.0.169
Host A-2 connected to SEFOS-1, port 26 VLAN 10 10.0.0.152
SEFOS-2 VLAN 20
VLAN 40
20.0.0.200
40.0.0.200

Configuring Static Routing
Configuring the Routing Feature 71
Switch or Host Name VLAN ID IP Address
Host B connected to SEFOS-2, port 25 VLAN 40 40.0.0.110
Host B-2 connected to SEFOS-2, port 26 VLAN 40 40.0.0.118
Related Information■ “Configuring Static Routing” on page 71■ “Configuring Dynamic Routing” on page 77■ “Disabling Routing” on page 81
Configuring Static Routing
These tasks describe how to configure static routing.
■ “Configure Static Unicast Route Entries” on page 71■ “Add Static Routes” on page 76
Related Information■ “Routing Feature Topology” on page 70■ “Configuring Dynamic Routing” on page 77■ “Disabling Routing” on page 81
Configure Static Unicast Route Entries
This task configures the static route entries in SEFOS and verifies that traffic is reachable acrossnetworks.
Note - Before performing this task, erase any previous configurations on the switches.
See “Routing Feature Topology” on page 70 for the topology of this task.
1. Configure the initial settings.See “Configure Initial Settings” on page 57.
2. If GVRP and GMRP are enabled, disable them so that the VLAN creation will notbe propagated.

Configure Static Unicast Route Entries
72 Oracle Switch ES2-72 and Oracle Switch ES2-64 Configuration Guide • April 2015
SEFOS-1# configure terminal
SEFOS-1(config)# set gvrp disable
SEFOS-1(config)# set gmrp disable
SEFOS-1(config)# end
SEFOS-1# show vlan device info
Vlan device configurations
--------------------------
Vlan Status : Enabled
Vlan Oper status : Enabled
Gvrp status : Disabled
Gmrp status : Disabled
Gvrp Oper status : Disabled
Gmrp Oper status : Disabled
The set gvrp disable and set gmrp disable commands disable these protocols. The showvlan device info command shows the VLAN configuration information.
3. Configure SEFOS-1.See “Routing Feature Topology” on page 70.
a. Remove the IP address of VLAN 1.
SEFOS-1# configure terminal
SEFOS-1(config)# interface vlan 1
SEFOS-1(config-if)# no ip address
SEFOS-1(config-if)# exit
SEFOS-1(config)# vlan 10
SEFOS-1(config-vlan)# exit
SEFOS-1(config)# interface range xl-ethernet 0/25-26
SEFOS-1(config-if-range)# switchport access vlan 10
SEFOS-1(config-if-range)# no shutdown
SEFOS-1(config-if-range)# exit
SEFOS-1(config)# interface vlan 10
SEFOS-1(config-if)# shut
SEFOS-1(config-if)# ip address 10.0.0.201 255.255.255.0
SEFOS-1(config-if)# no shutdown
SEFOS-1(config-if)# end
The default IP address of VLAN 1 is 10.0.0.1, and the IP address of VLAN 10 is10.0.0.201. So you must remove the IP address of VLAN 1 before you can add the IPaddress for VLAN 10.
b. Ping host A from SEFOS-1.
SEFOS-1# ping 10.0.0.169
c. Ping host A-2 from SEFOS-1.

Configure Static Unicast Route Entries
Configuring the Routing Feature 73
SEFOS-1# ping 10.0.0.152
d. Ping SEFOS-1 and host A-2 from host A.
# ping 10.0.20110.0.201 is alive
# ping 10.0.0.15210.0.0.152 is alive
#
4. Configure the SEFOS-2 switch based on the topology.See “Routing Feature Topology” on page 70.
SEFOS-2# configure terminal
SEFOS-2(config)# interface vlan 1
SEFOS-2(config-if)# no ip address
SEFOS-2(config-if)# exit
SEFOS-2(config)# vlan 40
SEFOS-2(config-vlan)# exit
SEFOS-2(config)# interface range xl-ethernet 0/25-26
SEFOS-2(config-if-range)# shutdown
SEFOS-2(config-if-range)# switchport access vlan 40
SEFOS-2(config-if-range)# no shutdown
SEFOS-2(config-if-range)# exit
SEFOS-2(config)# interface vlan 40
SEFOS-2(config-if)# shutdown
SEFOS-2(config-if)# ip address 40.0.0.200 255.255.255.0
SEFOS-2(config-if)# no shutdown
SEFOS-2(config-if)# endSEFOS-2#
5. Ping host B and host B-2 from SEFOS-2.
SEFOS-2# ping 40.0.0.110
SEFOS-2# ping 40.0.0.118
6. Create VLAN 20 between the two switches.Use ports 1 to 2 on both switches.
a. Create VLAN 20 on SEFOS-1, ports 21 to 22.
SEFOS-1# configure terminal
SEFOS-1(config)# interface range xl-ethernet 0/1-2
SEFOS-1(config-if-range)# switchport access vlan 20
SEFOS-1(config-if-range)# no shutdown

Configure Static Unicast Route Entries
74 Oracle Switch ES2-72 and Oracle Switch ES2-64 Configuration Guide • April 2015
SEFOS-1(config-if-range)# exit
SEFOS-1(config)# interface vlan 20
SEFOS-1(config-if)# shutdown
SEFOS-1(config-if)# ip address 20.0.0.201 255.255.255.0
SEFOS-1(config-if)# no shutdown
SEFOS-1(config-if)# endSEFOS-1#
b. Create VLAN 20 on SEFOS-2, ports 21 to 22.
SEFOS-2# configure terminal
SEFOS-2(config)# interface range xl-ethernet 0/1-2
SEFOS-2(config-if-range)# switchport access vlan 20
SEFOS-2(config-if-range)# no shutdown
SEFOS-2(config-if-range)# exit
SEFOS-2(config)# interface vlan 20
SEFOS-2(config-if)# shutdown
SEFOS-2(config-if)# ip address 20.0.0.200 255.255.255.0
SEFOS-2(config-if)# no shutdown
SEFOS-2(config-if)# end
SEFOS-2# ping 20.0.0.201
You can now use this configuration as a starting point for different router configurations.
7. Save the configuration.
a. On on SEFOS-1, type:
SEFOS-1# write startup-configBuilding configuration _
[OK]
b. On SEFOS-2, type:
SEFOS-2# write startup-configBuilding configuration _
[OK]
Switches start with the saved configuration on reboot.
8. Verify that the existing routes are available in SEFOS-1.
a. On SEFOS-1, type:
SEFOS-1# show ip routeCodes: C - connected, S - static, R - rip, B - bgp, O - ospf

Configure Static Unicast Route Entries
Configuring the Routing Feature 75
C 10.0.0.0/24 is directly connected, vlan10
C 20.0.0.0/24 is directly connected, vlan20
SEFOS-1#
b. On SEFOS-2, type:
SEFOS-2# show ip routeCodes: C - connected, S - static, R - rip, B - bgp, O - ospf
C 20.0.0.0/24 is directly connected, vlan20
C 40.0.0.0/24 is directly connected, vlan40
SEFOS-2#
If there is no known route from SEFOS-1 to host B, the ping from host A to host B fails.
9. Configure the static route in the SEFOS-1.
SEFOS-1# configure terminal
SEFOS-1(config)# ip route 40.0.0.0 255.255.255.0 20.0.0.200
SEFOS-1(config)# end
10. Configure the static route in SEFOS-2.
SEFOS-2# configure terminal
SEFOS-2(config)# ip route 10.0.0.0 255.255.255.0 20.0.0.201
SEFOS-2(config)# end
11. Verify that the routes are known to SEFOS-1 and SEFOS-2.
a. On SEFOS-1, type:
SEFOS-1# show ip routeCodes: C - connected, S - static, R - rip, B - bgp, O - ospf
C 10.0.0.0/24 is directly connected, vlan10
C 20.0.0.0/24 is directly connected, vlan20
S 40.0.0.0/24 [-1] via 20.0.0.200
b. On SEFOS-2, type:
SEFOS-2# show ip routeCodes: C - connected, S - static, R - rip, B - bgp, O - ospf
S 10.0.0.0/24 [-1] via 20.0.0.201C 20.0.0.0/24 is directly connected, vlan20
C 40.0.0.0/24 is directly connected, vlan40

Add Static Routes
76 Oracle Switch ES2-72 and Oracle Switch ES2-64 Configuration Guide • April 2015
Related Information■ “Add Static Routes” on page 76■ “Configure RIP Dynamic Routing” on page 77■ “Configure OSPF Dynamic Routing” on page 79■ “Remove Static Routes” on page 82
Add Static Routes
Depending on how each server configures routes, you might need to add static routes withcommands provided by the servers.
1. On host A, add static routes to reach VLAN 40 and VLAN 20 configured on SEFOS-2.
# route add 40.0.0.0 -netmask 255.255.255.0 10.0.0.201
# route add 20.0.0.0 -netmask 255.255.255.0 10.0.0.201
2. On host B, add static routes to reach VLAN 10 and VLAN 20 configured on SEFOS-1.
# route add -net 10.0.0.0 netmask 255.255.255.0 gw 40.0.0.200
# route add -net 20.0.0.0 netmask 255.255.255.0 gw 40.0.0.200
3. Connect to SEFOS on SEFOS-1.See “Connect to SEFOS” on page 26.
4. Ping the SEFOS-2 VLAN 40 IP address from SEFOS-1.
SEFOS-1# ping 40.0.0.200
5. Ping host B VLAN 40 IP address from SEFOS-1.
SEFOS-1# ping 40.0.0.110
6. Ping host B from host A.
# ping -s 40.0.0.110
7. Connect to SEFOS on SEFOS-2.See “Connect to SEFOS” on page 26.
8. Ping SEFOS-1 VLAN 10 IP address from SEFOS-2.

Configuring Dynamic Routing
Configuring the Routing Feature 77
SEFOS-2# ping 10.0.0.201
9. Ping the host A IP address from SEFOS-2.
SEFOS-2# ping 10.0.0.169
10. Ping host A from host B.
# ping 10.0.0.169
To reach host A from host B, packets must be routed between VLAN 40–VLAN 20 and VLAN20–VLAN 10. With static routes configured, you can now test the routing functions with SEFOS.
Related Information
■ “Configure Static Unicast Route Entries” on page 71■ “Configure RIP Dynamic Routing” on page 77■ “Configure OSPF Dynamic Routing” on page 79■ “Remove Static Routes” on page 82
Configuring Dynamic Routing
These tasks describe how to configure dynamic routing.
■ “Configure RIP Dynamic Routing” on page 77■ “Configure OSPF Dynamic Routing” on page 79
Related Information
■ “Routing Feature Topology” on page 70■ “Configuring Static Routing” on page 71■ “Disabling Routing” on page 81
Configure RIP Dynamic Routing
This task configures dynamic routing with the redistribution feature of RIP in SEFOS. This taskalso verifies the accessibility of the two hosts by learning the routes dynamically through RIP.

Configure RIP Dynamic Routing
78 Oracle Switch ES2-72 and Oracle Switch ES2-64 Configuration Guide • April 2015
See “Routing Feature Topology” on page 70 for the topology of this task.
1. Verify that SEFOS-1 and SEFOS-2 still have the configuration information that yousaved.See “Configure Static Unicast Route Entries” on page 71.
The basic VLAN configuration for dynamic routing is similar to the basic VLAN configurationfor static routing. If the configuration information was not saved on SEFOS-1 and SEFOS-2,follow Step 1 through Step 6 in “Configure Static Unicast Route Entries” on page 71, thenreturn here.
2. Enable the RIP protocol on SEFOS-1.
SEFOS-1# configure terminal
SEFOS-1(config)# router rip
SEFOS-1(config-router)# neighbor 20.0.0.200
SEFOS-1(config-router)# network 20.0.0.201
SEFOS-1(config-router)# network 10.0.0.201
SEFOS-1(config-router)# redistribute all
SEFOS-1(config-router)# end
3. Enable the RIP protocol on SEFOS-2.
SEFOS-2# configure terminal
SEFOS-2(config)# router rip
SEFOS-2(config-router)# neighbor 20.0.0.201
SEFOS-2(config-router)# network 20.0.0.200
SEFOS-2(config-router)# network 40.0.0.200
SEFOS-2(config-router)# redistribute all
SEFOS-2(config-router)# end
If SEFOS-2 is a third-party switch, verify that the RIP is enabled on SEFOS-2 and that relatedconfigurations are applied accordingly.
4. Check the routing database on SEFOS-1.
SEFOS-1# show ip rip databaseVrf default
10.0.0.0/8 [1] auto-summary
10.0.0.0/24 [1] directly connected, vlan10
20.0.0.0/8 [1] auto-summary
20.0.0.0/24 [1] directly connected, vlan20
40.0.0.0/8 [2] auto-summary
40.0.0.0/8 [2] via 20.0.0.200, vlan20
5. Check the routing database on SEFOS-2.
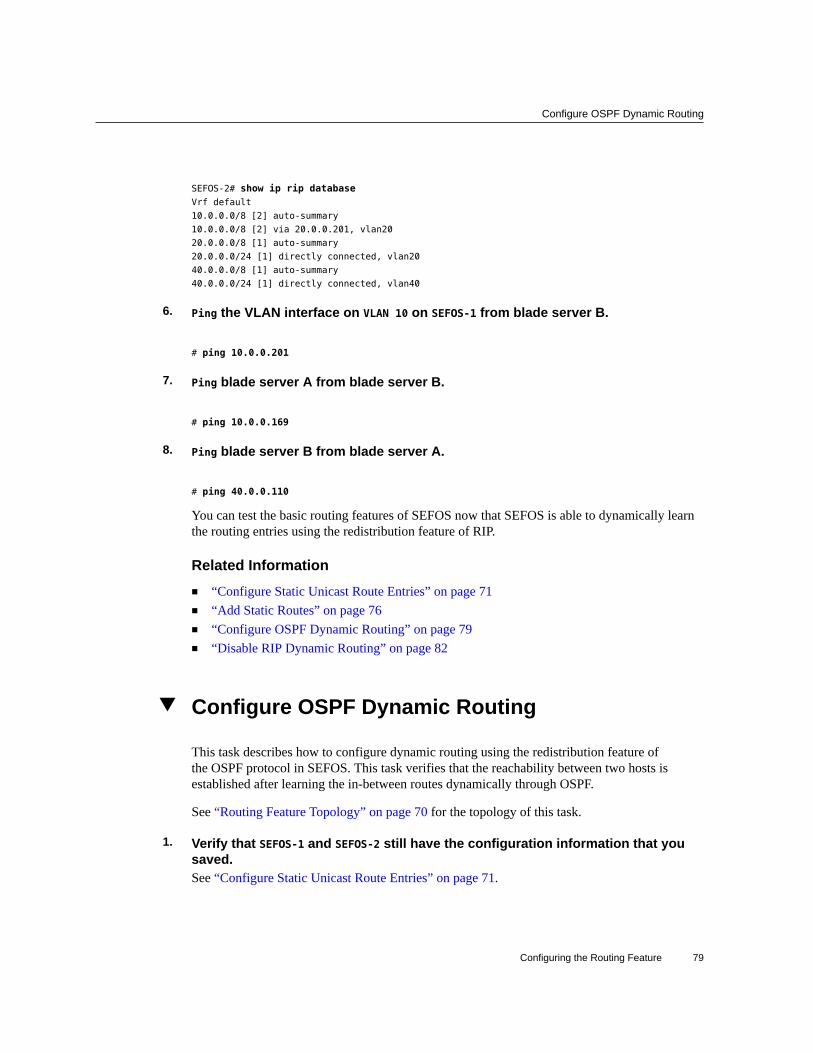
Configure OSPF Dynamic Routing
Configuring the Routing Feature 79
SEFOS-2# show ip rip databaseVrf default
10.0.0.0/8 [2] auto-summary
10.0.0.0/8 [2] via 20.0.0.201, vlan20
20.0.0.0/8 [1] auto-summary
20.0.0.0/24 [1] directly connected, vlan20
40.0.0.0/8 [1] auto-summary
40.0.0.0/24 [1] directly connected, vlan40
6. Ping the VLAN interface on VLAN 10 on SEFOS-1 from blade server B.
# ping 10.0.0.201
7. Ping blade server A from blade server B.
# ping 10.0.0.169
8. Ping blade server B from blade server A.
# ping 40.0.0.110
You can test the basic routing features of SEFOS now that SEFOS is able to dynamically learnthe routing entries using the redistribution feature of RIP.
Related Information■ “Configure Static Unicast Route Entries” on page 71■ “Add Static Routes” on page 76■ “Configure OSPF Dynamic Routing” on page 79■ “Disable RIP Dynamic Routing” on page 82
Configure OSPF Dynamic Routing
This task describes how to configure dynamic routing using the redistribution feature ofthe OSPF protocol in SEFOS. This task verifies that the reachability between two hosts isestablished after learning the in-between routes dynamically through OSPF.
See “Routing Feature Topology” on page 70 for the topology of this task.
1. Verify that SEFOS-1 and SEFOS-2 still have the configuration information that yousaved.See “Configure Static Unicast Route Entries” on page 71.
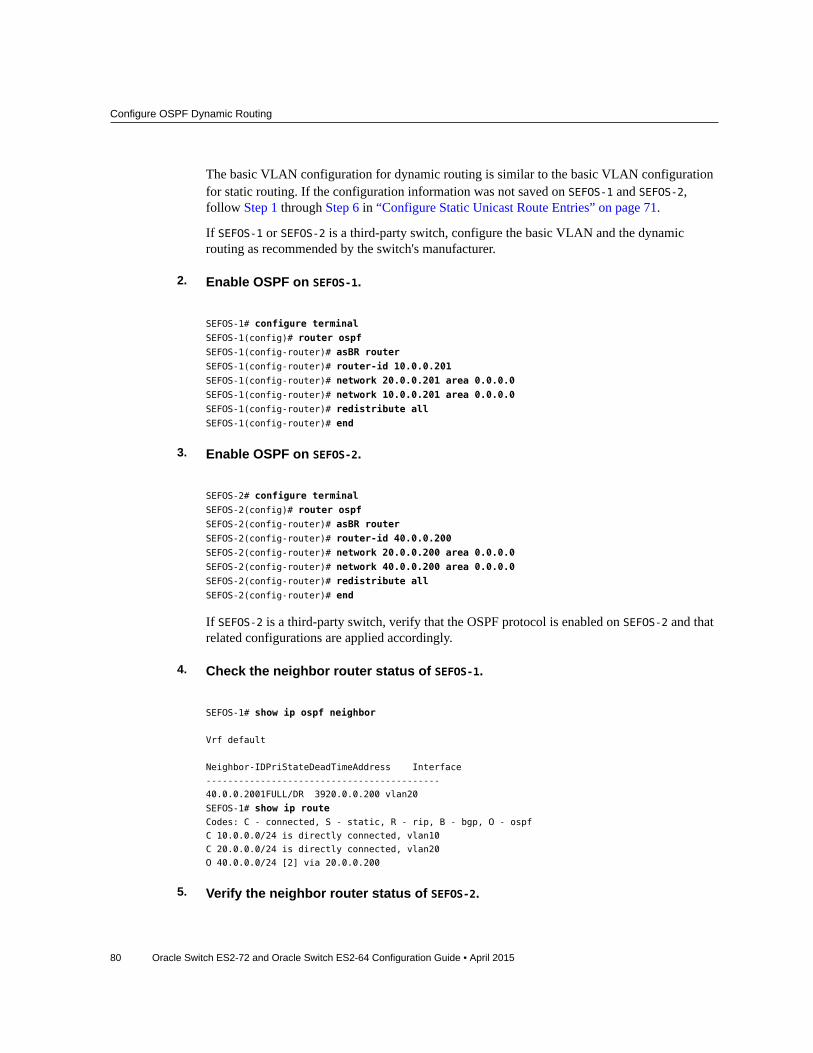
Configure OSPF Dynamic Routing
80 Oracle Switch ES2-72 and Oracle Switch ES2-64 Configuration Guide • April 2015
The basic VLAN configuration for dynamic routing is similar to the basic VLAN configurationfor static routing. If the configuration information was not saved on SEFOS-1 and SEFOS-2,follow Step 1 through Step 6 in “Configure Static Unicast Route Entries” on page 71.
If SEFOS-1 or SEFOS-2 is a third-party switch, configure the basic VLAN and the dynamicrouting as recommended by the switch's manufacturer.
2. Enable OSPF on SEFOS-1.
SEFOS-1# configure terminal
SEFOS-1(config)# router ospf
SEFOS-1(config-router)# asBR router
SEFOS-1(config-router)# router-id 10.0.0.201
SEFOS-1(config-router)# network 20.0.0.201 area 0.0.0.0
SEFOS-1(config-router)# network 10.0.0.201 area 0.0.0.0
SEFOS-1(config-router)# redistribute all
SEFOS-1(config-router)# end
3. Enable OSPF on SEFOS-2.
SEFOS-2# configure terminal
SEFOS-2(config)# router ospf
SEFOS-2(config-router)# asBR router
SEFOS-2(config-router)# router-id 40.0.0.200
SEFOS-2(config-router)# network 20.0.0.200 area 0.0.0.0
SEFOS-2(config-router)# network 40.0.0.200 area 0.0.0.0
SEFOS-2(config-router)# redistribute all
SEFOS-2(config-router)# end
If SEFOS-2 is a third-party switch, verify that the OSPF protocol is enabled on SEFOS-2 and thatrelated configurations are applied accordingly.
4. Check the neighbor router status of SEFOS-1.
SEFOS-1# show ip ospf neighbor
Vrf default
Neighbor-IDPriStateDeadTimeAddress Interface
-------------------------------------------
40.0.0.2001FULL/DR 3920.0.0.200 vlan20
SEFOS-1# show ip routeCodes: C - connected, S - static, R - rip, B - bgp, O - ospf
C 10.0.0.0/24 is directly connected, vlan10
C 20.0.0.0/24 is directly connected, vlan20
O 40.0.0.0/24 [2] via 20.0.0.200
5. Verify the neighbor router status of SEFOS-2.

Disabling Routing
Configuring the Routing Feature 81
SEFOS-2# show ip ospf neighbor
Vrf default
Neighbor-ID Pri State DeadTime Address Interface
----------- --- ----- -------- ------- ---------
SEFOS-2# show ip route10.0.0.201 1 FULL/BACKUP 32 20.0.0.201 vlan20
Codes: C - connected, S - static, R - rip, B - bgp, O - ospf
O 10.0.0.0/24 [2] via 20.0.0.201
C 20.0.0.0/24 is directly connected, vlan20
C 40.0.0.0/24 is directly connected, vlan40
If SEFOS-2 is a third-party switch, use the appropriate command to verify the neighbor routerstatus.
6. Verify connectivity between SEFOS-1 and SEFOS-2 with the ping command.
Related Information
■ “Configure Static Unicast Route Entries” on page 71■ “Add Static Routes” on page 76■ “Configure RIP Dynamic Routing” on page 77■ “Disable OSPF Dynamic Routing” on page 83
Disabling Routing
These tasks describe how to disable static and dynamic routing features.
■ “Remove Static Routes” on page 82■ “Disable RIP Dynamic Routing” on page 82■ “Disable OSPF Dynamic Routing” on page 83
Related Information
■ “Routing Feature Topology” on page 70■ “Configuring Static Routing” on page 71■ “Configuring Dynamic Routing” on page 77

Remove Static Routes
82 Oracle Switch ES2-72 and Oracle Switch ES2-64 Configuration Guide • April 2015
Remove Static Routes
1. Connect to SEFOS on SEFOS-1.See “Connect to SEFOS” on page 26.
2. Remove the static route on SEFOS-1.
SEFOS-1# configure terminal
SEFOS-1(config)# no ip route 40.0.0.0 255.0.0.0 20.0.0.200
SEFOS-1(config)# end
3. Connect to SEFOS on SEFOS-2.See “Connect to SEFOS” on page 26.
4. Remove the static route on SEFOS-2.
SEFOS-2# configure terminal
SEFOS-2(config)# no ip route 10.0.0.0 255.0.0.0 20.0.0.201
SEFOS-2(config)# end
Related Information
■ “Disable RIP Dynamic Routing” on page 82■ “Disable OSPF Dynamic Routing” on page 83■ “Configure Static Unicast Route Entries” on page 71■ “Add Static Routes” on page 76
Disable RIP Dynamic Routing
1. Connect to SEFOS on SEFOS-1.See “Connect to SEFOS” on page 26.
2. Disable RIP on SEFOS-1.
SEFOS-1# configure terminal
SEFOS-1(config)# no router rip
SEFOS-1(config)# end
3. Disable RIP on SEFOS-2.

Disable OSPF Dynamic Routing
Configuring the Routing Feature 83
If SEFOS-2 is a third-party switch, follow the instructions that came with the switch to disableRIP. Otherwise, follow Step 1 to disable RIP on SEFOS-2.
Related Information
■ “Remove Static Routes” on page 82■ “Disable OSPF Dynamic Routing” on page 83■ “Configure RIP Dynamic Routing” on page 77
Disable OSPF Dynamic Routing
1. Connect to SEFOS on SEFOS-1.See “Connect to SEFOS” on page 26.
2. Disable OSPF on SEFOS-1.
SEFOS-1# configure terminal
SEFOS-1(config)# no router ospf
SEFOS-1(config)# end
3. Disable OSPF on SEFOS-2.If SEFOS-2 is a third-party switch, follow the instructions that came with the switch to disableOSPF. Otherwise, follow Step 1 to disable OSPF on SEFOS-2.
Related Information
■ “Remove Static Routes” on page 82■ “Disable RIP Dynamic Routing” on page 82■ “Configure OSPF Dynamic Routing” on page 79

84 Oracle Switch ES2-72 and Oracle Switch ES2-64 Configuration Guide • April 2015

Glossary 85
Glossary
10
10GbE 10 Gigabit Ethernet.
A
ACL Access control list.
C
CMA Cable management assembly.
D
DHCP Dynamic Host Configuration Protocol.
G
GARP Generic Attribute Registration Protocol.
GMRP GARP Multicast Registration Protocol.
GVRP GARP VLAN Registration Protocol.
L
LA Link aggregation.

Oracle ILOM
86 Oracle Switch ES2-72 and Oracle Switch ES2-64 Configuration Guide • April 2015
O
Oracle ILOM Oracle Integrated Lights Out Manager. ILOM provides advanced server processor hardwareand software to manage and monitor servers.
Oracle SwitchES2-64
An Ethernet switch by Oracle. Oracle Switch ES2-64 provides six QSFP ports and 4010GBASE-T RJ-45 ports. See also switch.
Oracle SwitchES2-72
An Ethernet switch by Oracle. Oracle Switch ES2-72 provides 18 QSFP ports. See also switch.
OSPF Open Shortest Path First Protocol.
Q
QSFP+ Quad small form-factor pluggable. QSFP+ is a hot-pluggable transceiver that provides 40 Gb/sor 4 x 10 Gb/s of data transfer.
R
RIP Routing Information Protocol.
RSTP Rapid Spanning Tree Protocol.
S
SEFOS Sun Ethernet Fabric Operating System. A full-featured fabric and switch management softwarepackage for configuring and monitoring the switches network infrastructure.
SEL System event log. The switch includes a number of replaceable component sensors thatgenerate entries in the SEL when the sensor crosses a threshold. Many of these readingsare used to adjust the fan speeds and perform other actions, such as illuminating LEDs andpowering off the switch.
SR Short range. A short range optical transceiver module.
STP Spanning-Tree Protocol.
switch Shortened name for the Oracle Switch ES2-64 and Oracle Switch ES2-72. See also OracleSwitch ES2-64 and Oracle Switch ES2-72.

87
Index
AACL filters, 36adding static routes, 76administering
SEFOS, 23switch, 11
auto save, 46
Cconfiguration
verifying, 59configuration files
configuring name, 32copying from flash to remote location, 51copying to flash, 50copying to remote location, 49erasing, 48managing, 47saving to, 47
configuringACL filters, 36configuration file name, 32debug logging, 36default VLAN ID, 33dynamic routing, 77
OSPF, 79RIP, 77
initial settings, 57interface IP address, 31LA, 64network management
web, 18port mirroring, 42QoS, 39rate limiting, 44
routingdynamic, 77static, 71
routing feature, 69RSTP, 62save parameters, 45SEFOS, 30static routing, 71switching feature, 55unicast route entries, 71VLAN forwarding, 60
copyingconfiguration files
from flash to remote location, 51to flash, 50to remote location, 49
log files, 51
Ddebug
configuring logging, 36viewing logs, 52
disablingauto save, 46dynamic routing
OSPF, 83RIP, 82
incremental save, 46routing, 81SEFOS timeout, 31static routing, 82trap generation, 34
dynamic routing, 77configuring
OSPF, 79

Index
88 Oracle Switch ES2-72 and Oracle Switch ES2-64 Configuration Guide • April 2015
RIP, 77disabling
OSPF, 83RIP, 82
Eenabling
auto save, 46incremental save, 46SEFOS timeout, 31trap generation, 34
Iincremental save, 46IP address
configuring interface, 31
LLA, 64log files
copying to remote location, 51managing, 51
logging inOracle ILOM, 13SEFOS, 26
logging outOracle ILOM, 21SEFOS, 27
Mmanaging
configuration files, 47log files, 51
OOracle ILOM
logging in, 13logging out, 21
overview, 11OSPF
configuring, 79disabling, 83
Pport mirroring, 42
QQoS, 39
Rrate limiting, 44RIP
configuring, 77disabling, 82
routingconfiguring
dynamic, 77static, 71
routing featureconfiguring, 69topology, 70
RSTP, 62
SSEFOS
administering, 23basics, 24changing user level, 29configuring, 30connecting to, 26creating user, 28disconnecting from, 27logging in, 26logging out, 27setup tasks, 23timeout, 31topology, 25
static routing, 71

Index
89
adding routes, 76configuring route entries, 71disabling, 82
switchadministering, 11
switching featureconfiguring, 55topology, 55
Ttopology
routing feature, 70SEFOS, 25switching feature, 55
trap generation, 34
Uuser
changing level, 29creating, 28
Vverifying
configuration, 59VLAN membership, 61
viewing debug logs, 52VLAN
configuringdefault ID, 33forwarding, 60
verifying membership, 61

90 Oracle Switch ES2-72 and Oracle Switch ES2-64 Configuration Guide • April 2015