Embed Size (px)
Citation preview
Oracle® Student LearningLearning Tool User’s Guide
Release 3.1.3
E20665-04
January 2012
Oracle Student Learning Learning Tool User's Guide, Release 3.1.3
E20665-04
Copyright © 2009, 2012, Oracle and/or its affiliates. All rights reserved.
This software and related documentation are provided under a license agreement containing restrictions on use and disclosure and are protected by intellectual property laws. Except as expressly permitted in your license agreement or allowed by law, you may not use, copy, reproduce, translate, broadcast, modify, license, transmit, distribute, exhibit, perform, publish, or display any part, in any form, or by any means. Reverse engineering, disassembly, or decompilation of this software, unless required by law for interoperability, is prohibited.
The information contained herein is subject to change without notice and is not warranted to be error-free. If you find any errors, please report them to us in writing.
If this is software or related documentation that is delivered to the U.S. Government or anyone licensing it on behalf of the U.S. Government, the following notice is applicable:
U.S. GOVERNMENT RIGHTS Programs, software, databases, and related documentation and technical data delivered to U.S. Government customers are "commercial computer software" or "commercial technical data" pursuant to the applicable Federal Acquisition Regulation and agency-specific supplemental regulations. As such, the use, duplication, disclosure, modification, and adaptation shall be subject to the restrictions and license terms set forth in the applicable Government contract, and, to the extent applicable by the terms of the Government contract, the additional rights set forth in FAR 52.227-19, Commercial Computer Software License (December 2007). Oracle USA, Inc., 500 Oracle Parkway, Redwood City, CA 94065.
This software or hardware is developed for general use in a variety of information management applications. It is not developed or intended for use in any inherently dangerous applications, including applications that may create a risk of personal injury. If you use this software or hardware in dangerous applications, then you shall be responsible to take all appropriate fail-safe, backup, redundancy, and other measures to ensure its safe use. Oracle Corporation and its affiliates disclaim any liability for any damages caused by use of this software or hardware in dangerous applications.
Oracle is a registered trademark of Oracle Corporation and/or its affiliates. Other names may be trademarks of their respective owners.
This software and documentation may provide access to or information on content, products, and services from third parties. Oracle Corporation and its affiliates are not responsible for and expressly disclaim all warranties of any kind with respect to third-party content, products, and services. Oracle Corporation and its affiliates will not be responsible for any loss, costs, or damages incurred due to your access to or use of third-party content, products, or services.
iii
Contents
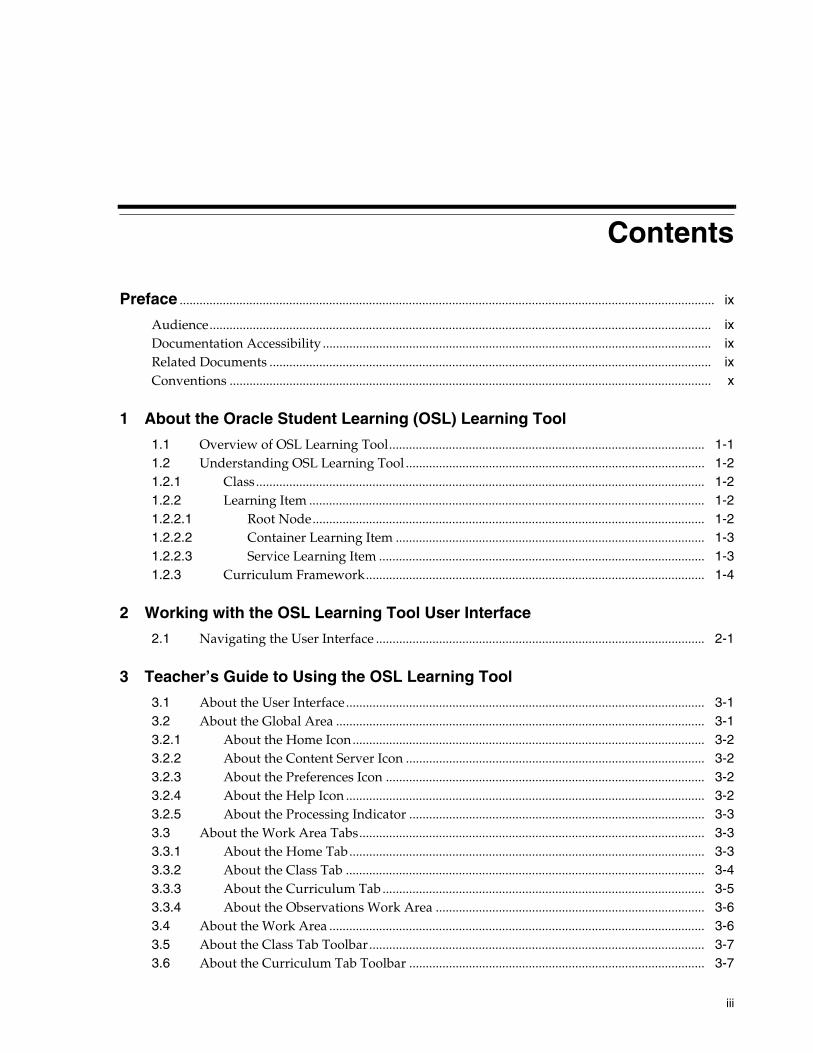
Preface ................................................................................................................................................................. ix
Audience....................................................................................................................................................... ixDocumentation Accessibility ..................................................................................................................... ixRelated Documents ..................................................................................................................................... ixConventions ................................................................................................................................................. x
1 About the Oracle Student Learning (OSL) Learning Tool
1.1 Overview of OSL Learning Tool............................................................................................... 1-11.2 Understanding OSL Learning Tool .......................................................................................... 1-21.2.1 Class....................................................................................................................................... 1-21.2.2 Learning Item ....................................................................................................................... 1-21.2.2.1 Root Node...................................................................................................................... 1-21.2.2.2 Container Learning Item ............................................................................................. 1-31.2.2.3 Service Learning Item .................................................................................................. 1-31.2.3 Curriculum Framework...................................................................................................... 1-4
2 Working with the OSL Learning Tool User Interface
2.1 Navigating the User Interface ................................................................................................... 2-1
3 Teacher’s Guide to Using the OSL Learning Tool
3.1 About the User Interface............................................................................................................ 3-13.2 About the Global Area ............................................................................................................... 3-13.2.1 About the Home Icon.......................................................................................................... 3-23.2.2 About the Content Server Icon .......................................................................................... 3-23.2.3 About the Preferences Icon ................................................................................................ 3-23.2.4 About the Help Icon ............................................................................................................ 3-23.2.5 About the Processing Indicator ......................................................................................... 3-33.3 About the Work Area Tabs........................................................................................................ 3-33.3.1 About the Home Tab........................................................................................................... 3-33.3.2 About the Class Tab ............................................................................................................ 3-43.3.3 About the Curriculum Tab................................................................................................. 3-53.3.4 About the Observations Work Area ................................................................................. 3-63.4 About the Work Area ................................................................................................................. 3-63.5 About the Class Tab Toolbar..................................................................................................... 3-73.6 About the Curriculum Tab Toolbar ......................................................................................... 3-7
iv
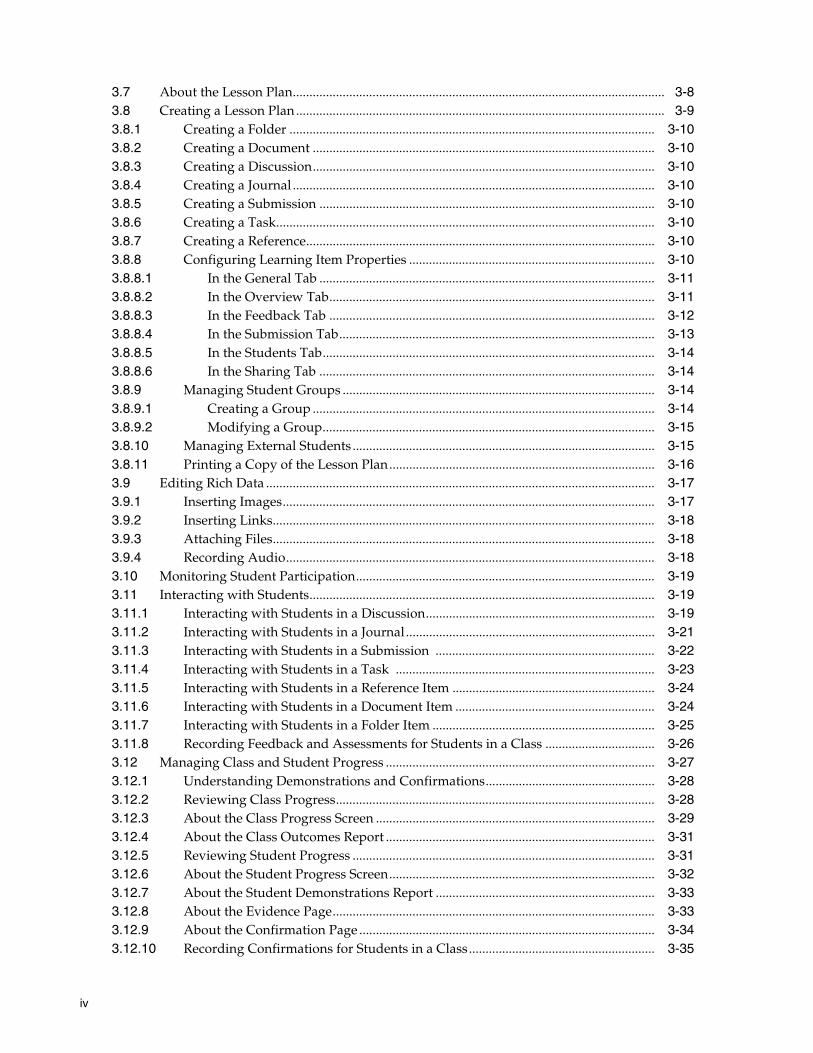
3.7 About the Lesson Plan................................................................................................................ 3-83.8 Creating a Lesson Plan............................................................................................................... 3-93.8.1 Creating a Folder .............................................................................................................. 3-103.8.2 Creating a Document ....................................................................................................... 3-103.8.3 Creating a Discussion....................................................................................................... 3-103.8.4 Creating a Journal ............................................................................................................. 3-103.8.5 Creating a Submission ..................................................................................................... 3-103.8.6 Creating a Task.................................................................................................................. 3-103.8.7 Creating a Reference......................................................................................................... 3-103.8.8 Configuring Learning Item Properties .......................................................................... 3-103.8.8.1 In the General Tab ..................................................................................................... 3-113.8.8.2 In the Overview Tab.................................................................................................. 3-113.8.8.3 In the Feedback Tab .................................................................................................. 3-123.8.8.4 In the Submission Tab............................................................................................... 3-133.8.8.5 In the Students Tab.................................................................................................... 3-143.8.8.6 In the Sharing Tab ..................................................................................................... 3-143.8.9 Managing Student Groups .............................................................................................. 3-143.8.9.1 Creating a Group ....................................................................................................... 3-143.8.9.2 Modifying a Group.................................................................................................... 3-153.8.10 Managing External Students ........................................................................................... 3-153.8.11 Printing a Copy of the Lesson Plan................................................................................ 3-163.9 Editing Rich Data ..................................................................................................................... 3-173.9.1 Inserting Images................................................................................................................ 3-173.9.2 Inserting Links................................................................................................................... 3-183.9.3 Attaching Files................................................................................................................... 3-183.9.4 Recording Audio............................................................................................................... 3-183.10 Monitoring Student Participation.......................................................................................... 3-193.11 Interacting with Students........................................................................................................ 3-193.11.1 Interacting with Students in a Discussion..................................................................... 3-193.11.2 Interacting with Students in a Journal........................................................................... 3-213.11.3 Interacting with Students in a Submission .................................................................. 3-223.11.4 Interacting with Students in a Task .............................................................................. 3-233.11.5 Interacting with Students in a Reference Item ............................................................. 3-243.11.6 Interacting with Students in a Document Item ............................................................ 3-243.11.7 Interacting with Students in a Folder Item ................................................................... 3-253.11.8 Recording Feedback and Assessments for Students in a Class ................................. 3-263.12 Managing Class and Student Progress ................................................................................. 3-273.12.1 Understanding Demonstrations and Confirmations................................................... 3-283.12.2 Reviewing Class Progress................................................................................................ 3-283.12.3 About the Class Progress Screen .................................................................................... 3-293.12.4 About the Class Outcomes Report ................................................................................. 3-313.12.5 Reviewing Student Progress ........................................................................................... 3-313.12.6 About the Student Progress Screen................................................................................ 3-323.12.7 About the Student Demonstrations Report .................................................................. 3-333.12.8 About the Evidence Page................................................................................................. 3-333.12.9 About the Confirmation Page ......................................................................................... 3-343.12.10 Recording Confirmations for Students in a Class........................................................ 3-35
v
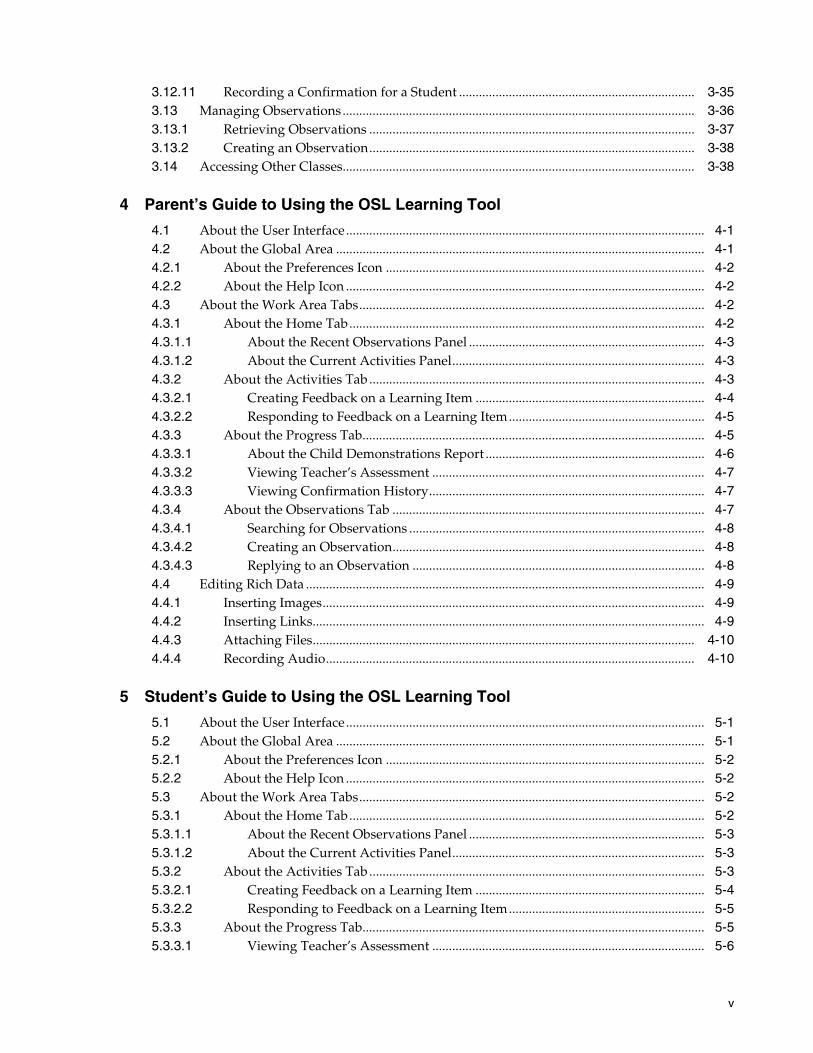
3.12.11 Recording a Confirmation for a Student ....................................................................... 3-353.13 Managing Observations.......................................................................................................... 3-363.13.1 Retrieving Observations .................................................................................................. 3-373.13.2 Creating an Observation.................................................................................................. 3-383.14 Accessing Other Classes.......................................................................................................... 3-38
4 Parent’s Guide to Using the OSL Learning Tool
4.1 About the User Interface............................................................................................................ 4-14.2 About the Global Area ............................................................................................................... 4-14.2.1 About the Preferences Icon ................................................................................................ 4-24.2.2 About the Help Icon ............................................................................................................ 4-24.3 About the Work Area Tabs........................................................................................................ 4-24.3.1 About the Home Tab........................................................................................................... 4-24.3.1.1 About the Recent Observations Panel ....................................................................... 4-34.3.1.2 About the Current Activities Panel............................................................................ 4-34.3.2 About the Activities Tab ..................................................................................................... 4-34.3.2.1 Creating Feedback on a Learning Item ..................................................................... 4-44.3.2.2 Responding to Feedback on a Learning Item........................................................... 4-54.3.3 About the Progress Tab....................................................................................................... 4-54.3.3.1 About the Child Demonstrations Report .................................................................. 4-64.3.3.2 Viewing Teacher’s Assessment .................................................................................. 4-74.3.3.3 Viewing Confirmation History................................................................................... 4-74.3.4 About the Observations Tab .............................................................................................. 4-74.3.4.1 Searching for Observations ......................................................................................... 4-84.3.4.2 Creating an Observation.............................................................................................. 4-84.3.4.3 Replying to an Observation ........................................................................................ 4-84.4 Editing Rich Data ........................................................................................................................ 4-94.4.1 Inserting Images................................................................................................................... 4-94.4.2 Inserting Links...................................................................................................................... 4-94.4.3 Attaching Files................................................................................................................... 4-104.4.4 Recording Audio............................................................................................................... 4-10
5 Student’s Guide to Using the OSL Learning Tool
5.1 About the User Interface............................................................................................................ 5-15.2 About the Global Area ............................................................................................................... 5-15.2.1 About the Preferences Icon ................................................................................................ 5-25.2.2 About the Help Icon ............................................................................................................ 5-25.3 About the Work Area Tabs........................................................................................................ 5-25.3.1 About the Home Tab........................................................................................................... 5-25.3.1.1 About the Recent Observations Panel ....................................................................... 5-35.3.1.2 About the Current Activities Panel............................................................................ 5-35.3.2 About the Activities Tab ..................................................................................................... 5-35.3.2.1 Creating Feedback on a Learning Item ..................................................................... 5-45.3.2.2 Responding to Feedback on a Learning Item........................................................... 5-55.3.3 About the Progress Tab....................................................................................................... 5-55.3.3.1 Viewing Teacher’s Assessment .................................................................................. 5-6
vi
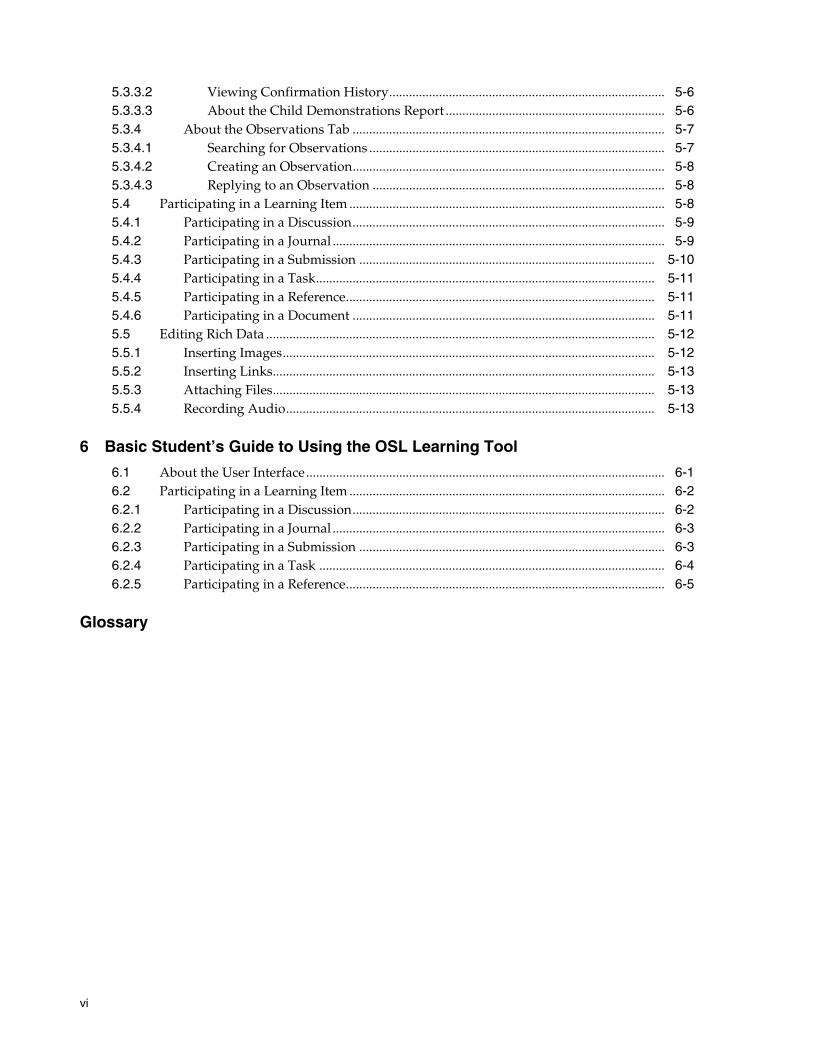
5.3.3.2 Viewing Confirmation History................................................................................... 5-65.3.3.3 About the Child Demonstrations Report .................................................................. 5-65.3.4 About the Observations Tab .............................................................................................. 5-75.3.4.1 Searching for Observations ......................................................................................... 5-75.3.4.2 Creating an Observation.............................................................................................. 5-85.3.4.3 Replying to an Observation ........................................................................................ 5-85.4 Participating in a Learning Item ............................................................................................... 5-85.4.1 Participating in a Discussion.............................................................................................. 5-95.4.2 Participating in a Journal .................................................................................................... 5-95.4.3 Participating in a Submission ......................................................................................... 5-105.4.4 Participating in a Task...................................................................................................... 5-115.4.5 Participating in a Reference............................................................................................. 5-115.4.6 Participating in a Document ........................................................................................... 5-115.5 Editing Rich Data ..................................................................................................................... 5-125.5.1 Inserting Images................................................................................................................ 5-125.5.2 Inserting Links................................................................................................................... 5-135.5.3 Attaching Files................................................................................................................... 5-135.5.4 Recording Audio............................................................................................................... 5-13
6 Basic Student’s Guide to Using the OSL Learning Tool
6.1 About the User Interface............................................................................................................ 6-16.2 Participating in a Learning Item ............................................................................................... 6-26.2.1 Participating in a Discussion.............................................................................................. 6-26.2.2 Participating in a Journal .................................................................................................... 6-36.2.3 Participating in a Submission ............................................................................................ 6-36.2.4 Participating in a Task ........................................................................................................ 6-46.2.5 Participating in a Reference................................................................................................ 6-5
Glossary

vii
viii
List of Figures
1–1 Containers for Learning Items .................................................................................................. 1-33–1 OSL Global Menu........................................................................................................................ 3-13–2 Teacher Home Work Area ......................................................................................................... 3-33–3 Teacher’s Personal Planning Page............................................................................................ 3-43–4 Class Area Context Selector....................................................................................................... 3-43–5 Teacher’s Class Page................................................................................................................... 3-43–6 Student and Activity Filters....................................................................................................... 3-53–7 Curriculum Work Area .............................................................................................................. 3-53–8 Observation Area ........................................................................................................................ 3-63–9 Class Work Area ......................................................................................................................... 3-63–10 Class Tab Toolbar........................................................................................................................ 3-73–11 Curriculum Tab Toolbar ............................................................................................................ 3-73–12 Lesson Plan .................................................................................................................................. 3-83–13 Lesson Plan Print Options ..................................................................................................... 3-163–14 Rich Data Editor ....................................................................................................................... 3-173–15 Reviewing Student Participation........................................................................................... 3-193–16 Quick Assessment.................................................................................................................... 3-273–17 Class Confirmations Screen.................................................................................................... 3-293–18 Class Overview Screen............................................................................................................ 3-303–19 Class Outcomes Report ........................................................................................................... 3-313–20 Student Progress Page............................................................................................................. 3-323–21 Student Demonstrations Report ............................................................................................ 3-333–22 Evidence Page........................................................................................................................... 3-343–23 Confirmation Page ................................................................................................................... 3-343–24 Quick Confirmations ............................................................................................................... 3-353–25 Observation Page ..................................................................................................................... 3-363–26 New Search Criteria................................................................................................................. 3-374–1 Parent Global Area...................................................................................................................... 4-14–2 Parent Home Tab ........................................................................................................................ 4-34–3 Parent Activities Tab .................................................................................................................. 4-44–4 Parent Progress Tab .................................................................................................................... 4-64–5 Child Demonstrations Report ................................................................................................... 4-64–6 Teacher Observations Tab ......................................................................................................... 4-84–7 Rich Data Editor .......................................................................................................................... 4-95–1 Student Global Area ................................................................................................................... 5-15–2 Student Home Tab ...................................................................................................................... 5-35–3 Student Activities Tab ................................................................................................................ 5-45–4 Student Progress Tab.................................................................................................................. 5-55–5 Demonstrations Report .............................................................................................................. 5-75–6 Standard Student Observations Tab ........................................................................................ 5-75–7 Rich Data Editor ....................................................................................................................... 5-126–1 Home Page ................................................................................................................................... 6-1
ix
Preface
This preface includes the following topics:
■ Audience
■ Documentation Accessibility
■ Related Documents
■ Conventions
AudienceThis document is intended for the users of the Oracle Student Learning (OSL) Learning Tool.
Documentation AccessibilityFor information about Oracle's commitment to accessibility, visit the Oracle Accessibility Program website at http://www.oracle.com/pls/topic/lookup?ctx=acc&id=docacc.
Access to Oracle SupportOracle customers have access to electronic support through My Oracle Support. For information, visit http://www.oracle.com/pls/topic/lookup?ctx=acc&id=info or visit http://www.oracle.com/pls/topic/lookup?ctx=acc&id=trs if you are hearing impaired.
Related DocumentsFor more information, see the following documents in the Oracle Student Learning documentation set:
■ Oracle Student Learning (OSL) Implementation Guide
■ Oracle Student Learning (OSL) Installation and Deployment Guide
■ Oracle Student Learning (OSL) Learning Tool Admin User’s Guide
■ Oracle Student Learning (OSL) Learning Tool Customization Guide
■ Oracle Student Learning (OSL) Programmer’s Guide
■ Oracle Student Learning (OSL) Release Notes
x
ConventionsThe following text conventions are used in this document:
Convention Meaning
boldface Boldface type indicates graphical user interface elements associated with an action, or terms defined in text or the glossary.
italic Italic type indicates book titles, emphasis, or placeholder variables for which you supply particular values.
monospace Monospace type indicates commands within a paragraph, URLs, code in examples, text that appears on the screen, or text that you enter.
1
About the Oracle Student Learning (OSL) Learning Tool 1-1
1About the Oracle Student Learning (OSL)Learning Tool
This chapter gives an overview of the OSL Learning Tool (LT).
1.1 Overview of OSL Learning ToolOSL is a teaching and learning product that aims to improve the learning outcomes of students. It is a comprehensive environment for teachers, students, and parents to collaborate in the learning process with lesson creation, participation, evaluation, and dialog. It helps teachers offer a personalized learning experience for students by better understanding the learning pathways of each student.
The OSL LT provides the user interface that allows teachers, students, and parents to participate and collaborate in learning activities in one or more school curricula.
The teacher’s interface facilitates:
■ Preparation and delivery of courses and lessons
■ Sharing of information, courses, and resources within and across schools
■ Greater collaboration among the teaching community
■ Direct linking of learning standards and outcomes to learning tasks of students
■ Assessing, tracking the progress, and managing the learning pathways of each student
■ Reporting and providing feedback on the student progress to parents and school administration
■ Communication with parents and students online with ongoing feedback relating to student work
■ Simplifying many of the administrative requirements of schools and teachers with less time spent on gathering data and more time spent acting on it
The students’ interface facilitates:
■ Viewing their learning plan and tasks online
■ Keeping of online journals and participating in online discussions
■ Submission of work to teachers online
■ Easily accessing online learning objects and other online resources
■ Reviewing their learning over time, encouraging a deeper understanding of their learning
Understanding OSL Learning Tool
1-2 Oracle Student Learning Learning Tool User's Guide
■ Communication with teachers online with ongoing feedback relating to student work
■ Creation of knowledge about the student’s learning and progress, also knowledge about the process of teaching and learning
■ Continuous and ongoing feedback to parents, teachers, and student managers
The parents’ interface facilitates:
■ Viewing his or her children’s learning plan and specific tasks online
■ Reviewing his or her children’s learning over time, encouraging deeper understanding of his or her children’s learning
■ Communicating with teachers online with ongoing feedback relating to his or her children’s work
1.2 Understanding OSL Learning ToolThe following sections define concepts related to using the OSL LT.
1.2.1 ClassA class is a group of students and teachers that is defined in a specified period in relation to a specified course. For example:
■ Grade 2 General Studies 2007
■ Year 9B English 2006
■ Middle Years Peer Support Program Term 2 2008
1.2.2 Learning ItemLearning items are key elements that act as a reference against which lessons may be assembled, participated in, and assessed.
1.2.2.1 Root NodeWithin the Class area, learning items are displayed in a hierarchy, with some learning items containing subordinate learning items. This allows teachers to organize and group their lessons as they see fit.
At the top of the hierarchy is a root node. In the case of the teacher’s personal planning area, this root node represents the personal planning area. In the case of a class, the root node represents the class.
Each teacher is allocated a personal planning area by default, that no other user can access. Lessons created within this area do not necessarily have any relation to each other and no student can be assigned to these lessons.
Classes are configured and maintained by school curriculum administrators.
Teachers are able to edit the properties of their personal planning area or classes in which they teach. They can create and maintain learning items under these root nodes. Teachers are also able to view other classes at the schools in which they teach, however they are not able to modify these classes or the learning items within them.
Understanding OSL Learning Tool
About the Oracle Student Learning (OSL) Learning Tool 1-3
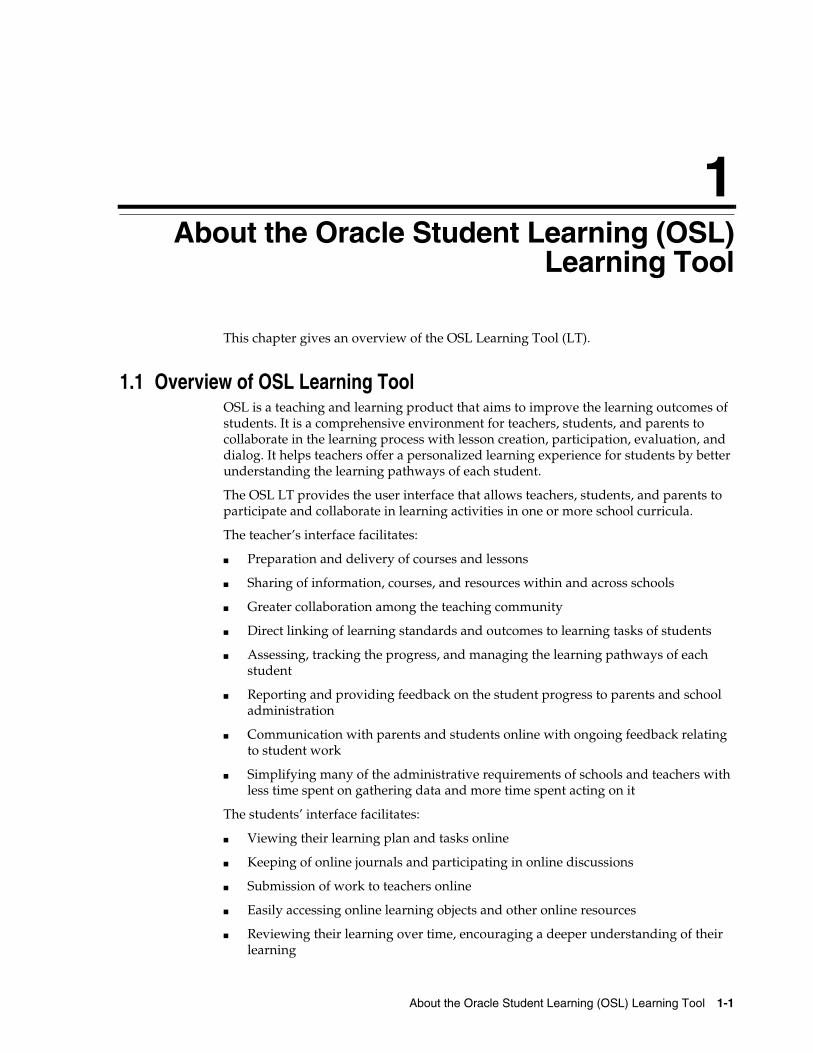
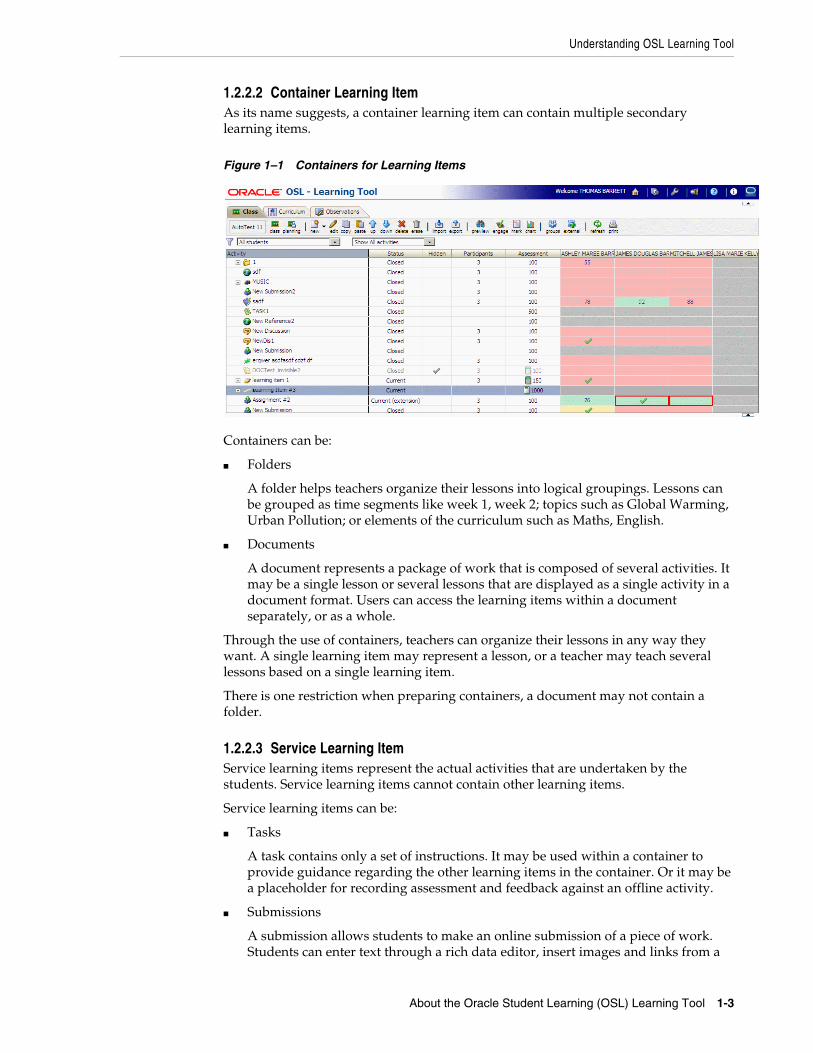
1.2.2.2 Container Learning ItemAs its name suggests, a container learning item can contain multiple secondary learning items.
Figure 1–1 Containers for Learning Items
Containers can be:
■ Folders
A folder helps teachers organize their lessons into logical groupings. Lessons can be grouped as time segments like week 1, week 2; topics such as Global Warming, Urban Pollution; or elements of the curriculum such as Maths, English.
■ Documents
A document represents a package of work that is composed of several activities. It may be a single lesson or several lessons that are displayed as a single activity in a document format. Users can access the learning items within a document separately, or as a whole.
Through the use of containers, teachers can organize their lessons in any way they want. A single learning item may represent a lesson, or a teacher may teach several lessons based on a single learning item.
There is one restriction when preparing containers, a document may not contain a folder.
1.2.2.3 Service Learning ItemService learning items represent the actual activities that are undertaken by the students. Service learning items cannot contain other learning items.
Service learning items can be:
■ Tasks
A task contains only a set of instructions. It may be used within a container to provide guidance regarding the other learning items in the container. Or it may be a placeholder for recording assessment and feedback against an offline activity.
■ Submissions
A submission allows students to make an online submission of a piece of work. Students can enter text through a rich data editor, insert images and links from a

Understanding OSL Learning Tool
1-4 Oracle Student Learning Learning Tool User's Guide
content management system, attach files from local system, or record audio. Students may participate in a Submission Item as an individual or as part of a group.
■ Journals
A journal allows students to maintain a sequence of journal entries or personal thoughts on a certain topic, as instructed by their teachers. Students can enter text through a rich data editor, insert images and links from content management system, attach files from local system, or record audio.
Teachers may add their own comments to their students’ journals.
■ Discussions
A discussion allows students to participate in a discussion forum, which helps them to share and discuss ideas in a moderated environment. Students can enter text through a rich data editor, insert images and links from content management system, attach files from local system, or record audio.
Teachers may join in the discussion as well.
■ References
A reference allows teachers to refer students to a specified URL such as an educational Web site that is displayed within the OSL page.
When a learning item is created within a class, the teacher can specify the start date, end date, and due date (for submissions only) along with the students who should participate in the learning item. Container learning items derive their start and end dates from their subordinate learning items. A student must be assigned to a container learning item before he or she can be assigned to a subordinate learning item.
1.2.3 Curriculum FrameworkA school curriculum is defined by a curriculum framework, which is created and maintained by a curriculum administrator.
A curriculum framework consists of several framework items, defined in a hierarchy. Each framework item identifies an element within the curriculum. In most curricula, the elements are of a type dictated by their level in a hierarchy. For example, the first level may be called Learning Areas, the next level called Outcomes, and the next level called Aspects.
Outcomes define areas within the curriculum with decreasing scope. Outcome statements are used to further decrease the scope of a definition, and are used to define the level of competence of a student against an outcome.
Within each curriculum framework, one or more proficiency sets are defined. Each level is typically given a number, with a higher number indicating a higher level of proficiency. Proficiency levels may be divided further into sub-levels for finer granularity.
Outcome statements are associated with proficiency levels so that it is possible to define several outcome statements for the same outcome, in the order of lowest proficiency to highest. By doing so, teachers are able to assess the abilities of a student
Note: Throughout the OSL LT, and within this document, any element within a curriculum framework is typically called an Outcome.
Understanding OSL Learning Tool
About the Oracle Student Learning (OSL) Learning Tool 1-5
in light of a particular outcome by assigning the student a particular outcome statement. Such assignments may be made as demonstrations of a student’s ability while participating in learning items, or as confirmations of general ability. For more information on demonstrations and confirmations, see Section 3.12.1.
Understanding OSL Learning Tool
1-6 Oracle Student Learning Learning Tool User's Guide
2
Working with the OSL Learning Tool User Interface 2-1
2Working with the OSL Learning Tool UserInterface
This chapter provides an overview of the elements of the OSL LT user interface. The interface you see is based on the role you are assigned in OSL Learning Tool.
2.1 Navigating the User InterfaceThe OSL LT user interface works entirely inside a single page display. You should not use your Web browser buttons (such as Forward, Back, or Refresh) to navigate within the page. If a Web browser navigation button is used accidentally, click the Refresh button in the OSL LT to resolve any issues. Otherwise, close the OSL LT, and then launch it again.
The user interface is made up of a number of elements:
■ The global area.
■ The work area tabs.
■ The work area.
■ The toolbar.
The functions available from these elements vary. They depend on the role you are assigned. For information on specific user interfaces:
■ Teachers, see Section 3.1.
■ Parents, see Section 4.1.
■ Students with basic access, see Section 6.1.
■ Students with standard access, see Section 5.1.
Note: Do not open multiple instances of the OSL LT in different tabs of the same browser.

Navigating the User Interface
2-2 Oracle Student Learning Learning Tool User's Guide
3
Teacher’s Guide to Using the OSL Learning Tool 3-1
3Teacher’s Guide to Using the OSL LearningTool
This chapter guides teachers on how to use the OSL Learning Tool (LT). It describes the components and the concepts that teachers must understand in using the application.
The OSL LT enables teachers to:
■ Prepare and manage the learning items within a lesson plan
■ Participate in the learning items within a lesson plan
■ Provide feedback and assessment of students’ participation in learning items
■ Review the progress of students in their lesson plans and against curriculum outcomes and standards
■ Create and manage observations about students
3.1 About the User InterfaceThe user interface is made up of a number of elements:
■ The global area. See Section 3.2.
■ The work area tabs. See Section 3.3
■ The work area. See Section 3.4.
■ The toolbar.
– Class tab toolbar. See Section 3.5.
– Curriculum tab toolbar. See Section 3.6.
3.2 About the Global Area
Figure 3–1 OSL Global Menu
The global area at the top of the OSL LT user interface consists of:
■ A product identification area; Oracle OSL - Learning Tool
■ An area showing the name of the currently logged in user; ANNE ROBERTS
■ A Home icon. See Section 3.2.1.
About the Global Area
3-2 Oracle Student Learning Learning Tool User's Guide
■ Icons that could be enabled or disabled by the OSL LT administrator:
– A Content Server icon. See Section 3.2.2.
– A Preferences icon. See Section 3.2.3.
– A Logout icon.
■ A Help icon. See Section 3.2.4.
■ An About icon. This icon displays a screen that shows the build and version number of the OSL LT that you use.
■ A processing indicator. See Section 3.2.5.
3.2.1 About the Home IconThe Home icon takes you to the Home tab. For information about the Home tab, see Section 3.3.1.
3.2.2 About the Content Server IconThe Content Server icon takes you to the home page of the content management system that you deploy with OSL.
3.2.3 About the Preferences IconThe Preferences icon takes you to the Preferences page where you can enable or disable preferences.
3.2.4 About the Help IconThe Help icon takes you to the Help page where you see:
■ The build number and version number of the OSL LT.
Table 3–1 Teacher Preferences
In You can
Accessibility Mode Set accessibility to:
■ Inaccessible. Accessibility features are removed, which optimizes the performance of the system.
■ Accessible. Accessibility features are on.
■ Screen Reader. Accessibility features are on but are optimized for a screen reader.
User default role Select the role that the system defaults to when you log in. This is applicable when you are assigned more than one role in OSL.
Display end dated students by default
Set the OSL LT to display end-dated students.
Display external students by default Set the OSL LT to display external students.
Display format of listed names Set the format in which names are displayed.
Sort order of listed names Set the order in which lists are displayed.
Months of recent demonstration data to display
Set the number of months of demonstration data that the OSL LT retrieves.
Use high-contrast colours in Class screen
Set OSL to display the colors within the Class screen in high contrast.
About the Work Area Tabs
Teacher’s Guide to Using the OSL Learning Tool 3-3
■ A link to the Release Notes related to the version of the OSL LT that you use.
■ A link to the online or PDF copy of the OSL LT User’s Guide.
To return to the OSL LT home page, click the Home icon.
3.2.5 About the Processing IndicatorThe processing indicator is a logo at the upper right corner of the global area. The indicator displays the following states:
■ Idle (the normal state): the indicator is not spinning
■ Processing: the indicator is spinning; for example: a search is being carried out
■ Disconnected: A red broken circle is displayed.
3.3 About the Work Area Tabs
3.3.1 About the Home Tab
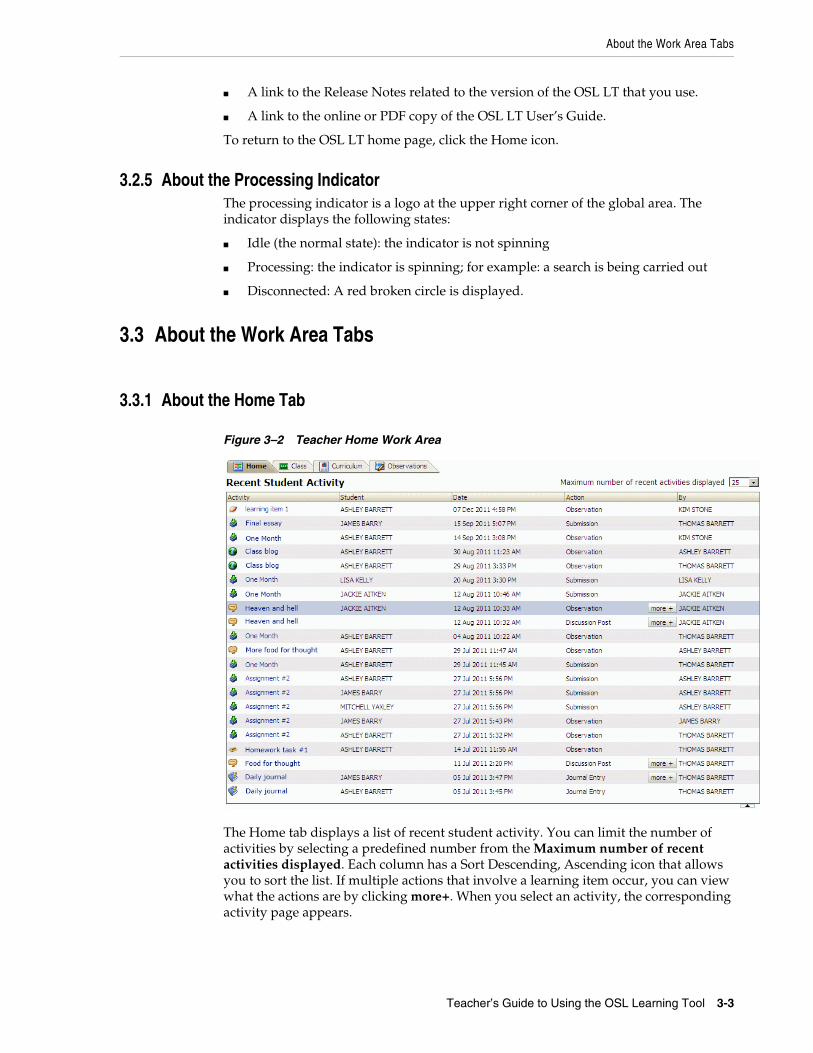
Figure 3–2 Teacher Home Work Area
The Home tab displays a list of recent student activity. You can limit the number of activities by selecting a predefined number from the Maximum number of recent activities displayed. Each column has a Sort Descending, Ascending icon that allows you to sort the list. If multiple actions that involve a learning item occur, you can view what the actions are by clicking more+. When you select an activity, the corresponding activity page appears.
About the Work Area Tabs
3-4 Oracle Student Learning Learning Tool User's Guide
3.3.2 About the Class Tab
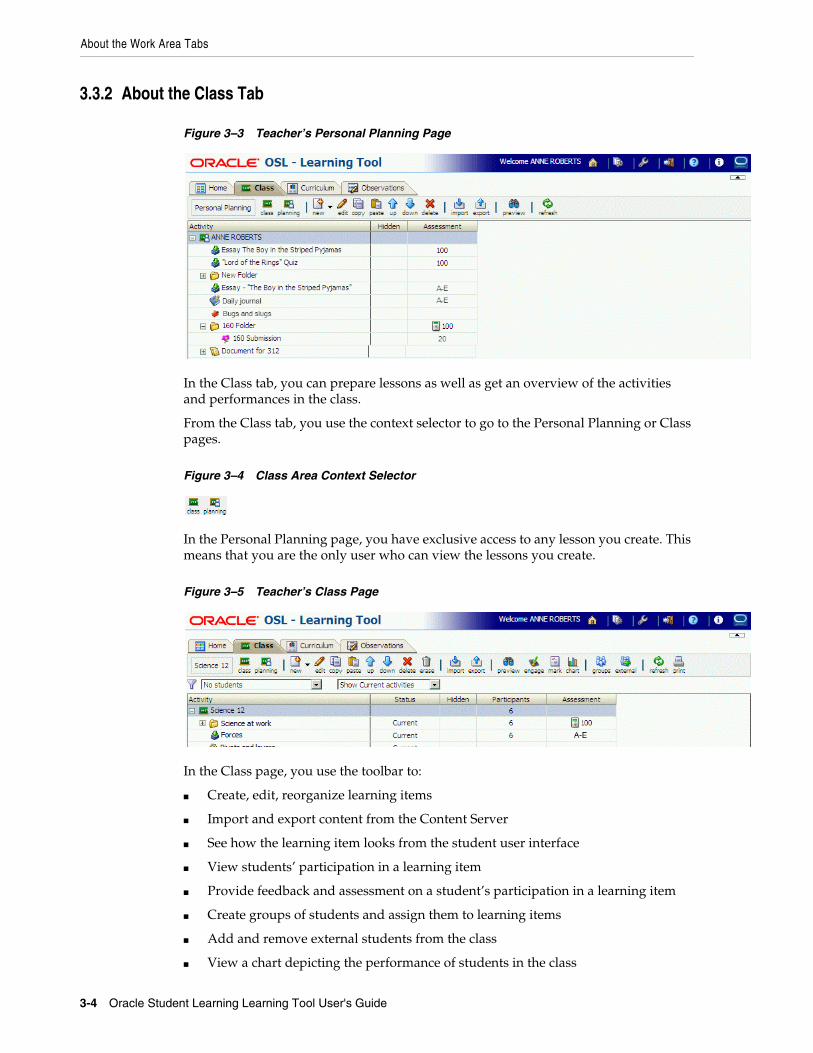
Figure 3–3 Teacher’s Personal Planning Page
In the Class tab, you can prepare lessons as well as get an overview of the activities and performances in the class.
From the Class tab, you use the context selector to go to the Personal Planning or Class pages.
Figure 3–4 Class Area Context Selector
In the Personal Planning page, you have exclusive access to any lesson you create. This means that you are the only user who can view the lessons you create.
Figure 3–5 Teacher’s Class Page
In the Class page, you use the toolbar to:
■ Create, edit, reorganize learning items
■ Import and export content from the Content Server
■ See how the learning item looks from the student user interface
■ View students’ participation in a learning item
■ Provide feedback and assessment on a student’s participation in a learning item
■ Create groups of students and assign them to learning items
■ Add and remove external students from the class
■ View a chart depicting the performance of students in the class
About the Work Area Tabs
Teacher’s Guide to Using the OSL Learning Tool 3-5
■ Print lesson plans, enrollments, class participation, class properties, learning activities, feedback, and so on
You can only create or edit the lessons for your own active classes. You have read-only access to other teachers’ classes. You can also use the student and activity filters to limit the items that appear.
Figure 3–6 Student and Activity Filters
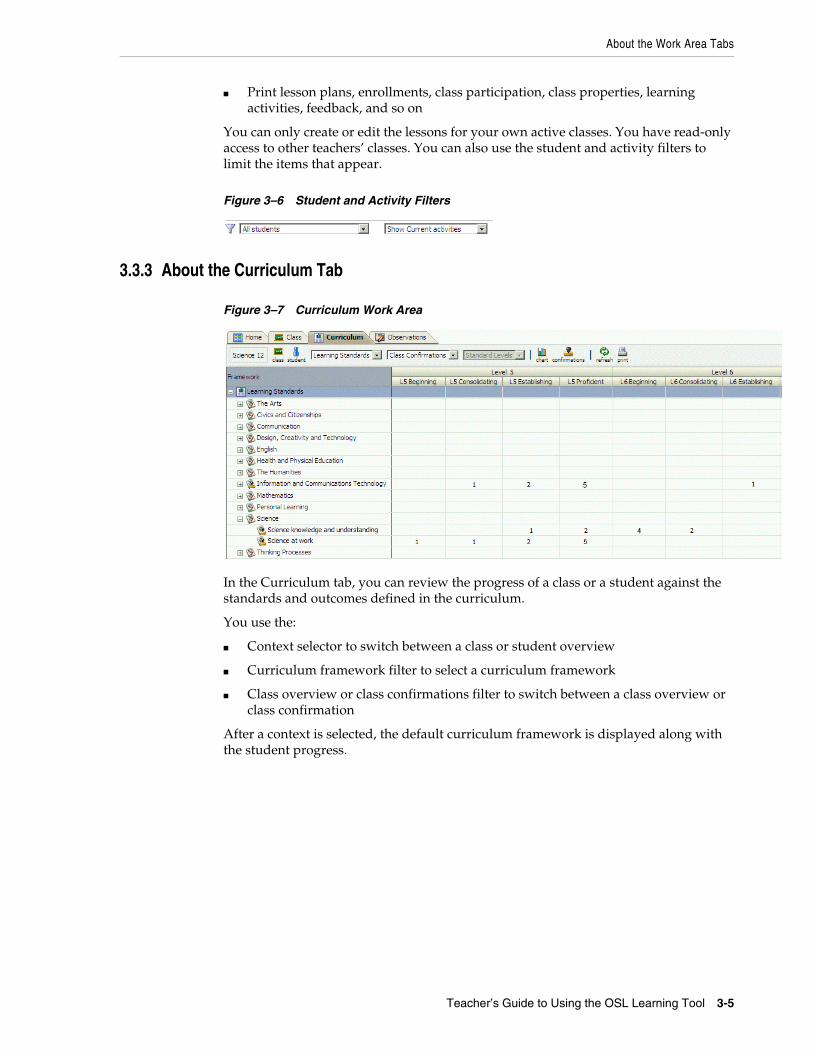
3.3.3 About the Curriculum Tab
Figure 3–7 Curriculum Work Area
In the Curriculum tab, you can review the progress of a class or a student against the standards and outcomes defined in the curriculum.
You use the:
■ Context selector to switch between a class or student overview
■ Curriculum framework filter to select a curriculum framework
■ Class overview or class confirmations filter to switch between a class overview or class confirmation
After a context is selected, the default curriculum framework is displayed along with the student progress.
About the Work Area
3-6 Oracle Student Learning Learning Tool User's Guide
3.3.4 About the Observations Work Area
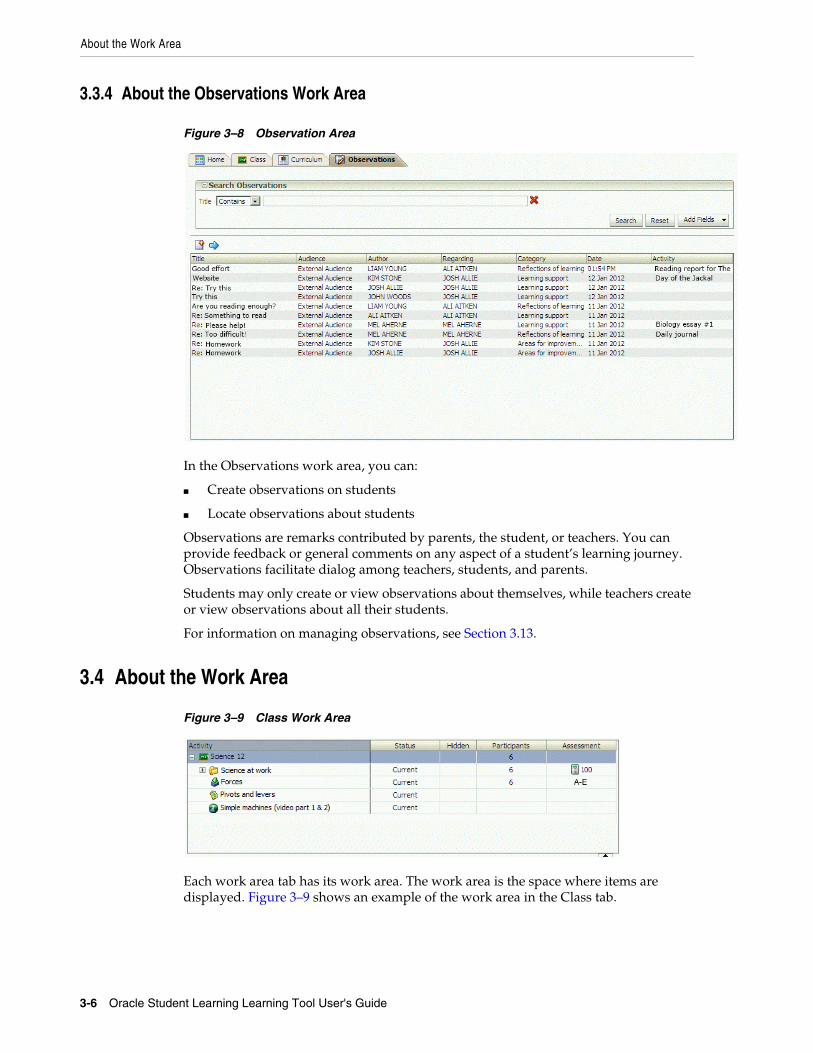
Figure 3–8 Observation Area
In the Observations work area, you can:
■ Create observations on students
■ Locate observations about students
Observations are remarks contributed by parents, the student, or teachers. You can provide feedback or general comments on any aspect of a student’s learning journey. Observations facilitate dialog among teachers, students, and parents.
Students may only create or view observations about themselves, while teachers create or view observations about all their students.
For information on managing observations, see Section 3.13.
3.4 About the Work Area
Figure 3–9 Class Work Area
Each work area tab has its work area. The work area is the space where items are displayed. Figure 3–9 shows an example of the work area in the Class tab.
About the Curriculum Tab Toolbar
Teacher’s Guide to Using the OSL Learning Tool 3-7
3.5 About the Class Tab Toolbar
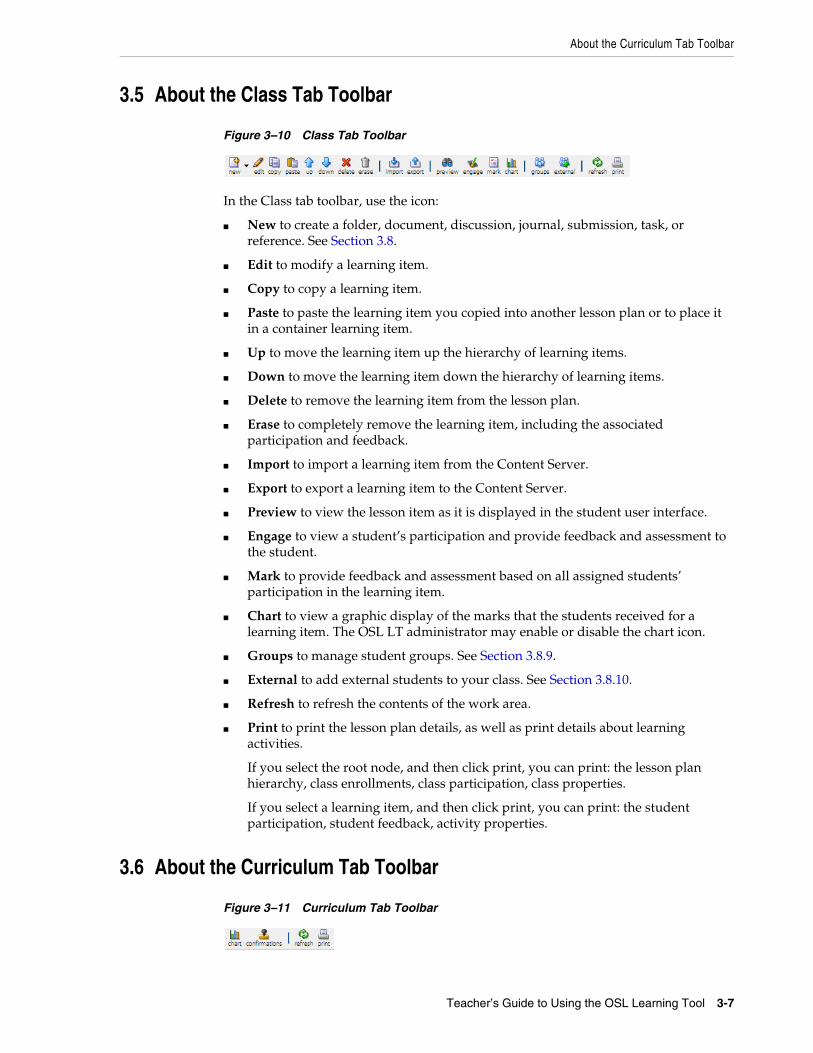
Figure 3–10 Class Tab Toolbar
In the Class tab toolbar, use the icon:
■ New to create a folder, document, discussion, journal, submission, task, or reference. See Section 3.8.
■ Edit to modify a learning item.
■ Copy to copy a learning item.
■ Paste to paste the learning item you copied into another lesson plan or to place it in a container learning item.
■ Up to move the learning item up the hierarchy of learning items.
■ Down to move the learning item down the hierarchy of learning items.
■ Delete to remove the learning item from the lesson plan.
■ Erase to completely remove the learning item, including the associated participation and feedback.
■ Import to import a learning item from the Content Server.
■ Export to export a learning item to the Content Server.
■ Preview to view the lesson item as it is displayed in the student user interface.
■ Engage to view a student’s participation and provide feedback and assessment to the student.
■ Mark to provide feedback and assessment based on all assigned students’ participation in the learning item.
■ Chart to view a graphic display of the marks that the students received for a learning item. The OSL LT administrator may enable or disable the chart icon.
■ Groups to manage student groups. See Section 3.8.9.
■ External to add external students to your class. See Section 3.8.10.
■ Refresh to refresh the contents of the work area.
■ Print to print the lesson plan details, as well as print details about learning activities.
If you select the root node, and then click print, you can print: the lesson plan hierarchy, class enrollments, class participation, class properties.
If you select a learning item, and then click print, you can print: the student participation, student feedback, activity properties.
3.6 About the Curriculum Tab Toolbar
Figure 3–11 Curriculum Tab Toolbar

About the Lesson Plan
3-8 Oracle Student Learning Learning Tool User's Guide
In the Curriculum tab toolbar, use the icon:
■ Chart to view a graphical display of the student progress for the selected framework item.
■ Confirmations to enter confirmations against a learning item for one or more students. See Section 3.12.10.
■ Refresh to refresh the contents of the work area.
■ Print to print the curriculum progress details.
3.7 About the Lesson Plan
Figure 3–12 Lesson Plan
Once you have selected your class, you can prepare a learning sequence by creating a hierarchy of learning items, either from scratch, copying, or importing pre-assembled learning items from your personal planning area, another class, or a content management system.
There is no restrictive structure that you are required to follow in creating a hierarchy of learning items, except that the Service Learning Items cannot contain other learning items and Documents cannot contain Folders.
For example, you could organize the first level of the hierarchy into major areas of study such as Issues, Texts, or Folios. The second level could be organized into two to three week units of study with the lessons defined at the third level.
You can also navigate to other classes in read-only mode, which only enables you to view and copy the learning items—you cannot create or edit the learning items.
In Figure 3–12, the Activity column lists the learning items. You can nest learning items to create a hierarchy of learning items. To create a learning item, click New, and then select a learning item type. You cannot change the type of learning item once you create it.
The Status column displays Not Started, Current, or Closed. The status of each learning item depends on the start and end dates. You can participate in learning items if its status is Current. You have read-only access to other learning items. If you give a student an extension, you may see the status Current (extension), which means the learning item is current only for the student to whom you gave an extension.
The Hidden column indicates whether or not a learning item is hidden from students and their parents. You can hide a learning item while preparing it and make it visible to the students and their parents once it is ready.
Creating a Lesson Plan
Teacher’s Guide to Using the OSL Learning Tool 3-9
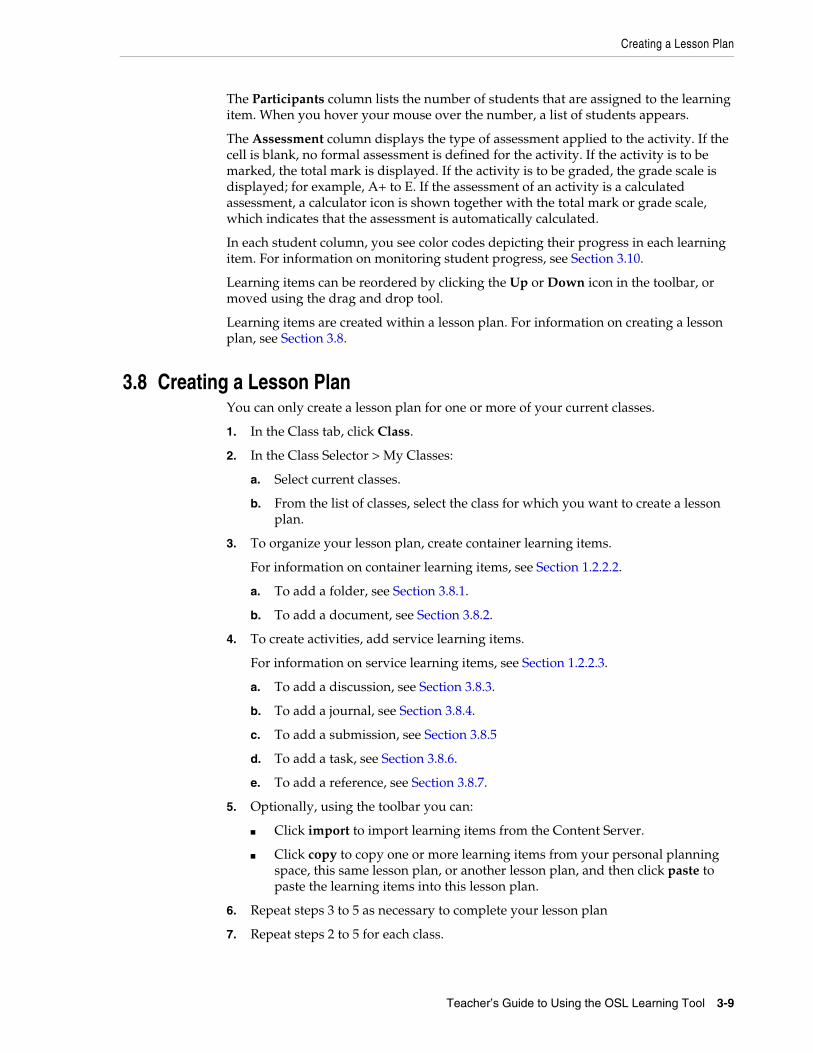
The Participants column lists the number of students that are assigned to the learning item. When you hover your mouse over the number, a list of students appears.
The Assessment column displays the type of assessment applied to the activity. If the cell is blank, no formal assessment is defined for the activity. If the activity is to be marked, the total mark is displayed. If the activity is to be graded, the grade scale is displayed; for example, A+ to E. If the assessment of an activity is a calculated assessment, a calculator icon is shown together with the total mark or grade scale, which indicates that the assessment is automatically calculated.
In each student column, you see color codes depicting their progress in each learning item. For information on monitoring student progress, see Section 3.10.
Learning items can be reordered by clicking the Up or Down icon in the toolbar, or moved using the drag and drop tool.
Learning items are created within a lesson plan. For information on creating a lesson plan, see Section 3.8.
3.8 Creating a Lesson PlanYou can only create a lesson plan for one or more of your current classes.
1. In the Class tab, click Class.
2. In the Class Selector > My Classes:
a. Select current classes.
b. From the list of classes, select the class for which you want to create a lesson plan.
3. To organize your lesson plan, create container learning items.
For information on container learning items, see Section 1.2.2.2.
a. To add a folder, see Section 3.8.1.
b. To add a document, see Section 3.8.2.
4. To create activities, add service learning items.
For information on service learning items, see Section 1.2.2.3.
a. To add a discussion, see Section 3.8.3.
b. To add a journal, see Section 3.8.4.
c. To add a submission, see Section 3.8.5
d. To add a task, see Section 3.8.6.
e. To add a reference, see Section 3.8.7.
5. Optionally, using the toolbar you can:
■ Click import to import learning items from the Content Server.
■ Click copy to copy one or more learning items from your personal planning space, this same lesson plan, or another lesson plan, and then click paste to paste the learning items into this lesson plan.
6. Repeat steps 3 to 5 as necessary to complete your lesson plan
7. Repeat steps 2 to 5 for each class.

Creating a Lesson Plan
3-10 Oracle Student Learning Learning Tool User's Guide
3.8.1 Creating a Folder1. Click New > Folder.
The Properties window appears.
2. To configure the properties of the folder, see Section 3.8.8.
3.8.2 Creating a Document1. Click New > Document.
The Properties window appears.
2. To configure the properties of the document, see Section 3.8.8.
3.8.3 Creating a Discussion1. Click New > Discussion.
The Properties window appears.
2. To configure the properties of the discussion, see Section 3.8.8.
3.8.4 Creating a Journal1. Click New > Journal.
The Properties window appears.
2. To configure the properties of the journal, see Section 3.8.8.
3.8.5 Creating a Submission1. Click New > Submission.
The Properties window appears.
2. To configure the properties of the submission, see Section 3.8.8.
3.8.6 Creating a Task1. Click New > Task.
The Properties window appears.
2. To configure the properties of the task, see Section 3.8.8.
3.8.7 Creating a Reference1. Click New > Reference.
The Properties window appears.
2. To configure the properties of the reference, see Section 3.8.8.
3.8.8 Configuring Learning Item PropertiesYou configure the properties of container learning items (folders, documents) or service learning items (discussions, journals, submissions, tasks, references) in the following tabs as necessary.
Creating a Lesson Plan
Teacher’s Guide to Using the OSL Learning Tool 3-11
3.8.8.1 In the General Tab1. Enter a title for the learning item.
2. If you want to hide the learning item, select Hide from students.
3. To change the learning item icon, click the corresponding pencil icon.
4. If necessary, assign a start date. This applies to discussions, journals, submissions, tasks, and references.
A folder or document inherits its start date from its earliest starting subordinate learning item. Students cannot start participating in the learning item until the specified start date.
5. If necessary, assign an end date. This applies to discussions, journals, submissions, tasks, and references.
A folder or document inherits its end date from its latest finishing subordinate learning item. Students cannot continue participating in the learning item past the specified end date.
6. If you are creating a submission, you can assign a due date.
Student submissions submitted after the due date are considered late.
7. If you are creating a reference, specify a URL.
8. If necessary, add instructions by clicking the corresponding pencil icon.
The rich data editor appears. Enter the instructions using the rich data editor. See Section 3.9.
9. Click Apply to save your changes and continue editing the properties, or click OK to save your changes and exit the Properties dialog.
3.8.8.2 In the Overview TabThe Overview tab appears only for folders and documents.
1. If you want to add content to the teacher overview, click the corresponding pencil icon.
The rich data editor appears. Enter the teacher overview using the rich data editor. See Section 3.9.
2. If you want other teachers to see the content of your teacher overview, select Teacher overview visible to other teachers.
3. If you want to add content to the student overview, click the corresponding pencil icon.
The rich data editor appears. Enter the student overview using the rich data editor. See Section 3.9.
4. Click Apply to save your changes and continue editing the properties, or click OK to save your changes and exit the Properties dialog.
Note: If you want the students to see the same overview as the teacher overview, select Use Teacher Overview. You must unselect this option to be able to enter a student overview separate from the teacher overview.

Creating a Lesson Plan
3-12 Oracle Student Learning Learning Tool User's Guide
3.8.8.3 In the Feedback Tab1. If you want to hide feedback from students and parents, deselect Feedback visible
to students & parents.
2. To enable observations, select Enable Observations.
This option enables you to record observations about the assigned students in the context of the learning item.
3. To enable comments, select Enable Comment.
This option enables you to record summative comments about the assigned students in the context of the learning item.
4. To enable assessments, select Enable Assessment.
This option enables you to record formal assessments about the assigned students in the context of the learning item.
In the Assessment Configuration area:
a. If you want to set a mark-based assessment, select Mark.
In Total, set a maximum value.
In Rounding, set a rounding precision.
For example:
A mark between 0 and 100, with no decimal places
A mark between 0 and 10, with 2 decimal places
b. If you want to set a grade-based assessment, select Grade, and then select the desired grade scale.
Grade-based assessment scales are defined by the school curriculum administrator.
For example, grade-based assessments could be: A to E; High, Medium, Low; Satisfactory, Not Satisfactory; and so on.
c. If you want to set the folder or document to use calculated assessments, select Calculated assessment.
A table is displayed that lists the immediate subordinate learning items for which formal assessment is enabled. You can specify a weighting for each learning item, which sets the percentage contribution of the learning item's assessment to the container's calculated assessment.
5. To enable demonstrations, select Enable Demonstrations.
This option enables you to record demonstrations for the assigned students in the context of the learning item. You can also associate curriculum outcome standards with the learning item in the Feedback tab.
By associating curriculum outcome statements with a learning item, you indicate against which curriculum outcomes you intend to record demonstrations and to which level you expect the students to demonstrate competency.
In the Outcome Configuration area:
a. If you want to import outcome statements from the container learning item that this discussion belongs to, click the Import Outcomes icon.
b. Click the corresponding plus icon to add an outcome.
Creating a Lesson Plan
Teacher’s Guide to Using the OSL Learning Tool 3-13
c. In the Select Outcome Statement dialog, select a curriculum framework from the list.
The left panel displays the hierarchy of the selected curriculum framework. Once you select a framework item, the corresponding outcome statements for this item are displayed in the right panel.
d. From the list of outcome statements, select one or more outcome statements.
e. To exit the dialog, click OK.
The outcome statements you selected appear in the Outcome Configuration section.
f. If you want to restate an outcome statement, click the corresponding pencil icon.
This functionality enables you to provide a more meaningful or contextual description of the outcome statement to your students in the context of this learning item.
g. If you want to revert to the original text of the outcome statement, click the corresponding eraser icon.
h. If you want to delete an outcome statement, click the corresponding delete icon.
6. Click Apply to save your changes and continue editing the properties, or click OK to save your changes and exit the Properties dialog.
3.8.8.4 In the Submission TabThe Submission tab appears only for submissions.
1. If you want to create a submission template:
a. Click the corresponding pencil icon.
b. Use the rich data editor to create your template. See Section 3.9.
The template you provide becomes the basis for all student submissions in relation to this learning item.
2. If you want to assign students to a submission group:
a. In the Submission Groups area, click the Add Submission Group icon.
The teacher is able to group the assigned students into submission groups. Students in each group should work collaboratively on the submission.
b. In the Add Submission Group dialog, enter a group name for the submission group.
c. From Available Students, select the students who are to be members of the group and then click Move.
d. In Assign Group Leader, select the student who will be the group leader.
Note: You can select more than one outcome statement for a framework item by using the SHIFT or CTRL keys.
To select outcome statements from multiple framework items, click the Apply button before selecting the next framework item to retain each of your outcome statement selections.
Creating a Lesson Plan
3-14 Oracle Student Learning Learning Tool User's Guide
Every submission group must have a leader. Only the group leader can enter the submission into the OSL LT and submit it to the teacher.
e. Click OK.
3. Click Apply to save your changes and continue editing the properties, or click OK to save your changes and exit the Properties dialog.
3.8.8.5 In the Students TabStudents must be assigned to a folder or document (container learning items) before they can be assigned to a subordinate learning item within the container learning item. When a student is assigned to a container learning item, you can also assign the student to all subordinate learning items. When students are removed from a container learning item, they are also removed from all subordinate learning items.
Students cannot be removed from a learning item if they have participated in the activity, have had feedback provided for an activity, or if the student has a related submission group enrollment.
In the Student Assignment area:
1. If you want to hide the list of students that are assigned to the learning item, deselect Student Assignments visible to students & parents.
2. Use the SHIFT or CTRL keys to select one or more students in the available or assigned lists. You can add or remove the selected students using the arrow buttons.
3. Click Apply to save your changes and continue editing the properties, or click OK to save your changes and exit the Properties dialog.
3.8.8.6 In the Sharing TabYou can share a learning item with one or more classes to facilitate collaboration among students.
When sharing learning items with one or more classes, only the host teachers can share, revoke, or modify the general properties, instructions, submission template, student and teacher overview.
1. To share the learning item with another class, click the corresponding plus icon.
2. Locate the class by searching for it, and then select the class.
3. Click the Close button to close the Class Selector dialog.
4. To revoke sharing with a class, click the Revoke sharing icon.
5. Click Apply to save your changes and continue editing the properties, or click OK to save your changes and exit the Properties dialog.
3.8.9 Managing Student GroupsYou can group students in a class into any number of groups. There is no restriction on how this is done. For example, some students may be placed into multiple groups and others may not be placed into any group. Student groups allow you to easily assign a group of students to one or more learning items.
3.8.9.1 Creating a Group1. In the Class tab, click class.
2. In the Class Selector > My Classes:
Creating a Lesson Plan
Teacher’s Guide to Using the OSL Learning Tool 3-15
a. Select current classes.
b. From the list of classes, select the class.
The Class page appears.
3. From the toolbar, click groups.
4. Click new.
5. In Group Name, enter a name for the group.
6. In Available Students, select the students you want to assign to the group, and then click Move.
7. Click OK.
3.8.9.2 Modifying a Group1. In the Class tab, click class.
2. In the Class Selector > My Classes:
a. Select current classes.
b. From the list of classes, select the class.
The Class page appears.
3. From the toolbar, click groups.
4. Locate the group you want to modify.
5. To modify the details of the group:
a. Click the corresponding Edit icon.
b. In the Edit window, you can modify the group name or group members.
c. Click OK.
6. To delete the group, click the corresponding Delete icon.
3.8.10 Managing External StudentsThe OSL LT enables you to add a student to one of your classes even though the student is not enrolled in the class. This allows external students to participate in the activities of your class.
To manage external students in your class:
1. In the Class tab, click Class.
2. In the Class Selector > My Classes:
a. Select current classes.
b. From the list of classes, select the class.
The Class page appears.
3. From the toolbar, click external.
4. To add an external student:
a. From the toolbar, click add.
Note: You cannot delete a group if it contains enrolled students.
Creating a Lesson Plan
3-16 Oracle Student Learning Learning Tool User's Guide
b. In the External Class list, select a class.
c. In the Student Name list, select a student or press CTRL + Shift and then click to select multiple students.
d. Click OK.
5. To delete a student from the list:
a. Select a student or press CTRL + Shift and then click to select multiple students.
b. From the toolbar, click delete.
6. Click back to return to the Class page.
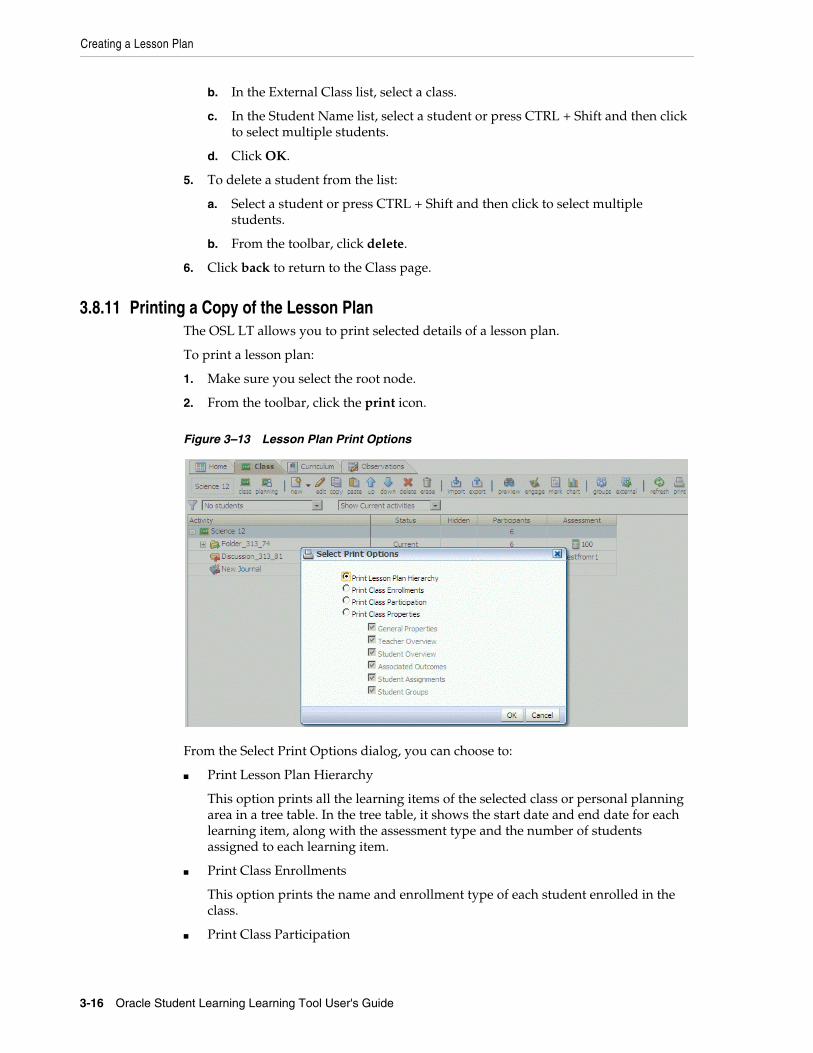
3.8.11 Printing a Copy of the Lesson PlanThe OSL LT allows you to print selected details of a lesson plan.
To print a lesson plan:
1. Make sure you select the root node.
2. From the toolbar, click the print icon.
Figure 3–13 Lesson Plan Print Options
From the Select Print Options dialog, you can choose to:
■ Print Lesson Plan Hierarchy
This option prints all the learning items of the selected class or personal planning area in a tree table. In the tree table, it shows the start date and end date for each learning item, along with the assessment type and the number of students assigned to each learning item.
■ Print Class Enrollments
This option prints the name and enrollment type of each student enrolled in the class.
■ Print Class Participation
Editing Rich Data
Teacher’s Guide to Using the OSL Learning Tool 3-17
This option prints the learning item hierarchy with summary information about the students' participation in the learning items.
For each learning item, the status and visibility of the learning item is displayed. Additionally, for each student assigned to the learning item, the student's progress and a summary of the teacher's assessment of each student is displayed.
Because there may be many students in the class, student information is grouped four students at a time per page.
■ Print Class Properties
This option prints the class properties. You can select one or more of the available property groups.
To view each print option in a printable page, click Show Printable Page.
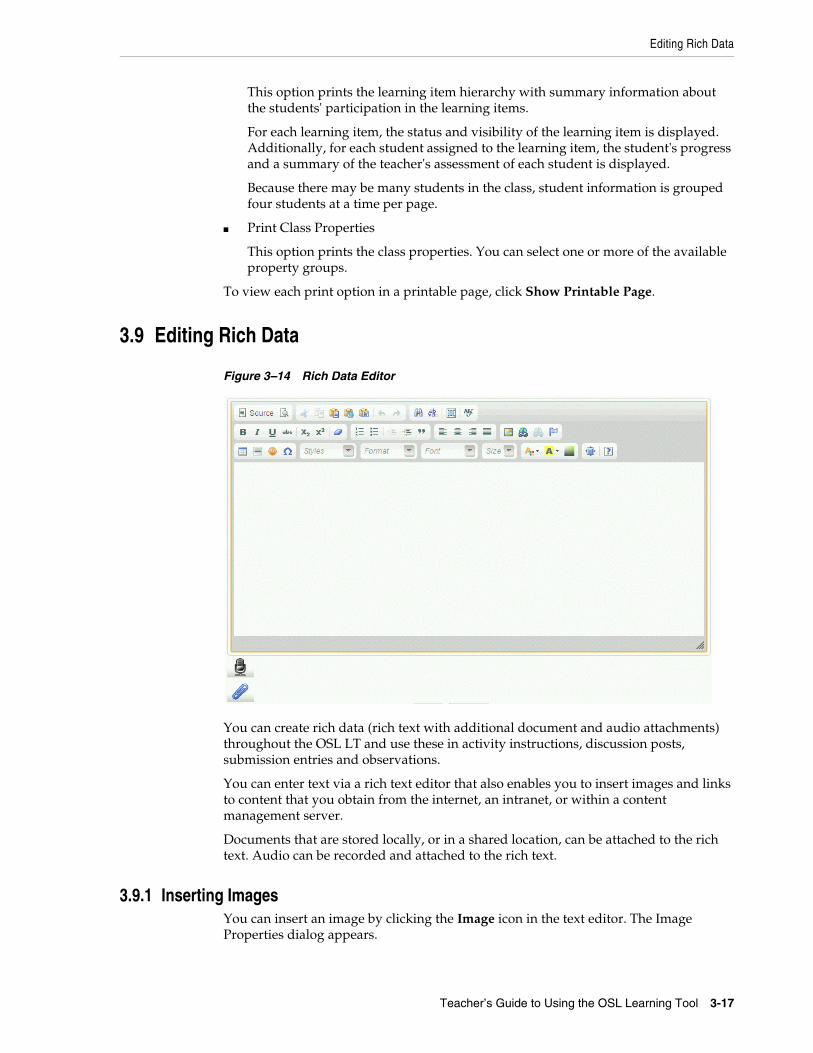
3.9 Editing Rich Data
Figure 3–14 Rich Data Editor
You can create rich data (rich text with additional document and audio attachments) throughout the OSL LT and use these in activity instructions, discussion posts, submission entries and observations.
You can enter text via a rich text editor that also enables you to insert images and links to content that you obtain from the internet, an intranet, or within a content management server.
Documents that are stored locally, or in a shared location, can be attached to the rich text. Audio can be recorded and attached to the rich text.
3.9.1 Inserting ImagesYou can insert an image by clicking the Image icon in the text editor. The Image Properties dialog appears.

Editing Rich Data
3-18 Oracle Student Learning Learning Tool User's Guide
In the Image Properties dialog, you can specify the image to insert in one of the following ways:
■ In the Image Info area, select an image from a content management server. Click Browse Server to locate the image.
■ In the Image Info area, enter the URL to the image.
■ In the Upload area, select an image from your hard disk or a network drive.
Click OK to insert the image in the text area.
3.9.2 Inserting LinksYou can insert an image by clicking the Link icon in the text editor. The Link dialog appears.
In the Link dialog, you can specify the link to insert in one of the following ways:
■ In the Link Info area, select a document from a content management server. Click Browse Server to locate the document to which you wish to link.
■ In the Link Info area, select the link type and enter other required information, such as the URL of the Web site to which you are linking.
■ In the Upload area, select a file from your hard disk or a network drive.
Click OK to insert the link in the text area.
3.9.3 Attaching FilesYou can attach files from your local system by clicking the Attach Files button below the editor. The Attach Files dialog box is displayed, which enables you to select a file from your hard disk or a network drive. The selected file is attached and shown as a hyperlink with the file icon.
You can click the hyperlink to open or save the attached file.
You can also remove the attached file by clicking the Delete File icon.
3.9.4 Recording AudioYou can add audio instructions to complement your text and attachments. This is especially helpful for young students or those with poor reading skills.
To record audio:
1. Click the Record Audio icon in the editor.
2. In the Record Audio dialog, enter a name for the audio file.
3. Click the Start Recording Audio icon, and then speak into your microphone.
Make sure your computer has the necessary hardware to record audio.
4. When you are done recording, click the Stop Recording icon.
5. To exit the Record Audio dialog, click the Close button.
The recorded audio listed below the text area
6. If you want to remove a recording, click the corresponding Delete icon.

Interacting with Students
Teacher’s Guide to Using the OSL Learning Tool 3-19
3.10 Monitoring Student ParticipationThe OSL LT allows you to monitor the progress in which students participate in the class.
Figure 3–15 Reviewing Student Participation
Each cell below the student name is color coded to indicate the student’s progress.
When the cell is:
■ Grey, the student is not assigned to an activity.
■ White, the student is assigned to the activity but the activity has not yet started.
■ Red, the student has not yet started participating, or the activity has not yet started.
■ Amber, the student has started participating.
■ Green, the student has finished the activity.
■ For submission activities, if the student is late making the submission to the teacher, a red border is displayed on the cell.
A student's progress in a container is derived from the student's progress within the subordinate learning items. Thus, if a student has started to participate in a learning item, the progress within the container will change to “in progress”. And the progress within the container will only change to “finished” when all subordinate learning items have been completed by the student.
The cells below each student name display any mark or grade assigned to the student for each learning item. If no mark or grade has been assigned for a learning item, but a comment or demonstration has been recorded, this is indicated in the cell
3.11 Interacting with StudentsFrom the Class tab, you can interact with students in the following ways:
■ View student participation in learning items and participate in them yourself
■ Give and receive feedback through observations, comments, and assessments
■ Review students’ progress
3.11.1 Interacting with Students in a DiscussionA discussion is a service learning item that allows students to submit posts in a discussion forum.
To interact with the students in a discussion learning item:
1. Click the Class tab.

Interacting with Students
3-20 Oracle Student Learning Learning Tool User's Guide
2. Select the desired class, and then do one of the following:
■ Select the discussion learning item and click engage in the toolbar. The first assigned student will be in context.
■ Select a cell that corresponds to a student and the discussion learning item.
At this point, you can either provide feedback about the student or participate in the discussion.
3. If you want to provide feedback:
a. Click Feedback, and then enter your feedback about the student.
Your entry is automatically saved.
b. If you want to provide a mark, enter the mark accordingly.
c. If you want to provide a grade, select the grade accordingly.
d. If you want to set an extension date, select a date accordingly.
e. If you want to record a planned demonstration, select the desired level from the list provided for the associated outcome. If the desired level is not displayed, select Other... and in the dialog, select the desired level.
f. If you want to record an unplanned or ad hoc demonstration, click the Specify Adhoc Demonstration icon.
In the Select Proficiency Level dialog, select the desired curriculum framework, framework item, and level.
g. If you want to record an observation, click New in the Observations area.
h. If you want to provide feedback to other students, select the student from the filter on the upper right corner of the Engage dialog.
4. If you want to participate in the discussion:
a. Click Participate.
Any existing discussion threads are displayed.
b. To create a new discussion thread, click New.
In the discussion post editor, enter a title for the thread and select a type.
Enter the discussion post details into the rich data editor, as described in Section 3.9.
c. To view the posts in an existing thread, select the thread. All posts in the thread are displayed.
d. To reply to an existing discussion post, click Reply.
In the discussion post editor, enter a title for the post and select a type.
Enter the discussion post details into the rich data editor, as described in Section 3.9.
e. If you want to interact with a different student, select the student from the filter on the upper right corner of the Engage dialog.
5. To close the Engage dialog, click OK.
When you interact with students in a discussion, you can also:
■ View the progress of the student.
Interacting with Students
Teacher’s Guide to Using the OSL Learning Tool 3-21
■ Moderate a discussion post you or one of your students created either by hiding it from students or editing it. Only teachers can subsequently view the original discussion post.
■ View the original discussion post, if it has been edited, by clicking the View Previous Version icon.
3.11.2 Interacting with Students in a JournalA journal is a service learning item that allows students to type entries into their personal journal.
To interact with a student in a journal learning item:
1. Click the Class tab.
2. Select the desired class, and then do one of the following:
■ Select the journal learning item and click engage in the toolbar. The first assigned student will be in context.
■ Select a cell that corresponds to a student and the journal learning item.
At this point, you can either provide feedback about the student or participate in their journal.
3. If you want to provide feedback:
a. Click Feedback, and then enter your feedback about the student.
Your entry is automatically saved.
b. If you want to provide a mark, enter the mark accordingly.
c. If you want to provide a grade, select the grade accordingly.
d. If you want to set an extension date, select a date accordingly.
e. If you want to record a planned demonstration, select the desired level from the list provided for the associated outcome. If the desired level is not displayed, select Other... and in the dialog, select the desired level.
f. If you want to record an unplanned or ad hoc demonstration, click the Specify Adhoc Demonstration icon.
In the Select Proficiency Level dialog, select the desired curriculum framework, framework item, and level.
g. If you want to record an observation, click New in the Observations area.
h. If you want to provide feedback to other students, select the student from the filter on the upper right corner of the Engage dialog.
4. If you want to participate in the journal:
a. Click Participate.
Any existing journal entries are displayed.
b. To create a new post, click New in the Entries area.
The journal entry editor appears. Enter the journal entry details into the rich data editor, as described in Section 3.9.
c. If you want to interact with a different student, select the student from the filter on the upper right corner of the Engage dialog.
5. To close the Engage dialog, click OK.
Interacting with Students
3-22 Oracle Student Learning Learning Tool User's Guide
When you interact with students in their journal, you can also:
■ View the progress of the student
■ Moderate a journal entry created by you or one of your students either by hiding it from the students or editing it. Only teachers can subsequently view the original journal entry.
■ View the original journal entry, if it has been edited, by clicking the View Previous Versions icon.
3.11.3 Interacting with Students in a Submission A submission is a service learning item that enables students to create and submit their submission online.
To interact with a student in a submission learning item:
1. Click the Class tab.
2. Select the desired class, and then do one of the following:
■ From the submission learning item and click engage in the toolbar. The first assigned student will be in context.
■ Select a cell that corresponds to a student and the submission learning item.
At this point, you can either provide feedback about the student or participate in their submission.
3. If you want to provide feedback:
a. Click Feedback, and then enter your feedback about the student.
Your entry is automatically saved.
b. If you want to provide a mark, enter the mark accordingly.
c. If you want to provide a grade, select the grade accordingly.
d. If you want to set an extension date, select a date accordingly.
e. If you want to record a planned demonstration, select the desired level from the list provided for the associated outcome. If the desired level is not displayed, select Other... and in the dialog, select the desired level.
f. If you want to record an unplanned or ad hoc demonstration, click the Specify Adhoc Demonstration icon.
In the Select Proficiency Level dialog, select the desired curriculum framework, framework item, and level.
g. If you want to record an observation, click New in the Observations area.
h. If you want to provide feedback to other students, select the student from the filter on the upper right corner of the Engage dialog.
4. If you want to participate in the submission:
a. Click Participate.
Any existing submission entry is displayed.
b. If you want to create a submission on behalf of the student where one doesn’t already exist, click the New icon.
The submission entry editor appears. Enter the submission entry details into the rich data editor, as described in Section 3.9.
Interacting with Students
Teacher’s Guide to Using the OSL Learning Tool 3-23
c. If you want to edit the student’s submission, click the Edit icon.
The submission entry editor appears. Enter the submission entry details into the rich data editor, as described in Section 3.9.
d. If you want to interact with a different student, select the student from the filter on the upper right corner of the Engage dialog.
5. To close the Engage dialog, click OK.
When you interact with students in their submission, you can also:
■ View the progress of the student
■ Reopen the submission if the student has submitted it, but must make further changes
■ View the previous versions of the student’s submission
■ Submit the submission on behalf of the student
3.11.4 Interacting with Students in a Task A task is a service learning item that provides students with instructions related to an offline task or other related learning items.
To interact with the student in a task learning item:
1. Click the Class tab.
2. Select the desired class, and then do one of the following:
■ Select the task learning item and click engage in the toolbar. The first assigned student will be in context.
■ Select a cell that corresponds to a student and the task learning item.
At this point, you can either provide feedback about the student or participate in the task.
3. If you want to provide feedback:
a. Click Feedback, and then enter your feedback about the student.
Your entry is automatically saved.
b. If you want to provide a mark, enter the mark accordingly.
c. If you want to provide a grade, select the grade accordingly.
d. If you want to set an extension date, select a date accordingly.
e. If you want to record a planned demonstration, select the desired level from the list provided for the associated outcome. If the desired level is not displayed, select Other... and in the dialog, select the desired level.
f. If you want to record an observation, click New in the Observations area.
g. If you want to provide feedback to other students, select the student from the filter on the upper right corner of the Engage dialog.
4. If you want to view the student’s participation, click Participate.
There is no online participation in a task learning item.
5. To close the Engage dialog, click OK.
When you interact with students in the task, you can also view the progress of the student.
Interacting with Students
3-24 Oracle Student Learning Learning Tool User's Guide
3.11.5 Interacting with Students in a Reference ItemA reference is a service learning item that enables students to participate in an external Web site within the OSL page.
To interact with students in a reference learning item:
1. Click the Class tab.
2. Select the desired class, and then do one of the following:
■ Select the reference learning item and click engage in the toolbar. The first assigned student will be in context.
■ Select a cell that corresponds to a student and the reference learning item.
At this point, you can either provide feedback about the student or participate in the referenced Web site.
3. If you want to provide feedback:
a. Click Feedback, and then enter your feedback about the student.
Your entry is automatically saved.
b. If you want to provide a mark, enter the mark accordingly.
c. If you want to provide a grade, select the grade accordingly.
d. If you want to set an extension date, select a date accordingly.
e. If you want to record a planned demonstration, select the desired level from the list provided for the associated outcome. If the desired level is not displayed, select Other... and in the dialog, select the desired level.
f. If you want to record an unplanned or ad hoc demonstration, click the Specify Adhoc Demonstration icon.
In the Select Proficiency Level dialog, select the desired curriculum framework, framework item, and level.
g. If you want to record an observation, click New in the Observations area.
h. If you want to provide feedback to other students, select the student from the filter on the upper right corner of the Engage dialog.
4. If you want to view the student’s participation, click Participate.
The referenced Web site is displayed within the OSL page.
5. To close the Engage dialog, click OK.
When you interact with students in a reference learning item, you can also:
■ View the progress of the student
■ View the student’s participation in the external Web site
■ Participate in the external Web site
3.11.6 Interacting with Students in a Document ItemA document is a collection of learning items that are displayed as a single package of work.
To interact with students in a document learning item:
1. Click the Class tab.

Interacting with Students
Teacher’s Guide to Using the OSL Learning Tool 3-25
2. Select the desired class, and then do one of the following:
■ Select the document learning item and click engage in the toolbar. The first assigned student will be in context.
■ Select a cell that corresponds to a student and the document learning item.
At this point, you can either provide feedback about the student or participate in the document.
3. If you want to provide feedback:
a. Click Feedback, and then enter your feedback about the student.
Your entry is automatically saved.
b. If you want to provide a mark, enter the mark accordingly.
c. If you want to provide a grade, select the grade accordingly.
d. If you want to set an extension date, select a date accordingly.
e. If you want to record a planned demonstration, select the desired level from the list provided for the associated outcome. If the desired level is not displayed, select Other... and in the dialog, select the desired level.
f. If you want to record an unplanned or ad hoc demonstration, click the Specify Adhoc Demonstration icon.
In the Select Proficiency Level dialog, select the desired curriculum framework, framework item, and level.
g. If you want to record an observation, click New in the Observations area.
h. If you want to provide feedback to other students, select the student from the filter on the upper right corner of the Engage dialog.
4. If you want to view the student’s participation, click Participate.
The participation details for all subordinate learning items is displayed in a single page.
5. To close the Engage dialog, click OK.
When you interact with students in a document, you can also:
■ View the progress of the student. The progress is calculated based on the progress of the student in the subordinate learning items.
■ Participate in any subordinate learning item
3.11.7 Interacting with Students in a Folder ItemA folder is a collection of learning items that you participate in separately.
To interact with students in a folder learning item:
1. Click the Class tab.
2. Select the desired class, and then do one of the following:
■ Select the folder learning item and click engage in the toolbar. The first assigned student will be in context.
■ Select a cell that corresponds to a student and the folder learning item.
3. If you want to provide feedback:
a. Click Feedback, and then enter your feedback about the student.
Interacting with Students
3-26 Oracle Student Learning Learning Tool User's Guide
Your entry is automatically saved.
b. If you want to provide a mark, enter the mark accordingly.
c. If you want to provide a grade, select the grade accordingly.
d. If you want to set an extension date, select a date accordingly.
e. If you want to record a planned demonstration, select the desired level from the list provided for the associated outcome. If the desired level is not displayed, select Other... and in the dialog, select the desired level.
f. If you want to record an unplanned or ad hoc demonstration, click the Specify Adhoc Demonstration icon.
In the Select Proficiency Level dialog, select the desired curriculum framework, framework item, and level.
g. If you want to record an observation, click New in the Observations area.
h. If you want to provide feedback to other students, select the student from the filter on the upper right corner of the Engage dialog.
4. To close the Engage dialog, click OK.
When you interact with students in a folder, you can also view the progress of the student. The progress is calculated based on the progress of the student in the subordinate learning items.
3.11.8 Recording Feedback and Assessments for Students in a ClassThe OSL LT enables you to quickly record feedback and assessments of student participation in a learning item.
1. In the Class tab, click class.
2. In the Class Selector > My Classes, select a class.
3. In the Student Filter, select All students.
4. In the Activity column, select the learning item for which you want to record assessments.
5. From the toolbar, click mark.
The Feedback dialog appears and enables you to provide feedback and assessment to all students assigned to the learning item.
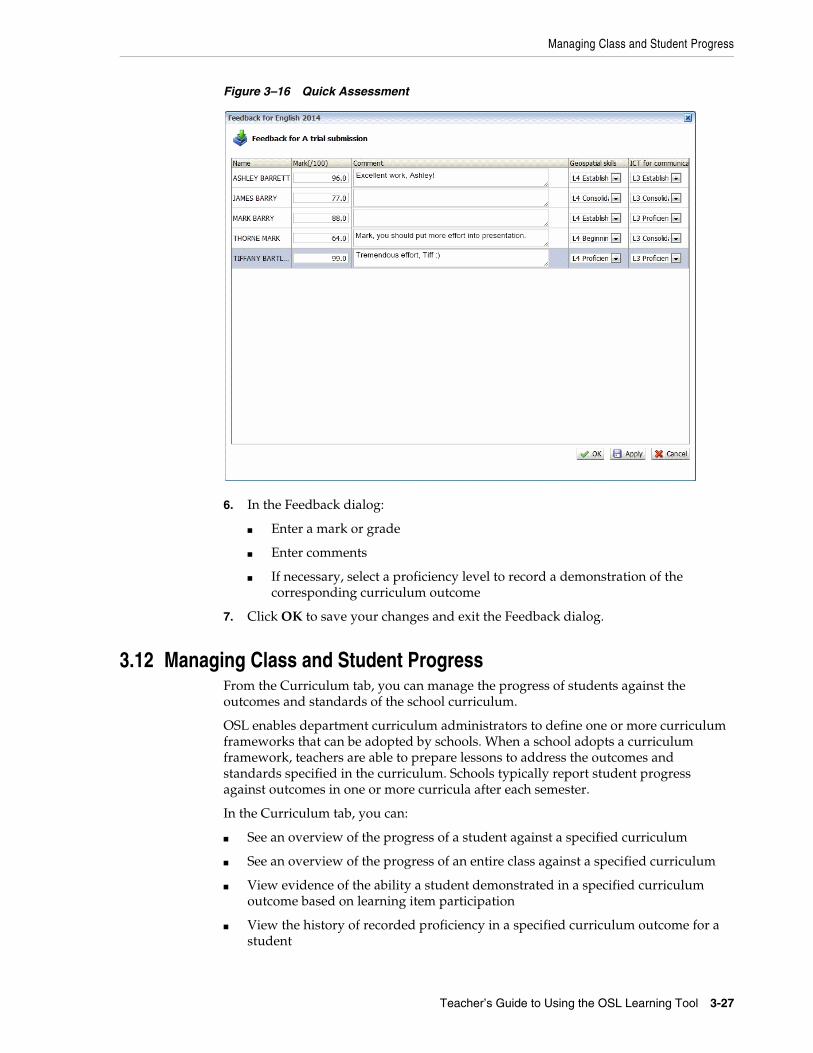
Managing Class and Student Progress
Teacher’s Guide to Using the OSL Learning Tool 3-27
Figure 3–16 Quick Assessment
6. In the Feedback dialog:
■ Enter a mark or grade
■ Enter comments
■ If necessary, select a proficiency level to record a demonstration of the corresponding curriculum outcome
7. Click OK to save your changes and exit the Feedback dialog.
3.12 Managing Class and Student ProgressFrom the Curriculum tab, you can manage the progress of students against the outcomes and standards of the school curriculum.
OSL enables department curriculum administrators to define one or more curriculum frameworks that can be adopted by schools. When a school adopts a curriculum framework, teachers are able to prepare lessons to address the outcomes and standards specified in the curriculum. Schools typically report student progress against outcomes in one or more curricula after each semester.
In the Curriculum tab, you can:
■ See an overview of the progress of a student against a specified curriculum
■ See an overview of the progress of an entire class against a specified curriculum
■ View evidence of the ability a student demonstrated in a specified curriculum outcome based on learning item participation
■ View the history of recorded proficiency in a specified curriculum outcome for a student
Managing Class and Student Progress
3-28 Oracle Student Learning Learning Tool User's Guide
■ Create a record that confirms the proficiency of a student against a curriculum outcome
3.12.1 Understanding Demonstrations and ConfirmationsFor every curriculum outcome that has a defined set of proficiency levels and outcome statements, it is possible for you to make an assessment of a student against this outcome.
For example:
Adam Baker is a student of Class 7A. Whilst participating in a learning item discussing the works of Leonardo da Vinci, you recognize that Adam has demonstrated a Level 4 proficiency in the curriculum outcome Arts in Society, based on the associated outcome statement description. You are able to record this assessment within the feedback and assessment provided to Adam regarding his participation in the learning item.
This type of assessment provided for a learning item is known as a Demonstration.
It is expected that for every student there will be multiple demonstrations from several learning items for each curriculum outcome in any given semester or term of study. The student’s participation in the learning item against which a demonstration has been recorded is the evidence for the demonstration.
In addition, you can also make a more formal assessment against a specific curriculum outcome. Such assessment would be made from evidence provided by the demonstrations. This type of assessment is known as a Confirmation, and would typically occur on a much less frequent basis.
For example, this type of assessment may occur after each semester, or when the teacher decides that the student has attained a new level of proficiency in the curriculum outcome.
A complete history of confirmations is maintained to help track the student progress over a period of time. The most recent confirmation is considered to be the current confirmation, which indicates the student’s current confirmed level for the curriculum outcome. You have the option to provide two comments with each confirmation: one that is visible only to teachers and one that is also visible to the student.
Recording demonstrations is a routine part of the teacher’s role when providing regular feedback and assessment to their students regarding their participation in learning items. You can record confirmations at any point in time from evidence provided by the demonstrations. This is part of the teacher’s role in reviewing and recording the progress of their students against curriculum outcomes and standards.
3.12.2 Reviewing Class Progress1. In the Curriculum tab, click Class.
2. In the Class Selector:
a. In My Classes, select current classes.
b. From the list of classes, select the class you want to view.
The Class Review screen appears.
3. If necessary, from the framework list, select a curriculum framework.
4. If necessary, from the class review screen list, you can select any one of the following:

Managing Class and Student Progress
Teacher’s Guide to Using the OSL Learning Tool 3-29
■ Class Confirmations. If you select this, the Class Confirmations screen appears.
■ Class Overview. If you select this, the Class Overview screen appears.
5. If you want to view a report on the class progress, click the chart icon. For information about the class outcomes report, see Section 3.12.4.
6. If you want to print a hard copy of the progress of the class, click the print icon.
a. In the page that appears, you can click Show Printable Page. A new browser window opens and shows a printable page.
b. From the browser menu, click File > Print.
c. Select a printer, and then print as necessary.
d. To go back to the OSL LT, click Return.
3.12.3 About the Class Progress ScreenFrom the Class Progress screen, you can choose to display the Class Confirmations or Class Overview Screen.
Figure 3–17 Class Confirmations Screen
In Figure 3–17, the Class Confirmations screen displays the curriculum framework as a hierarchy of curriculum outcomes. The subsequent columns describe each of the levels in the associated proficiency set. The cells in these columns display the number of students currently confirmed at the corresponding level for each of the relevant curriculum outcomes within the selected curriculum framework. Not all curriculum outcomes support confirmations—this is defined by the curriculum administrator. For more information about confirmations, Section 3.12.9.
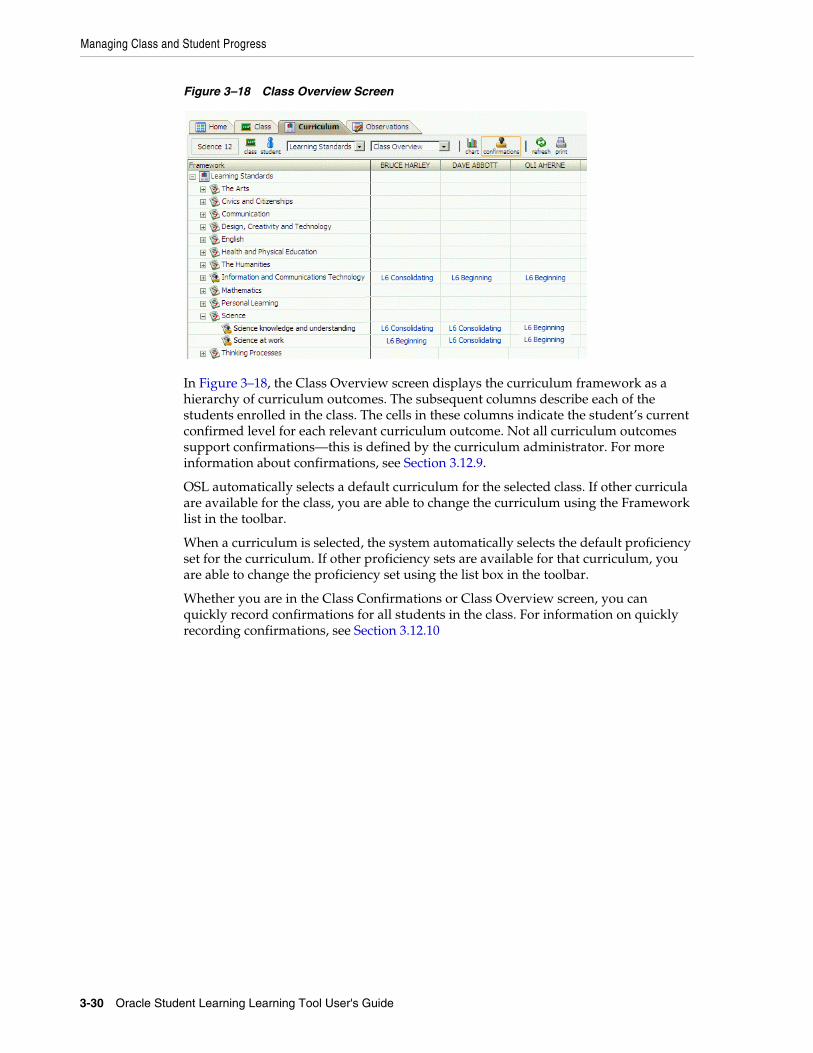
Managing Class and Student Progress
3-30 Oracle Student Learning Learning Tool User's Guide
Figure 3–18 Class Overview Screen
In Figure 3–18, the Class Overview screen displays the curriculum framework as a hierarchy of curriculum outcomes. The subsequent columns describe each of the students enrolled in the class. The cells in these columns indicate the student’s current confirmed level for each relevant curriculum outcome. Not all curriculum outcomes support confirmations—this is defined by the curriculum administrator. For more information about confirmations, see Section 3.12.9.
OSL automatically selects a default curriculum for the selected class. If other curricula are available for the class, you are able to change the curriculum using the Framework list in the toolbar.
When a curriculum is selected, the system automatically selects the default proficiency set for the curriculum. If other proficiency sets are available for that curriculum, you are able to change the proficiency set using the list box in the toolbar.
Whether you are in the Class Confirmations or Class Overview screen, you can quickly record confirmations for all students in the class. For information on quickly recording confirmations, see Section 3.12.10

Managing Class and Student Progress
Teacher’s Guide to Using the OSL Learning Tool 3-31
3.12.4 About the Class Outcomes Report
Figure 3–19 Class Outcomes Report
The Class Outcomes Report (Class Confirmations Report) is a graphical representation of the current confirmed level of each student enrolled in a particular class for a particular curriculum outcome.
By default, the class and curriculum outcome selections are set using the current context information provided by the OSL LT.
3.12.5 Reviewing Student Progress1. In the Curriculum tab, click Student.
2. In the Select student dialog:
a. From the class list, select the class to which the student belongs.
b. From the list of students, select the student.
3. If necessary, from the framework list, select a curriculum framework.
4. If you want to view a report on the student’s progress, click the chart icon. For information about the student demonstrations report, see Section 3.12.7.
5. If you want to view the evidence page, which provides a list of the student’s demonstrations or missed opportunities, click the demonstration number in the proficiency level.
For information about the evidence page, see Section 3.12.8.
6. If you want to view the confirmation page, which lists the complete history of the student’s confirmations, click the confirmed level of the corresponding curriculum outcome.
For information about the confirmation page, see Section 3.12.9.
7. If you want to print a hard copy of the progress of the class, click the print icon.
a. In the page that appears, you can click Show Printable Page. A new browser window opens and shows a printable page.
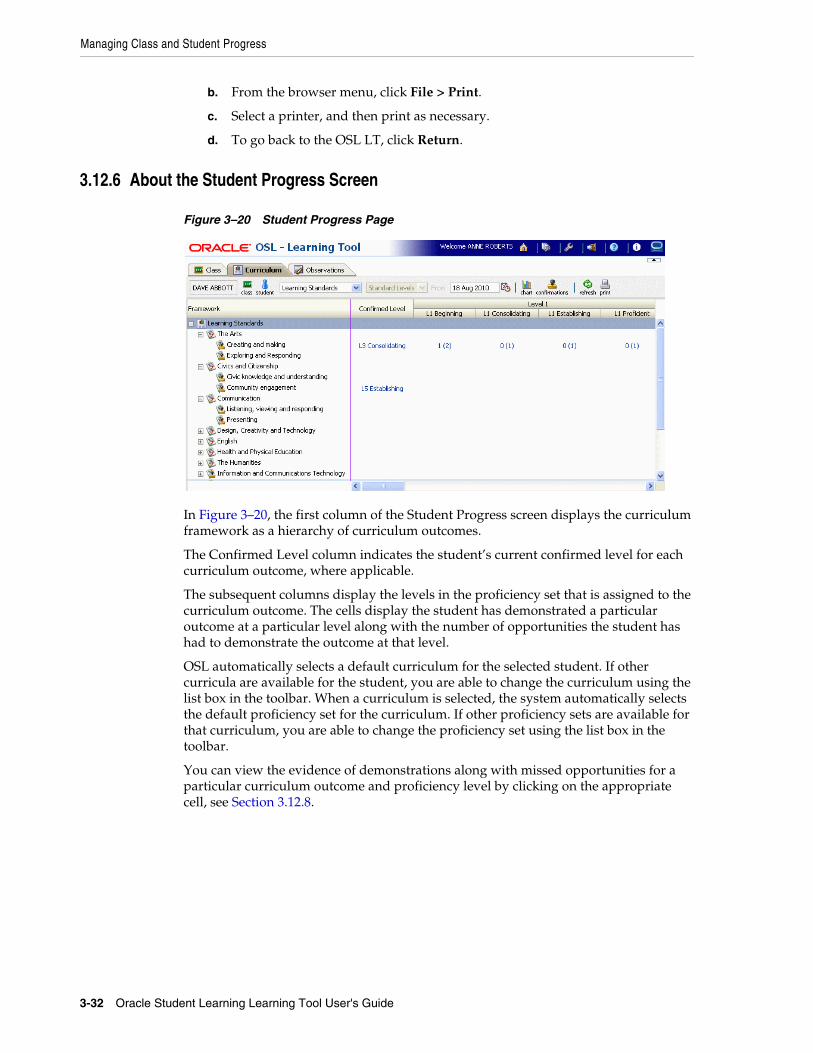
Managing Class and Student Progress
3-32 Oracle Student Learning Learning Tool User's Guide
b. From the browser menu, click File > Print.
c. Select a printer, and then print as necessary.
d. To go back to the OSL LT, click Return.
3.12.6 About the Student Progress Screen
Figure 3–20 Student Progress Page
In Figure 3–20, the first column of the Student Progress screen displays the curriculum framework as a hierarchy of curriculum outcomes.
The Confirmed Level column indicates the student’s current confirmed level for each curriculum outcome, where applicable.
The subsequent columns display the levels in the proficiency set that is assigned to the curriculum outcome. The cells display the student has demonstrated a particular outcome at a particular level along with the number of opportunities the student has had to demonstrate the outcome at that level.
OSL automatically selects a default curriculum for the selected student. If other curricula are available for the student, you are able to change the curriculum using the list box in the toolbar. When a curriculum is selected, the system automatically selects the default proficiency set for the curriculum. If other proficiency sets are available for that curriculum, you are able to change the proficiency set using the list box in the toolbar.
You can view the evidence of demonstrations along with missed opportunities for a particular curriculum outcome and proficiency level by clicking on the appropriate cell, see Section 3.12.8.

Managing Class and Student Progress
Teacher’s Guide to Using the OSL Learning Tool 3-33
3.12.7 About the Student Demonstrations Report
Figure 3–21 Student Demonstrations Report
The Student Demonstrations Report is a graphical representation of the demonstrations and missed opportunities to demonstrate a particular outcome for a particular student.
By default, the framework item (outcome) and student selection are set using the context information provided by the OSL LT.
The table on the left displays the missed opportunities and demonstration information of the student across the proficiency levels for the selected framework item (outcome).
The chart on the right shows the missed opportunities and demonstrations for each proficiency level. The light blue bar on top shows the number of missed opportunities while the dark blue bar below shows the number of demonstrations.
You can click the number under the Missed Opportunities column in the table to view the list of learning items where the student has failed to demonstrate the proficiency level in the given curriculum outcome. Similarly, you can click the number under the Demonstrations column in the table to view the list of learning items where the student has demonstrated the proficiency level in the given curriculum outcome.
3.12.8 About the Evidence PageIn the Evidence page, you can view the evidence for:
■ Demonstrations of outcomes for a learning item
■ Opportunities a student missed
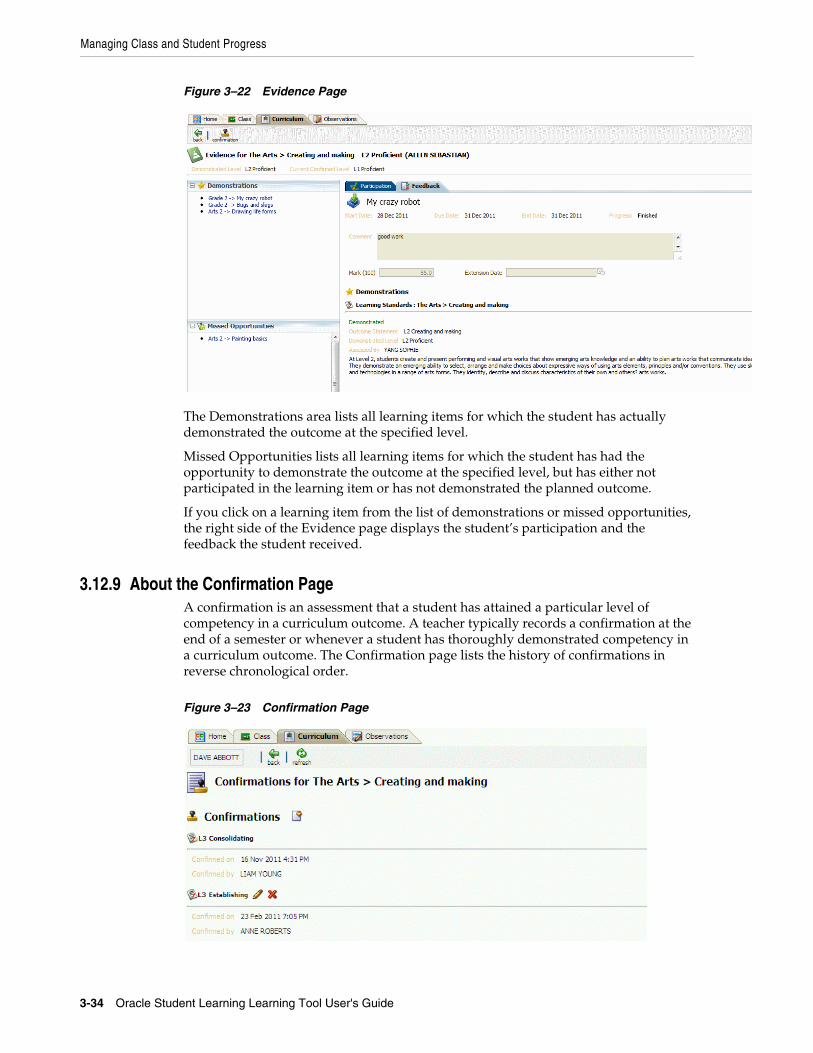
Managing Class and Student Progress
3-34 Oracle Student Learning Learning Tool User's Guide
Figure 3–22 Evidence Page
The Demonstrations area lists all learning items for which the student has actually demonstrated the outcome at the specified level.
Missed Opportunities lists all learning items for which the student has had the opportunity to demonstrate the outcome at the specified level, but has either not participated in the learning item or has not demonstrated the planned outcome.
If you click on a learning item from the list of demonstrations or missed opportunities, the right side of the Evidence page displays the student’s participation and the feedback the student received.
3.12.9 About the Confirmation PageA confirmation is an assessment that a student has attained a particular level of competency in a curriculum outcome. A teacher typically records a confirmation at the end of a semester or whenever a student has thoroughly demonstrated competency in a curriculum outcome. The Confirmation page lists the history of confirmations in reverse chronological order.
Figure 3–23 Confirmation Page

Managing Class and Student Progress
Teacher’s Guide to Using the OSL Learning Tool 3-35
3.12.10 Recording Confirmations for Students in a ClassOSL provides a quick way to add confirmations for all students in a class.
1. From the Curriculum tab, click class.
2. In the Class Selector window, select the class.
3. If necessary, use the framework filter to select a curriculum framework.
4. From the work area, select the curriculum outcome for which you want to enter confirmations.
The multiple confirmations window appears.
Figure 3–24 Quick Confirmations
5. For each student:
a. In New Level, select a confirmation level.
b. In Note, optionally enter a comment related to this confirmation for the student.
6. Click OK.
3.12.11 Recording a Confirmation for a StudentTo enter a confirmation for a particular student:
1. From the Curriculum tab, click student.
2. In the Select student dialog:
a. In the Class list, select the class.
b. In the Student list, select the student.
3. If necessary, use the framework filter to select a curriculum framework.
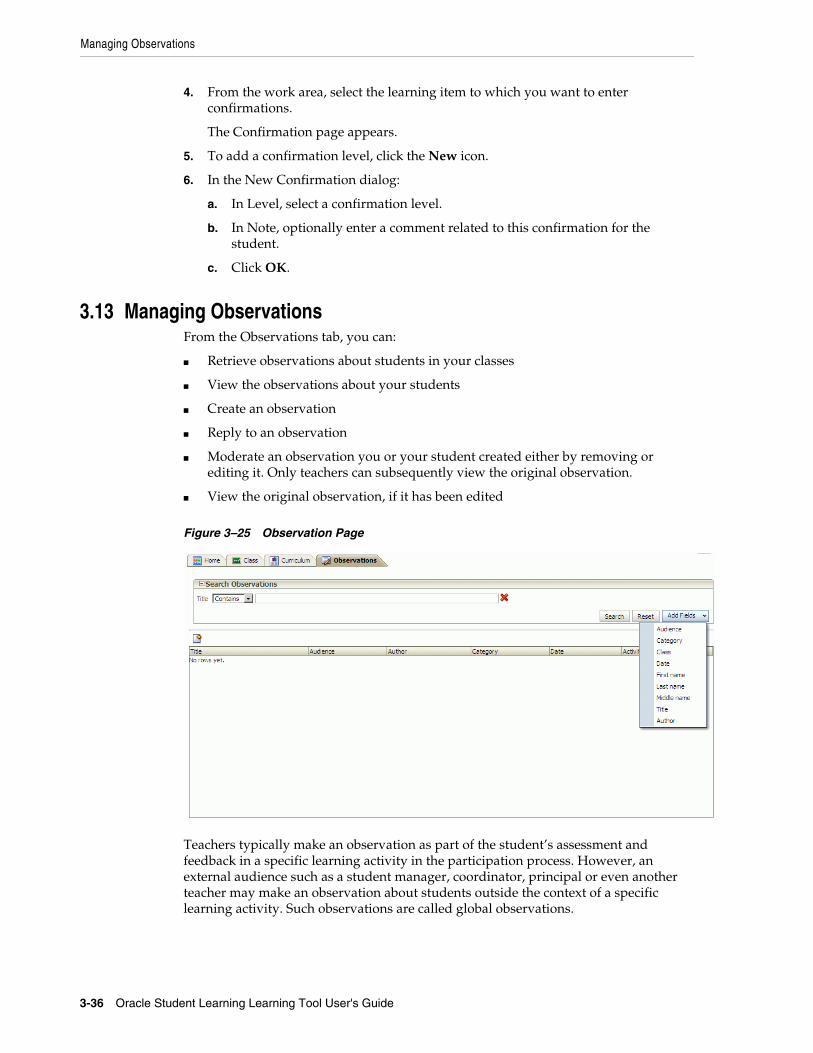
Managing Observations
3-36 Oracle Student Learning Learning Tool User's Guide
4. From the work area, select the learning item to which you want to enter confirmations.
The Confirmation page appears.
5. To add a confirmation level, click the New icon.
6. In the New Confirmation dialog:
a. In Level, select a confirmation level.
b. In Note, optionally enter a comment related to this confirmation for the student.
c. Click OK.
3.13 Managing ObservationsFrom the Observations tab, you can:
■ Retrieve observations about students in your classes
■ View the observations about your students
■ Create an observation
■ Reply to an observation
■ Moderate an observation you or your student created either by removing or editing it. Only teachers can subsequently view the original observation.
■ View the original observation, if it has been edited
Figure 3–25 Observation Page
Teachers typically make an observation as part of the student’s assessment and feedback in a specific learning activity in the participation process. However, an external audience such as a student manager, coordinator, principal or even another teacher may make an observation about students outside the context of a specific learning activity. Such observations are called global observations.

Managing Observations
Teacher’s Guide to Using the OSL Learning Tool 3-37
3.13.1 Retrieving ObservationsYou retrieve observations about your students by specifying search criteria. By default, the title of the observation is the sole search criterion.
You can define new search criteria by clicking the Add Fields button. This prompts you with a list of fields that can be used as search criteria. For example, you may want to find all observations about a particular student in a given date range and in a specific category.
A search field can be removed by clicking the Remove icon. The same search field can be selected multiple times. For example, a Date field can be selected twice to apply one date with the After condition and the other date with the Before condition.
Figure 3–26 New Search Criteria
When you click Search, the results of the search are displayed in a table that provides a summary of each observation matching the search criteria. Selecting Match All will ensure that all search criteria are met. Selecting Match Any will ensure that any search criterion is met. By default, the system fetches only ten observations that match the search criteria. If there are more observations, Next and Previous buttons are provided.
If you select an observation, a set of icons is enabled in the toolbar:
■ View
Allows you to view the details of the selected observation in read-only mode.
■ View Previous Versions
Allows you to view the original observation in read-only mode if the selected observation has been edited.
■ Edit
Allows you to edit the selected observation if you were the author, or to moderate the selected observation if authored by one of your students.
You cannot edit observations created by parents.
■ Reply
Allows you to reply to the selected observation.
When replying to an observation, fields such as Audience, Category and Regarding are inherited from the original observation entry and are disabled. The Summary field is automatically populated based on the original observation and can be edited.
Accessing Other Classes
3-38 Oracle Student Learning Learning Tool User's Guide
■ Hide or Unhide
Allows you to hide or unhide the selected observation if you were the author, or if one of your students was the author.
3.13.2 Creating an ObservationThe toolbar above the results table includes a New icon, which enables you to create a observation. If there are search results in the table, any new observation is listed at the top of the list of observations.
In the observation entry editor, you must:
■ Enter a summary or title for the observation.
■ Select an audience type:
– Internal Audience enables other teachers to view the observation.
– External Audience enables students and their parents to view the observation.
■ Select an observation category.
■ Select a student about which the observation is regarding.
■ Enter the observation details in the rich data editor, as described in Section 3.9.
3.14 Accessing Other ClassesThe OSL LT enables you to view the information in your old classes or another teacher’s classes. You have read-only access to such classes.
To select one of your old classes:
1. In the Class Selector > My Classes:
a. Select all classes.
b. From the list of classes, select the class you want to view.
To select another teacher’s class:
1. In the Class Selector, click Find Classes
2. Select the desired school from the list.
Schools in which you are enrolled as a teacher is displayed at the top of the list. All schools are listed below the separator.
3. Select the desired calendar from the list.
4. Optionally, enter text in the Class field that partially matches the class name, course name, or any tag applied to the course.
5. Click Search.
The list of classes that matches the search criteria is displayed. To sort the list, click the relevant column.
6. From the list of classes, select the class you want to view.
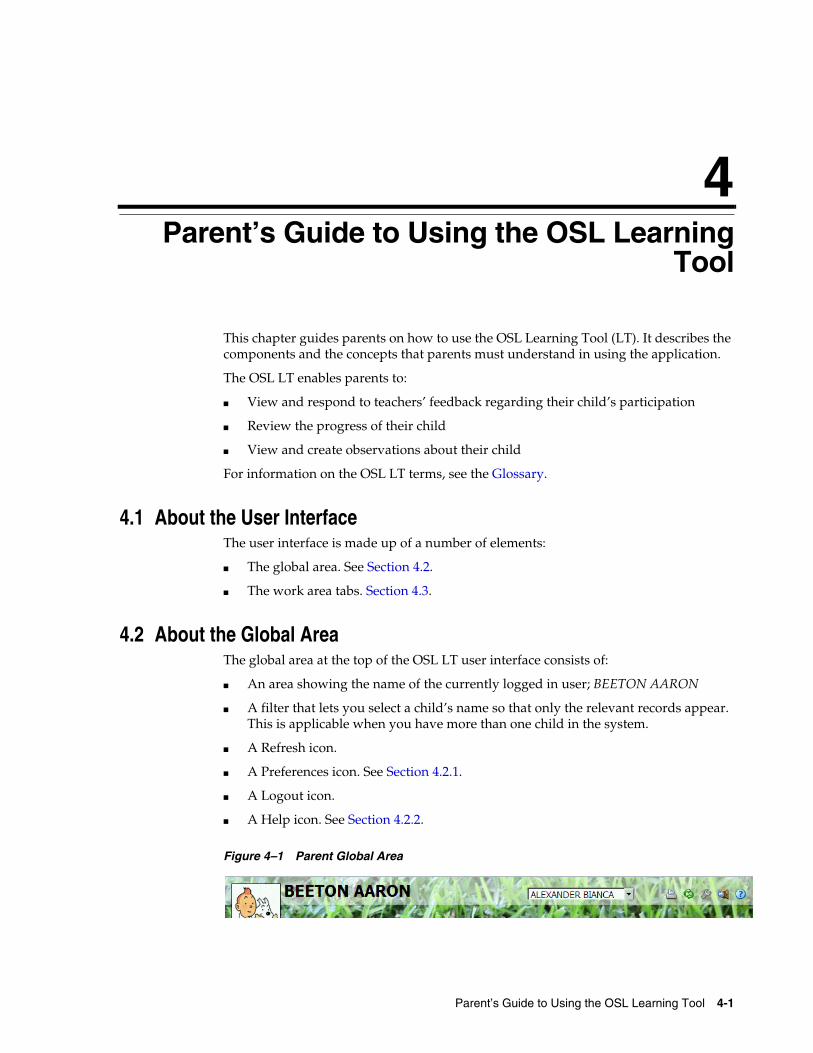
4
Parent’s Guide to Using the OSL Learning Tool 4-1
4Parent’s Guide to Using the OSL LearningTool
This chapter guides parents on how to use the OSL Learning Tool (LT). It describes the components and the concepts that parents must understand in using the application.
The OSL LT enables parents to:
■ View and respond to teachers’ feedback regarding their child’s participation
■ Review the progress of their child
■ View and create observations about their child
For information on the OSL LT terms, see the Glossary.
4.1 About the User InterfaceThe user interface is made up of a number of elements:
■ The global area. See Section 4.2.
■ The work area tabs. Section 4.3.
4.2 About the Global AreaThe global area at the top of the OSL LT user interface consists of:
■ An area showing the name of the currently logged in user; BEETON AARON
■ A filter that lets you select a child’s name so that only the relevant records appear. This is applicable when you have more than one child in the system.
■ A Refresh icon.
■ A Preferences icon. See Section 4.2.1.
■ A Logout icon.
■ A Help icon. See Section 4.2.2.
Figure 4–1 Parent Global Area
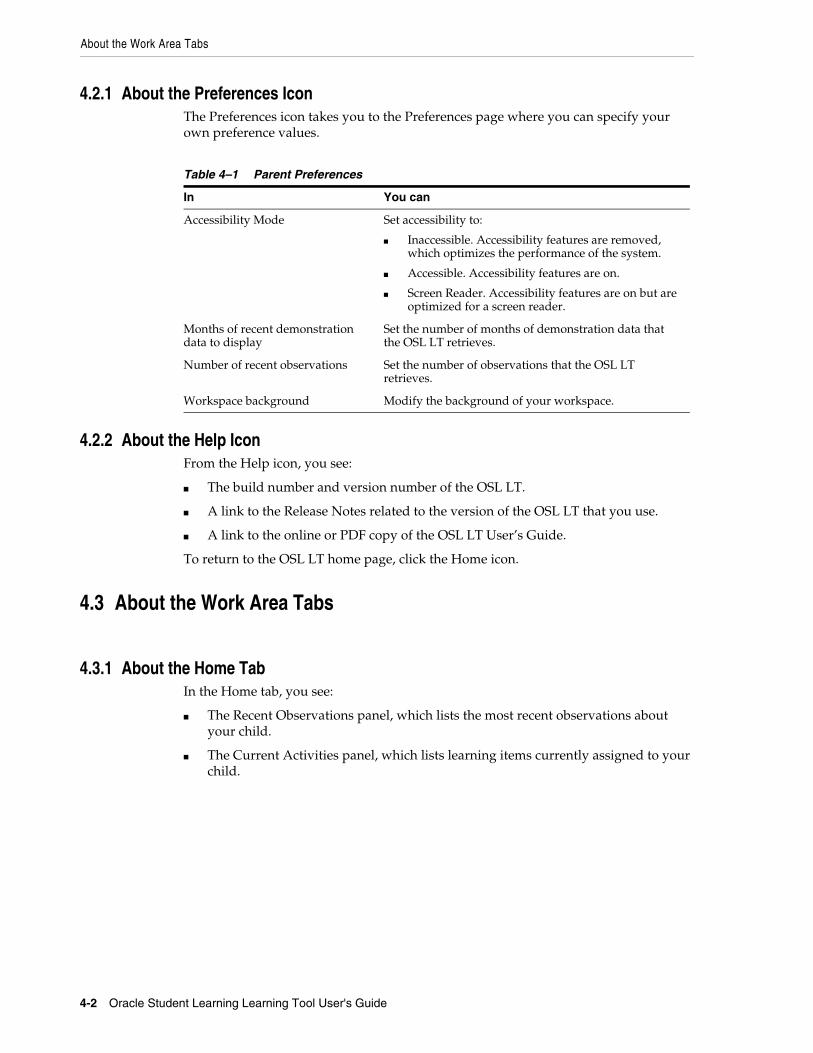
About the Work Area Tabs
4-2 Oracle Student Learning Learning Tool User's Guide
4.2.1 About the Preferences IconThe Preferences icon takes you to the Preferences page where you can specify your own preference values.
4.2.2 About the Help IconFrom the Help icon, you see:
■ The build number and version number of the OSL LT.
■ A link to the Release Notes related to the version of the OSL LT that you use.
■ A link to the online or PDF copy of the OSL LT User’s Guide.
To return to the OSL LT home page, click the Home icon.
4.3 About the Work Area Tabs
4.3.1 About the Home TabIn the Home tab, you see:
■ The Recent Observations panel, which lists the most recent observations about your child.
■ The Current Activities panel, which lists learning items currently assigned to your child.
Table 4–1 Parent Preferences
In You can
Accessibility Mode Set accessibility to:
■ Inaccessible. Accessibility features are removed, which optimizes the performance of the system.
■ Accessible. Accessibility features are on.
■ Screen Reader. Accessibility features are on but are optimized for a screen reader.
Months of recent demonstration data to display
Set the number of months of demonstration data that the OSL LT retrieves.
Number of recent observations Set the number of observations that the OSL LT retrieves.
Workspace background Modify the background of your workspace.

About the Work Area Tabs
Parent’s Guide to Using the OSL Learning Tool 4-3
Figure 4–2 Parent Home Tab
4.3.1.1 About the Recent Observations PanelFrom the Recent Observations panel, you can:
■ View the most recent observations regarding your child
■ Create an observation about your child. Click the New icon to create an observation from the Recent Observations panel. See Section 4.3.4.2.
■ Reply to an observation. See Section 4.3.4.3.
4.3.1.2 About the Current Activities PanelFrom the Current Activities panel, you can view your child’s participation and the teacher's feedback for any activities (learning items) that are currently assigned to your child.
The Current Activities area displays the following details:
■ Activity—The icon and title of the learning item.
■ Class—The name of the class in which the learning item is held.
■ Due—The submission due date for Submission Item. For other learning items, the end date is displayed.
■ Progress—Your child’s progress in the learning item.
4.3.2 About the Activities TabIn the Activities tab, you can view the classes in which your child is enrolled, along with all the learning items assigned to your child.
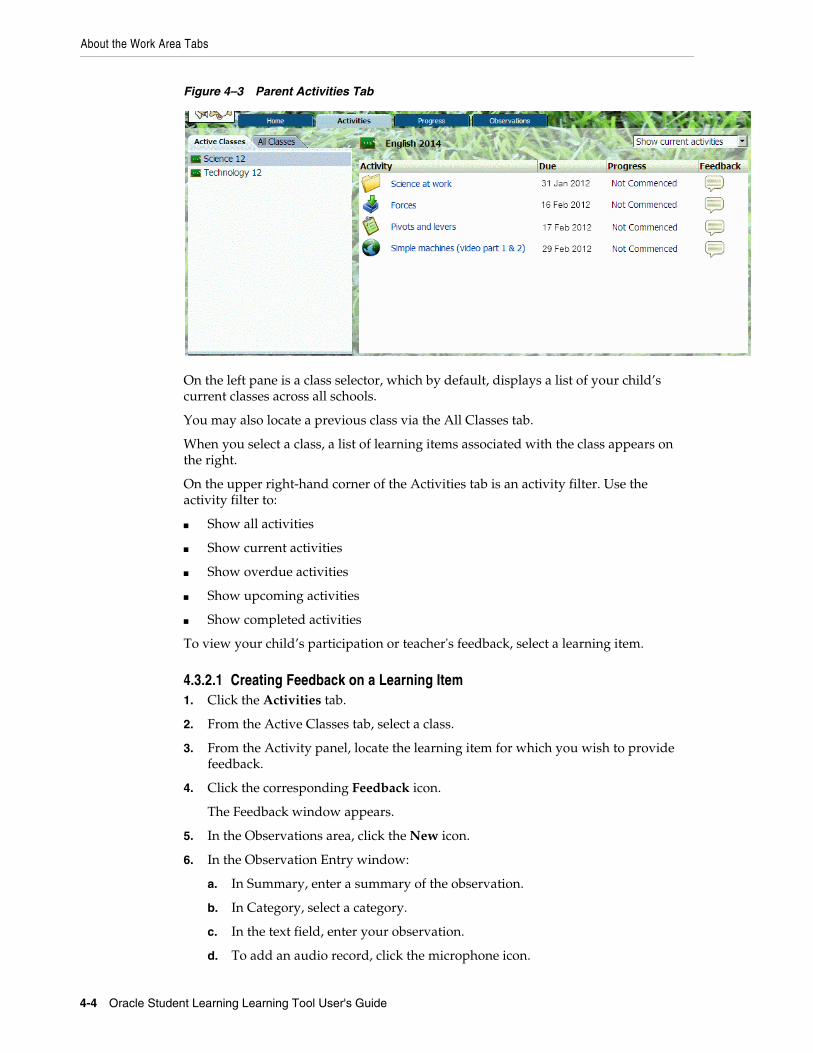
About the Work Area Tabs
4-4 Oracle Student Learning Learning Tool User's Guide
Figure 4–3 Parent Activities Tab
On the left pane is a class selector, which by default, displays a list of your child’s current classes across all schools.
You may also locate a previous class via the All Classes tab.
When you select a class, a list of learning items associated with the class appears on the right.
On the upper right-hand corner of the Activities tab is an activity filter. Use the activity filter to:
■ Show all activities
■ Show current activities
■ Show overdue activities
■ Show upcoming activities
■ Show completed activities
To view your child’s participation or teacher's feedback, select a learning item.
4.3.2.1 Creating Feedback on a Learning Item1. Click the Activities tab.
2. From the Active Classes tab, select a class.
3. From the Activity panel, locate the learning item for which you wish to provide feedback.
4. Click the corresponding Feedback icon.
The Feedback window appears.
5. In the Observations area, click the New icon.
6. In the Observation Entry window:
a. In Summary, enter a summary of the observation.
b. In Category, select a category.
c. In the text field, enter your observation.
d. To add an audio record, click the microphone icon.
About the Work Area Tabs
Parent’s Guide to Using the OSL Learning Tool 4-5
e. To add other files, click the paper clip icon.
f. Click OK.
The feedback appears in the Observations area.
4.3.2.2 Responding to Feedback on a Learning Item1. In the Observations area, locate the observation to which you wish to reply.
2. Click the Reply icon.
3. In the Observation Entry window:
a. In Summary, modify the summary as necessary.
b. In the text field, enter your reply.
c. To add an audio record, click the microphone icon.
d. To add other files, click the paper clip icon.
e. Click OK.
The feedback appears in the Observations area.
4.3.3 About the Progress TabFrom the Progress tab, you can review your child’s progress against a relevant curriculum framework.
The first column displays the curriculum framework as a hierarchy of curriculum outcomes. The next column displays your child’s current confirmed level for each curriculum outcome. The subsequent columns represent the levels of the default proficiency set for the curriculum. Each cell in the columns displays the number of times your child demonstrated a curriculum outcome. In brackets next to each number is the total number of opportunities your child had to demonstrate this level of proficiency for the particular curriculum outcome.
If your child is enrolled in classes across multiple curricula, a curriculum framework selector is provided in the toolbar for you to select another curriculum framework. If the selected curriculum has multiple proficiency sets, a proficiency set selector is provided in the toolbar for you to select another proficiency set.
You can click the chart icon to review information about your child’s demonstrations across the proficiency levels for each framework item (outcome). For information on the child demonstrations report, see Section 4.3.3.1.
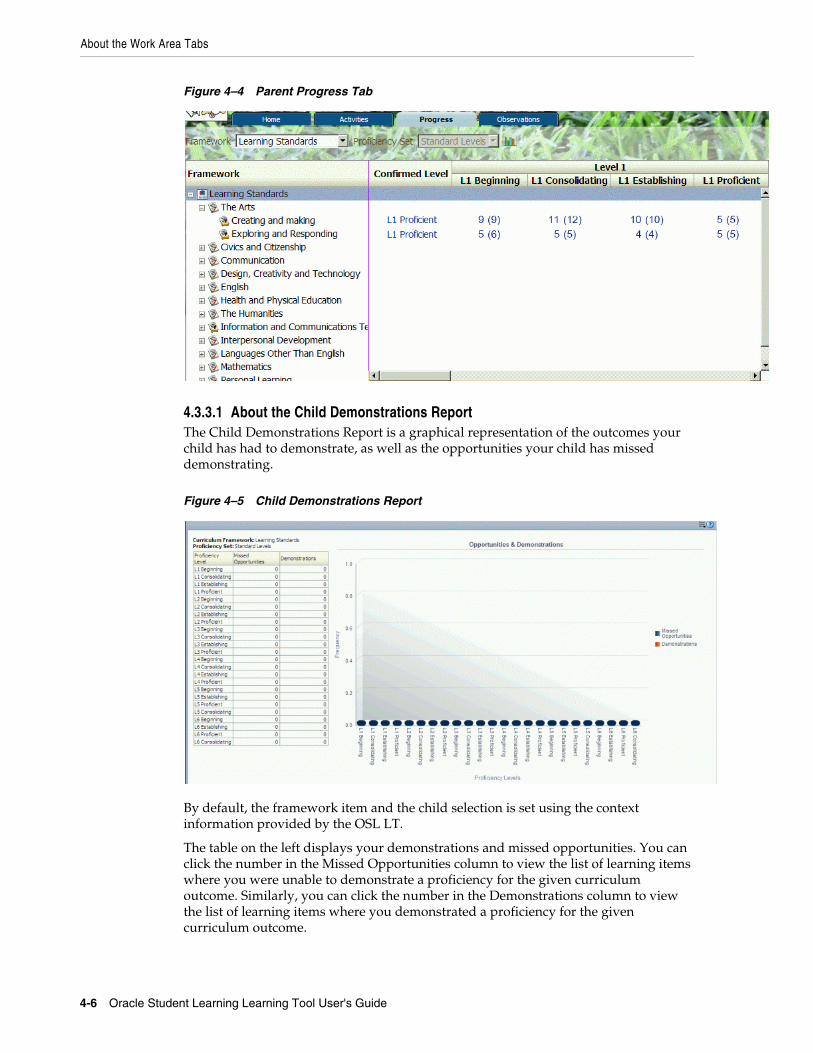
About the Work Area Tabs
4-6 Oracle Student Learning Learning Tool User's Guide
Figure 4–4 Parent Progress Tab
4.3.3.1 About the Child Demonstrations ReportThe Child Demonstrations Report is a graphical representation of the outcomes your child has had to demonstrate, as well as the opportunities your child has missed demonstrating.
Figure 4–5 Child Demonstrations Report
By default, the framework item and the child selection is set using the context information provided by the OSL LT.
The table on the left displays your demonstrations and missed opportunities. You can click the number in the Missed Opportunities column to view the list of learning items where you were unable to demonstrate a proficiency for the given curriculum outcome. Similarly, you can click the number in the Demonstrations column to view the list of learning items where you demonstrated a proficiency for the given curriculum outcome.
About the Work Area Tabs
Parent’s Guide to Using the OSL Learning Tool 4-7
The chart on the right shows the missed opportunities and demonstrations for each proficiency level. The light blue bar on top shows the number of missed opportunities while the dark blue bar below shows the number of demonstrations.
4.3.3.2 Viewing Teacher’s AssessmentTo view the details of proficiencies your child has demonstrated:
1. Click the Progress tab.
2. If necessary, from the framework list select a curriculum framework.
3. In the proficiency levels area, click the appropriate cell that displays the demonstration data of the framework item you want to view.
The Demonstration area appears and lists all learning items for which the student has actually demonstrated the outcome at the specified level.
Missed Opportunities lists all learning items for which the student has had the opportunity to demonstrate the outcome at the specified level, but has either not participated in the learning item or has not demonstrated the planned outcome.
4. From the Demonstrations panel, click a learning item.
The Participation and Feedback tabs appear. The Participation tab lists records of your child’s participation in the learning item.
5. Click the Feedback tab.
The teacher’s assessment appears.
4.3.3.3 Viewing Confirmation HistoryThe teacher assesses your child’s proficiency against curriculum outcomes on a periodic basis, typically at the end of a semester. These assessments are called confirmations. To view the records of your child’s confirmations:
1. Click the Progress tab.
2. If necessary, from the framework list select a curriculum framework.
3. In the Confirmed Level column, select the current confirmed level for the curriculum outcome of interest.
The Confirmation History window appears. This window lists records of confirmations in which your child has attained a particular level of competency for a curriculum outcome.
4.3.4 About the Observations TabFrom the Observations tab, you can retrieve, create, and reply to observations. The number of observations that appear are based on the preference value you set. For information on preferences, see Section 4.2.1.
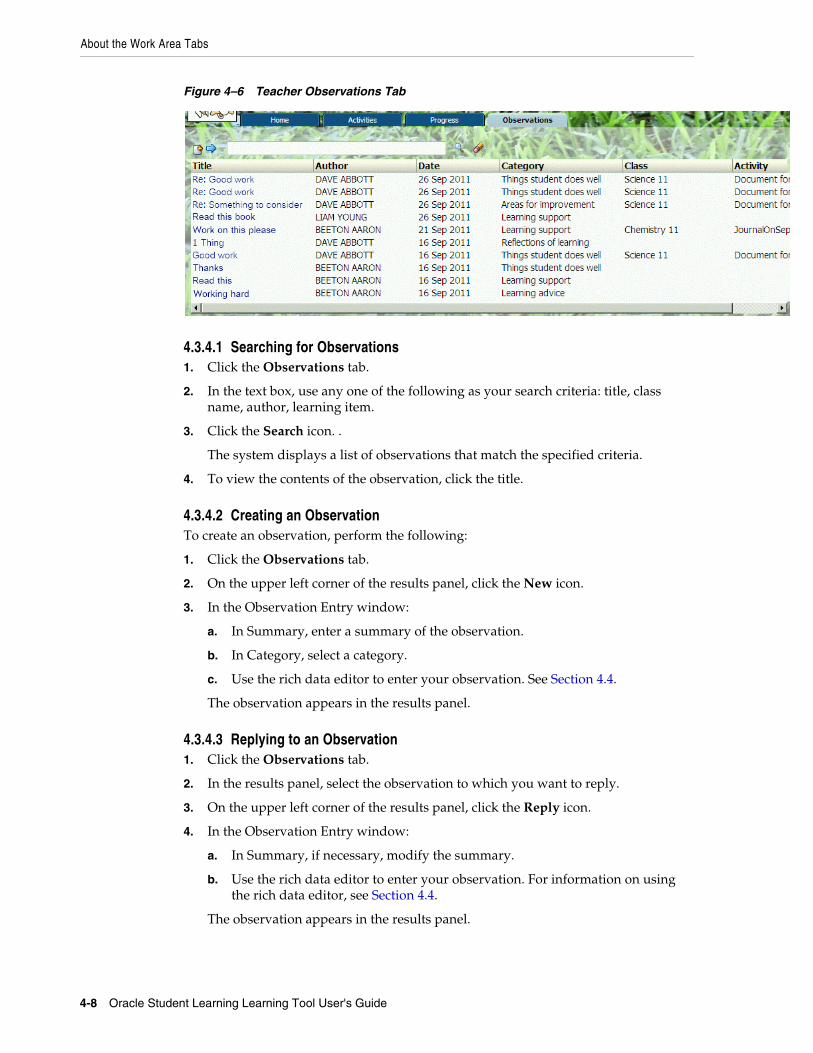
About the Work Area Tabs
4-8 Oracle Student Learning Learning Tool User's Guide
Figure 4–6 Teacher Observations Tab
4.3.4.1 Searching for Observations1. Click the Observations tab.
2. In the text box, use any one of the following as your search criteria: title, class name, author, learning item.
3. Click the Search icon. .
The system displays a list of observations that match the specified criteria.
4. To view the contents of the observation, click the title.
4.3.4.2 Creating an ObservationTo create an observation, perform the following:
1. Click the Observations tab.
2. On the upper left corner of the results panel, click the New icon.
3. In the Observation Entry window:
a. In Summary, enter a summary of the observation.
b. In Category, select a category.
c. Use the rich data editor to enter your observation. See Section 4.4.
The observation appears in the results panel.
4.3.4.3 Replying to an Observation1. Click the Observations tab.
2. In the results panel, select the observation to which you want to reply.
3. On the upper left corner of the results panel, click the Reply icon.
4. In the Observation Entry window:
a. In Summary, if necessary, modify the summary.
b. Use the rich data editor to enter your observation. For information on using the rich data editor, see Section 4.4.
The observation appears in the results panel.
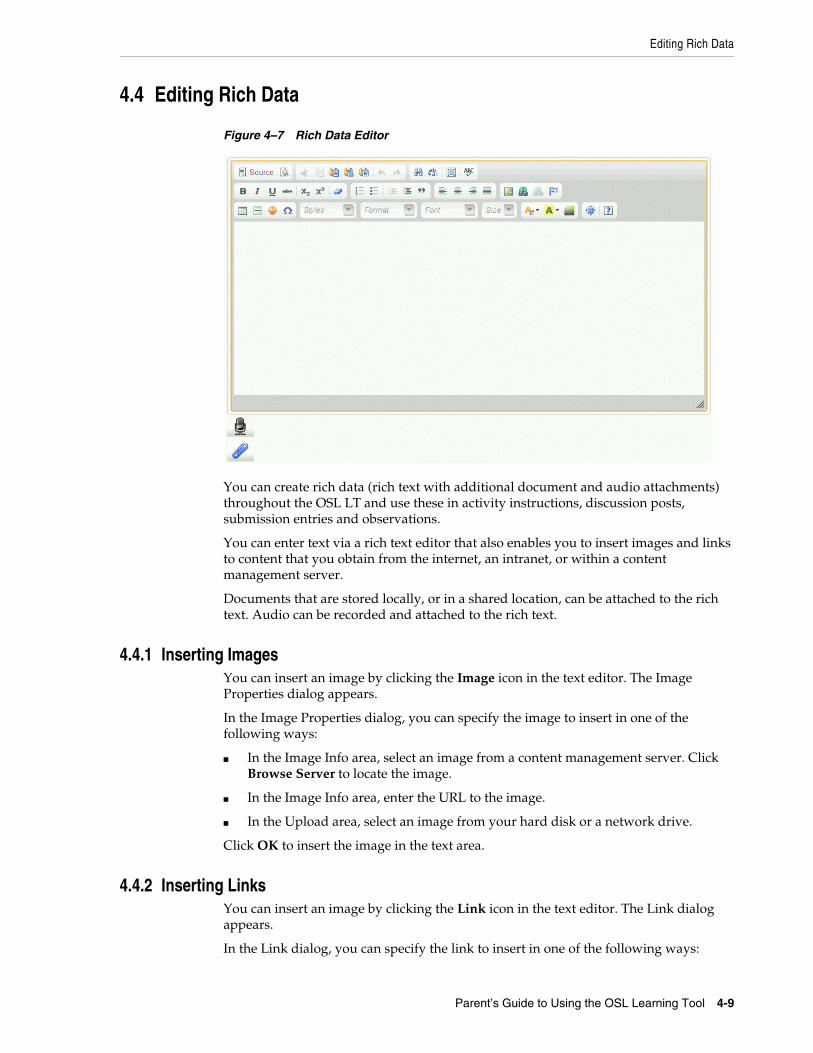
Editing Rich Data
Parent’s Guide to Using the OSL Learning Tool 4-9
4.4 Editing Rich Data
Figure 4–7 Rich Data Editor
You can create rich data (rich text with additional document and audio attachments) throughout the OSL LT and use these in activity instructions, discussion posts, submission entries and observations.
You can enter text via a rich text editor that also enables you to insert images and links to content that you obtain from the internet, an intranet, or within a content management server.
Documents that are stored locally, or in a shared location, can be attached to the rich text. Audio can be recorded and attached to the rich text.
4.4.1 Inserting ImagesYou can insert an image by clicking the Image icon in the text editor. The Image Properties dialog appears.
In the Image Properties dialog, you can specify the image to insert in one of the following ways:
■ In the Image Info area, select an image from a content management server. Click Browse Server to locate the image.
■ In the Image Info area, enter the URL to the image.
■ In the Upload area, select an image from your hard disk or a network drive.
Click OK to insert the image in the text area.
4.4.2 Inserting LinksYou can insert an image by clicking the Link icon in the text editor. The Link dialog appears.
In the Link dialog, you can specify the link to insert in one of the following ways:
Editing Rich Data
4-10 Oracle Student Learning Learning Tool User's Guide
■ In the Link Info area, select a document from a content management server. Click Browse Server to locate the document to which you wish to link.
■ In the Link Info area, select the link type and enter other required information, such as the URL of the Web site to which you are linking.
■ In the Upload area, select a file from your hard disk or a network drive.
Click OK to insert the link in the text area.
4.4.3 Attaching FilesYou can attach files from your local system by clicking the Attach Files button below the editor. The Attach Files dialog box is displayed, which enables you to select a file from your hard disk or a network drive. The selected file is attached and shown as a hyperlink with the file icon.
You can click the hyperlink to open or save the attached file.
You can also remove the attached file by clicking the Delete File icon.
4.4.4 Recording AudioYou can add audio instructions to complement your text and attachments. This is especially helpful for young students or those with poor reading skills.
To record audio:
1. Click the Record Audio icon in the editor.
2. In the Record Audio dialog, enter a name for the audio file.
3. Click the Start Recording Audio icon, and then speak into your microphone.
Make sure your computer has the necessary hardware to record audio.
4. When you are done recording, click the Stop Recording icon.
5. To exit the Record Audio dialog, click the Close button.
The recorded audio listed below the text area
6. If you want to remove a recording, click the corresponding Delete icon.
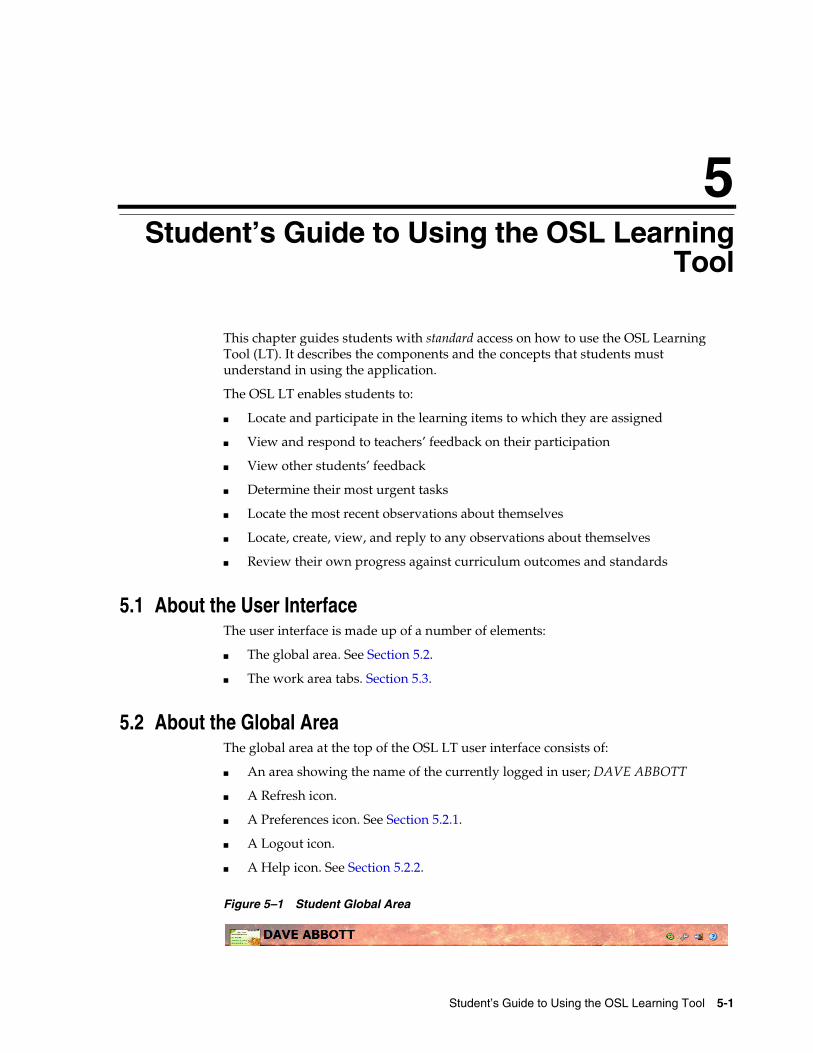
5
Student’s Guide to Using the OSL Learning Tool 5-1
5Student’s Guide to Using the OSL LearningTool
This chapter guides students with standard access on how to use the OSL Learning Tool (LT). It describes the components and the concepts that students must understand in using the application.
The OSL LT enables students to:
■ Locate and participate in the learning items to which they are assigned
■ View and respond to teachers’ feedback on their participation
■ View other students’ feedback
■ Determine their most urgent tasks
■ Locate the most recent observations about themselves
■ Locate, create, view, and reply to any observations about themselves
■ Review their own progress against curriculum outcomes and standards
5.1 About the User InterfaceThe user interface is made up of a number of elements:
■ The global area. See Section 5.2.
■ The work area tabs. Section 5.3.
5.2 About the Global AreaThe global area at the top of the OSL LT user interface consists of:
■ An area showing the name of the currently logged in user; DAVE ABBOTT
■ A Refresh icon.
■ A Preferences icon. See Section 5.2.1.
■ A Logout icon.
■ A Help icon. See Section 5.2.2.
Figure 5–1 Student Global Area
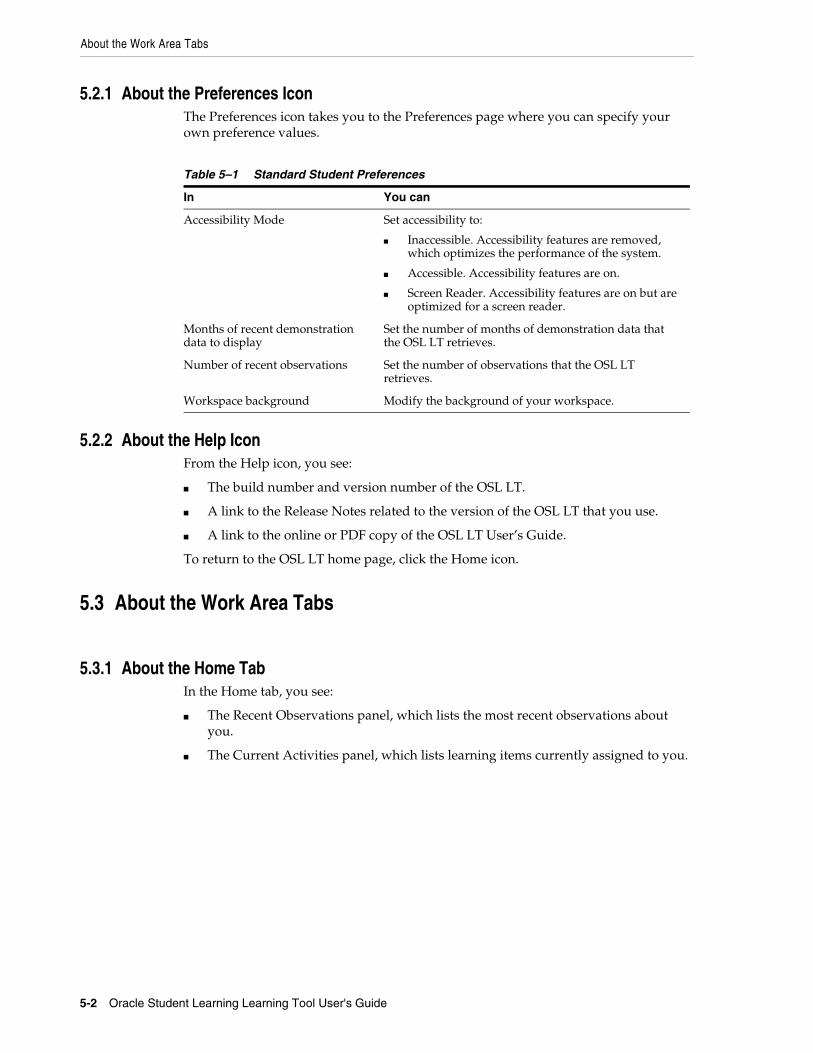
About the Work Area Tabs
5-2 Oracle Student Learning Learning Tool User's Guide
5.2.1 About the Preferences IconThe Preferences icon takes you to the Preferences page where you can specify your own preference values.
5.2.2 About the Help IconFrom the Help icon, you see:
■ The build number and version number of the OSL LT.
■ A link to the Release Notes related to the version of the OSL LT that you use.
■ A link to the online or PDF copy of the OSL LT User’s Guide.
To return to the OSL LT home page, click the Home icon.
5.3 About the Work Area Tabs
5.3.1 About the Home TabIn the Home tab, you see:
■ The Recent Observations panel, which lists the most recent observations about you.
■ The Current Activities panel, which lists learning items currently assigned to you.
Table 5–1 Standard Student Preferences
In You can
Accessibility Mode Set accessibility to:
■ Inaccessible. Accessibility features are removed, which optimizes the performance of the system.
■ Accessible. Accessibility features are on.
■ Screen Reader. Accessibility features are on but are optimized for a screen reader.
Months of recent demonstration data to display
Set the number of months of demonstration data that the OSL LT retrieves.
Number of recent observations Set the number of observations that the OSL LT retrieves.
Workspace background Modify the background of your workspace.
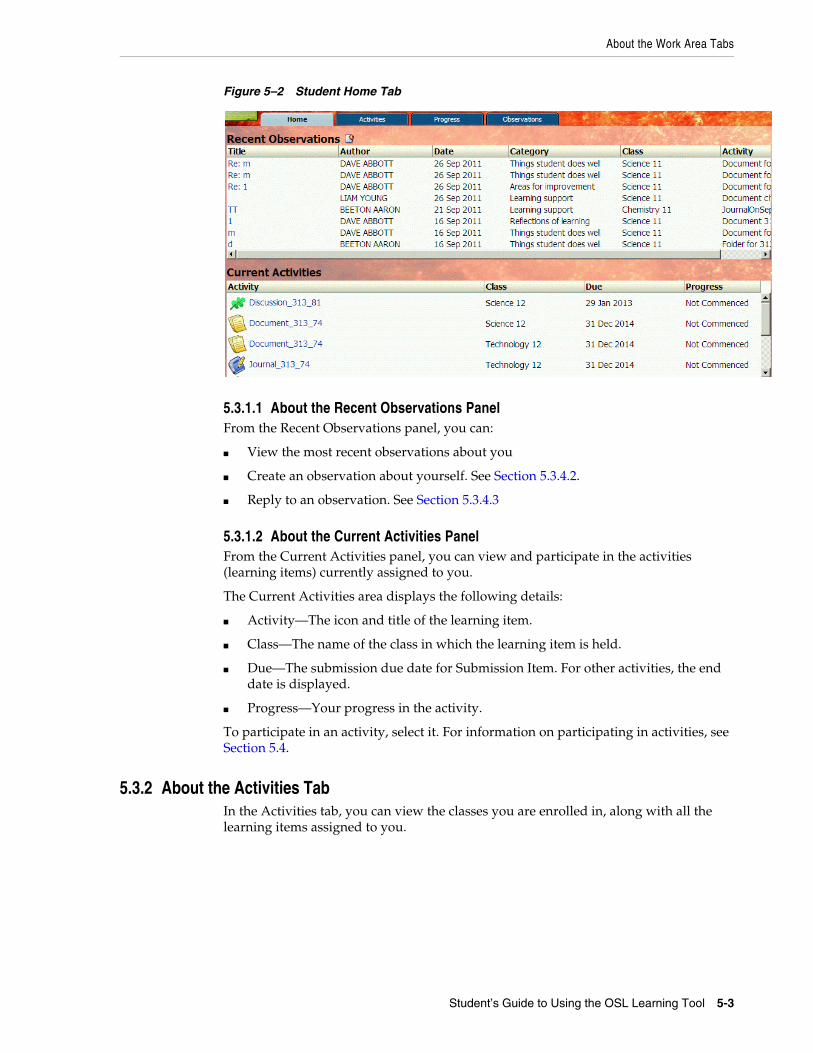
About the Work Area Tabs
Student’s Guide to Using the OSL Learning Tool 5-3
Figure 5–2 Student Home Tab
5.3.1.1 About the Recent Observations PanelFrom the Recent Observations panel, you can:
■ View the most recent observations about you
■ Create an observation about yourself. See Section 5.3.4.2.
■ Reply to an observation. See Section 5.3.4.3
5.3.1.2 About the Current Activities PanelFrom the Current Activities panel, you can view and participate in the activities (learning items) currently assigned to you.
The Current Activities area displays the following details:
■ Activity—The icon and title of the learning item.
■ Class—The name of the class in which the learning item is held.
■ Due—The submission due date for Submission Item. For other activities, the end date is displayed.
■ Progress—Your progress in the activity.
To participate in an activity, select it. For information on participating in activities, see Section 5.4.
5.3.2 About the Activities TabIn the Activities tab, you can view the classes you are enrolled in, along with all the learning items assigned to you.
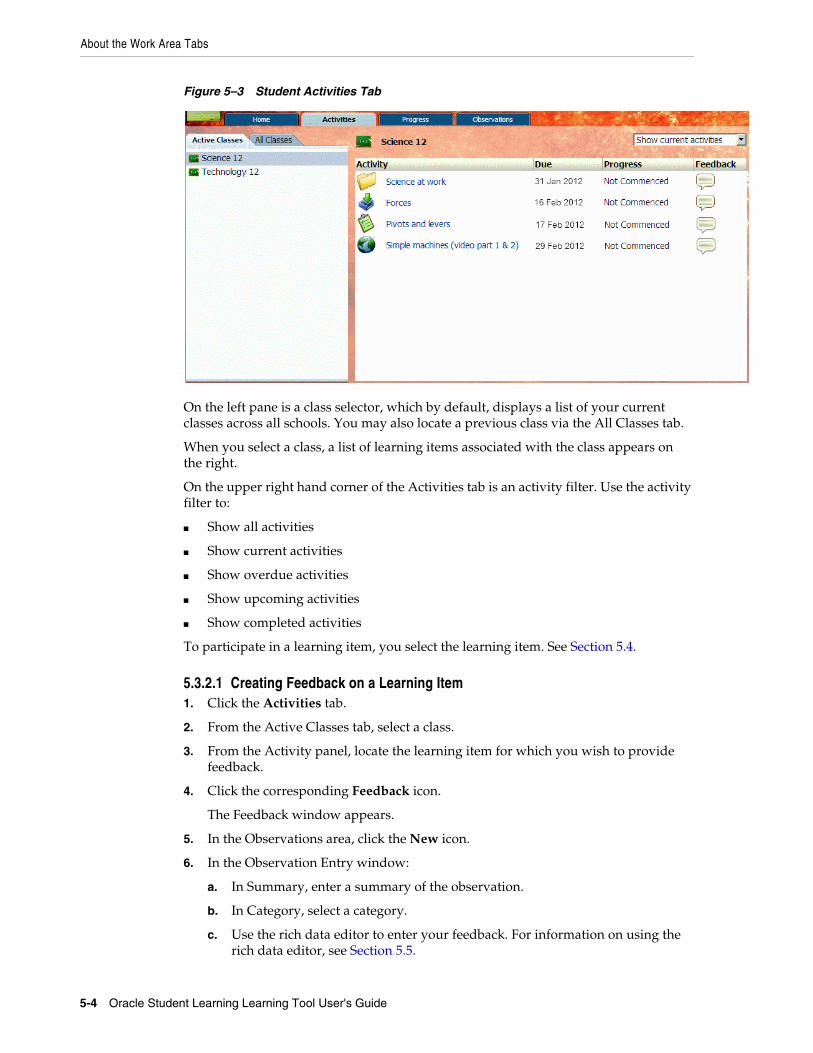
About the Work Area Tabs
5-4 Oracle Student Learning Learning Tool User's Guide
Figure 5–3 Student Activities Tab
On the left pane is a class selector, which by default, displays a list of your current classes across all schools. You may also locate a previous class via the All Classes tab.
When you select a class, a list of learning items associated with the class appears on the right.
On the upper right hand corner of the Activities tab is an activity filter. Use the activity filter to:
■ Show all activities
■ Show current activities
■ Show overdue activities
■ Show upcoming activities
■ Show completed activities
To participate in a learning item, you select the learning item. See Section 5.4.
5.3.2.1 Creating Feedback on a Learning Item1. Click the Activities tab.
2. From the Active Classes tab, select a class.
3. From the Activity panel, locate the learning item for which you wish to provide feedback.
4. Click the corresponding Feedback icon.
The Feedback window appears.
5. In the Observations area, click the New icon.
6. In the Observation Entry window:
a. In Summary, enter a summary of the observation.
b. In Category, select a category.
c. Use the rich data editor to enter your feedback. For information on using the rich data editor, see Section 5.5.
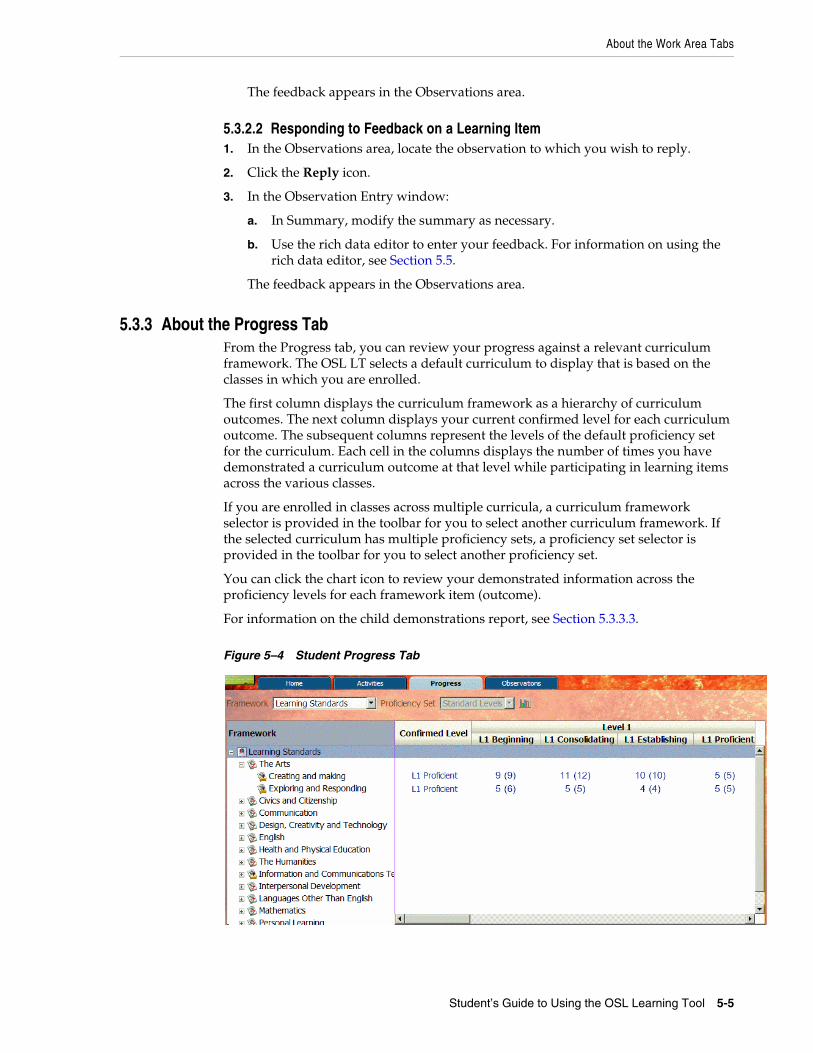
About the Work Area Tabs
Student’s Guide to Using the OSL Learning Tool 5-5
The feedback appears in the Observations area.
5.3.2.2 Responding to Feedback on a Learning Item1. In the Observations area, locate the observation to which you wish to reply.
2. Click the Reply icon.
3. In the Observation Entry window:
a. In Summary, modify the summary as necessary.
b. Use the rich data editor to enter your feedback. For information on using the rich data editor, see Section 5.5.
The feedback appears in the Observations area.
5.3.3 About the Progress TabFrom the Progress tab, you can review your progress against a relevant curriculum framework. The OSL LT selects a default curriculum to display that is based on the classes in which you are enrolled.
The first column displays the curriculum framework as a hierarchy of curriculum outcomes. The next column displays your current confirmed level for each curriculum outcome. The subsequent columns represent the levels of the default proficiency set for the curriculum. Each cell in the columns displays the number of times you have demonstrated a curriculum outcome at that level while participating in learning items across the various classes.
If you are enrolled in classes across multiple curricula, a curriculum framework selector is provided in the toolbar for you to select another curriculum framework. If the selected curriculum has multiple proficiency sets, a proficiency set selector is provided in the toolbar for you to select another proficiency set.
You can click the chart icon to review your demonstrated information across the proficiency levels for each framework item (outcome).
For information on the child demonstrations report, see Section 5.3.3.3.
Figure 5–4 Student Progress Tab
About the Work Area Tabs
5-6 Oracle Student Learning Learning Tool User's Guide
5.3.3.1 Viewing Teacher’s AssessmentTo view the details of proficiencies you have demonstrated:
1. Click the Progress tab.
2. If necessary, from the framework list select a curriculum framework.
3. In the confirmation levels area, click the appropriate cell that displays the demonstration data of the framework item you want to view.
The Demonstration area appears and lists all learning items for which the student has actually demonstrated the outcome at the specified level.
Missed Opportunities lists all learning items for which the student has had the opportunity to demonstrate the outcome at the specified level, but has either not participated in the learning item or has not demonstrated the planned outcome.
4. From the Demonstrations panel, click a learning item.
The Participation and Feedback tabs appear. The Participation tab lists records of your child’s participation in the learning item.
5. Click the Feedback tab.
The teacher’s assessment appears.
5.3.3.2 Viewing Confirmation HistoryThe teacher assesses your proficiency against curriculum outcomes on a periodic basis, typically at the end of a semester. These assessments are called confirmations.
To view the records of your confirmations:
1. Click the Progress tab.
2. If necessary, from the framework list select a curriculum framework.
3. In the Confirmed Level column, select the current confirmed level for the curriculum outcome of interest.
The Confirmation History window appears. This window lists records of confirmations in which your child has attained a particular level of competency for a curriculum outcome.
5.3.3.3 About the Child Demonstrations ReportThe Child Demonstrations Report is a graphical representation of the outcomes you demonstrated, as well as the opportunities you missed demonstrating.
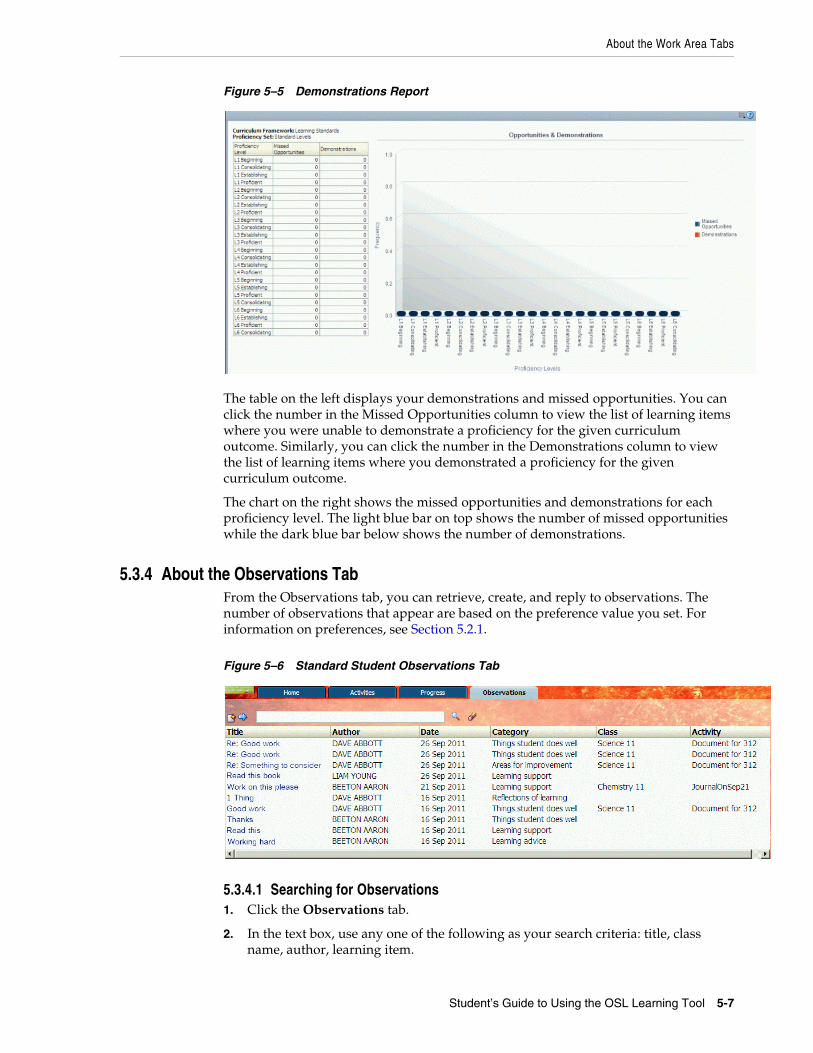
About the Work Area Tabs
Student’s Guide to Using the OSL Learning Tool 5-7
Figure 5–5 Demonstrations Report
The table on the left displays your demonstrations and missed opportunities. You can click the number in the Missed Opportunities column to view the list of learning items where you were unable to demonstrate a proficiency for the given curriculum outcome. Similarly, you can click the number in the Demonstrations column to view the list of learning items where you demonstrated a proficiency for the given curriculum outcome.
The chart on the right shows the missed opportunities and demonstrations for each proficiency level. The light blue bar on top shows the number of missed opportunities while the dark blue bar below shows the number of demonstrations.
5.3.4 About the Observations TabFrom the Observations tab, you can retrieve, create, and reply to observations. The number of observations that appear are based on the preference value you set. For information on preferences, see Section 5.2.1.
Figure 5–6 Standard Student Observations Tab
5.3.4.1 Searching for Observations1. Click the Observations tab.
2. In the text box, use any one of the following as your search criteria: title, class name, author, learning item.
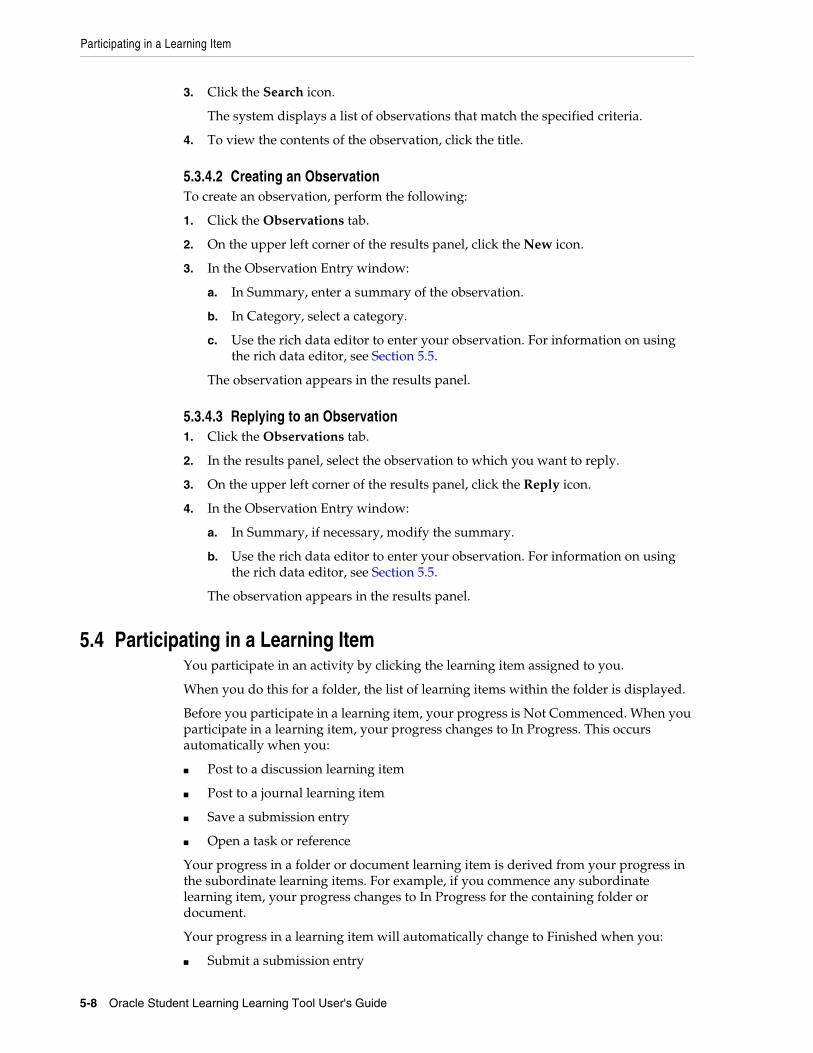
Participating in a Learning Item
5-8 Oracle Student Learning Learning Tool User's Guide
3. Click the Search icon.
The system displays a list of observations that match the specified criteria.
4. To view the contents of the observation, click the title.
5.3.4.2 Creating an ObservationTo create an observation, perform the following:
1. Click the Observations tab.
2. On the upper left corner of the results panel, click the New icon.
3. In the Observation Entry window:
a. In Summary, enter a summary of the observation.
b. In Category, select a category.
c. Use the rich data editor to enter your observation. For information on using the rich data editor, see Section 5.5.
The observation appears in the results panel.
5.3.4.3 Replying to an Observation1. Click the Observations tab.
2. In the results panel, select the observation to which you want to reply.
3. On the upper left corner of the results panel, click the Reply icon.
4. In the Observation Entry window:
a. In Summary, if necessary, modify the summary.
b. Use the rich data editor to enter your observation. For information on using the rich data editor, see Section 5.5.
The observation appears in the results panel.
5.4 Participating in a Learning ItemYou participate in an activity by clicking the learning item assigned to you.
When you do this for a folder, the list of learning items within the folder is displayed.
Before you participate in a learning item, your progress is Not Commenced. When you participate in a learning item, your progress changes to In Progress. This occurs automatically when you:
■ Post to a discussion learning item
■ Post to a journal learning item
■ Save a submission entry
■ Open a task or reference
Your progress in a folder or document learning item is derived from your progress in the subordinate learning items. For example, if you commence any subordinate learning item, your progress changes to In Progress for the containing folder or document.
Your progress in a learning item will automatically change to Finished when you:
■ Submit a submission entry
Participating in a Learning Item
Student’s Guide to Using the OSL Learning Tool 5-9
■ Have commenced any other learning item type and the end date of the learning item is reached
Your progress in a folder or document will only change to Finished if you have finished all subordinate learning items.
You can only participate in a learning item while it is current (that is, between the start and end dates, inclusive). Submission learning items also have due dates. If you have not submitted your submission entry before the due date, it will be automatically indicated as late. A teacher may give you an extension. For a submission, it extends the due date and if the extension date is later than the end date, it also extends the end date. For other learning item types, it extends the end date.
5.4.1 Participating in a Discussion1. Click the title of the discussion.
The details of the discussion, such as the start and end dates and your progress are displayed. Any instructions provided by the teacher are displayed.
A discussion may contain multiple threads. All existing posts in each thread are displayed.
2. To create a new thread, click the Post icon.
3. In the Discussion Post dialog, enter a title for the thread, a type, and the details of the first post in the rich data editor. See Section 5.5.
4. Click OK.
Your new thread is added to the discussion.
5. To reply to an existing post, click the Reply icon.
6. In the Discussion Post dialog, alter the title of the thread and select a different type if desired.
Enter the details of your reply in the rich data editor. See Section 5.5.
7. Click OK.
Your reply post is added to the discussion.
8. To view the students assigned to the discussion, click the View Participants icon.
9. To view the feedback given to you by the teacher in relation to the discussion, click the Feedback icon.
This Feedback page displays any comment, mark, grade, demonstration, or observation recorded by your teacher in relation to your participation in the discussion. To create your own feedback, see Section 5.3.2.2.
10. To leave the discussion and return to the activity list, click the Back icon.
5.4.2 Participating in a Journal1. Click the title of the journal.
The details of the journal, such as the start and end dates and your progress are displayed. Any instructions provided by the teacher are displayed. Any existing journal entries are displayed.
2. To create a new entry:
a. Click the Post icon.

Participating in a Learning Item
5-10 Oracle Student Learning Learning Tool User's Guide
b. In the Journal Entry dialog, enter the details of the journal in the rich data editor. See Section 5.5.
c. Click OK.
Your entry is added to the journal.
3. To edit an existing entry:
a. Click the Edit icon.
b. In the Journal Entry dialog, alter the details of the journal entry in the rich data editor. See Section 5.5.
c. Click OK.
Your entry is saved.
4. To view the students assigned to the journal learning item, click the View Participants icon.
5. To view the feedback given to you by the teacher in relation to your journal, click the Feedback icon.
This Feedback page displays any comment, mark, grade, demonstration, or observation recorded by your teacher in relation to your participation in the journal. To create your own feedback, see Section 5.3.2.2.
6. To leave the journal and return to the activity list, click the Back icon.
5.4.3 Participating in a Submission1. Click the title of the submission.
The details of the submission, such as the start, due, and end dates and your progress are displayed. Any instructions provided by the teacher are displayed. Any existing submission entry is displayed.
2. To create a new entry:
a. Click the New icon.
b. In the Submission Entry dialog, enter the details of the submission in the rich data editor. See Section 5.5.
c. Click OK.
Your submission entry is added.
3. To edit an existing entry:
a. Click the Edit icon.
b. In the Submission Entry dialog, alter the details of the entry in the rich data editor. See Section 5.5.
c. Click OK.
Your changes are saved.
4. To submit the final submission entry to the teacher, click the Submit button.
After this, you cannot edit the entry further. If you need to make alterations, you can request the teacher to reopen your submission.
5. To view the students assigned to the submission learning item, click the View Participants icon.
Participating in a Learning Item
Student’s Guide to Using the OSL Learning Tool 5-11
6. To view the feedback given to you by the teacher in relation to your submission, click the Feedback icon.
This Feedback page displays any comment, mark, grade, demonstration, or observation recorded by your teacher in relation to your participation in the submission. To create your own feedback, see Section 5.3.2.2.
7. To leave the submission and return to the activity list, click the Back icon.
If the teacher has placed you into a submission group, you should work on the submission entry collaboratively with the group members. Only the group leader can edit and submit the submission on behalf of the group in the OSL LT.
The teacher may create, edit or submit a submission entry on your behalf. If you both edit the same submission entry, different versions will be created and you are able to view earlier versions of the submission entry. A new version will also be created if the teacher reopens your submission.
5.4.4 Participating in a Task1. Click the title of the task.
The details of the task, such as the start and end dates and your progress are displayed. Any instructions provided by the teacher are displayed.
2. To view the students assigned to the task, click the View Participants icon.
3. To view the feedback given to you by the teacher in relation to the task, click the Feedback icon.
This Feedback page displays any comment, mark, grade, demonstration, or observation recorded by your teacher in relation to your participation in the task. To create your own feedback, see Section 5.3.2.2.
4. To leave the task and return to the activity list, click the Back icon.
5.4.5 Participating in a Reference1. Click the title of the reference learning item.
The details of the reference, such as the start and end dates and your progress are displayed. Any instructions provided by the teacher are displayed. The referenced Web site is displayed.
2. Participate in the Web site directly.
3. To view the students assigned to the task, click the View Participants icon.
4. To view the feedback given to you by the teacher in relation to the reference learning item, click the Feedback icon.
This Feedback page displays any comment, mark, grade, demonstration, or observation recorded by your teacher in relation to your participation in the referenced Web site. To create your own feedback, see Section 5.3.2.2.
5. To leave the reference learning item and return to the activity list, click the Back icon.
5.4.6 Participating in a Document1. Click the title of the document.
Each of the subordinate learning items are displayed in a single page.
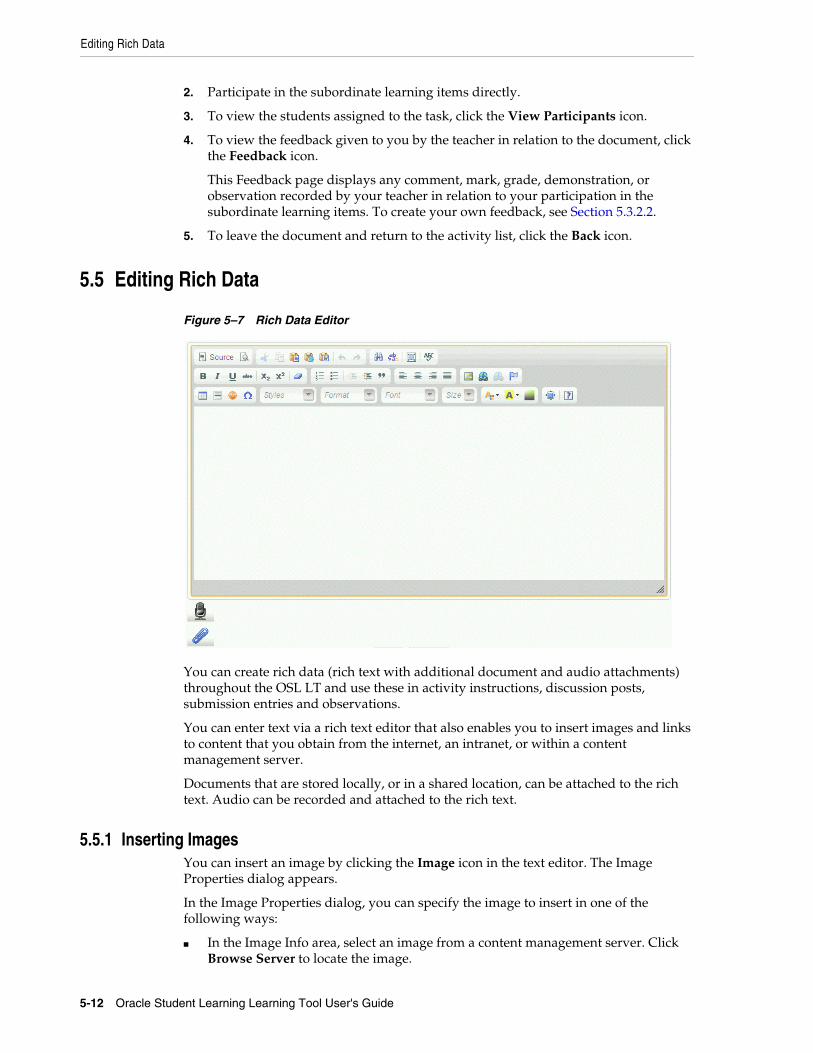
Editing Rich Data
5-12 Oracle Student Learning Learning Tool User's Guide
2. Participate in the subordinate learning items directly.
3. To view the students assigned to the task, click the View Participants icon.
4. To view the feedback given to you by the teacher in relation to the document, click the Feedback icon.
This Feedback page displays any comment, mark, grade, demonstration, or observation recorded by your teacher in relation to your participation in the subordinate learning items. To create your own feedback, see Section 5.3.2.2.
5. To leave the document and return to the activity list, click the Back icon.
5.5 Editing Rich Data
Figure 5–7 Rich Data Editor
You can create rich data (rich text with additional document and audio attachments) throughout the OSL LT and use these in activity instructions, discussion posts, submission entries and observations.
You can enter text via a rich text editor that also enables you to insert images and links to content that you obtain from the internet, an intranet, or within a content management server.
Documents that are stored locally, or in a shared location, can be attached to the rich text. Audio can be recorded and attached to the rich text.
5.5.1 Inserting ImagesYou can insert an image by clicking the Image icon in the text editor. The Image Properties dialog appears.
In the Image Properties dialog, you can specify the image to insert in one of the following ways:
■ In the Image Info area, select an image from a content management server. Click Browse Server to locate the image.
Editing Rich Data
Student’s Guide to Using the OSL Learning Tool 5-13
■ In the Image Info area, enter the URL to the image.
■ In the Upload area, select an image from your hard disk or a network drive.
Click OK to insert the image in the text area.
5.5.2 Inserting LinksYou can insert an image by clicking the Link icon in the text editor. The Link dialog appears.
In the Link dialog, you can specify the link to insert in one of the following ways:
■ In the Link Info area, select a document from a content management server. Click Browse Server to locate the document to which you wish to link.
■ In the Link Info area, select the link type and enter other required information, such as the URL of the Web site to which you are linking.
■ In the Upload area, select a file from your hard disk or a network drive.
Click OK to insert the link in the text area.
5.5.3 Attaching FilesYou can attach files from your local system by clicking the Attach Files button below the editor. The Attach Files dialog box is displayed, which enables you to select a file from your hard disk or a network drive. The selected file is attached and shown as a hyperlink with the file icon.
You can click the hyperlink to open or save the attached file.
You can also remove the attached file by clicking the Delete File icon.
5.5.4 Recording AudioYou can add audio instructions to complement your text and attachments. This is especially helpful for young students or those with poor reading skills.
To record audio:
1. Click the Record Audio icon in the editor.
2. In the Record Audio dialog, enter a name for the audio file.
3. Click the Start Recording Audio icon, and then speak into your microphone.
Make sure your computer has the necessary hardware to record audio.
4. When you are done recording, click the Stop Recording icon.
5. To exit the Record Audio dialog, click the Close button.
The recorded audio listed below the text area
6. If you want to remove a recording, click the corresponding Delete icon.
Editing Rich Data
5-14 Oracle Student Learning Learning Tool User's Guide
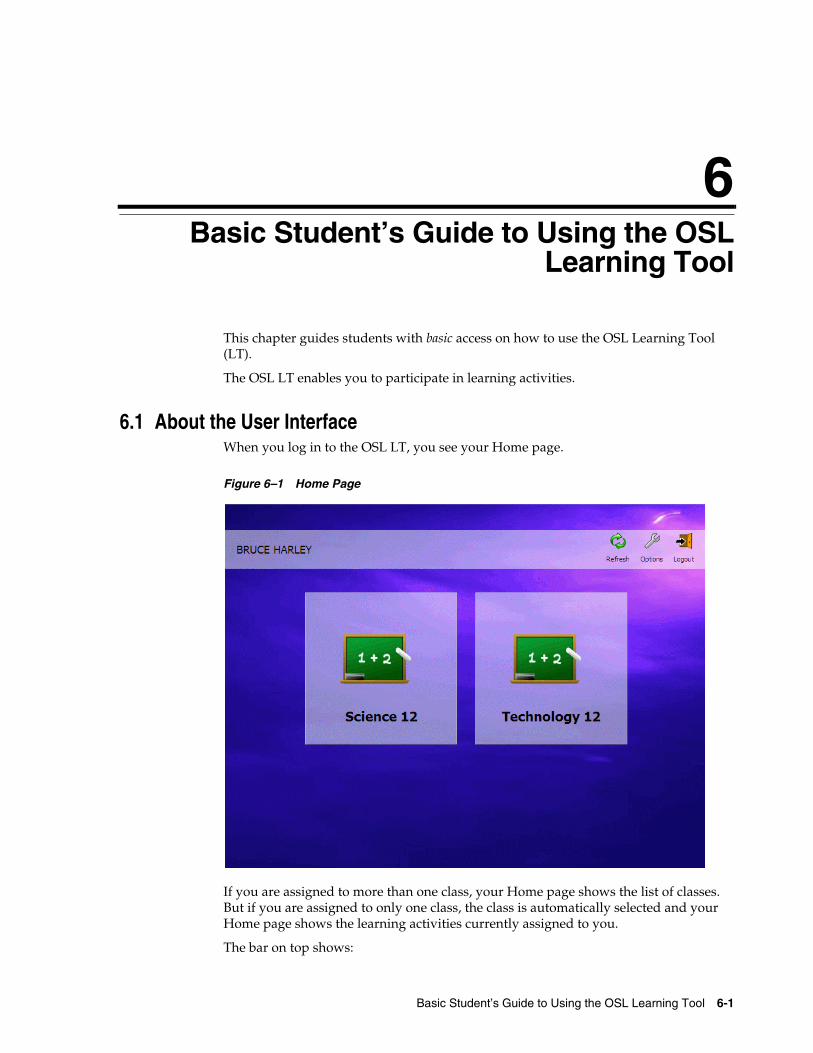
6
Basic Student’s Guide to Using the OSL Learning Tool 6-1
6Basic Student’s Guide to Using the OSLLearning Tool
This chapter guides students with basic access on how to use the OSL Learning Tool (LT).
The OSL LT enables you to participate in learning activities.
6.1 About the User InterfaceWhen you log in to the OSL LT, you see your Home page.
Figure 6–1 Home Page
If you are assigned to more than one class, your Home page shows the list of classes. But if you are assigned to only one class, the class is automatically selected and your Home page shows the learning activities currently assigned to you.
The bar on top shows:
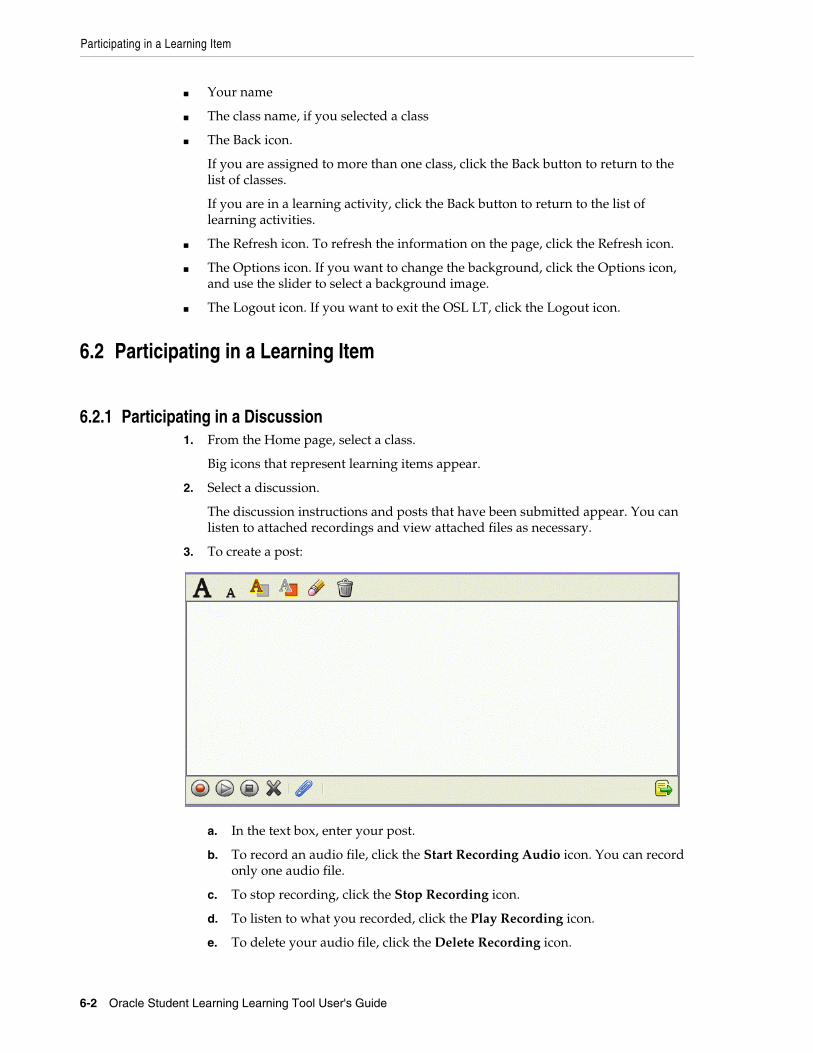
Participating in a Learning Item
6-2 Oracle Student Learning Learning Tool User's Guide
■ Your name
■ The class name, if you selected a class
■ The Back icon.
If you are assigned to more than one class, click the Back button to return to the list of classes.
If you are in a learning activity, click the Back button to return to the list of learning activities.
■ The Refresh icon. To refresh the information on the page, click the Refresh icon.
■ The Options icon. If you want to change the background, click the Options icon, and use the slider to select a background image.
■ The Logout icon. If you want to exit the OSL LT, click the Logout icon.
6.2 Participating in a Learning Item
6.2.1 Participating in a Discussion1. From the Home page, select a class.
Big icons that represent learning items appear.
2. Select a discussion.
The discussion instructions and posts that have been submitted appear. You can listen to attached recordings and view attached files as necessary.
3. To create a post:
a. In the text box, enter your post.
b. To record an audio file, click the Start Recording Audio icon. You can record only one audio file.
c. To stop recording, click the Stop Recording icon.
d. To listen to what you recorded, click the Play Recording icon.
e. To delete your audio file, click the Delete Recording icon.
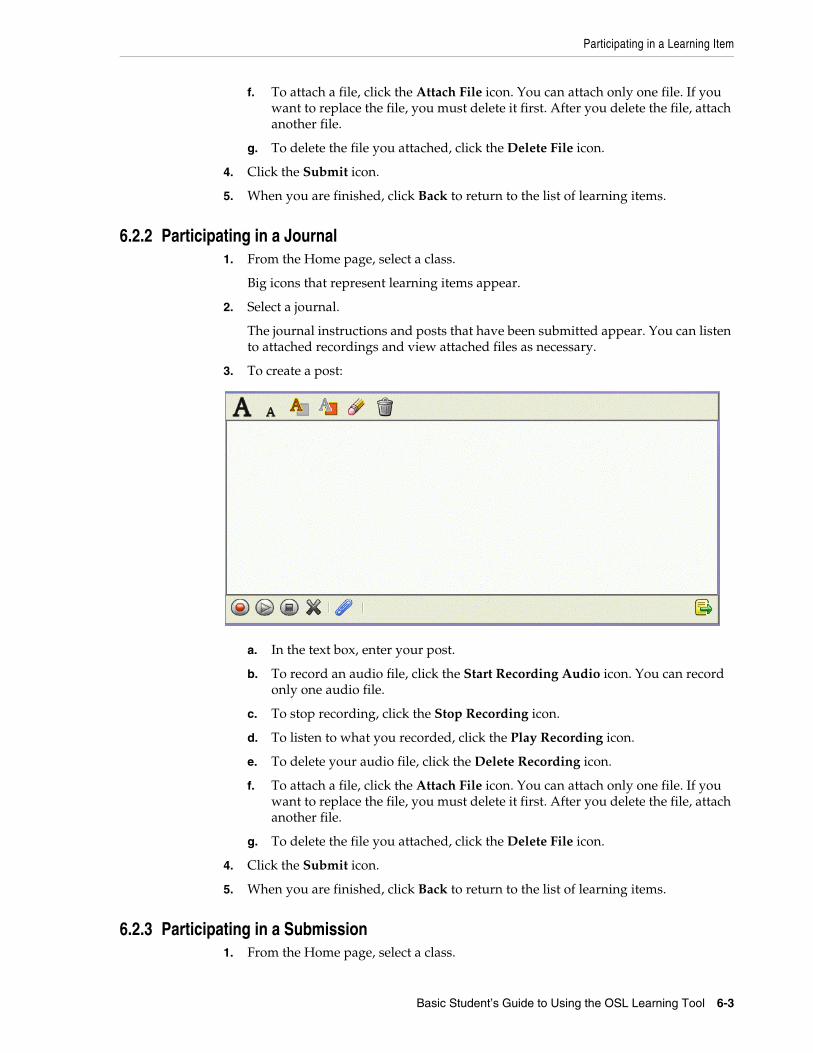
Participating in a Learning Item
Basic Student’s Guide to Using the OSL Learning Tool 6-3
f. To attach a file, click the Attach File icon. You can attach only one file. If you want to replace the file, you must delete it first. After you delete the file, attach another file.
g. To delete the file you attached, click the Delete File icon.
4. Click the Submit icon.
5. When you are finished, click Back to return to the list of learning items.
6.2.2 Participating in a Journal1. From the Home page, select a class.
Big icons that represent learning items appear.
2. Select a journal.
The journal instructions and posts that have been submitted appear. You can listen to attached recordings and view attached files as necessary.
3. To create a post:
a. In the text box, enter your post.
b. To record an audio file, click the Start Recording Audio icon. You can record only one audio file.
c. To stop recording, click the Stop Recording icon.
d. To listen to what you recorded, click the Play Recording icon.
e. To delete your audio file, click the Delete Recording icon.
f. To attach a file, click the Attach File icon. You can attach only one file. If you want to replace the file, you must delete it first. After you delete the file, attach another file.
g. To delete the file you attached, click the Delete File icon.
4. Click the Submit icon.
5. When you are finished, click Back to return to the list of learning items.
6.2.3 Participating in a Submission1. From the Home page, select a class.

Participating in a Learning Item
6-4 Oracle Student Learning Learning Tool User's Guide
Big icons that represent learning items appear.
2. Select a submission.
The submission instructions appear. If you have already submitted your submission, it will be displayed but you cannot edit it. If you have not yet submitted your submission, it will be displayed within the editor for you to continue editing it.
3. To edit your submission:
a. In the text box, enter your text.
b. To record an audio file, click the Start Recording Audio icon. You can record only one audio file.
c. To stop recording, click the Stop Recording icon.
d. To listen to what you recorded, click the Play Recording icon.
e. To delete your audio file, click the Delete Recording icon.
f. To attach a file, click the Attach File icon. You can attach only one file. If you want to replace the file, you must delete it first. After you delete the file, attach another file.
g. To delete the file you attached, click the Delete File icon.
4. If you want to save your work but not submit it, click the Save icon. You can go back to this entry later and edit it as necessary.
5. If you want to submit your work, click the Submit icon. If you want to edit your submission after you have submitted it, request your teacher to reopen the submission.
6. When you are finished, click Back to return to the list of learning items.
6.2.4 Participating in a Task 1. From the Home page, select a class.
Big icons that represent learning items appear.
2. Select a task.
The task instructions appear. You can listen to attached recordings and view attached files as necessary.
Participating in a Learning Item
Basic Student’s Guide to Using the OSL Learning Tool 6-5
3. Follow the instructions to complete the task.
4. When you are finished, click Back to return to the list of learning items.
6.2.5 Participating in a Reference1. From the Home area, select a class.
Big icons that represent learning items appear.
2. Select a reference.
The reference instructions and the referenced web site appear.
3. Follow the instructions by participating in the referenced Web page to complete the learning item.
4. When you are finished, click Back to return to the list of learning items.
Participating in a Learning Item
6-6 Oracle Student Learning Learning Tool User's Guide
Glossary-1
Glossary
Confirmation
An assessment that is made after a semester, or whenever the student has thoroughly demonstrated competency in a given curriculum outcome.
Curriculum Framework
OSL allows for the definition of one or more curriculum frameworks. A curriculum framework defines the learning dimensions, outcomes and standards. Outcome statements are defined at various levels so that students progress against specific curriculum outcomes can be tracked and monitored.
Demonstration
An assessment that is used to indicate an instance where a student has demonstrated a proficiency level in a given curriculum outcome.
Framework Item
A component or learning dimension of a curriculum framework. For example, English is an area of specialization, the relevant framework items are Language, Writing, and Speaking.
Learning Item
A key element within the LT that represents a part of a lesson plan. Teachers construct a hierarchy of learning items to develop a logical sequence of learning activities for their students.
Lesson Plan
A list of learning items created by teachers.
Oracle Student Learning (OSL)
An enterprise teaching and learning product with the aim of improving the learning outcomes of students in Kindergarten to year 12 (K-12) education.
OSL Learning Tool Admin
A browser-based administration application intended for Administrators who manage the students, teachers, curricula, and classes.
OSL Learning Tool (LT)
The primary user interface provided by OSL for teachers, students and parents.
Outcome Statement
A description of the meaning of a proficiency level in terms of a framework item.

Proficiency Levels
Glossary-2
Proficiency Levels
A level of defined proficiency that can be used to assess student's day-to-day learning or overall learning progress.
Proficiency Set
A set of proficiency levels.
Student Reporting
Student Reporting is a component of OSL which is integrated with the LT. It is implemented using the Oracle Business Intelligence Enterprise Edition (OBIEE).


![Building Learning Repository based on Semantic and ... · 3.1 E-Learning and Semantic Web Electronic learning [27] is interactive learning in which the learning content is available](https://img.pdfslide.us/doc/110x75/5fb544511c0d0646e616605c/building-learning-repository-based-on-semantic-and-31-e-learning-and-semantic.jpg)