Embed Size (px)
Citation preview
COMMUNICATIONS
Oracle SBC integration with Cisco
CUCM and Microsoft Teams Enterprise
Model
Technical Application Note
2 | P a g e
Disclaimer
The following is intended to outline our general product direction. It is intended for information purposes only, and may not be
incorporated into any contract. It is not a commitment to deliver any material, code, or functionality, and should not be relied
upon in making purchasing decisions. The development, release, and timing of any features or functionality described for
Oracle’s products remains at the sole discretion of Oracle.
Revision History
Version Description of Changes Date Revision Completed
1.0 Oracle SBC integration with
Cisco CUCM and Microsoft
Teams Enterprise Model
21st February 2020
3 | P a g e
Table of Contents
1. INTENDED AUDIENCE ................................................................................................................................................. 5
2. DOCUMENT OVERVIEW .............................................................................................................................................. 5
3. INTRODUCTION ............................................................................................................................................................ 7 3.1. AUDIENCE ..................................................................................................................................................................................... 7 3.2. REQUIREMENTS ........................................................................................................................................................................... 7 3.3. ARCHITECTURE ........................................................................................................................................................................... 8
4. CONFIGURING THE CISCO CUCM ............................................................................................................................. 9 4.1. CONFIGURING A NEW SIP TRUNK ............................................................................................................................................ 9 4.2. CONFIGURE A NEW ROUTE PATTERN ................................................................................................................................... 11
5. REQUIREMENTS TO CONFIGURE MICROSOFT TEAMS DIRECT ROUTING ............................................. 14 5.1. TENANT REQUIREMENTS ....................................................................................................................................................... 14 5.2. LICENSING REQUIREMENTS ................................................................................................................................................... 14 5.3. DNS REQUIREMENTS .............................................................................................................................................................. 14 5.4. SBC DOMAIN NAMES .............................................................................................................................................................. 14 5.5. PUBLIC TRUSTED CERTIFICATE FOR THE SBC..................................................................................................................... 16
6. CONFIGURE TEAMS DIRECT ROUTING .............................................................................................................. 17 6.1. ESTABLISH A REMOTE POWERSHELL SESSION ................................................................................................................... 17 6.2. PAIR THE SBC TO THE TENANT ............................................................................................................................................. 18 6.3. ENABLE USERS FOR DIRECT ROUTING. ................................................................................................................................ 20 6.4. ASSIGN A PHONE NUMBER TO THE USER ............................................................................................................................. 21 6.5. CONFIGURE VOICE ROUTING .................................................................................................................................................. 21
7. MICROSOFT TEAMS DIRECT ROUTING INTERFACE CHARACTERISTICS ............................................... 23
8. CONFIGURING THE SBC ........................................................................................................................................... 25 8.1. VALIDATED ORACLE SBC VERSION ...................................................................................................................................... 25
9. NEW SBC CONFIGURATION .................................................................................................................................... 25 9.1. ESTABLISHING A SERIAL CONNECTION TO THE SBC .......................................................................................................... 25 9.2. CONFIGURE SBC USING WEB GUI ........................................................................................................................................ 30 9.3. CONFIGURE SYSTEM-CONFIG .................................................................................................................................................. 32 9.4. CONFIGURE PHYSICAL INTERFACE VALUES ......................................................................................................................... 33 9.5. CONFIGURE NETWORK INTERFACE VALUES ........................................................................................................................ 34 9.6. ENABLE MEDIA MANAGER ...................................................................................................................................................... 37 9.7. CONFIGURE REALMS................................................................................................................................................................ 38 9.8. ENABLE SIP-CONFIG................................................................................................................................................................. 39 9.9. CONFIGURING A CERTIFICATE FOR SBC ............................................................................................................................... 40 9.10. TLS-PROFILE ......................................................................................................................................................................... 44 9.11. CONFIGURE SIP INTERFACES. ............................................................................................................................................. 45 9.12. CONFIGURE SESSION-AGENT ............................................................................................................................................... 46 9.13. CONFIGURE SESSION-AGENT GROUP .................................................................................................................................. 50 9.14. CONFIGURE LOCAL-POLICY .................................................................................................................................................. 51 9.15. CONFIGURE MEDIA PROFILE AND CODEC POLICY ........................................................................................................... 53 9.16. CONFIGURE STEERING-POOL ............................................................................................................................................... 56 9.17. CONFIGURE SDES PROFILE ................................................................................................................................................... 57 9.18. CONFIGURE MEDIA SECURITY PROFILE ............................................................................................................................ 58 9.19. CONFIGURE RTCP POLICY AND RTCP MUX .................................................................................................................... 59

4 | P a g e
10. EXISTING SBC CONFIGURATION ........................................................................................................................ 61
APPENDIX A ..................................................................................................................................................................... 62

5 | P a g e
1. Intended Audience
This document is intended for use by Oracle Systems Engineers, third party Systems Integrators, Oracle Enterprise customers and partners and end users of the Oracle Enterprise Session Border Controller (SBC). It is assumed that the reader is familiar with basic operations of the Oracle Enterprise Session Border Controller platform along with Microsoft Teams Direct Routing Enterprise Model and Cisco CUCM.
2. Document Overview
This Oracle technical application note outlines the configuration needed to set up the interworking between on premises Cisco CUCM and Microsoft's Teams Enterprise Model(Cloud based) using Oracle SBC. The solution contained within this document has been tested using Oracle Communication OS 830m1p2 version. Our scope of this document is only limited to testing Teams Enterprise Model with Cisco CUCM. Microsoft Teams Direct Routing lets you connect a supported, customer-provided Session Border Controller (SBC) to Microsoft Phone System. With Direct Routing, you can connect your SBC to almost any telephony trunk or interconnect with third-party Public Switched Telephone Network (PSTN) equipment. Direct Routing enables you to:
Use virtually any PSTN trunk with Microsoft Phone System.
Configure interoperability between customer-owned telephony equipment, such as a third-party
private branch exchange (PBX), analog devices, and Microsoft Phone System.
Microsoft Teams works on two different methods which is given below:
1) Media bypass
Media bypass shortens the path of media traffic and reduces the number of hops in transit
for better performance. With media bypass, media is kept between the Session Border
Controller (SBC) and the client instead of sending it via the Microsoft Phone System.
For more information on media bypass, please read the links given below.
https://docs.microsoft.com/en-us/microsoftteams/direct-routing-plan-media-bypass
https://www.oracle.com/webfolder/technetwork/acmepacket/Microsoft/SBC-MSFTTeams-
MB.pdf
2) Non-media bypass
Without media bypass, when a client makes or receives a call, both signaling and media flow between the SBC, the Microsoft Phone System, and the Teams client.
For more information on media bypass, please read the links given below.
https://www.oracle.com/webfolder/technetwork/acmepacket/Microsoft/SBC-MSFTTeams-
NONMB.pdf
6 | P a g e
Cisco Unified Call Manager provides industry-leading reliability, security, scalability, efficiency, and enterprise call and session management and is the core call control application of the collaboration portfolio. It should be noted that while this application note focuses on the optimal configurations for the Oracle SBC in an enterprise Cisco CUCM 11.5 environment, the same SBC configuration model can also be used for other enterprise applications with a few tweaks to the configuration for required features. In addition, it should be noted that the SBC configuration provided in this guide focuses strictly on the Cisco CUCM Server associated parameters. Many SBC applications may have additional configuration requirements that are specific to individual customer requirements. These configuration items are not covered in this guide. Please contact your Oracle representative with any questions pertaining to this topic.
Please note that the IP address, FQDN and config name and its details given in this document is used as reference purpose only. The same details cannot be used in customer config and the end users can use the configuration details according to their network requirements.
For additional information on CUCM 11.5, please visit https://www.cisco.com/c/en/us/products/unified-communications/unified-communications-manager-version-11-5/index.html

7 | P a g e
3. Introduction
3.1. Audience
This is a technical document intended for telecommunications engineers with the purpose of configuring Teams Direct Routing Enterprise Model with Cisco CUCM 11.5 version using Oracle Enterprise SBC. There will be steps that require navigating the CUCM 11.5 server configuration, Oracle SBC GUI interface, understanding the basic concepts of TCP/UDP, IP/Routing, DNS server and SIP/RTP are also necessary to complete the configuration and for troubleshooting, if necessary.
3.2. Requirements
Fully functioning Cisco UCM 11.5
Oracle Enterprise Session Border Controller (hereafter Oracle SBC) running 8.3.0 version
Teams Direct Routing Enterprise Model running Teams Client.
The below revision table explains the versions of the software used for each component: This table is Revision 1 as of now:
Software Used CUCM Version SBC Version Teams Client version
Revision 1 11.5 8.3.0 1.3.00.362 (64-bit) (Windows) v.2020.1.14.4 i.USWE2.2 (Mobile)
8 | P a g e
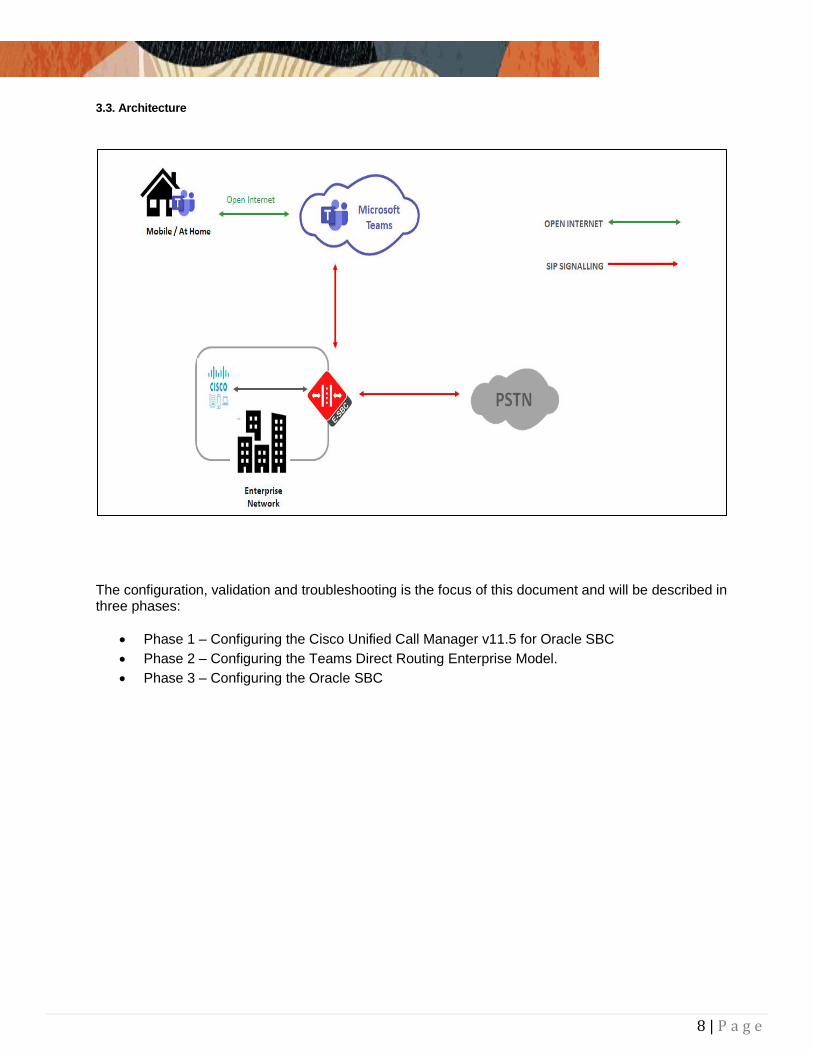
3.3. Architecture
The configuration, validation and troubleshooting is the focus of this document and will be described in three phases:
Phase 1 – Configuring the Cisco Unified Call Manager v11.5 for Oracle SBC
Phase 2 – Configuring the Teams Direct Routing Enterprise Model.
Phase 3 – Configuring the Oracle SBC
9 | P a g e
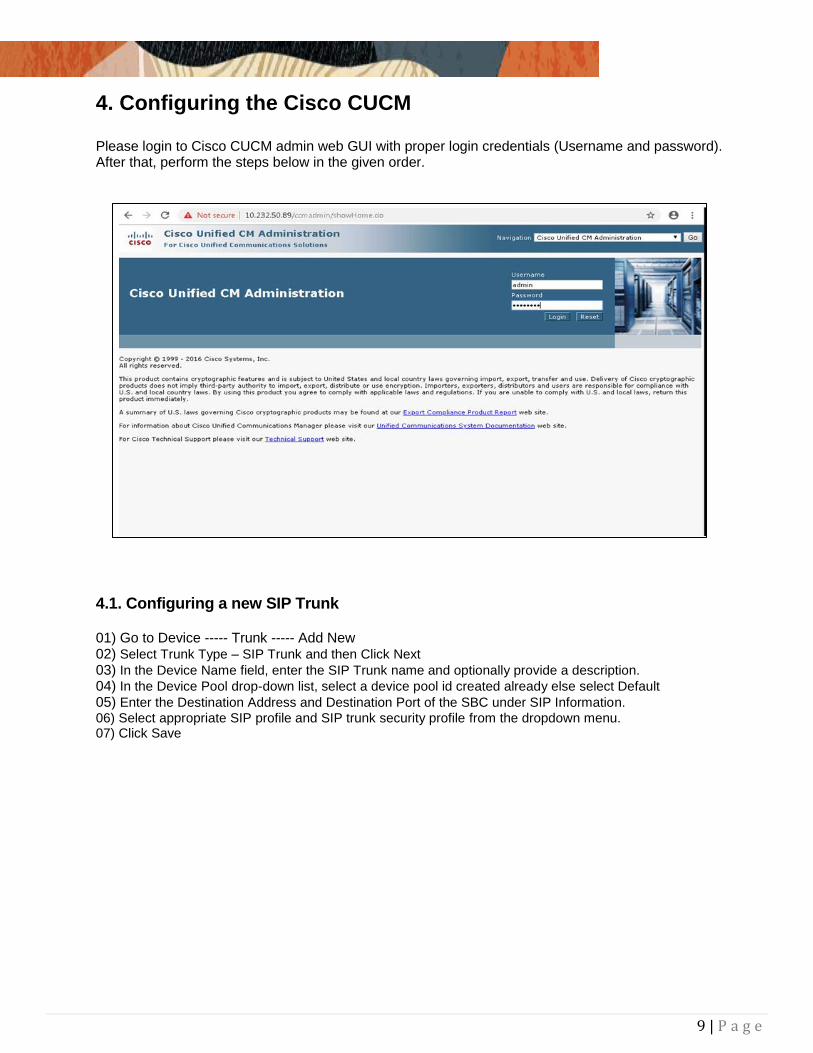
4. Configuring the Cisco CUCM Please login to Cisco CUCM admin web GUI with proper login credentials (Username and password). After that, perform the steps below in the given order.
4.1. Configuring a new SIP Trunk
01) Go to Device ----- Trunk ----- Add New 02) Select Trunk Type – SIP Trunk and then Click Next 03) In the Device Name field, enter the SIP Trunk name and optionally provide a description. 04) In the Device Pool drop-down list, select a device pool id created already else select Default 05) Enter the Destination Address and Destination Port of the SBC under SIP Information.
06) Select appropriate SIP profile and SIP trunk security profile from the dropdown menu. 07) Click Save

10 | P a g e
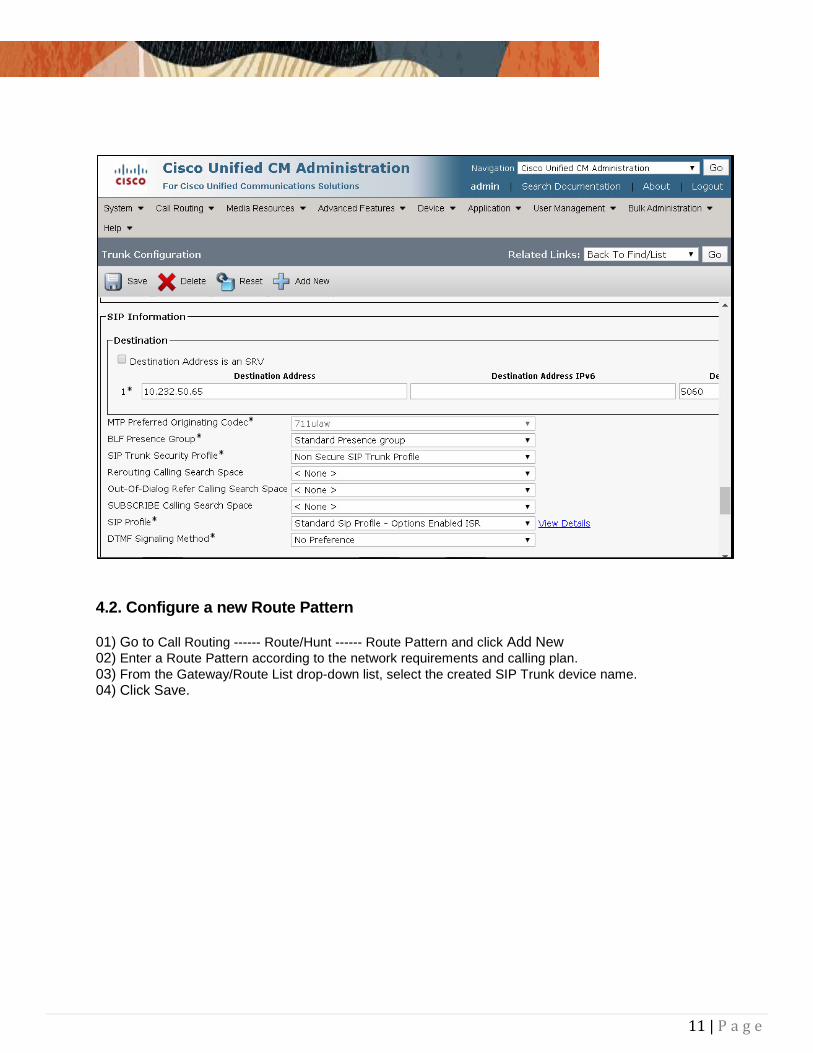
11 | P a g e
4.2. Configure a new Route Pattern
01) Go to Call Routing ------ Route/Hunt ------ Route Pattern and click Add New 02) Enter a Route Pattern according to the network requirements and calling plan. 03) From the Gateway/Route List drop-down list, select the created SIP Trunk device name. 04) Click Save.
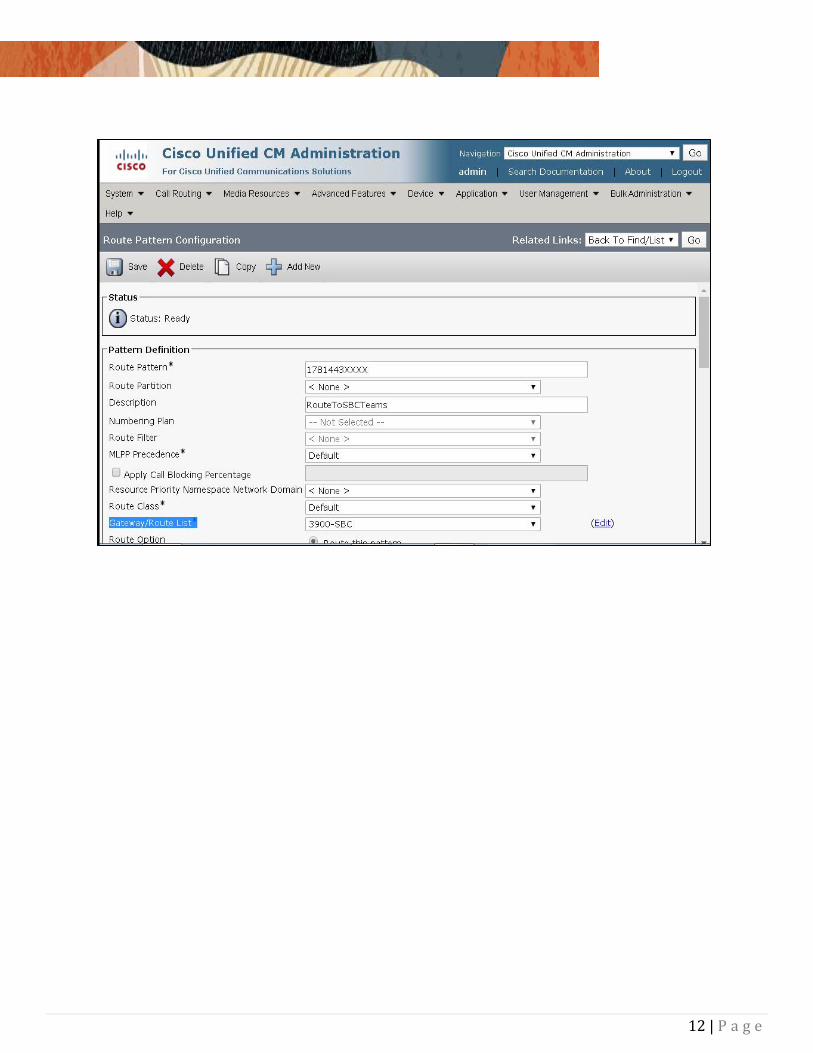
12 | P a g e
13 | P a g e
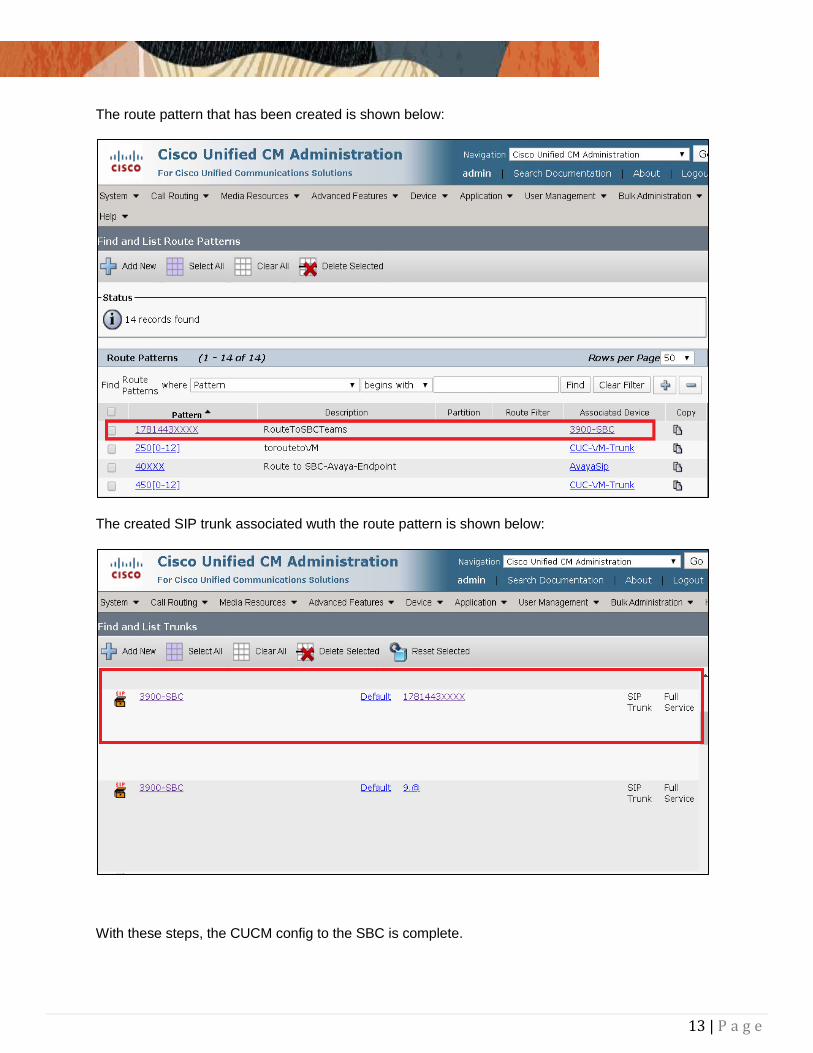
The route pattern that has been created is shown below:
The created SIP trunk associated wuth the route pattern is shown below:
With these steps, the CUCM config to the SBC is complete.
14 | P a g e
5. Requirements to Configure Microsoft Teams Direct Routing
If you are planning to configure direct routing with Oracle SBC, you must ensure that the following prerequisites are completed before proceeding further
Tenant requirements
Licensing and other requirements
SBC domain names
Public trusted certificate for the SBC
SIP Signaling: FQDNs
5.1. Tenant Requirements
Make sure that you have a custom domain on your O365 tenant. Here we have created an account [email protected]. Likewise create an account, which is not the default domain created for your tenant. For more information
https://docs.microsoft.com/en-us/microsoftteams/direct-routing-plan#sbc-domain-names
5.2. Licensing Requirements
Make sure that the following license requirements are met by the Direct routing users.(ie the users must be assigned the following licenses in Office 365)
Microsoft Phone System
Microsoft Teams + Skype for Business Plan 2 if included in Licensing SKU
5.3. DNS Requirements
Create DNS records for domains in your network that resolve to your SBC. Before you begin, make sure that you have the following per every SBC you want to pair: - Public IP address - FQDN name resolving to the Public IP address
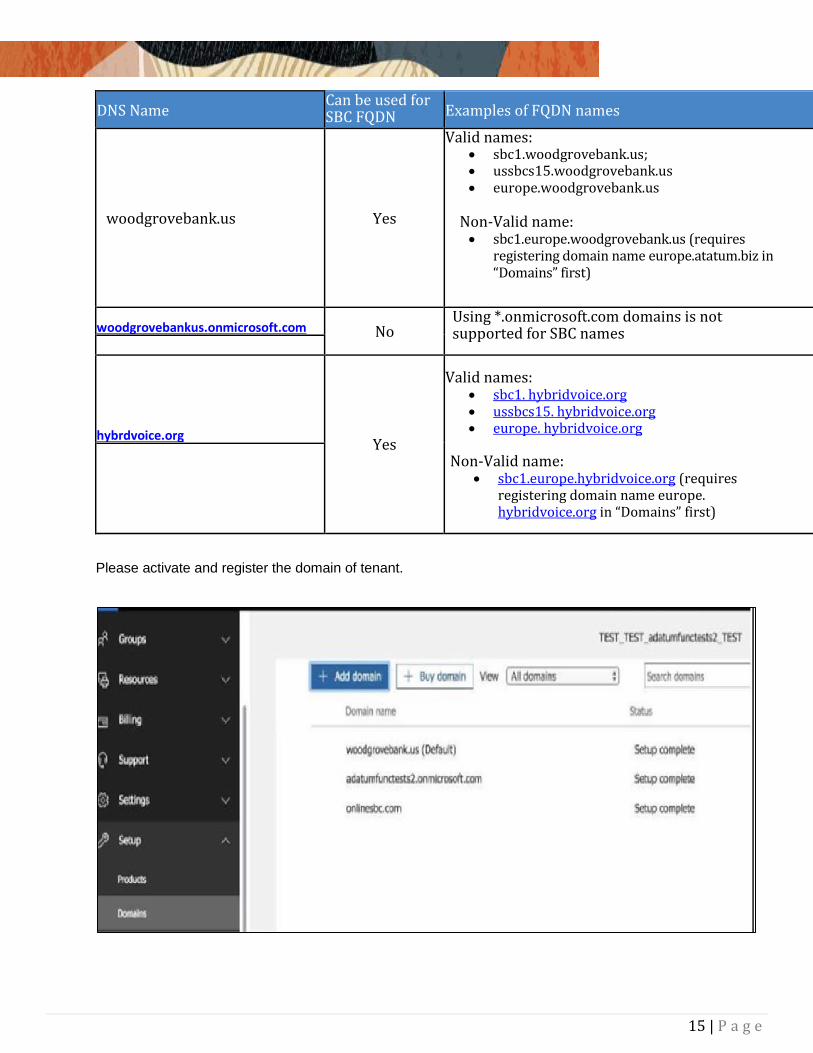
5.4. SBC Domain Names
The SBC domain name must be from one of the names registered in “Domains” of the tenant. You cannot use the *.onmicrosoft.com tenant for the domain name. For example, on the picture below, the administrator registered the following DNS names for the tenant:
15 | P a g e
DNS Name Can be used for SBC FQDN Examples of FQDN names
woodgrovebank.us Yes
Valid names: sbc1.woodgrovebank.us; ussbcs15.woodgrovebank.us europe.woodgrovebank.us
Non-Valid name: sbc1.europe.woodgrovebank.us (requires
registering domain name europe.atatum.biz in “Domains” first)
woodgrovebankus.onmicrosoft.com No Using *.onmicrosoft.com domains is not supported for SBC names
hybrdvoice.org Yes
Valid names: sbc1. hybridvoice.org ussbcs15. hybridvoice.org europe. hybridvoice.org
Non-Valid name:
sbc1.europe.hybridvoice.org (requires registering domain name europe. hybridvoice.org in “Domains” first)
Please activate and register the domain of tenant.
16 | P a g e
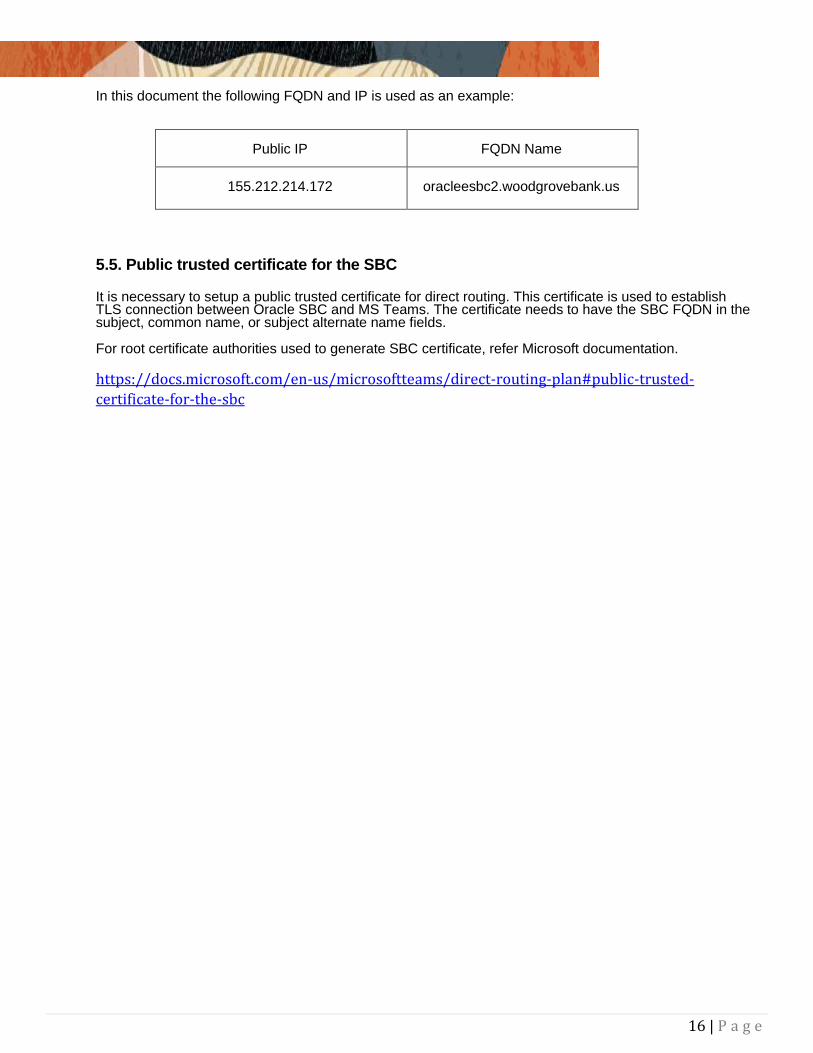
In this document the following FQDN and IP is used as an example:
Public IP
FQDN Name
155.212.214.172
oracleesbc2.woodgrovebank.us
5.5. Public trusted certificate for the SBC
It is necessary to setup a public trusted certificate for direct routing. This certificate is used to establish TLS connection between Oracle SBC and MS Teams. The certificate needs to have the SBC FQDN in the subject, common name, or subject alternate name fields. For root certificate authorities used to generate SBC certificate, refer Microsoft documentation. https://docs.microsoft.com/en-us/microsoftteams/direct-routing-plan#public-trusted-
certificate-for-the-sbc
17 | P a g e
6. Configure Teams Direct Routing
The SBC has to be paired with the direct routing interface for direct routing to work. To achieve this follow the below steps
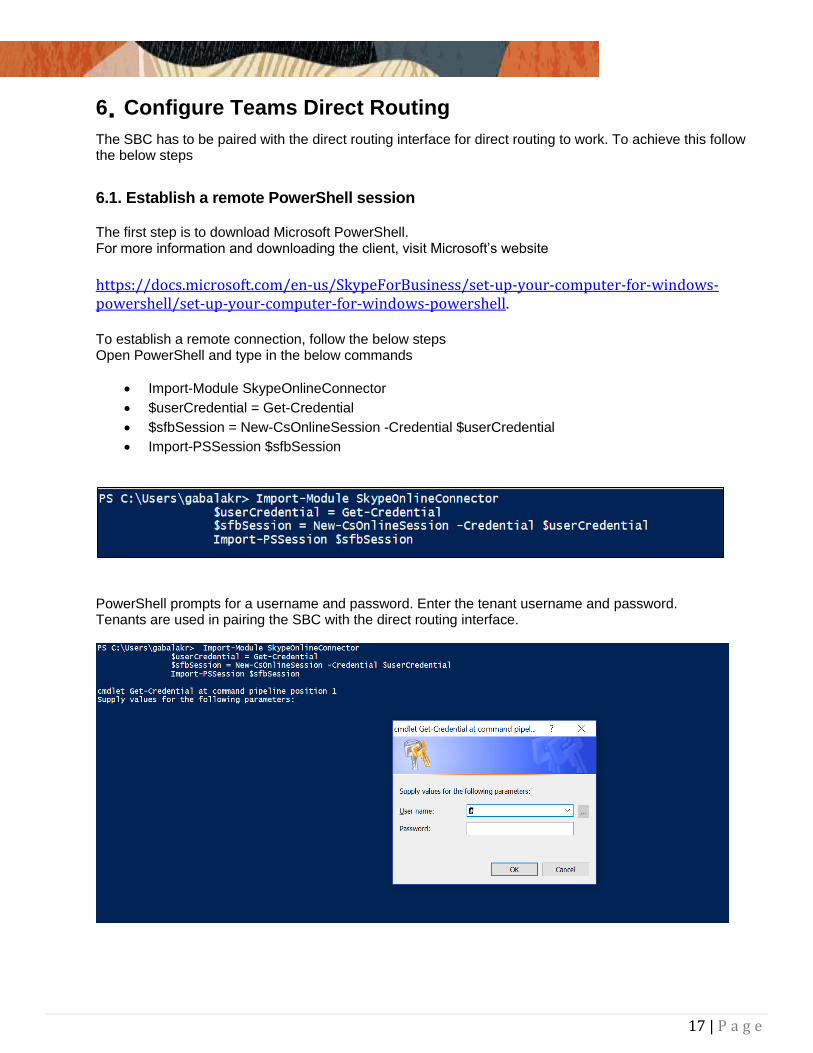
6.1. Establish a remote PowerShell session
The first step is to download Microsoft PowerShell. For more information and downloading the client, visit Microsoft’s website
https://docs.microsoft.com/en-us/SkypeForBusiness/set-up-your-computer-for-windows-powershell/set-up-your-computer-for-windows-powershell. To establish a remote connection, follow the below steps Open PowerShell and type in the below commands
Import-Module SkypeOnlineConnector
$userCredential = Get-Credential
$sfbSession = New-CsOnlineSession -Credential $userCredential
Import-PSSession $sfbSession
PowerShell prompts for a username and password. Enter the tenant username and password. Tenants are used in pairing the SBC with the direct routing interface.
18 | P a g e
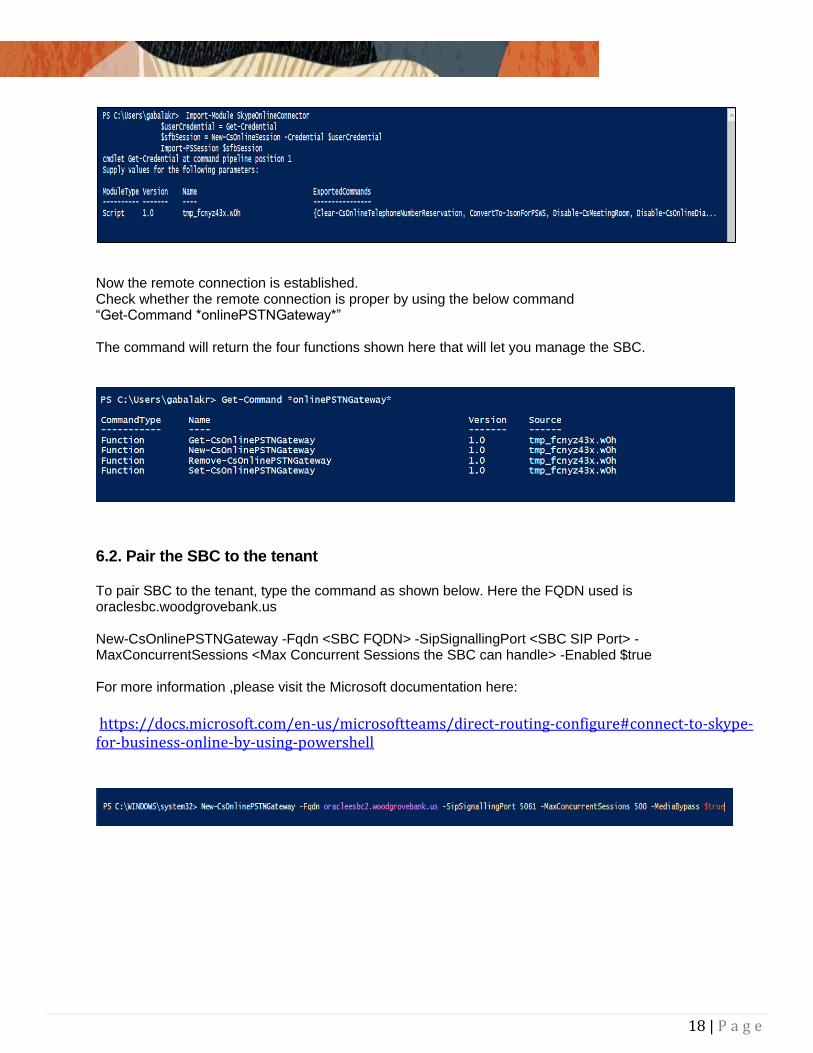
Now the remote connection is established. Check whether the remote connection is proper by using the below command “Get-Command *onlinePSTNGateway*” The command will return the four functions shown here that will let you manage the SBC.
6.2. Pair the SBC to the tenant
To pair SBC to the tenant, type the command as shown below. Here the FQDN used is oraclesbc.woodgrovebank.us New-CsOnlinePSTNGateway -Fqdn <SBC FQDN> -SipSignallingPort <SBC SIP Port> -MaxConcurrentSessions <Max Concurrent Sessions the SBC can handle> -Enabled $true For more information ,please visit the Microsoft documentation here:
https://docs.microsoft.com/en-us/microsoftteams/direct-routing-configure#connect-to-skype-for-business-online-by-using-powershell
19 | P a g e
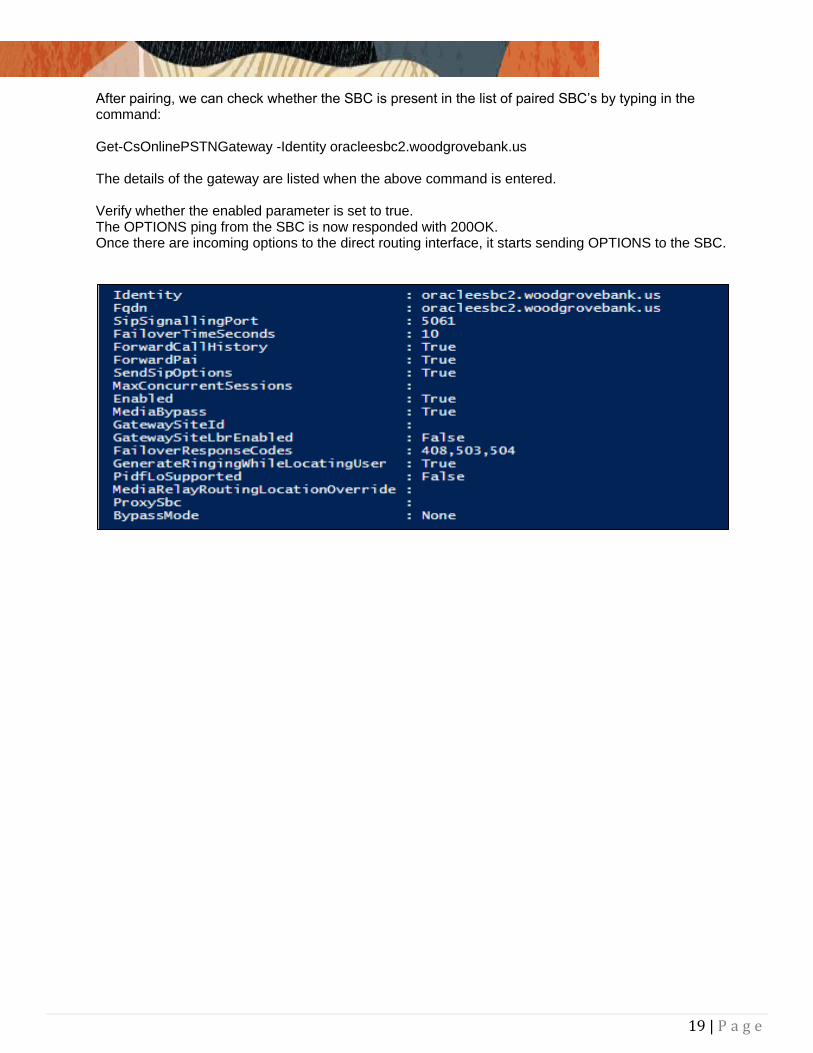
After pairing, we can check whether the SBC is present in the list of paired SBC’s by typing in the command: Get-CsOnlinePSTNGateway -Identity oracleesbc2.woodgrovebank.us The details of the gateway are listed when the above command is entered. Verify whether the enabled parameter is set to true. The OPTIONS ping from the SBC is now responded with 200OK. Once there are incoming options to the direct routing interface, it starts sending OPTIONS to the SBC.
20 | P a g e
6.3. Enable Users for Direct Routing.
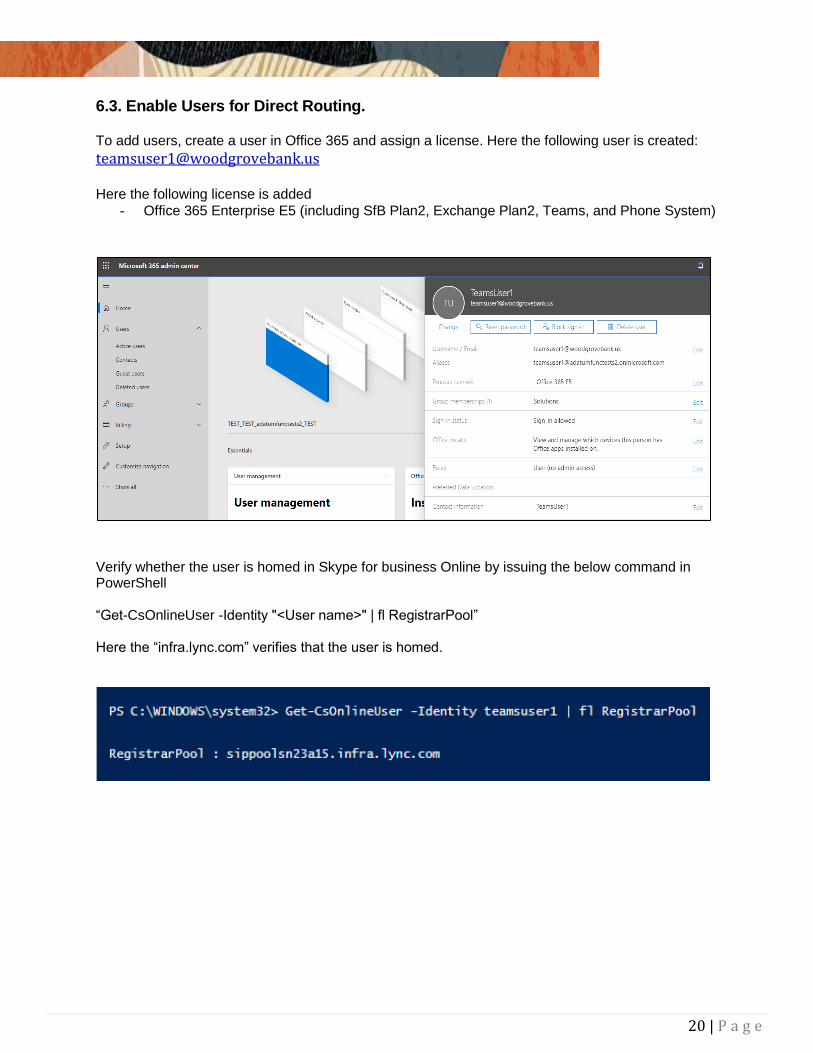
To add users, create a user in Office 365 and assign a license. Here the following user is created:
[email protected] Here the following license is added
- Office 365 Enterprise E5 (including SfB Plan2, Exchange Plan2, Teams, and Phone System)
Verify whether the user is homed in Skype for business Online by issuing the below command in PowerShell “Get-CsOnlineUser -Identity "<User name>" | fl RegistrarPool” Here the “infra.lync.com” verifies that the user is homed.
21 | P a g e
6.4. Assign a phone number to the User
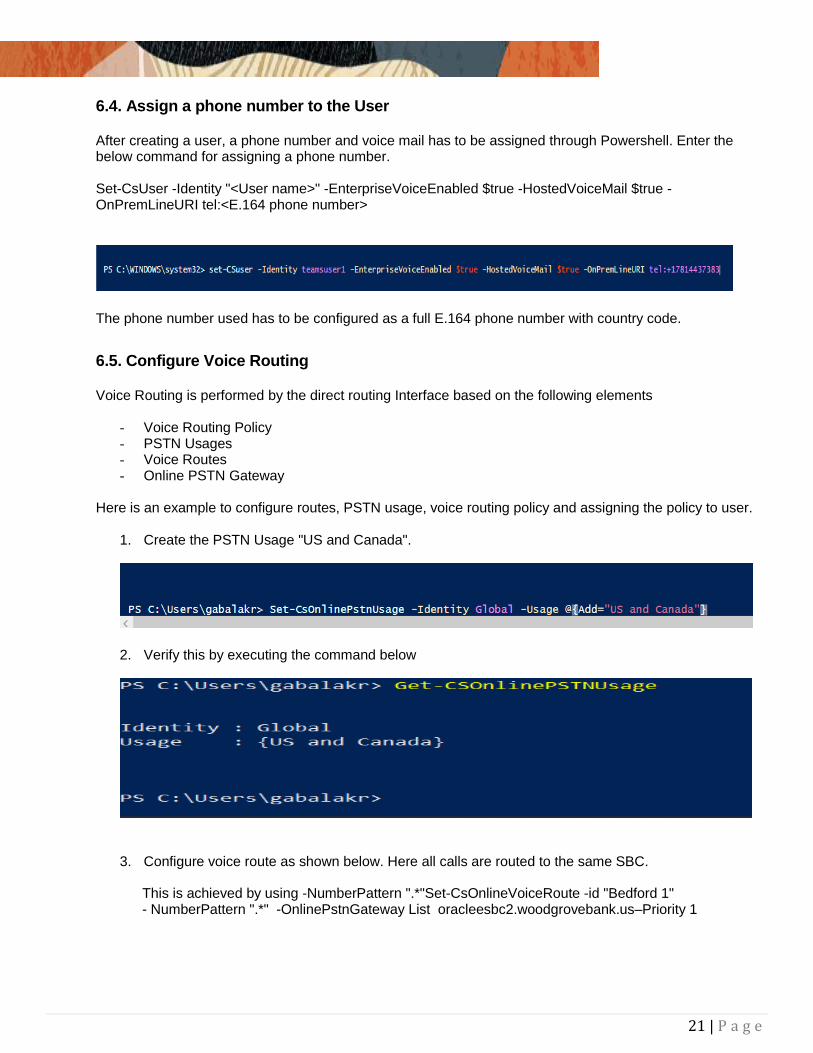
After creating a user, a phone number and voice mail has to be assigned through Powershell. Enter the below command for assigning a phone number. Set-CsUser -Identity "<User name>" -EnterpriseVoiceEnabled $true -HostedVoiceMail $true -OnPremLineURI tel:<E.164 phone number>
The phone number used has to be configured as a full E.164 phone number with country code.
6.5. Configure Voice Routing
Voice Routing is performed by the direct routing Interface based on the following elements
- Voice Routing Policy - PSTN Usages - Voice Routes - Online PSTN Gateway
Here is an example to configure routes, PSTN usage, voice routing policy and assigning the policy to user.
1. Create the PSTN Usage "US and Canada".
2. Verify this by executing the command below
3. Configure voice route as shown below. Here all calls are routed to the same SBC.
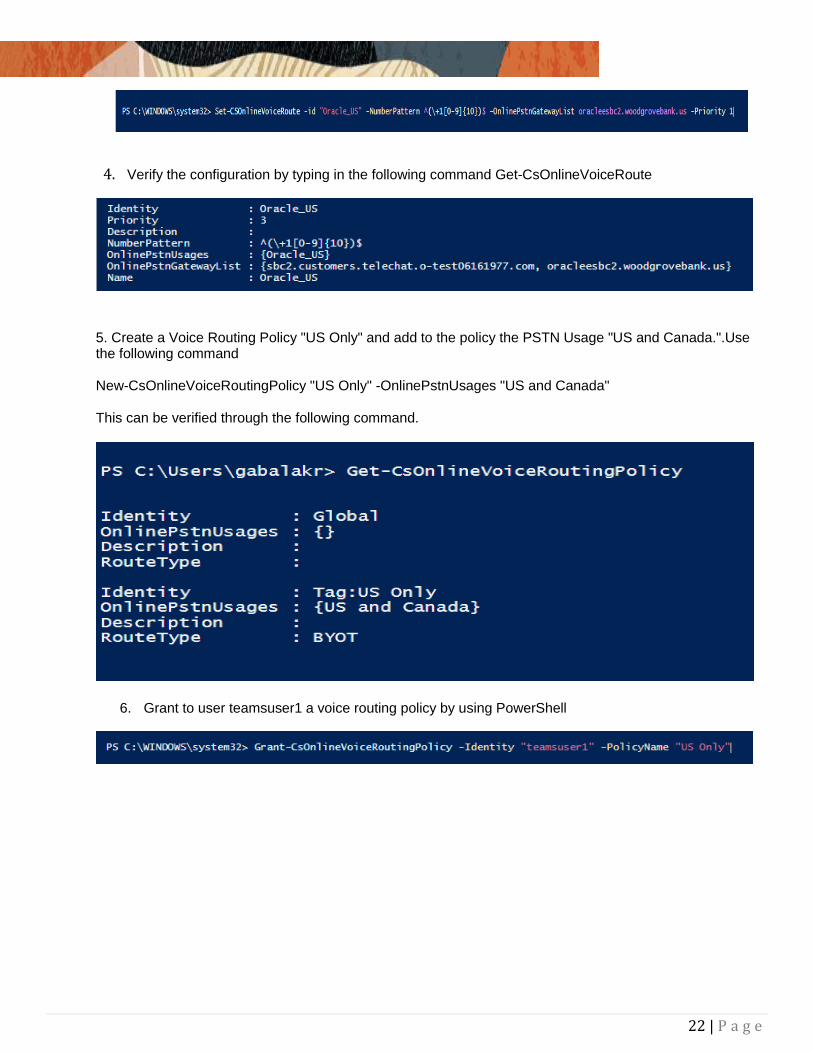
This is achieved by using -NumberPattern ".*"Set-CsOnlineVoiceRoute -id "Bedford 1" - NumberPattern ".*" -OnlinePstnGateway List oracleesbc2.woodgrovebank.us–Priority 1
22 | P a g e
4. Verify the configuration by typing in the following command Get-CsOnlineVoiceRoute
5. Create a Voice Routing Policy "US Only" and add to the policy the PSTN Usage "US and Canada.".Use the following command New-CsOnlineVoiceRoutingPolicy "US Only" -OnlinePstnUsages "US and Canada" This can be verified through the following command.
6. Grant to user teamsuser1 a voice routing policy by using PowerShell
23 | P a g e
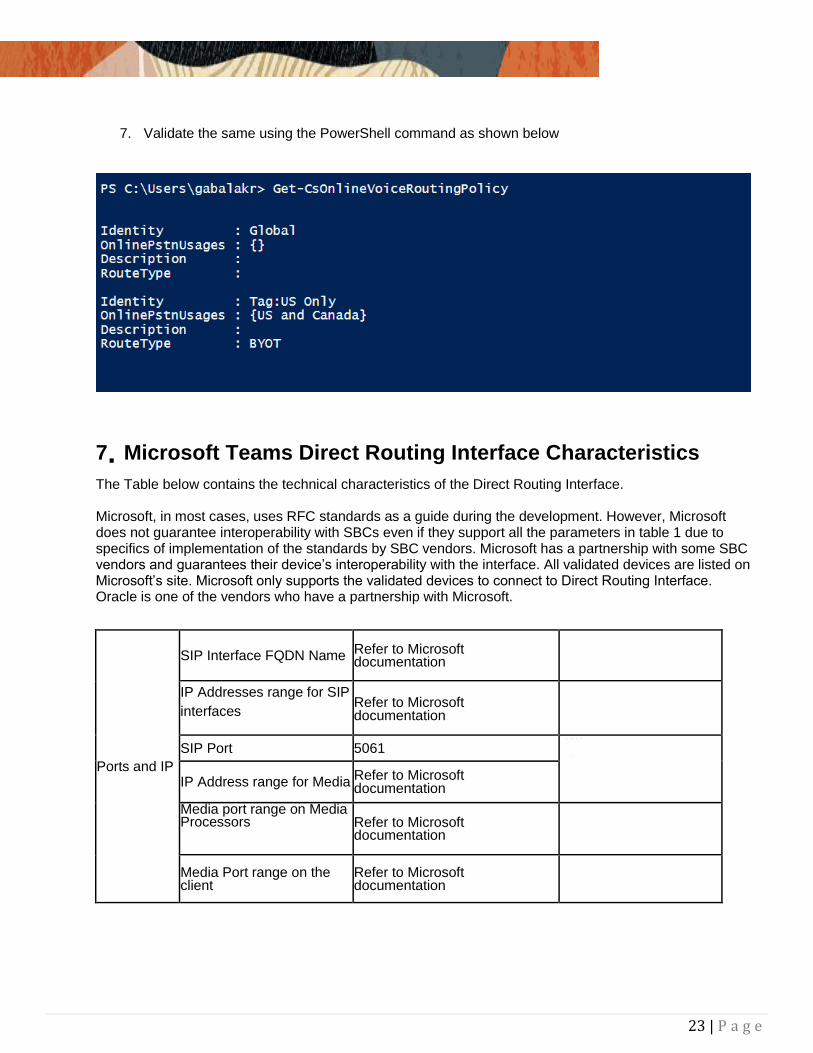
7. Validate the same using the PowerShell command as shown below
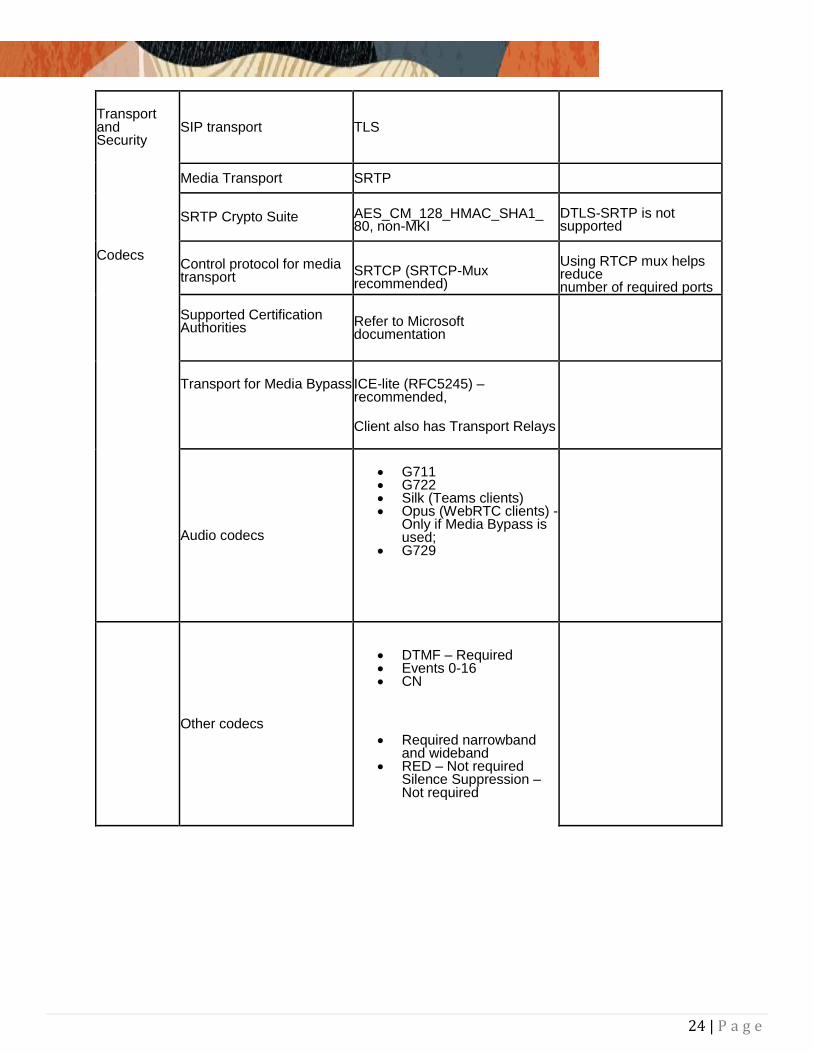
7. Microsoft Teams Direct Routing Interface Characteristics
The Table below contains the technical characteristics of the Direct Routing Interface. Microsoft, in most cases, uses RFC standards as a guide during the development. However, Microsoft does not guarantee interoperability with SBCs even if they support all the parameters in table 1 due to specifics of implementation of the standards by SBC vendors. Microsoft has a partnership with some SBC vendors and guarantees their device’s interoperability with the interface. All validated devices are listed on Microsoft’s site. Microsoft only supports the validated devices to connect to Direct Routing Interface. Oracle is one of the vendors who have a partnership with Microsoft.
Ports and IP
SIP Interface FQDN Name Refer to Microsoft documentation
IP Addresses range for SIP
interfaces Refer to Microsoft documentation
SIP Port 5061
IP Address range for Media Refer to Microsoft documentation
Media port range on Media Processors Refer to Microsoft
documentation
Media Port range on the client
Refer to Microsoft documentation
24 | P a g e
Transport and Security
Codecs
SIP transport TLS
Media Transport SRTP
SRTP Crypto Suite AES_CM_128_HMAC_SHA1_80, non-MKI
DTLS-SRTP is not supported
Control protocol for media transport SRTCP (SRTCP-Mux
recommended)
Using RTCP mux helps reduce number of required ports
Supported Certification Authorities Refer to Microsoft
documentation
Transport for Media Bypass ICE-lite (RFC5245) – recommended,
Client also has Transport Relays
Audio codecs
G711 G722 Silk (Teams clients) Opus (WebRTC clients) -
Only if Media Bypass is used;
G729
Other codecs
DTMF – Required Events 0-16 CN
Required narrowband and wideband
RED – Not required Silence Suppression – Not required
25 | P a g e
8. Configuring the SBC
This chapter provides step-by-step guidance on how to configure Oracle SBC for interworking with Microsoft Teams Direct Routing Enterprise Model with CUCM.
8.1. Validated Oracle SBC version
Oracle conducted tests with Oracle SBC 8.3 software – this software with the configuration listed below can run on any of the following products:
AP 1100
AP 3900
AP 4600
AP 6350
AP 6300
VME
9. New SBC configuration If the customer is looking to setup a new SBC from scratch, please follow the section below.
9.1. Establishing a serial connection to the SBC
Connect one end of a straight-through Ethernet cable to the front console port (which is active by
default) on the SBC and the other end to console adapter that ships with the SBC, connect the
console adapter (a DB-9 adapter) to the DB-9 port on a workstation, running a terminal emulator
application such as Putty. Start the terminal emulation application using the following settings:
Baud Rate=115200
Data Bits=8
Parity=None
Stop Bits=1
Flow Control=None
26 | P a g e
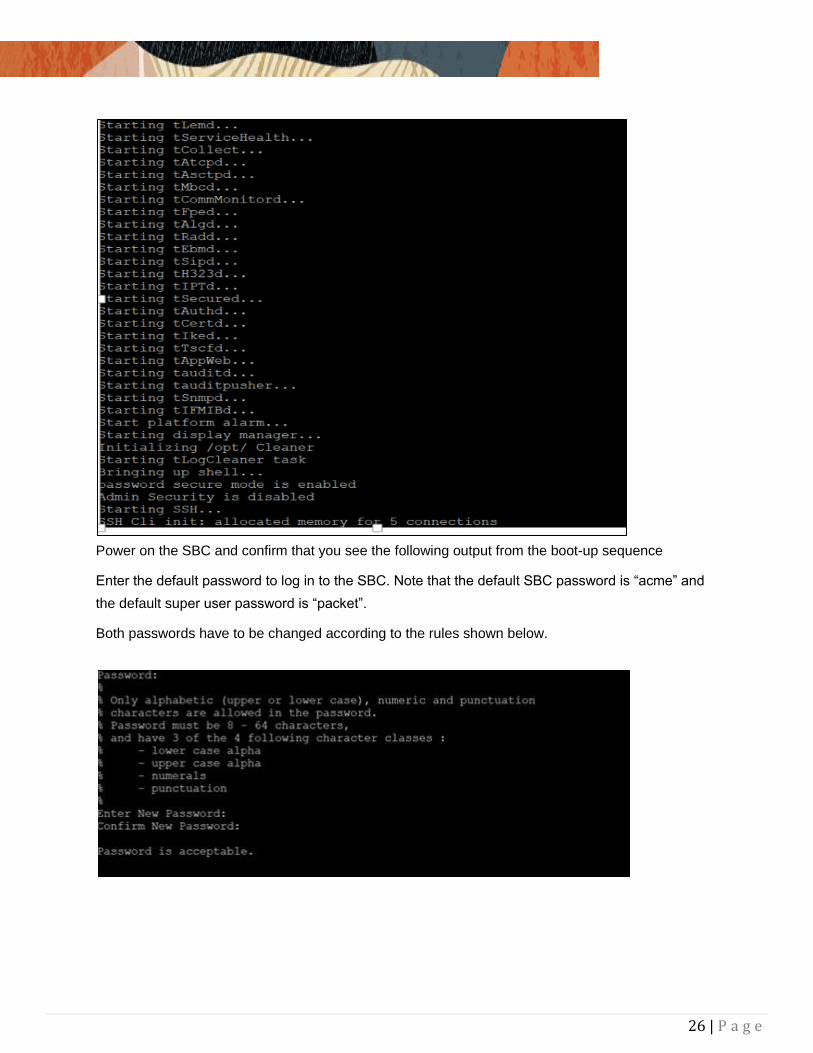
Power on the SBC and confirm that you see the following output from the boot-up sequence
Enter the default password to log in to the SBC. Note that the default SBC password is “acme” and
the default super user password is “packet”.
Both passwords have to be changed according to the rules shown below.
27 | P a g e
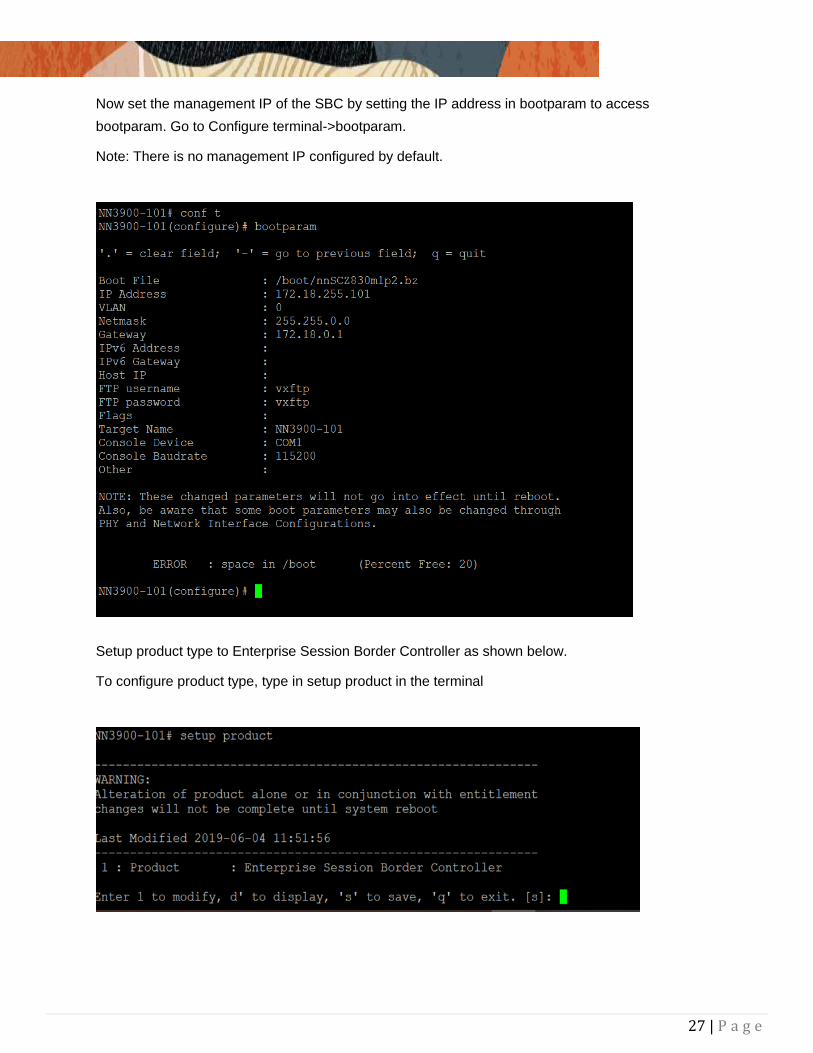
Now set the management IP of the SBC by setting the IP address in bootparam to access
bootparam. Go to Configure terminal->bootparam.
Note: There is no management IP configured by default.
Setup product type to Enterprise Session Border Controller as shown below.
To configure product type, type in setup product in the terminal
28 | P a g e
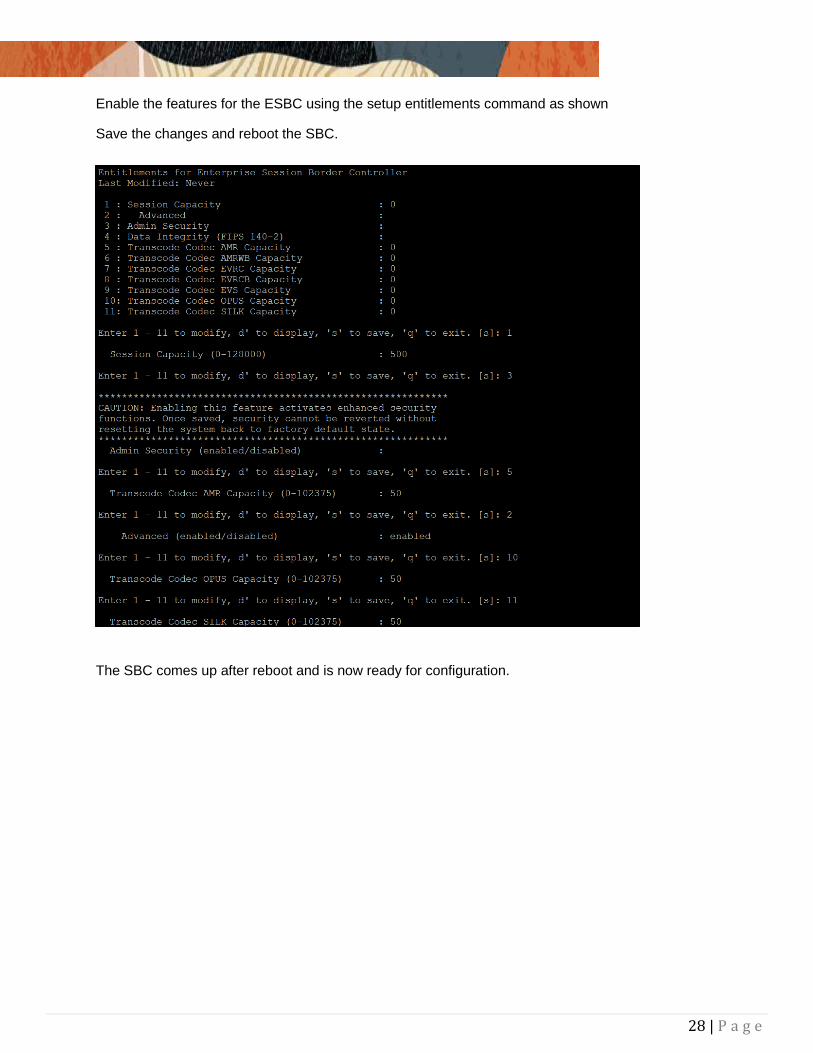
Enable the features for the ESBC using the setup entitlements command as shown
Save the changes and reboot the SBC.
The SBC comes up after reboot and is now ready for configuration.
29 | P a g e
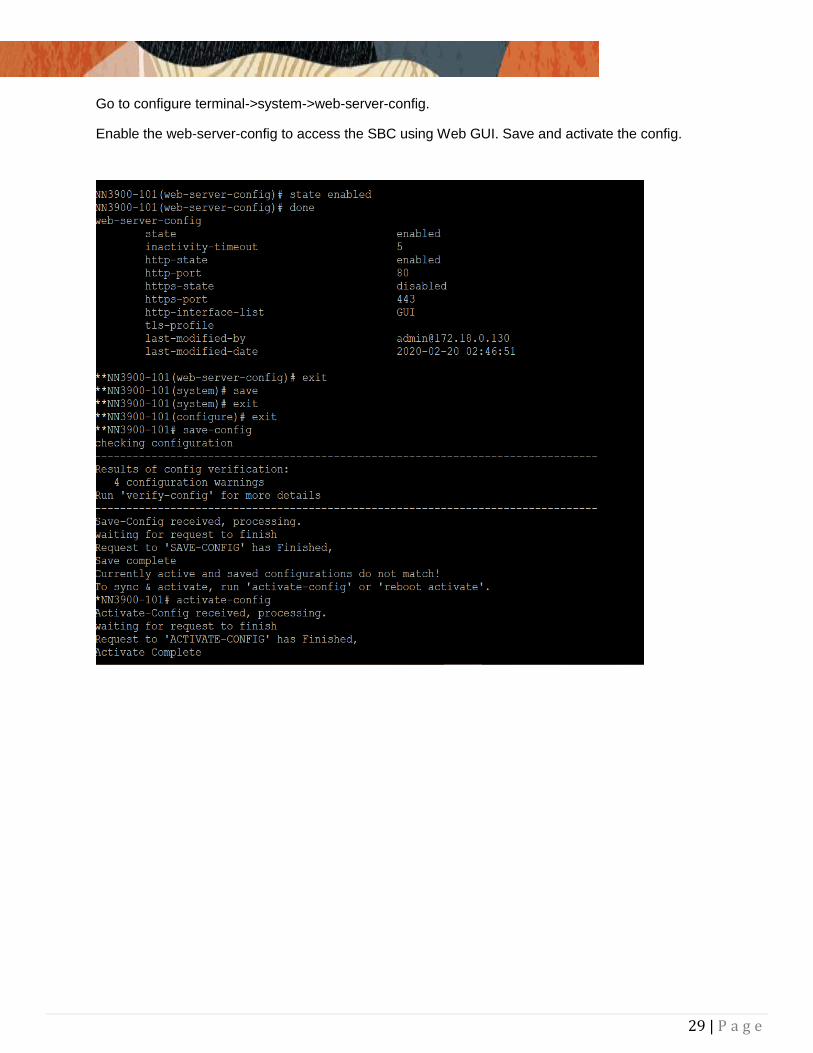
Go to configure terminal->system->web-server-config.
Enable the web-server-config to access the SBC using Web GUI. Save and activate the config.
30 | P a g e
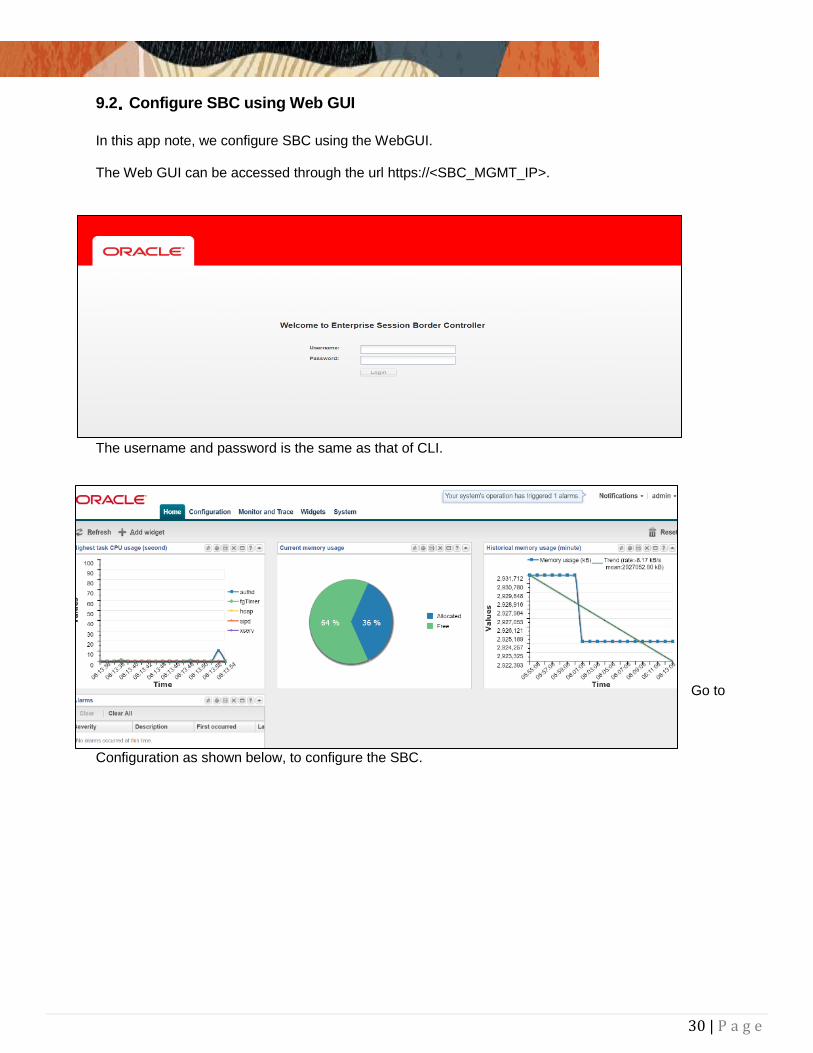
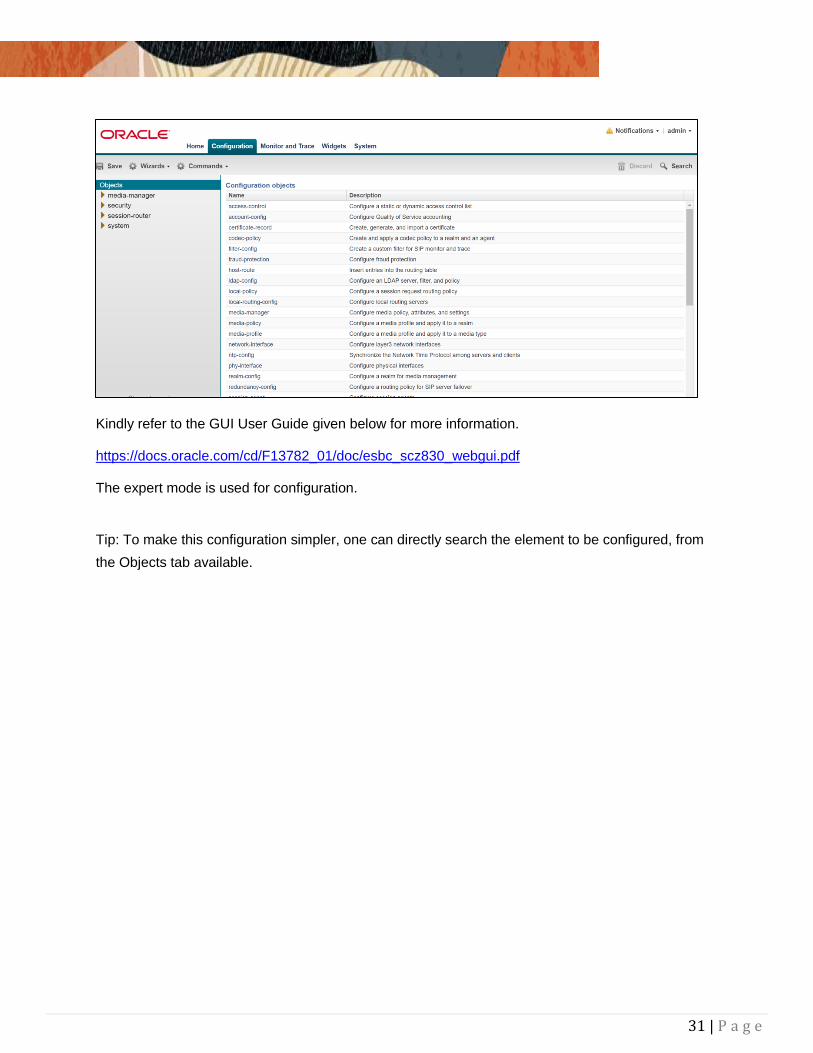
9.2. Configure SBC using Web GUI
In this app note, we configure SBC using the WebGUI. The Web GUI can be accessed through the url https://<SBC_MGMT_IP>.
The username and password is the same as that of CLI.
Go to
Configuration as shown below, to configure the SBC.
31 | P a g e
Kindly refer to the GUI User Guide given below for more information. https://docs.oracle.com/cd/F13782_01/doc/esbc_scz830_webgui.pdf The expert mode is used for configuration.
Tip: To make this configuration simpler, one can directly search the element to be configured, from
the Objects tab available.
32 | P a g e
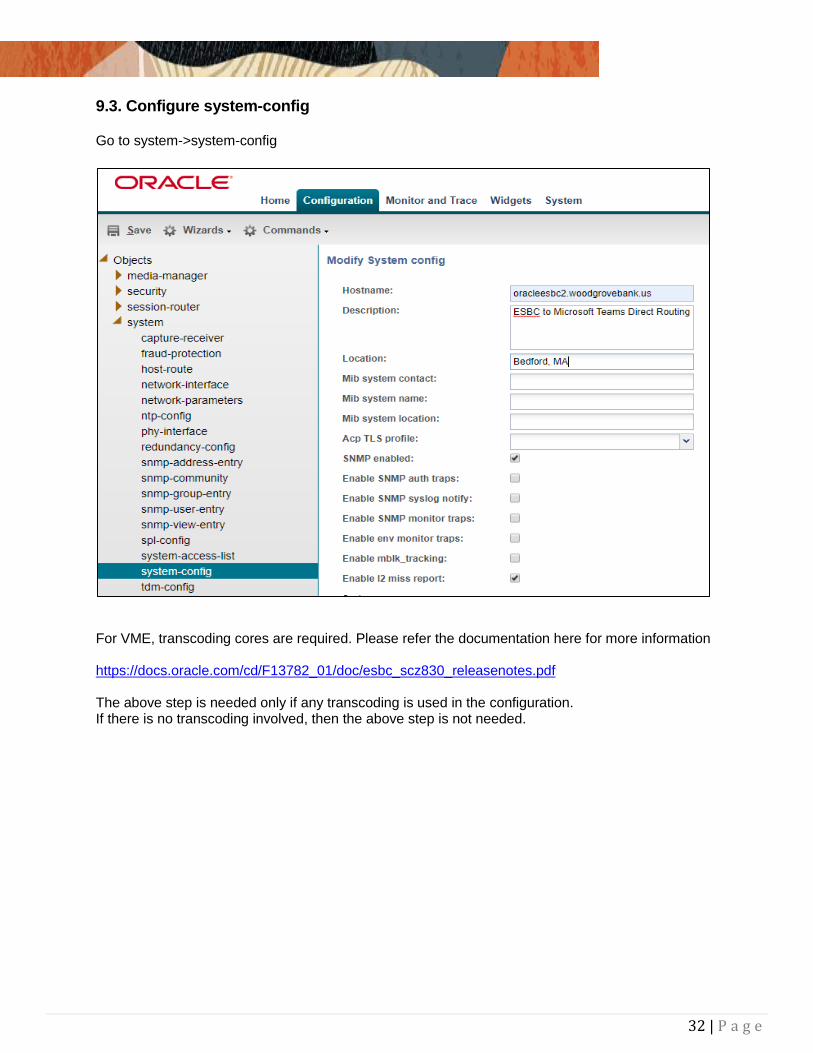
9.3. Configure system-config
Go to system->system-config
For VME, transcoding cores are required. Please refer the documentation here for more information https://docs.oracle.com/cd/F13782_01/doc/esbc_scz830_releasenotes.pdf The above step is needed only if any transcoding is used in the configuration. If there is no transcoding involved, then the above step is not needed.
33 | P a g e
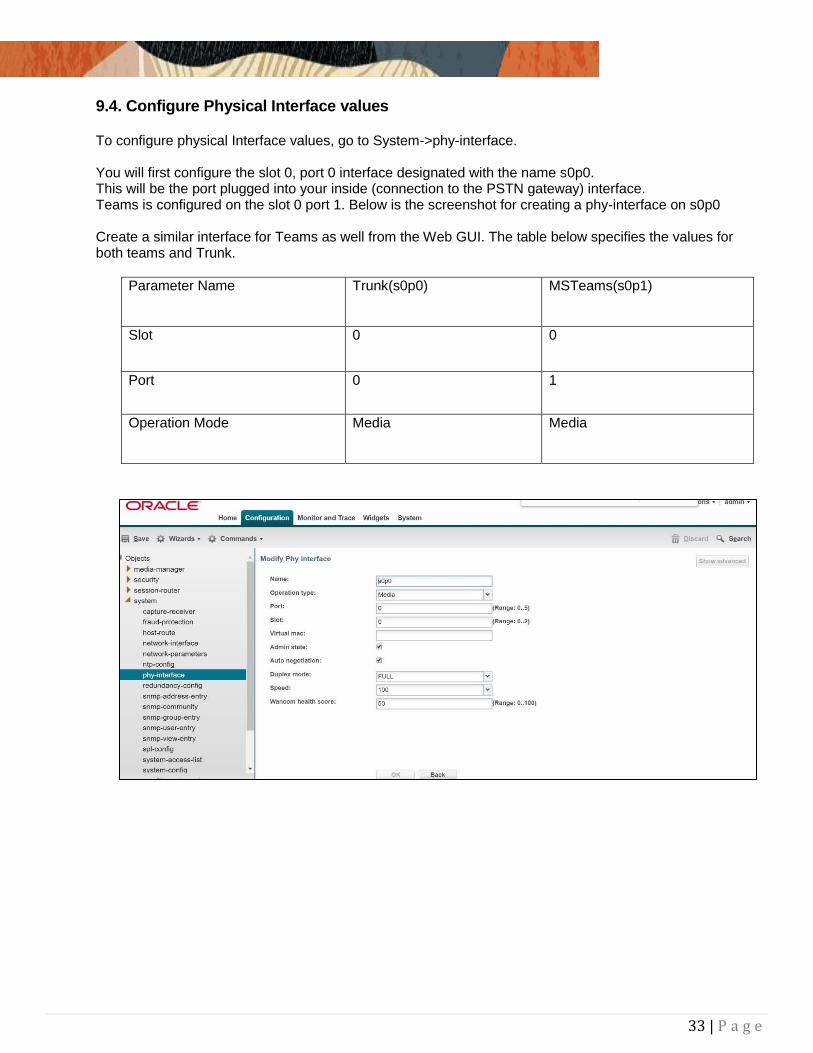
9.4. Configure Physical Interface values
To configure physical Interface values, go to System->phy-interface. You will first configure the slot 0, port 0 interface designated with the name s0p0. This will be the port plugged into your inside (connection to the PSTN gateway) interface. Teams is configured on the slot 0 port 1. Below is the screenshot for creating a phy-interface on s0p0 Create a similar interface for Teams as well from the Web GUI. The table below specifies the values for both teams and Trunk.
Parameter Name Trunk(s0p0) MSTeams(s0p1)
Slot 0 0
Port 0 1
Operation Mode Media Media
34 | P a g e
9.5. Configure Network Interface values
To configure network-interface, go to system->Network-Interface. Configure two interfaces, one for Teams side and one for CUCM side. The table below lists the parameters, to be configured for both the interfaces.
Parameter Name Teams side Network Interface CUCM side Network interface
Name s0p0 s1p1
Host Name oracleesbc2.woodgrovebank.us
IP address 155.212.214.172 10.232.50.50
Netmask 255.255.255.0 255.255.255.0
Gateway 155.212.214.1 10.232.50.1
DNS-IP Primary 8.8.8.8
DNS-domain Woodgrovebank.us
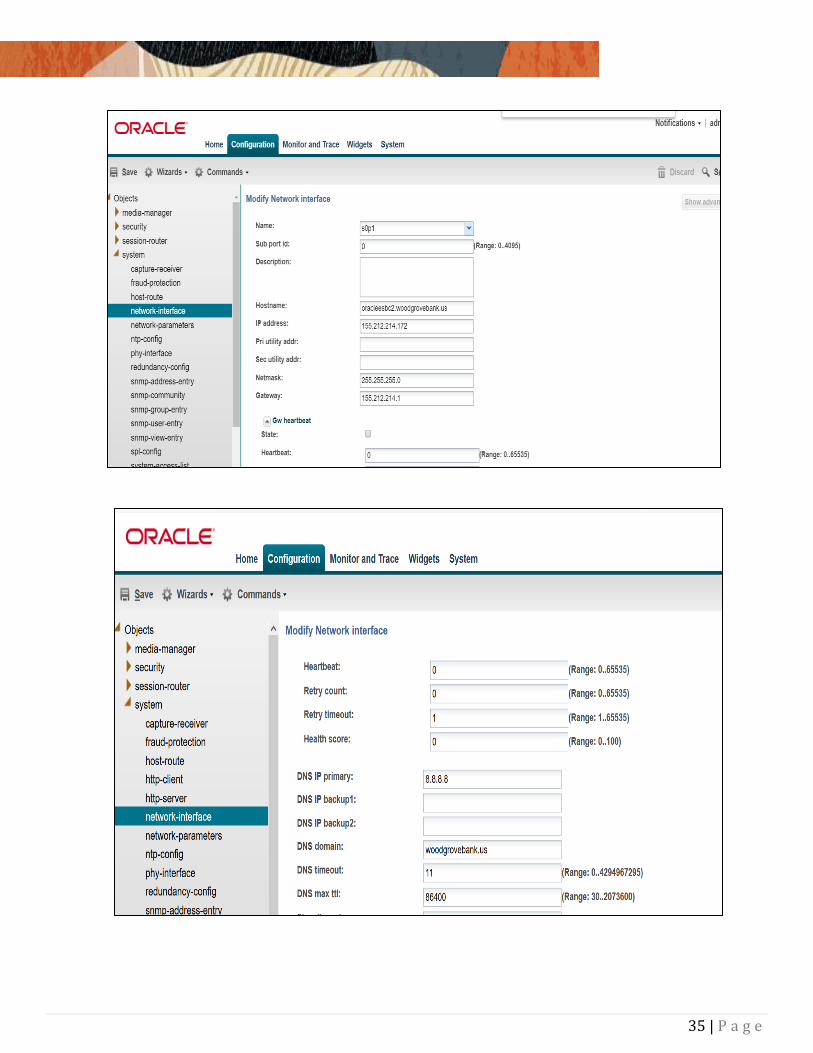
35 | P a g e

36 | P a g e
37 | P a g e
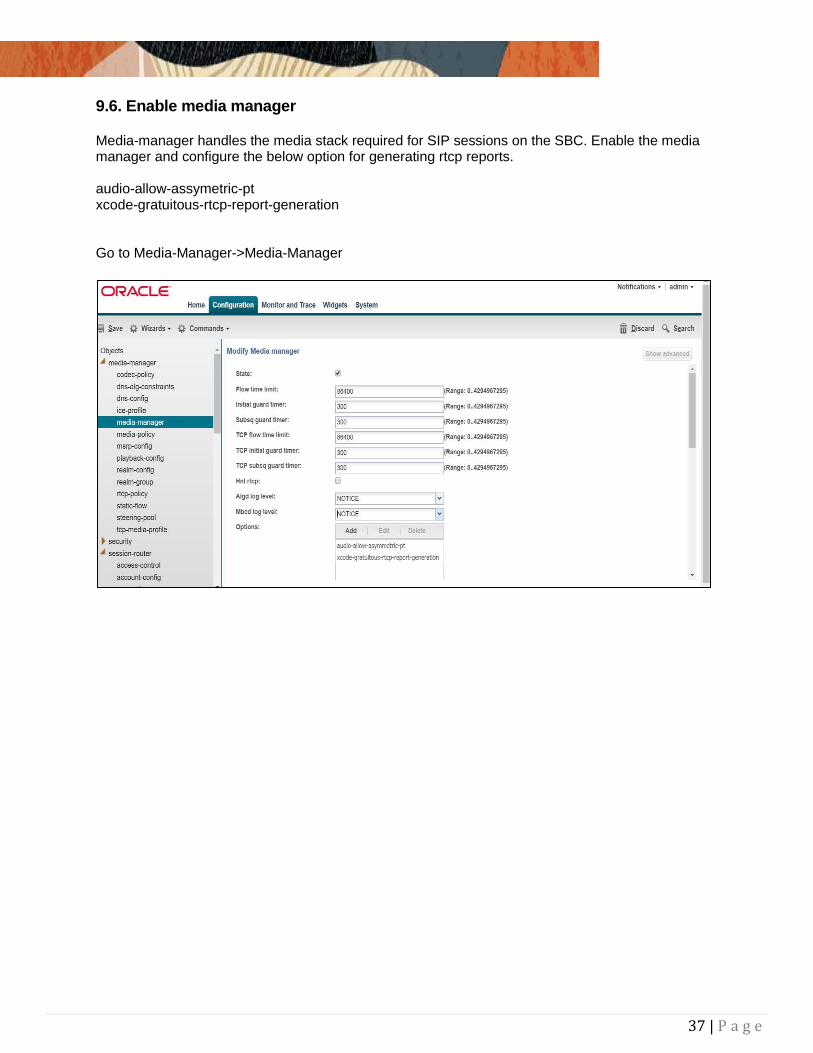
9.6. Enable media manager
Media-manager handles the media stack required for SIP sessions on the SBC. Enable the media manager and configure the below option for generating rtcp reports. audio-allow-assymetric-pt xcode-gratuitous-rtcp-report-generation Go to Media-Manager->Media-Manager
38 | P a g e
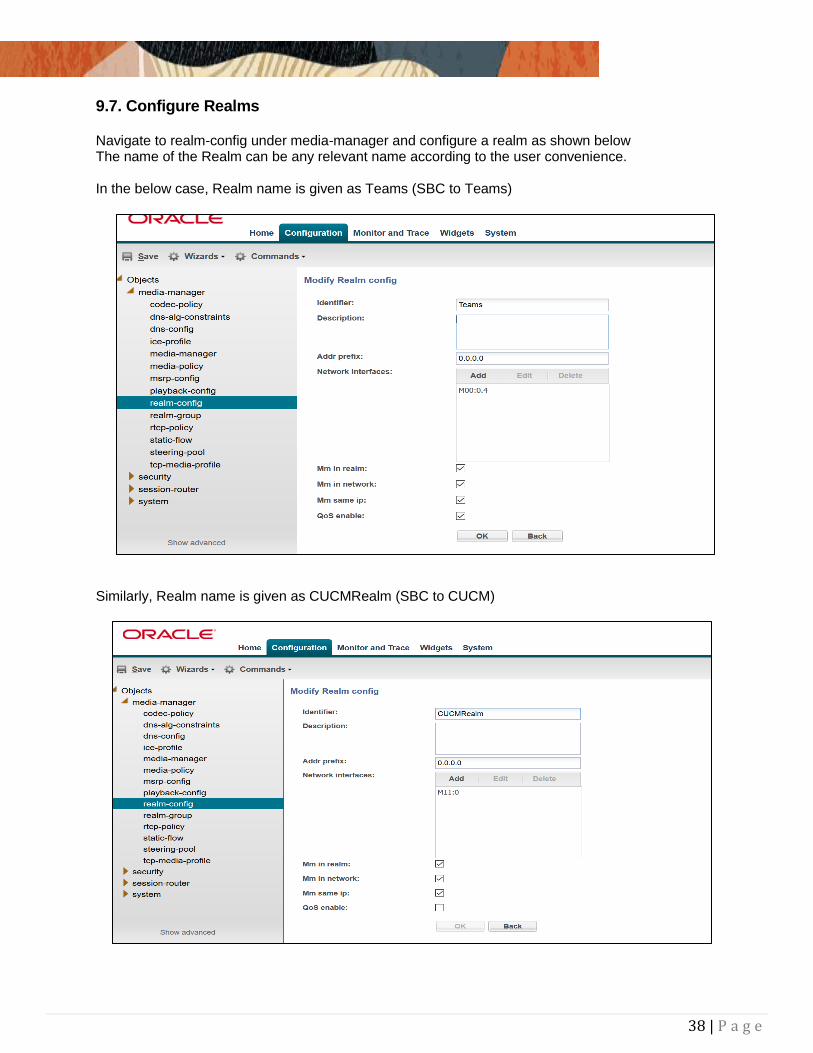
9.7. Configure Realms
Navigate to realm-config under media-manager and configure a realm as shown below The name of the Realm can be any relevant name according to the user convenience. In the below case, Realm name is given as Teams (SBC to Teams)
Similarly, Realm name is given as CUCMRealm (SBC to CUCM)
39 | P a g e
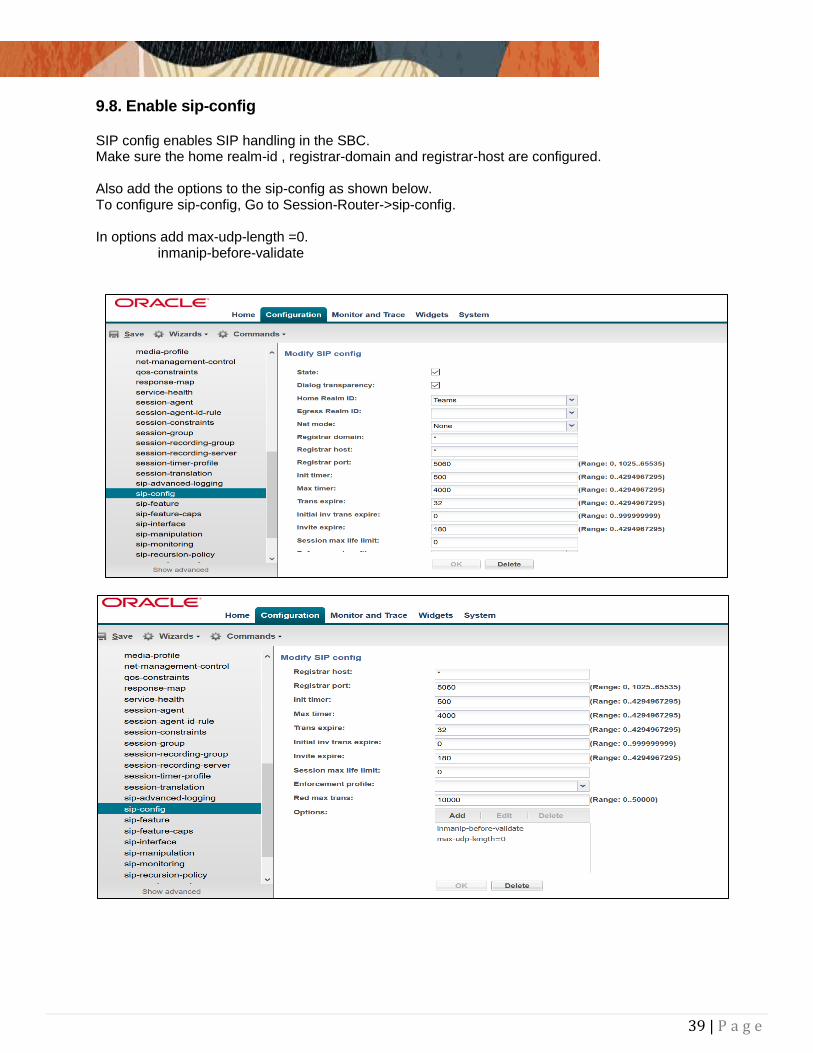
9.8. Enable sip-config
SIP config enables SIP handling in the SBC. Make sure the home realm-id , registrar-domain and registrar-host are configured. Also add the options to the sip-config as shown below. To configure sip-config, Go to Session-Router->sip-config. In options add max-udp-length =0. inmanip-before-validate
40 | P a g e
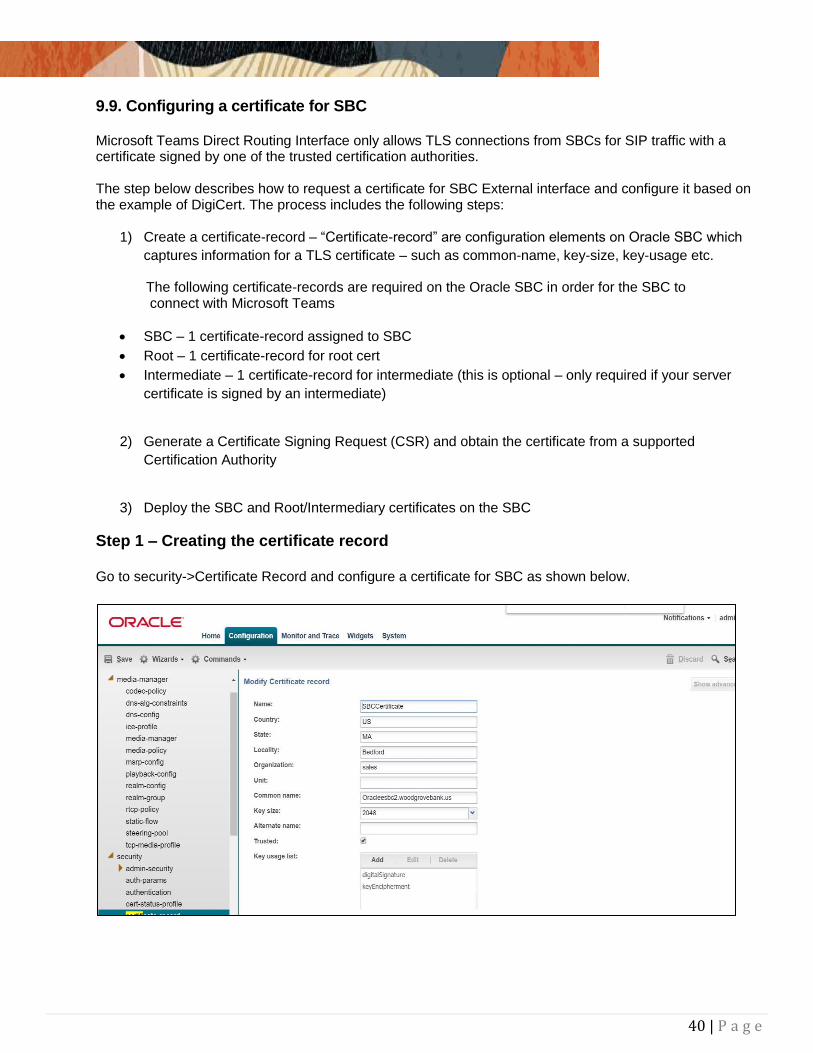
9.9. Configuring a certificate for SBC
Microsoft Teams Direct Routing Interface only allows TLS connections from SBCs for SIP traffic with a certificate signed by one of the trusted certification authorities. The step below describes how to request a certificate for SBC External interface and configure it based on the example of DigiCert. The process includes the following steps:
1) Create a certificate-record – “Certificate-record” are configuration elements on Oracle SBC which
captures information for a TLS certificate – such as common-name, key-size, key-usage etc.
The following certificate-records are required on the Oracle SBC in order for the SBC to connect with Microsoft Teams
SBC – 1 certificate-record assigned to SBC
Root – 1 certificate-record for root cert
Intermediate – 1 certificate-record for intermediate (this is optional – only required if your server
certificate is signed by an intermediate)
2) Generate a Certificate Signing Request (CSR) and obtain the certificate from a supported
Certification Authority
3) Deploy the SBC and Root/Intermediary certificates on the SBC
Step 1 – Creating the certificate record Go to security->Certificate Record and configure a certificate for SBC as shown below.
41 | P a g e
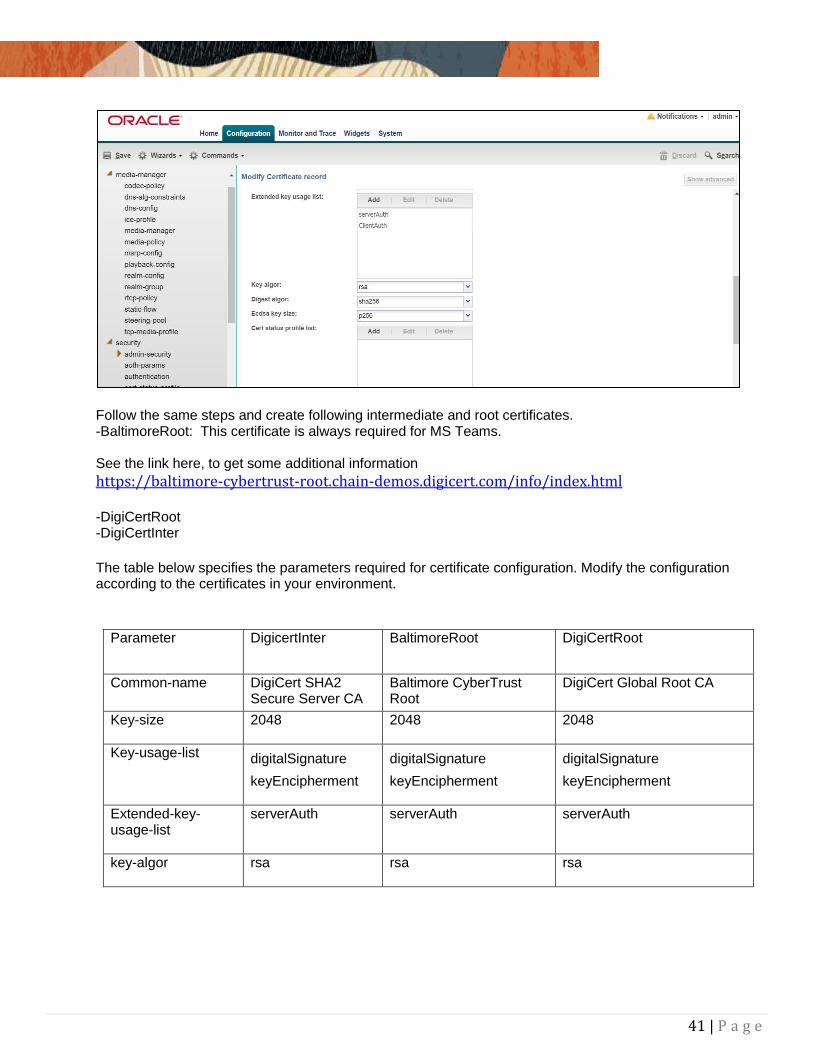
Follow the same steps and create following intermediate and root certificates. -BaltimoreRoot: This certificate is always required for MS Teams. See the link here, to get some additional information
https://baltimore-cybertrust-root.chain-demos.digicert.com/info/index.html -DigiCertRoot -DigiCertInter
The table below specifies the parameters required for certificate configuration. Modify the configuration according to the certificates in your environment.
Parameter DigicertInter
BaltimoreRoot
DigiCertRoot
Common-name
DigiCert SHA2 Secure Server CA
Baltimore CyberTrust Root
DigiCert Global Root CA
Key-size
2048 2048 2048
Key-usage-list
digitalSignature
keyEncipherment
digitalSignature
keyEncipherment
digitalSignature
keyEncipherment
Extended-key-usage-list
serverAuth serverAuth serverAuth
key-algor
rsa rsa rsa
42 | P a g e
digest-algor sha256 sha256 sha256
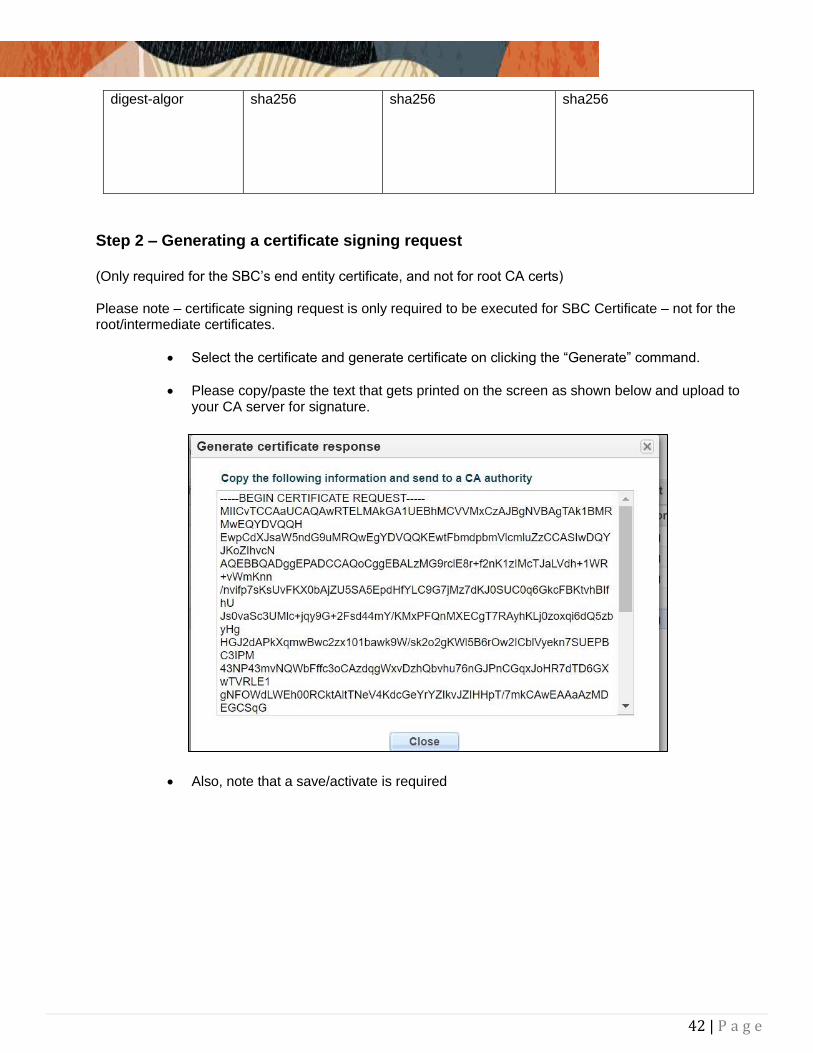
Step 2 – Generating a certificate signing request (Only required for the SBC’s end entity certificate, and not for root CA certs) Please note – certificate signing request is only required to be executed for SBC Certificate – not for the root/intermediate certificates.
Select the certificate and generate certificate on clicking the “Generate” command.
Please copy/paste the text that gets printed on the screen as shown below and upload to your CA server for signature.
Also, note that a save/activate is required
43 | P a g e
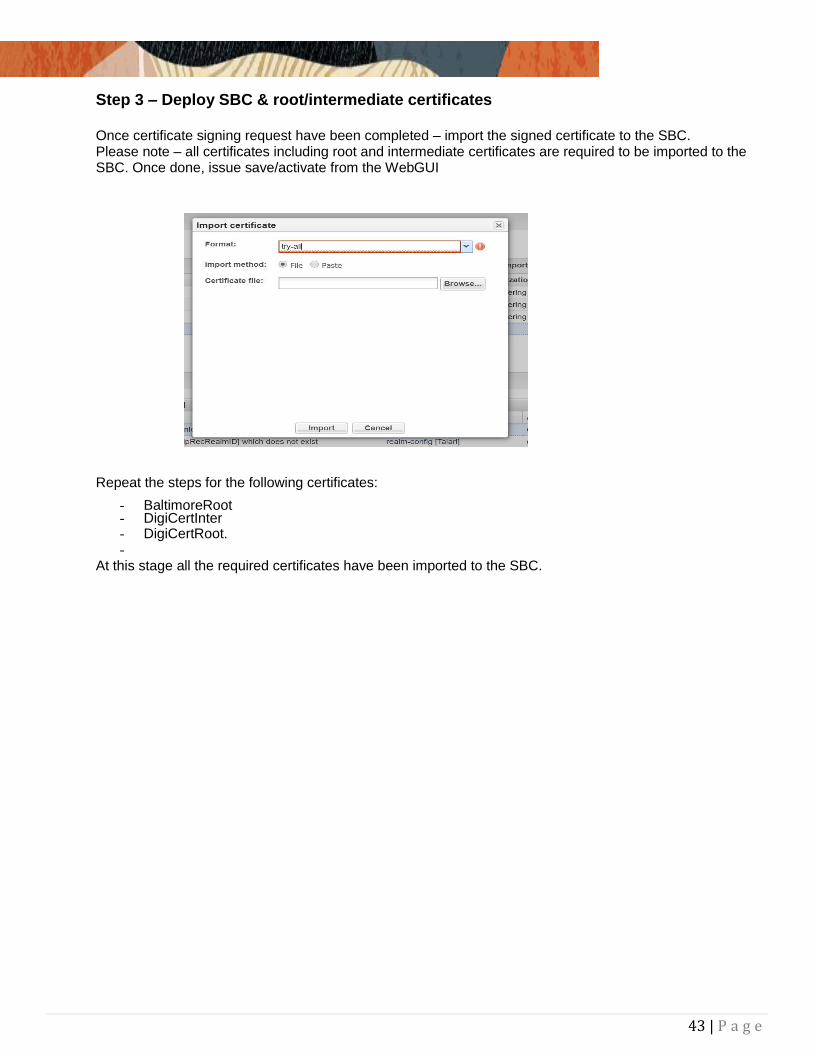
Step 3 – Deploy SBC & root/intermediate certificates Once certificate signing request have been completed – import the signed certificate to the SBC. Please note – all certificates including root and intermediate certificates are required to be imported to the SBC. Once done, issue save/activate from the WebGUI
Repeat the steps for the following certificates:
- BaltimoreRoot - DigiCertInter - DigiCertRoot. -
At this stage all the required certificates have been imported to the SBC.
44 | P a g e
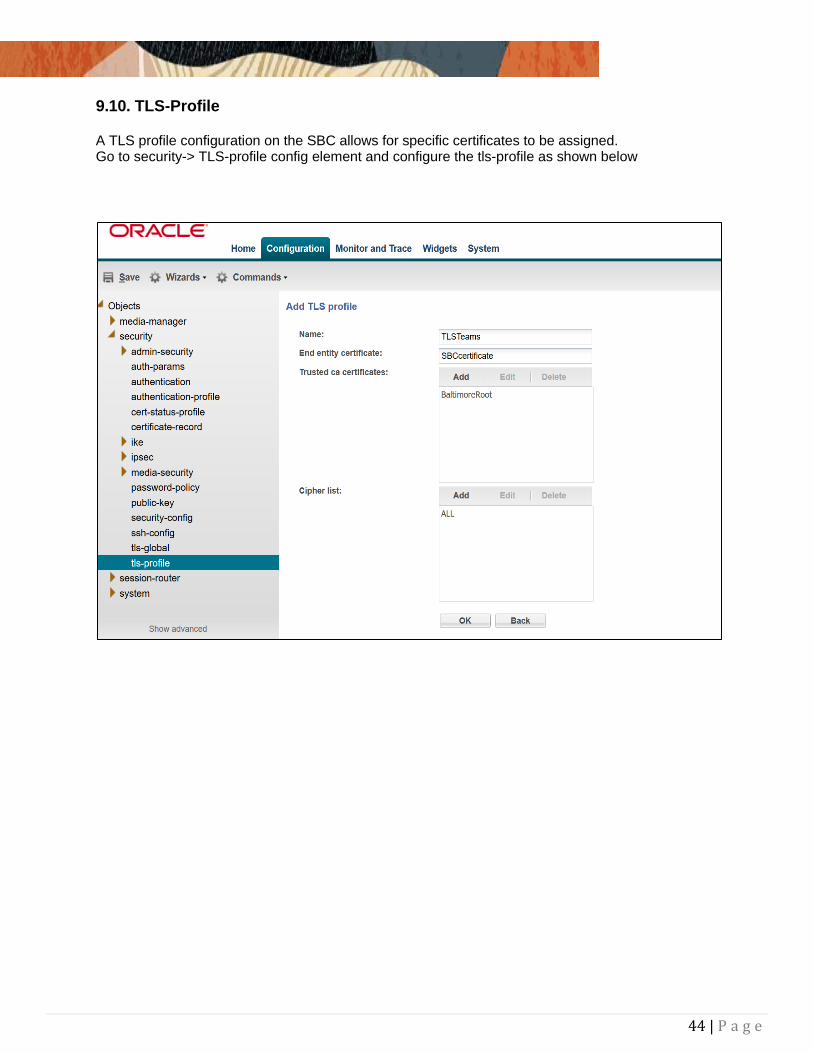
9.10. TLS-Profile
A TLS profile configuration on the SBC allows for specific certificates to be assigned. Go to security-> TLS-profile config element and configure the tls-profile as shown below

45 | P a g e
9.11. Configure SIP Interfaces.
Navigate to sip-interface under session-router and configure the sip-interface as shown below Please ensure that the IP address allocated to the SIP interface is the FQDN resolvable address. i.e. if you issue command nslookup from another computer , “oracleesbc2.woodgrovebank.us” – it should resolve to 155.212.214.172. Note that the IP should be publicly routable IP address. Note: -Tls-profile needs to match the name of the tls-profile previously created -Set allow-anonymous to agents-only to ensure traffic to this sip-interface only comes from Teams server

46 | P a g e
Similarly, Configure Internal IP under sip-port of sip-interface for CUCM side.
Once sip-interface is configured – the SBC is ready to accept traffic on the allocated IP address. Now configure where the SBC sends the outbound traffic.
9.12. Configure session-agent
Session-agents are config elements which are trusted agents who can send/receive traffic from the SBC with direct access to trusted data path. Session-agents are config elements which are trusted agents who can send/receive traffic from the SBC with direct access to trusted data path. Configure the session-agent for Teams with the following parameters. Go to session-router->Session-Agent.
- hostname to “sip.pstnhub.microsoft.com” - port 5061 - realm-id – needs to match the realm created for teams - transport set to “StaticTLS” - refer-call-transfer set to enabled - ping-method – send OPTIONS message to Microsoft to check health - ping-interval to 30 secs
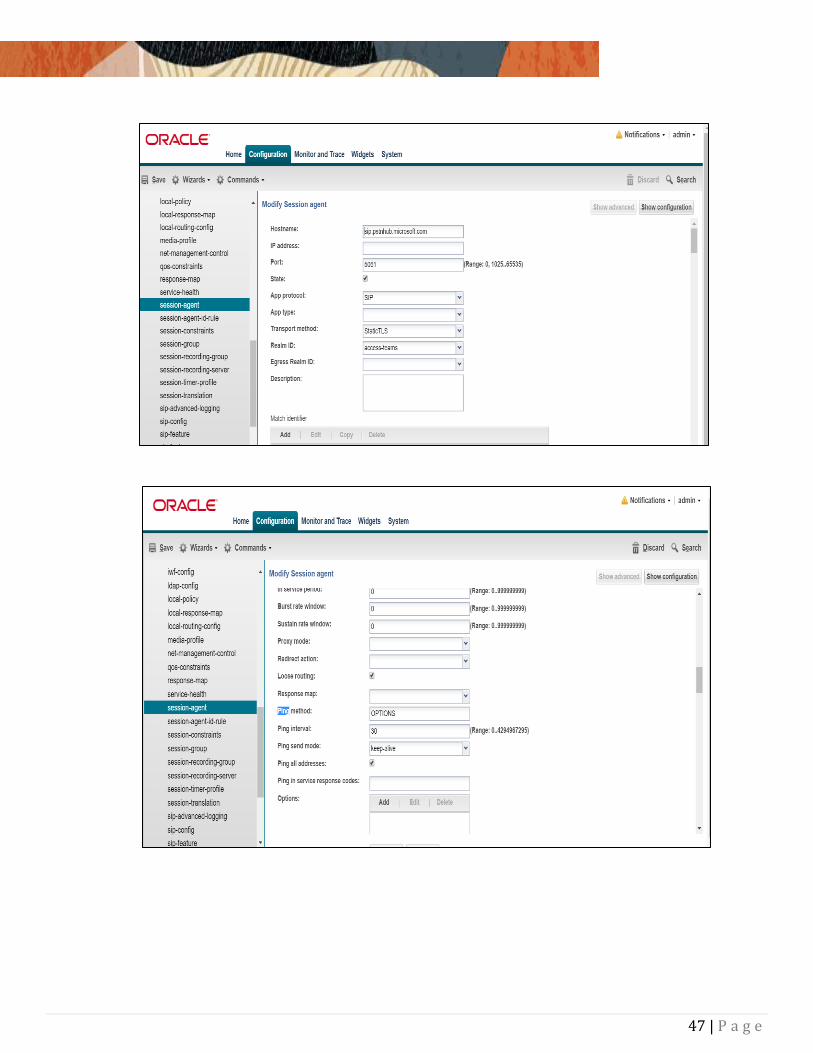
47 | P a g e
48 | P a g e
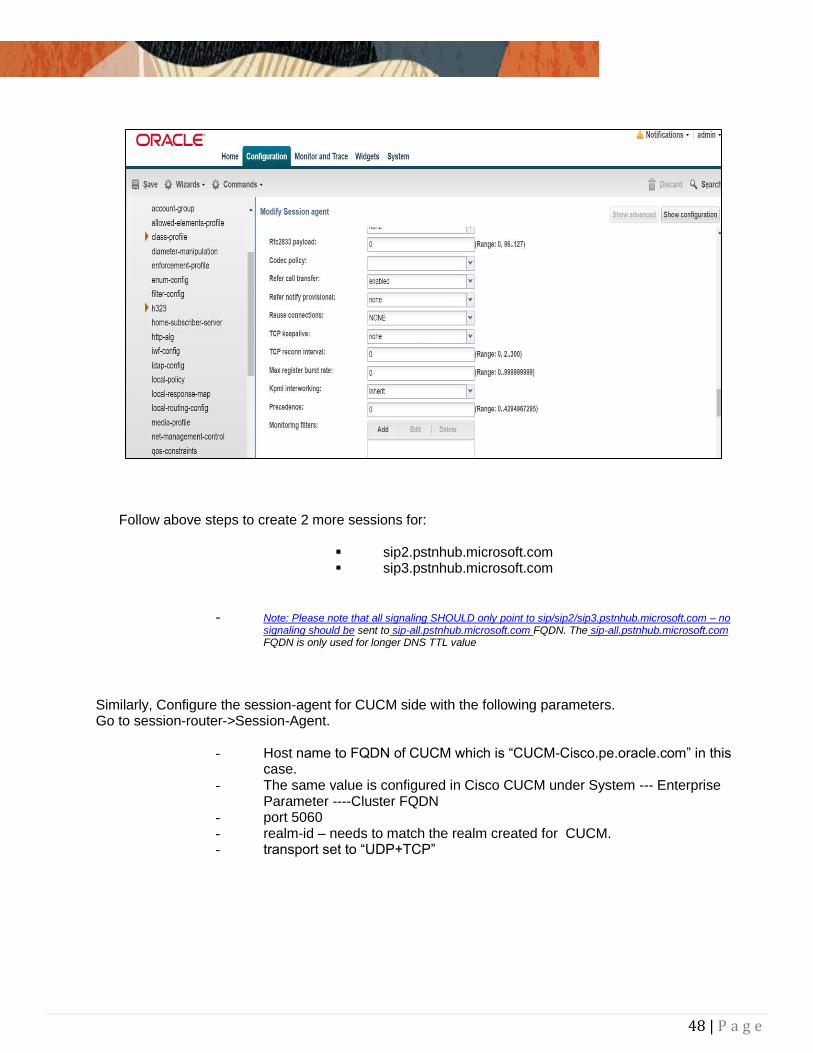
Follow above steps to create 2 more sessions for:
sip2.pstnhub.microsoft.com sip3.pstnhub.microsoft.com
- Note: Please note that all signaling SHOULD only point to sip/sip2/sip3.pstnhub.microsoft.com – no signaling should be sent to sip-all.pstnhub.microsoft.com FQDN. The sip-all.pstnhub.microsoft.com FQDN is only used for longer DNS TTL value
Similarly, Configure the session-agent for CUCM side with the following parameters. Go to session-router->Session-Agent.
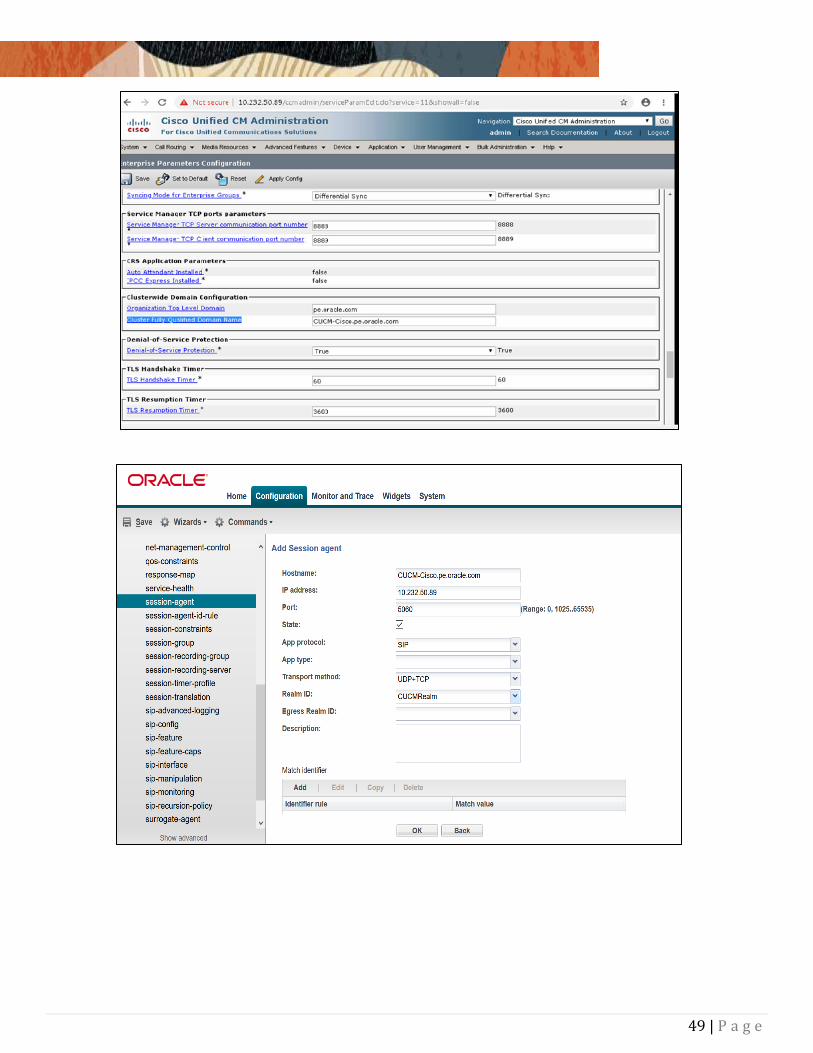
- Host name to FQDN of CUCM which is “CUCM-Cisco.pe.oracle.com” in this case.
- The same value is configured in Cisco CUCM under System --- Enterprise Parameter ----Cluster FQDN
- port 5060 - realm-id – needs to match the realm created for CUCM. - transport set to “UDP+TCP”
49 | P a g e
50 | P a g e
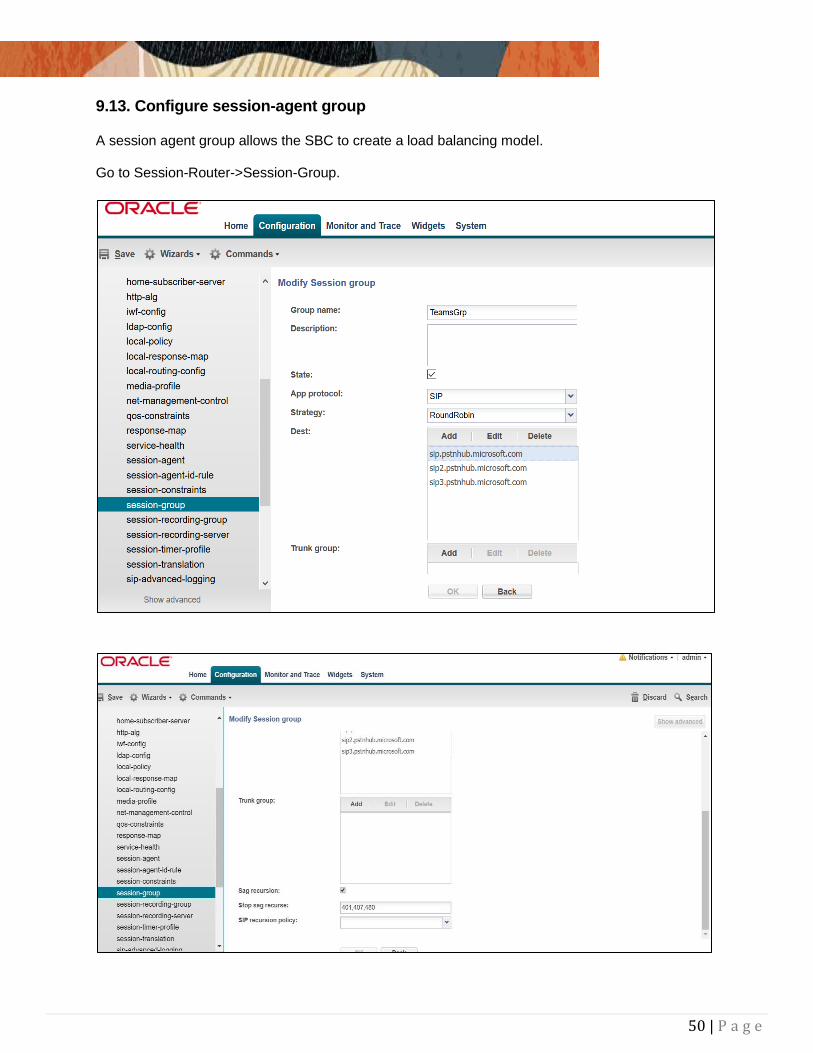
9.13. Configure session-agent group
A session agent group allows the SBC to create a load balancing model. Go to Session-Router->Session-Group.

51 | P a g e
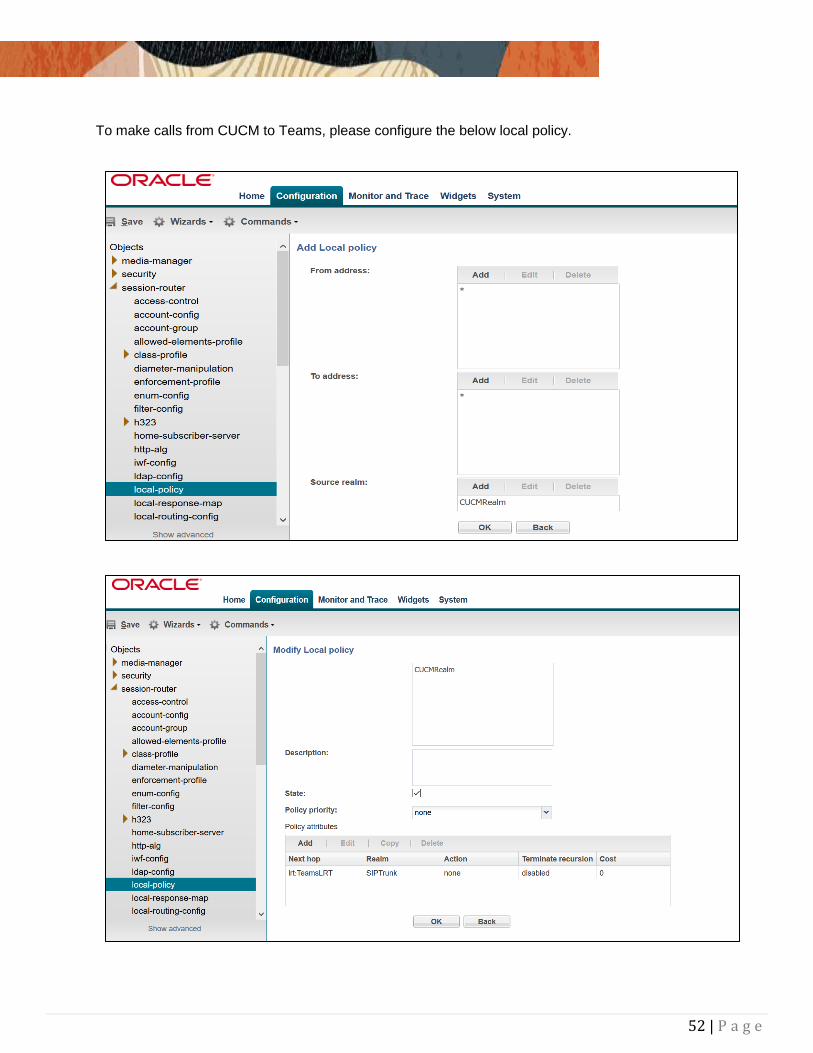
9.14. Configure local-policy
Local policy config allows for the SBC to route calls from one end of the network to the other based on routing criteria. To configure local-policy, go to Session-Router->local-policy. To make calls from Teams to CUCM, the following config is required:
52 | P a g e
To make calls from CUCM to Teams, please configure the below local policy.
53 | P a g e
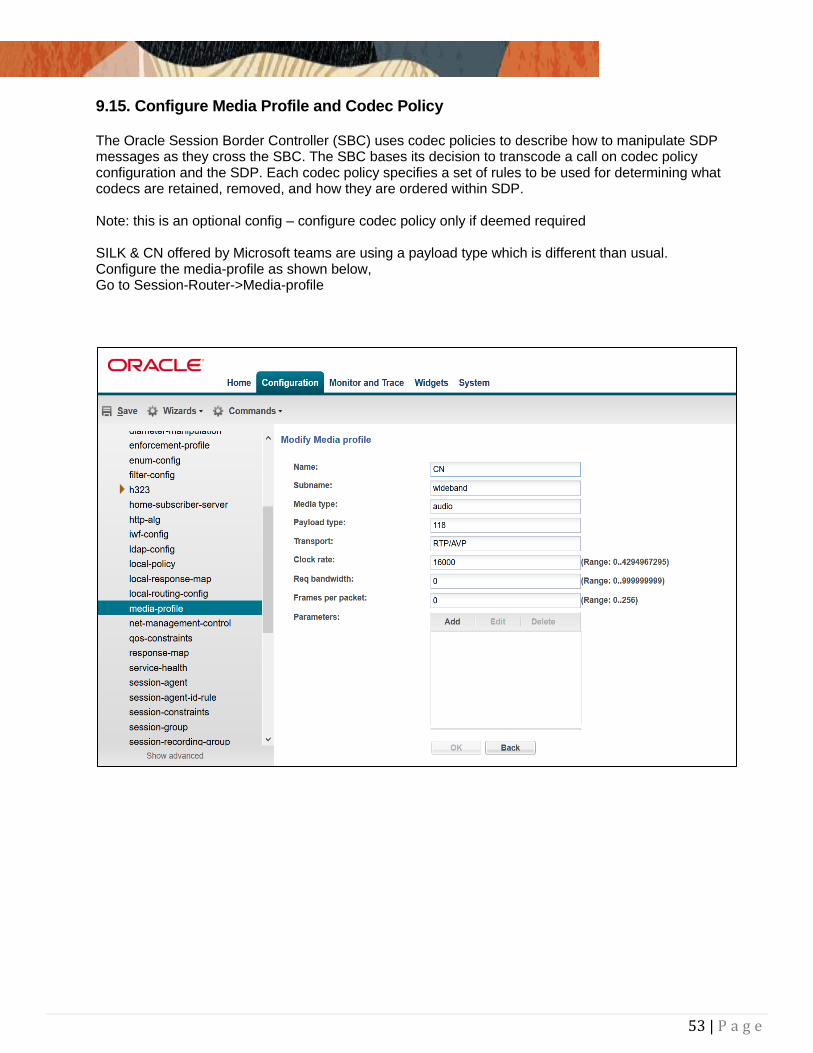
9.15. Configure Media Profile and Codec Policy
The Oracle Session Border Controller (SBC) uses codec policies to describe how to manipulate SDP messages as they cross the SBC. The SBC bases its decision to transcode a call on codec policy configuration and the SDP. Each codec policy specifies a set of rules to be used for determining what codecs are retained, removed, and how they are ordered within SDP. Note: this is an optional config – configure codec policy only if deemed required SILK & CN offered by Microsoft teams are using a payload type which is different than usual. Configure the media-profile as shown below, Go to Session-Router->Media-profile
54 | P a g e
Configure media profiles similarly, for silk codec also as given below.
Parameters SILK-1
SILK-2
Subname narrowband wideband
Payload-Type 103 104
Clock-rate 8000 16000
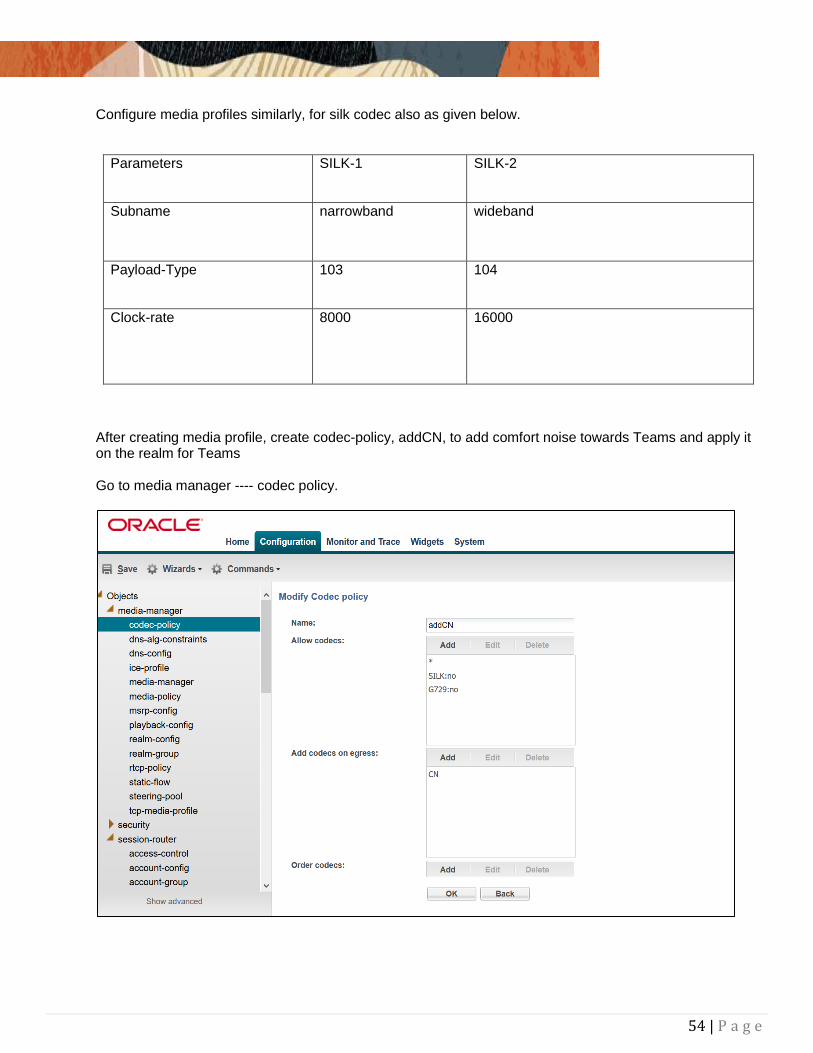
After creating media profile, create codec-policy, addCN, to add comfort noise towards Teams and apply it on the realm for Teams Go to media manager ---- codec policy.
55 | P a g e
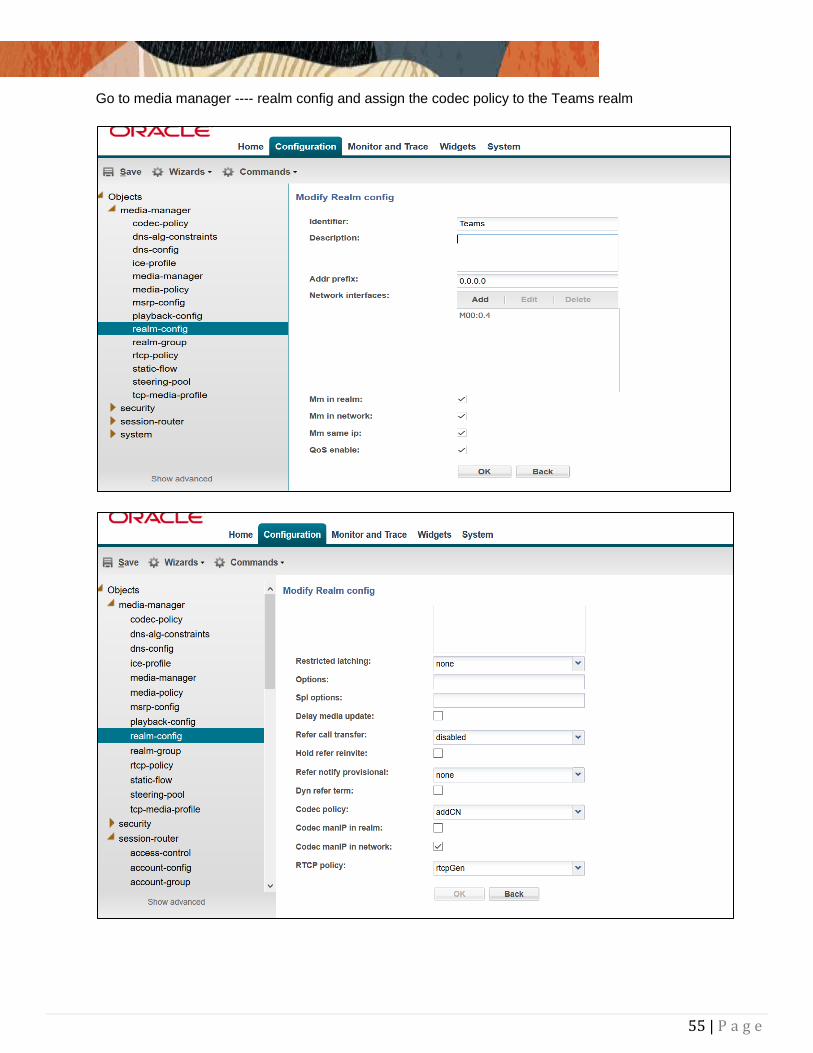
Go to media manager ---- realm config and assign the codec policy to the Teams realm
56 | P a g e
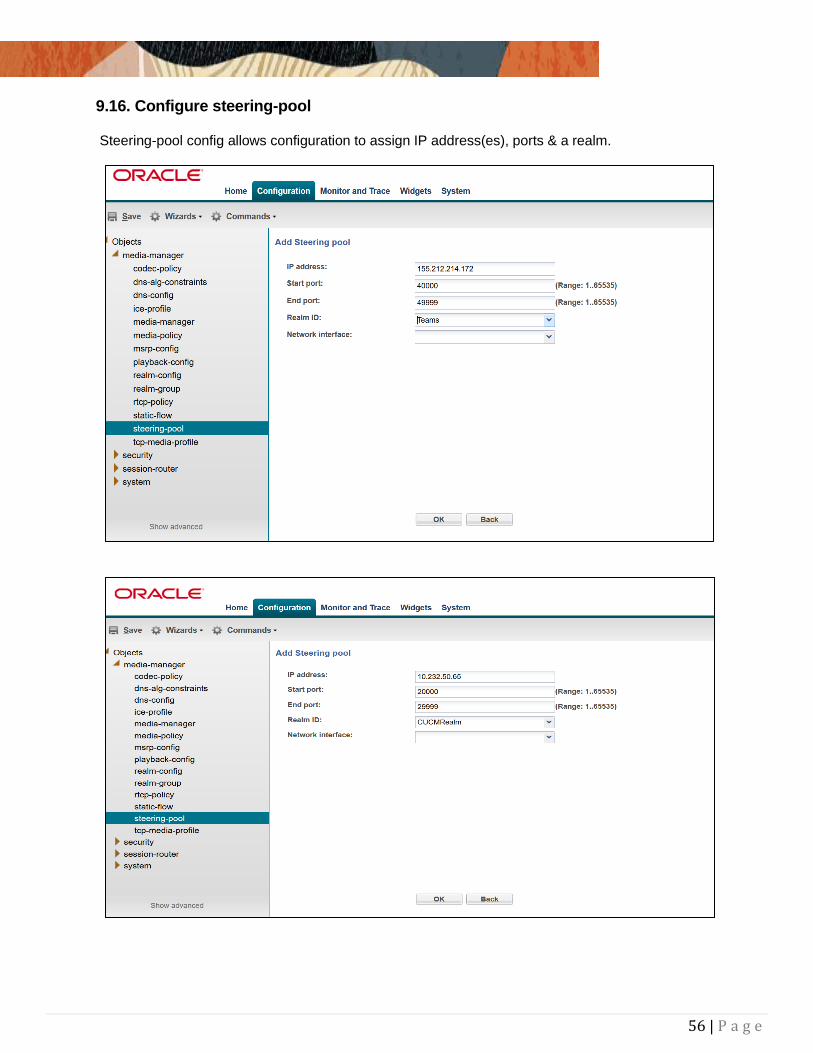
9.16. Configure steering-pool
Steering-pool config allows configuration to assign IP address(es), ports & a realm.

57 | P a g e
9.17. Configure sdes profile
Please go to Security Media Security sdes profile and create the policy as below.
Microsoft only supports AES_CM_128_HMAC_SHA1_80 encryption.
58 | P a g e
9.18. Configure Media Security Profile
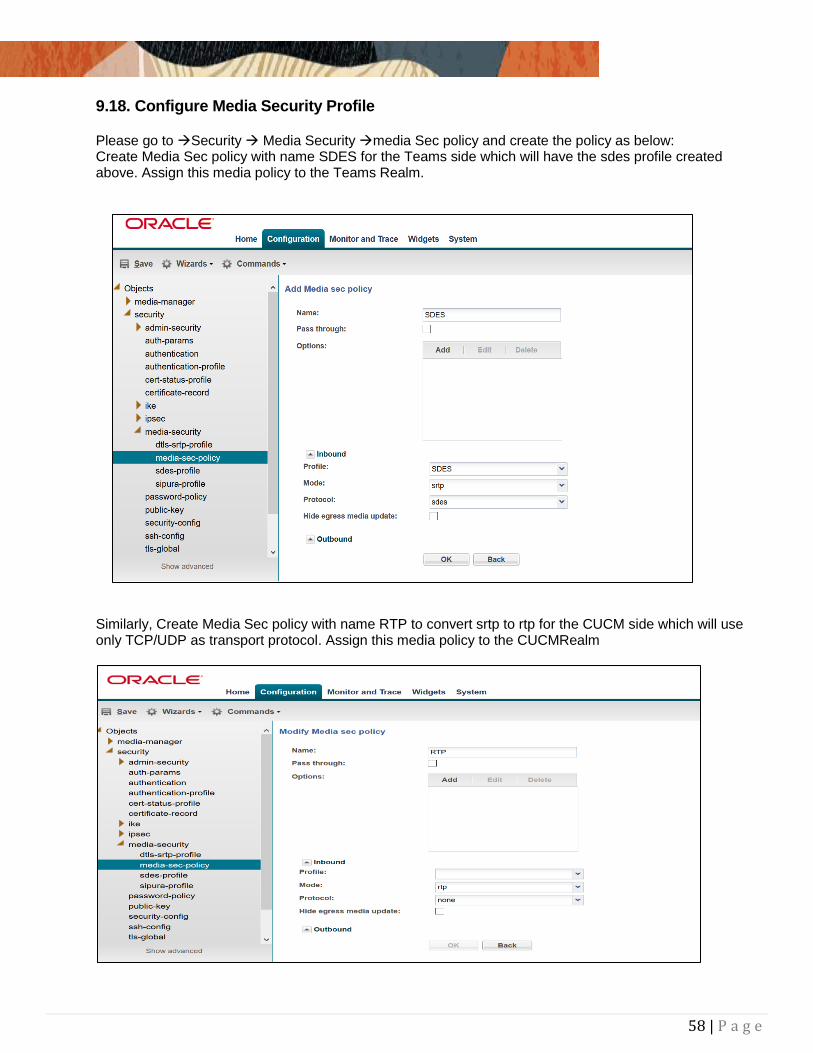
Please go to Security Media Security media Sec policy and create the policy as below: Create Media Sec policy with name SDES for the Teams side which will have the sdes profile created above. Assign this media policy to the Teams Realm.
Similarly, Create Media Sec policy with name RTP to convert srtp to rtp for the CUCM side which will use only TCP/UDP as transport protocol. Assign this media policy to the CUCMRealm
59 | P a g e
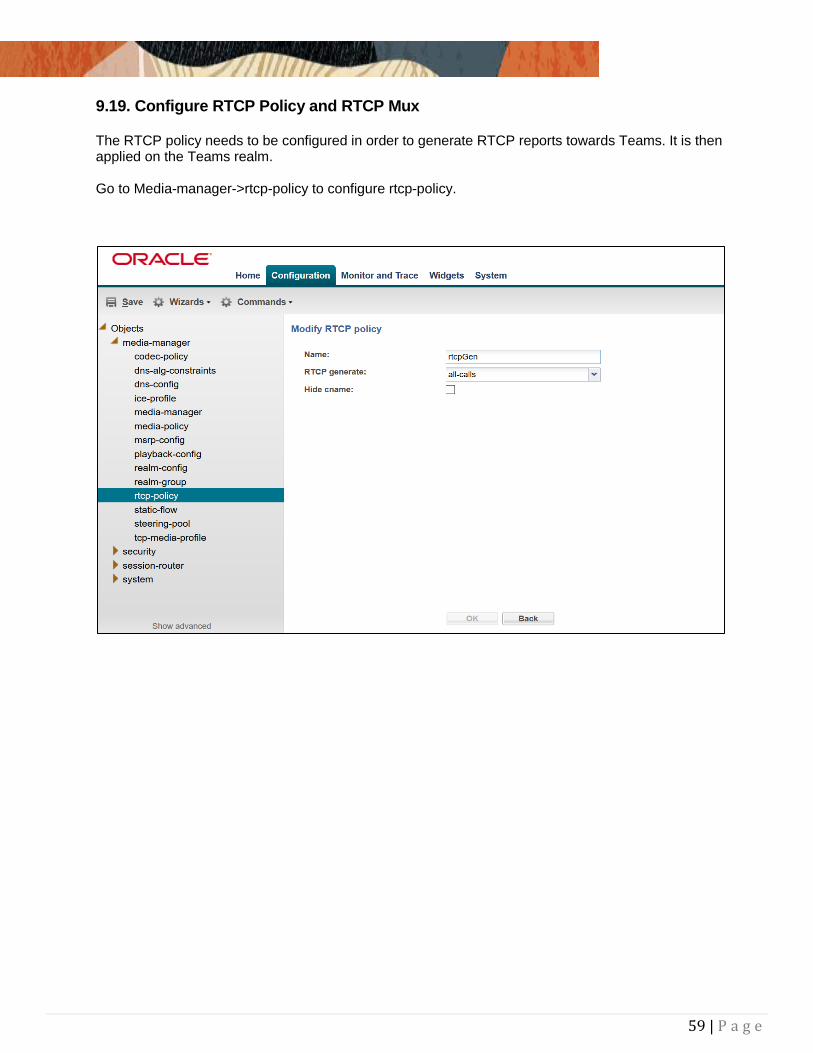
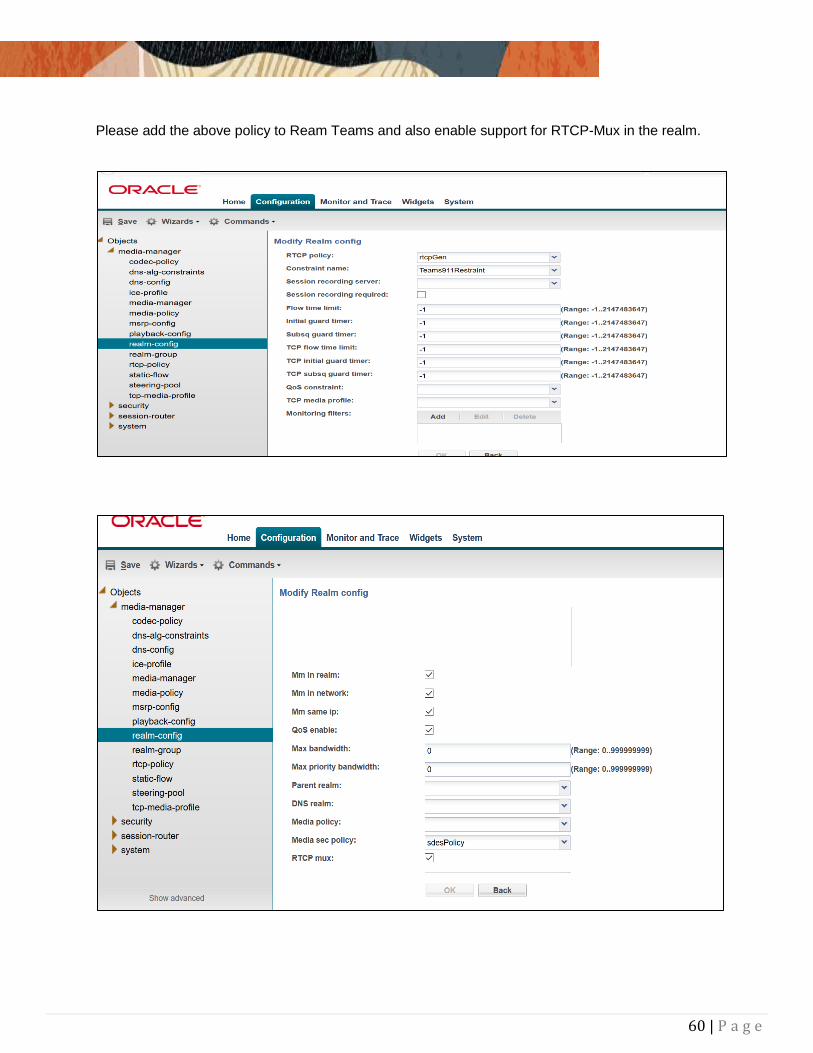
9.19. Configure RTCP Policy and RTCP Mux
The RTCP policy needs to be configured in order to generate RTCP reports towards Teams. It is then applied on the Teams realm. Go to Media-manager->rtcp-policy to configure rtcp-policy.
60 | P a g e
Please add the above policy to Ream Teams and also enable support for RTCP-Mux in the realm.
61 | P a g e
10. Existing SBC configuration If the SBC being used with Microsoft Teams is an existing SBC with functional configuration with a SIP trunk, following configuration elements are required: - New realm-config - Configuring a certificate for SBC Interface - TLS-Profile - Enable DNS - New sip-interface - New session-agent - New-Session-Agent-Group - New steering-pools - New Local-policy - Media-profile - Codec-policy - SDES Profile - Media-sec-Policy - RTCP policy - RTCP-mux Please follow the steps mentioned in the above chapters to configure these elements.
62 | P a g e
Appendix A
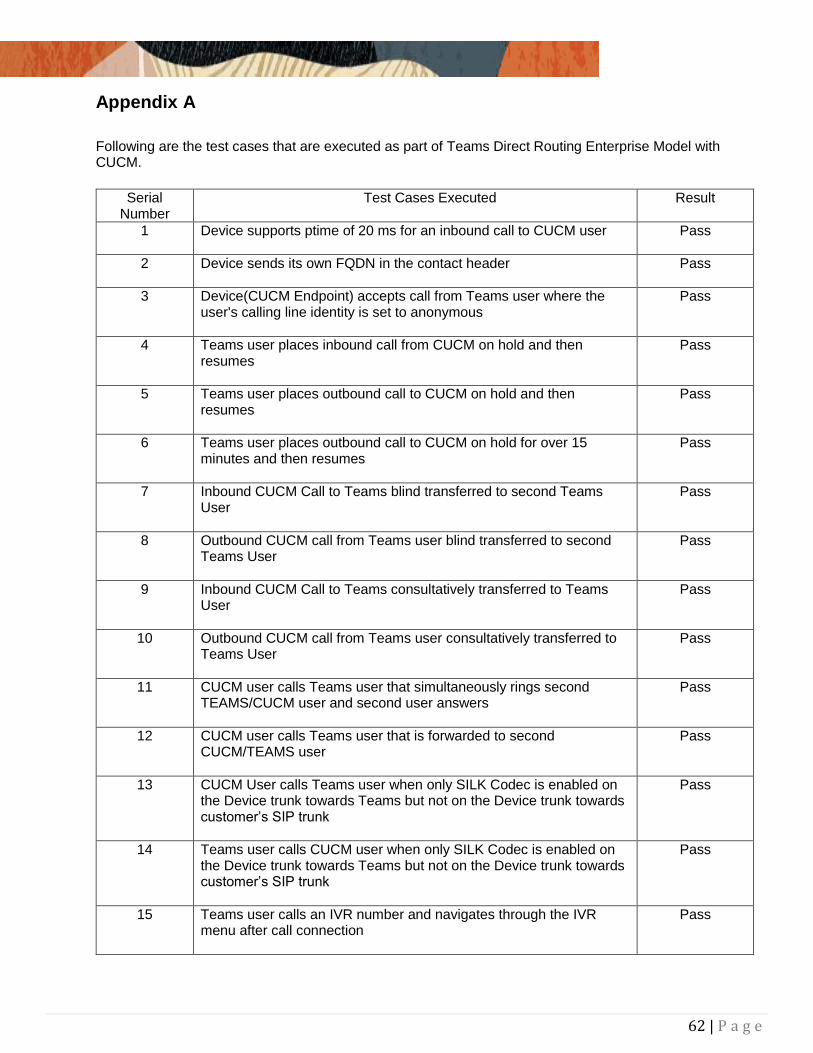
Following are the test cases that are executed as part of Teams Direct Routing Enterprise Model with CUCM.
Serial
Number Test Cases Executed Result
1 Device supports ptime of 20 ms for an inbound call to CUCM user
Pass
2 Device sends its own FQDN in the contact header
Pass
3 Device(CUCM Endpoint) accepts call from Teams user where the user's calling line identity is set to anonymous
Pass
4 Teams user places inbound call from CUCM on hold and then resumes
Pass
5 Teams user places outbound call to CUCM on hold and then resumes
Pass
6 Teams user places outbound call to CUCM on hold for over 15 minutes and then resumes
Pass
7 Inbound CUCM Call to Teams blind transferred to second Teams User
Pass
8 Outbound CUCM call from Teams user blind transferred to second Teams User
Pass
9 Inbound CUCM Call to Teams consultatively transferred to Teams User
Pass
10 Outbound CUCM call from Teams user consultatively transferred to Teams User
Pass
11 CUCM user calls Teams user that simultaneously rings second TEAMS/CUCM user and second user answers
Pass
12 CUCM user calls Teams user that is forwarded to second CUCM/TEAMS user
Pass
13 CUCM User calls Teams user when only SILK Codec is enabled on the Device trunk towards Teams but not on the Device trunk towards customer’s SIP trunk
Pass
14 Teams user calls CUCM user when only SILK Codec is enabled on the Device trunk towards Teams but not on the Device trunk towards customer’s SIP trunk
Pass
15 Teams user calls an IVR number and navigates through the IVR menu after call connection
Pass
63 | P a g e
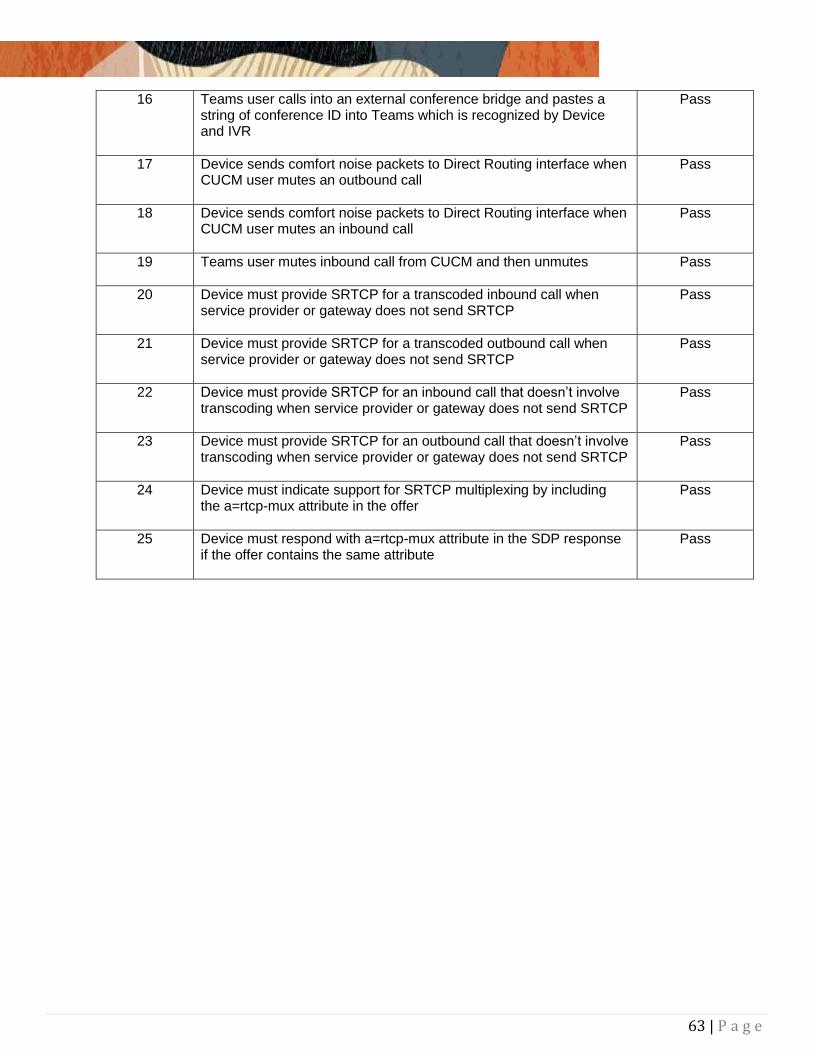
16 Teams user calls into an external conference bridge and pastes a string of conference ID into Teams which is recognized by Device and IVR
Pass
17 Device sends comfort noise packets to Direct Routing interface when CUCM user mutes an outbound call
Pass
18 Device sends comfort noise packets to Direct Routing interface when CUCM user mutes an inbound call
Pass
19 Teams user mutes inbound call from CUCM and then unmutes
Pass
20 Device must provide SRTCP for a transcoded inbound call when service provider or gateway does not send SRTCP
Pass
21 Device must provide SRTCP for a transcoded outbound call when service provider or gateway does not send SRTCP
Pass
22 Device must provide SRTCP for an inbound call that doesn’t involve transcoding when service provider or gateway does not send SRTCP
Pass
23 Device must provide SRTCP for an outbound call that doesn’t involve transcoding when service provider or gateway does not send SRTCP
Pass
24 Device must indicate support for SRTCP multiplexing by including the a=rtcp-mux attribute in the offer
Pass
25 Device must respond with a=rtcp-mux attribute in the SDP response if the offer contains the same attribute
Pass

64 | P a g e
Oracle Corporation, World Headquarters Worldwide Inquiries
500 Oracle Parkway Phone: +1.650.506.7000
Redwood Shores, CA 94065, USA Fax: +1.650.506.7200
Integrated Cloud Applications & Platform Services
Copyright © 2019, Oracle and/or its affiliates. All rights reserved. This document is provided for information purposes only, and the contents hereof are subject
to change without notice. This document is not warranted to be error-free, nor subject to any other warranties or conditions, whether expressed orally or implied in law, including implied warranties and conditions of merchantability or fitness for a particular purpose. We specifically disclaim any liability with respect to this document, and no contractual obligations are formed either directly or indirectly by this document. This document may not be reproduced or transmitted in any form or by any means, electronic or mechanical, for any purpose, without our prior written permission. Oracle and Java are registered trademarks of Oracle and/or its affiliates. Other names may be trademarks of their respective owners. Intel and Intel Xeon are trademarks or registered trademarks of Intel Corporation. All SPARC trademarks are used under license and are trademarks or registered trademarks of SPARC International, Inc. AMD, Opteron, the AMD logo, and the AMD Opteron logo are trademarks or registered trademarks of Advanced Micro Devices. UNIX is a registered trademark of The Open Group. 0615
C O N N E C T W I T H U S
blogs.oracle.com/oracle
facebook.com/Oracle/
twitter.com/Oracle
oracle.com