Embed Size (px)
Citation preview
Oracle® Retail PlaceConfiguration Guide
Release 12.3
November 2009

Oracle® Retail Place Configuration Guide, Release 12.3
Copyright © 2009, Oracle. All rights reserved.
Primary Author: Anirudha Accanoor
The Programs (which include both the software and documentation) contain proprietary information; they are provided under a license agreement containing restrictions on use and disclosure and are also protected by copyright, patent, and other intellectual and industrial property laws. Reverse engineering, disassembly, or decompilation of the Programs, except to the extent required to obtain interoperability with other independently created software or as specified by law, is prohibited.
The information contained in this document is subject to change without notice. If you find any problems in the documentation, please report them to us in writing. This document is not warranted to be error-free. Except as may be expressly permitted in your license agreement for these Programs, no part of these Programs may be reproduced or transmitted in any form or by any means, electronic or mechanical, for any purpose.
If the Programs are delivered to the United States Government or anyone licensing or using the Programs on behalf of the United States Government, the following notice is applicable:
U.S. GOVERNMENT RIGHTS Programs, software, databases, and related documentation and technical data delivered to U.S. Government customers are "commercial computer software" or "commercial technical data" pursuant to the applicable Federal Acquisition Regulation and agency-specific supplemental regulations. As such, use, duplication, disclosure, modification, and adaptation of the Programs, including documentation and technical data, shall be subject to the licensing restrictions set forth in the applicable Oracle license agreement, and, to the extent applicable, the additional rights set forth in FAR 52.227-19, Commercial Computer Software—Restricted Rights (June 1987). Oracle Corporation, 500 Oracle Parkway, Redwood City, CA 94065
The Programs are not intended for use in any nuclear, aviation, mass transit, medical, or other inherently dangerous applications. It shall be the licensee's responsibility to take all appropriate fail-safe, backup, redundancy and other measures to ensure the safe use of such applications if the Programs are used for such purposes, and we disclaim liability for any damages caused by such use of the Programs.
Oracle, JD Edwards, PeopleSoft, and Siebel are registered trademarks of Oracle Corporation and/or its affiliates. Other names may be trademarks of their respective owners.
The Programs may provide links to Web sites and access to content, products, and services from third parties. Oracle is not responsible for the availability of, or any content provided on, third-party Web sites. You bear all risks associated with the use of such content. If you choose to purchase any products or services from a third party, the relationship is directly between you and the third party. Oracle is not responsible for: (a) the quality of third-party products or services; or (b) fulfilling any of the terms of the agreement with the third party, including delivery of products or services and warranty obligations related to purchased products or services. Oracle is not responsible for any loss or damage of any sort that you may incur from dealing with any third party.

Value-Added Reseller (VAR) Language
Oracle Retail VAR Applications
The following restrictions and provisions only apply to the programs referred to in this section and licensed to you. You acknowledge that the programs may contain third party software (VAR applications) licensed to Oracle. Depending upon your product and its version number, the VAR applications may include:
(i) the software component known as ACUMATE developed and licensed by Lucent Technologies Inc. of Murray Hill, New Jersey, to Oracle and imbedded in the Oracle Retail Predictive Application Server - Enterprise Engine, Oracle Retail Category Management, Oracle Retail Item Planning, Oracle Retail Merchandise Financial Planning, Oracle Retail Advanced Inventory Planning and Oracle Retail Demand Forecasting applications.
(ii) the MicroStrategy Components developed and licensed by MicroStrategy Services Corporation (MicroStrategy) of McLean, Virginia to Oracle and imbedded in the MicroStrategy for Oracle Retail Data Warehouse and MicroStrategy for Oracle Retail Planning & Optimization applications.
(iii) the SeeBeyond component developed and licensed by Sun MicroSystems, Inc. (Sun) of Santa Clara, California, to Oracle and imbedded in the Oracle Retail Integration Bus application.
(iv) the Wavelink component developed and licensed by Wavelink Corporation (Wavelink) of Kirkland, Washington, to Oracle and imbedded in Oracle Retail Store Inventory Management.
(v) the software component known as Crystal Enterprise Professional and/or Crystal Reports Professional licensed by Business Objects Software Limited ("Business Objects") and imbedded in Oracle Retail Store Inventory Management.
(vi) the software component known as Access Via™ licensed by Access Via of Seattle, Washington, and imbedded in Oracle Retail Signs and Oracle Retail Labels and Tags.
(vii) the software component known as Adobe Flex™ licensed by Adobe Systems Incorporated of San Jose, California, and imbedded in Oracle Retail Promotion Planning & Optimization application.
(viii) the software component known as Style Report™ developed and licensed by InetSoft Technology Corp. of Piscataway, New Jersey, to Oracle and imbedded in the Oracle Retail Value Chain Collaboration application.
(ix) the software component known as DataBeacon™ developed and licensed by Cognos Incorporated of Ottawa, Ontario, Canada, to Oracle and imbedded in the Oracle Retail Value Chain Collaboration application.

v
Contents
Preface ................................................................................................................................................................. ix
1 Introduction
About the Place Configuration Guide ................................................................................................. 1-1What’s in This Book ................................................................................................................................. 1-1
2 Getting Started
3 User Management
Introduction .............................................................................................................................................. 3-1About User Roles and User Actions ..................................................................................................... 3-1
About User Actions............................................................................................................................ 3-2About User Management Roles ....................................................................................................... 3-3
User Management Bulk Loader Utility ................................................................................................ 3-3Validate Users and Roles Assignment Information...................................................................... 3-3Using the User Management Bulk Loader Utility......................................................................... 3-4
bulkloader.sh Syntax .................................................................................................................. 3-4Setting Up the Password Policies and Account Lockouts ................................................................ 3-5Setting Up the Access to Merchandise and Location Hierarchy ..................................................... 3-5User Management Security .................................................................................................................... 3-6
4 Business Rule Management
Introduction............................................................................................................................................... 4-1Getting Started .......................................................................................................................................... 4-1Default Place Business Rules................................................................................................................. 4-2Business Rule Definitions ...................................................................................................................... 4-2
Sample Business Rule Definition ..................................................................................................... 4-3Business Rule Definitions Attributes .............................................................................................. 4-3
Loading Business Rule Definitions ...................................................................................................... 4-4Business Rule Instances .......................................................................................................................... 4-5
Guidelines for Entering Business Rule Instances .......................................................................... 4-5Business Rule Management Bulk Loader ....................................................................................... 4-5
Business Rule Instances Standard Interface Specification (ASH_BRM_INSTANCE_TBL) 4-6Loading Instances ....................................................................................................................... 4-6
vi
Custom Attributes .................................................................................................................................... 4-7Loading Custom Attributes .............................................................................................................. 4-7
Setting Up the Business Rule Management Properties .................................................................... 4-8Guidelines for Setting BRM Properties ........................................................................................... 4-8
5 Database Configuration
Introduction............................................................................................................................................... 5-1Loading Seed Data ................................................................................................................................... 5-1Reference to the Data Load Scripts ....................................................................................................... 5-2Interfaces for One-Time Data Inserts ................................................................................................... 5-3
Pricing Event Types (PRICING_TYPES_TBL) ............................................................................... 5-3Client Hierarchy Actions (CLIENT_HIERARCHY_ACTIONS_TBL)........................................ 5-4Cross Products Information (ASH_CP_TBL)................................................................................. 5-5Location Hierarchy Levels (ASH_LHL_TBL) ................................................................................ 5-5Merchandise Hierarchy Levels (ASH_MHL_TBL) ....................................................................... 5-6Pack Hierarchy Levels (ASH_PHL_TBL) ....................................................................................... 5-6
Setting Up Multi-level OTR................................................................................................................... 5-7
6 Store Sets Configuration
Introduction............................................................................................................................................... 6-1Creating Admin Store Sets ..................................................................................................................... 6-1Configuring Store Sets with Filters Based on CDAs ........................................................................ 6-1Updating Dynamic Store Sets................................................................................................................ 6-2
7 Configurable Data Attributes
Introduction............................................................................................................................................... 7-1Defining Configurable Data Attributes .............................................................................................. 7-1Enabling the Configurable Data Attributes........................................................................................ 7-2Using the CDA Administrative Utility ................................................................................................ 7-2
8 Configuration Properties File
Introduction............................................................................................................................................... 8-1Allocating4p.properties File................................................................................................................... 8-1
Calc Engine Properties ...................................................................................................................... 8-2Background Event Subsystem Properties....................................................................................... 8-3Auxiliary URL Properties ................................................................................................................. 8-3Login Properties ................................................................................................................................. 8-3Productionalization Properties ........................................................................................................ 8-4Status Module Properties.................................................................................................................. 8-4Other Properties ................................................................................................................................. 8-4Tab Names Properties ....................................................................................................................... 8-5Grid Configuration Properties ......................................................................................................... 8-6Customize Properties ........................................................................................................................ 8-7Filters Properties ................................................................................................................................ 8-8Language and Country Properties .................................................................................................. 8-8
vii
About Box Heading Properties ........................................................................................................ 8-9Store Sets (Merv) Properties ............................................................................................................. 8-9Acknowledgement and Non-acknowledgement Message Properties ....................................... 8-9Holdback Minimum Properties .................................................................................................... 8-10Store Weights Properties................................................................................................................ 8-10
Store Weights Properties Value Format ............................................................................... 8-12Pricing Plan Configuration Properties ......................................................................................... 8-13
Integration.properties File ................................................................................................................... 8-14Suite.properties File.............................................................................................................................. 8-15A4PConf.properties File....................................................................................................................... 8-16Delphi.properties File .......................................................................................................................... 8-20
9 Customizing the Place User Interface
Introduction............................................................................................................................................... 9-1Grid Configuration XML Files .............................................................................................................. 9-1GridResources.properties File ............................................................................................................... 9-3Loading Customized Grid Configurations ......................................................................................... 9-3Setting Up the Threshold Screen .......................................................................................................... 9-3Restricting the Sort Feature on the Summary Tab ............................................................................. 9-4
Index

viii

ix
Preface
Oracle® Retail Place enables retailers to generate and publish recommended allocations based on optimal size profiles, pack configurations, available warehouse inventory or advance shipping notices (ASNs), and forecasted sales. It also enables retailers to integrate the external systems to capture daily warehouse inventory and current ASNs, and generate the recommended allocations to the stores.
AudienceThis document is intended for system administrators who configure and manage the Place application.
Related DocumentsFor more information, the following documents are available in the Oracle Retail Place Release 12.1.2 documentation set:
■ Oracle Retail Place Installation Guide
■ Oracle Retail Place User Guide
■ Oracle Retail Place Administration Guide
■ Oracle Retail Place Operations Guide
Customer Support■ https://metalink.oracle.com
When contacting Customer Support, please provide:
■ Product version and program/module name
■ Functional and technical description of the problem (include business impact)
■ Detailed step-by-step instructions to recreate
■ Exact error message received
■ Screen shots of each step you take

x
Review Patch DocumentationIf you are installing the application for the first time, you install either a base release (for example, 12.0) or a later patch release (for example, 12.0.2). If you are installing a software version other than the base release, be sure to read the documentation for each patch release (since the base release) before you begin installation. Patch documentation can contain critical information related to the base release and code changes that have been made since the base release.
Oracle Retail Documentation on the Oracle Technology NetworkIn addition to being packaged with each product release (on the base or patch level), all Oracle Retail documentation is available on the following Web site (with the exception of the Data Model which is only available with the release packaged code):
http://www.oracle.com/technology/documentation/oracle_retail.html
Documentation should be available on this Web site within a month after a product release. Note that documentation is always available with the packaged code on the release date.
ConventionsThe following text conventions are used in this document:
Convention Meaning
boldface Boldface type indicates graphical user interface elements associated with an action, or terms defined in text or the glossary.
italic Italic type indicates book titles, emphasis, or placeholder variables for which you supply particular values.
monospace Monospace type indicates commands within a paragraph, URLs, code in examples, text that appears on the screen, or text that you enter.

Introduction 1-1
1Introduction
This chapter contains the following sections:
■ “About the Place Configuration Guide” on page 1-1
■ “What’s in This Book” on page 1-1
About the Place Configuration GuideAlthough you can use Place with the default configuration that comes with the product, in order to take full advantage of the capabilities of Place and integrate it into your business practices, you can customize Place to reflect your own business requirements.
This Configuration Guide provides the information on configuring the Place application to meet the specific business requirements.
What’s in This BookThe Place Configuration Guide addresses the following topics:
■ Chapter 2, "Getting Started", provides an overview of all the configuration points in Place.
■ Chapter 3, "User Management", provides information on how you can configure the user accounts.
■ Chapter 4, "Business Rule Management", provides information on how you can customize the business rule settings.
■ Chapter 5, "Database Configuration", provides information on the scripts you must run to load the seed data into the database.
■ Chapter 6, "Store Sets Configuration", provides information on how you can configure the store sets and update the dynamic store sets.
■ Chapter 7, "Configurable Data Attributes", provides information on how you can define and enable configurable data attributes (CDAs).
■ Chapter 8, "Configuration Properties File", provides information on the various properties files that you can use to configure the application.
■ Chapter 9, "Customizing the Place User Interface", provides information on the grid configuration files you can use to customize the grid configurations in the Place application.
What’s in This Book
1-2 Oracle® Retail Place Configuration Guide
Getting Started 2-1
2Getting Started
Once you have installed Place, you are ready to configure it to perform allocation optimization in a production environment. The best approach to configure Place is to get a basic production environment up and running. Once that is done, you can customize the application to meet the specific business needs.
The general areas for configuration include:
■ User Management – Place is installed with some default roles. You must configure the password policies and set accessible hierarchy levels for the user accounts. For more information, see Chapter 3, "User Management".
■ Business Rule Management – You must configure and load the business rules that manage system-wide business parameters. Most business rules in Place are configured only once. For more information, see Chapter 4, "Business Rule Management".
■ Database Configuration – Before the first set of data is loaded, a number of one-time data loads must occur. This process includes the running of scripts to populate the database with seed data. For more information, see Chapter 5, "Database Configuration".
■ Store Set Configuration – After you load the location hierarchy information for the first time, you must create admin store sets. You must also update the dynamic store set information using the storesetupdater.sh script. For more information, see Chapter 6, "Store Sets Configuration".
■ Configurable Data Attributes (CDA) – CDAs include the custom merchandise or location attributes. You must enable the CDA feature for Place (disabled by default), and use the CDA Administration Utility to load the CDA columns you want in Place. For more information, see Chapter 7, "Configurable Data Attributes".
■ Configuration Properties Files – Place includes certain properties files that help you configure the application based on your business needs. This includes properties such as Calc Engine parameters, grid configuration, and messaging. For more information, see Chapter 8, "Configuration Properties File".
■ Customizing the Place User Interface – The Place user interface displays information based on the grid configuration file setup for each functional area. You can set up and load the customized grid configurations for the modules you want. For more information, see Chapter 9, "Customizing the Place User Interface".

2-2 Oracle® Retail Place Configuration Guide
User Management 3-1
3User Management
This chapter contains the following sections:
■ “Introduction” on page 3-1
■ “About User Roles and User Actions” on page 3-1
■ “User Management Bulk Loader Utility” on page 3-3
■ “Setting Up the Password Policies and Account Lockouts” on page 3-5
■ “Setting Up the Access to Merchandise and Location Hierarchy” on page 3-5
■ “User Management Security” on page 3-6
Introduction User Management is a utility that lets you create, modify, and remove user accounts from a central location. The User Management utility is installed automatically when you install the application.
Each user who accesses the application must have a user account. Each user account is assigned one or more roles that determine the types of functions the user can perform with the application.
Single sign-on is supported so that users can access the entire suite of products, if available, without additional authentication.
About User Roles and User ActionsA user role is a named set of actions for a particular software, which determines the following:
■ The software features or utilities a user can access.
■ The actions a user can perform with that product (such as approve access or view only access).
■ The merchandise hierarchy and location hierarchy levels a user is allowed to access, which in turn, determines the following:
– The data a user can access in reports.
– The items a user can allocate.
The Place application includes a set of default user roles. However, your company may work with the implementation team to customize user roles for your particular working environment. Customizing user roles involves adding one or more user actions to a named role. You can assign as many roles as necessary to a user account.
About User Roles and User Actions
3-2 Oracle® Retail Place Configuration Guide
During the implementation, you must load the following initial set of roles (along with default users) using the User Management Bulk Loader utility:
■ Sysadmin
■ Bizadmin
■ Allocmgr
■ Allocdir
■ Allocsr
■ Alloc
■ View
■ Viewonly
■ Alloctrn
About User ActionsRoles are defined by a specific set of user actions. The actions that define each role serve to delimit the activities a user can perform. All actions are self-contained. For example, Write does not imply Read. So a role must include all the actions that are necessary for complete functionality.
Place comes with the following set of actions, loaded into the ROLE_ACTION_TBL table:
■ View allocations (VA)
■ Edit allocations (EA)
■ Approve allocations (PA)
■ Release allocations (RA)
■ Edit Business Admin Data (EB)
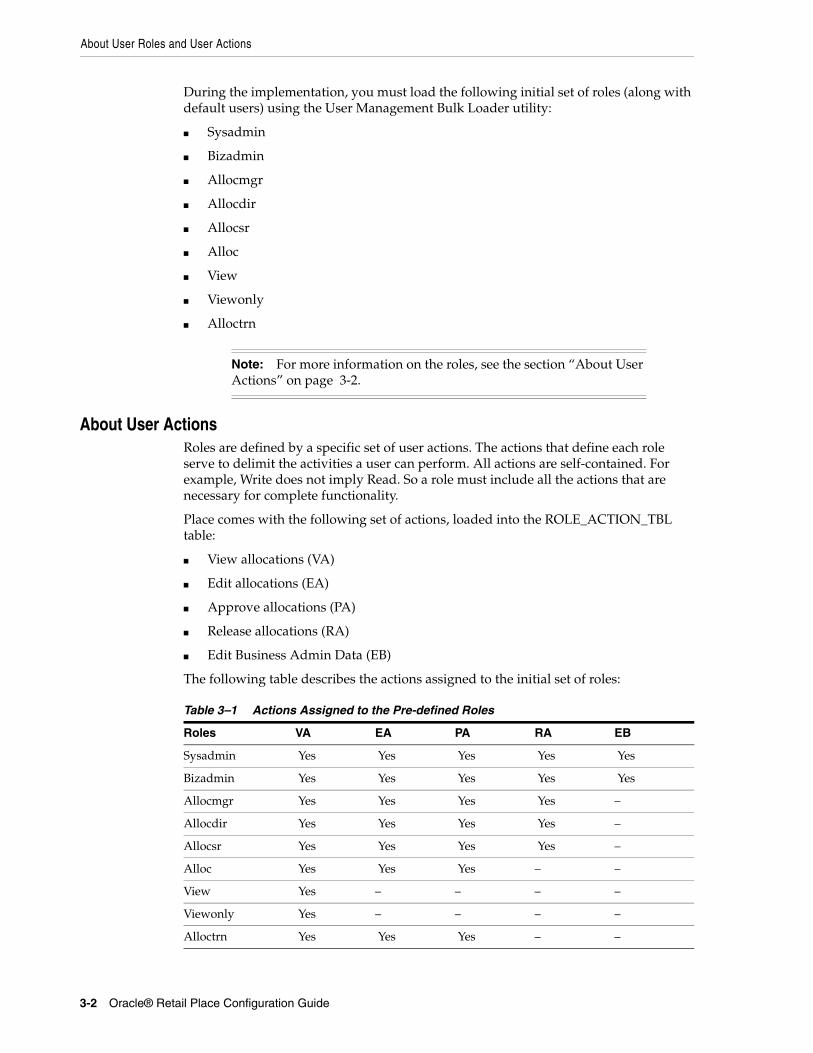
The following table describes the actions assigned to the initial set of roles:
Note: For more information on the roles, see the section “About User Actions” on page 3-2.
Table 3–1 Actions Assigned to the Pre-defined Roles
Roles VA EA PA RA EB
Sysadmin Yes Yes Yes Yes Yes
Bizadmin Yes Yes Yes Yes Yes
Allocmgr Yes Yes Yes Yes –
Allocdir Yes Yes Yes Yes –
Allocsr Yes Yes Yes Yes –
Alloc Yes Yes Yes – –
View Yes – – – –
Viewonly Yes – – – –
Alloctrn Yes Yes Yes – –

User Management Bulk Loader Utility
User Management 3-3
About User Management RolesUser accounts with user management roles have access to features such as creating users, assigning roles, removing user accounts, and resetting passwords.
When a user with a User Management role logs on, a link to the User Management utility appears on the Main Menu.
The following list describes the default User Management roles:
■ UM_READ_ONLY_ADMIN – This role allows read-only access to the User Management utility. This role has privileges to view the list of users and their roles and hierarchy levels, but not to create new user accounts or modify or inactivate existing ones.
■ UM_ROLE_ASSIGN_ADMIN – This role allows assigning new roles (and related hierarchy levels) to existing user accounts, but it does not allow the creation of new user accounts.
■ UM_USER_ADMIN – This role allows creating new user accounts, but it does not allow the assignment of roles to the new accounts.
User Management Bulk Loader UtilityUse the User Management Bulk Loader utility to load a group of users and their roles in the Place application.
If you are creating a small number of user accounts, using the default actions, you can create those accounts using the User Management console. (For more information, see the Oracle Retail Place Administration Guide.) However, if you want to create user accounts for a group of users all at one time, you must use the User Management Bulk Loader (bulkloader.sh) utility.
Before you run the Bulk Loader utility, you must perform the following tasks:
■ Validate the user accounts and role assignment XML files that define the users, roles, and role assignments. For more information, see the section “Validate Users and Roles Assignment Information” on page 3-3.
■ Complete the standard load process to load information into the merchandise hierarchy (ASH_MH_TBL) and location hierarchy (ASH_LH_TBL) tables. For more information, see the Standard Load chapter in the Oracle Retail Place Operations Guide.
■ Specify the application server URL in the jndi.properties file (in the BulkLoader folder).
Validate Users and Roles Assignment InformationYou must update and validate the following XML files to include the initial set of user accounts and role assignments essential for configuring the Place application:
■ User Accounts file (user_set.xml) – This file includes the user account information. Ensure that the user names are unique.
■ Role Assignments file (role_assignment_set.xml) – This file includes the user names and the roles associated with the user name.
Note: User Management administrators must understand the levels available in the merchandise and location hierarchies.
User Management Bulk Loader Utility
3-4 Oracle® Retail Place Configuration Guide
A Role Accounts file (roles_set.xml) is also available that includes the initial set of roles that can be assigned. Ensure that you retain the roles defined in this XML file.
You can find the sample XML files, along with the XML schemas, at the following location in the Place installation folder:
<Place_Installation>\modules\tools\conf\
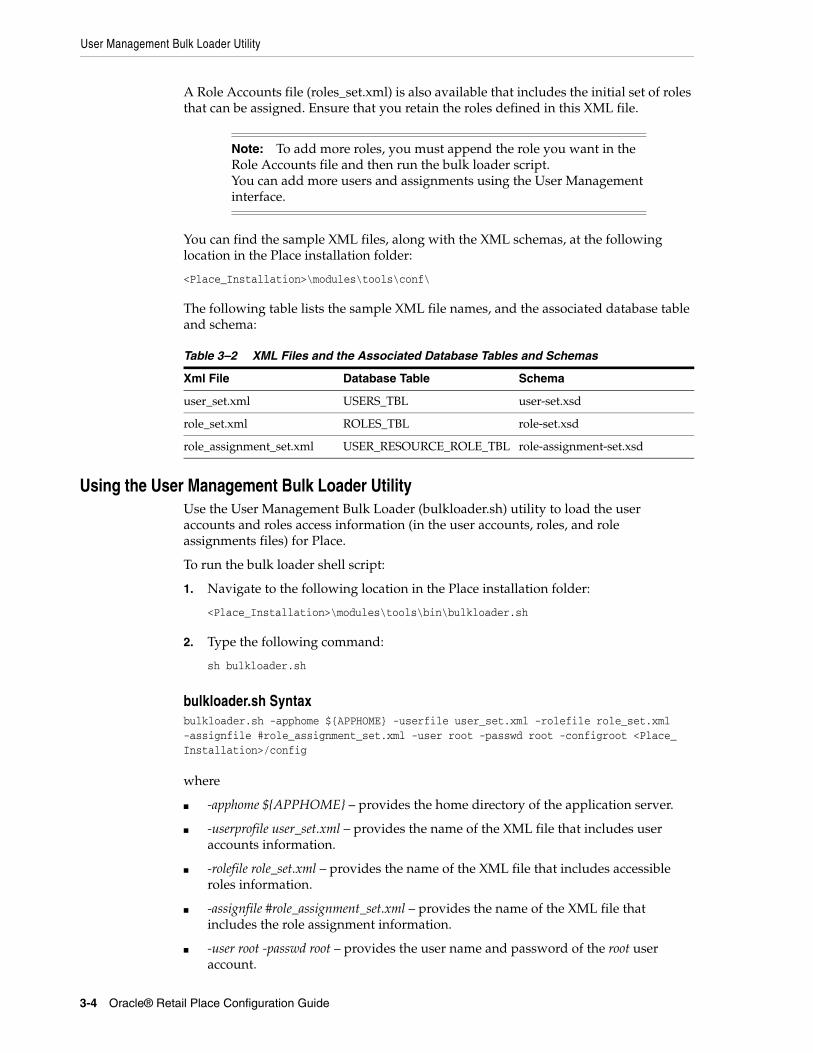
The following table lists the sample XML file names, and the associated database table and schema:
Using the User Management Bulk Loader UtilityUse the User Management Bulk Loader (bulkloader.sh) utility to load the user accounts and roles access information (in the user accounts, roles, and role assignments files) for Place.
To run the bulk loader shell script:
1. Navigate to the following location in the Place installation folder:
<Place_Installation>\modules\tools\bin\bulkloader.sh
2. Type the following command:
sh bulkloader.sh
bulkloader.sh Syntaxbulkloader.sh -apphome ${APPHOME} -userfile user_set.xml -rolefile role_set.xml -assignfile #role_assignment_set.xml -user root -passwd root -configroot <Place_Installation>/config
where
■ -apphome ${APPHOME} – provides the home directory of the application server.
■ -userprofile user_set.xml – provides the name of the XML file that includes user accounts information.
■ -rolefile role_set.xml – provides the name of the XML file that includes accessible roles information.
■ -assignfile #role_assignment_set.xml – provides the name of the XML file that includes the role assignment information.
■ -user root -passwd root – provides the user name and password of the root user account.
Note: To add more roles, you must append the role you want in the Role Accounts file and then run the bulk loader script.You can add more users and assignments using the User Management interface.
Table 3–2 XML Files and the Associated Database Tables and Schemas
Xml File Database Table Schema
user_set.xml USERS_TBL user-set.xsd
role_set.xml ROLES_TBL role-set.xsd
role_assignment_set.xml USER_RESOURCE_ROLE_TBL role-assignment-set.xsd
Setting Up the Access to Merchandise and Location Hierarchy
User Management 3-5
■ -configroot <Place_Installation>/config – provides the path to the application configuration root directory.
Setting Up the Password Policies and Account LockoutsUse the useraccount.properties file to set up the following password policies for the user accounts:
■ Password format and length
■ Check for the previous passwords
■ Password expiry period
■ Maximum allowed unsuccessful login attempts
You can find the useraccount.properties file at the following location:
<Place_Installation>\config\UserManagement\
To configure the useraccount.properties file:
1. Navigate to the following location in the Place installation folder:
<Place_Installation>\config\UserManagement\
2. Edit the useraccount.properties file, specifying values based on the descriptions provided in the properties file, and save it.
3. Restart the application server.
Setting Up the Access to Merchandise and Location HierarchyUse the usermanagement.properties file to specify the lowest merchandise and location hierarchy level accessible to the user accounts. The usermanagement.properties file is located in the following folder:
<Place_Installation>\config\UserManagement\
To specify the accessible merchandise and location hierarchy levels:
1. Navigate to the following location in the Place installation folder:
<Place_Installation>\config\UserManagement\
2. In the usermanagement.properties file, enter an appropriate hierarchy level in both the fields, merchandizeMaxRoleAssignmentDepth and locationMaxRoleAssignmentDepth, and save the file.
3. Restart the application server.
Note: If you place the XML files in a folder other than the default location (see “Validate Users and Roles Assignment Information” on page 3-3), you must specify the path along with the file name in the bulkloader.sh.
Note: Updates to the password policies take effect once you restart the application server.

User Management Security
3-6 Oracle® Retail Place Configuration Guide
User Management SecurityIn order to ensure the security of the application, the following security features are available in User Management:
■ The AUTOCOMPLETE attribute is configurable on forms where passwords or user names are entered. By default, AUTOCOMPLETE is set to ON so that sensitive information is stored.
<ConfigRoot>/suite/suite.properties/suite.loginform.autocomplete = ON
■ The session timeout value is set in suite.httpsession.timeout. By default, it is set to 1800 seconds.
<ConfigRoot>/suite/suite.properties/suite.httpsession.timeout = 1800
■ The configure login timeout value is independent of the session timeout and should be of a shorter time period than the session timeout. If the value is not set, it defaults to the session timeout value. By default, it is set to 120 seconds.
<ConfigRoot>/suite/suite.properties/suite.userlogin.timeout = 120
■ The attribute on the session ID cookie is set for secure deployments so that only the cookie can be transmitted via HTTPS and over an encrypted network. The default value is FALSE.
<ConfigRoot>/suite/suite.properties/suite.cookie.secure = FALSE
For more information on the suite.properties file, see the section “Suite.properties File” on page 8-15.
Note: Updates to the password policies take effect once you restart the application server.

Business Rule Management 4-1
4Business Rule Management
This chapter contains the following sections:
■ “Introduction” on page 4-1
■ “Getting Started” on page 4-1
■ “Default Place Business Rules” on page 4-2
■ “Business Rule Definitions” on page 4-2
■ “Loading Business Rule Definitions” on page 4-4
■ “Business Rule Instances” on page 4-5
■ “Custom Attributes” on page 4-7
■ “Setting Up the Business Rule Management Properties” on page 4-8
IntroductionThe Business Rule Management utility enables you to view and change the business rule settings in the Place application. Business rules specify the business constraints that the application applies when performing calculations, forecasts, and other automated processes. These business rules determine the data need for calculations and the data that should be displayed. This chapter describes how you can load and configure the business rules for the Place application.
Users can access the Business Rule Management (BRM) utility to view and change the business rule settings. A user’s ability to view and change the business rule settings is based on the permissions applied to the user roles. For more information on the access and the user interface to the Business Rule Management utility, see the Oracle Retail Place Administration Guide.
Getting StartedOnce Place is installed, you must configure the business rule definitions based on your business needs. The Place installation includes a configurable business rule definitions file that specifies the constraints associated to the business rule instances (mappings between location and merchandise hierarchy levels and business rule values).
The default business rule definitions file for Place is located in the following Place installation folder:
<Place_Installation>\modules\tools\conf\DefaultRules\place_rule_definitions.xml
When configuring business rules to meet your business needs, consider the following:
Default Place Business Rules
4-2 Oracle® Retail Place Configuration Guide
■ When configuring key levels, you must manage the levels you can set in conjunction with the inheritance hierarchy and user access.
■ Editing business rule definitions to change validations or default values may affect rule instances.
■ Editing business rule definitions to change validations or default values may affect system performance.
■ If you add a new business rule or change an existing one, you may need to add resources or modify the grid configuration.
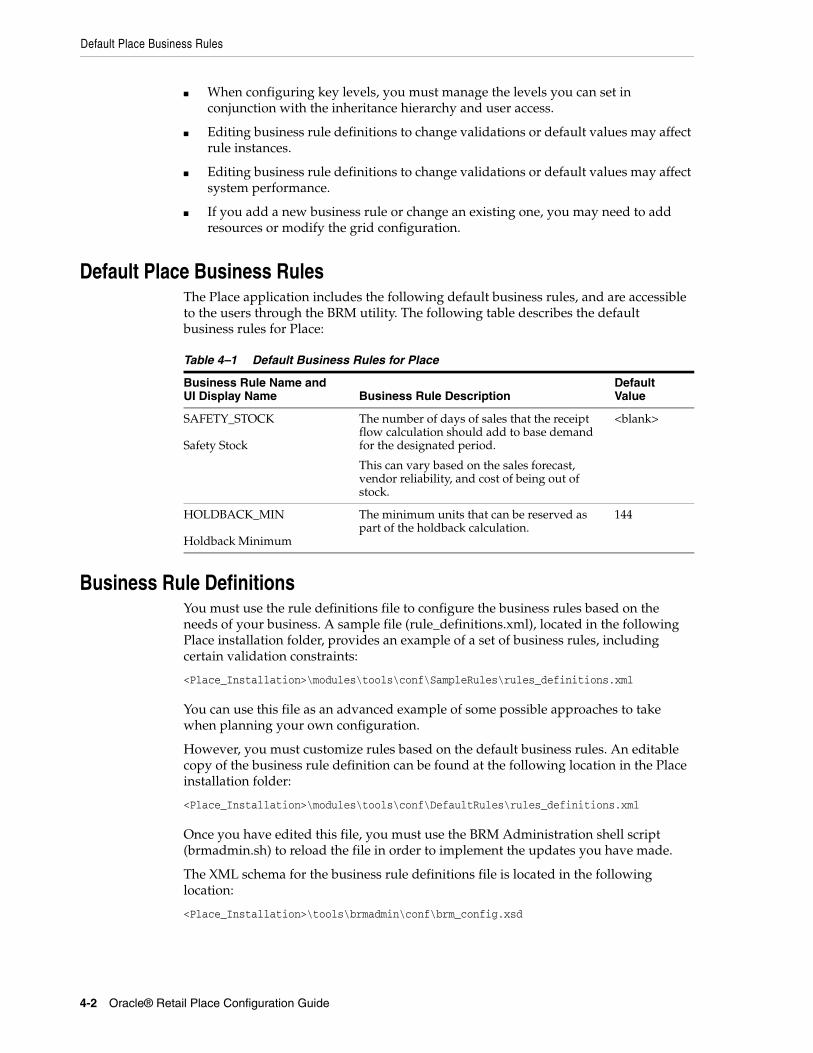
Default Place Business RulesThe Place application includes the following default business rules, and are accessible to the users through the BRM utility. The following table describes the default business rules for Place:
Business Rule DefinitionsYou must use the rule definitions file to configure the business rules based on the needs of your business. A sample file (rule_definitions.xml), located in the following Place installation folder, provides an example of a set of business rules, including certain validation constraints:
<Place_Installation>\modules\tools\conf\SampleRules\rules_definitions.xml
You can use this file as an advanced example of some possible approaches to take when planning your own configuration.
However, you must customize rules based on the default business rules. An editable copy of the business rule definition can be found at the following location in the Place installation folder:
<Place_Installation>\modules\tools\conf\DefaultRules\rules_definitions.xml
Once you have edited this file, you must use the BRM Administration shell script (brmadmin.sh) to reload the file in order to implement the updates you have made.
The XML schema for the business rule definitions file is located in the following location:
<Place_Installation>\tools\brmadmin\conf\brm_config.xsd
Table 4–1 Default Business Rules for Place
Business Rule Name andUI Display Name Business Rule Description
Default Value
SAFETY_STOCK
Safety Stock
The number of days of sales that the receipt flow calculation should add to base demand for the designated period.
This can vary based on the sales forecast, vendor reliability, and cost of being out of stock.
<blank>
HOLDBACK_MIN
Holdback Minimum
The minimum units that can be reserved as part of the holdback calculation.
144
Business Rule Definitions
Business Rule Management 4-3
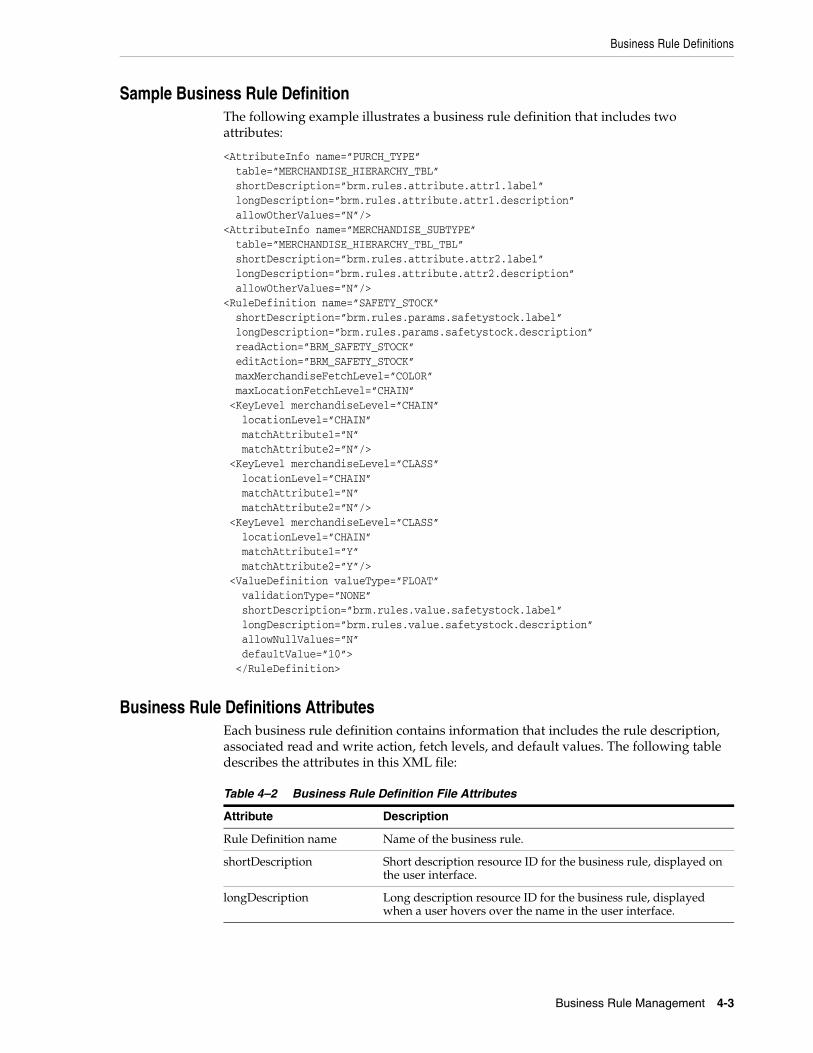
Sample Business Rule DefinitionThe following example illustrates a business rule definition that includes two attributes:
<AttributeInfo name=”PURCH_TYPE” table=”MERCHANDISE_HIERARCHY_TBL” shortDescription=”brm.rules.attribute.attr1.label” longDescription=”brm.rules.attribute.attr1.description” allowOtherValues=”N”/><AttributeInfo name=”MERCHANDISE_SUBTYPE” table=”MERCHANDISE_HIERARCHY_TBL_TBL” shortDescription=”brm.rules.attribute.attr2.label” longDescription=”brm.rules.attribute.attr2.description” allowOtherValues=”N”/><RuleDefinition name=”SAFETY_STOCK” shortDescription=”brm.rules.params.safetystock.label” longDescription=”brm.rules.params.safetystock.description” readAction=”BRM_SAFETY_STOCK” editAction=”BRM_SAFETY_STOCK” maxMerchandiseFetchLevel=”COLOR” maxLocationFetchLevel=”CHAIN” <KeyLevel merchandiseLevel=”CHAIN” locationLevel=”CHAIN” matchAttribute1=”N” matchAttribute2=”N”/> <KeyLevel merchandiseLevel=”CLASS” locationLevel=”CHAIN” matchAttribute1=”N” matchAttribute2=”N”/> <KeyLevel merchandiseLevel=”CLASS” locationLevel=”CHAIN” matchAttribute1=”Y” matchAttribute2=”Y”/> <ValueDefinition valueType=”FLOAT” validationType=”NONE” shortDescription=”brm.rules.value.safetystock.label” longDescription=”brm.rules.value.safetystock.description” allowNullValues=”N” defaultValue=”10”> </RuleDefinition>
Business Rule Definitions AttributesEach business rule definition contains information that includes the rule description, associated read and write action, fetch levels, and default values. The following table describes the attributes in this XML file:
Table 4–2 Business Rule Definition File Attributes
Attribute Description
Rule Definition name Name of the business rule.
shortDescription Short description resource ID for the business rule, displayed on the user interface.
longDescription Long description resource ID for the business rule, displayed when a user hovers over the name in the user interface.

Loading Business Rule Definitions
4-4 Oracle® Retail Place Configuration Guide
Loading Business Rule DefinitionsWhen you first begin using the application and whenever you make changes, you must load the business rule definitions file into the database, using brmadmin.sh.
Use the Business Rules Management Administration shell script (brmadmin.sh) to load the business rule definitions file into the application.
To run the BRM Administration script:
1. Navigate to the following location in the Place installation folder:
<Place_Installation_Root>\modules\tools\bin\
2. Type the following command:
sh brmadmin.sh
brmadmin.sh SyntaxHere is the usage for the brmadmin.sh script.
For Server Mode (the default), which sends the request to the application server:
brmadmin.sh [-server] <config_root> <rule_definitions>
readAction and editAction The read action and the write action associated with the business rule. Roles, which are assigned to specific users and determine their permissions, are made up of actions. In order for users to be able to view or edit a business rule in the UI, they must be assigned appropriate roles.
maxMerchandiseFetchLevel Fetch levels for the merchandise hierarchy, always set to OPTIMIZATION.
maxLocationFetchLevel Fetch levels for the location hierarchy, always set to OPTIMIZATION.
KeyLevels An arbitrary number of key levels that specify at what levels an instance of the business rule can be matched to an item. Each key level contains a merchandise hierarchy level; a location hierarchy level, and optional custom attributes that are used to determine the match between an item and a rule.
Value Definition Type of value for the rule. You can specify the following value types:
■ Integer
■ Floating point number
■ Date
■ String
Validation Validation by range, enumeration, or none. If the value is range, then the minimum and maximum values are provided. If the value is enumeration, a list of values is provided.
Default Value The default value for the rule. If no default value is assigned, then NULL is assumed.
Range If range is being used for validation, in combination with a valid type, the minimum and maximum values of the range are provided.
Table 4–2 (Cont.) Business Rule Definition File Attributes
Attribute Description
Business Rule Instances
Business Rule Management 4-5
For Client Mode, which processes the request on the client side:
brmadmin.sh [-client] <config_root> <rule_definitions>
where
■ <config_root> – The root folder of the Place configuration files.
■ <rule_definitions> – The name of the XML file that contains the rule definitions.
The file must contain the complete set of definitions. Definitions for rules not contained in the file are removed. You must preserve business rule definitions required by the application.
Business rule instances are affected when you modify business rule definitions. If you change rule value types, business rule instances may be deleted. In addition, changes to definitions may cause inconsistencies between the rules and the instances. As a result, the application may not perform properly.
Business Rule InstancesA business rule instance is a specific mapping between a key and a rule value. When BRM is installed, instances for the business rules exist at the top level and have the default values assigned to them (even if the top level is not a settable key level as defined in the business rule definition). If a business rule instance is deleted, the object that was assigned that instance will then inherit the settings of the instance at the next higher precedence level in the hierarchy. If the top level is deleted, the instance returns to the default value in the business rule definition file.
Guidelines for Entering Business Rule InstancesYou can enter values for business rules either by using the BRM application or the BRM API. Both methods validate the instance against the BRM rule definitions. When using the BRM, you must be assigned a role that permits you to make changes to business rule values.
Business rule instances must be consistent with business rule definitions:
■ Instances must be settable at the desired level, as defined in the rule definitions.
■ Instances must conform to the validations defined in the rule definitions, which include the value type.
■ Each instance must have an associated business rule definition.
■ The key level of each instance must be permitted by the rule definition.
■ The attribute values used in the instance keys should be consistent with the attributes in the BRM configuration.
Business Rule Management Bulk LoaderThe Business Rule Management Bulk Loader provides a means for staging and loading a set of business rule instances. This utility is included within the standard interface and standard load (for more information, see the Oracle® Retail Place Operations Guide), but can also be implemented separately if new or updated business rule instances need to be loaded outside the normal scheduled batch processes. The Bulk Loader validates the business rule instances according to the guidelines described in Guidelines for Entering Business Rule Instances.
Business Rule Instances
4-6 Oracle® Retail Place Configuration Guide
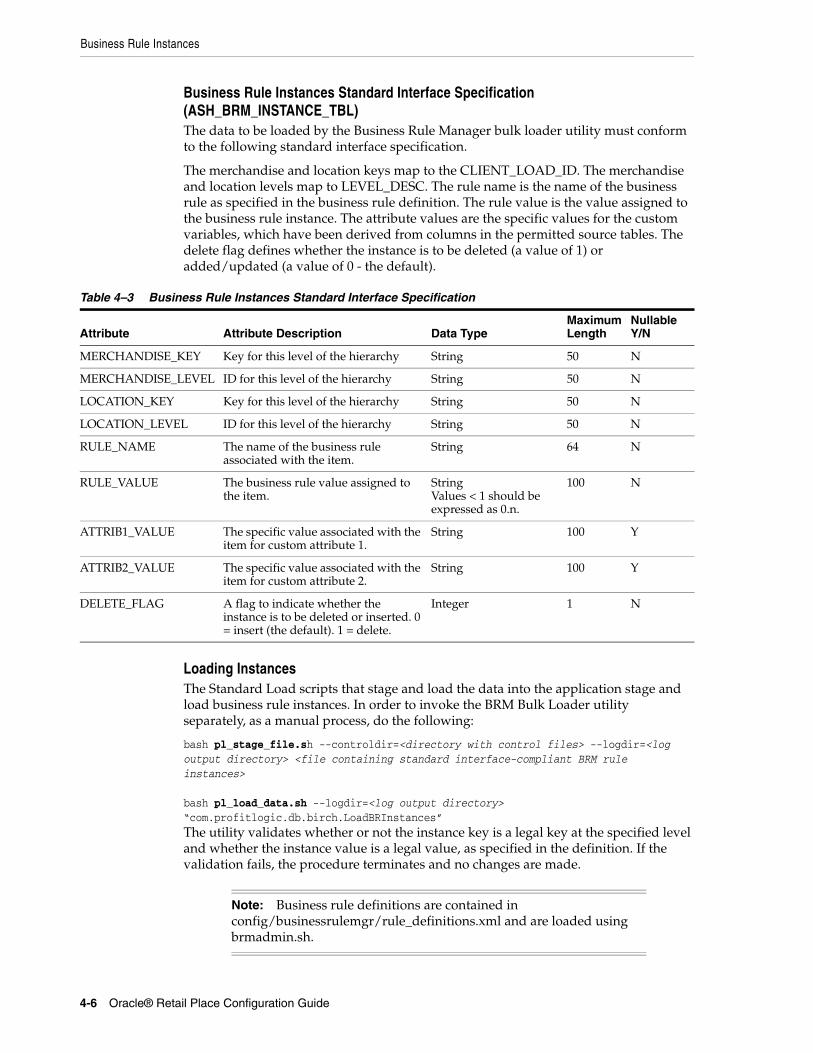
Business Rule Instances Standard Interface Specification (ASH_BRM_INSTANCE_TBL)The data to be loaded by the Business Rule Manager bulk loader utility must conform to the following standard interface specification.
The merchandise and location keys map to the CLIENT_LOAD_ID. The merchandise and location levels map to LEVEL_DESC. The rule name is the name of the business rule as specified in the business rule definition. The rule value is the value assigned to the business rule instance. The attribute values are the specific values for the custom variables, which have been derived from columns in the permitted source tables. The delete flag defines whether the instance is to be deleted (a value of 1) or added/updated (a value of 0 - the default).
Loading InstancesThe Standard Load scripts that stage and load the data into the application stage and load business rule instances. In order to invoke the BRM Bulk Loader utility separately, as a manual process, do the following:
bash pl_stage_file.sh --controldir=<directory with control files> --logdir=<log output directory> <file containing standard interface-compliant BRM rule instances>
bash pl_load_data.sh --logdir=<log output directory> “com.profitlogic.db.birch.LoadBRInstances”The utility validates whether or not the instance key is a legal key at the specified level and whether the instance value is a legal value, as specified in the definition. If the validation fails, the procedure terminates and no changes are made.
Table 4–3 Business Rule Instances Standard Interface Specification
Attribute Attribute Description Data TypeMaximum Length
NullableY/N
MERCHANDISE_KEY Key for this level of the hierarchy String 50 N
MERCHANDISE_LEVEL ID for this level of the hierarchy String 50 N
LOCATION_KEY Key for this level of the hierarchy String 50 N
LOCATION_LEVEL ID for this level of the hierarchy String 50 N
RULE_NAME The name of the business rule associated with the item.
String 64 N
RULE_VALUE The business rule value assigned to the item.
StringValues < 1 should be expressed as 0.n.
100 N
ATTRIB1_VALUE The specific value associated with the item for custom attribute 1.
String 100 Y
ATTRIB2_VALUE The specific value associated with the item for custom attribute 2.
String 100 Y
DELETE_FLAG A flag to indicate whether the instance is to be deleted or inserted. 0 = insert (the default). 1 = delete.
Integer 1 N
Note: Business rule definitions are contained in config/businessrulemgr/rule_definitions.xml and are loaded using brmadmin.sh.
Custom Attributes
Business Rule Management 4-7
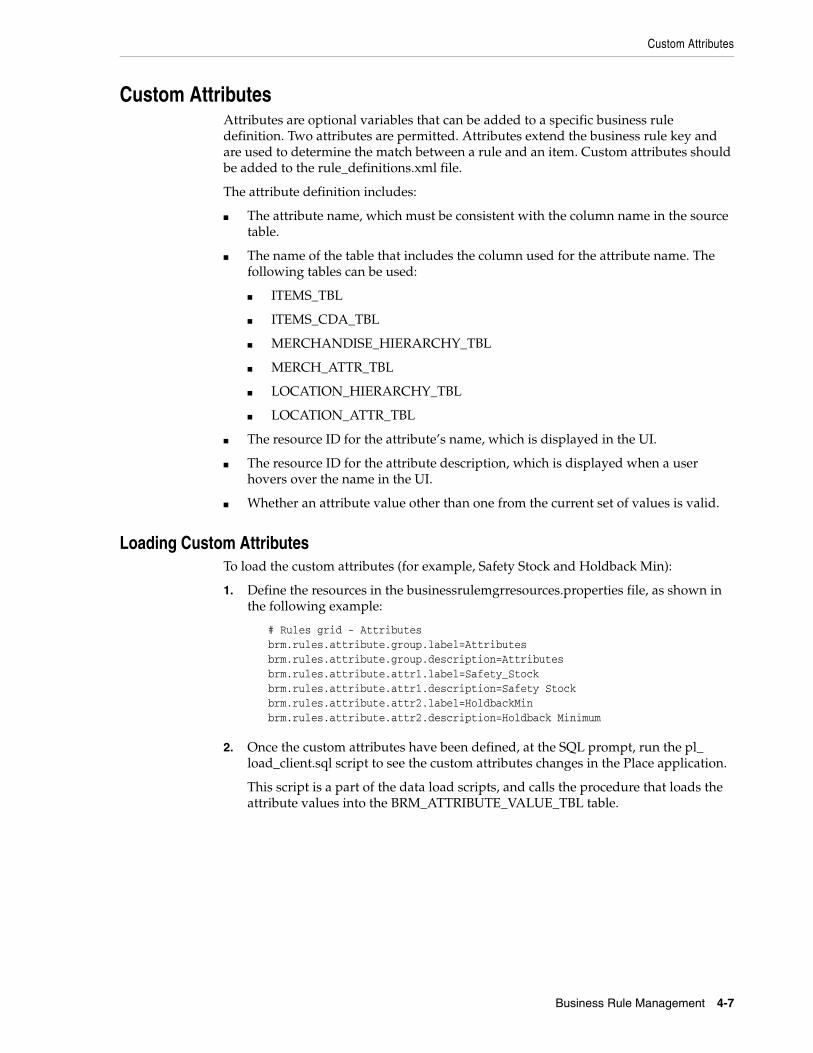
Custom AttributesAttributes are optional variables that can be added to a specific business rule definition. Two attributes are permitted. Attributes extend the business rule key and are used to determine the match between a rule and an item. Custom attributes should be added to the rule_definitions.xml file.
The attribute definition includes:
■ The attribute name, which must be consistent with the column name in the source table.
■ The name of the table that includes the column used for the attribute name. The following tables can be used:
■ ITEMS_TBL
■ ITEMS_CDA_TBL
■ MERCHANDISE_HIERARCHY_TBL
■ MERCH_ATTR_TBL
■ LOCATION_HIERARCHY_TBL
■ LOCATION_ATTR_TBL
■ The resource ID for the attribute’s name, which is displayed in the UI.
■ The resource ID for the attribute description, which is displayed when a user hovers over the name in the UI.
■ Whether an attribute value other than one from the current set of values is valid.
Loading Custom AttributesTo load the custom attributes (for example, Safety Stock and Holdback Min):
1. Define the resources in the businessrulemgrresources.properties file, as shown in the following example:
# Rules grid - Attributesbrm.rules.attribute.group.label=Attributesbrm.rules.attribute.group.description=Attributesbrm.rules.attribute.attr1.label=Safety_Stockbrm.rules.attribute.attr1.description=Safety Stockbrm.rules.attribute.attr2.label=HoldbackMinbrm.rules.attribute.attr2.description=Holdback Minimum
2. Once the custom attributes have been defined, at the SQL prompt, run the pl_load_client.sql script to see the custom attributes changes in the Place application.
This script is a part of the data load scripts, and calls the procedure that loads the attribute values into the BRM_ATTRIBUTE_VALUE_TBL table.
Setting Up the Business Rule Management Properties
4-8 Oracle® Retail Place Configuration Guide
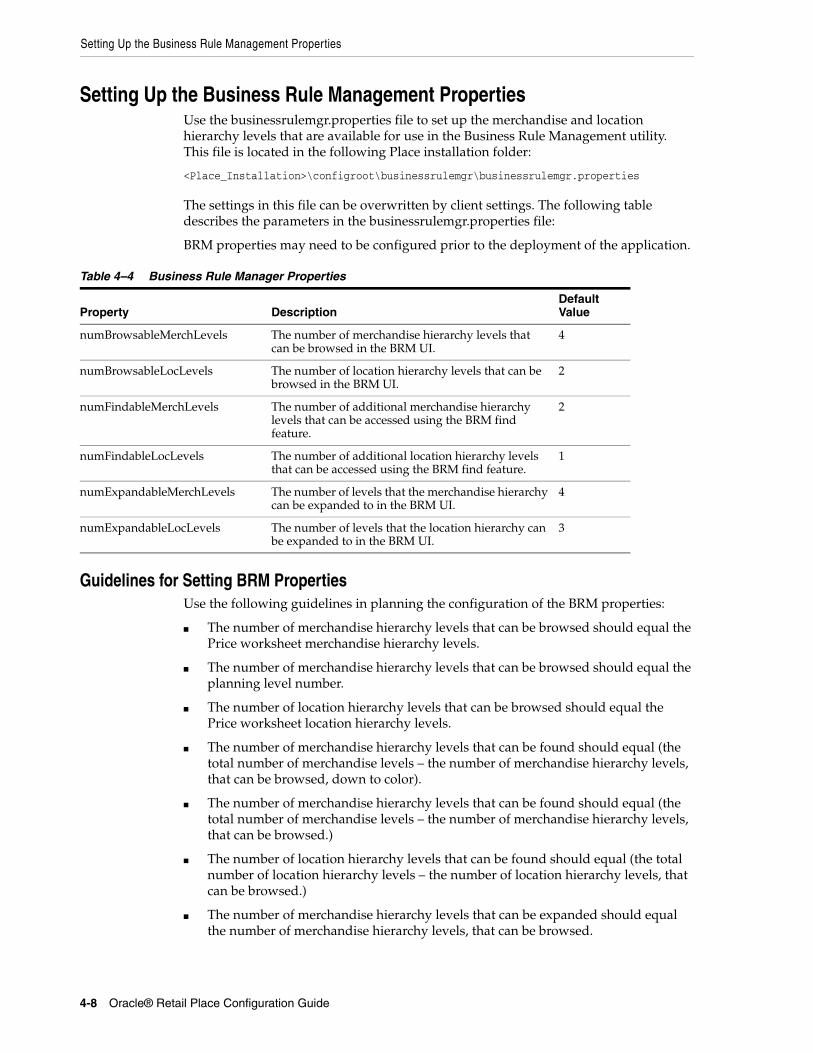
Setting Up the Business Rule Management PropertiesUse the businessrulemgr.properties file to set up the merchandise and location hierarchy levels that are available for use in the Business Rule Management utility. This file is located in the following Place installation folder:
<Place_Installation>\configroot\businessrulemgr\businessrulemgr.properties
The settings in this file can be overwritten by client settings. The following table describes the parameters in the businessrulemgr.properties file:
BRM properties may need to be configured prior to the deployment of the application.
Guidelines for Setting BRM PropertiesUse the following guidelines in planning the configuration of the BRM properties:
■ The number of merchandise hierarchy levels that can be browsed should equal the Price worksheet merchandise hierarchy levels.
■ The number of merchandise hierarchy levels that can be browsed should equal the planning level number.
■ The number of location hierarchy levels that can be browsed should equal the Price worksheet location hierarchy levels.
■ The number of merchandise hierarchy levels that can be found should equal (the total number of merchandise levels – the number of merchandise hierarchy levels, that can be browsed, down to color).
■ The number of merchandise hierarchy levels that can be found should equal (the total number of merchandise levels – the number of merchandise hierarchy levels, that can be browsed.)
■ The number of location hierarchy levels that can be found should equal (the total number of location hierarchy levels – the number of location hierarchy levels, that can be browsed.)
■ The number of merchandise hierarchy levels that can be expanded should equal the number of merchandise hierarchy levels, that can be browsed.
Table 4–4 Business Rule Manager Properties
Property DescriptionDefault Value
numBrowsableMerchLevels The number of merchandise hierarchy levels that can be browsed in the BRM UI.
4
numBrowsableLocLevels The number of location hierarchy levels that can be browsed in the BRM UI.
2
numFindableMerchLevels The number of additional merchandise hierarchy levels that can be accessed using the BRM find feature.
2
numFindableLocLevels The number of additional location hierarchy levels that can be accessed using the BRM find feature.
1
numExpandableMerchLevels The number of levels that the merchandise hierarchy can be expanded to in the BRM UI.
4
numExpandableLocLevels The number of levels that the location hierarchy can be expanded to in the BRM UI.
3
Setting Up the Business Rule Management Properties
Business Rule Management 4-9
■ The number of location hierarchy levels that can be expanded should equal the number of location hierarchy levels, that can be browsed.
In addition, keep in mind the following considerations:
■ The BRM validates that the total number of levels defined in the properties file does not exceed the number of levels defined in the database.
■ To forestall performance or memory problems, set the number of levels in the properties file close to Class in the merchandise hierarchy.
■ You may need to configure the default values for the following parameters in suite.properties file (located in the configroot/suite folder):
■ common.hierarchy.fetch.merch.maxlevels
■ common.hierarchy.fetch.loc.maxlevels
■ common.hierarchy.cache.timeout.hours
Setting Up the Business Rule Management Properties
4-10 Oracle® Retail Place Configuration Guide
Database Configuration 5-1
5Database Configuration
This chapter contains the following sections:
■ “Introduction” on page 5-1
■ “Loading Seed Data” on page 5-1
■ “Reference to the Data Load Scripts” on page 5-2
■ “Interfaces for One-Time Data Inserts” on page 5-3
■ “Setting Up Multi-level OTR” on page 5-7
IntroductionOnce you set up user accounts and business rules, you must load the initial set of data required by the application (seed data), into the database. This chapter provides information on the various scripts you must use to load the seed data. It also describes the data load scripts and the interfaces for the data feeds.
Loading Seed DataFor the Place application to work, you must run certain scripts to load the seed data. These scripts help you load generic and customized data required for your business.
You can find the sample scripts at the following location in the Place installation directory:
<Place_Installation>/Datasets/AESample/Data/Seed
Before you start the load process, ensure that the custom scripts are set up based on your business needs. You can run the generic scripts without any modifications and load the seed data. For more information on the scripts, see the section “Reference to the Data Load Scripts” on page 5-2.
To load the seed data:
1. At the SQL prompt, run the following scripts in order:
■ custom_ir_objects.sql (Custom script)
■ pl_dd_attributes.sql (Generic script)
■ data_levels_tbl.sql (Custom script)
■ dist_centers_tbl.sql (Custom script)
■ create_default_users.sql (Generic script)
■ merch_admin_setting_types_tbl.sql (Generic script)
Reference to the Data Load Scripts
5-2 Oracle® Retail Place Configuration Guide
■ merchandise_admin_settings_tbl.sql (Custom script)
■ otr_component_types_tbl.sql (Custom script)
■ grid_data_population.sql (Generic script)
■ upd_static_grid_data.sql (Generic script)
2. Add the following script to the automation setup process (based on your business needs) for the nightly run:
■ pl_load_client_place.sql (Place-specific script)
3. After the first automation process, run the following scripts:
■ store_set_data.sql (Generic script)
■ store_attribute_names_tbl.sql (Generic script)
■ planned_item_types.sql (Generic script)
■ media_types.sql (Generic script)
■ emphasis_types.sql (Generic script)
■ indicator_types.sql (Generic script)
■ pricing_types.sql (Generic script)
4. Run the Initialization Load process, and then the following script:
■ a4p_required_data.sql (Place-specific script)
For more information on the Initialization Load process, see the chapter Standard Load in the Oracle® Retail Place Operations Guide.
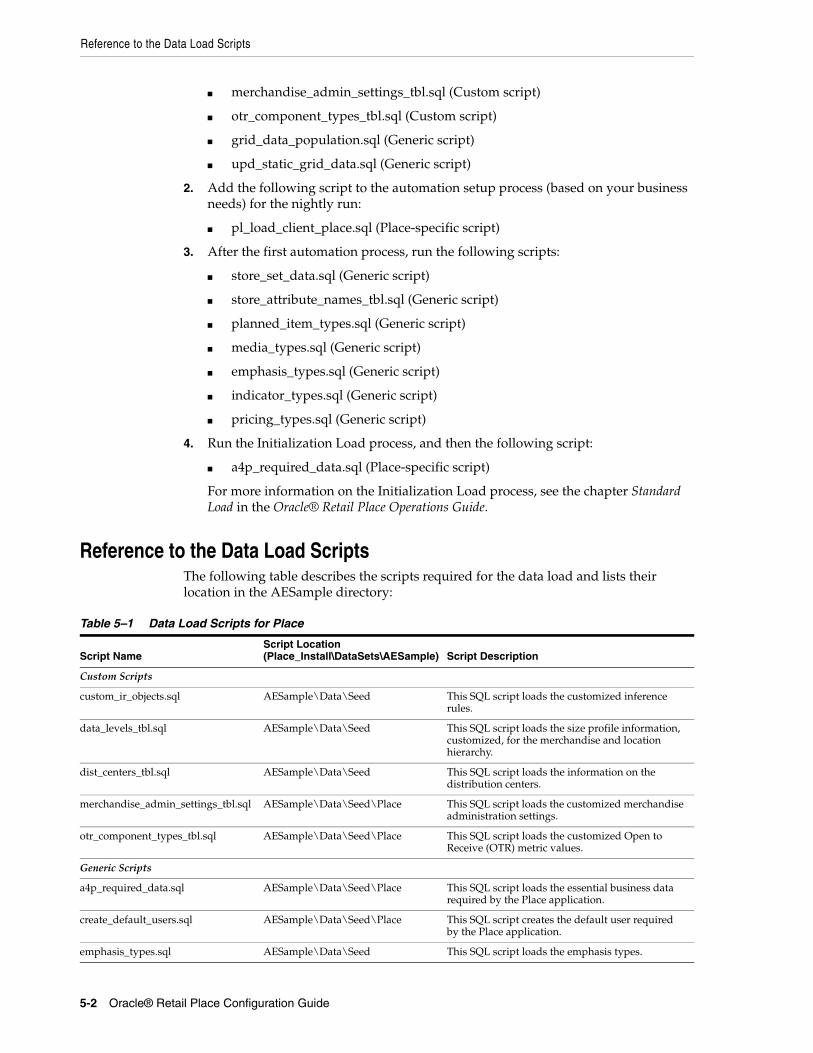
Reference to the Data Load ScriptsThe following table describes the scripts required for the data load and lists their location in the AESample directory:
Table 5–1 Data Load Scripts for Place
Script NameScript Location(Place_Install\DataSets\AESample) Script Description
Custom Scripts
custom_ir_objects.sql AESample\Data\Seed This SQL script loads the customized inference rules.
data_levels_tbl.sql AESample\Data\Seed This SQL script loads the size profile information, customized, for the merchandise and location hierarchy.
dist_centers_tbl.sql AESample\Data\Seed This SQL script loads the information on the distribution centers.
merchandise_admin_settings_tbl.sql AESample\Data\Seed\Place This SQL script loads the customized merchandise administration settings.
otr_component_types_tbl.sql AESample\Data\Seed\Place This SQL script loads the customized Open to Receive (OTR) metric values.
Generic Scripts
a4p_required_data.sql AESample\Data\Seed\Place This SQL script loads the essential business data required by the Place application.
create_default_users.sql AESample\Data\Seed\Place This SQL script creates the default user required by the Place application.
emphasis_types.sql AESample\Data\Seed This SQL script loads the emphasis types.

Interfaces for One-Time Data Inserts
Database Configuration 5-3
Interfaces for One-Time Data InsertsThe following standard interface specifications are required by some of the scripts that load the seed data:
■ “Pricing Event Types (PRICING_TYPES_TBL)” on page 5-3
■ “Client Hierarchy Actions (CLIENT_HIERARCHY_ACTIONS_TBL)” on page 5-4
■ “Cross Products Information (ASH_CP_TBL)” on page 5-5
■ “Location Hierarchy Levels (ASH_LHL_TBL)” on page 5-5
■ “Merchandise Hierarchy Levels (ASH_MHL_TBL)” on page 5-6
■ “Pack Hierarchy Levels (ASH_PHL_TBL)” on page 5-6
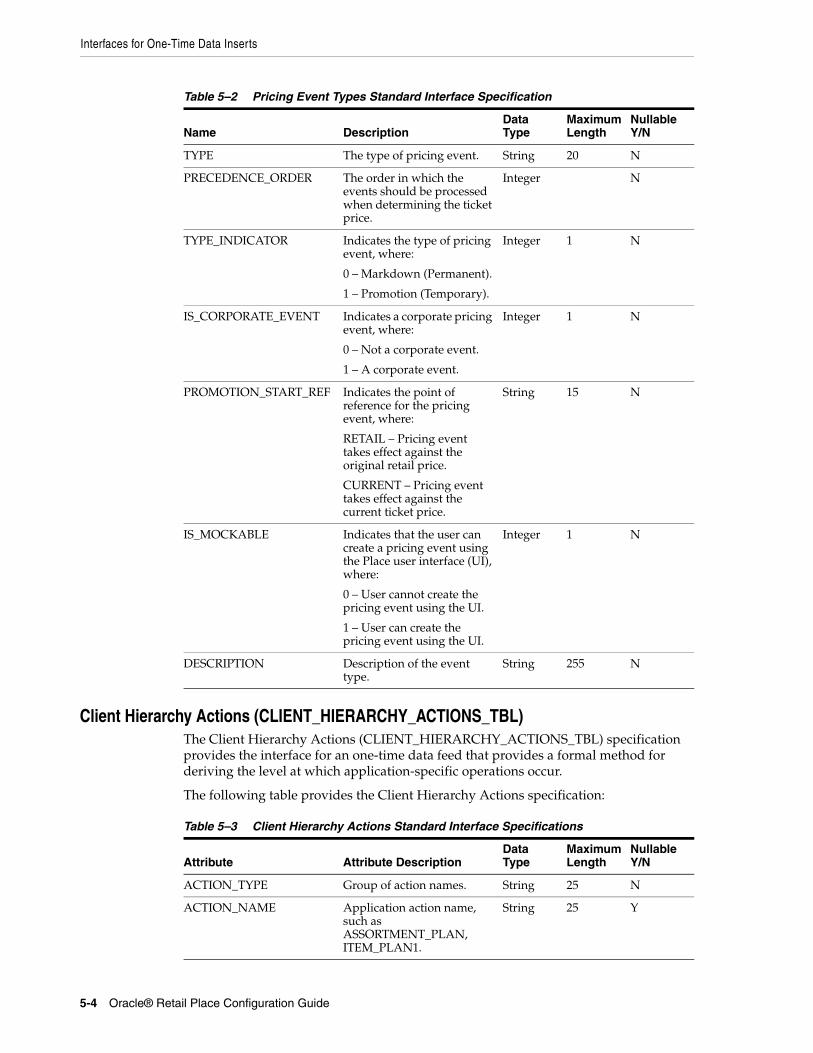
Pricing Event Types (PRICING_TYPES_TBL)The Pricing Event Types (PRICING_TYPES_TBL) specification provides the customized values that are required by the PLANNED_PROMOS view.
The following table describes the Pricing Event Types interface specification:
grid_data_population.sql AESample\Data\Seed\Place This SQL script loads the grid and column configurations.
media_types.sql AESample\Data\Seed This SQL script loads the information on the type of media used in a promotion.
merch_admin_setting_types_tbl.sql AESample\Data\Seed\Place This SQL script loads the merchandise administration setting types.
page_indicator_types.sql AESample\Data\Seed This SQL script loads the information about the location, front or back, where the promotion advertisement can be placed.
pl_dd_attributes.sql AESample\Data\Seed This SQL script enables the merchandise hierarchy and location hierarchy CDAs (disabled by default.)
pl_load_client_place.sql AESample\DeployScripts\Place This SQL script executes various procedures to load the warehouse inventory, daily inventory, OTR feeds, and weekly sales for the Place application.
planned_item_types.sql AESample\Data\Seed This SQL script loads the planned item types.
pricing_types.sql AESample\Data\Seed This SQL script loads the pricing types.
store_attribute_names_tbl.sql AESample\Data\Seed This SQL script loads the store division (Str Div) and subset records in the STORE_ATTRIBUTES_NAMES_TBL table. These records are the initial set of location hierarchy level descriptions (in the Store Set User Interface) essential for the application.
store_set_data.sql AESample\Data\Seed This SQL script loads the store set information.
upd_static_grid_data.sql AESample\Data\Seed\Place This SQL script loads the Store Division (STR DIV) record in the CT_COLUMNS_TBL table. This table stores the grid and column information in the database.
Table 5–1 (Cont.) Data Load Scripts for Place
Script NameScript Location(Place_Install\DataSets\AESample) Script Description
Interfaces for One-Time Data Inserts
5-4 Oracle® Retail Place Configuration Guide
Client Hierarchy Actions (CLIENT_HIERARCHY_ACTIONS_TBL)The Client Hierarchy Actions (CLIENT_HIERARCHY_ACTIONS_TBL) specification provides the interface for an one-time data feed that provides a formal method for deriving the level at which application-specific operations occur.
The following table provides the Client Hierarchy Actions specification:
Table 5–2 Pricing Event Types Standard Interface Specification
Name DescriptionData Type
Maximum Length
Nullable Y/N
TYPE The type of pricing event. String 20 N
PRECEDENCE_ORDER The order in which the events should be processed when determining the ticket price.
Integer N
TYPE_INDICATOR Indicates the type of pricing event, where:
0 – Markdown (Permanent).
1 – Promotion (Temporary).
Integer 1 N
IS_CORPORATE_EVENT Indicates a corporate pricing event, where:
0 – Not a corporate event.
1 – A corporate event.
Integer 1 N
PROMOTION_START_REF Indicates the point of reference for the pricing event, where:
RETAIL – Pricing event takes effect against the original retail price.
CURRENT – Pricing event takes effect against the current ticket price.
String 15 N
IS_MOCKABLE Indicates that the user can create a pricing event using the Place user interface (UI), where:
0 – User cannot create the pricing event using the UI.
1 – User can create the pricing event using the UI.
Integer 1 N
DESCRIPTION Description of the event type.
String 255 N
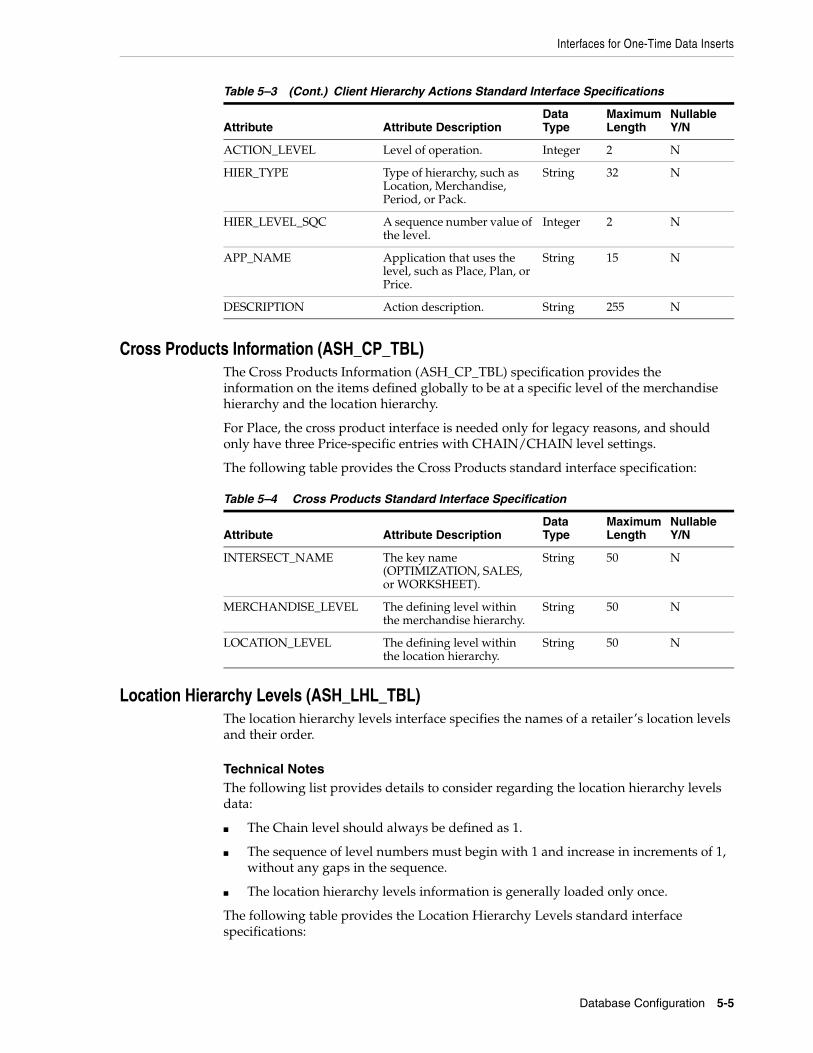
Table 5–3 Client Hierarchy Actions Standard Interface Specifications
Attribute Attribute DescriptionData Type
Maximum Length
NullableY/N
ACTION_TYPE Group of action names. String 25 N
ACTION_NAME Application action name, such as ASSORTMENT_PLAN, ITEM_PLAN1.
String 25 Y
Interfaces for One-Time Data Inserts
Database Configuration 5-5
Cross Products Information (ASH_CP_TBL)The Cross Products Information (ASH_CP_TBL) specification provides the information on the items defined globally to be at a specific level of the merchandise hierarchy and the location hierarchy.
For Place, the cross product interface is needed only for legacy reasons, and should only have three Price-specific entries with CHAIN/CHAIN level settings.
The following table provides the Cross Products standard interface specification:
Location Hierarchy Levels (ASH_LHL_TBL)The location hierarchy levels interface specifies the names of a retailer’s location levels and their order.
Technical NotesThe following list provides details to consider regarding the location hierarchy levels data:
■ The Chain level should always be defined as 1.
■ The sequence of level numbers must begin with 1 and increase in increments of 1, without any gaps in the sequence.
■ The location hierarchy levels information is generally loaded only once.
The following table provides the Location Hierarchy Levels standard interface specifications:
ACTION_LEVEL Level of operation. Integer 2 N
HIER_TYPE Type of hierarchy, such as Location, Merchandise, Period, or Pack.
String 32 N
HIER_LEVEL_SQC A sequence number value of the level.
Integer 2 N
APP_NAME Application that uses the level, such as Place, Plan, or Price.
String 15 N
DESCRIPTION Action description. String 255 N
Table 5–4 Cross Products Standard Interface Specification
Attribute Attribute DescriptionData Type
Maximum Length
NullableY/N
INTERSECT_NAME The key name (OPTIMIZATION, SALES, or WORKSHEET).
String 50 N
MERCHANDISE_LEVEL The defining level within the merchandise hierarchy.
String 50 N
LOCATION_LEVEL The defining level within the location hierarchy.
String 50 N
Table 5–3 (Cont.) Client Hierarchy Actions Standard Interface Specifications
Attribute Attribute DescriptionData Type
Maximum Length
NullableY/N

Interfaces for One-Time Data Inserts
5-6 Oracle® Retail Place Configuration Guide
Merchandise Hierarchy Levels (ASH_MHL_TBL)The Merchandise Hierarchy Levels standard interface specifies the names of a retailer’s merchandise levels and their order.
Technical NotesThe following list provides details to consider regarding the merchandise hierarchy levels data:
■ The Chain level should always be defined as 1.
■ The sequence of level numbers must begin with 1 and increase in increments of 1, without any gaps in the sequence.
■ The merchandise hierarchy levels information is generally loaded only once.
The following table provides the Merchandise Hierarchy Levels standard interface specifications:
Pack Hierarchy Levels (ASH_PHL_TBL)The Pack Hierarchy Levels standard interface specifies the names of a retailer’s pack levels and their order.
Technical NotesThe following list provides details to consider regarding the pack hierarchy levels data:
■ The Chain level should always be defined as 1.
■ The sequence of level numbers must begin with 1 and increase in increments of 1, without any gaps in the sequence.
■ The pack hierarchy levels information is generally loaded only once.
The following table describes the Pack Hierarchy Levels standard interface specifications:
Table 5–5 Location Hierarchy Levels Standard Interface Specification
Attribute Attribute DescriptionData Type
Maximum Length
NullableY/N
LOCATION_LEVEL The name of the location level.
String 50 N
LEVEL_SQC The sequence number of the level.
Integer 2 N
Table 5–6 Merchandise Hierarchy Levels Standard Interface Specification
Attribute Attribute DescriptionData Type
Maximum Length
NullableY/N
MERCHANDISE_LEVEL The name of the merchandise level.
String 50 N
LEVEL_SQC The sequence number of the merchandise level.
Integer 2 N

Setting Up Multi-level OTR
Database Configuration 5-7
Setting Up Multi-level OTRThe multi-level Open-To-Receive or Open-To-Ship data allows the comparison of OTR values at multiple levels of the merchandise hierarchy such as department, sub-department, class, or sub-class.
The merchandising levels of aggregation (OTR levels) are read from the client_actions_levels_vw view, which is sourced from the client_hierarchy_actions_tbl database table. The client_hierarchy_actions_tbl database table includes information based on the nightly loads from the client_hierarchy_actions_tbl.dat data file.
This data file is specific to your business, and each entry must include information in the following format:
APP_NAME|ACTION_NAME|ACTION_TYPE|ACTION_LEVEL|HIER_TYPE|HIER_LEVEL_SQC |DESCRIPTION|
For example,
An entry in the .dat file for a department level OTR data looks like the following:
AE|OTR_LEVEL1|OTR_LEVEL|0|MERCHANDISE|4|Department level OTR metric
Where,
Before you start the load, ensure that the client_hierarchy_actions_tbl database table does not contain any OTR level information. In case the OTR level information exists, use the following SQL statement to remove the records:
delete from client_hierarchy_actions_tbl where action_name = 'OTR_LEVEL'; commit;
Table 5–7 Pack Hierarchy Levels Standard Interface Specification
Attribute Attribute DescriptionData Type
Maximum Length
NullableY/N
PACK_LEVEL The name of the pack level. String 50 N
LEVEL_SQC The sequence number of the level.
Integer 2 N
APP_NAME Name of the application. For OTR, the value is AE.
ACTION_NAME Specifies a particular action types. For example, OTR_LEVEL1, OTR_LEVEL2, and so on.
ACTION_TYPE Specifies the type of hierarchy. For example, OTR_LEVEL.
ACTION_LEVEL Specifies the level set for the hierarchy type. For OTR, the value is 0.
HIER_TYPE Specifies the hierarchy type. For OTR, the value is MERCHANDISE.
HIER_LEVEL_SQC Merchandising hierarchy level sequence. This value must be UNIQUE within the OTR_LEVEL. ACTION_NAME records or the load will fail, if duplicate data are being created.
DESCRIPTION Short description of this row.
Note: Currently, Place 12.0.8 environments have a OTR level record (with hierarchy level sequence set at the Department level, by default) in the client_hierarchy_actions_tbl database table. To avoid load failures, you must remove this record using the SQL statement mentioned above.
Setting Up Multi-level OTR
5-8 Oracle® Retail Place Configuration Guide

Store Sets Configuration 6-1
6Store Sets Configuration
This chapter contains the following sections:
■ “Introduction” on page 6-1
■ “Creating Admin Store Sets” on page 6-1
■ “Configuring Store Sets with Filters Based on CDAs” on page 6-1
■ “Updating Dynamic Store Sets” on page 6-2
IntroductionOnce you load the seed data, which includes the merchandise hierarchy levels, location hierarchy levels, and pack hierarchy levels, you must configure the store sets. The configuration includes creating the admin store sets, configuring store sets with filters based on CDAs, and updating the dynamic store sets.
Creating Admin Store SetsAfter you load the location hierarchy information for the first time, you must create the following admin store sets:
■ ALL
■ store_ad_group
Subset filters for the store_ad_group store set must be specified, based on the distinct values of the store_ad_group column in LOCATION_HIERARCHY_TBL. To create the store sets, run the following SQL scripts:
■ a4p_required_data.sql – This script populates the LOCATION_GROUPS_TBL table. This table provides information on the store sets, subsets, and groups to be used in the Place application.
■ dist_centers_tbl.sql – This script populates the DIST_CENTERS_TBL table. This table provides information on the distribution centers and the load routine so that the default distribution centers are created.
Configuring Store Sets with Filters Based on CDAsIf you have store sets with filters based on CDAs, then you must complete the following configuration tasks:
1. Use the following steps and update the store_attribute_names_tbl table for each implemented CDA. (The entries already exist in the table for CDAs, but the filtering is disabled by default.)

Updating Dynamic Store Sets
6-2 Oracle® Retail Place Configuration Guide
a. Change the filterable_flag field to 1.
b. Update the Display_Name field to reflect the desired label for the CDA. This governs the attribute name in the Filter drop-down list (on the Filters tab in Store Set Management utility).
c. The Subset Filter display names are not resourced. So, you must update this table with any standard location attribute names that are changing.
2. In the storelayout-grid.xml file, add the attribute columns you want.
3. Update the gridResources.properties file with the desired CDA labels, which will configure the column headings and customize the table labels on the Stores grid. The gridResources.properties file is located in the following Place installation folder:
<Place_Installation>\config\storesets\resources\
Updating Dynamic Store SetsUse the store set updater utility (storesetupdater.sh) to update all the dynamic store sets, based on any new data feeds. Changes to store sets that require using this utility include changes to store attributes or the addition of a new store. You must schedule this utility to run after the nightly data load. It should be included as part of the automation process.
You can find the storesetupdater.sh script in <Install_Base>/StoreSets/tools/bin. It is normally run without arguments. The script picks up the application server location from jndi.properties.
You can also run the script in the following manner:
storesetupdater.sh -u jndiURL
where jndiURL is formatted as t3://<host>:<port>
T3 is an optimized protocol developed by BEA to transport data across clients and servers.

Configurable Data Attributes 7-1
7Configurable Data Attributes
This chapter contains the following:
■ “Introduction” on page 7-1
■ “Defining Configurable Data Attributes” on page 7-1
■ “Enabling the Configurable Data Attributes” on page 7-2
■ “Using the CDA Administrative Utility” on page 7-2
IntroductionConfigurable Data Attributes (CDAs) provide a way for retailers to see, in addition to the default data that is visible through the application interface, custom data that they themselves specify and that is not required by the application. This data can be used in business rules and can be displayed in the application UI.
Defining Configurable Data AttributesConfigurable Data Attributes are defined in the database using the CDA Administration Utility. The data is then staged and loaded. All client-specified data is included in the standard interface specification in fields with field names beginning with the word ATTRIBUTE.
You can access the CDAs in the database via database queries or change the grid configuration to make them visible in the user interface.
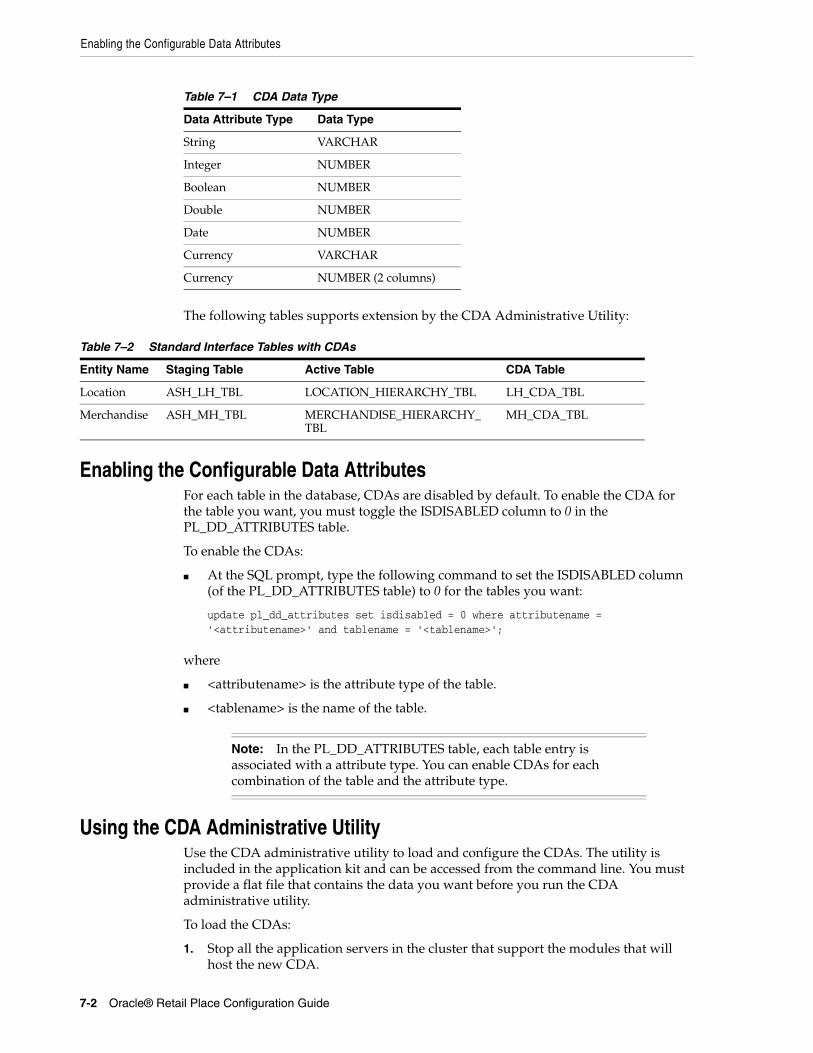
The number of CDAs per entity is limited by the number of database columns pre-allocated in every CDA database table. Every application schema provides eight data columns of type VARCHAR and DATE, and ten number columns of type NUMBER. When you are creating a new attribute, you can choose the data columns from the following attributes of the corresponding type:
Note: The Place application supports the use of CDAs for the Store Set Management utility.
Note: CDAs are disabled by default. The ISDISABLED column in the PL_DD_ATTRIBUTES table must be set to 0 to enable the CDA. For more information, see the section “Enabling the Configurable Data Attributes” on page 7-2.
Enabling the Configurable Data Attributes
7-2 Oracle® Retail Place Configuration Guide
The following tables supports extension by the CDA Administrative Utility:
Enabling the Configurable Data AttributesFor each table in the database, CDAs are disabled by default. To enable the CDA for the table you want, you must toggle the ISDISABLED column to 0 in the PL_DD_ATTRIBUTES table.
To enable the CDAs:
■ At the SQL prompt, type the following command to set the ISDISABLED column (of the PL_DD_ATTRIBUTES table) to 0 for the tables you want:
update pl_dd_attributes set isdisabled = 0 where attributename = '<attributename>' and tablename = '<tablename>';
where
■ <attributename> is the attribute type of the table.
■ <tablename> is the name of the table.
Using the CDA Administrative UtilityUse the CDA administrative utility to load and configure the CDAs. The utility is included in the application kit and can be accessed from the command line. You must provide a flat file that contains the data you want before you run the CDA administrative utility.
To load the CDAs:
1. Stop all the application servers in the cluster that support the modules that will host the new CDA.
Table 7–1 CDA Data Type
Data Attribute Type Data Type
String VARCHAR
Integer NUMBER
Boolean NUMBER
Double NUMBER
Date NUMBER
Currency VARCHAR
Currency NUMBER (2 columns)
Table 7–2 Standard Interface Tables with CDAs
Entity Name Staging Table Active Table CDA Table
Location ASH_LH_TBL LOCATION_HIERARCHY_TBL LH_CDA_TBL
Merchandise ASH_MH_TBL MERCHANDISE_HIERARCHY_TBL
MH_CDA_TBL
Note: In the PL_DD_ATTRIBUTES table, each table entry is associated with a attribute type. You can enable CDAs for each combination of the table and the attribute type.
Using the CDA Administrative Utility
Configurable Data Attributes 7-3
2. Set the DISPLAY environment variable as follows:
export DISPLAY=ipaddress:0.0
where the IP address is a machine that has the X-Window system configured on Linux or the X server on Windows.
3. From the bash shell, change the current working directory to the following folder:
<Place_installation>\modules\tools\cdaadmin\bin\
4. Run the CDA administrative utility, using the following command:
sh cdaadmin.sh /<install directory>/config.variables
where the config.variables is the config.variables file that was generated during installation.
5. Enable the appropriate number of CDA columns.
6. Enter or choose the appropriate property, such as name, type, or restriction, as well as the business entity for the CDA.
7. Save and exit from the CDA Administrative Utility. The Standard Data Interface is configured for staging and loading CDAs.
8. Once the CDAs are defined and enabled using the CDA Administrative Utility, run the staging and loading procedure to make the CDA available to the database.
9. Restart all application servers in the cluster.
Note: Ensure that no other user is running the CDA utility on another node at the same time.
Using the CDA Administrative Utility
7-4 Oracle® Retail Place Configuration Guide

Configuration Properties File 8-1
8Configuration Properties File
This chapter contains the following sections:
■ “Introduction” on page 8-1
■ “Allocating4p.properties File” on page 8-1
■ “Integration.properties File” on page 8-14
■ “Suite.properties File” on page 8-15
■ “A4PConf.properties File” on page 8-16
■ “Delphi.properties File” on page 8-20
IntroductionThe configuration properties files enable you to set up and configure various parameters in the Place application. This chapter lists the properties files installed along with Place, and describes the parameters included in each file.
Although you can update or set the values for the properties in these configuration files to configure the Place application, Oracle recommends that you make a copy of the file in the client subfolder, and then update the configuration file. The properties defined in the configuration file (in the client subfolder) override those found in the original configuration file.
Once you update the value of any parameter in the configuration files, you must restart the application server for the changes to take effect.
Allocating4p.properties FileThe allocating4p.properties configuration file enables you to set up the following parameters for the Place application:
■ “Calc Engine Properties” on page 8-2
■ “Background Event Subsystem Properties” on page 8-3
■ “Auxiliary URL Properties” on page 8-3
■ “Login Properties” on page 8-3
■ “Productionalization Properties” on page 8-4
■ “Status Module Properties” on page 8-4
■ “Other Properties” on page 8-4
■ “Tab Names Properties” on page 8-5

Allocating4p.properties File
8-2 Oracle® Retail Place Configuration Guide
■ “Grid Configuration Properties” on page 8-6
■ “Customize Properties” on page 8-7
■ “Filters Properties” on page 8-8
■ “Language and Country Properties” on page 8-8
■ “About Box Heading Properties” on page 8-9
■ “Store Sets (Merv) Properties” on page 8-9
■ “Acknowledgement and Non-acknowledgement Message Properties” on page 8-9
■ “Store Weights Properties” on page 8-10
This configuration file is located in the following Place installation folder:
<Place_Installation>\config\allocating4p\
Calc Engine PropertiesUse the Calc Engine properties to specify the parameters, such as information on the JNDI connection, message queue, and timeouts, used by Place to communicate with the Calc Engine.
The following table describes the Calc Engine properties:
Table 8–1 Calc Engine Properties
Parameter Description
default_Context The JNDI context factory that is used to obtain the JNDI name server hosting the JMS-administered objects for the Calc Engine.
weblogic.jndi.WLInitialContextFactory
jndi_url The URL of the Calc Engine. Place uses this URL to connect to the Calc Engine. You can specify this URL in the install.properties file before installing the Place application.
connection_factory javax.jms.QueueConnectionFactory
The JMS Queue Connection Factory look-up name for communicating with the Calc Engine.
send_queue com.profitlogic.jms.CERequestQueue
The JMS Send Queue name for communicating with the Calc Engine.
mreply_queue com.profitlogic.jms.CEResponseQueuee
The JMS Reply Queue name for communicating with the Calc Engine.
user and password The user name and password used to connect to the Calc Engine.
message_dump_flg Use this parameter to specify that the XML request/response messages from the Calc Engine are stored into a file in the application server domain directory.
The default value is false.
time_out Timeout for the request or response messages (in milliseconds).
engine_timeperiod Timeout for the engine status response (in milliseconds).
Priority Priority of the request or response message.
input_file Use this parameter to specify the location of the sample XML file used for unit testing.
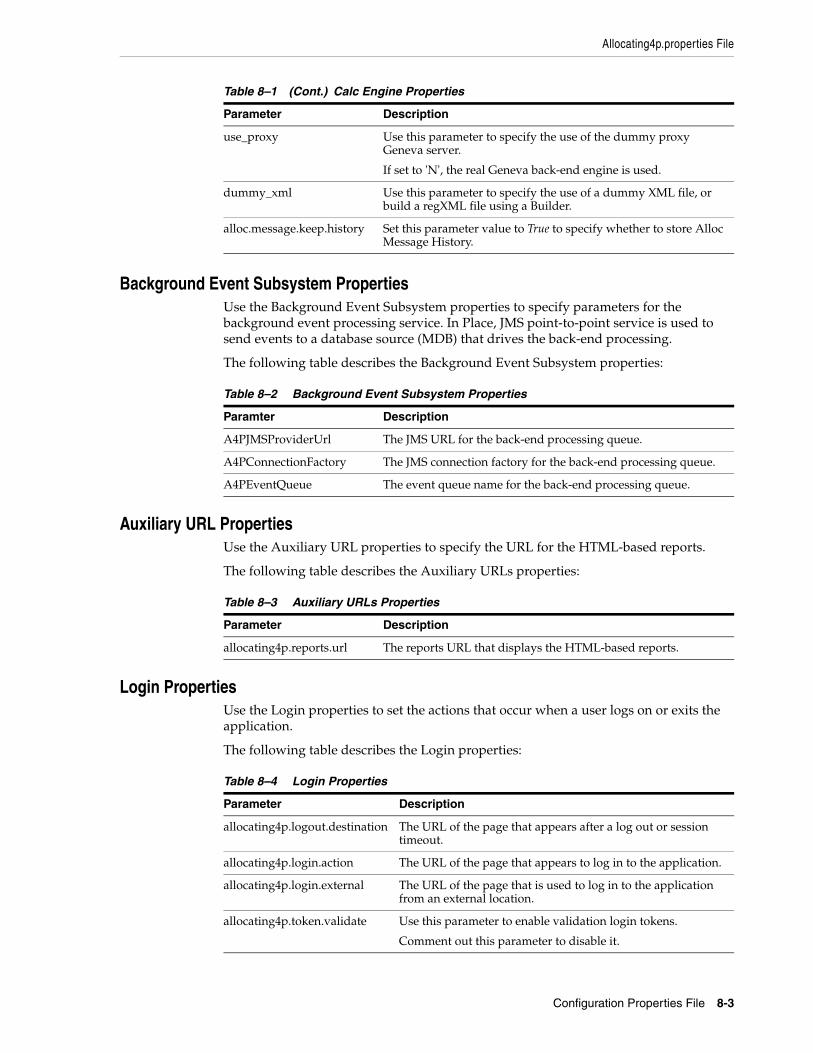
Allocating4p.properties File
Configuration Properties File 8-3
Background Event Subsystem PropertiesUse the Background Event Subsystem properties to specify parameters for the background event processing service. In Place, JMS point-to-point service is used to send events to a database source (MDB) that drives the back-end processing.
The following table describes the Background Event Subsystem properties:
Auxiliary URL PropertiesUse the Auxiliary URL properties to specify the URL for the HTML-based reports.
The following table describes the Auxiliary URLs properties:
Login PropertiesUse the Login properties to set the actions that occur when a user logs on or exits the application.
The following table describes the Login properties:
use_proxy Use this parameter to specify the use of the dummy proxy Geneva server.
If set to 'N', the real Geneva back-end engine is used.
dummy_xml Use this parameter to specify the use of a dummy XML file, or build a regXML file using a Builder.
alloc.message.keep.history Set this parameter value to True to specify whether to store Alloc Message History.
Table 8–2 Background Event Subsystem Properties
Paramter Description
A4PJMSProviderUrl The JMS URL for the back-end processing queue.
A4PConnectionFactory The JMS connection factory for the back-end processing queue.
A4PEventQueue The event queue name for the back-end processing queue.
Table 8–3 Auxiliary URLs Properties
Parameter Description
allocating4p.reports.url The reports URL that displays the HTML-based reports.
Table 8–4 Login Properties
Parameter Description
allocating4p.logout.destination The URL of the page that appears after a log out or session timeout.
allocating4p.login.action The URL of the page that appears to log in to the application.
allocating4p.login.external The URL of the page that is used to log in to the application from an external location.
allocating4p.token.validate Use this parameter to enable validation login tokens.
Comment out this parameter to disable it.
Table 8–1 (Cont.) Calc Engine Properties
Parameter Description
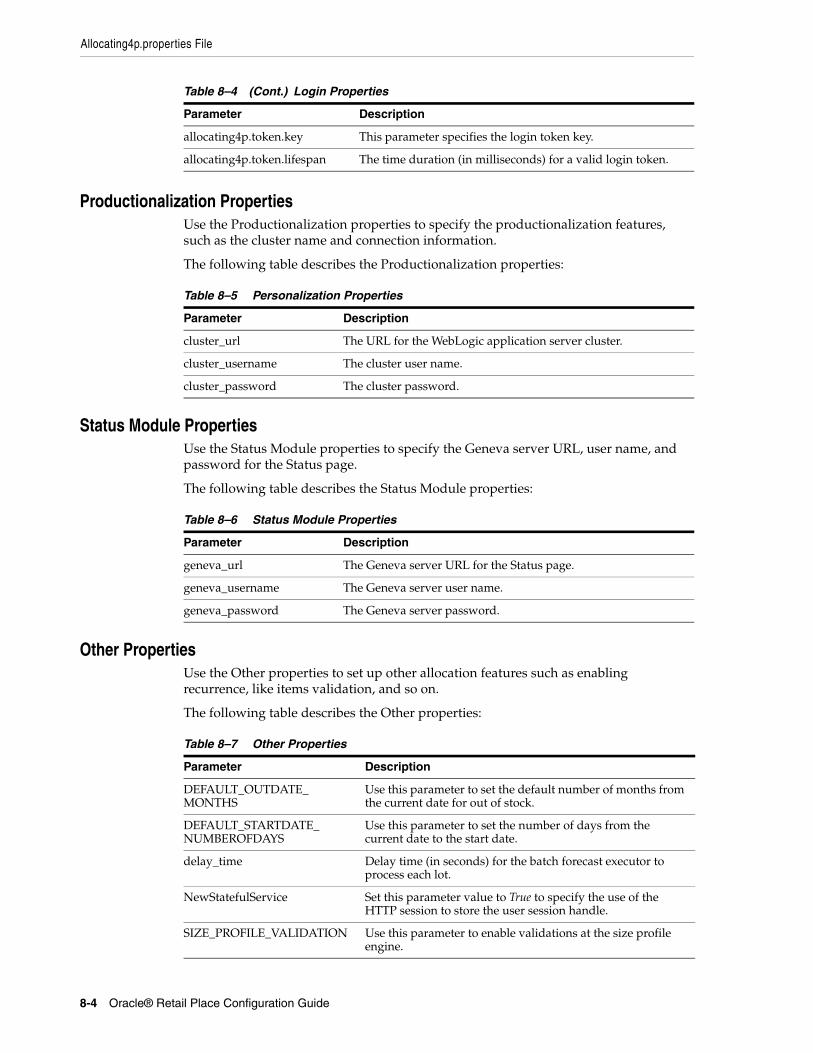
Allocating4p.properties File
8-4 Oracle® Retail Place Configuration Guide
Productionalization PropertiesUse the Productionalization properties to specify the productionalization features, such as the cluster name and connection information.
The following table describes the Productionalization properties:
Status Module PropertiesUse the Status Module properties to specify the Geneva server URL, user name, and password for the Status page.
The following table describes the Status Module properties:
Other PropertiesUse the Other properties to set up other allocation features such as enabling recurrence, like items validation, and so on.
The following table describes the Other properties:
allocating4p.token.key This parameter specifies the login token key.
allocating4p.token.lifespan The time duration (in milliseconds) for a valid login token.
Table 8–5 Personalization Properties
Parameter Description
cluster_url The URL for the WebLogic application server cluster.
cluster_username The cluster user name.
cluster_password The cluster password.
Table 8–6 Status Module Properties
Parameter Description
geneva_url The Geneva server URL for the Status page.
geneva_username The Geneva server user name.
geneva_password The Geneva server password.
Table 8–7 Other Properties
Parameter Description
DEFAULT_OUTDATE_MONTHS
Use this parameter to set the default number of months from the current date for out of stock.
DEFAULT_STARTDATE_NUMBEROFDAYS
Use this parameter to set the number of days from the current date to the start date.
delay_time Delay time (in seconds) for the batch forecast executor to process each lot.
NewStatefulService Set this parameter value to True to specify the use of the HTTP session to store the user session handle.
SIZE_PROFILE_VALIDATION Use this parameter to enable validations at the size profile engine.
Table 8–4 (Cont.) Login Properties
Parameter Description
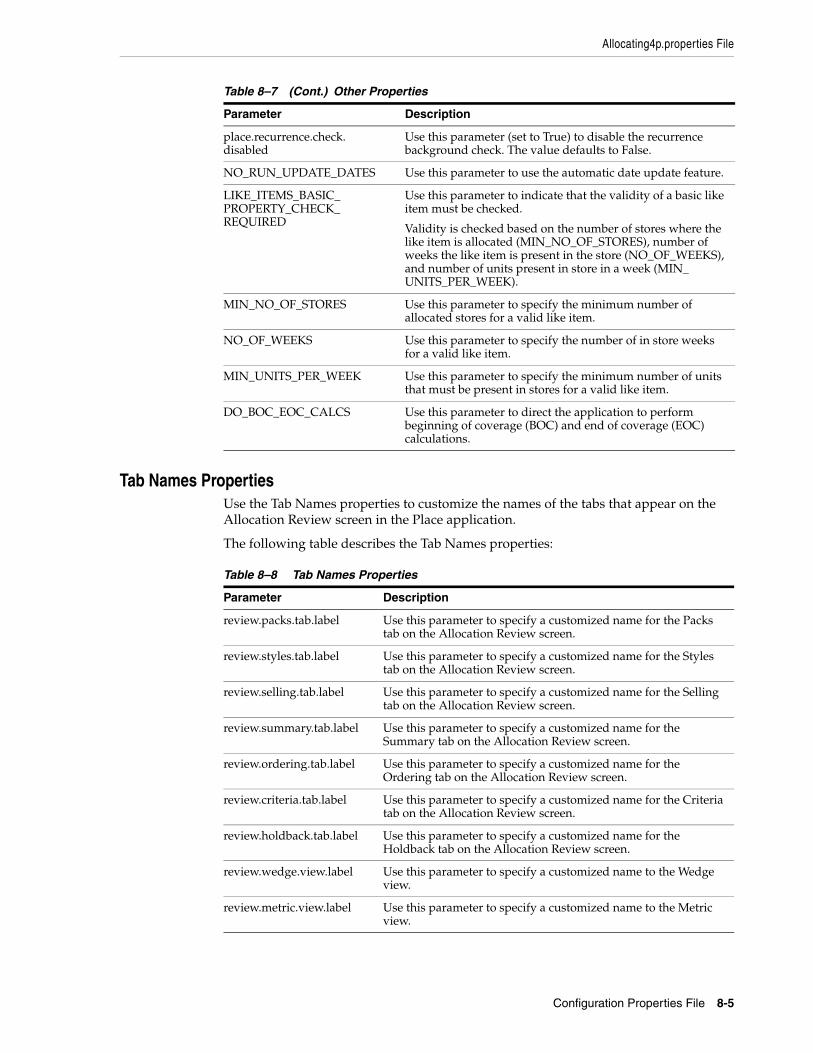
Allocating4p.properties File
Configuration Properties File 8-5
Tab Names PropertiesUse the Tab Names properties to customize the names of the tabs that appear on the Allocation Review screen in the Place application.
The following table describes the Tab Names properties:
place.recurrence.check.disabled
Use this parameter (set to True) to disable the recurrence background check. The value defaults to False.
NO_RUN_UPDATE_DATES Use this parameter to use the automatic date update feature.
LIKE_ITEMS_BASIC_PROPERTY_CHECK_REQUIRED
Use this parameter to indicate that the validity of a basic like item must be checked.
Validity is checked based on the number of stores where the like item is allocated (MIN_NO_OF_STORES), number of weeks the like item is present in the store (NO_OF_WEEKS), and number of units present in store in a week (MIN_UNITS_PER_WEEK).
MIN_NO_OF_STORES Use this parameter to specify the minimum number of allocated stores for a valid like item.
NO_OF_WEEKS Use this parameter to specify the number of in store weeks for a valid like item.
MIN_UNITS_PER_WEEK Use this parameter to specify the minimum number of units that must be present in stores for a valid like item.
DO_BOC_EOC_CALCS Use this parameter to direct the application to perform beginning of coverage (BOC) and end of coverage (EOC) calculations.
Table 8–8 Tab Names Properties
Parameter Description
review.packs.tab.label Use this parameter to specify a customized name for the Packs tab on the Allocation Review screen.
review.styles.tab.label Use this parameter to specify a customized name for the Styles tab on the Allocation Review screen.
review.selling.tab.label Use this parameter to specify a customized name for the Selling tab on the Allocation Review screen.
review.summary.tab.label Use this parameter to specify a customized name for the Summary tab on the Allocation Review screen.
review.ordering.tab.label Use this parameter to specify a customized name for the Ordering tab on the Allocation Review screen.
review.criteria.tab.label Use this parameter to specify a customized name for the Criteria tab on the Allocation Review screen.
review.holdback.tab.label Use this parameter to specify a customized name for the Holdback tab on the Allocation Review screen.
review.wedge.view.label Use this parameter to specify a customized name to the Wedge view.
review.metric.view.label Use this parameter to specify a customized name to the Metric view.
Table 8–7 (Cont.) Other Properties
Parameter Description
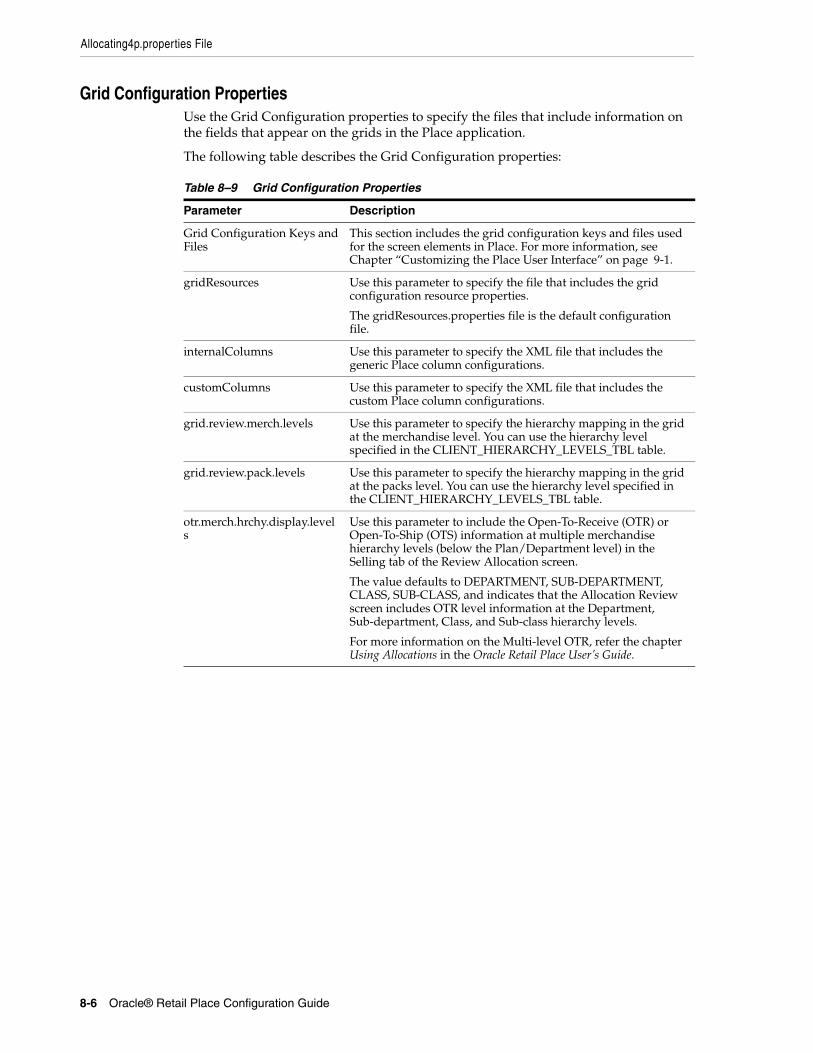
Allocating4p.properties File
8-6 Oracle® Retail Place Configuration Guide
Grid Configuration PropertiesUse the Grid Configuration properties to specify the files that include information on the fields that appear on the grids in the Place application.
The following table describes the Grid Configuration properties:
Table 8–9 Grid Configuration Properties
Parameter Description
Grid Configuration Keys and Files
This section includes the grid configuration keys and files used for the screen elements in Place. For more information, see Chapter “Customizing the Place User Interface” on page 9-1.
gridResources Use this parameter to specify the file that includes the grid configuration resource properties.
The gridResources.properties file is the default configuration file.
internalColumns Use this parameter to specify the XML file that includes the generic Place column configurations.
customColumns Use this parameter to specify the XML file that includes the custom Place column configurations.
grid.review.merch.levels Use this parameter to specify the hierarchy mapping in the grid at the merchandise level. You can use the hierarchy level specified in the CLIENT_HIERARCHY_LEVELS_TBL table.
grid.review.pack.levels Use this parameter to specify the hierarchy mapping in the grid at the packs level. You can use the hierarchy level specified in the CLIENT_HIERARCHY_LEVELS_TBL table.
otr.merch.hrchy.display.levels
Use this parameter to include the Open-To-Receive (OTR) or Open-To-Ship (OTS) information at multiple merchandise hierarchy levels (below the Plan/Department level) in the Selling tab of the Review Allocation screen.
The value defaults to DEPARTMENT, SUB-DEPARTMENT, CLASS, SUB-CLASS, and indicates that the Allocation Review screen includes OTR level information at the Department, Sub-department, Class, and Sub-class hierarchy levels.
For more information on the Multi-level OTR, refer the chapter Using Allocations in the Oracle Retail Place User’s Guide.
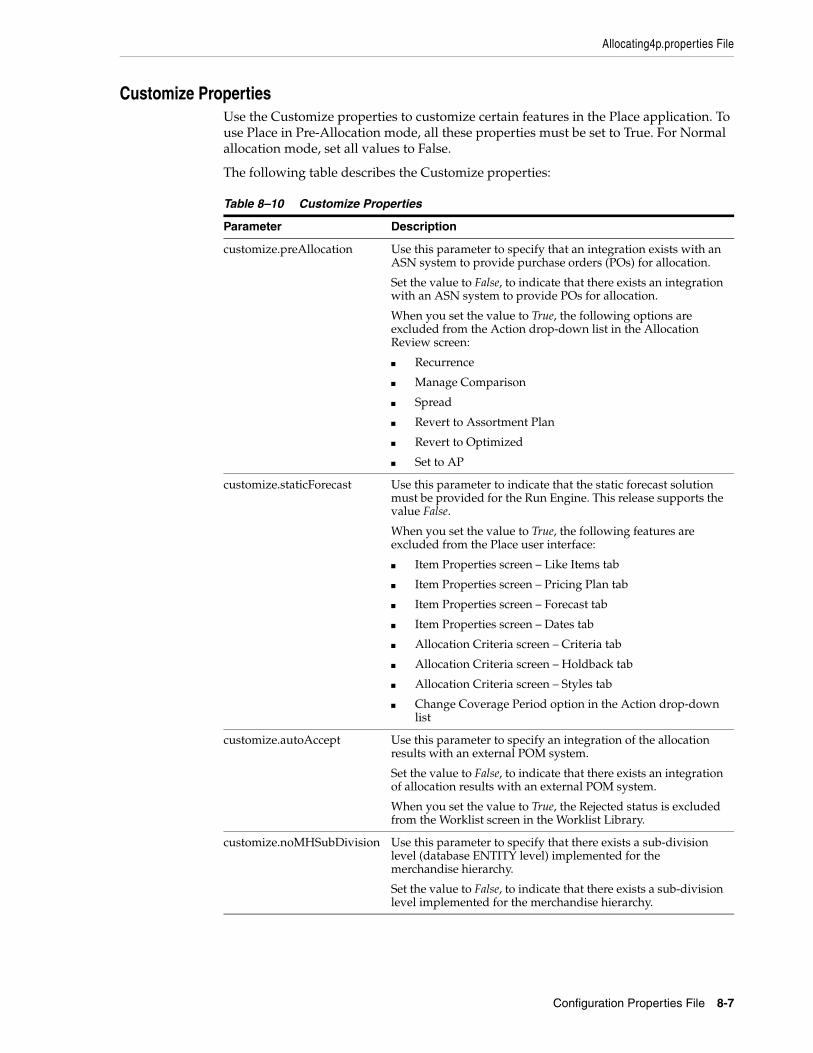
Allocating4p.properties File
Configuration Properties File 8-7
Customize PropertiesUse the Customize properties to customize certain features in the Place application. To use Place in Pre-Allocation mode, all these properties must be set to True. For Normal allocation mode, set all values to False.
The following table describes the Customize properties:
Table 8–10 Customize Properties
Parameter Description
customize.preAllocation Use this parameter to specify that an integration exists with an ASN system to provide purchase orders (POs) for allocation.
Set the value to False, to indicate that there exists an integration with an ASN system to provide POs for allocation.
When you set the value to True, the following options are excluded from the Action drop-down list in the Allocation Review screen:
■ Recurrence
■ Manage Comparison
■ Spread
■ Revert to Assortment Plan
■ Revert to Optimized
■ Set to AP
customize.staticForecast Use this parameter to indicate that the static forecast solution must be provided for the Run Engine. This release supports the value False.
When you set the value to True, the following features are excluded from the Place user interface:
■ Item Properties screen – Like Items tab
■ Item Properties screen – Pricing Plan tab
■ Item Properties screen – Forecast tab
■ Item Properties screen – Dates tab
■ Allocation Criteria screen – Criteria tab
■ Allocation Criteria screen – Holdback tab
■ Allocation Criteria screen – Styles tab
■ Change Coverage Period option in the Action drop-down list
customize.autoAccept Use this parameter to specify an integration of the allocation results with an external POM system.
Set the value to False, to indicate that there exists an integration of allocation results with an external POM system.
When you set the value to True, the Rejected status is excluded from the Worklist screen in the Worklist Library.
customize.noMHSubDivision Use this parameter to specify that there exists a sub-division level (database ENTITY level) implemented for the merchandise hierarchy.
Set the value to False, to indicate that there exists a sub-division level implemented for the merchandise hierarchy.
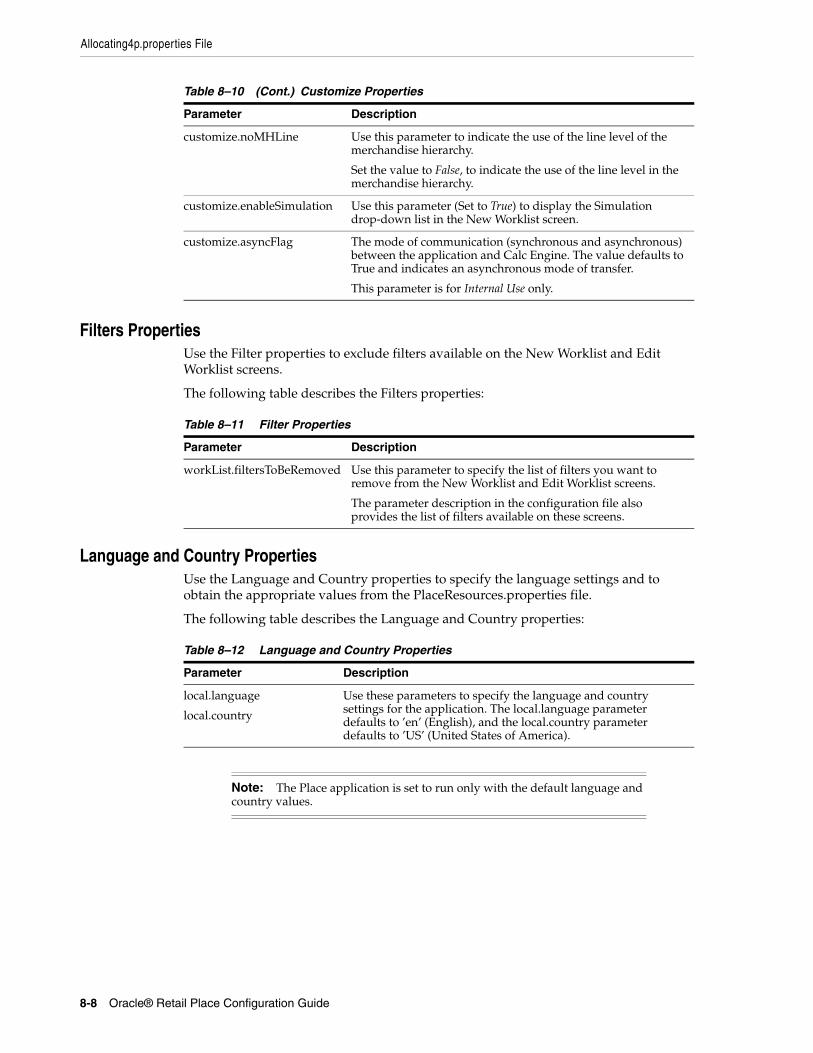
Allocating4p.properties File
8-8 Oracle® Retail Place Configuration Guide
Filters PropertiesUse the Filter properties to exclude filters available on the New Worklist and Edit Worklist screens.
The following table describes the Filters properties:
Language and Country PropertiesUse the Language and Country properties to specify the language settings and to obtain the appropriate values from the PlaceResources.properties file.
The following table describes the Language and Country properties:
customize.noMHLine Use this parameter to indicate the use of the line level of the merchandise hierarchy.
Set the value to False, to indicate the use of the line level in the merchandise hierarchy.
customize.enableSimulation Use this parameter (Set to True) to display the Simulation drop-down list in the New Worklist screen.
customize.asyncFlag The mode of communication (synchronous and asynchronous) between the application and Calc Engine. The value defaults to True and indicates an asynchronous mode of transfer.
This parameter is for Internal Use only.
Table 8–11 Filter Properties
Parameter Description
workList.filtersToBeRemoved Use this parameter to specify the list of filters you want to remove from the New Worklist and Edit Worklist screens.
The parameter description in the configuration file also provides the list of filters available on these screens.
Table 8–12 Language and Country Properties
Parameter Description
local.language
local.country
Use these parameters to specify the language and country settings for the application. The local.language parameter defaults to ’en’ (English), and the local.country parameter defaults to ’US’ (United States of America).
Note: The Place application is set to run only with the default language and country values.
Table 8–10 (Cont.) Customize Properties
Parameter Description
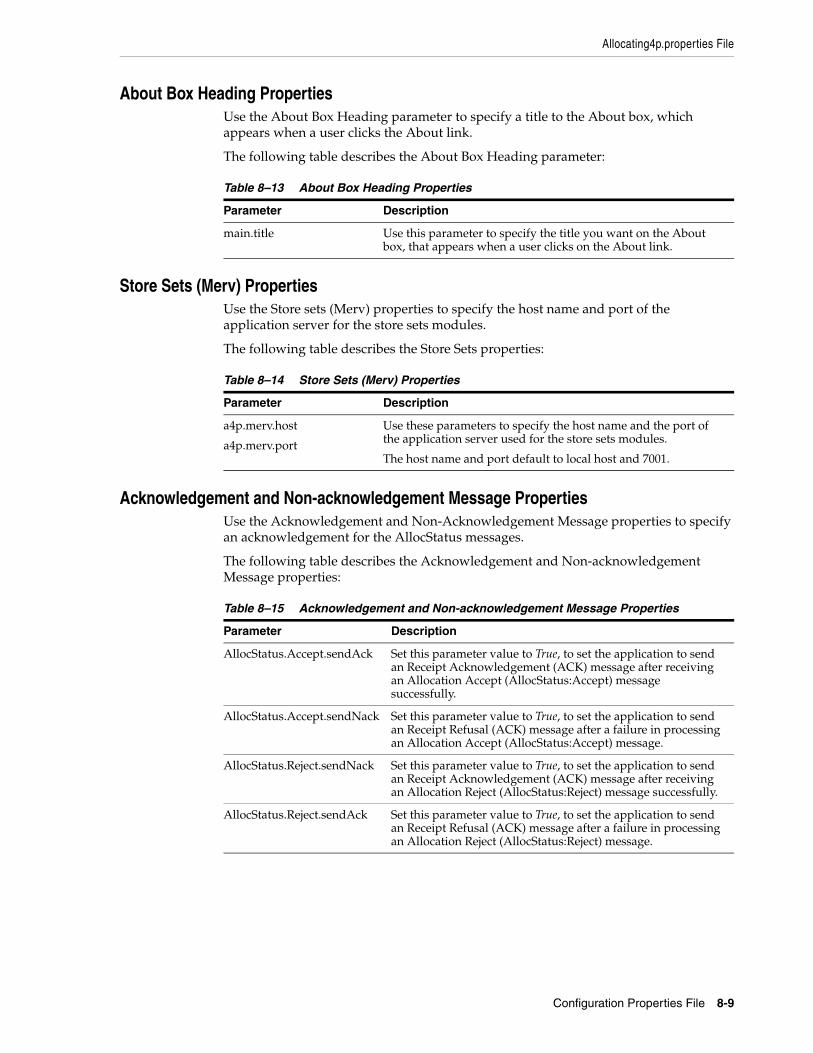
Allocating4p.properties File
Configuration Properties File 8-9
About Box Heading PropertiesUse the About Box Heading parameter to specify a title to the About box, which appears when a user clicks the About link.
The following table describes the About Box Heading parameter:
Store Sets (Merv) PropertiesUse the Store sets (Merv) properties to specify the host name and port of the application server for the store sets modules.
The following table describes the Store Sets properties:
Acknowledgement and Non-acknowledgement Message PropertiesUse the Acknowledgement and Non-Acknowledgement Message properties to specify an acknowledgement for the AllocStatus messages.
The following table describes the Acknowledgement and Non-acknowledgement Message properties:
Table 8–13 About Box Heading Properties
Parameter Description
main.title Use this parameter to specify the title you want on the About box, that appears when a user clicks on the About link.
Table 8–14 Store Sets (Merv) Properties
Parameter Description
a4p.merv.host
a4p.merv.port
Use these parameters to specify the host name and the port of the application server used for the store sets modules.
The host name and port default to local host and 7001.
Table 8–15 Acknowledgement and Non-acknowledgement Message Properties
Parameter Description
AllocStatus.Accept.sendAck Set this parameter value to True, to set the application to send an Receipt Acknowledgement (ACK) message after receiving an Allocation Accept (AllocStatus:Accept) message successfully.
AllocStatus.Accept.sendNack Set this parameter value to True, to set the application to send an Receipt Refusal (ACK) message after a failure in processing an Allocation Accept (AllocStatus:Accept) message.
AllocStatus.Reject.sendNack Set this parameter value to True, to set the application to send an Receipt Acknowledgement (ACK) message after receiving an Allocation Reject (AllocStatus:Reject) message successfully.
AllocStatus.Reject.sendAck Set this parameter value to True, to set the application to send an Receipt Refusal (ACK) message after a failure in processing an Allocation Reject (AllocStatus:Reject) message.

Allocating4p.properties File
8-10 Oracle® Retail Place Configuration Guide
Holdback Minimum PropertiesUse the Holdback Minimum parameter to set the merchandise hierarchy level from which the holdback minimum value must be retrieved during the allocation requests.
The following table describes the Holdback Minimum parameter:
Store Weights PropertiesUse the Store Weights properties to set up the default settings and forecast configuration parameters for the Store Weights feature in the Place application. These parameters provide you with the flexibility to work with internal as well as external store weights.
The following table describes the Store Weights properties:
Table 8–16 Holdback Minimum Properties
Parameter Description
HoldbackMin.MerchHierarchy.LookupLevel
Use this parameter to set the merchandise hierarchy level from which the holdback minimum value must be retrieved during the allocation requests. Defaults to 4 (indicates the Department level).
Table 8–17 Store Weight Properties
Parameter Description
place.likeitem.style.store.weights.default Use this parameter to specify the default store weight for an item at the Style level (appears on the Like Item tab in the Item Properties screen).
For more information on the value format, see the section “Store Weights Properties Value Format” on page 8-12.
place.likeitem.color.store.weights.default Use this parameter to specify the default store weight for an item at the Color level (appears on the Like Item tab in the Item Properties screen).
For more information on the value format, see the section “Store Weights Properties Value Format” on page 8-12.
place.forecast.config.weights.style.options Use this parameter to specify the options that appear, and the order in which they appear, in the Store Weight field at the Style level (Like Item tab on the Item Properties screen).
For more information on the value format, see the section “Store Weights Properties Value Format” on page 8-12.
place.forecast.config.weights.color.options Use this parameter to specify the options that appear, and the order in which they appear, in the Store Weight field at the Color level (Like Item tab on the Item Properties screen).
For more information on the value format, see the section “Store Weights Properties Value Format” on page 8-12.
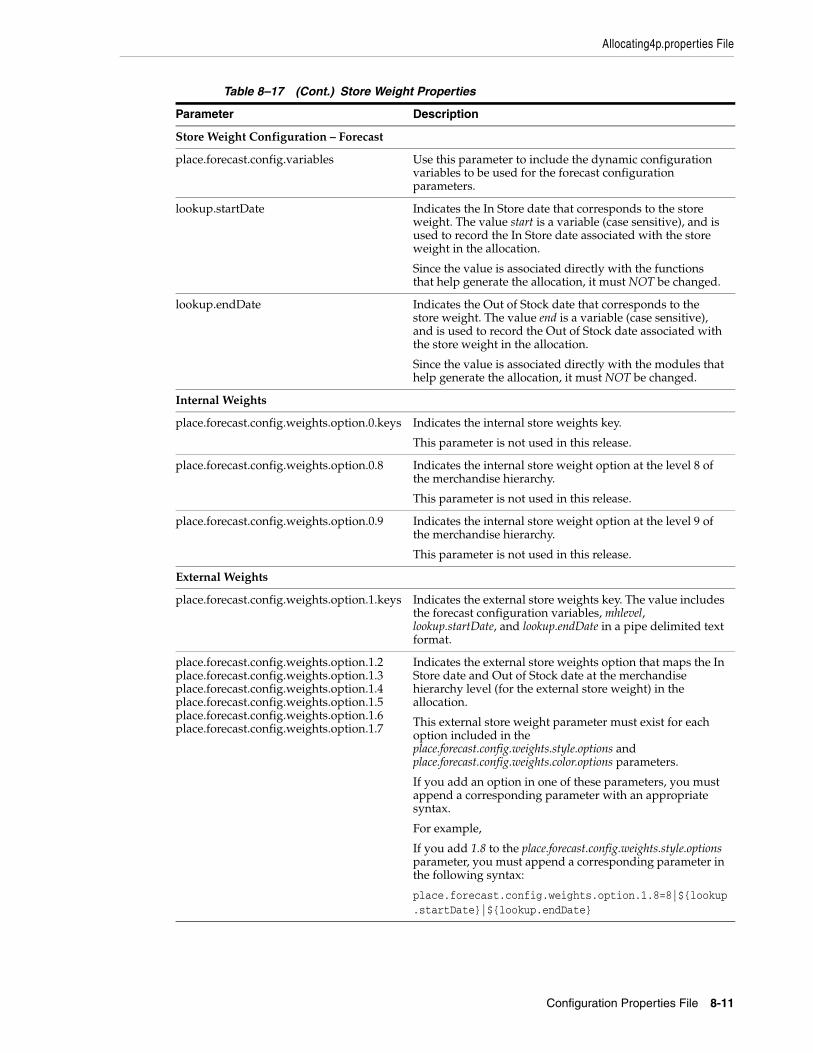
Allocating4p.properties File
Configuration Properties File 8-11
Store Weight Configuration – Forecast
place.forecast.config.variables Use this parameter to include the dynamic configuration variables to be used for the forecast configuration parameters.
lookup.startDate Indicates the In Store date that corresponds to the store weight. The value start is a variable (case sensitive), and is used to record the In Store date associated with the store weight in the allocation.
Since the value is associated directly with the functions that help generate the allocation, it must NOT be changed.
lookup.endDate Indicates the Out of Stock date that corresponds to the store weight. The value end is a variable (case sensitive), and is used to record the Out of Stock date associated with the store weight in the allocation.
Since the value is associated directly with the modules that help generate the allocation, it must NOT be changed.
Internal Weights
place.forecast.config.weights.option.0.keys Indicates the internal store weights key.
This parameter is not used in this release.
place.forecast.config.weights.option.0.8 Indicates the internal store weight option at the level 8 of the merchandise hierarchy.
This parameter is not used in this release.
place.forecast.config.weights.option.0.9 Indicates the internal store weight option at the level 9 of the merchandise hierarchy.
This parameter is not used in this release.
External Weights
place.forecast.config.weights.option.1.keys Indicates the external store weights key. The value includes the forecast configuration variables, mhlevel, lookup.startDate, and lookup.endDate in a pipe delimited text format.
place.forecast.config.weights.option.1.2place.forecast.config.weights.option.1.3place.forecast.config.weights.option.1.4place.forecast.config.weights.option.1.5place.forecast.config.weights.option.1.6place.forecast.config.weights.option.1.7
Indicates the external store weights option that maps the In Store date and Out of Stock date at the merchandise hierarchy level (for the external store weight) in the allocation.
This external store weight parameter must exist for each option included in the place.forecast.config.weights.style.options and place.forecast.config.weights.color.options parameters.
If you add an option in one of these parameters, you must append a corresponding parameter with an appropriate syntax.
For example,
If you add 1.8 to the place.forecast.config.weights.style.options parameter, you must append a corresponding parameter in the following syntax:
place.forecast.config.weights.option.1.8=8|${lookup.startDate}|${lookup.endDate}
Table 8–17 (Cont.) Store Weight Properties
Parameter Description
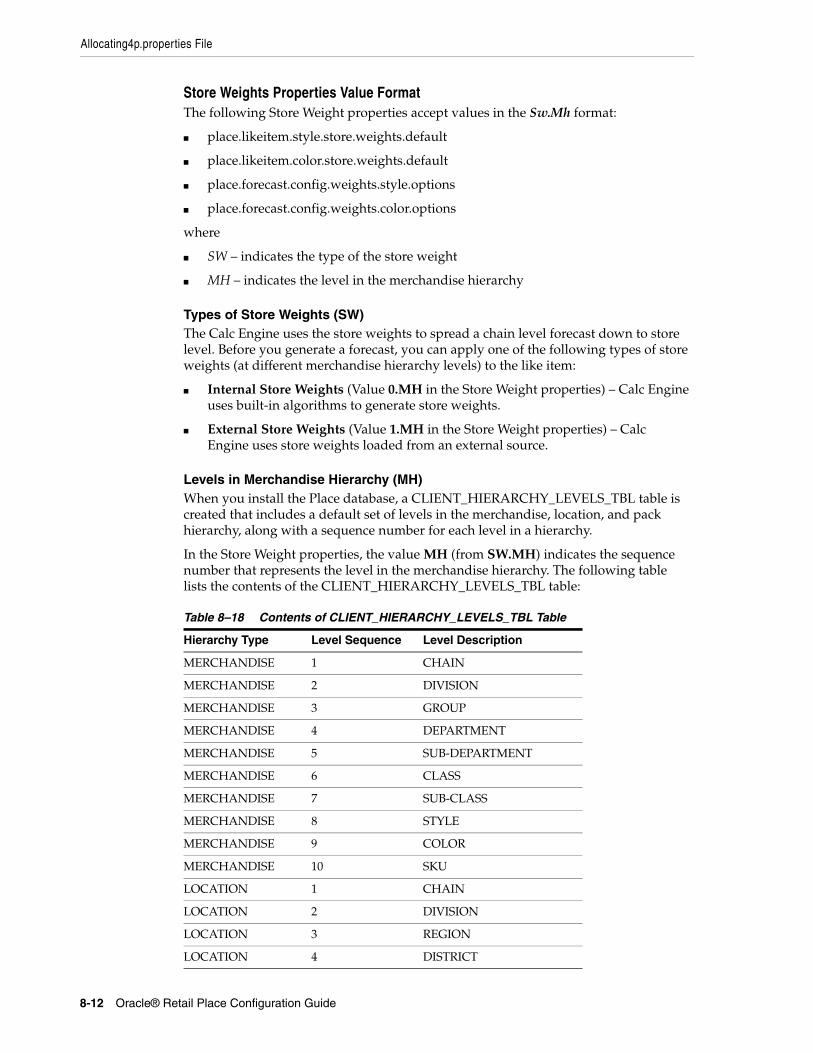
Allocating4p.properties File
8-12 Oracle® Retail Place Configuration Guide
Store Weights Properties Value FormatThe following Store Weight properties accept values in the Sw.Mh format:
■ place.likeitem.style.store.weights.default
■ place.likeitem.color.store.weights.default
■ place.forecast.config.weights.style.options
■ place.forecast.config.weights.color.options
where
■ SW – indicates the type of the store weight
■ MH – indicates the level in the merchandise hierarchy
Types of Store Weights (SW)The Calc Engine uses the store weights to spread a chain level forecast down to store level. Before you generate a forecast, you can apply one of the following types of store weights (at different merchandise hierarchy levels) to the like item:
■ Internal Store Weights (Value 0.MH in the Store Weight properties) – Calc Engine uses built-in algorithms to generate store weights.
■ External Store Weights (Value 1.MH in the Store Weight properties) – Calc Engine uses store weights loaded from an external source.
Levels in Merchandise Hierarchy (MH)When you install the Place database, a CLIENT_HIERARCHY_LEVELS_TBL table is created that includes a default set of levels in the merchandise, location, and pack hierarchy, along with a sequence number for each level in a hierarchy.
In the Store Weight properties, the value MH (from SW.MH) indicates the sequence number that represents the level in the merchandise hierarchy. The following table lists the contents of the CLIENT_HIERARCHY_LEVELS_TBL table:
Table 8–18 Contents of CLIENT_HIERARCHY_LEVELS_TBL Table
Hierarchy Type Level Sequence Level Description
MERCHANDISE 1 CHAIN
MERCHANDISE 2 DIVISION
MERCHANDISE 3 GROUP
MERCHANDISE 4 DEPARTMENT
MERCHANDISE 5 SUB-DEPARTMENT
MERCHANDISE 6 CLASS
MERCHANDISE 7 SUB-CLASS
MERCHANDISE 8 STYLE
MERCHANDISE 9 COLOR
MERCHANDISE 10 SKU
LOCATION 1 CHAIN
LOCATION 2 DIVISION
LOCATION 3 REGION
LOCATION 4 DISTRICT
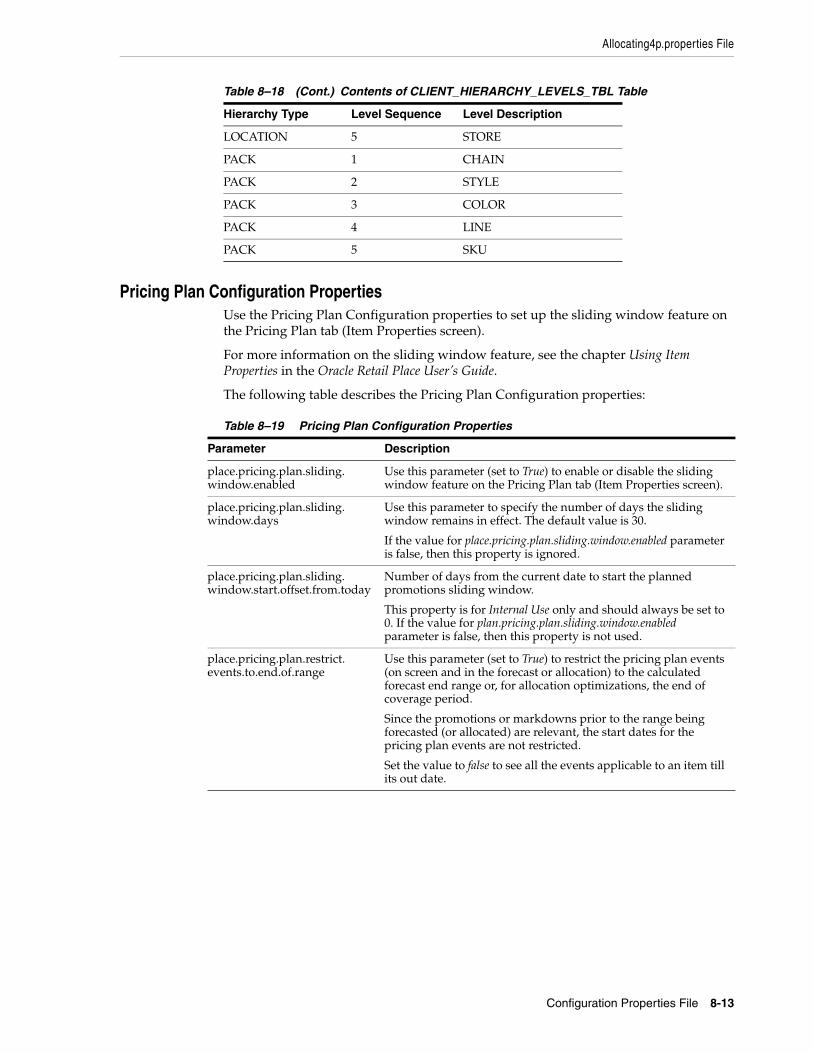
Allocating4p.properties File
Configuration Properties File 8-13
Pricing Plan Configuration PropertiesUse the Pricing Plan Configuration properties to set up the sliding window feature on the Pricing Plan tab (Item Properties screen).
For more information on the sliding window feature, see the chapter Using Item Properties in the Oracle Retail Place User’s Guide.
The following table describes the Pricing Plan Configuration properties:
LOCATION 5 STORE
PACK 1 CHAIN
PACK 2 STYLE
PACK 3 COLOR
PACK 4 LINE
PACK 5 SKU
Table 8–19 Pricing Plan Configuration Properties
Parameter Description
place.pricing.plan.sliding.window.enabled
Use this parameter (set to True) to enable or disable the sliding window feature on the Pricing Plan tab (Item Properties screen).
place.pricing.plan.sliding.window.days
Use this parameter to specify the number of days the sliding window remains in effect. The default value is 30.
If the value for place.pricing.plan.sliding.window.enabled parameter is false, then this property is ignored.
place.pricing.plan.sliding.window.start.offset.from.today
Number of days from the current date to start the planned promotions sliding window.
This property is for Internal Use only and should always be set to 0. If the value for plan.pricing.plan.sliding.window.enabled parameter is false, then this property is not used.
place.pricing.plan.restrict.events.to.end.of.range
Use this parameter (set to True) to restrict the pricing plan events (on screen and in the forecast or allocation) to the calculated forecast end range or, for allocation optimizations, the end of coverage period.
Since the promotions or markdowns prior to the range being forecasted (or allocated) are relevant, the start dates for the pricing plan events are not restricted.
Set the value to false to see all the events applicable to an item till its out date.
Table 8–18 (Cont.) Contents of CLIENT_HIERARCHY_LEVELS_TBL Table
Hierarchy Type Level Sequence Level Description

Integration.properties File
8-14 Oracle® Retail Place Configuration Guide
Integration.properties FileUse the integration.properties file to configure the message handling between the Place application and the Calc Engine. This file includes properties you can use to specify the files that define the translator code and names used for the messaging destinations. It also includes properties you can use to specify the folders where the Purchase Order Management (POM) messages get stored.
This file is located in the following Place installation folder:
<Place_Installation>\config\integration\
The following table lists the parameters in the integration.properties file.
Table 8–20 Parameters in the integration.properties File
Parameter Description
messaging Use this parameter to specify the XML file that defines the translator code and the symbolic names for message destinations, for each message type.
The default XML file is messaging.xml located in the integration folder.
destinations Use this parameter to specify the XML file that defines the properties of destinations referred in the messaging.xml.
The default XML file is destinations.xml located in the integration folder.
MESSAGE_DUMP_DIRECTORY
Use this parameter to specify the folder path, where you want to store the POM messages.
MESSAGE_DUMP_DIRECTORY_INBOUND
Use this parameter to specify the folder path, where you want to store the inbound POM messages.
SSEND_MESSAGE_DATETIMES_IN_UTC
Use this parameter to specify that the date and time included in the outbound XML messages, is in the Coordinated Universal Time (UTC) time format.
ASN.Revise.sendAck Use this parameter to specify an acknowledgement for an ASN Revise message.
ASN.Revise.sendNack Use this parameter to specify a negative acknowledgement for an ASN Revise message.
ASN.sendNack Use this parameter to specify a negative acknowledgement for an ASN message.
ASN.sendAck Use this parameter to specify an acknowledgement for an ASN message.
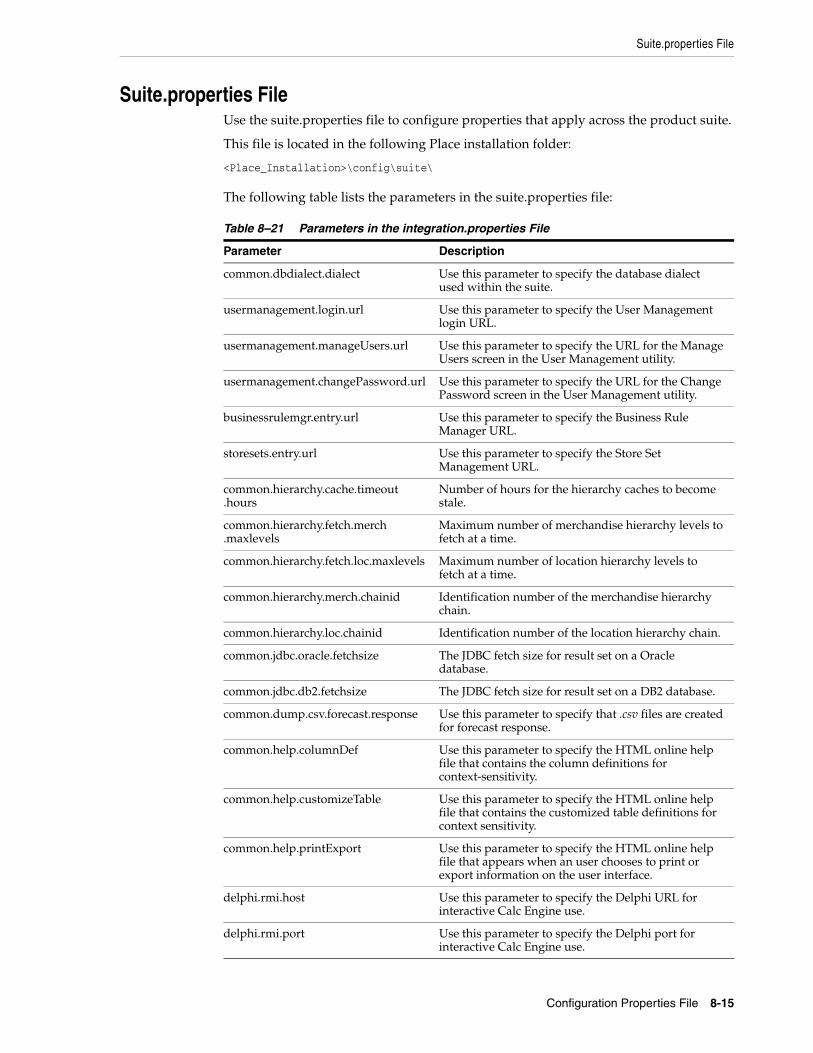
Suite.properties File
Configuration Properties File 8-15
Suite.properties FileUse the suite.properties file to configure properties that apply across the product suite.
This file is located in the following Place installation folder:
<Place_Installation>\config\suite\
The following table lists the parameters in the suite.properties file:
Table 8–21 Parameters in the integration.properties File
Parameter Description
common.dbdialect.dialect Use this parameter to specify the database dialect used within the suite.
usermanagement.login.url Use this parameter to specify the User Management login URL.
usermanagement.manageUsers.url Use this parameter to specify the URL for the Manage Users screen in the User Management utility.
usermanagement.changePassword.url Use this parameter to specify the URL for the Change Password screen in the User Management utility.
businessrulemgr.entry.url Use this parameter to specify the Business Rule Manager URL.
storesets.entry.url Use this parameter to specify the Store Set Management URL.
common.hierarchy.cache.timeout.hours
Number of hours for the hierarchy caches to become stale.
common.hierarchy.fetch.merch.maxlevels
Maximum number of merchandise hierarchy levels to fetch at a time.
common.hierarchy.fetch.loc.maxlevels Maximum number of location hierarchy levels to fetch at a time.
common.hierarchy.merch.chainid Identification number of the merchandise hierarchy chain.
common.hierarchy.loc.chainid Identification number of the location hierarchy chain.
common.jdbc.oracle.fetchsize The JDBC fetch size for result set on a Oracle database.
common.jdbc.db2.fetchsize The JDBC fetch size for result set on a DB2 database.
common.dump.csv.forecast.response Use this parameter to specify that .csv files are created for forecast response.
common.help.columnDef Use this parameter to specify the HTML online help file that contains the column definitions for context-sensitivity.
common.help.customizeTable Use this parameter to specify the HTML online help file that contains the customized table definitions for context sensitivity.
common.help.printExport Use this parameter to specify the HTML online help file that appears when an user chooses to print or export information on the user interface.
delphi.rmi.host Use this parameter to specify the Delphi URL for interactive Calc Engine use.
delphi.rmi.port Use this parameter to specify the Delphi port for interactive Calc Engine use.
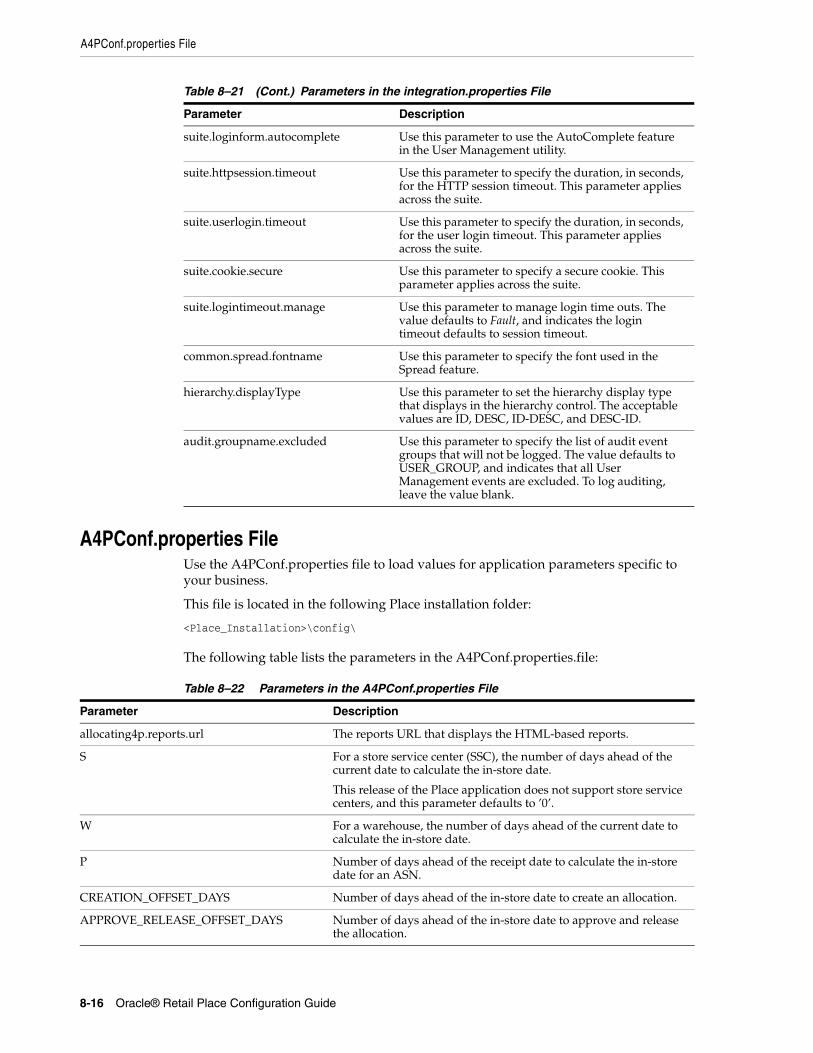
A4PConf.properties File
8-16 Oracle® Retail Place Configuration Guide
A4PConf.properties FileUse the A4PConf.properties file to load values for application parameters specific to your business.
This file is located in the following Place installation folder:
<Place_Installation>\config\
The following table lists the parameters in the A4PConf.properties.file:
suite.loginform.autocomplete Use this parameter to use the AutoComplete feature in the User Management utility.
suite.httpsession.timeout Use this parameter to specify the duration, in seconds, for the HTTP session timeout. This parameter applies across the suite.
suite.userlogin.timeout Use this parameter to specify the duration, in seconds, for the user login timeout. This parameter applies across the suite.
suite.cookie.secure Use this parameter to specify a secure cookie. This parameter applies across the suite.
suite.logintimeout.manage Use this parameter to manage login time outs. The value defaults to Fault, and indicates the login timeout defaults to session timeout.
common.spread.fontname Use this parameter to specify the font used in the Spread feature.
hierarchy.displayType Use this parameter to set the hierarchy display type that displays in the hierarchy control. The acceptable values are ID, DESC, ID-DESC, and DESC-ID.
audit.groupname.excluded Use this parameter to specify the list of audit event groups that will not be logged. The value defaults to USER_GROUP, and indicates that all User Management events are excluded. To log auditing, leave the value blank.
Table 8–22 Parameters in the A4PConf.properties File
Parameter Description
allocating4p.reports.url The reports URL that displays the HTML-based reports.
S For a store service center (SSC), the number of days ahead of the current date to calculate the in-store date.
This release of the Place application does not support store service centers, and this parameter defaults to ’0’.
W For a warehouse, the number of days ahead of the current date to calculate the in-store date.
P Number of days ahead of the receipt date to calculate the in-store date for an ASN.
CREATION_OFFSET_DAYS Number of days ahead of the in-store date to create an allocation.
APPROVE_RELEASE_OFFSET_DAYS Number of days ahead of the in-store date to approve and release the allocation.
Table 8–21 (Cont.) Parameters in the integration.properties File
Parameter Description

A4PConf.properties File
Configuration Properties File 8-17
OOS_NO_OF_DAYS Minimum number of days from the in-store date before the Out of Stock (OOS) date.
BLANK_OOS The default Out of Stock date, if the date is not set up in the application.
DATE_FORMAT Use this parameter to specify the date format used in the application.
Defaults to MM/DD/YYYY.
T Use this parameter, along with LOG_REQUEST_FILE and LOG_RESPONSE_FILE, to enable or disable logging in the response and request XML files.
LOG_REQUEST_FILE Use this parameter to enable or disable logging in the request.xml file. To enable logging, set the value as T.
LOG_RESPONSE_FILE Use this parameter to enable or disable logging in the response.xml file. To enable logging, set the value as T.
REQUEST_FILE_NAME Name of the request XML file.
RESPONSE_FILE_NAME Name of the response XML file.
OPENING_DATE_PLUS_X Number of days prior to the current date when the store opens. A store is considered as a new store, if the opening date is within this time period.
OPENING_DATE_MINUS_Y Number of days, after the current date, when the store opens. A store is considered as a new store, if the opening date is within this time period.
DEFAULT_BREAK_DATE_MONTHS Default time period in which the break date occurs for an item.
DEFAULT_COVERAGE_MONTHS Default coverage period for an item setup in the application.
ALLOC_STORE_TARGET_ABOVE_COST Use these parameters to specify the allocation optimization store target range.
ALLOC_STORE_TARGET_BELOW_COST
MIN_ABOVE_COST Use these parameters to specify the shipping minimum cost range.
MIN_BELOW_COST
MAX_ABOVE_COST Use these parameters to specify the presentation-maximum cost range.
MAX_BELOW_COST
MAPQ_ABOVE_COST Use these parameters to specify the presentation-minimum cost range.
MAPQ_BELOW_COST
HOLDBACK_ABOVE_COST Use these parameters to specify the holdback cost range.
HOLDBACK_BELOW_COST
HOLDBACK_MAX_ABOVE_COST Use these parameters to specify the holdback-maximum cost range.
HOLDBACK_MAX_BELOW_COST
HOLDBACK_MIN_ABOVE_COST Use these parameters to specify the holdback-minimum cost range.
HOLDBACK_MIN_BELOW_COST
SPREAD_STORE_TARGET_ABOVE_COST Use these parameters to specify the Spread Store Target cost range.
SPREAD_STORE_TARGET_BELOW_COST
SPREAD_COST_FOR_ZERO_TARGET Use this parameter to specify the spread store cost for a zero target.
Table 8–22 (Cont.) Parameters in the A4PConf.properties File
Parameter Description

A4PConf.properties File
8-18 Oracle® Retail Place Configuration Guide
SIMULATION_ABOVE_COST Use these parameters to specify the simulation cost range.
SIMULATION_BELOW_COST
SIMULATION_COMPONENT Number of SKUs that constitute one simulation component.
SIMULATION_MIN_ABOVE_COST Use these parameter to specify the simulation-minimum cost range.
SIMULATION_MIN_BELOW_COST
LSD_STORE_ABOVE_COST Use these parameters to specify the location spread distribution (LSD) cost range for the store.
LSD_STORE_BELOW_COST
LSD_STORE_ZERO_ABOVE_COST Use this parameter to specify the LSD above cost for a zero target store.
LSD_AGGREGATE_ABOVE_COST_FACTOR
Use these parameters to specify the LSD cost factor range for the store.
LSD_AGGREGATE_BELOW_COST_FACTOR
FROM_PERIODS The plan periods range for the Like Items. You can also specify the months in the planned period.
TO_PERIODS
FILTERS Use this parameter to specify a list of fields that appear in the Filters drop-down list (in the Add Like Item screen).
This parameter includes the following default fields:
■ BRAND
■ TYPE
■ STORES_NUM
■ TOTAL_RECEIPTS
■ AVERAGE_RECEIPTS
■ TOTAL_SALES
■ AVERAGE_SALES
■ RECEIPT_AUR
Filter Names - Type Mapping Use this section to include the data types for each of the fields specified in the FILTERS parameter.
Filter Names - Possible Values Use this section to include the possible values for each of the fields specified in the FILTERS parameter.
Filter Type and Relation options mapping Use this section to include the data types and the relation option mapping for the fields in the FILTERS parameter.
Review Customize Table Use this section to specify the columns that appear in the grid for the ReviewCustomizeTable screen.
MaxRowSize Use this parameter to specify the maximum row size in the Worklist screen.
ClusterDevelopmentMode Use this parameter to specify whether the application is running on a cluster or development mode. To specify a cluster mode, set the value to False.
likeitem.search.hierarchy.division.label Use this parameter to specify a label that represents the Division level in the merchandise hierarchy for your business.
likeitem.search.hierarchy.group.label Use this parameter to specify a label that represents the Group level in the merchandise hierarchy for your business.
Table 8–22 (Cont.) Parameters in the A4PConf.properties File
Parameter Description
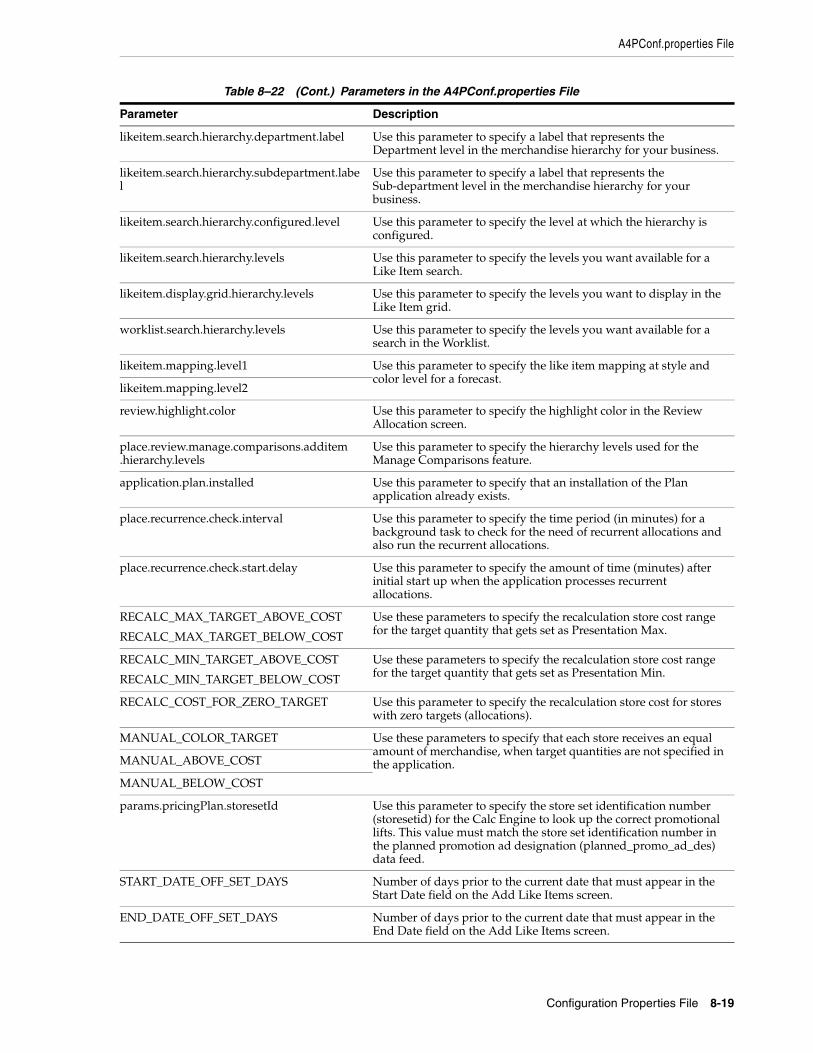
A4PConf.properties File
Configuration Properties File 8-19
likeitem.search.hierarchy.department.label Use this parameter to specify a label that represents the Department level in the merchandise hierarchy for your business.
likeitem.search.hierarchy.subdepartment.label
Use this parameter to specify a label that represents the Sub-department level in the merchandise hierarchy for your business.
likeitem.search.hierarchy.configured.level Use this parameter to specify the level at which the hierarchy is configured.
likeitem.search.hierarchy.levels Use this parameter to specify the levels you want available for a Like Item search.
likeitem.display.grid.hierarchy.levels Use this parameter to specify the levels you want to display in the Like Item grid.
worklist.search.hierarchy.levels Use this parameter to specify the levels you want available for a search in the Worklist.
likeitem.mapping.level1 Use this parameter to specify the like item mapping at style and color level for a forecast.
likeitem.mapping.level2
review.highlight.color Use this parameter to specify the highlight color in the Review Allocation screen.
place.review.manage.comparisons.additem.hierarchy.levels
Use this parameter to specify the hierarchy levels used for the Manage Comparisons feature.
application.plan.installed Use this parameter to specify that an installation of the Plan application already exists.
place.recurrence.check.interval Use this parameter to specify the time period (in minutes) for a background task to check for the need of recurrent allocations and also run the recurrent allocations.
place.recurrence.check.start.delay Use this parameter to specify the amount of time (minutes) after initial start up when the application processes recurrent allocations.
RECALC_MAX_TARGET_ABOVE_COST
RECALC_MAX_TARGET_BELOW_COST
Use these parameters to specify the recalculation store cost range for the target quantity that gets set as Presentation Max.
RECALC_MIN_TARGET_ABOVE_COST
RECALC_MIN_TARGET_BELOW_COST
Use these parameters to specify the recalculation store cost range for the target quantity that gets set as Presentation Min.
RECALC_COST_FOR_ZERO_TARGET Use this parameter to specify the recalculation store cost for stores with zero targets (allocations).
MANUAL_COLOR_TARGET Use these parameters to specify that each store receives an equal amount of merchandise, when target quantities are not specified in the application.MANUAL_ABOVE_COST
MANUAL_BELOW_COST
params.pricingPlan.storesetId Use this parameter to specify the store set identification number (storesetid) for the Calc Engine to look up the correct promotional lifts. This value must match the store set identification number in the planned promotion ad designation (planned_promo_ad_des) data feed.
START_DATE_OFF_SET_DAYS Number of days prior to the current date that must appear in the Start Date field on the Add Like Items screen.
END_DATE_OFF_SET_DAYS Number of days prior to the current date that must appear in the End Date field on the Add Like Items screen.
Table 8–22 (Cont.) Parameters in the A4PConf.properties File
Parameter Description
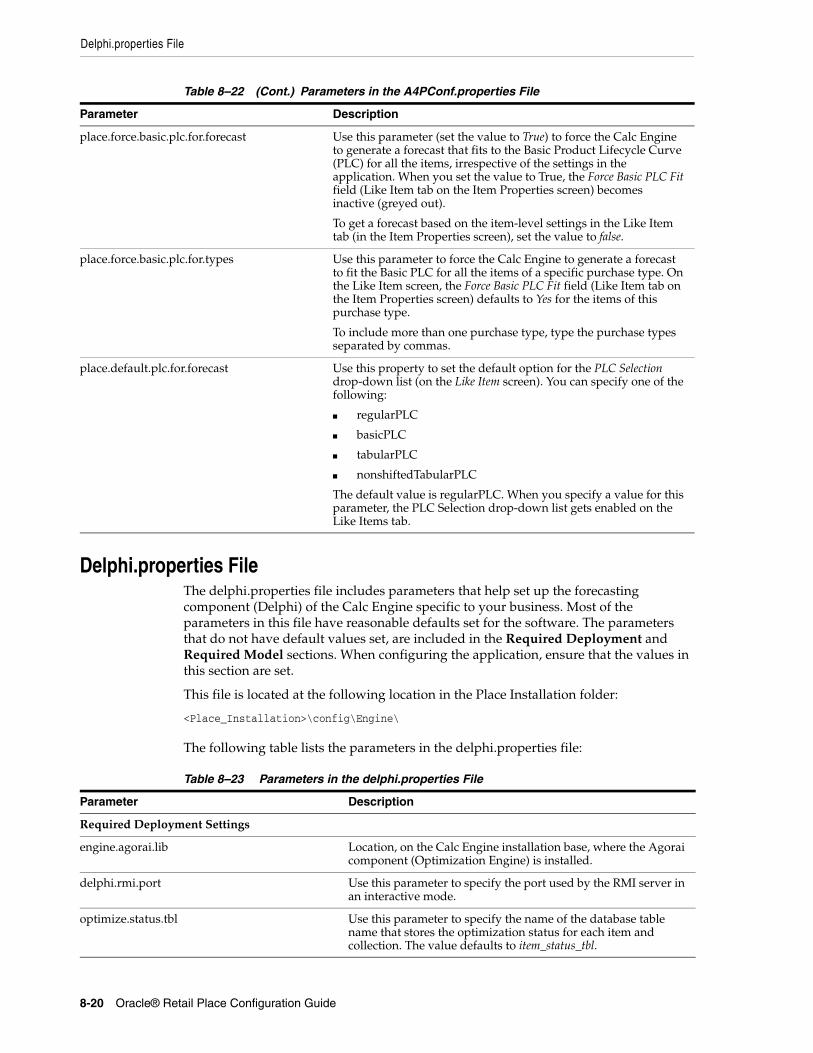
Delphi.properties File
8-20 Oracle® Retail Place Configuration Guide
Delphi.properties FileThe delphi.properties file includes parameters that help set up the forecasting component (Delphi) of the Calc Engine specific to your business. Most of the parameters in this file have reasonable defaults set for the software. The parameters that do not have default values set, are included in the Required Deployment and Required Model sections. When configuring the application, ensure that the values in this section are set.
This file is located at the following location in the Place Installation folder:
<Place_Installation>\config\Engine\
The following table lists the parameters in the delphi.properties file:
place.force.basic.plc.for.forecast Use this parameter (set the value to True) to force the Calc Engine to generate a forecast that fits to the Basic Product Lifecycle Curve (PLC) for all the items, irrespective of the settings in the application. When you set the value to True, the Force Basic PLC Fit field (Like Item tab on the Item Properties screen) becomes inactive (greyed out).
To get a forecast based on the item-level settings in the Like Item tab (in the Item Properties screen), set the value to false.
place.force.basic.plc.for.types Use this parameter to force the Calc Engine to generate a forecast to fit the Basic PLC for all the items of a specific purchase type. On the Like Item screen, the Force Basic PLC Fit field (Like Item tab on the Item Properties screen) defaults to Yes for the items of this purchase type.
To include more than one purchase type, type the purchase types separated by commas.
place.default.plc.for.forecast Use this property to set the default option for the PLC Selection drop-down list (on the Like Item screen). You can specify one of the following:
■ regularPLC
■ basicPLC
■ tabularPLC
■ nonshiftedTabularPLC
The default value is regularPLC. When you specify a value for this parameter, the PLC Selection drop-down list gets enabled on the Like Items tab.
Table 8–23 Parameters in the delphi.properties File
Parameter Description
Required Deployment Settings
engine.agorai.lib Location, on the Calc Engine installation base, where the Agorai component (Optimization Engine) is installed.
delphi.rmi.port Use this parameter to specify the port used by the RMI server in an interactive mode.
optimize.status.tbl Use this parameter to specify the name of the database table name that stores the optimization status for each item and collection. The value defaults to item_status_tbl.
Table 8–22 (Cont.) Parameters in the A4PConf.properties File
Parameter Description

Delphi.properties File
Configuration Properties File 8-21
driver Use this parameter to specify the Java CLASS driver that is used to communicate with the database. The value defaults to jdbc.driver.OracleDriver.
url Use this parameter to specify the URL to connect to the database.
user Use this parameter to specify the user name to connect to the database.
password Use this parameter to specify the password (associated with the user name) to connect to the database.
Optional Batch Configuration
batch.write.size Number of items or collections to be included in a batch for write operations to the database.
chunk.tryLimit Maximum number of times that any item will be tried for optimization, before evaluating that the item cannot be processed.
Set the limit according to the optimal policy based on the simulations, and the value must be greater than 1.
chunk.sizes Sequence of chunk sizes that are used to group items with retries. The value defaults to 1000;100;1.
The sequence of chunk sizes relates to the progressive discovery of which items are causing chunks to fail. The optimal policy is to try large chunks first, then split the chunks into smaller pieces when retries are needed.
When specifying the values, consider the following:
■ Decreasing sequence of positive integers
■ Length of the sequence equals the chunk.trylimit.
■ Last number must be 1.
■ Members must be separated by semi-colon.
Choosing the chunk size is the key to good performance and the large chunk size must balance two factors, random memory access per worker and process limitations.
worker.lifetime The time duration (in minutes) the processor must be allowed to run before it determines an infinite loop and terminates.
The value defaults to 30 and must be more than 1 minute.
chunk.active The time duration (in minutes) a chunk, after being terminated, can be reclaimed.
Required Model
Lifecycle estimation parameters
delphi.TLandingAlgorithmName Use this parameter to specify the TLanding algorithm to be used. You can specify one of the following values:
■ HMM – is the default value and indicates the use of Hidden Markov Model.
■ SellThru – chooses the week in which the cumulative sales (from the start of history) as a percentage of all historical sales reaches the threshold defined by the delphi.lifecycle.sellThruPercent parameter.
■ SimplifiedPLAN – the legacy algorithm used in previous versions.
Table 8–23 (Cont.) Parameters in the delphi.properties File
Parameter Description
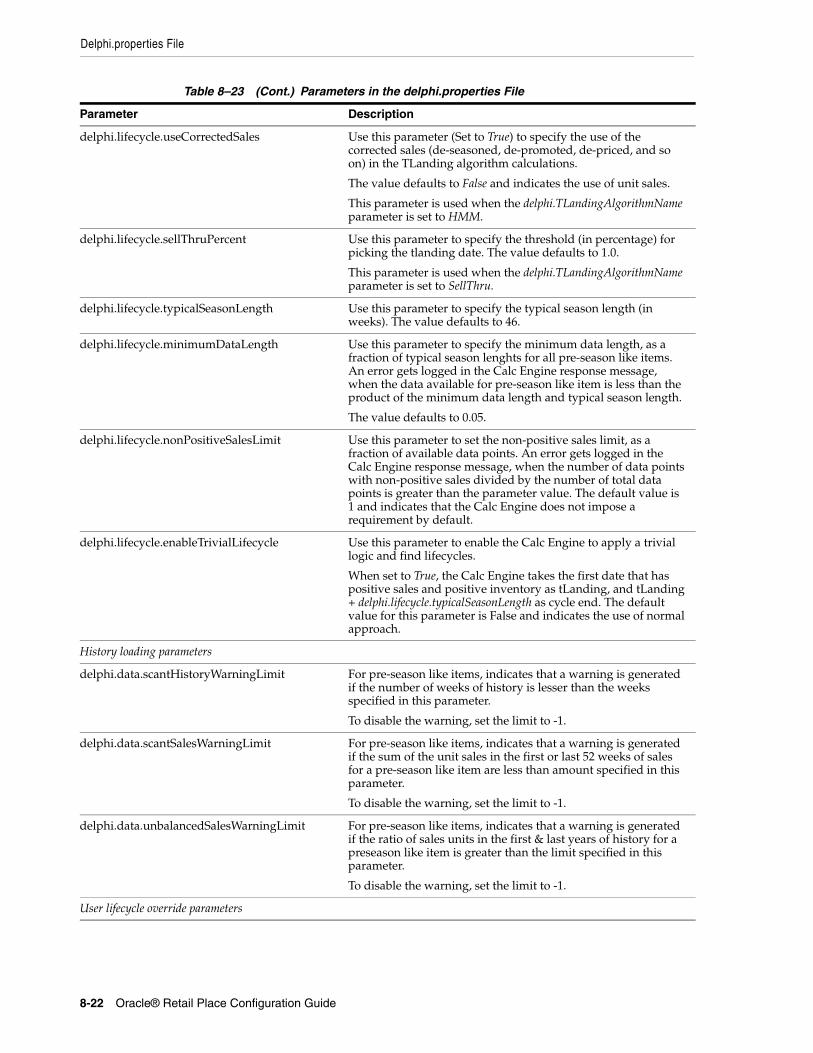
Delphi.properties File
8-22 Oracle® Retail Place Configuration Guide
delphi.lifecycle.useCorrectedSales Use this parameter (Set to True) to specify the use of the corrected sales (de-seasoned, de-promoted, de-priced, and so on) in the TLanding algorithm calculations.
The value defaults to False and indicates the use of unit sales.
This parameter is used when the delphi.TLandingAlgorithmName parameter is set to HMM.
delphi.lifecycle.sellThruPercent Use this parameter to specify the threshold (in percentage) for picking the tlanding date. The value defaults to 1.0.
This parameter is used when the delphi.TLandingAlgorithmName parameter is set to SellThru.
delphi.lifecycle.typicalSeasonLength Use this parameter to specify the typical season length (in weeks). The value defaults to 46.
delphi.lifecycle.minimumDataLength Use this parameter to specify the minimum data length, as a fraction of typical season lenghts for all pre-season like items. An error gets logged in the Calc Engine response message, when the data available for pre-season like item is less than the product of the minimum data length and typical season length.
The value defaults to 0.05.
delphi.lifecycle.nonPositiveSalesLimit Use this parameter to set the non-positive sales limit, as a fraction of available data points. An error gets logged in the Calc Engine response message, when the number of data points with non-positive sales divided by the number of total data points is greater than the parameter value. The default value is 1 and indicates that the Calc Engine does not impose a requirement by default.
delphi.lifecycle.enableTrivialLifecycle Use this parameter to enable the Calc Engine to apply a trivial logic and find lifecycles.
When set to True, the Calc Engine takes the first date that has positive sales and positive inventory as tLanding, and tLanding + delphi.lifecycle.typicalSeasonLength as cycle end. The default value for this parameter is False and indicates the use of normal approach.
History loading parameters
delphi.data.scantHistoryWarningLimit For pre-season like items, indicates that a warning is generated if the number of weeks of history is lesser than the weeks specified in this parameter.
To disable the warning, set the limit to -1.
delphi.data.scantSalesWarningLimit For pre-season like items, indicates that a warning is generated if the sum of the unit sales in the first or last 52 weeks of sales for a pre-season like item are less than amount specified in this parameter.
To disable the warning, set the limit to -1.
delphi.data.unbalancedSalesWarningLimit For pre-season like items, indicates that a warning is generated if the ratio of sales units in the first & last years of history for a preseason like item is greater than the limit specified in this parameter.
To disable the warning, set the limit to -1.
User lifecycle override parameters
Table 8–23 (Cont.) Parameters in the delphi.properties File
Parameter Description
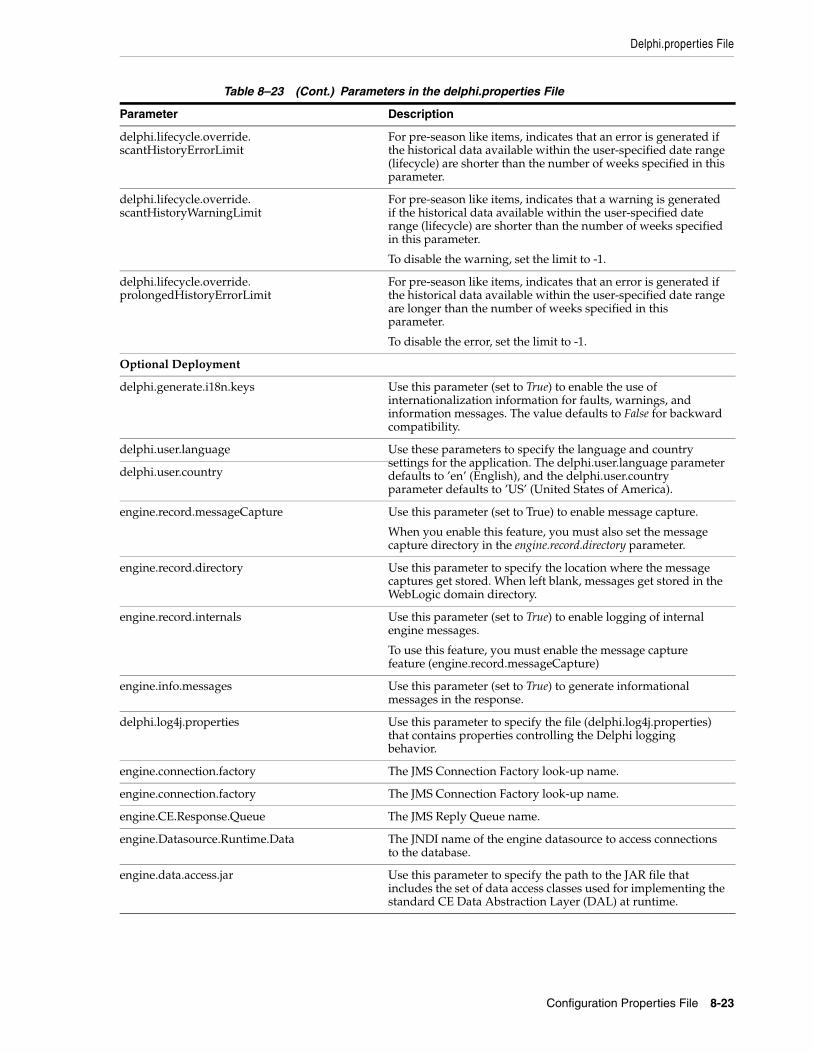
Delphi.properties File
Configuration Properties File 8-23
delphi.lifecycle.override.scantHistoryErrorLimit
For pre-season like items, indicates that an error is generated if the historical data available within the user-specified date range (lifecycle) are shorter than the number of weeks specified in this parameter.
delphi.lifecycle.override.scantHistoryWarningLimit
For pre-season like items, indicates that a warning is generated if the historical data available within the user-specified date range (lifecycle) are shorter than the number of weeks specified in this parameter.
To disable the warning, set the limit to -1.
delphi.lifecycle.override.prolongedHistoryErrorLimit
For pre-season like items, indicates that an error is generated if the historical data available within the user-specified date range are longer than the number of weeks specified in this parameter.
To disable the error, set the limit to -1.
Optional Deployment
delphi.generate.i18n.keys Use this parameter (set to True) to enable the use of internationalization information for faults, warnings, and information messages. The value defaults to False for backward compatibility.
delphi.user.language Use these parameters to specify the language and country settings for the application. The delphi.user.language parameter defaults to ’en’ (English), and the delphi.user.country parameter defaults to ’US’ (United States of America).
delphi.user.country
engine.record.messageCapture Use this parameter (set to True) to enable message capture.
When you enable this feature, you must also set the message capture directory in the engine.record.directory parameter.
engine.record.directory Use this parameter to specify the location where the message captures get stored. When left blank, messages get stored in the WebLogic domain directory.
engine.record.internals Use this parameter (set to True) to enable logging of internal engine messages.
To use this feature, you must enable the message capture feature (engine.record.messageCapture)
engine.info.messages Use this parameter (set to True) to generate informational messages in the response.
delphi.log4j.properties Use this parameter to specify the file (delphi.log4j.properties) that contains properties controlling the Delphi logging behavior.
engine.connection.factory The JMS Connection Factory look-up name.
engine.connection.factory The JMS Connection Factory look-up name.
engine.CE.Response.Queue The JMS Reply Queue name.
engine.Datasource.Runtime.Data The JNDI name of the engine datasource to access connections to the database.
engine.data.access.jar Use this parameter to specify the path to the JAR file that includes the set of data access classes used for implementing the standard CE Data Abstraction Layer (DAL) at runtime.
Table 8–23 (Cont.) Parameters in the delphi.properties File
Parameter Description
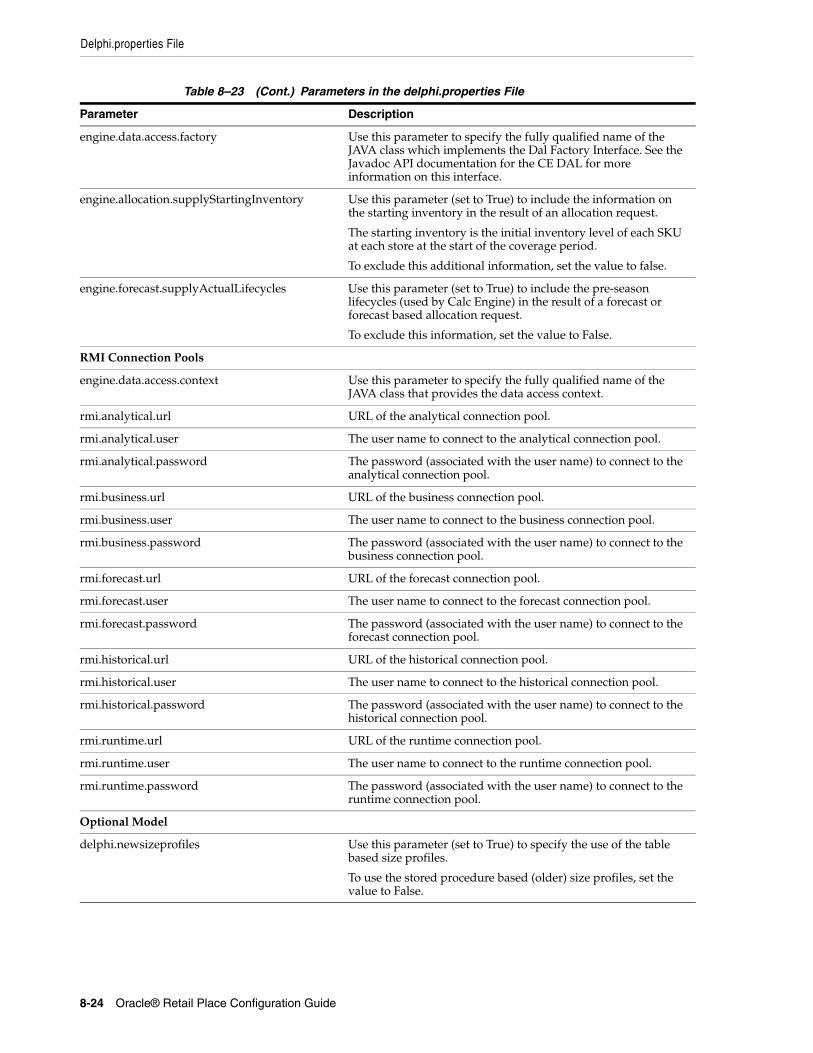
Delphi.properties File
8-24 Oracle® Retail Place Configuration Guide
engine.data.access.factory Use this parameter to specify the fully qualified name of the JAVA class which implements the Dal Factory Interface. See the Javadoc API documentation for the CE DAL for more information on this interface.
engine.allocation.supplyStartingInventory Use this parameter (set to True) to include the information on the starting inventory in the result of an allocation request.
The starting inventory is the initial inventory level of each SKU at each store at the start of the coverage period.
To exclude this additional information, set the value to false.
engine.forecast.supplyActualLifecycles Use this parameter (set to True) to include the pre-season lifecycles (used by Calc Engine) in the result of a forecast or forecast based allocation request.
To exclude this information, set the value to False.
RMI Connection Pools
engine.data.access.context Use this parameter to specify the fully qualified name of the JAVA class that provides the data access context.
rmi.analytical.url URL of the analytical connection pool.
rmi.analytical.user The user name to connect to the analytical connection pool.
rmi.analytical.password The password (associated with the user name) to connect to the analytical connection pool.
rmi.business.url URL of the business connection pool.
rmi.business.user The user name to connect to the business connection pool.
rmi.business.password The password (associated with the user name) to connect to the business connection pool.
rmi.forecast.url URL of the forecast connection pool.
rmi.forecast.user The user name to connect to the forecast connection pool.
rmi.forecast.password The password (associated with the user name) to connect to the forecast connection pool.
rmi.historical.url URL of the historical connection pool.
rmi.historical.user The user name to connect to the historical connection pool.
rmi.historical.password The password (associated with the user name) to connect to the historical connection pool.
rmi.runtime.url URL of the runtime connection pool.
rmi.runtime.user The user name to connect to the runtime connection pool.
rmi.runtime.password The password (associated with the user name) to connect to the runtime connection pool.
Optional Model
delphi.newsizeprofiles Use this parameter (set to True) to specify the use of the table based size profiles.
To use the stored procedure based (older) size profiles, set the value to False.
Table 8–23 (Cont.) Parameters in the delphi.properties File
Parameter Description

Delphi.properties File
Configuration Properties File 8-25
delphi.updateZeroStoreWeights Use this parameter (set to True) to specify the use of the budget-based weights for stores that get history-based weights of zero.
To use the weights based on history alone, set the value to False.
delphi.useExternalStoreWeightsAsFallback Use this parameter (set to True) for the Calc Engine to use the relative external store weight (in place of store budget) as a fallback when the item has no sales history.
The value defaults to False for backward compatibility.
When you set the value to True, ensure that external store weights exist in the database.
delphi.enableLikeStores Use this parameter (set to True) to enable the use of like stores.
If the like stores are not specified in the input XML files, this property is ignored.
delphi.minWeeksStoreWeightData Use this parameter to set the minimum number of weeks of historical data required to calculate the pre-season store weights. In case the weeks qualified for store-weight data are lesser than the weeks specified in this parameter, the budget-based weights are used.
delphi.data.duplicateBoundaryRequestBehavior Use this parameter to set the control behavior for the duplicate boundary requests (multiple like items). Set one of the following values:
■ match - (default) all bounds must match
■ error - generate an error if there is more one like item
■ min - consider the earliest date
■ max - consider the latest date
delphi.absolutePromotionalScaling Set the parameter value to True to use absolute promotional scaling. The value defaults to False and indicates the use of relative scaling.
delphi.usePromotionalMediaTypes Set the parameter value to True to use promotions of all media types.
delphi.inventoryEffectModel Use this parameter to apply an inventory effect that attempts to correct the historical sales.
Set one of the following values:
■ none - (default) no inventory effect
■ piecewiseLinear
■ piecewiseLinearByStoreCount
■ exponentialByStoreCount
■ sigmoidByStoreCount
The inventory effect is a number that represents the fraction of sales lost due to insufficient inventory in the store. The Calc Engine corrects for this by determining how much the historical sales were lowered by such an effect and inflating them to compensate.
delphi.inseasonUpdate.plcScale.exponentialSmoothing.enable
Use this parameter (set to True) to enable the exponential smoothing.
Table 8–23 (Cont.) Parameters in the delphi.properties File
Parameter Description

Delphi.properties File
8-26 Oracle® Retail Place Configuration Guide
delphi.inseasonUpdate.plcScale.exponentialSmoothing.rate.preseason
Use these exponential smoothing parameters to set up the exponential smoothing rate applied on pre-season and in-season data. You can also specify the data window (in weeks) to be considered to be used.
These parameters can be used only when the exponential smoothing feature is enabled.
Note: The default values for these parameters ensure optimal performance. Oracle recommends that these default values remain unchanged.
delphi.inseasonUpdate.plcScale.exponentialSmoothing.notouch
delphi.inseasonUpdate.plcScale.exponentialSmoothing.rate.inseason
delphi.inseasonUpdate.plcScale.exponentialSmoothing.datawindow
delphi.plc.tabulated.enable Use this parameter (set to True) to specify that the application uses the Tabulated PLC feature.
The Tabulated PLC feature allows the Calc Engine to use the Like Item's selling shape over time as the Product Lifecycle Curve (PLC) for the forecast. This feature enables the allocator additional ability to alter the shape and scale of the item's forecast.
delphi.plc.tabulated.movingAvg Use this parameter to specify the weighing coefficients (an array of real numbers) for the moving average window that smoothens the corrected sales to get tabulated PLC.
The valid values must be positive, and the size of the array must be an odd number. The value right in the middle of the array is the weight applied to the current date point.
The value defaults to {0.1, 1, 0.1}.
delphi.plc.tabulated.extrapolation.count Number of the valid data points used to compute the average as the extrapolations of the tabulated PLC. The value must be a positive integer.
The default value is 2. For optimal performance, ensure that the value for this parameter is set to 3.
delphi.plcfit.RValue Indicates the R value threshold to select a fashion fit.
delphi.plcfit.minTimeToPeak Indicates the minimum time-to-peak (in weeks) the Calc Engine must try when fitting fashion PLC.
Valid values can be between 1 and 9.
delphi.plcfit.baseLevel.min Use these parameters to control the base levels during a fashion PLC fit. The Calc Engine selects the best values among the range that is generated based on the min, max, and step specified in these parameters.
Valid values can be between 0 and 1.
delphi.plcfit.baseLevel.max
delphi.plcfit.baseLevel.step
delphi.plcfit.minFashionWeeks Use this parameter for the Calc Engine to force a basic PLC fit, if after data cleansing, the preSeason like item has fewer weeks of data than the number of weeks specified through this parameter.
Valid values can be between 4 and 51. For optimal performance, ensure that the value for this parameter is set to 6.
delphi.plcfit.preseasonLifecycleSpan Use this parameter to control the pre-season lifecycle span calculations. Valid values are “old” and "new".
The value defaults to "old" and indicates the use of t1 and t2 calculations.
Table 8–23 (Cont.) Parameters in the delphi.properties File
Parameter Description

Delphi.properties File
Configuration Properties File 8-27
delphi.adjust.inseason.plc.alignment Use this parameter to set the inseason PLC alignment behavior based on the inseason like item, inseason lifecycle, and stores sales plan.
Set the value to false to specify that the sales plan start date be always used. When set to true, the inseason lifecycle start date is used for the forecasted item that acts as the inseason like item for itself and the inseason lifecycle start date is later than the sales plan start date.
When the inseason like item is the forecasted item itself and the inseason lifecycle start date found by calc engine is later than store sales plan start date, it is recommended that the inseason updated PLC is aligned with the item's inseason lifecycle start than sales plan start date.
delphi.forecastedItemID.likeItemID.comparable Use this parameter to enable the comparison of the forecasted item ID and like item ID. The same IDs will indicate that the like item is the forecasted item itself.
The value of the parameter defaults to false indicating that such a conclusion cannot be arrived based on the IDs.
IR Performance Tuning Strategies
strategy.activitydata Use these parameters to tune the performance of the IRs by changing the strategies.
Valid strategy definitions are single, list, and template.strategy.businesspolicy
strategy.distribution
strategy.forcedmarkdowns
strategy.itemdates
strategy.itemparameters
strategy.itemprices
strategy.markdowncalendar
strategy.modelvalues
strategy.pastticketprices
strategy.pendingmarkdowns
strategy.plannedpromos
strategy.priceladder
Test Configuration (Set only while testing the software.)
delphi.disableHistoricPromotions Use this parameter (set to True) to disable the removing the promotion lifts from the historical data.
delphi.disableFuturePromotions Use this parameter (set to True) to disable the sales lifts of future promotions by forcing them to have a lift of 1.0.
delphi.disableFuturePriceEffects Use this parameter (set to True) to set the price elasticity exponent to zero.
delphi.disableMerchandiseDistribution Use this parameter (set to True) to set the merchandise distributions to 1.0.
delphi.UseCache Use this parameter to specify the use of the Pine cache. Valid values are "disabled" and "required".
Set the value to "disabled" to disable the use of the Pine cache.
Table 8–23 (Cont.) Parameters in the delphi.properties File
Parameter Description

Delphi.properties File
8-28 Oracle® Retail Place Configuration Guide
engine.data.access.statsFile Use this parameter to specify the name of the file that will include the data access layer (DAL) performance statistics.
The statistics are updated after each processed message.
CSV DAL Record/Playback
engine.csvdal.useMessageNameAsSubDir Use this parameter to specify that the data recorded for each message is recorded in a separate subdirectory of the recording directory and the subdirectory uses the message name as its name. The value defaults to True.
The CSV DAL record/playback method supports merging the data from multiple messages into a single collection of csv files. To use this mode, set the value to False.
CsvDal recording parameters
engine.csvdal.recordEnable Indicates that the CSV DAL recording is stored in the directory specified in the engine.csvdal.recordTo parameter.
engine.csvdal.recordTo Location where the Direct CSV DAL recording gets stored. This directory is created if it does not exist.
engine.csvdal.clobber Use this parameter (set to True) to delete any existing data files in the CSV DAL recording directory, before the recording begins.
When set to False, the existing files are updated with the data from the current recording session.
CsvDal playback parameters
engine.csvdal.playbackFrom Indicates the CSV DAL playback directory.
Automated Failure Generation
engine.failure.lowerBound Indicates the range of valid item identifiers.
engine.failure.upperBound
engine.failure.rate Indicate the fraction (not the percentage) of the items within the lowerBound and upperBound that will be failed.
engine.failure.logFileName Indicates the name of a file that will contain all item IDs of items that fail.
Table 8–23 (Cont.) Parameters in the delphi.properties File
Parameter Description
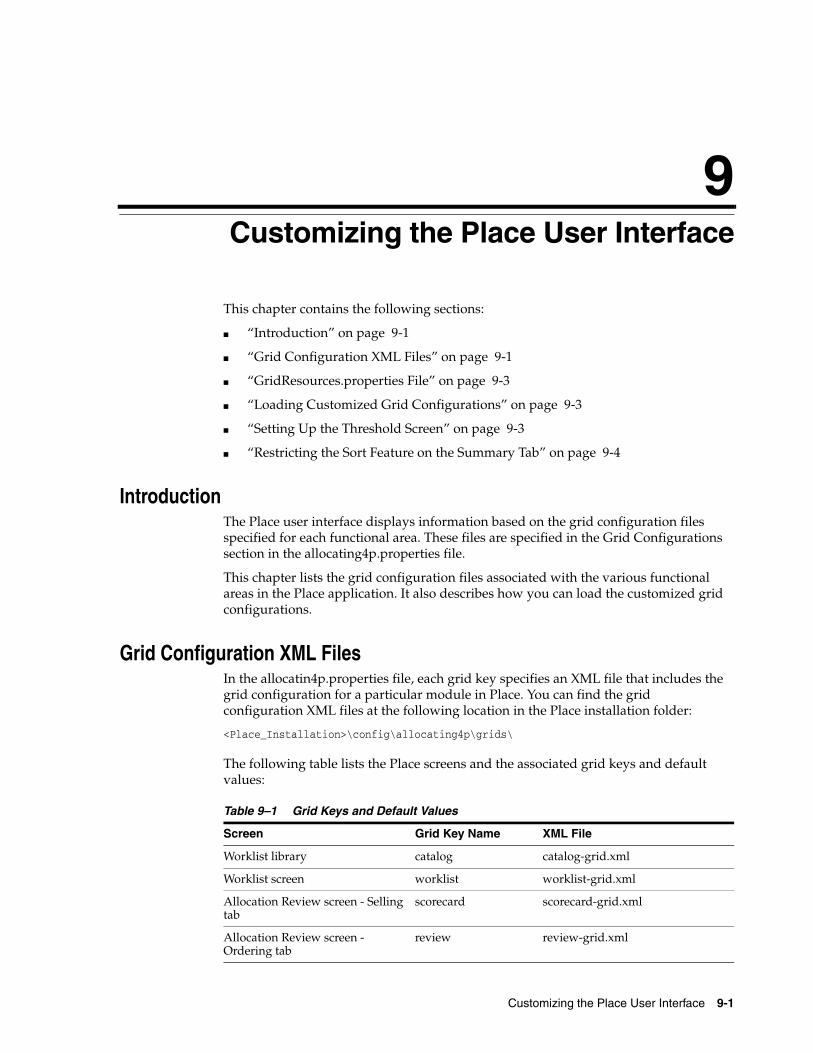
Customizing the Place User Interface 9-1
9Customizing the Place User Interface
This chapter contains the following sections:
■ “Introduction” on page 9-1
■ “Grid Configuration XML Files” on page 9-1
■ “GridResources.properties File” on page 9-3
■ “Loading Customized Grid Configurations” on page 9-3
■ “Setting Up the Threshold Screen” on page 9-3
■ “Restricting the Sort Feature on the Summary Tab” on page 9-4
IntroductionThe Place user interface displays information based on the grid configuration files specified for each functional area. These files are specified in the Grid Configurations section in the allocating4p.properties file.
This chapter lists the grid configuration files associated with the various functional areas in the Place application. It also describes how you can load the customized grid configurations.
Grid Configuration XML FilesIn the allocatin4p.properties file, each grid key specifies an XML file that includes the grid configuration for a particular module in Place. You can find the grid configuration XML files at the following location in the Place installation folder:
<Place_Installation>\config\allocating4p\grids\
The following table lists the Place screens and the associated grid keys and default values:
Table 9–1 Grid Keys and Default Values
Screen Grid Key Name XML File
Worklist library catalog catalog-grid.xml
Worklist screen worklist worklist-grid.xml
Allocation Review screen - Selling tab
scorecard scorecard-grid.xml
Allocation Review screen - Ordering tab
review review-grid.xml
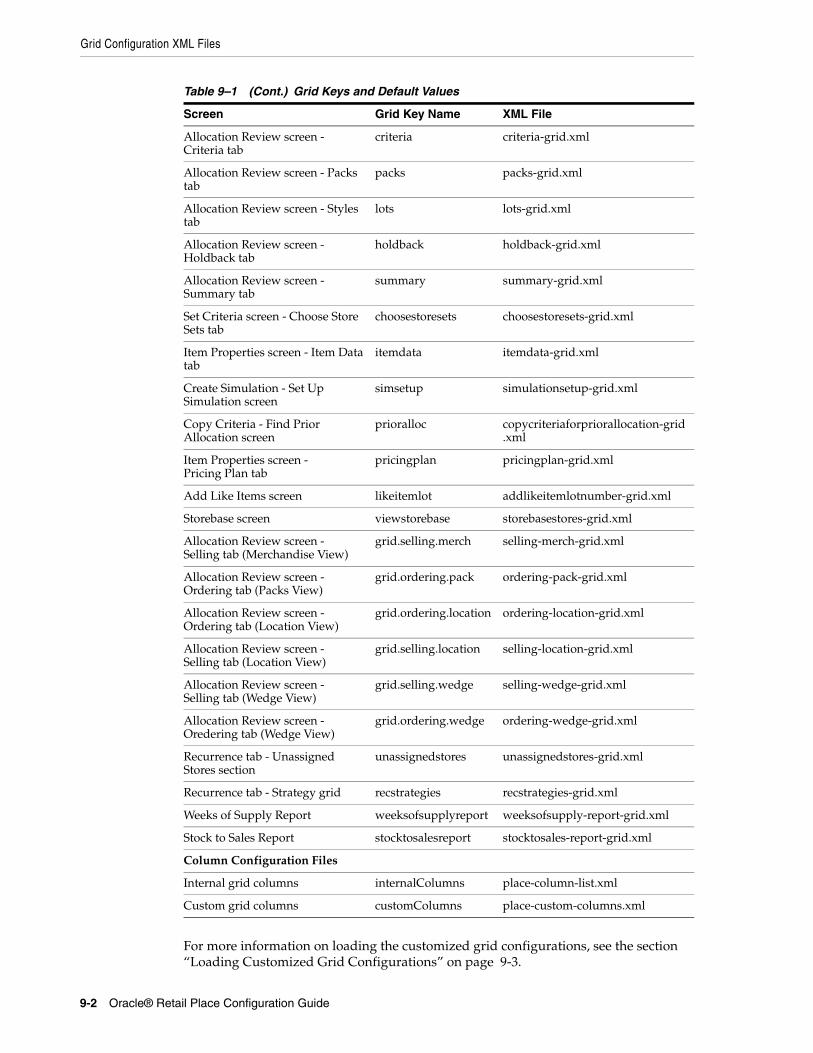
Grid Configuration XML Files
9-2 Oracle® Retail Place Configuration Guide
For more information on loading the customized grid configurations, see the section “Loading Customized Grid Configurations” on page 9-3.
Allocation Review screen - Criteria tab
criteria criteria-grid.xml
Allocation Review screen - Packs tab
packs packs-grid.xml
Allocation Review screen - Styles tab
lots lots-grid.xml
Allocation Review screen - Holdback tab
holdback holdback-grid.xml
Allocation Review screen - Summary tab
summary summary-grid.xml
Set Criteria screen - Choose Store Sets tab
choosestoresets choosestoresets-grid.xml
Item Properties screen - Item Data tab
itemdata itemdata-grid.xml
Create Simulation - Set Up Simulation screen
simsetup simulationsetup-grid.xml
Copy Criteria - Find Prior Allocation screen
prioralloc copycriteriaforpriorallocation-grid.xml
Item Properties screen - Pricing Plan tab
pricingplan pricingplan-grid.xml
Add Like Items screen likeitemlot addlikeitemlotnumber-grid.xml
Storebase screen viewstorebase storebasestores-grid.xml
Allocation Review screen - Selling tab (Merchandise View)
grid.selling.merch selling-merch-grid.xml
Allocation Review screen - Ordering tab (Packs View)
grid.ordering.pack ordering-pack-grid.xml
Allocation Review screen - Ordering tab (Location View)
grid.ordering.location ordering-location-grid.xml
Allocation Review screen - Selling tab (Location View)
grid.selling.location selling-location-grid.xml
Allocation Review screen - Selling tab (Wedge View)
grid.selling.wedge selling-wedge-grid.xml
Allocation Review screen - Oredering tab (Wedge View)
grid.ordering.wedge ordering-wedge-grid.xml
Recurrence tab - Unassigned Stores section
unassignedstores unassignedstores-grid.xml
Recurrence tab - Strategy grid recstrategies recstrategies-grid.xml
Weeks of Supply Report weeksofsupplyreport weeksofsupply-report-grid.xml
Stock to Sales Report stocktosalesreport stocktosales-report-grid.xml
Column Configuration Files
Internal grid columns internalColumns place-column-list.xml
Custom grid columns customColumns place-custom-columns.xml
Table 9–1 (Cont.) Grid Keys and Default Values
Screen Grid Key Name XML File
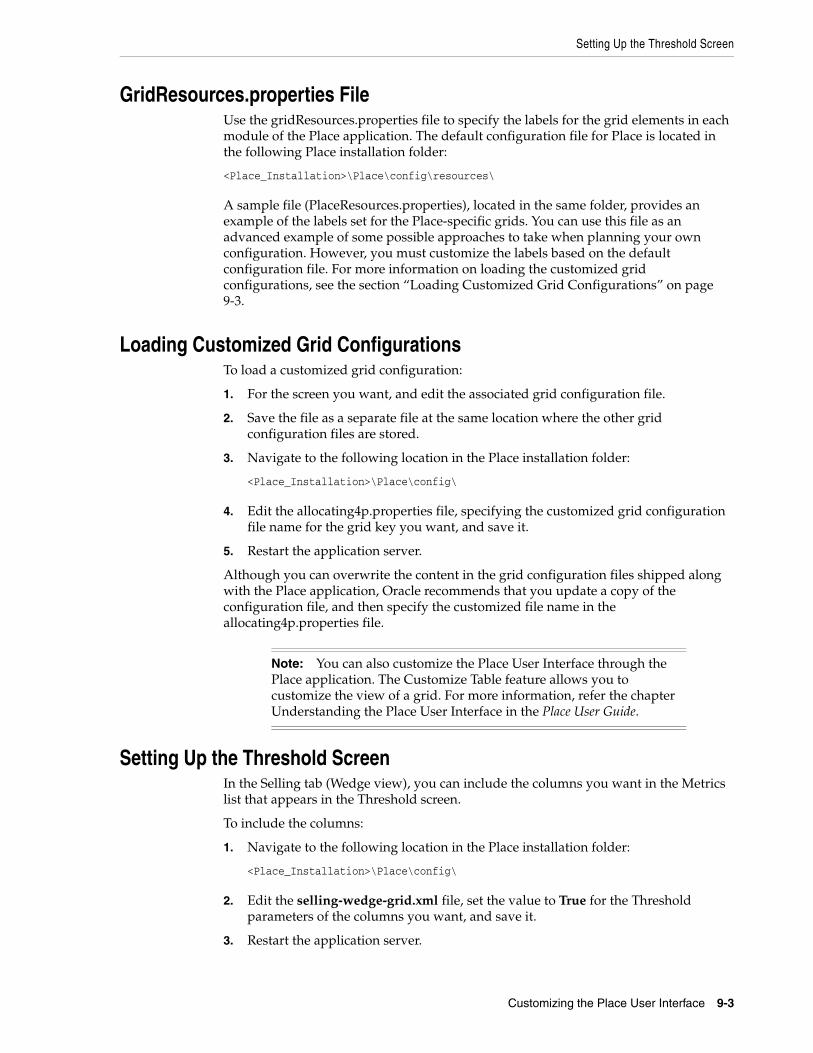
Setting Up the Threshold Screen
Customizing the Place User Interface 9-3
GridResources.properties FileUse the gridResources.properties file to specify the labels for the grid elements in each module of the Place application. The default configuration file for Place is located in the following Place installation folder:
<Place_Installation>\Place\config\resources\
A sample file (PlaceResources.properties), located in the same folder, provides an example of the labels set for the Place-specific grids. You can use this file as an advanced example of some possible approaches to take when planning your own configuration. However, you must customize the labels based on the default configuration file. For more information on loading the customized grid configurations, see the section “Loading Customized Grid Configurations” on page 9-3.
Loading Customized Grid ConfigurationsTo load a customized grid configuration:
1. For the screen you want, and edit the associated grid configuration file.
2. Save the file as a separate file at the same location where the other grid configuration files are stored.
3. Navigate to the following location in the Place installation folder:
<Place_Installation>\Place\config\
4. Edit the allocating4p.properties file, specifying the customized grid configuration file name for the grid key you want, and save it.
5. Restart the application server.
Although you can overwrite the content in the grid configuration files shipped along with the Place application, Oracle recommends that you update a copy of the configuration file, and then specify the customized file name in the allocating4p.properties file.
Setting Up the Threshold ScreenIn the Selling tab (Wedge view), you can include the columns you want in the Metrics list that appears in the Threshold screen.
To include the columns:
1. Navigate to the following location in the Place installation folder:
<Place_Installation>\Place\config\
2. Edit the selling-wedge-grid.xml file, set the value to True for the Threshold parameters of the columns you want, and save it.
3. Restart the application server.
Note: You can also customize the Place User Interface through the Place application. The Customize Table feature allows you to customize the view of a grid. For more information, refer the chapter Understanding the Place User Interface in the Place User Guide.
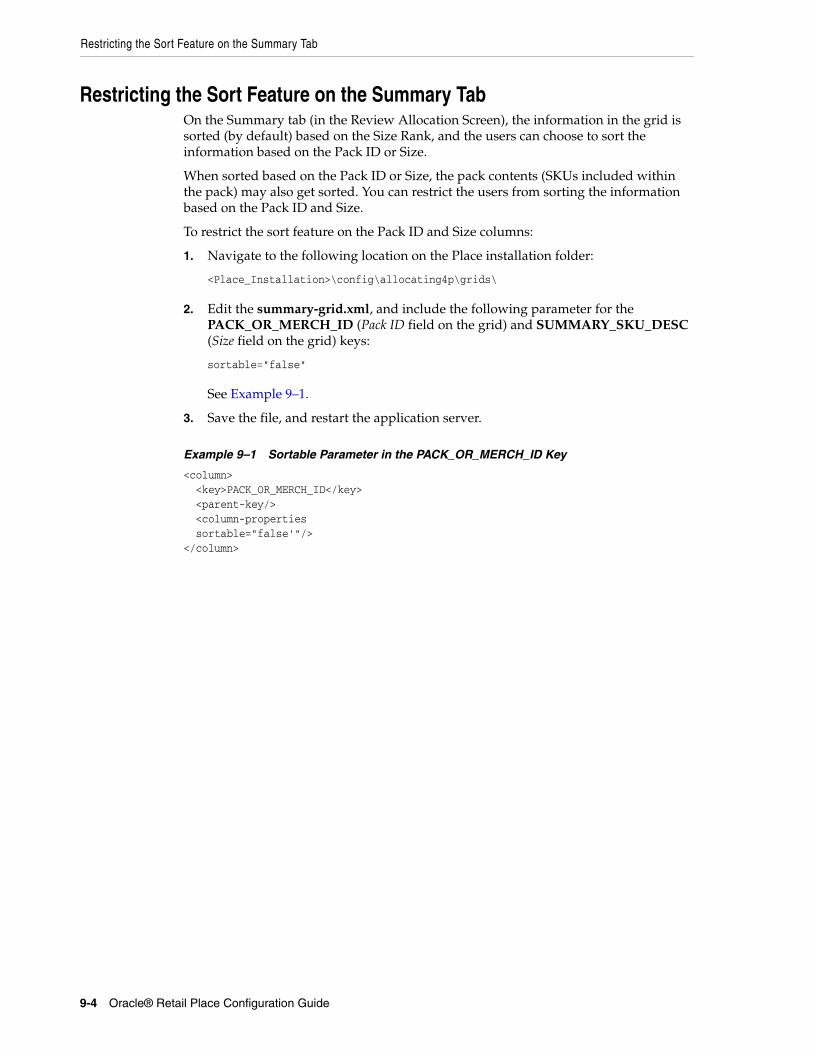
Restricting the Sort Feature on the Summary Tab
9-4 Oracle® Retail Place Configuration Guide
Restricting the Sort Feature on the Summary TabOn the Summary tab (in the Review Allocation Screen), the information in the grid is sorted (by default) based on the Size Rank, and the users can choose to sort the information based on the Pack ID or Size.
When sorted based on the Pack ID or Size, the pack contents (SKUs included within the pack) may also get sorted. You can restrict the users from sorting the information based on the Pack ID and Size.
To restrict the sort feature on the Pack ID and Size columns:
1. Navigate to the following location on the Place installation folder:
<Place_Installation>\config\allocating4p\grids\
2. Edit the summary-grid.xml, and include the following parameter for the PACK_OR_MERCH_ID (Pack ID field on the grid) and SUMMARY_SKU_DESC (Size field on the grid) keys:
sortable="false"
See Example 9–1.
3. Save the file, and restart the application server.
Example 9–1 Sortable Parameter in the PACK_OR_MERCH_ID Key
<column> <key>PACK_OR_MERCH_ID</key> <parent-key/> <column-properties sortable="false'"/></column>
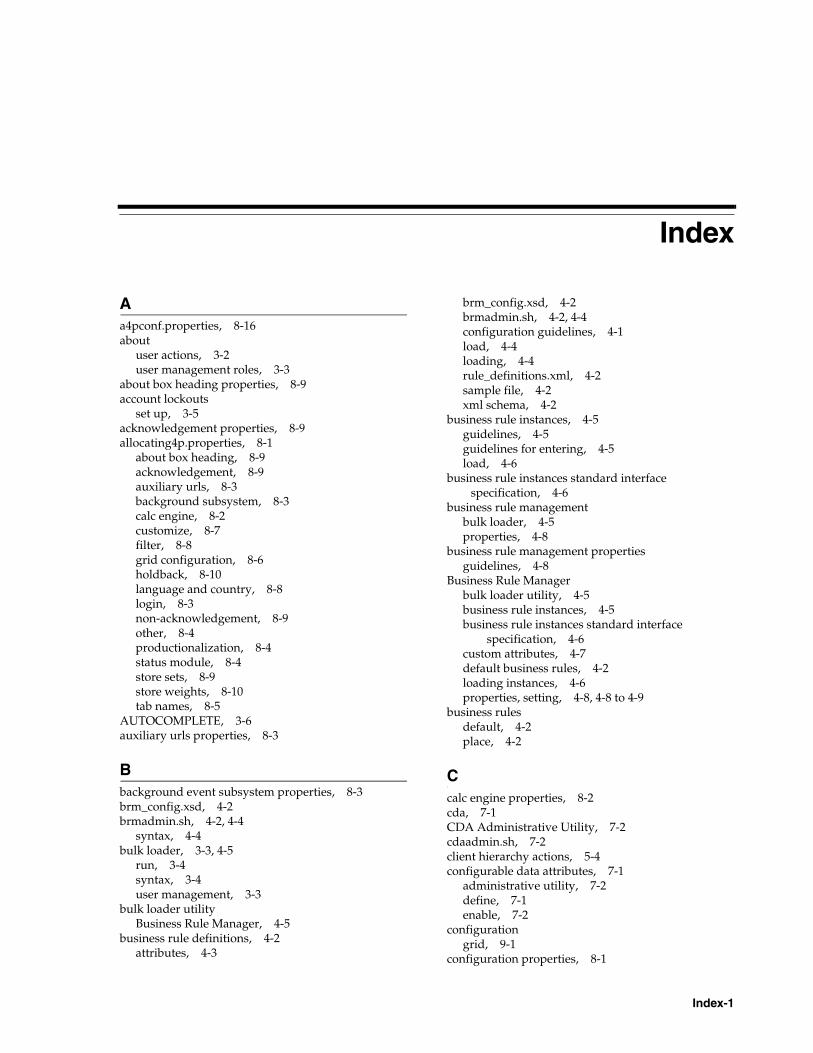
Index-1
Index
Aa4pconf.properties, 8-16about
user actions, 3-2user management roles, 3-3
about box heading properties, 8-9account lockouts
set up, 3-5acknowledgement properties, 8-9allocating4p.properties, 8-1
about box heading, 8-9acknowledgement, 8-9auxiliary urls, 8-3background subsystem, 8-3calc engine, 8-2customize, 8-7filter, 8-8grid configuration, 8-6holdback, 8-10language and country, 8-8login, 8-3non-acknowledgement, 8-9other, 8-4productionalization, 8-4status module, 8-4store sets, 8-9store weights, 8-10tab names, 8-5
AUTOCOMPLETE, 3-6auxiliary urls properties, 8-3
Bbackground event subsystem properties, 8-3brm_config.xsd, 4-2brmadmin.sh, 4-2, 4-4
syntax, 4-4bulk loader, 3-3, 4-5
run, 3-4syntax, 3-4user management, 3-3
bulk loader utilityBusiness Rule Manager, 4-5
business rule definitions, 4-2attributes, 4-3
brm_config.xsd, 4-2brmadmin.sh, 4-2, 4-4configuration guidelines, 4-1load, 4-4loading, 4-4rule_definitions.xml, 4-2sample file, 4-2xml schema, 4-2
business rule instances, 4-5guidelines, 4-5guidelines for entering, 4-5load, 4-6
business rule instances standard interface specification, 4-6
business rule managementbulk loader, 4-5properties, 4-8
business rule management propertiesguidelines, 4-8
Business Rule Managerbulk loader utility, 4-5business rule instances, 4-5business rule instances standard interface
specification, 4-6custom attributes, 4-7default business rules, 4-2loading instances, 4-6properties, setting, 4-8, 4-8 to 4-9
business rulesdefault, 4-2place, 4-2
Ccalc engine properties, 8-2cda, 7-1CDA Administrative Utility, 7-2cdaadmin.sh, 7-2client hierarchy actions, 5-4configurable data attributes, 7-1
administrative utility, 7-2define, 7-1enable, 7-2
configurationgrid, 9-1
configuration properties, 8-1
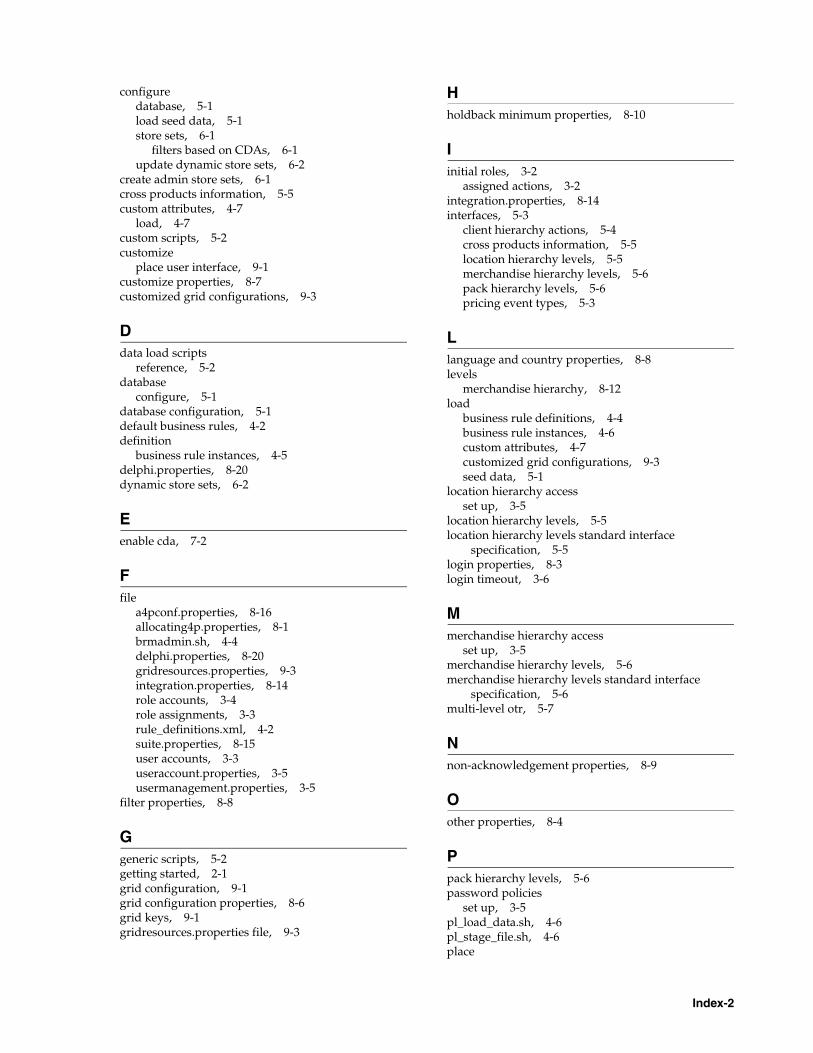
Index-2
configuredatabase, 5-1load seed data, 5-1store sets, 6-1
filters based on CDAs, 6-1update dynamic store sets, 6-2
create admin store sets, 6-1cross products information, 5-5custom attributes, 4-7
load, 4-7custom scripts, 5-2customize
place user interface, 9-1customize properties, 8-7customized grid configurations, 9-3
Ddata load scripts
reference, 5-2database
configure, 5-1database configuration, 5-1default business rules, 4-2definition
business rule instances, 4-5delphi.properties, 8-20dynamic store sets, 6-2
Eenable cda, 7-2
Ffile
a4pconf.properties, 8-16allocating4p.properties, 8-1brmadmin.sh, 4-4delphi.properties, 8-20gridresources.properties, 9-3integration.properties, 8-14role accounts, 3-4role assignments, 3-3rule_definitions.xml, 4-2suite.properties, 8-15user accounts, 3-3useraccount.properties, 3-5usermanagement.properties, 3-5
filter properties, 8-8
Ggeneric scripts, 5-2getting started, 2-1grid configuration, 9-1grid configuration properties, 8-6grid keys, 9-1gridresources.properties file, 9-3
Hholdback minimum properties, 8-10
Iinitial roles, 3-2
assigned actions, 3-2integration.properties, 8-14interfaces, 5-3
client hierarchy actions, 5-4cross products information, 5-5location hierarchy levels, 5-5merchandise hierarchy levels, 5-6pack hierarchy levels, 5-6pricing event types, 5-3
Llanguage and country properties, 8-8levels
merchandise hierarchy, 8-12load
business rule definitions, 4-4business rule instances, 4-6custom attributes, 4-7customized grid configurations, 9-3seed data, 5-1
location hierarchy accessset up, 3-5
location hierarchy levels, 5-5location hierarchy levels standard interface
specification, 5-5login properties, 8-3login timeout, 3-6
Mmerchandise hierarchy access
set up, 3-5merchandise hierarchy levels, 5-6merchandise hierarchy levels standard interface
specification, 5-6multi-level otr, 5-7
Nnon-acknowledgement properties, 8-9
Oother properties, 8-4
Ppack hierarchy levels, 5-6password policies
set up, 3-5pl_load_data.sh, 4-6pl_stage_file.sh, 4-6place

Index-3
business rules, 4-2pricing event types, 5-3productionalization properties, 8-4properties
about box heading, 8-9acknowledgement, 8-9auxiliary urls, 8-3background event subsystem, 8-3calc engine, 8-2customize, 8-7filter, 8-8grid configuration, 8-6holdback minimum, 8-10language and country, 8-8login, 8-3non-acknowledgement, 8-9other, 8-4productionalization, 8-4status module, 8-4store sets, 8-9store weights, 8-10tab names, 8-5
Rrestrict
sort, 9-4role accounts file, 3-4role assignments file, 3-3rule_definitions.xml, 4-2
Sscreen
threshold, 9-3scripts
custom, 5-2generic, 5-2
seed data, 5-1session cookie, 3-6session timeout, 3-6set
business rule management properties, 4-8set up
account lockouts, 3-5location hierarchy access, 3-5merchandise hierarchy access, 3-5multi-level otr, 5-7password policies, 3-5threshold screen, 9-3
Standard Interfacebusiness rule instances, 4-6location hierarchy levels, 5-5merchandise hierarchy levels, 5-6
status module properties, 8-4store sets
configure, 6-1configure filters based on CDAs, 6-1create admin, 6-1
store sets configuration, 6-1
store sets properties, 8-9store weights
types, 8-12store weights properties, 8-10suite.properties, 8-15summary tab
restrict sort, 9-4
Ttab names properties, 8-5threshold screen, 9-3
Uupdate
dynamic store sets, 6-2use
cda administrative utility, 7-2user accounts file, 3-3user actions, 3-2
about, 3-1User Management
AUTOCOMPLETE, 3-6login timeout, 3-6security, 3-6session cookie, 3-6session timeout, 3-6user accounts, 3-1
user managementbulk loader, 3-3
run, 3-4security, 3-6
user management rolesabout, 3-3
user rolesabout, 3-1initial, 3-2
useraccount.properties file, 3-5usermanagement.properties file, 3-5
Vvalidate
users and roles, 3-3validate users and roles assignment, 3-3value format
store weights, 8-12
XXML
grid configuration, 9-1

Index-4